Invoice Campaign
1. Purpose
The Invoice Campaign module allows an authorized business user to prepare marketing content for invoices. A campaign group combines:
- A campaign name.
- One or more target charging locations.
- A campaign start and end date.
- An enabled or disabled status.
- A marketing image in JPEG or PNG format.
When the campaign is enabled, valid for the invoice date, and applicable to the invoiced location, its marketing content can be included in the configured marketing section of the invoice template.
The module is designed to make campaign creation simple while maintaining accurate targeting, secure image handling, valid date ranges, and consistent invoice output.
Important: An enabled campaign can affect customer-facing invoices across all selected locations. Confirm the active business, selected locations, campaign dates, image content, and invoice-template placement before saving or enabling a campaign.
2. Roles and prerequisites
Before managing invoice campaigns, confirm that:
- You are signed in to the correct HIEV business account.
- Your role includes permission to view, create, edit, and, where required, delete campaign groups.
- The target locations exist and are available within your access scope.
- The marketing image has received brand, legal, and compliance approval.
- The image is a supported JPEG, JPG, or PNG file.
- Campaign dates and the applicable business time zone are known.
- The relevant invoice template contains or supports a marketing section.
- A test invoice can be generated before a production campaign is enabled.
3. General functional requirements
The Invoice Campaign feature should allow an authorized user to:
- Upload a marketing image through the application.
- Use JPEG, JPG, or PNG image files.
- Create a named campaign group.
- Select one or more locations using an intuitive hierarchical location picker.
- Reuse a predefined set of locations for future campaigns.
- Enter a campaign start date and end date.
- Receive clear feedback for missing, invalid, or unacceptable values.
- Enable or disable a campaign.
- View, search, refresh, edit, and delete campaign groups according to permissions.
- Store uploaded images securely and associate each image with the correct campaign.
- Apply eligible campaign content to the invoice template.
- Customize invoice templates so marketing sections can vary by business need.
4. Navigation
- Sign in to HIEV CPMS.
- Confirm the active business in the business selector.
- Open Invoice Campaign in the navigation menu.
- Select one of the available options:
- Campaign Groups — view and manage existing campaign groups.
- Add New Campaign Group — create a new campaign group.
- Campaign Groups — view and manage existing campaign groups.
5. Campaign Groups screen walkthrough
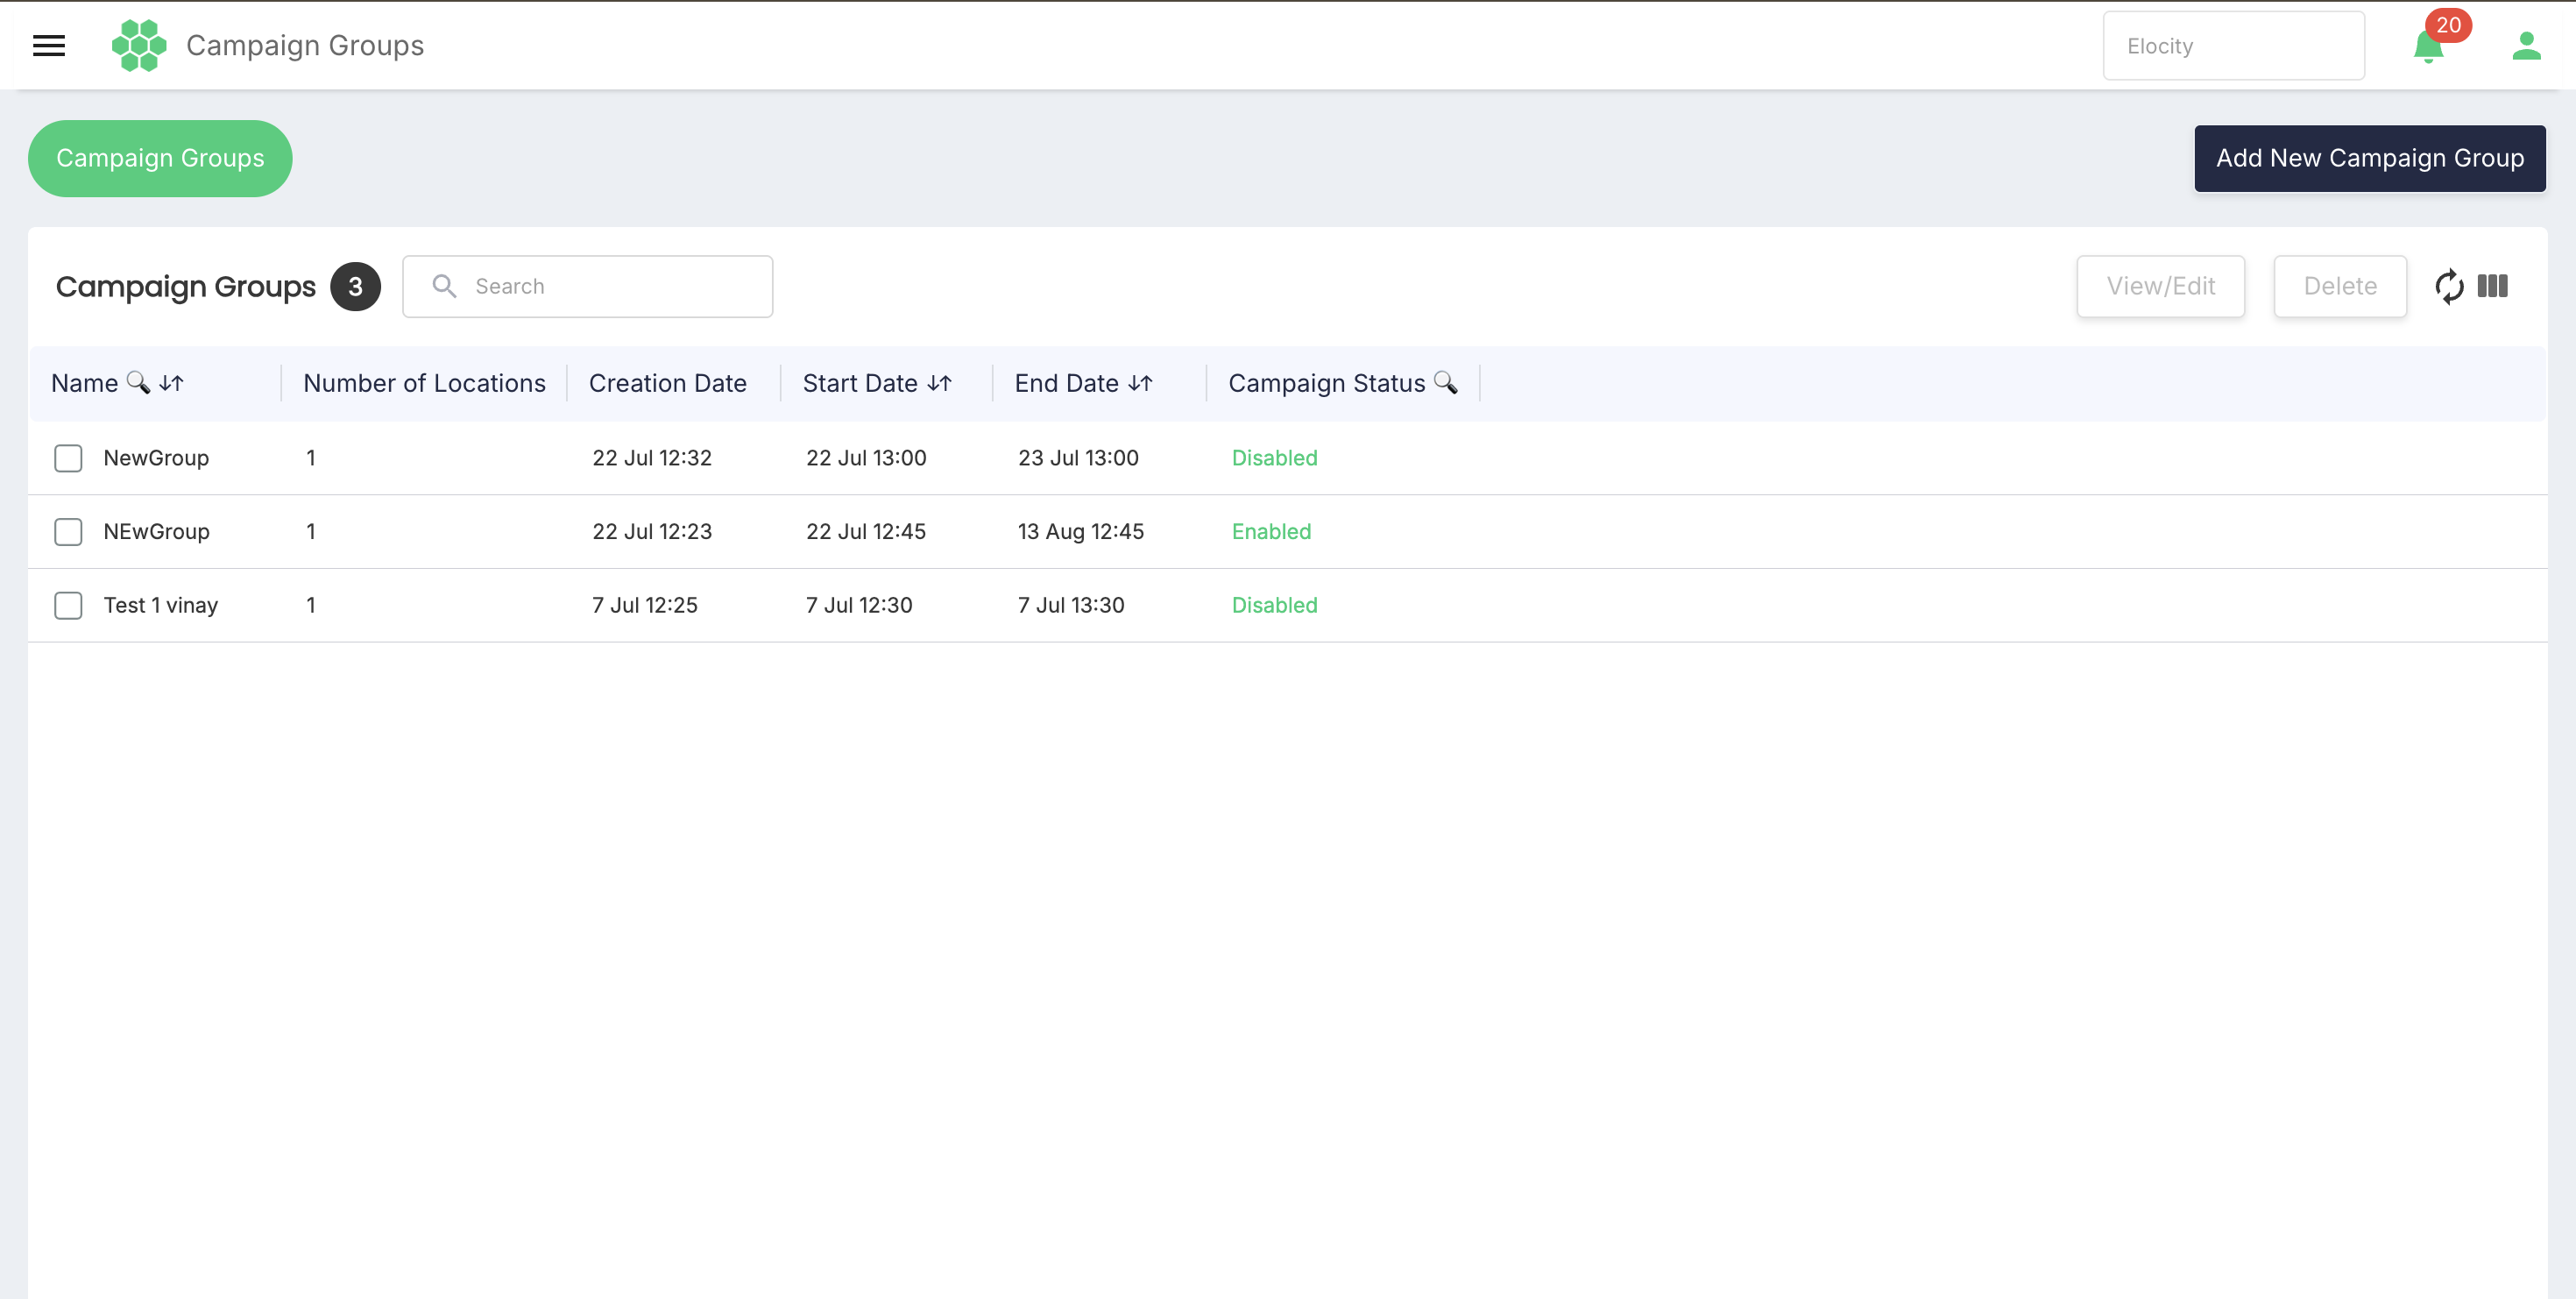
The Campaign Groups screen provides a list and management view for invoice campaigns.
5.1 Summary count
The Campaign Groups count shows the number of campaign-group records returned for the active business. If none exist, the table displays No Campaign Groups Exist.
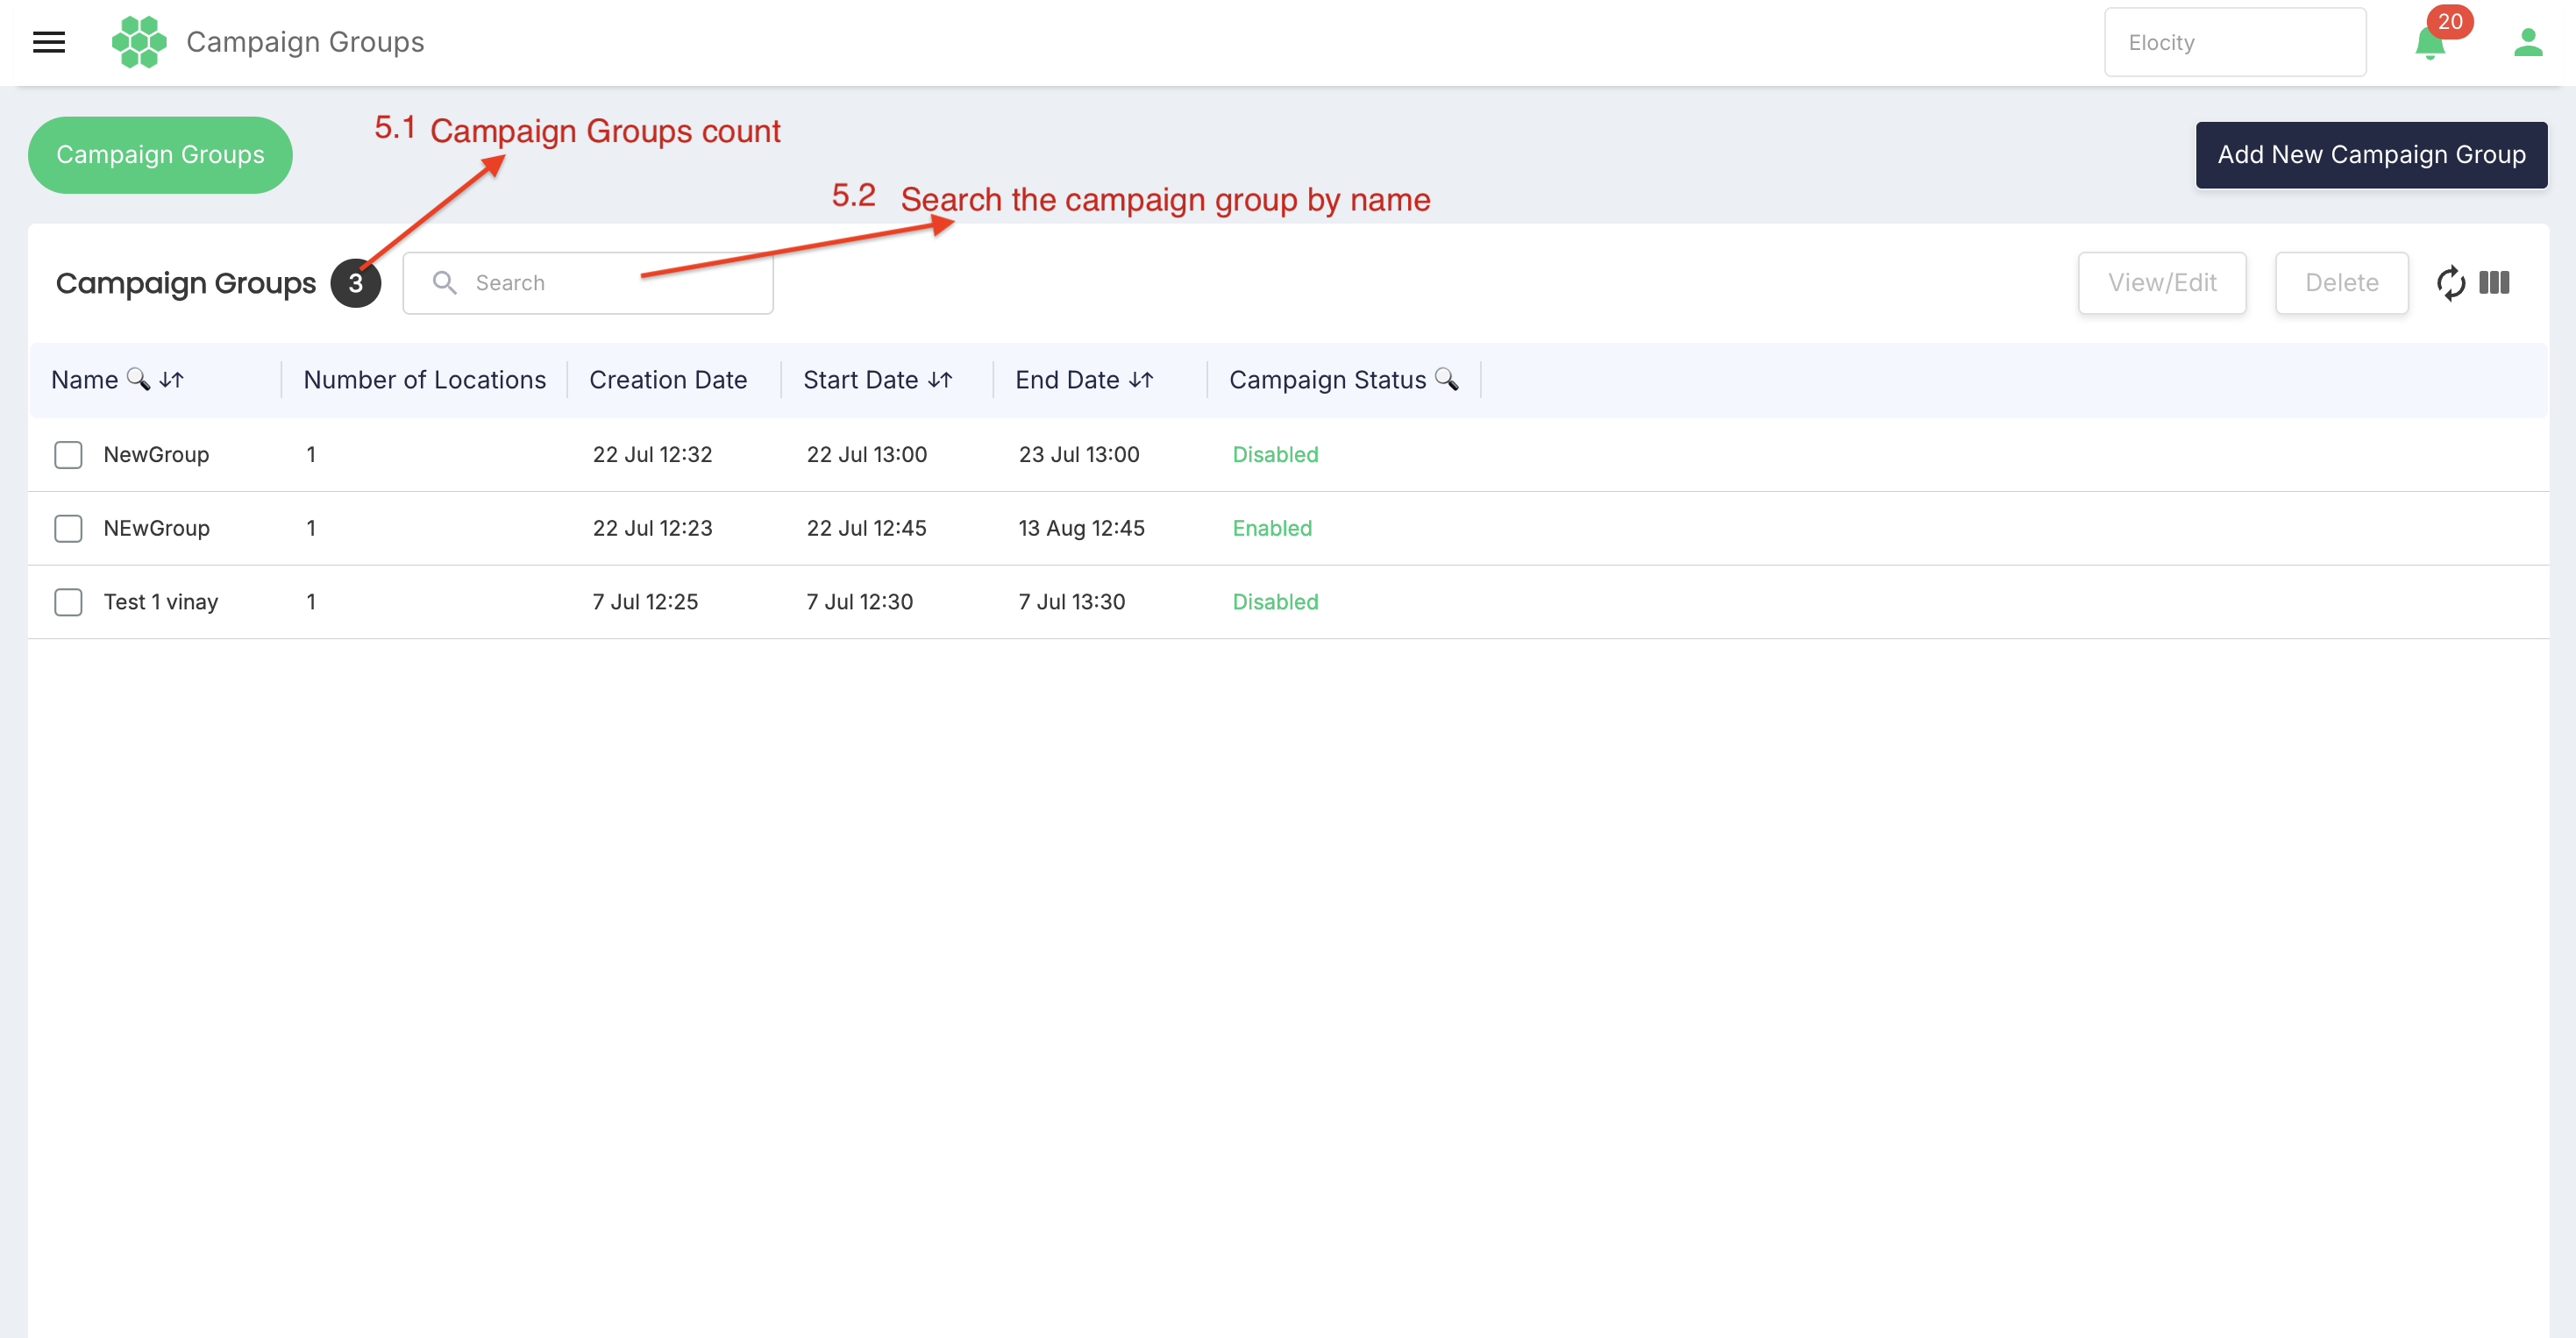
5.2 Search
Use the Search box to narrow the list. Search behaviour may match campaign names or other indexed table values depending on product configuration.
To search:
- Enter all or part of the campaign name.
- Review the filtered list.
- Clear the Search box to restore the complete list.
5.3 Campaign table
The verified columns are:
| Column | Description |
|---|---|
| Number of Locations | Number of locations associated with the campaign group. |
| Creation Date | Date on which the campaign group was created. |
| Campaign Status | Indicates whether the campaign is enabled or disabled. |
| Name | Campaign-group name. |
| Start Date | Date and time from which the campaign is eligible. |
| End Date | Date and time after which the campaign is no longer eligible. |
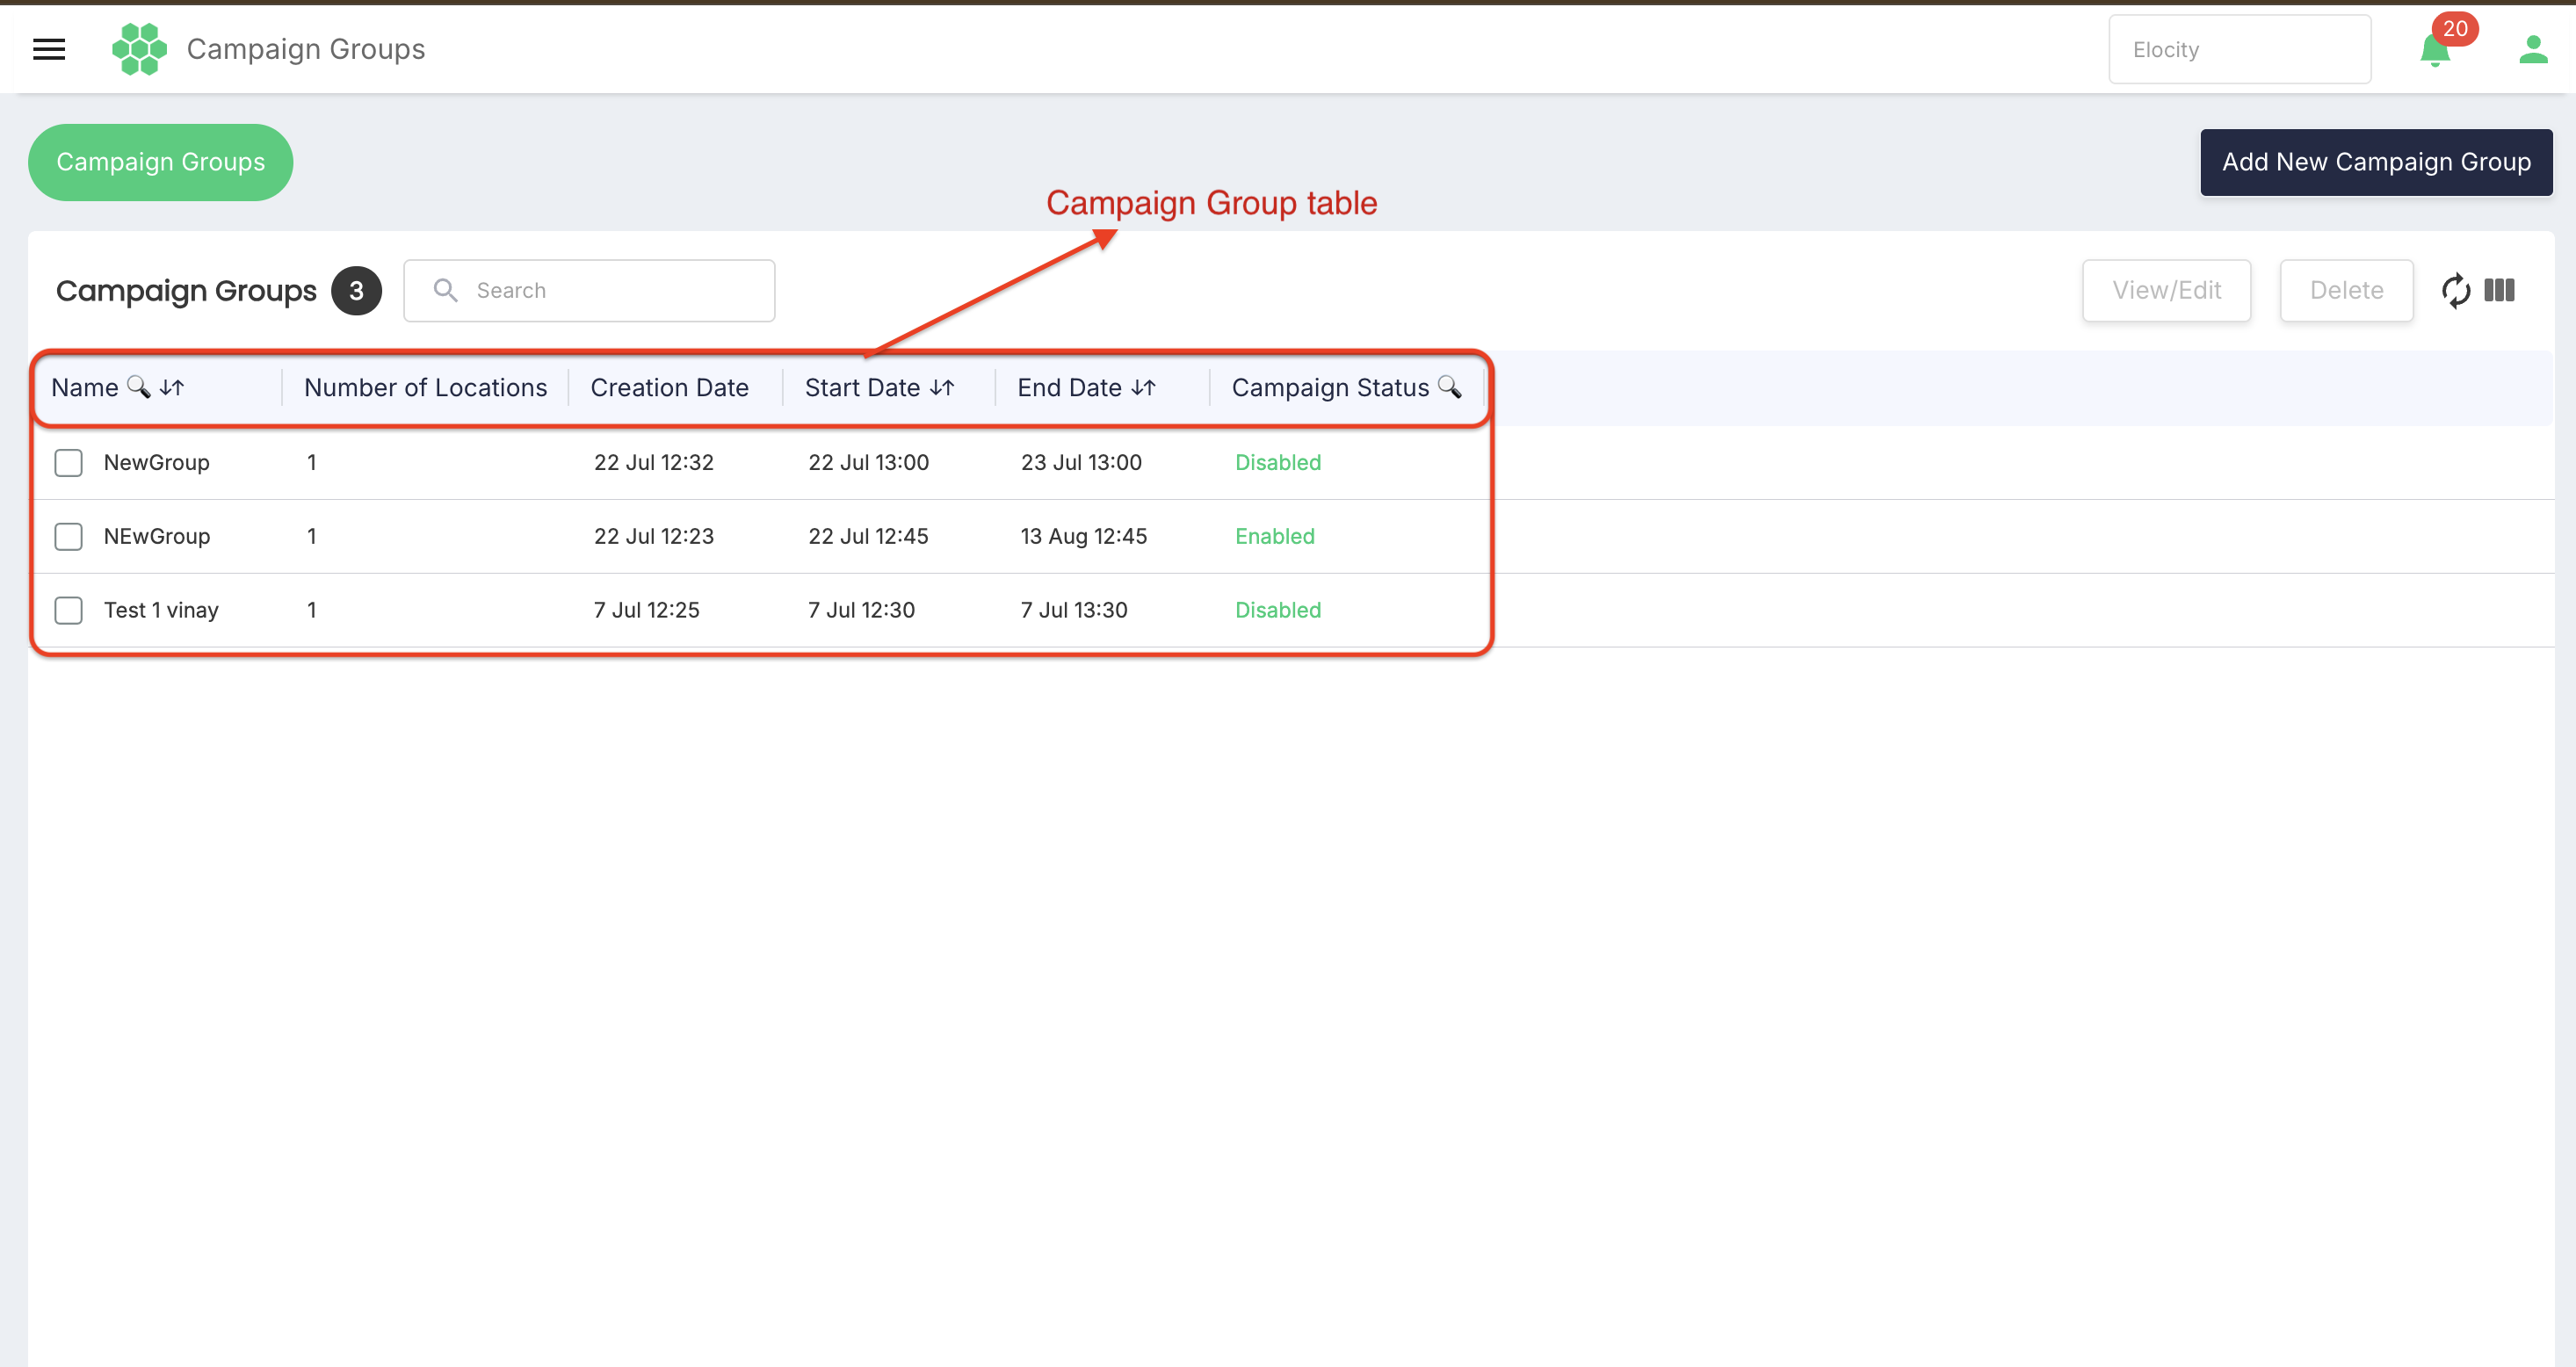
Name, Start Date, and End Date expose table sorting or filtering controls in the reviewed interface. Available behaviour can depend on the grid configuration.
5.4 Row selection and actions
Select a campaign row to enable record actions.
| Action | Description |
|---|---|
| View/Edit | Opens the selected campaign to review or modify its details. Disabled until a row is selected. |
| Delete | Deletes the selected campaign when permitted. Disabled until a row is selected. |
| Refresh | Retrieves the latest campaign data and status. |
| Column Filter | Shows or hides columns in the table. |
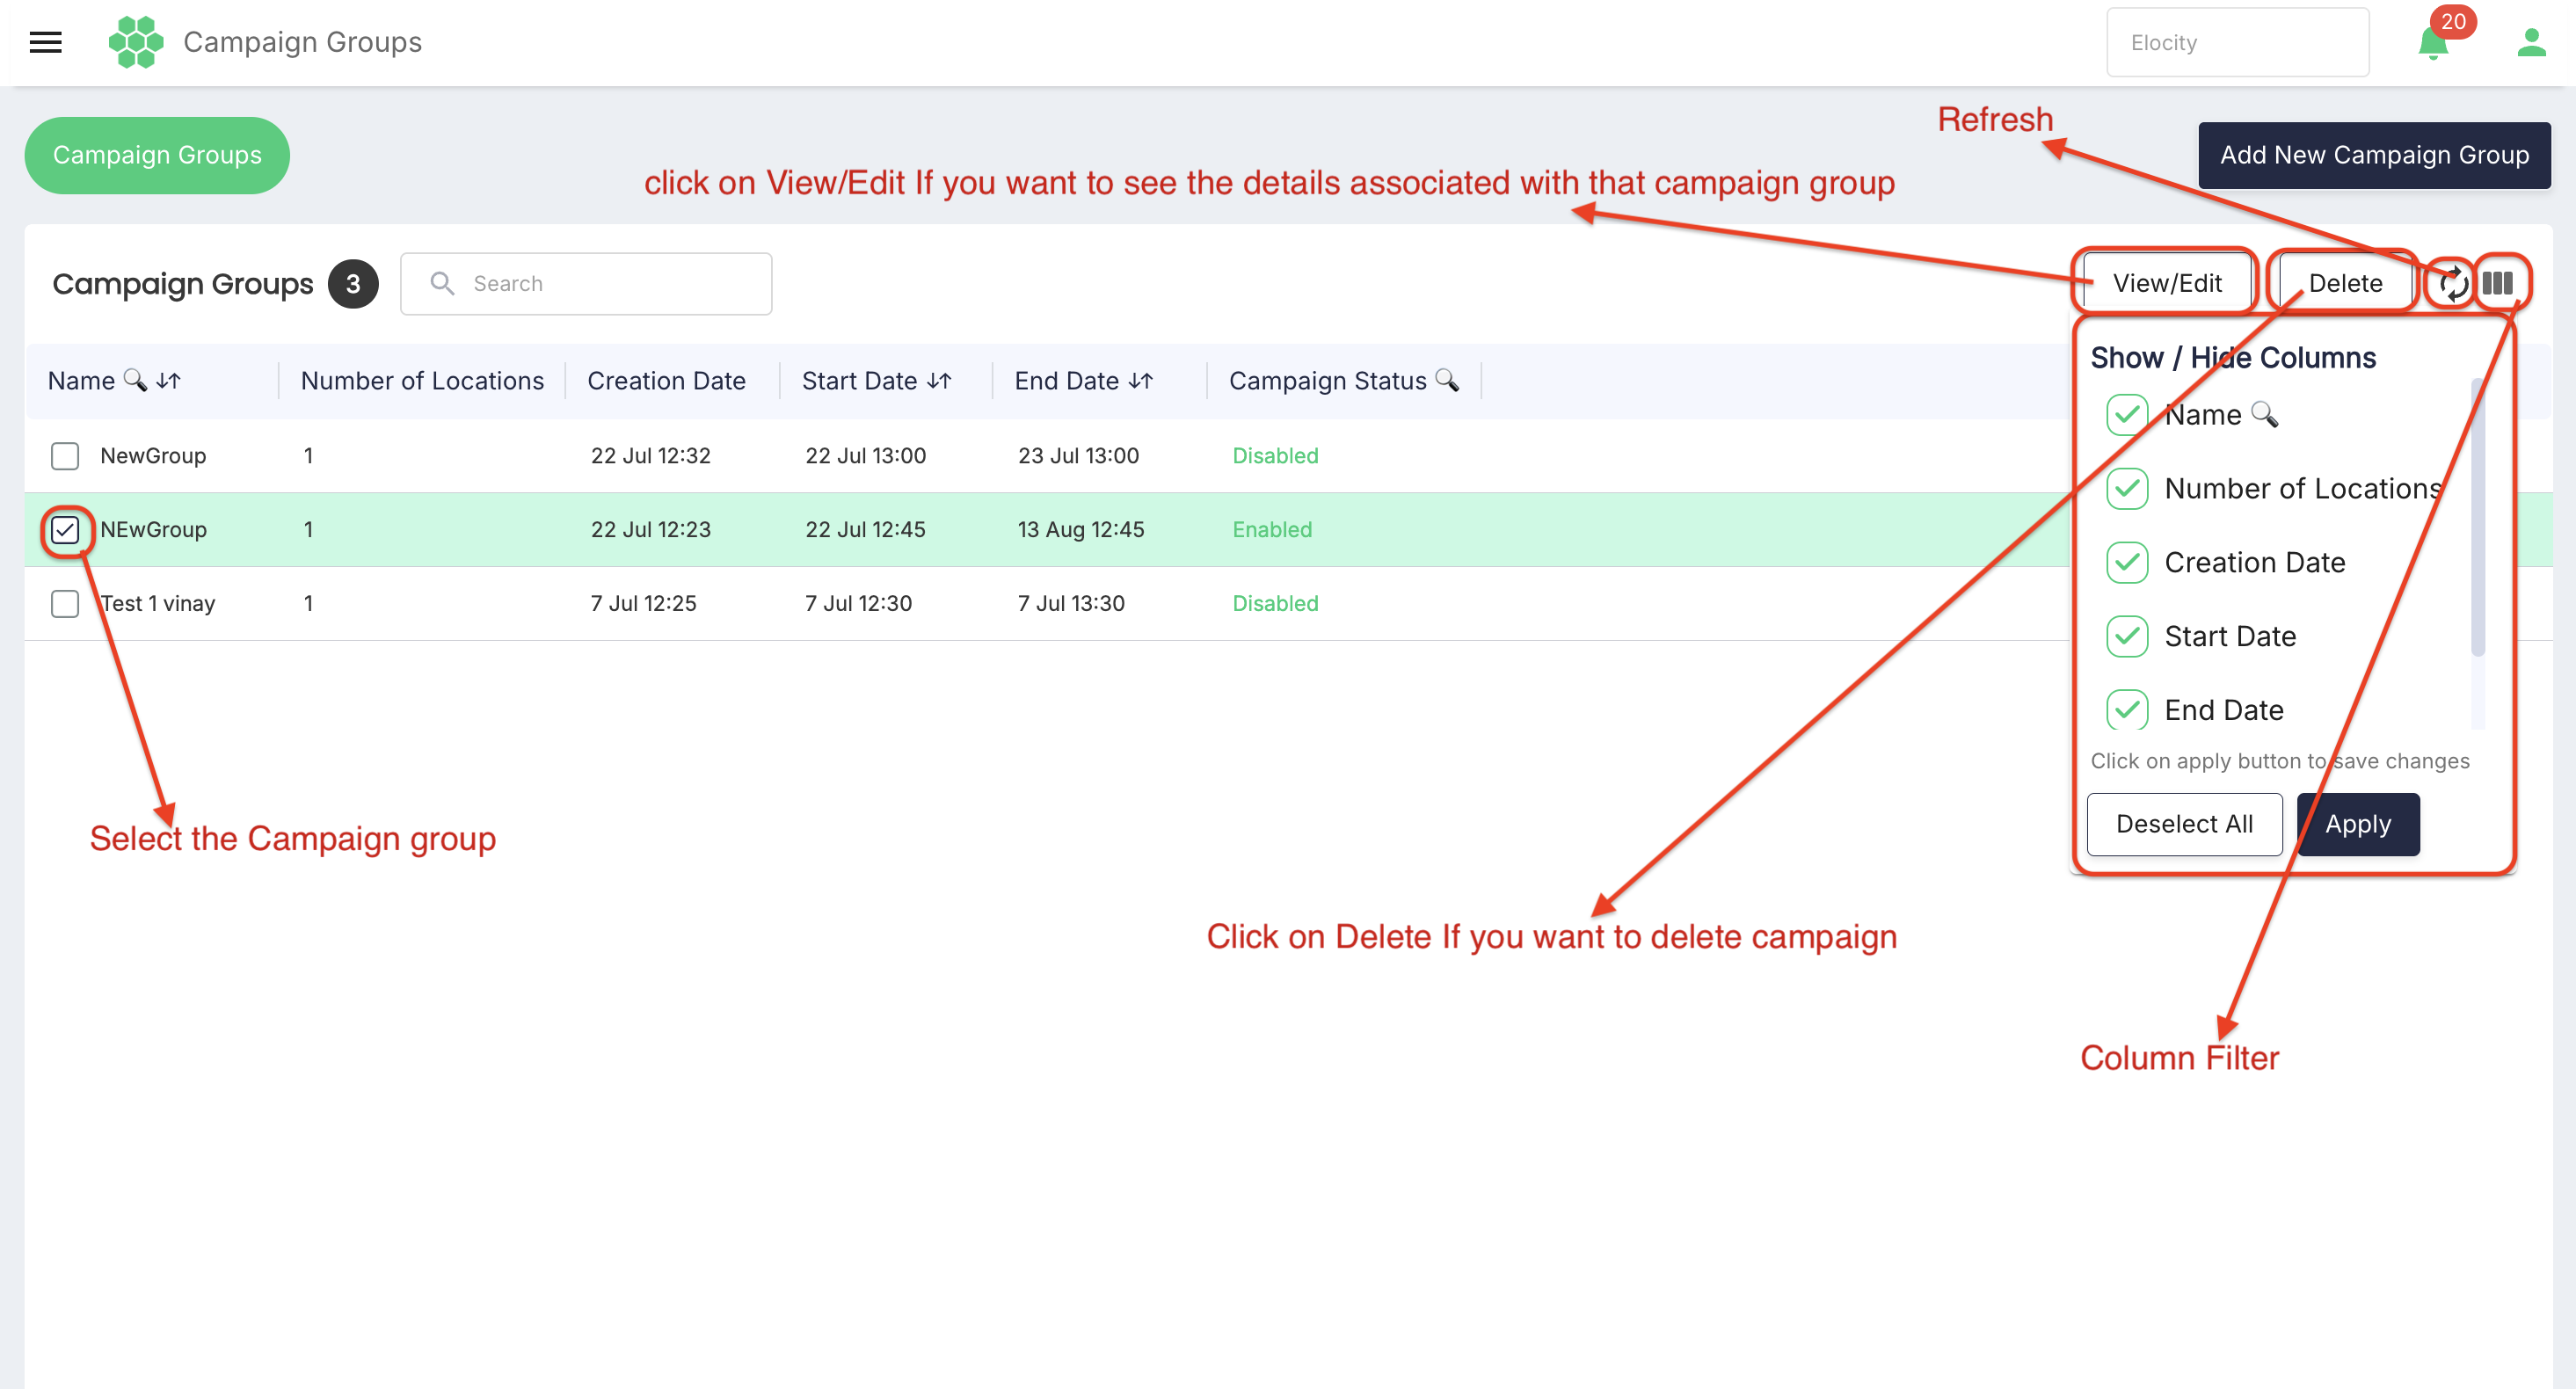
Deletion may affect future invoices that would otherwise use the campaign. Prefer disabling a campaign when its historical record must be preserved. Delete only after confirming the campaign is not required for active processing, audit, or reporting.
6. Add New Campaign Group screen walkthrough
Select Add New Campaign Group to open the campaign form.
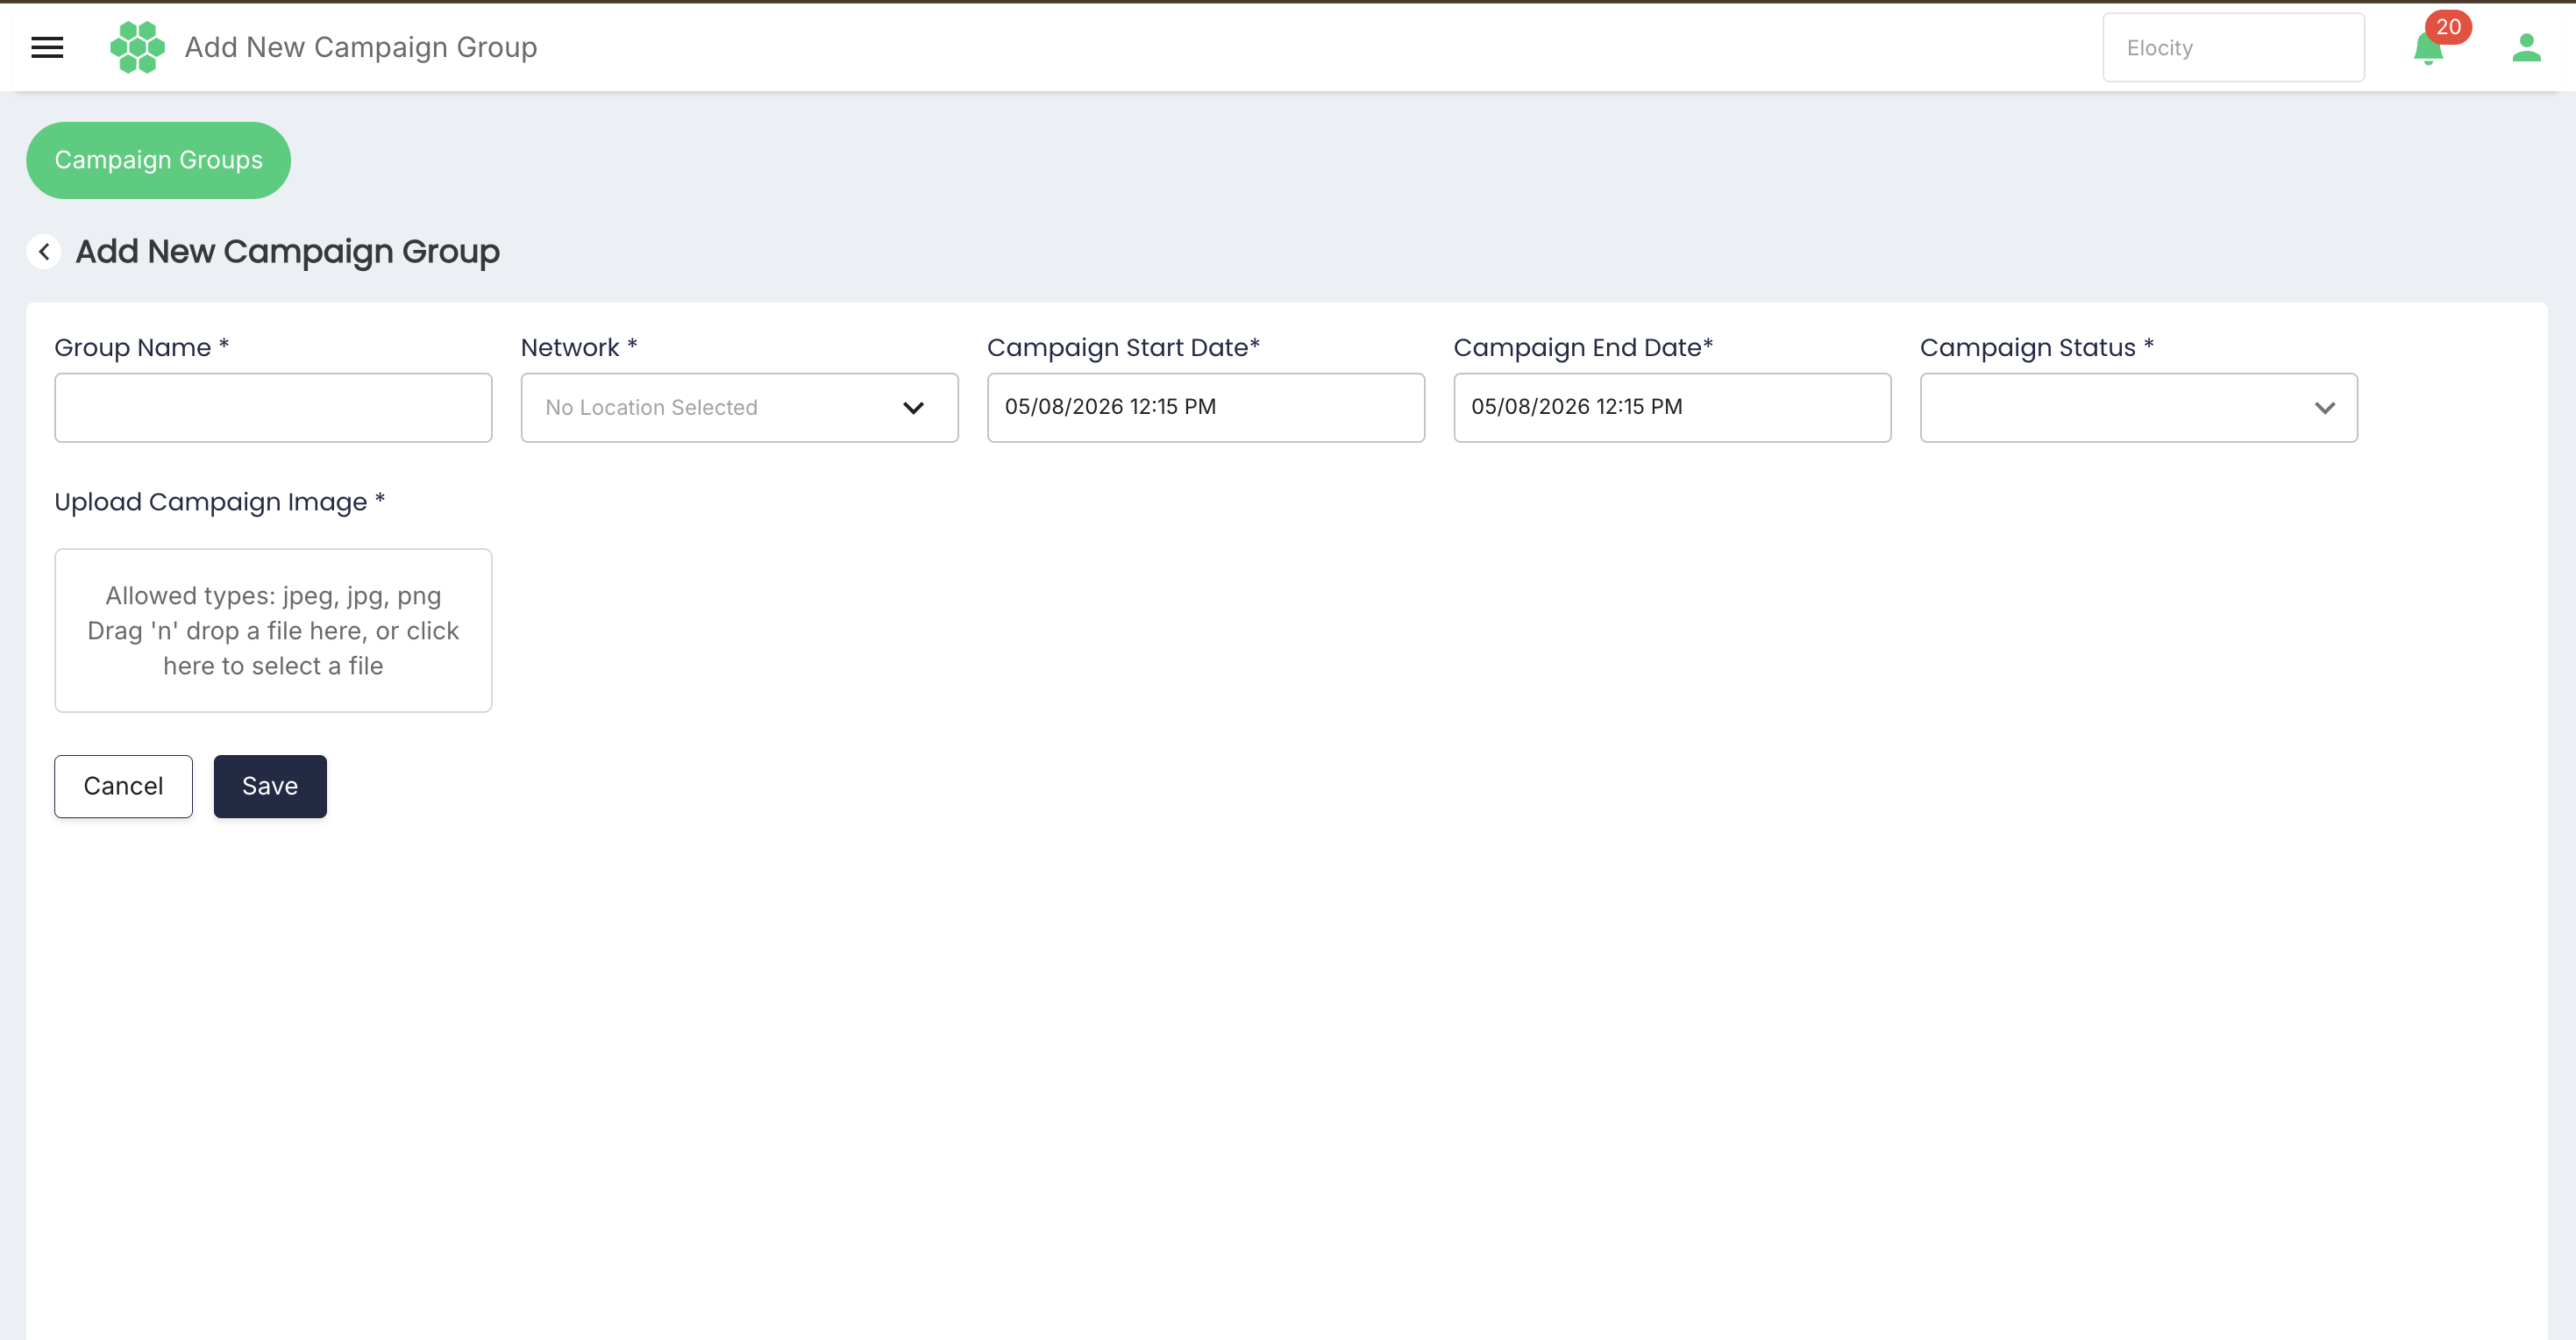
The reviewed form contains the following required fields:
| Field | Purpose | Live-interface status |
|---|---|---|
| Group Name | Provides a recognizable, unique campaign-group name. | Verified |
| Network | Selects one or more target locations. | Verified |
| Campaign Start Date | Defines when the campaign becomes eligible. | Verified |
| Campaign End Date | Defines when campaign eligibility ends. | Verified |
| Campaign Status | Enables or disables the campaign. Verified choices are Enabled and Disabled. | Verified |
| Upload Campaign Image | Attaches the approved marketing image. Allowed types shown are JPEG, JPG, and PNG. | Verified |
The form also provides:
- Cancel — leaves the form without creating the campaign.
- Save — validates and creates the campaign.
7. Create an invoice campaign
7.1 Enter a group name
- Open Add New Campaign Group.
- Enter a descriptive value in Group Name.
- Use a naming convention that identifies the campaign, audience, and period where practical.
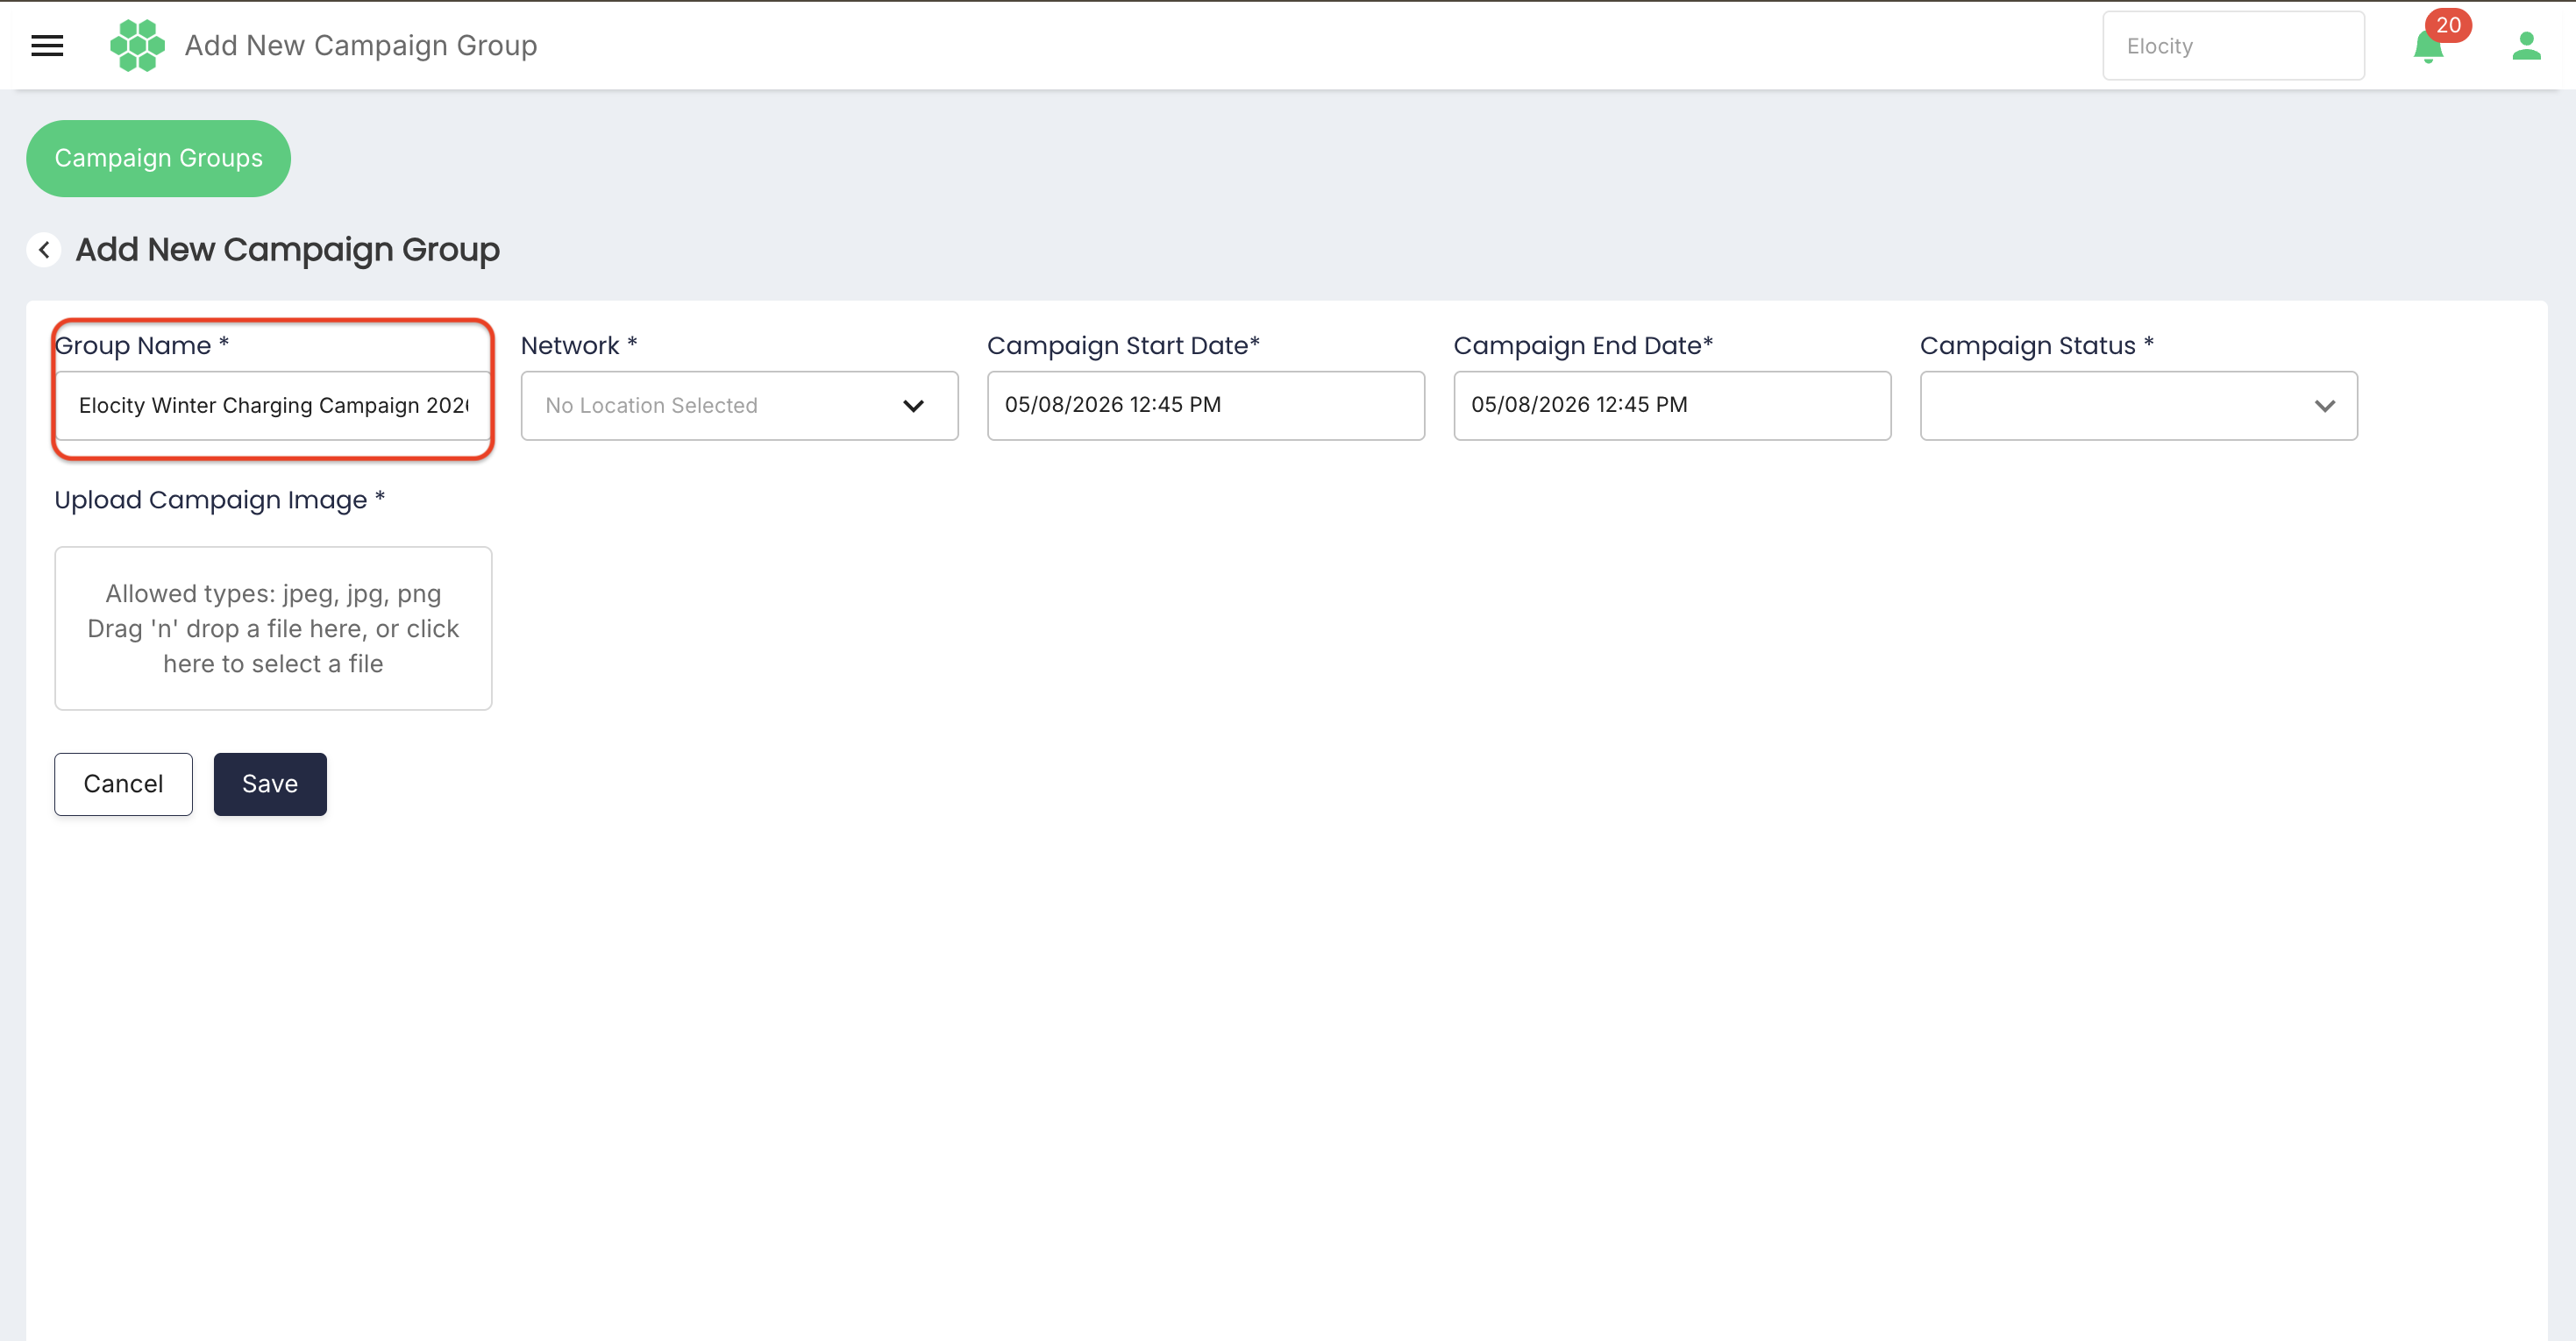
Example: Ontario Summer Charging Promotion 2026.
Avoid generic names such as Campaign 1, because they make selection and audit review difficult.
7.2 Select target locations
- Select the Network field, initially displayed as No Location Selected.
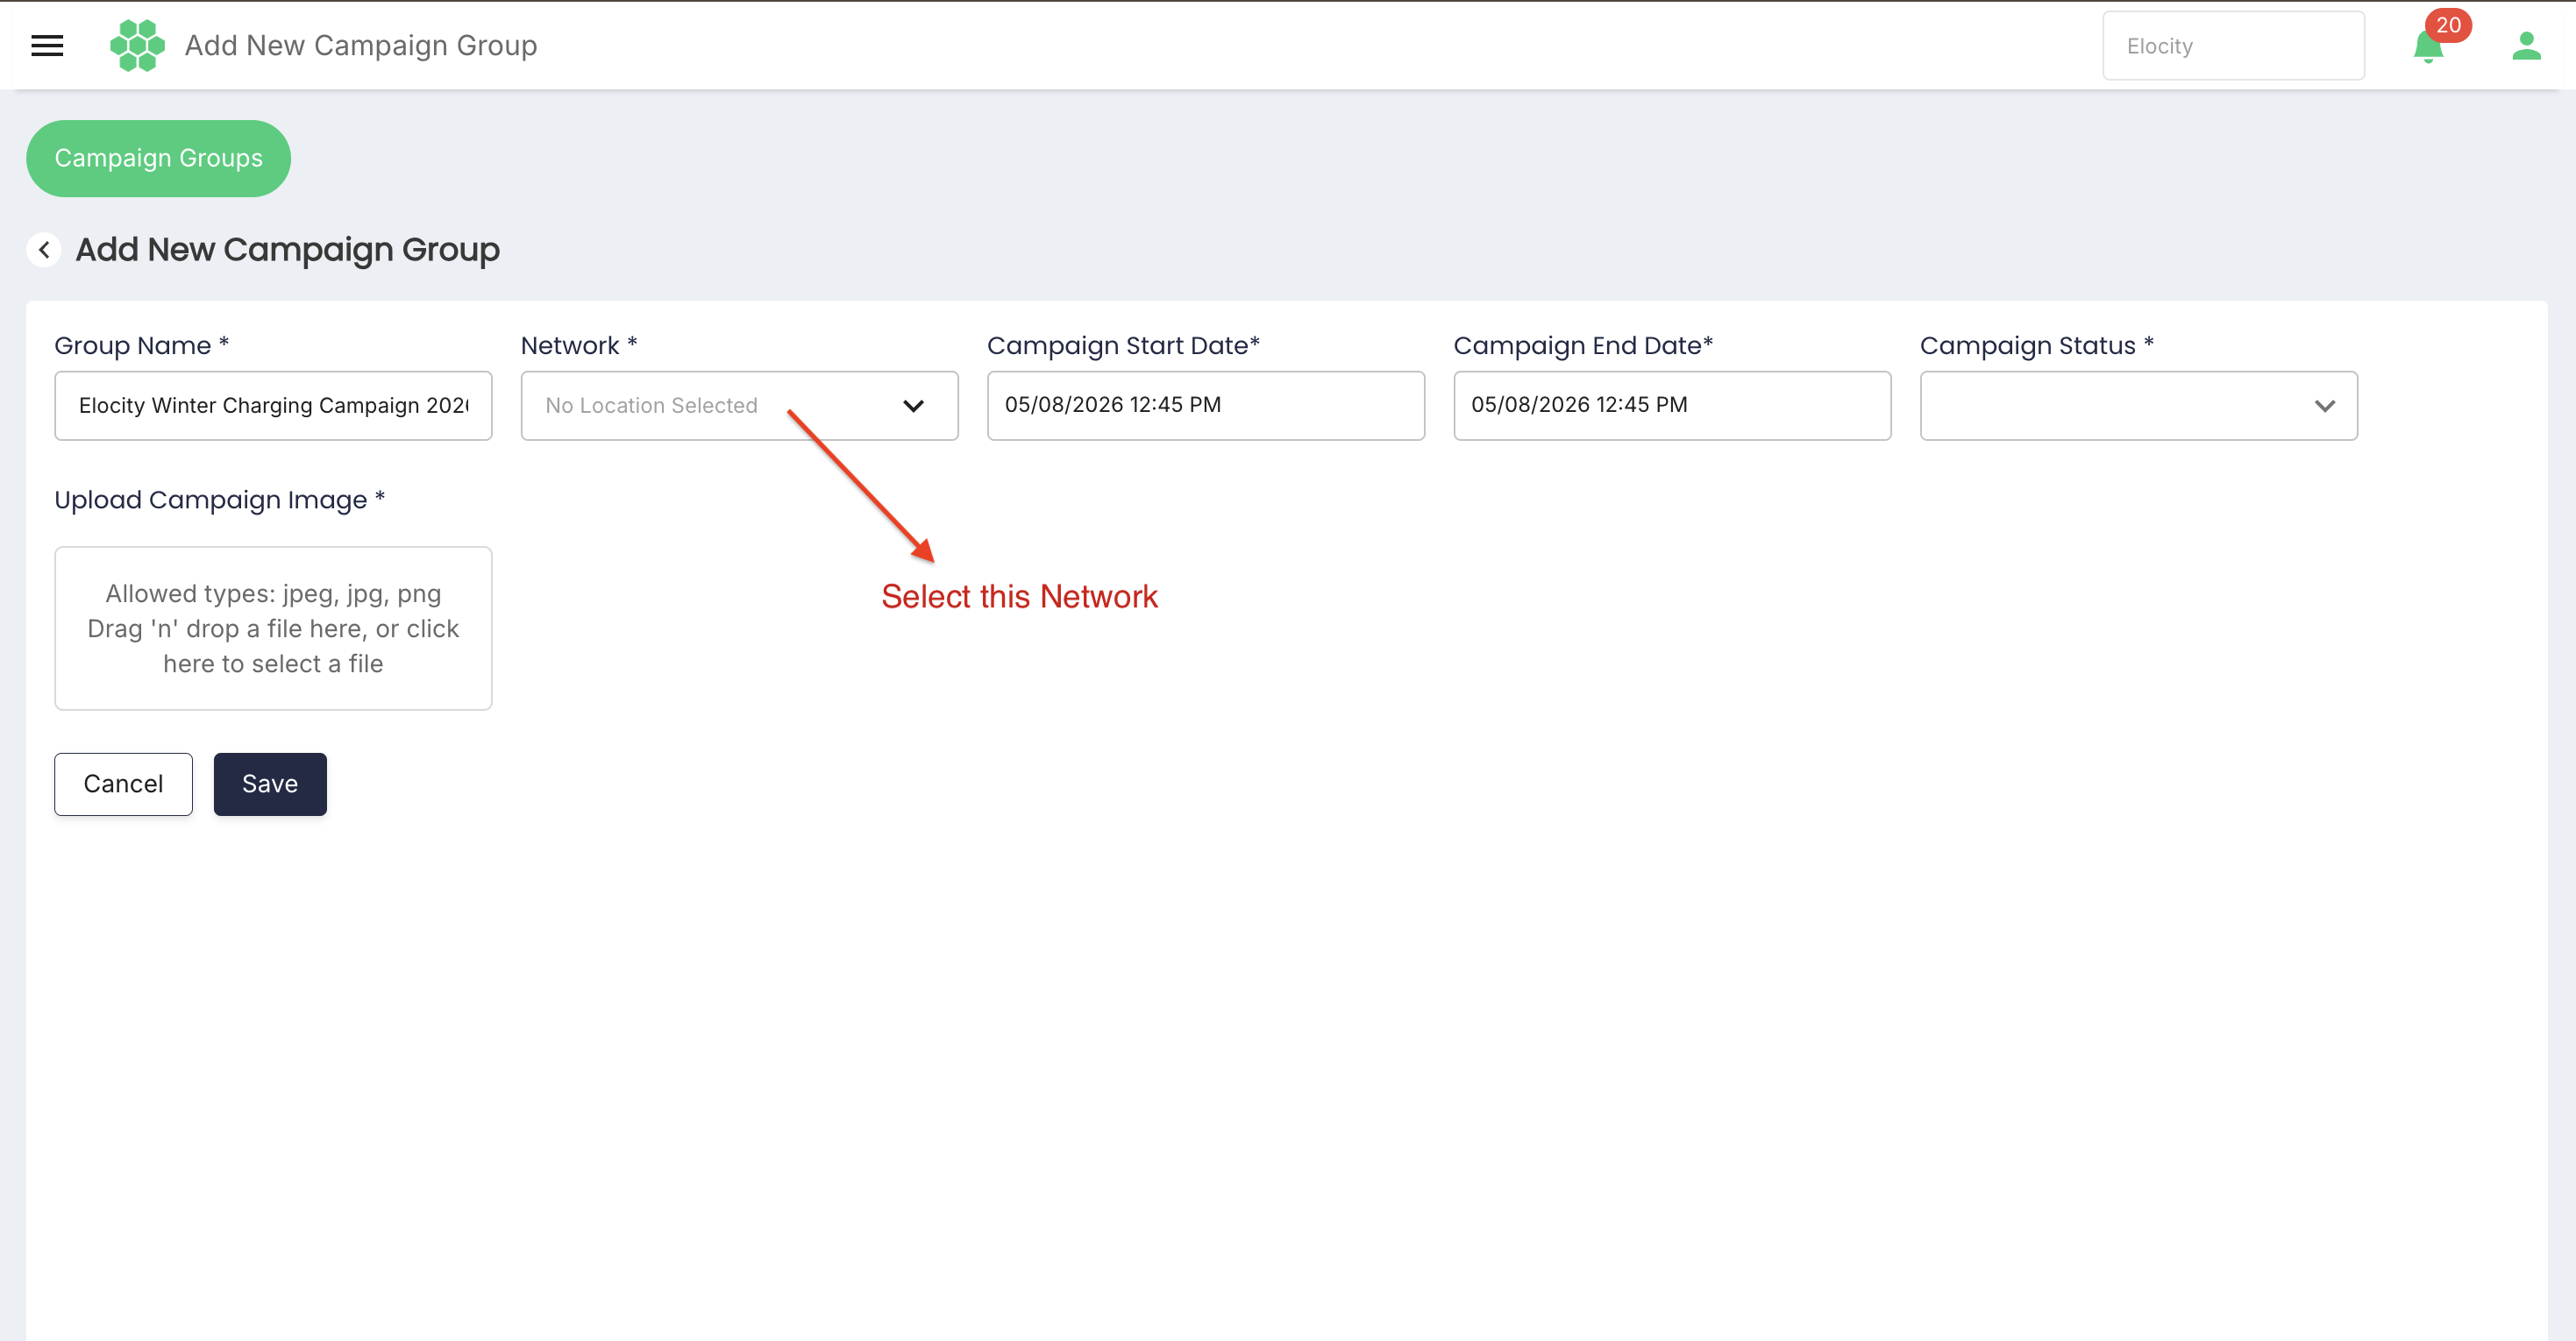
- The Select Locations dialog opens.
- Expand the location tree using Toggle.
- Select a country, province, region, or individual location according to the displayed hierarchy.
- Review the selected-location summary.
- Select Done to apply the selection.
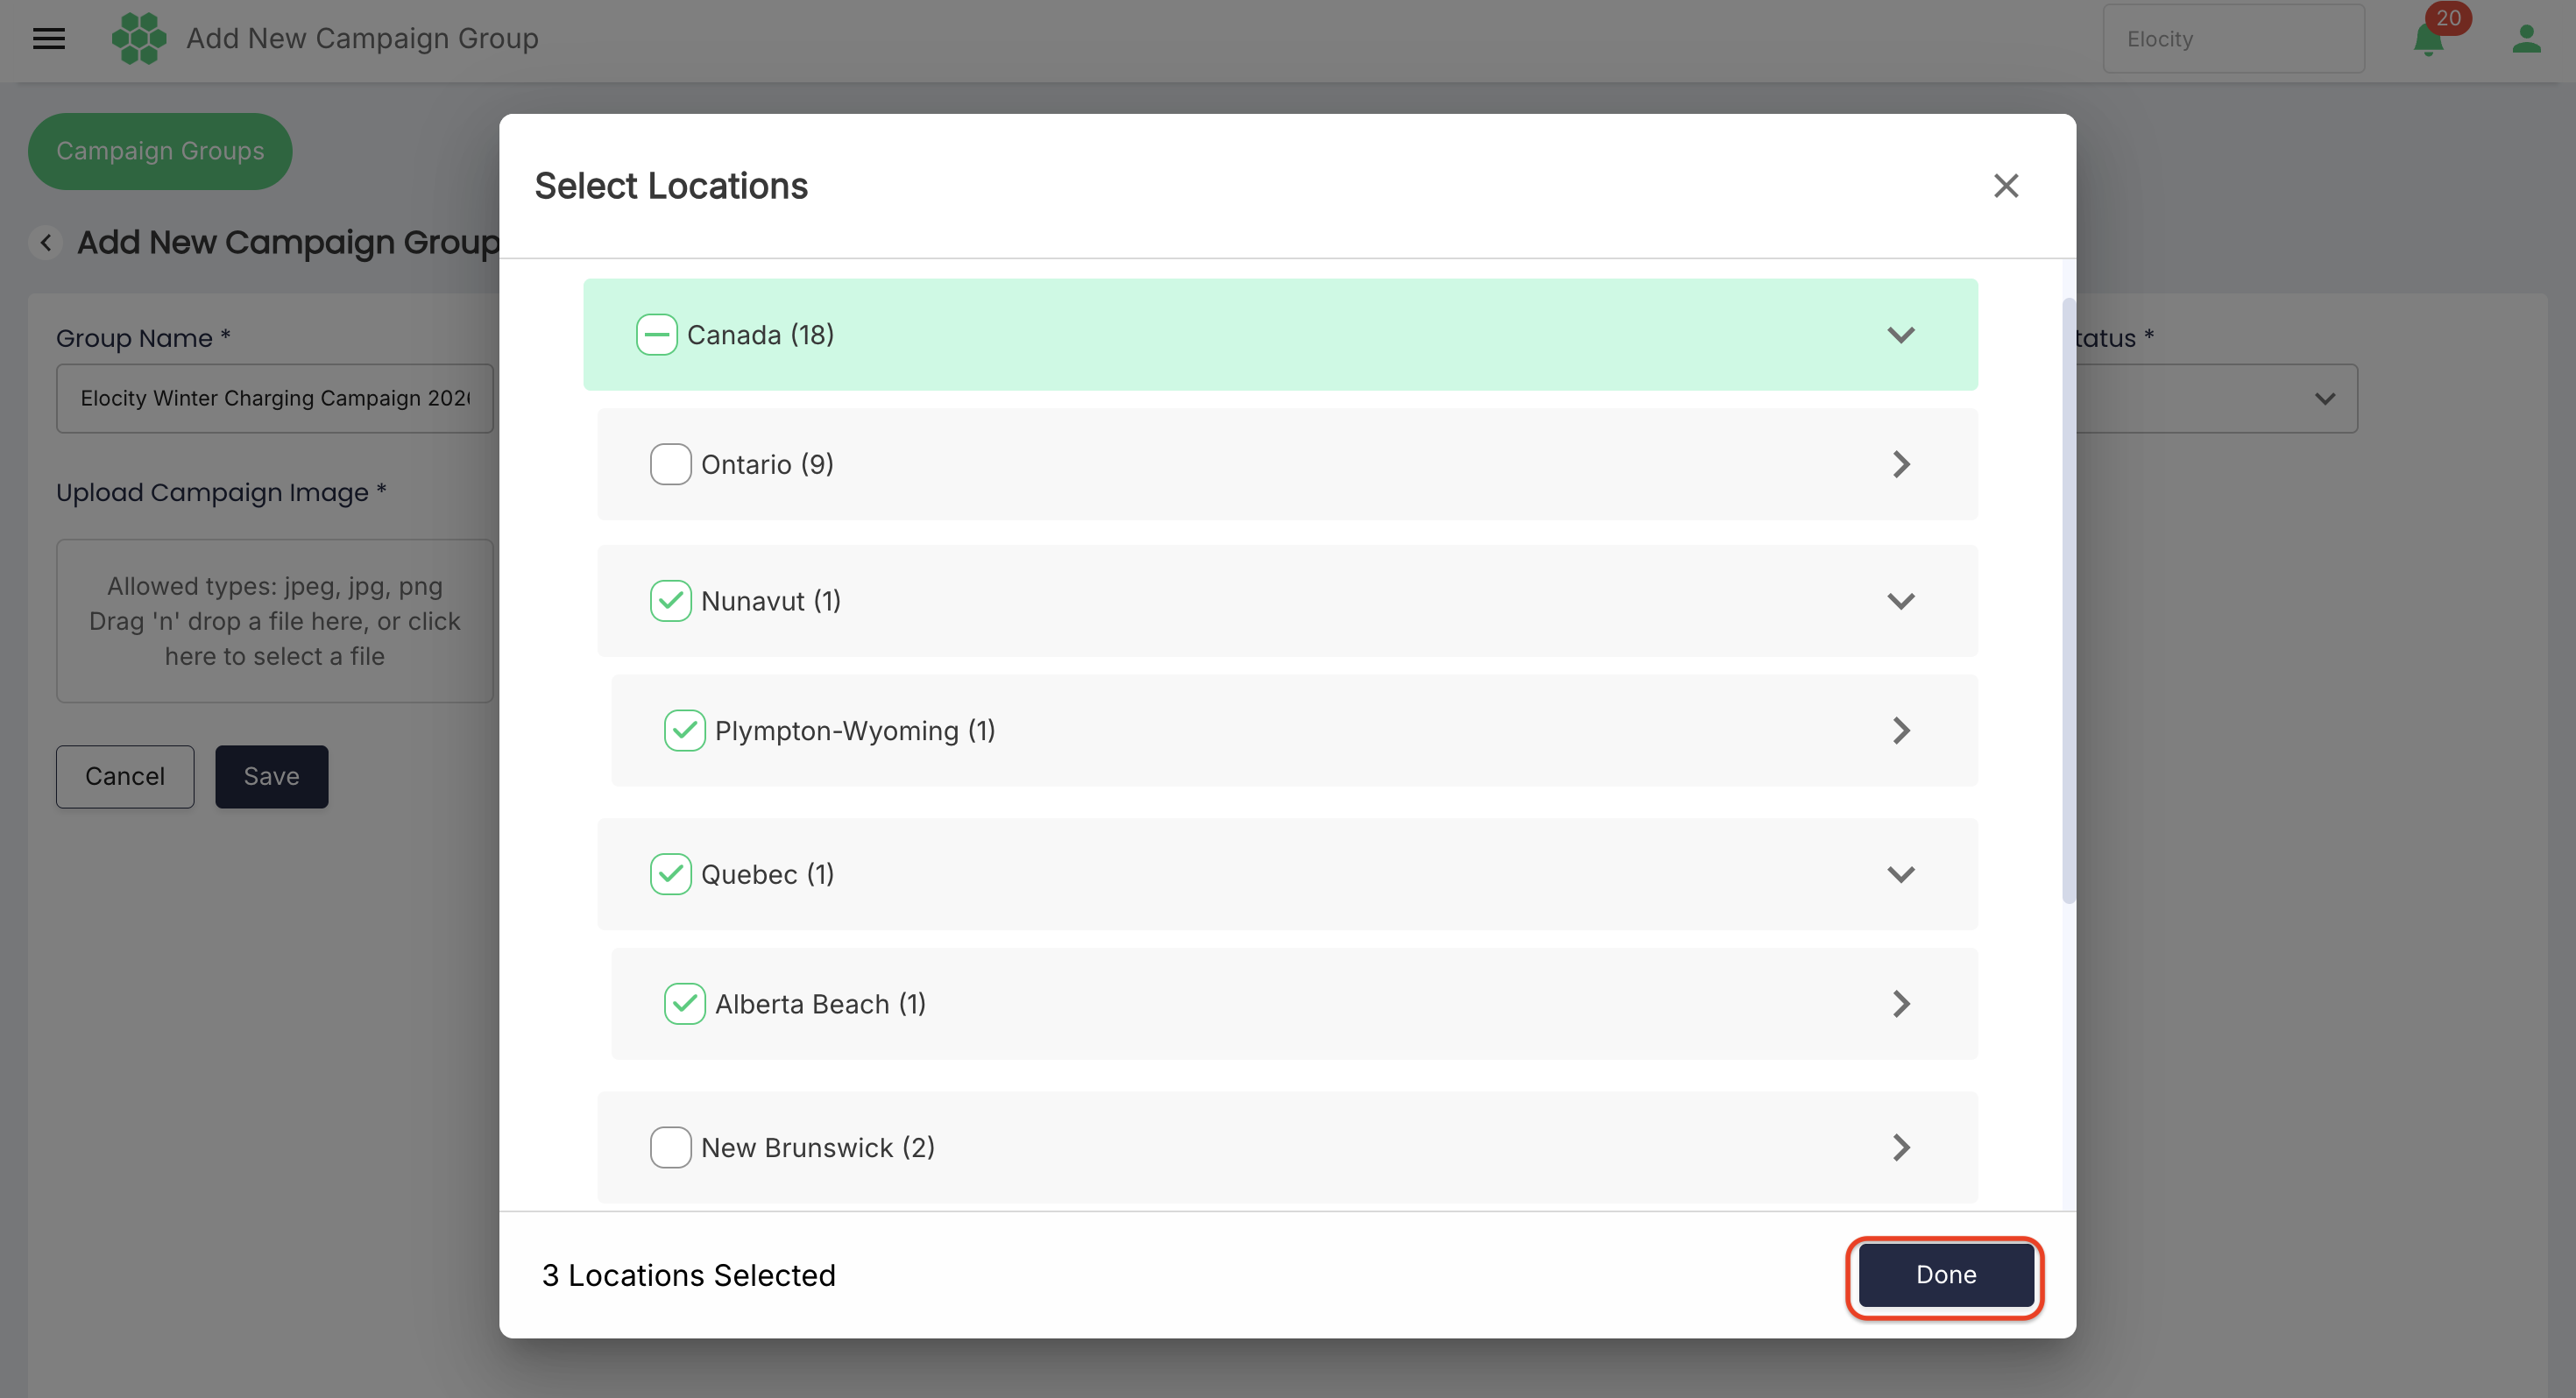
The reviewed hierarchy groups locations under Canada and then by province, such as Alberta, British Columbia, and Ontario. Available locations and counts depend on the active business and user permissions.
The Done button remains unavailable until at least one valid selection is made. Closing the dialog without selecting a location displays the verified validation message:
Network cannot be empty, at least one must be selected
7.3 Use predefined location groups
The system requirement calls for reusable location groups. Where this capability is enabled:
- Open the Network or location-group selector.
- Choose the required predefined location group.
- Expand or preview its member locations.
- Confirm whether membership is static or dynamically refreshed.
- Apply the group and review the displayed location count.
If the current screen exposes only the location hierarchy, select locations directly. Management of reusable location groups may be provided by tenant configuration or a separate administration workflow.
7.4 Enter campaign dates
- Select Campaign Start Date.
- Enter the date and time when the campaign should become eligible.
- Select Campaign End Date.
- Enter the date and time when campaign eligibility should end.
- Confirm the time zone used by the business and invoice-processing service.
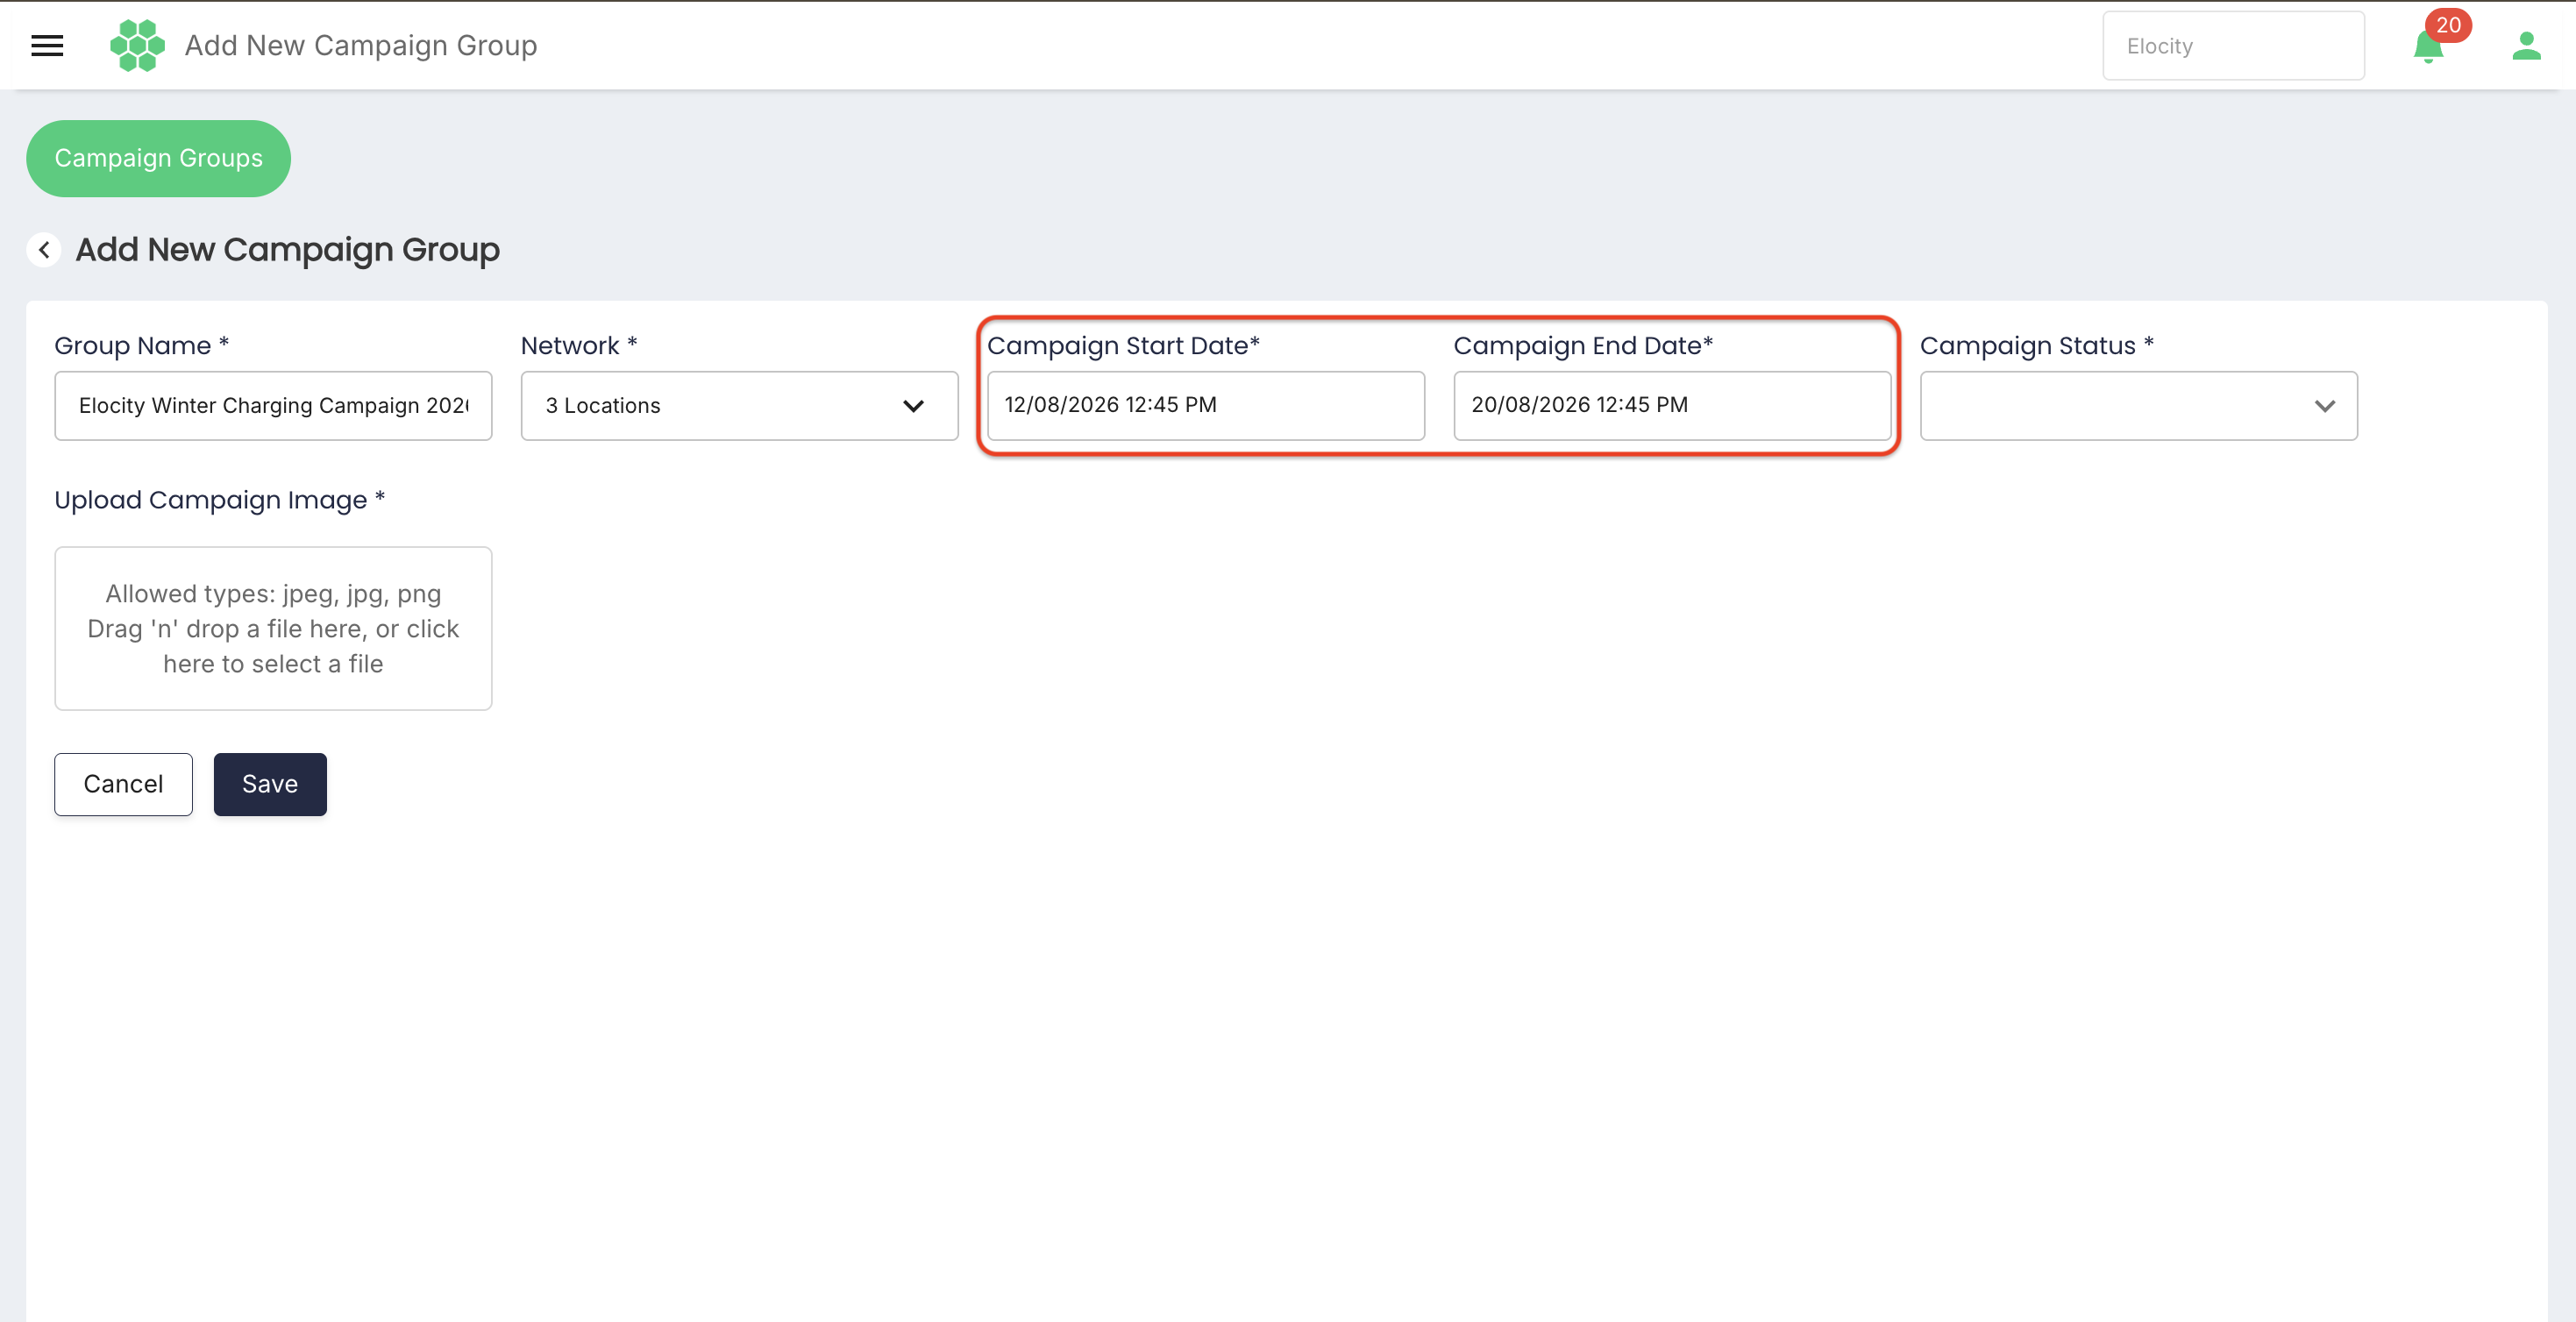
The campaign should apply only when the relevant invoice date falls within the valid campaign period according to the configured date-boundary rule.
7.5 Select campaign status
Choose one of the verified status values:
- Enabled — allows the campaign to be considered for eligible invoices.
- Disabled — preserves the campaign record but prevents it from being applied.
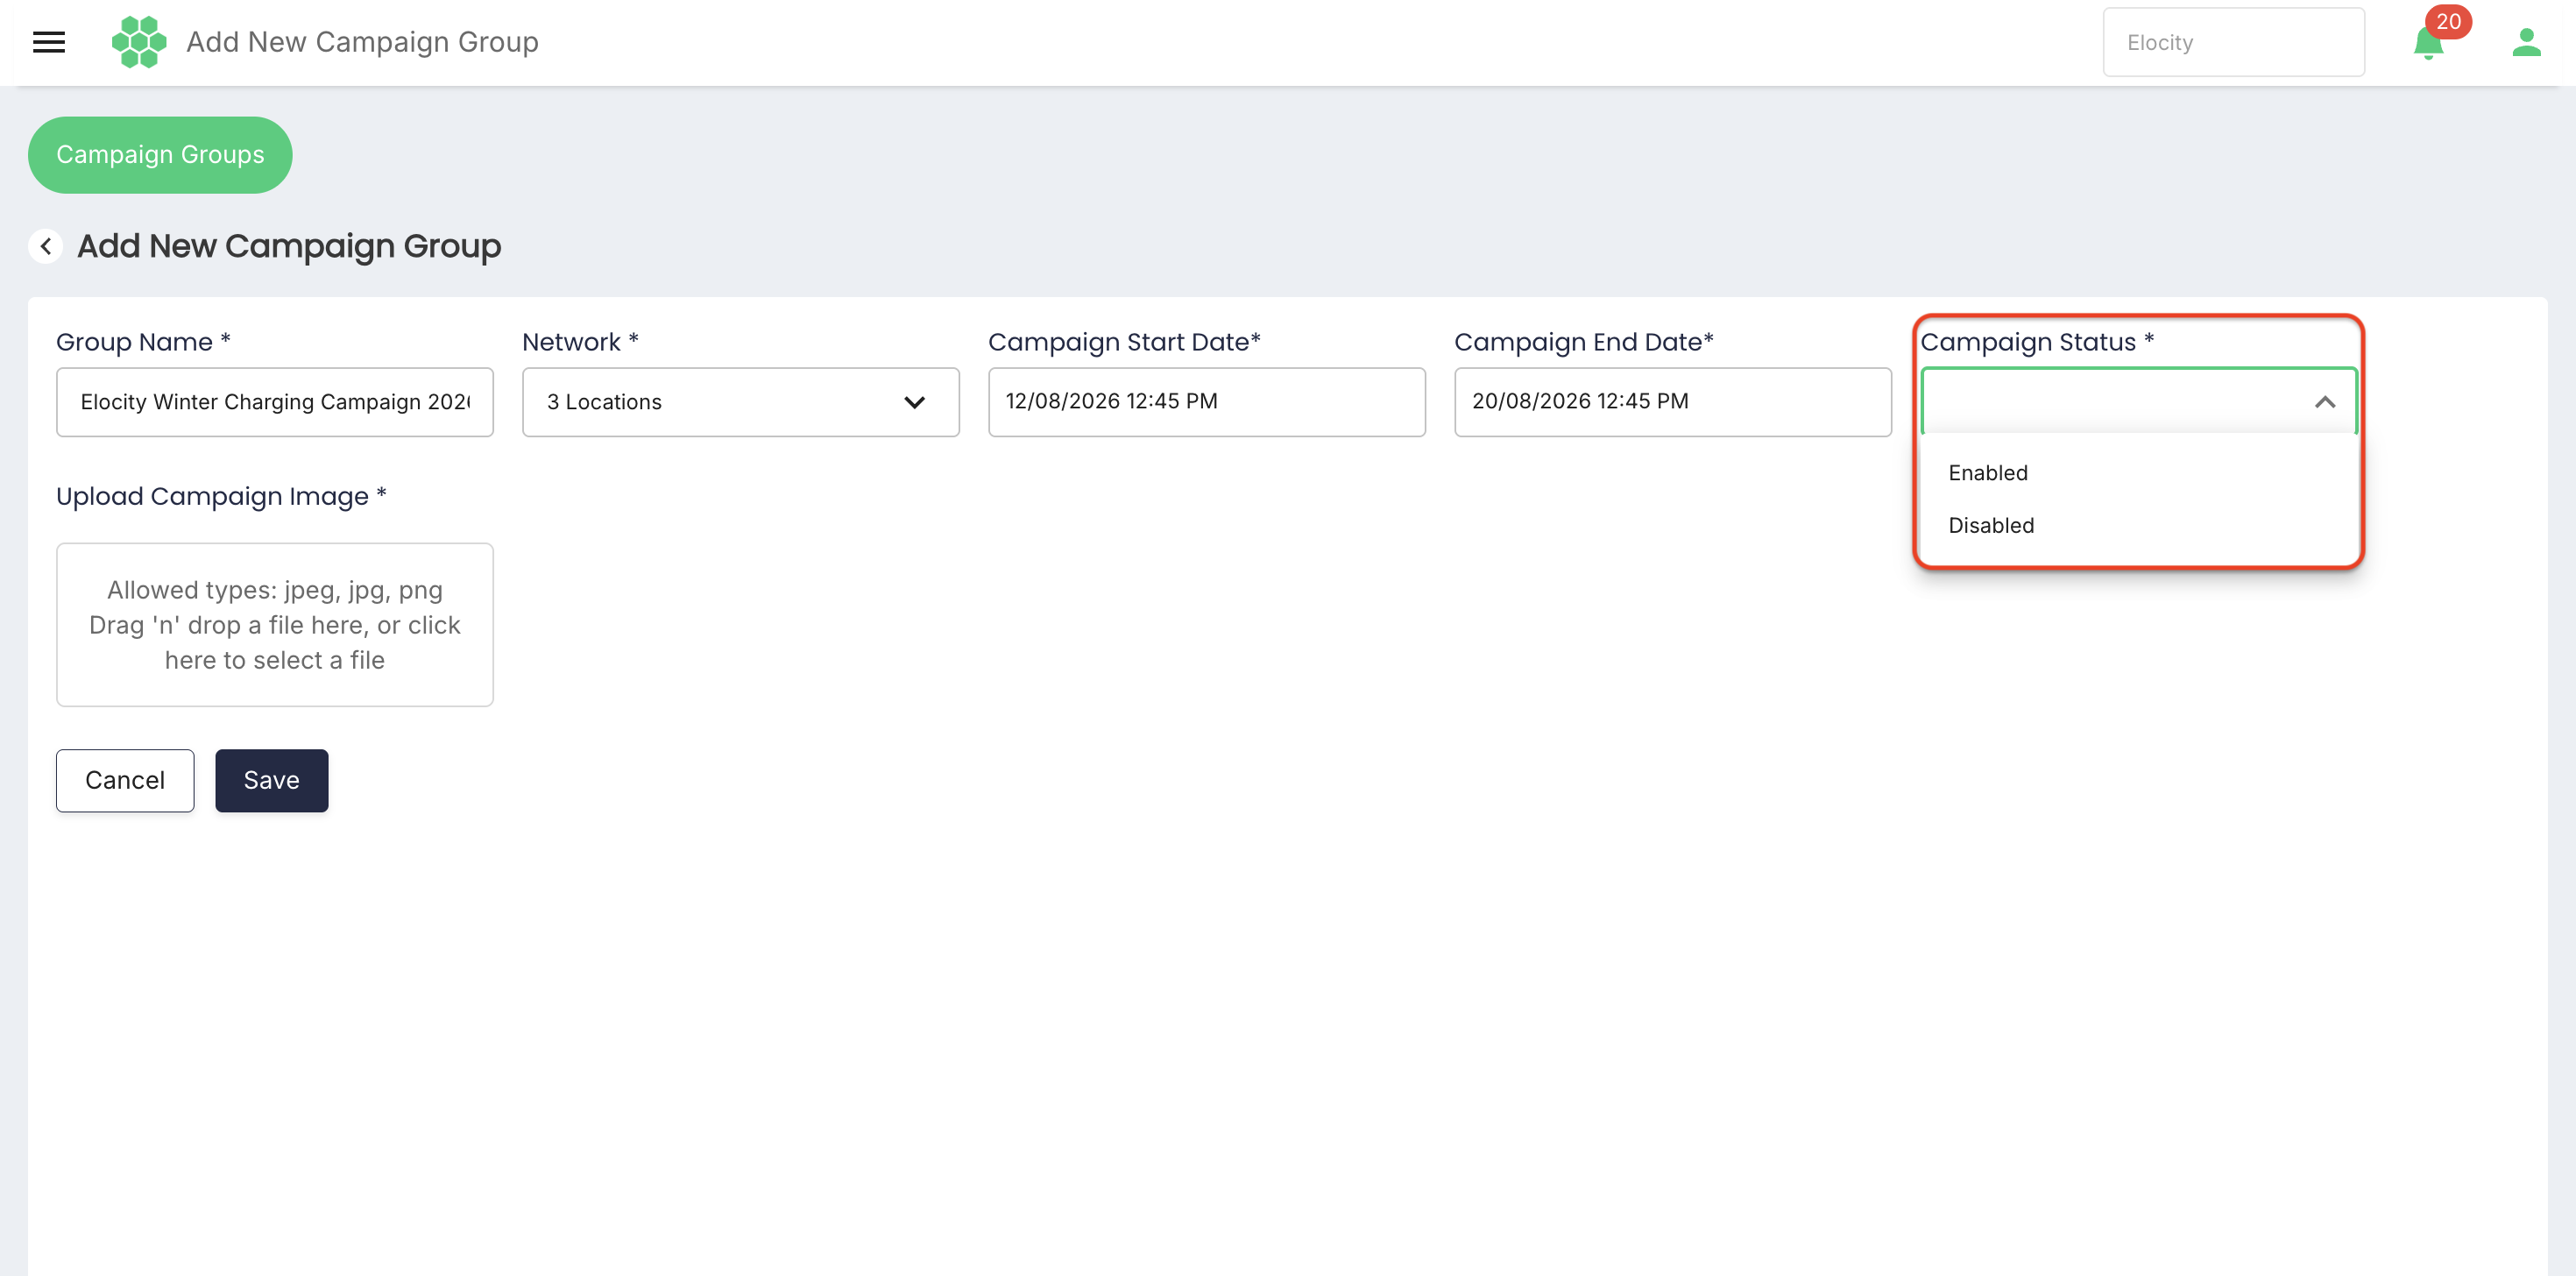
Create a campaign as Disabled when content or invoice output still requires review. Enable it only after approval and successful invoice testing.
7.6 Upload the campaign image
The image field supports either file browsing or drag and drop.
- Select Choose File, or drag the approved image into the upload area.
- Select one JPEG, JPG, or PNG image.
- Wait for the upload validation and success feedback.
- Confirm that the correct filename or preview is displayed.
- Replace the file before saving if the wrong image was selected.
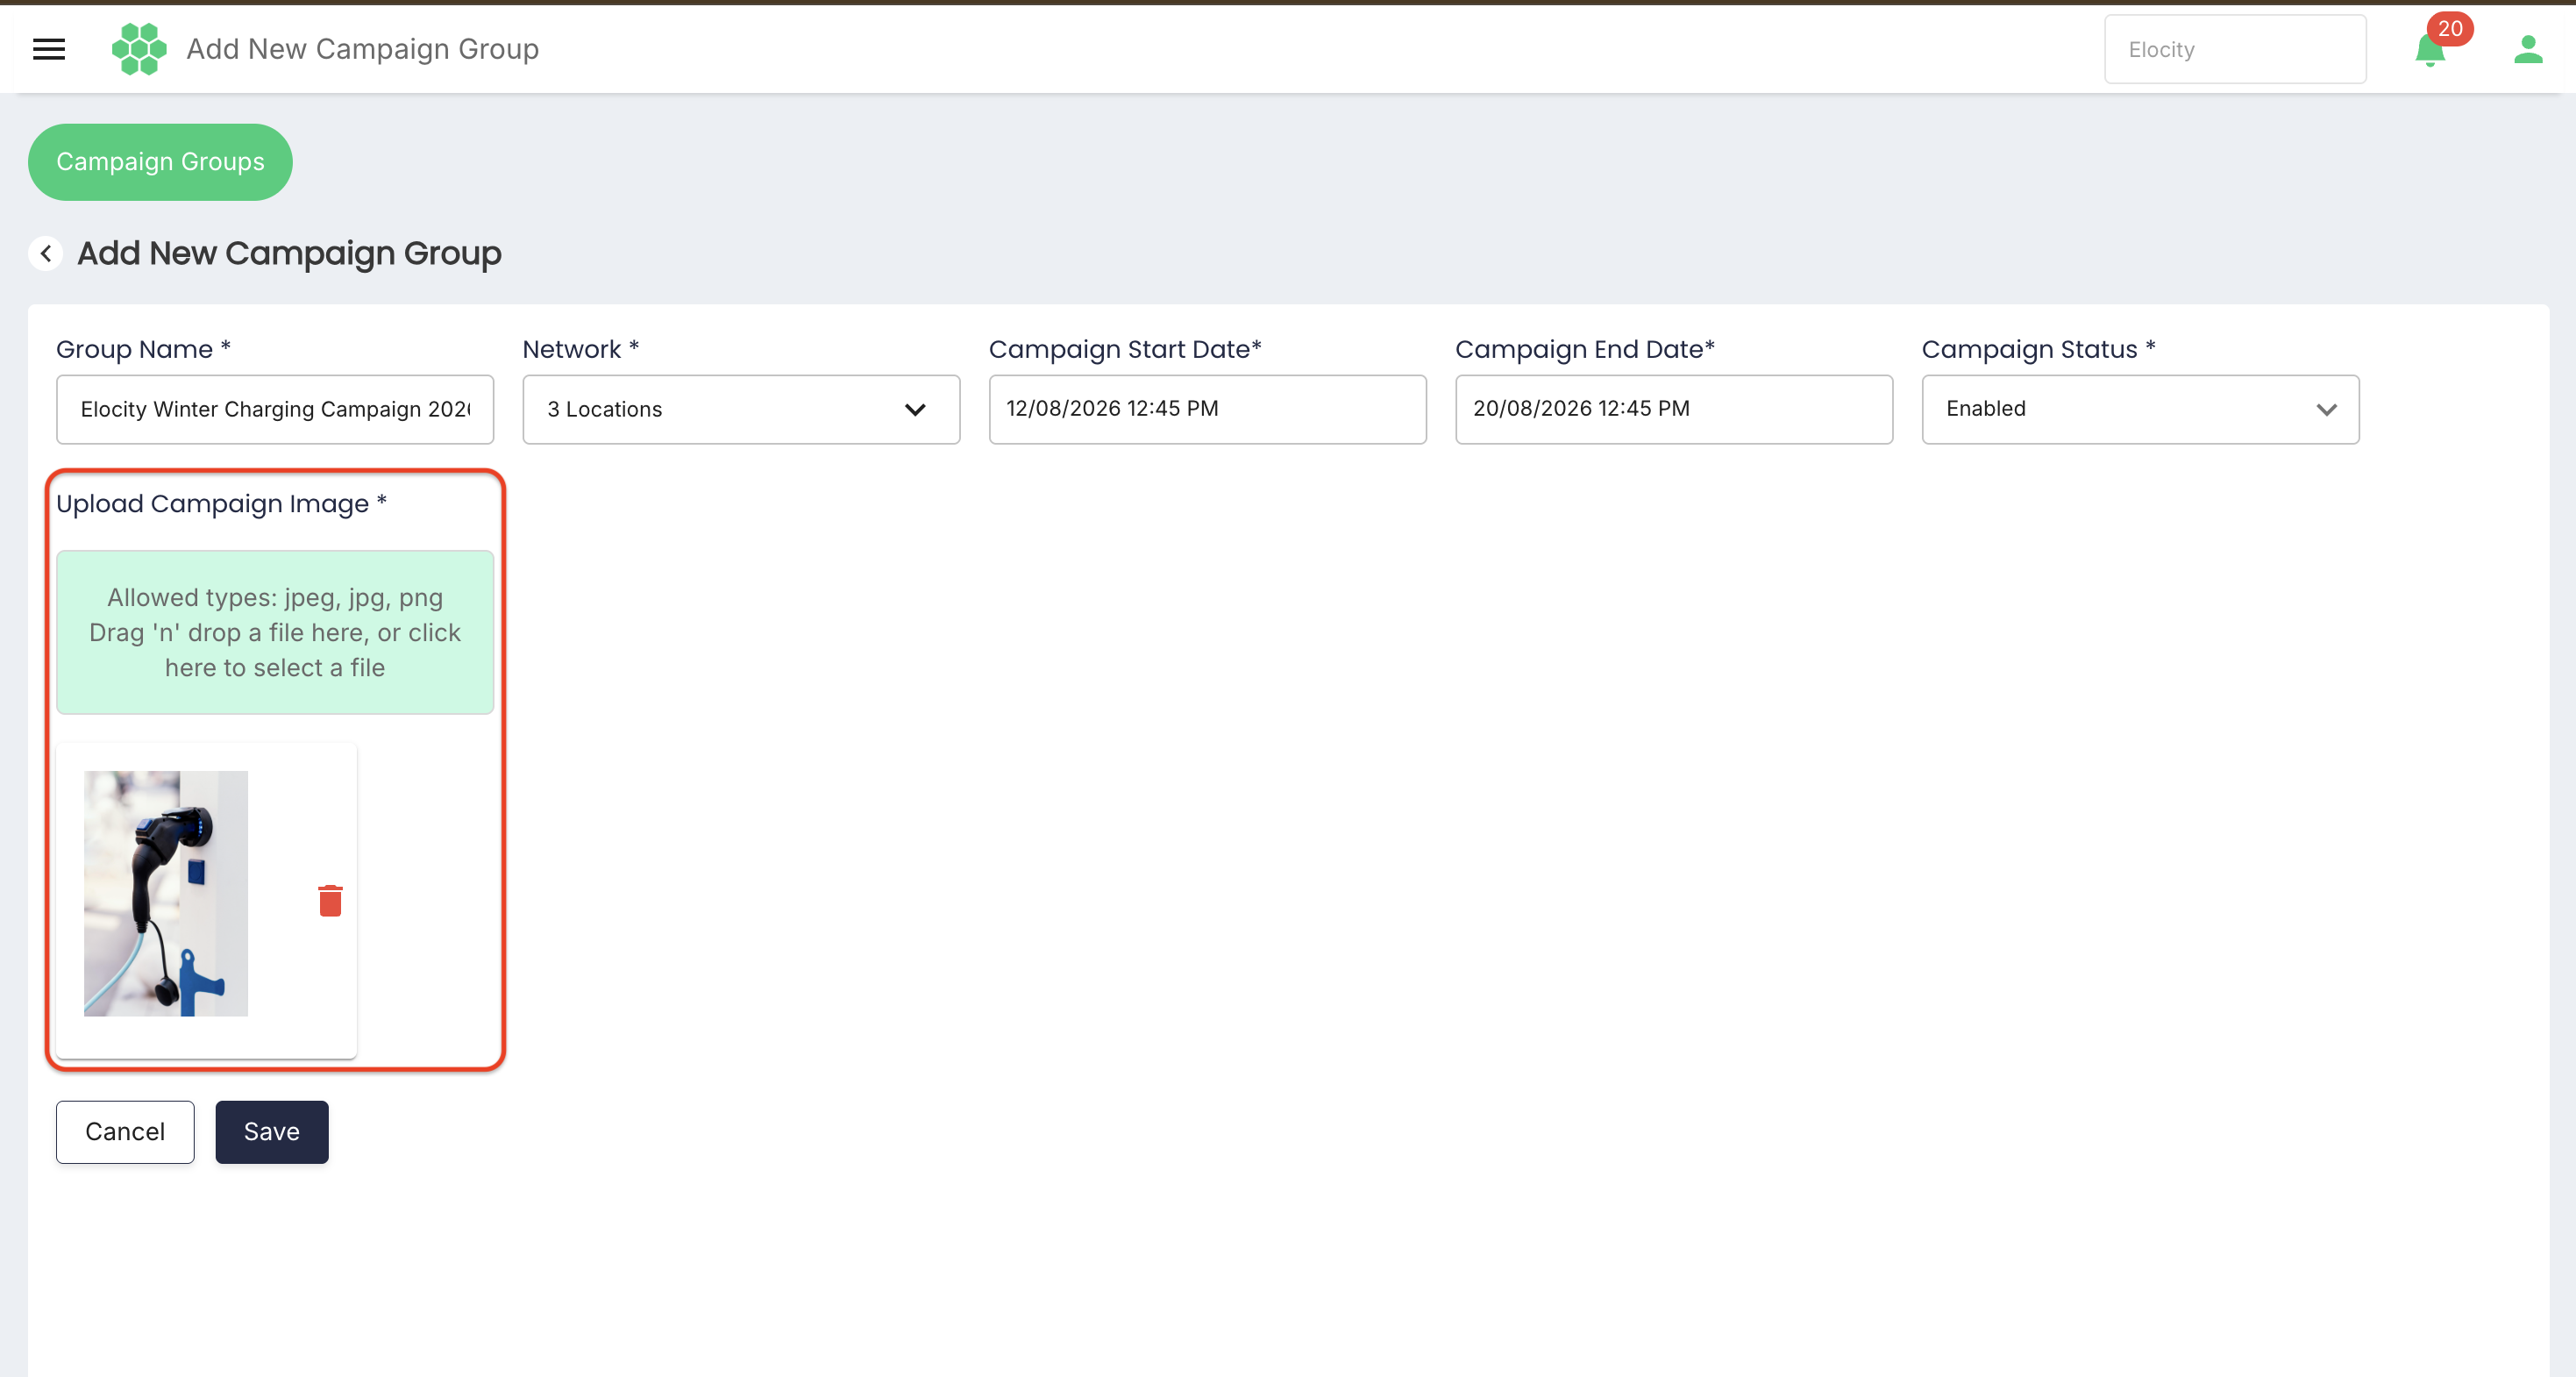
The reviewed interface displays:
- Allowed types: jpeg, jpg, png
- Drag 'n' drop a file here, or click here to select a file
The system should reject unsupported or unsafe files and provide a clear reason. File-size, pixel-dimension, and aspect-ratio limits should follow the configured invoice-template rules.
7.7 Review and save
Before saving, verify:
- Group Name is correct.
- At least one intended location is selected.
- Start Date and End Date are correct.
- Campaign Status matches the approval state.
- The correct JPEG or PNG image is attached.
- The image is appropriate for the invoice layout.
Select Save. After successful creation, the system should confirm the result and display the campaign in Campaign Groups.
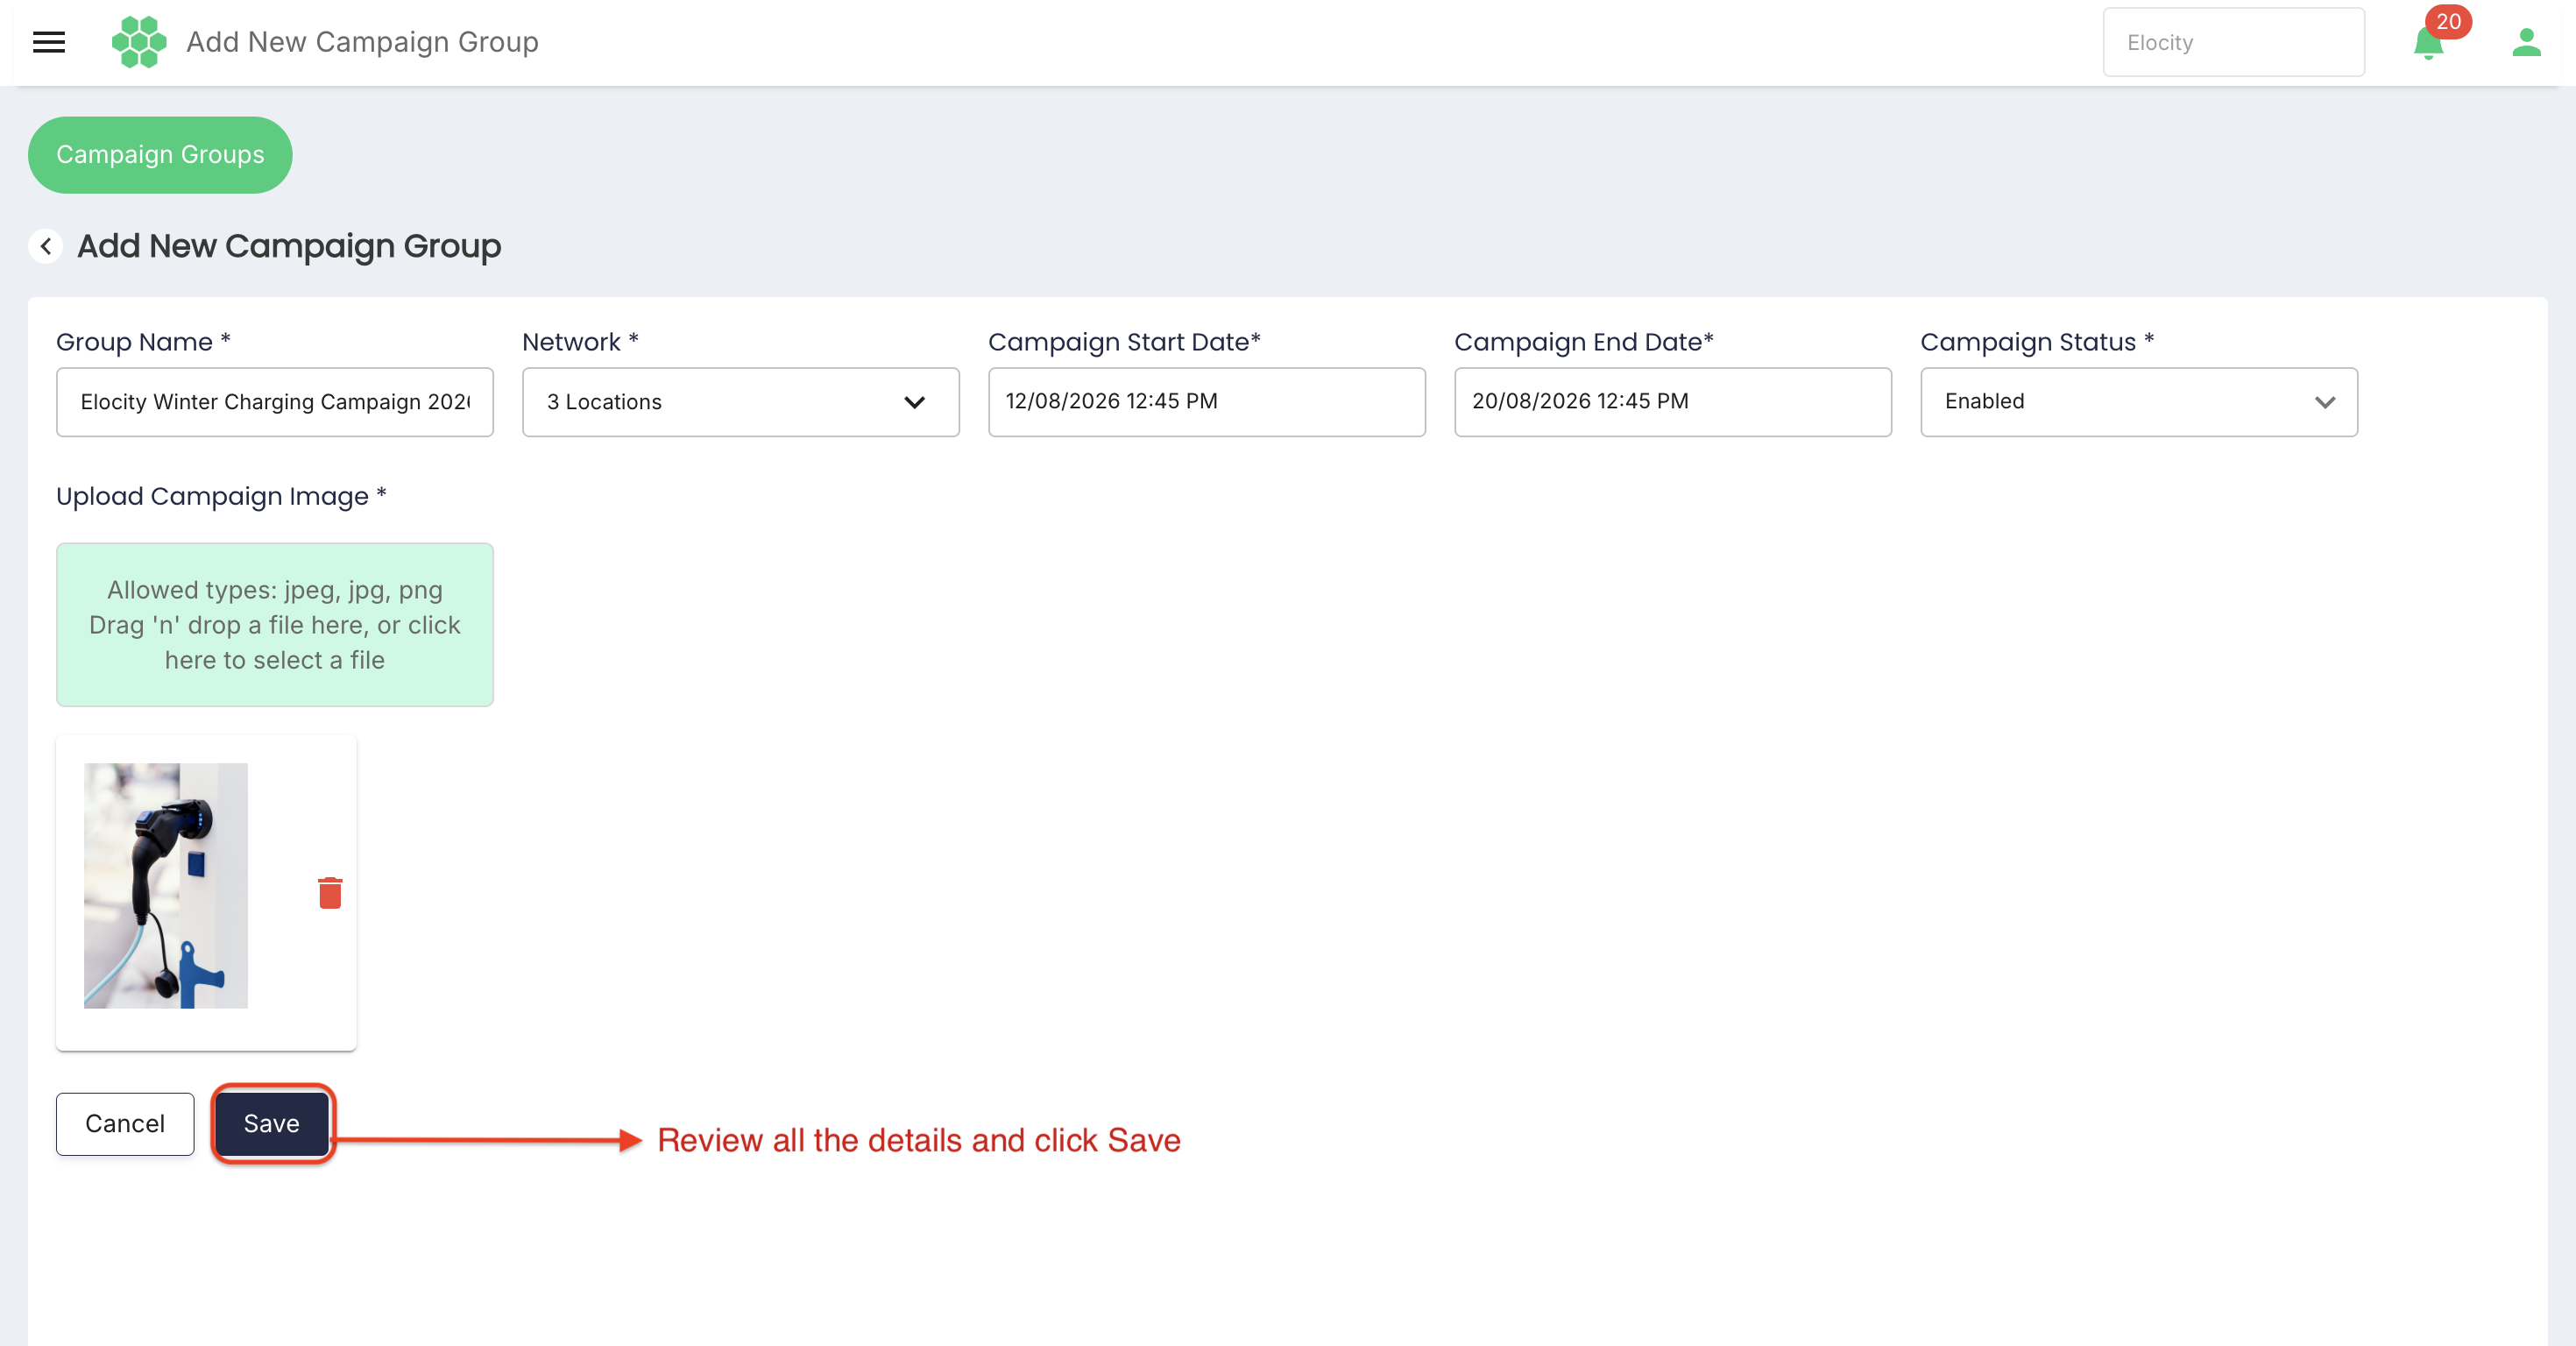
Select Cancel to leave without creating the campaign.
8. Date validation rules
The application should validate campaign dates and display specific, actionable feedback.
Recommended validation rules are:
| Validation | Expected behaviour |
|---|---|
| Required dates | Start and End must both be present. |
| Valid value | Each entry must be a valid calendar date and time. |
| Date order | End must be later than Start. |
| Acceptable range | Dates must fall within the permitted business and system range. |
| Past dates | A new enabled campaign should not start in the past unless business rules explicitly allow it. |
| Maximum duration | A campaign must not exceed the configured maximum period. |
| Time zone | Dates should be stored consistently and displayed in the applicable business time zone. |
| Overlap | If conflicting campaigns are prohibited for the same location and invoice section, the system should identify the conflict before save. |
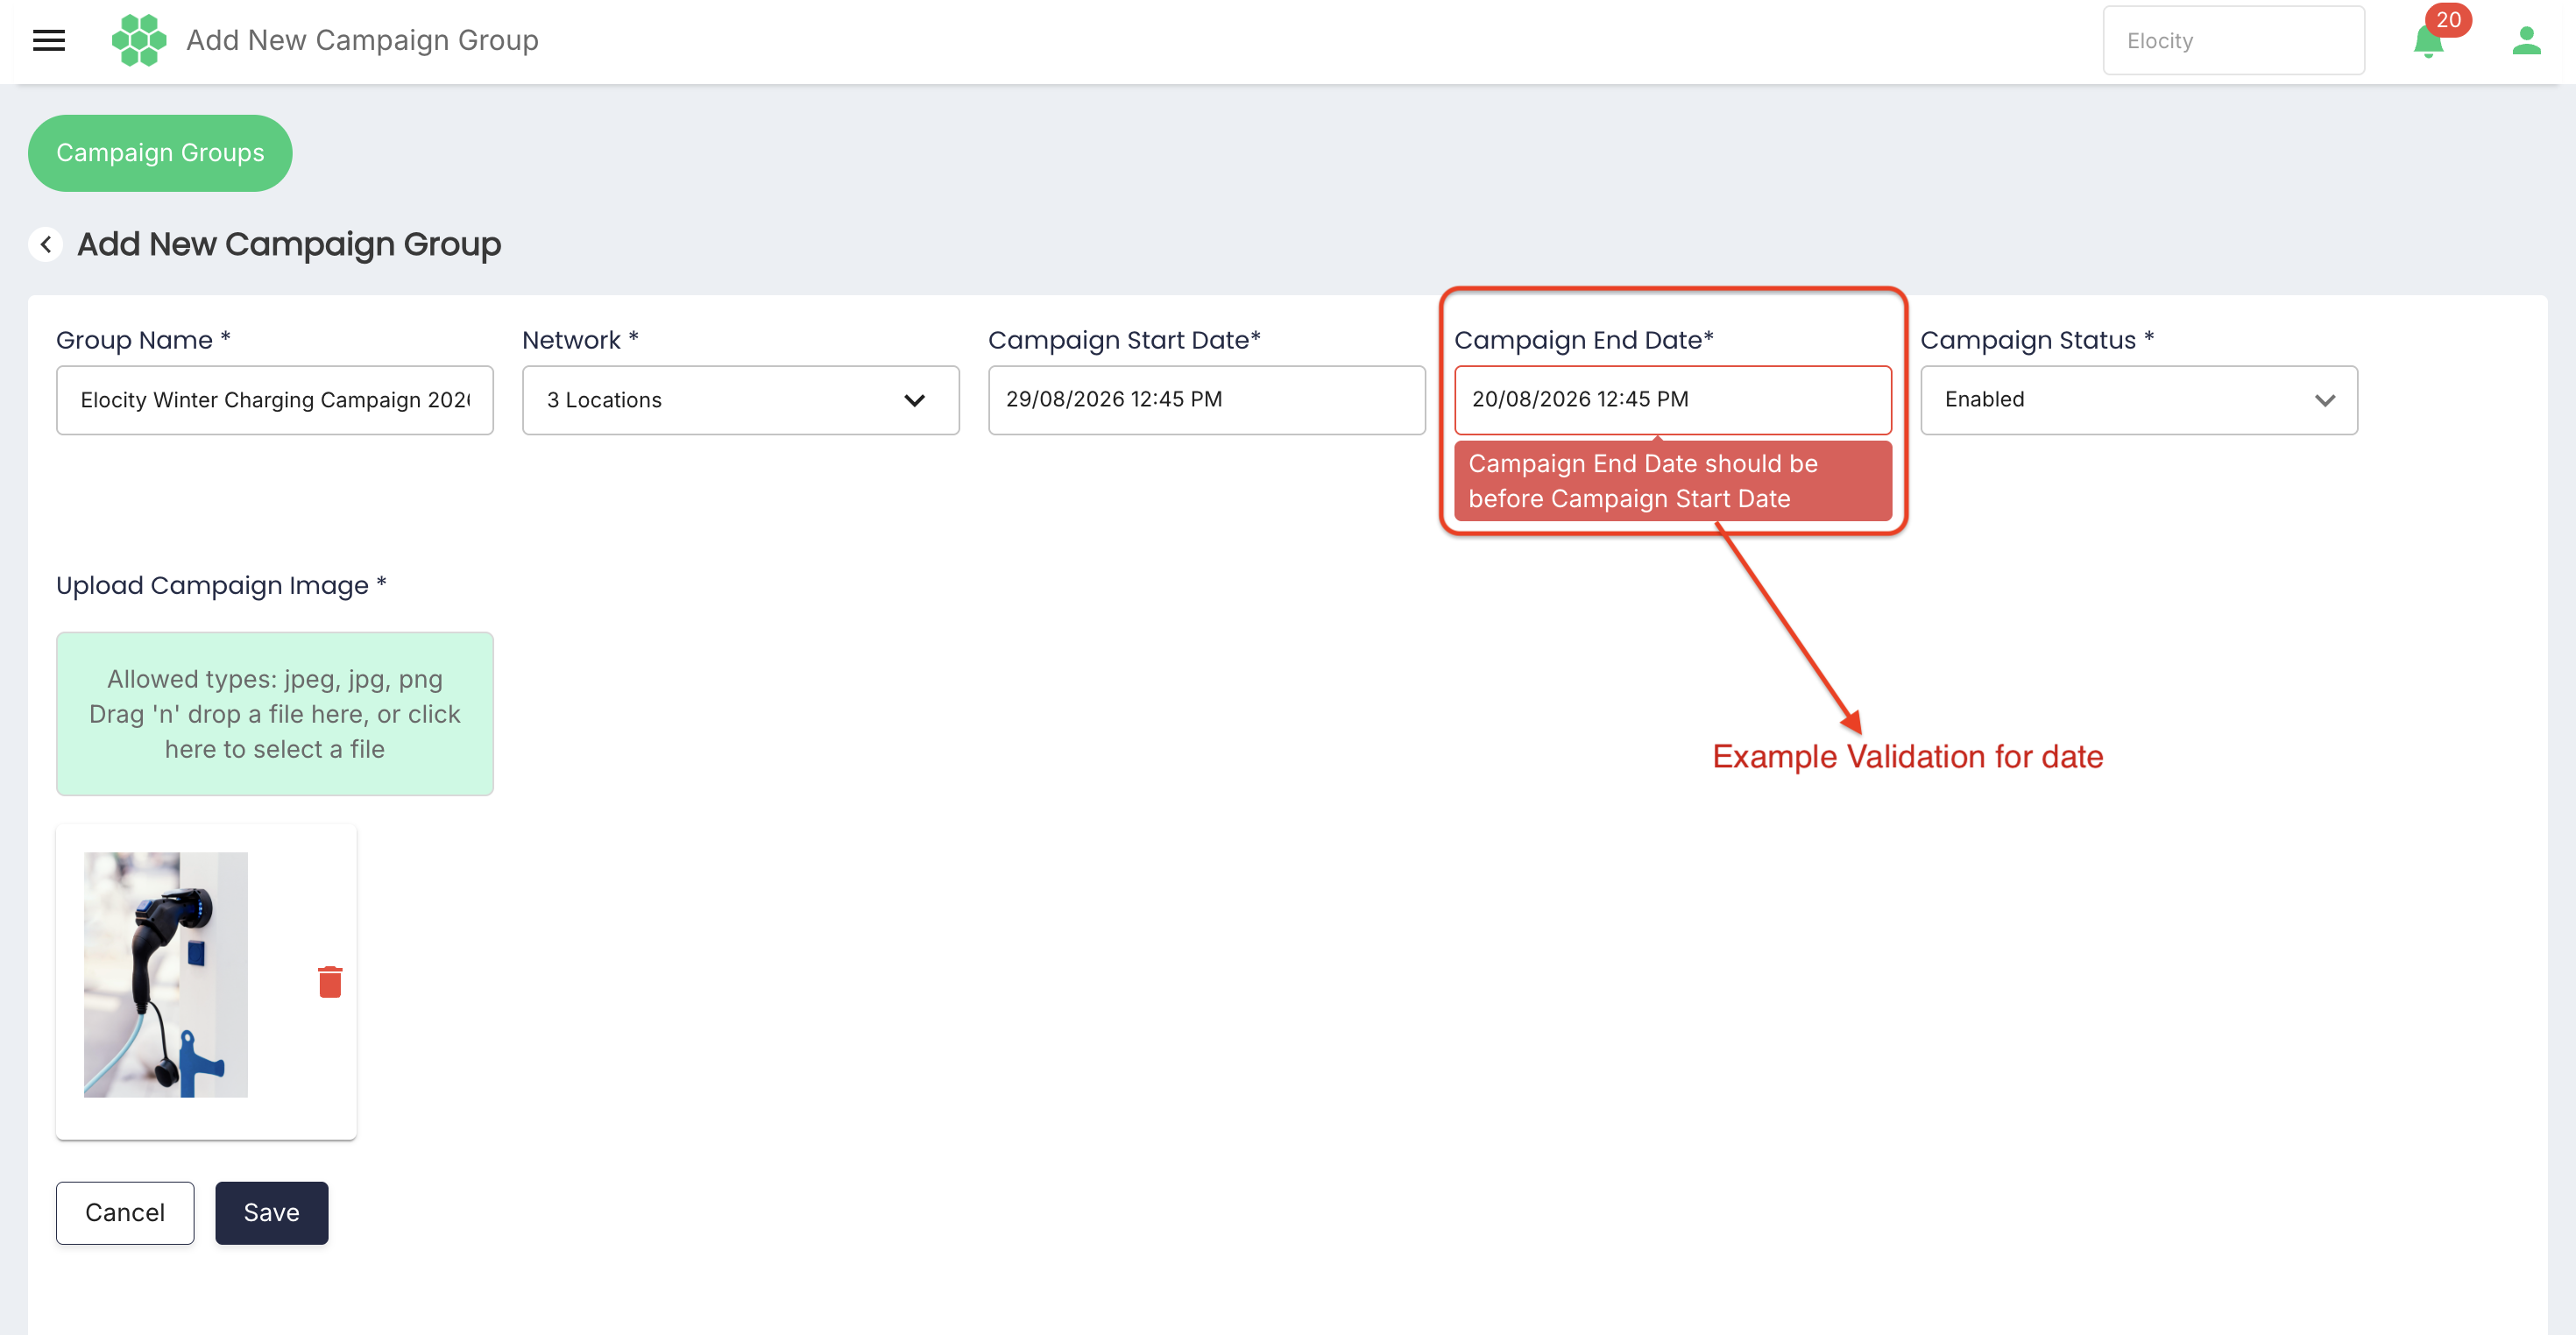 Examples of useful feedback include:
Campaign Start Date is required.Campaign End Date must be later than Campaign Start Date.The selected date is outside the allowed campaign range.This campaign overlaps an enabled campaign for one or more selected locations.
The supplied requirement defines these rules; exact date-error text and acceptable ranges were not exercised in the live form to avoid creating or modifying campaign data.
9. Image validation and secure storage
9.1 Upload validation
The system should:
- Accept only JPEG, JPG, and PNG files.
- Validate the file's actual content type, not only its extension.
- Reject files that exceed the configured size or dimension limit.
- Reject corrupt or unsafe content.
- Remove or safely handle unnecessary metadata.
- Generate a unique storage reference to prevent filename collisions.
- Display clear success or failure feedback.
- Show the selected filename or preview before Save.
9.2 Secure storage
Uploaded images should be:
- Stored in approved protected object or media storage.
- Encrypted in transit and at rest according to platform policy.
- Accessible only through authorized services and users.
- Associated with the correct business and campaign identifier.
- Protected from cross-business access.
- Retained or deleted according to audit and data-retention policy.
- Delivered to invoice generation using a controlled reference rather than an untrusted external path.
The live screen verifies the upload control and allowed formats. Storage implementation and security controls are system requirements and are not visible to the end user.
10. View and edit a campaign
- Open Campaign Groups.
- Search for the campaign if required.
- Select exactly one campaign row.
- Select View/Edit.
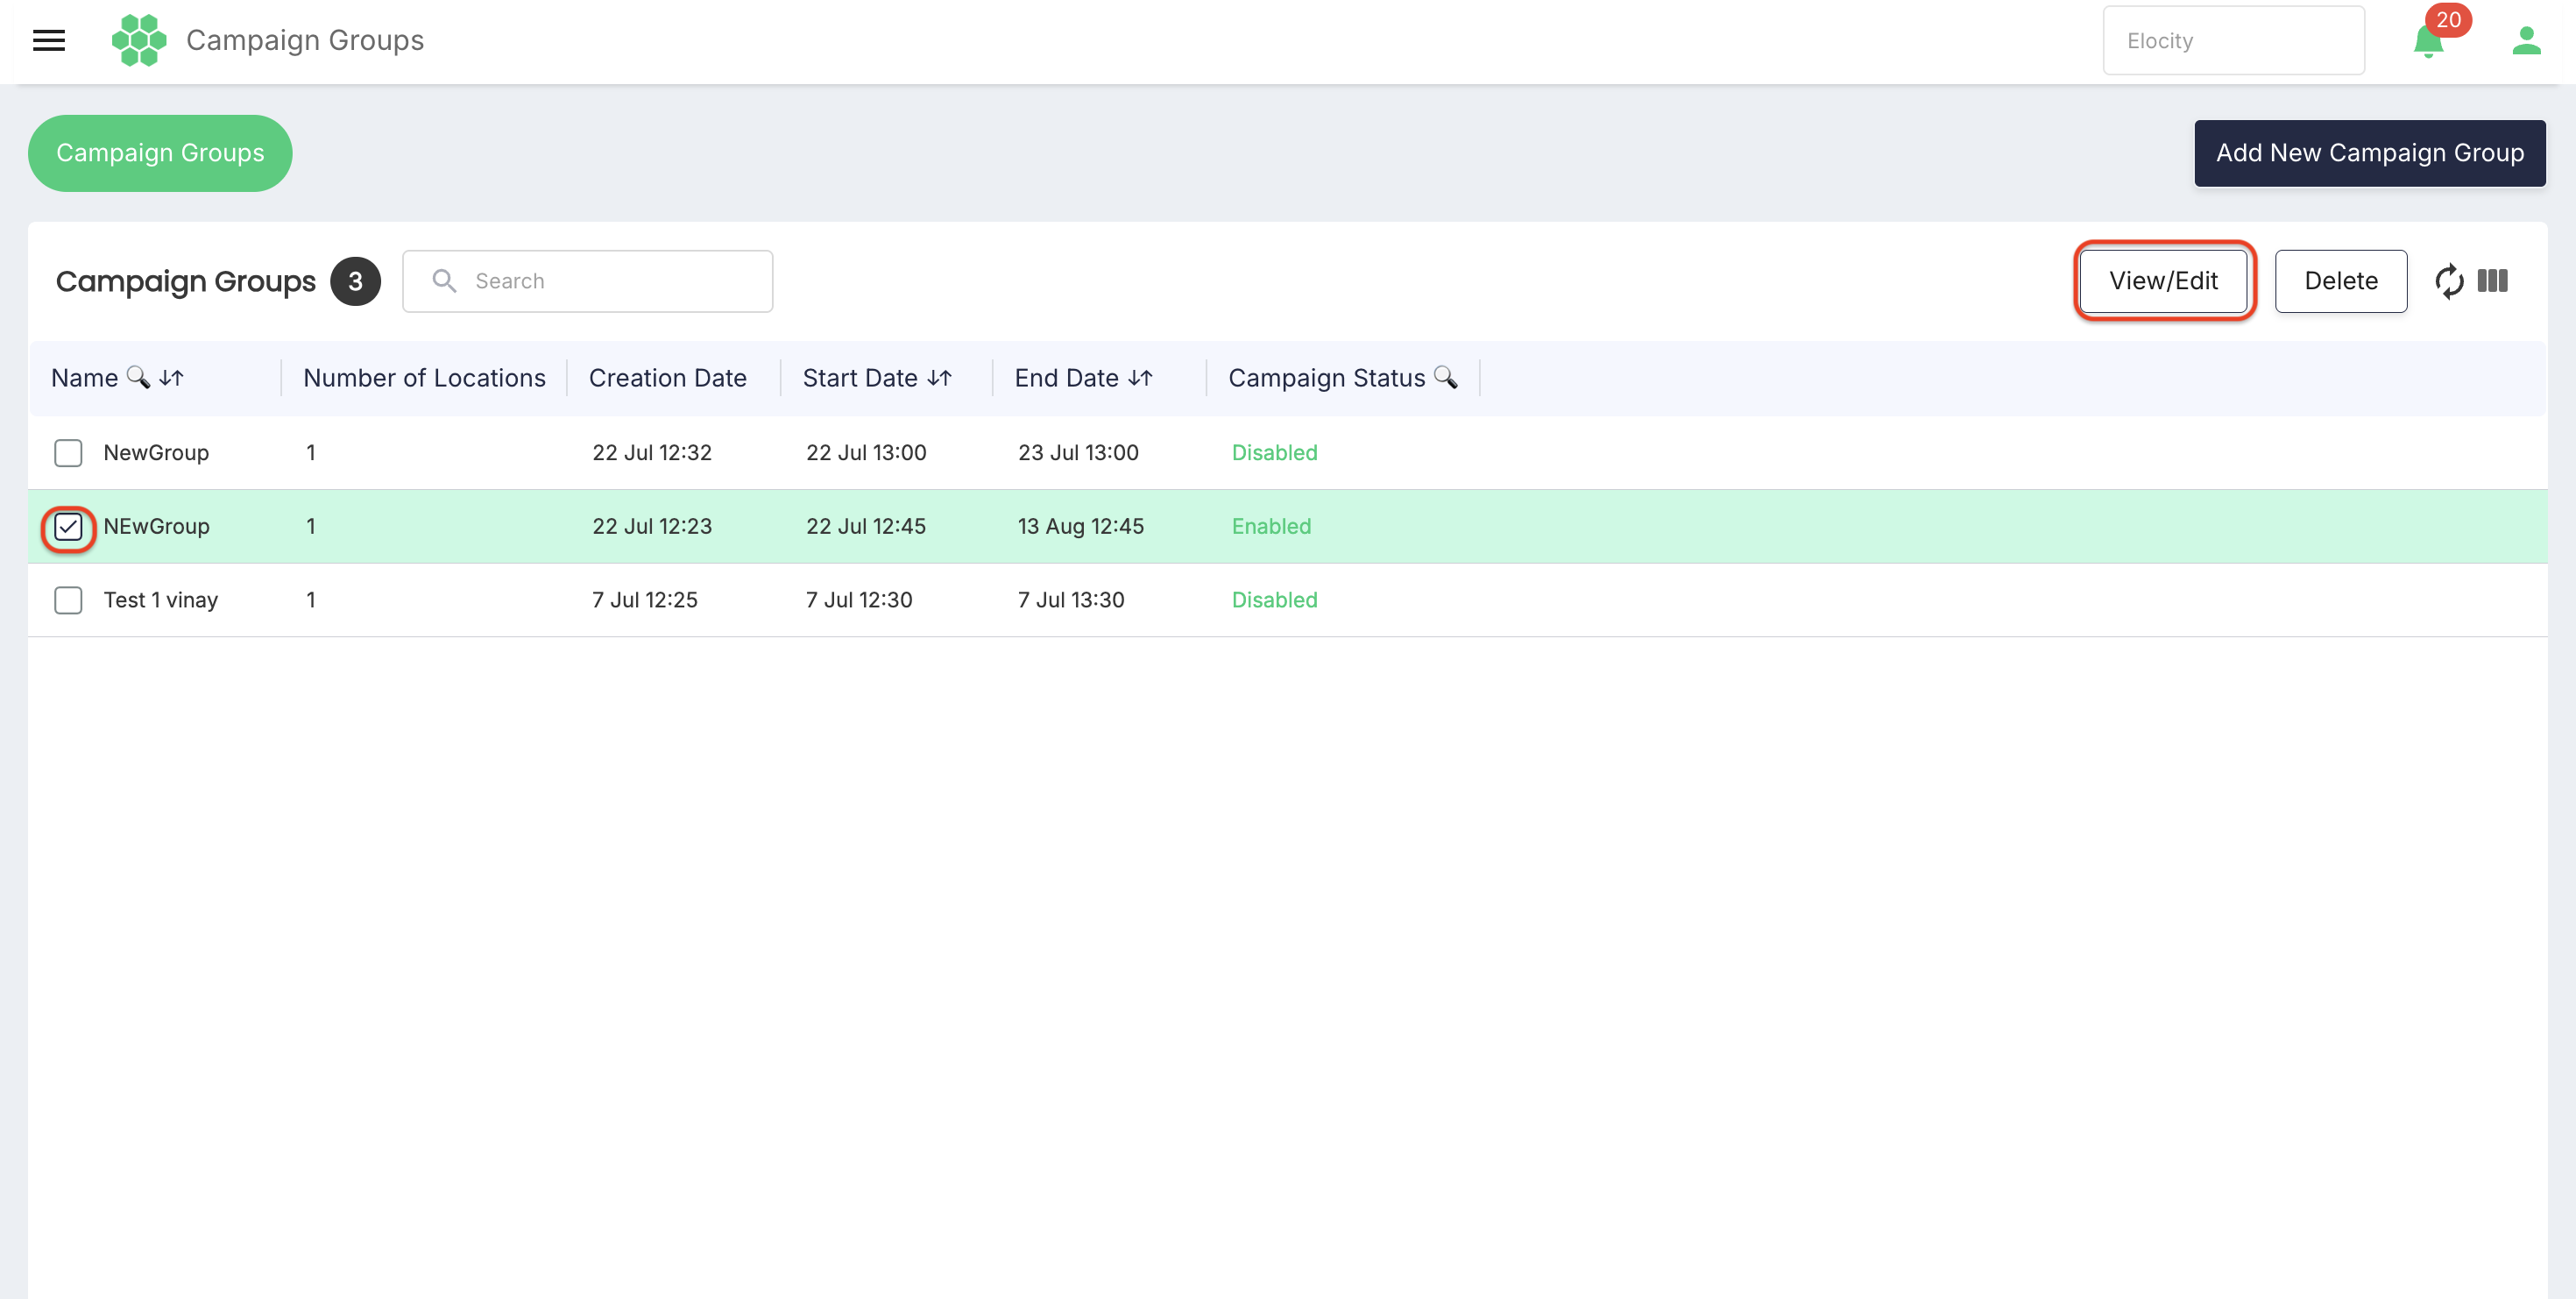
- Review the group name, locations, start and end dates, status, and image.
- Enter edit mode if the screen initially opens read-only.
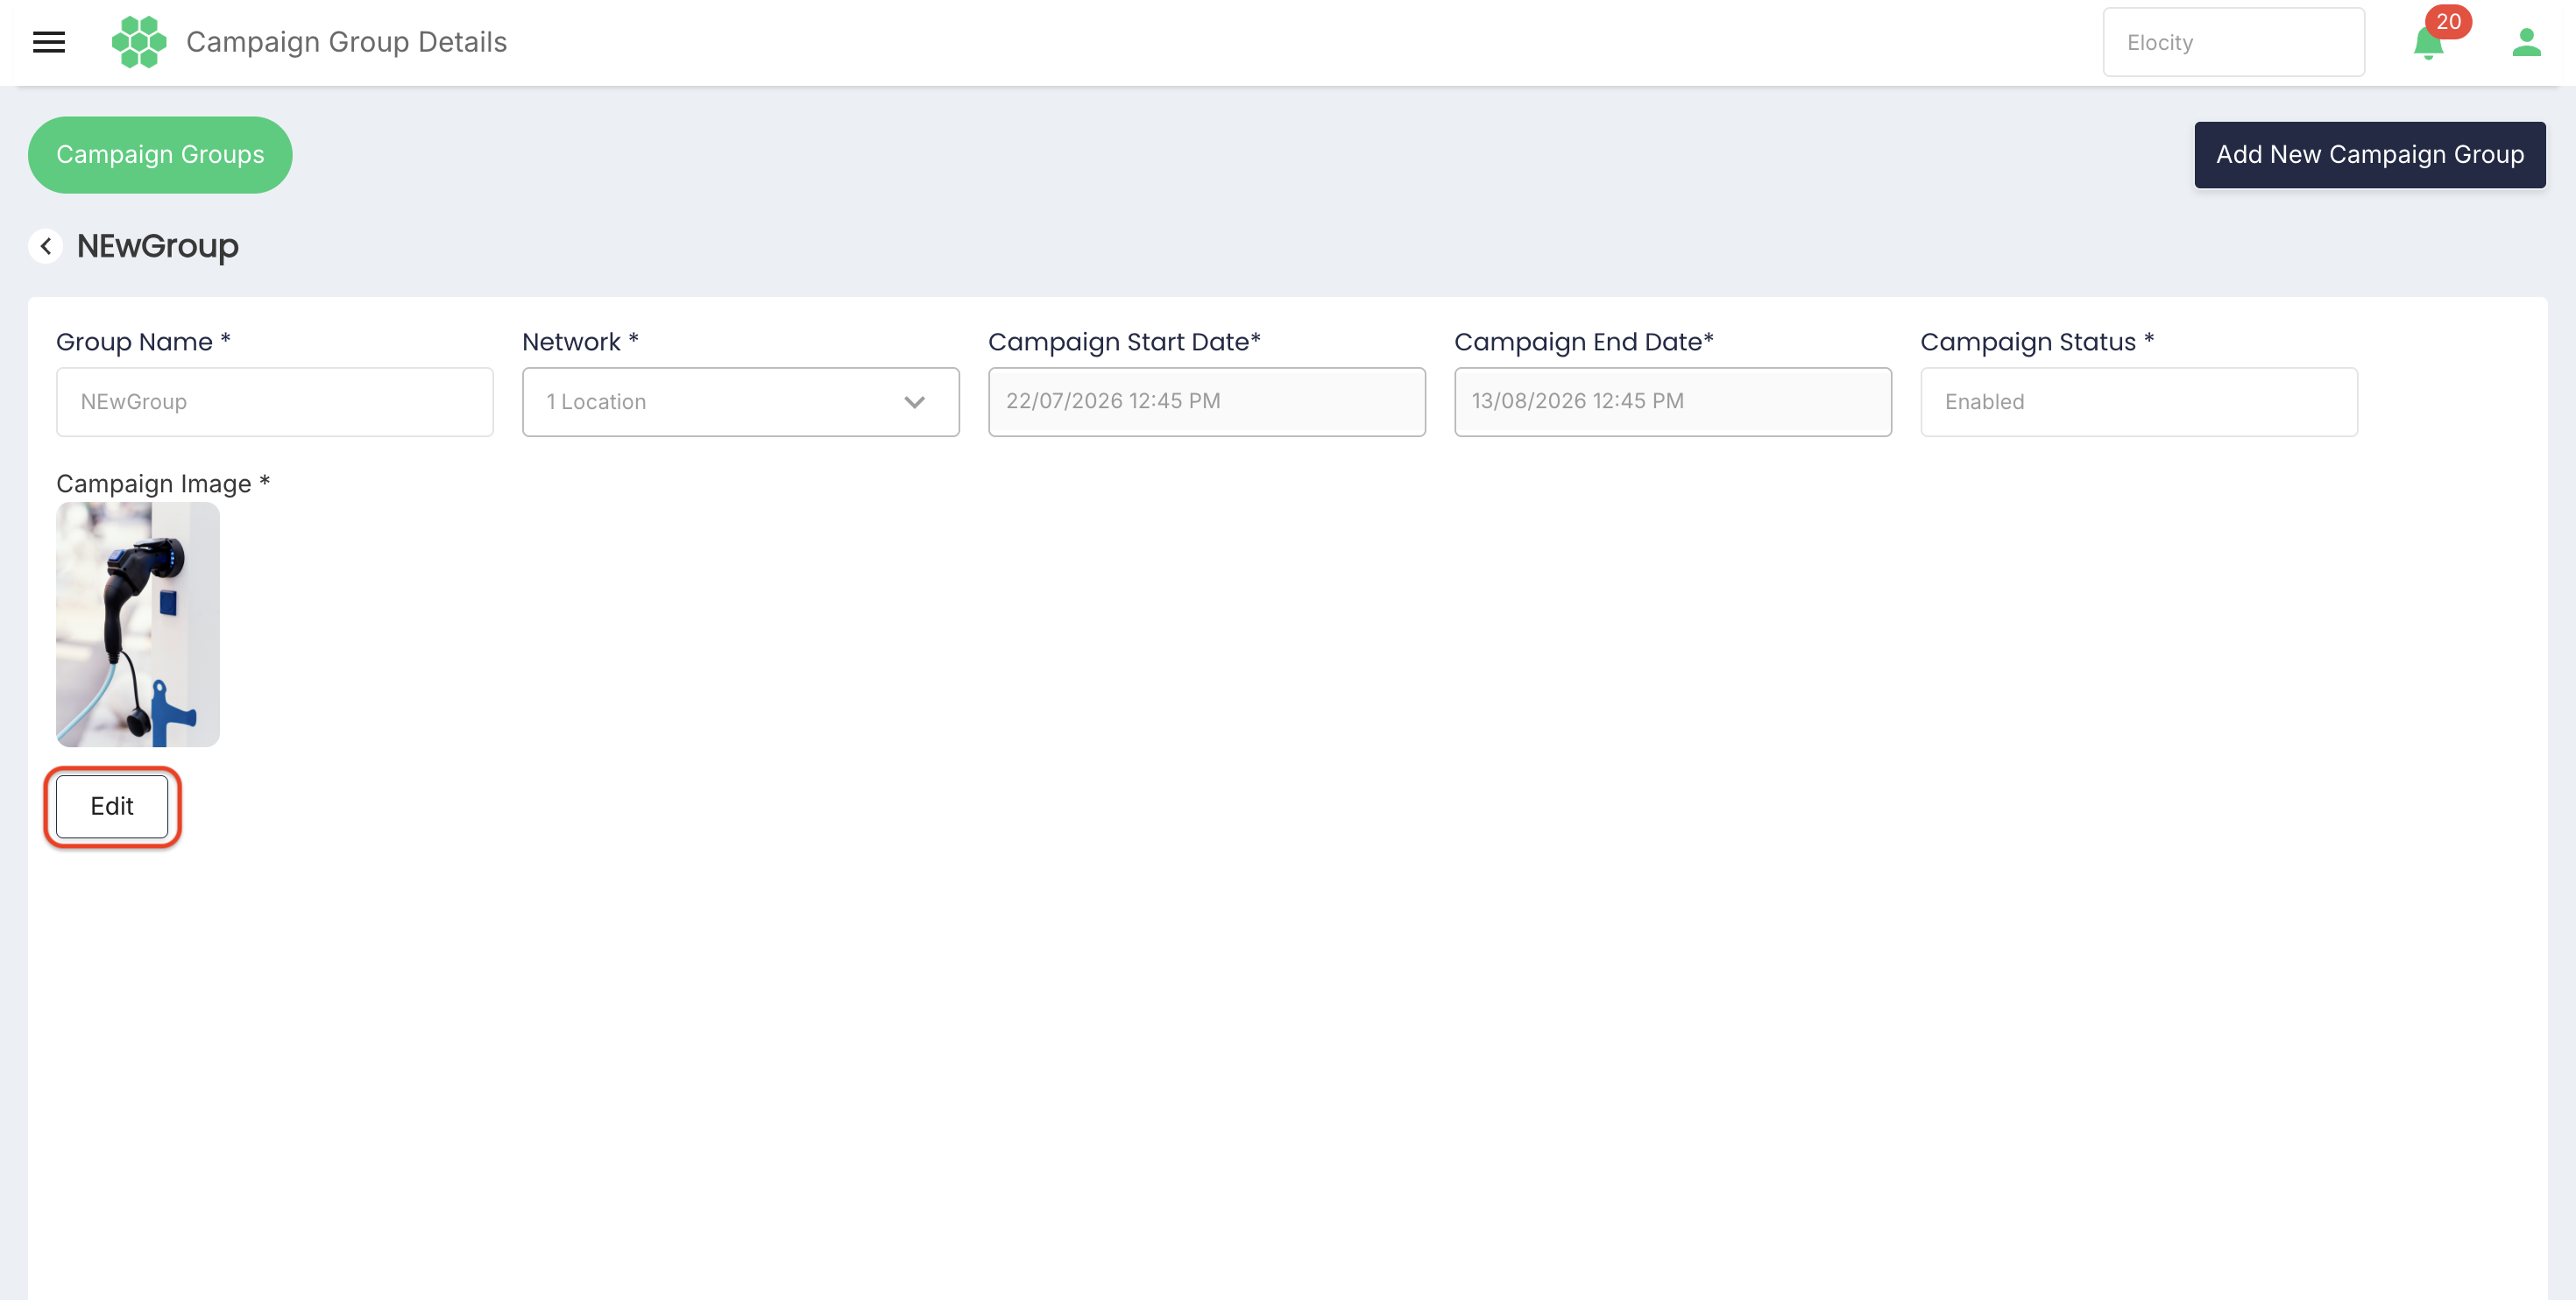
- Make the approved changes.
- Recheck invoice impact and select Save or Update.
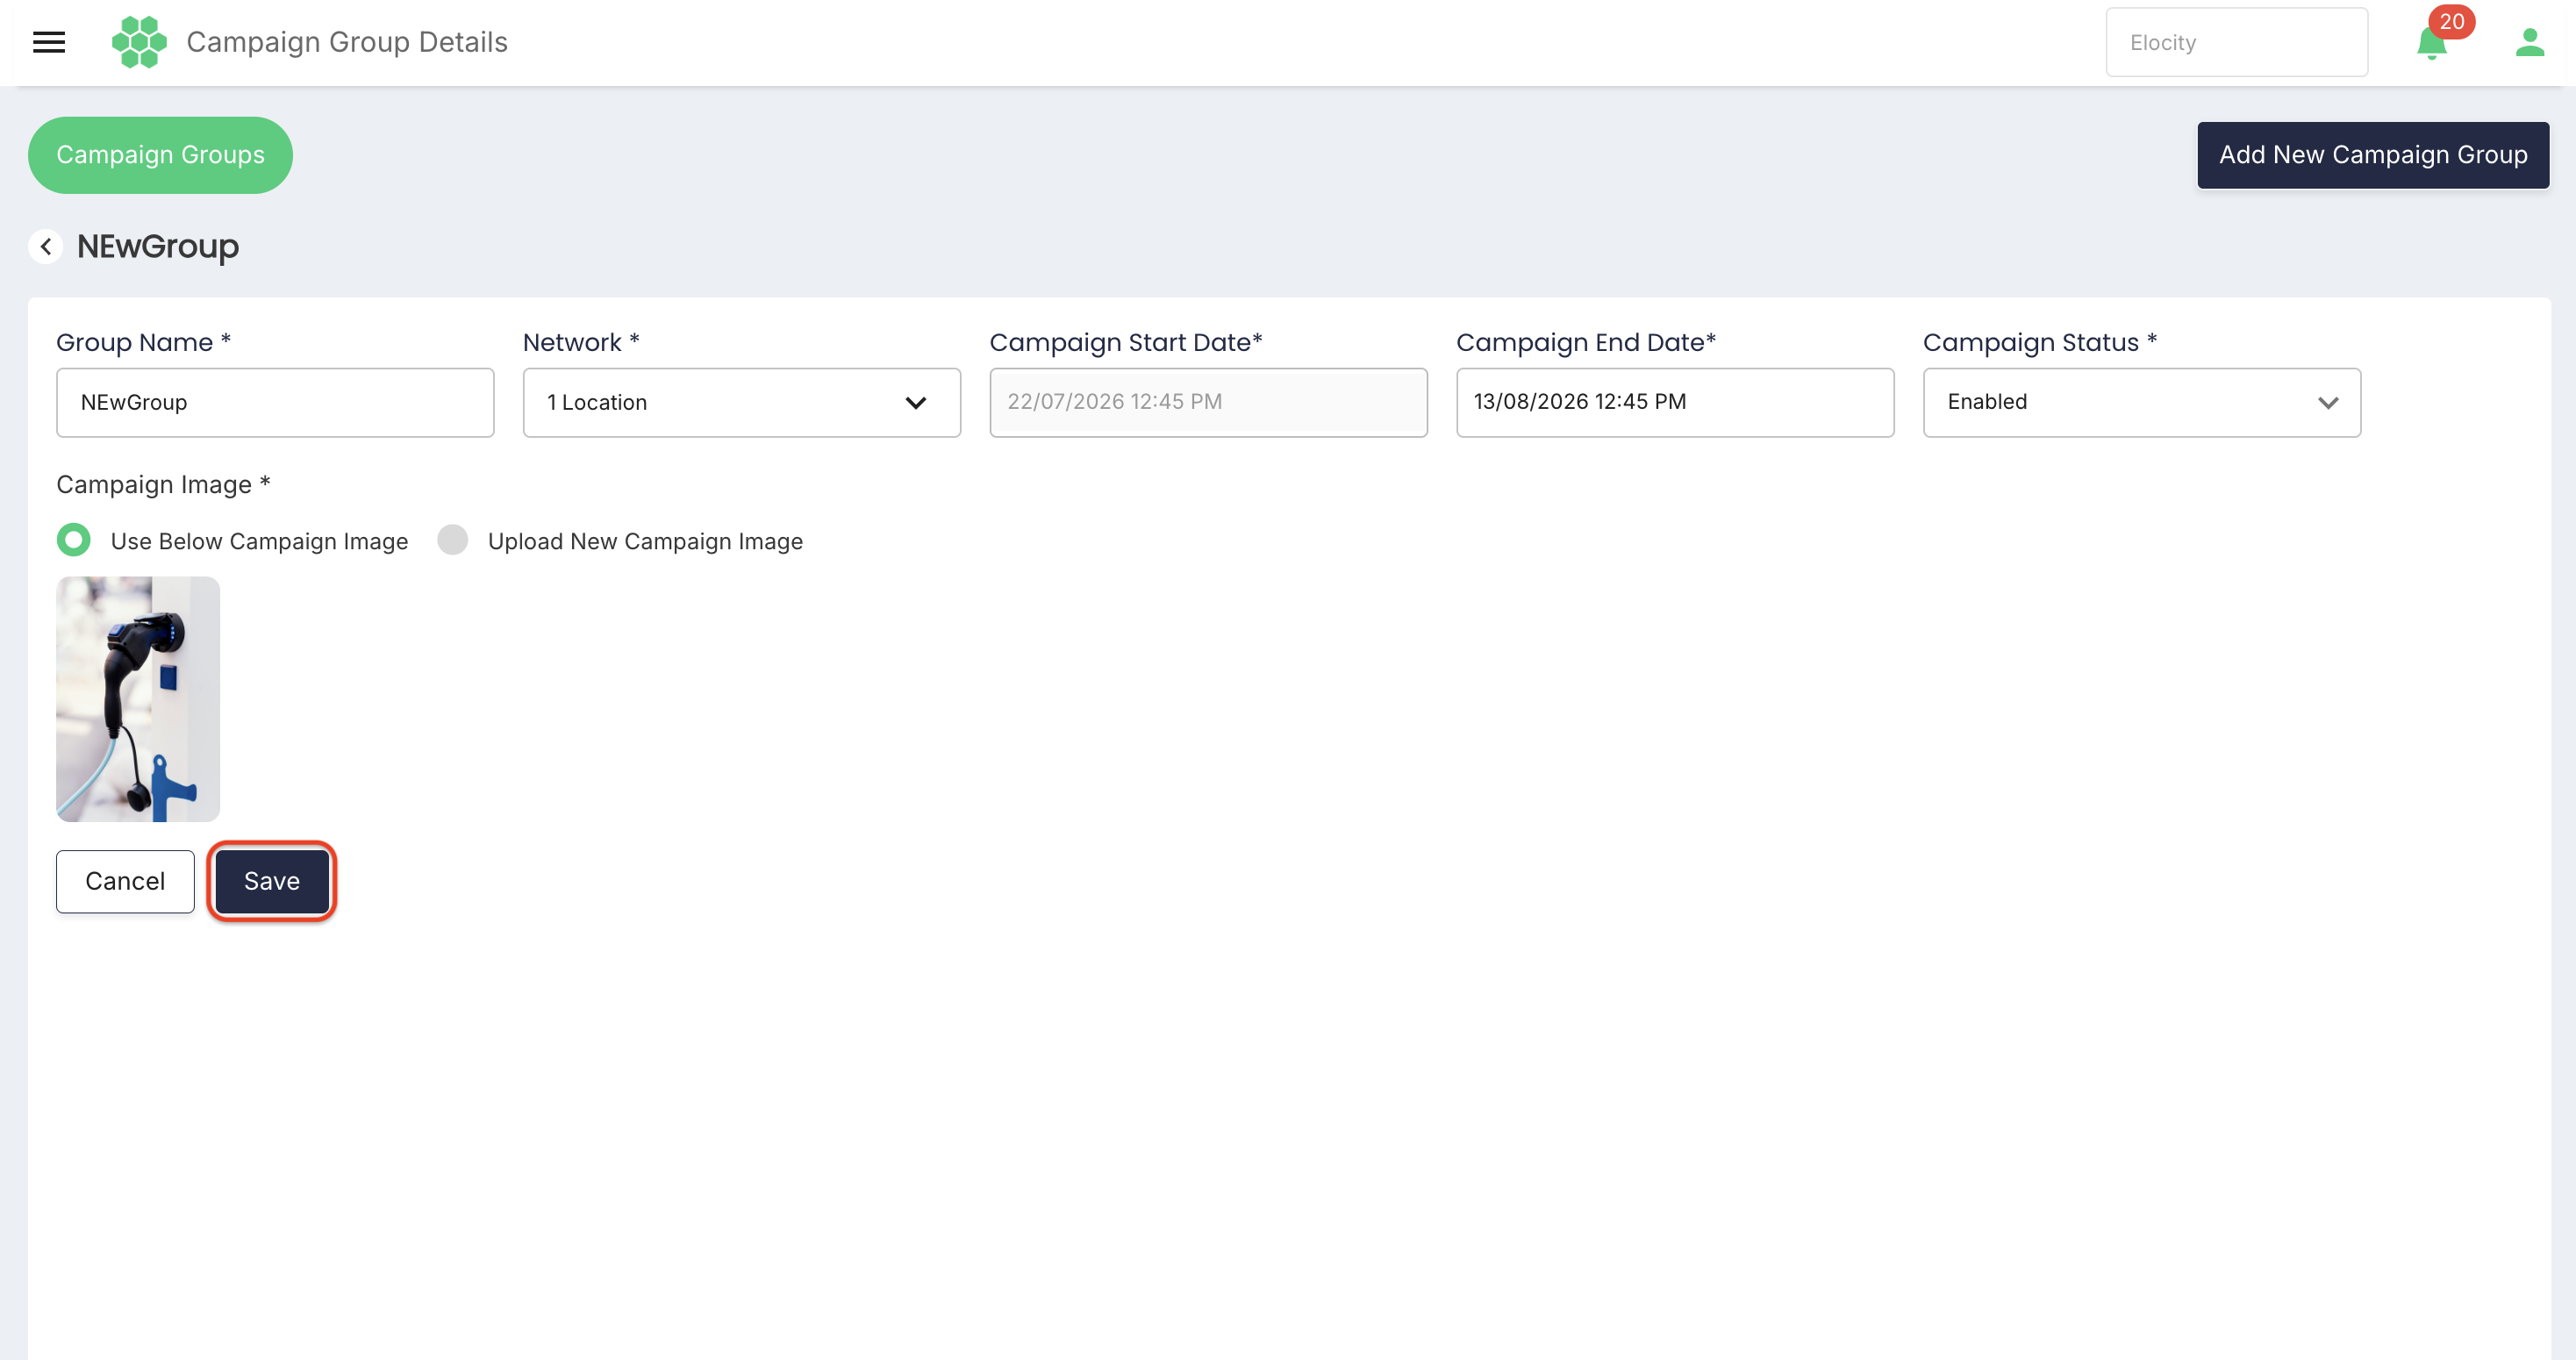
If locations, dates, or the image change during an active campaign, test an affected invoice after the change. Existing invoices should remain unchanged unless the product explicitly supports regeneration.
11. Disable or delete a campaign
11.1 Disable
Use Disabled when the campaign should stop applying but its record must remain available.
- Select the campaign and open View/Edit.
- Change Campaign Status to Disabled.
- Save the change.
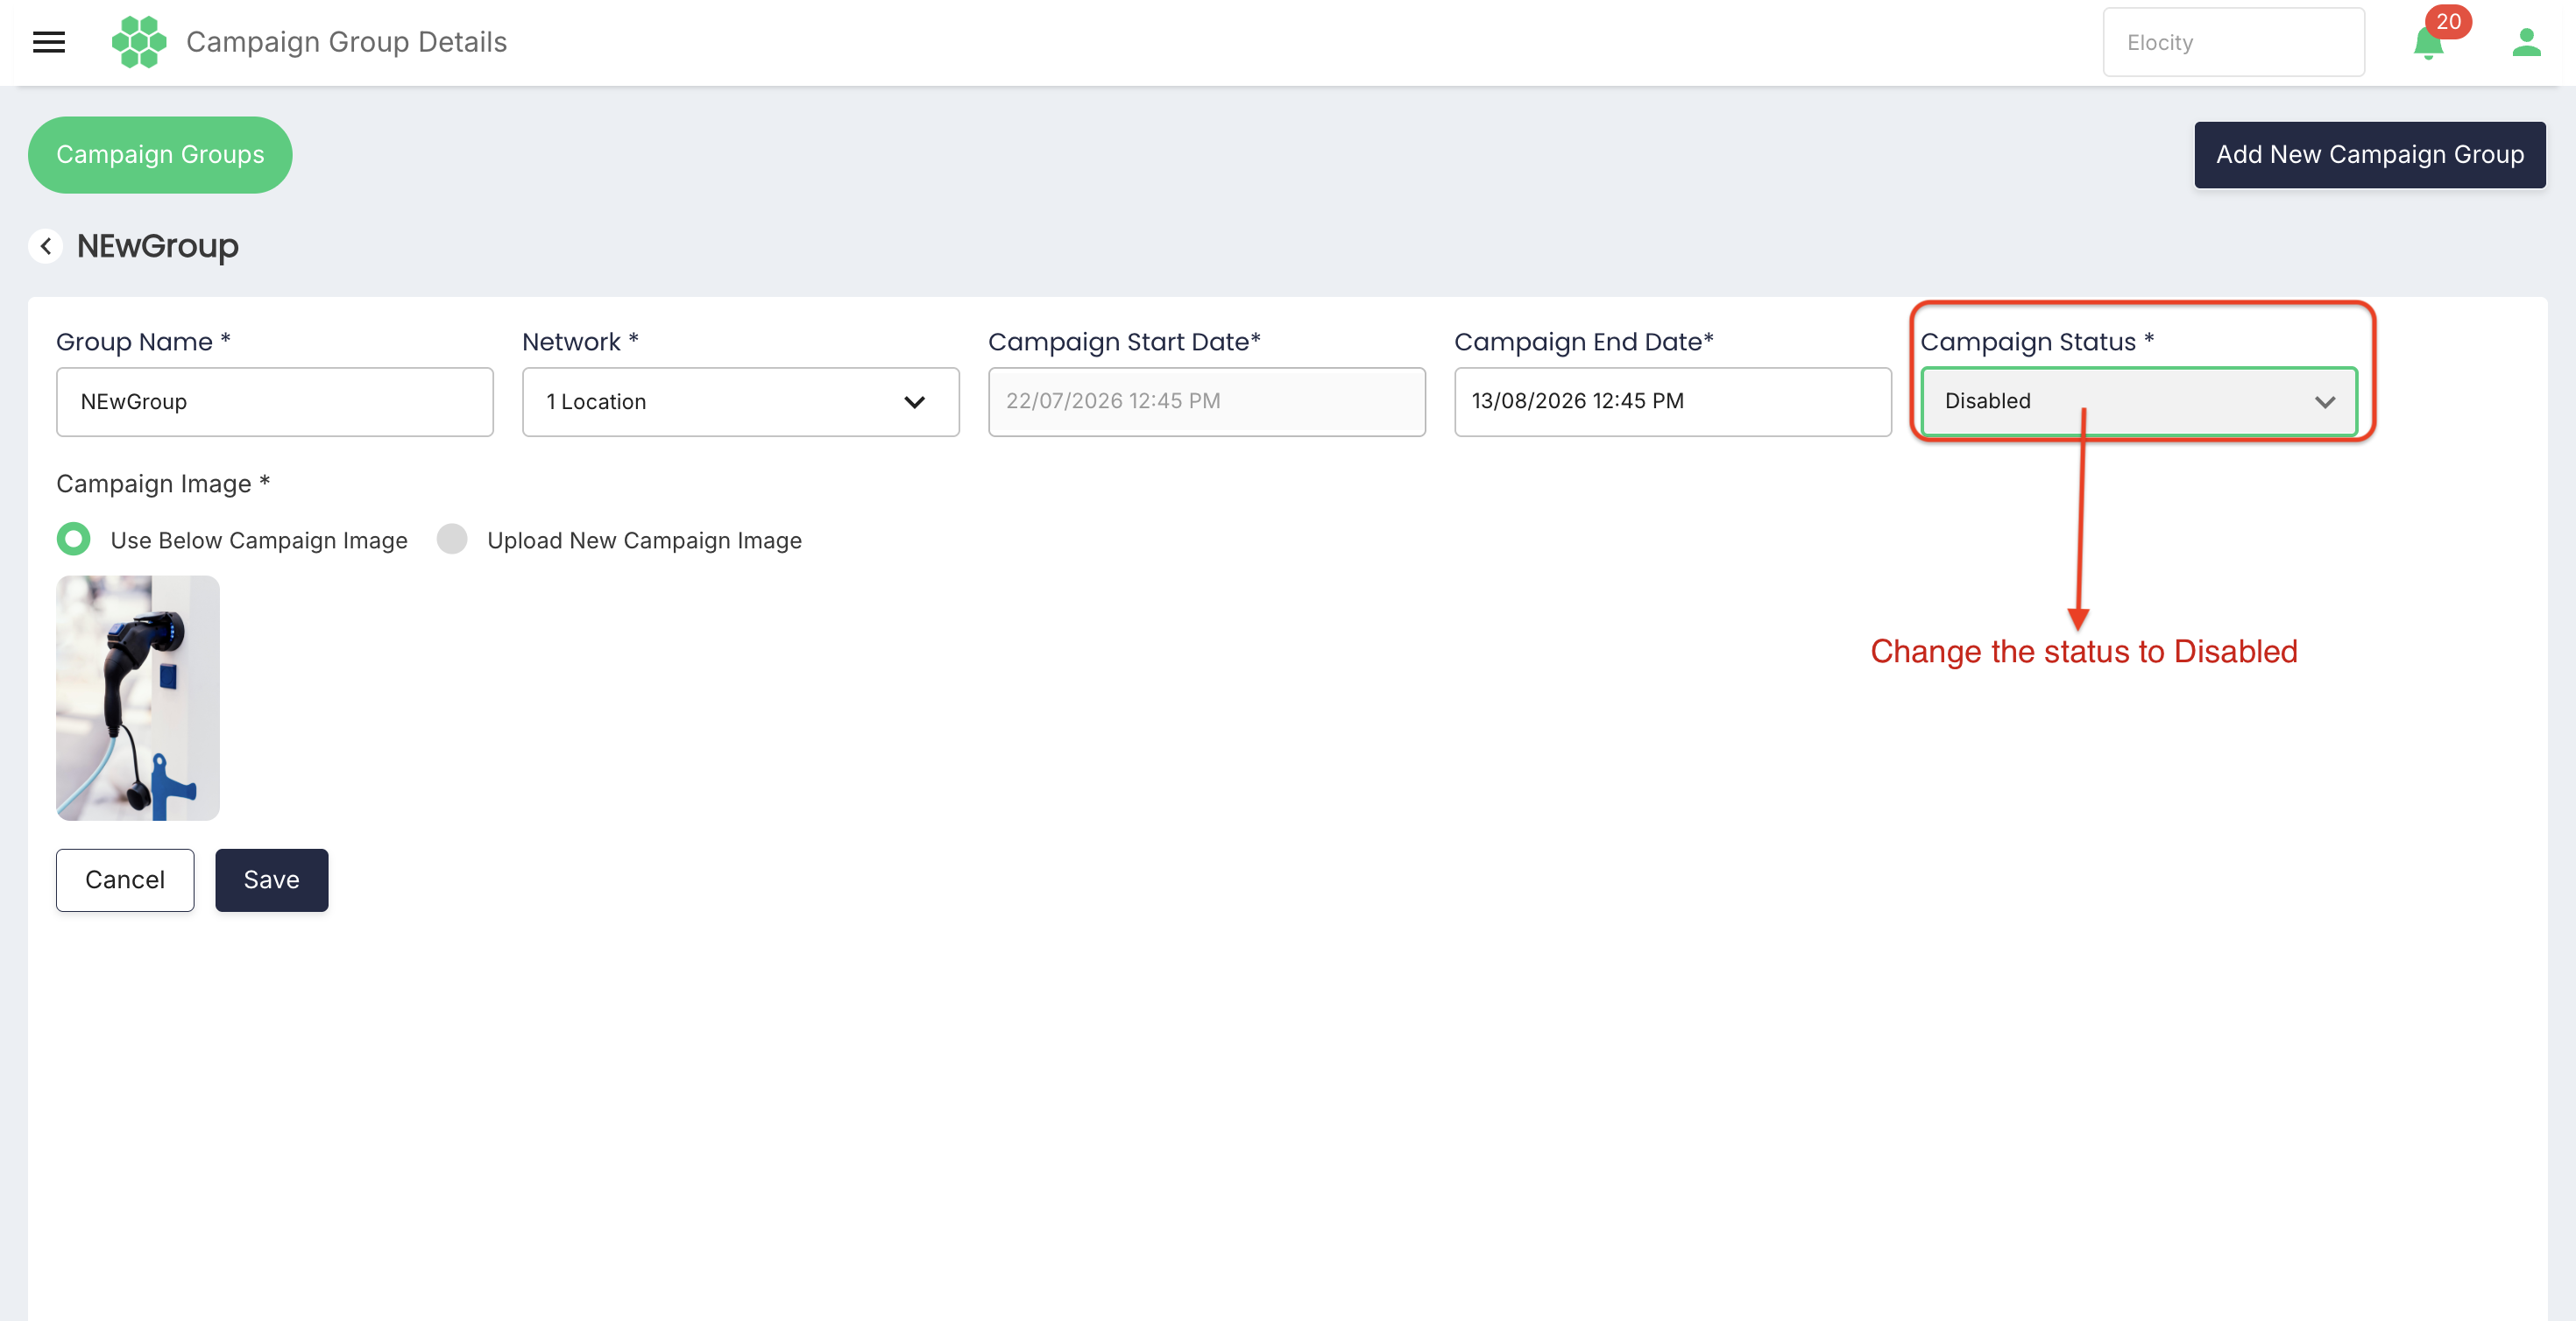
- Confirm through Refresh that the new status is displayed.
11.2 Delete
- Select the campaign in Campaign Groups.
- Select Delete.
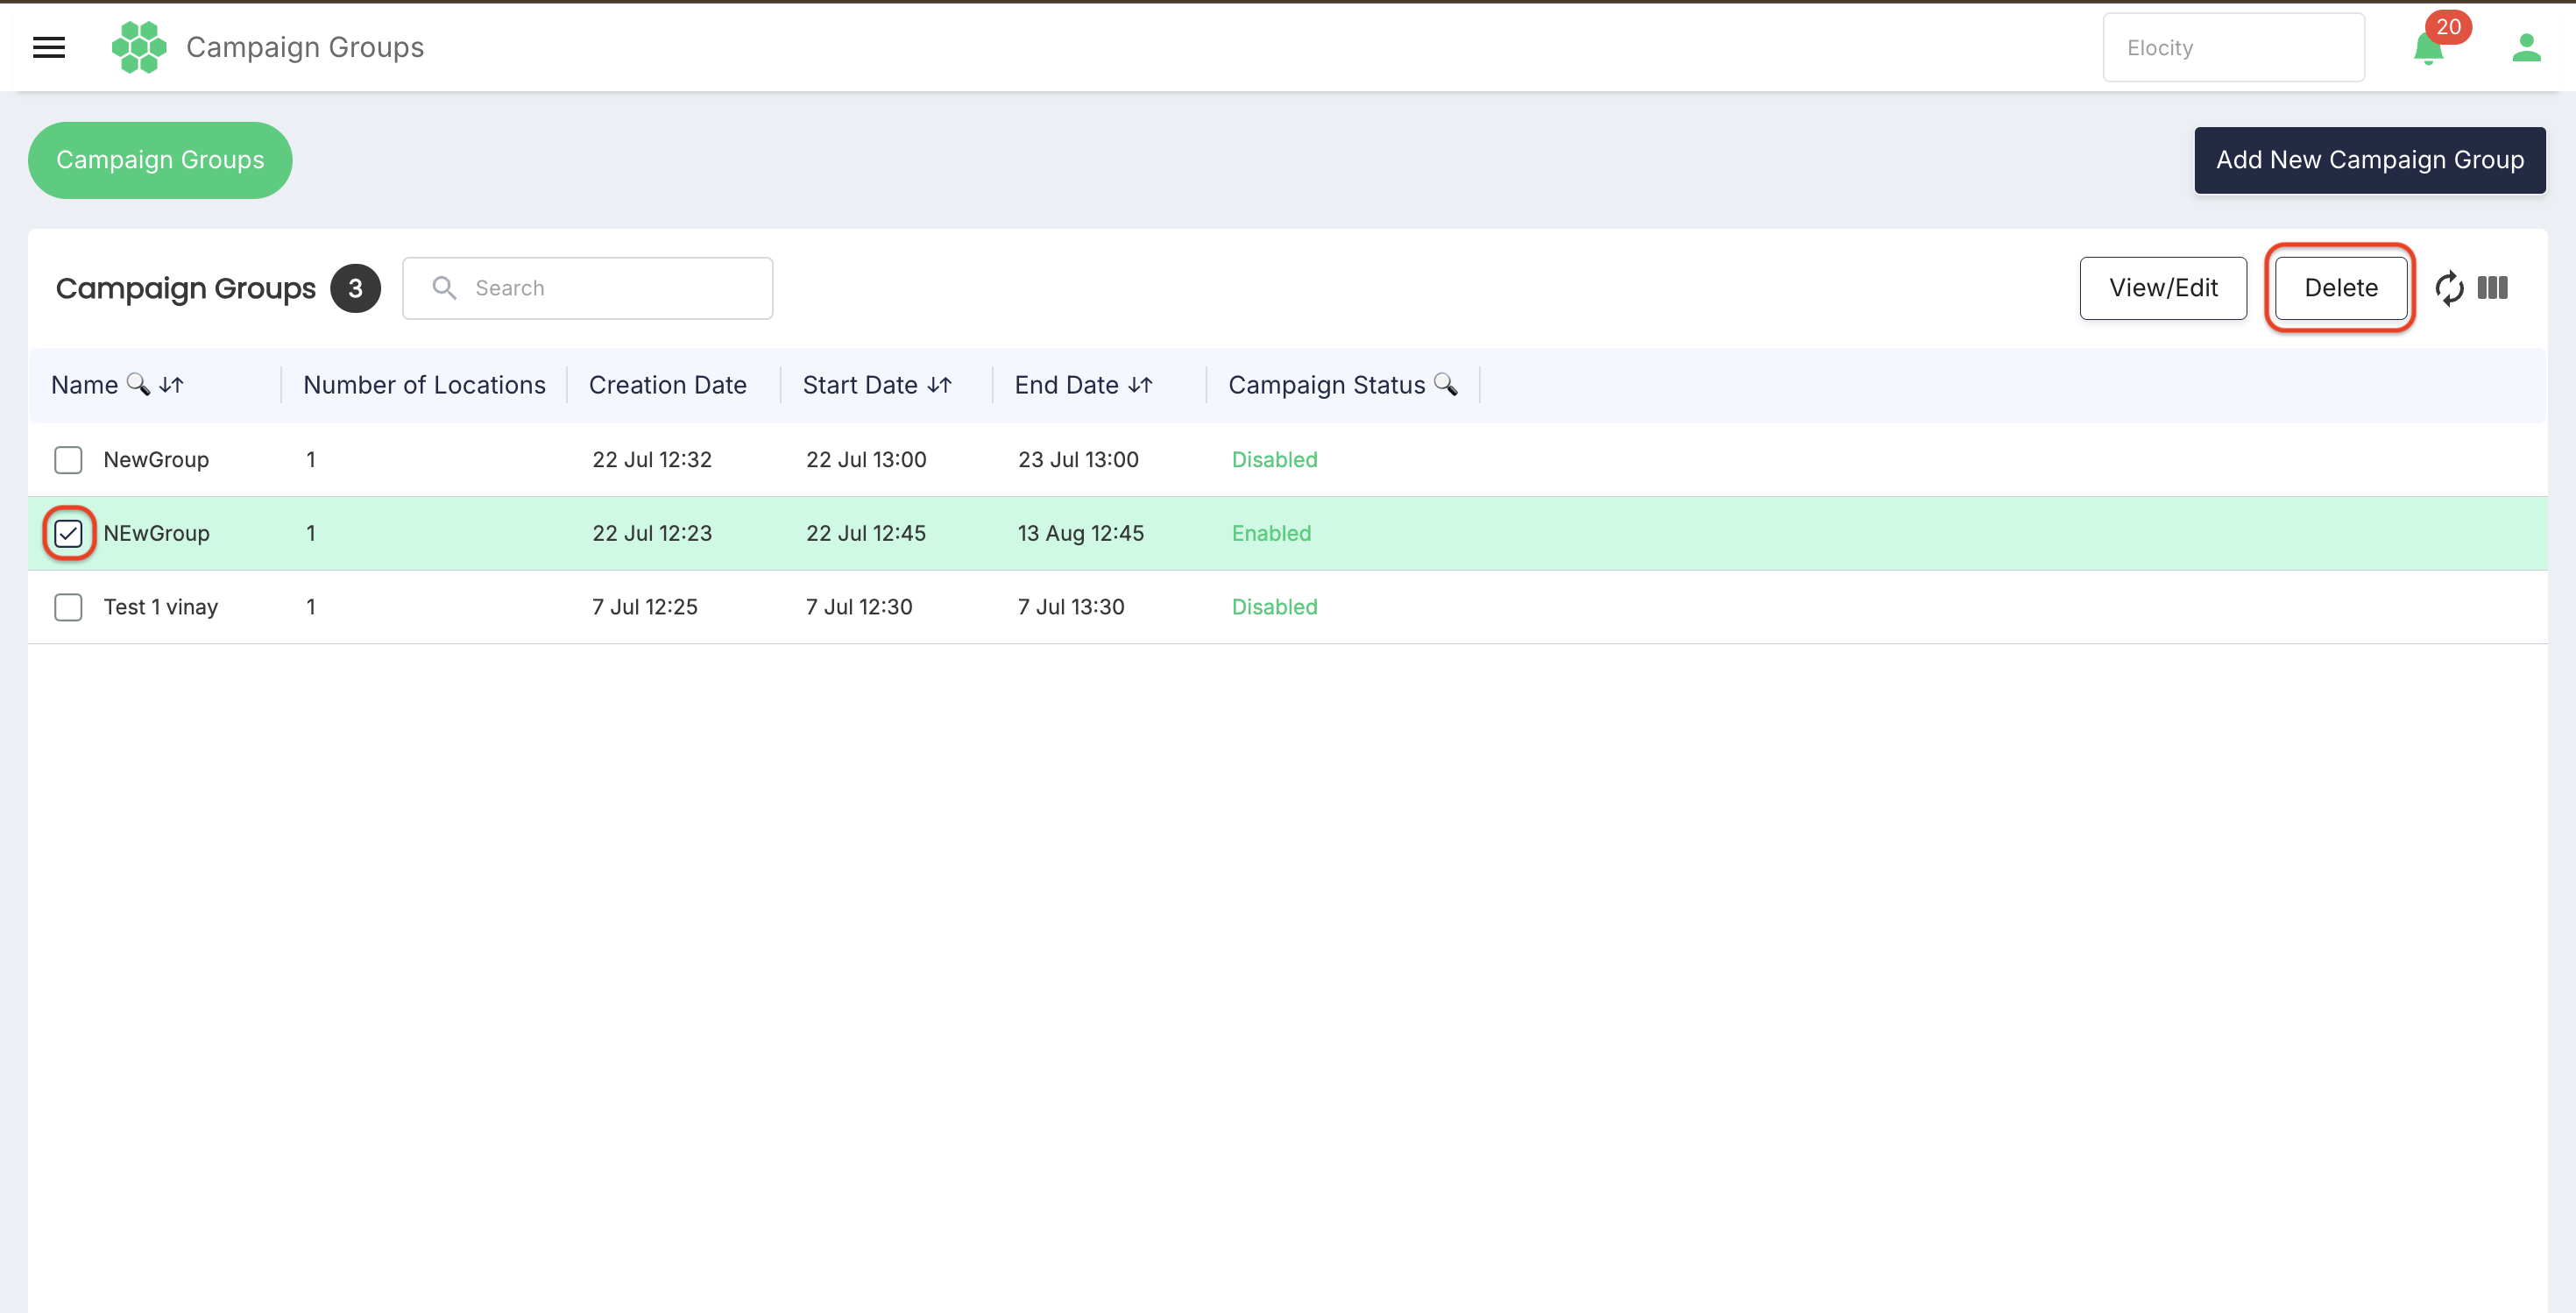
- Review the confirmation prompt and affected scope.
- Confirm only when deletion is approved and the record is no longer needed.
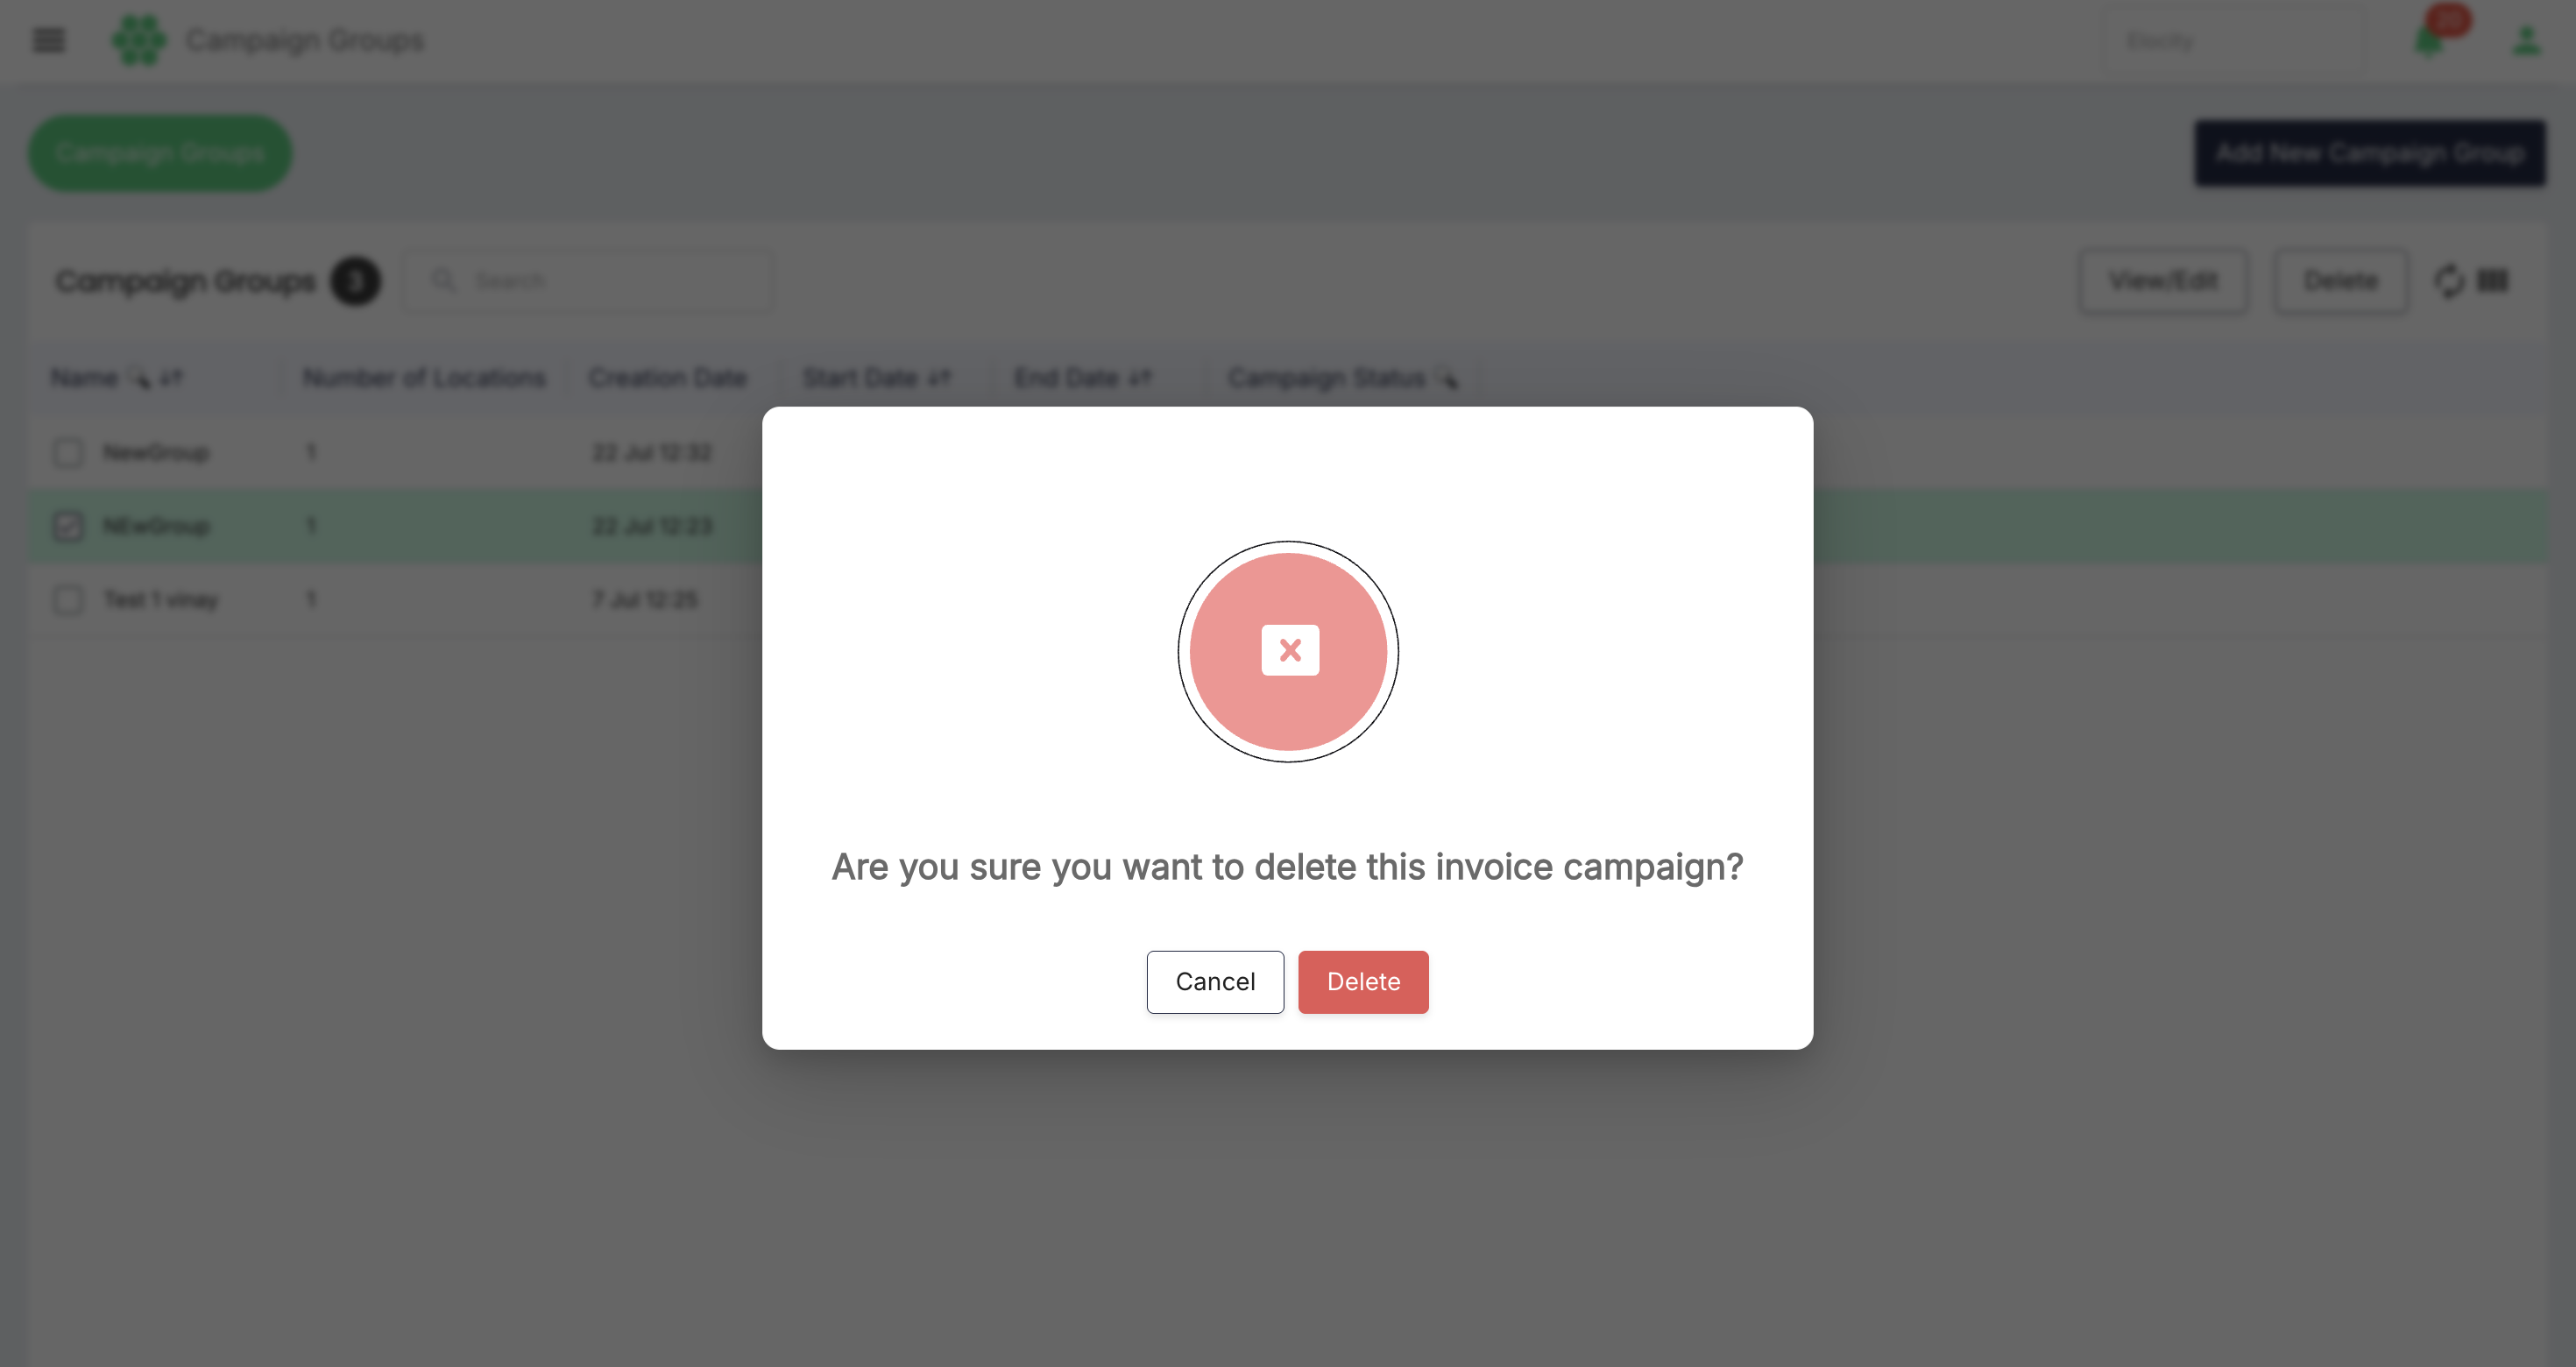
- Refresh the list and verify removal.
Deletion should be blocked or warned when the campaign is active, referenced by invoice processing, or required for audit history.
12. Invoice-template integration
Campaign details should be integrated into invoice generation using the following eligibility flow:
- Determine the invoice's business and charging location.
- Find enabled campaigns associated with that location.
- Check whether the applicable invoice date falls within the campaign start and end dates.
- Resolve conflicts if more than one campaign is eligible.
- Retrieve the securely stored image.
- Render it in the configured marketing section of the invoice template.
- Record the applied campaign identifier for audit and troubleshooting.
12.1 Marketing section content
The invoice template should support a configurable marketing section containing some or all of:
- Campaign image.
- Campaign or promotion title.
- Optional supporting text.
- Optional terms or disclaimer.
- Optional call-to-action text, QR code, or approved URL.
- Campaign validity dates when required.
12.2 Template customization
Depending on business needs, an authorized template administrator should be able to configure:
- Whether the marketing section is enabled.
- Its page and position.
- Image width, height, scaling, and alignment.
- Supporting text and styles.
- Visibility rules by business, location, language, or invoice type.
- Fallback behaviour when no campaign is eligible or the image cannot be loaded.
- Priority rules when multiple campaigns match.
Invoice-template customization and campaign rendering are downstream capabilities; they are not controls displayed on the reviewed Campaign Groups form.
12.3 Recommended conflict rules
If multiple enabled campaigns match the same invoice, the configured business rule should do one of the following:
- Apply the campaign with the highest priority.
- Apply the most recently created campaign.
- Allow multiple campaign sections where the template supports them.
- Block overlapping campaigns during validation.
The chosen rule should be deterministic and visible to administrators.
13. Verification after campaign creation
After saving an enabled campaign:
- Confirm that the Campaign Groups row shows the correct name, location count, status, start date, and end date.
- Generate a test invoice for a selected location and an in-range date.
- Confirm that the correct campaign image appears in the configured marketing section.
- Confirm that image quality, scaling, alignment, and page breaks are acceptable.
- Generate a test invoice for an unselected location; the campaign should not appear.
- Test an invoice date before Start Date and after End Date; the campaign should not appear.
- Disable the campaign and confirm it is no longer applied to new invoices.
- Retain test evidence according to the release or campaign-approval process.
14. Common use cases
14.1 Regional promotion
Create a campaign for selected Ontario locations, upload the approved PNG banner, define the promotional period, test the invoice, and enable the campaign.
14.2 Reuse a predefined location group
Select a previously maintained location group, verify its current membership, add the campaign dates and image, and save the campaign without selecting every location individually.
14.3 Prepare a future campaign
Create the campaign as Disabled, upload and validate its image, test the customized invoice template, then enable it after final approval.
14.4 End a campaign early
Open the campaign, set its status to Disabled or adjust its End Date according to policy, save, and verify that subsequent invoices do not include the content.
15. Troubleshooting
| Issue | Likely cause | Resolution |
|---|---|---|
| Network cannot be empty | No location was selected. | Reopen Select Locations, choose at least one valid location, and select Done. |
| Done is disabled | The location picker has no valid selection. | Select a country branch, province, region, or individual location. |
| Image is rejected | File format, content, size, dimensions, or security validation failed. | Use an approved JPEG, JPG, or PNG file that meets configured limits. |
| Upload success is not shown | Upload is incomplete or validation failed. | Wait for completion, review the error, and retry with a valid file. |
| Date is rejected | It is missing, invalid, outside the allowed range, or End is not later than Start. | Correct the values and confirm the business time zone. |
| View/Edit or Delete is disabled | No campaign row is selected. | Select exactly one row. |
| Campaign does not appear in the list | Save failed, filters are active, or the wrong business is selected. | Check feedback, clear filters, confirm business context, and select Refresh. |
| Campaign image is absent from invoice | Campaign is disabled, location/date does not match, template section is unavailable, or image retrieval failed. | Check status, eligibility, template configuration, and image reference; then generate a new test invoice. |
| Wrong campaign appears | Location association, dates, overlap, or priority rules are incorrect. | Review all eligible campaigns and apply the configured conflict rule. |
| Image is distorted on invoice | The aspect ratio or template dimensions are unsuitable. | Use the approved dimensions or update template scaling and retest. |
| Location group membership is outdated | Predefined group is static or has not refreshed. | Review and update group membership before campaign activation. |
16. Pre-save checklist
- Correct business account selected.
- Meaningful Group Name entered.
- Intended locations or approved location group selected.
- Selected-location count reviewed.
- Start Date and End Date valid and in the correct time zone.
- Campaign Status appropriate for the approval stage.
- Approved JPEG, JPG, or PNG image uploaded successfully.
- Image content, quality, dimensions, and branding reviewed.
- Campaign overlap and priority checked.
- Invoice marketing section configured.
- Test-invoice plan prepared.
17. Requirement coverage
| Requirement | Manual coverage | Reviewed-interface status |
|---|---|---|
| Upload marketing images | Sections 7.6 and 9 | Upload control verified |
| Support JPEG and PNG | Sections 6, 7.6, and 9 | JPEG, JPG, and PNG verified |
| Choose a group of target locations | Sections 7.2 and 7.3 | Hierarchical multi-location picker verified |
| User-friendly location management | Sections 5 and 7.2 | Selector and campaign list verified |
| Choose campaign start and end dates | Sections 6, 7.4, and 8 | Both fields verified |
| Validate dates and provide feedback | Section 8 | Required; exact date rules not exercised |
| Intuitive upload, location, and date controls | Sections 6 and 7 | Controls verified |
| Show upload success, locations, and dates | Sections 7 and 13 | Required feedback; locations and dates verified |
| Secure image storage and campaign association | Section 9 | System requirement; not visible in UI |
| Manage predefined location groups | Sections 7.3 and 14.2 | Requirement; separate management control not visible |
| Validate acceptable date ranges | Section 8 | Requirement; configured range not visible |
| Integrate campaign content into invoice | Section 12 | Downstream requirement; not visible in campaign form |
| Customize invoice marketing sections | Section 12.2 | Downstream requirement; not visible in campaign form |
18. Glossary
| Term | Definition |
|---|---|
| Campaign group | A named combination of target locations, dates, status, and marketing image used for invoice campaigns. |
| Network | The hierarchical set of locations available to the active HIEV business. |
| Location group | A reusable predefined set of locations. |
| Campaign period | The interval between Campaign Start Date and Campaign End Date. |
| Enabled | Campaign status that permits the campaign to be evaluated for invoice use. |
| Disabled | Campaign status that retains the record but prevents campaign application. |
| Invoice template | The configured layout used to render customer invoices. |
| Marketing section | A customizable invoice area that can display eligible campaign content. |
Verification note: This manual combines the supplied Invoice Campaign requirements with read-only verification of the HIEV CPMS Canada interface on 4 August 2026. No campaign was created, saved, edited, enabled, disabled, deleted, or uploaded during verification. Date-range rules, secure storage, predefined location-group administration, and invoice rendering are documented as requirements where they were not exposed or exercised in the reviewed interface.