Reservation Module
Purpose
The Reservation module lets an authorized user view, filter, and manage charging station reservations. The module provides visibility into upcoming and past booking slots, allocation details, power limits, and connector assignments.
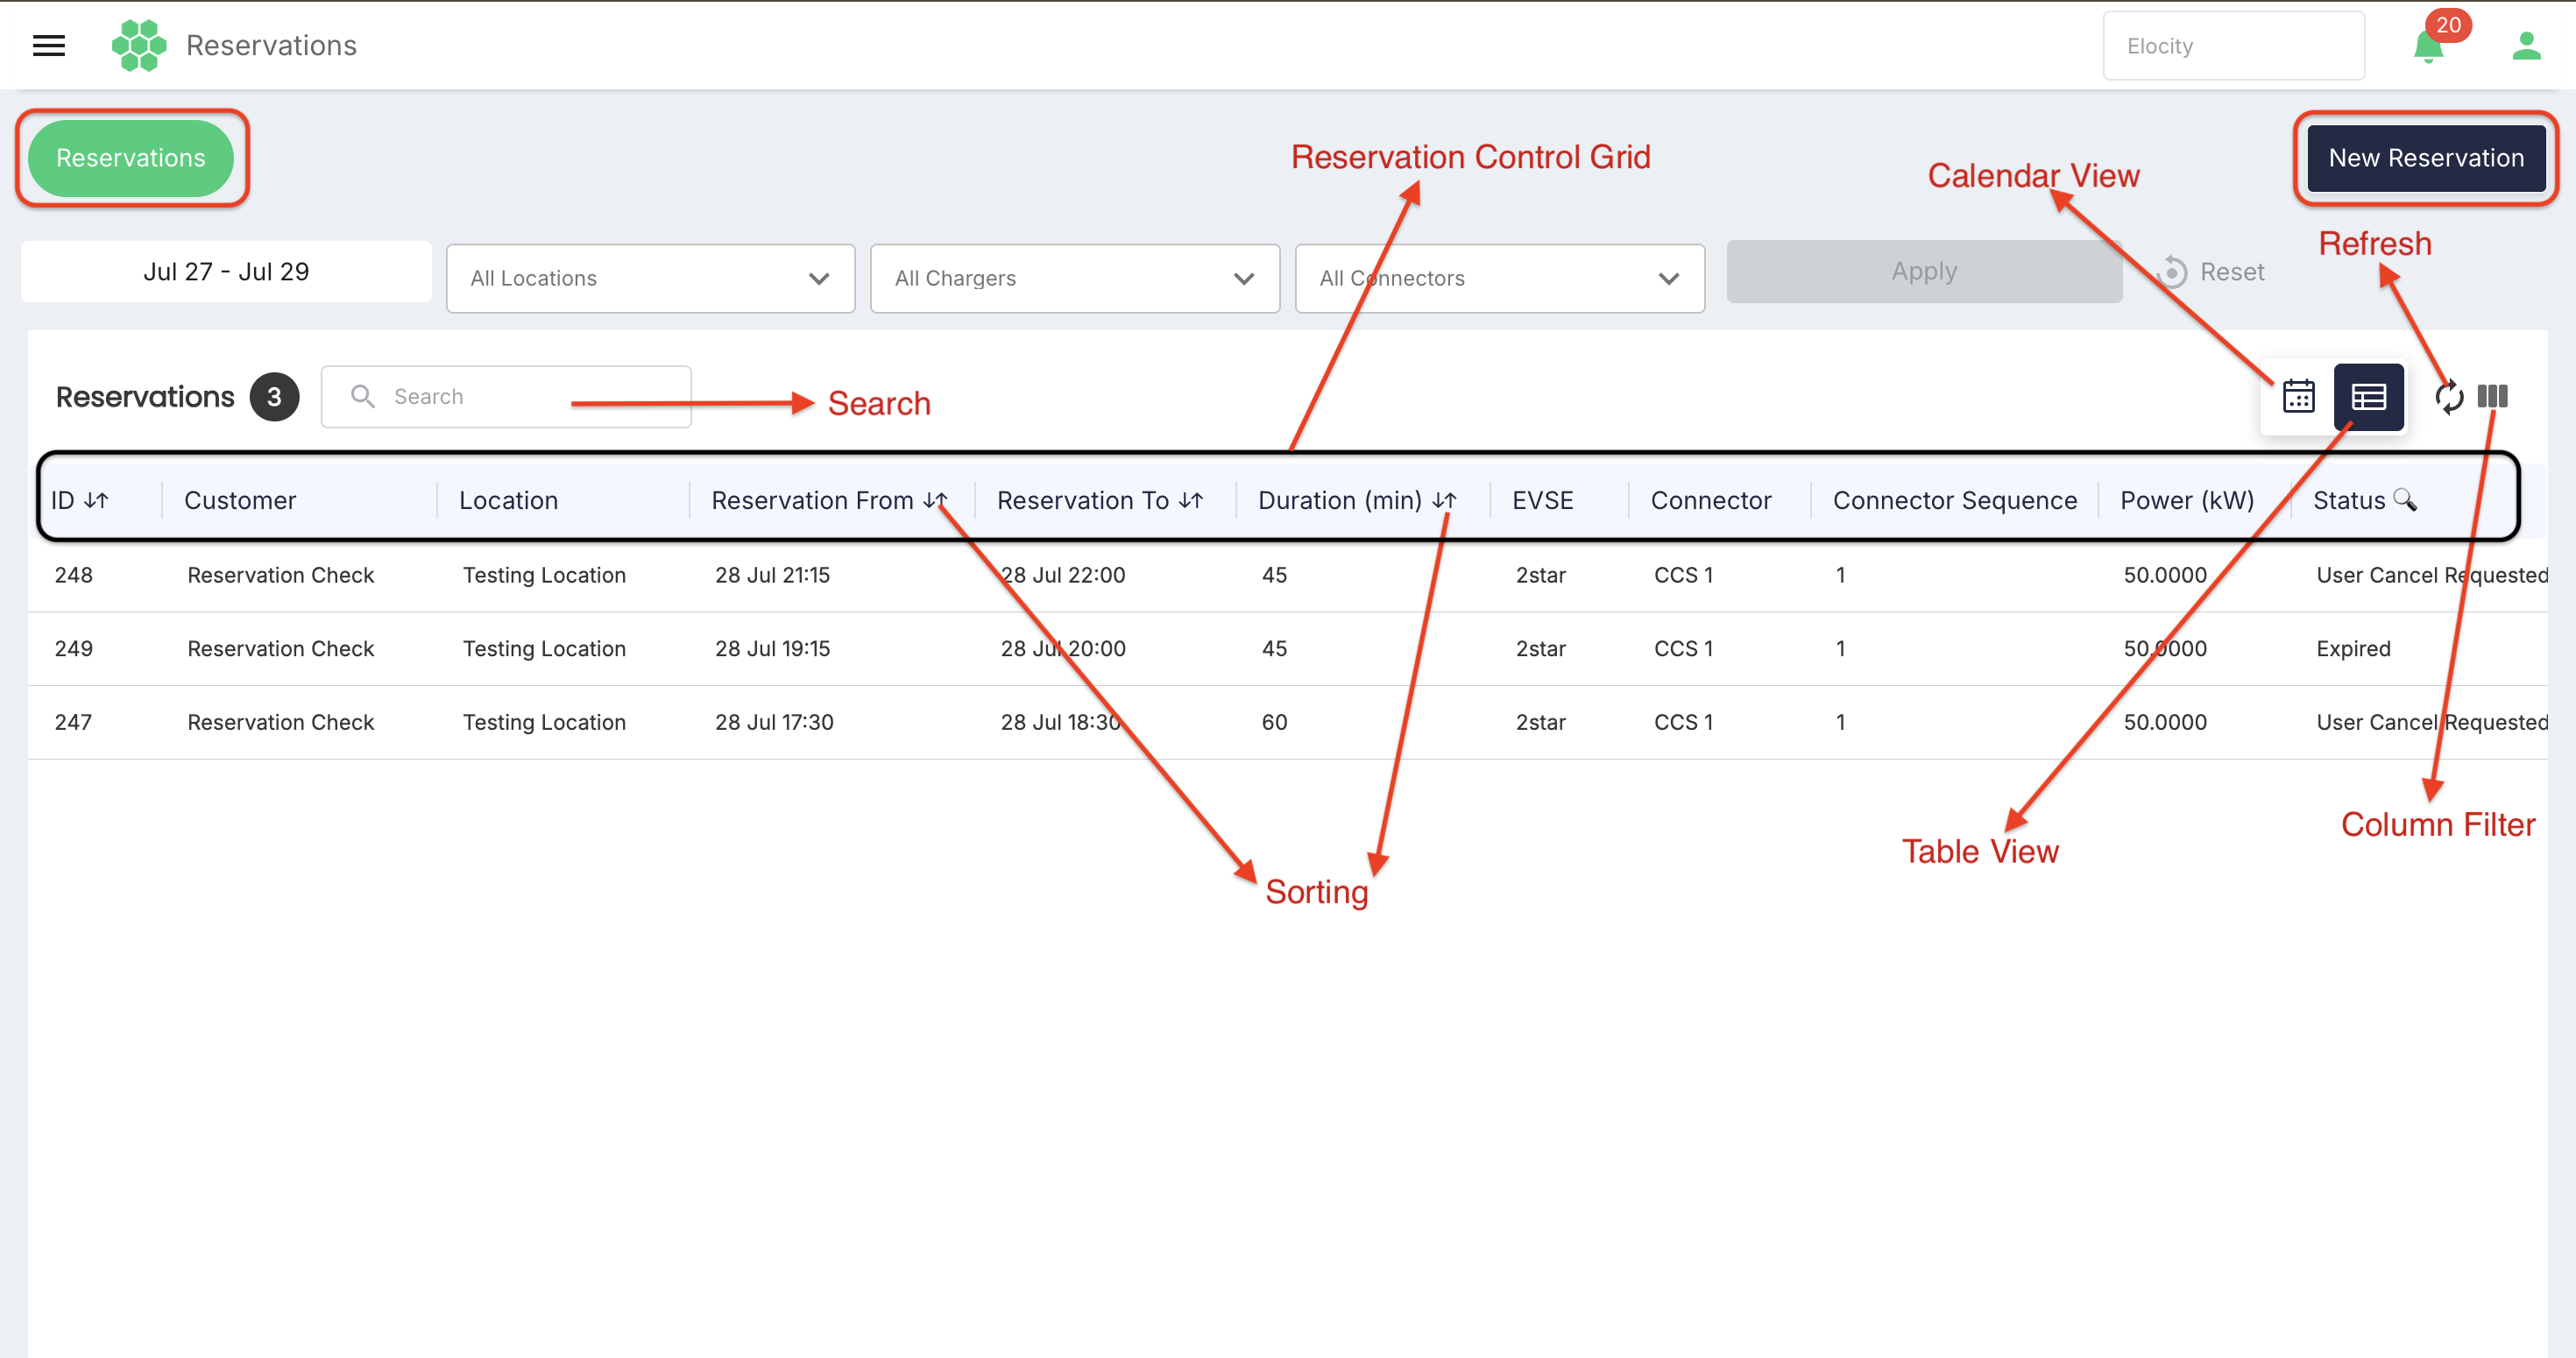
From this module, an authorized user can:
- Review the list of reservations for a selected date range, locations, chargers, and connectors using the Table View or Calendar View.
- Search, filter, and sort reservation records.
- Open the New Reservation creation form to book sessions for customers.
- Control grid visibility using the column filter menu.
- Review reservation identifiers, customer names, locations, scheduled start and end times, duration, EVSE identifiers, connector types, connector sequences, allocated power, and live statuses.
The records, views, and actions available depend on the selected business and the user's role-to-permission mapping. Reservation details and statuses update dynamically as bookings are processed or modified.
Accessing the module
- Sign in to the HIEV portal.
- Confirm the required business in the business selector.
- Open Reservations from the main navigation menu.
- Use the global filter bar or switch between available views using the view toggles at the top-right of the grid section.
Module structure
The Reservation module contains the following main areas:
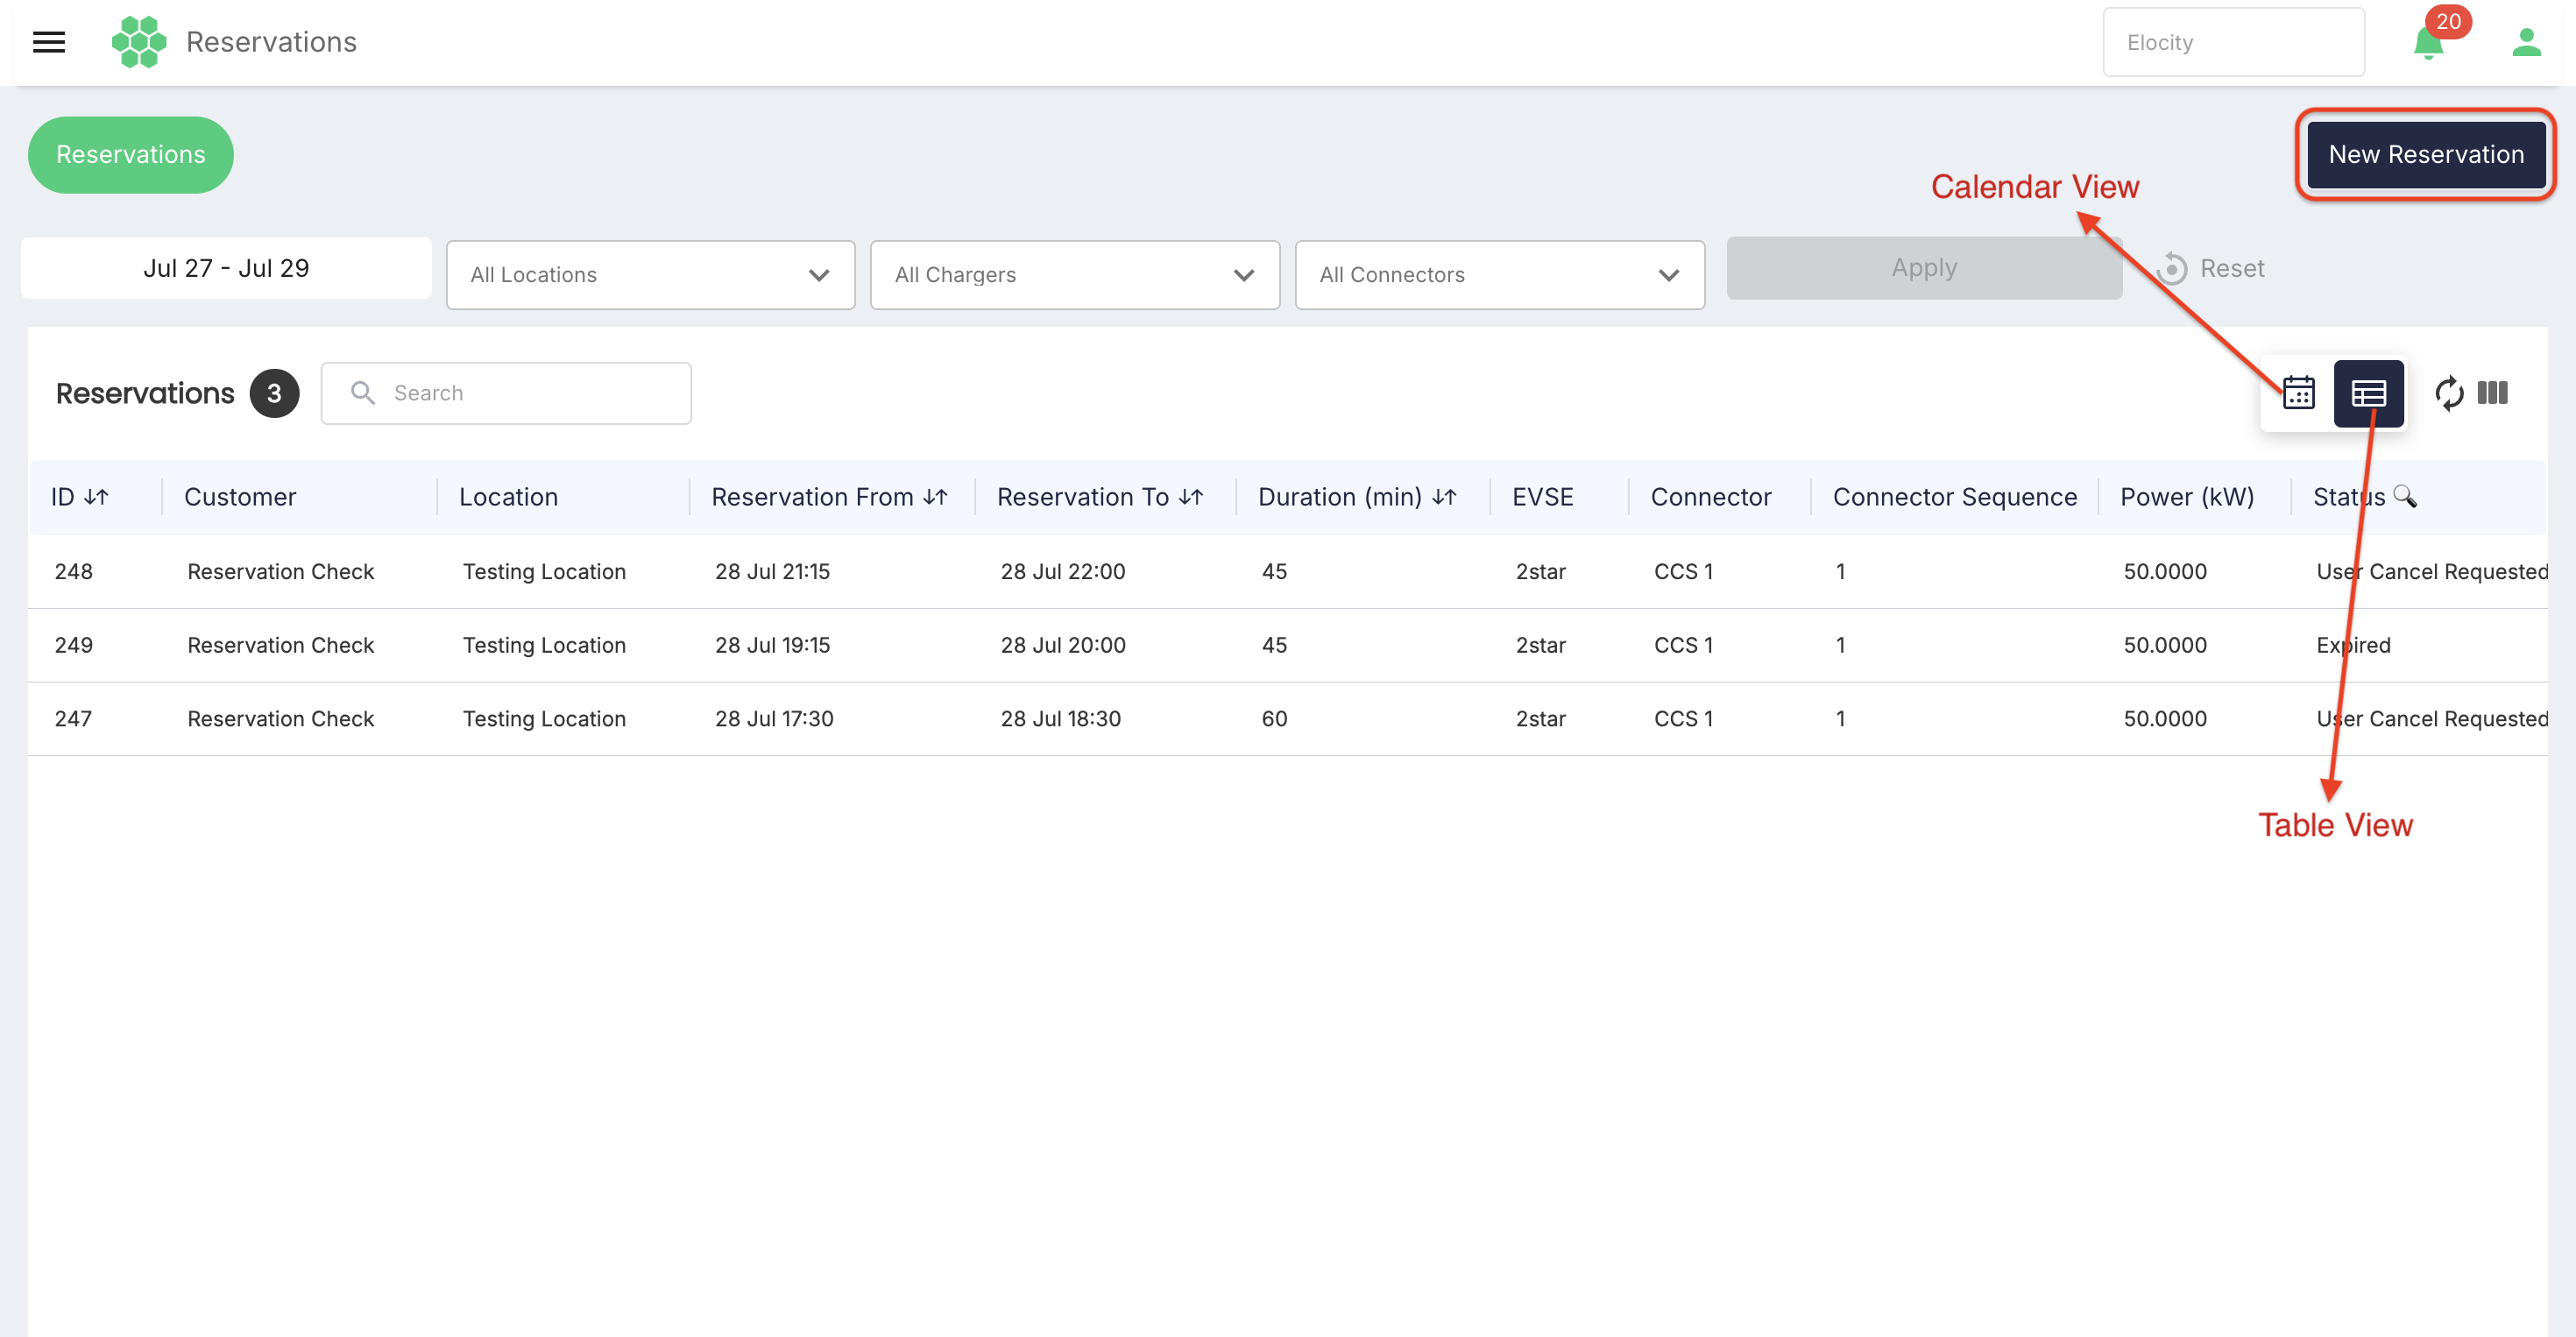
| View / Area | Contents |
|---|---|
| Reservations (Table View) | List grid showing all reservation records, record count, search control, column filter, view toggles, refresh, and quick action options. |
| Reservations (Calendar View) | Time-grid calendar visualization showing scheduled bookings across time slots and days. |
| New Reservation Form | Creation panel allowing administrators to book a charging session by specifying customer, location, station, connector type, and time window. |
Reservations page
The Reservations page provides two primary display formats: Table View and Calendar View, managed via view toggle icons next to the refresh control.
Filter bar controls
At the top of the Reservations page, a comprehensive filter bar allows users to narrow down displayed records:
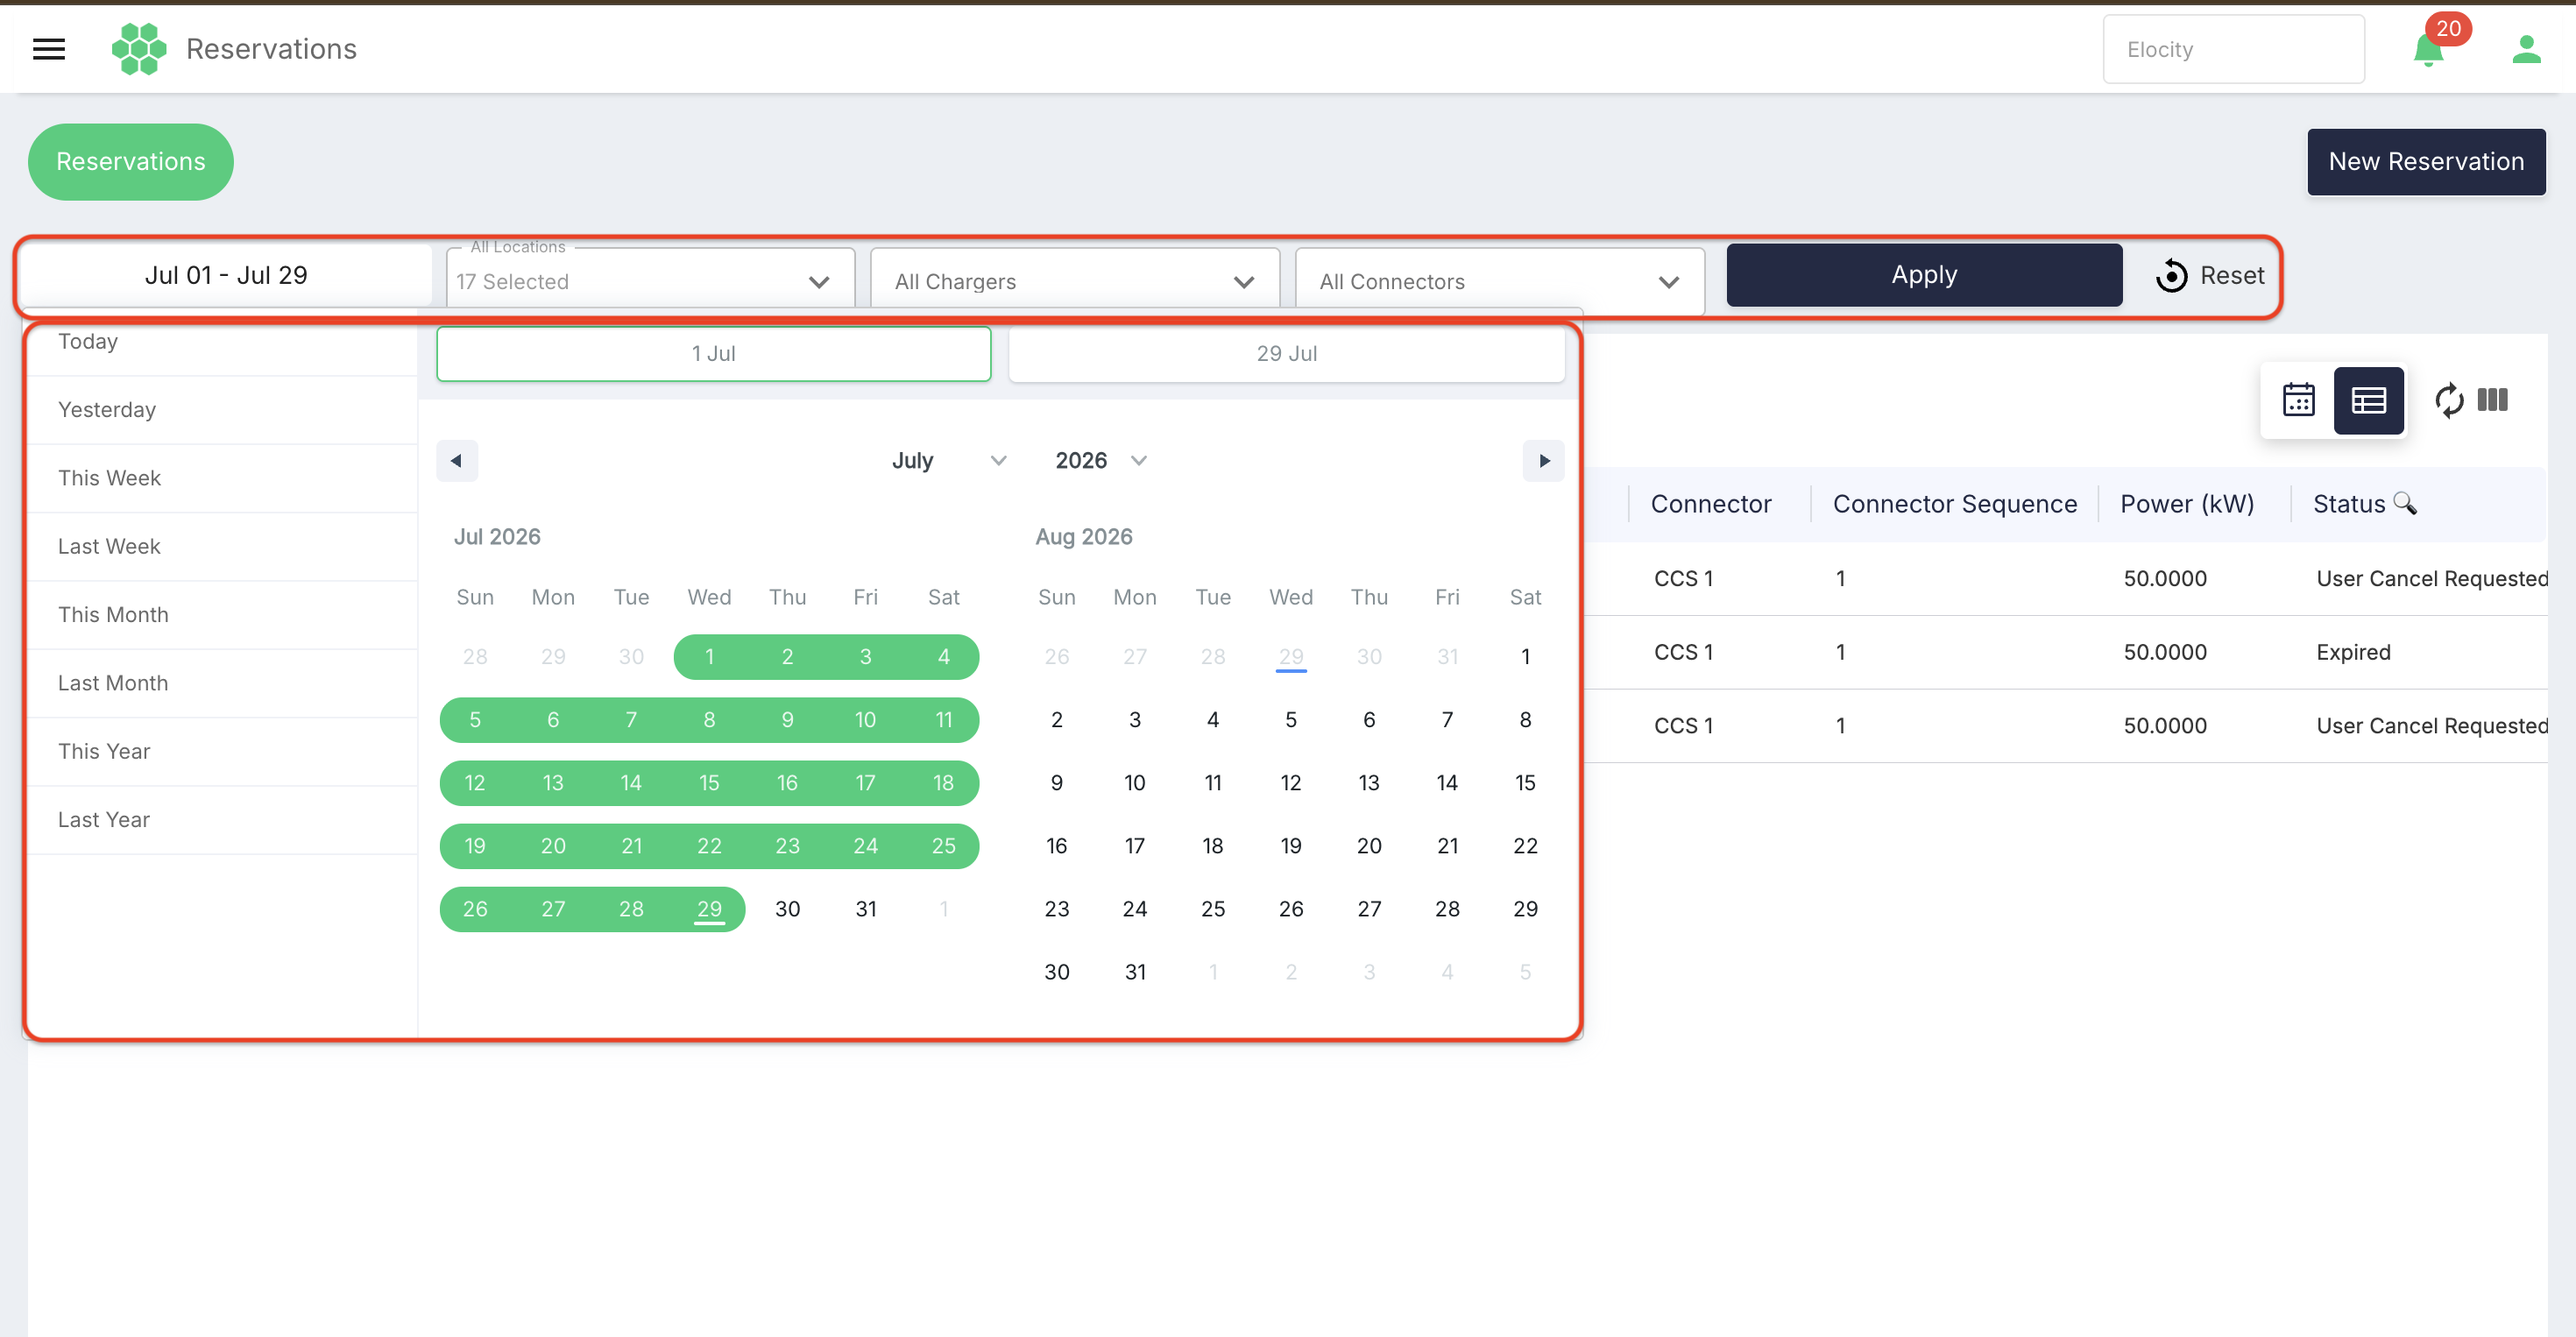
- Date Range Picker: Selects the active time window (e.g.,
Jul 27 - Jul 28). - All Locations: Multi-select or dropdown filter to limit records to specific locations.
- All Chargers: Filters the records by specific charging stations.
- All Connectors: Filters the view by specific connector standards.
- Apply: Executes the selected filters to update the records grid.
- Reset: Clears all active filter criteria back to default.
Table View grid
The Table View displays a summary grid of bookings. The section header indicates the total number of records returned (e.g., Reservations 3).
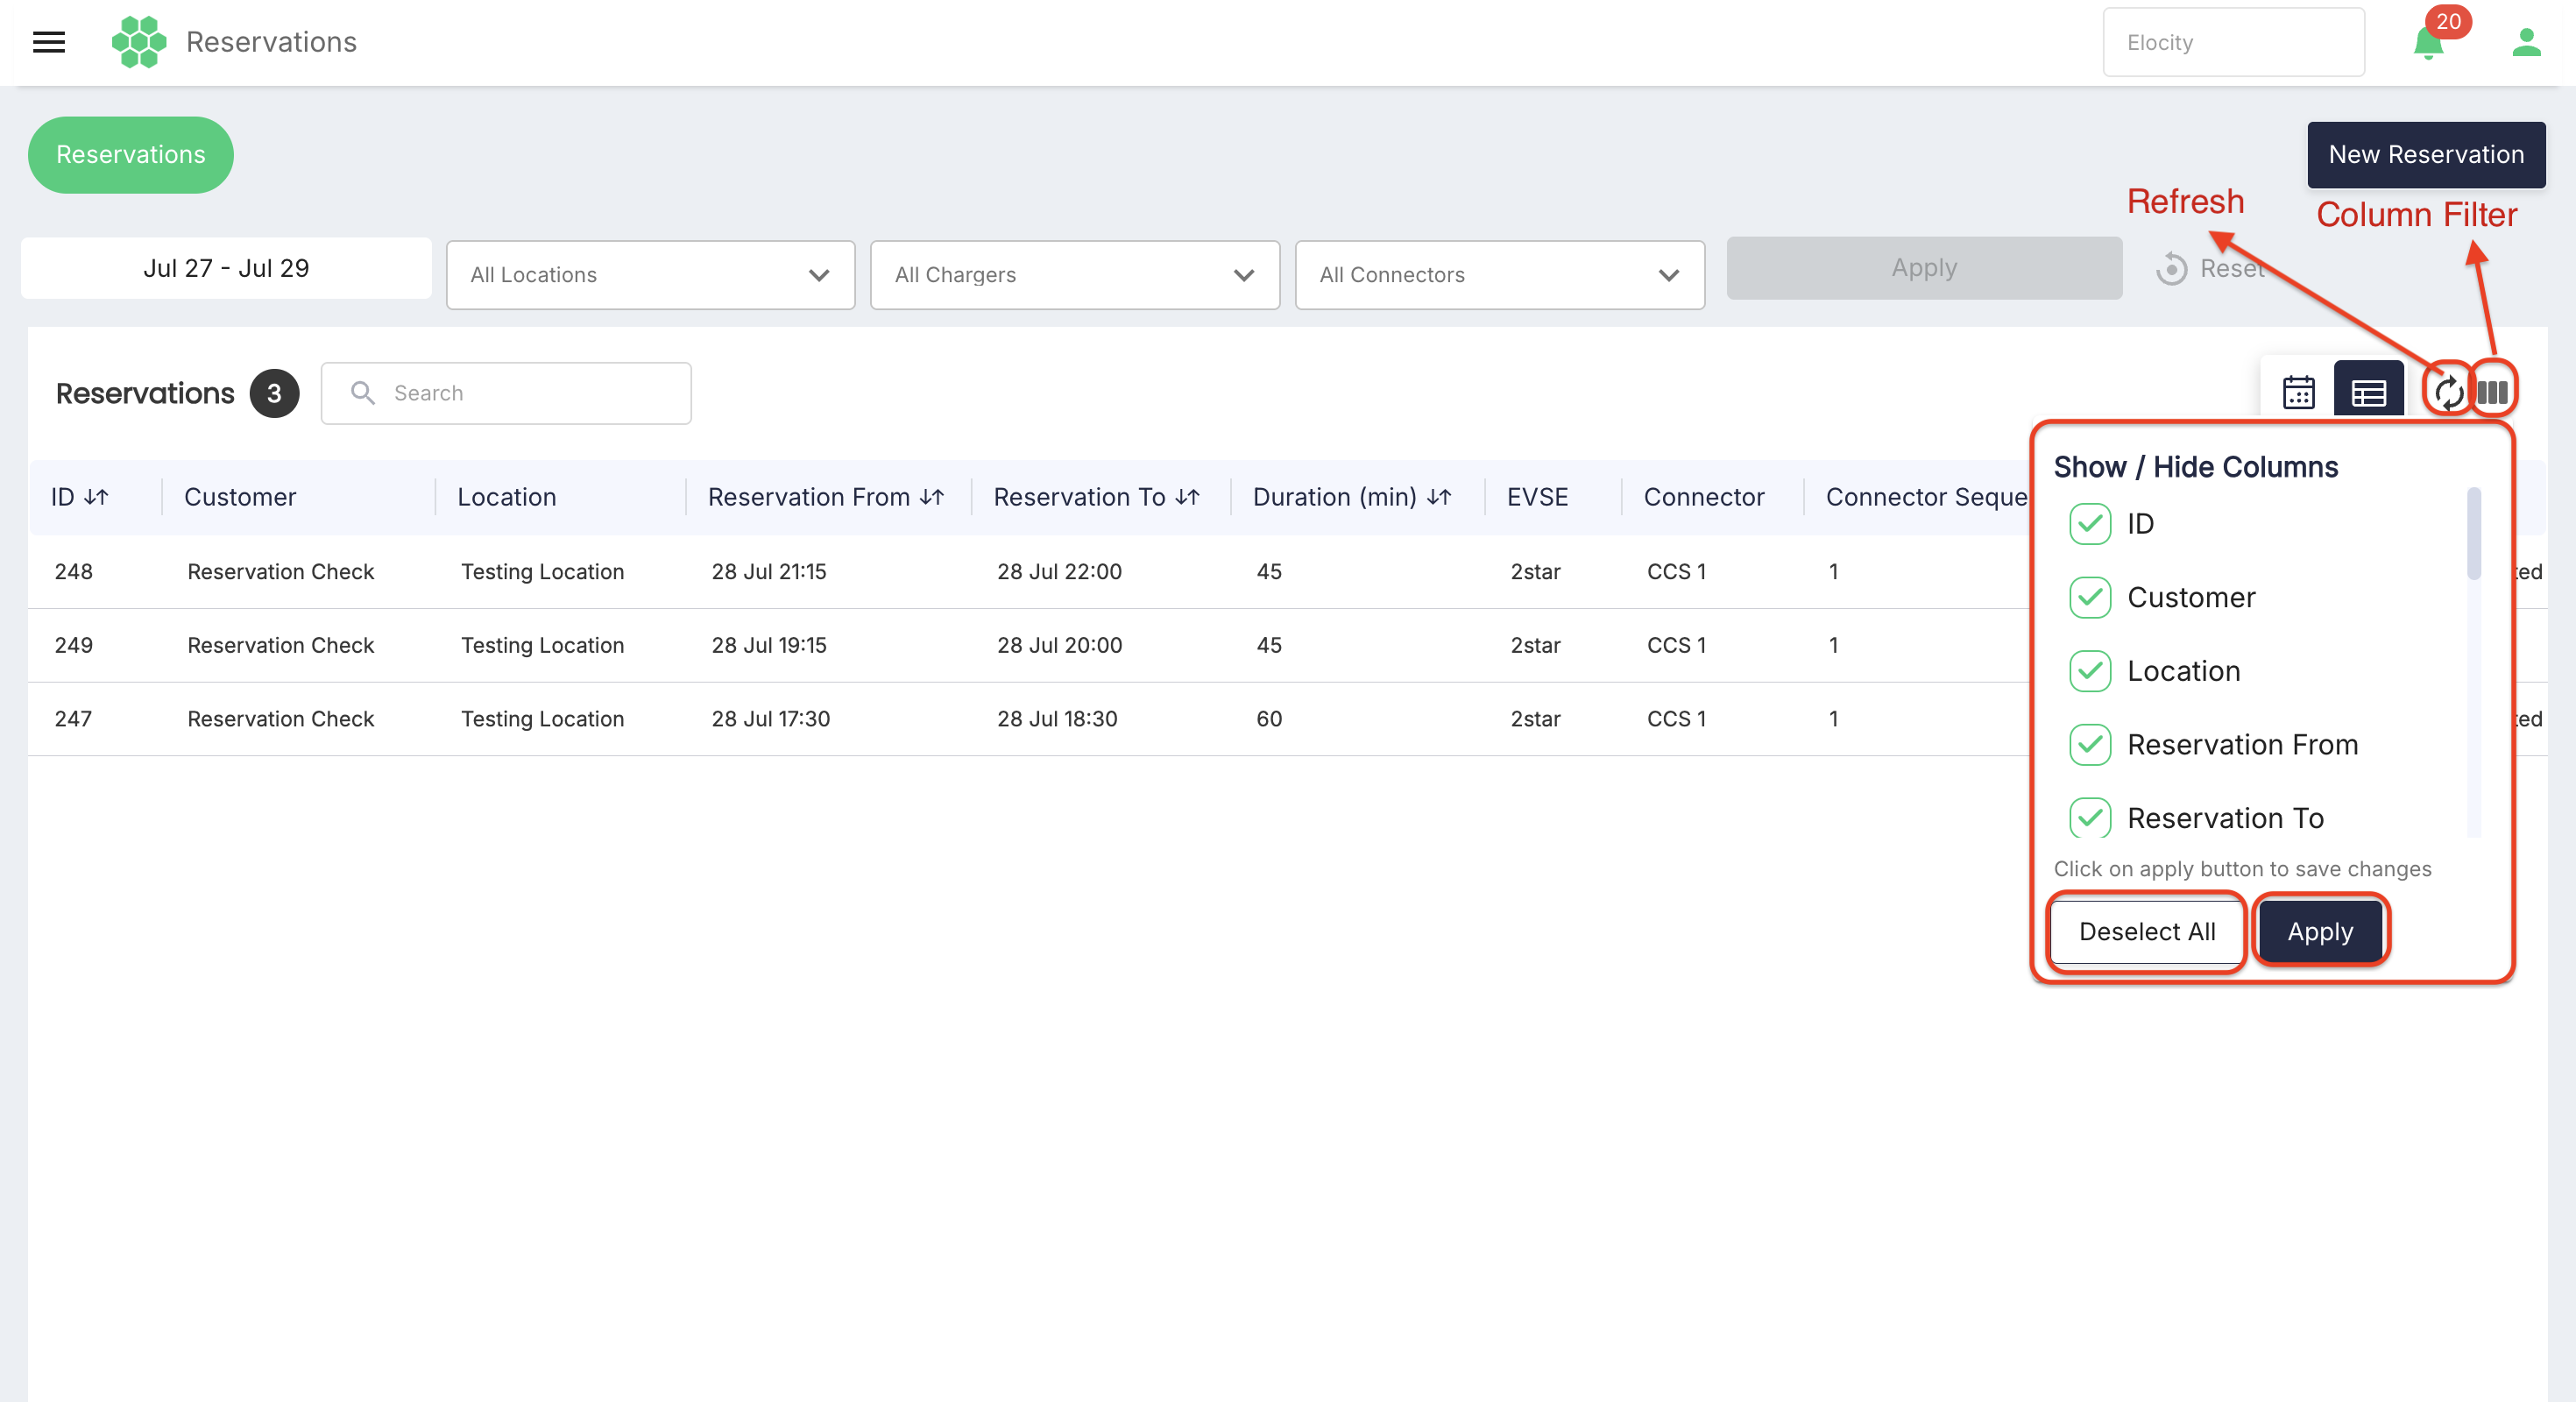
The grid includes a Search input field to instantly locate entries, a Refresh button to fetch the latest values, and a Column Filter icon that opens a Show / Hide Columns menu. Within the column menu, users can toggle individual columns on or off, select Deselect All, or click Apply to save column visibility preferences.
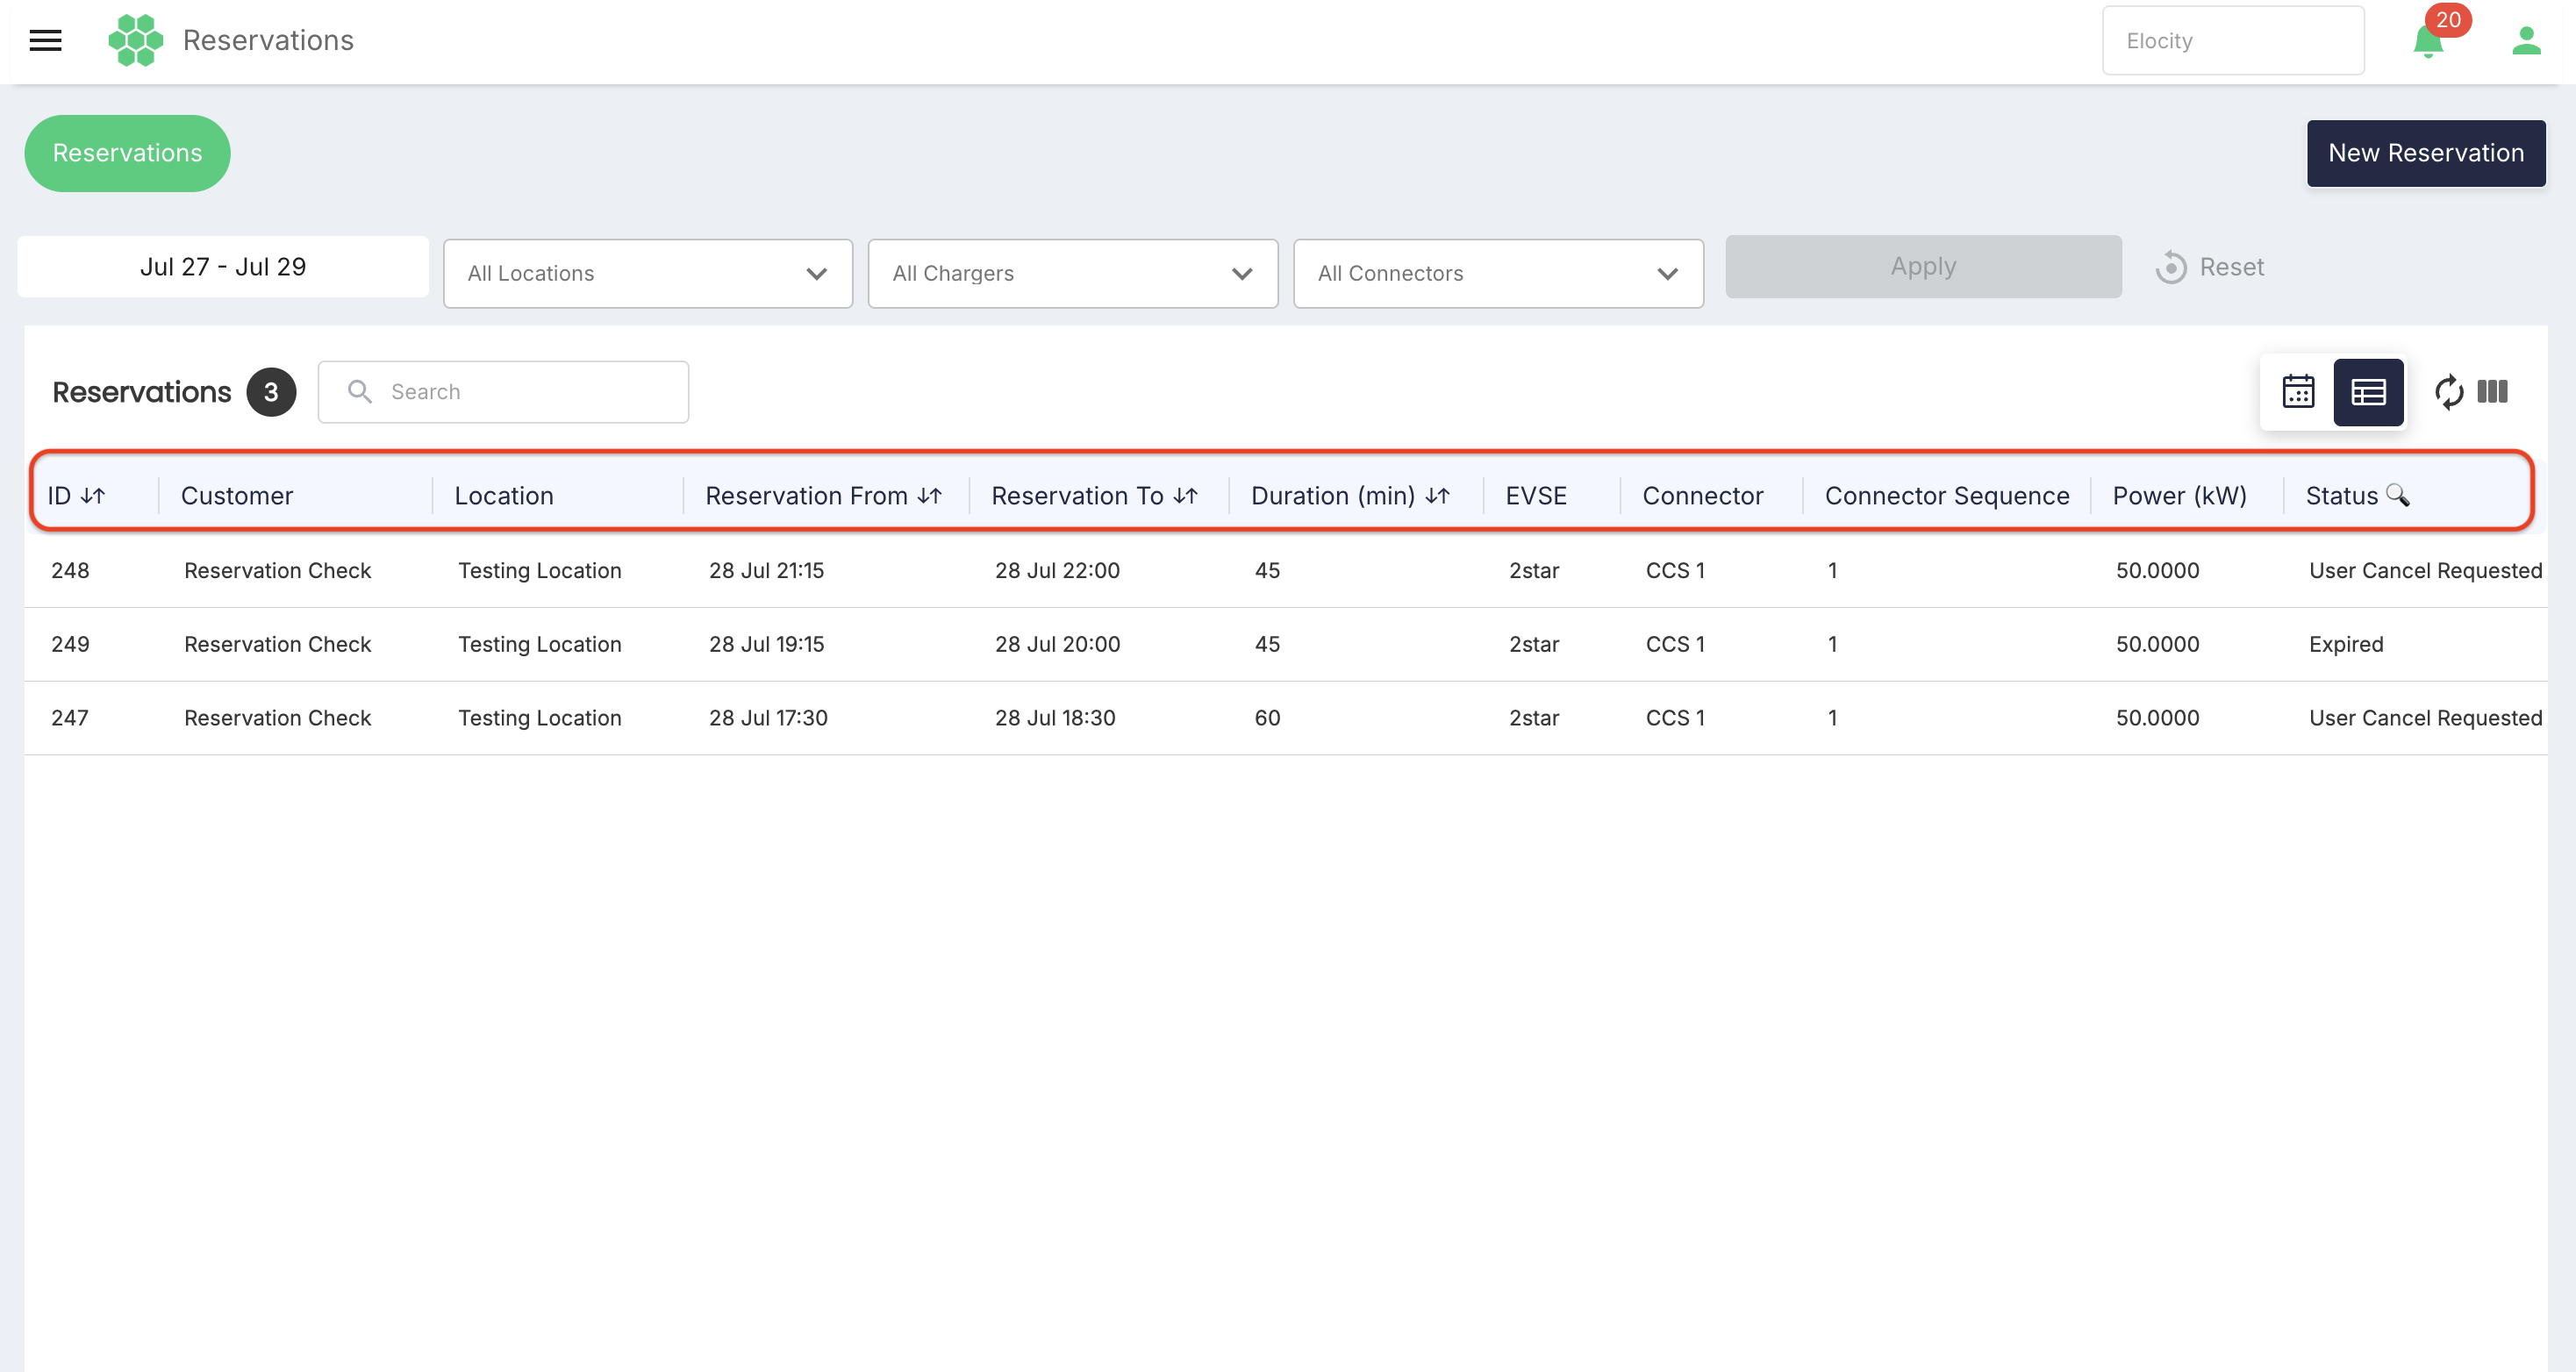
| Column | Description | Interaction |
|---|---|---|
| ID | Unique numeric identifier of the reservation record. | Supports sorting and per-column interaction. |
| Customer | Name of the customer or driver associated with the reservation. | Display only. |
| Location | Location where the reservation is registered. | Display only. |
| Reservation From | Scheduled start date and time of the reservation. | Supports sorting. |
| Reservation To | Scheduled end date and time of the reservation. | Supports sorting. |
| Duration (min) | Total length of the reservation window expressed in minutes. | Supports sorting. |
| EVSE | EVSE identifier assigned to the reservation. | Display only. |
| Connector | Connector standard used for the reservation (e.g., CCS 1). | Display only. |
| Connector Sequence | Sequence number of the specific connector port. | Display only. |
| Power (kW) | Power capacity allocated for the reservation. | Display only. |
| Status | Current lifecycle status of the reservation (e.g., User Cancelled Requested, Expired). | Supports search and filtering. |
| Date Created | Timestamp when the reservation record was created. | Supports sorting. |
| Payment Amount | Monetary amount associated with the reservation transaction. | Display only. |
| Payment Method | Payment method used for the booking (e.g., CASH). | Supports search and filtering. |
| Prepaid | Indicates whether the reservation session is prepaid (Yes or No). | Display only. |
| Invoice Id | Unique system invoice reference identifier associated with the transaction. | Supports search and filtering. |
| Payment Date | Timestamp when the payment transaction was recorded. | Display only. |
| Payment Status | Current status of the payment (e.g., PAID). | Display only. |
Calendar View
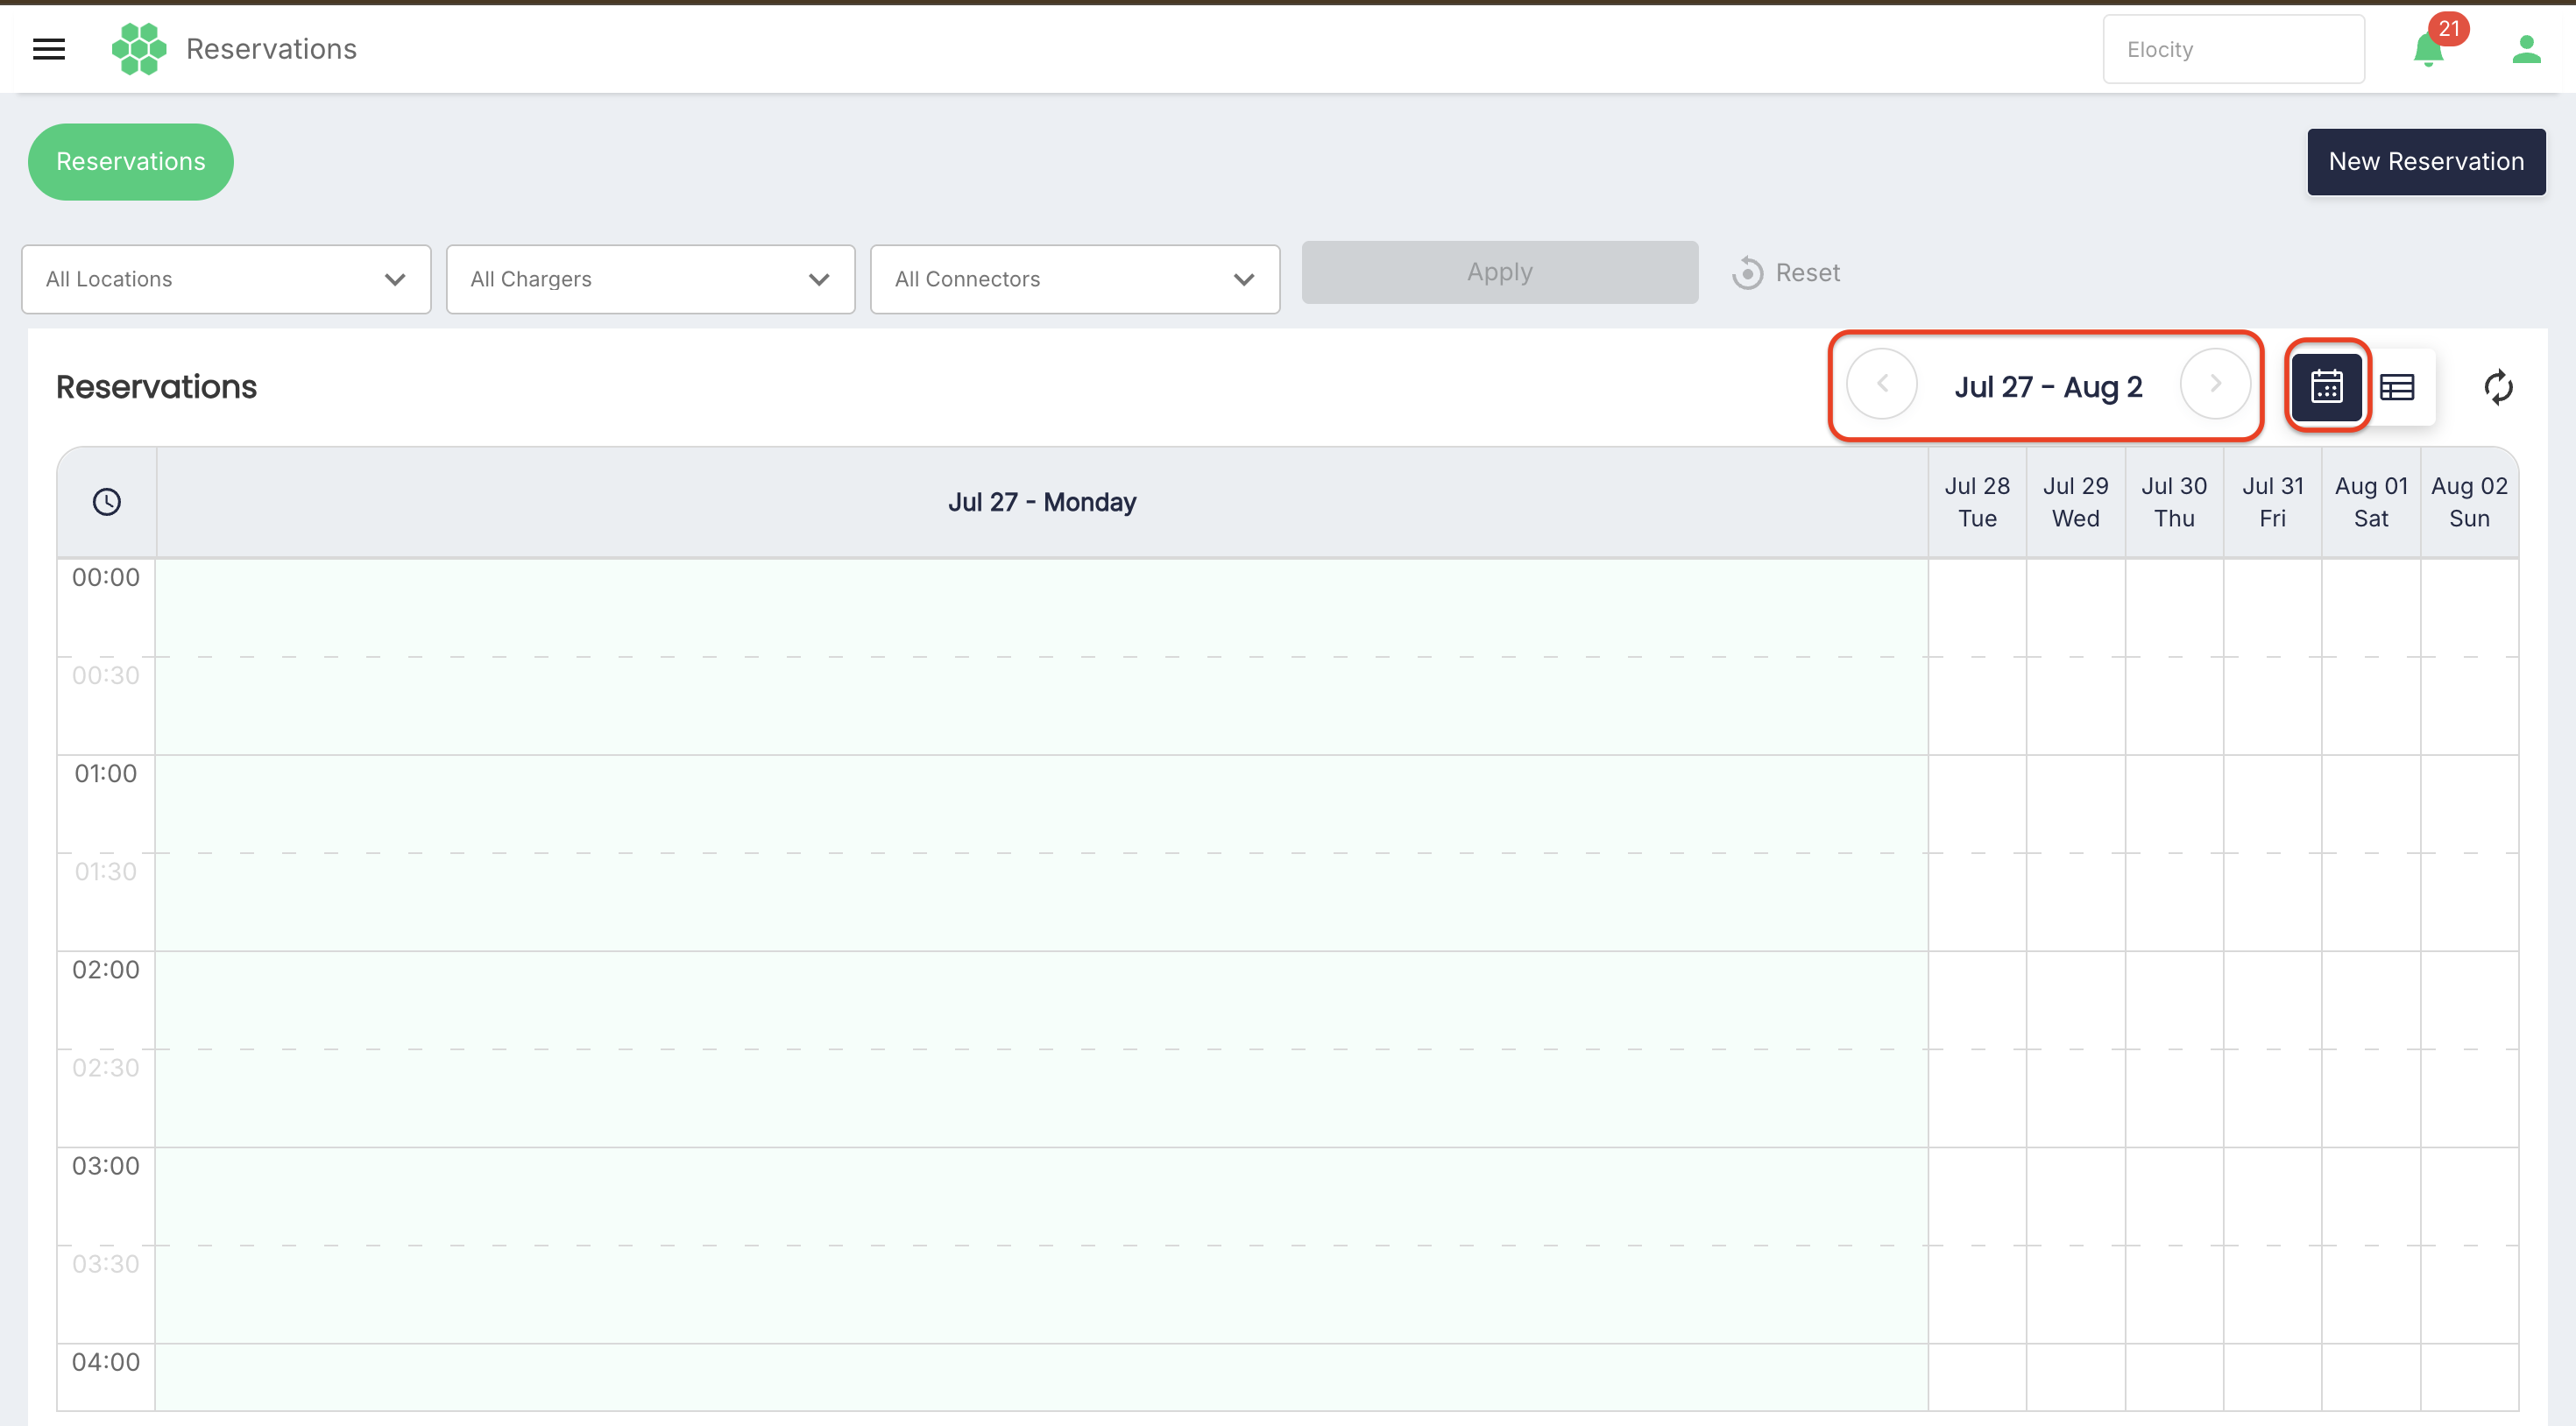
Selecting the calendar icon switches the interface to the Calendar View. This view presents a time-delineated grid (structured by hourly increments such as 00:00 to 04:00 and beyond across days of the week like Jul 27 - Aug 2), allowing operators to visually inspect schedule density, spot open windows, and track overlapping bookings. Navigation arrows allow shifting across weeks or days.
Creating a new reservation
Select New Reservation from the top-right button on the page to open the creation side panel.
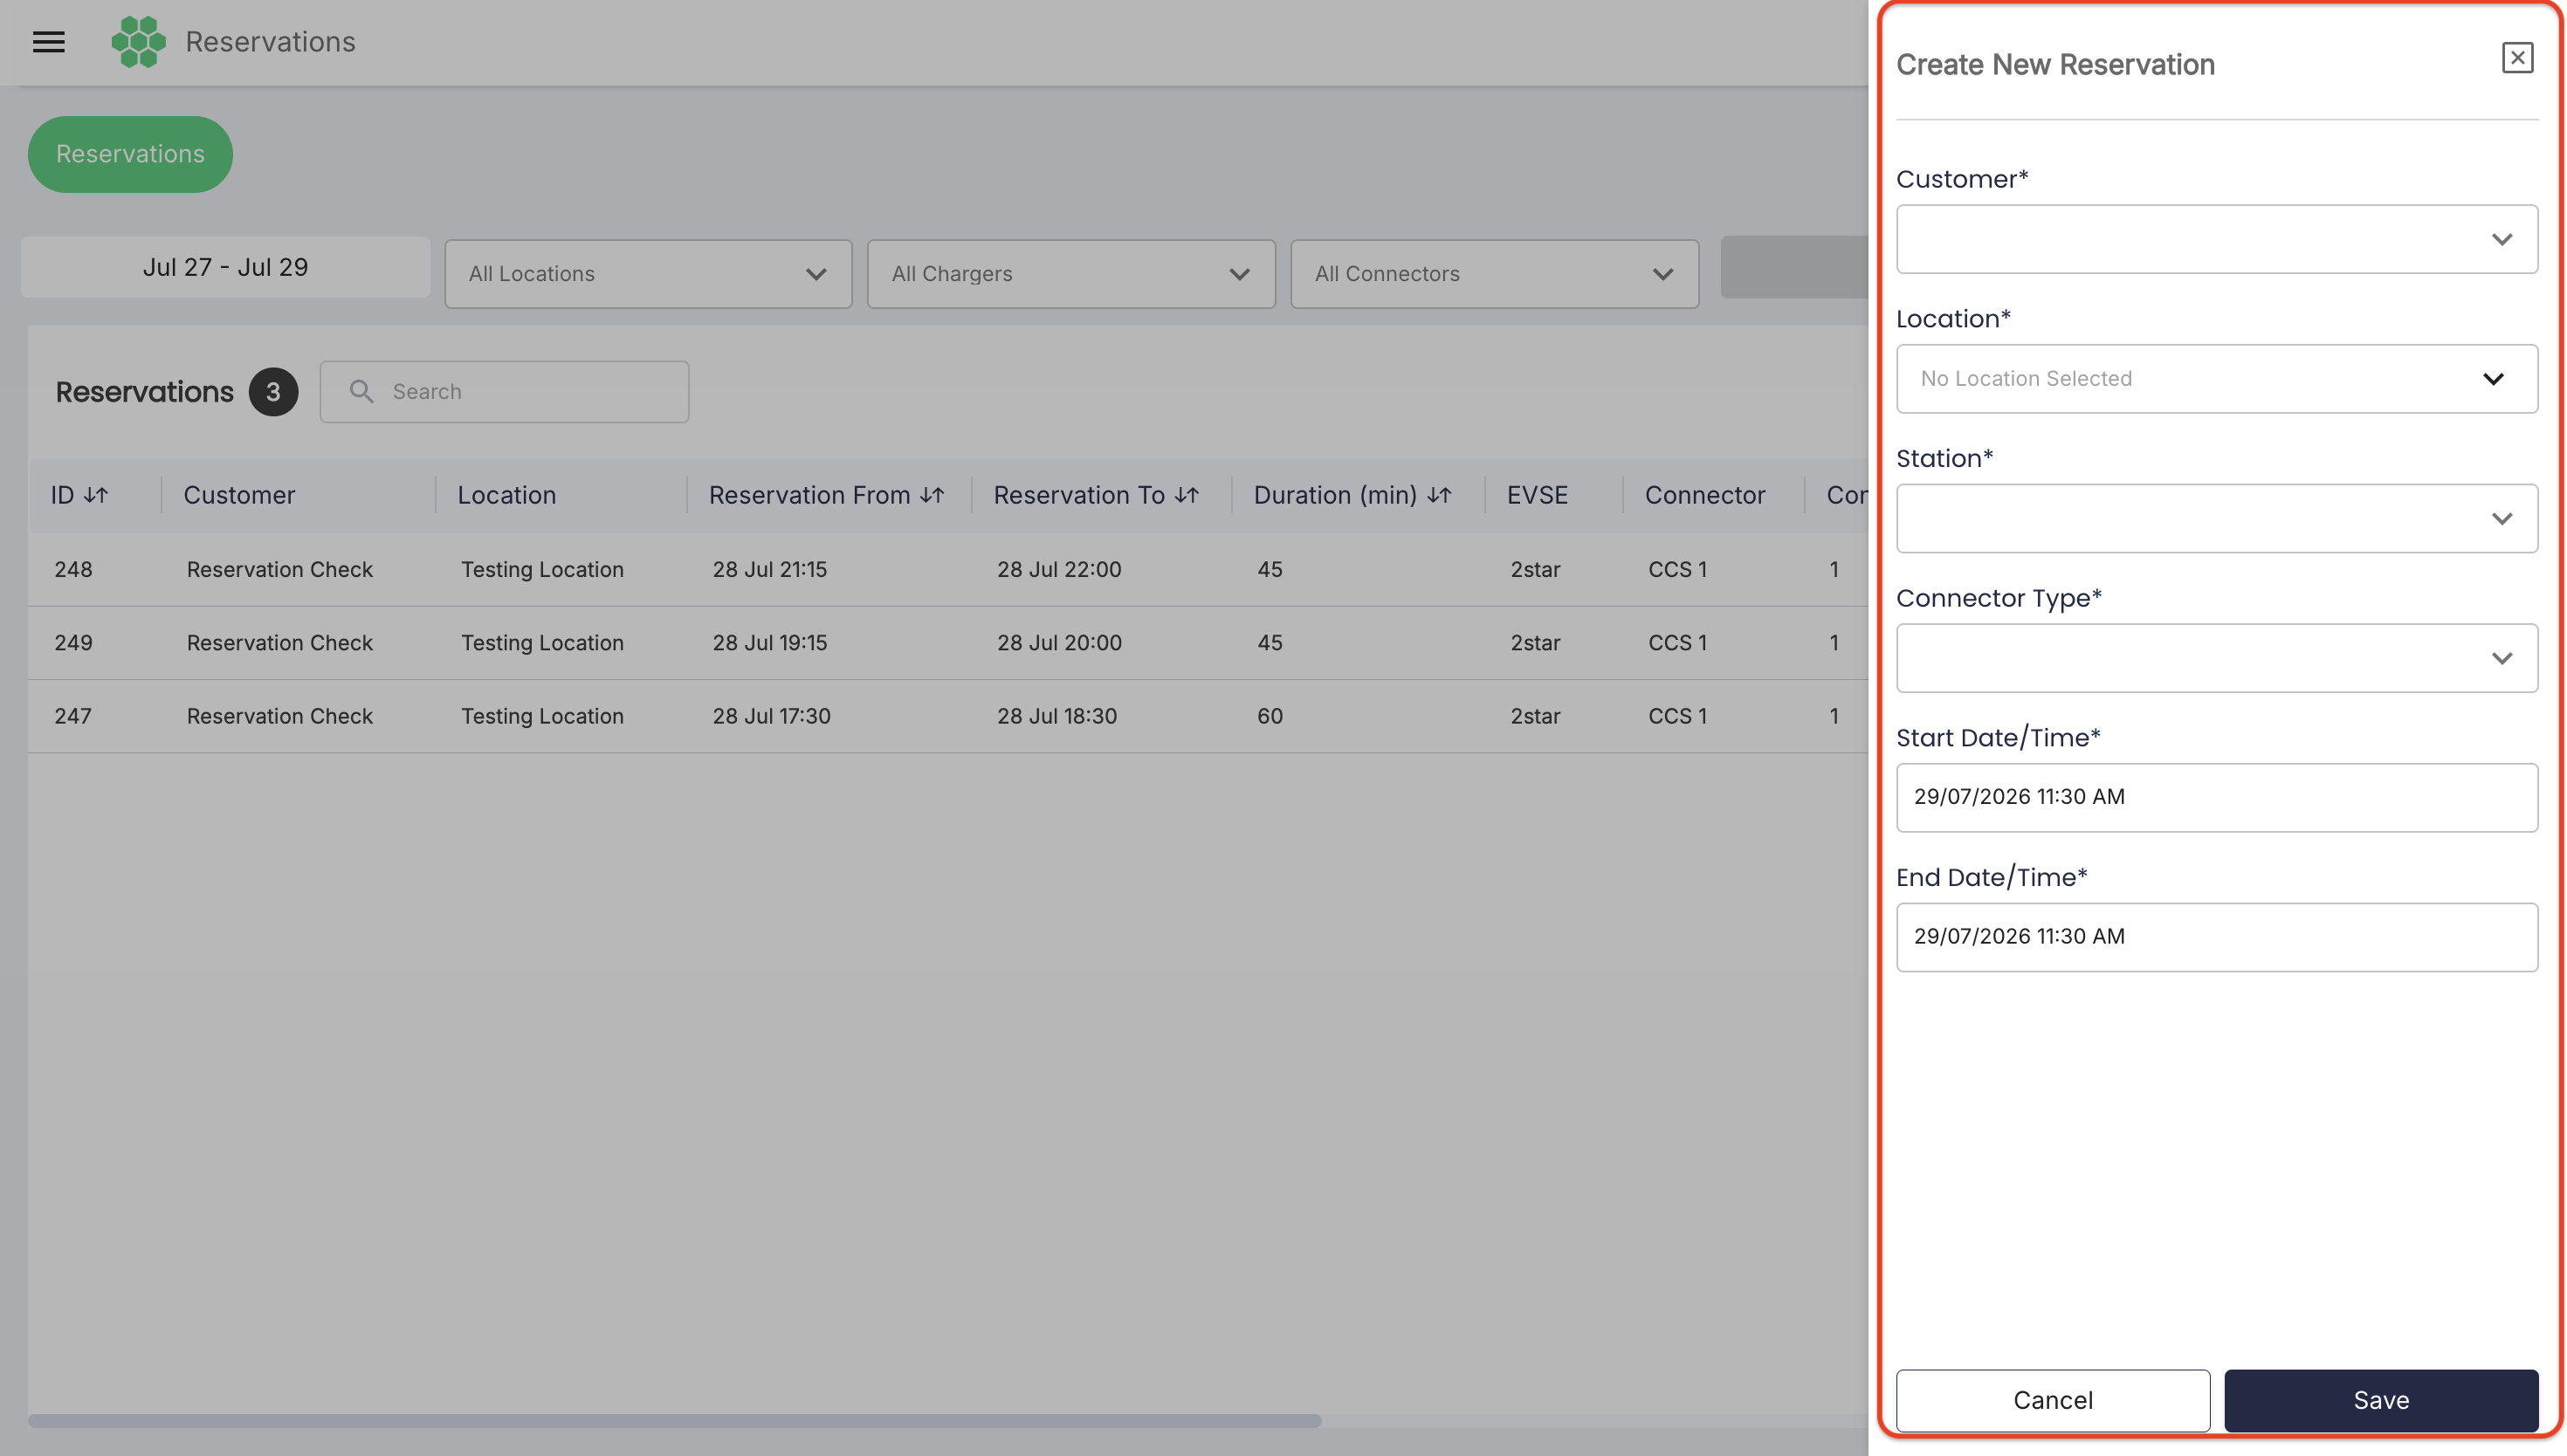
Creation fields
| Field | Description |
|---|---|
| Customer* | Required customer selector to associate the booking with a registered user account. |
| Location* | Required location network selector where the charging station resides. |
| Station* | Required charging station assigned to the booking. |
| Connector Type* | Required connector port standard selected for the session. |
| Start Date/Time* | Required starting timestamp for the reservation window. |
| End Date/Time* | Required ending timestamp for the reservation window. |
Fields marked with an asterisk are required. Select Save to confirm and register the reservation, or Cancel to close the panel without saving changes.
Recommended operating workflow
- Confirm the selected business in the portal header.
- Navigate to the Reservations page.
- Configure the desired filter criteria using the Date Range, Locations, Chargers, and Connectors dropdowns, then select Apply.
- Use the Table View to review specific textual details, status values, and record counts, or switch to the Calendar View for a visual timeline perspective.
- Use Search to find specific records or click the column filter icon to customize visible grid columns.
- Select New Reservation when a new booking session needs to be scheduled, complete all required form fields, and click Save.
- Use Refresh to request the latest updates and synchronization from the backend.
Product rules confirmed for this guide
- Filter selections and column visibility settings affect only the active browser view and do not modify underlying database records.
- Overlapping restrictions and slot availability are evaluated based on station and connector configurations during creation.
- Reservation statuses update automatically as time progresses or cancellation requests are processed.
- Operations within the module are governed by user role permissions and assigned business scope.