Push Notifications
1. Purpose
The Push Notifications module enables an authorized business user to create, schedule, target, and monitor messages delivered to customers through the HIEV mobile application. It supports operational communication, customer-service announcements, corporate-group messaging, and promotional campaigns.
 The module is intended to provide:
- Custom notification titles and messages.
- Immediate or scheduled delivery.
- Audience targeting for customers and corporate groups.
- Reusable customer segments based on selection criteria.
- Deep links that open a relevant feature or screen in the mobile application.
- Visual content such as a notification icon or thumbnail.
- Delivery history and reporting.
- A categorized notification centre in the mobile application.
Important: A push notification can reach a large audience immediately. Confirm the business account, audience, content, link destination, schedule, and approval before saving the notification.
2. Roles and prerequisites
Before using Push Notifications, confirm that:
- You are signed in to the correct HIEV business account.
- Your role includes permission to view and create push notifications.
- Mobile push-notification services are enabled for the intended application environment.
- The customer has installed the mobile application and granted notification permission.
- Corporate groups or customer segments exist before selecting them as an audience.
- Any promotional message has received the required marketing, privacy, and legal approval.
- Deep-link destinations are available in the applicable mobile-app version.
- The date, time, and business time zone have been verified.
3. General requirements
3.1 Business-user capabilities
The system should allow an authorized business user to:
- Compose a custom notification title and message.
- Choose the intended audience.
- Select an existing corporate group.
- Select one or multiple reusable customer segments.
- Add an icon or visual asset.
- attach a deep link to a feature or screen in the mobile application.
- Send the message immediately or schedule it for a future date and time.
- Preview the notification for iOS and Android.
- Review notification history, content, audience, scheduled/sent date, and status.
- Review scheduled notifications and cancel them when the user's role and notification state permit it.
3.2 Mobile-app capabilities
The mobile application should provide a Notifications section with multiple categories. At minimum, it should distinguish:
- Transactions — system-generated events such as Start Transaction and Stop Transaction.
- Payments — payment success, failure, refund, wallet, invoice, or billing events.
- Marketing — promotional messages created by authorized business users.
- System — security, account, maintenance, feature, and service notices.
The customer should be able to view the 10 most recent notifications in each category. If more than 10 notifications exist, the product may provide pagination, a View All action, or an archive, depending on the mobile-app implementation.
4. Push Notifications screen walkthrough
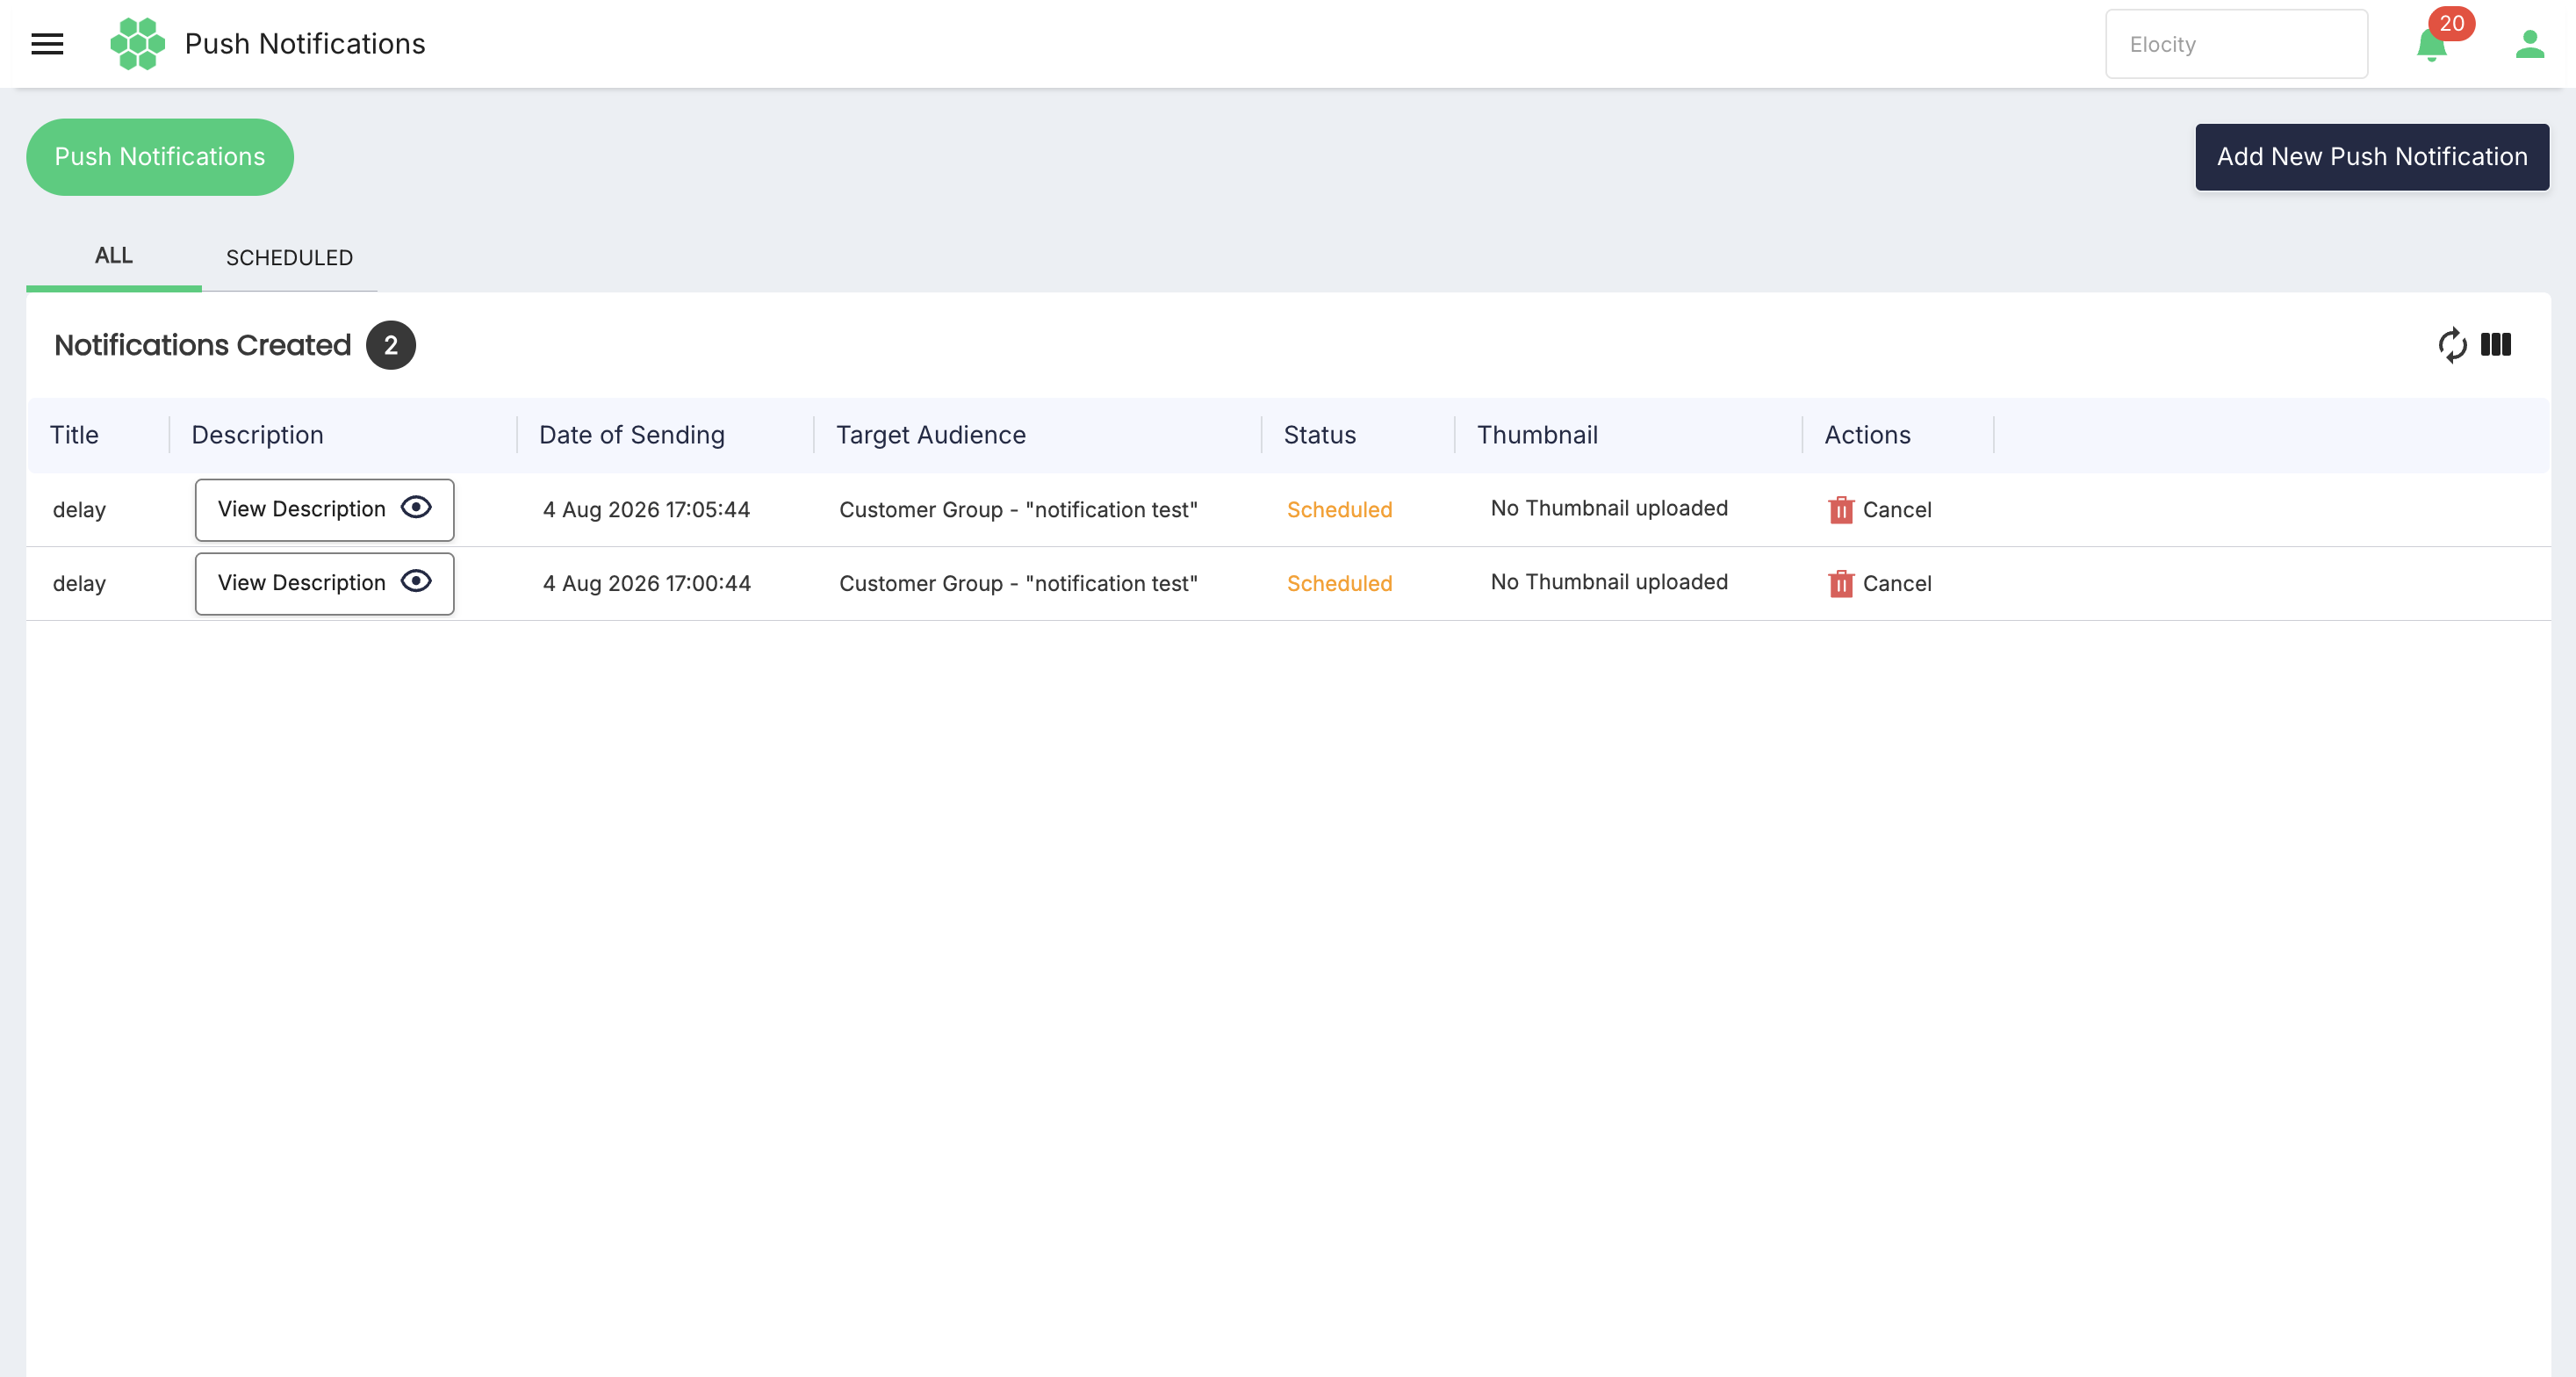
Open Push Notifications from the HIEV CPMS navigation menu. The screen contains the following main areas.
4.1 Header actions
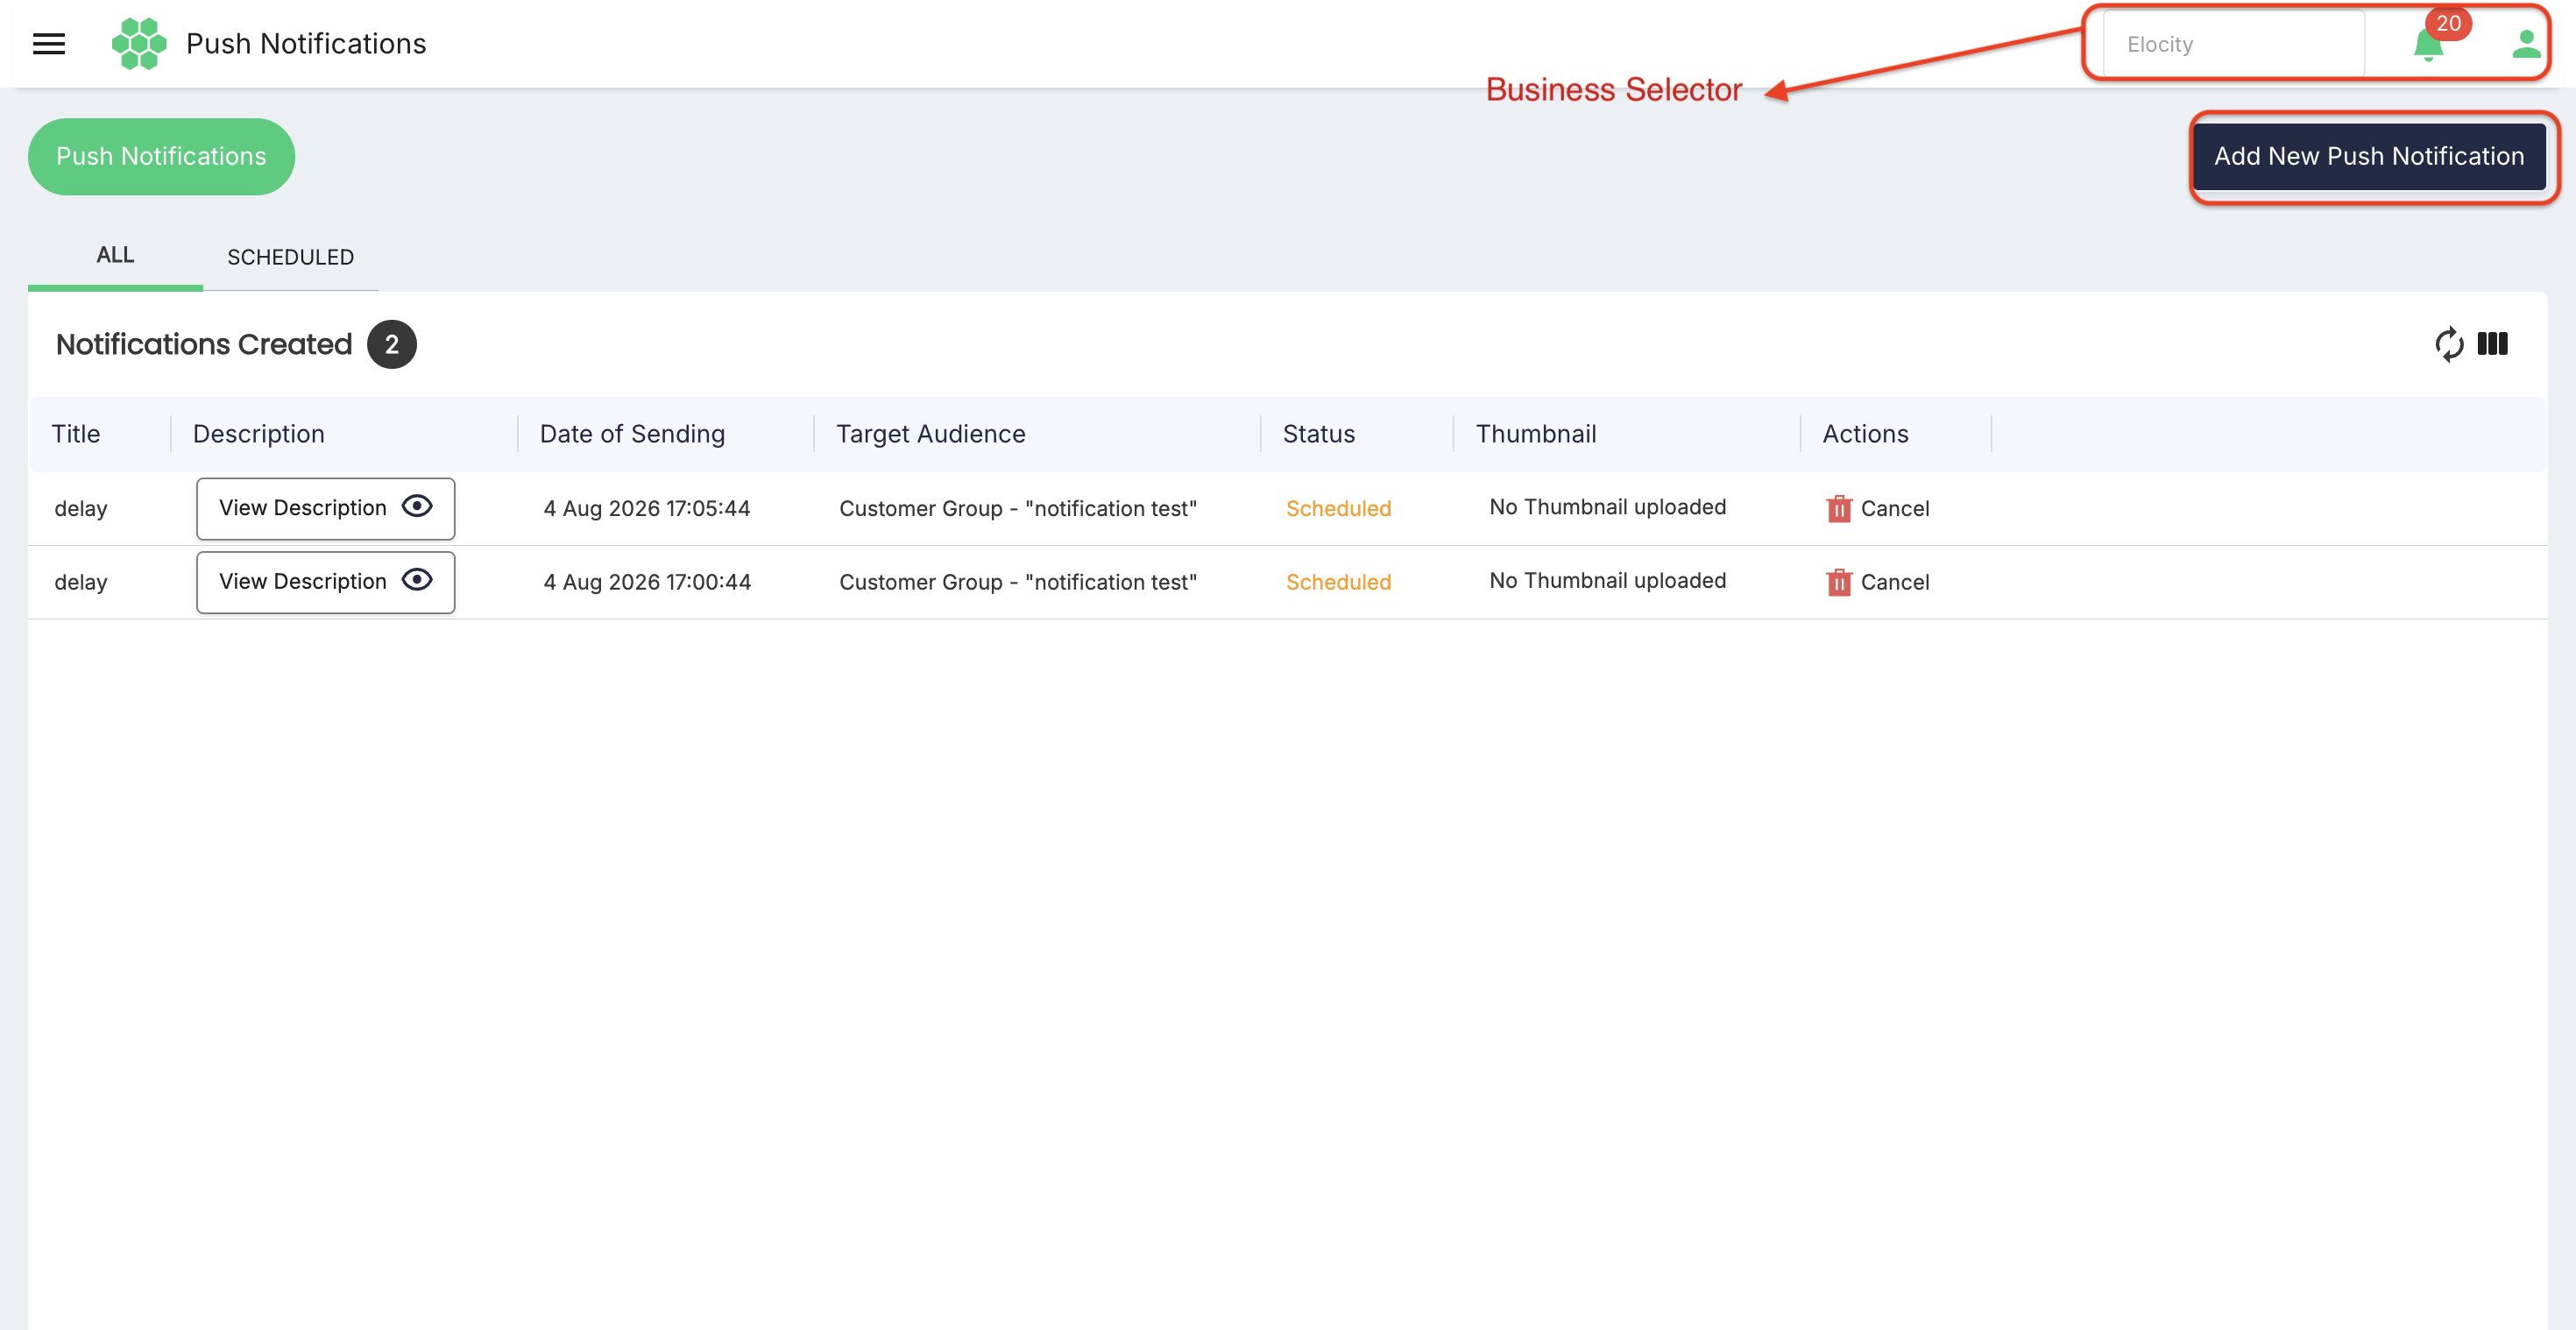
| Control | Description |
|---|---|
| Add New Push Notification | Opens the notification composer. |
| Business selector | Identifies the active business context. Confirm it before creating a notification. |
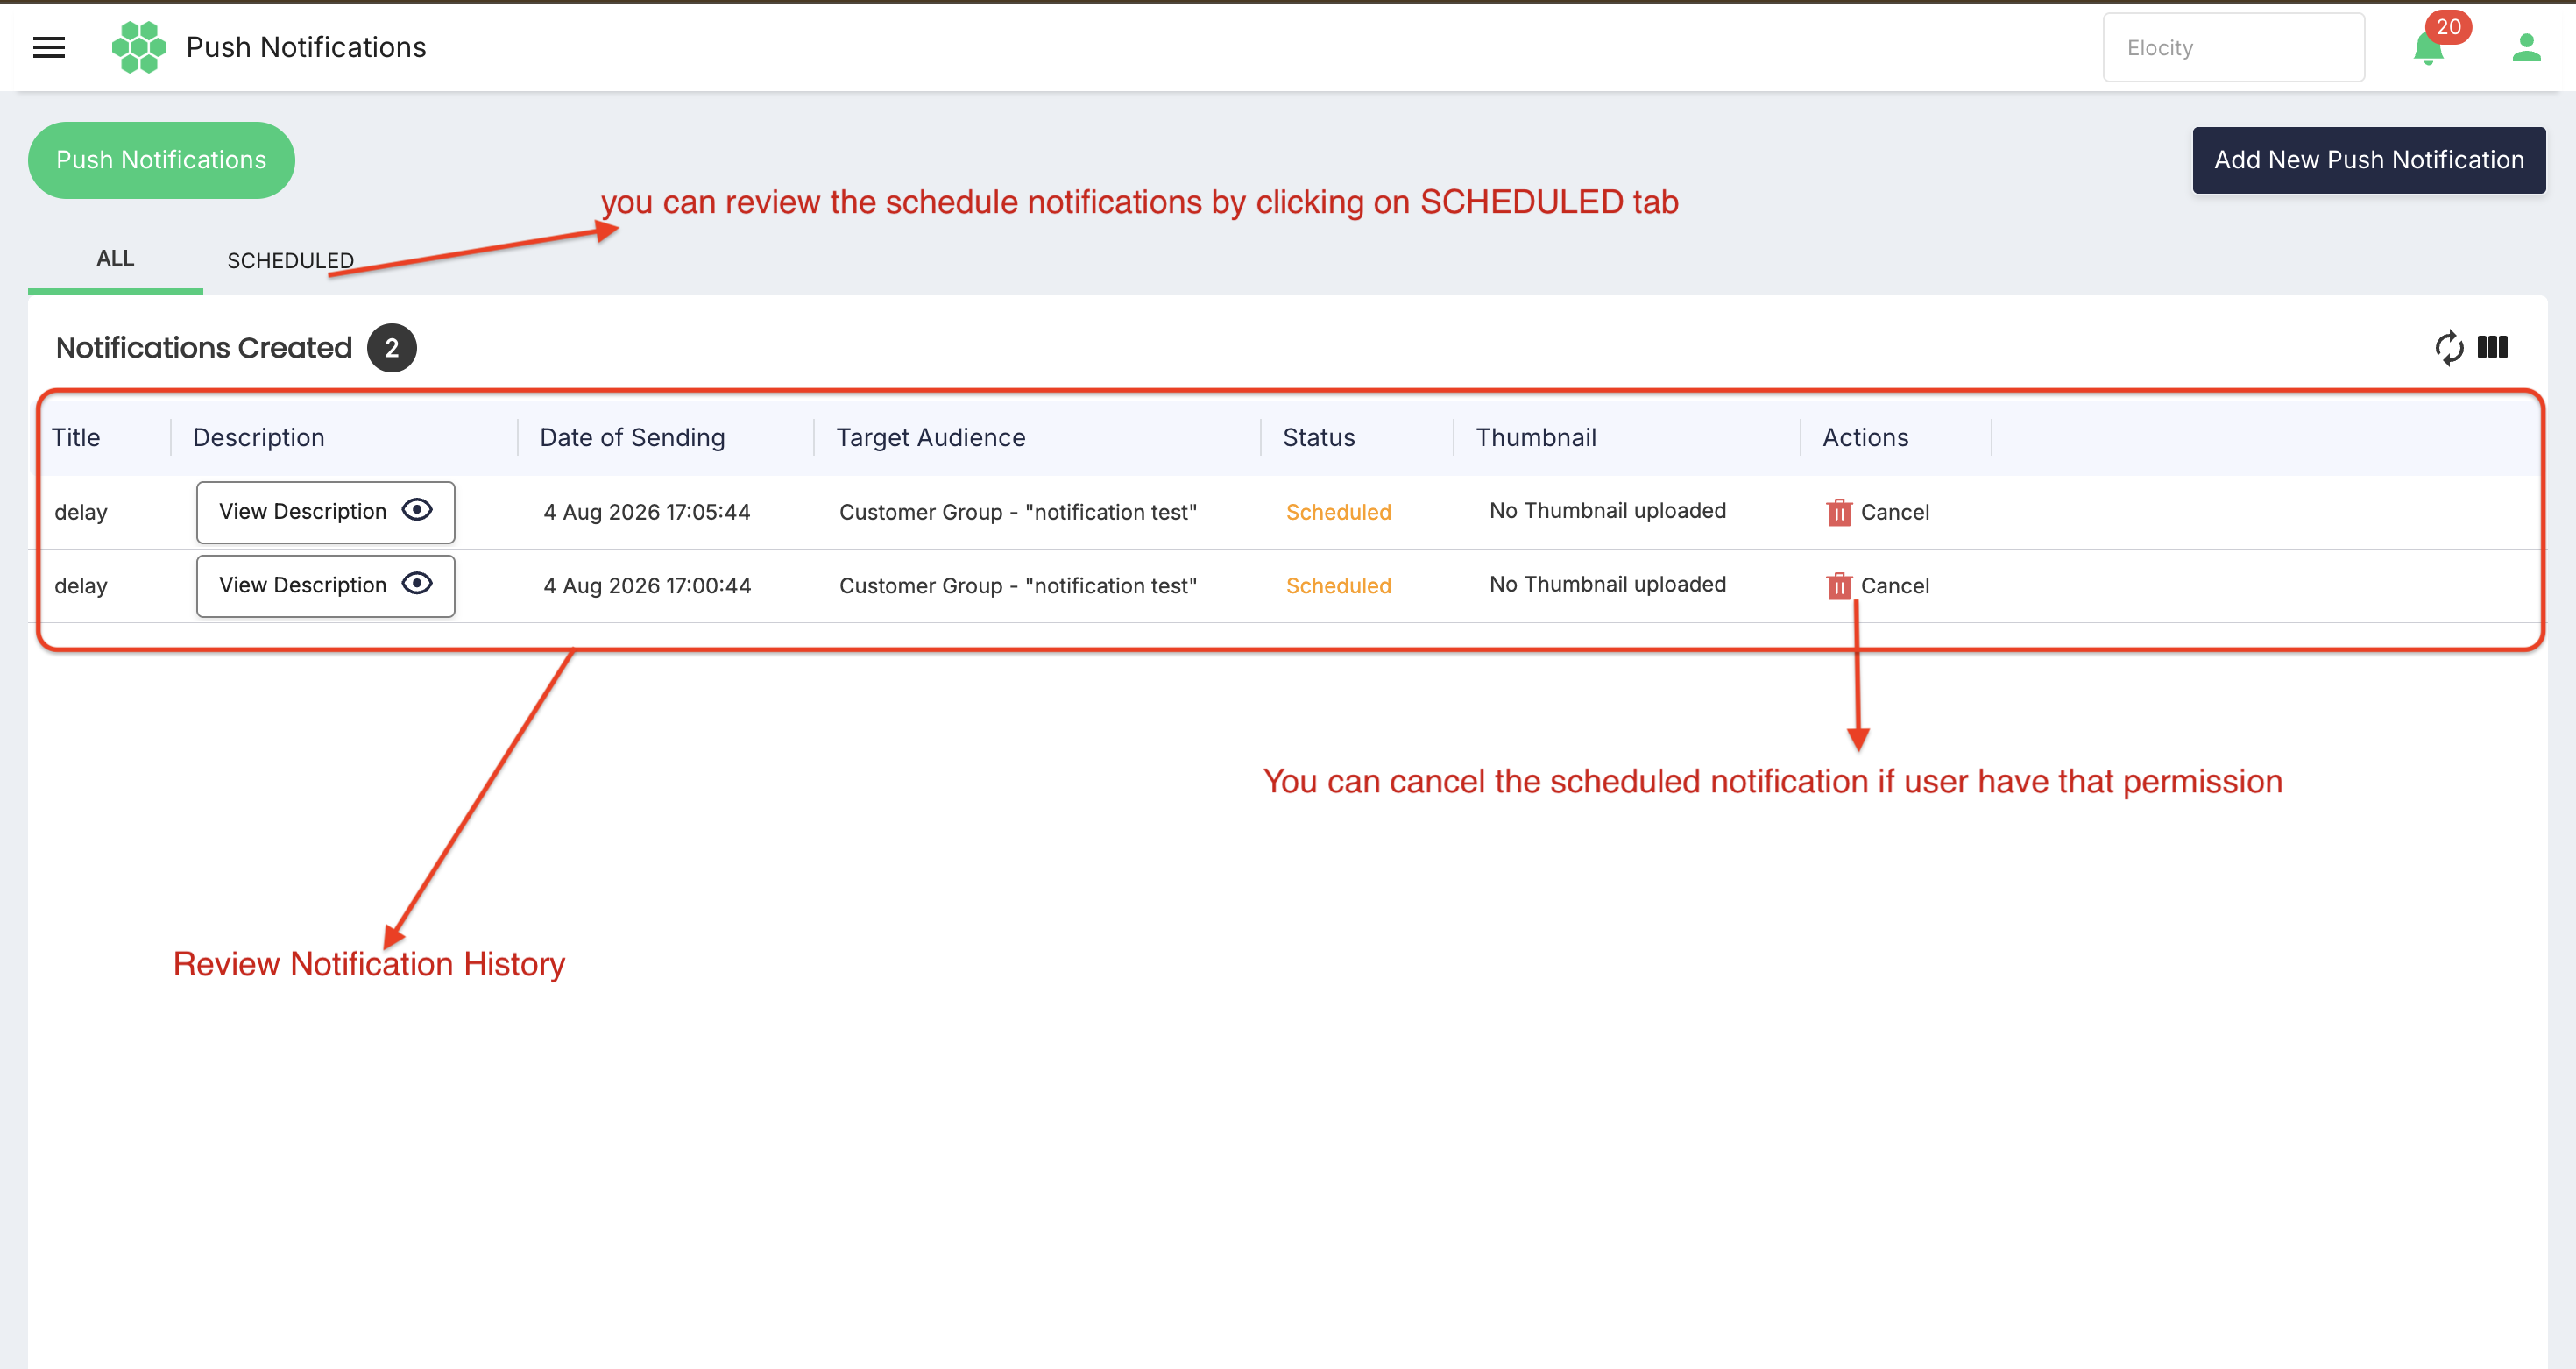
4.2 ALL tab
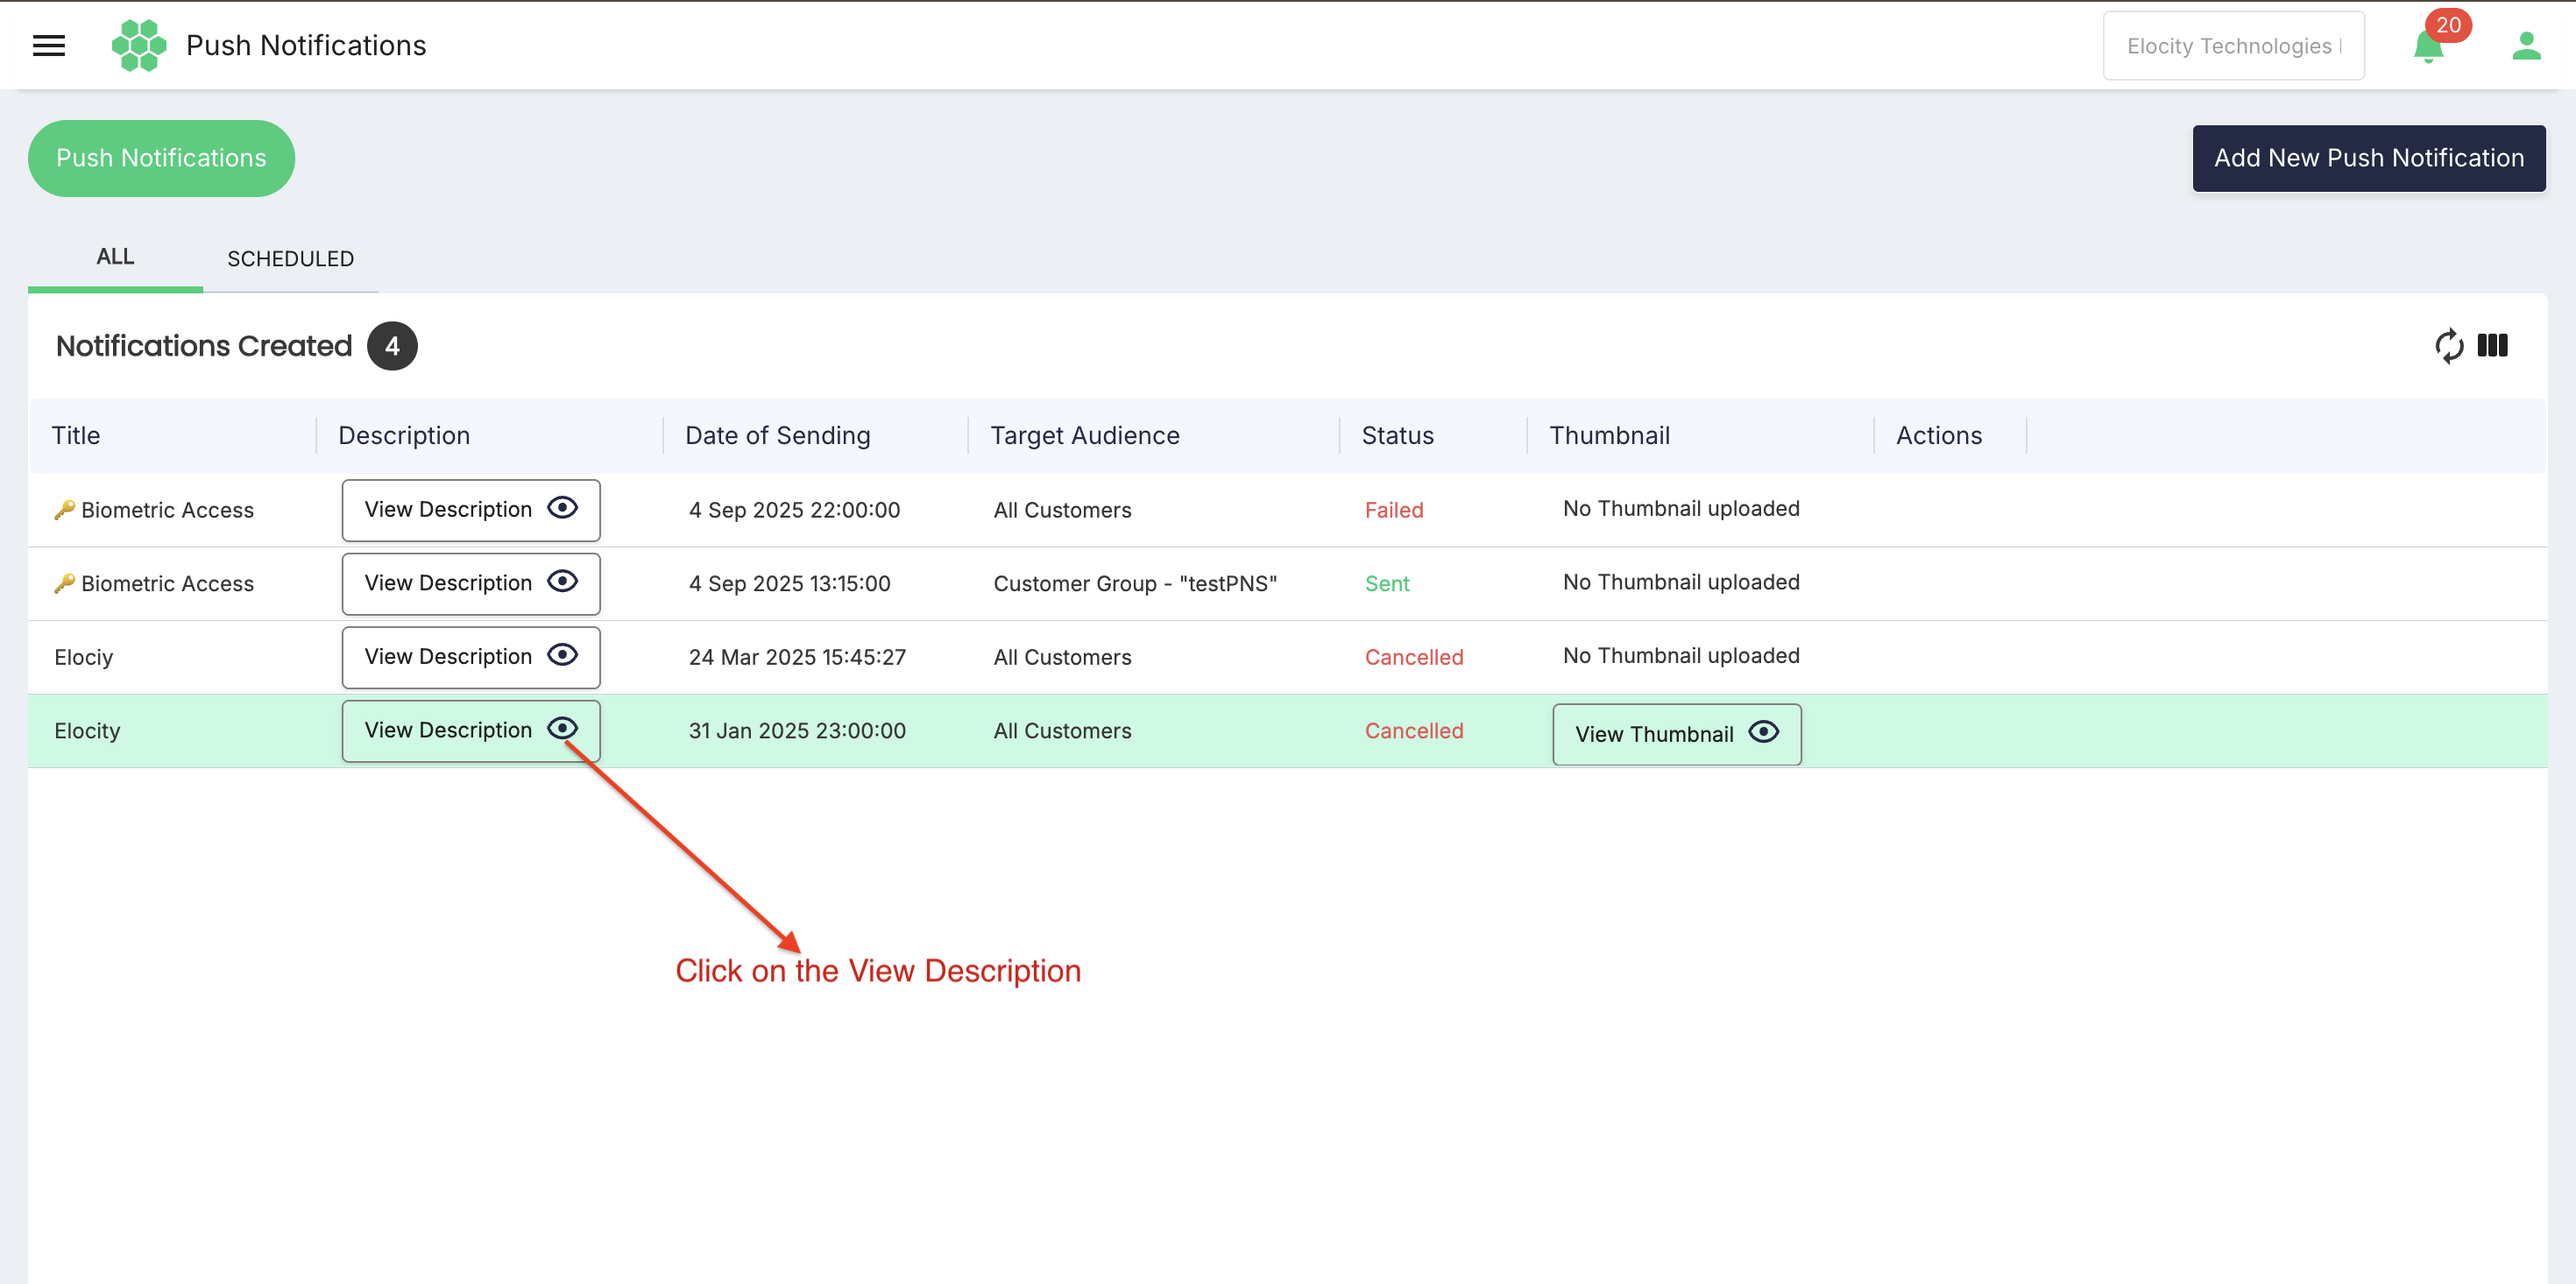
The ALL tab displays the notification history and the total Notifications Created count.
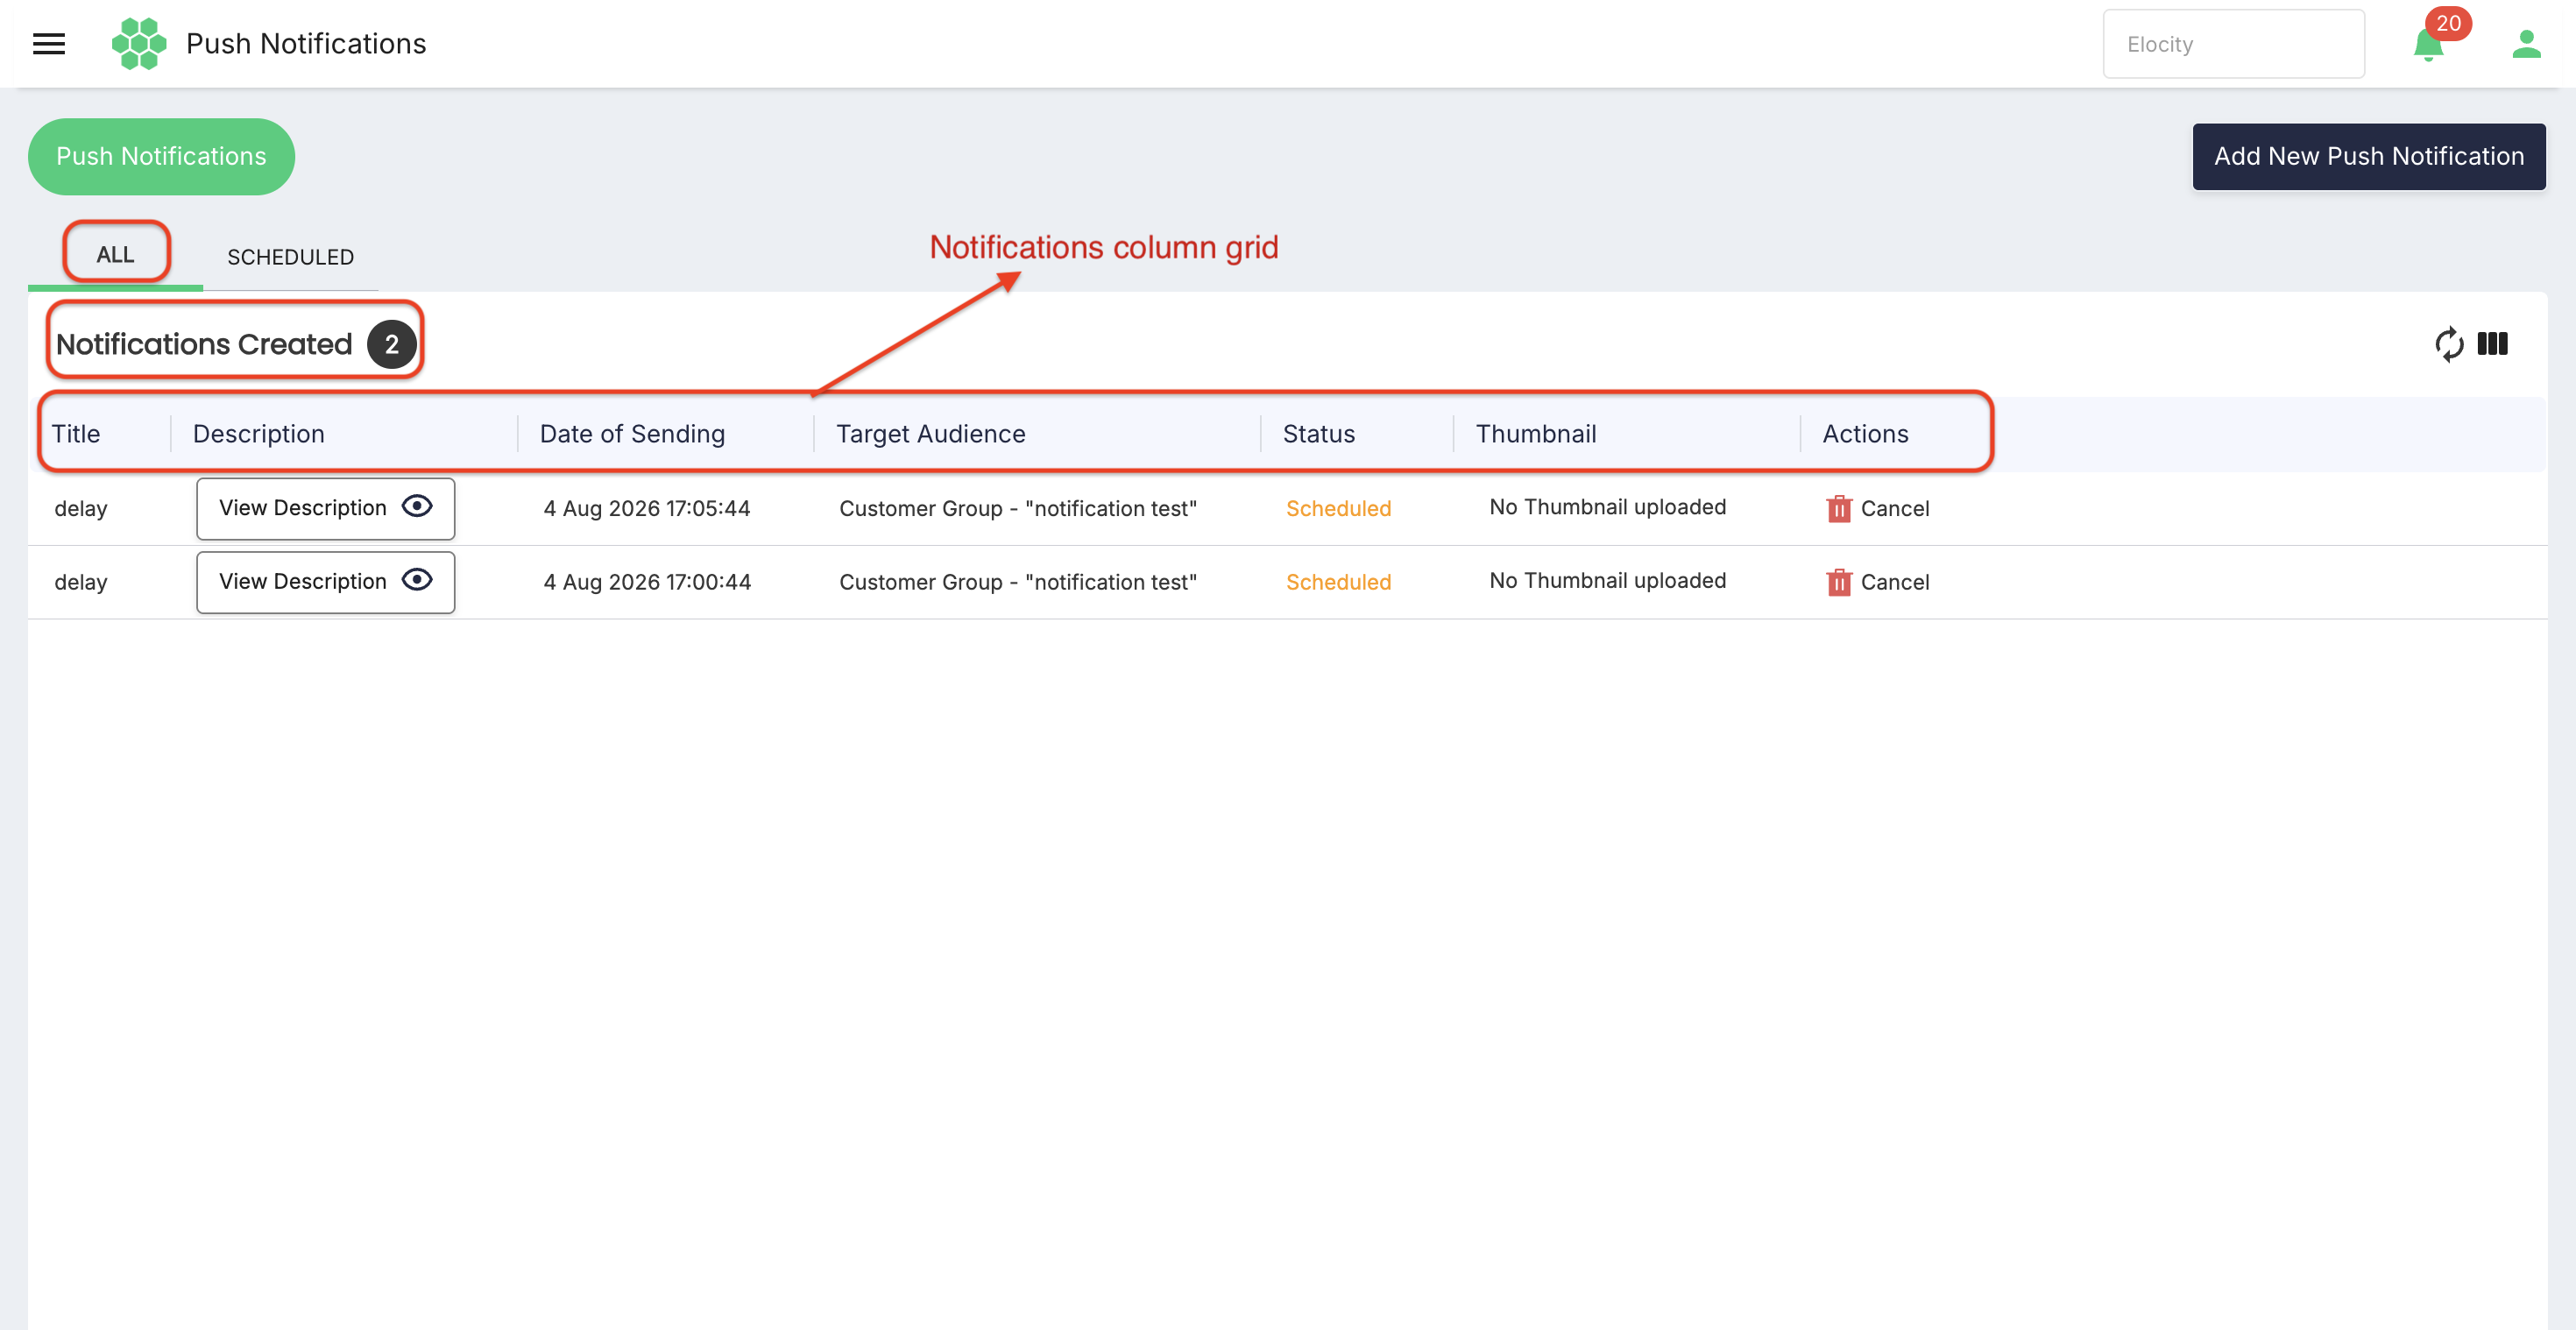
The verified table columns are:
| Column | Description |
|---|---|
| Title | Notification heading shown to the customer. |
| Description | Provides a View Description action for the complete message. |
| Date of Sending | Scheduled or actual delivery date and time represented by the record. |
| Target Audience | Audience used for the notification, such as All Customers or a named customer group. |
| Status | Current result, such as Sent, Failed, or Cancelled. |
| Thumbnail | Indicates that no thumbnail was uploaded or provides View Thumbnail. |
| Actions | Contains record actions when available for the notification's status and the user's permissions. |
4.3 SCHEDULED tab
The SCHEDULED tab lists notifications waiting for future delivery and displays the Scheduled Notifications count.
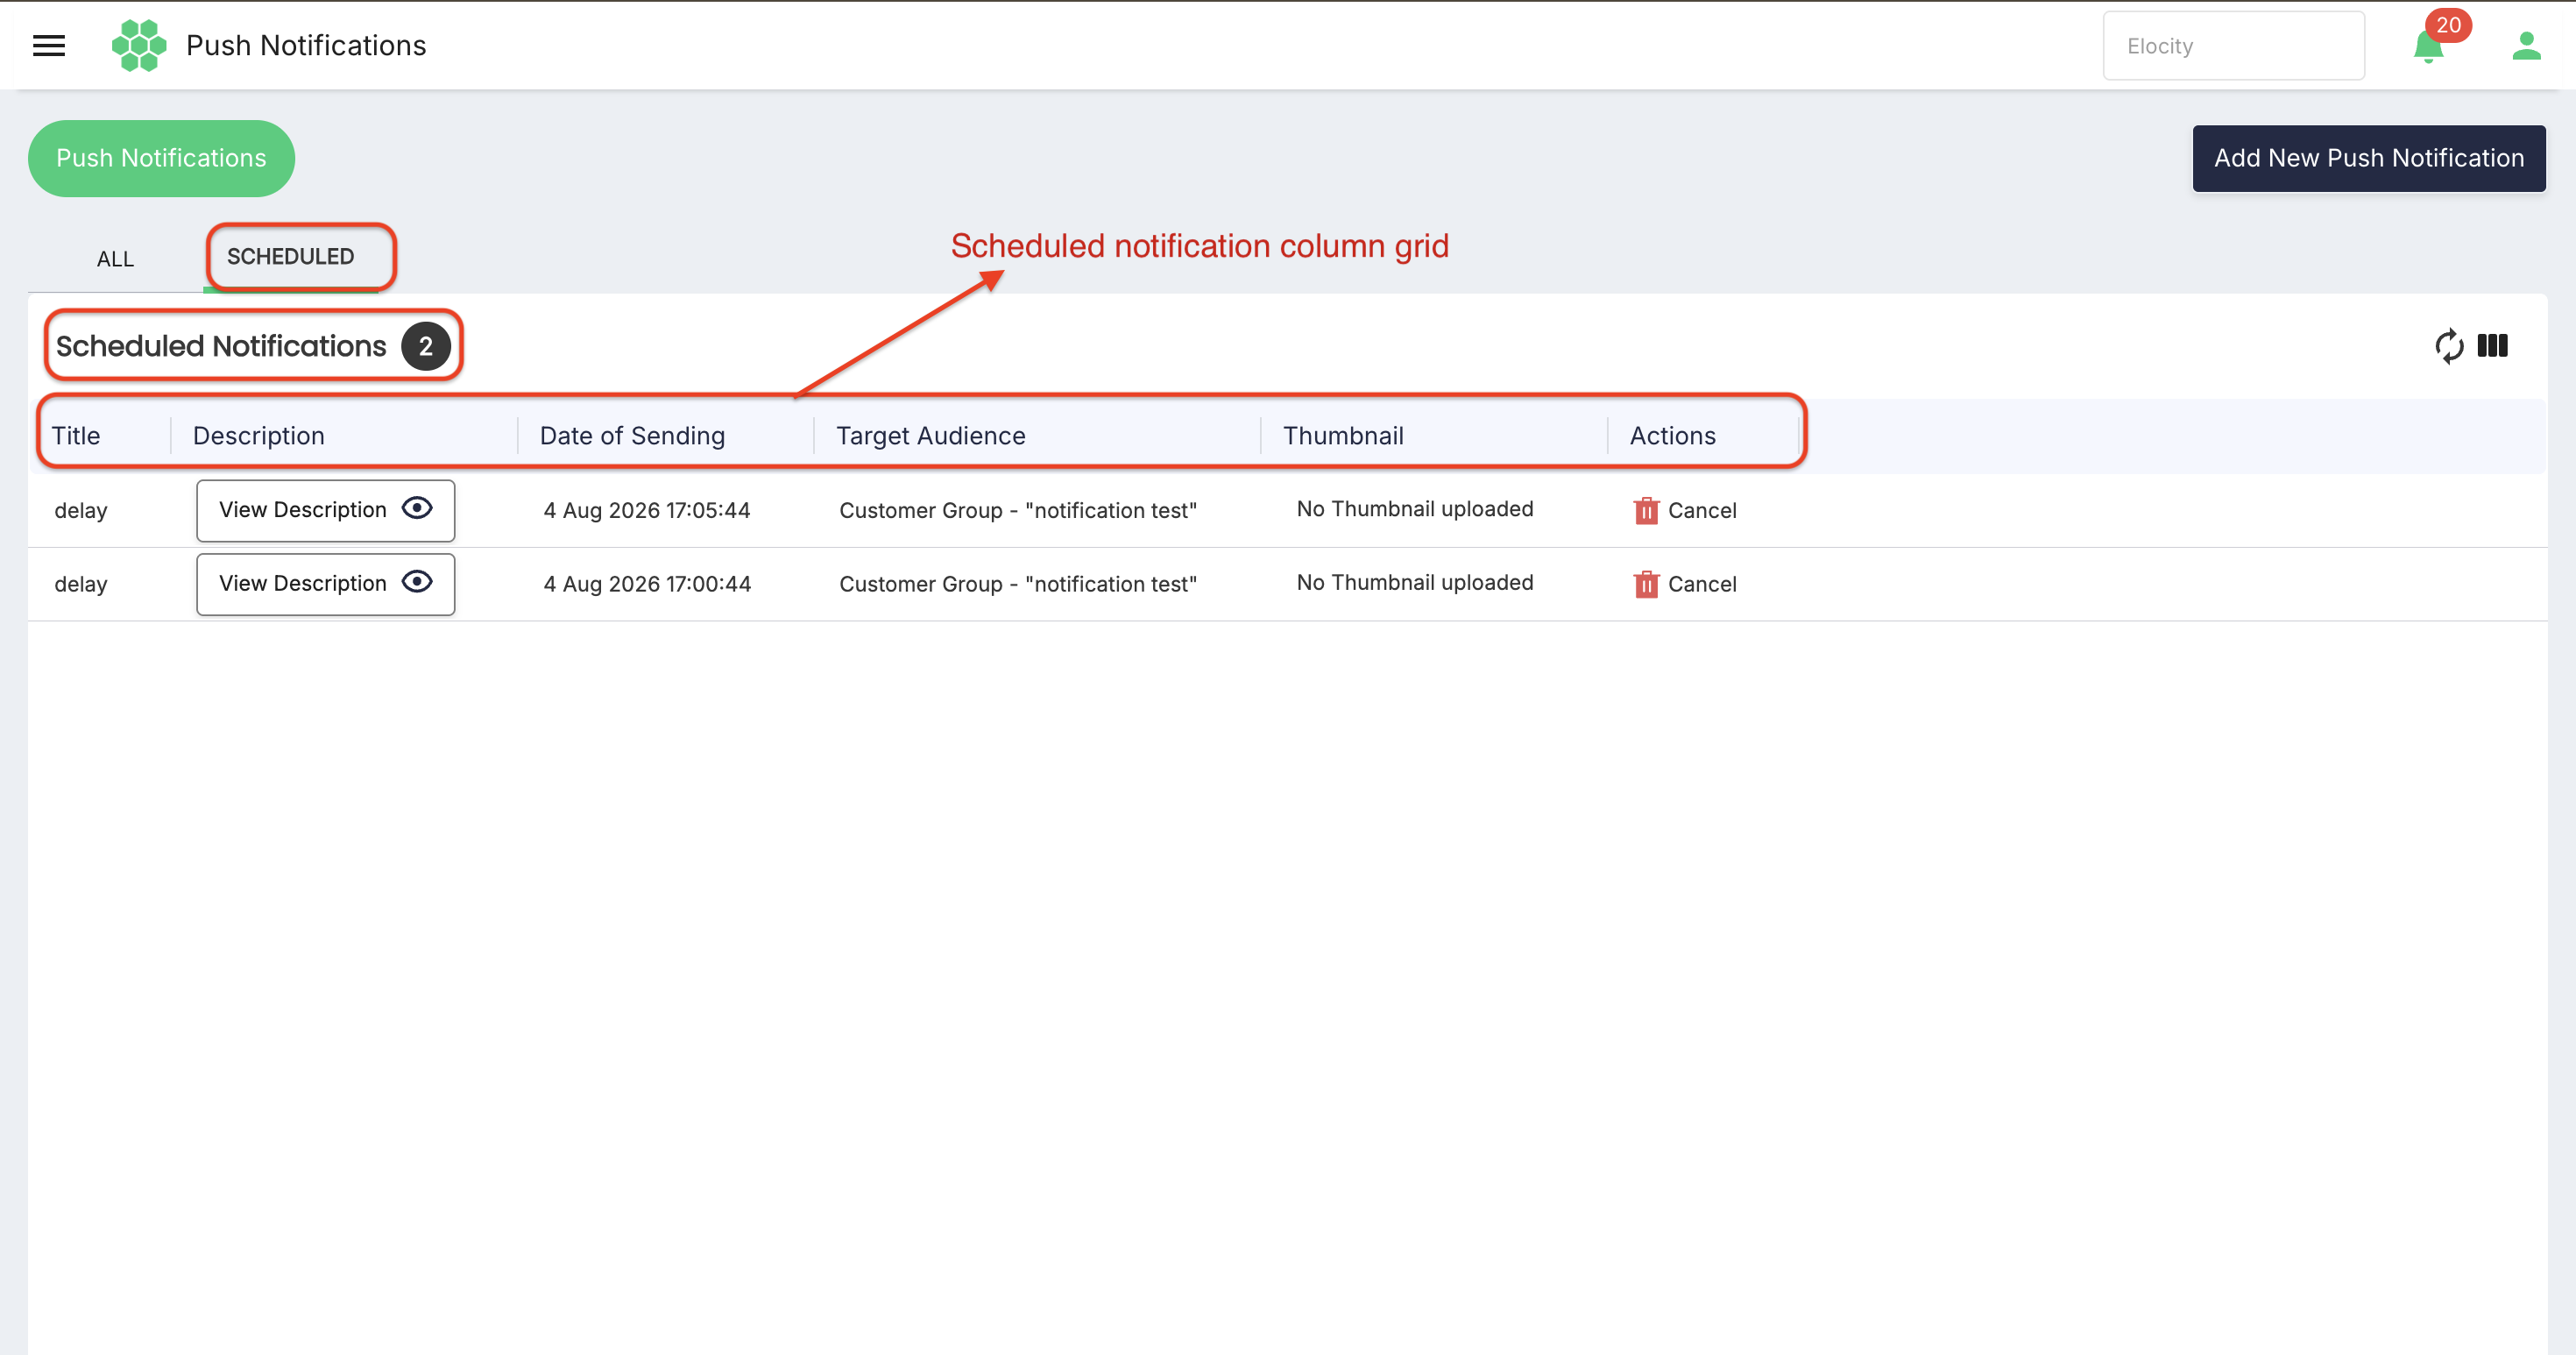
Its verified columns are:
- Title
- Description
- Date of Sending
- Target Audience
- Thumbnail
- Actions
If no future notifications exist, the screen displays No Scheduled Notifications Exist.
4.4 Refresh
Select Refresh to retrieve the latest counts, statuses, and table records. Use Refresh after a notification's scheduled time or when a status appears unchanged.
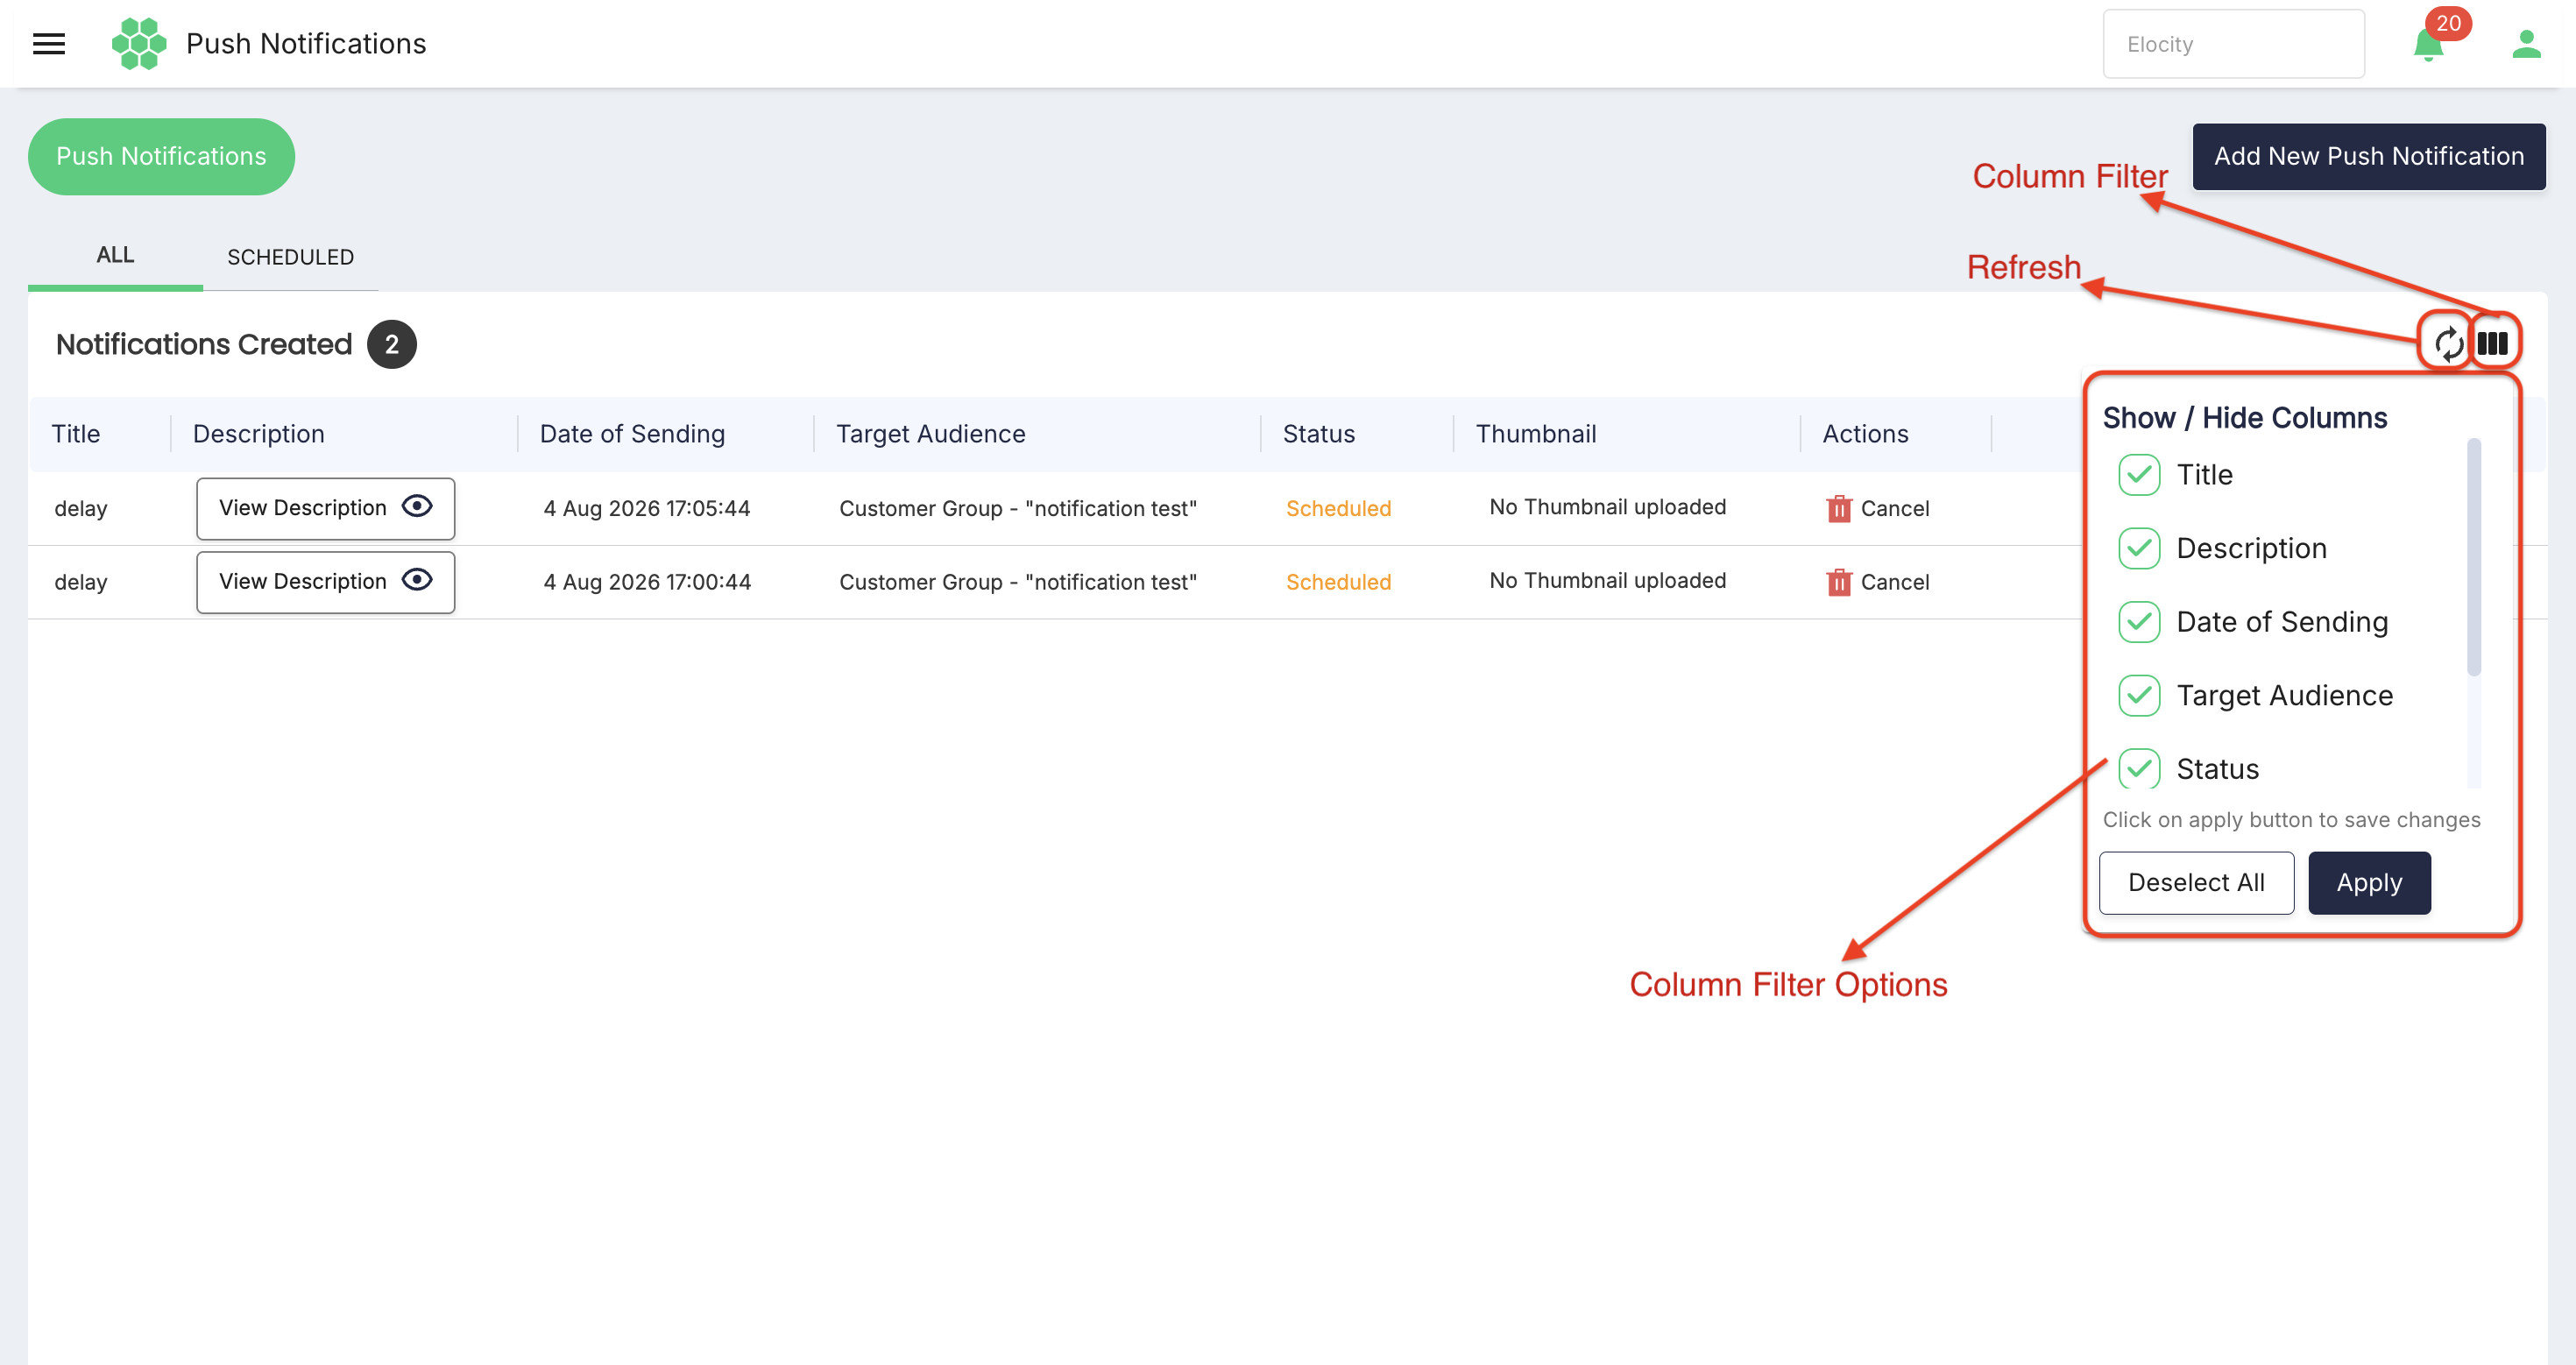
4.5 Column Filter
Select Column Filter to show or hide table columns. The panel provides:
- A checkbox for each available column.
- Deselect All to clear the current column selection.
- Apply to save and display the selected columns.
Column selection changes only the table presentation; it does not modify notification records.
5. Create a push notification
5.1 Open the composer
- Open Push Notifications.
- Confirm the active business account.
- Select Add New Push Notification.
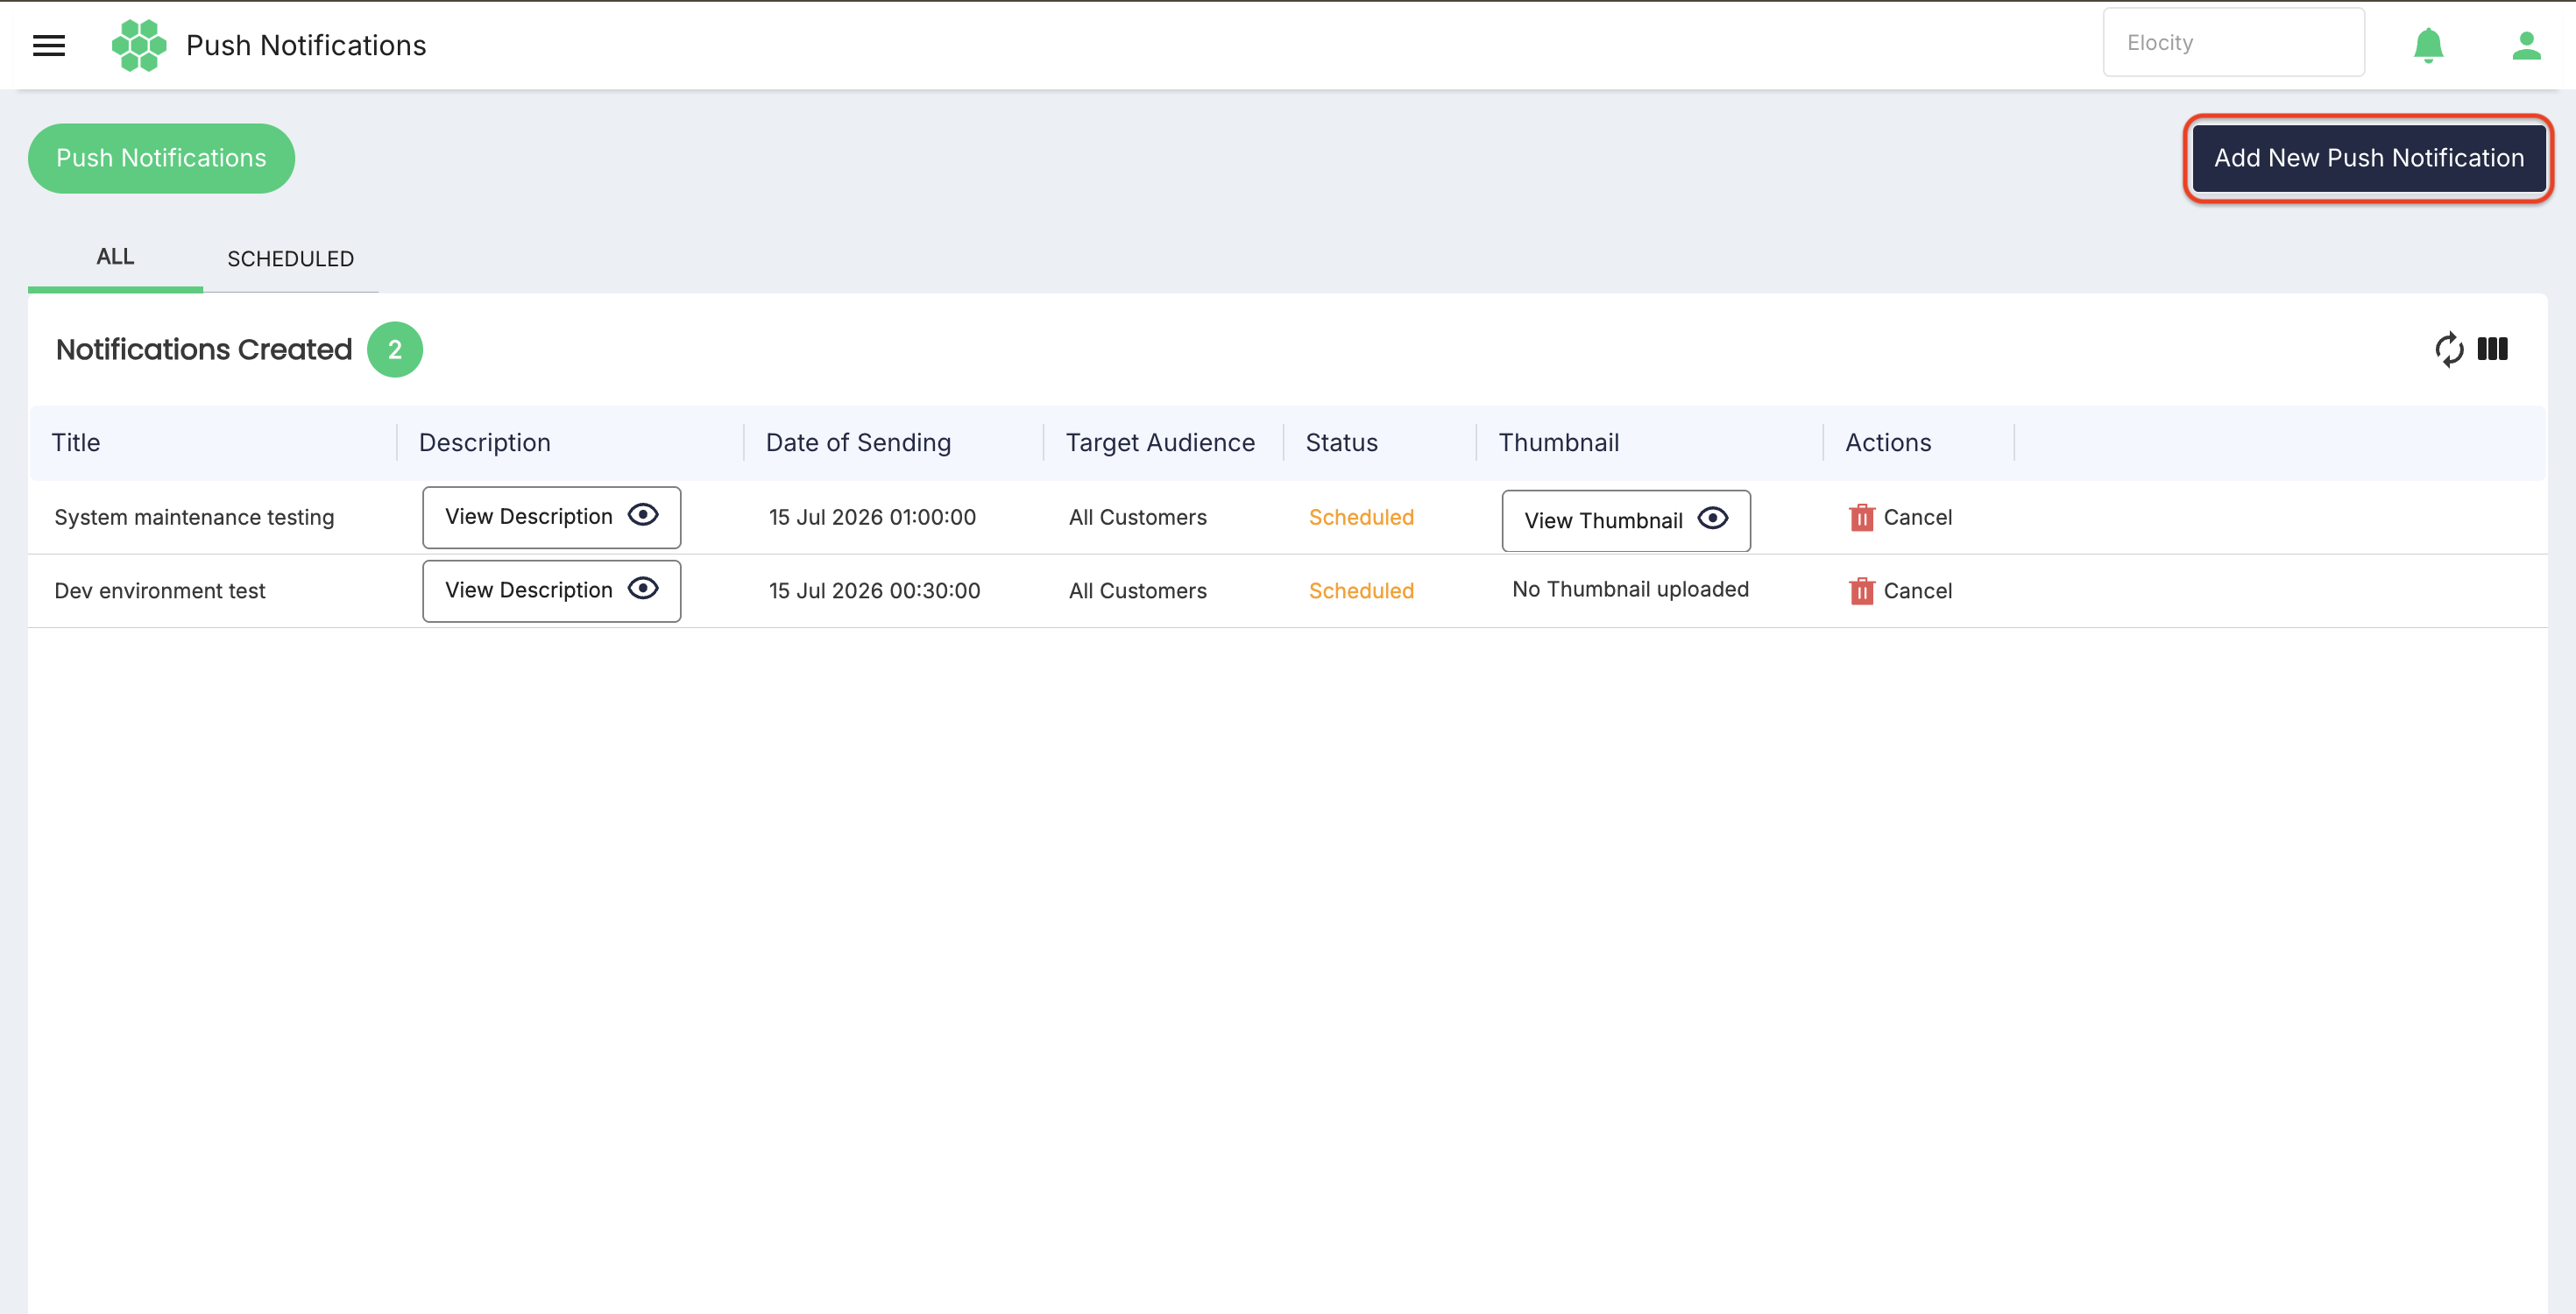
- The Create Push Notification screen opens.
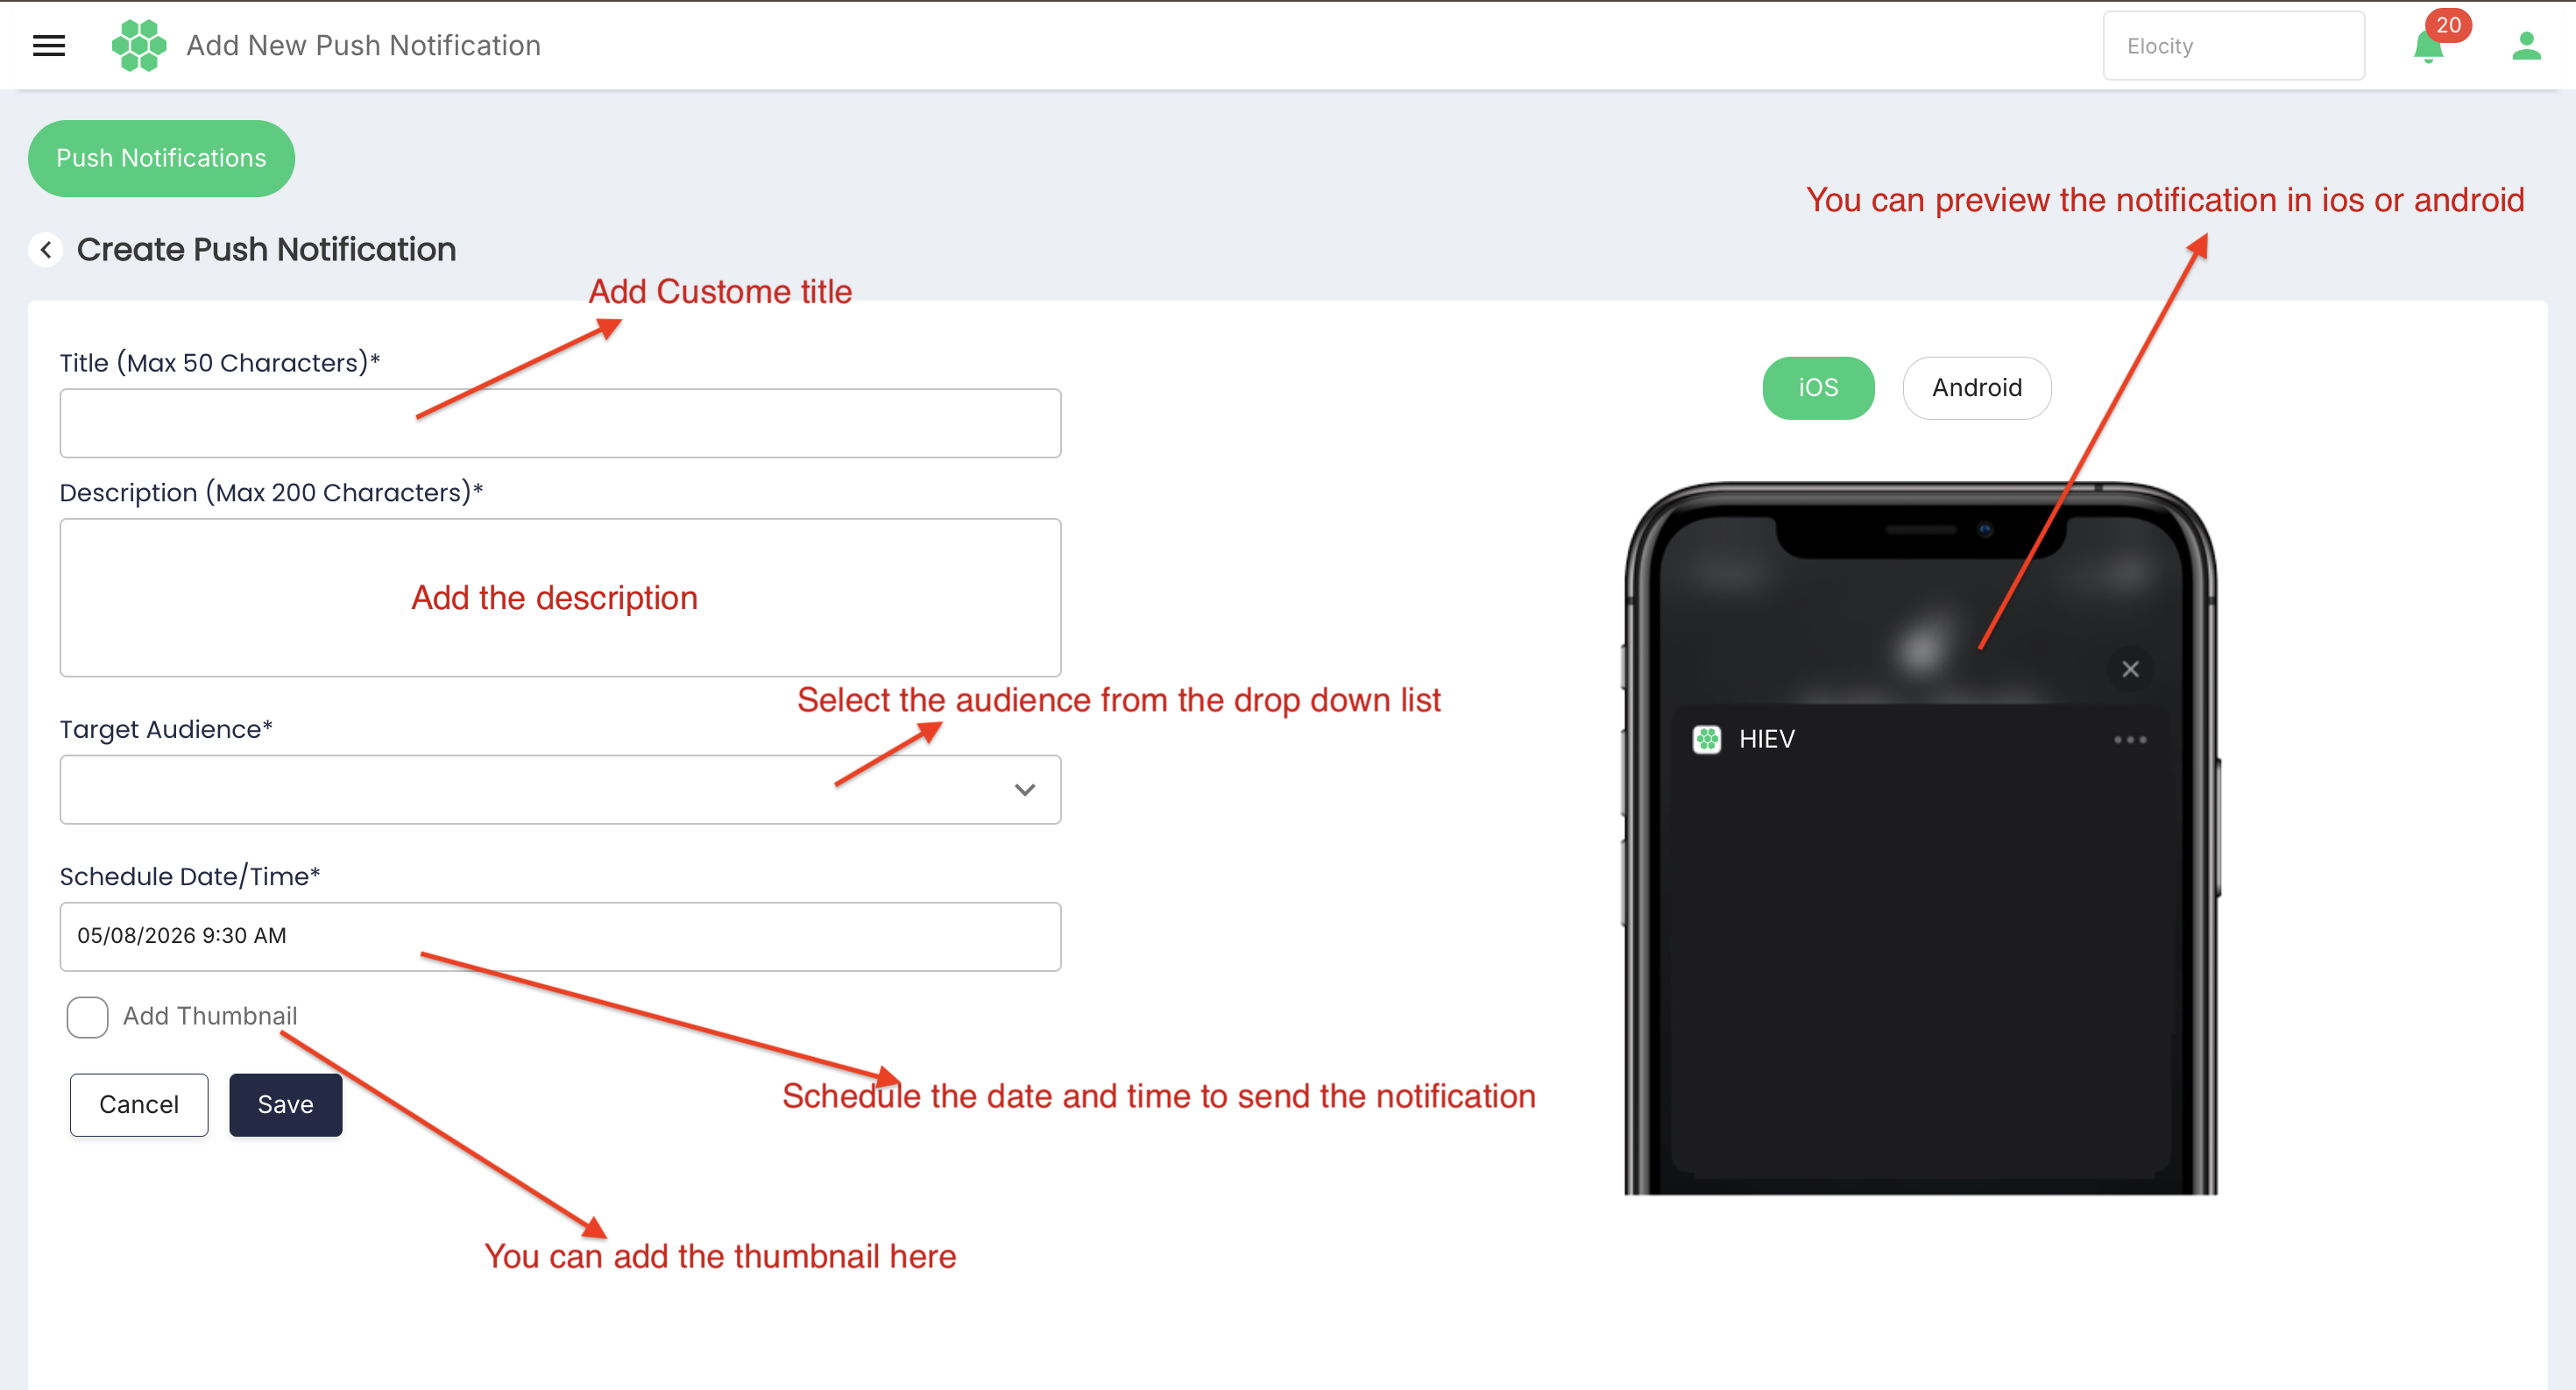
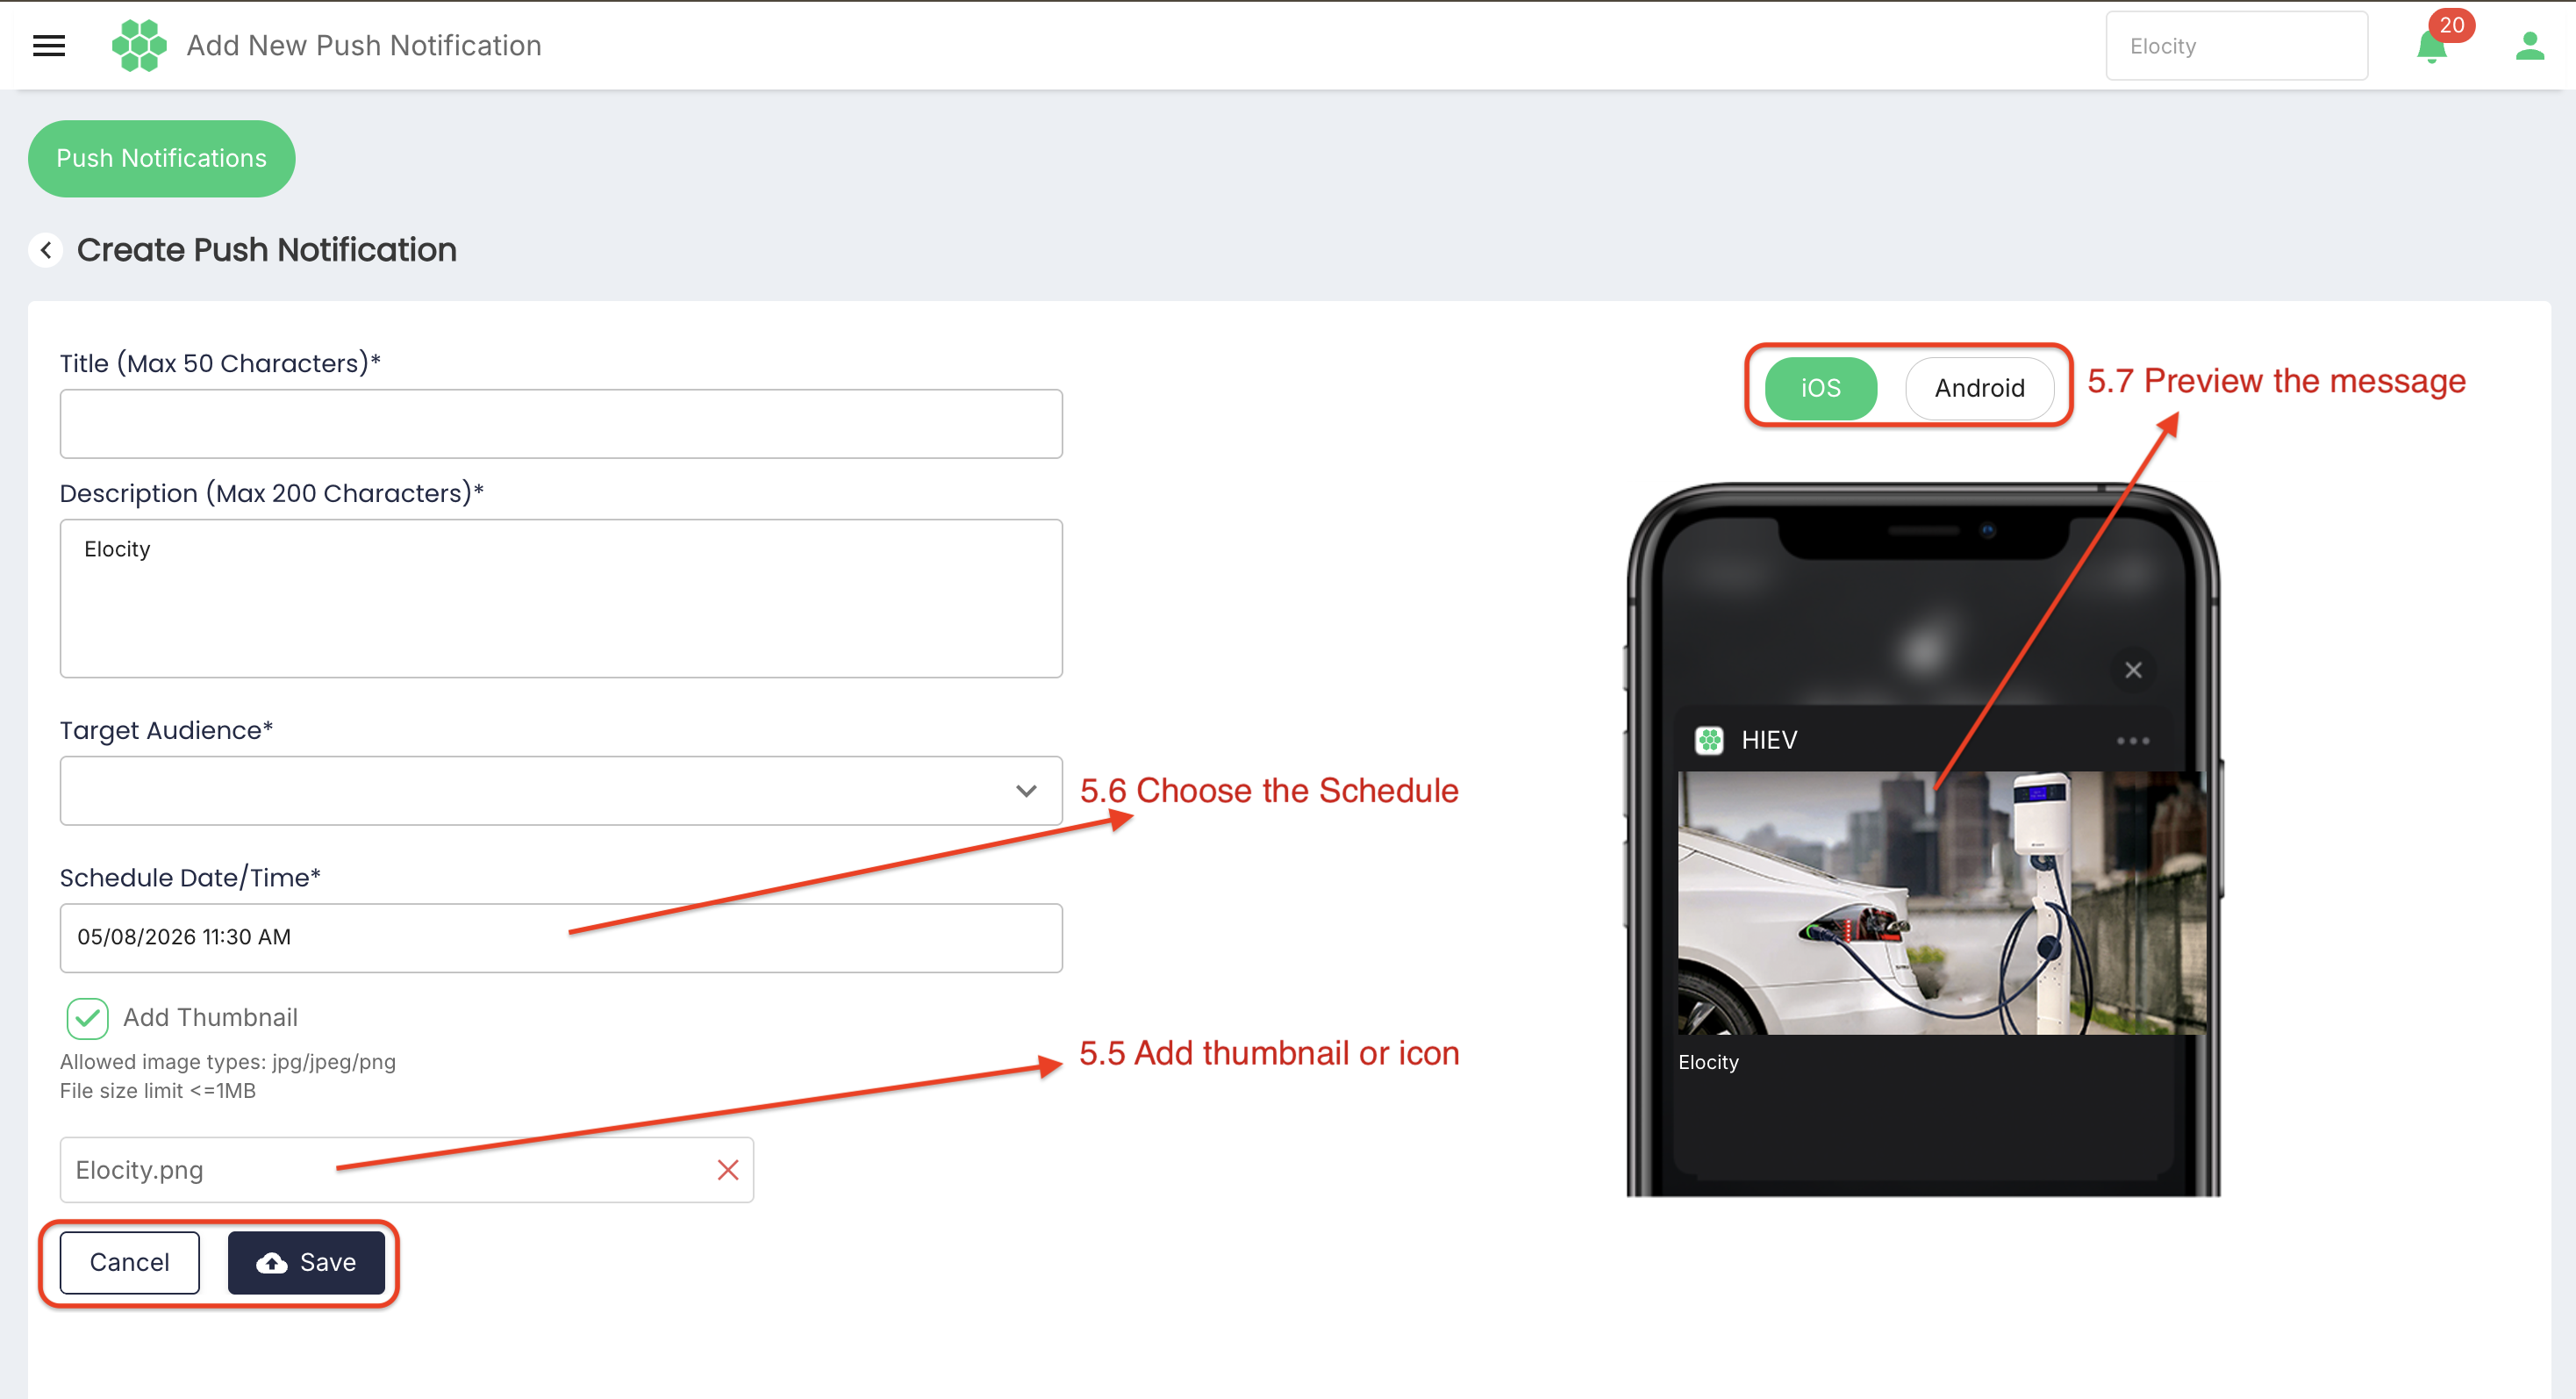
5.2 Complete the content fields
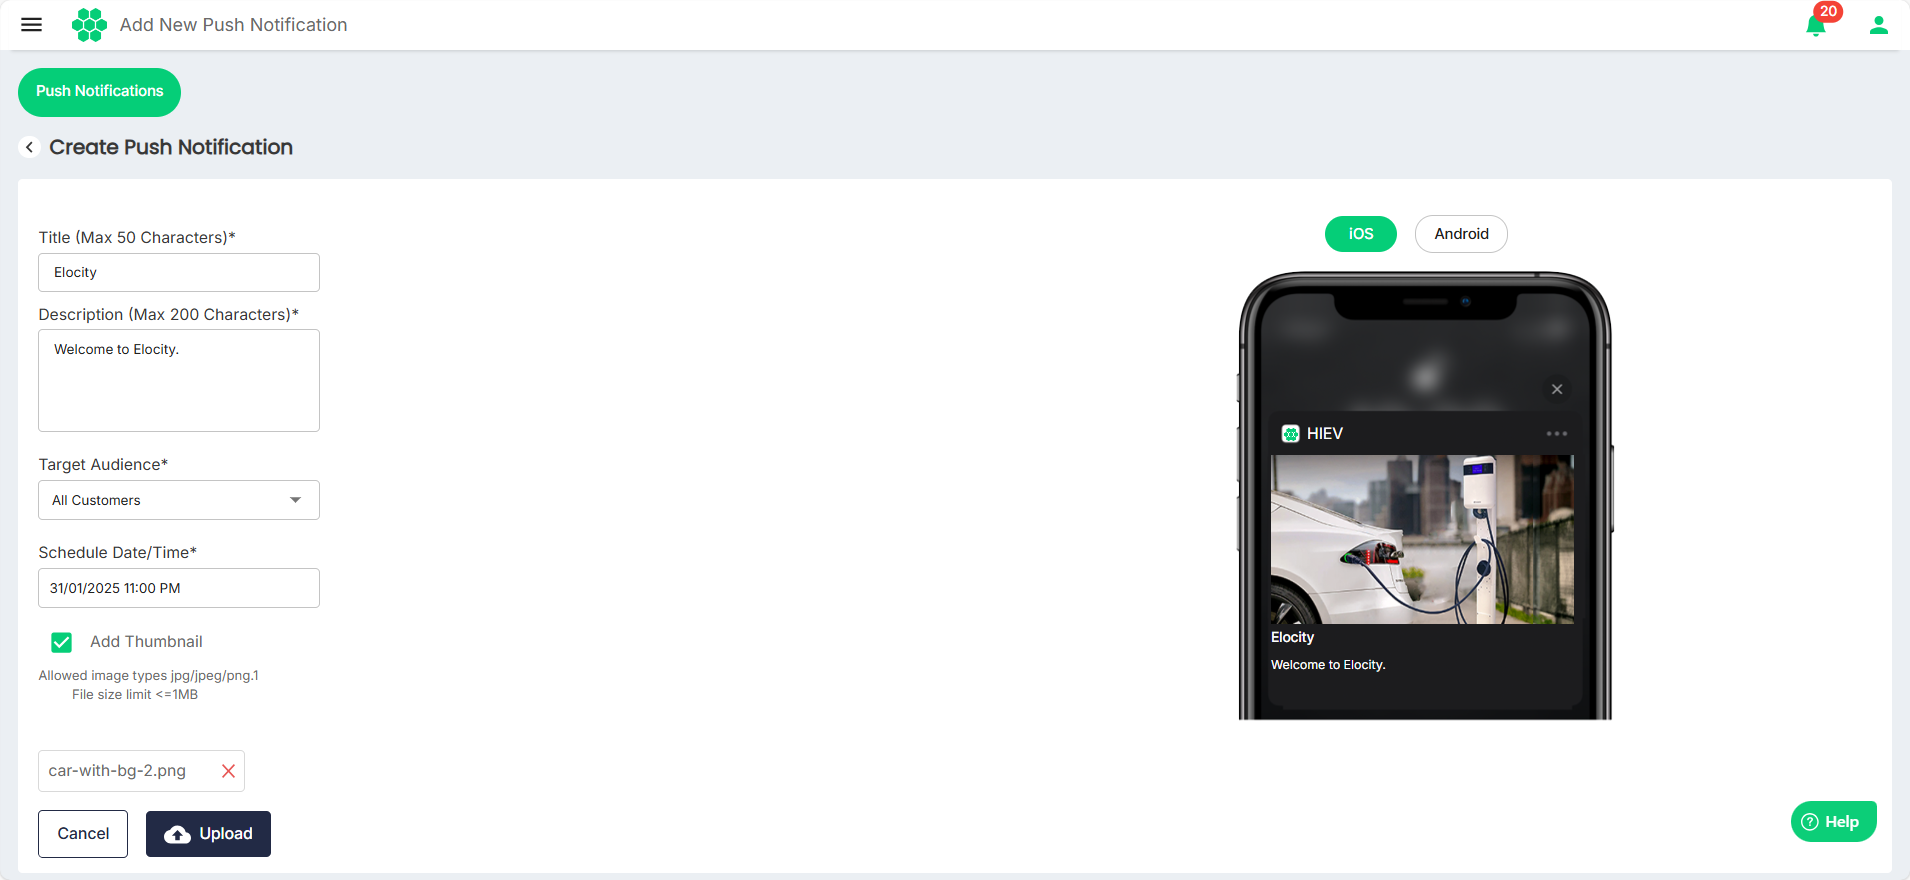
| Field | Requirement and guidance | Live-interface status |
|---|---|---|
| Title | Required. Enter a concise heading of no more than 50 characters. | Verified |
| Description | Required. Enter the message body using no more than 200 characters. | Verified |
| Target Audience | Required. Select the population that should receive the message. | Verified |
| Schedule Date/Time | Required in the current form. Select the intended delivery date and time and confirm the time zone. | Verified |
| Add Thumbnail | Adds visual content to the notification. Use an approved, legible asset. | Verified |
| Deep Link | Opens a specific feature or screen in the mobile application when the customer selects the notification. | Required by specification; not displayed in the reviewed form |
| Notification Icon | Adds an icon to the notification content or system notification presentation. | Required by specification; the reviewed form exposes a thumbnail rather than a dedicated icon field |
5.3 Select a target audience
The reviewed form provides these audience types:
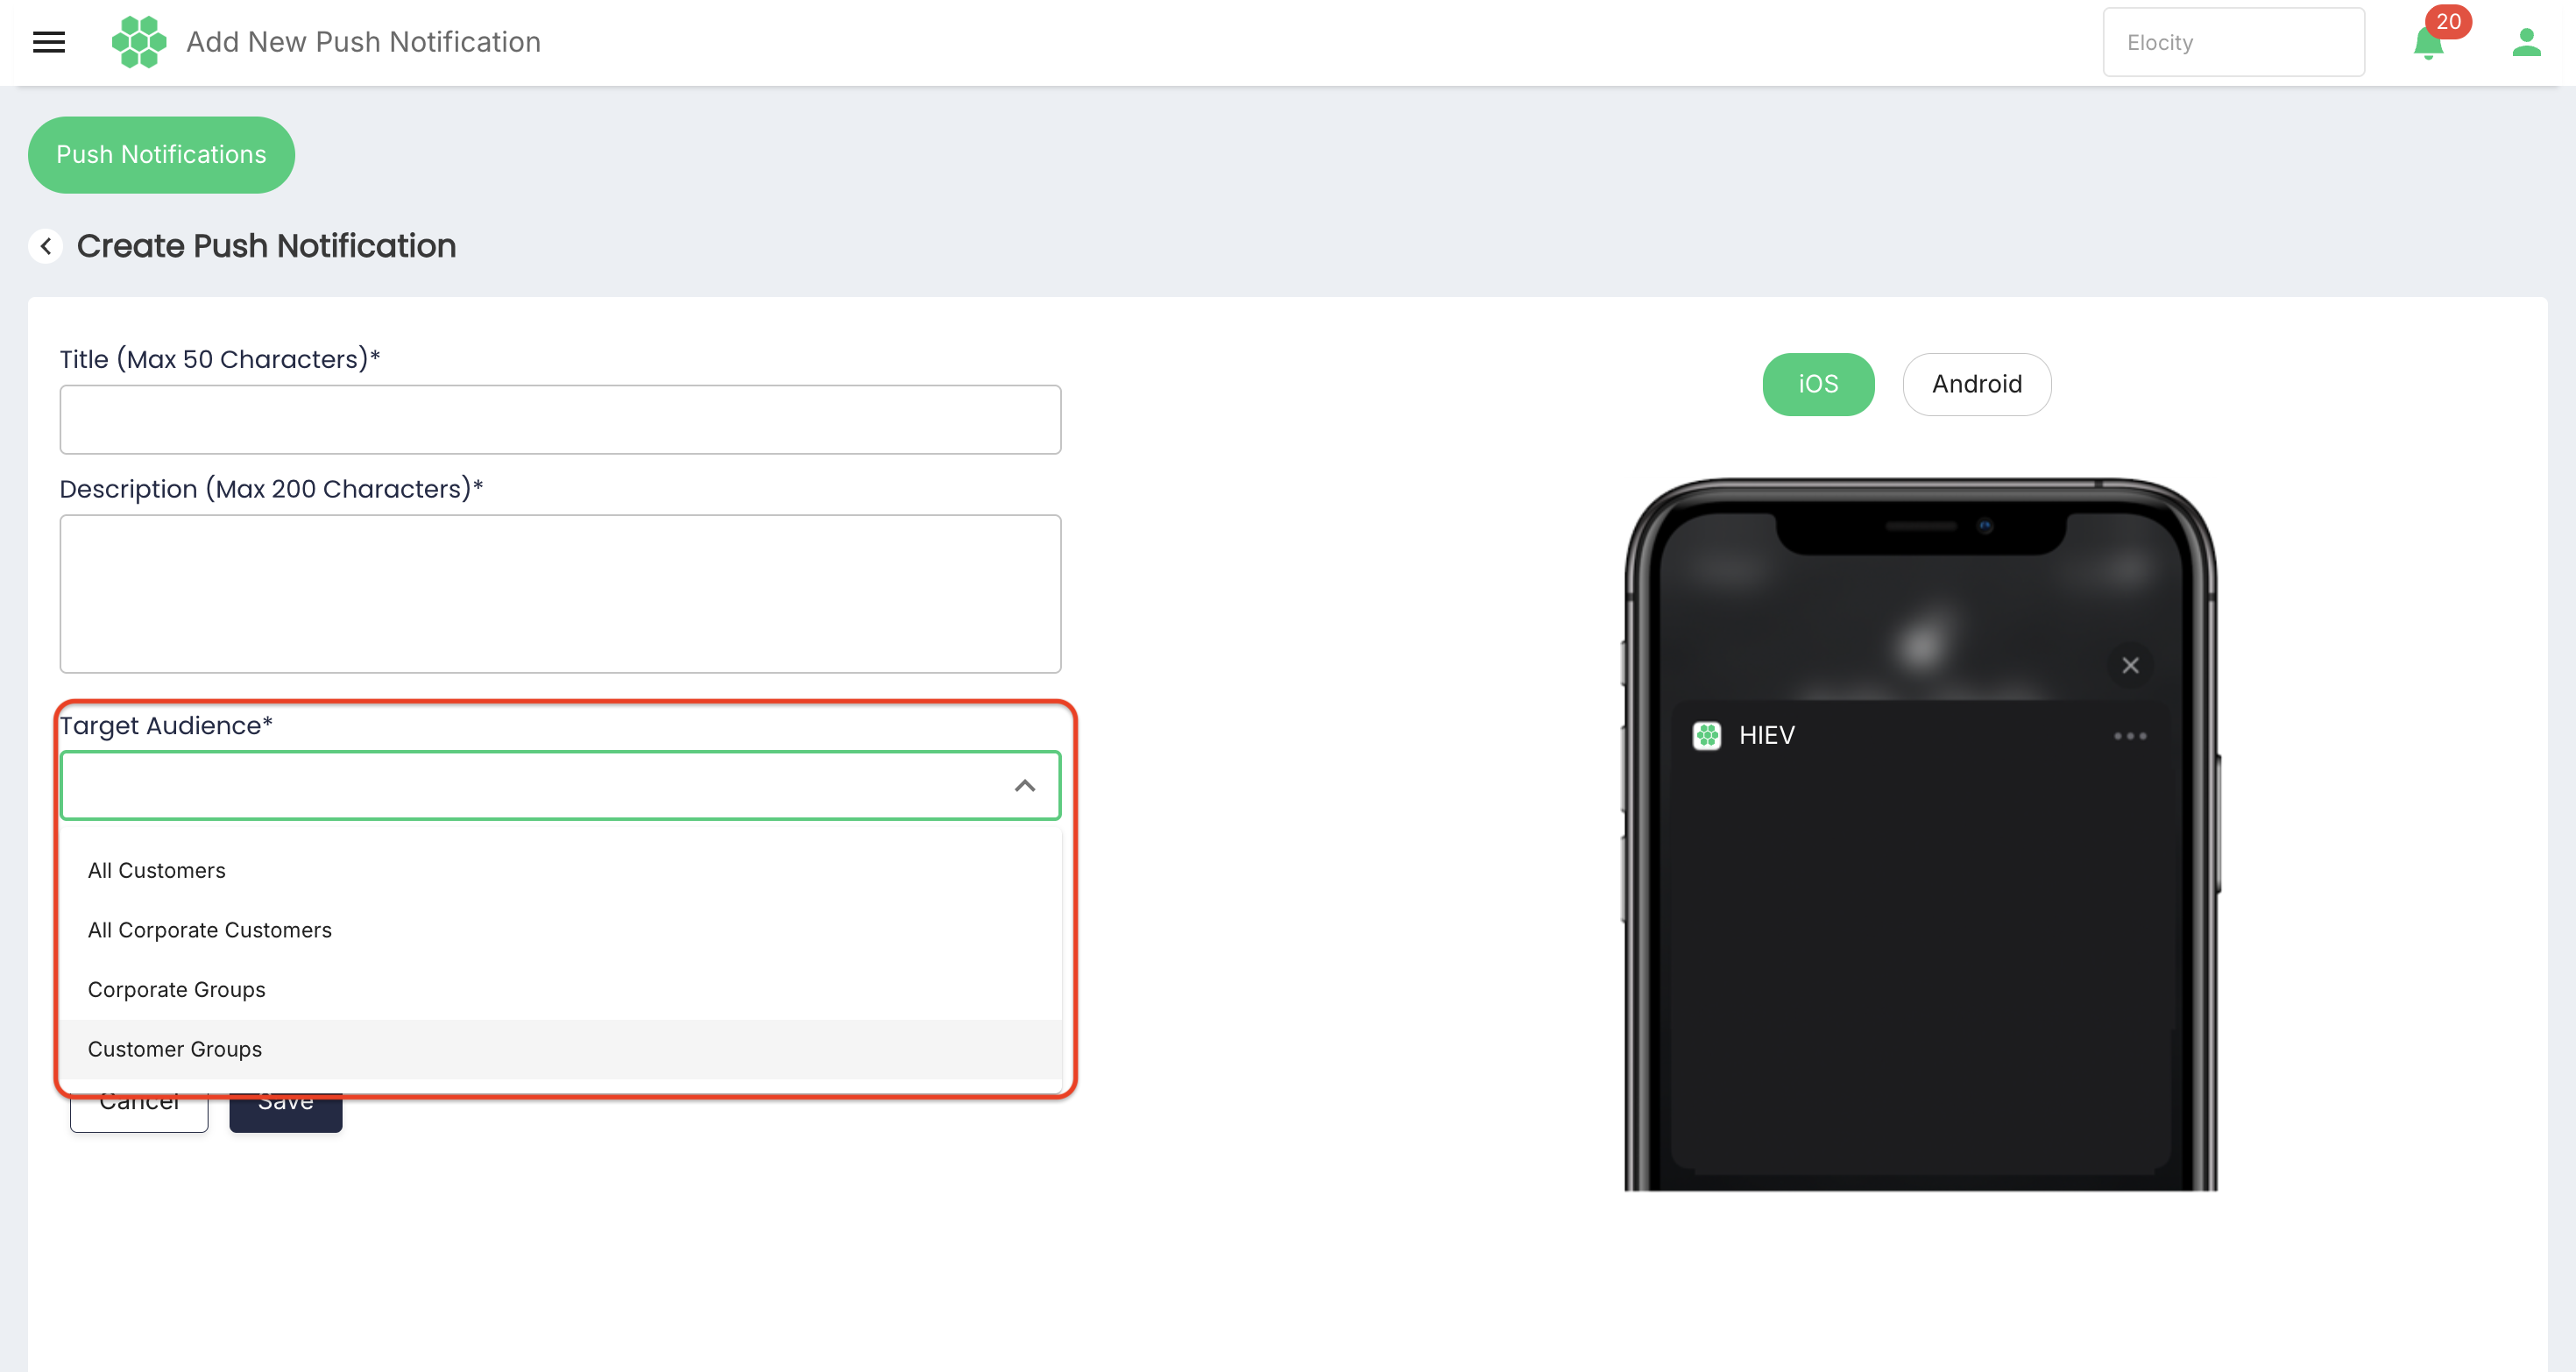
| Audience type | Intended use |
|---|---|
| All Customers | Sends to all eligible customers in the active business context. |
| All Corporate Customers | Sends to eligible customers associated with corporate accounts. |
| Corporate Groups | Targets an existing corporate partner and corporate partner group. |
| Customer Groups | Targets an existing customer group; this is the current interface's closest mapping to a reusable user segment. |
Target an existing corporate group
- In Target Audience, select Corporate Groups.
- Select or confirm the required Corporate Partner.
- Select the required Corporate Partner Group.
- Recheck the group name and expected recipient count before saving.
Only active groups available to the selected business and the user's access scope should be selectable.
Target a customer group or segment
- In Target Audience, select Customer Groups.
- Open the Customer Groups selector.
- Select the intended reusable group.
- Confirm the group criteria, membership refresh time, and estimated recipient count.
The product requirement also calls for selecting one or multiple segments in one notification. Multi-segment selection was not evident in the reviewed form. Where enabled, select all required segments and confirm whether duplicate members are deduplicated before delivery.
5.4 Add a deep link
A deep link directs the customer to a relevant destination after the notification is selected. Example destinations include:
- Active charging session
- Charging history
- Station map or station details
- Wallet or payment details
- Offers or promotions
- Account or security settings
When the deep-link feature is available:
- Enable or select Deep Link.
- Choose the supported mobile feature or screen.
- Provide the required record identifier or route parameter, if applicable.
- Verify that the destination exists on both iOS and Android.
- Confirm the fallback behaviour for signed-out users, unsupported app versions, deleted records, or invalid parameters.
- Test the link in a non-production audience before a large campaign.
A deep link should never expose unauthorized data. The mobile application must apply its normal authentication and access-control checks after opening the destination.
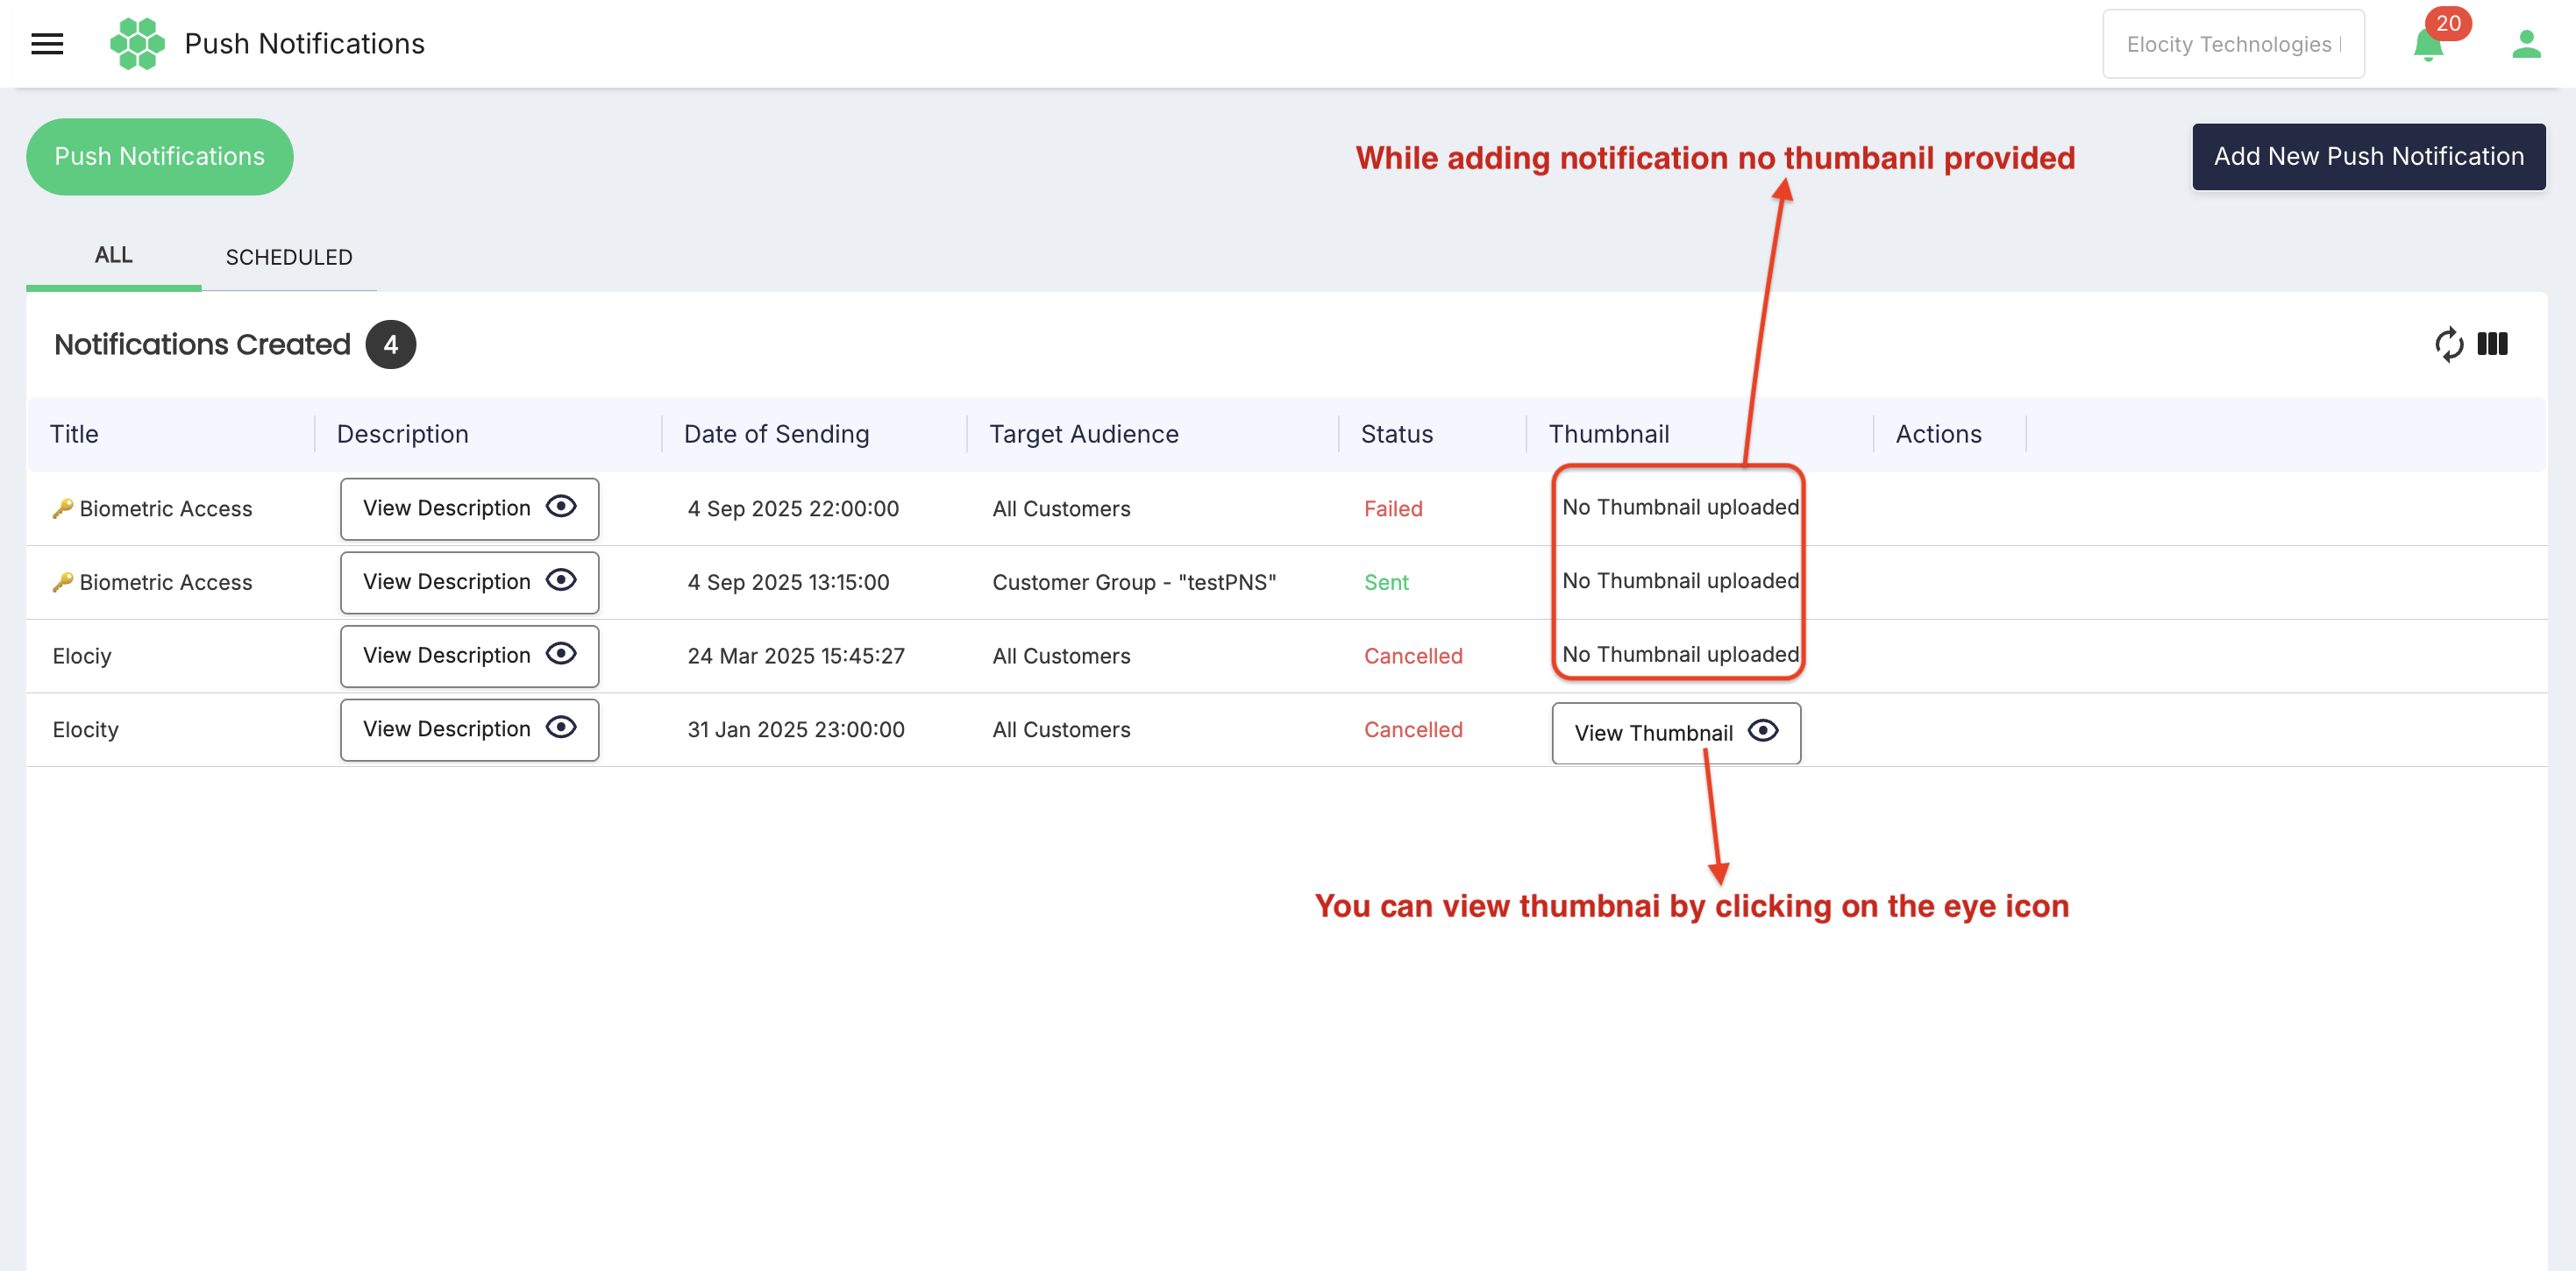
5.5 Add a thumbnail or icon
- Select Add Thumbnail or the available icon control.
- Choose an approved asset that meets the configured file type, size, and dimension rules.
- Avoid small text inside the image because notification layouts vary by device.
- Confirm that the asset is suitable for both light and dark device themes.
- Use the platform previews to confirm how the notification appears.
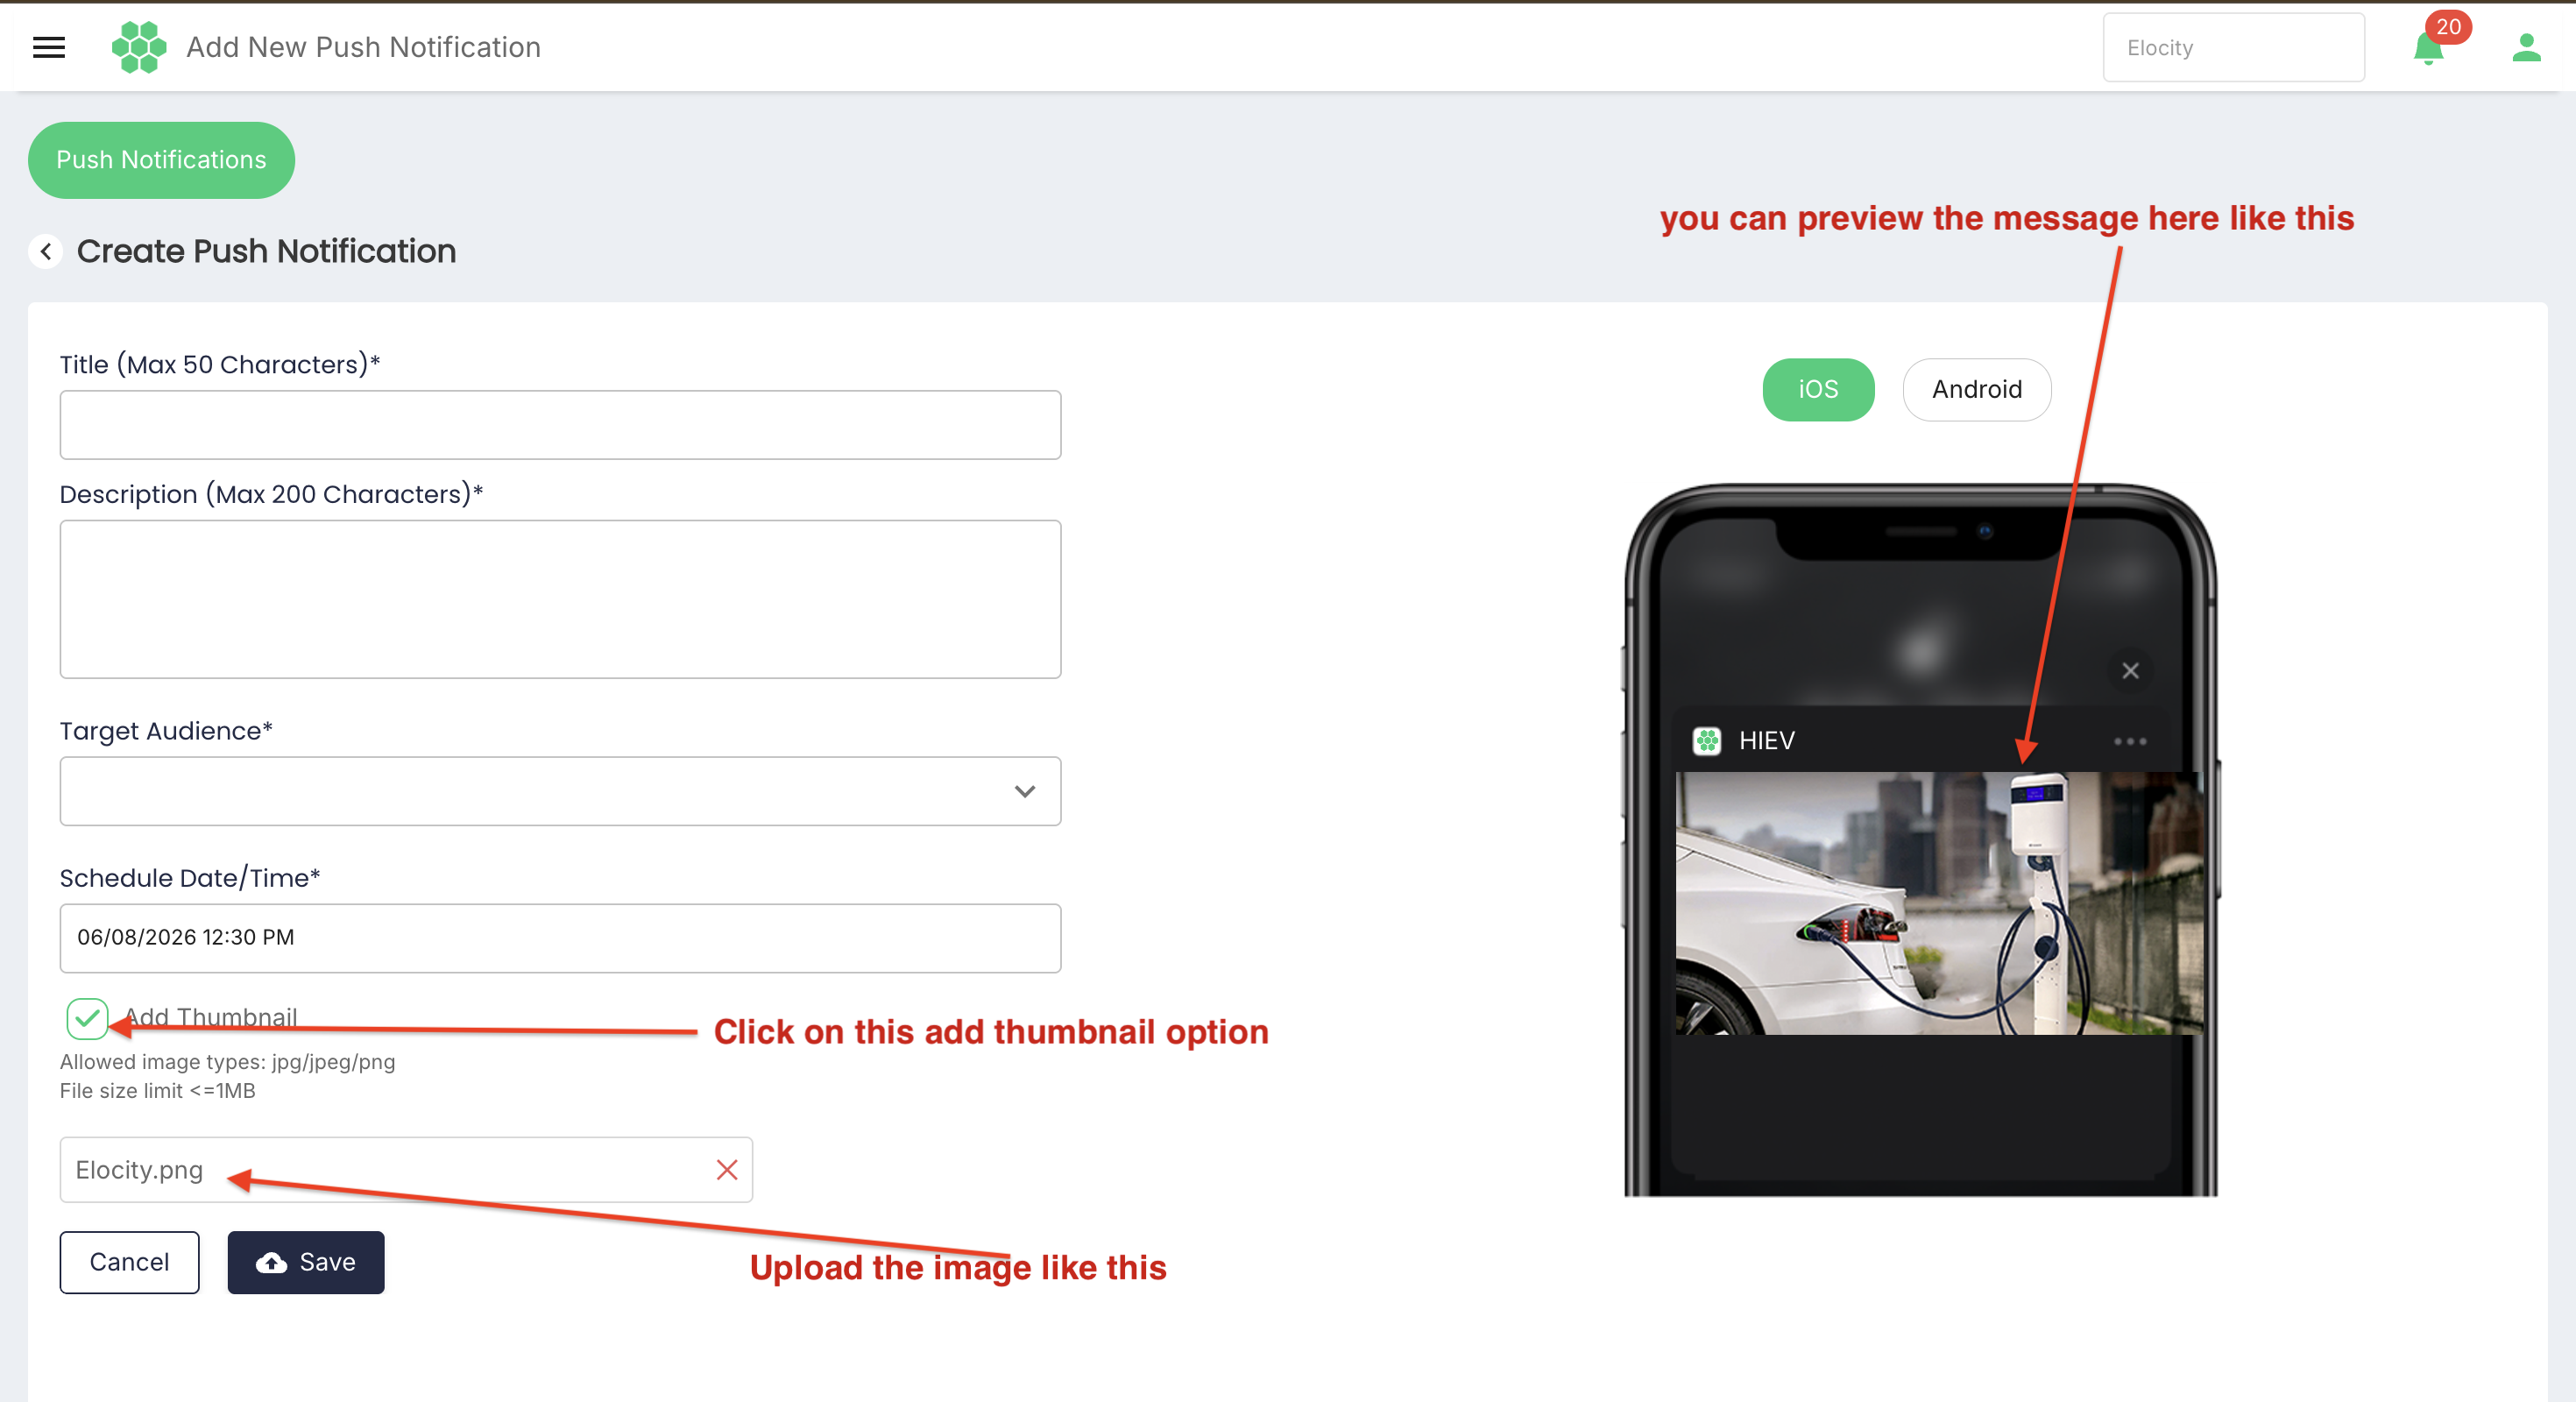
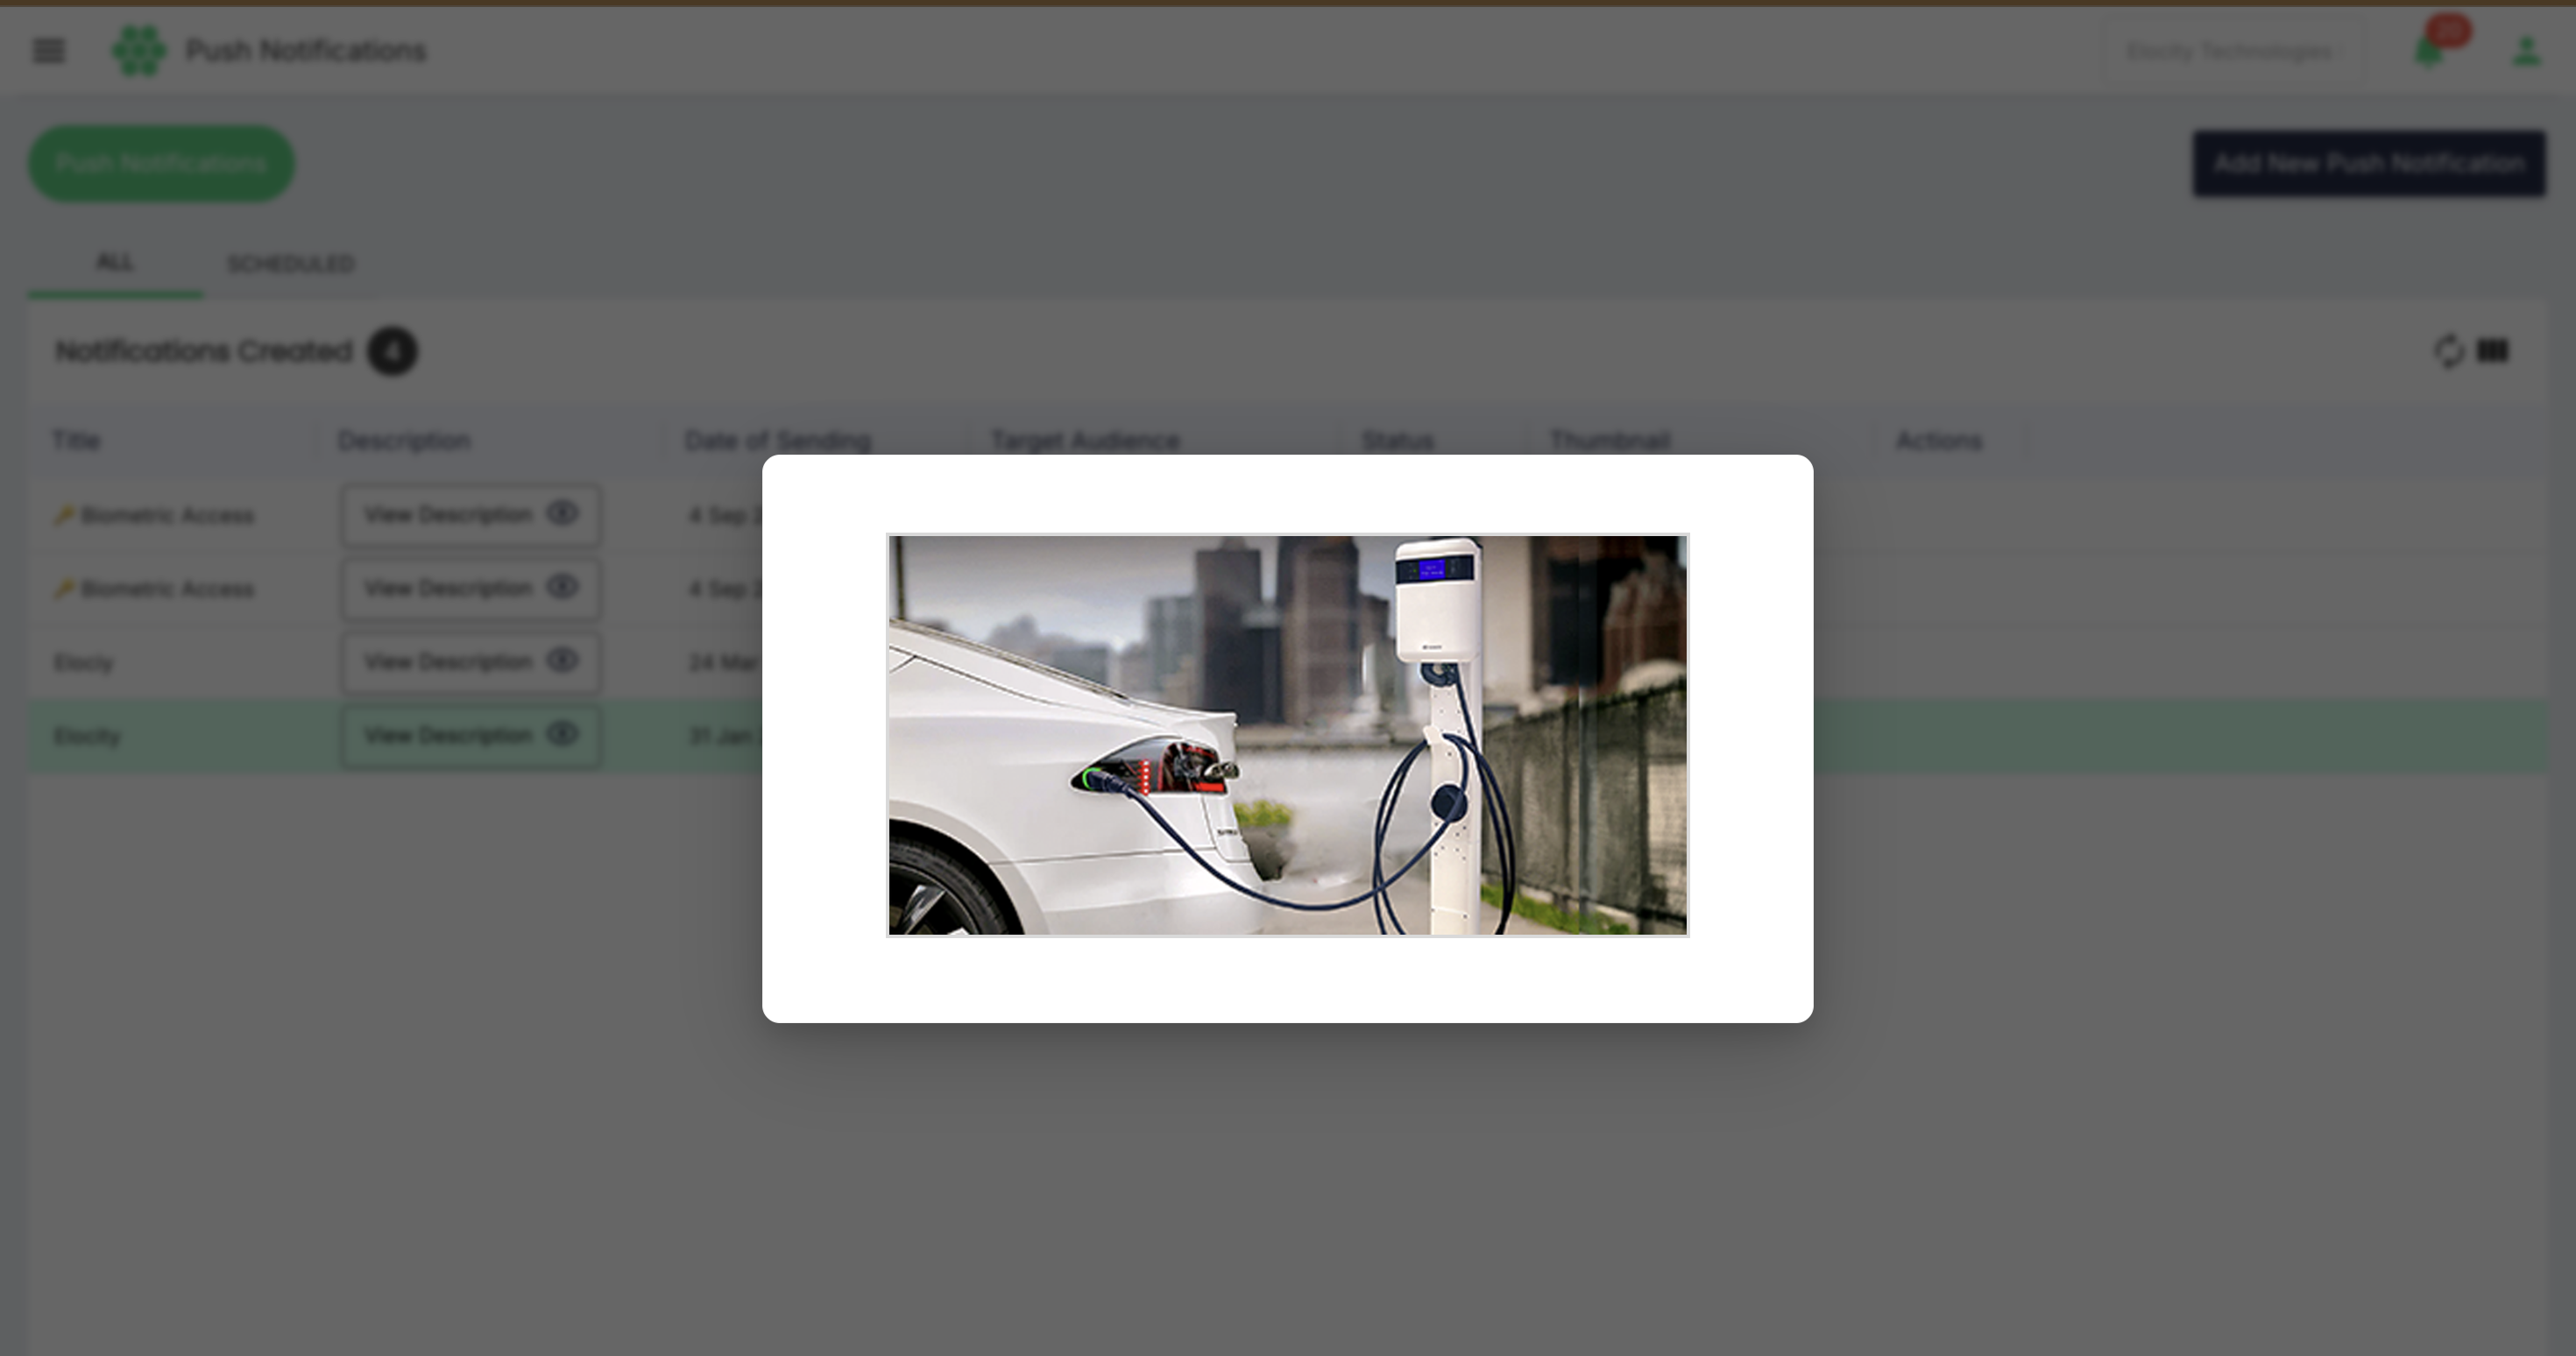
The table displays No Thumbnail uploaded when no visual asset is attached and View Thumbnail when one is available.
5.6 Choose the schedule
- Enter the required Schedule Date/Time.
- Confirm whether the displayed value uses the business, browser, or recipient time zone.
- Avoid scheduling during maintenance windows unless the message concerns that maintenance.
- For promotional messages, confirm that the schedule complies with customer preferences and applicable quiet-hour rules.
If immediate delivery is supported by product configuration, select the immediate-send option. Otherwise, use the earliest valid schedule time permitted by the form.
5.7 Preview the message
Use the verified preview controls:
- iOS — reviews the notification presentation for Apple devices.
- Android — reviews the notification presentation for Android devices.
Check title truncation, description wrapping, thumbnail appearance, icon visibility, and deep-link behaviour on both platforms.
5.8 Save or cancel
- Select Save only after completing the content, audience, and schedule review. Saving may create or schedule a customer-facing notification.
- Select Cancel to leave the composer without creating the notification.
After saving, verify that the notification appears in SCHEDULED or ALL, as appropriate.
6. User segmentation
User segmentation groups customers according to defined selection criteria so the audience can be reused in future notifications.
6.1 Example criteria
A segment may use one or more approved criteria, such as:
- Business or tenant
- Customer type
- Corporate account or corporate group
- Geographic area
- Mobile platform or application version
- Charging activity or inactivity period
- Wallet or payment state
- Marketing-consent status
- Registration or last-active date
6.2 Segment lifecycle
- Define a clear, unique segment name.
- Add the approved selection criteria.
- Preview the matching count and sample membership where permitted.
- Save the segment for reuse.
- Document whether membership is static or refreshed dynamically.
- Review the segment owner, creation date, criteria, refresh time, and current member count.
- Retire obsolete segments so they cannot be selected accidentally.
6.3 Multiple-segment behaviour
When one or more segments are selected for a notification, the system should:
- Support single- and multi-select.
- Display every selected segment before saving.
- Show or calculate the combined recipient count.
- Deduplicate customers who belong to more than one segment.
- Exclude customers who are ineligible, opted out, or no longer active.
- Record the selected segment names and resolved audience in the notification report.
7. Notification history and reporting
The ALL table provides an operational history. A comprehensive report should include at least:
| Report field | Description |
|---|---|
| Notification ID | Unique identifier for audit and troubleshooting. |
| Title | Notification title. |
| Message content | Complete notification description. |
| Category | Transactions, Payments, Marketing, System, or another configured category. |
| Created by | Business user who created the notification. |
| Created date/time | When the notification record was created. |
| Scheduled date/time | Intended delivery date and time. |
| Sent date/time | Actual processing or sending date and time. |
| Target type | All customers, all corporate customers, corporate group, customer group, or user segment. |
| Target name | Corporate group or segment name, where applicable. |
| Recipient count | Number of resolved eligible customers. |
| Delivery status | Scheduled, Sent, Failed, Cancelled, or another configured state. |
| Delivery result | Counts for attempted, delivered, failed, opened, and deep-link interactions when supported. |
| Deep link | Destination type and route reference, excluding sensitive data. |
| Visual content | Indicates whether a thumbnail or icon was included. |
The reviewed live history already exposes the message title, full description through View Description, date of sending, target audience, status, and thumbnail availability. Additional fields and export controls may depend on product configuration and reporting permissions.
7.1 Review a complete description
- Find the notification in ALL or SCHEDULED.
- Select View Description.
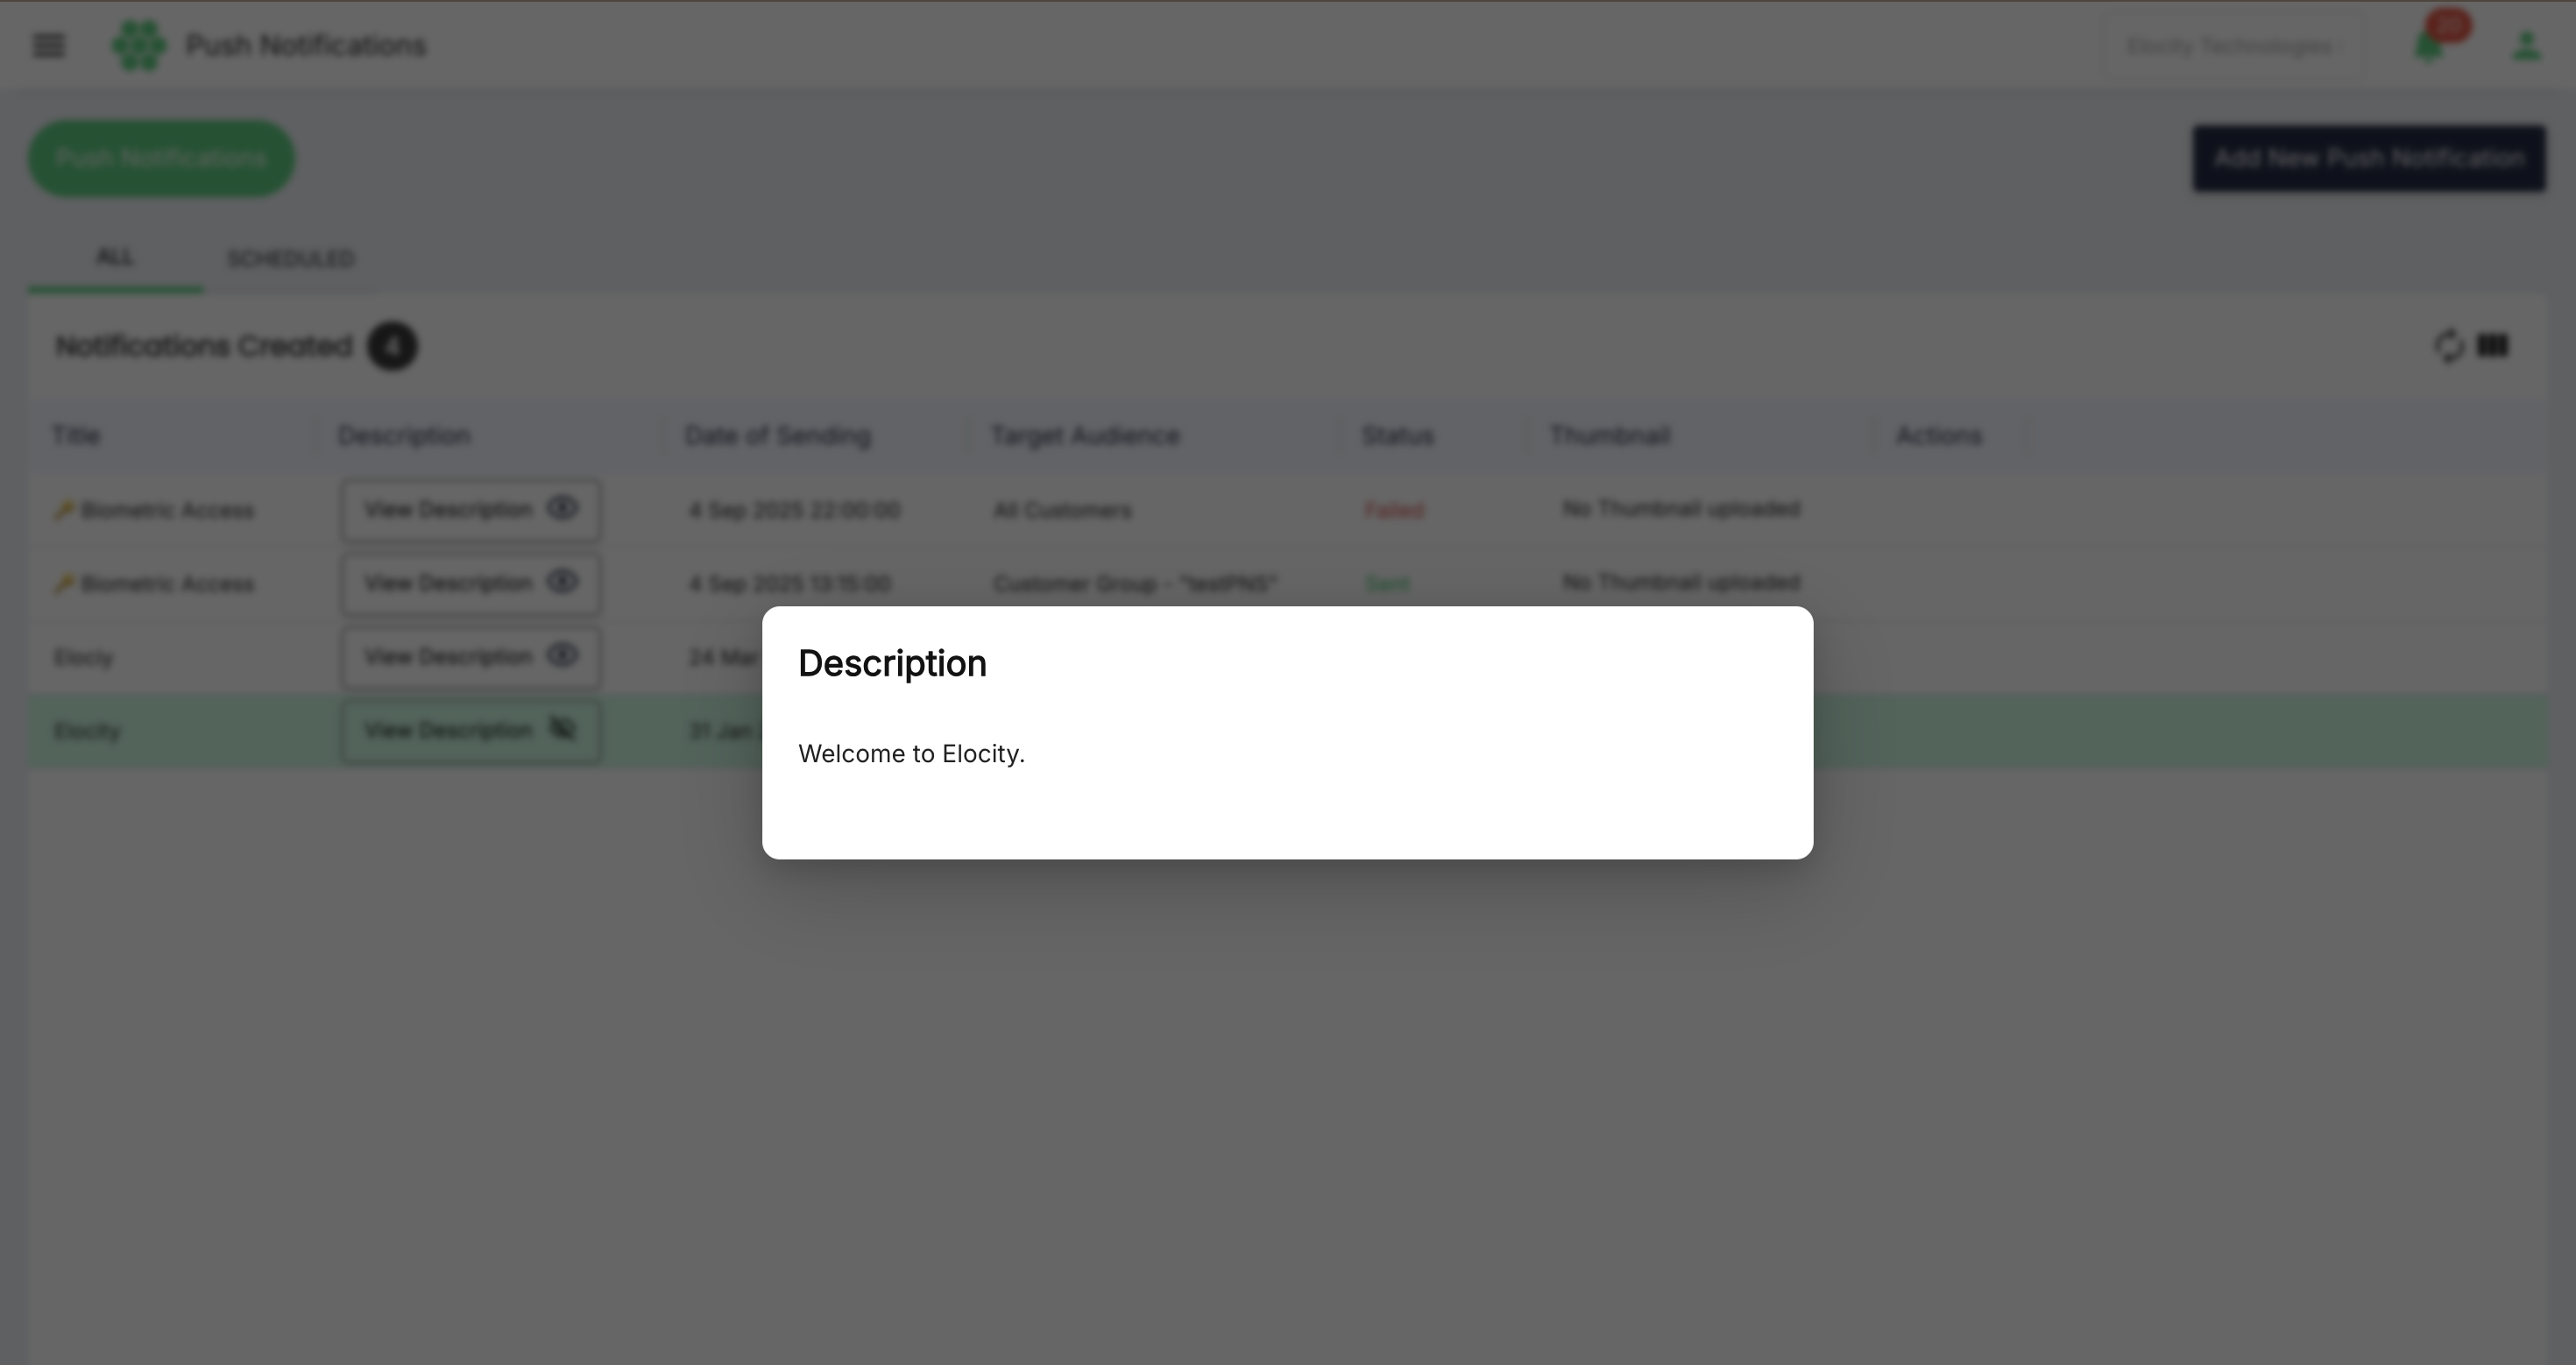
- Review the full message in the Description dialog.
- Close the dialog to return to the list.
7.2 Review a thumbnail
- Find a row that displays View Thumbnail.
- Select View Thumbnail.
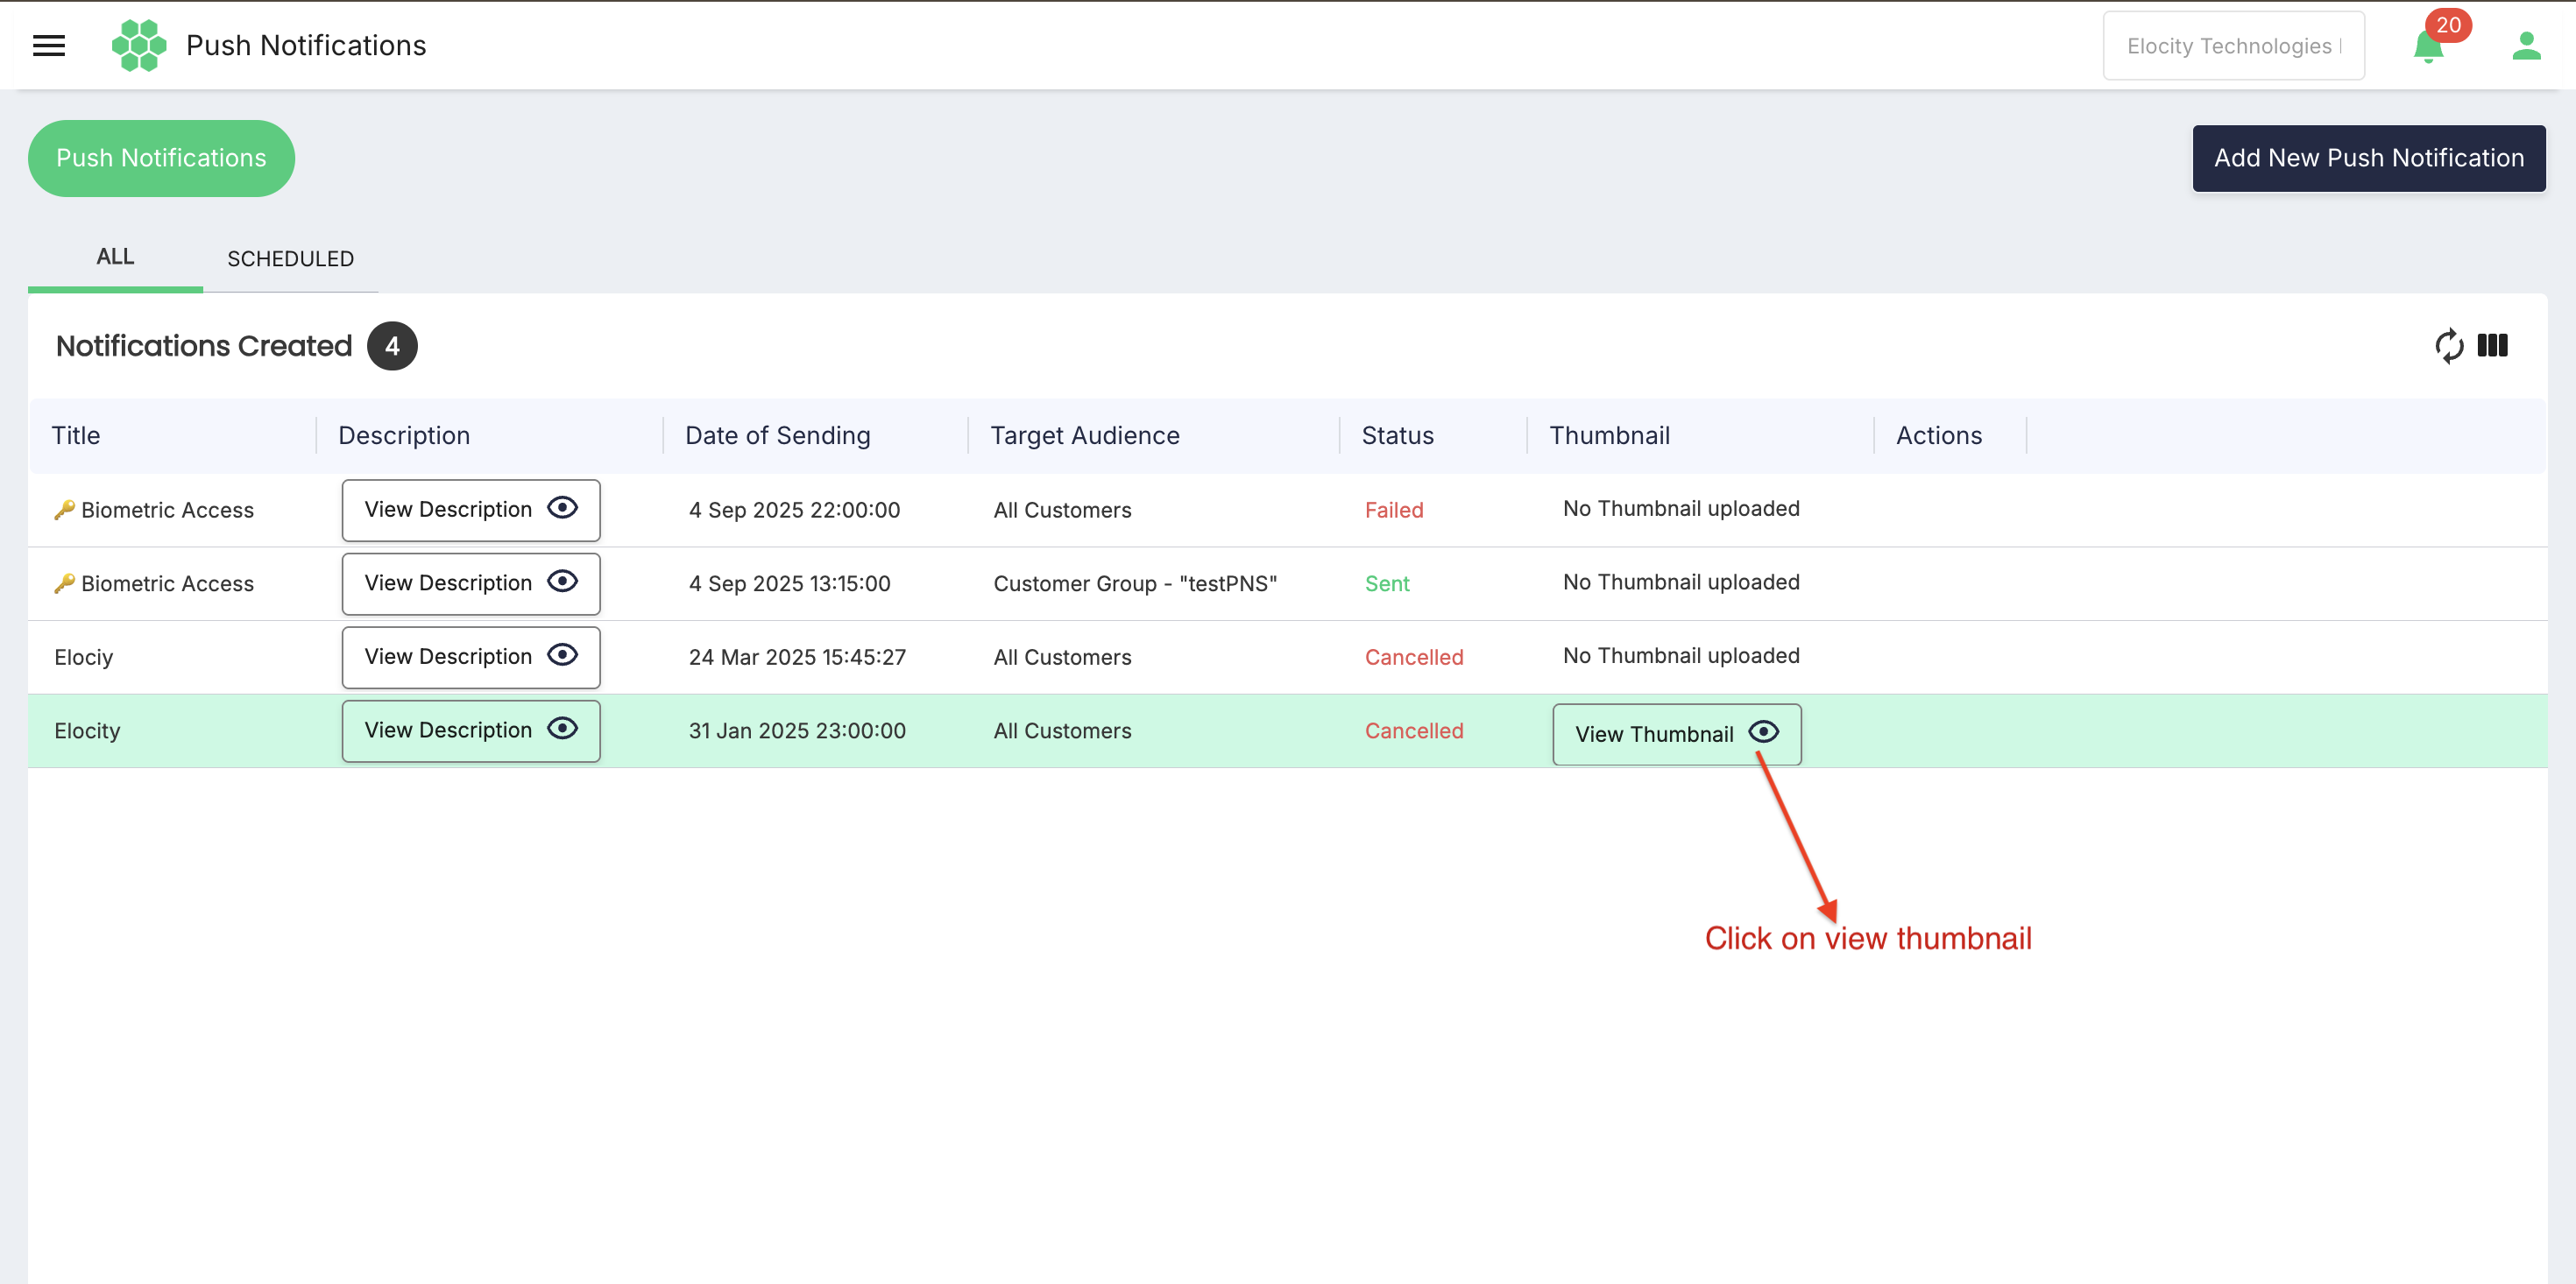
- Review the image and close the viewer.
7.3 Interpret common statuses
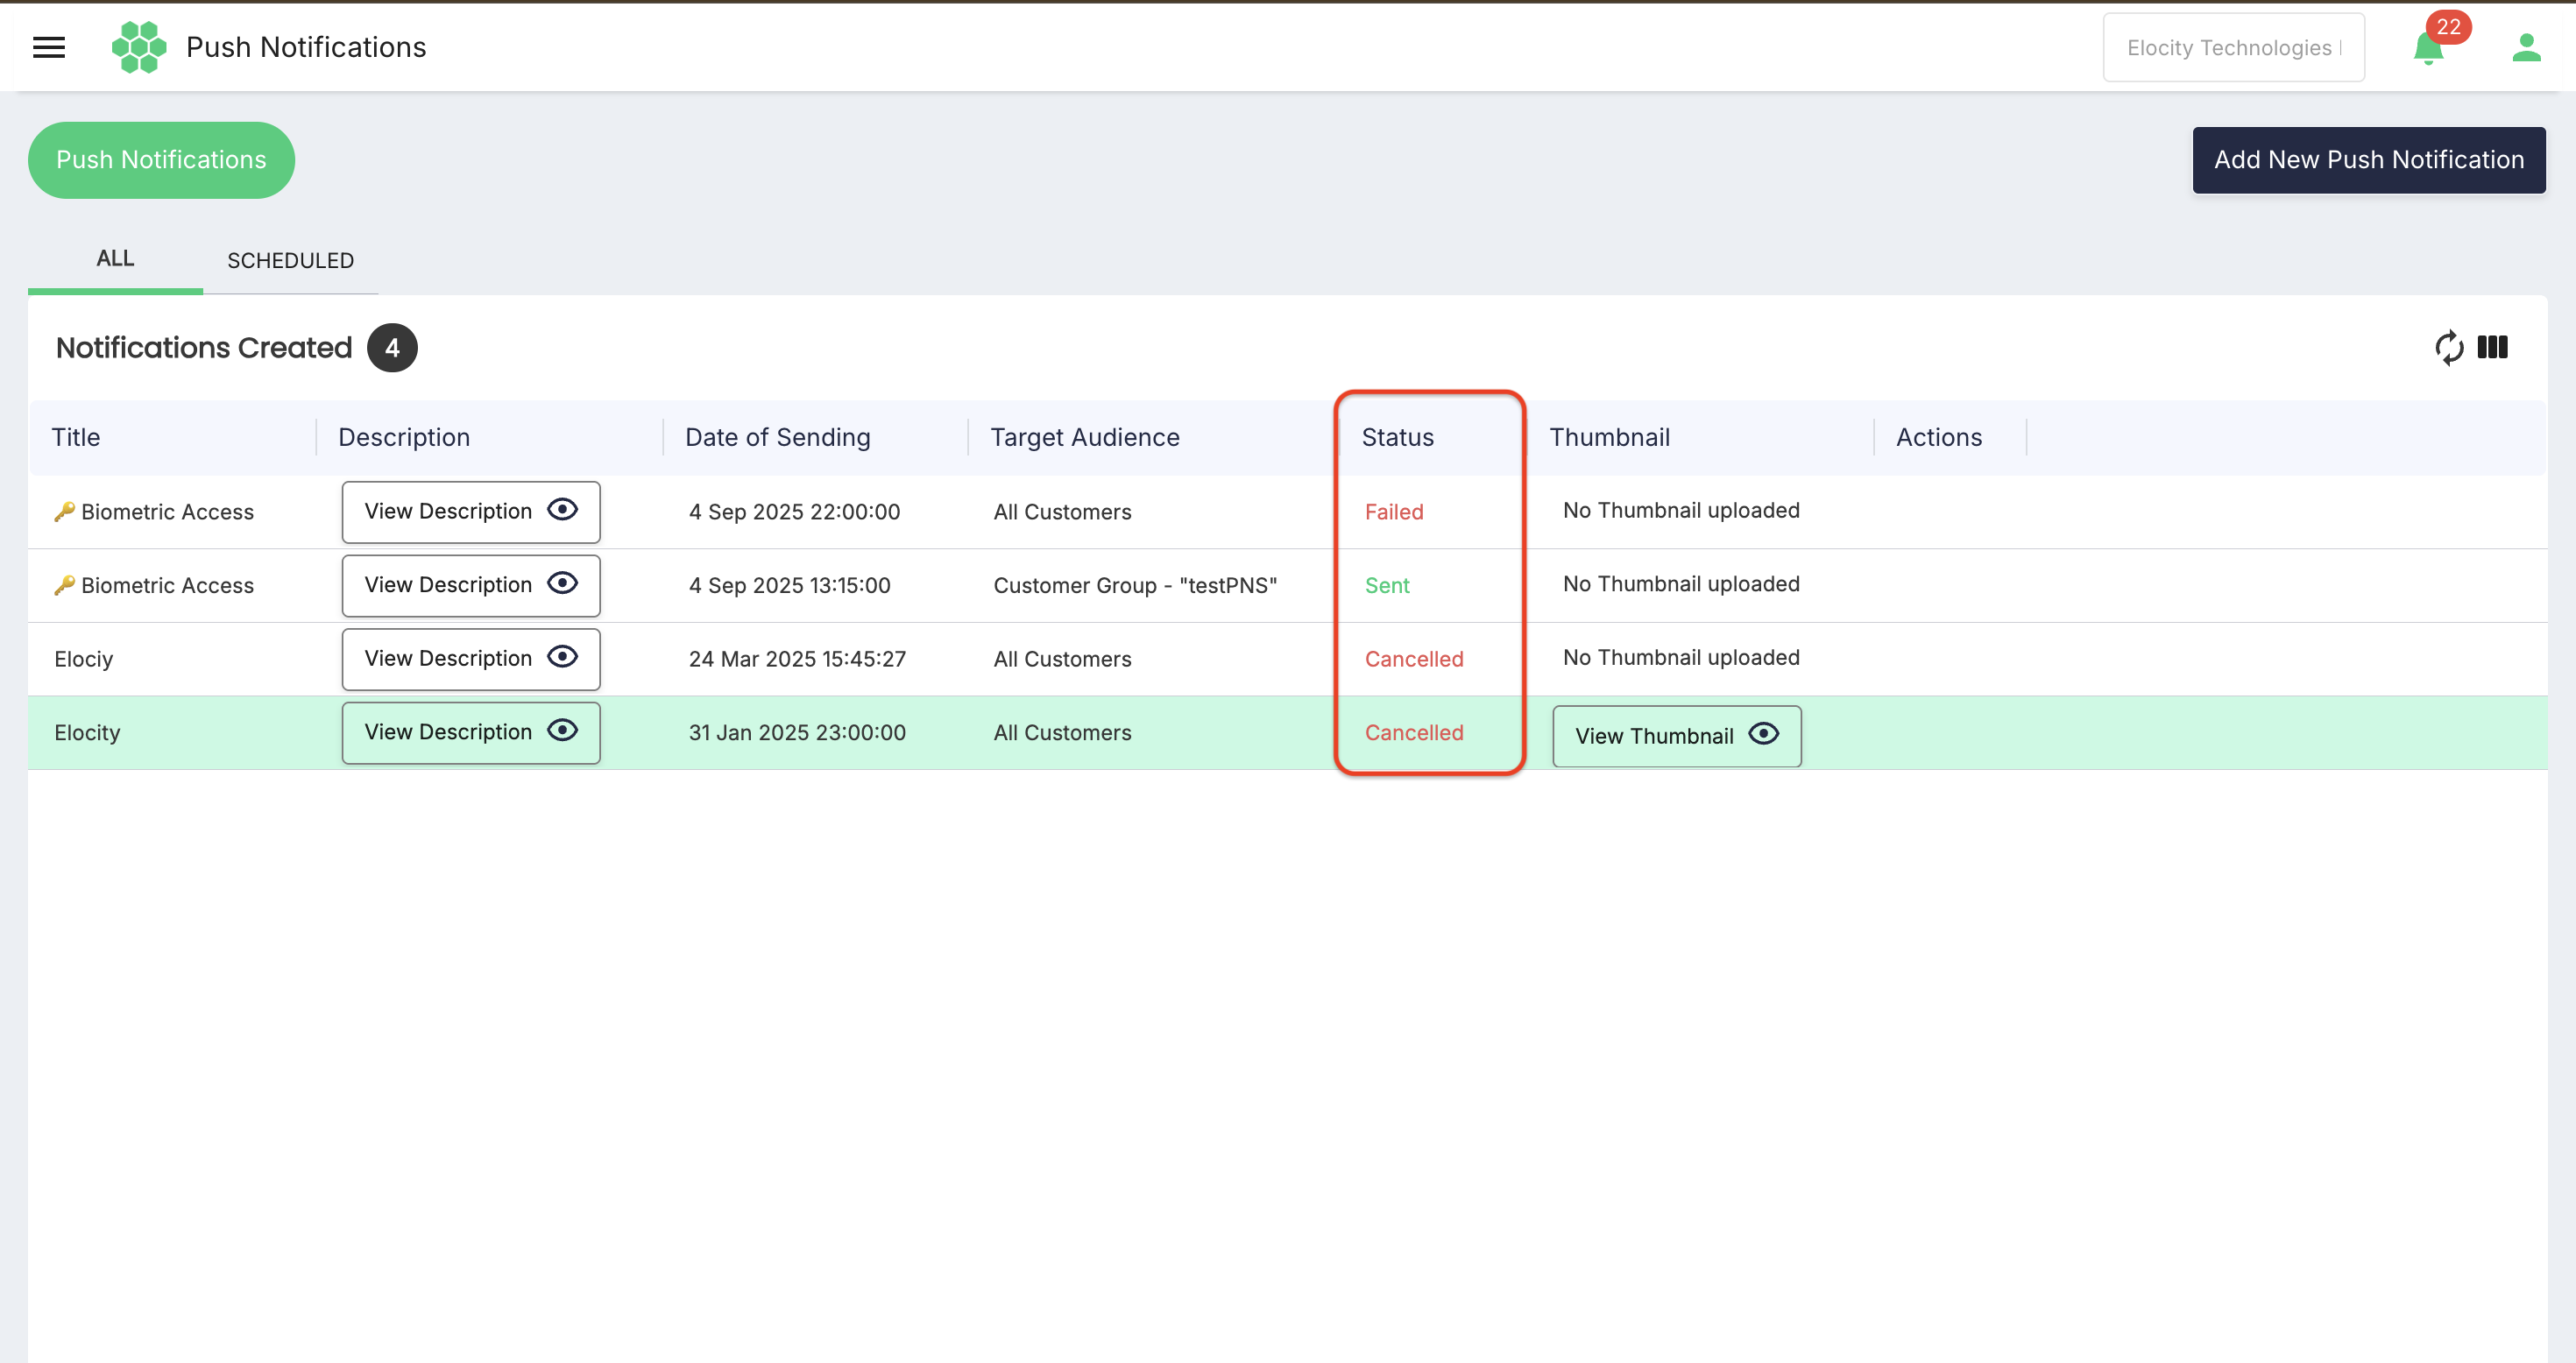
| Status | Meaning | Recommended action |
|---|---|---|
| Scheduled | Waiting for its configured send time. | Verify the date, time, audience, and content. |
| Sent | The notification was processed for delivery. | Review delivery metrics when available. |
| Failed | Processing or delivery did not complete successfully. | Refresh, review the failure reason, configuration, and recipient eligibility, then follow the approved retry process. |
| Cancelled | The scheduled notification was cancelled before delivery. | Confirm that cancellation was intentional; create a new notification if needed. |
8. Mobile application notification centre
8.1 Open notifications
- Sign in to the HIEV mobile application.
- Select the notification bell or Notifications menu item.
- Choose a category.
- Review the 10 most recent notifications in that category.
- Select a notification to read the full message or open its authorized deep-link destination.
8.2 Recommended categories and examples
| Category | Source | Examples |
|---|---|---|
| Transactions | System generated | Charging started, charging stopped, session interrupted, reservation status. |
| Payments | System generated | Payment successful, payment failed, refund processed, low balance, invoice available. |
| Marketing | Business generated | Campaigns, discounts, new locations, offers, loyalty promotions. |
| System | System or administrator generated | Maintenance, security settings, account changes, application updates. |
8.3 Mobile notification behaviour
The mobile notification centre should:
- Display the correct category, title, message, icon, and timestamp.
- Visually distinguish unread and read notifications.
- Show the 10 newest items per category in newest-first order.
- Prevent one category's records from displacing another category's top 10.
- Apply authentication and authorization before opening deep-linked content.
- Provide a safe fallback screen if the linked destination is unavailable.
- Synchronize read state across devices when supported.
- Respect customer communication preferences and operating-system permissions.
9. Common use cases
9.1 Notify all customers about service maintenance
- Create a clear title and short maintenance description.
- Choose All Customers.
- Add a deep link to service-status details, if available.
- Schedule the message before the maintenance window.
- Preview on iOS and Android, then save.
9.2 Send a promotion to selected segments
- Confirm marketing consent is part of each segment's criteria.
- Select Customer Groups or the configured segment audience.
- Choose one or multiple segments.
- Add an approved thumbnail or icon and a deep link to the offer.
- Verify deduplicated recipient count, schedule, previews, and campaign approval.
9.3 Notify a corporate group
- Choose Corporate Groups.
- Select the corporate partner and its group.
- Enter a message relevant only to that organization or group.
- Confirm that no unrelated customer can receive it.
- Preview and schedule the notification.
9.4 Review a failed notification
- Open ALL.
- Find the row with Failed status.
- Review its description, audience, send date, and visual content.
- Check the failure reason in the available operational logs or report.
- Correct the underlying problem before creating an approved replacement notification.
10. Validation and safety checks
Before saving, confirm:
- The title is present and has no more than 50 characters.
- The description is present and has no more than 200 characters.
- The message is accurate, concise, and free of sensitive personal data.
- The active business account is correct.
- The target audience is the smallest appropriate population.
- Corporate partner and group selections are correct.
- Segment criteria and membership are current.
- Multiple segments are deduplicated.
- The customer is eligible and has the required communication consent.
- The schedule and time zone are correct.
- The icon or thumbnail follows brand and content standards.
- The deep link opens the correct authorized destination on iOS and Android.
- The message has received all required approvals.
11. Troubleshooting
| Issue | Likely cause | Resolution |
|---|---|---|
| Save is unavailable | A required field is empty or invalid. | Complete Title, Description, Target Audience, Schedule Date/Time, and any audience-specific fields. |
| Corporate group cannot be selected | Corporate partner is not selected, group is inactive, or access is missing. | Select the correct partner and confirm group status and permissions. |
| Customer group or segment is missing | It is inactive, belongs to another business, or is outside the user's scope. | Confirm business context, segment status, and access permissions. |
| Notification remains scheduled | Its send time has not arrived, time zone differs, or processing is delayed. | Verify the schedule and select Refresh after the expected time. |
| Notification failed | Push configuration, recipient token, eligibility, content, or delivery service failed. | Review the failure reason and configuration before retrying. |
| Thumbnail does not appear | No asset was uploaded or the asset did not pass validation. | Use a supported, approved file and verify it in the platform previews. |
| Deep link opens the wrong screen | Route, identifier, app version, or platform mapping is incorrect. | Correct and test the route on iOS and Android before resending. |
| Customer did not receive the alert | Notifications are disabled, the device token is invalid, or the customer was outside the audience. | Check consent, operating-system settings, eligibility, and delivery reporting. |
| Mobile category shows more or fewer than expected | Category assignment, ordering, or top-10 query is incorrect. | Verify category mapping and newest-first limit independently for each category. |
| A required feature is not visible | Tenant configuration, release version, or role permissions do not expose it. | Confirm feature enablement and permissions with the HIEV administrator. |
12. Requirement coverage
| Requirement | Manual coverage | Reviewed-interface status |
|---|---|---|
| Business users can send notifications to customers | Sections 1 and 5 | Composer verified |
| Compose custom messages | Sections 5.2 and 10 | Title and Description verified |
| Deep link to a mobile feature or screen | Section 5.4 | Required; not displayed in reviewed form |
| Include icons | Section 5.5 | Thumbnail verified; dedicated icon field not displayed |
| Select an existing corporate group | Section 5.3 | Corporate Groups, Corporate Partner, and Corporate Partner Group verified |
| Create reusable user segments | Section 6 | Requirement; current Customer Groups mapping documented |
| Select one or multiple segments | Sections 5.3 and 6.3 | Single group selector verified; multi-select not evident |
| Comprehensive notification report | Section 7 | Core history fields verified; enhanced reporting specified |
| Mobile notification section | Section 8 | Requirement; not part of reviewed web portal |
| Multiple notification categories | Sections 3.2 and 8.2 | Requirement; not part of reviewed web portal |
| System-generated transaction/payment messages | Sections 3.2 and 8.2 | Requirement; not part of reviewed web portal |
| Promotional marketing messages | Sections 3.2, 8.2, and 9.2 | Web composer verified; category requirement specified |
| Top 10 recent notifications per category | Sections 3.2 and 8.3 | Requirement; not part of reviewed web portal |
13. Glossary
| Term | Definition |
|---|---|
| Push notification | A message delivered through a device's notification service and represented in the mobile application. |
| Target audience | The set of eligible customers selected to receive a notification. |
| Corporate group | A defined group of customers associated with a corporate partner. |
| Customer group | A reusable collection of customers; the reviewed interface's current audience option closest to a user segment. |
| Segment | A reusable group of users selected through defined criteria. |
| Deep link | A link that opens a specific authorized feature or screen in the mobile application. |
| Thumbnail | An image attached to the notification and available in the portal's notification record. |
| Notification icon | A small visual identifier displayed with a notification, subject to platform rules. |
| Scheduled notification | A notification stored for processing at a future date and time. |
Verification note: This manual combines the supplied Push Notifications requirements with read-only verification of the HIEV CPMS Canada interface on 4 August 2026. No notification was created, saved, scheduled, sent, cancelled, or otherwise modified during verification. Features not visible in the reviewed form are explicitly identified as requirements rather than current verified controls.