Load Management
Purpose
The Load Management module lets an authorized user distribute the available electrical capacity of a site across its charging stations and control when charging is permitted. The module groups chargers into managed load groups, applies a power limit and a distribution strategy to each group, and provides analytics on how the group performs over time. It also supports time-based Scheduled Charging, which restricts or permits charging during defined periods such as on-peak and mid-peak windows.
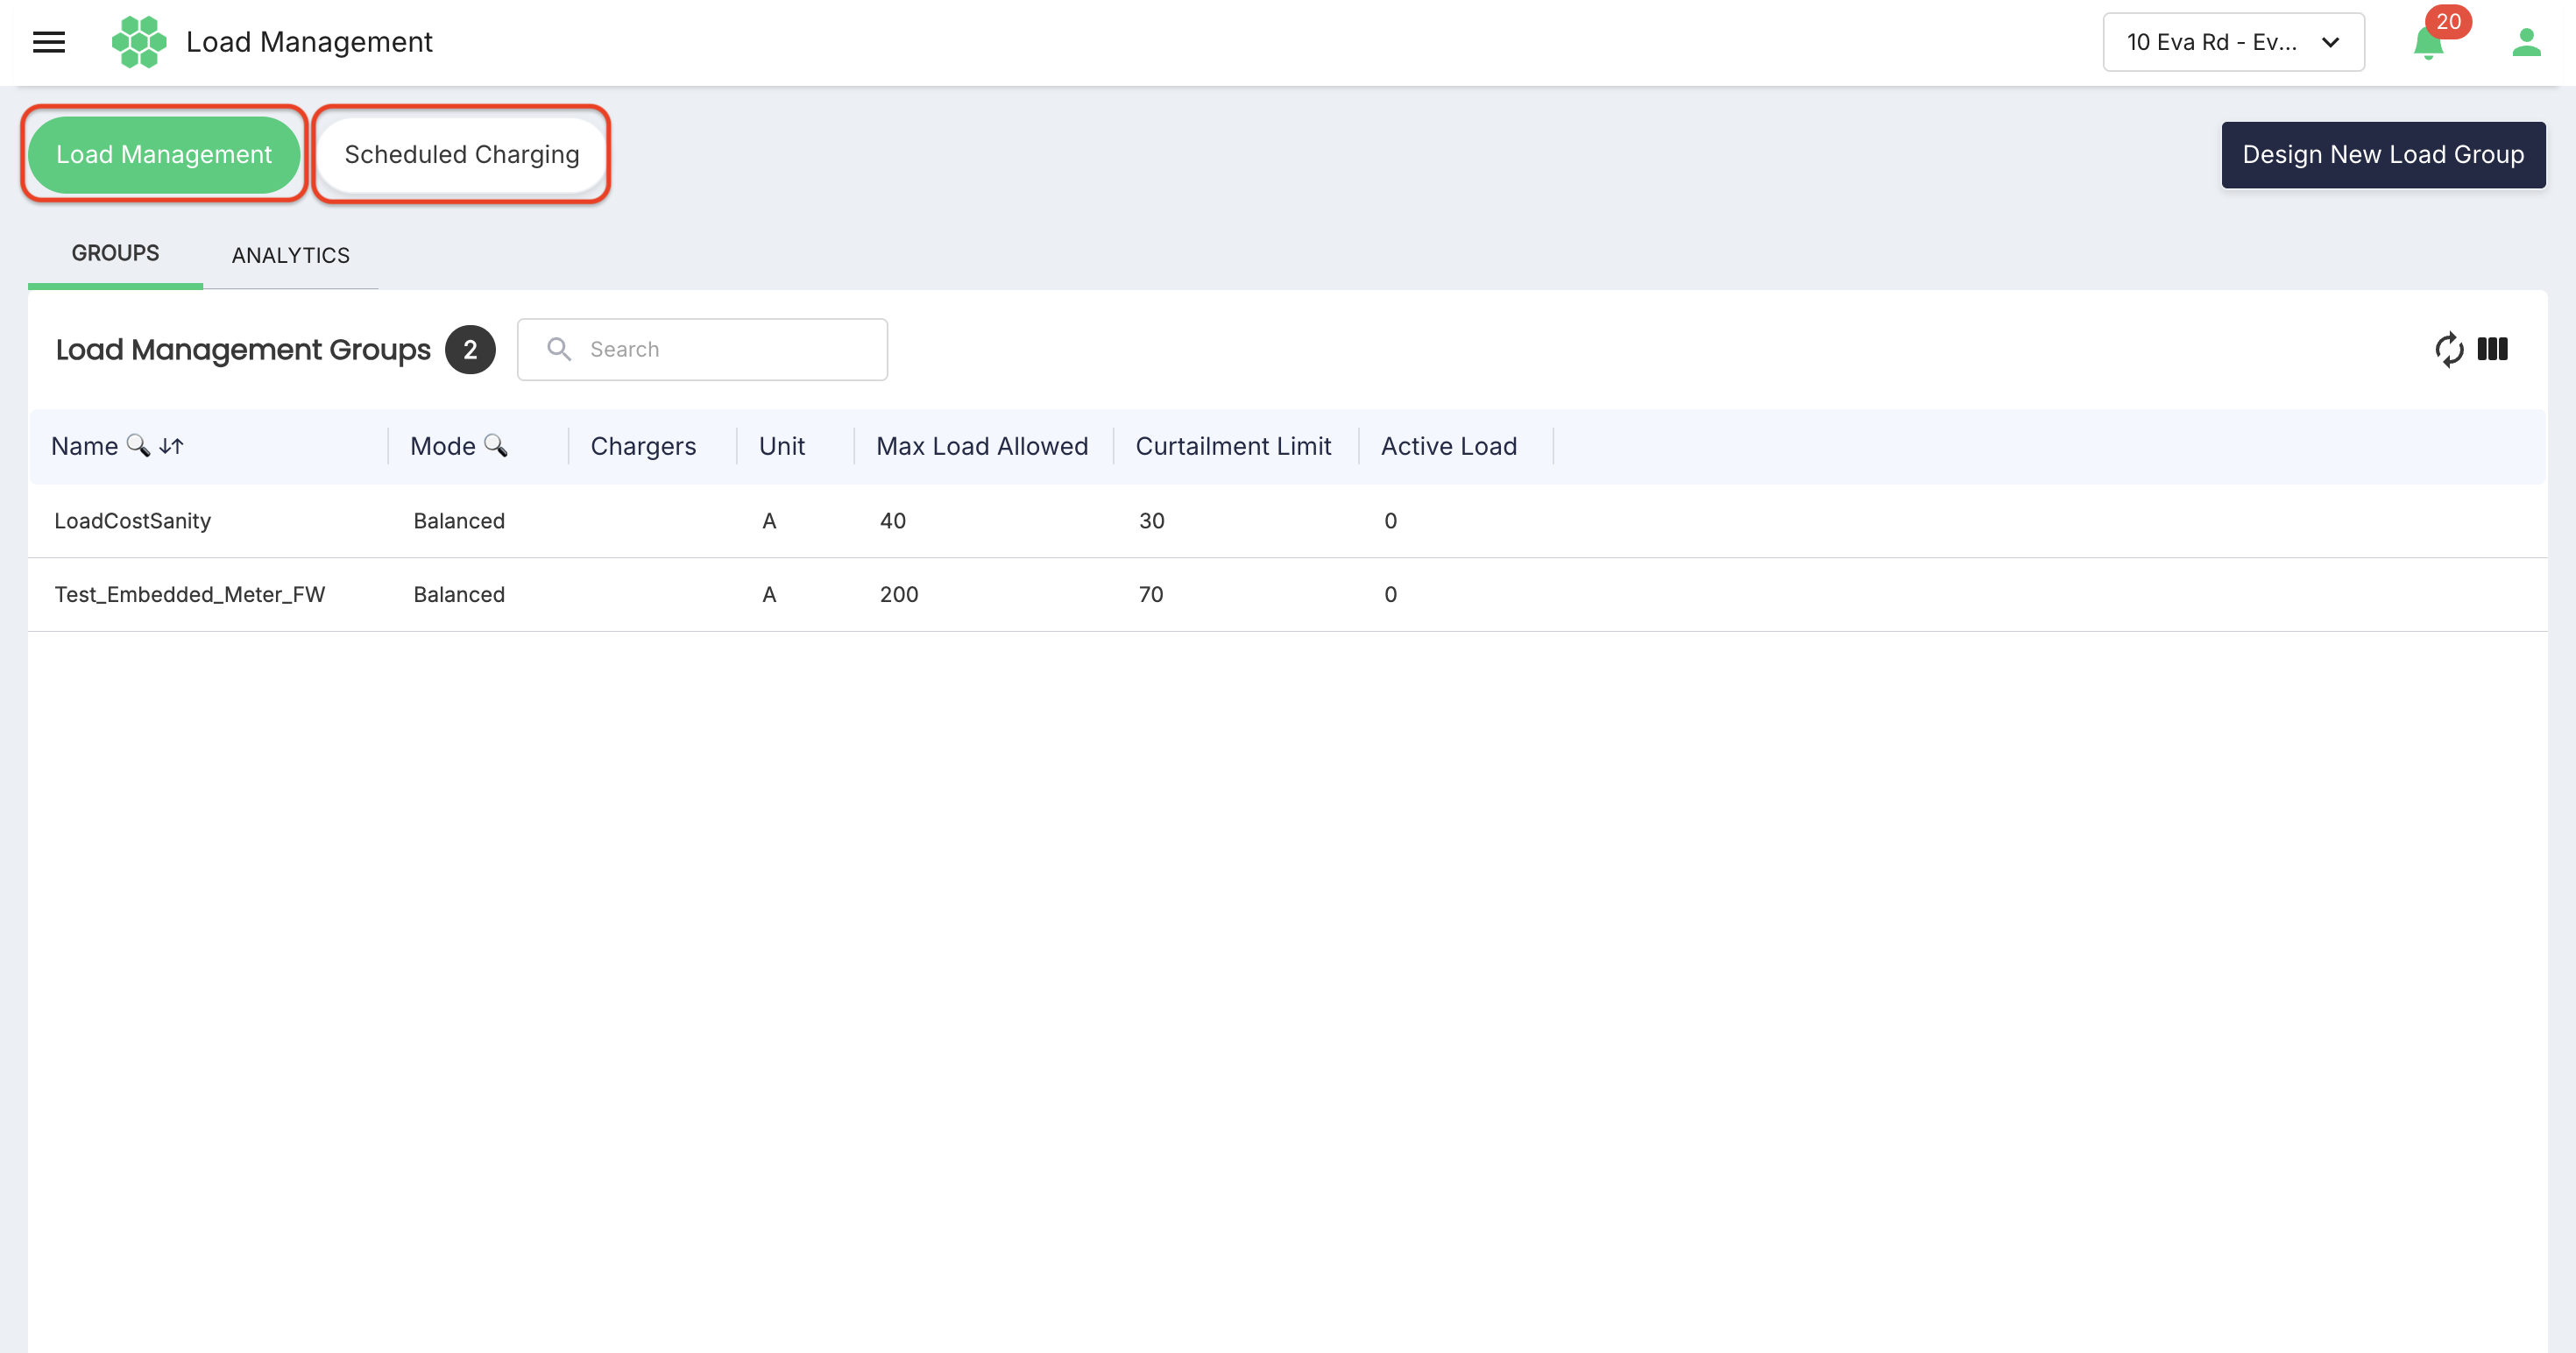
From this module, an authorized user can:
- Review the load groups configured for the selected business.
- Review live and historical load analytics for a group.
- Create a new load group and assign chargers, a load limit, and a management mode.
- Open, edit, or delete an existing load group.
- Review the scheduled-charging groups configured for the selected business.
- Create a scheduled-charging group and define its weekly charging windows.
- Review scheduled-charging reports, including energy consumed and cost.
The load groups, scheduled-charging groups, records, and actions available depend on the selected business and on the user's role-to-permission mapping. Load and analytics values change as new charging transactions and station messages are received.
Accessing Load Management
- Sign in to the HIEV portal.
- Confirm the required business in the business selector.
- Open Load Management in the main navigation.
- Select one of the module pages: Load Management, Design New Load Group, or Scheduled Charging.
Within the module, two buttons at the top of the page switch between the Load Management and Scheduled Charging areas. The Design New Load Group button (on the Load Management area) and the Design New Group button (on the Scheduled Charging area) open the respective creation forms.
Module structure
The Load Management module contains the following pages:
| Page | Contents |
|---|---|
| Load Management | Load Management Groups list (Groups tab) and per-group load analytics (Analytics tab). |
| Load Group Details | Configuration of a single load group. Opened by selecting a group in the Groups list. |
| Design New Load Group | Creation form for a new load group. |
| Scheduled Charging | Schedule Charging Groups list. |
| Scheduled Charging Details | Configuration, weekly schedule, and reports for a single scheduled-charging group (Info, Schedule, and Reports tabs). |
| Design New Group | Creation form for a new scheduled-charging group. |
Load Management page
The Load Management page provides two tabs: Groups and Analytics.
Groups tab
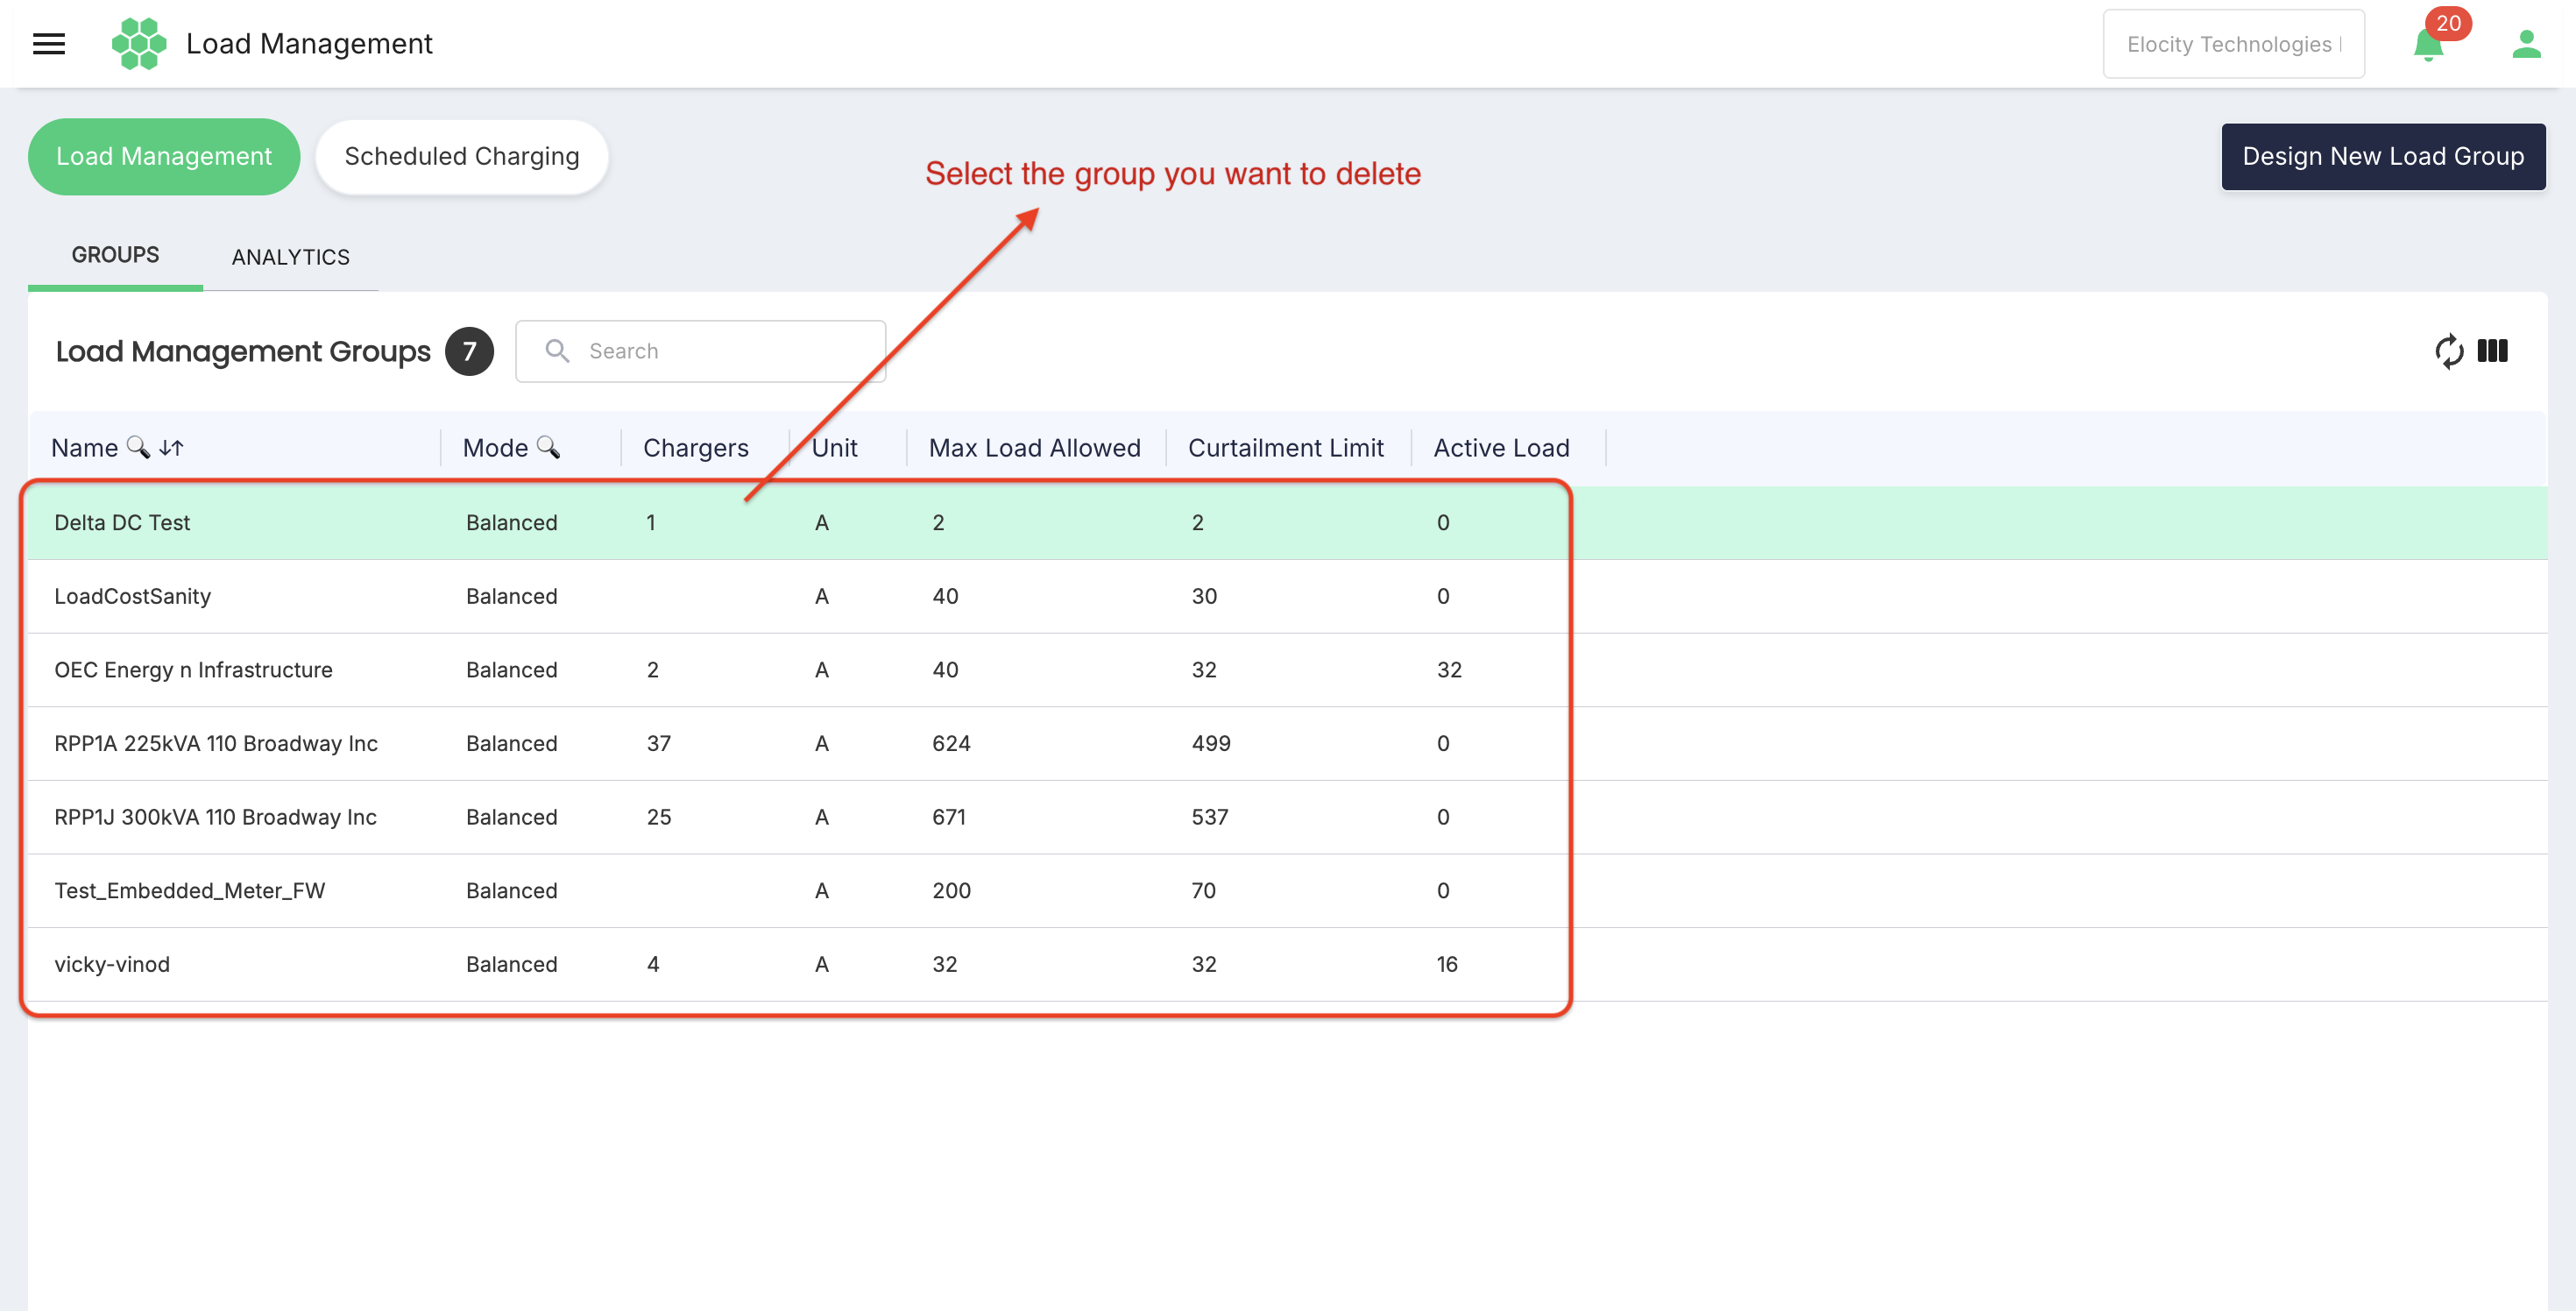
The Groups tab displays the Load Management Groups grid for the selected business. The header shows the number of groups returned, and the tab provides Search, Refresh, and Column Filter controls.
| Column | Description | Interaction |
|---|---|---|
| Name | Name of the load group. | Supports a per-column search and sorting. Selecting a row opens the group's Load Group Details page. |
| Mode | Management mode applied to the group, such as Balanced. | Supports a per-column search. Display only. |
| Chargers | Number of chargers assigned to the group. | Display only. |
| Unit | Unit used for the group's load values, such as A (amperes). | Display only. |
| Max Load Allowed | Maximum load the group is permitted to draw, expressed in the displayed unit. | Display only. |
| Curtailment Limit | Reduced load ceiling applied to the group when curtailment is in effect. | Display only. |
| Active Load | Load the group is currently drawing, expressed in the displayed unit. | Display only. |
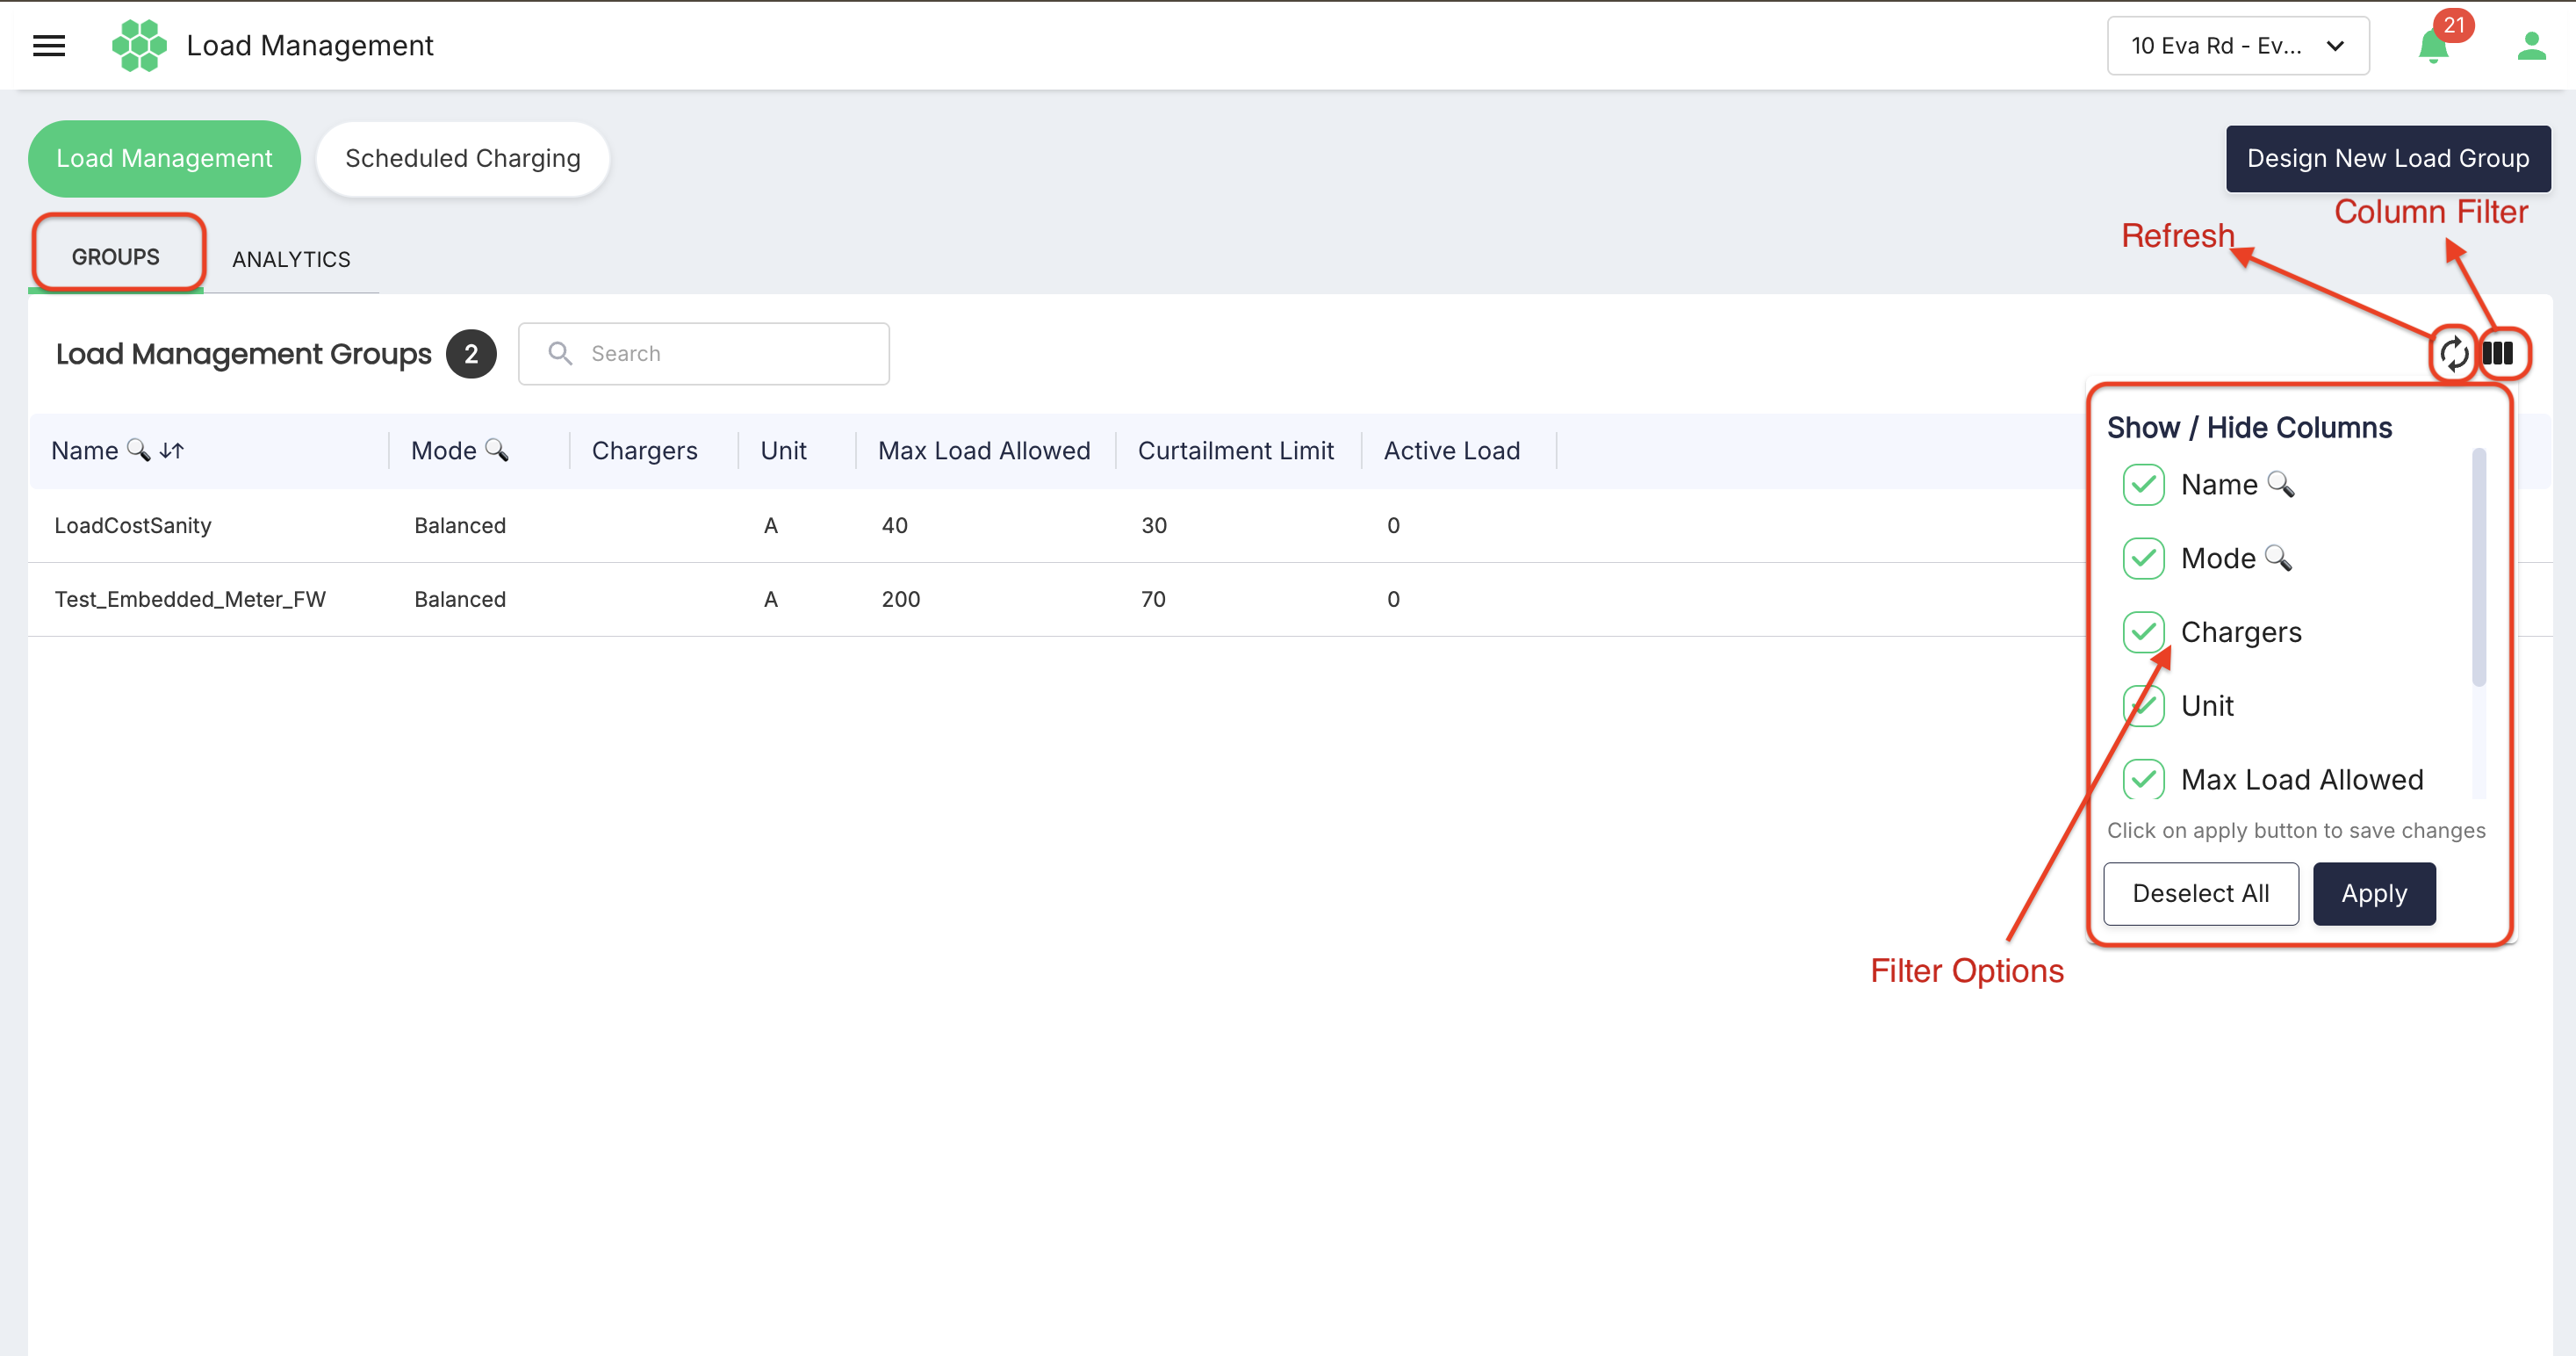
Use Search to narrow the grid, Refresh to request the latest values, and Column Filter to show or hide grid columns.
Analytics tab
The Analytics tab displays live and historical load information for one selected group.
The controls at the top of the tab are:
- Date range – selects the period shown in the chart and transactions.
- Select Load Group – chooses the group to analyze.
- Load Management Mode – displays the management mode applied to the selected group.
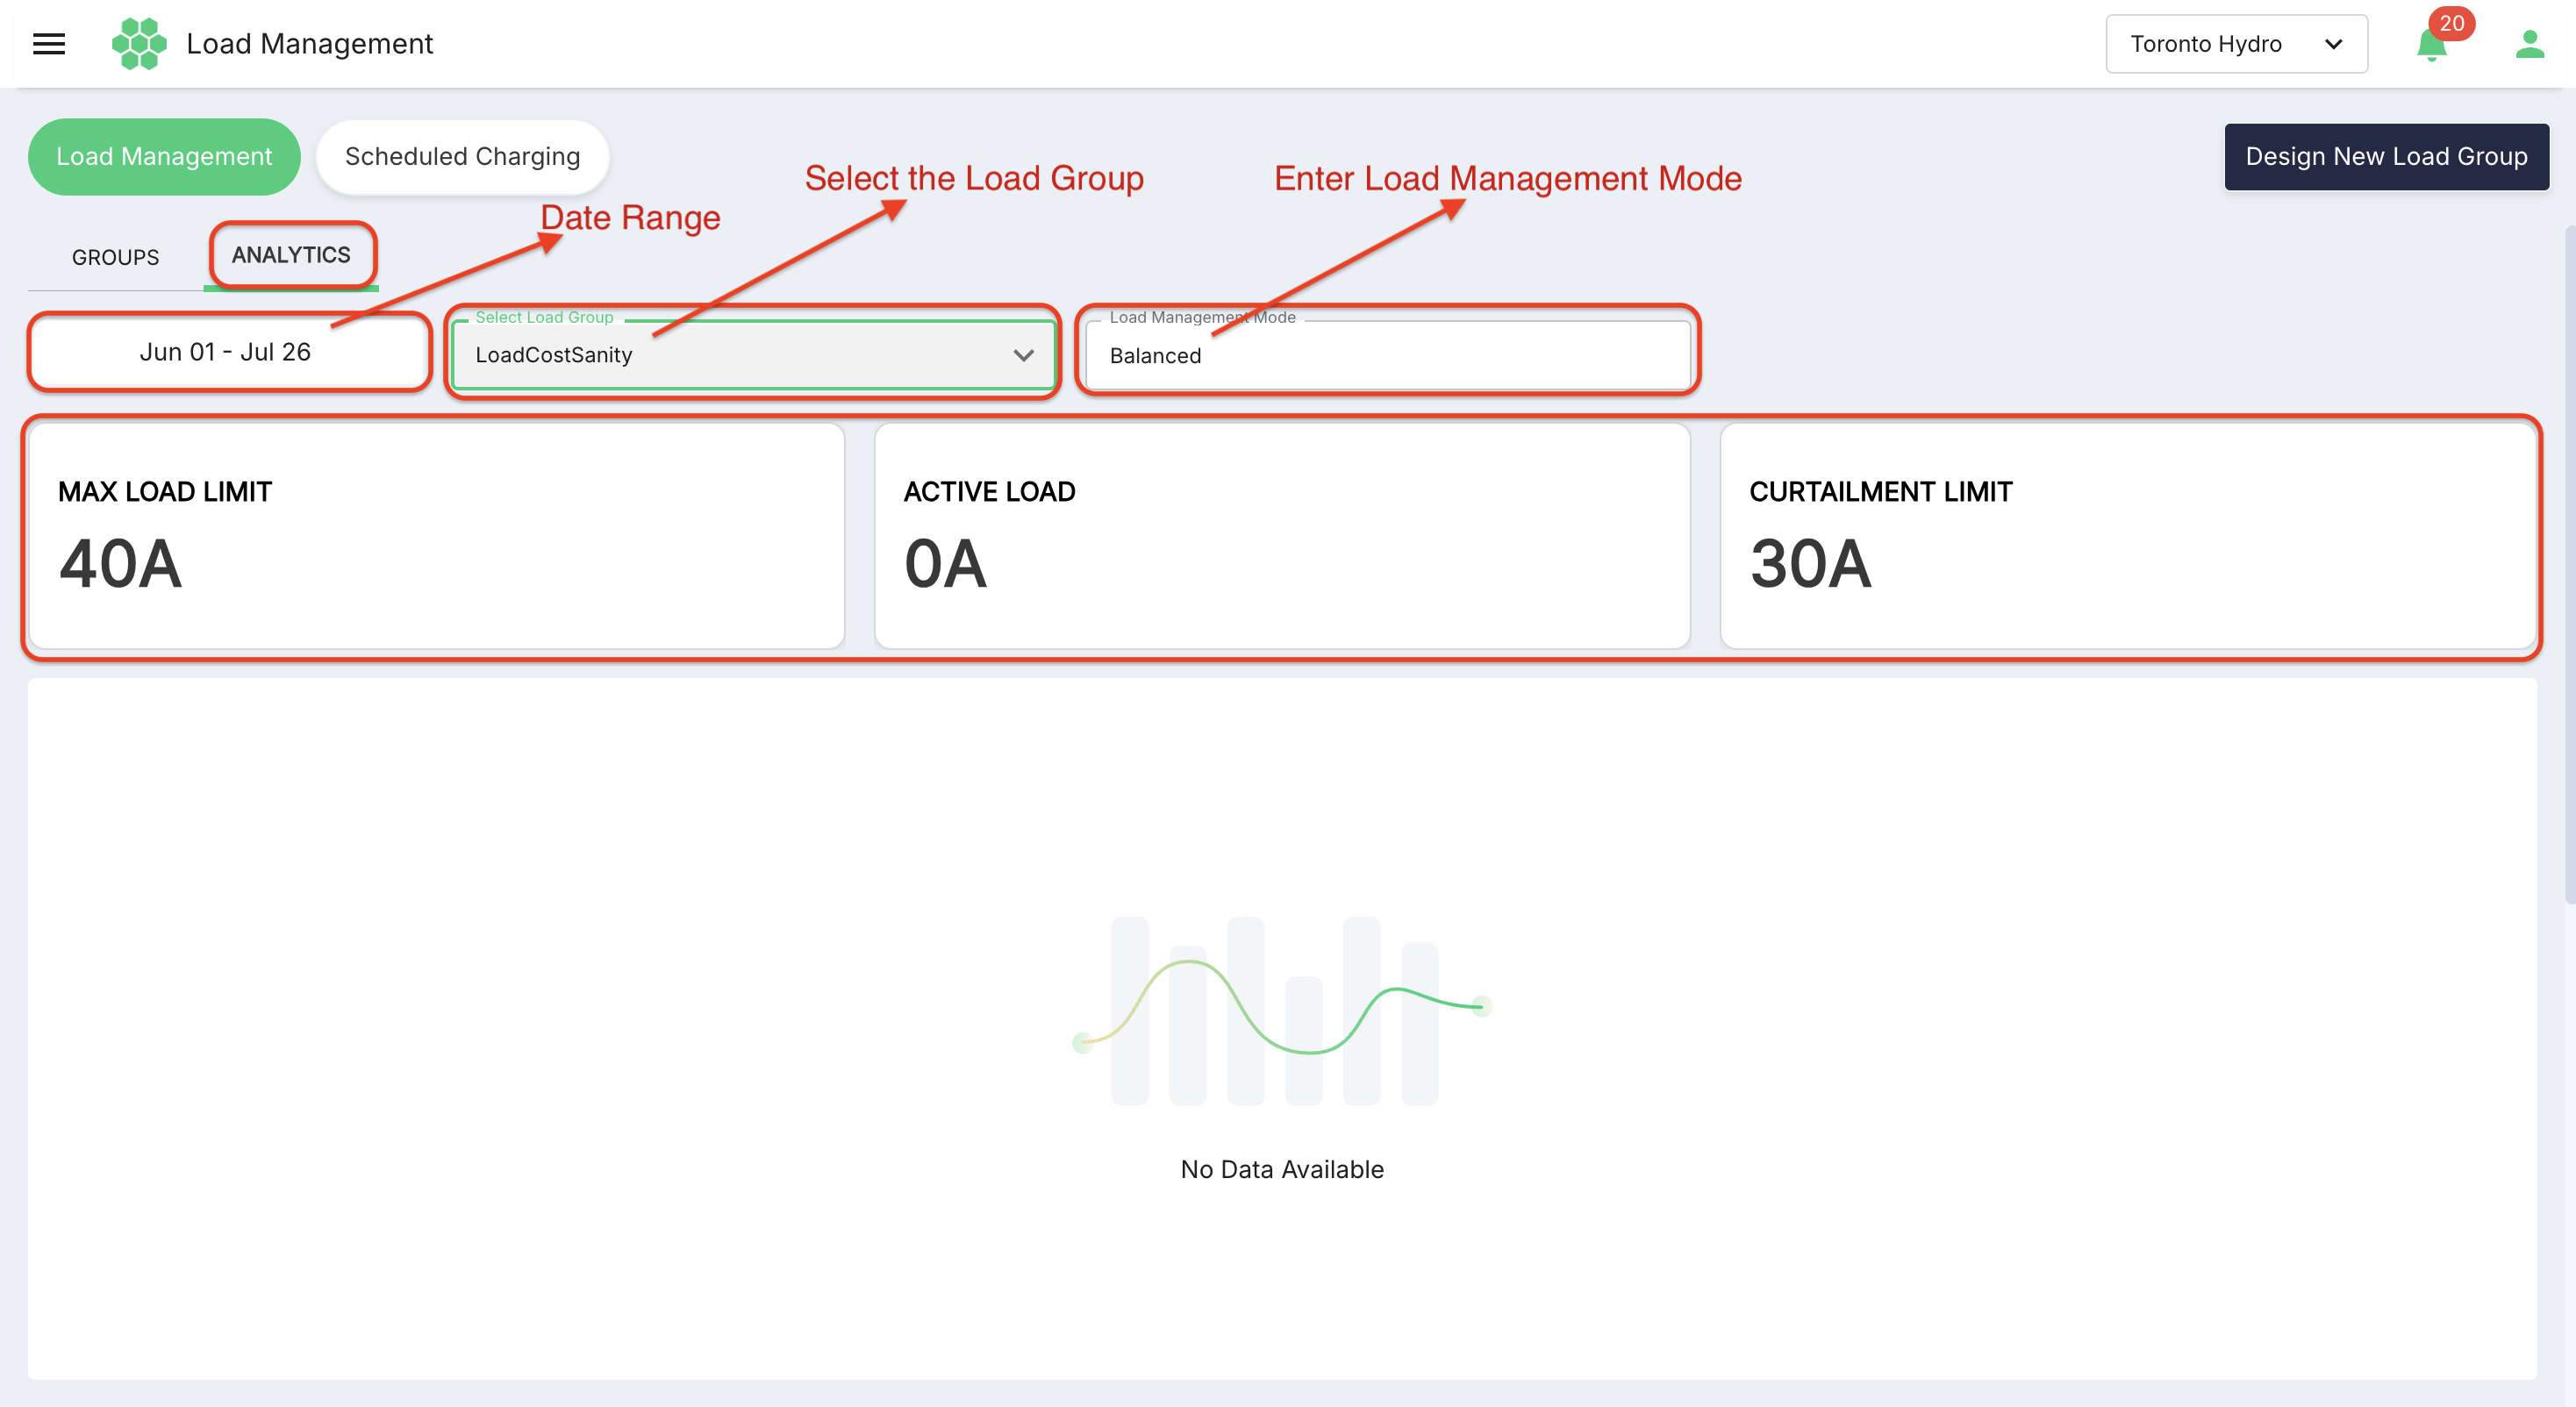
Below the controls, three summary cards display the current values for the selected group:
- Max Load Limit – the maximum load permitted for the group.
- Active Load – the load the group is currently drawing.
- Curtailment Limit – the reduced load ceiling applied during curtailment.
A load chart plots the selected period. Its legend distinguishes Max Load, Curtailment Limit, and Active Load, with the vertical axis in the group's load unit and the horizontal axis in time. Select Fullscreen to expand the chart.
Transactions
The Transactions grid below the chart lists the charging sessions included in the selected period. The header shows the number of transactions returned, and the grid provides Search, Refresh, and Column Filter controls.
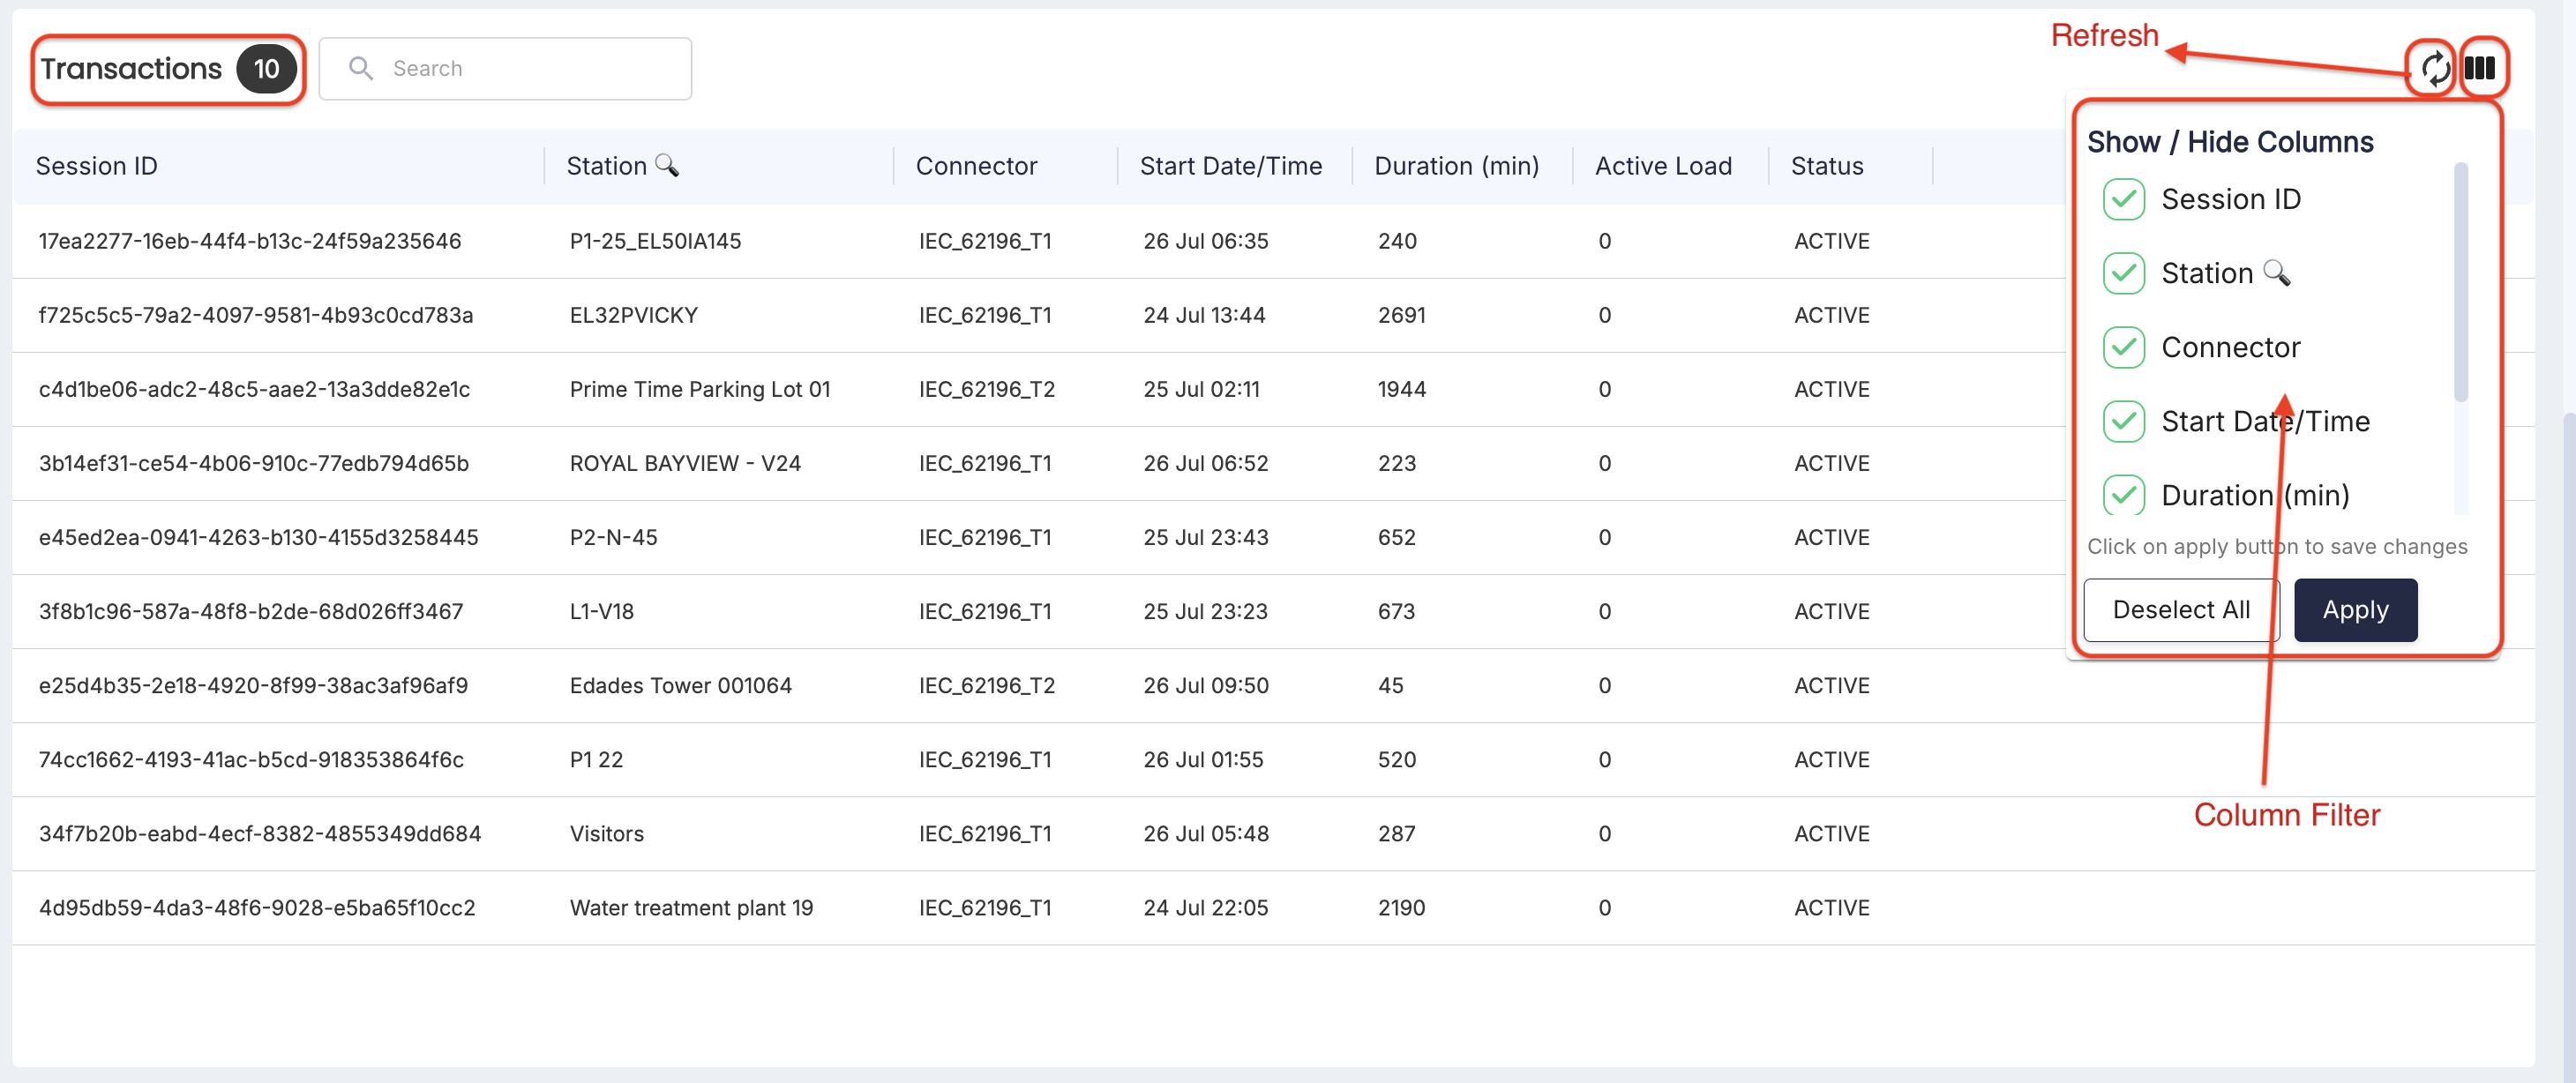
| Column | Description |
|---|---|
| Session ID | Identifier of the charging session. |
| Station | Station on which the session ran. Supports a per-column search. |
| Connector | Connector standard used for the session, such as IEC 62196. |
| Start Date/Time | Date and time the session started. |
| Duration (min) | Length of the session in minutes. |
| Active Load | Load associated with the session, expressed in the group's unit. |
| Status | Current session status, such as Active. |
Load Group Details
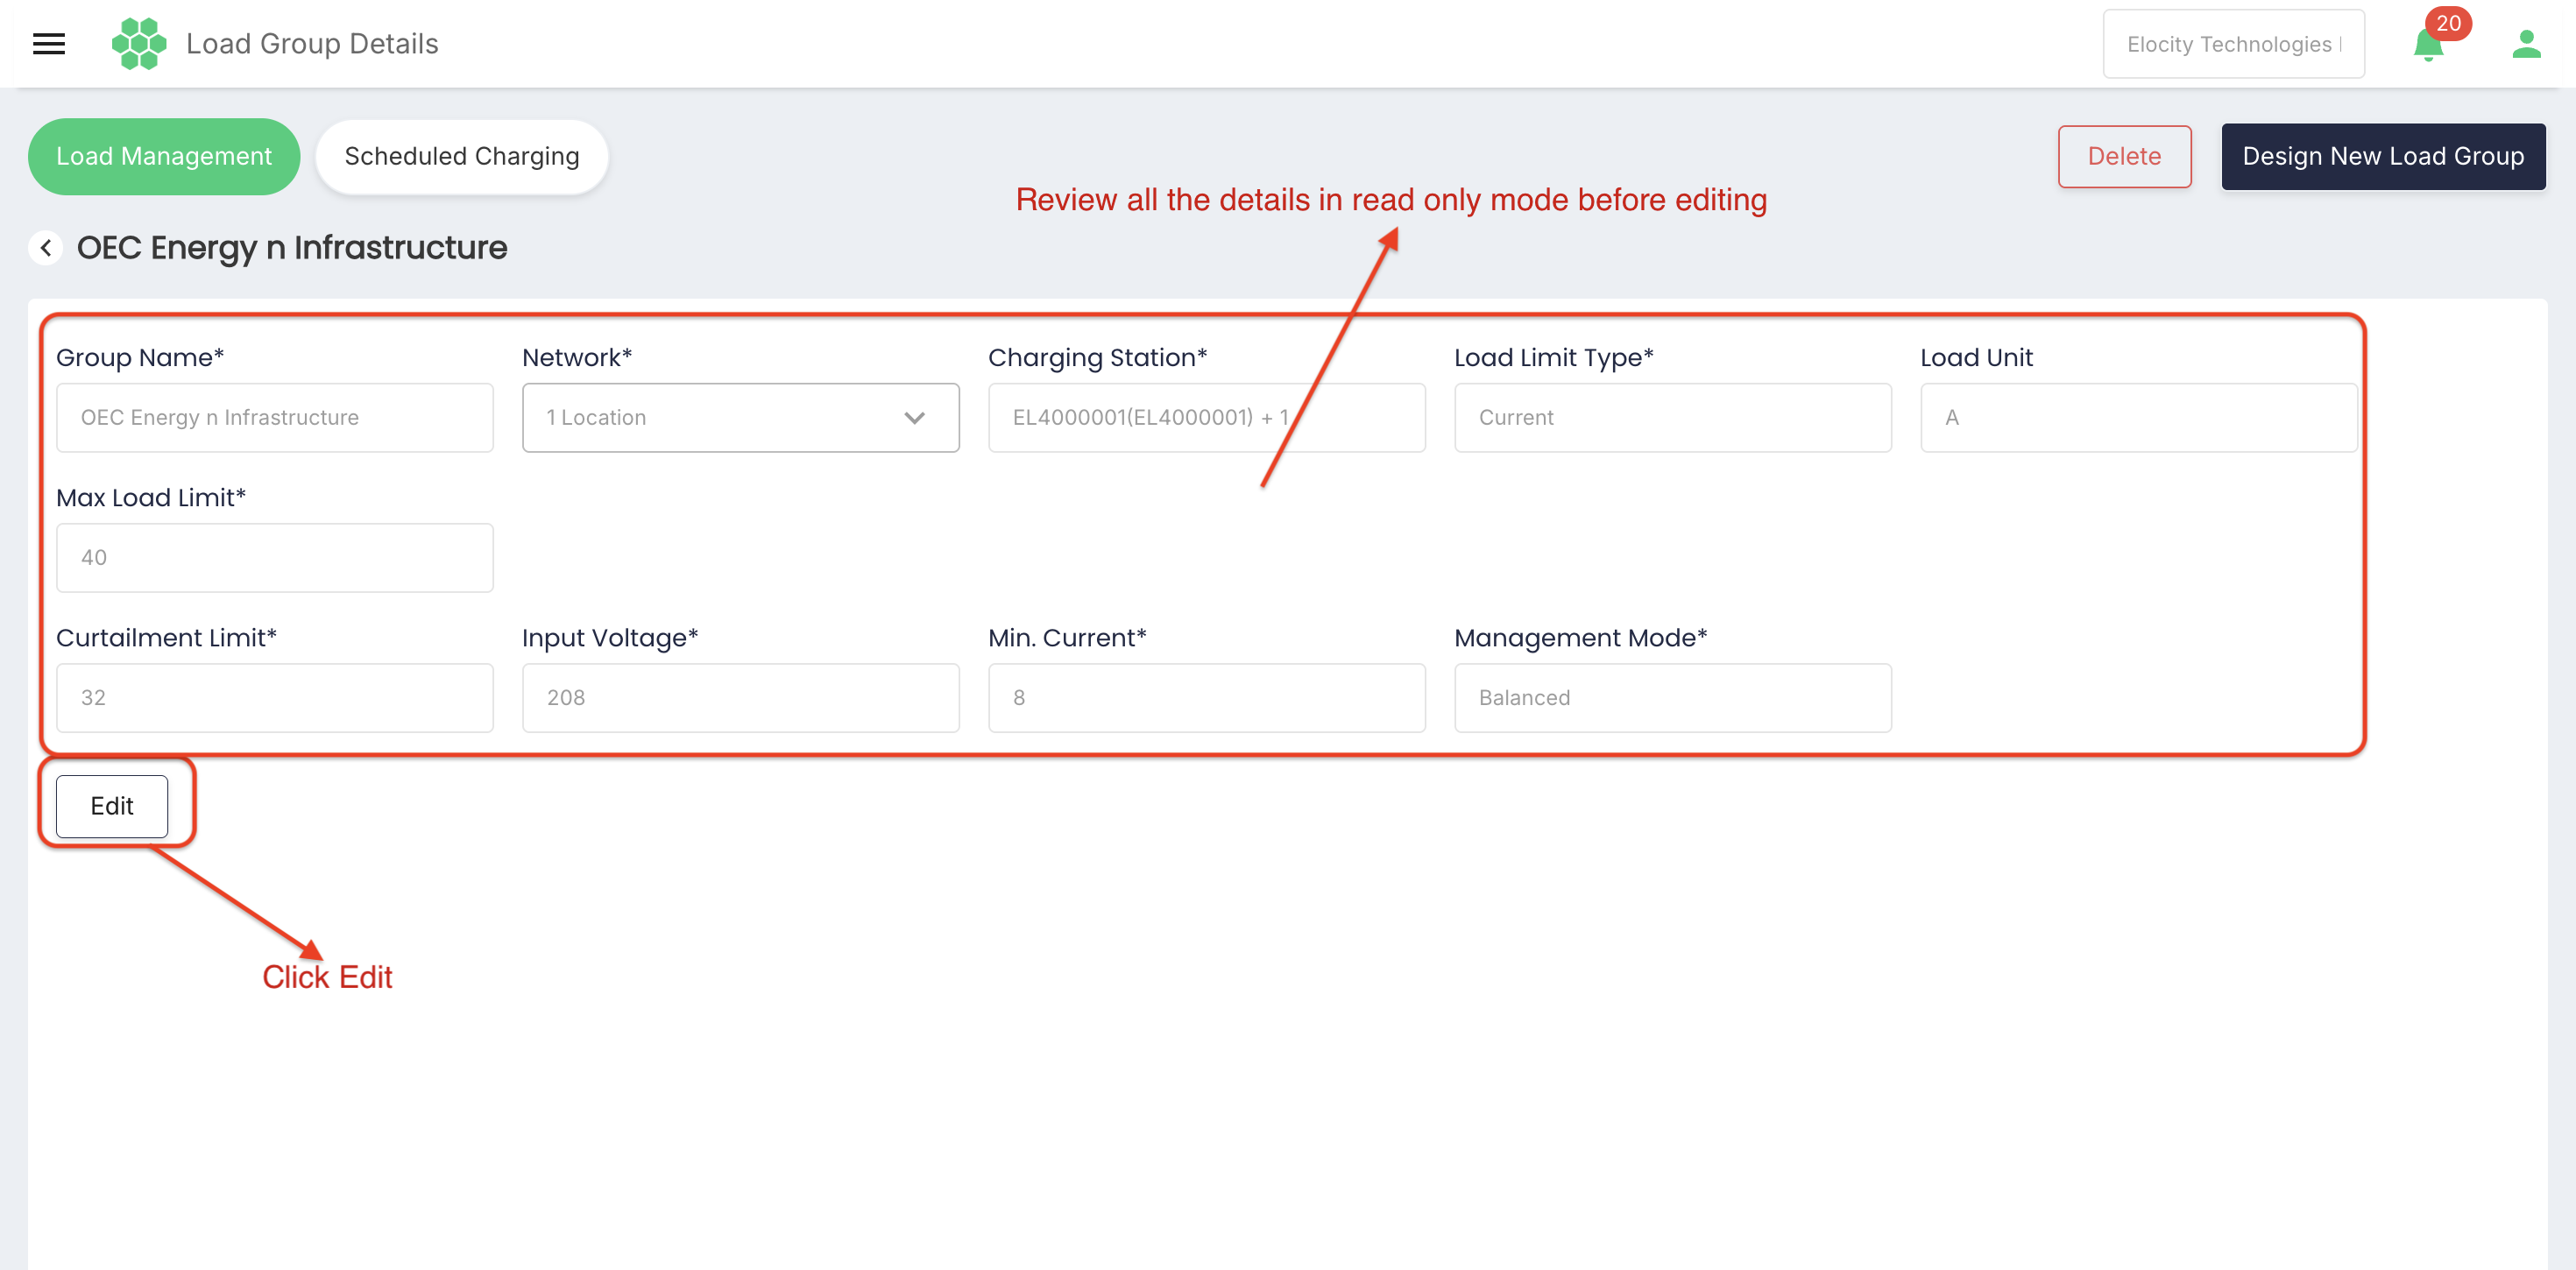
Select a group in the Groups list to open its Load Group Details page. The page displays the group name and the group configuration in read-only mode. Select Edit to change supported fields, or Delete to remove the group.
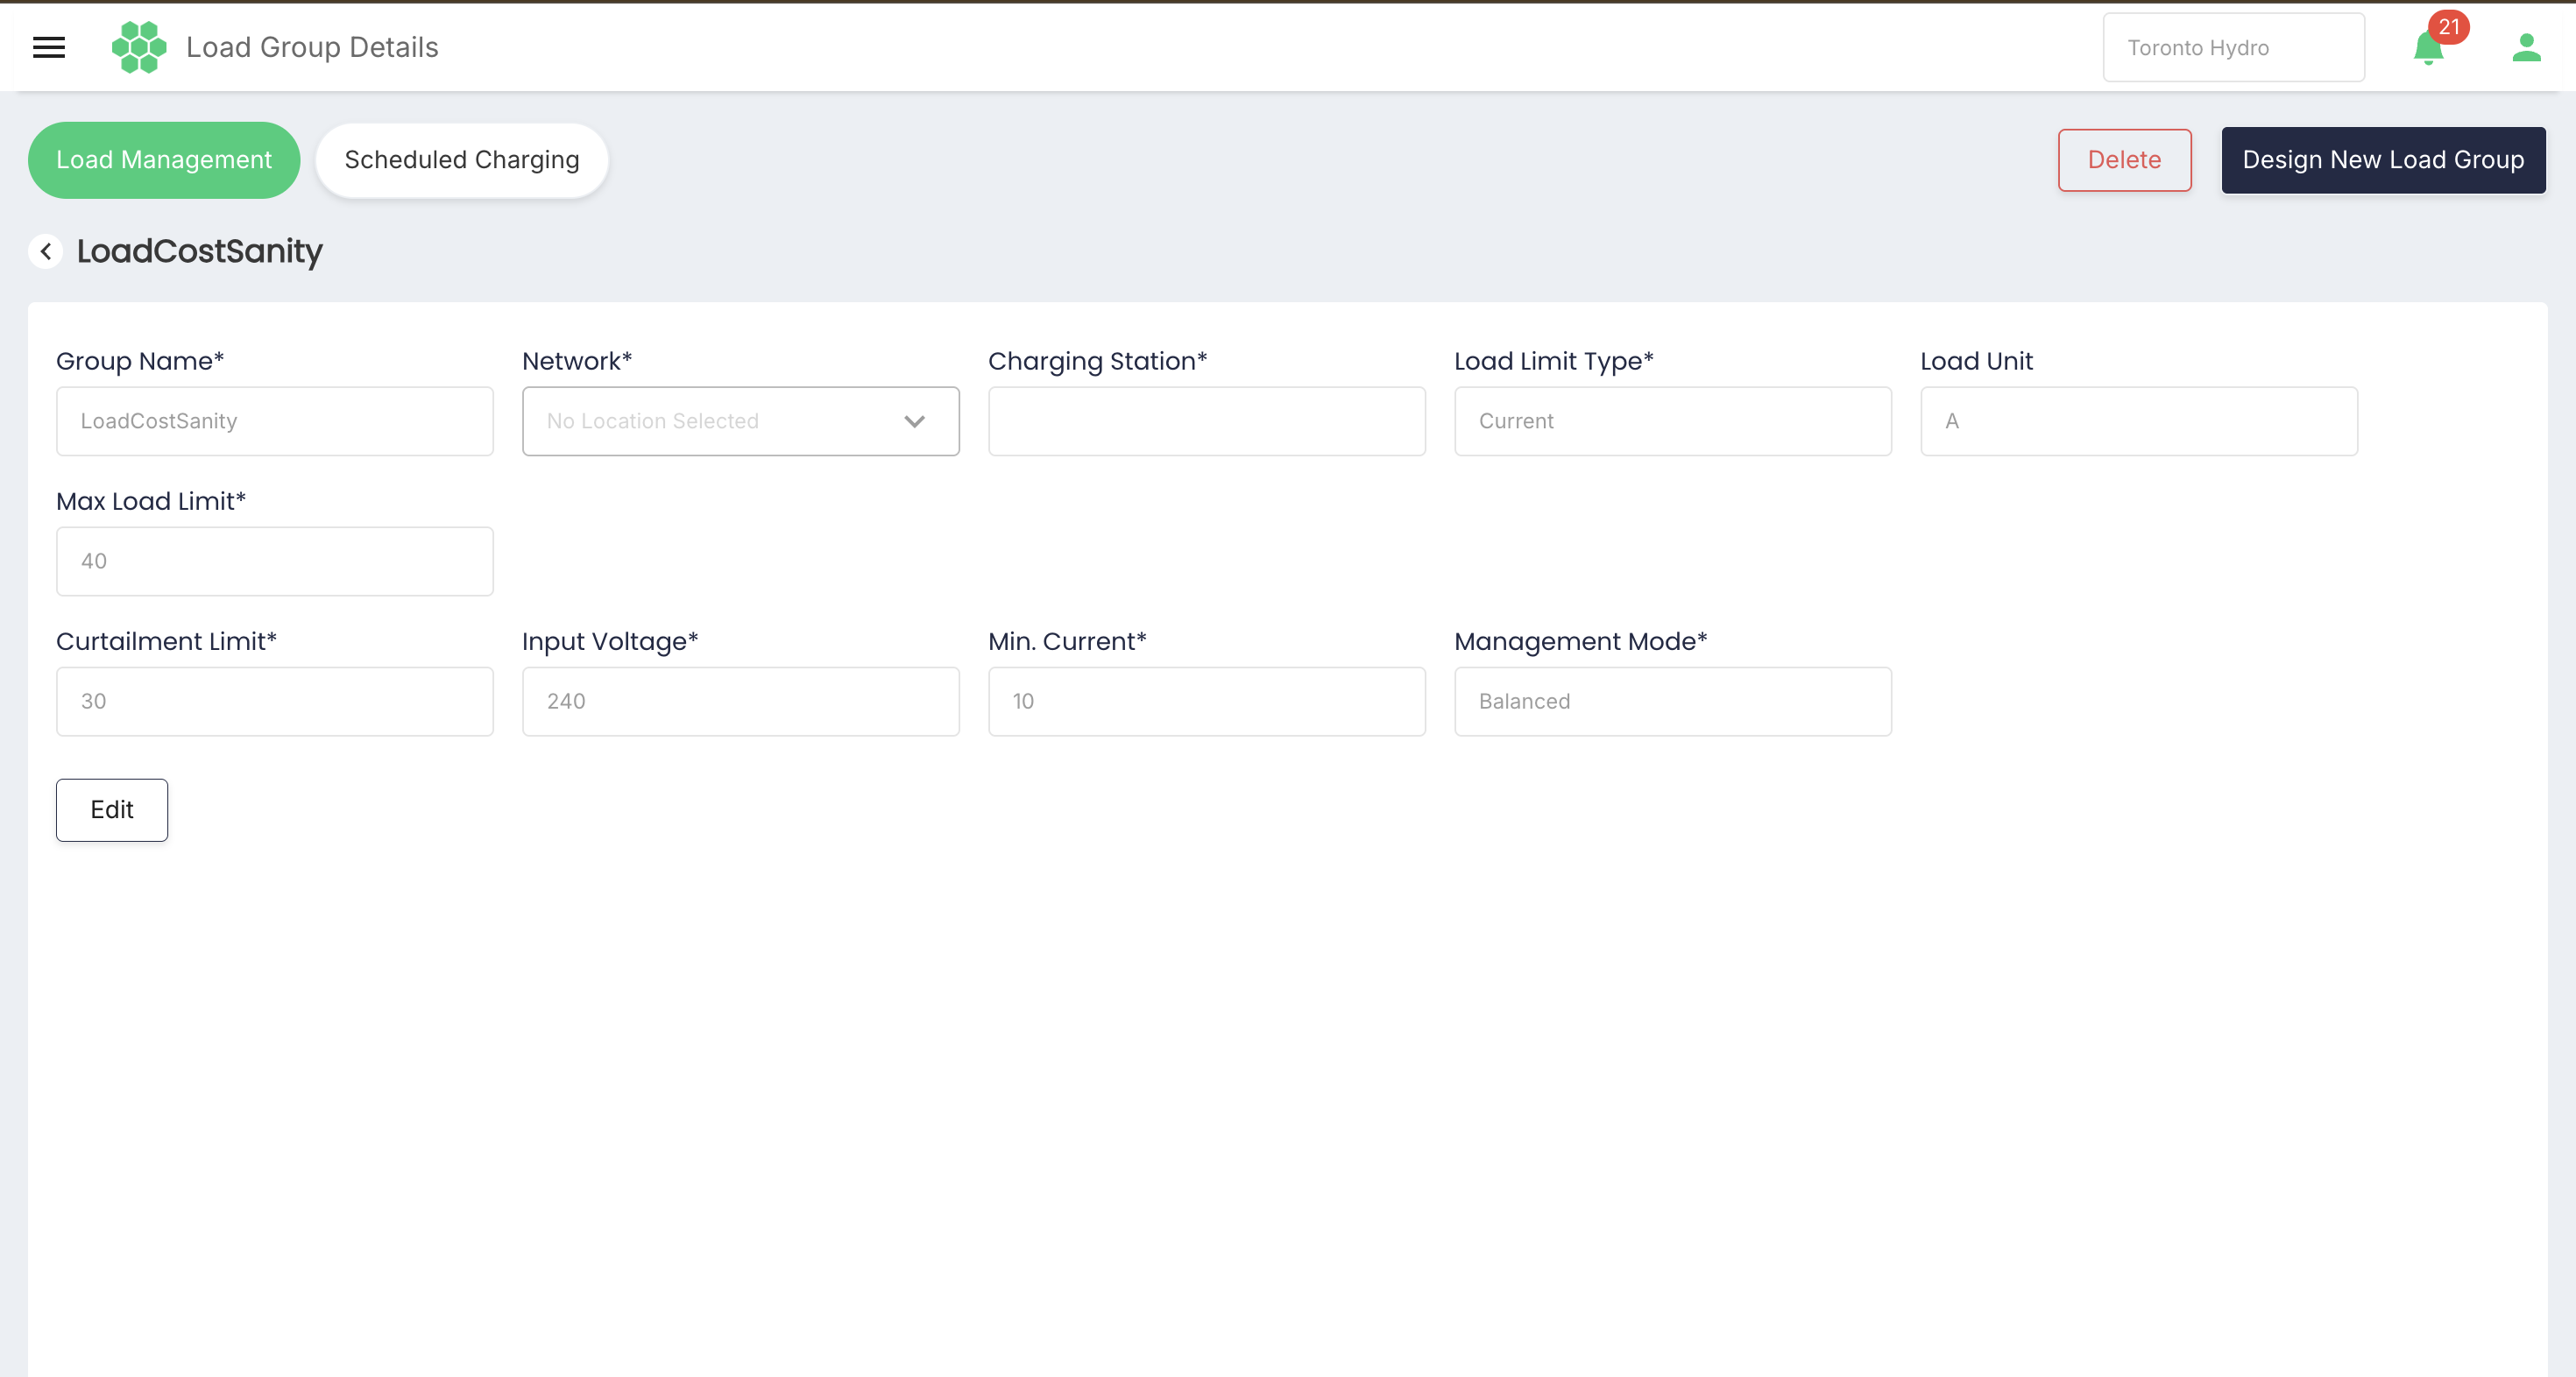
| Field | Description |
|---|---|
| Group Name* | Required name of the load group. |
| Network* | Required location network the group belongs to. The field indicates the number of locations included. |
| Charging Station* | Required set of charging stations assigned to the group. |
| Load Limit Type* | The basis used for the load limit, such as Current. Display only. |
| Load Unit | The unit used for the group's load values, such as A. Display only. |
| Max Load Limit* | Required maximum load the group may draw. |
| Curtailment Limit* | Required reduced load ceiling applied when curtailment is in effect. |
| Input Voltage* | Required supply voltage for the group. Supported values are 120, 208, and 240. |
| Min. Current* | Required minimum current to be maintained for a charging session in the group. |
| Management Mode* | Required load-distribution strategy applied to the group. |
Fields marked with an asterisk are required.
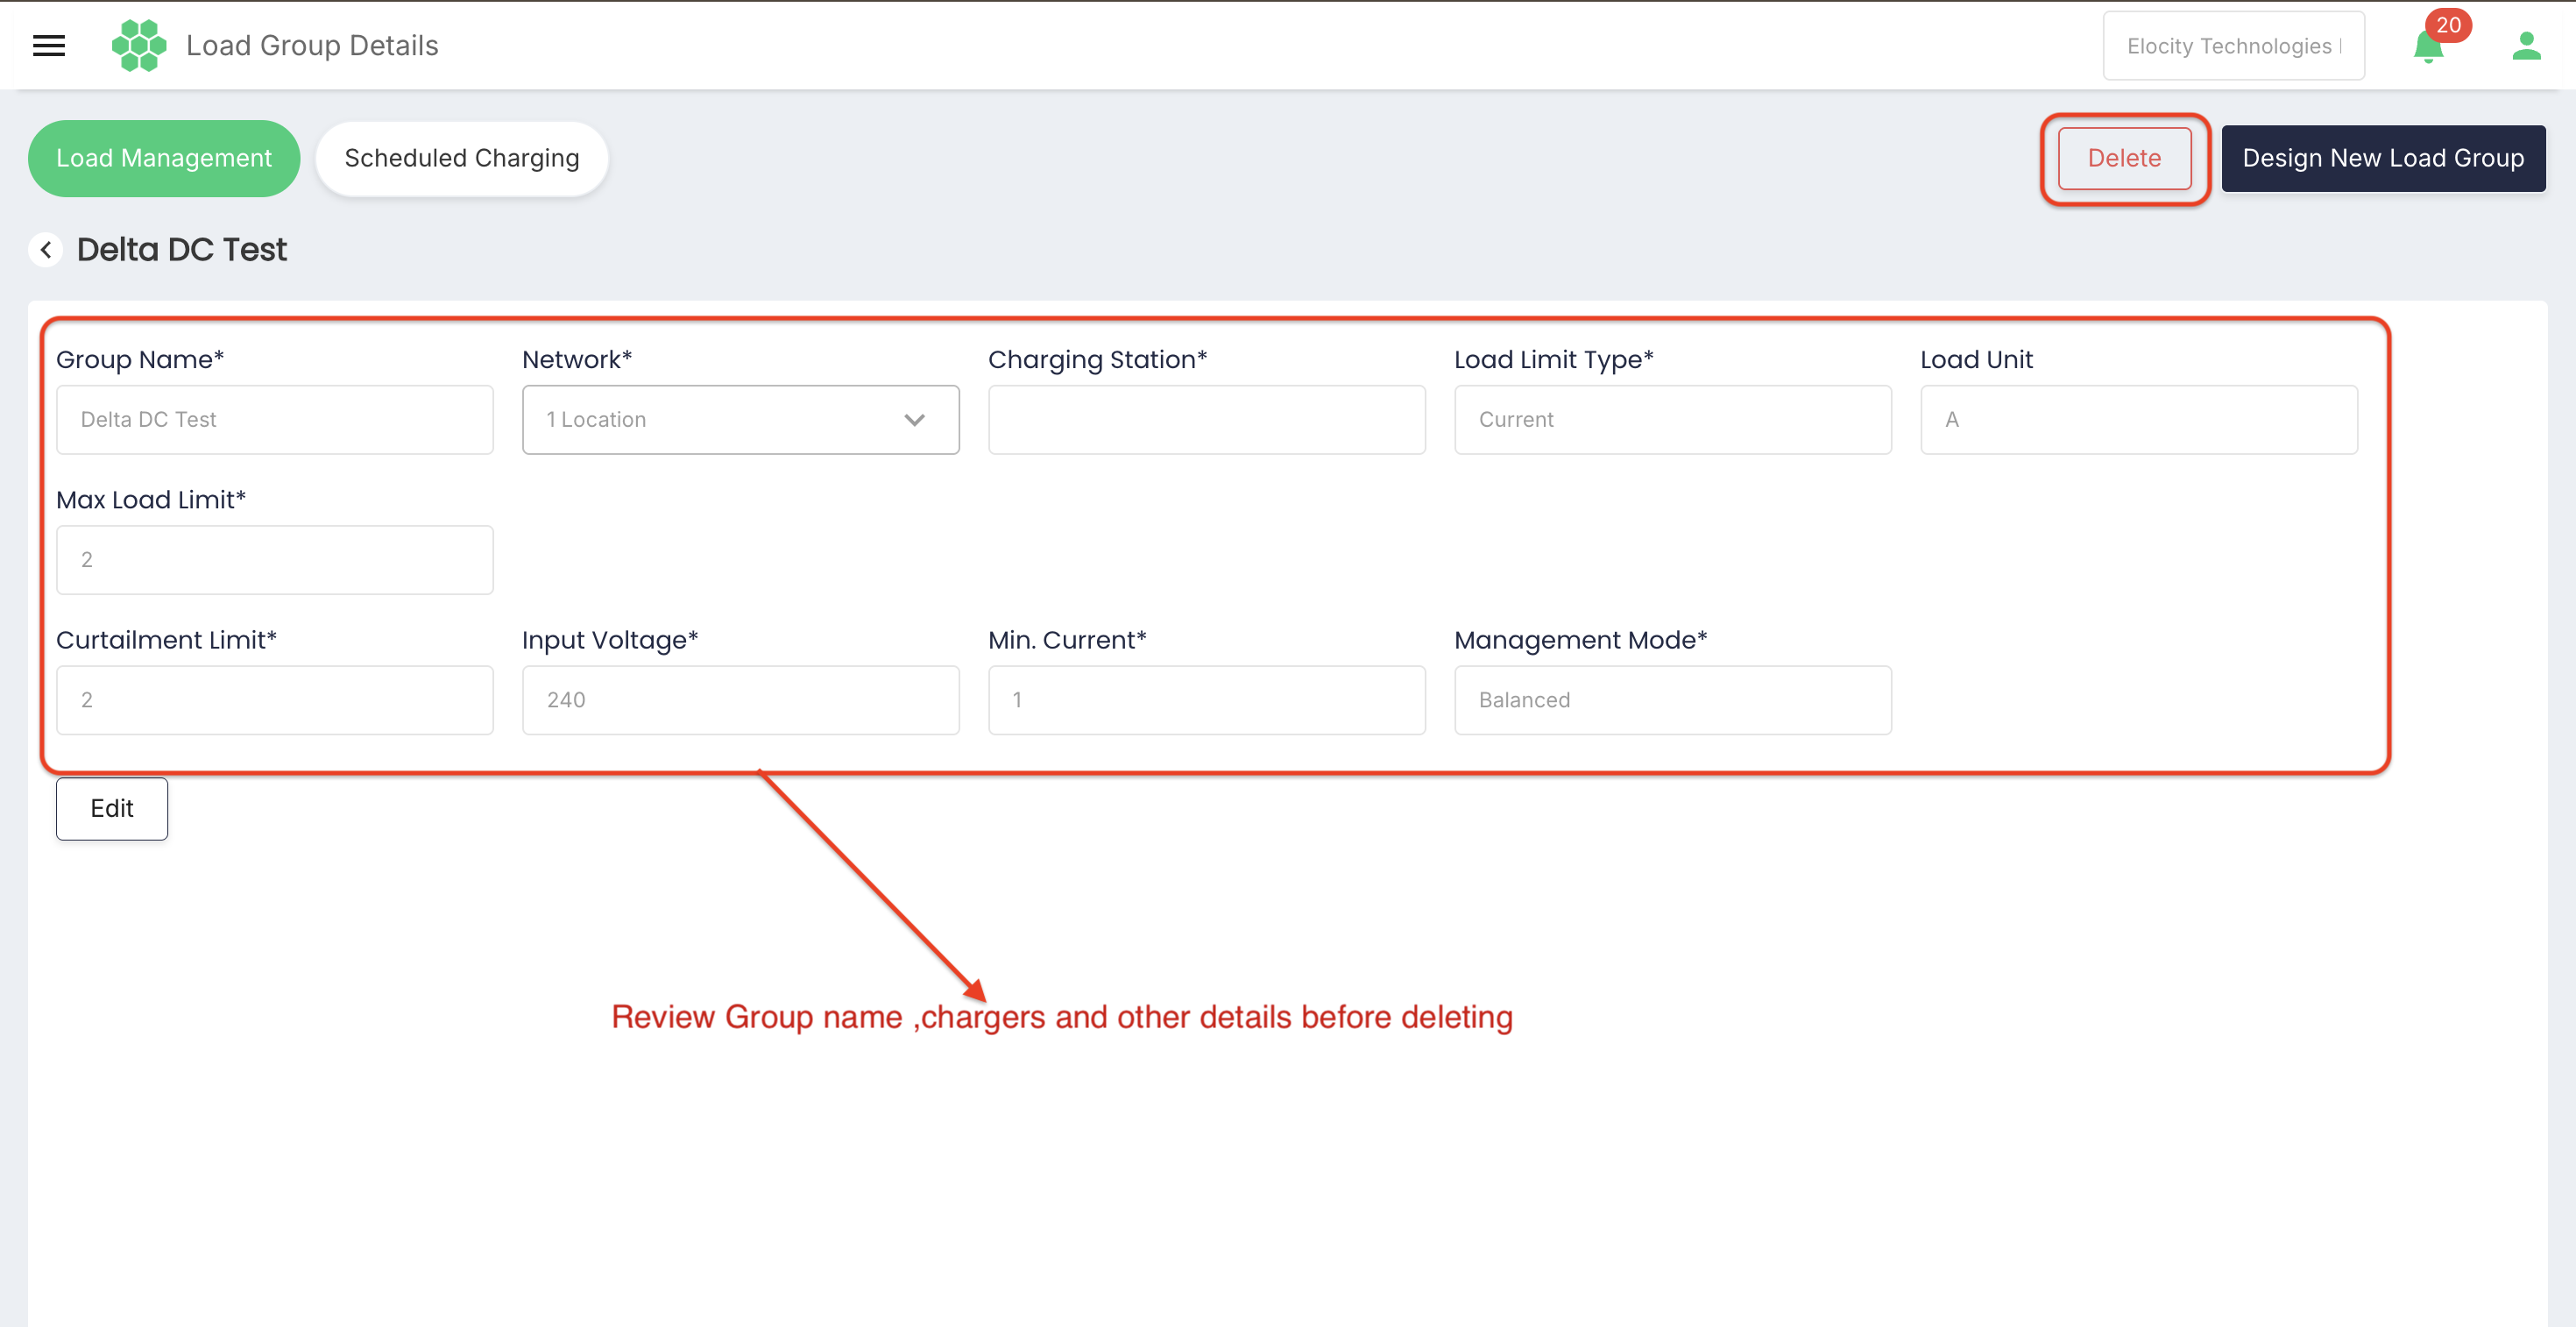
Deleting a load group changes site load control and should be performed only by an authorized user after confirming the group and its assigned chargers.
Design New Load Group
Select Design New Load Group to open the creation form. The form contains the same fields described under Load Group Details.
Management Mode options
The Management Mode determines how the group's available load is distributed across its active charging sessions:
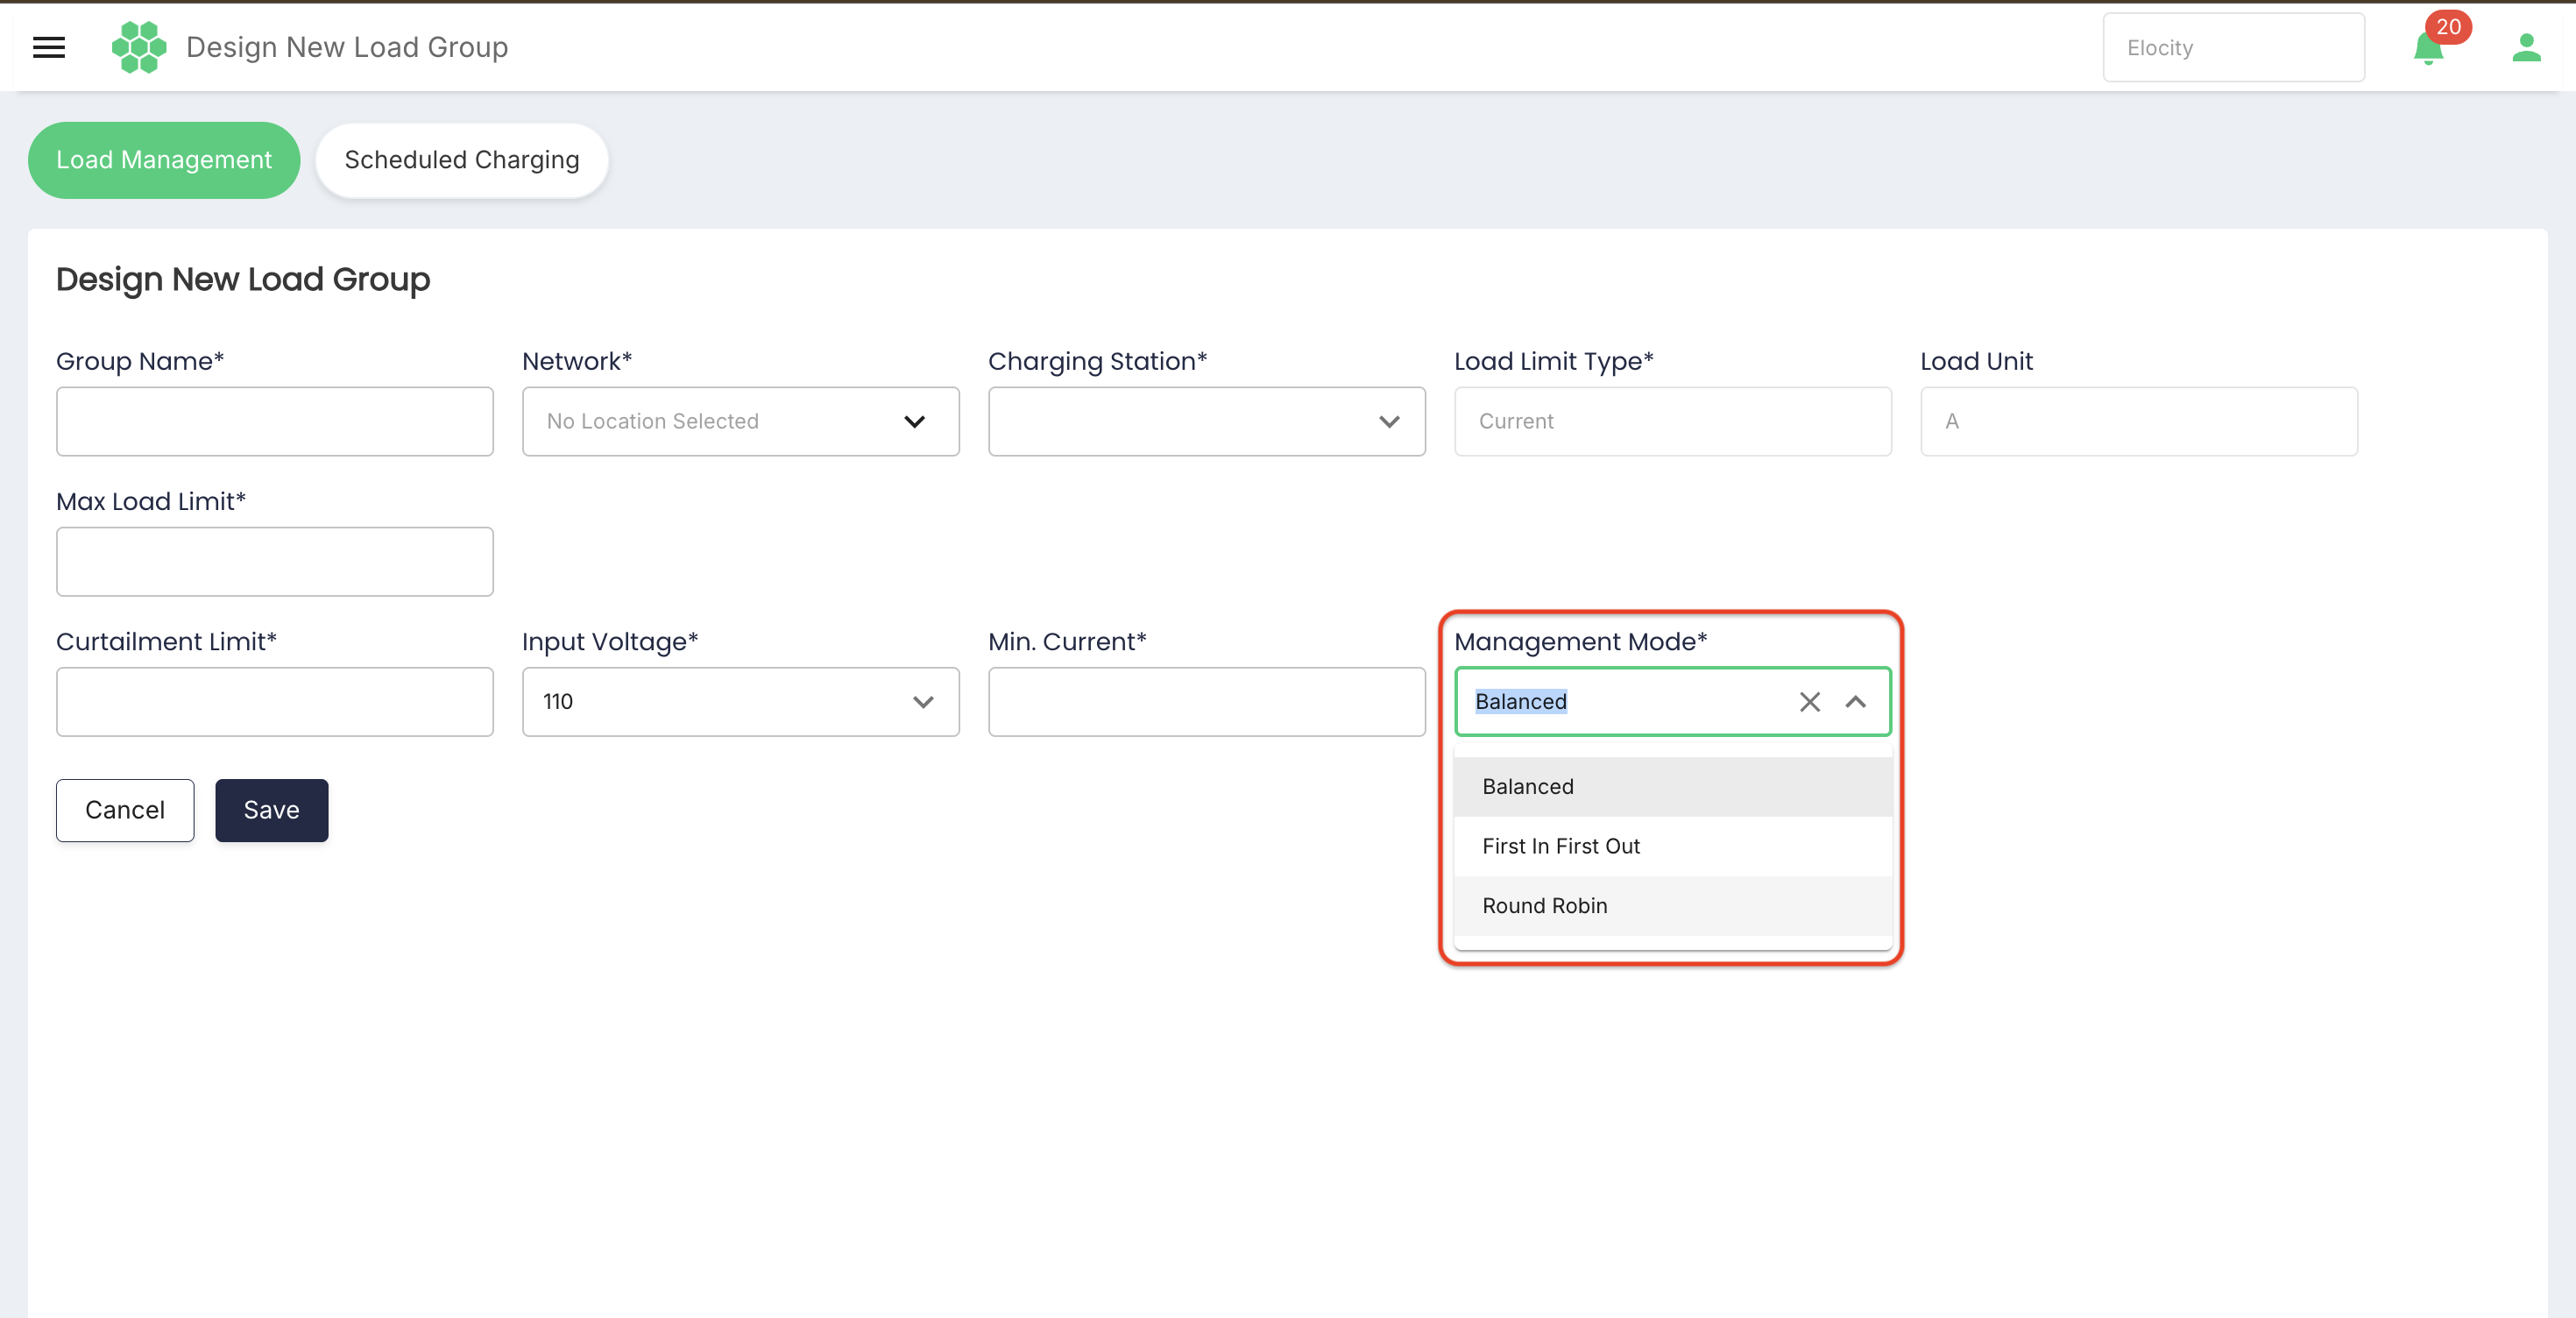
- Balanced – distributes the available load across the active sessions.
- First In First Out – prioritizes sessions in the order they began.
- Round Robin – rotates the available load among the active sessions.
Creating the group
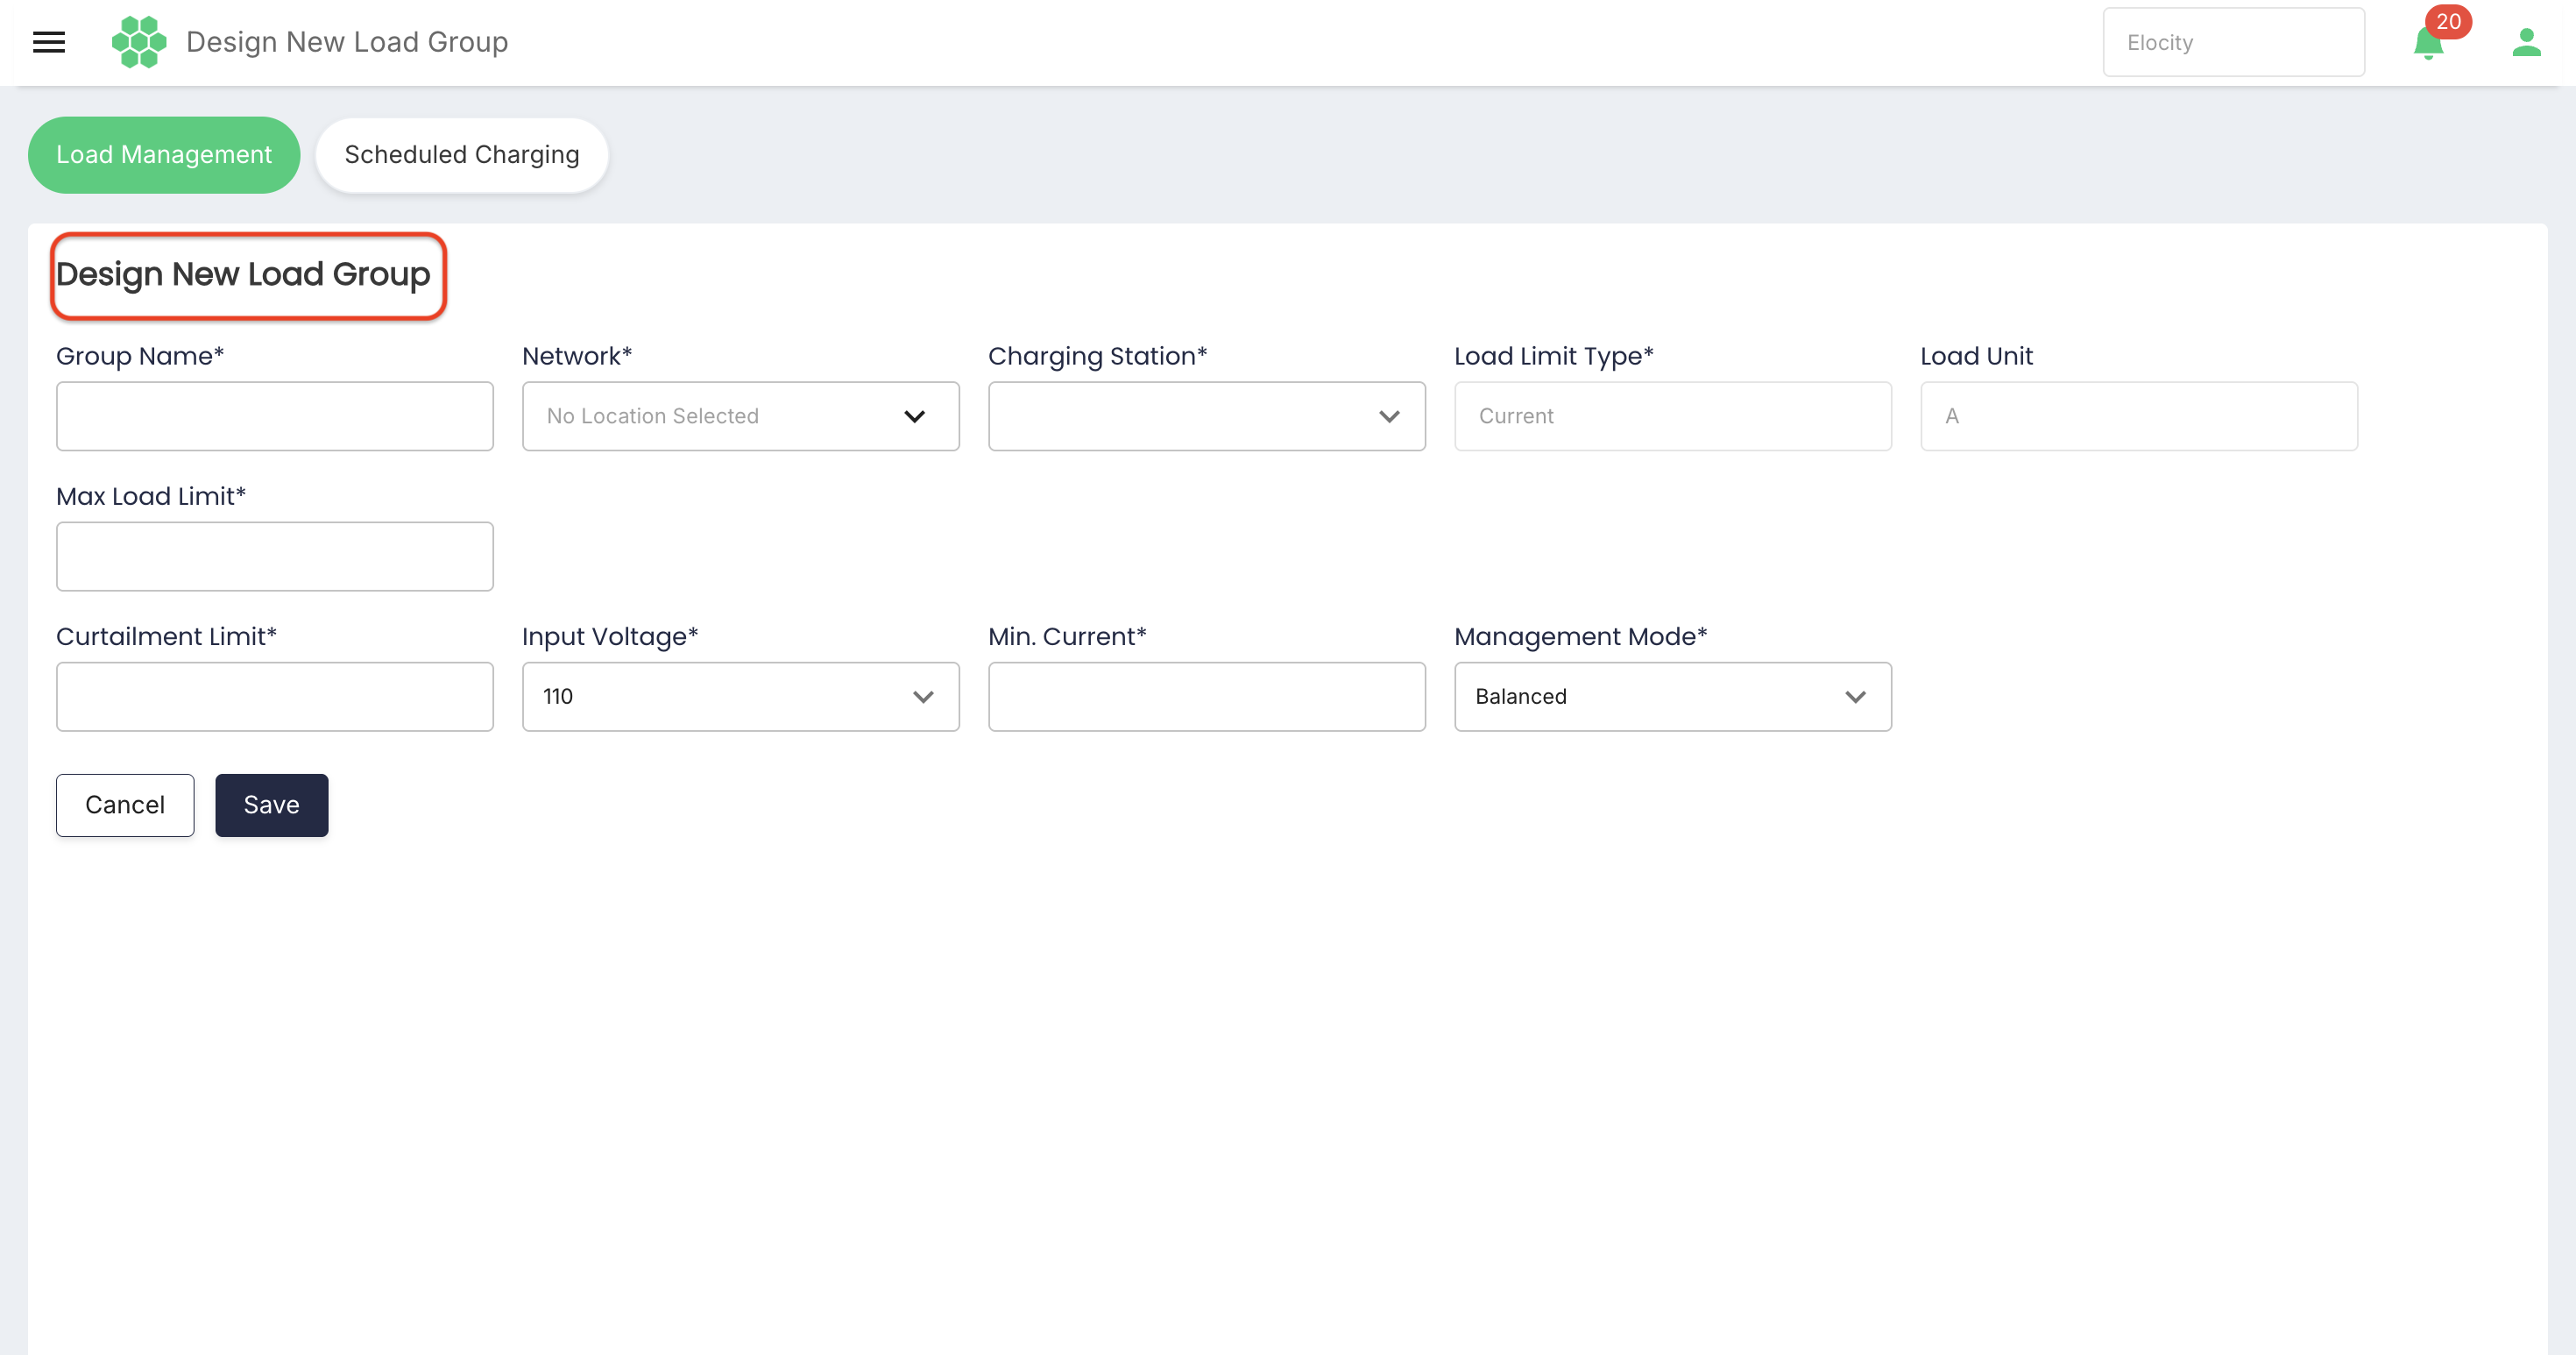
- Enter the Group Name.
- Select the Network and the Charging Station set to include.
- Confirm the Load Limit Type and Load Unit.
- Enter the Max Load Limit and Curtailment Limit.
- Select the Input Voltage and enter the Min. Current.
- Select the Management Mode.
- Select Save to create the group, or Cancel to leave without saving.
Edit a load-management group
- Open Load Management.
- Select the required group name.
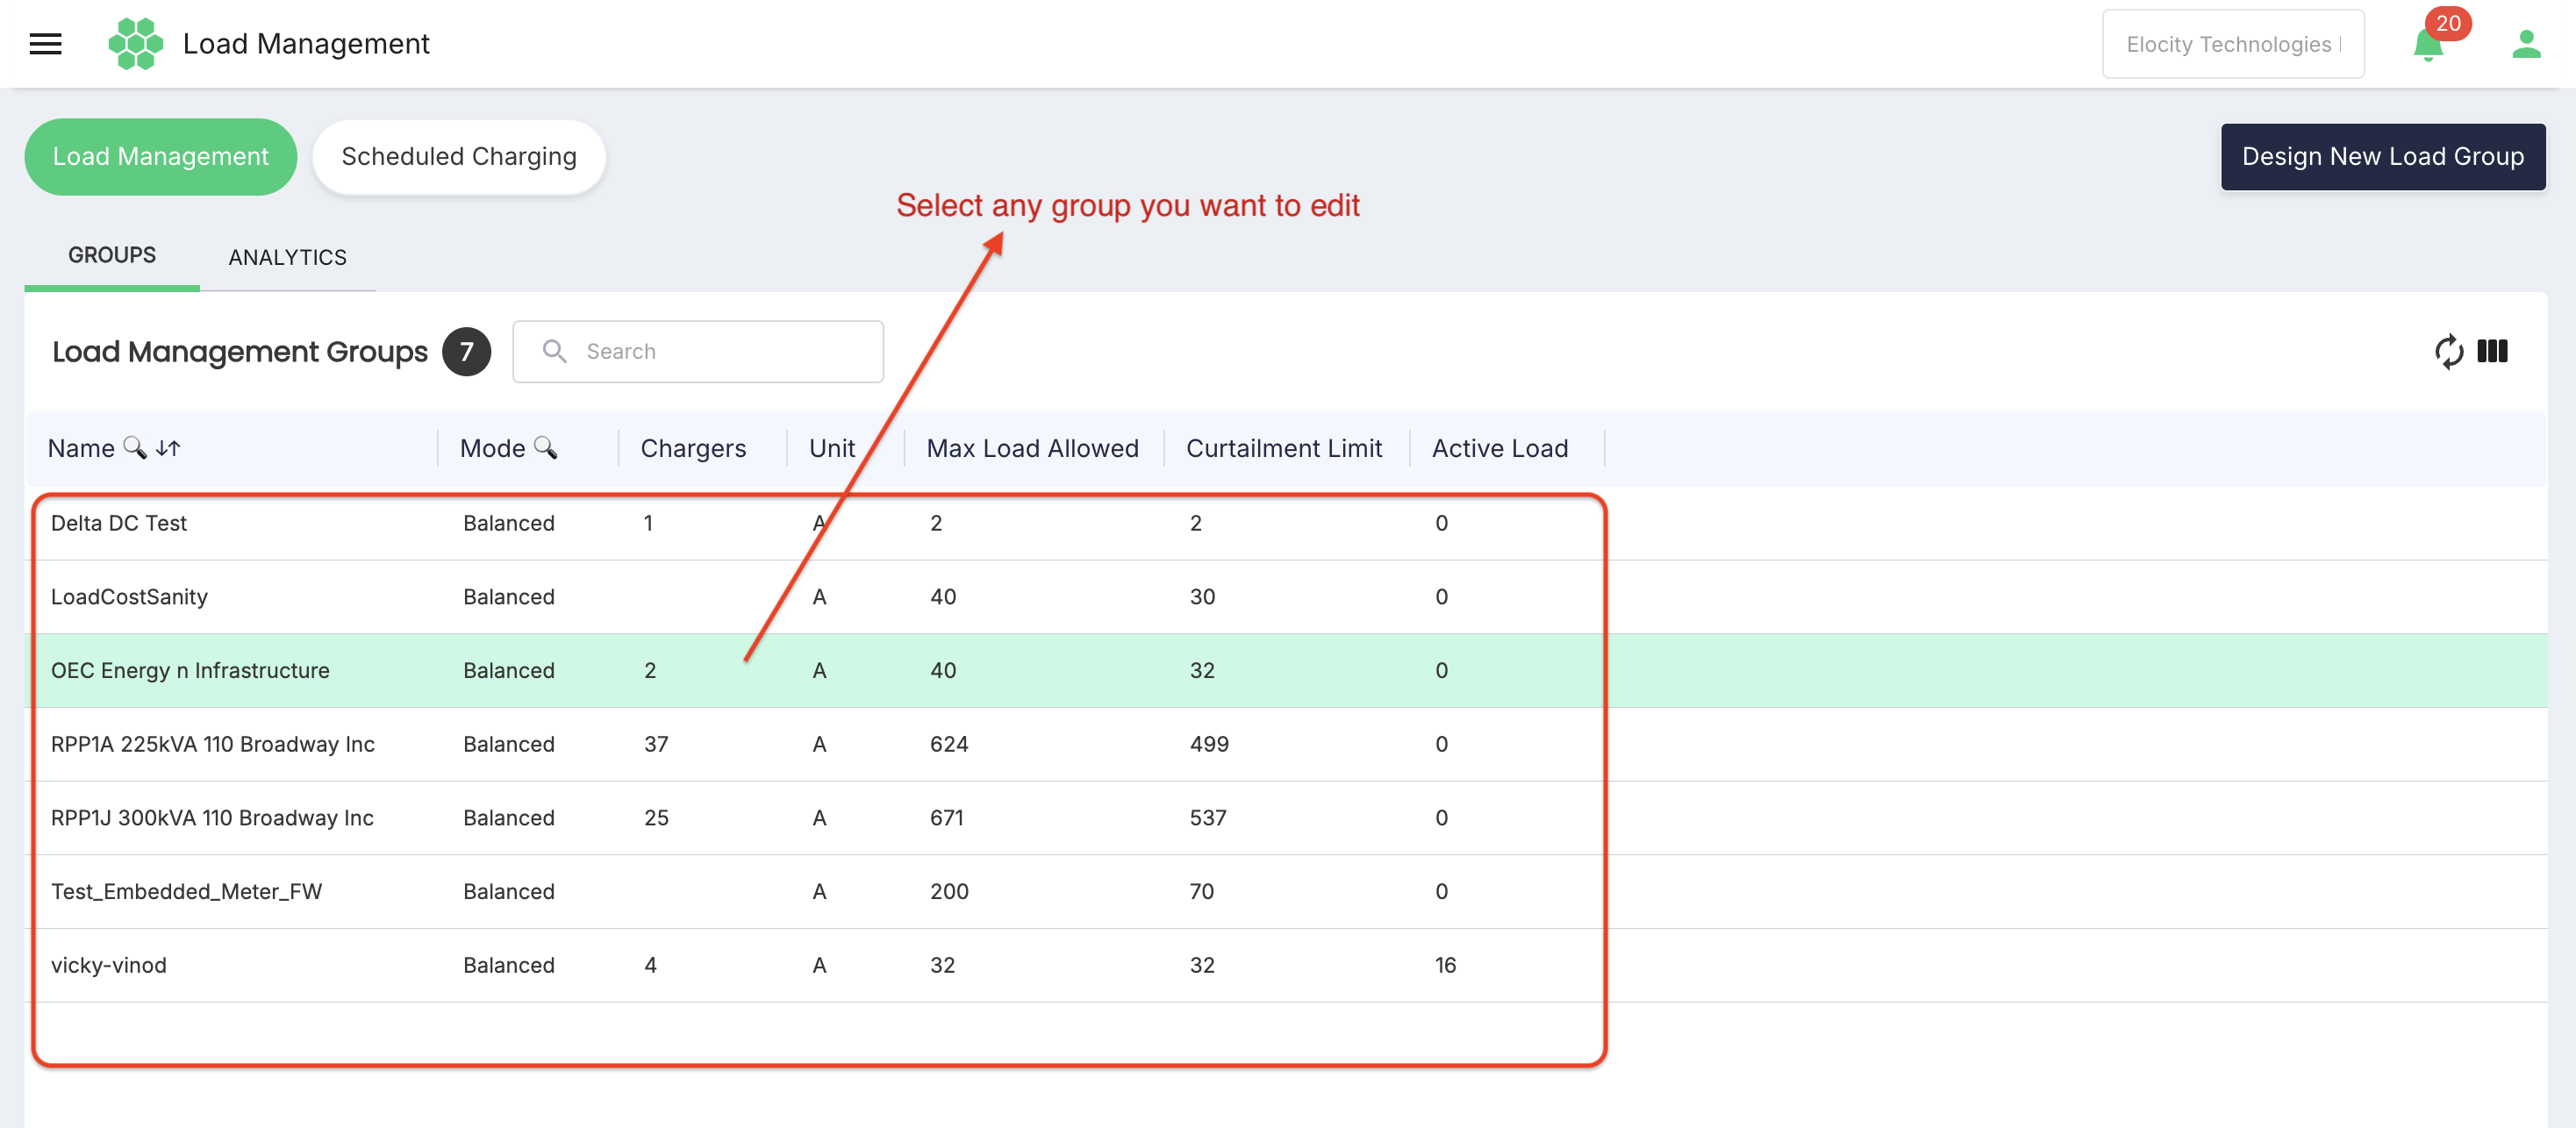
- Review all values in read-only mode.
- Record the current configuration for rollback.
- Select Edit.
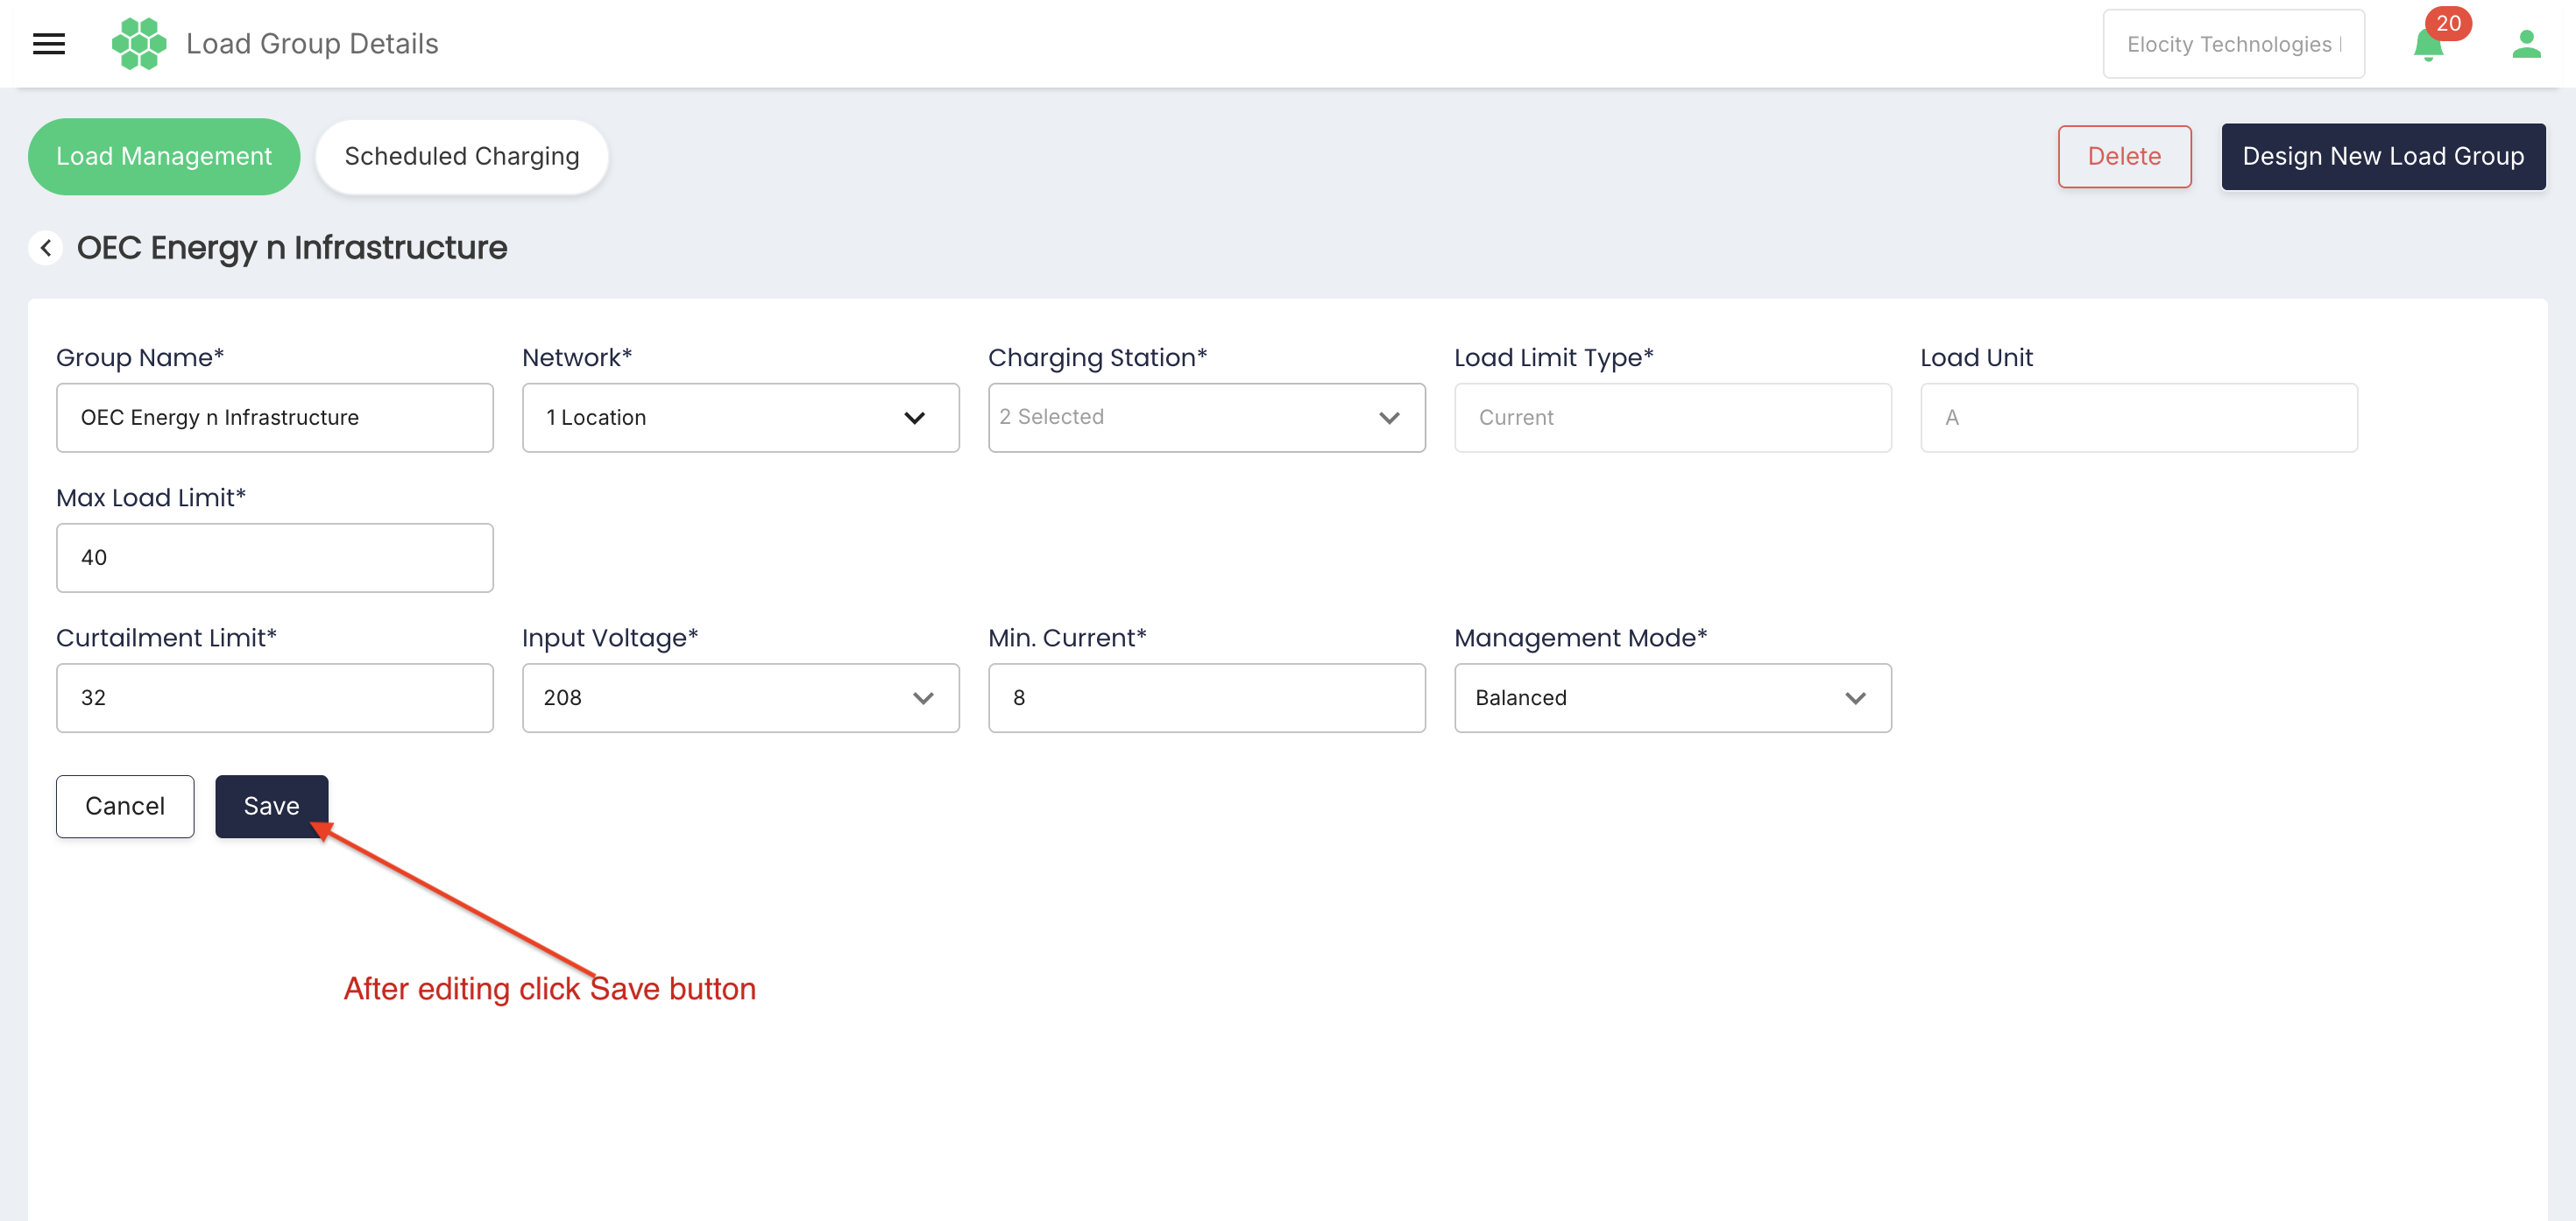
- Modify only the approved fields.
- Recheck locations, chargers, voltage, load limit, curtailment threshold, minimum current, and management mode.
- Save the group.
- Return to the group list and select Refresh.
- Monitor Active Load and affected charging sessions.
Editing precautions
- Do not reduce a limit without reviewing active sessions and required minimum current.
- Confirm that Max Load Limit remains compatible with the site's electrical capacity.
- Confirm that Curtailment Limit follows the configured relationship to the maximum load.
- Avoid assigning the same charger to conflicting groups unless the platform explicitly supports hierarchy or priority.
- Confirm the calculation effect when changing Input Voltage, unit, or limit type.
- Test the new configuration during a controlled operating window.
Delete a load-management group
Deleting a load group removes the group configuration. It may release its charger assignments from that load-control policy and can change how those chargers are managed.
Pre-deletion checks
Before deletion, confirm:
- The correct business and group are open.
- The group is not required by a Scheduled Charging group, automation, report, or external integration.
- Its chargers have an approved replacement configuration when required.
- Active charging sessions have been reviewed.
- Current load can be handled safely after removal.
- The existing group details have been recorded for audit or rollback.
- The deletion has the required operational approval.
Delete procedure
-
Open Load Management.
-
Select the group name.
-
Review Group Name, selected chargers, limits, and Management Mode.
-
Select Delete.
-
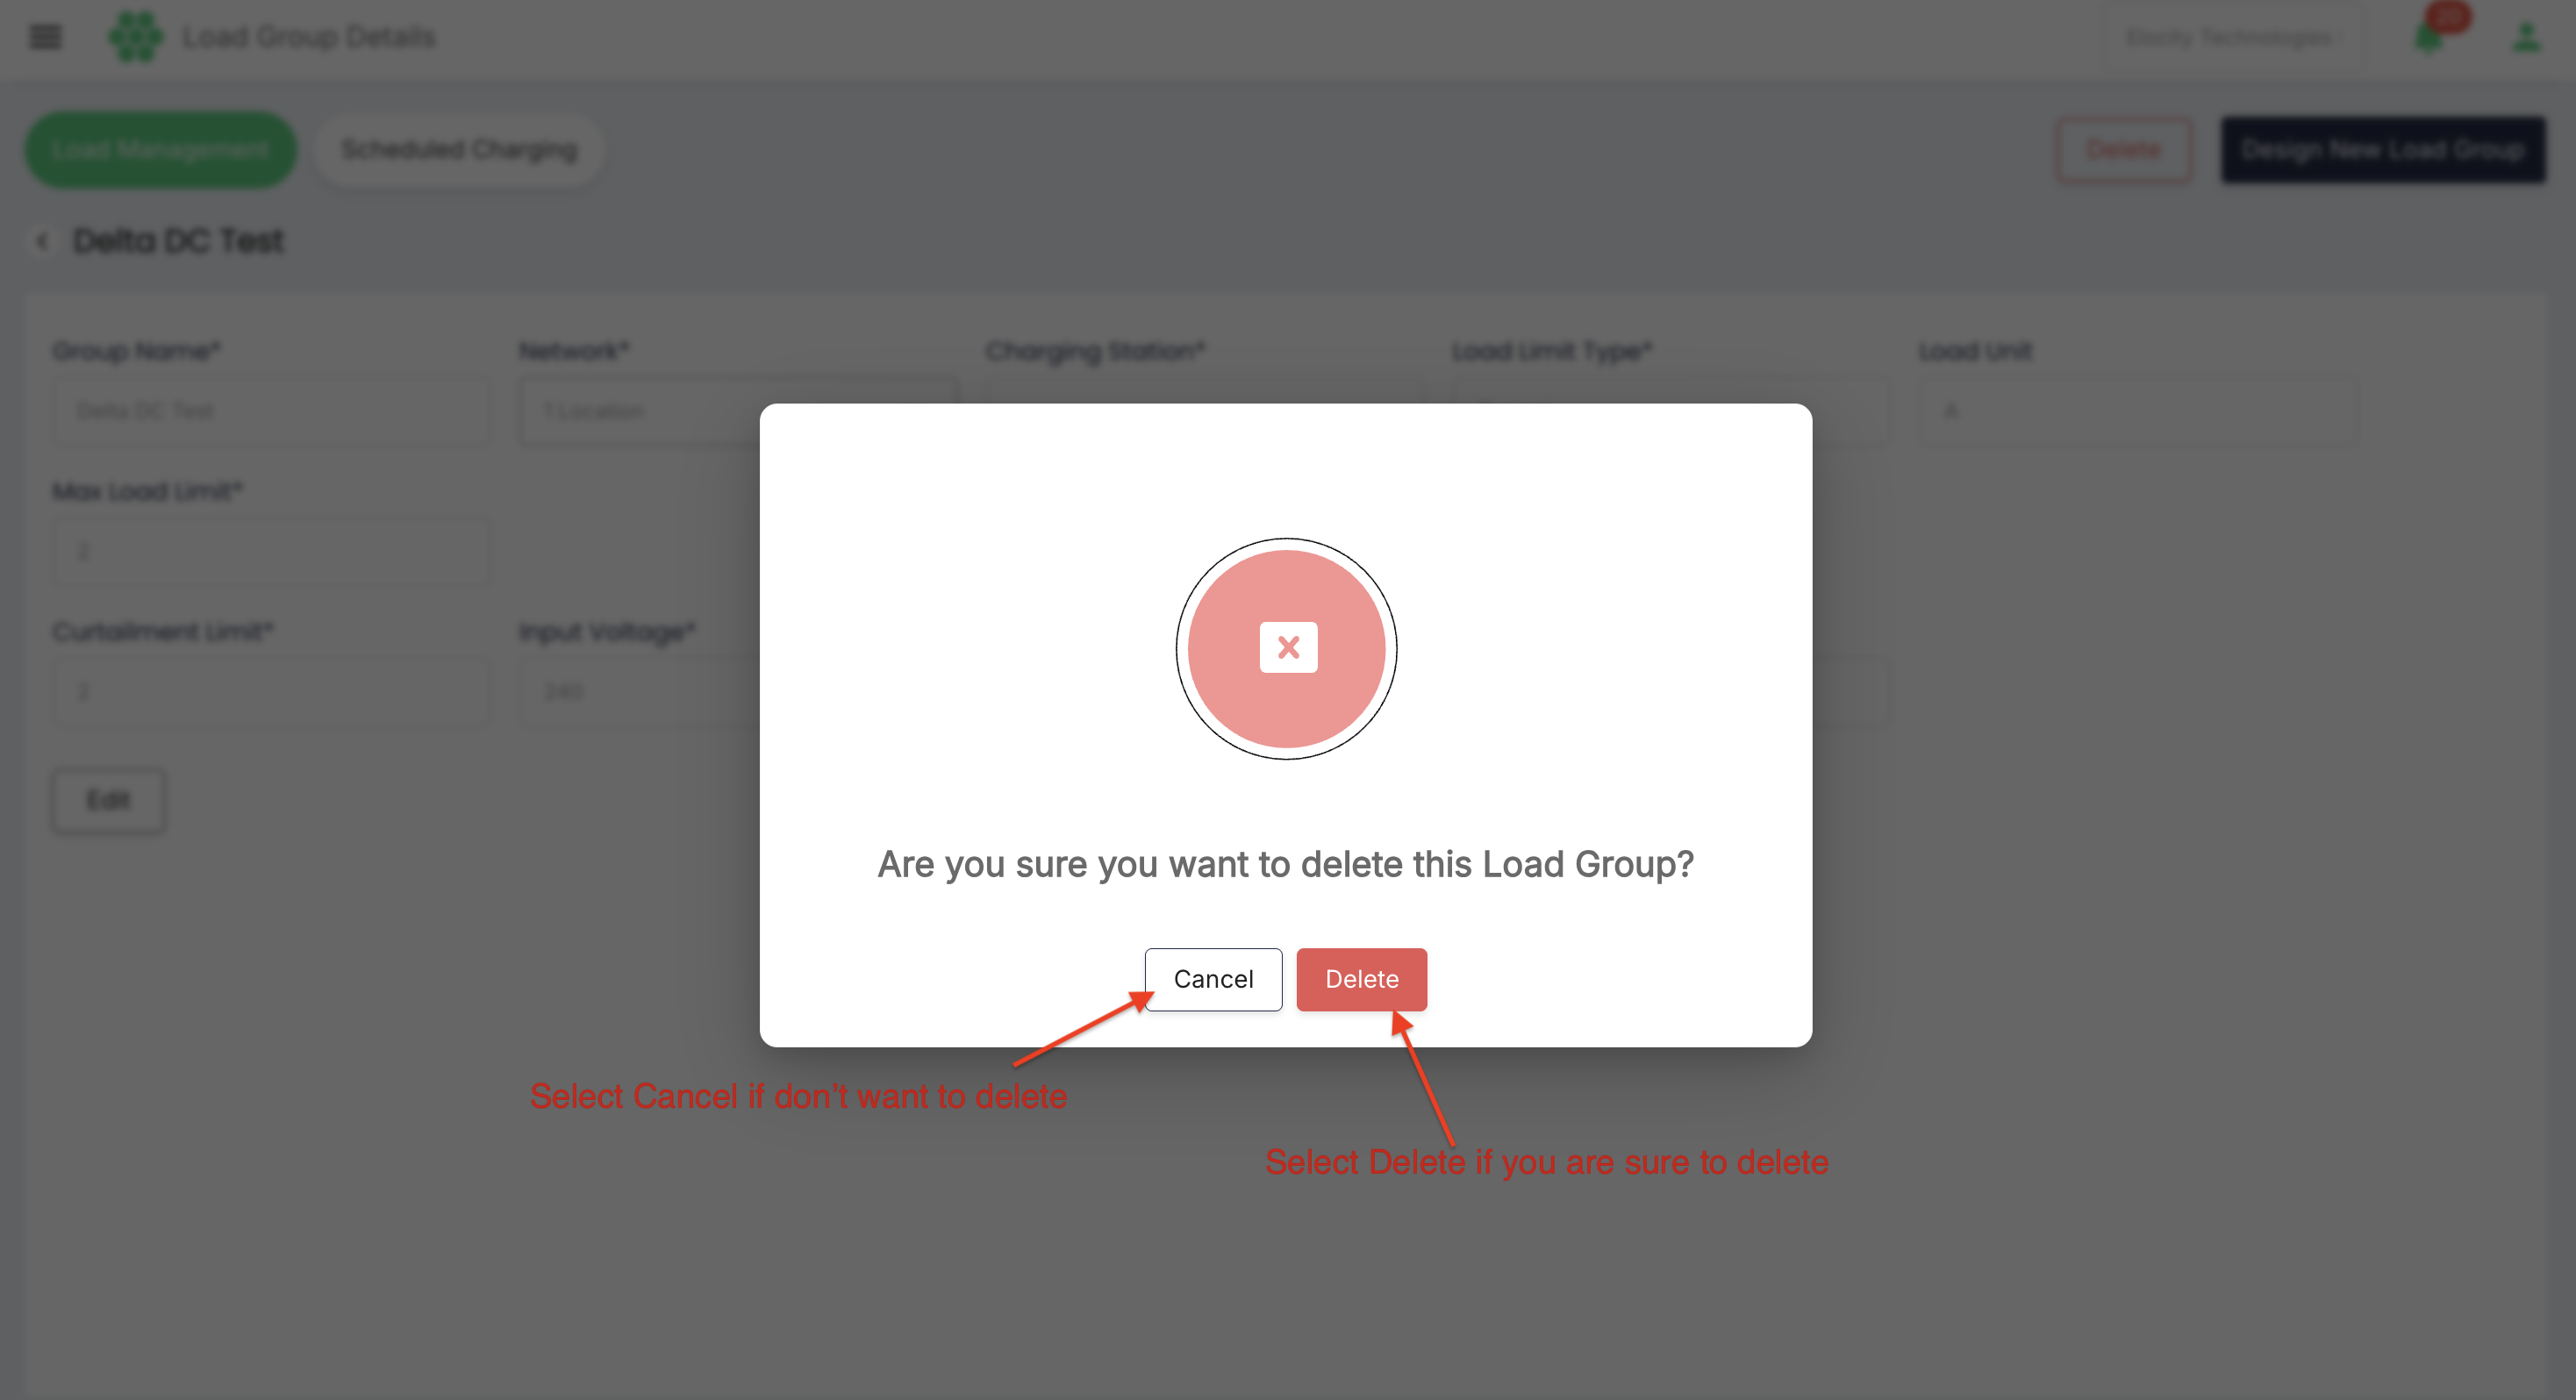
The reviewed interface displays:
Are you sure you want to delete this Load Group?
-
Select Cancel to close the confirmation without deleting.
-
Select Delete in the confirmation only when the group and impact have been verified.
-
Wait for success feedback.
-
Confirm that the page returns to the group list or that the group is otherwise removed.
-
Select Refresh and verify that the group no longer appears.
-
Check affected chargers, active load, alarms, and customer sessions.
Expected safeguards
The system should block or clearly warn about deletion when:
- The group has active or conflicting charging activity.
- The group is referenced by another load-management or scheduled-charging configuration.
- Deletion would leave required chargers without a valid policy.
- The current user lacks Delete permission.
- The record changed after it was opened.
If the platform permits deletion despite an active dependency, follow the approved dependency-removal order before confirming.
Recovering from accidental deletion
Deletion may not be reversible in the user interface. If a group was removed unintentionally:
- Notify the operations owner immediately.
- Monitor affected chargers and site load.
- Recreate the group from the recorded configuration if authorized.
- Restore charger assignments and approved limits.
- Validate load behaviour before closing the incident.
- Record the incident and corrective action.
Scheduled Charging page
Select Scheduled Charging to open the Schedule Charging Groups list for the selected business. The header shows the number of groups returned, and the page provides Refresh and Column Filter controls.
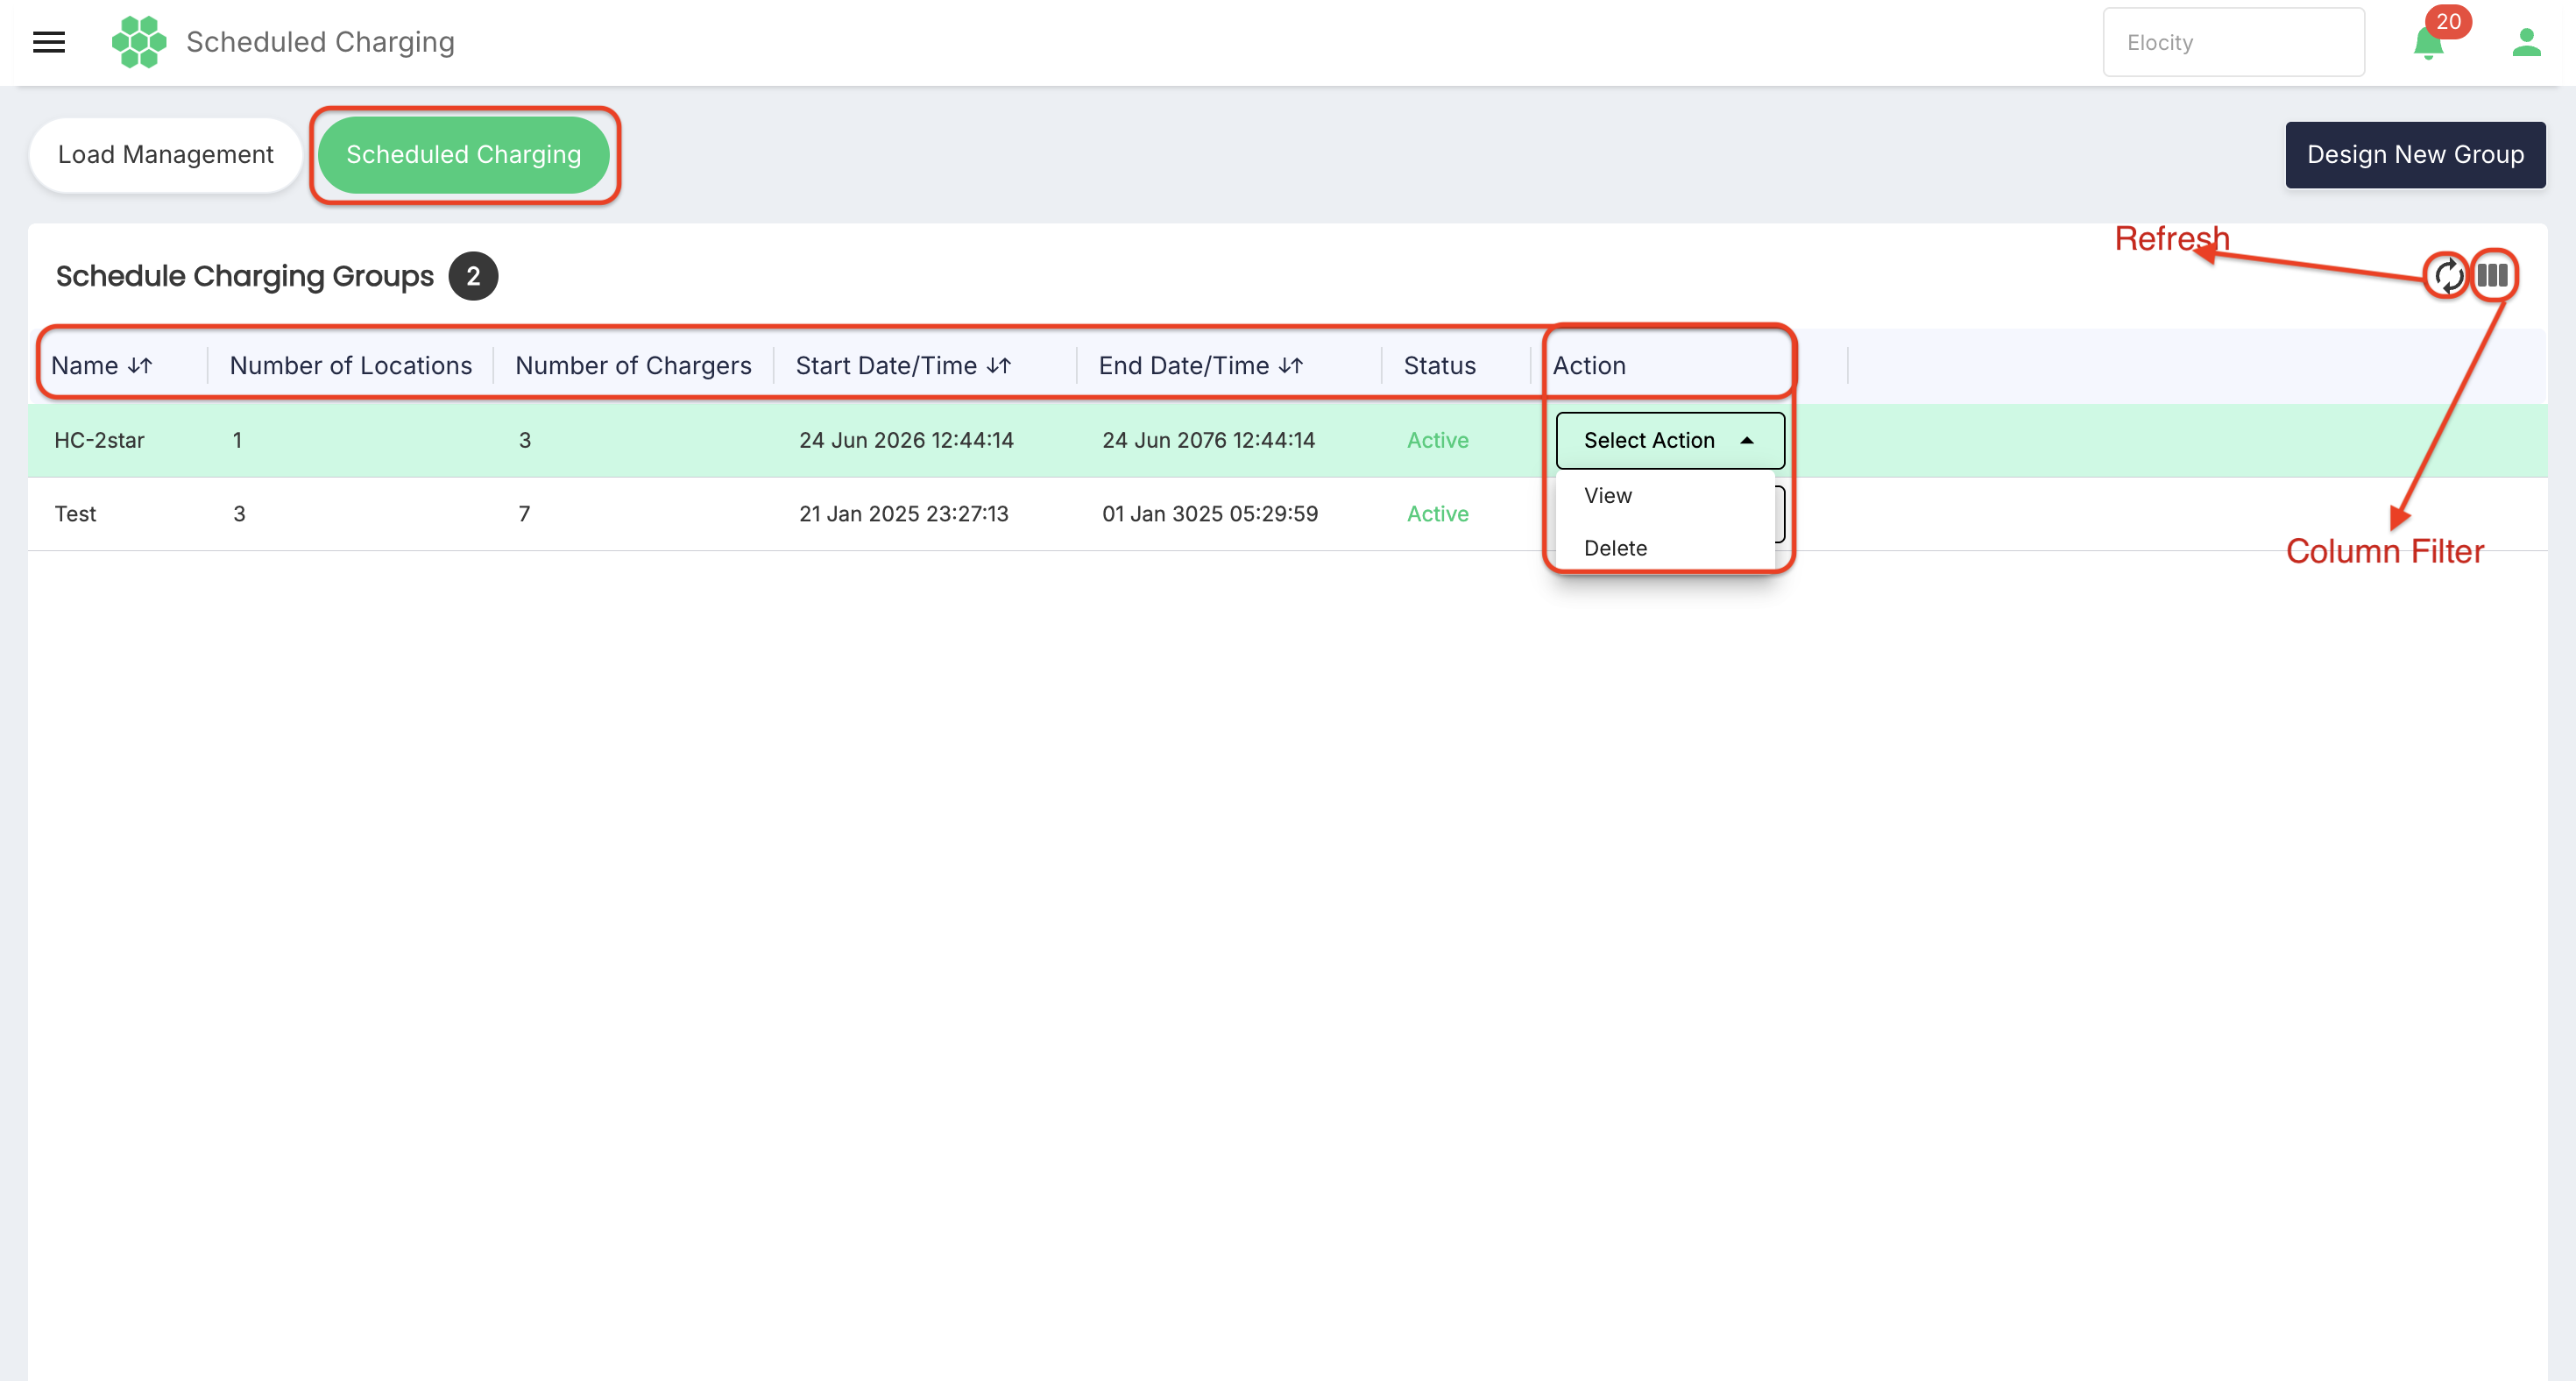
| Column | Description | Interaction |
|---|---|---|
| Name | Name of the scheduled-charging group. | Supports sorting. |
| Number of Locations | Number of locations included in the group. | Display only. |
| Number of Chargers | Number of chargers included in the group. | Display only. |
| Start Date/Time | Date and time the schedule takes effect. | Supports sorting. |
| End Date/Time | Date and time the schedule ends. | Supports sorting. |
| Status | Current schedule status, such as Active. | Display only. |
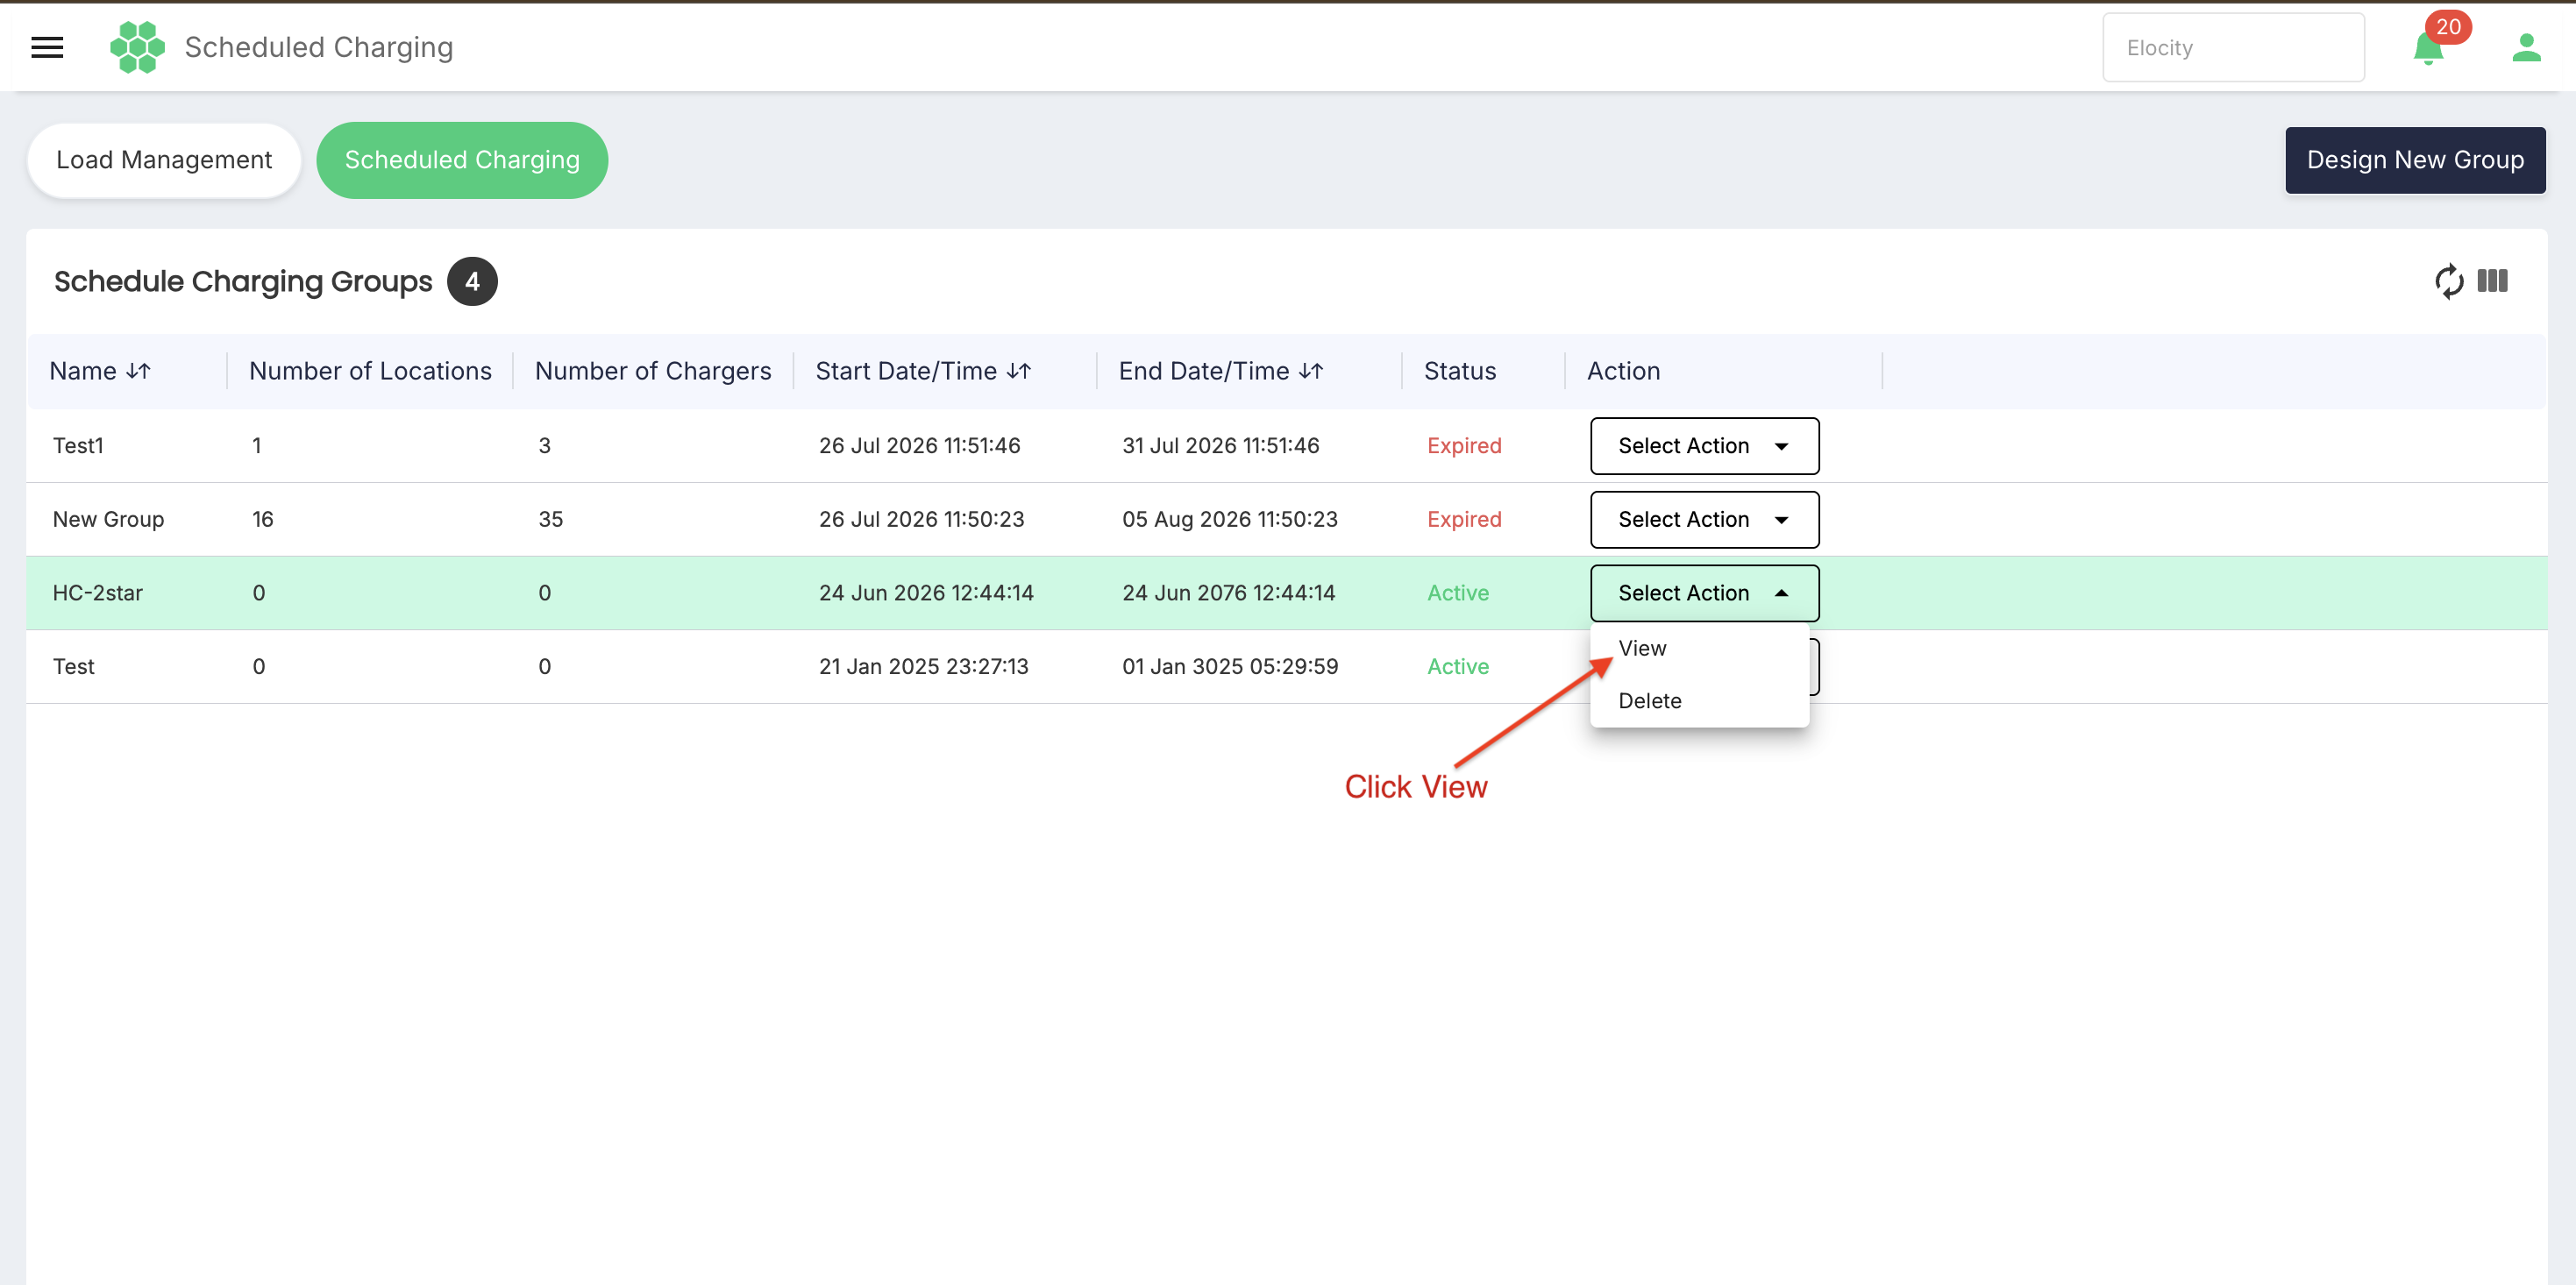
| Action | Provides Select Action with View and Delete. | Select View to open the group's Scheduled Charging Details page. Select Delete to remove the group. |
Deleting a scheduled-charging group changes when charging is permitted for the included chargers and should be performed only by an authorized user after confirming the group.
Scheduled Charging Details
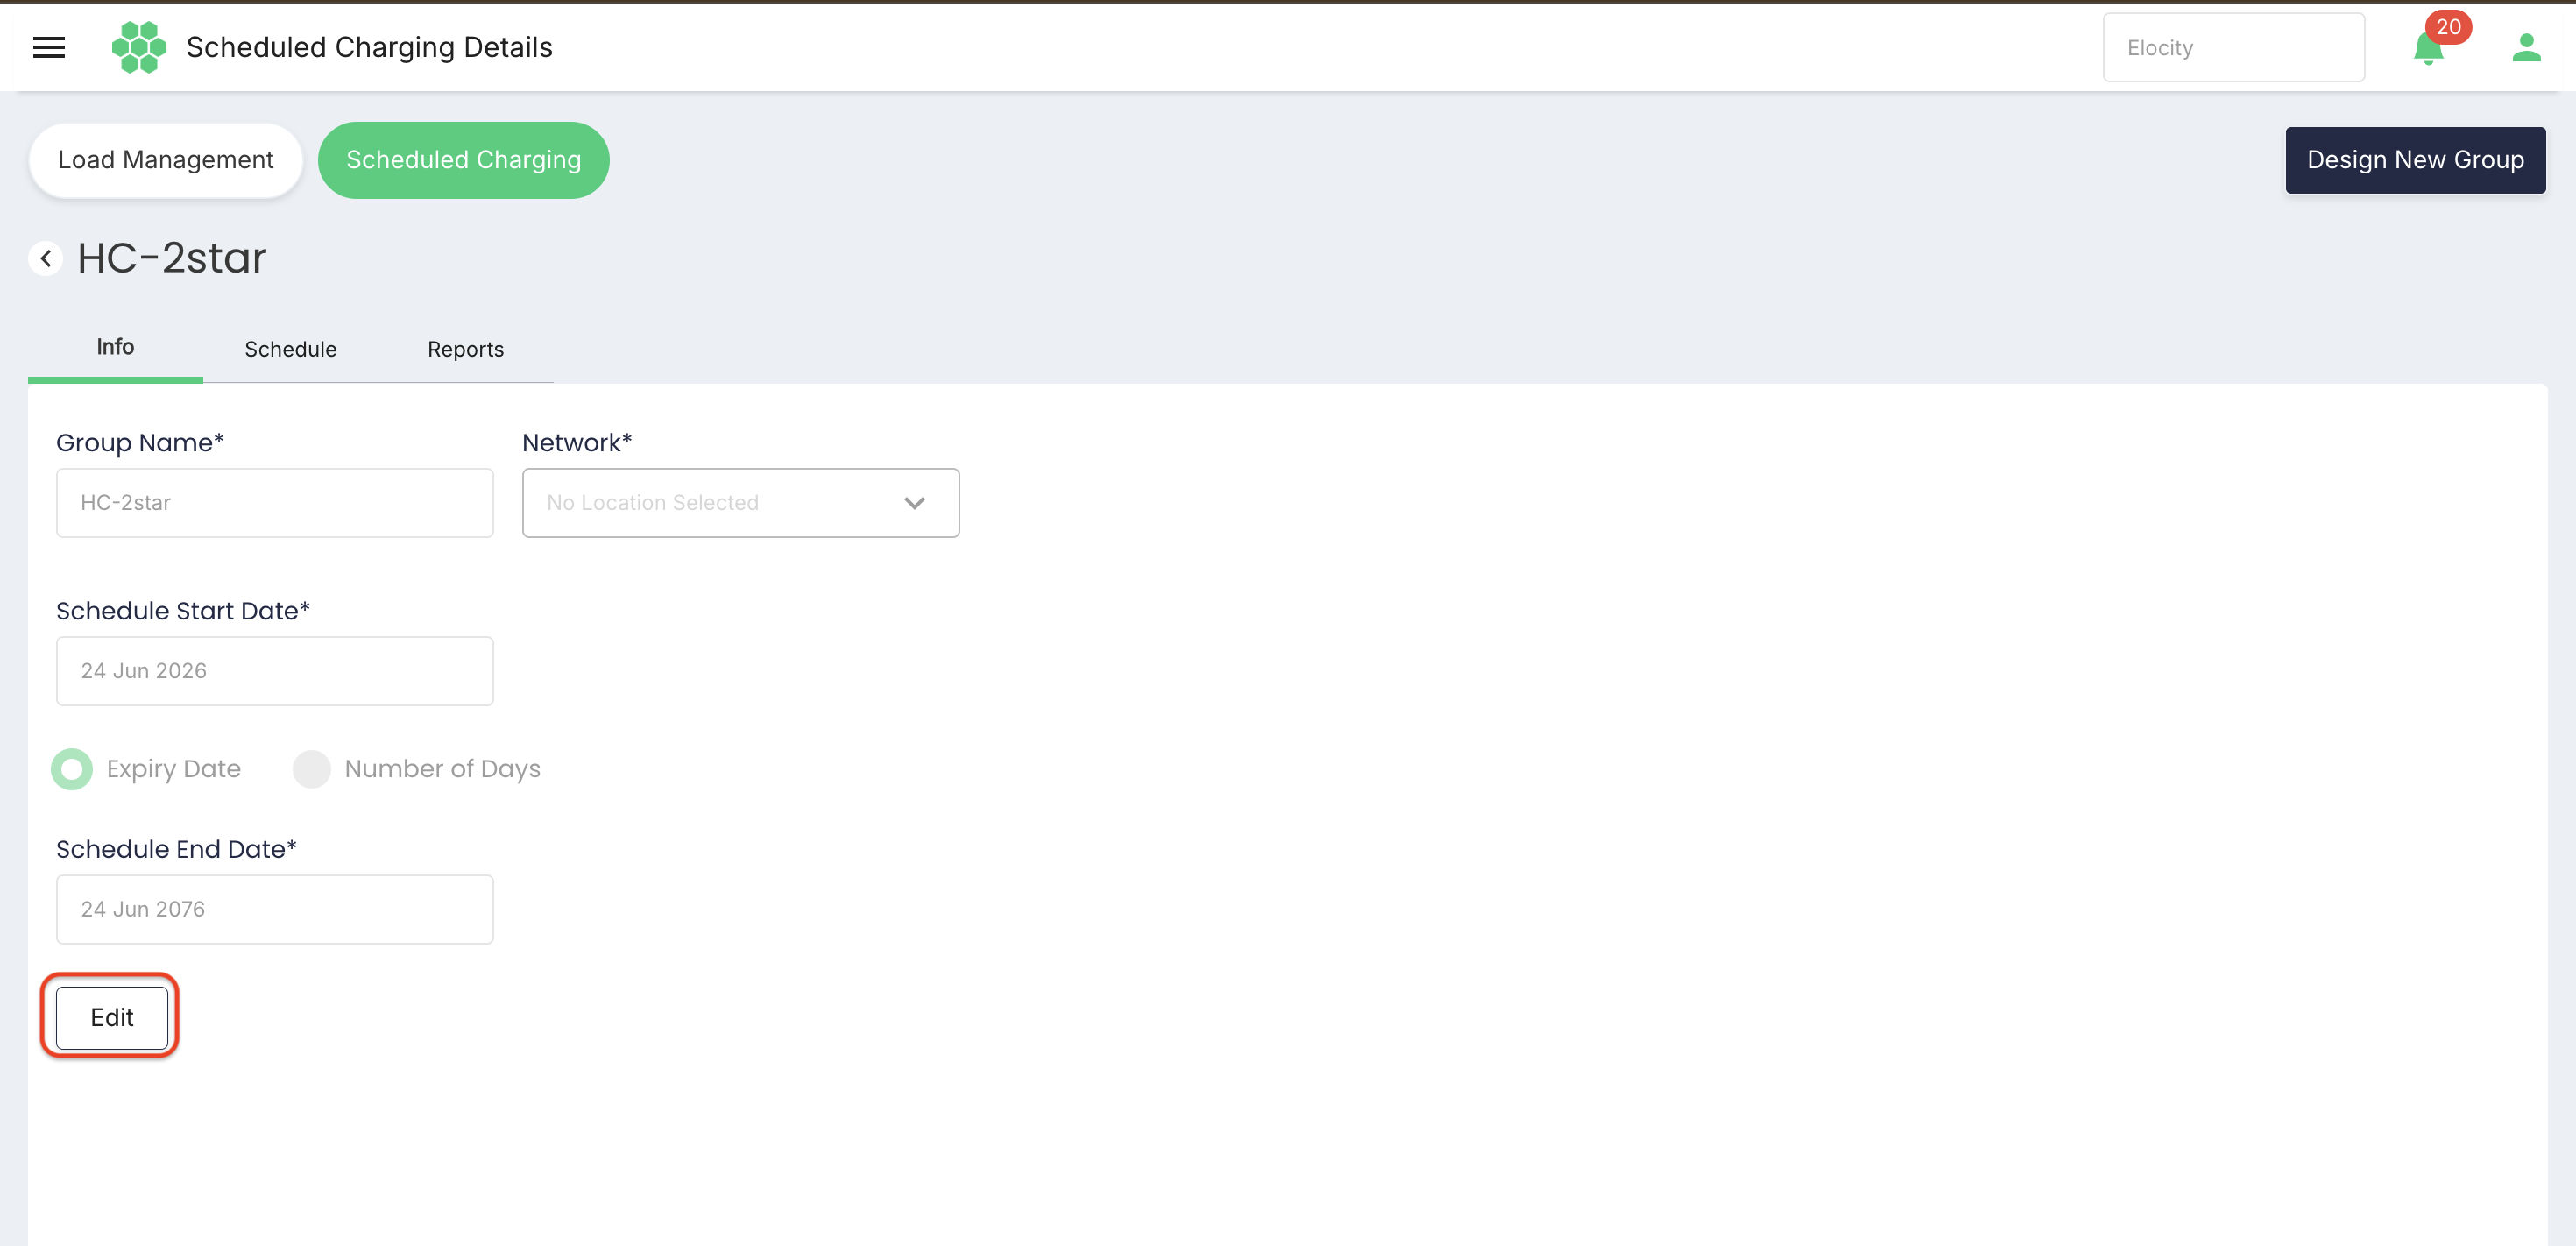
Selecting View for a group opens its Scheduled Charging Details page, which provides three tabs: Info, Schedule, and Reports. Each configuration tab opens in read-only mode and provides an Edit control.
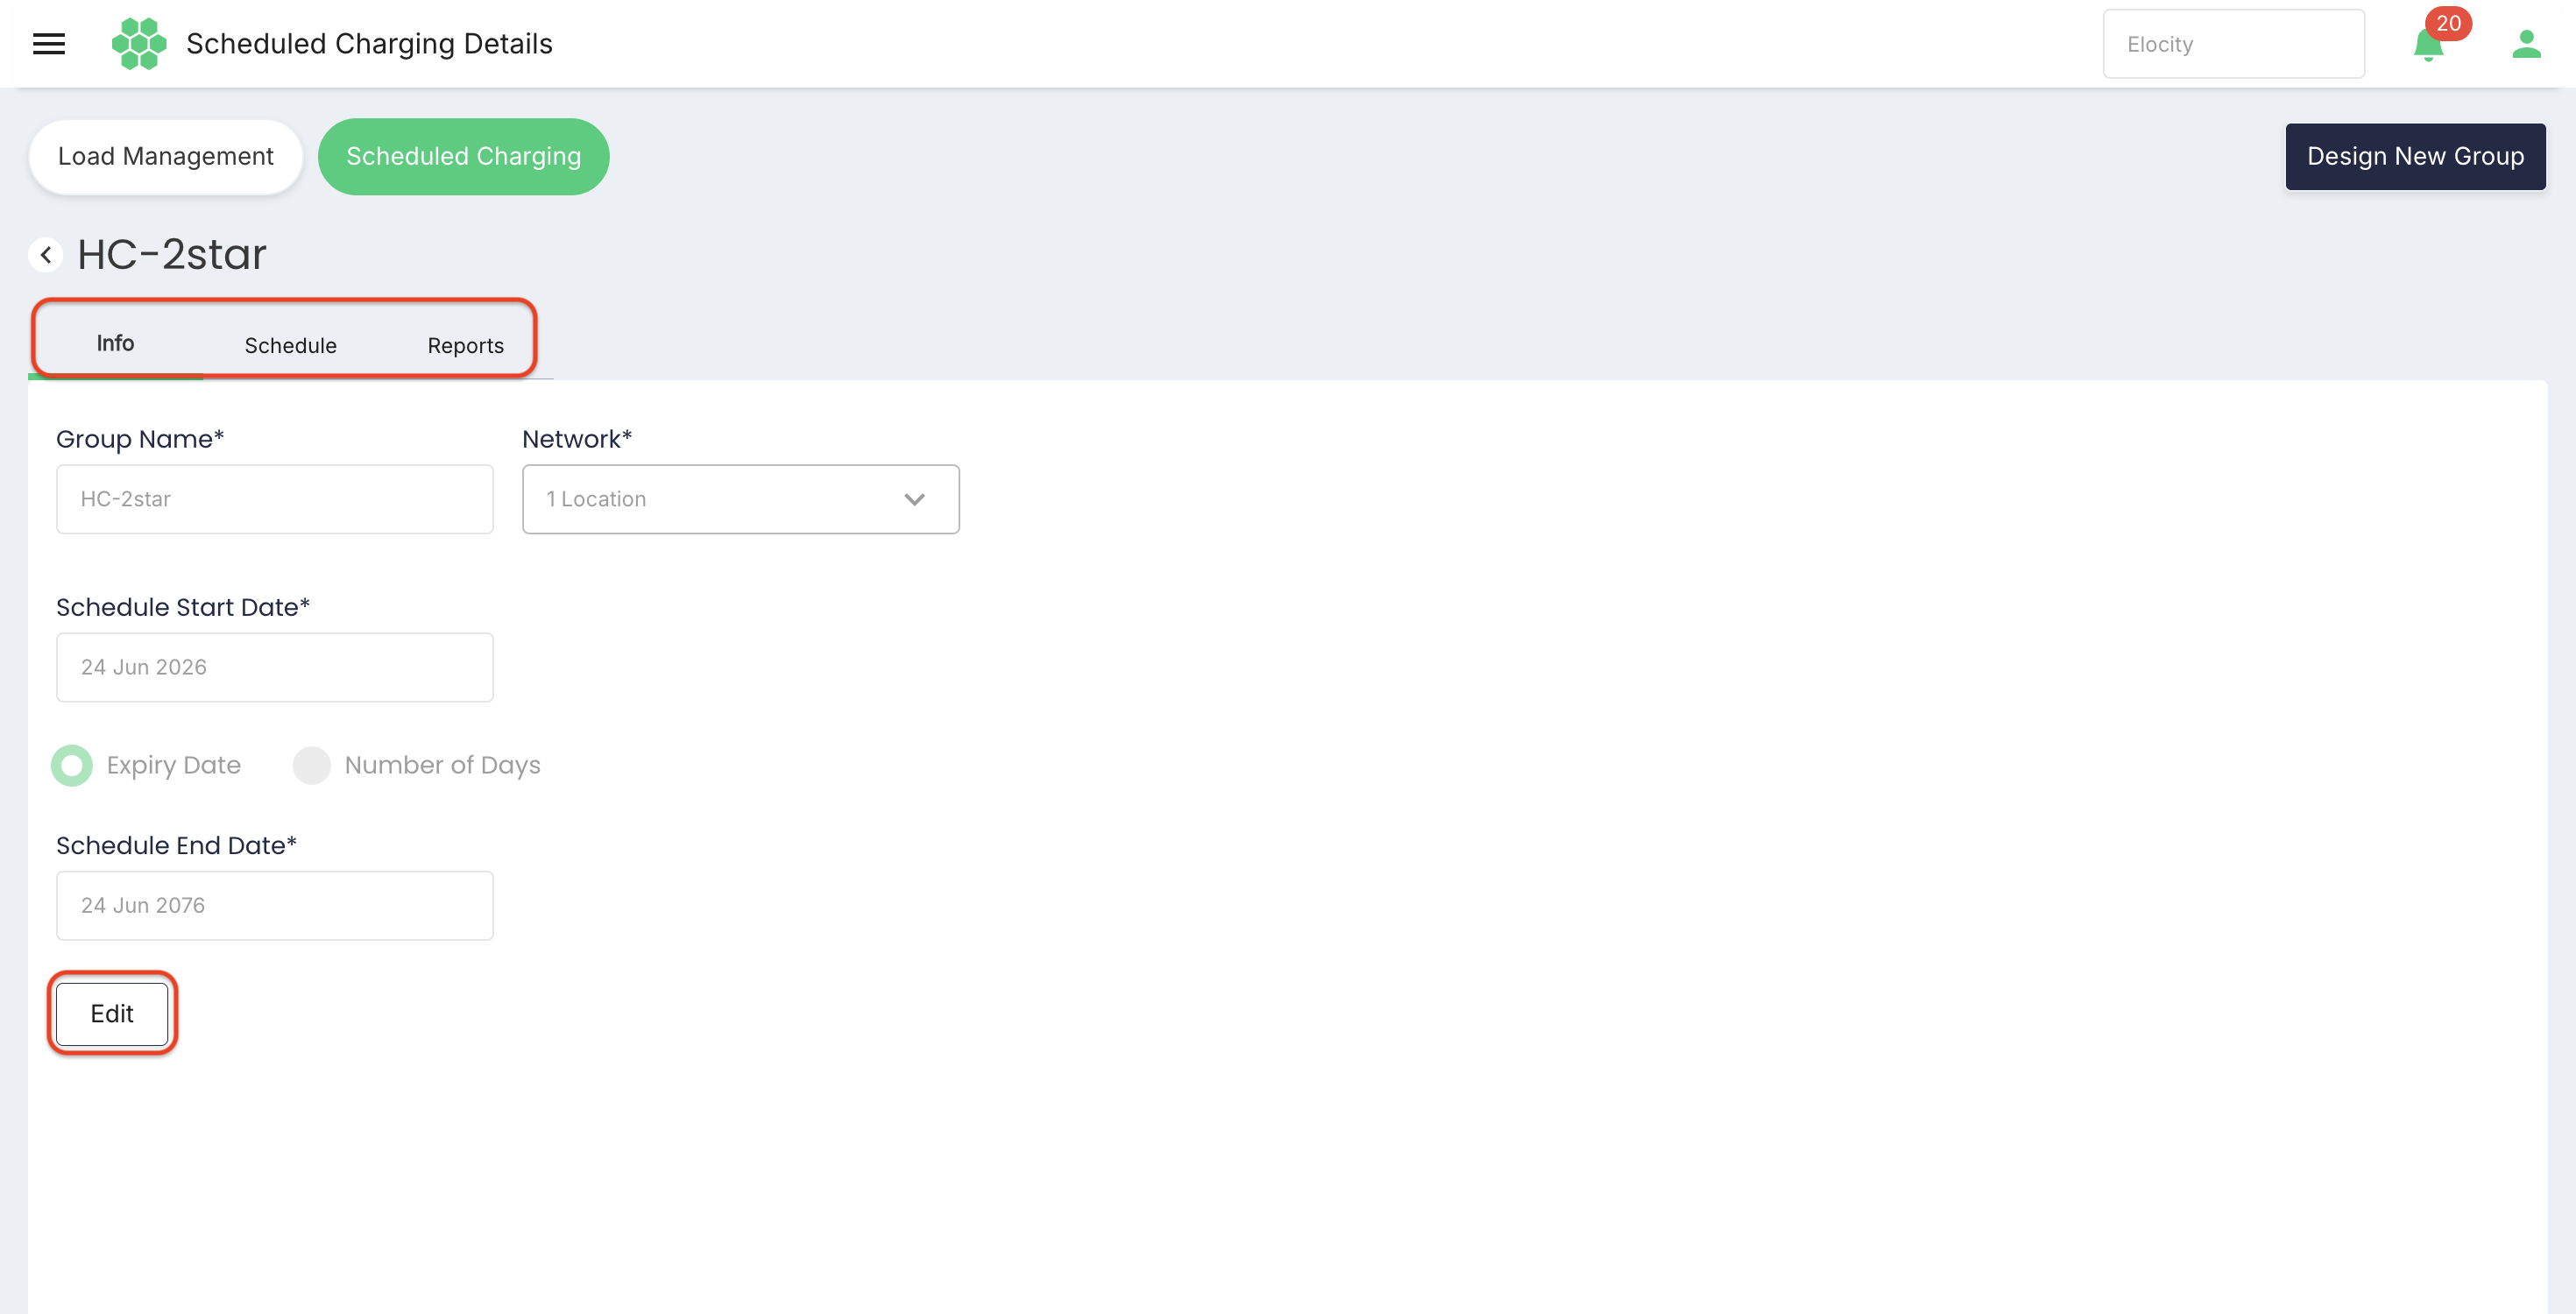
Info tab
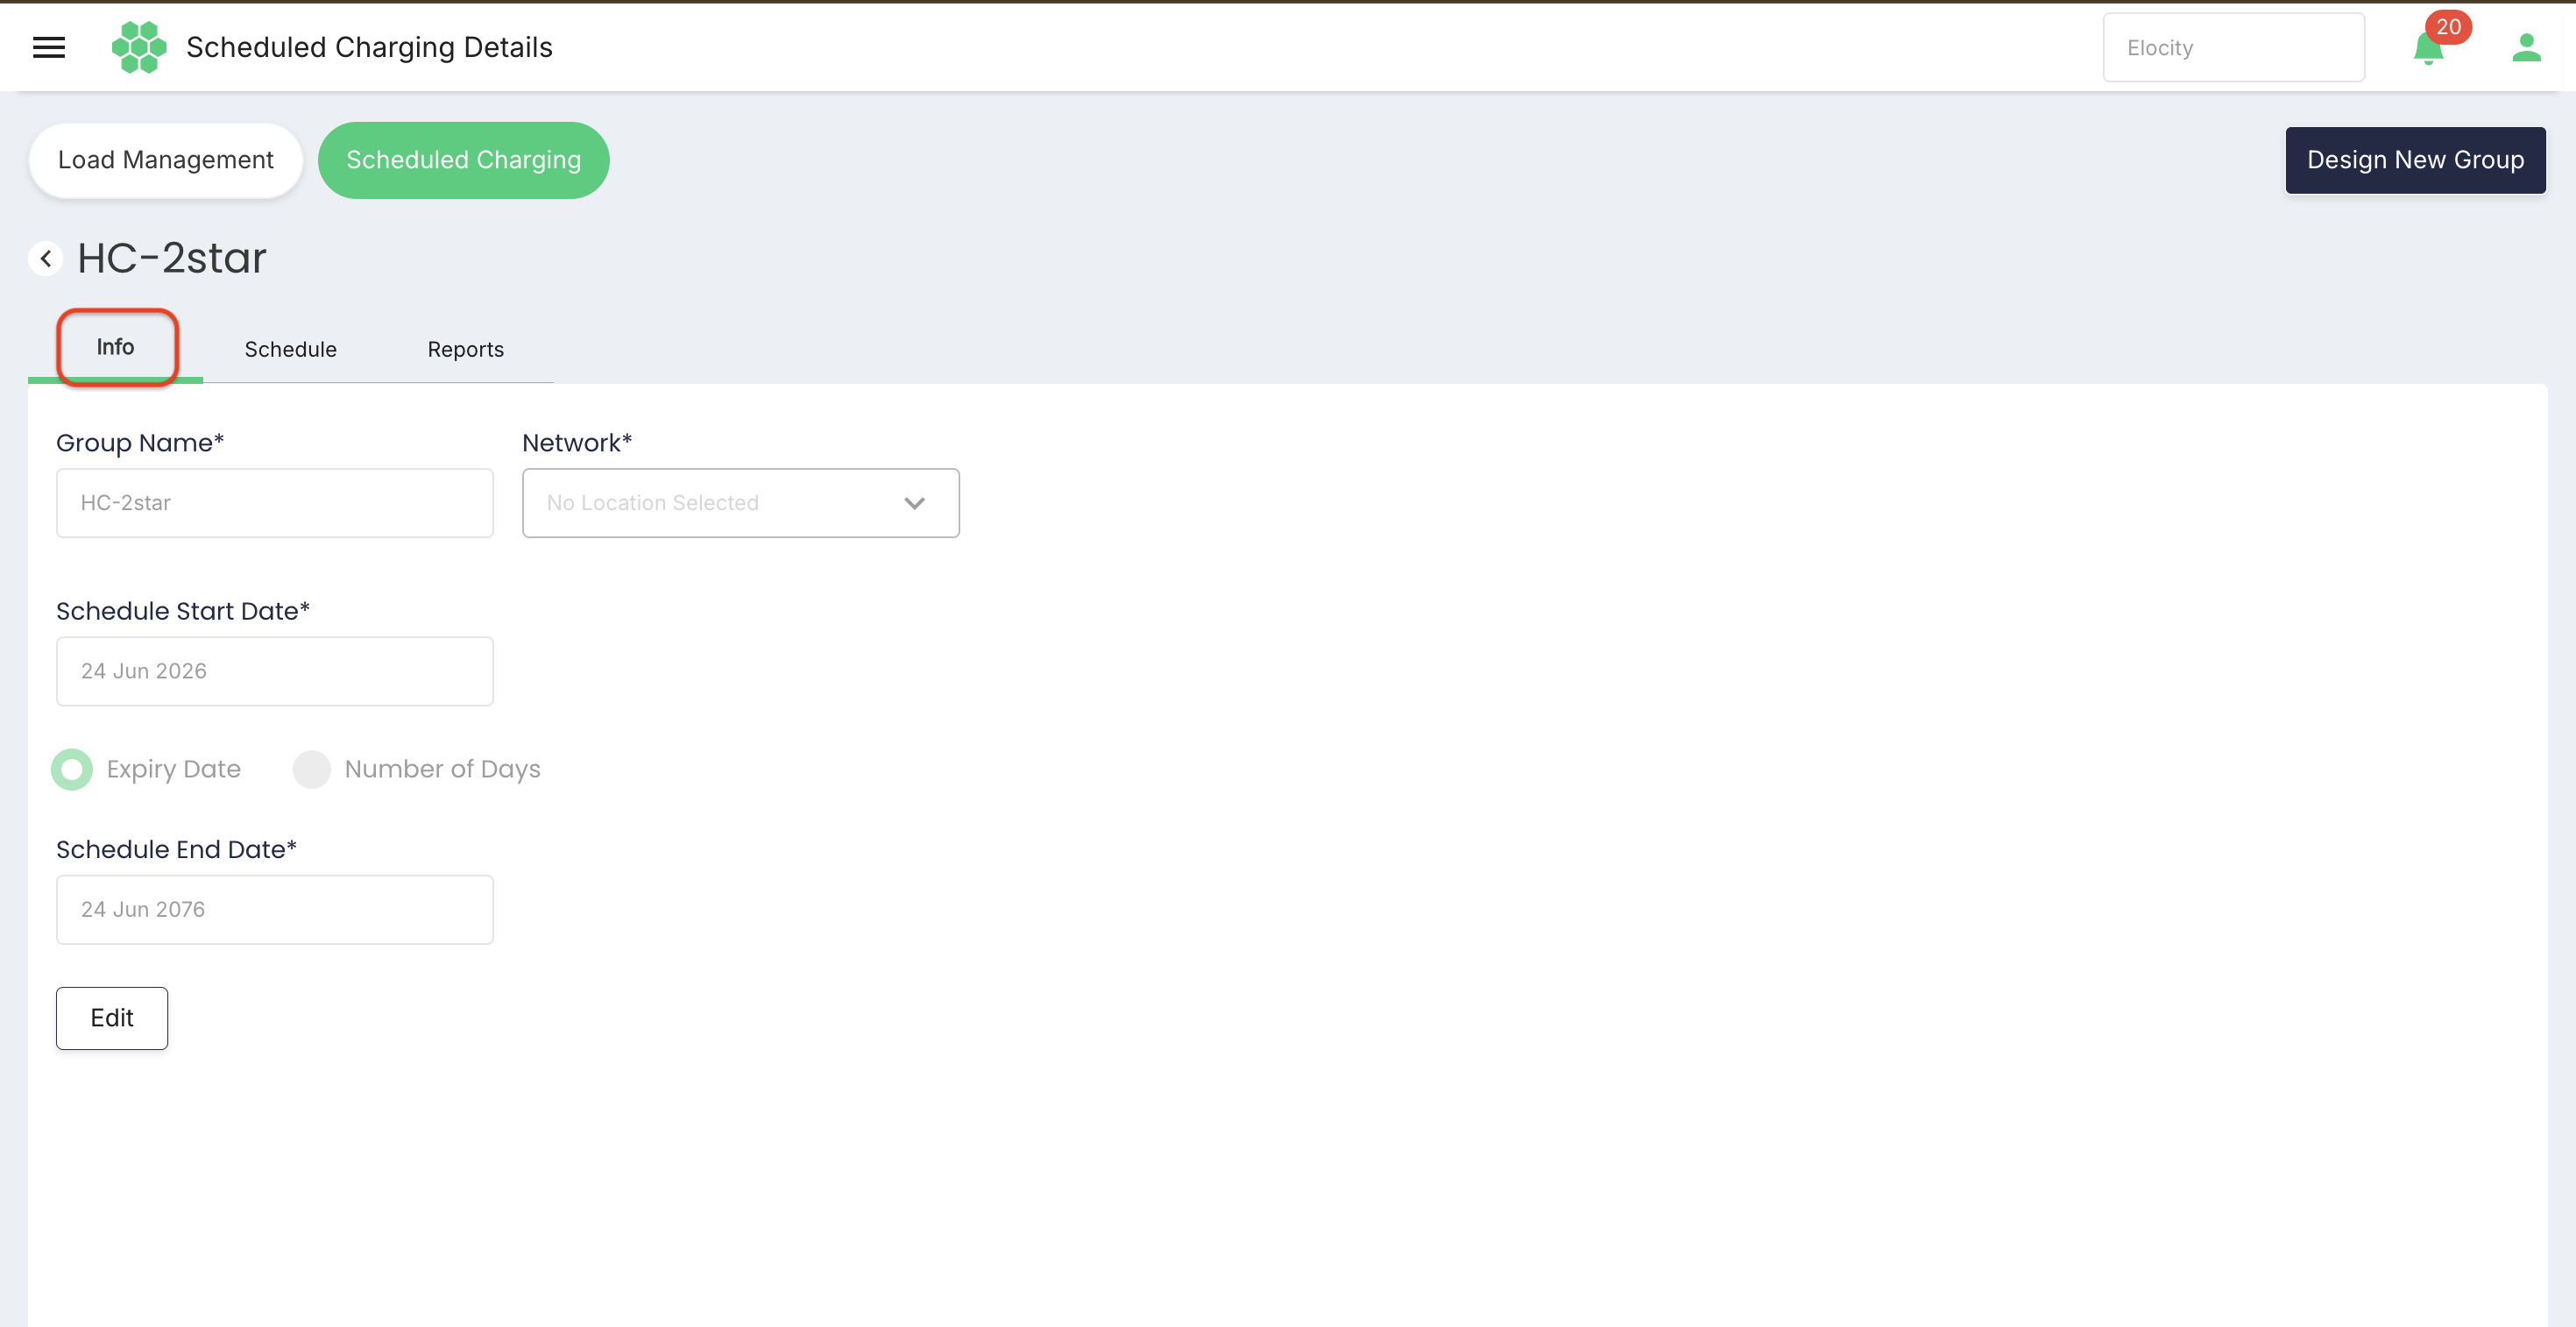
| Field | Description |
|---|---|
| Group Name* | Required name of the scheduled-charging group. |
| Network* | Required location network the group belongs to. The field indicates the number of locations included. |
| Schedule Start Date* | Required date on which the schedule takes effect. |
| Expiry Date / Number of Days | Selects how the schedule end is defined. Expiry Date ends the schedule on a chosen date; Number of Days ends it after a set number of days. |
| Schedule End Date* | Required end date shown when Expiry Date is selected. |
Schedule tab
The Schedule tab defines the weekly charging windows for the group. Each row is one window.
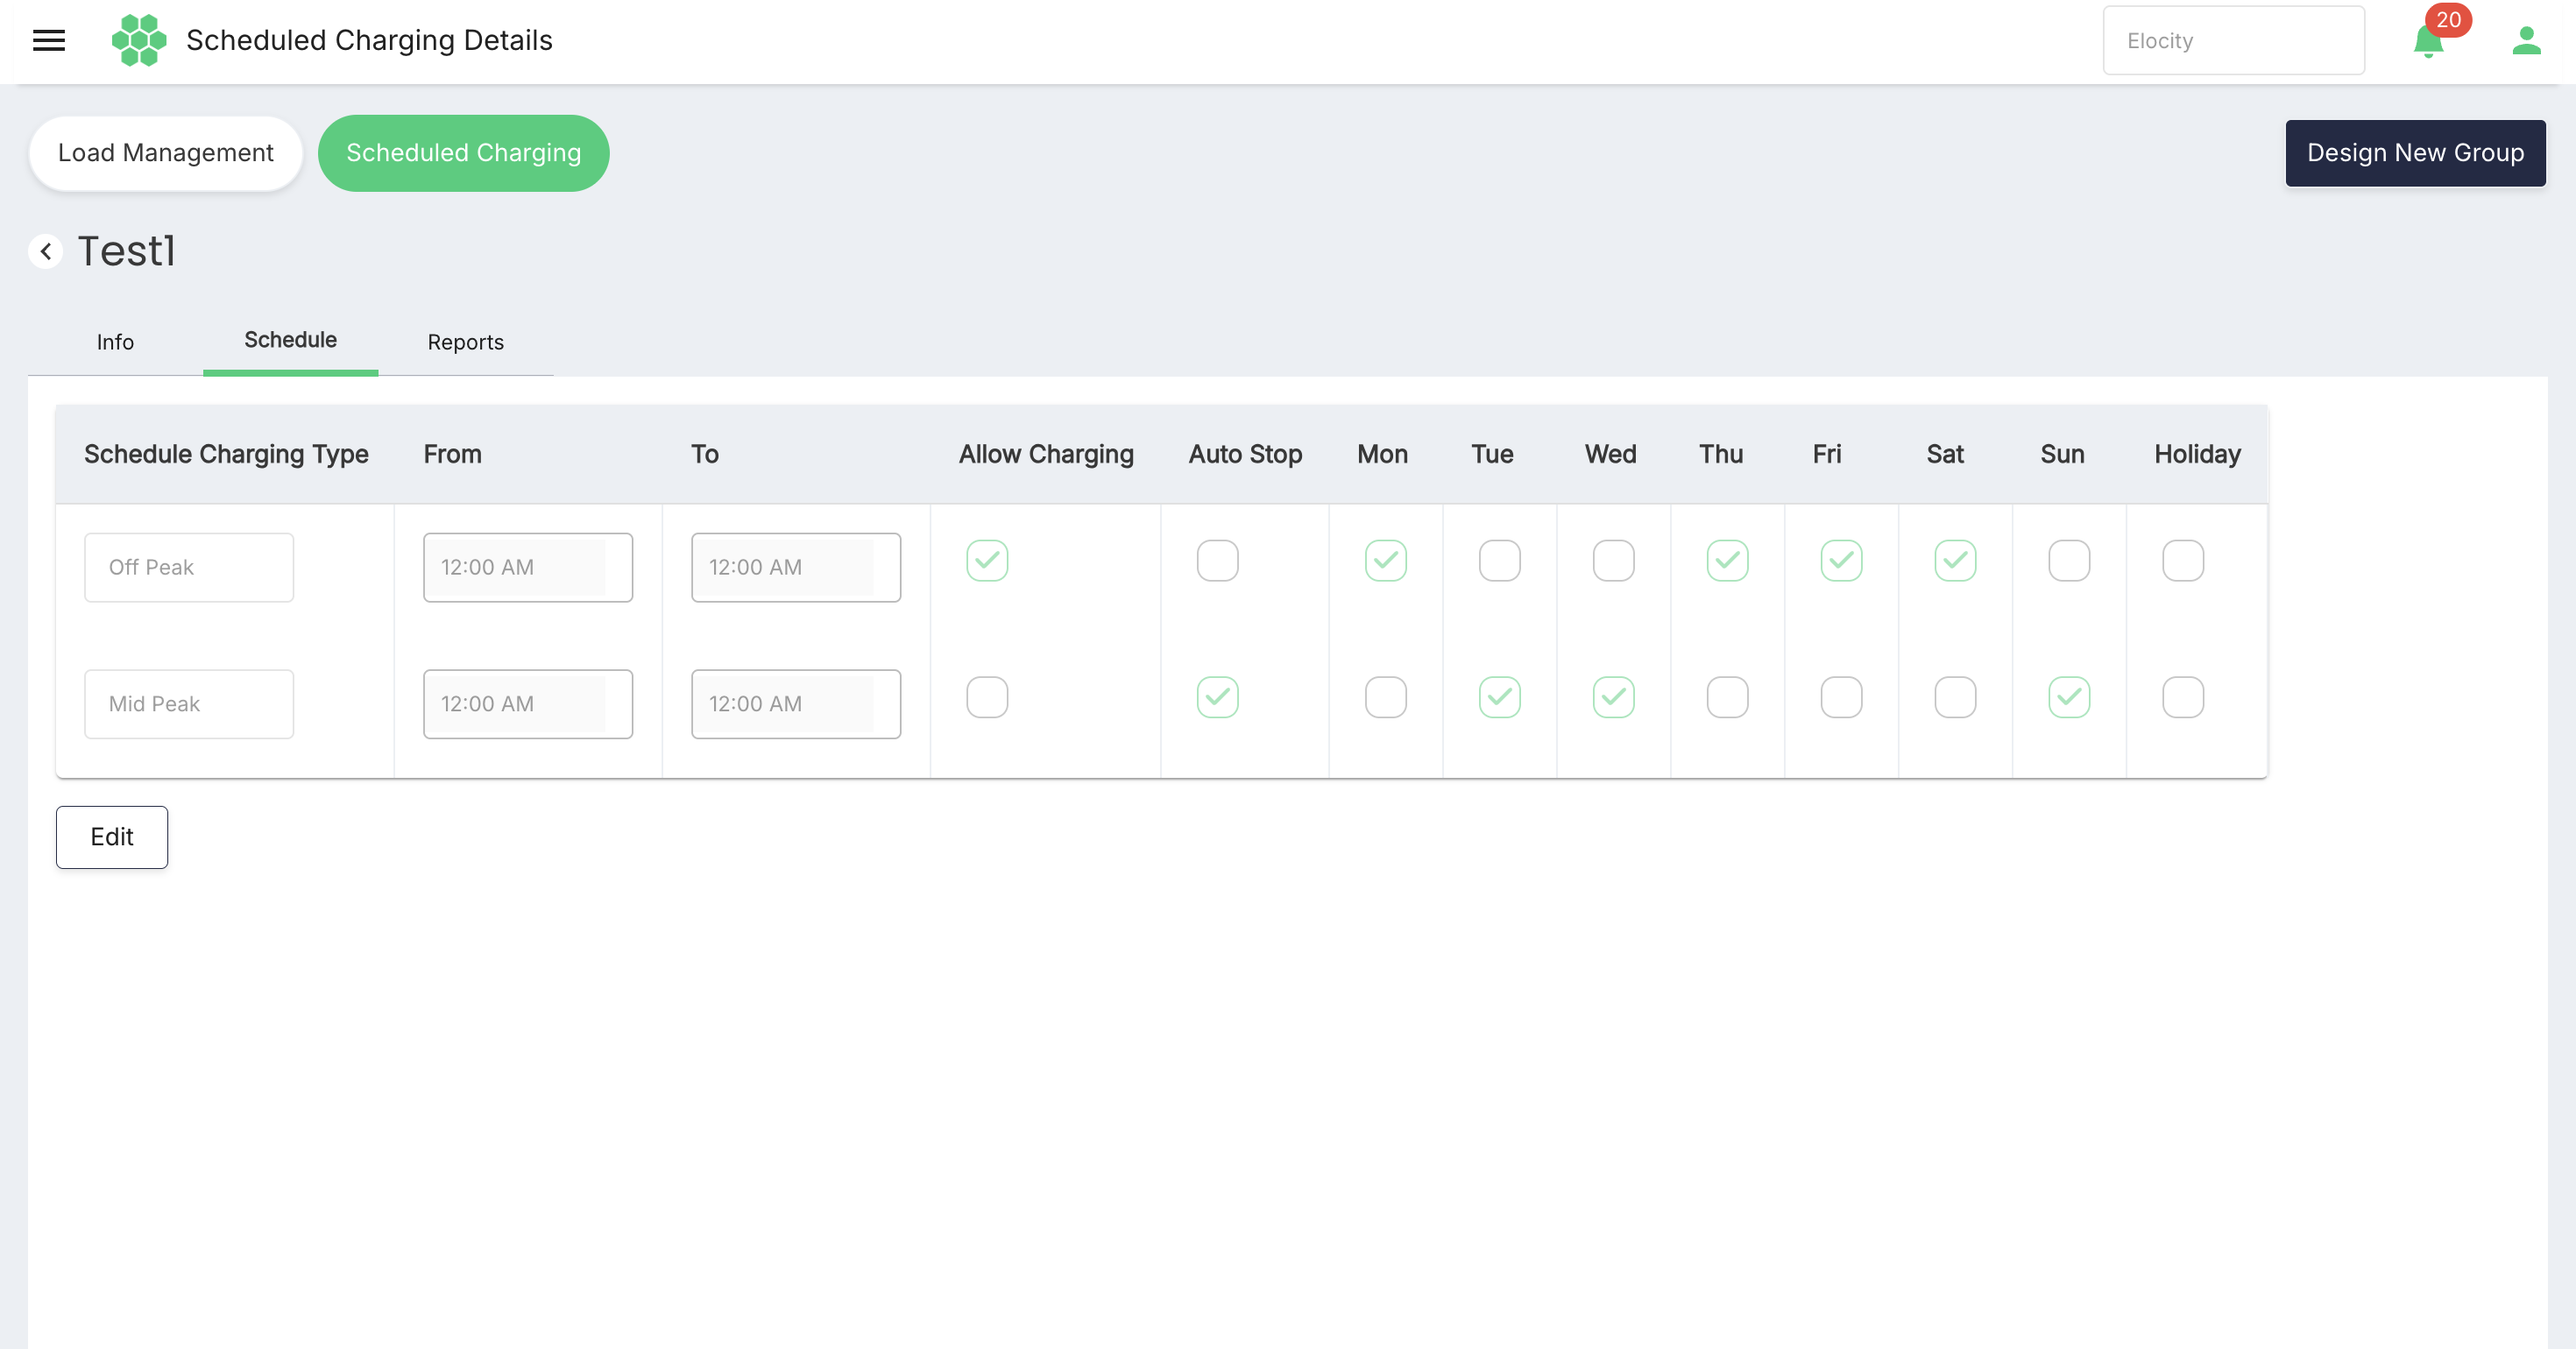
| Column | Description |
|---|---|
| Schedule Charging Type | The time-of-use period for the window, such as On Peak or Mid Peak. |
| From | Start time of the window. |
| To | End time of the window. |
| Allow Charging | When enabled, charging is permitted during the window. |
| Auto Stop | When enabled, an active session is stopped automatically at the end of the window. |
| Mon to Sun | Enables the window on the corresponding day of the week. |
| Holiday | Enables the window on days designated as holidays. |
Select Edit to change the windows, then save the revised schedule.
Reports tab
The Reports tab displays scheduled-charging results for the group. The filter bar provides a date range and Customer, Schedule Charging Type, All Locations, and All Chargers filters. Select Apply to run the report or Reset to clear the filters. The header shows the number of records returned, and Download Report exports the results. Use Column Filter to show or hide grid columns.
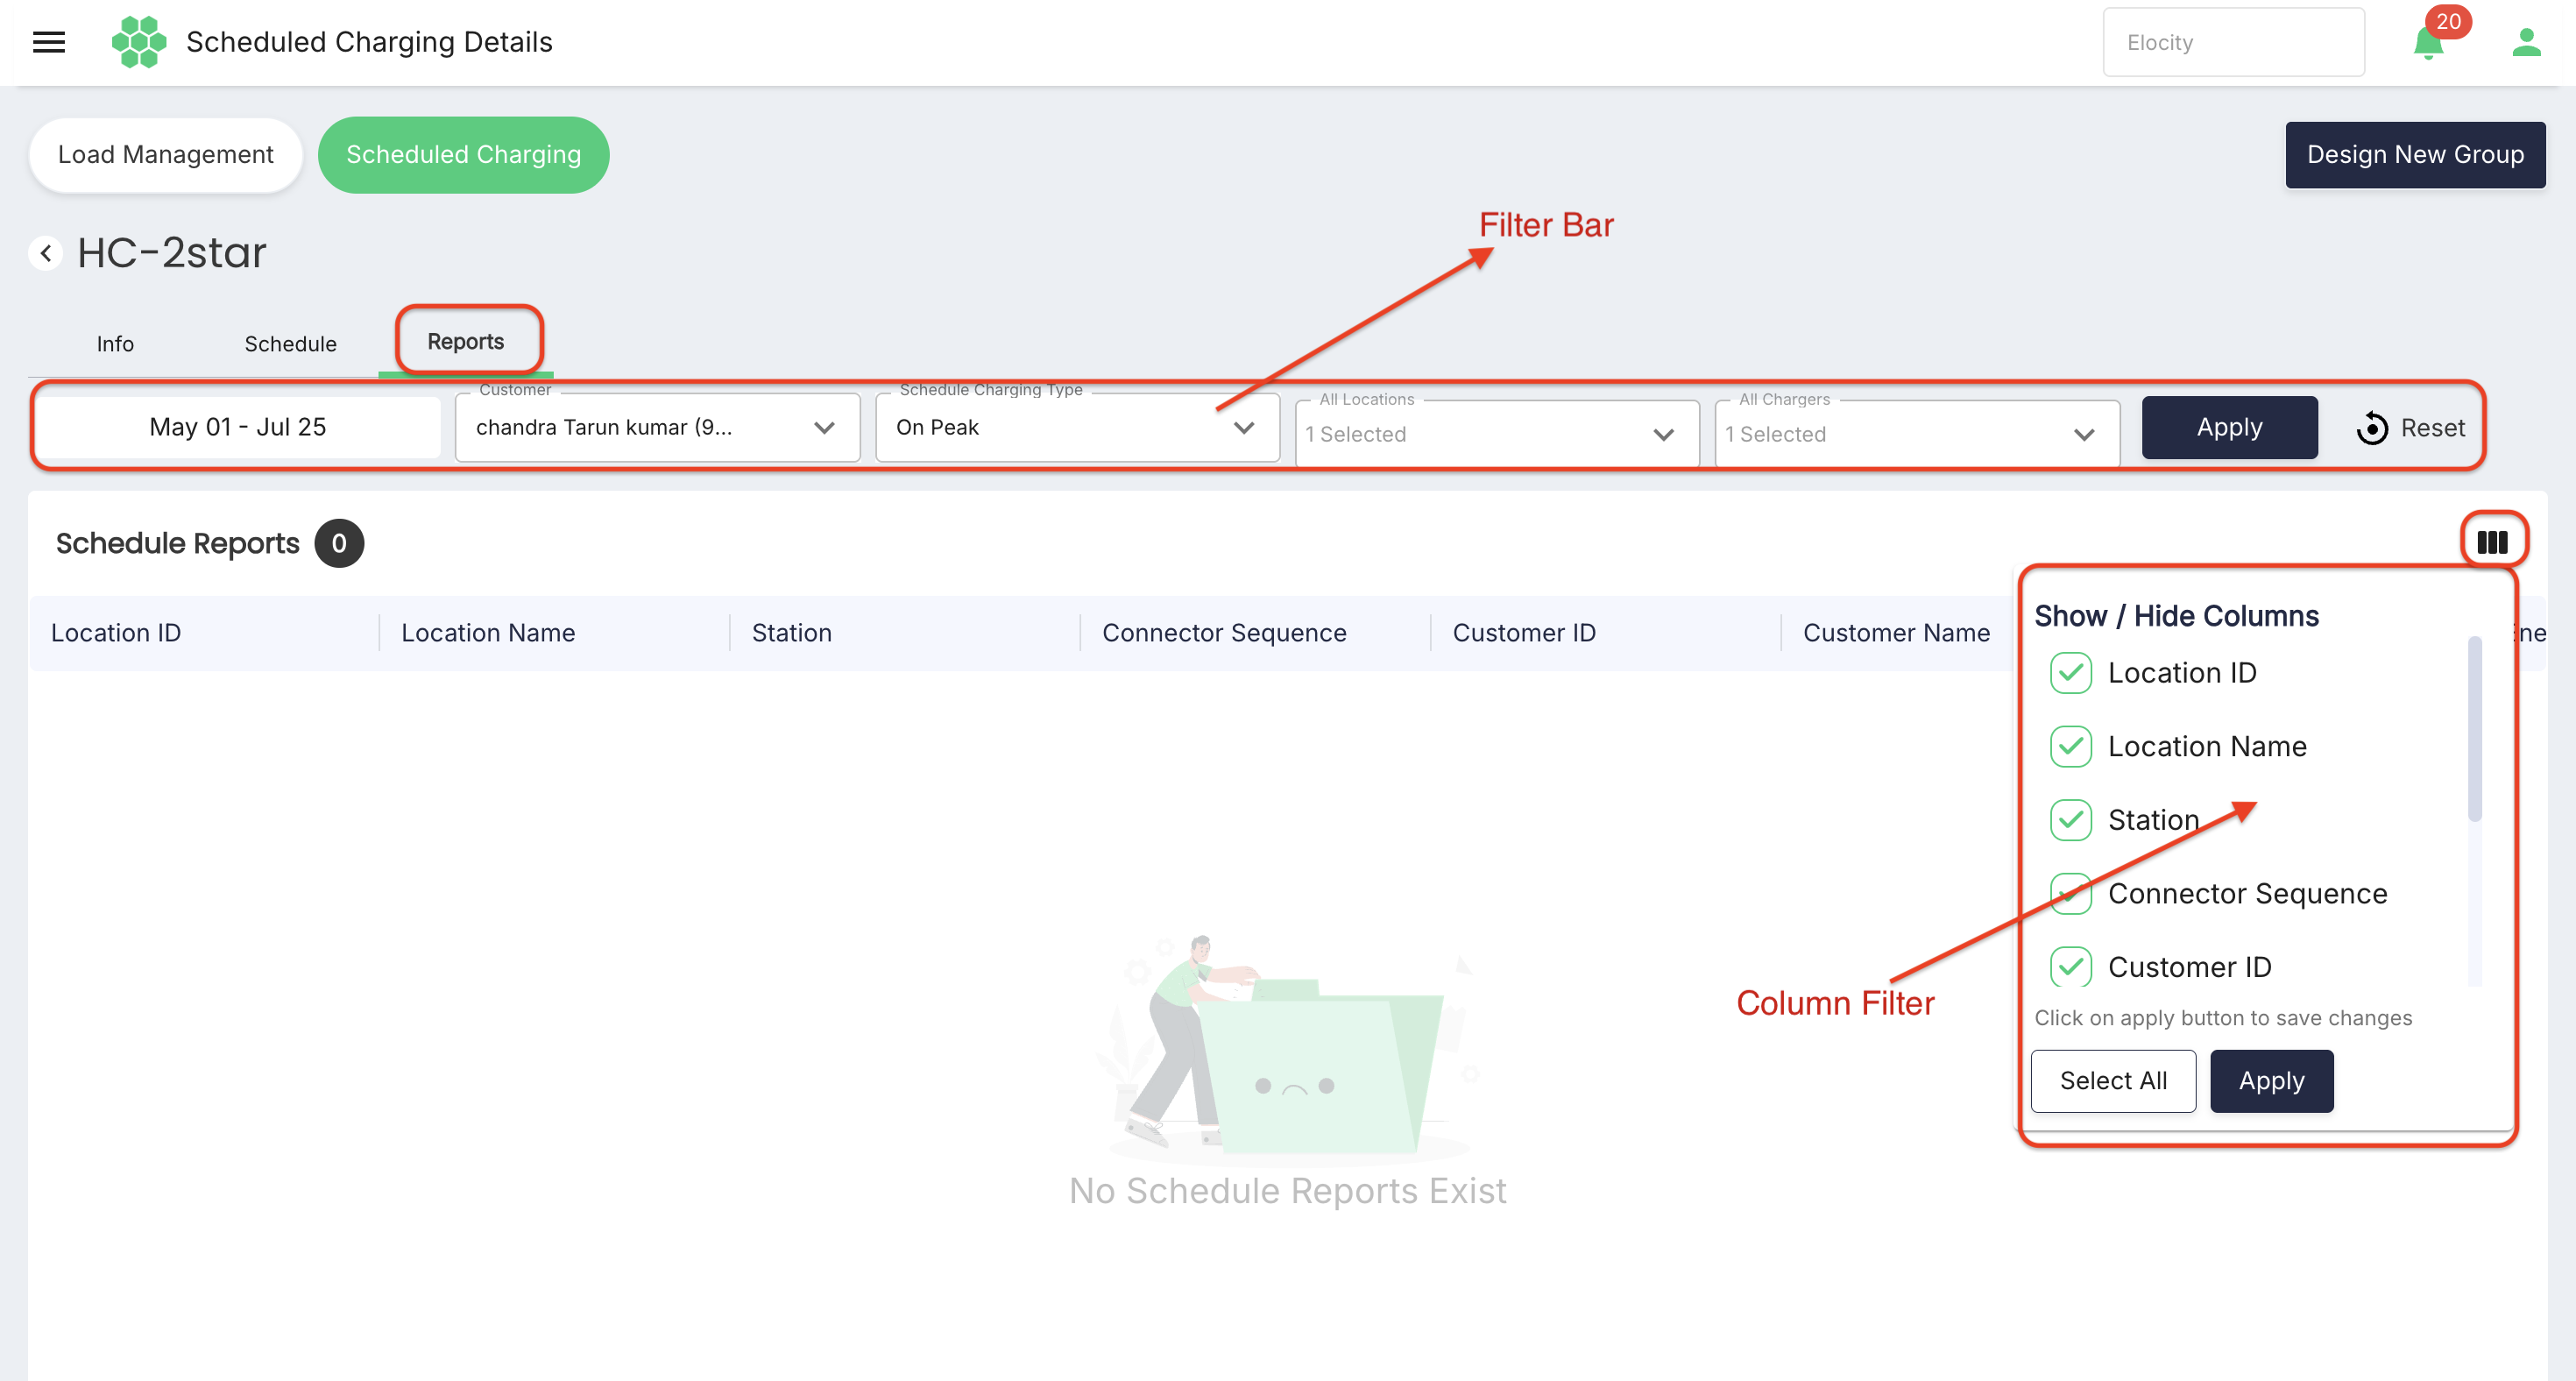
| Column | Description |
|---|---|
| Location ID | Identifier of the location. |
| Location Name | Name of the location. |
| Station | Station on which the session ran. |
| Connector Sequence | Connector used for the session. |
| Customer ID | Identifier of the customer. |
| Customer Name | Name of the customer. |
| Schedule Charging Type | Time-of-use period recorded for the session. |
| Energy Consumed (kWh) | Energy delivered during the session, in kilowatt-hours. |
| Cost | Cost recorded for the session. |
Design New Group (scheduled charging)
Select Design New Group on the Scheduled Charging area to open the Create New Schedule Group form.
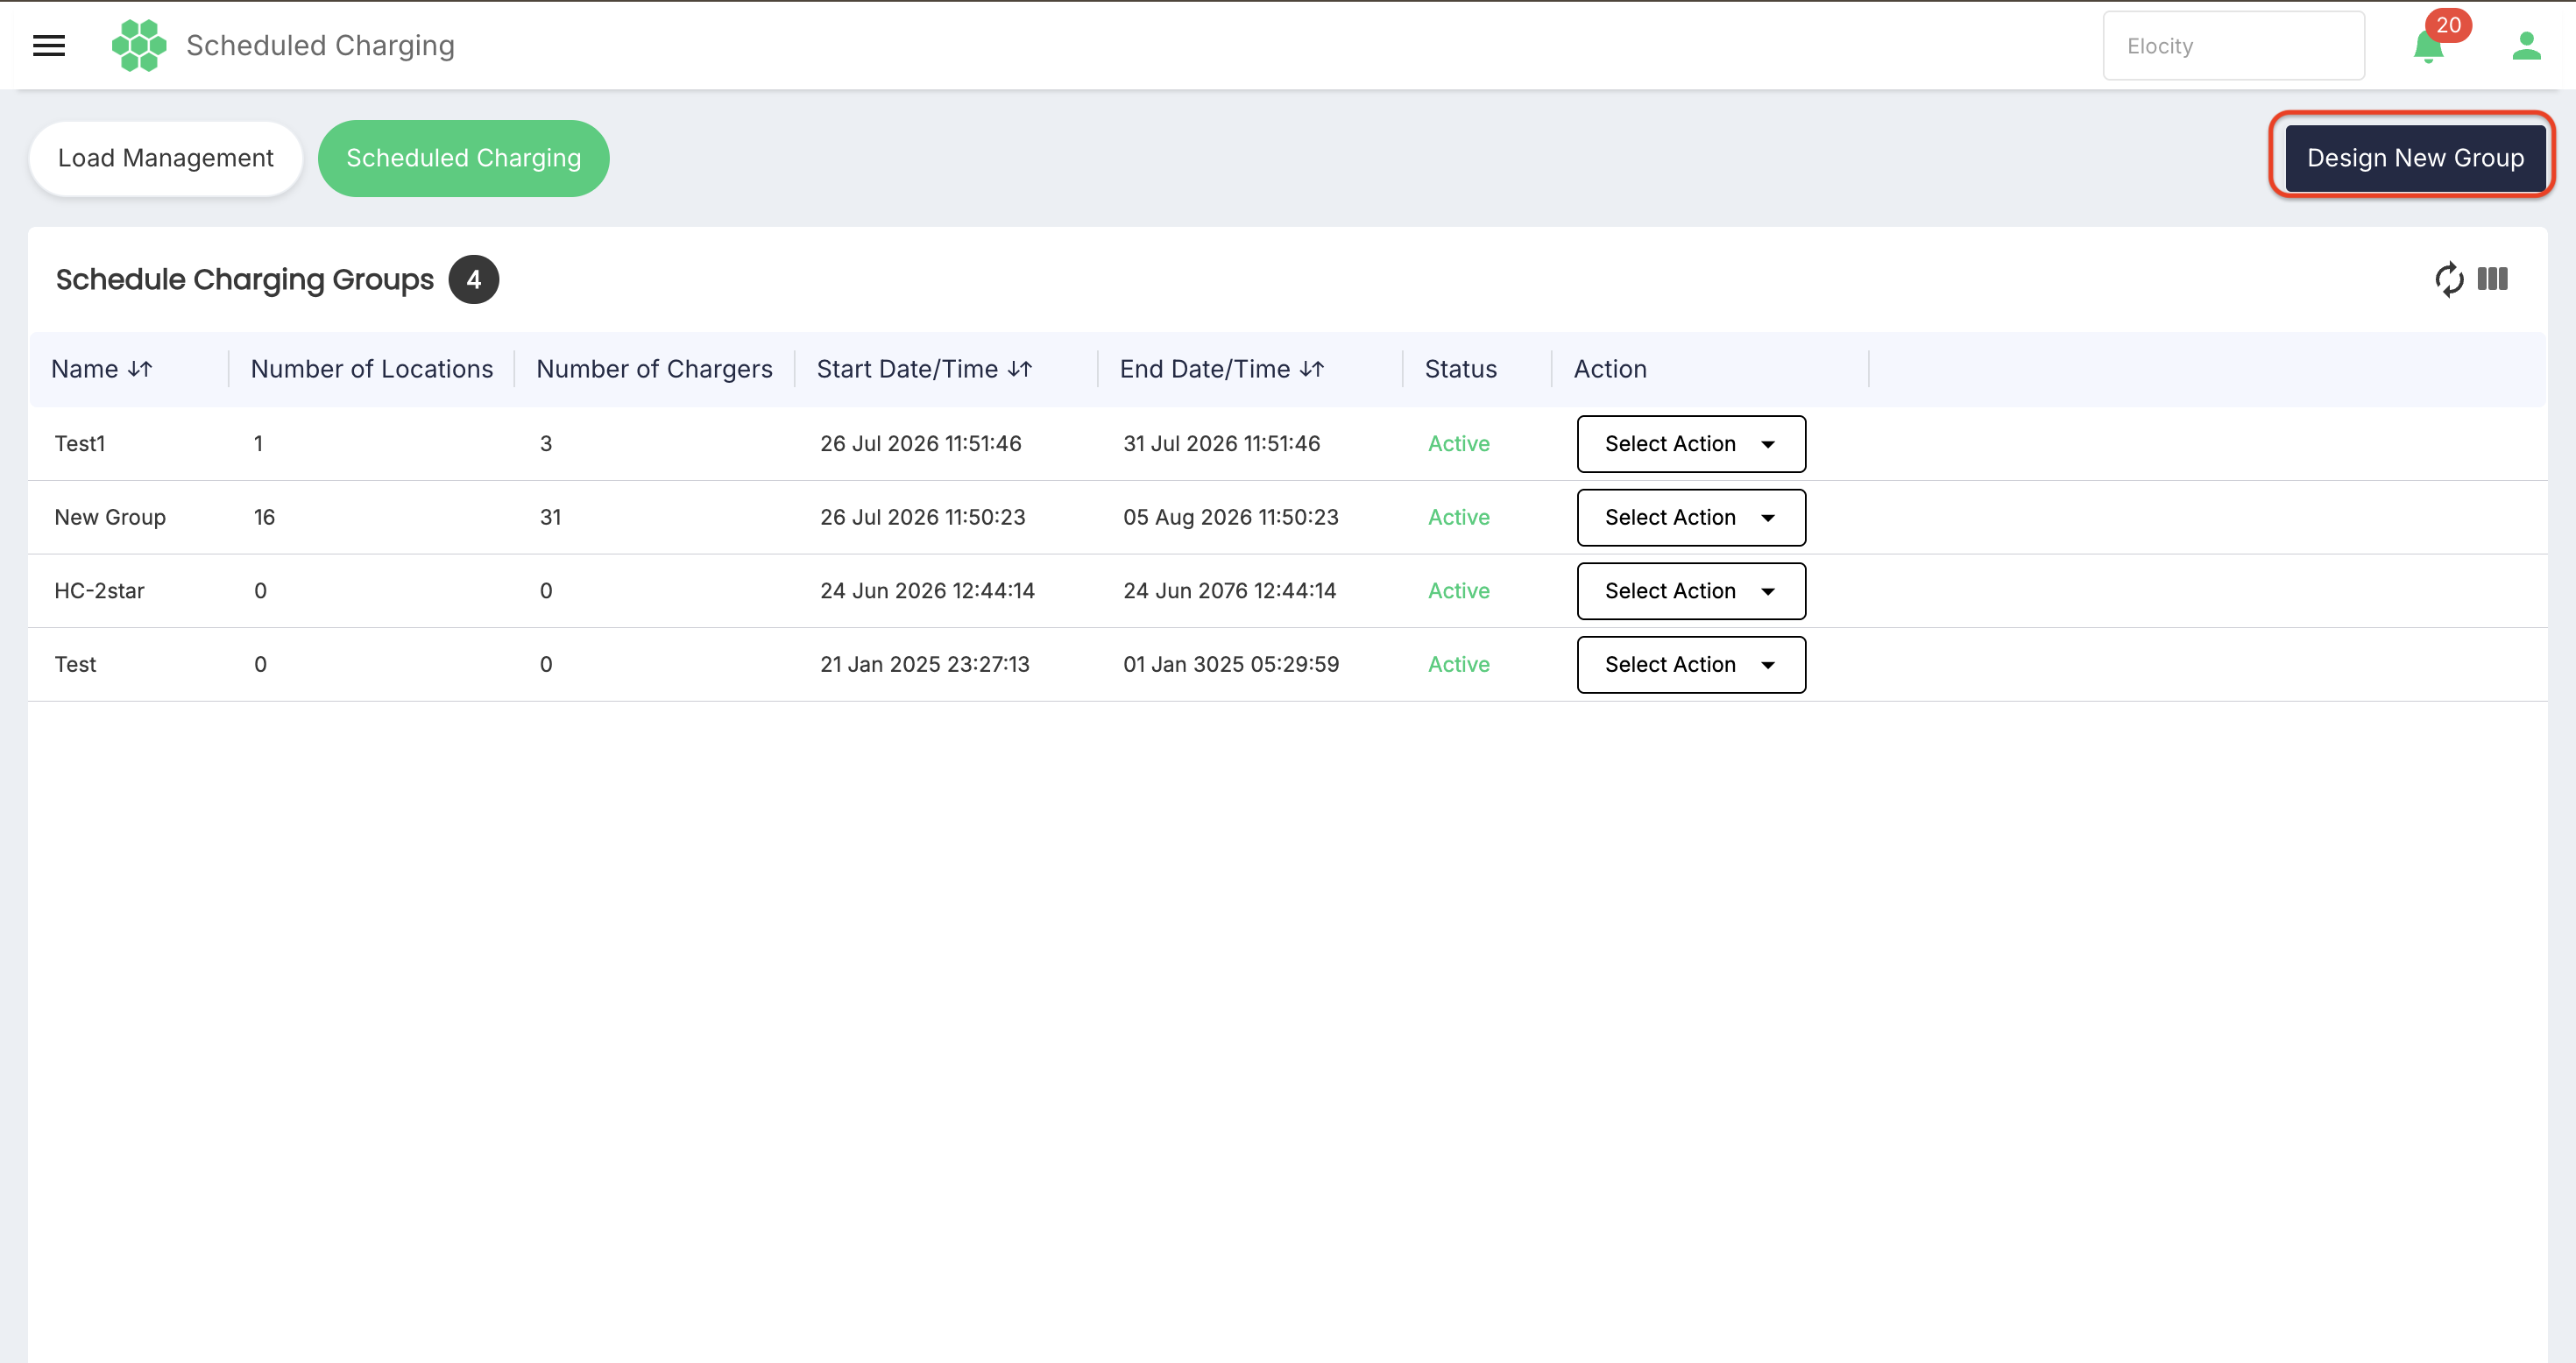
Creation fields
| Field | Description |
|---|---|
| Group Name* | Required name of the scheduled-charging group. |
| Network* | Required location network for the group. |
| Schedule Start Date* | Required date on which the schedule takes effect. |
| Expiry Date / Number of Days | Selects how the schedule end is defined. |
| Schedule End Date* | Required end date shown when Expiry Date is selected. |
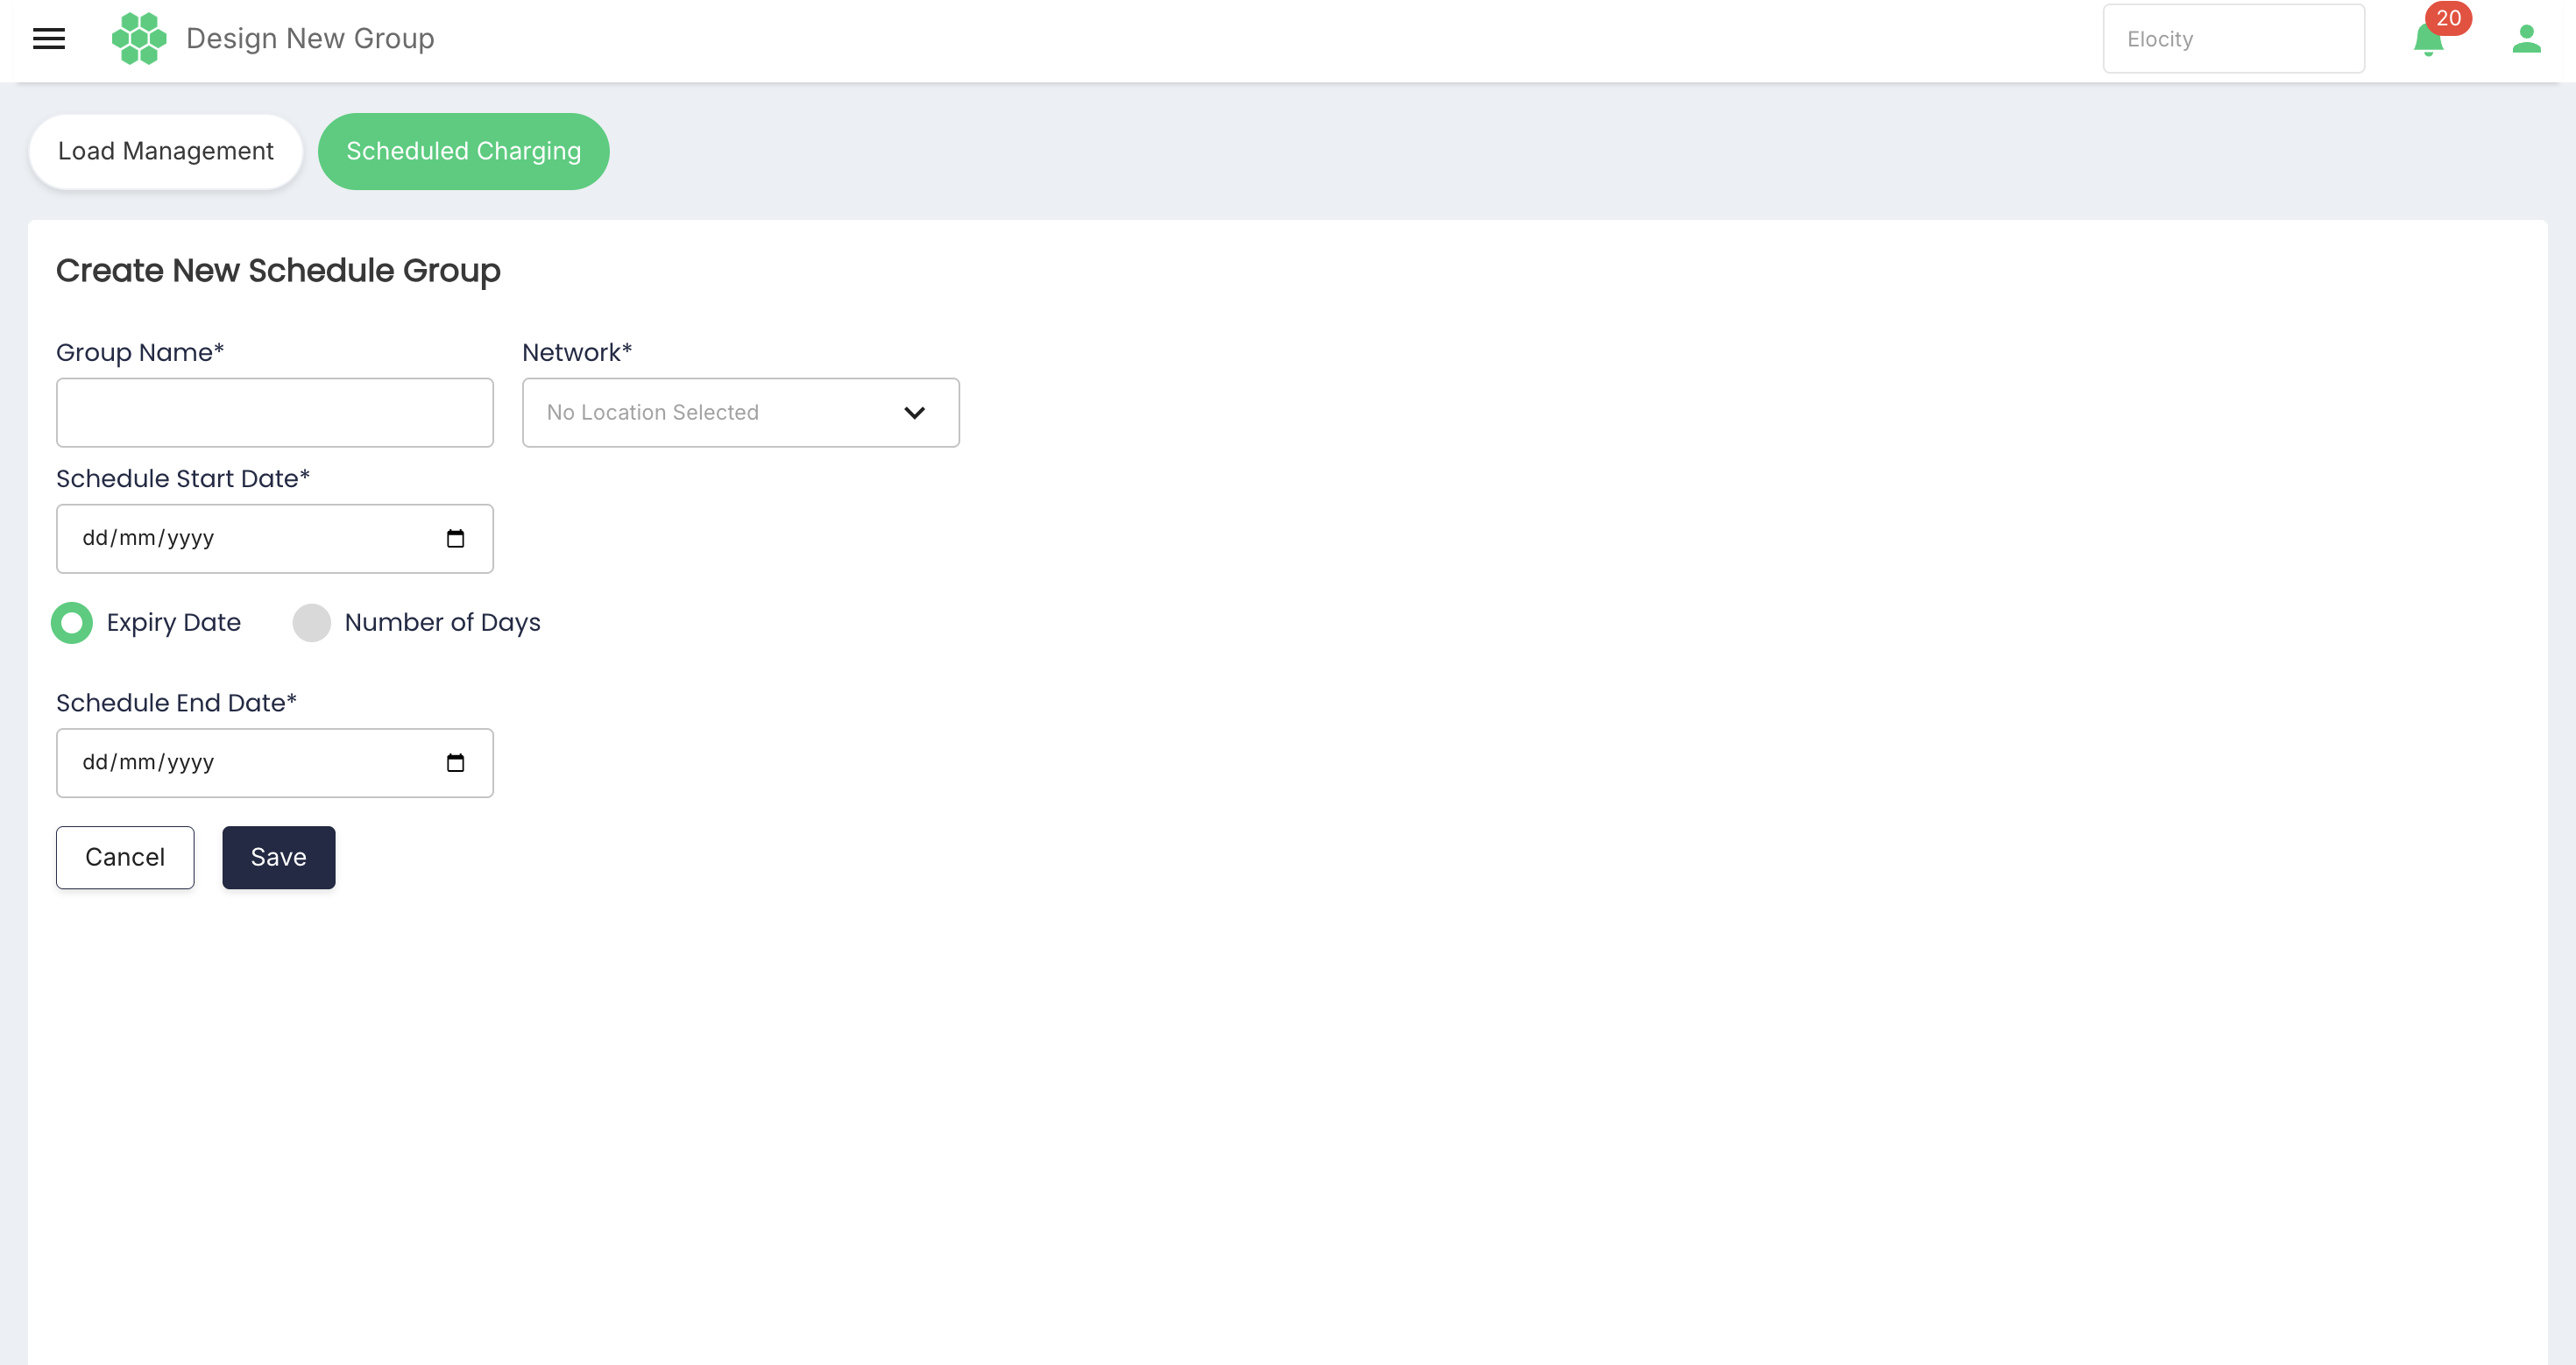
- Enter the Group Name and select the Network.
- Set the Schedule Start Date.
- Choose Expiry Date or Number of Days and set the corresponding value.
- Select Save to create the group, or Cancel to leave without saving.
After the group is created, define its weekly charging windows on the Schedule tab of the Scheduled Charging Details page.
Edit a Scheduled Charging group
Editing changes the scope or timing of an existing scheduled-charging policy. Use caution when the group is active or close to its start time.
Pre-edit checks
- Confirm the active business.
- Identify the correct scheduled group by Name and dates.
- Review its Status.
- Record the current locations, chargers, start, expiry mode, and end date or duration.
- Check for active sessions and overlapping schedules.
- Obtain approval for changes to an active or future customer-facing schedule.
Edit procedure
- Open Scheduled Charging.
- Locate the required group.
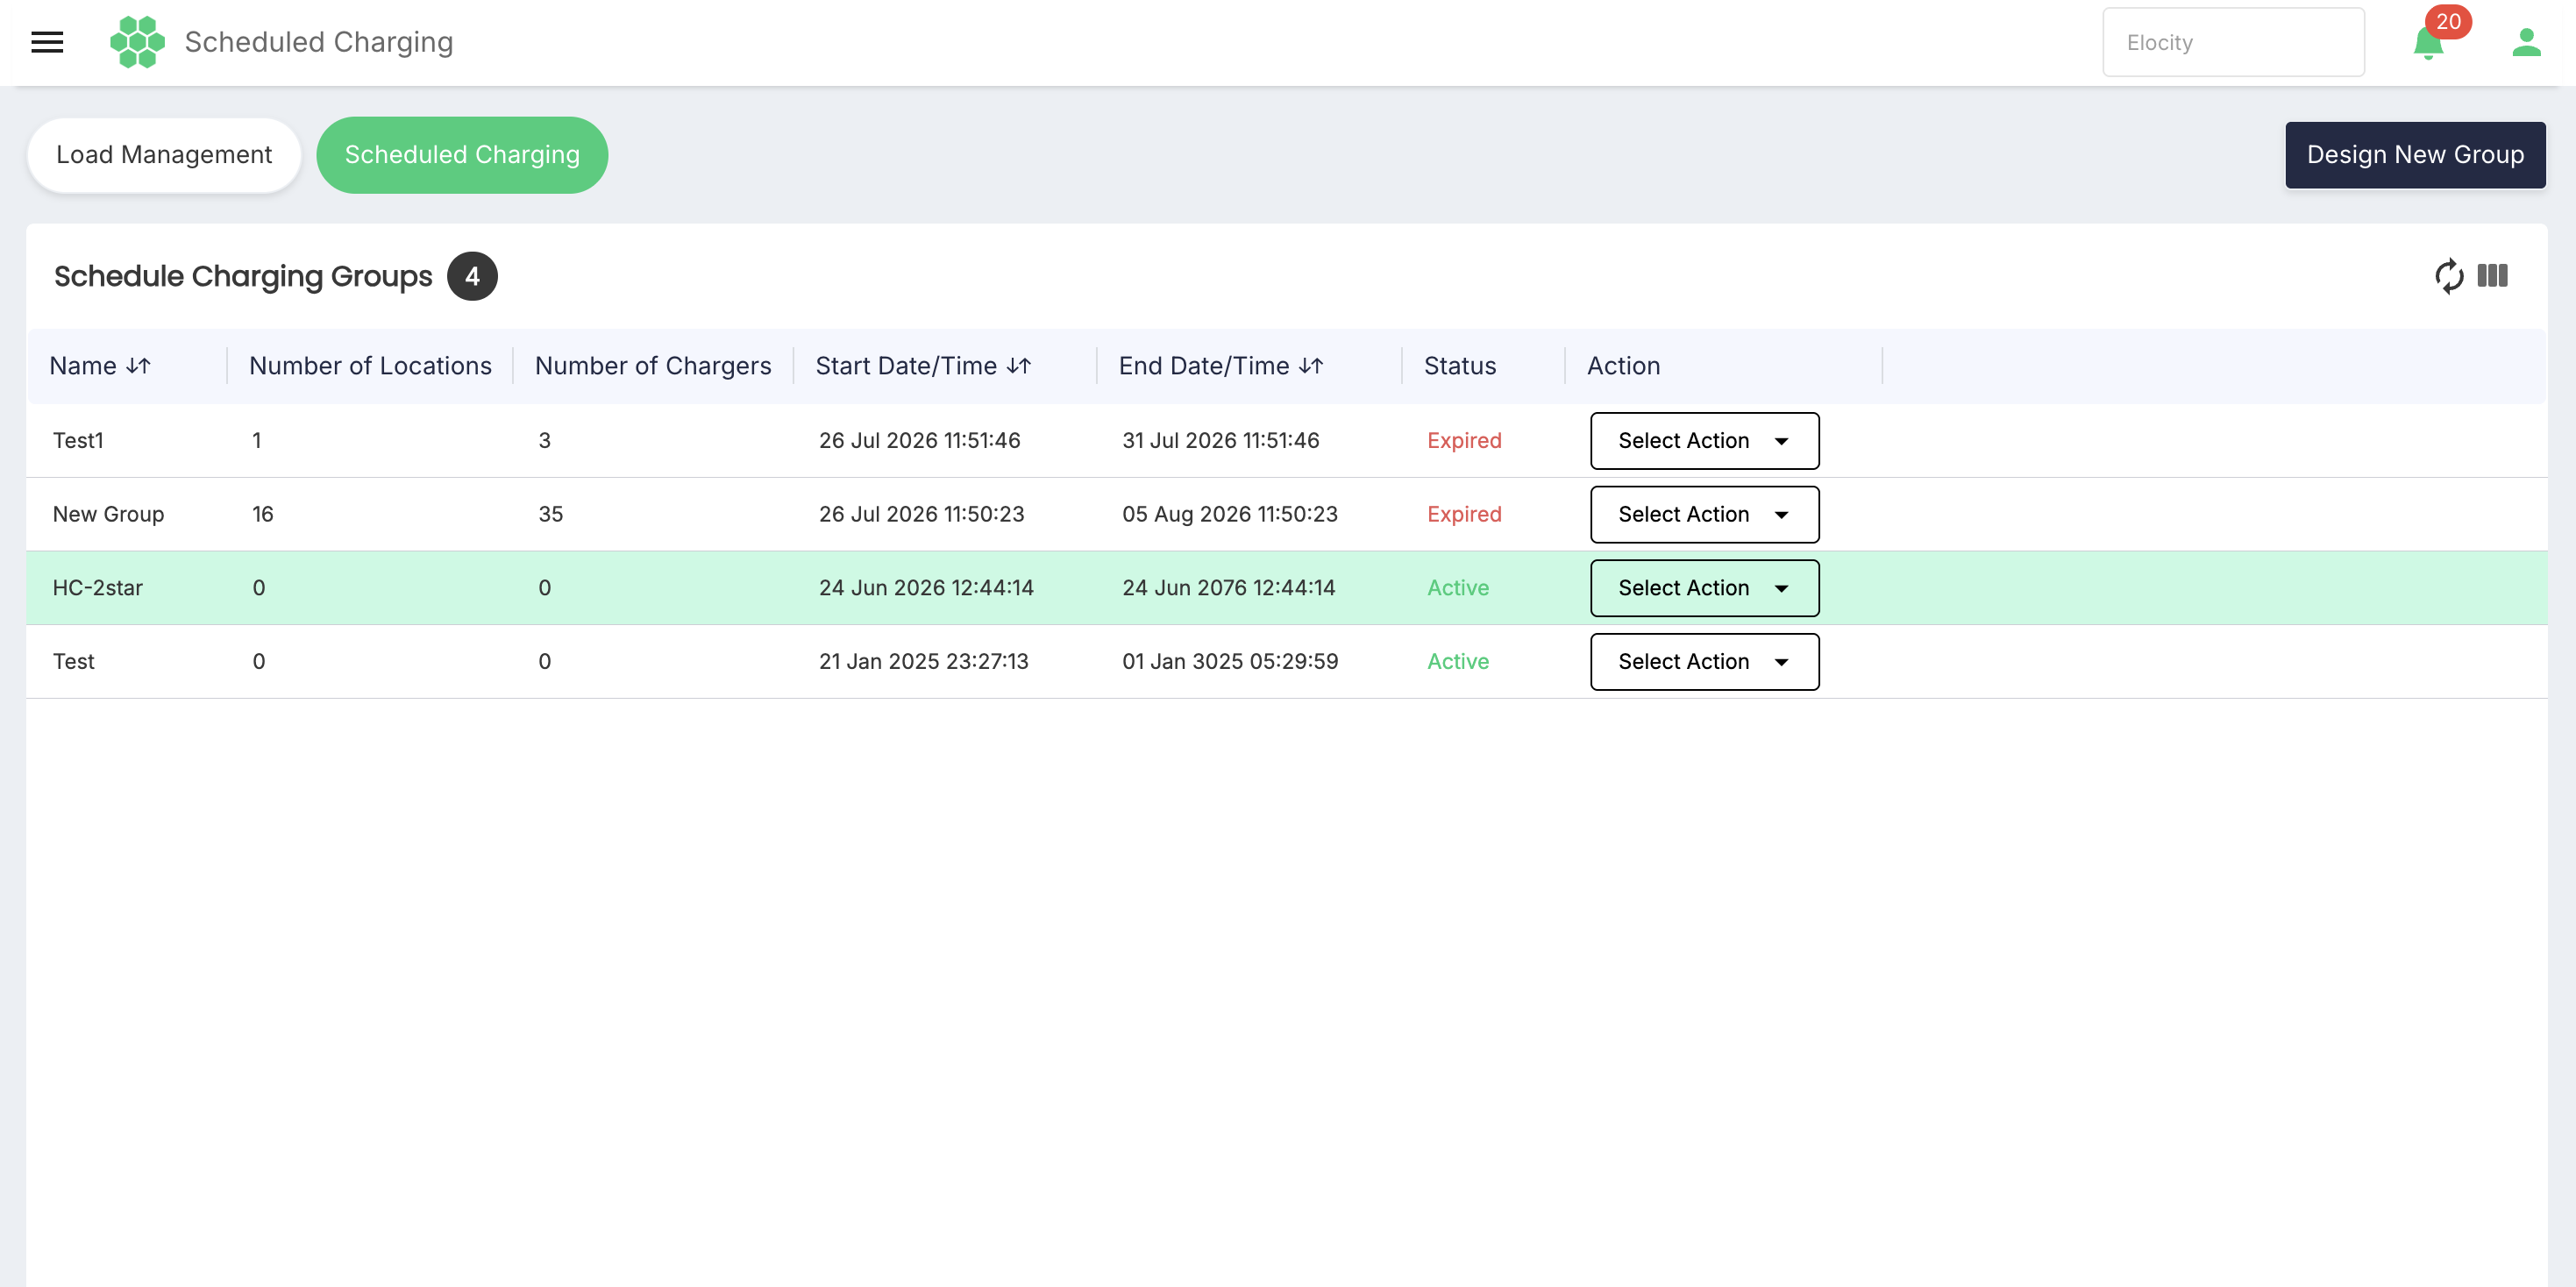
- Use the group's Action control and select View. In deployments where the name opens details, open the group first and then select Edit.
- Review the current values before making changes.
- Update the approved fields:
- Group Name
- Network, locations, or chargers
- Schedule Start Date
- Expiry Date or Number of Days mode
- Schedule End Date or duration
- Confirm that End is later than Start when Expiry Date is used.
- Confirm that the schedule does not conflict with another group for the same chargers.
- Select Save or Update according to the displayed action.
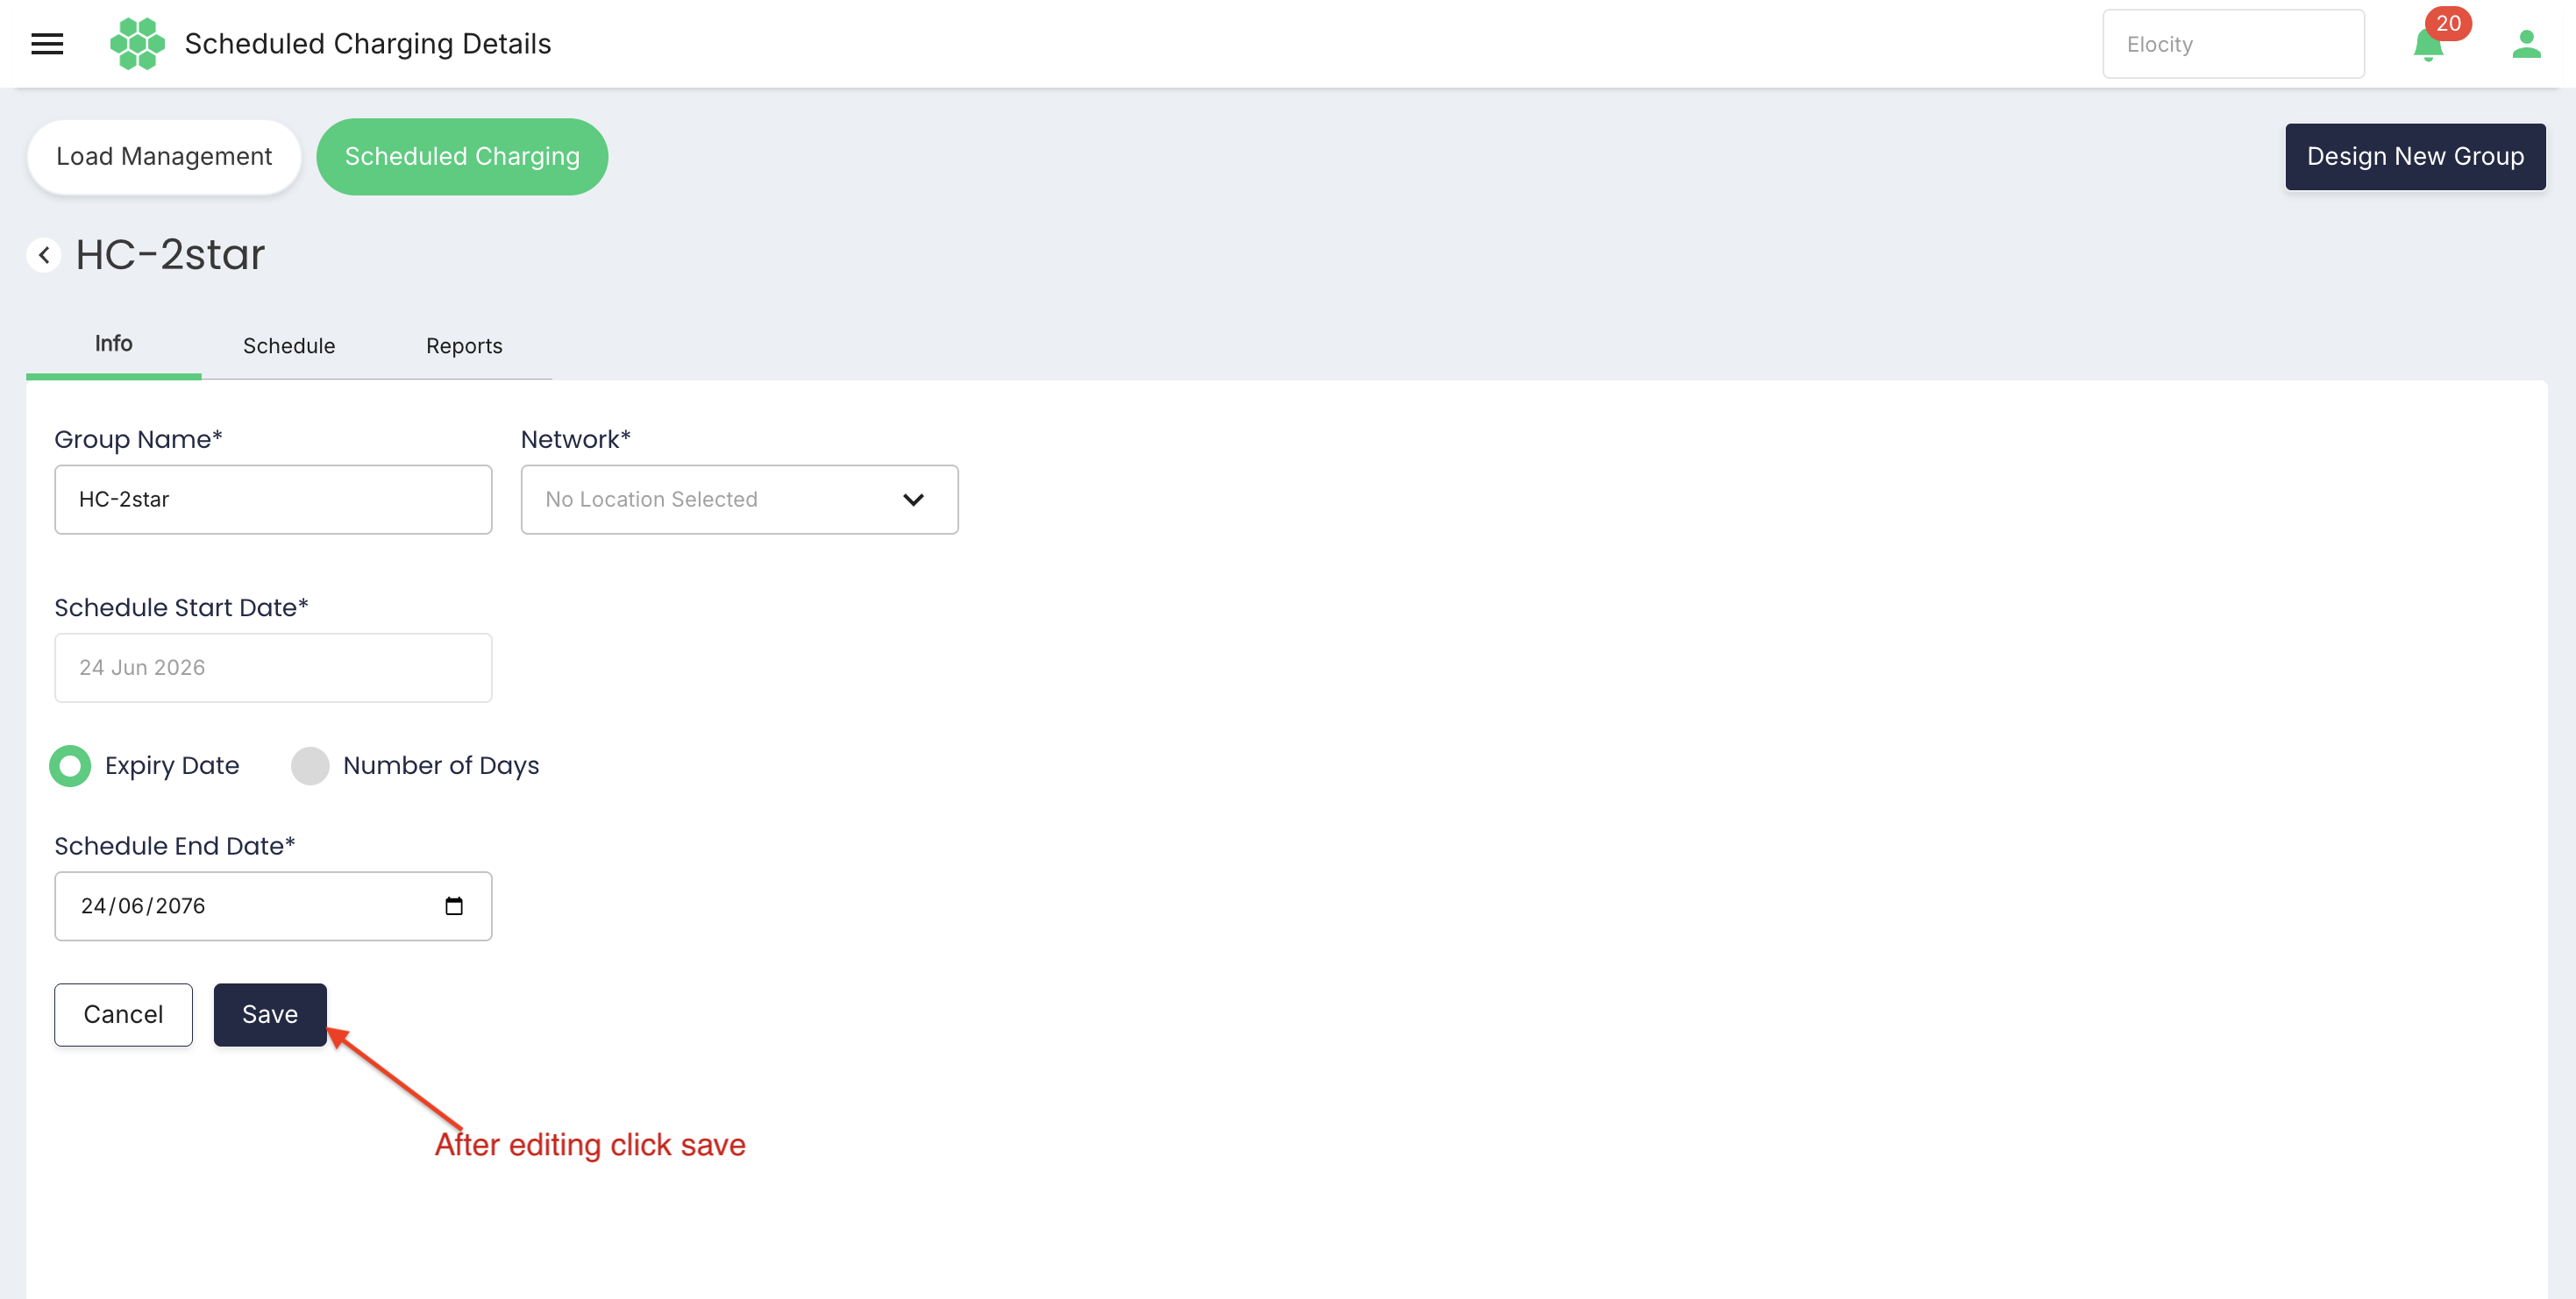
- Confirm success feedback.
- Return to Scheduled Charging, select Refresh, and verify the updated row.
- Monitor the group's Status and affected chargers.
Select Cancel before Save or Update to discard unsaved changes.
Editing an active group
When a group is already active, the platform should either apply the new configuration according to a defined effective-time rule or prevent incompatible edits.
Before editing an active group, determine:
- Whether current charging sessions retain the original schedule.
- Whether the new end time takes effect immediately.
- Whether removed chargers stop scheduled behaviour immediately or after their session ends.
- Whether newly added chargers become eligible immediately.
- How changes are recorded for audit.
Do not assume that editing is retroactive.
Date validation
The system should validate:
- Group Name is present.
- At least one valid Network/location selection exists.
- Schedule Start Date is valid.
- Schedule End Date is later than Start when Expiry Date is selected.
- Number of Days is a positive permitted whole number when that mode is selected.
- Dates fall within the configured acceptable range.
- The updated interval does not create a prohibited overlap.
Delete a Scheduled Charging group
Deleting a Scheduled Charging group removes its schedule definition and may stop future scheduled behaviour for its locations or chargers.
Pre-deletion checks
Before deletion, confirm:
- The correct business and scheduled group are selected.
- Name, locations, chargers, start, end, and Status have been reviewed.
- The schedule is not required for an upcoming operational period.
- The group is not active, or active-deletion behaviour is explicitly understood and approved.
- Current charging sessions have been reviewed.
- No downstream automation or integration depends on the schedule.
- The configuration has been recorded if it may need to be recreated.
Delete procedure
- Open Scheduled Charging.
- Locate the group.
- Open the group's Action control.
- Select Delete.
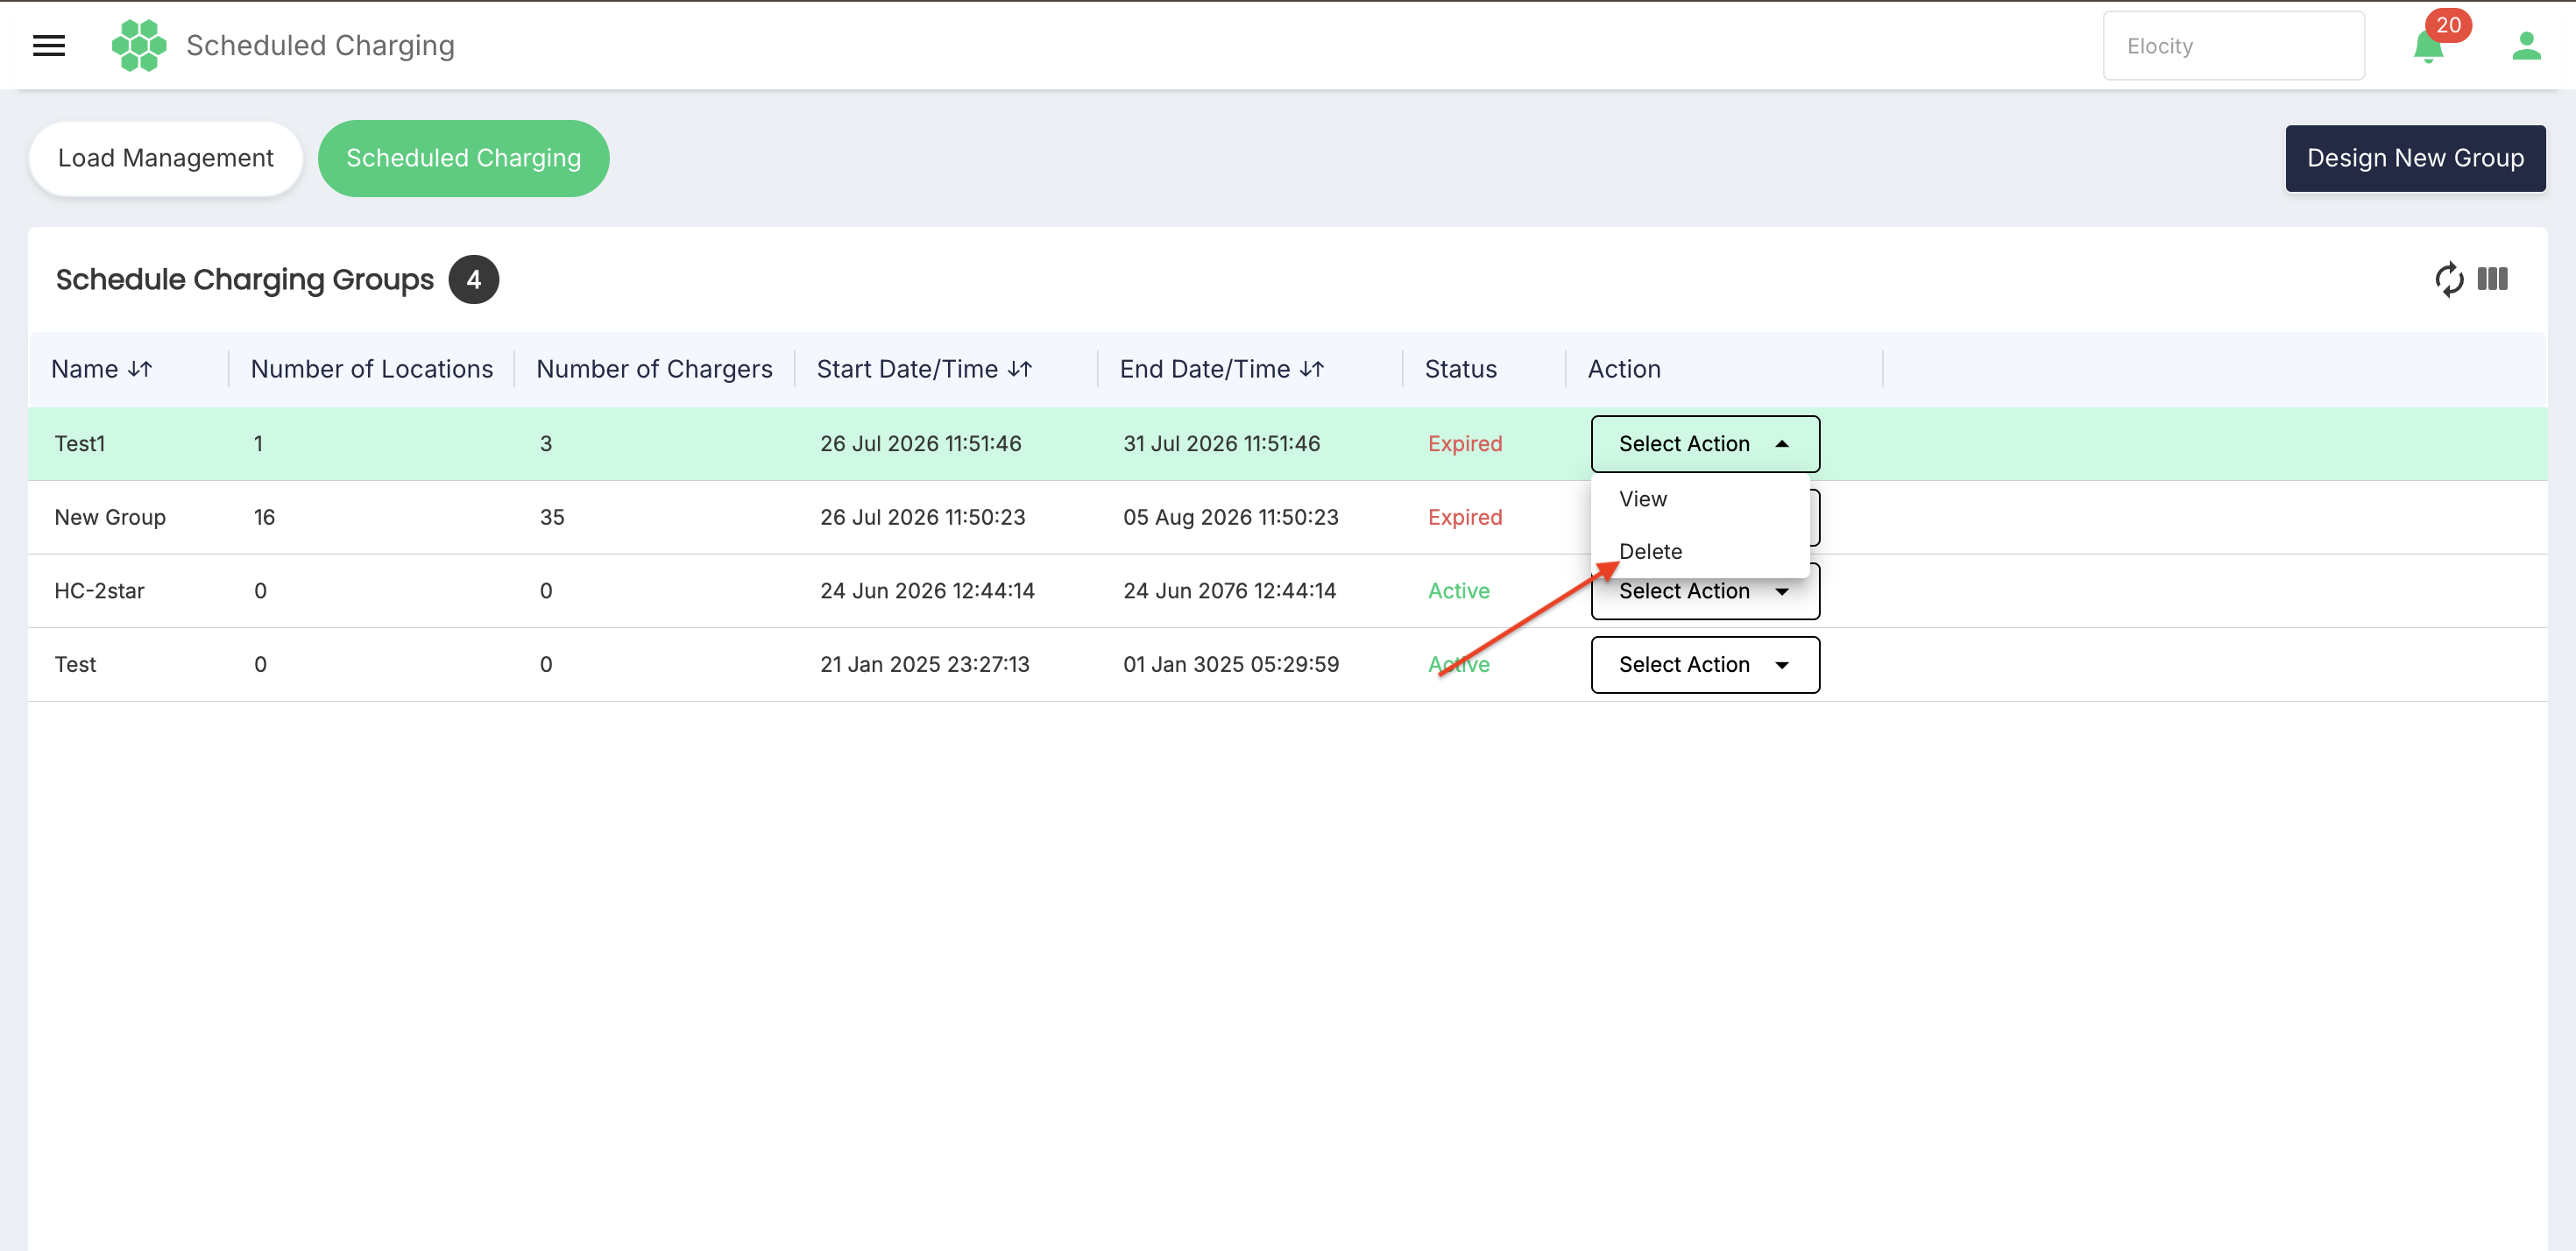
- Review the confirmation message and ensure it names or clearly identifies the intended group.
- Select Cancel to retain the group.
- Confirm Delete only after the impact checks are complete.
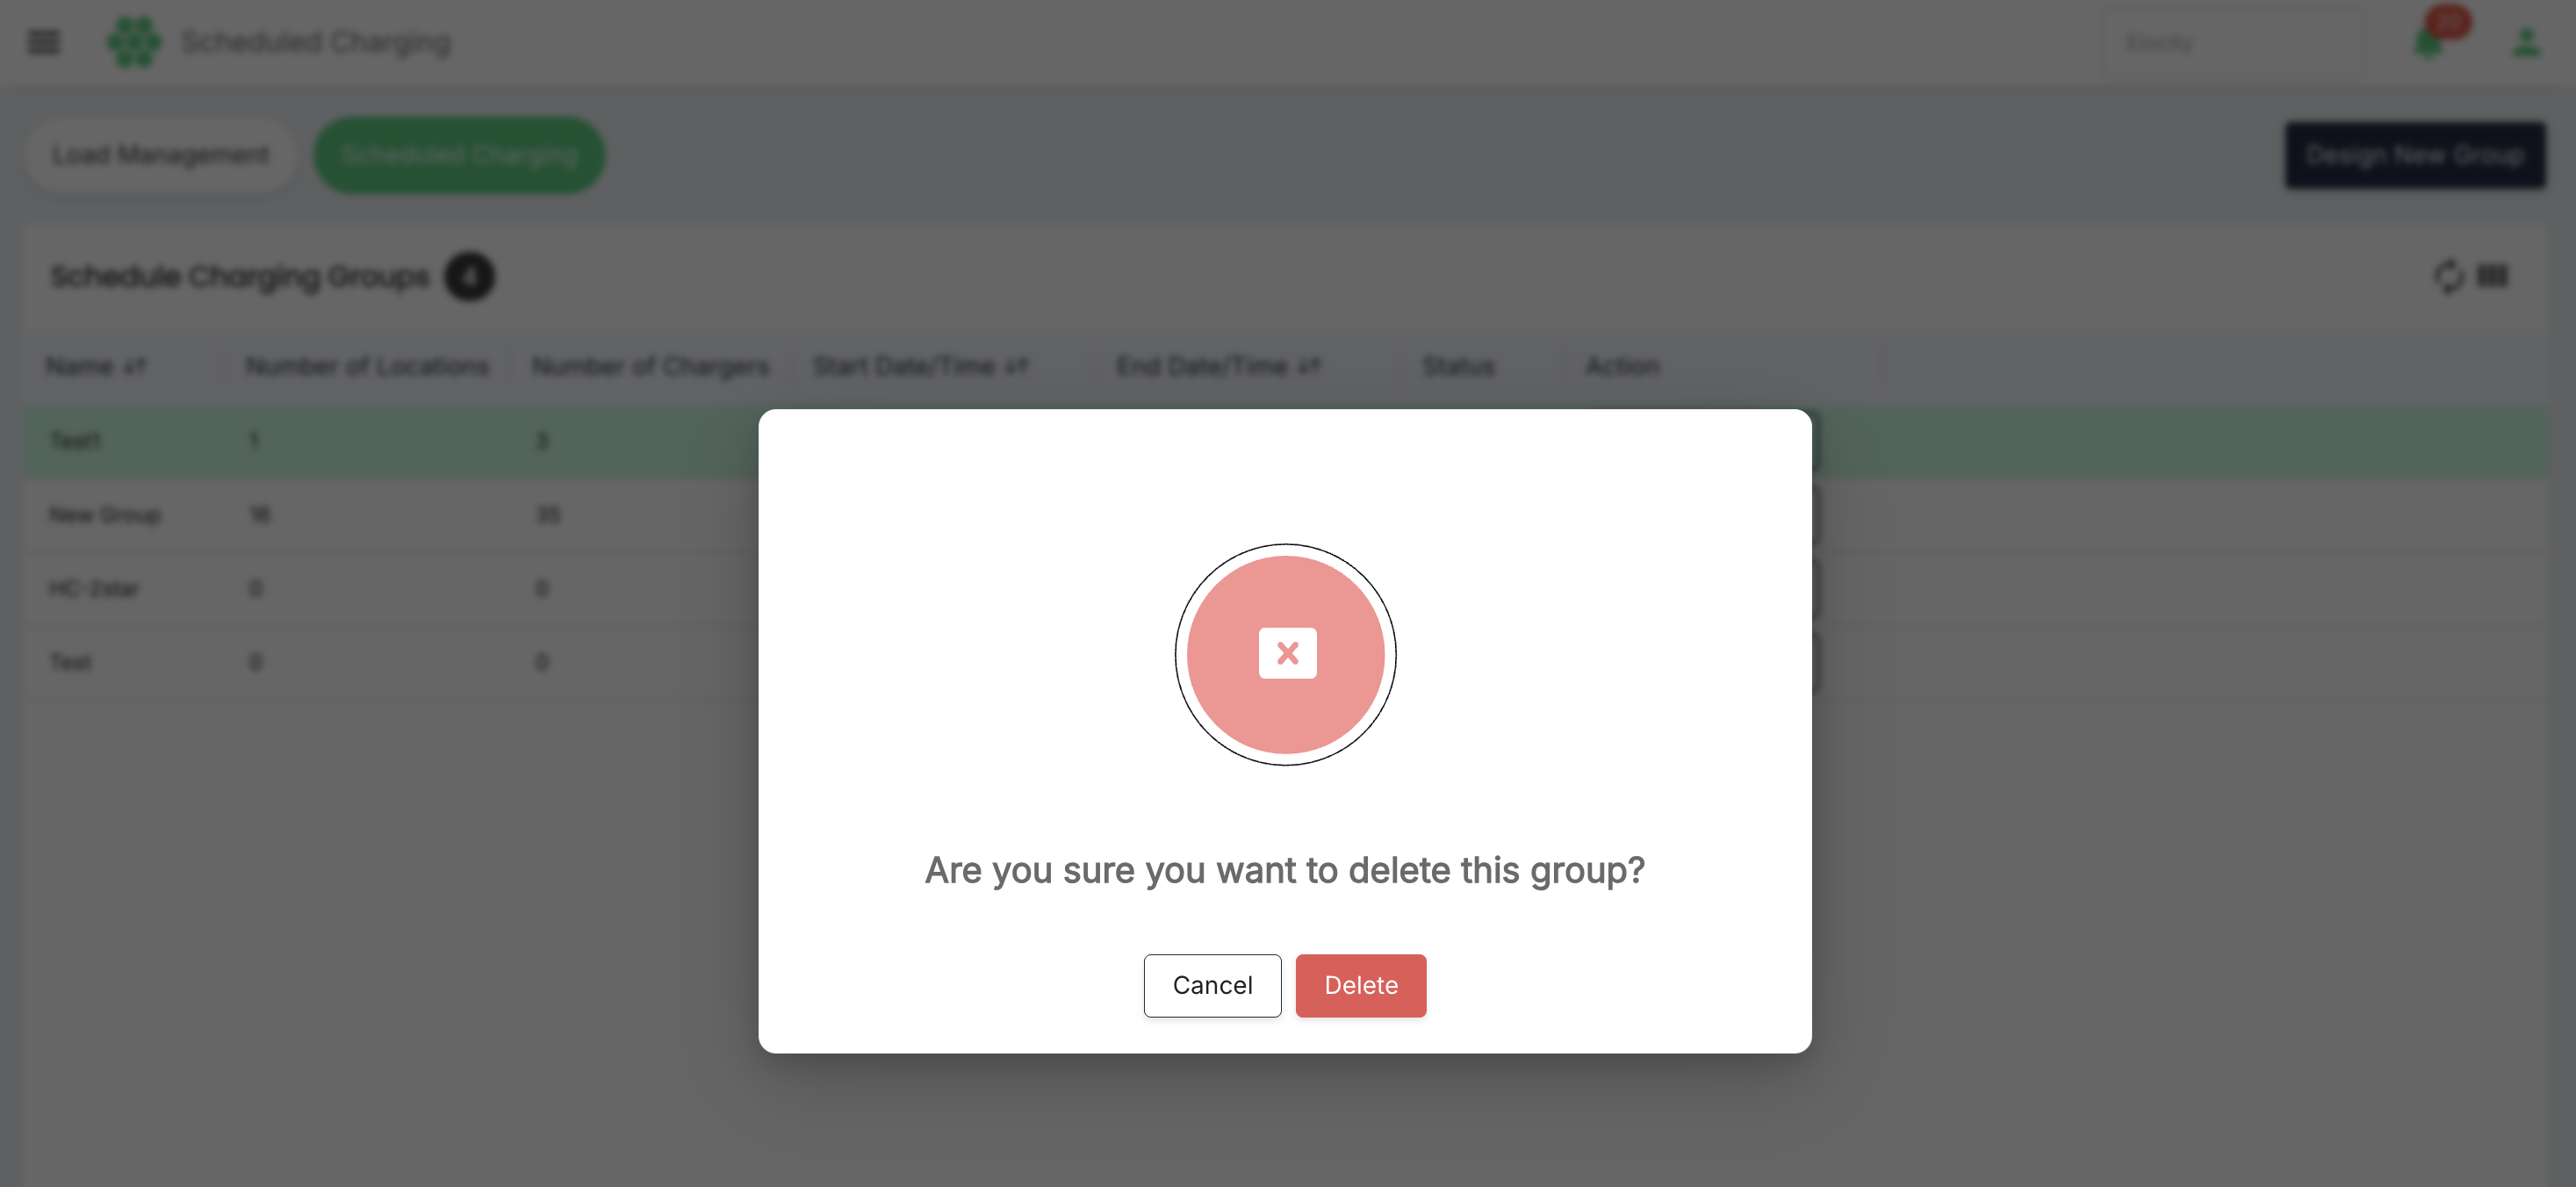
- Wait for success feedback.
- Select Refresh.
- Confirm that the group no longer appears.
- Check affected charger behaviour and active sessions.
Expected deletion safeguards
The system should:
- Require explicit confirmation.
- Check Delete permission.
- Warn or block deletion of an active group.
- Check current charging sessions where applicable.
- Check dependencies and overlapping schedules.
- Record the user, group, time, and result in the audit history.
- Prevent a double submission while deletion is processing.
Prefer disabling when available
If a Status control supports Disabled or Cancelled, use it instead of deletion when the schedule record must remain available for history or audit. Delete only when permanent removal is approved.
Recommended operating workflow
- Confirm the selected business.
- On the Load Management page, review the Groups list and confirm the returned group count.
- Open a group to review its configuration, or use Design New Load Group to create a new group with the required chargers, limits, voltage, and management mode.
- Select an existing load group to Edit its configuration parameters or securely Delete the group when it is no longer required.
- Use the Analytics tab to review the max load, active load, curtailment limit, load chart, and transactions for a group over a chosen period.
- On the Scheduled Charging page, review the schedule groups, or use Design New Group to create one.
- Select an existing scheduled charging group to Edit its timeframe/windows or Delete the schedule when appropriate.
- Define the group's weekly windows on the Schedule tab, setting the type, times, allow-charging, auto-stop, days, and holiday behavior.
- Use the Reports tab to review energy consumed and cost for the schedule, and Download Report when an offline record is required.
- Use Refresh after changes to request the latest grid and analytics values.
Notes
- Load groups, scheduled-charging groups, and available actions can differ between users because of business assignments, roles, and permissions.
- Load, active-load, and analytics values change as charging transactions and station messages are received; refresh the data before acting on it.
- Editing a load group's limits or management mode, and deleting a load group or scheduled-charging group, affect live charging behavior. Make such changes only under an approved operational procedure.
- Column visibility and search selections affect only the current on-screen view; they do not change stored records.