Bulk Operations
| Document information | Value |
|---|---|
| Version | 1.0 |
| Prepared for | HIEV CPMS administrators and operations teams |
| Interface verified | 4 August 2026 |
| Product area | Bulk Operations |
| Scope | Location Management, Station Management, OCPP Action Center, and template-based bulk additions |
1. Purpose
The Bulk Operations module allows an authorized user to apply the same change or command to multiple locations, stations, or OCPP charge points in one operation. It also supports adding multiple locations or stations through an XLSX template.
Use this module when a change must be made consistently across many records. For a one-off correction, use the applicable Location or Station details screen instead.
Important: A bulk operation can affect every selected target. Verify the business tenant, target count, parameter values, active charging sessions, and operational impact before selecting Update or Perform Action.
2. Main workflows
The module has two tabs:
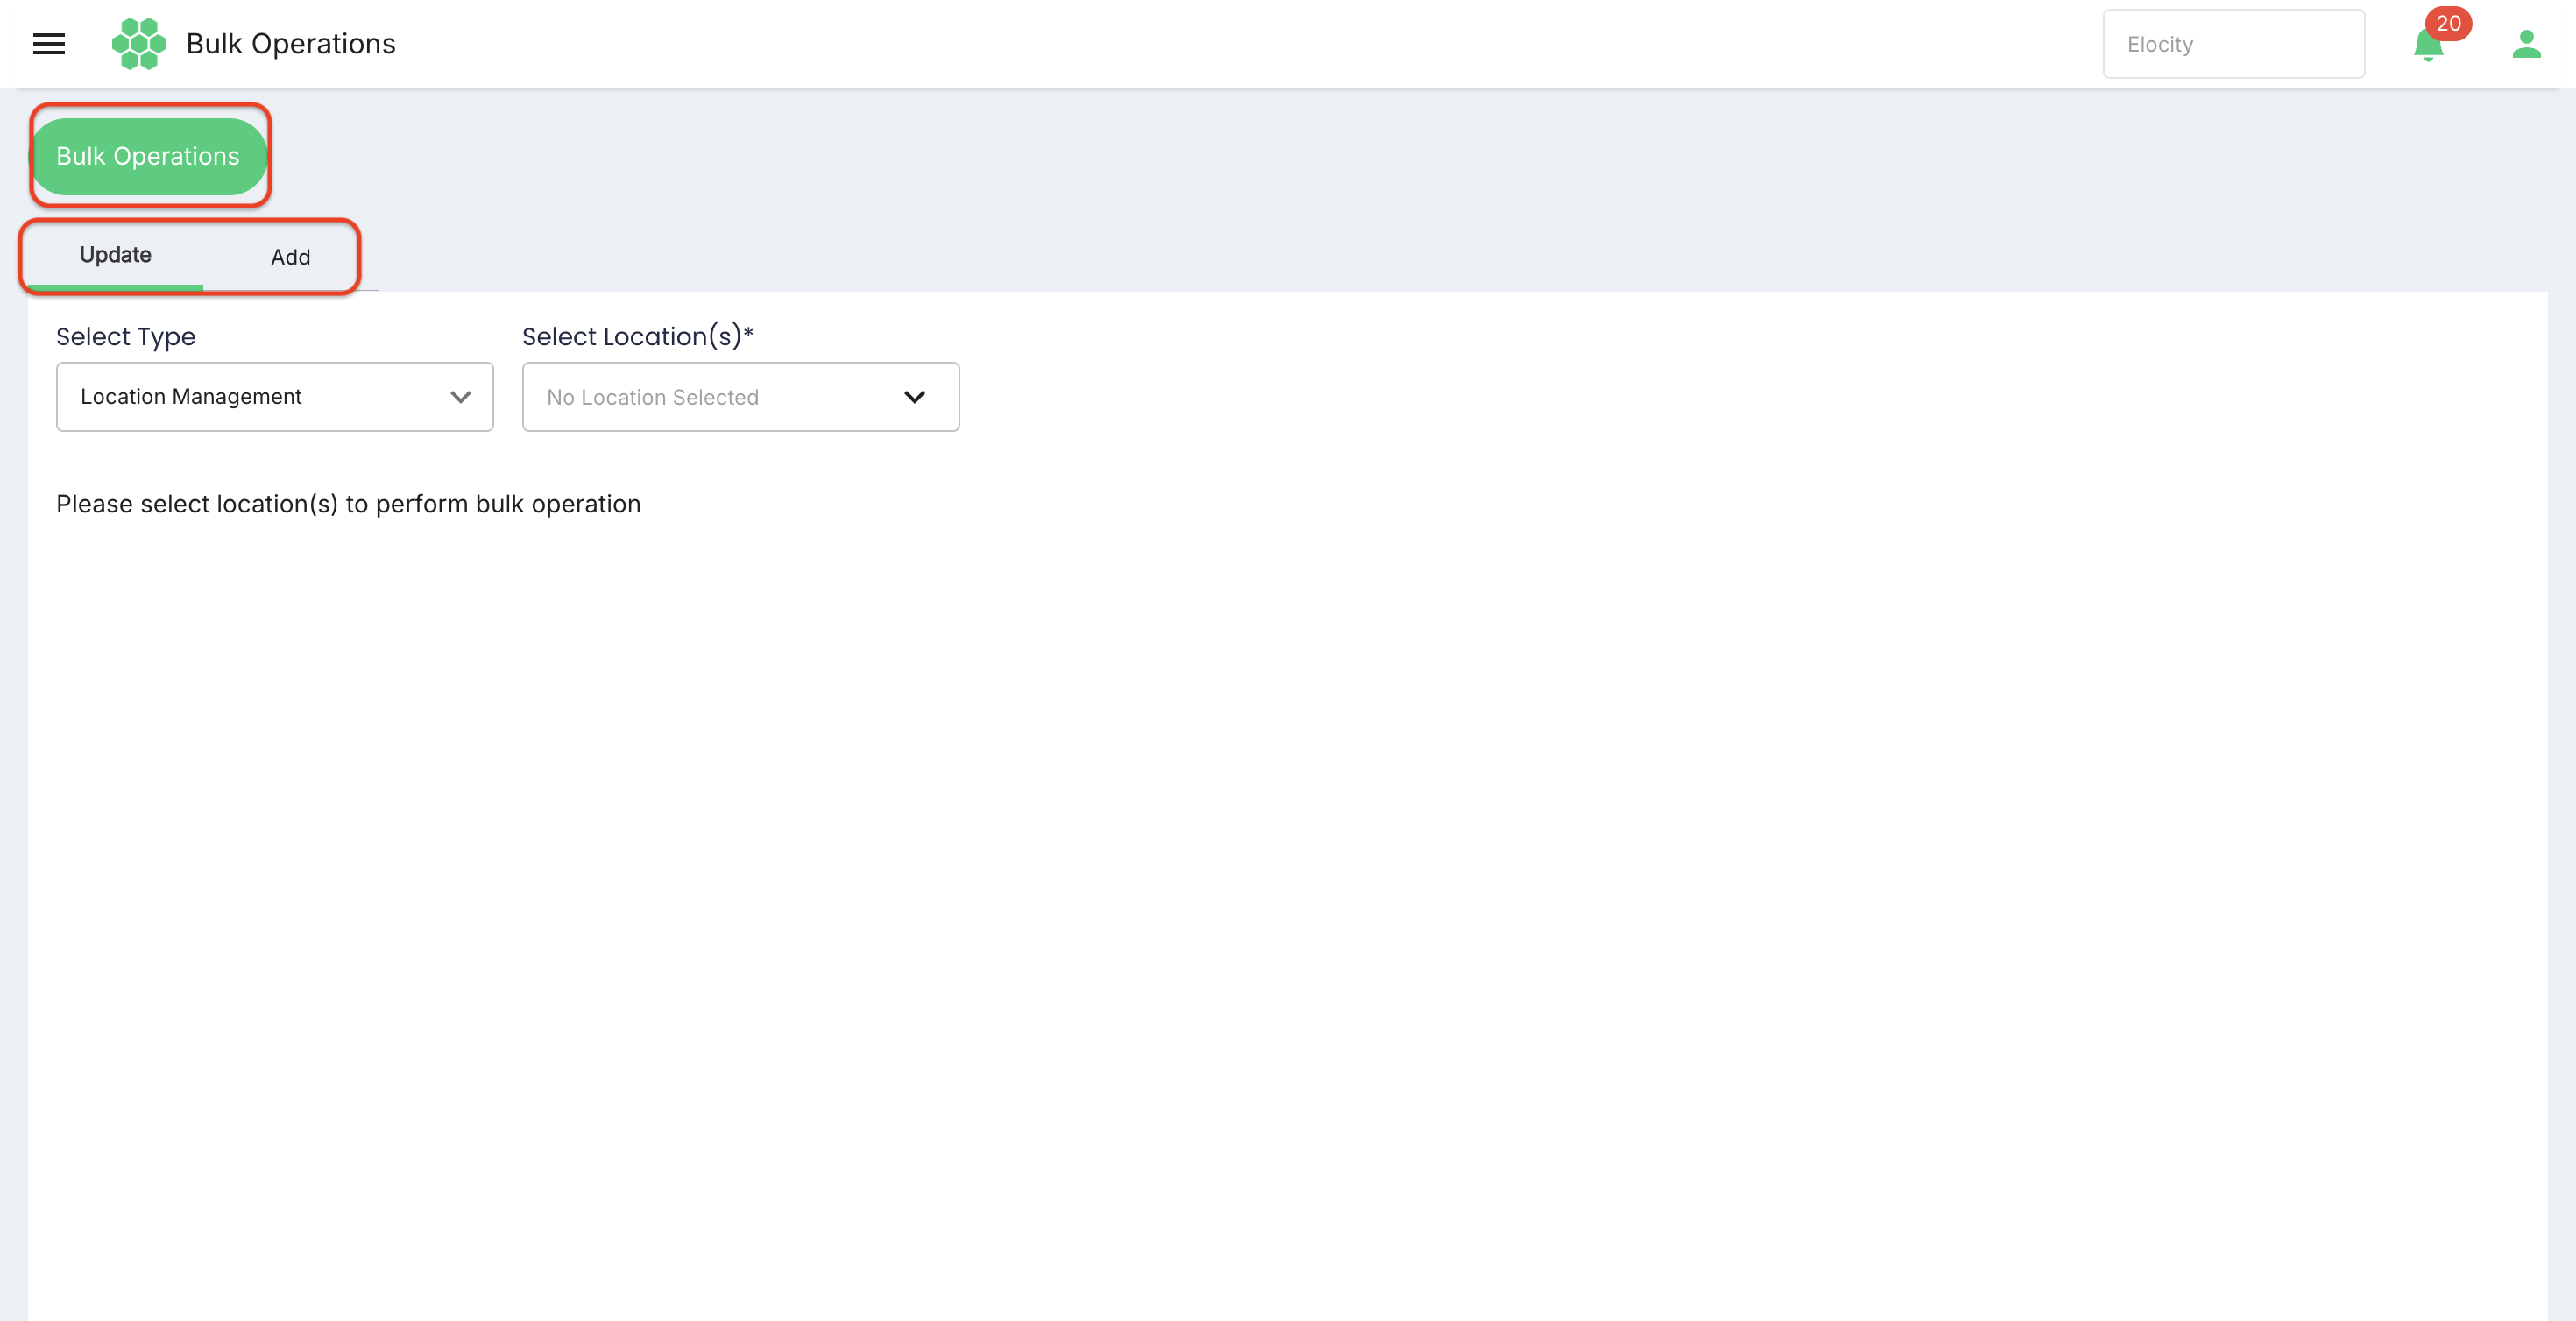
- Update — changes selected parameters on existing locations or stations, or sends an OCPP command to selected charge points.
- Add — imports new locations or stations from an XLSX template.
The verified Update types are:
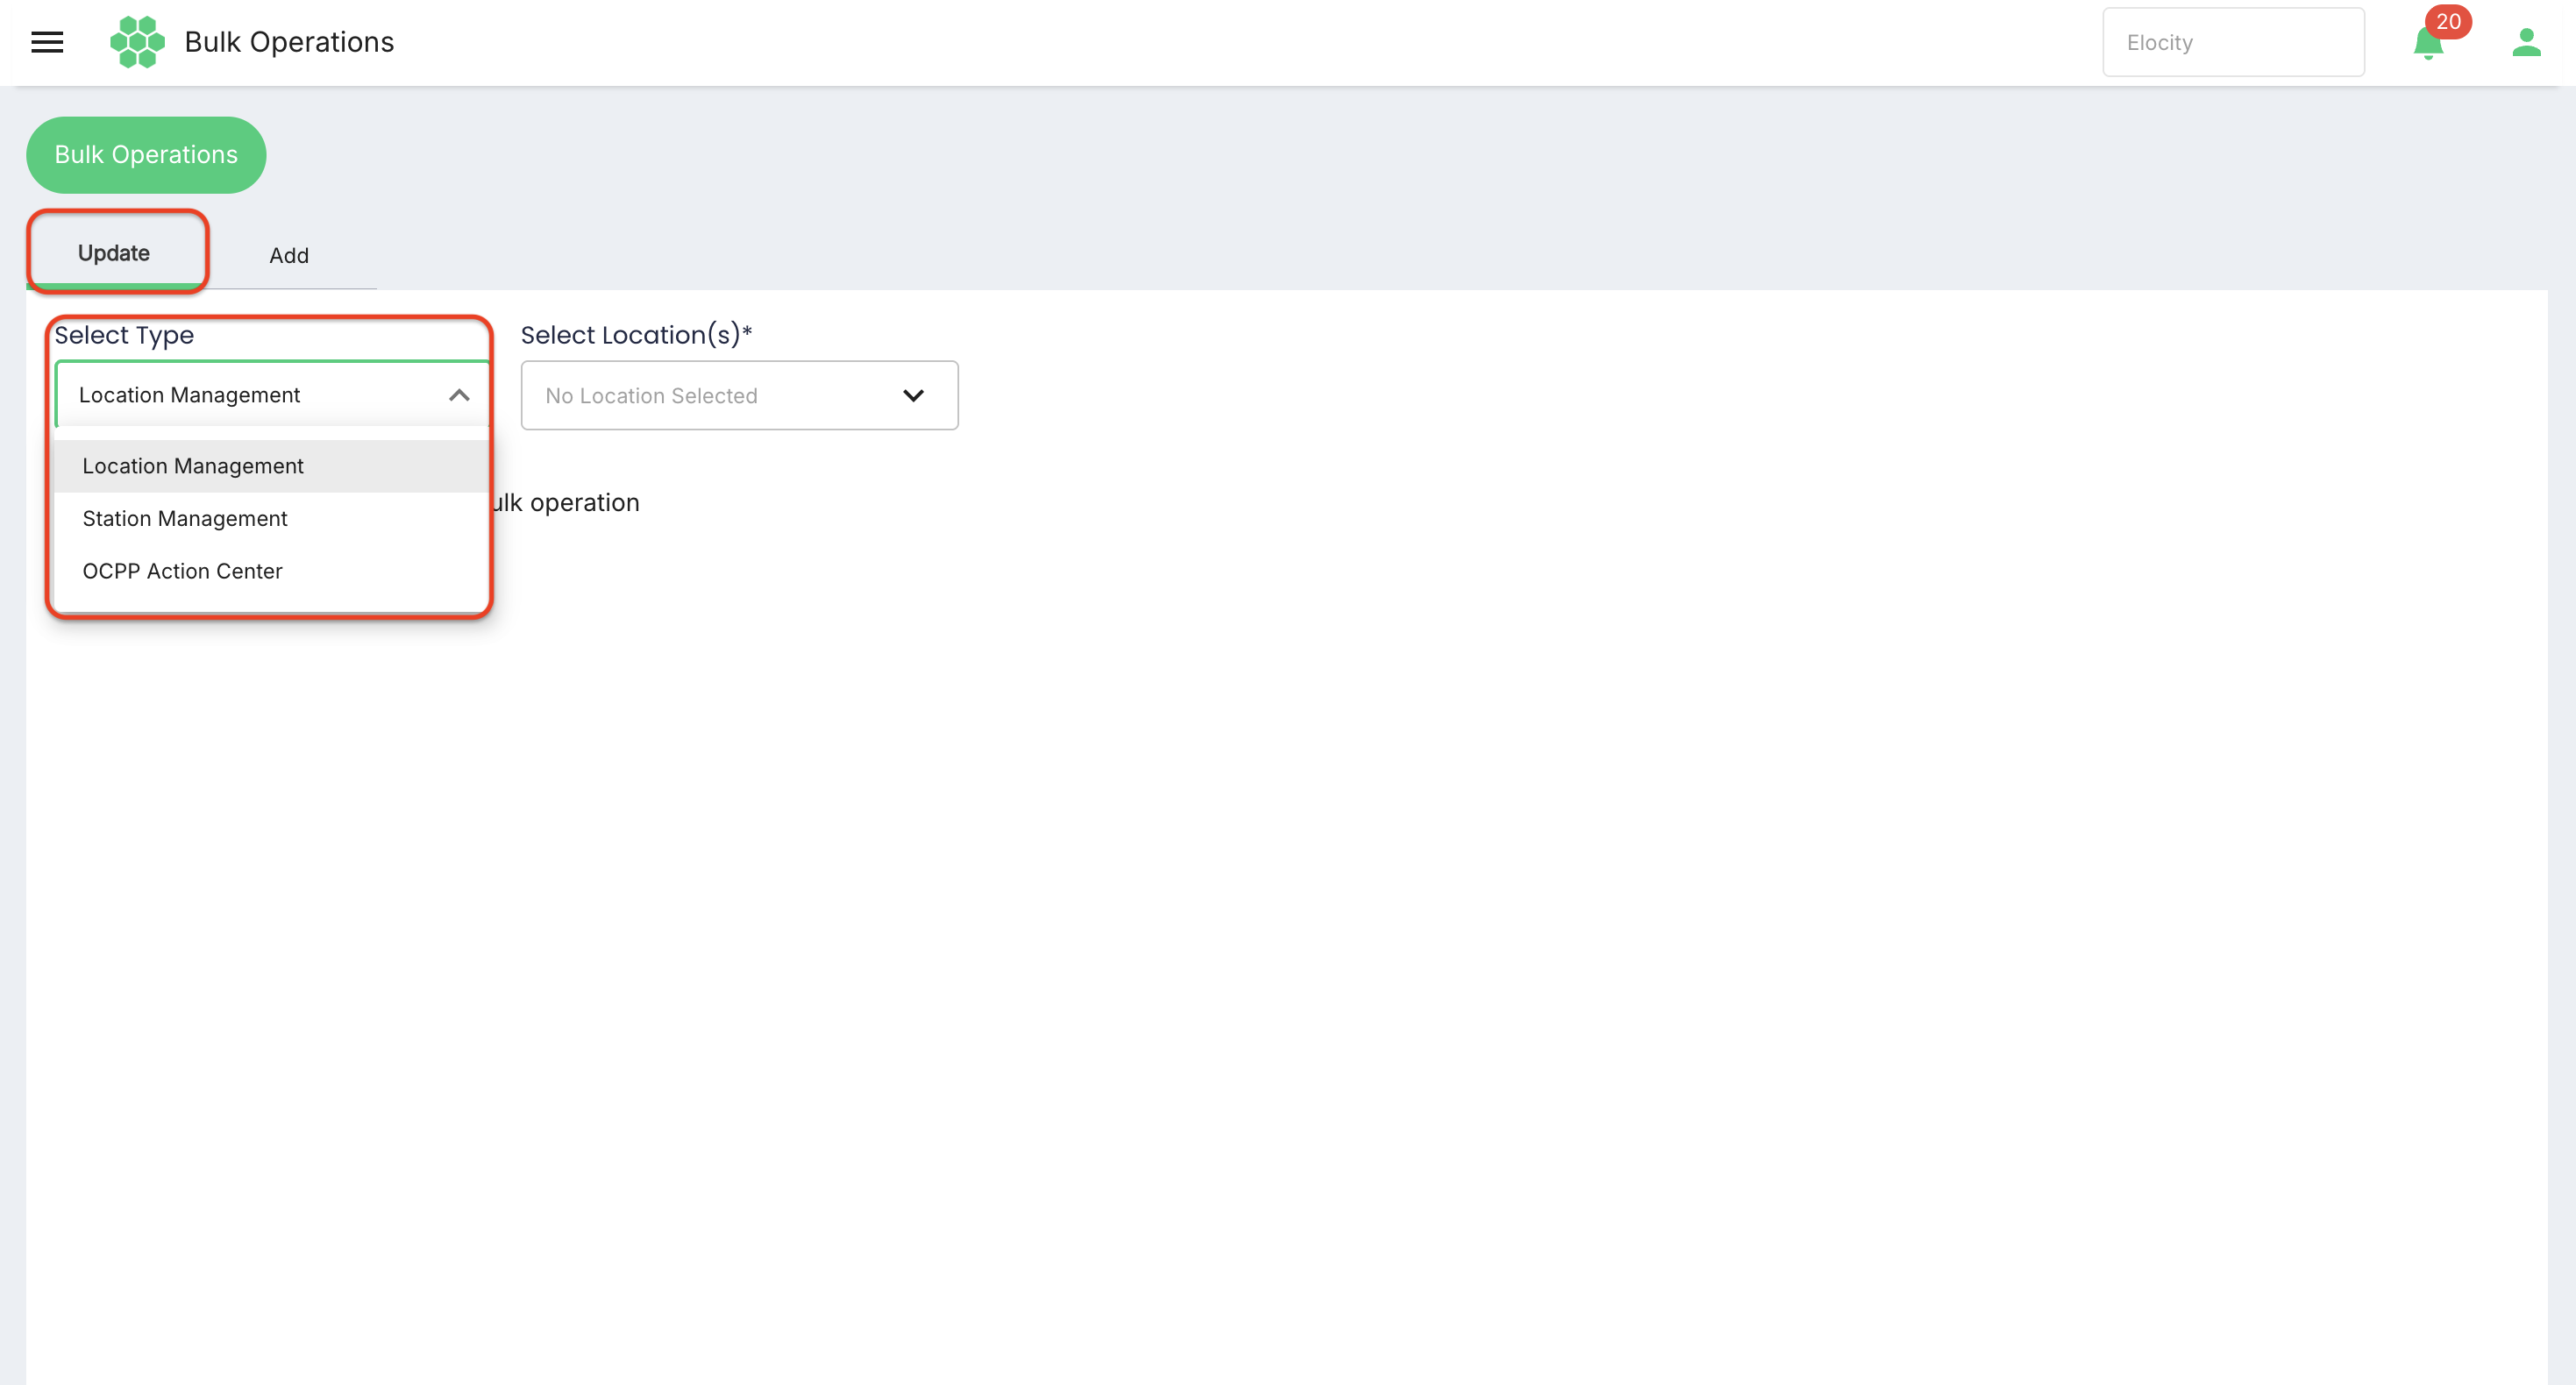
- Location Management
- Station Management
- OCPP Action Center
The verified Add types are:
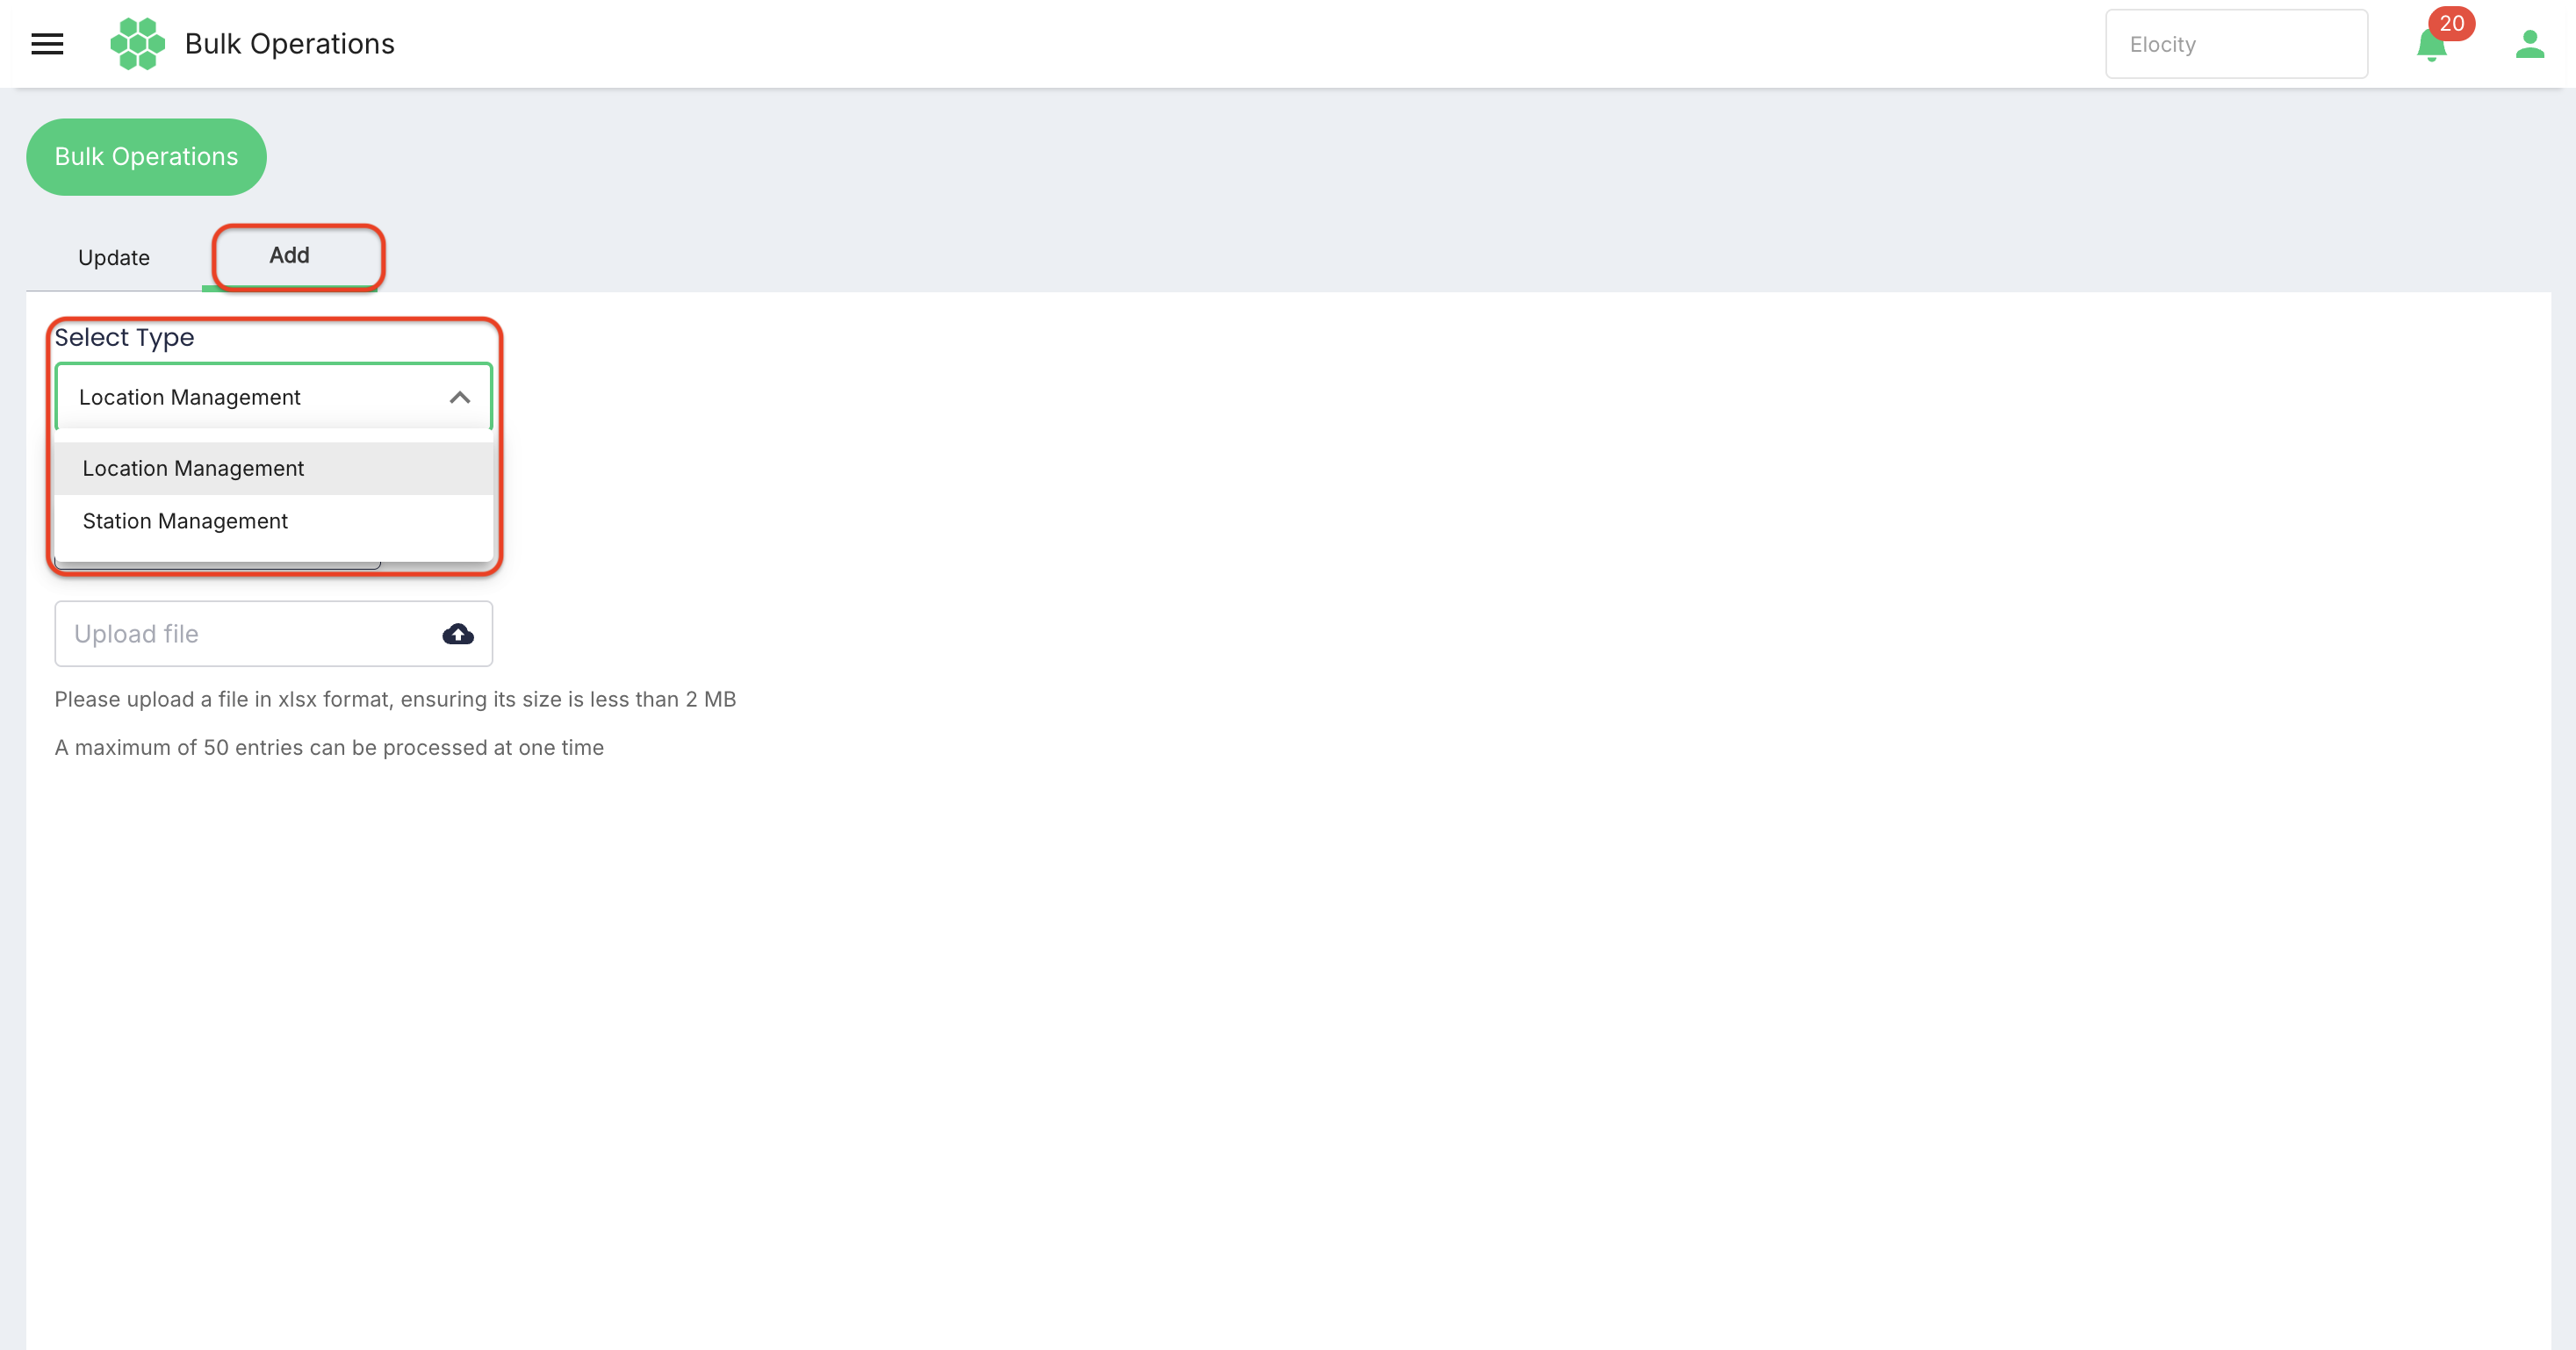
- Location Management
- Station Management
3. Roles and prerequisites
Before performing a bulk operation, confirm that:
- You are signed in to the correct HIEV business tenant.
- Your role includes the required Bulk Operations, Location, Station, or OCPP permissions.
- The intended locations, stations, or charge point IDs already exist when using Update.
- The proposed value has been approved by the responsible operations, finance, or compliance owner.
- No target is in an incompatible state, such as an active charging session before a disruptive reset or availability change.
- You understand whether the operation replaces an existing value, clears it, or appends data.
4. Screen overview
4.1 Update tab
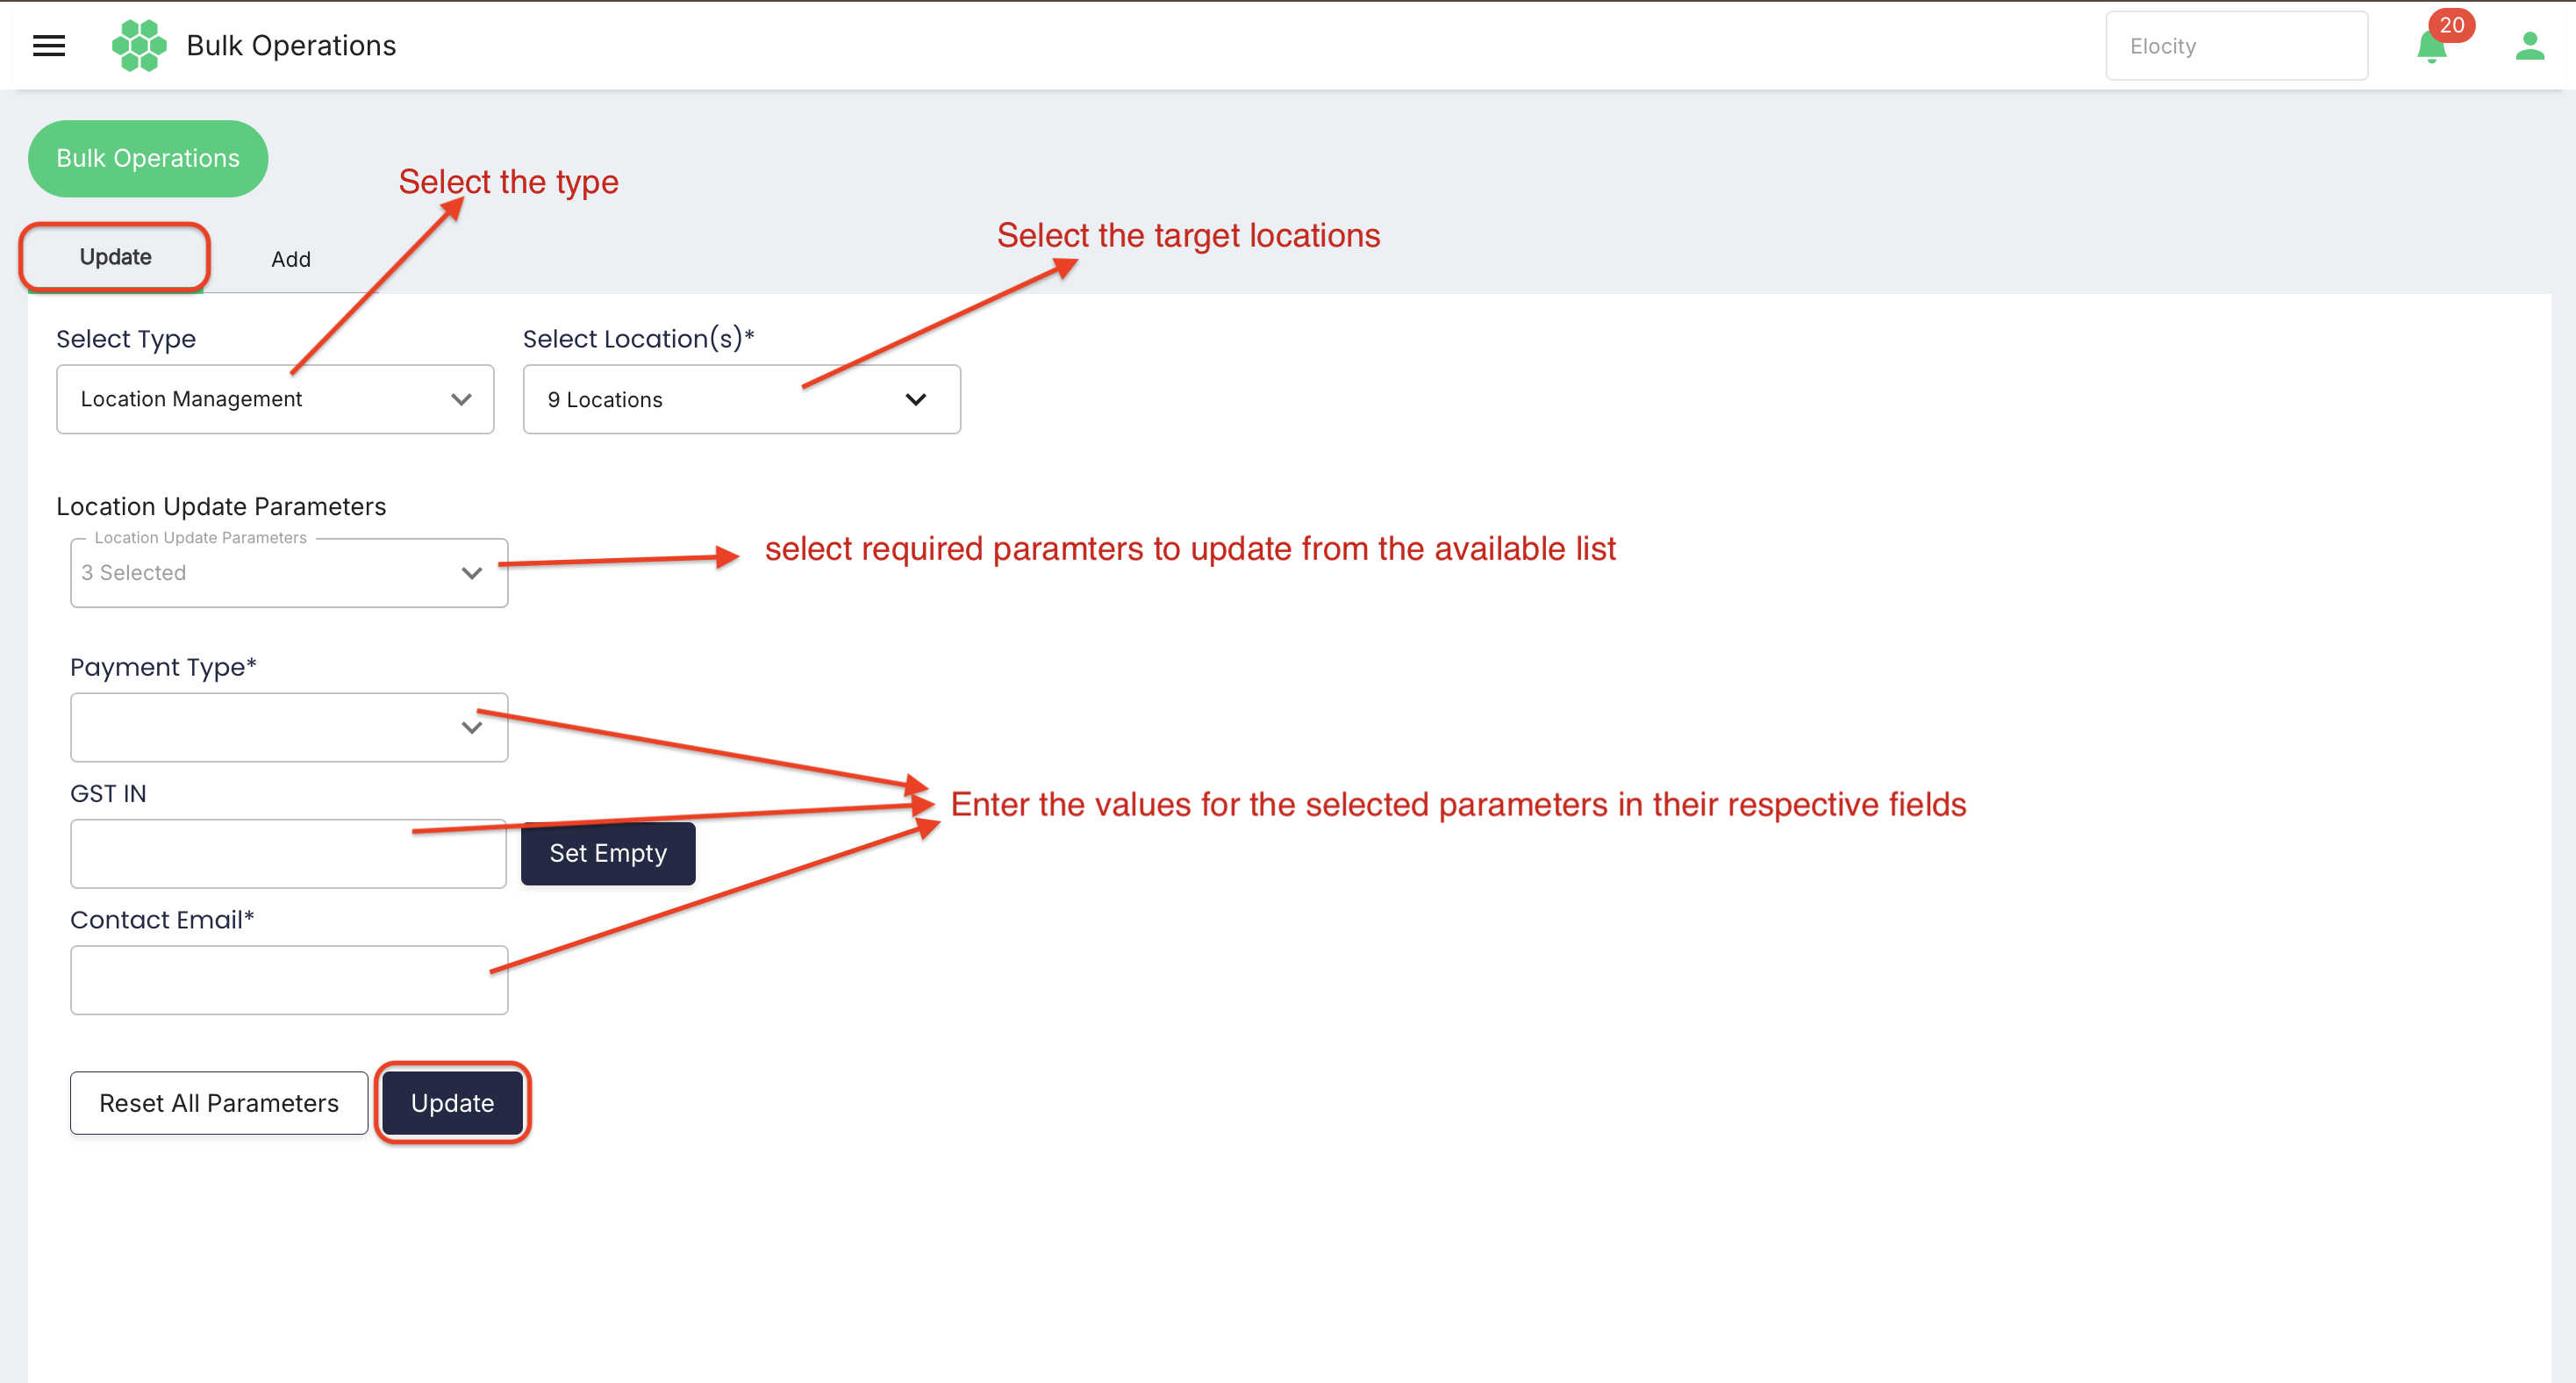
The general Update flow is:
- Select Update.
- Choose Select Type.
- Select one or more targets.
- Select the parameters or station action.
- Enter the value for every selected parameter.
- Review the target count and proposed values.
- Select Update or Perform Action.
- Verify the result on representative targets and review any failed records.
4.2 Add tab
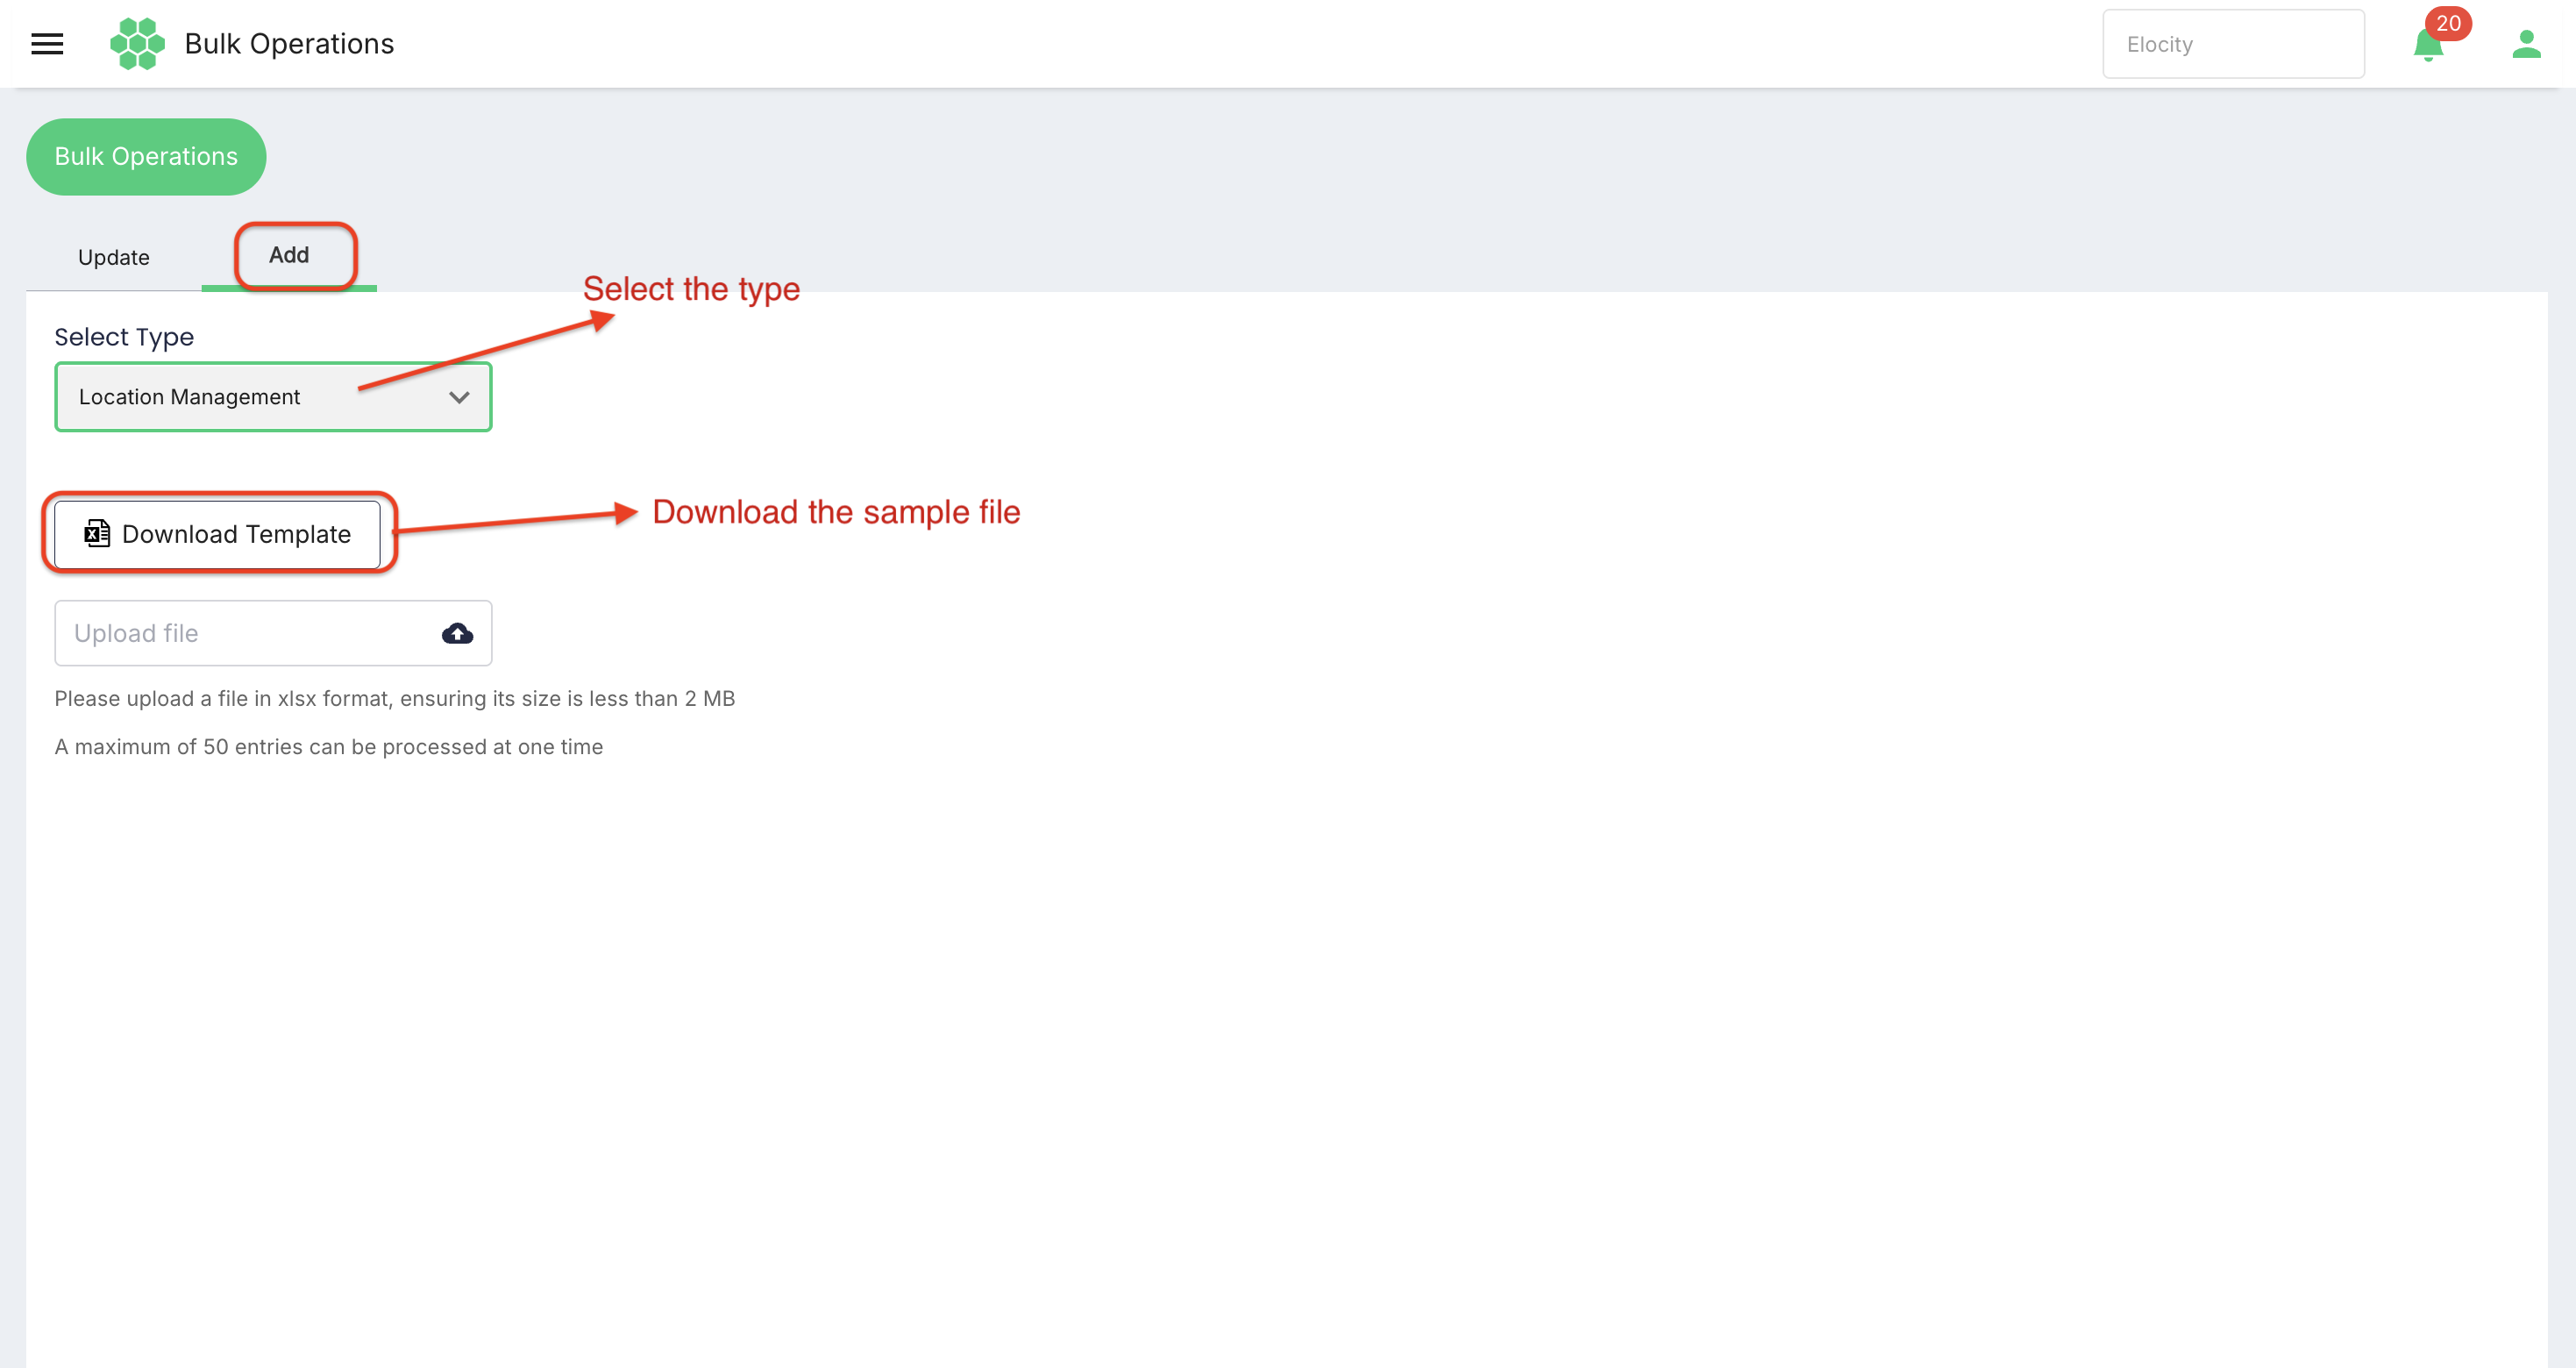
The Add workflow uses a downloaded template:
- Select Add.
- Choose Location Management or Station Management.
- Select Download Template.
- Populate the template without renaming, deleting, or reordering required columns.
- Save the file in
.xlsxformat. - Confirm the file is smaller than 2 MB.
- Confirm the file contains no more than 50 entries.
- Select Upload file and choose the completed workbook.
- Review validation results and correct rejected rows.
- Verify that all successful records were created with the intended values.
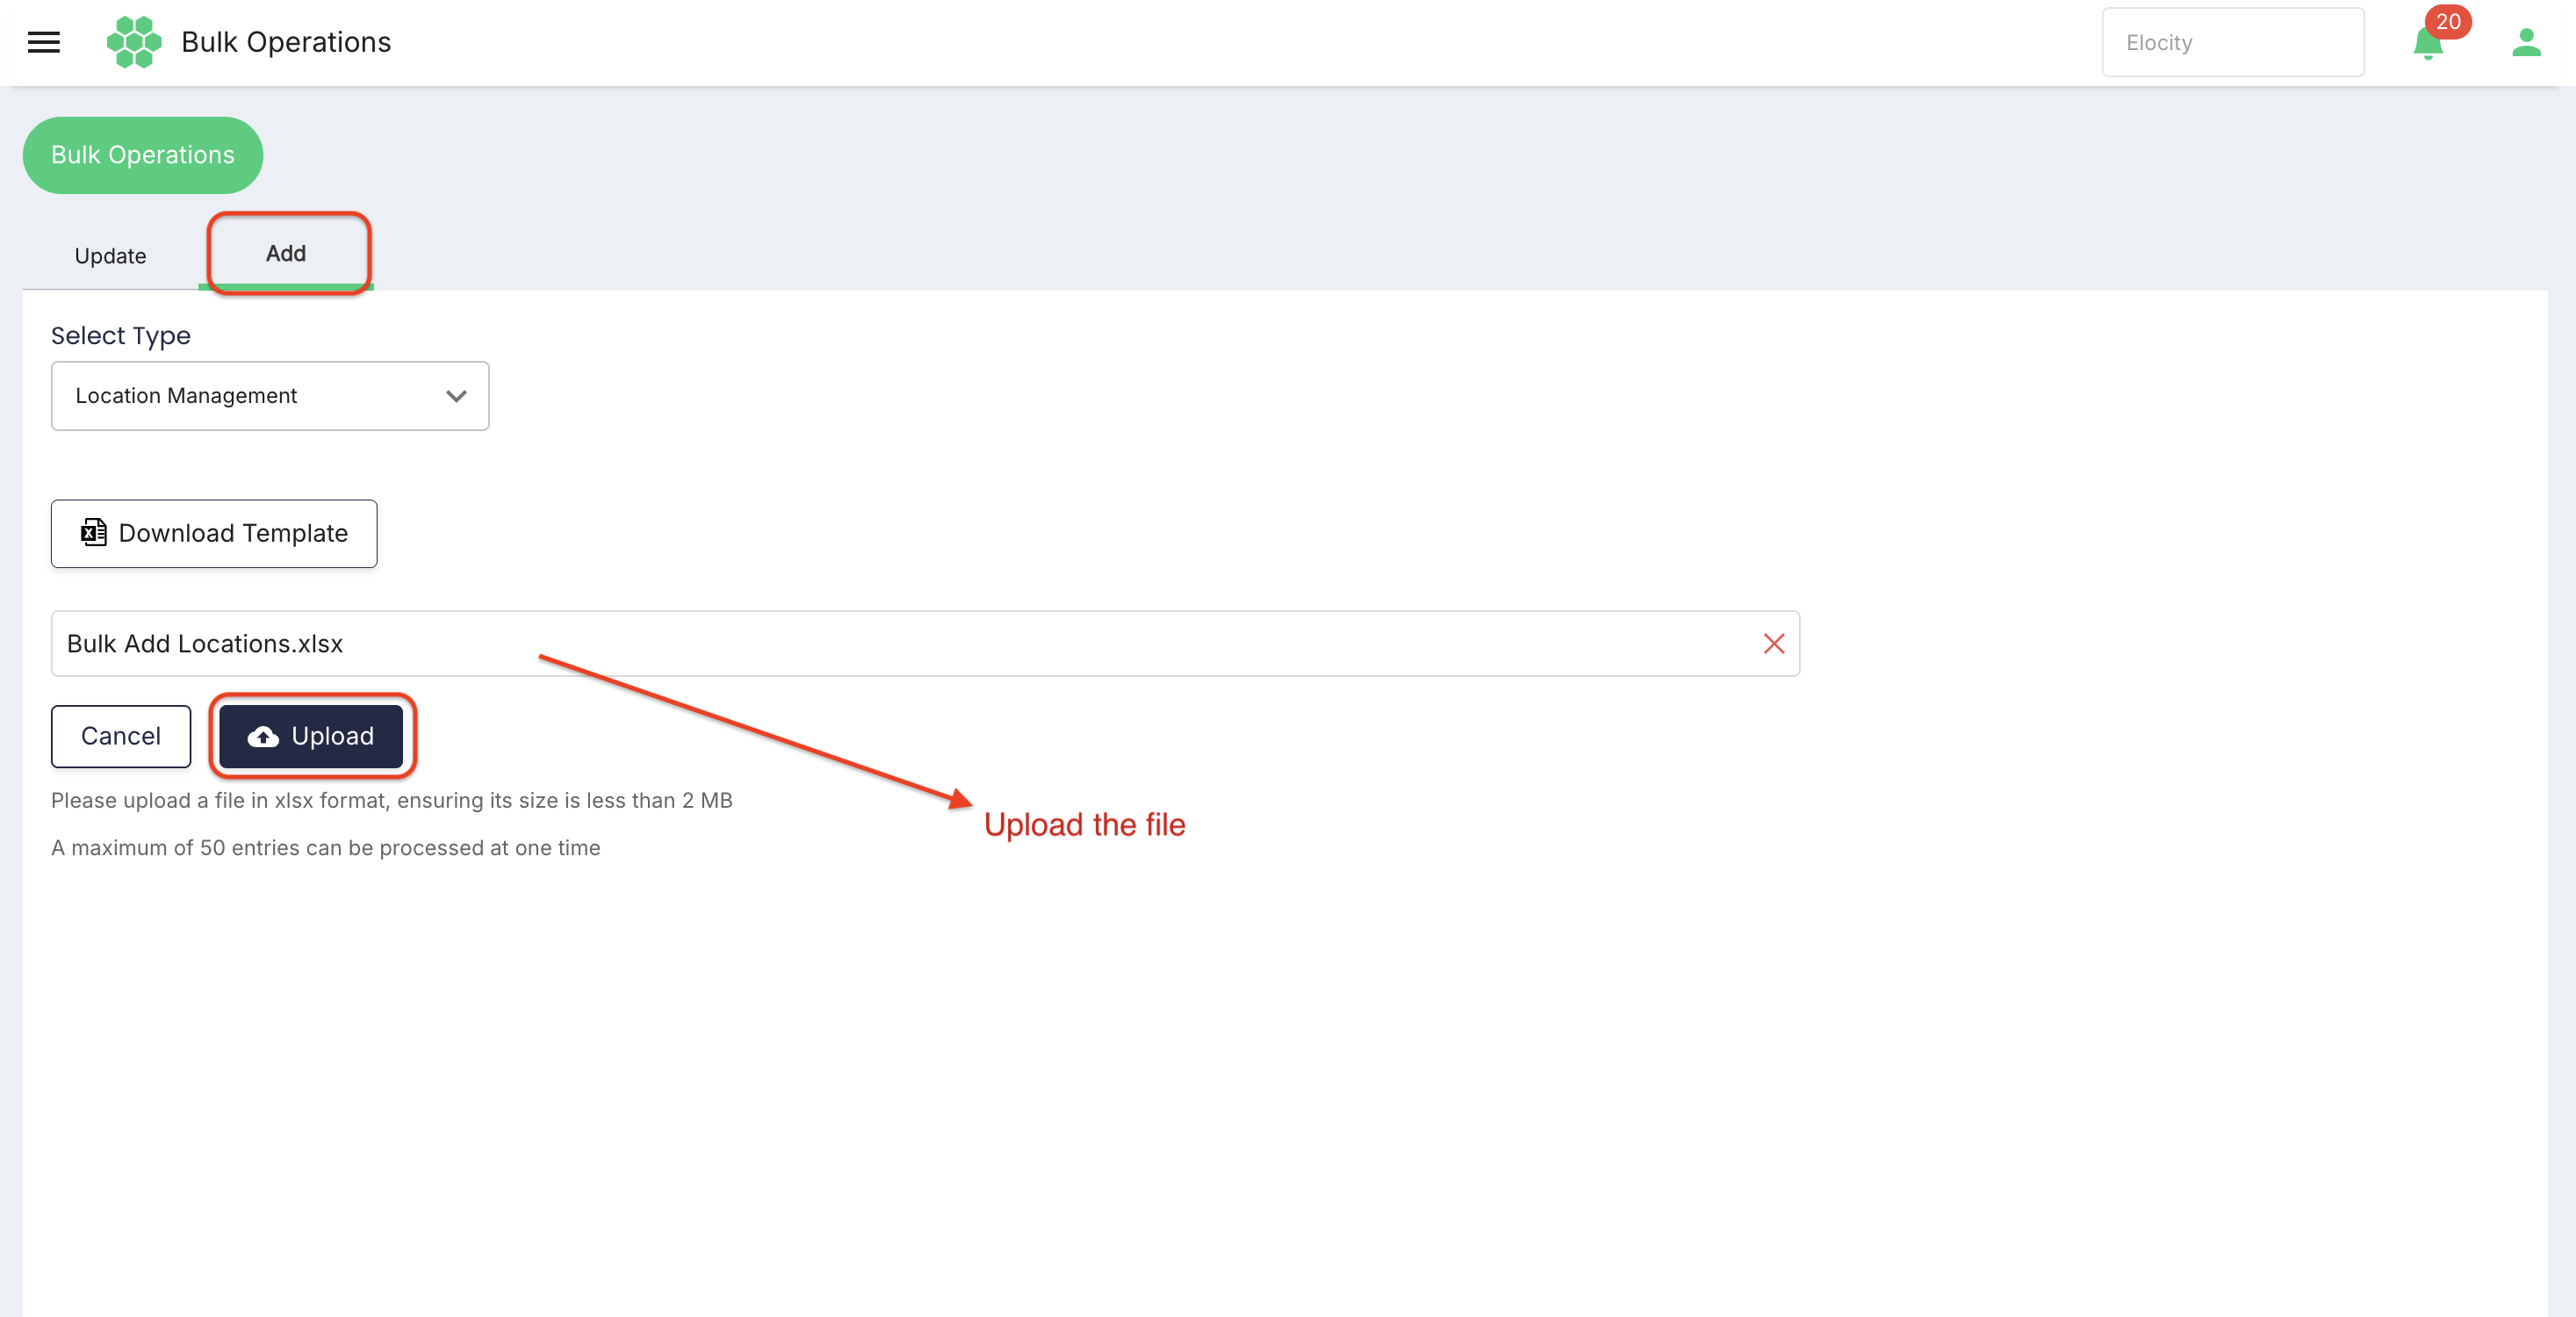
Template limits verified in the live interface: XLSX format, file size below 2 MB, and a maximum of 50 entries per upload.
5. Target selection
5.1 Selecting locations
The location selector is hierarchical. Expand the country and province or region, then select one or more locations.
- Choose Location Management.
- Select Select Location(s).
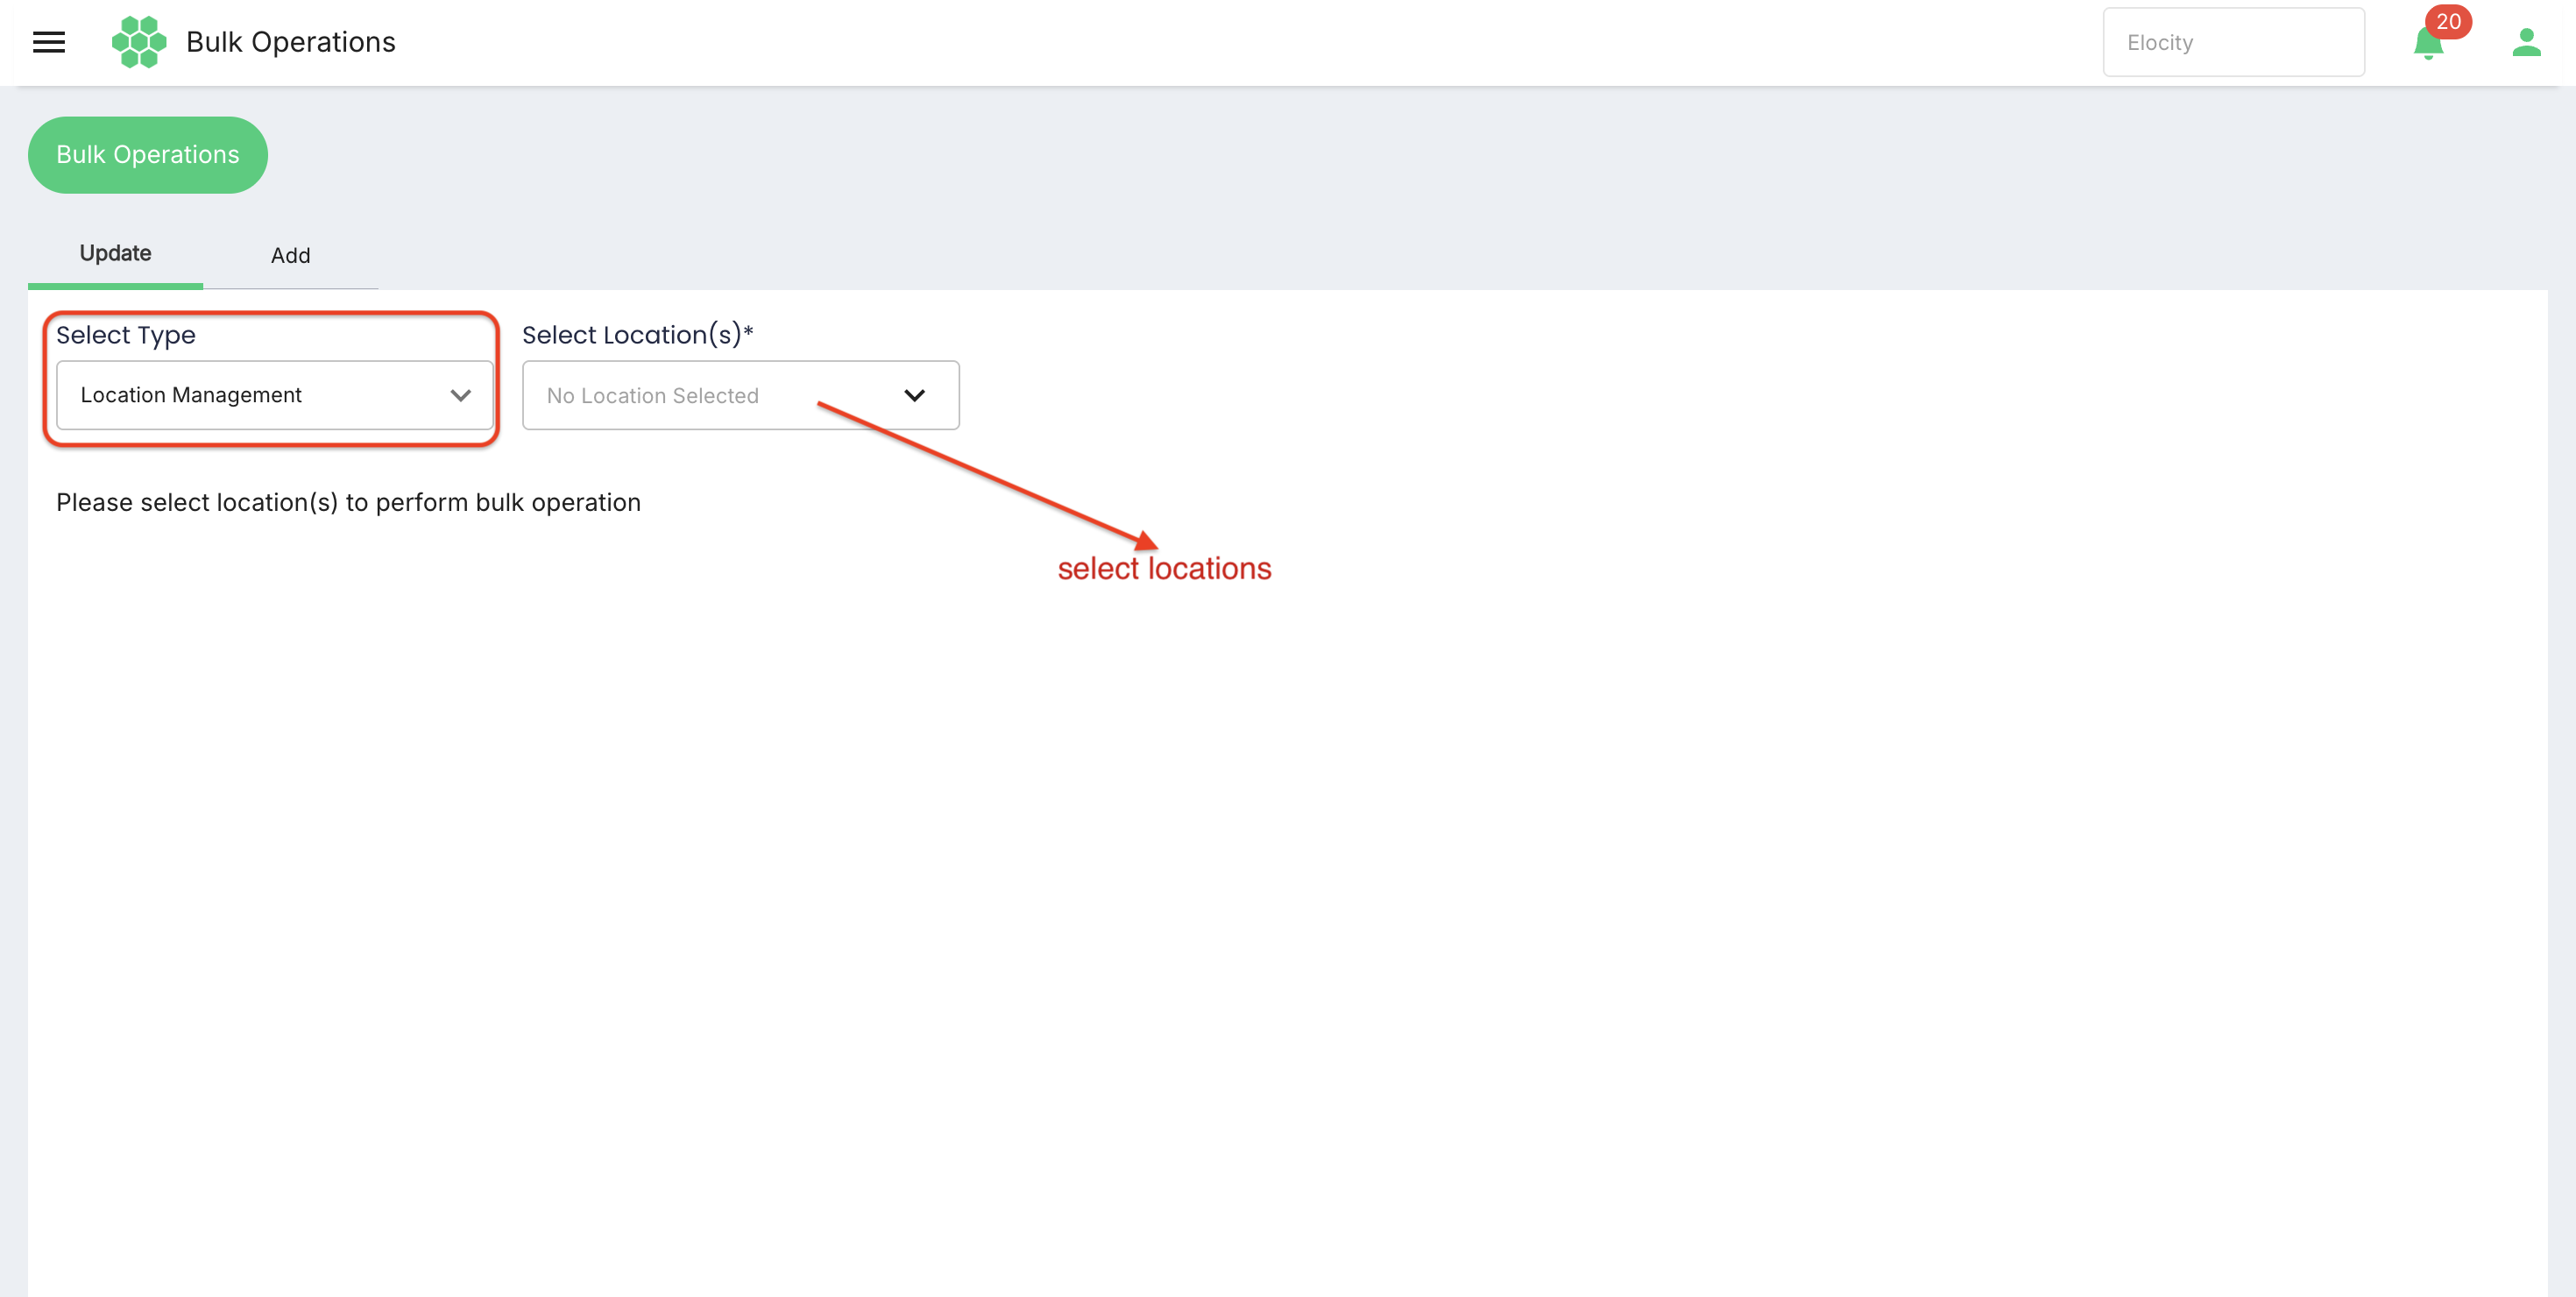
- Expand the location hierarchy.
- Select the required parent node or individual locations.
- Review the Locations Selected count.
- Select Done.
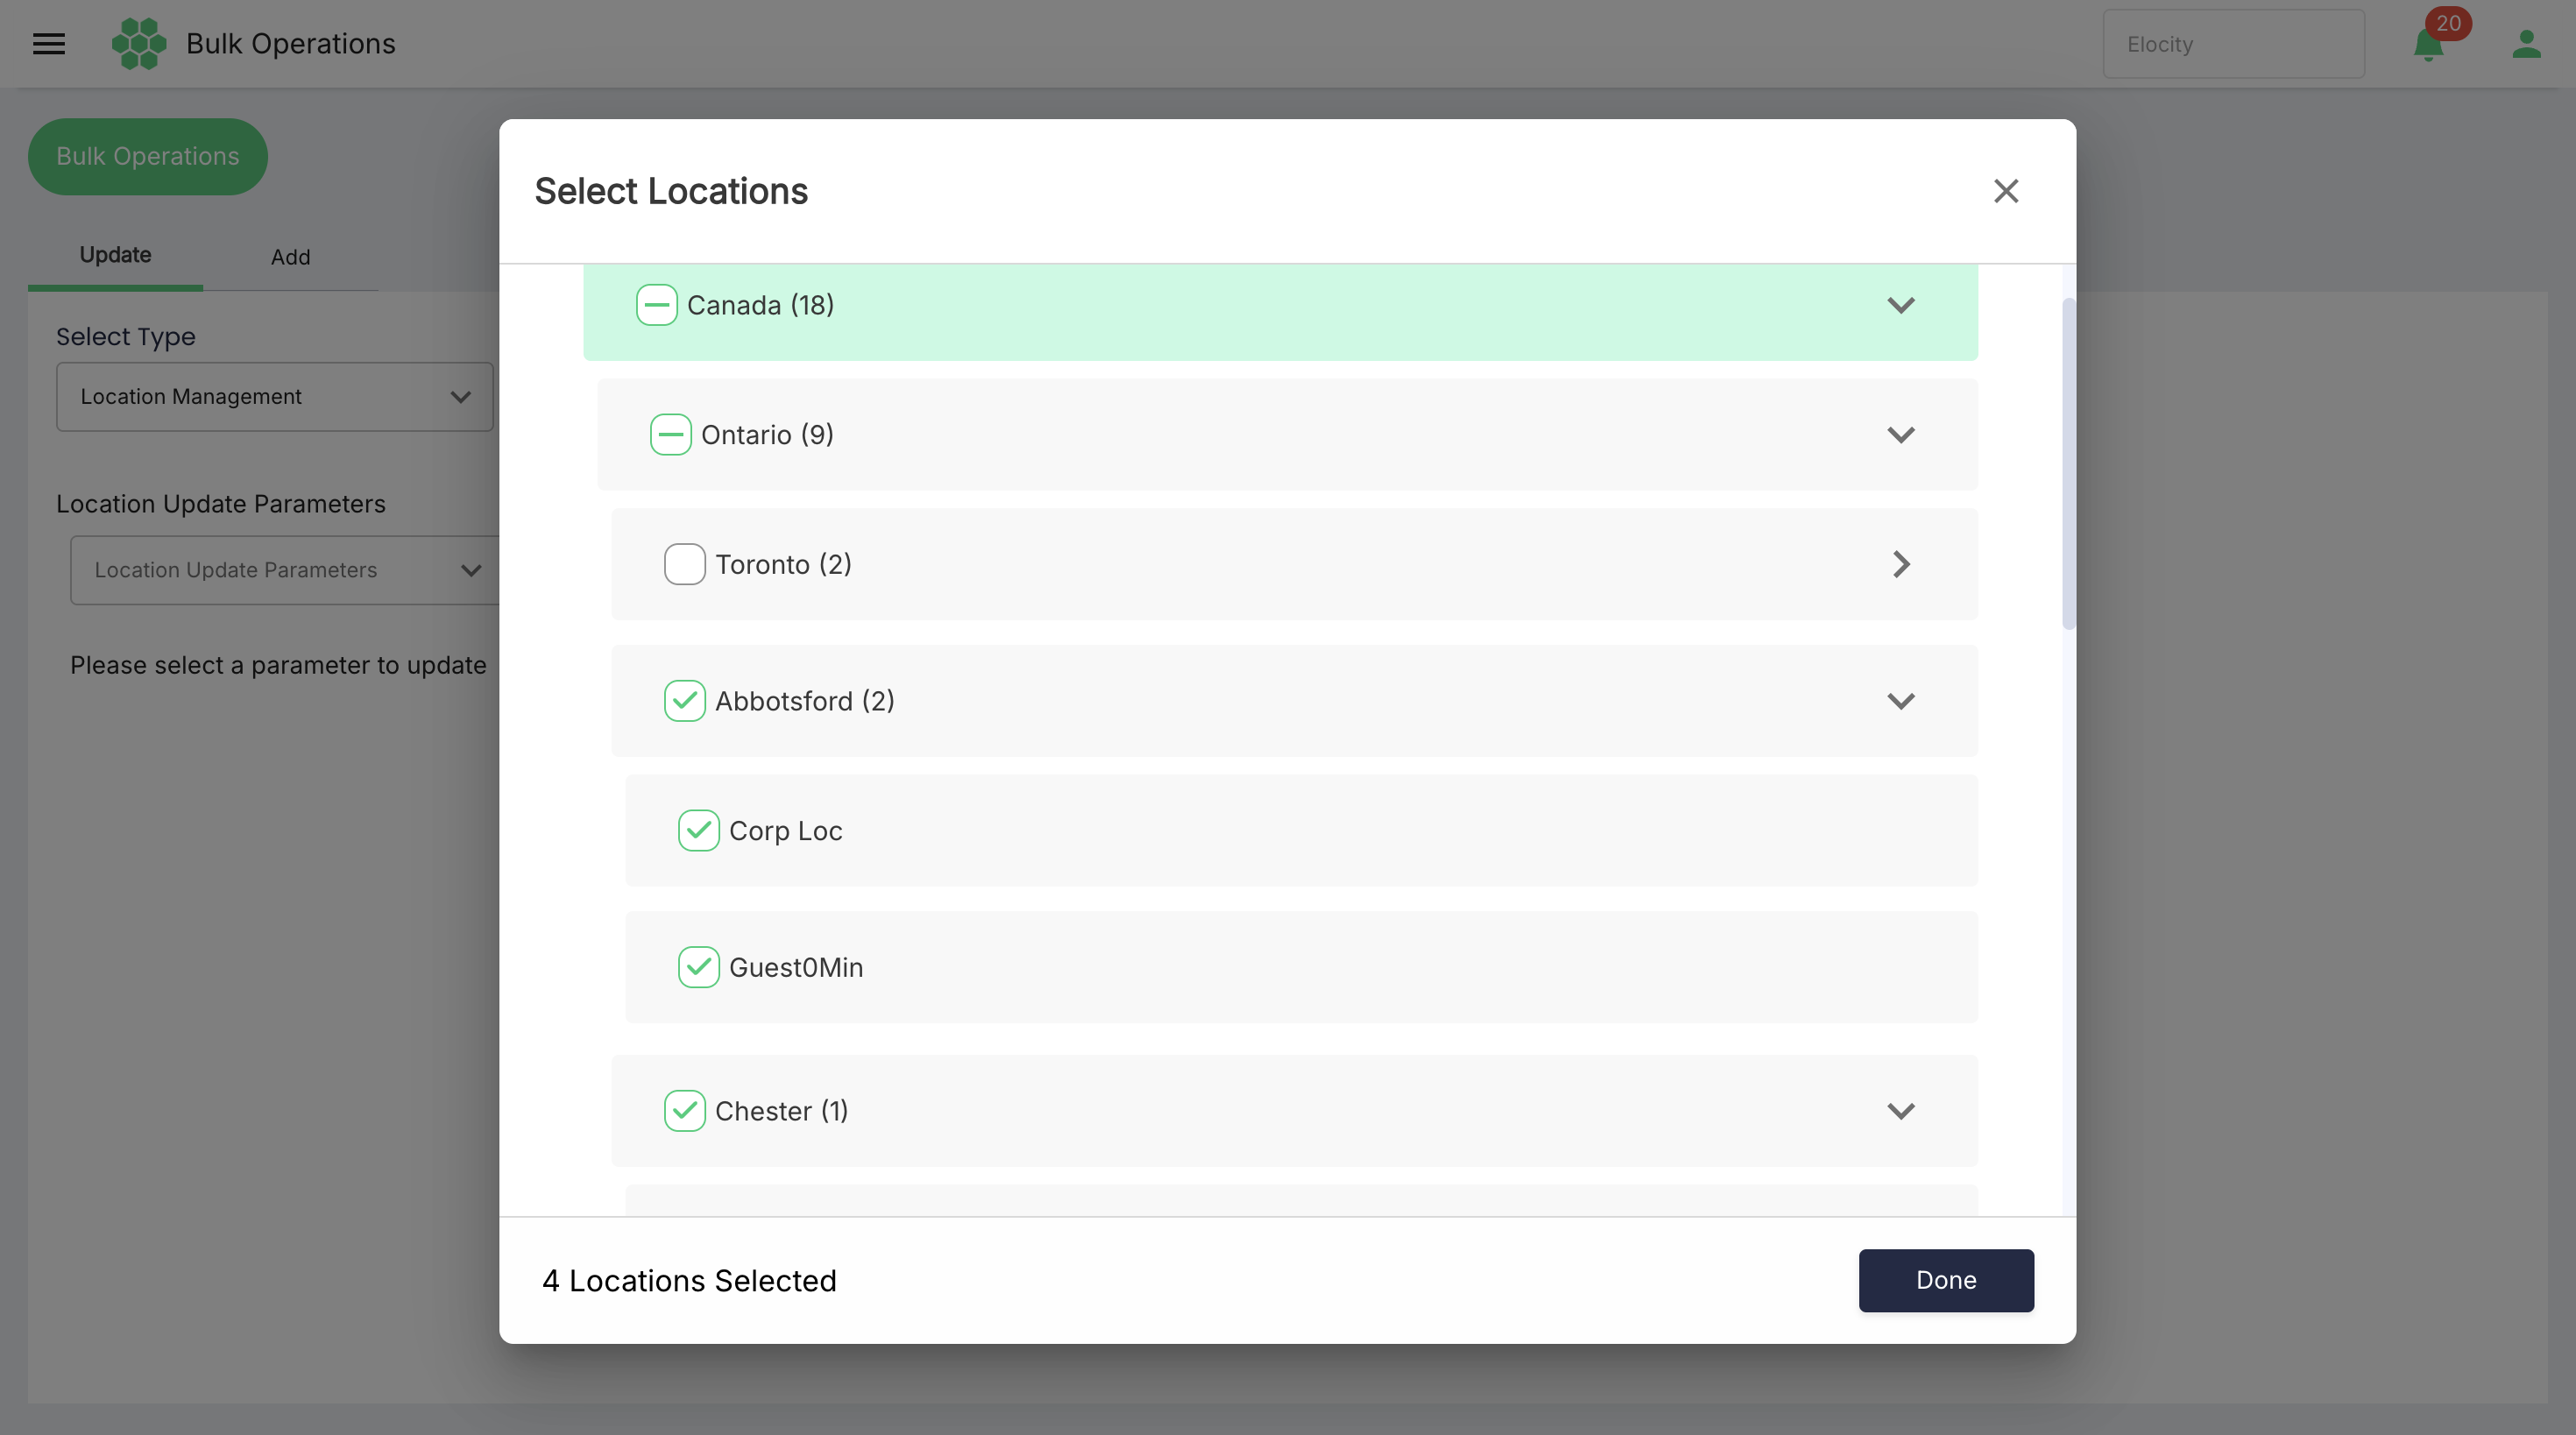
The parameter controls remain unavailable until at least one location is selected.
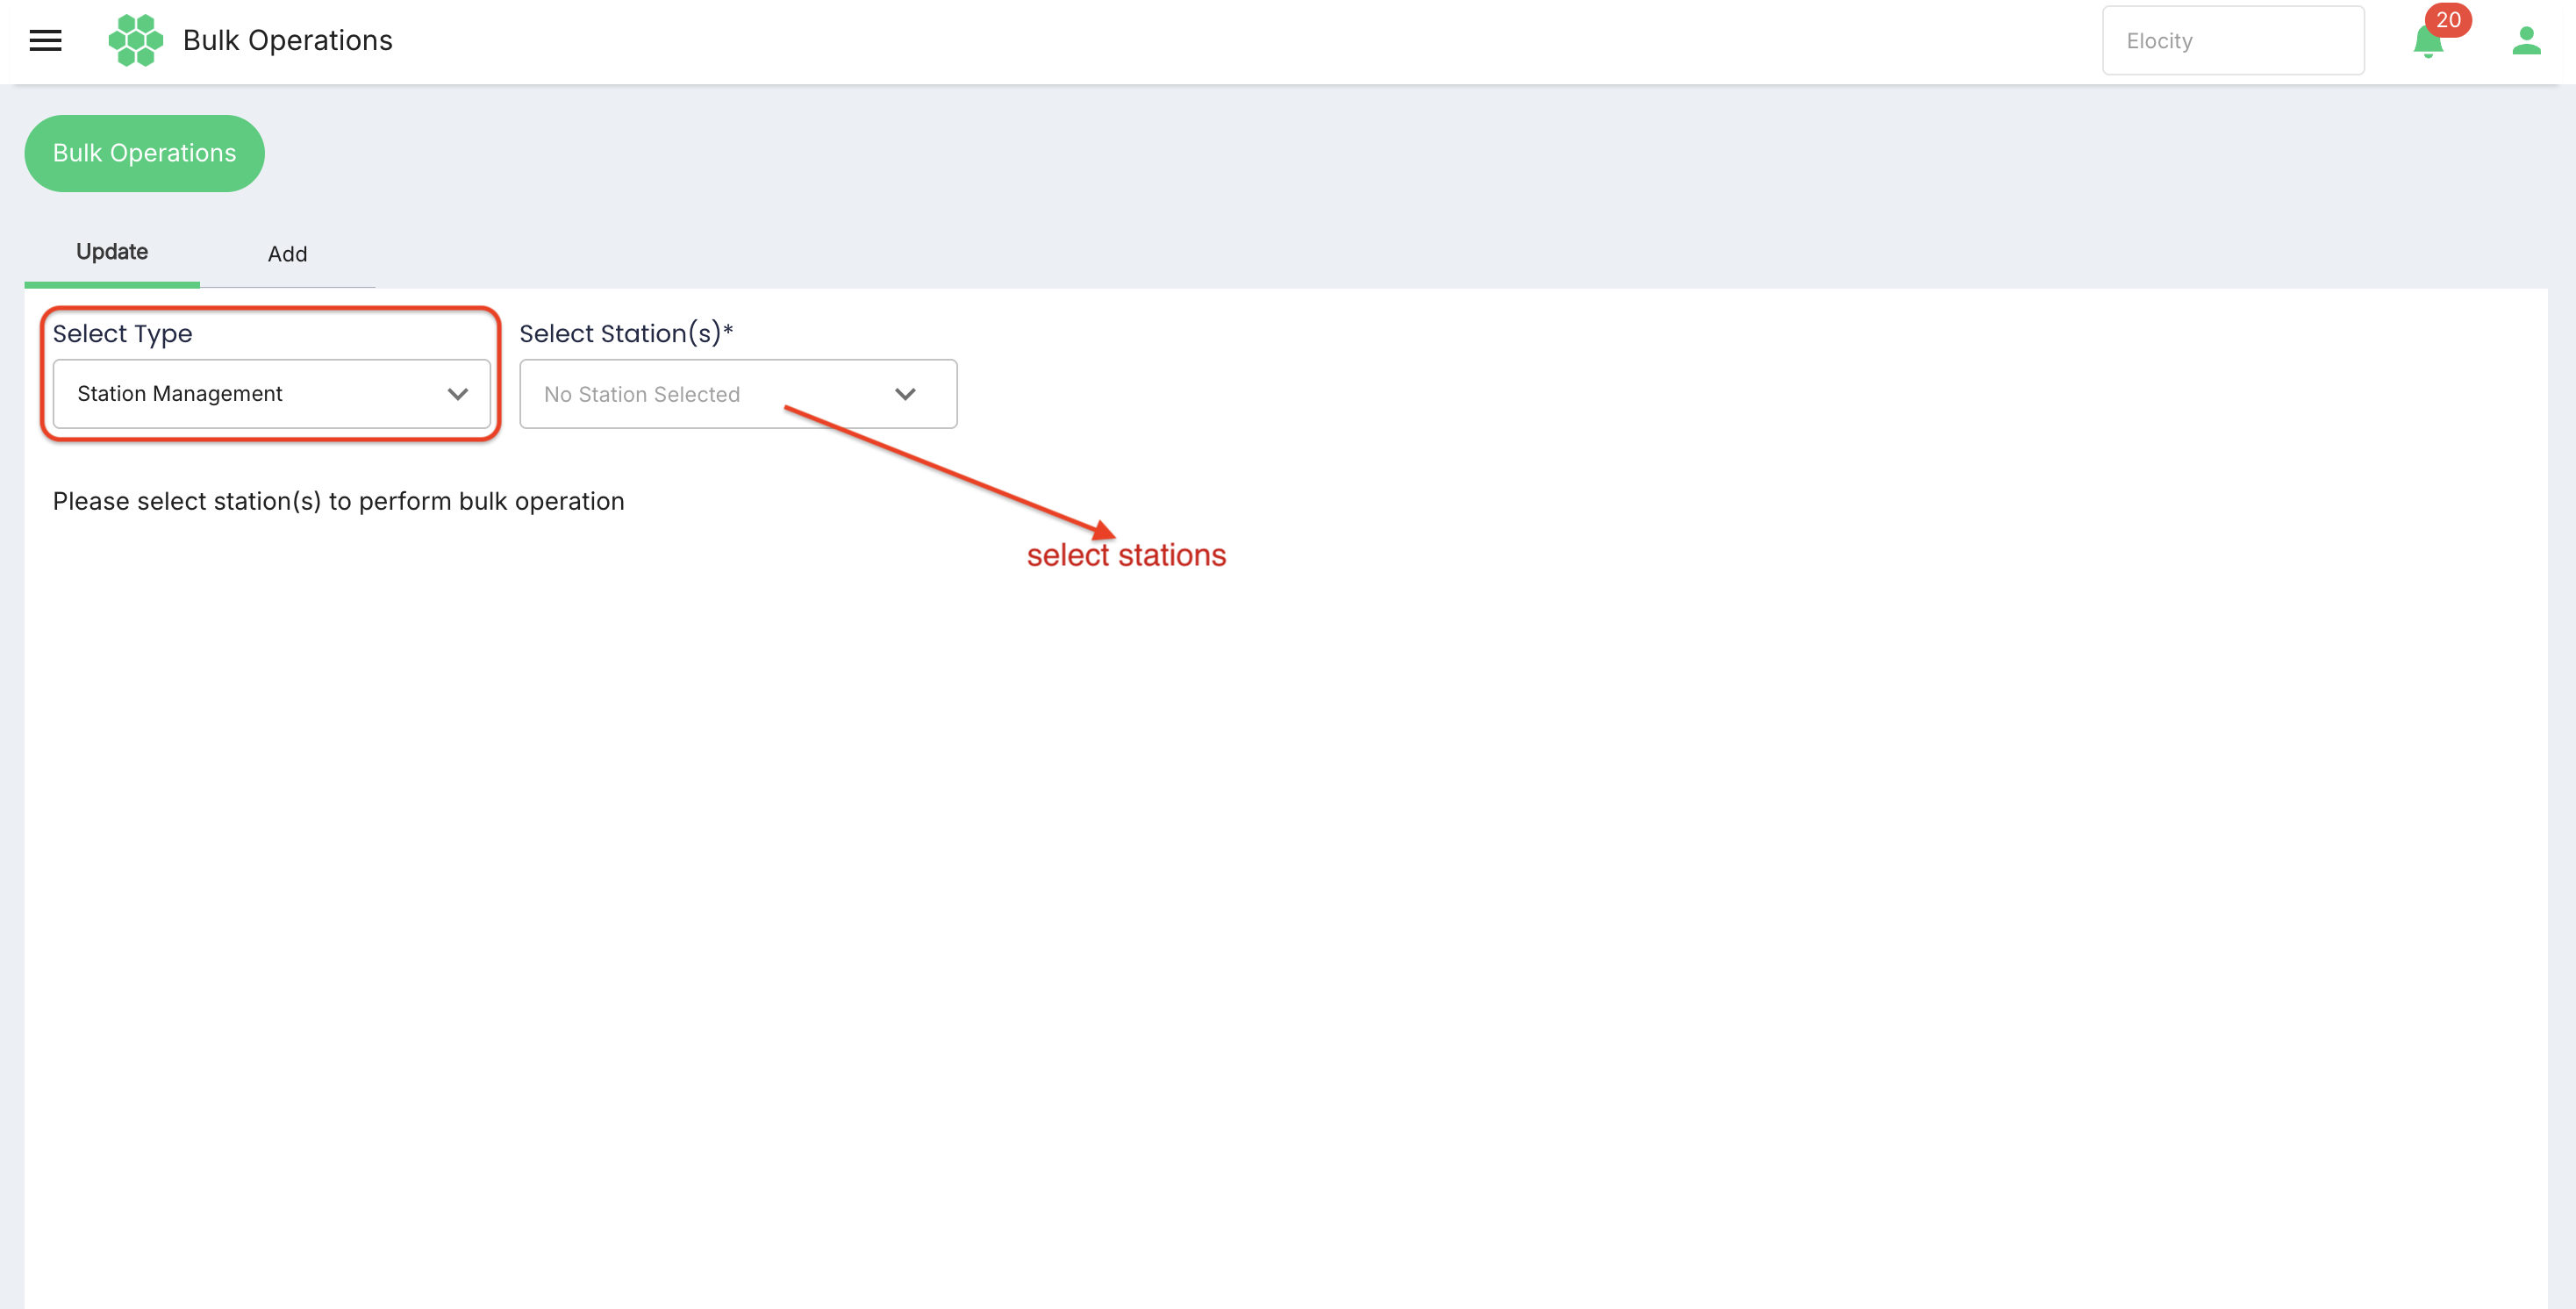
5.2 Selecting stations
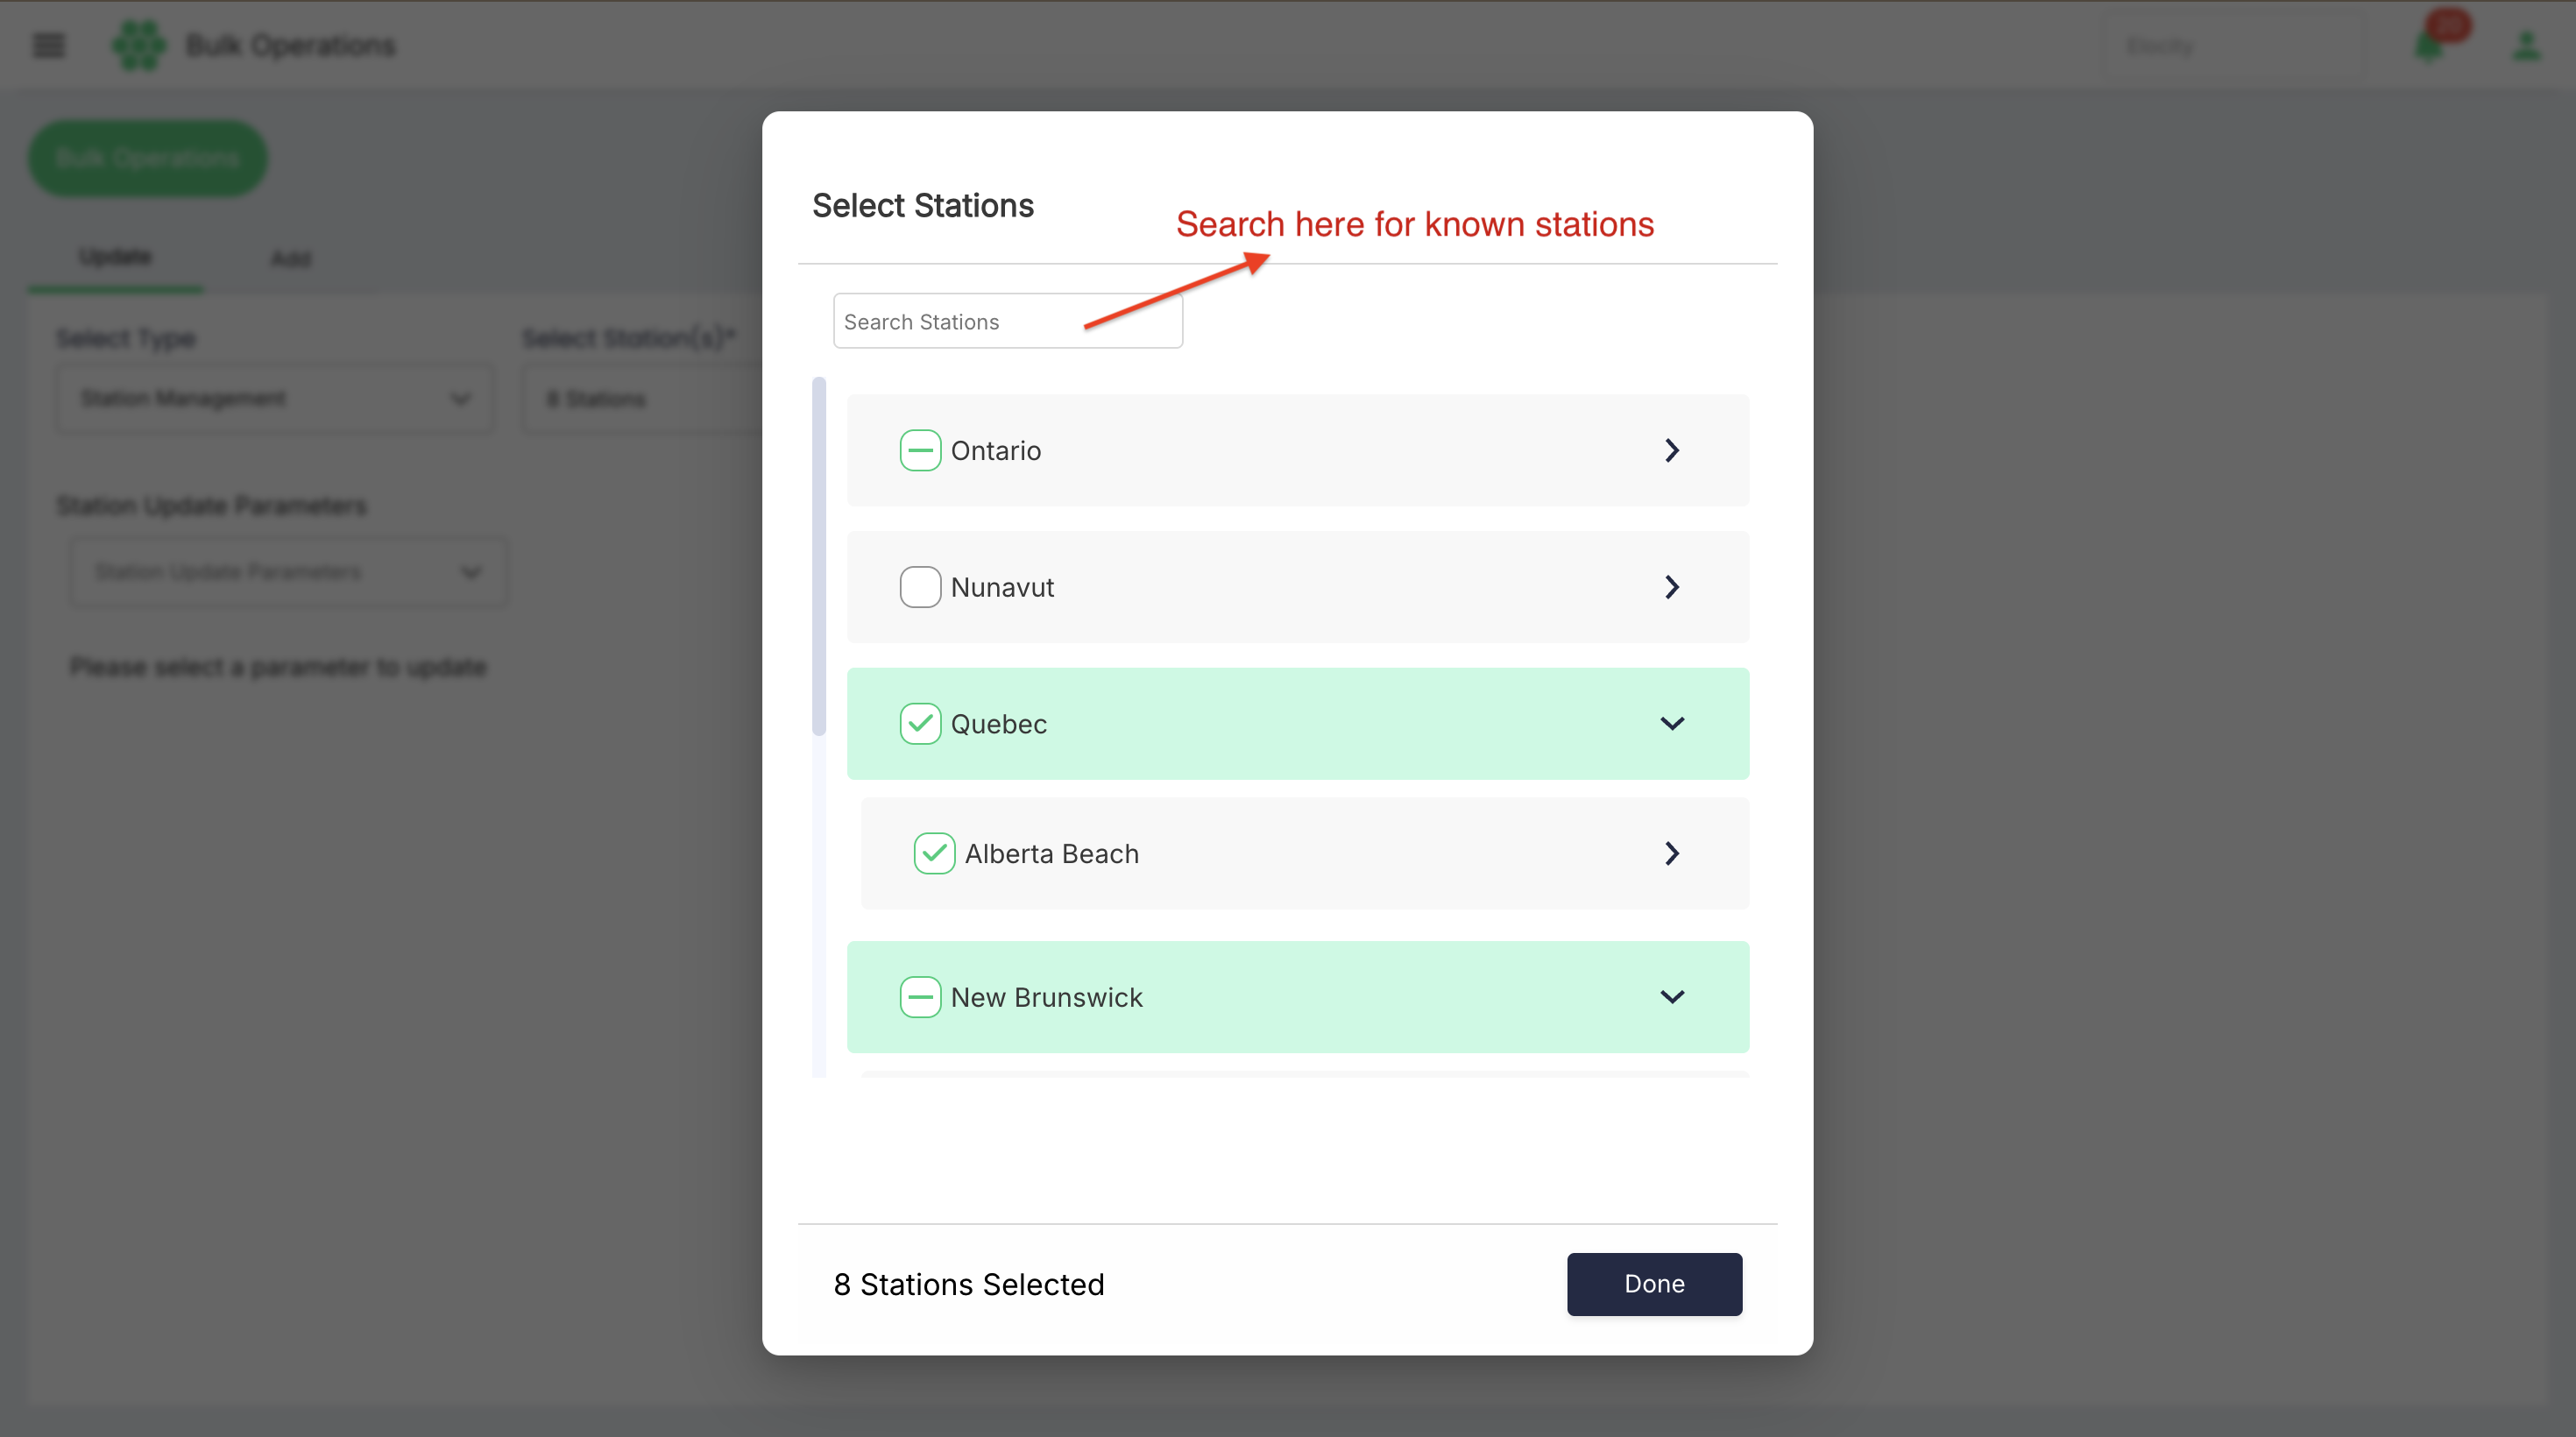
The station selector provides a hierarchy and a Search Stations field.
- Choose Station Management.
- Select Select Station(s).
- Search for a known station or expand the province, city, location, and station hierarchy.
- Select the required stations.
- Select Done.
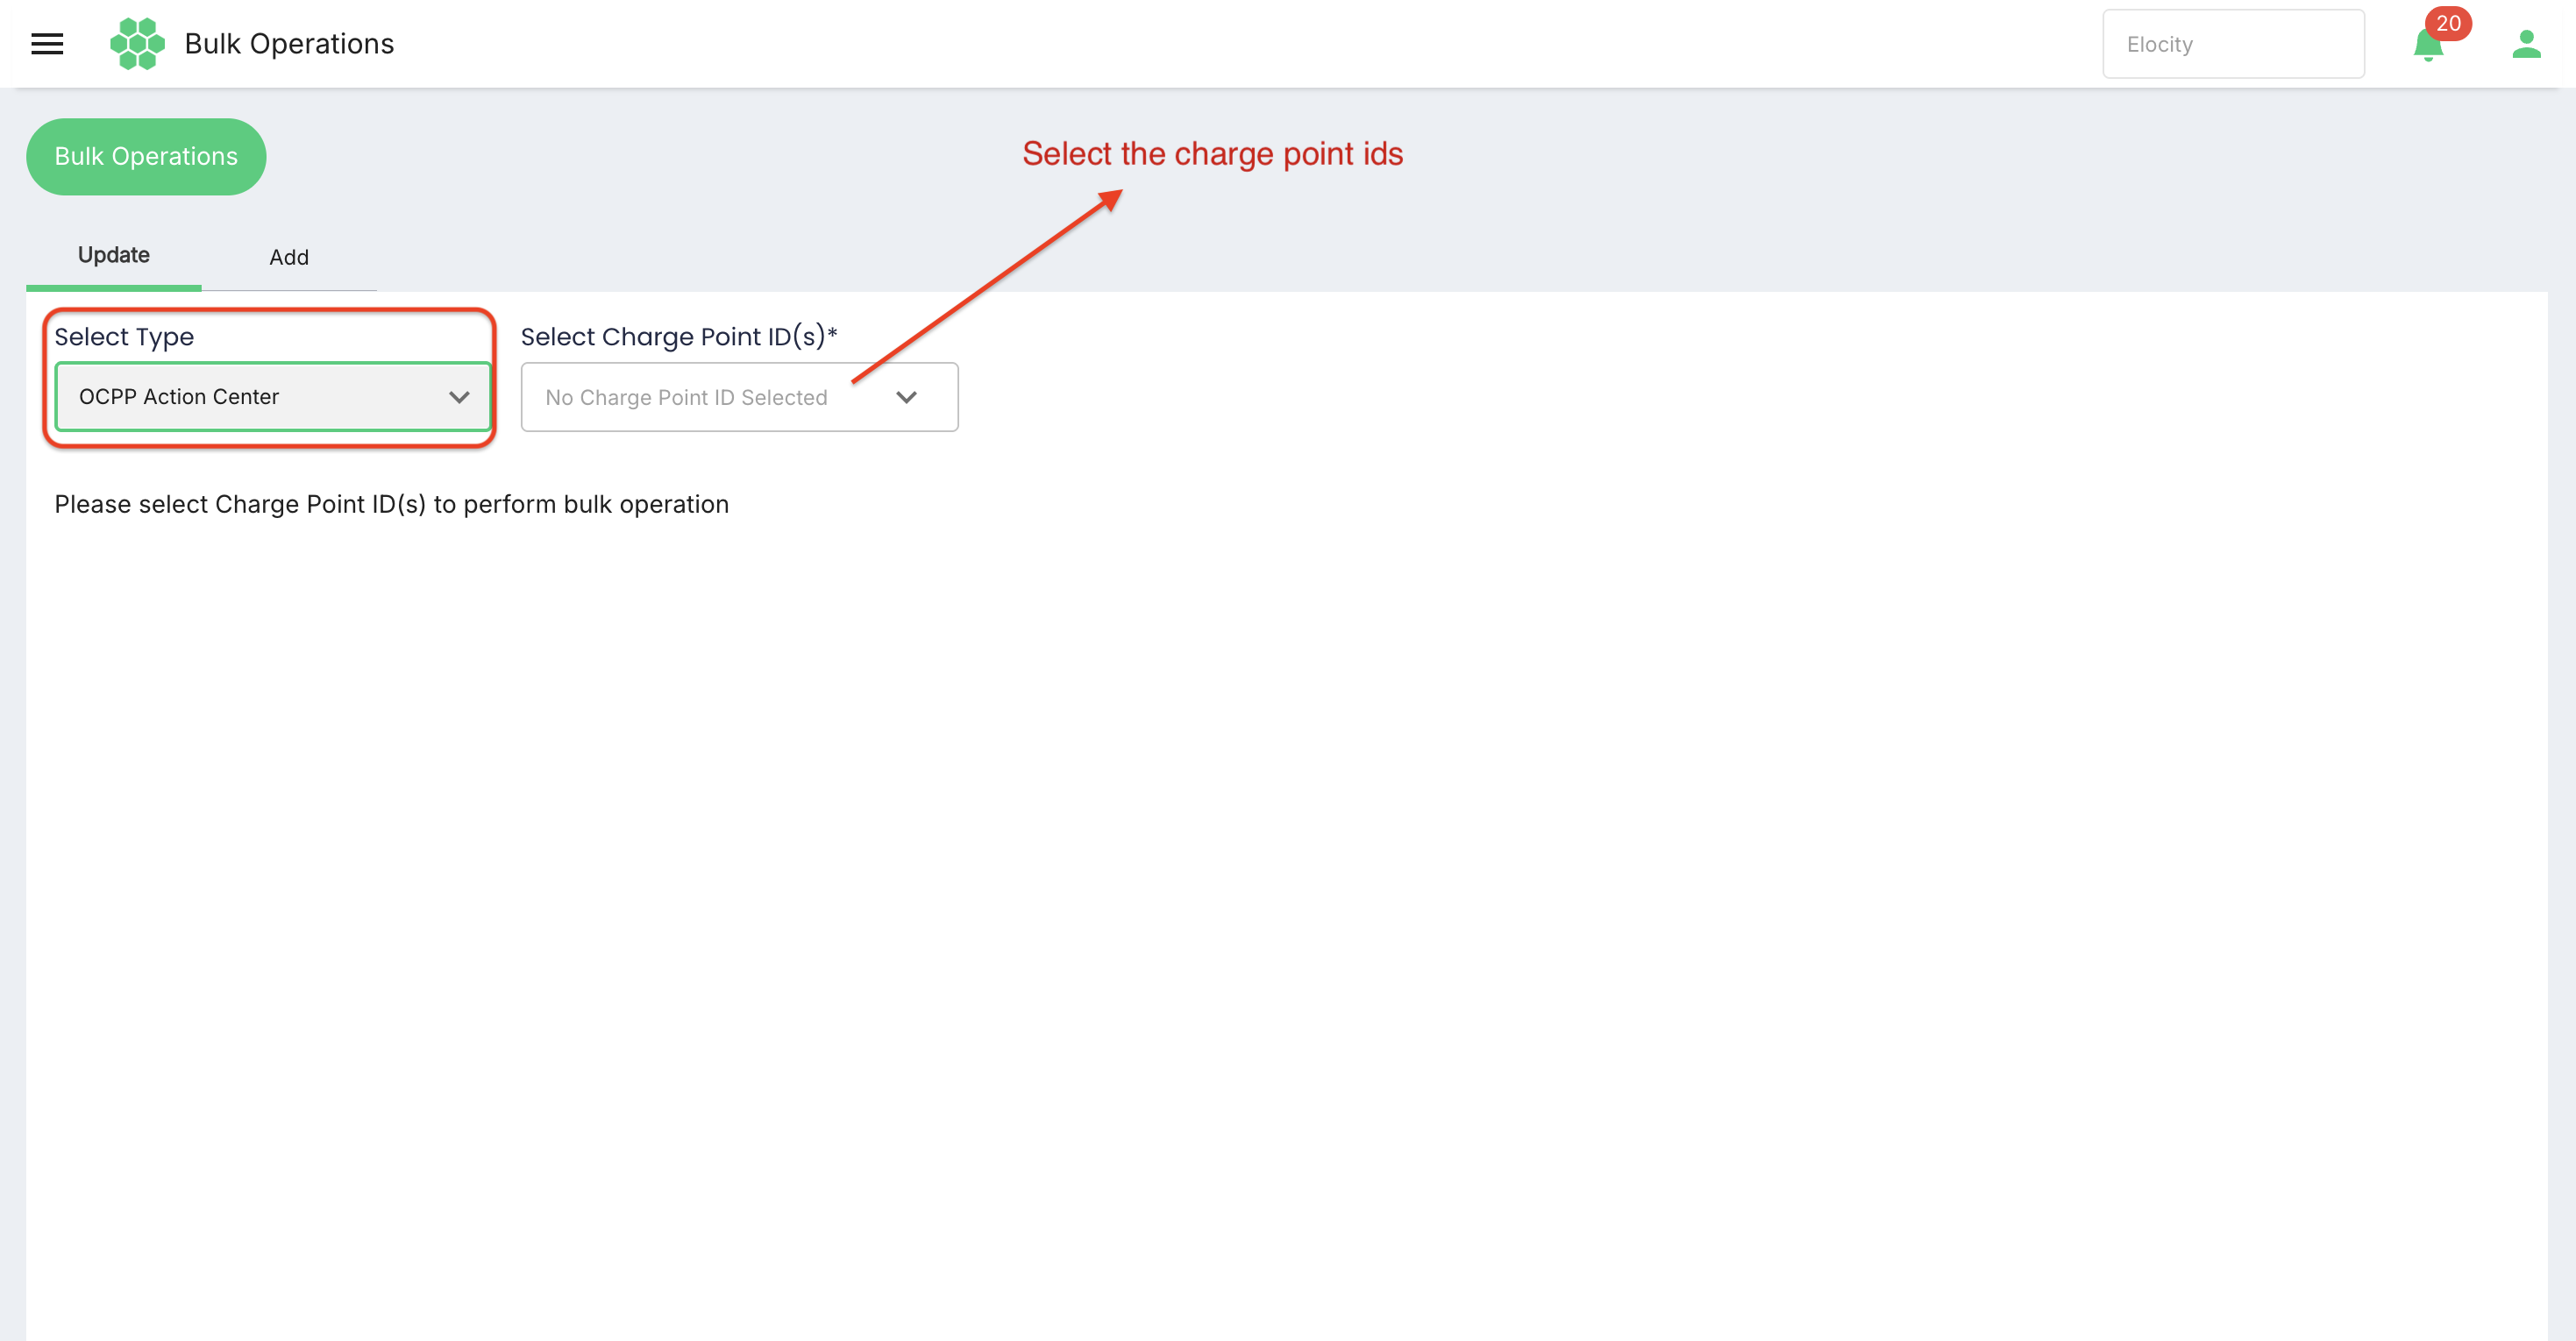
5.3 Selecting OCPP charge points
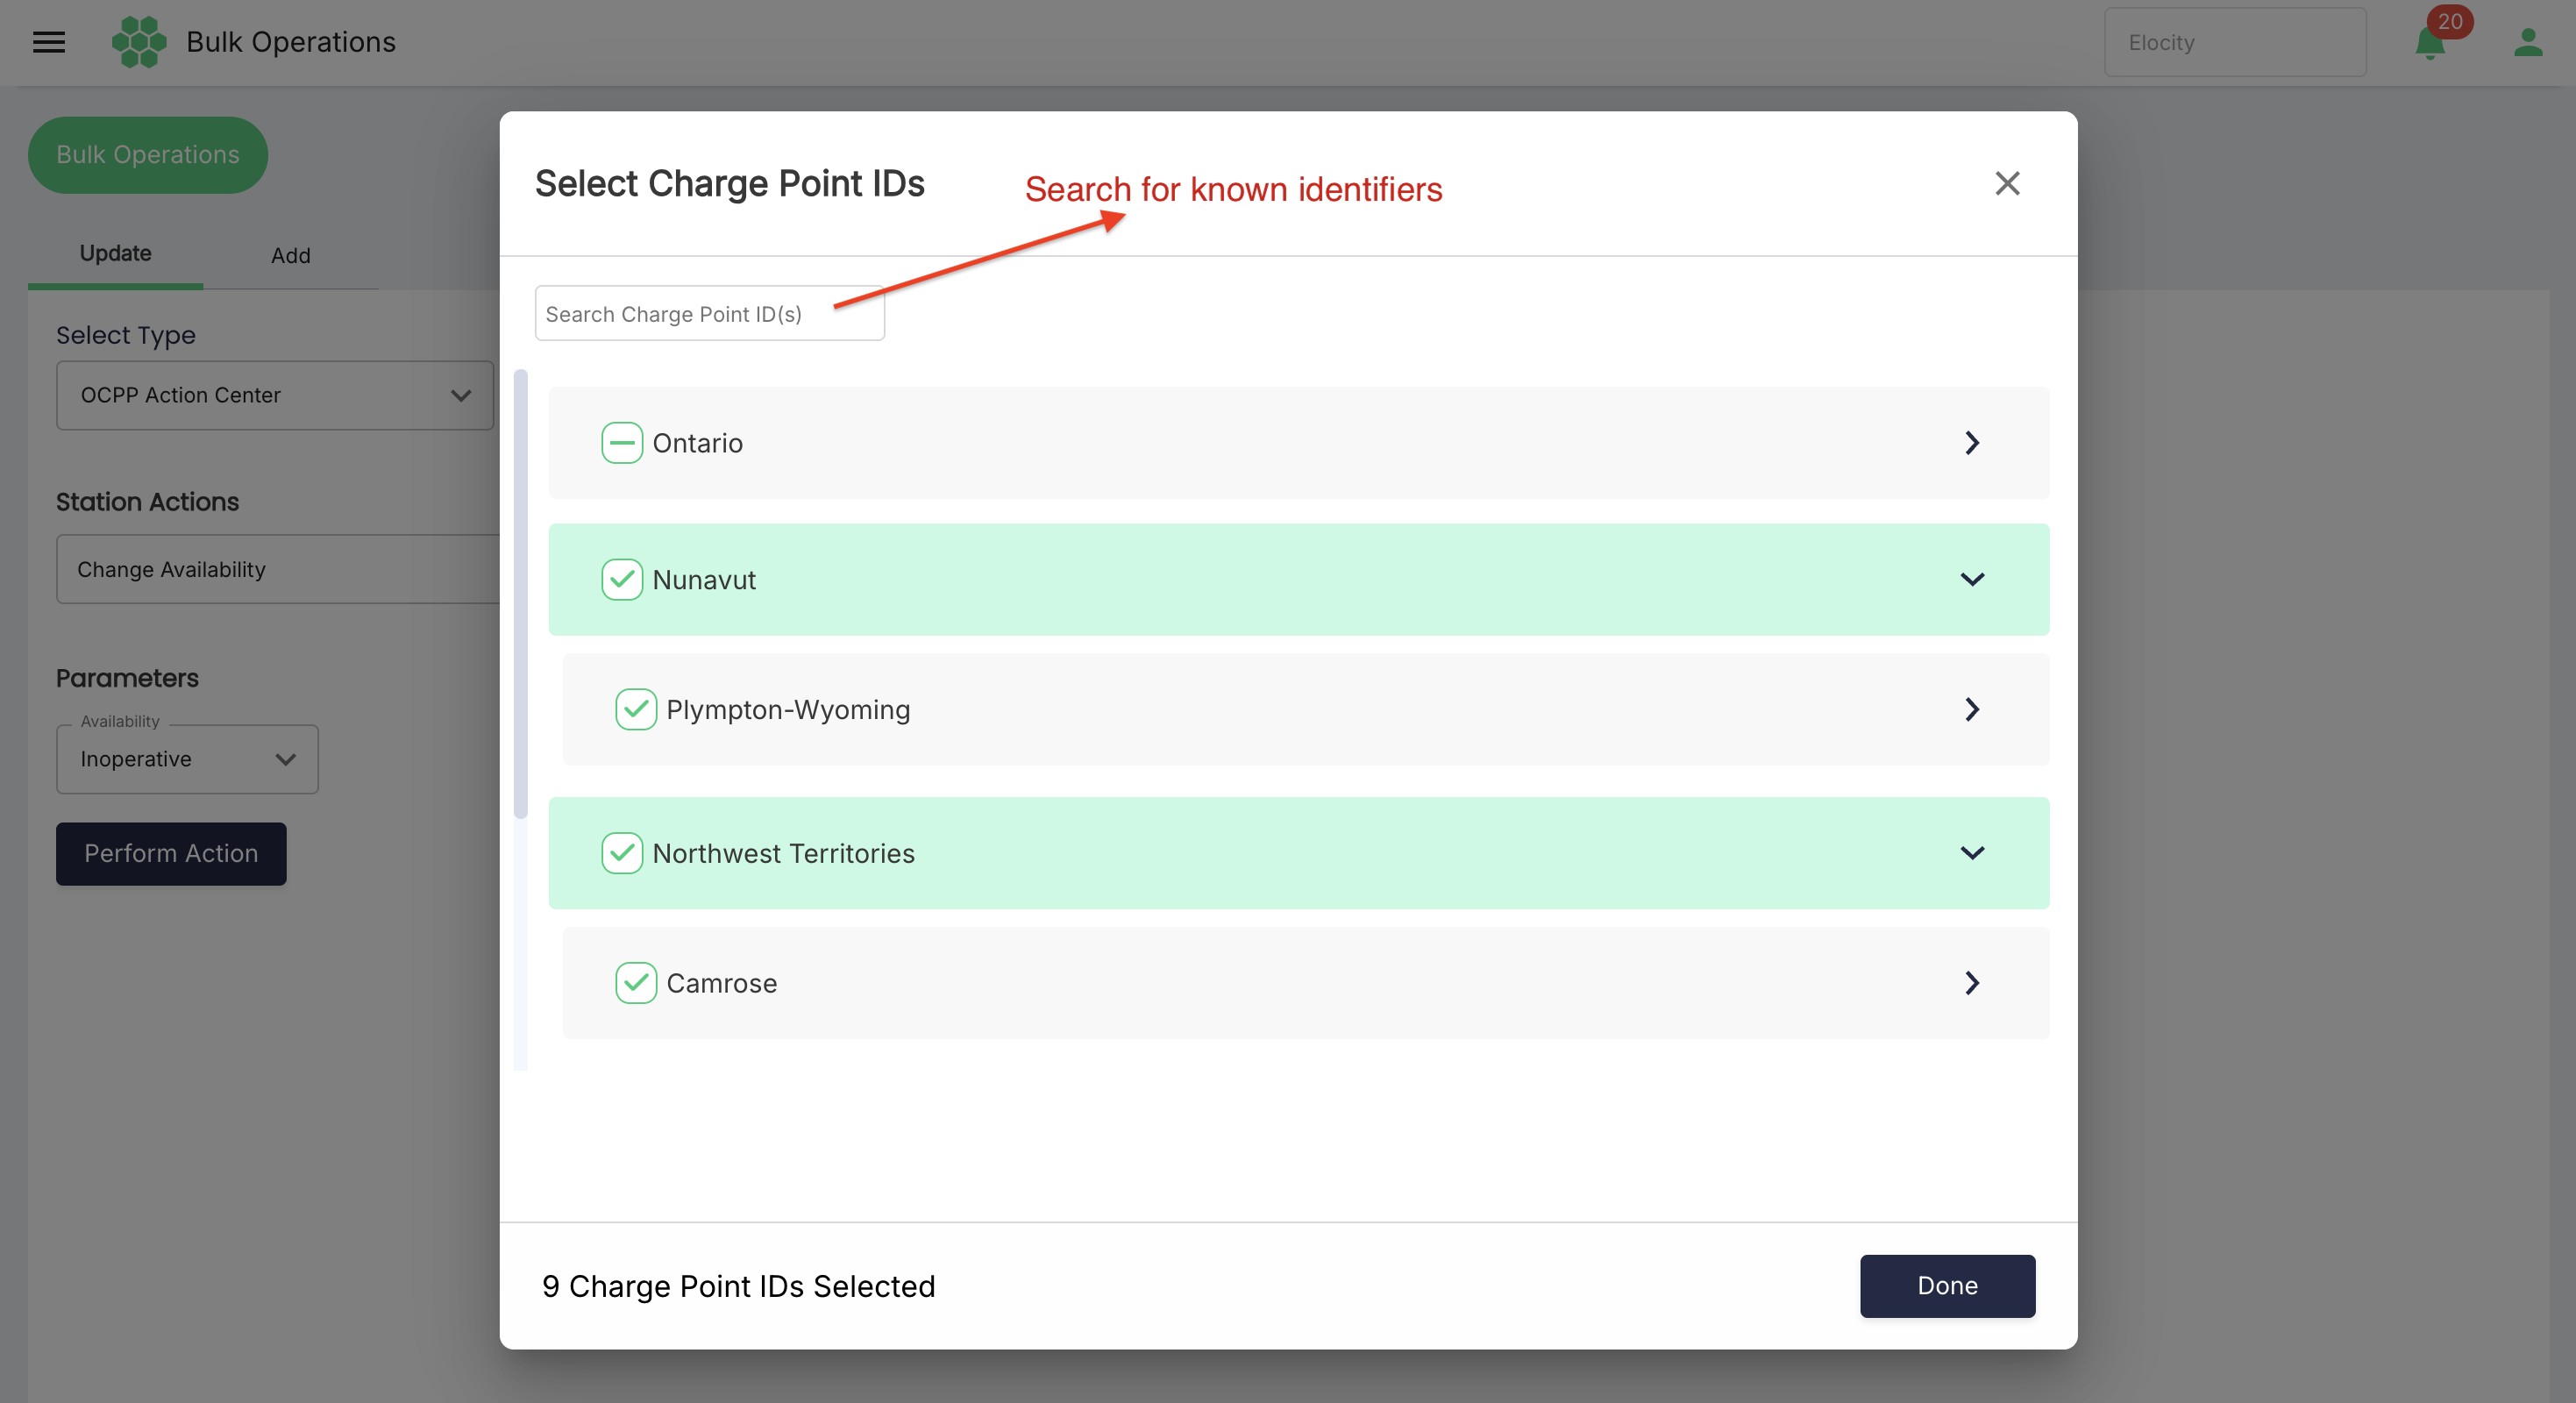
The OCPP selector provides a hierarchy and a Search Charge Point ID(s) field.
- Choose OCPP Action Center.
- Select Select Charge Point ID(s).
- Search for known identifiers or expand the location hierarchy.
- Select the required charge point IDs.
- Review the selected count.
- Select Done.
6. Location Management
Use Location Management to apply common location settings to all selected locations.
6.1 Perform a location update
- Select Update.
- Choose Location Management.
- Select the target locations.
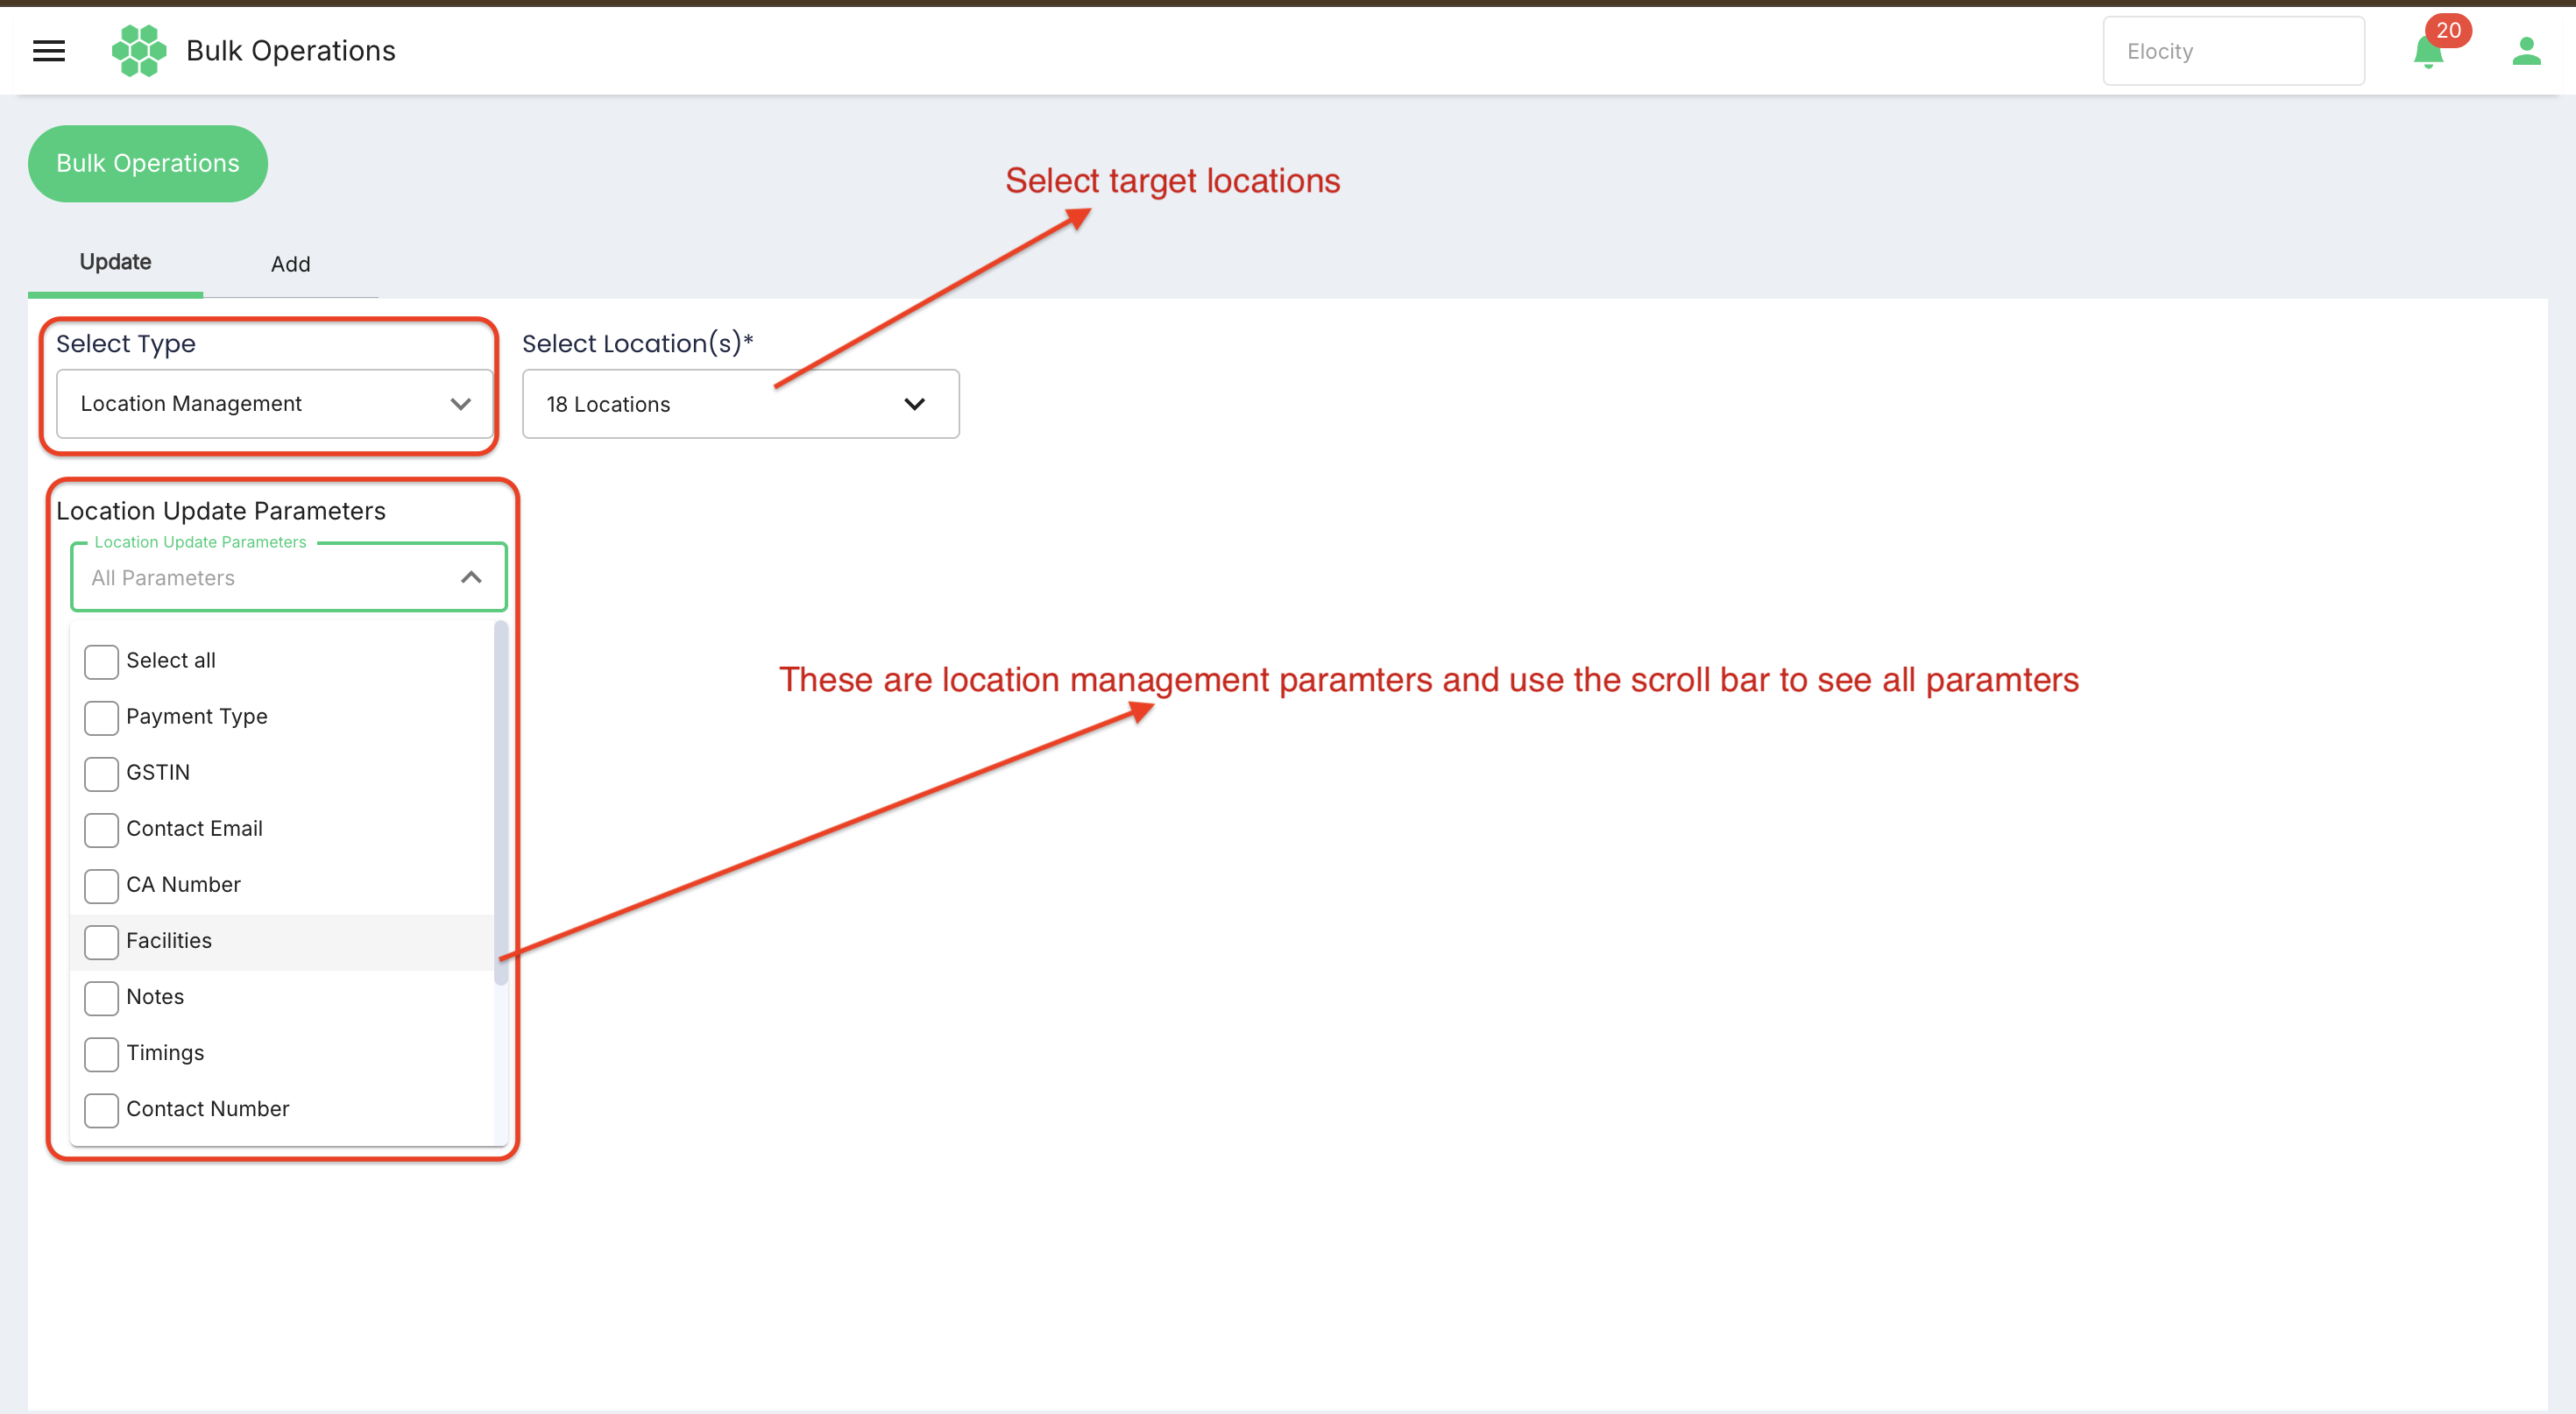
- Open Location Update Parameters.
- Select one or more parameters, or use Select all only when every displayed field must be changed.
- Enter a valid value for every selected parameter.
- Review the values and selected-location count.
- Select Update.
- Open representative Location records and verify the result.
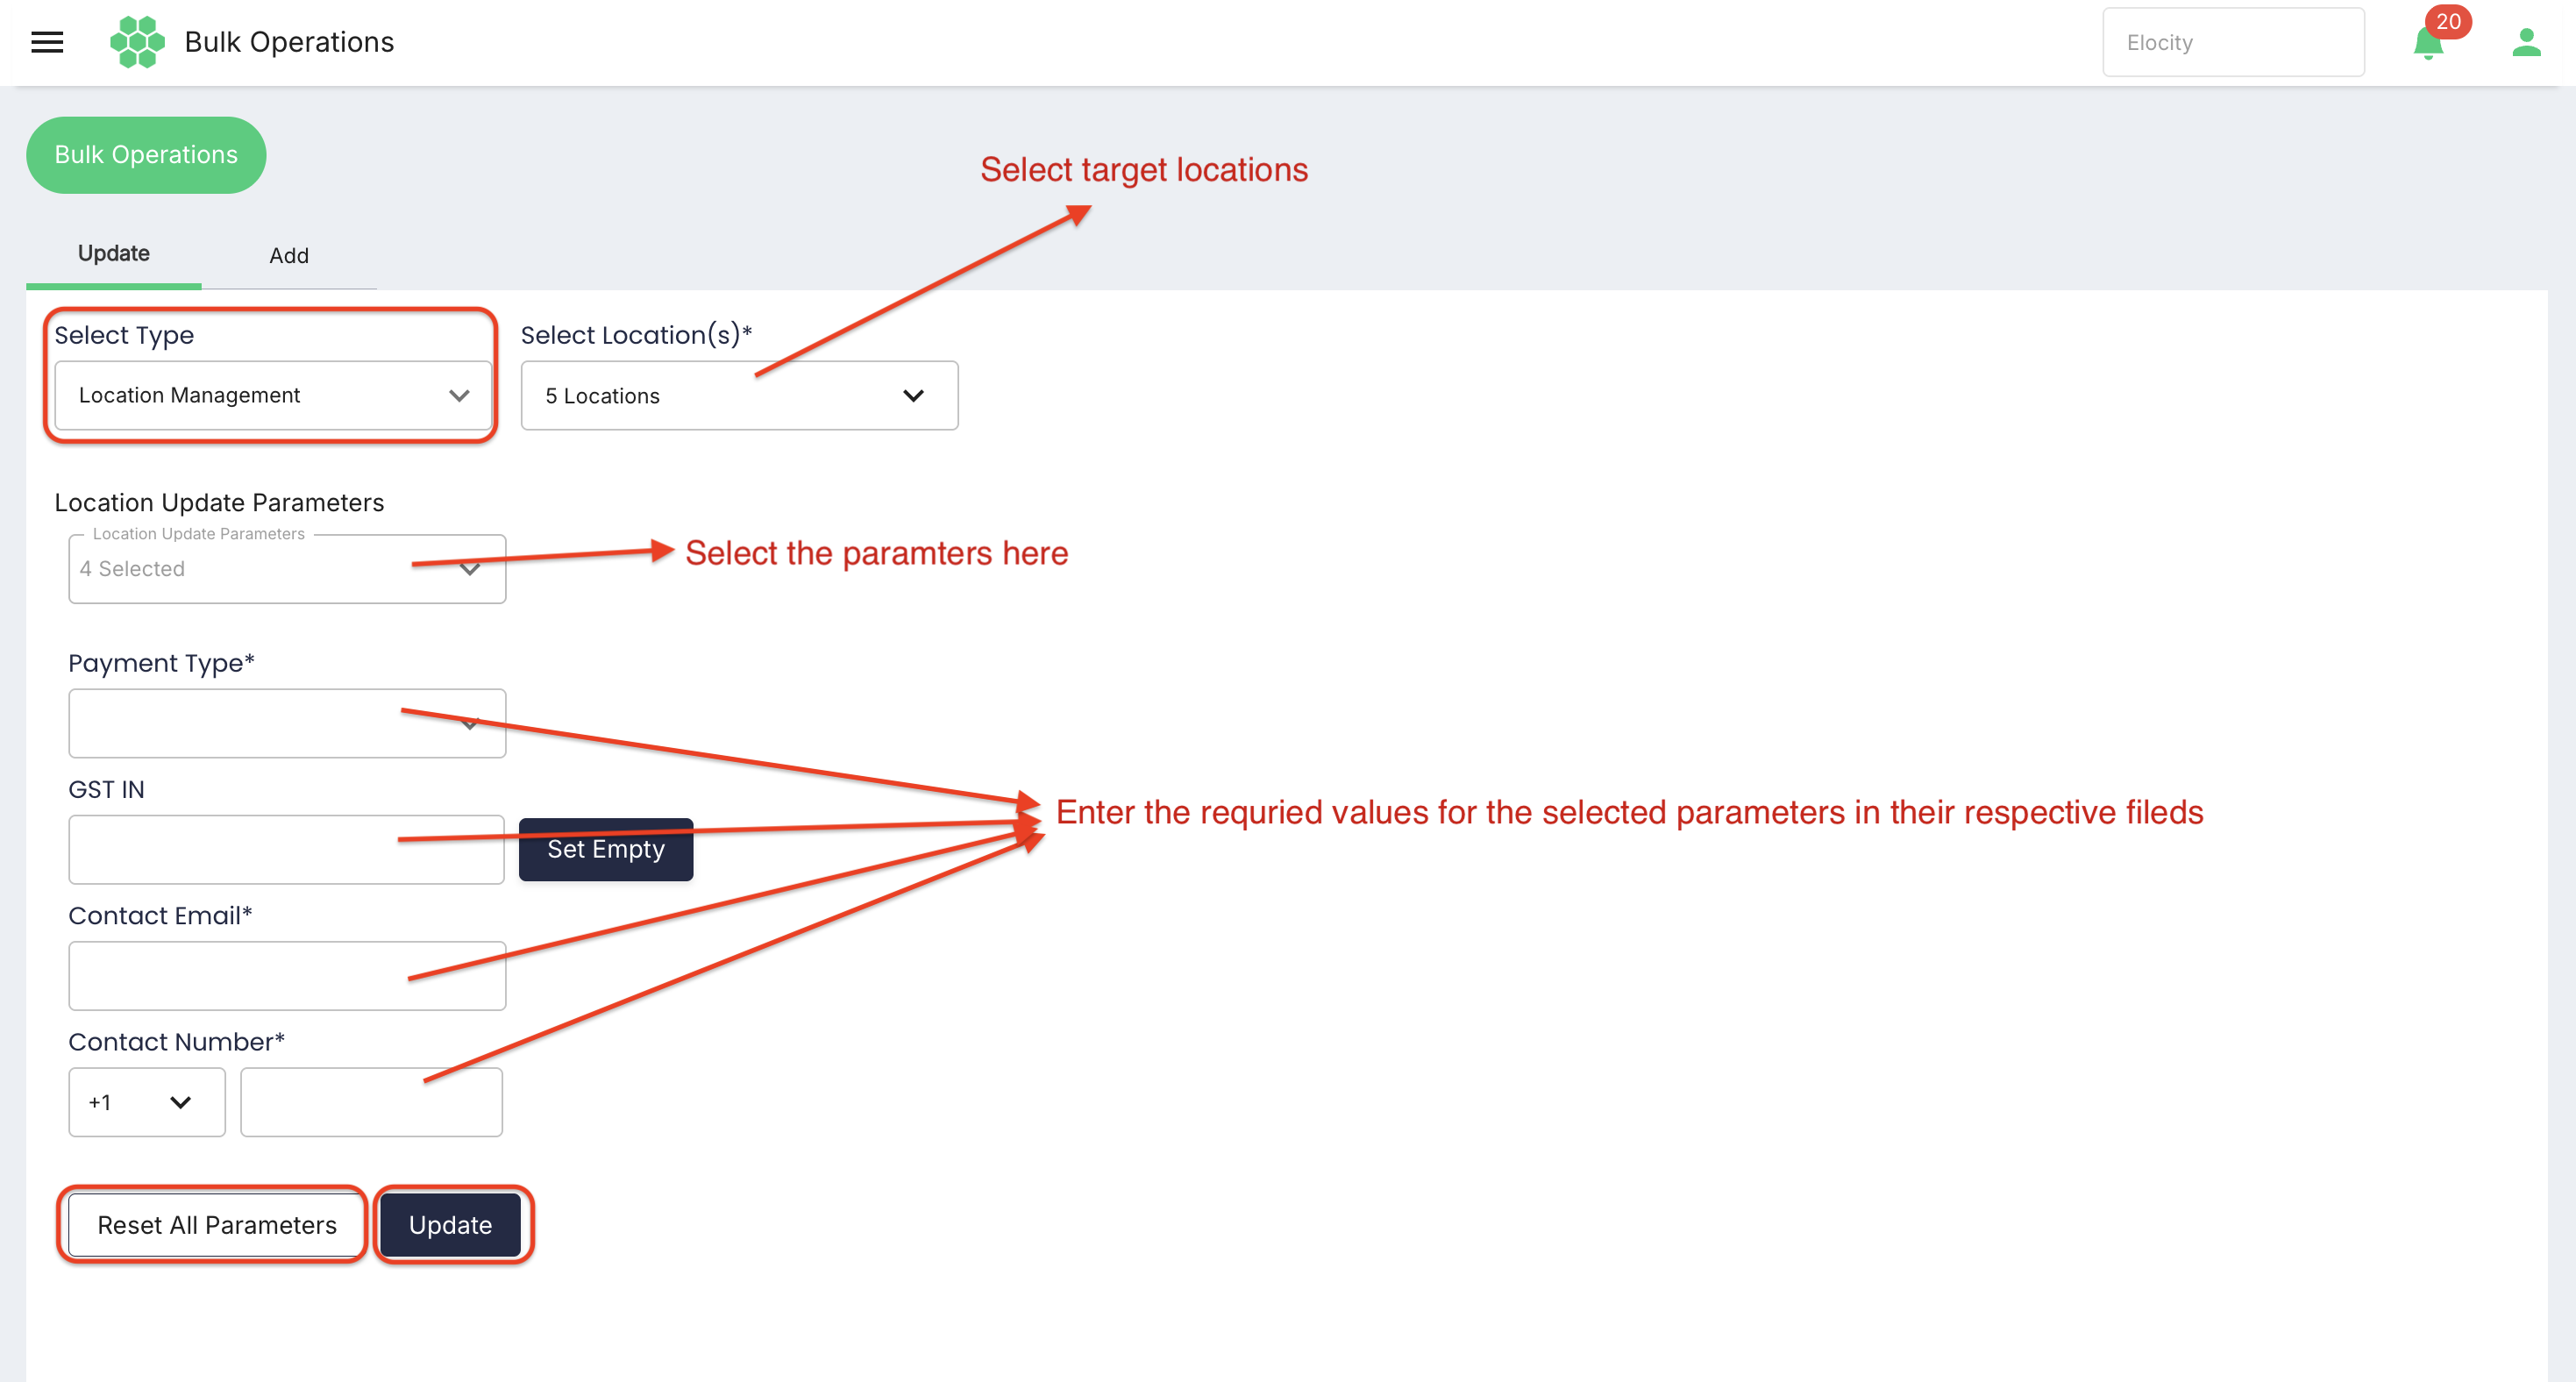
Use Reset All Parameters to discard the entered parameter values before execution.
6.2 Required location parameters
| Parameter | Description and guidance | Interface status |
|---|---|---|
| Payment Type | Sets the location payment model. The verified choices are Prepaid and Postpaid. Confirm the change with finance before applying it. | Verified |
| GST IN | Stores the applicable Goods and Services Tax identification number. Use the legally approved identifier and preserve formatting rules. | Required by specification; not displayed for the verified tenant/role |
| Reservation Type | Sets the reservation policy or type supported at the location. Confirm the intended policy before changing it. | Required by specification; the verified interface exposes Reservable rather than a field named Reservation Type |
| Location Manager | Assigns the responsible location manager. Select an active, authorized user. | Required by specification; not displayed for the verified tenant/role |
| Contact Email | Replaces the location contact email. Use a monitored and correctly formatted address. | Verified |
| Contact Phone Number | Replaces the location contact number, including the correct country code. | Verified as Contact Number |
6.3 Additional verified location parameters
The current interface also exposes:
- Facilities — selects the facilities available at the locations. Set Empty can intentionally clear the field.
- Notes — updates location notes. Set Empty can intentionally clear the field.
- Timings — updates operating hours or timing information.
- Private — controls private-location behavior.
- Public View — controls whether the location is shown in the public-facing experience.
- Reservable — controls whether reservations are permitted.
Caution:
Set Emptydeliberately removes the existing value from every selected location. Do not use it as a substitute for leaving a parameter unchanged.
6.4 Location use cases
- Change several locations from prepaid to postpaid after finance approval.
- Correct a shared contact email or phone number.
- Assign the same manager to a portfolio of locations.
- Enable or disable reservations across a region.
- Update operating timings after a seasonal schedule change.
- Change private or public visibility for a controlled rollout.
- Apply a corrected GST IN to locations under the same legal entity.
7. Station Management
Use Station Management to apply configuration or operational settings to selected stations.
7.1 Perform a station update
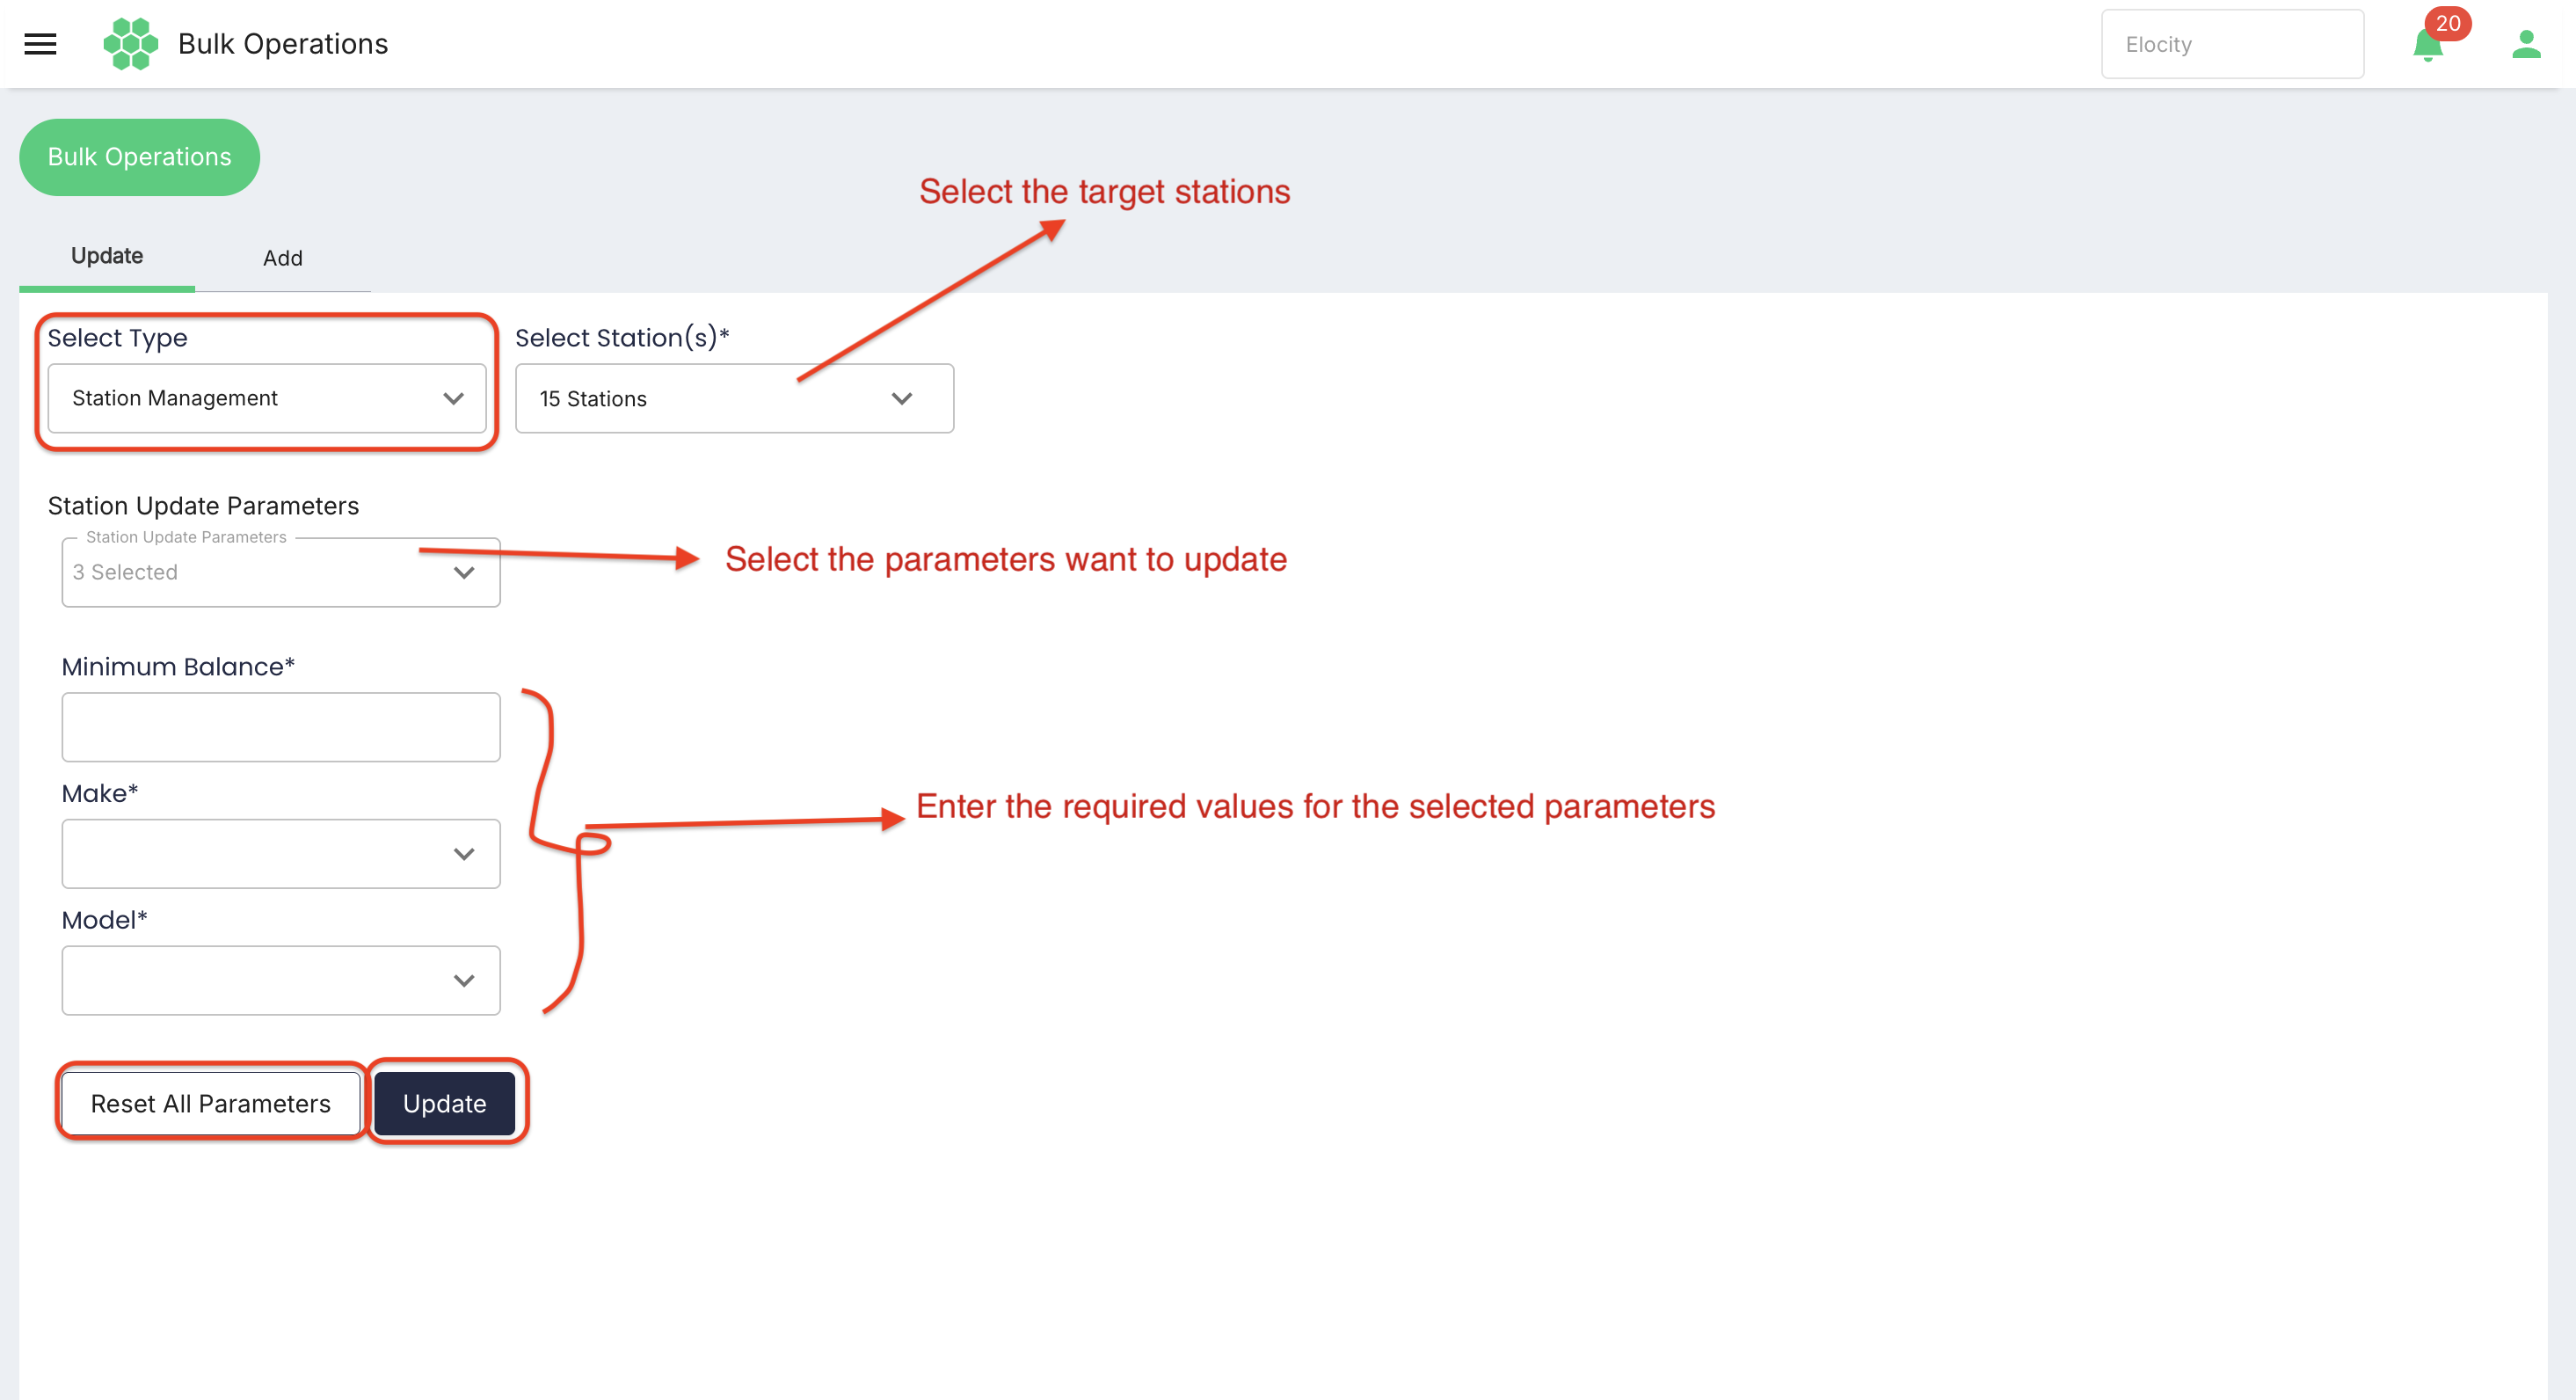
- Select Update.
- Choose Station Management.
- Select the target stations.
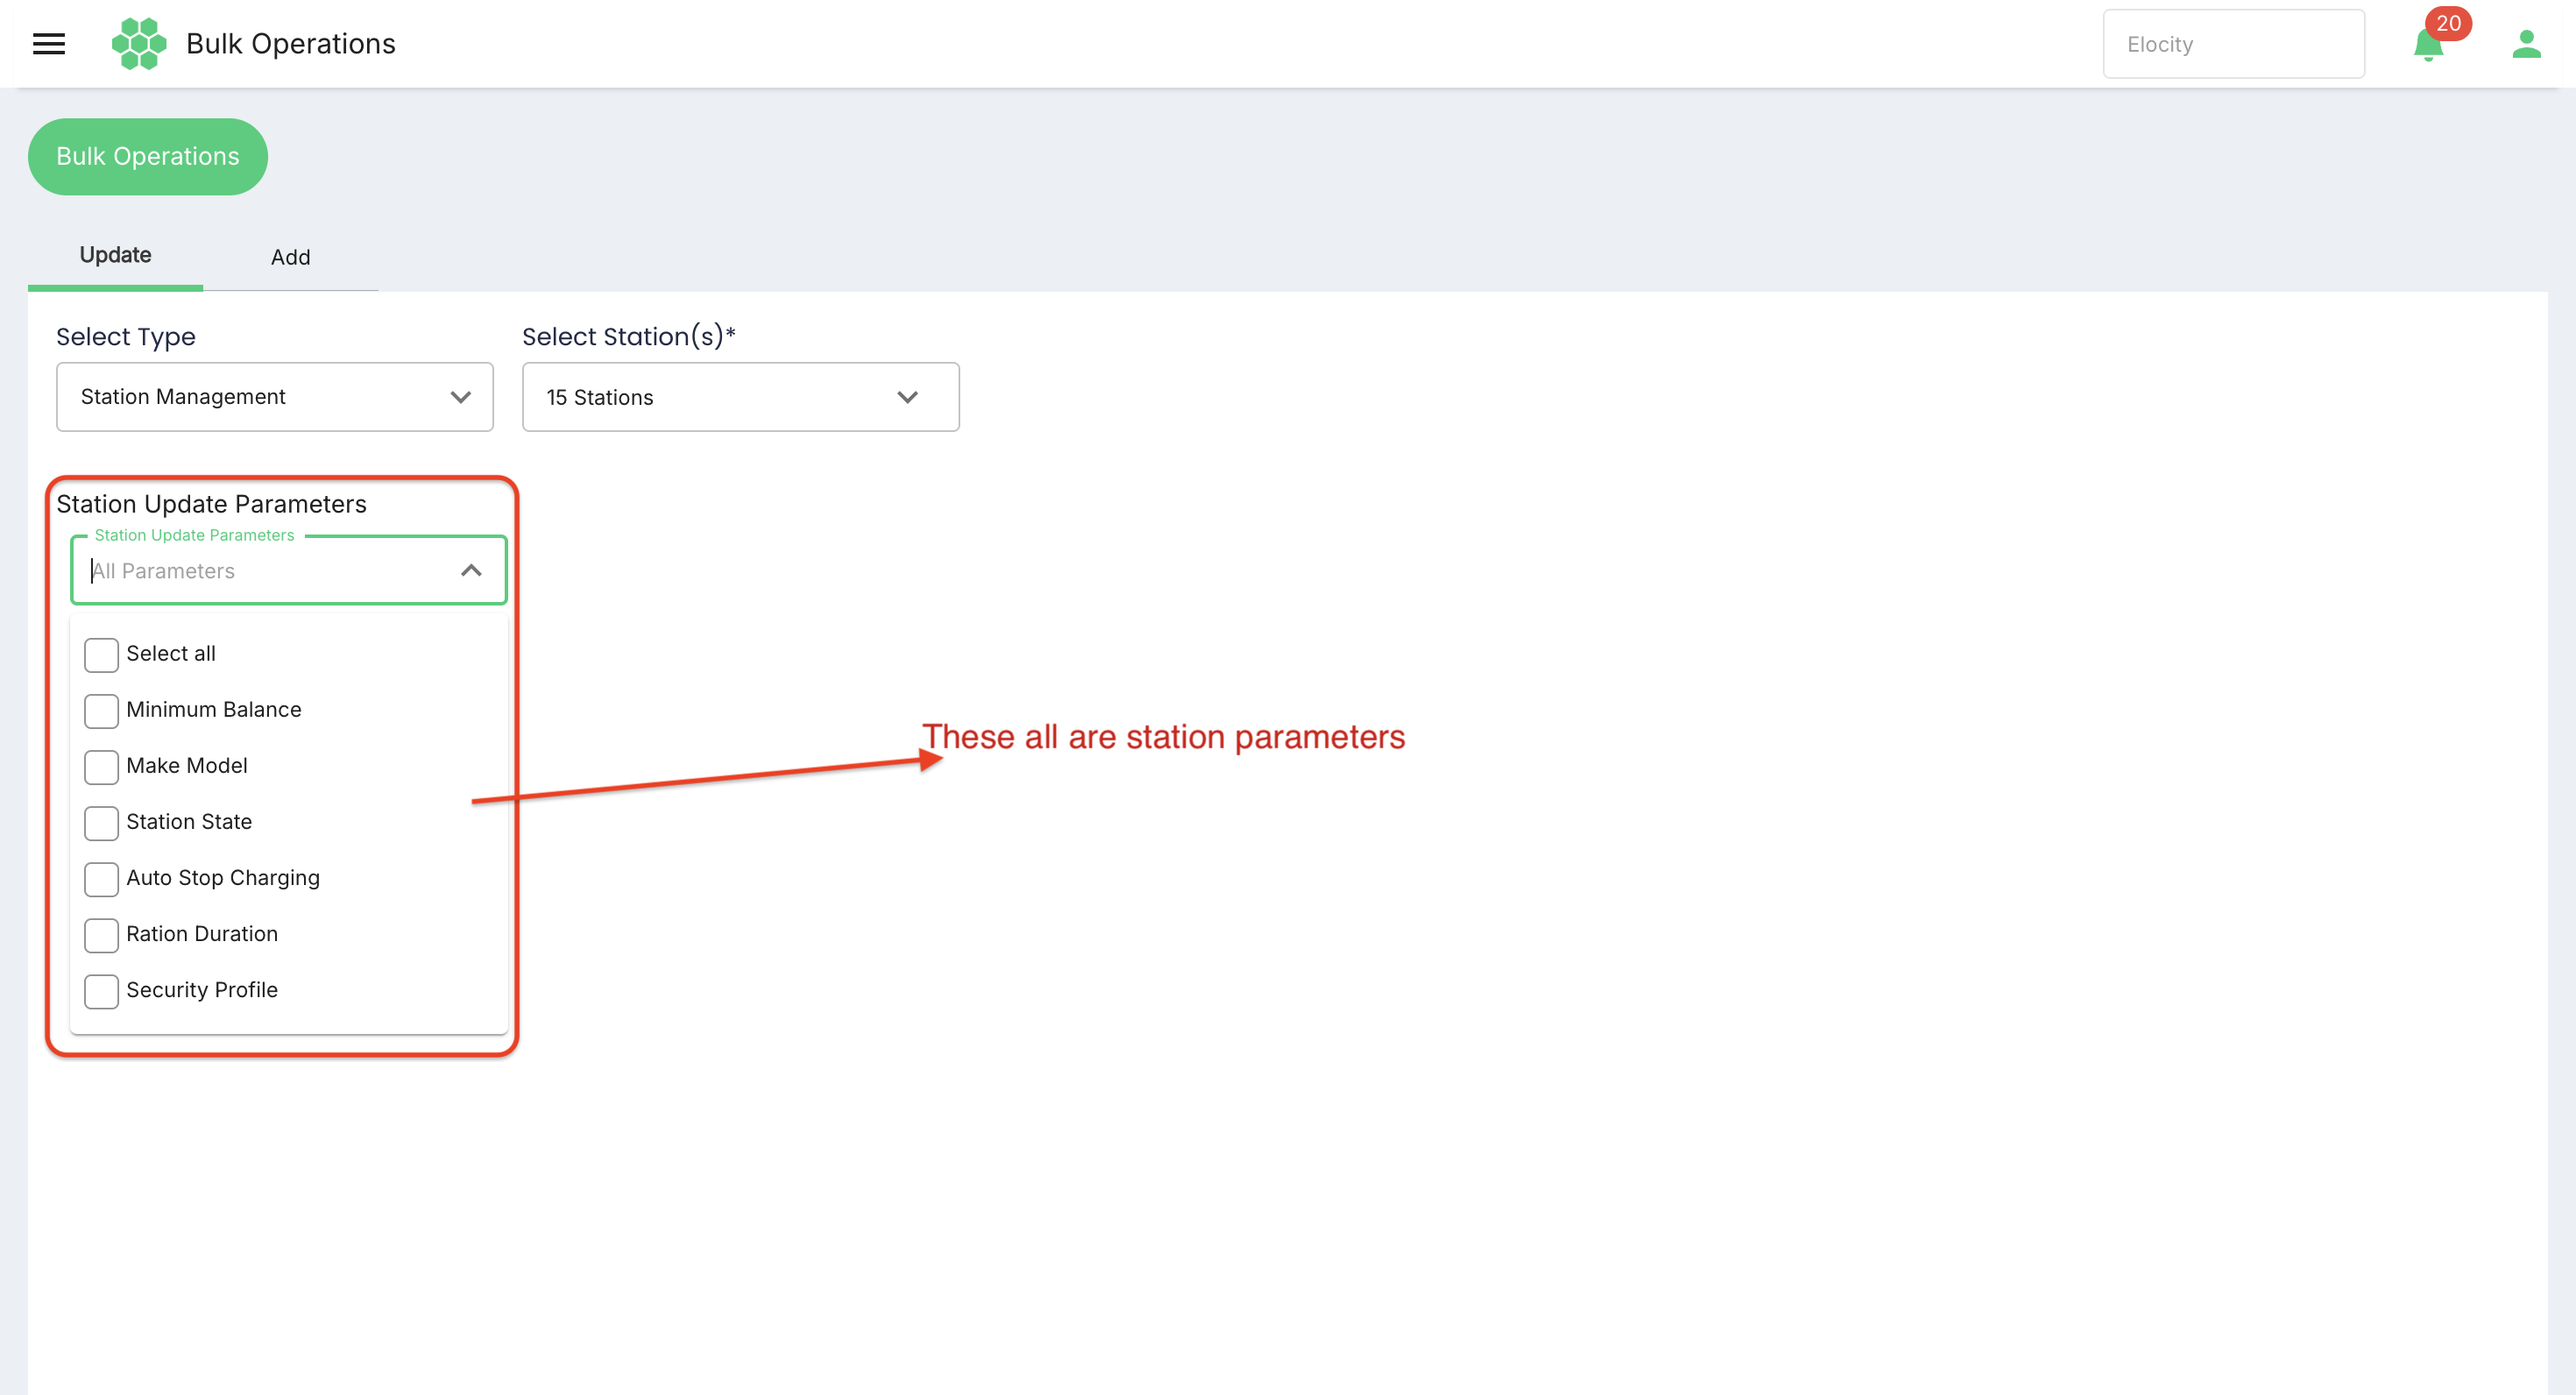
- Open Station Update Parameters.
- Select one or more parameters.
- Enter or select a value for every chosen parameter.
- Review compatibility and operational impact.
- Select Update.
- Refresh the affected Station records and verify the result.
7.2 Required station parameters
| Parameter | Description and guidance | Interface status |
|---|---|---|
| Minimum Wallet Balance | Sets the parent/customer balance threshold used by station charging controls. Enter the approved numeric amount and confirm currency context. | Verified as Minimum Balance |
| Maintenance Period | Defines the approved maintenance window. Confirm start, end, and applicable time zone. | Required by specification; not displayed for the verified tenant/role |
| Station State | Sets the operational or lifecycle state of the selected stations. Choose a state compatible with current activity. | Verified |
| Make and Model | Assigns station manufacturer and model metadata. Select Make before selecting the compatible Model. | Verified as separate Make and Model fields |
| Auto cut off on low wallet balance | Stops charging automatically when the relevant wallet falls below the configured minimum balance. Confirm the policy and threshold together. | Verified as Auto Stop Charging; confirm tenant mapping to low-wallet behavior |
7.3 Additional verified station parameters
- Ration Duration — configures the station rationing-duration behavior when supported.
- Security Profile — applies the approved station security profile.
7.4 Station update precautions
- Do not change Make or Model merely to correct a display label; the values may drive compatibility logic.
- Do not change Station State while a conflicting operation or active session is in progress.
- Apply Minimum Balance and Auto Stop Charging as one approved policy.
- Confirm whether a maintenance period should make the station unavailable during the window.
- Test security-profile changes on a small compatible group before a large rollout.
- Check a representative sample after the operation rather than relying only on the submission response.
7.5 Station use cases
- Apply a minimum wallet balance to a group of stations.
- Enable low-balance auto-stop behavior across a charging network.
- Place affected stations into a maintenance state for scheduled work.
- Correct Make and Model for stations from the same shipment.
- Apply an approved security profile.
8. OCPP Action Center
Use OCPP Action Center to send the same remote OCPP command to selected charge point IDs.
Warning: OCPP commands can interrupt service or alter charger behavior. Check station connectivity, OCPP compatibility, active sessions, and the selected target count before selecting Perform Action.
The verified actions are:
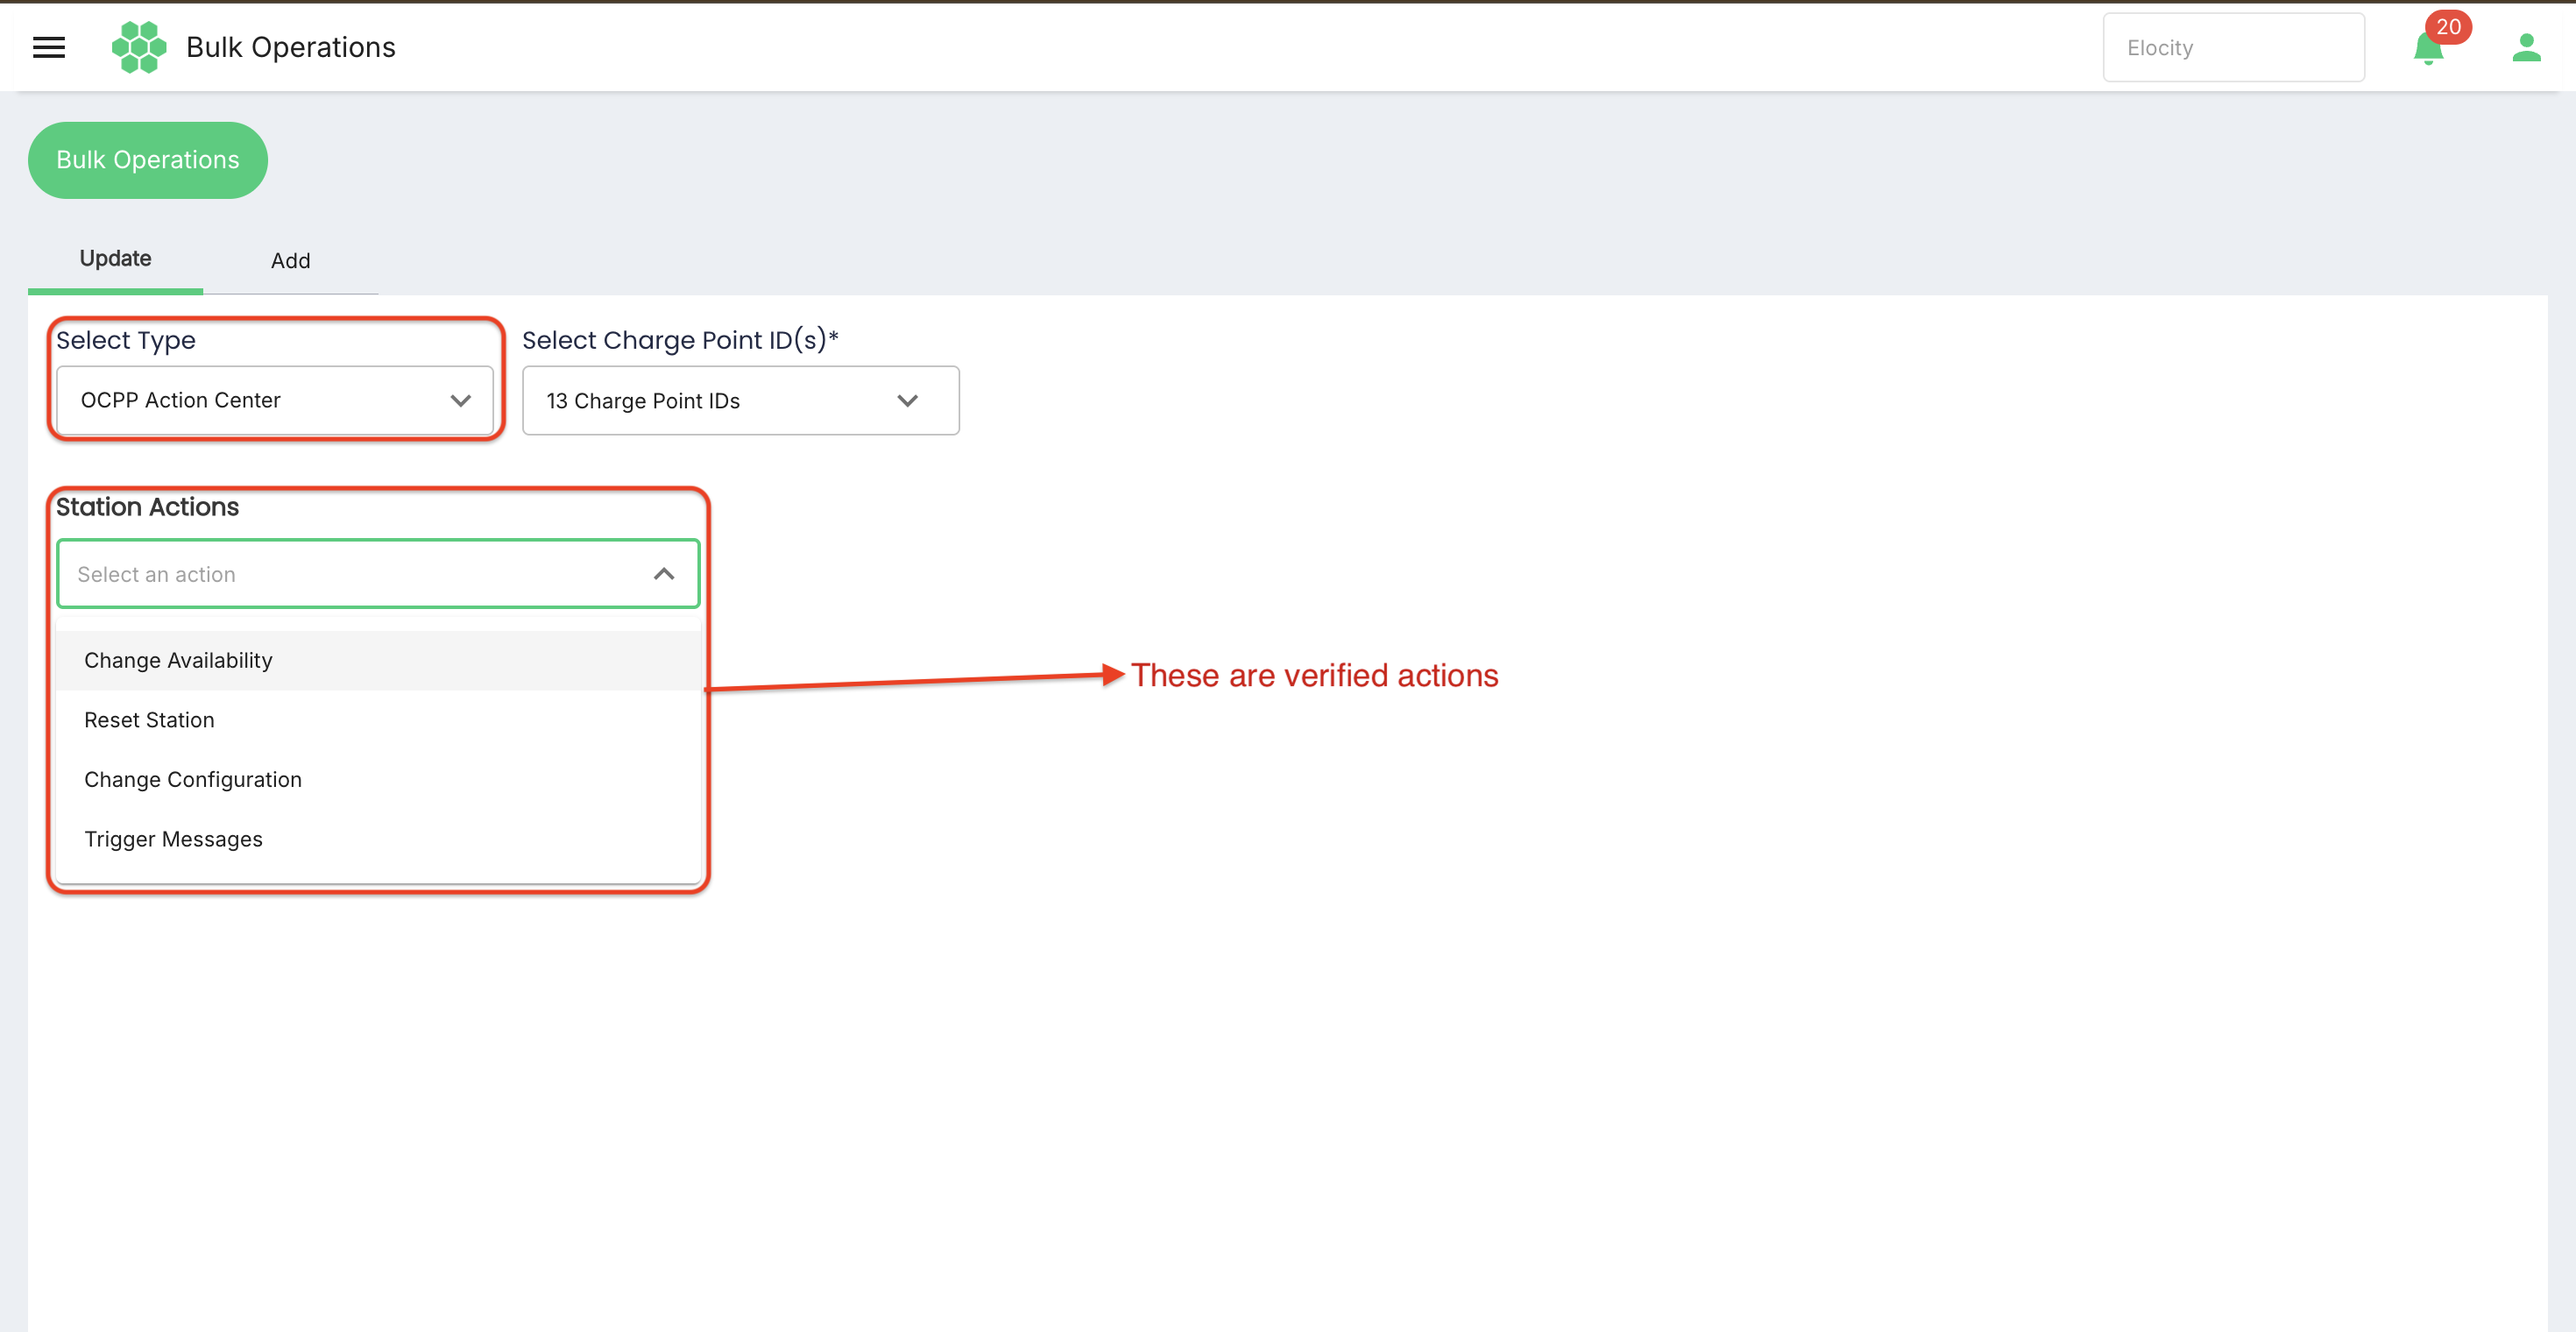
- Change Availability
- Reset Station
- Change Configuration
- Trigger Messages
8.1 Change Availability
Use this action to change whether the selected charge points are available for charging.
- Select the charge point IDs.
- Choose Change Availability.
- Set Availability to:
- Operative — allows the charge point to be available, subject to its current state.
- Inoperative — makes the charge point unavailable.
- Confirm that no active session would be disrupted.
- Select Perform Action.
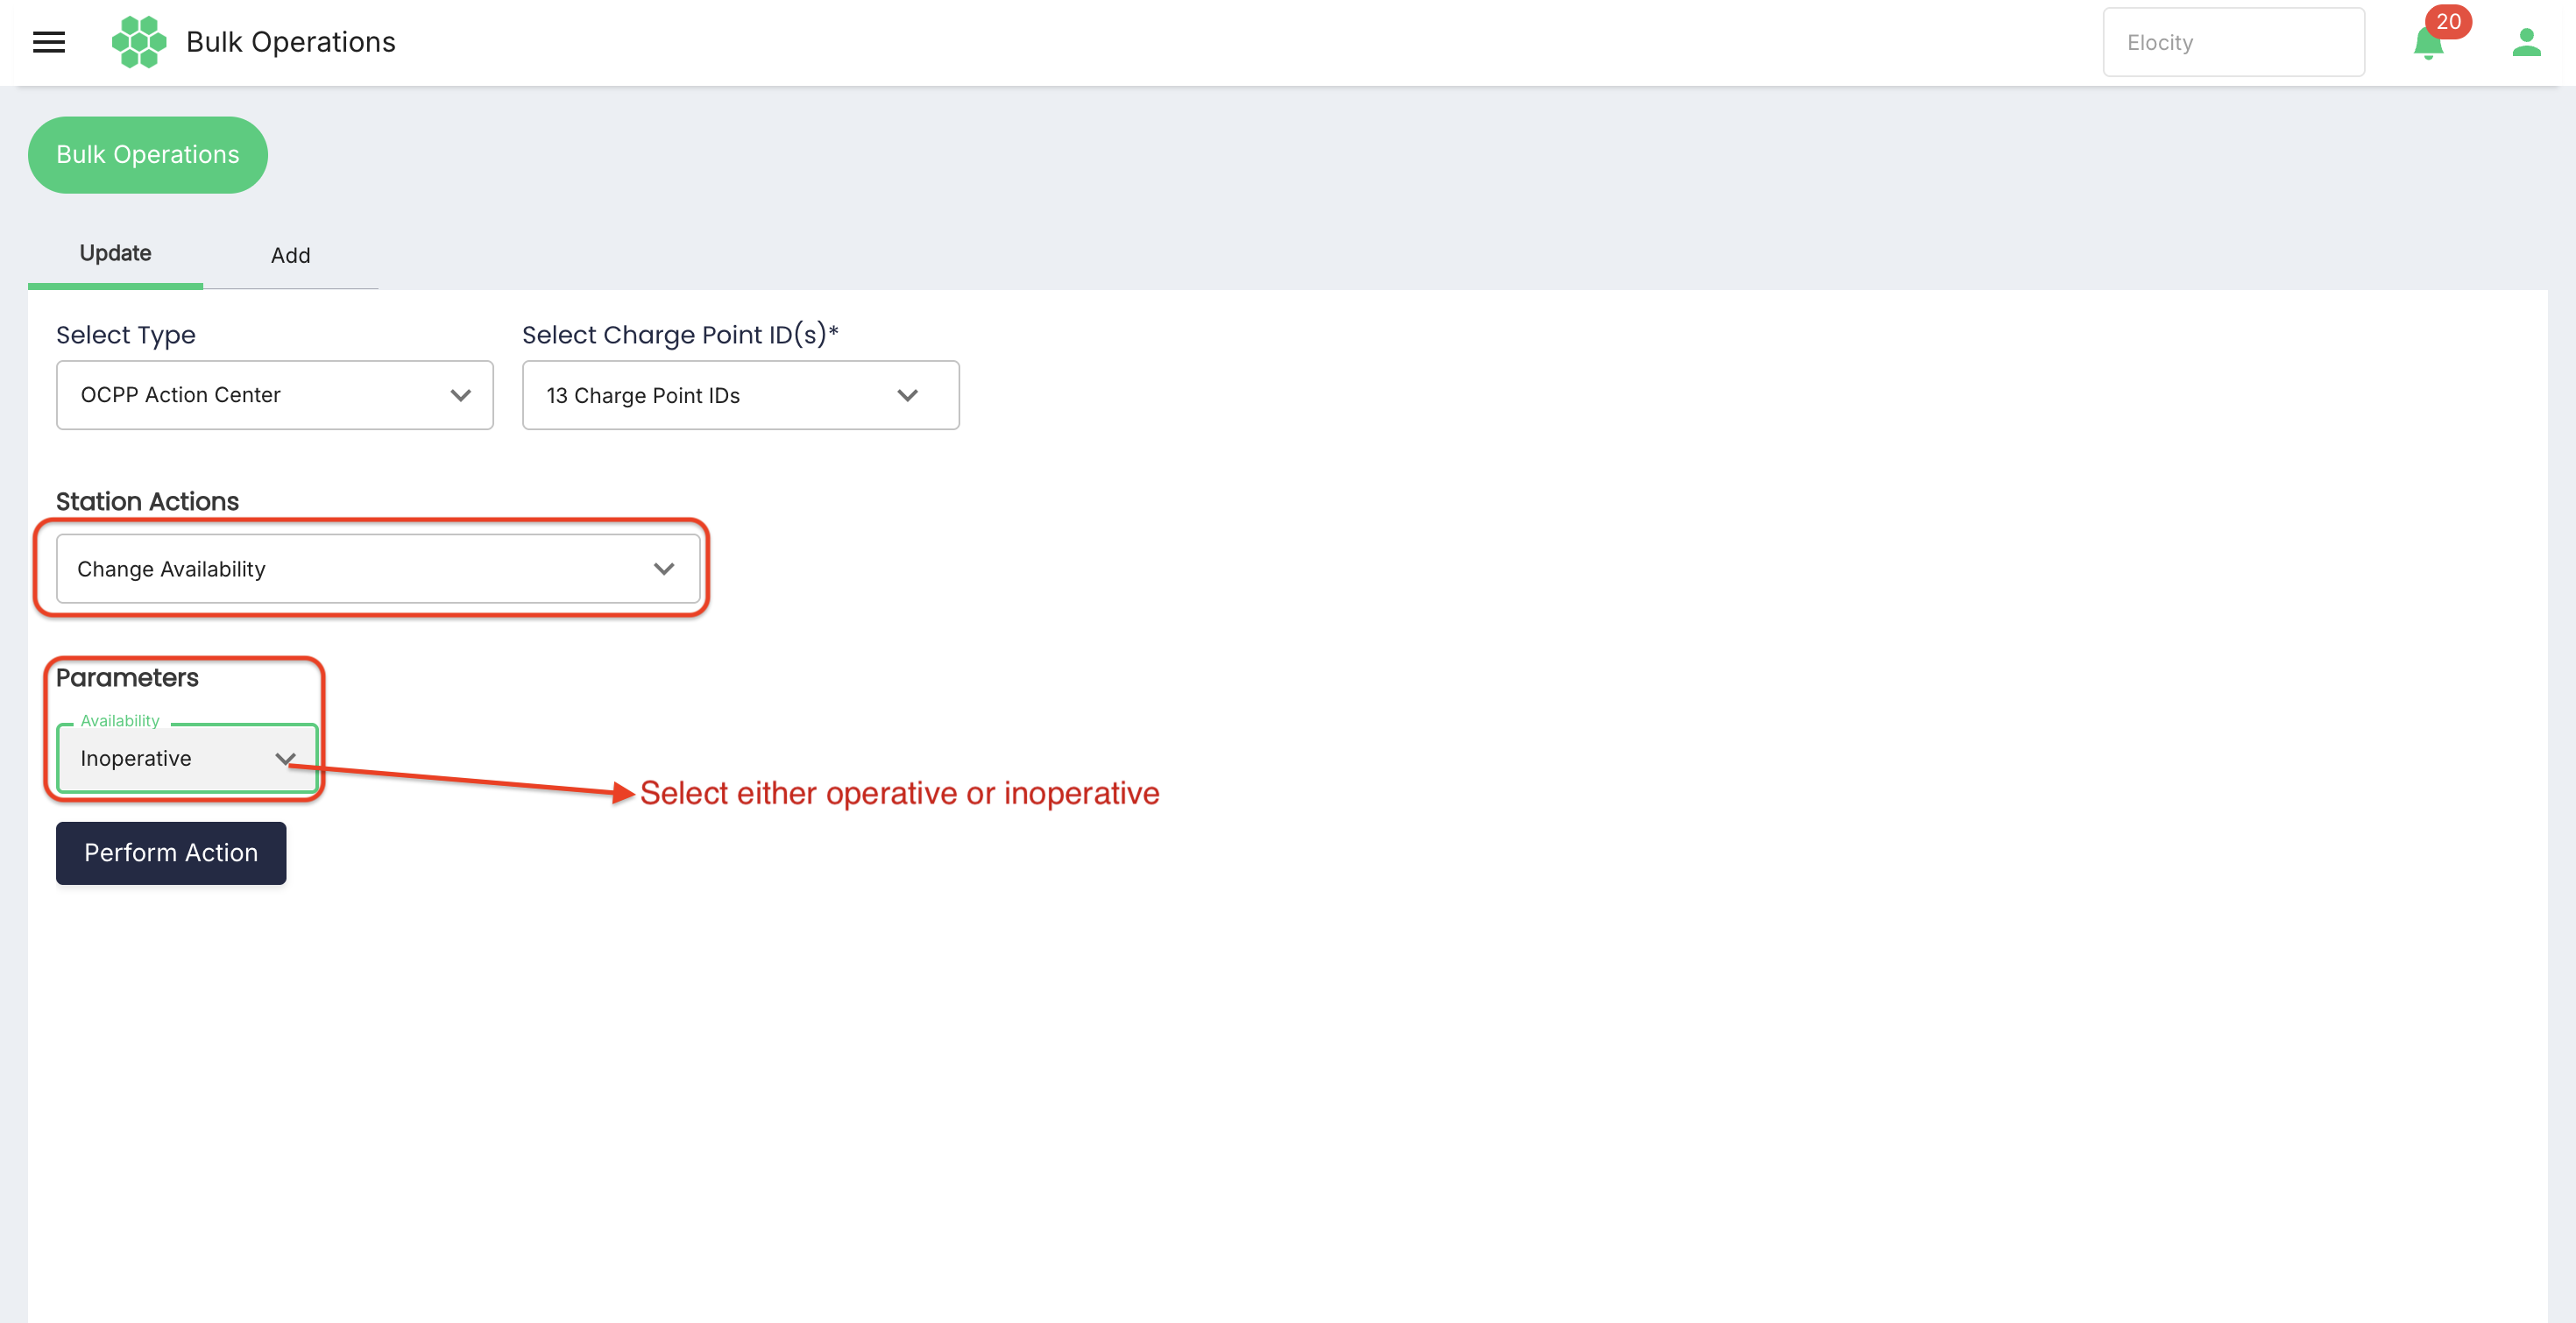
- Verify the returned status and the resulting charge-point availability.
8.2 Reset Station
Use reset only for a known operational need.
- Select the charge point IDs.
- Choose Reset Station.
- Select Reset Type:
- Soft — requests a controlled software reset.
- Hard — requests a full reset and can cause greater disruption.
- Confirm that no active session would be interrupted.
- Select Perform Action.
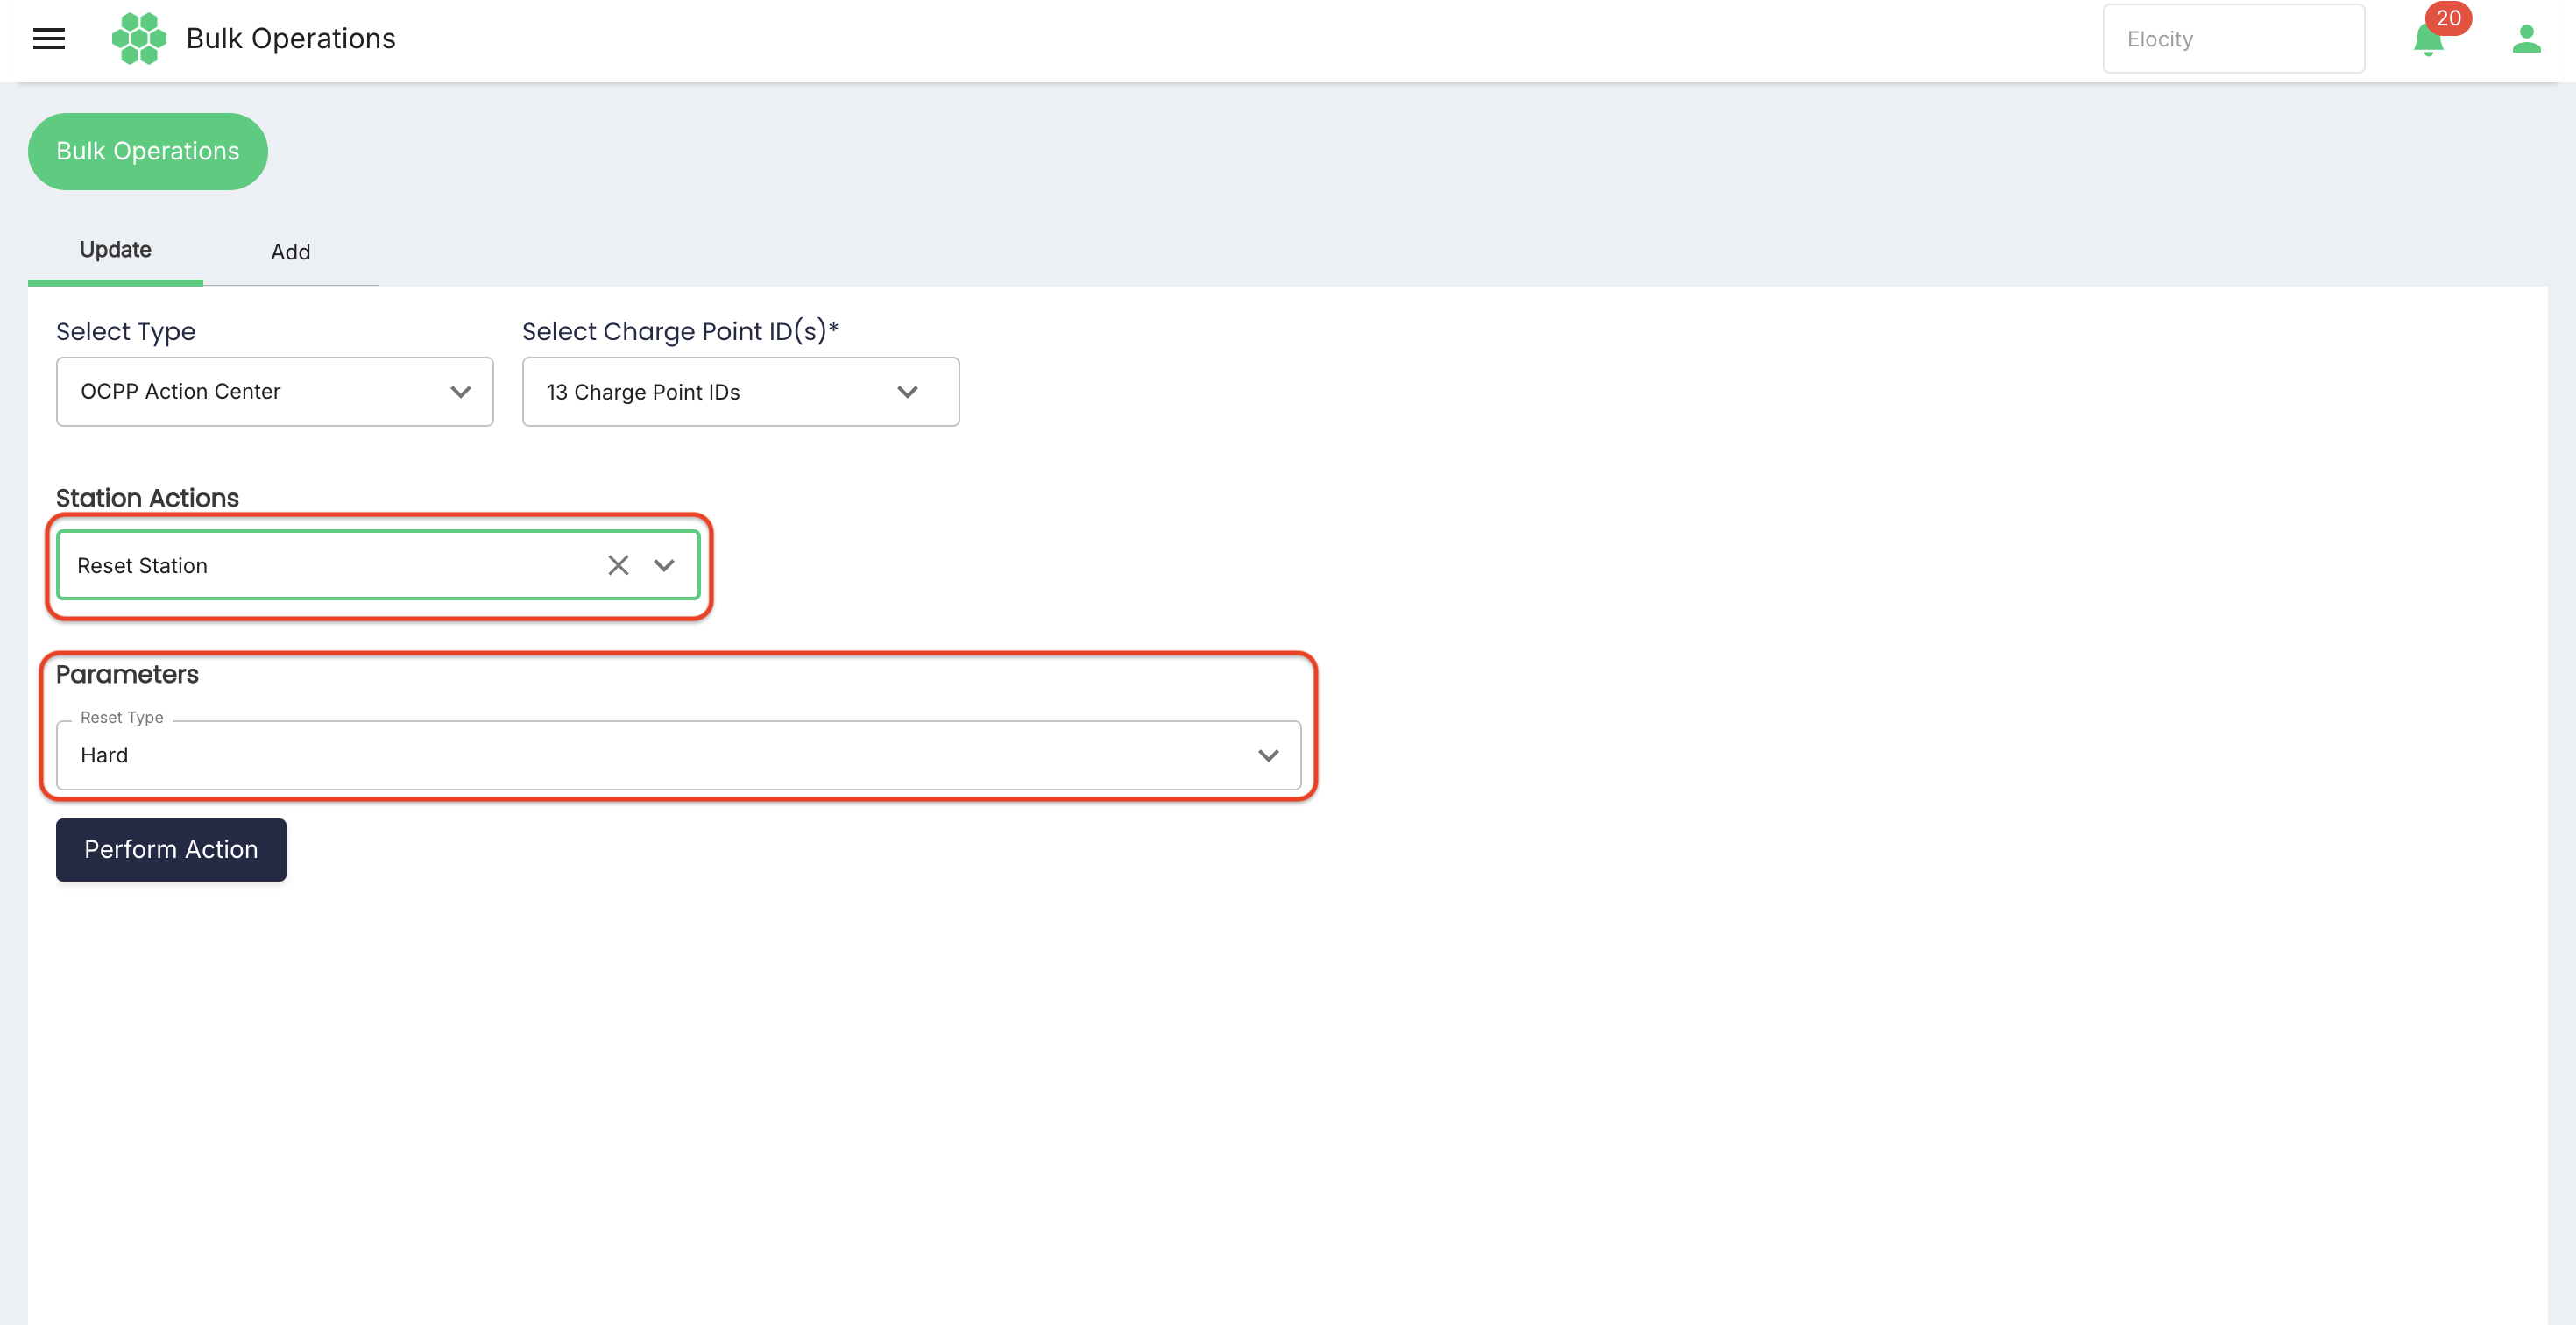
- Monitor reconnection, BootNotification, status, and alarms.
Use Soft reset by default unless a Hard reset is required by the support procedure.
8.3 Change Configuration
This action sends the same configuration key and value to every selected charge point.
- Select the charge point IDs.
- Choose Change Configuration.
- Select Key Type:
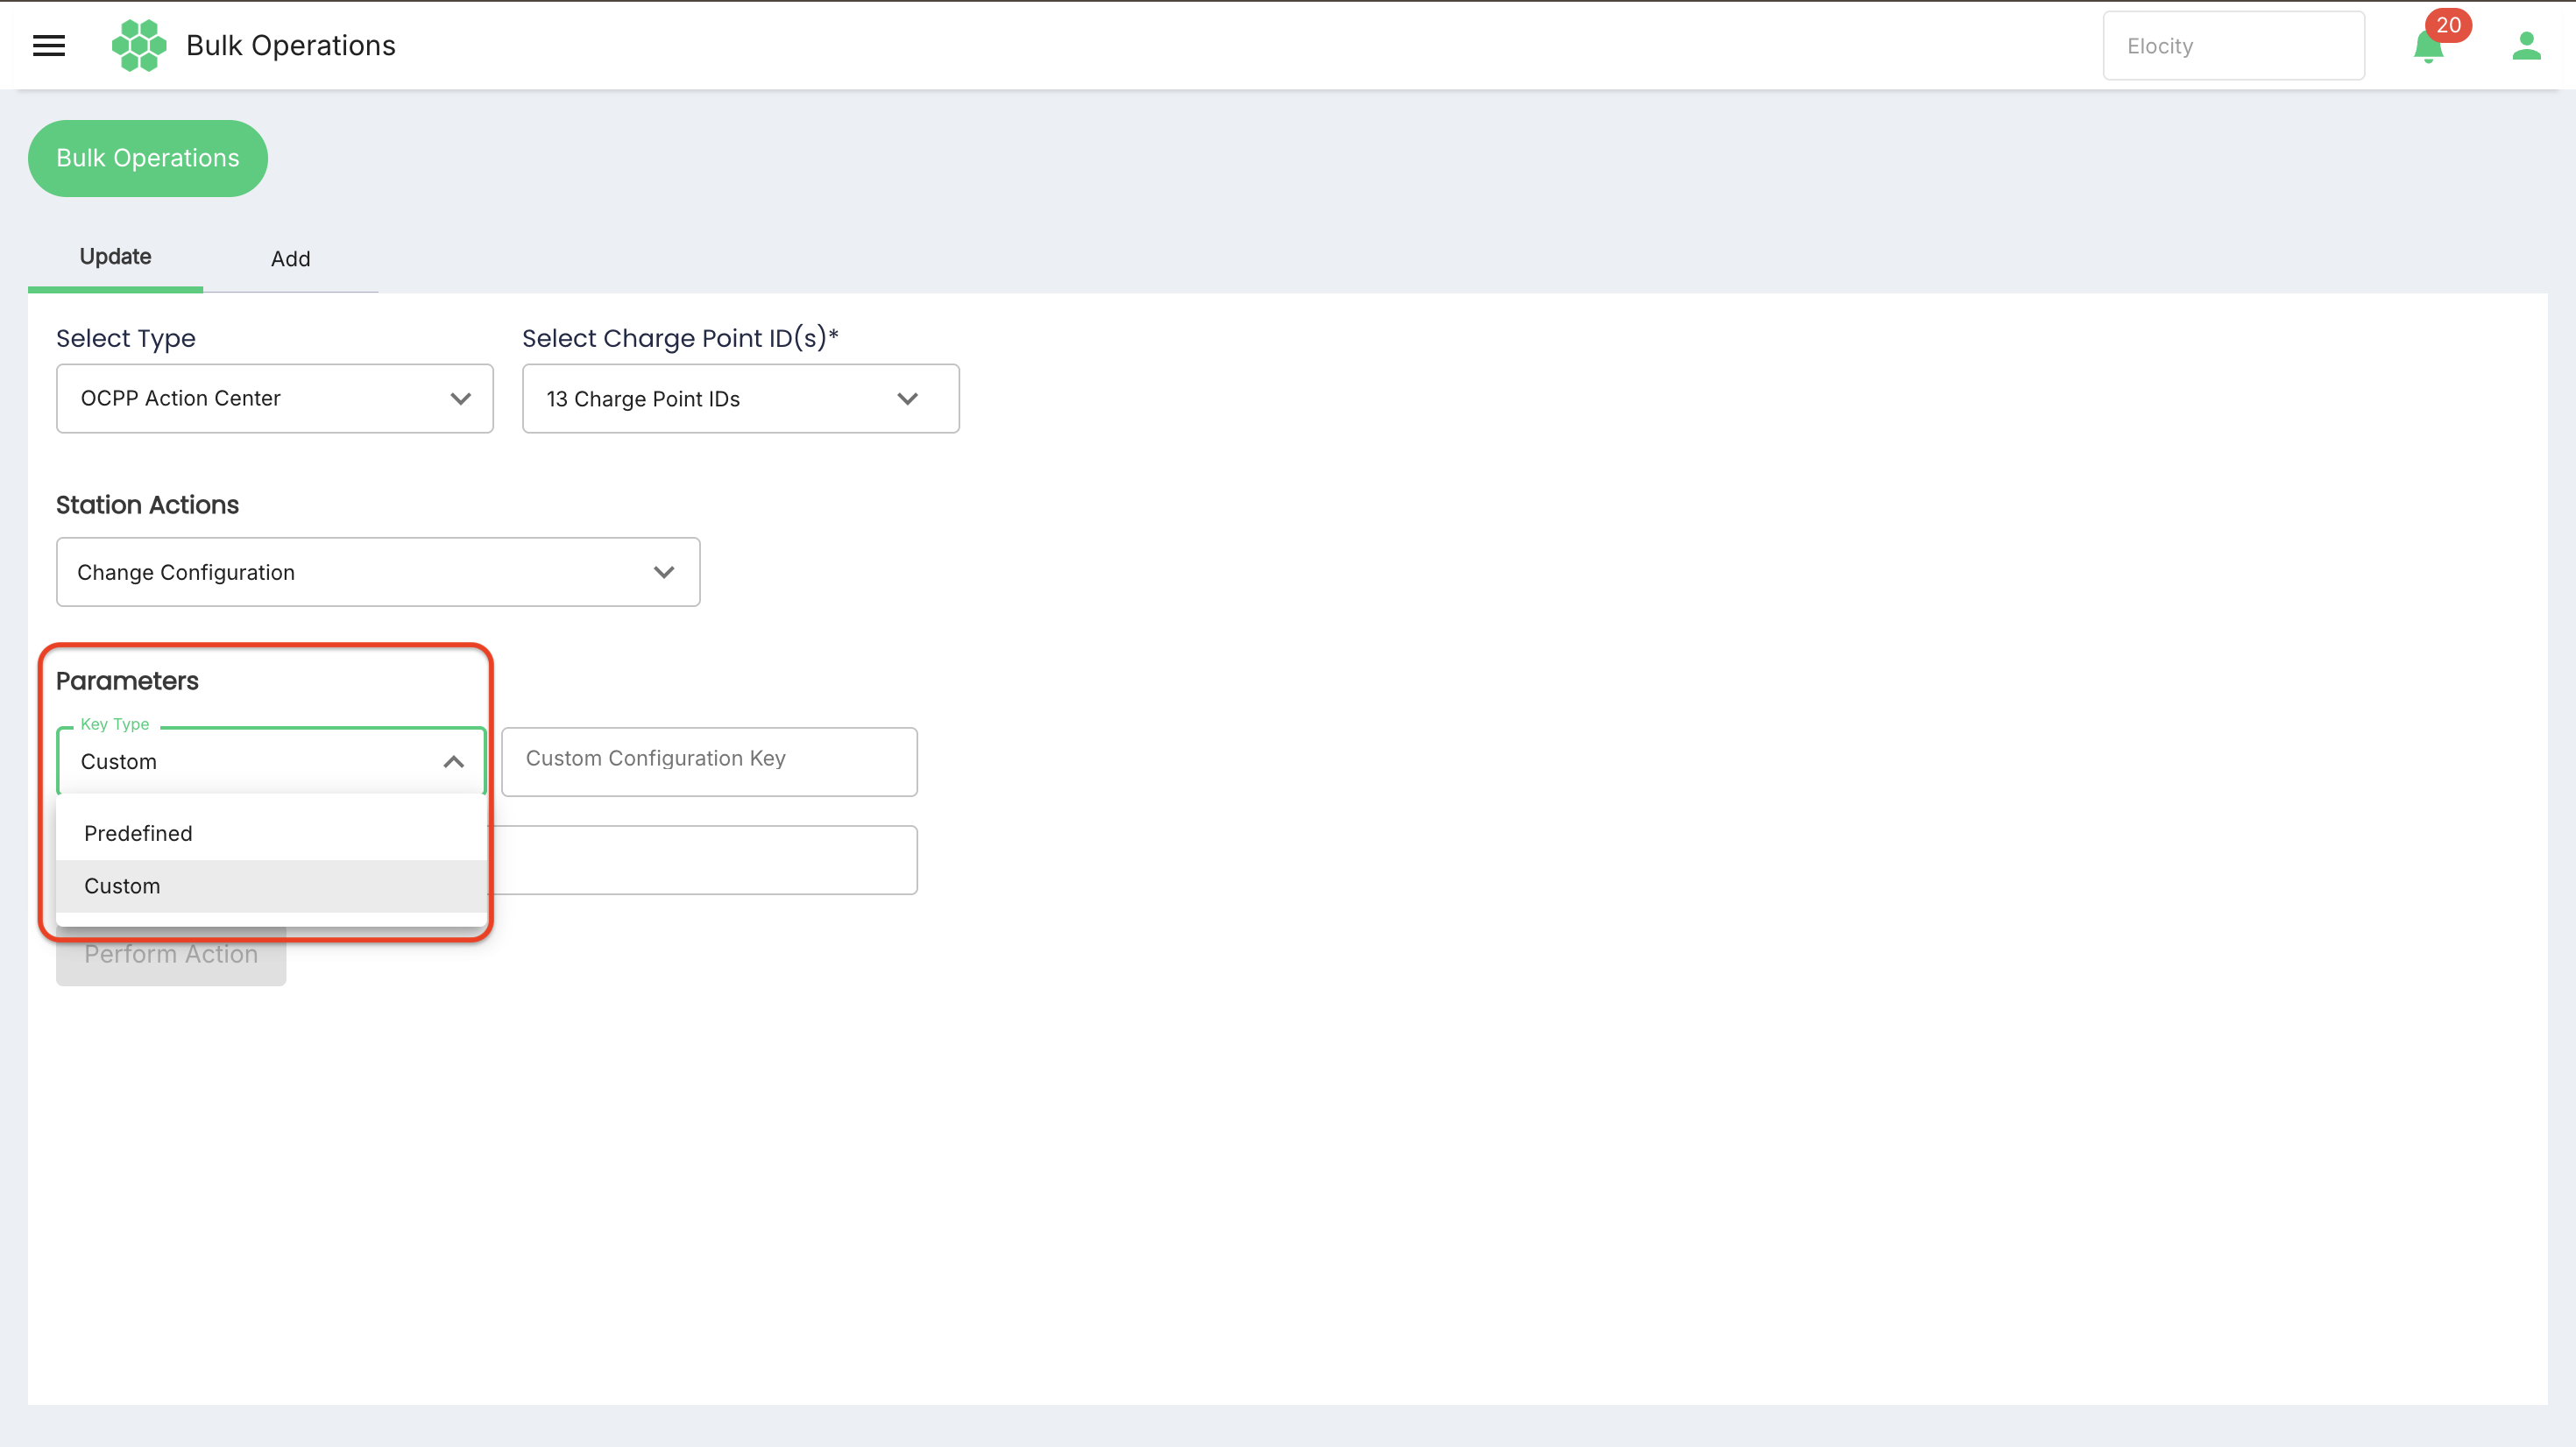
- Predefined — choose a supported key from the list.
- Custom — enter a key only when it is supported by the target charger and approved for use.
- Select or enter Configuration Key.
- Enter Value.
- Confirm that the key and value are supported by every selected target.
- Select Perform Action.
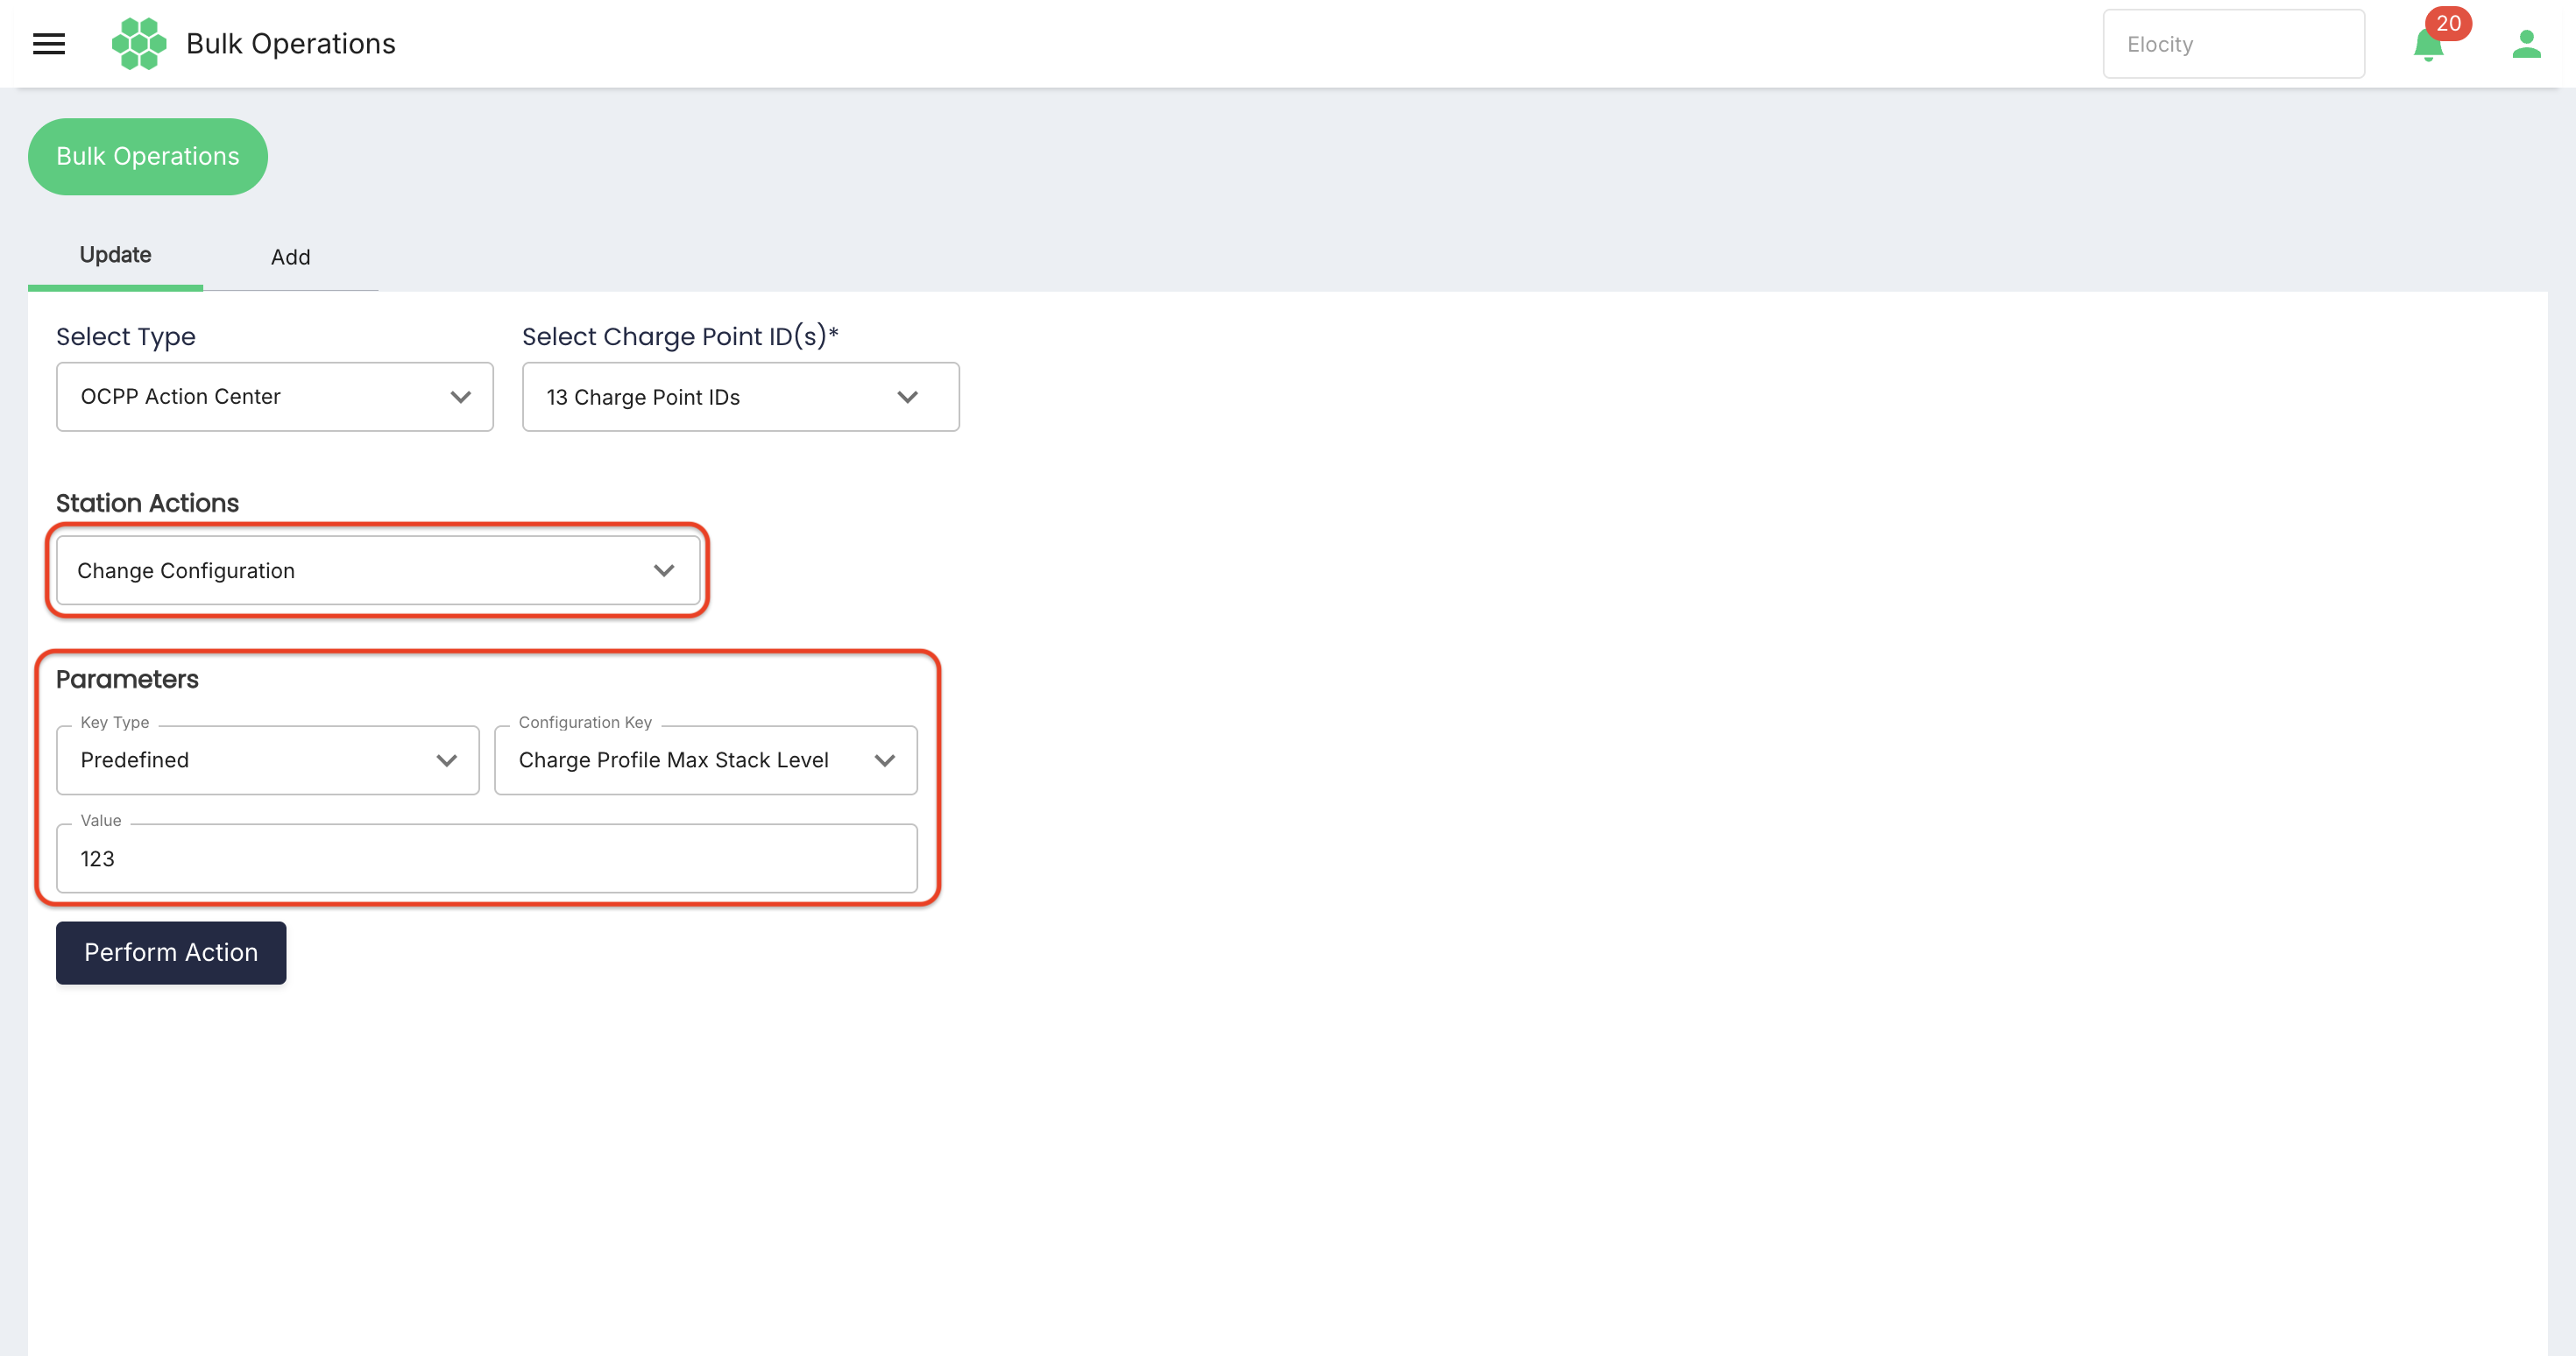
- Review accepted, rejected, unsupported, and failed results individually.
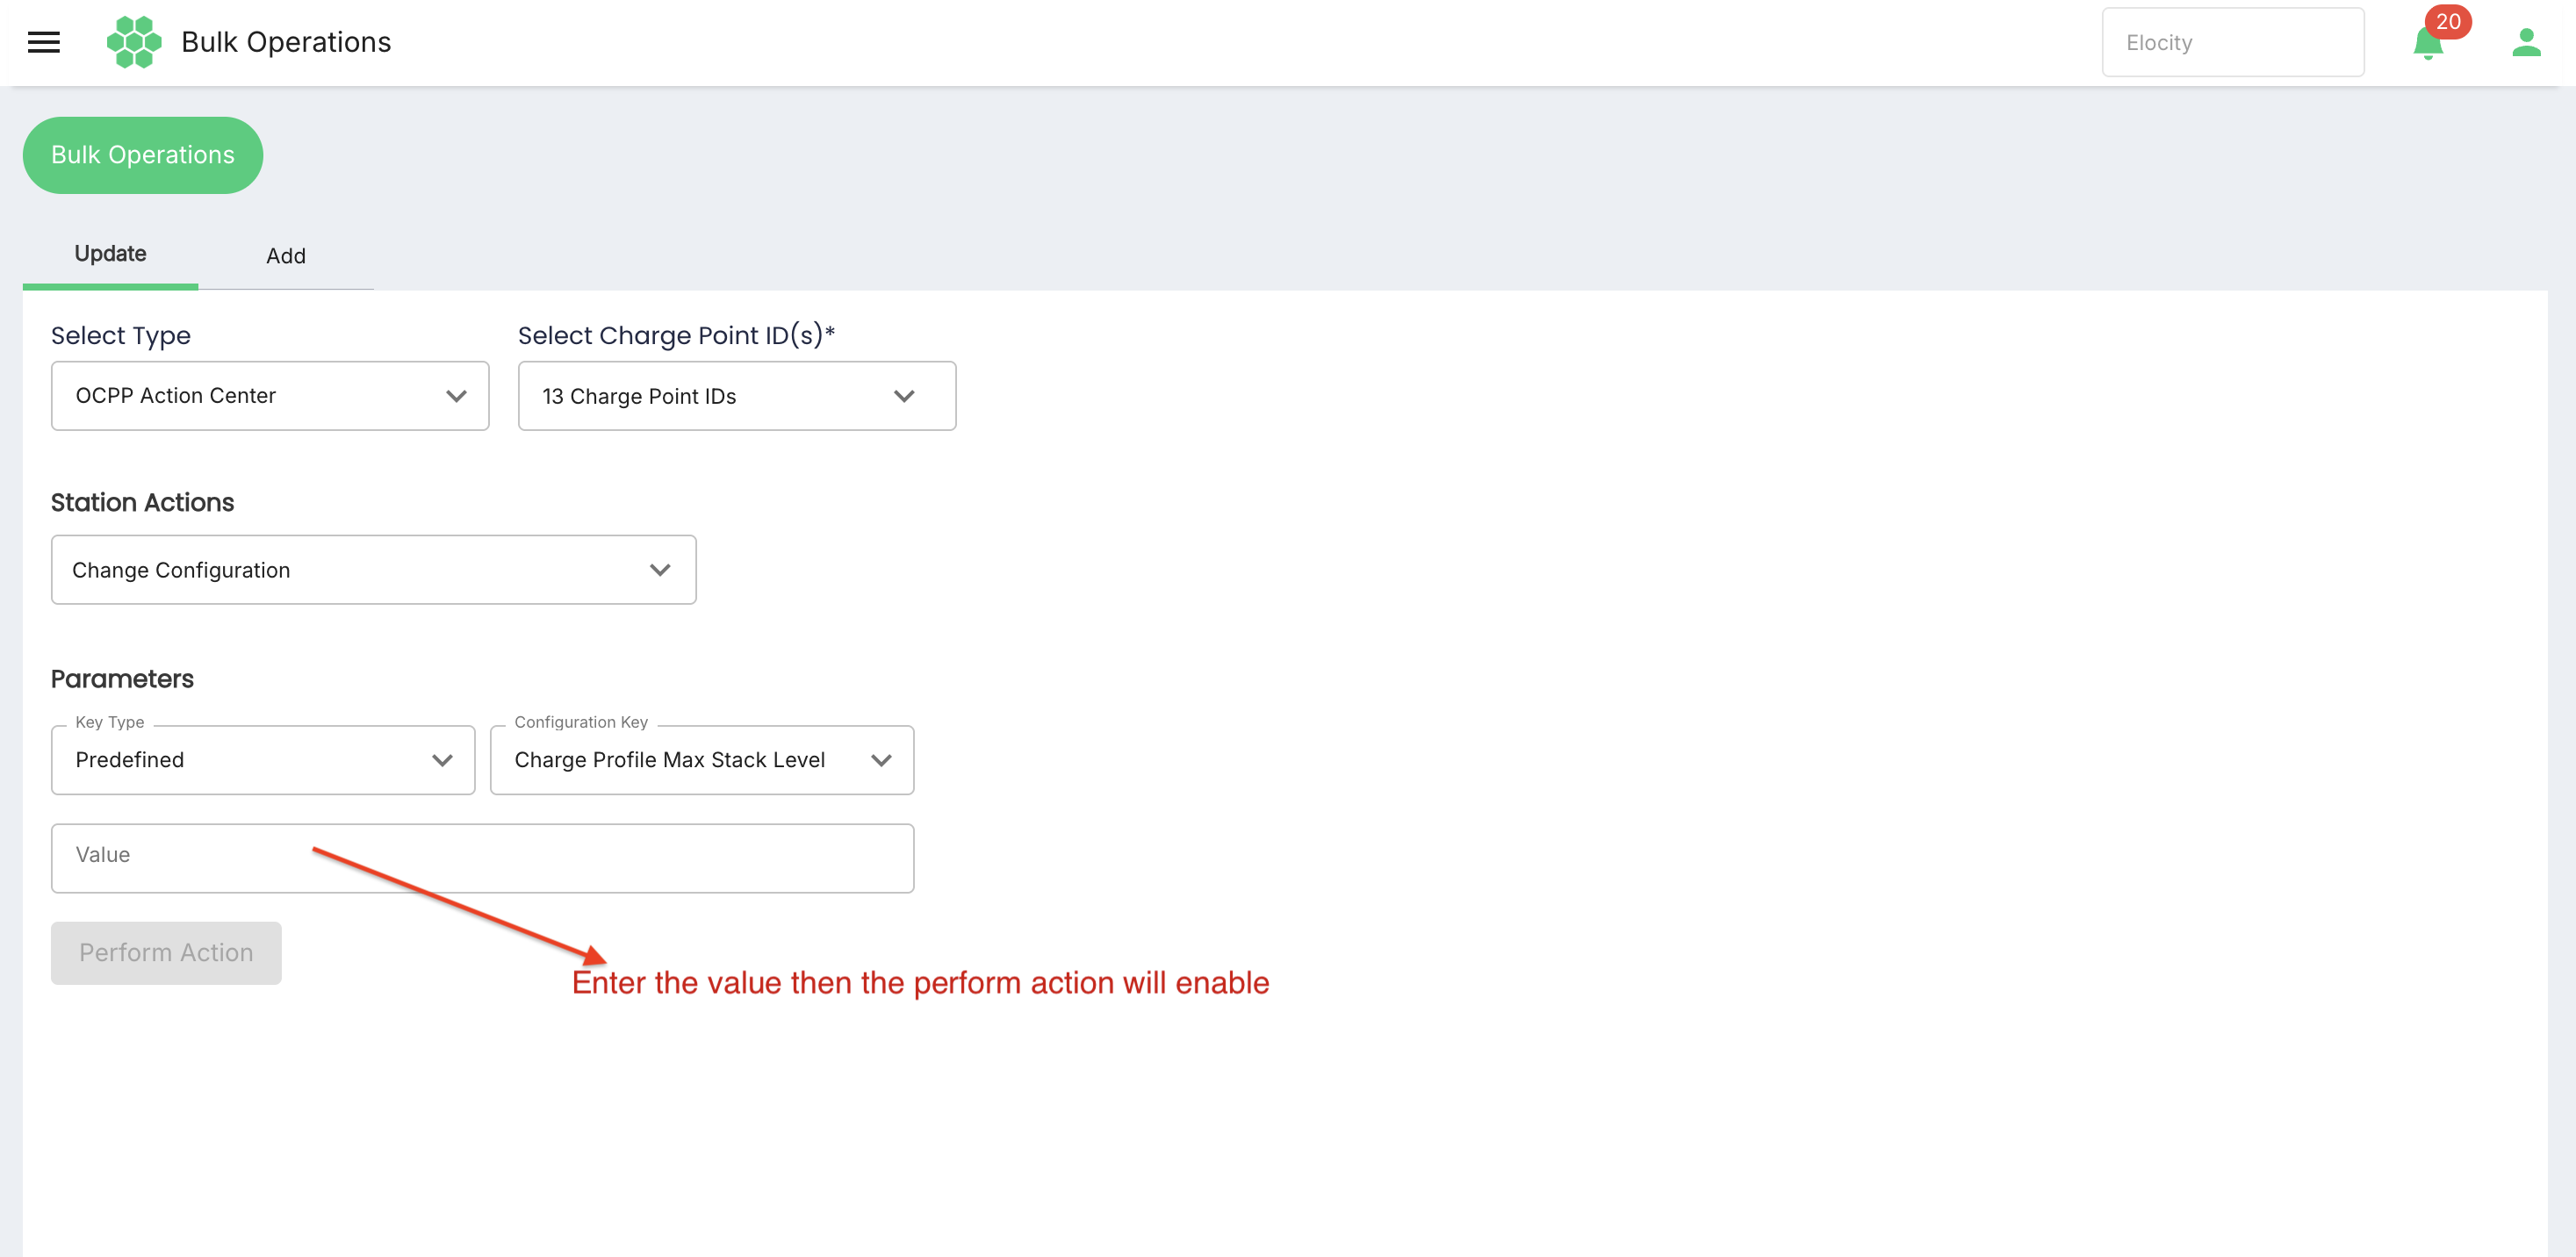
The action remains disabled until required values are supplied.
8.4 Trigger Messages
Use this action to request a standard message from selected charge points.
Verified Trigger Message choices are:
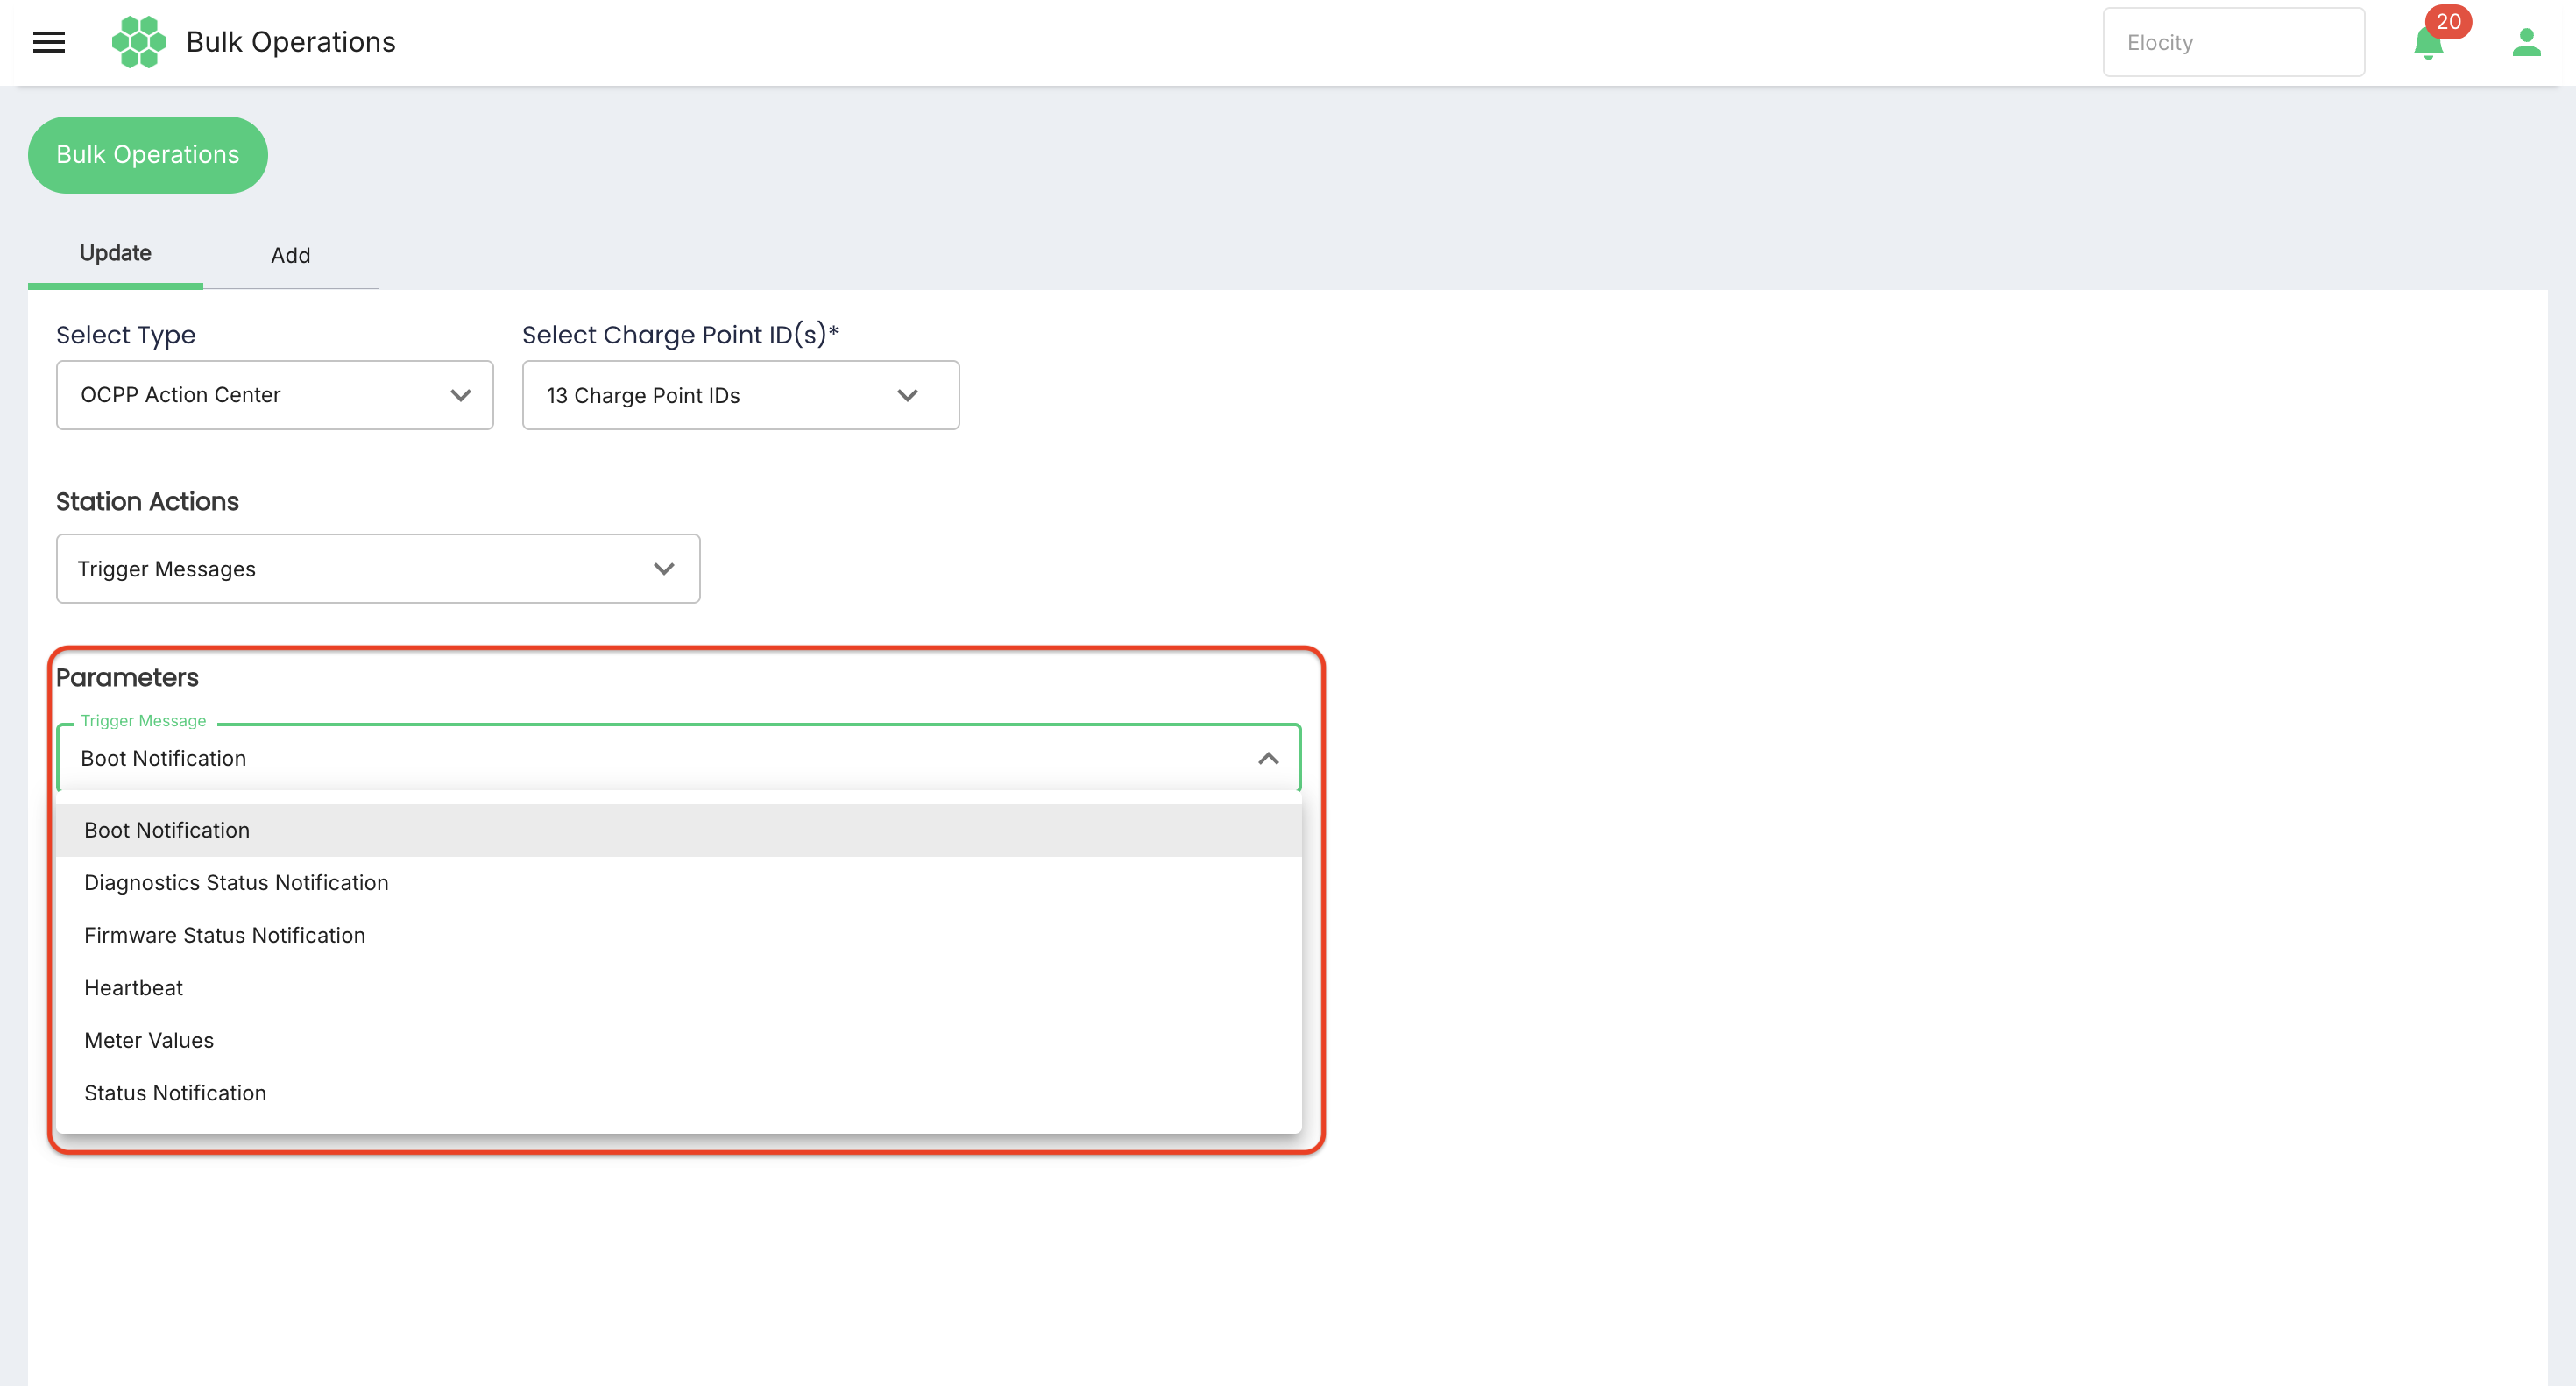
- Boot Notification
- Diagnostics Status Notification
- Firmware Status Notification
- Heartbeat
- Meter Values
- Status Notification
Procedure:
- Select the charge point IDs.
- Choose Trigger Messages.
- Select Trigger Message.
- Select Perform Action.
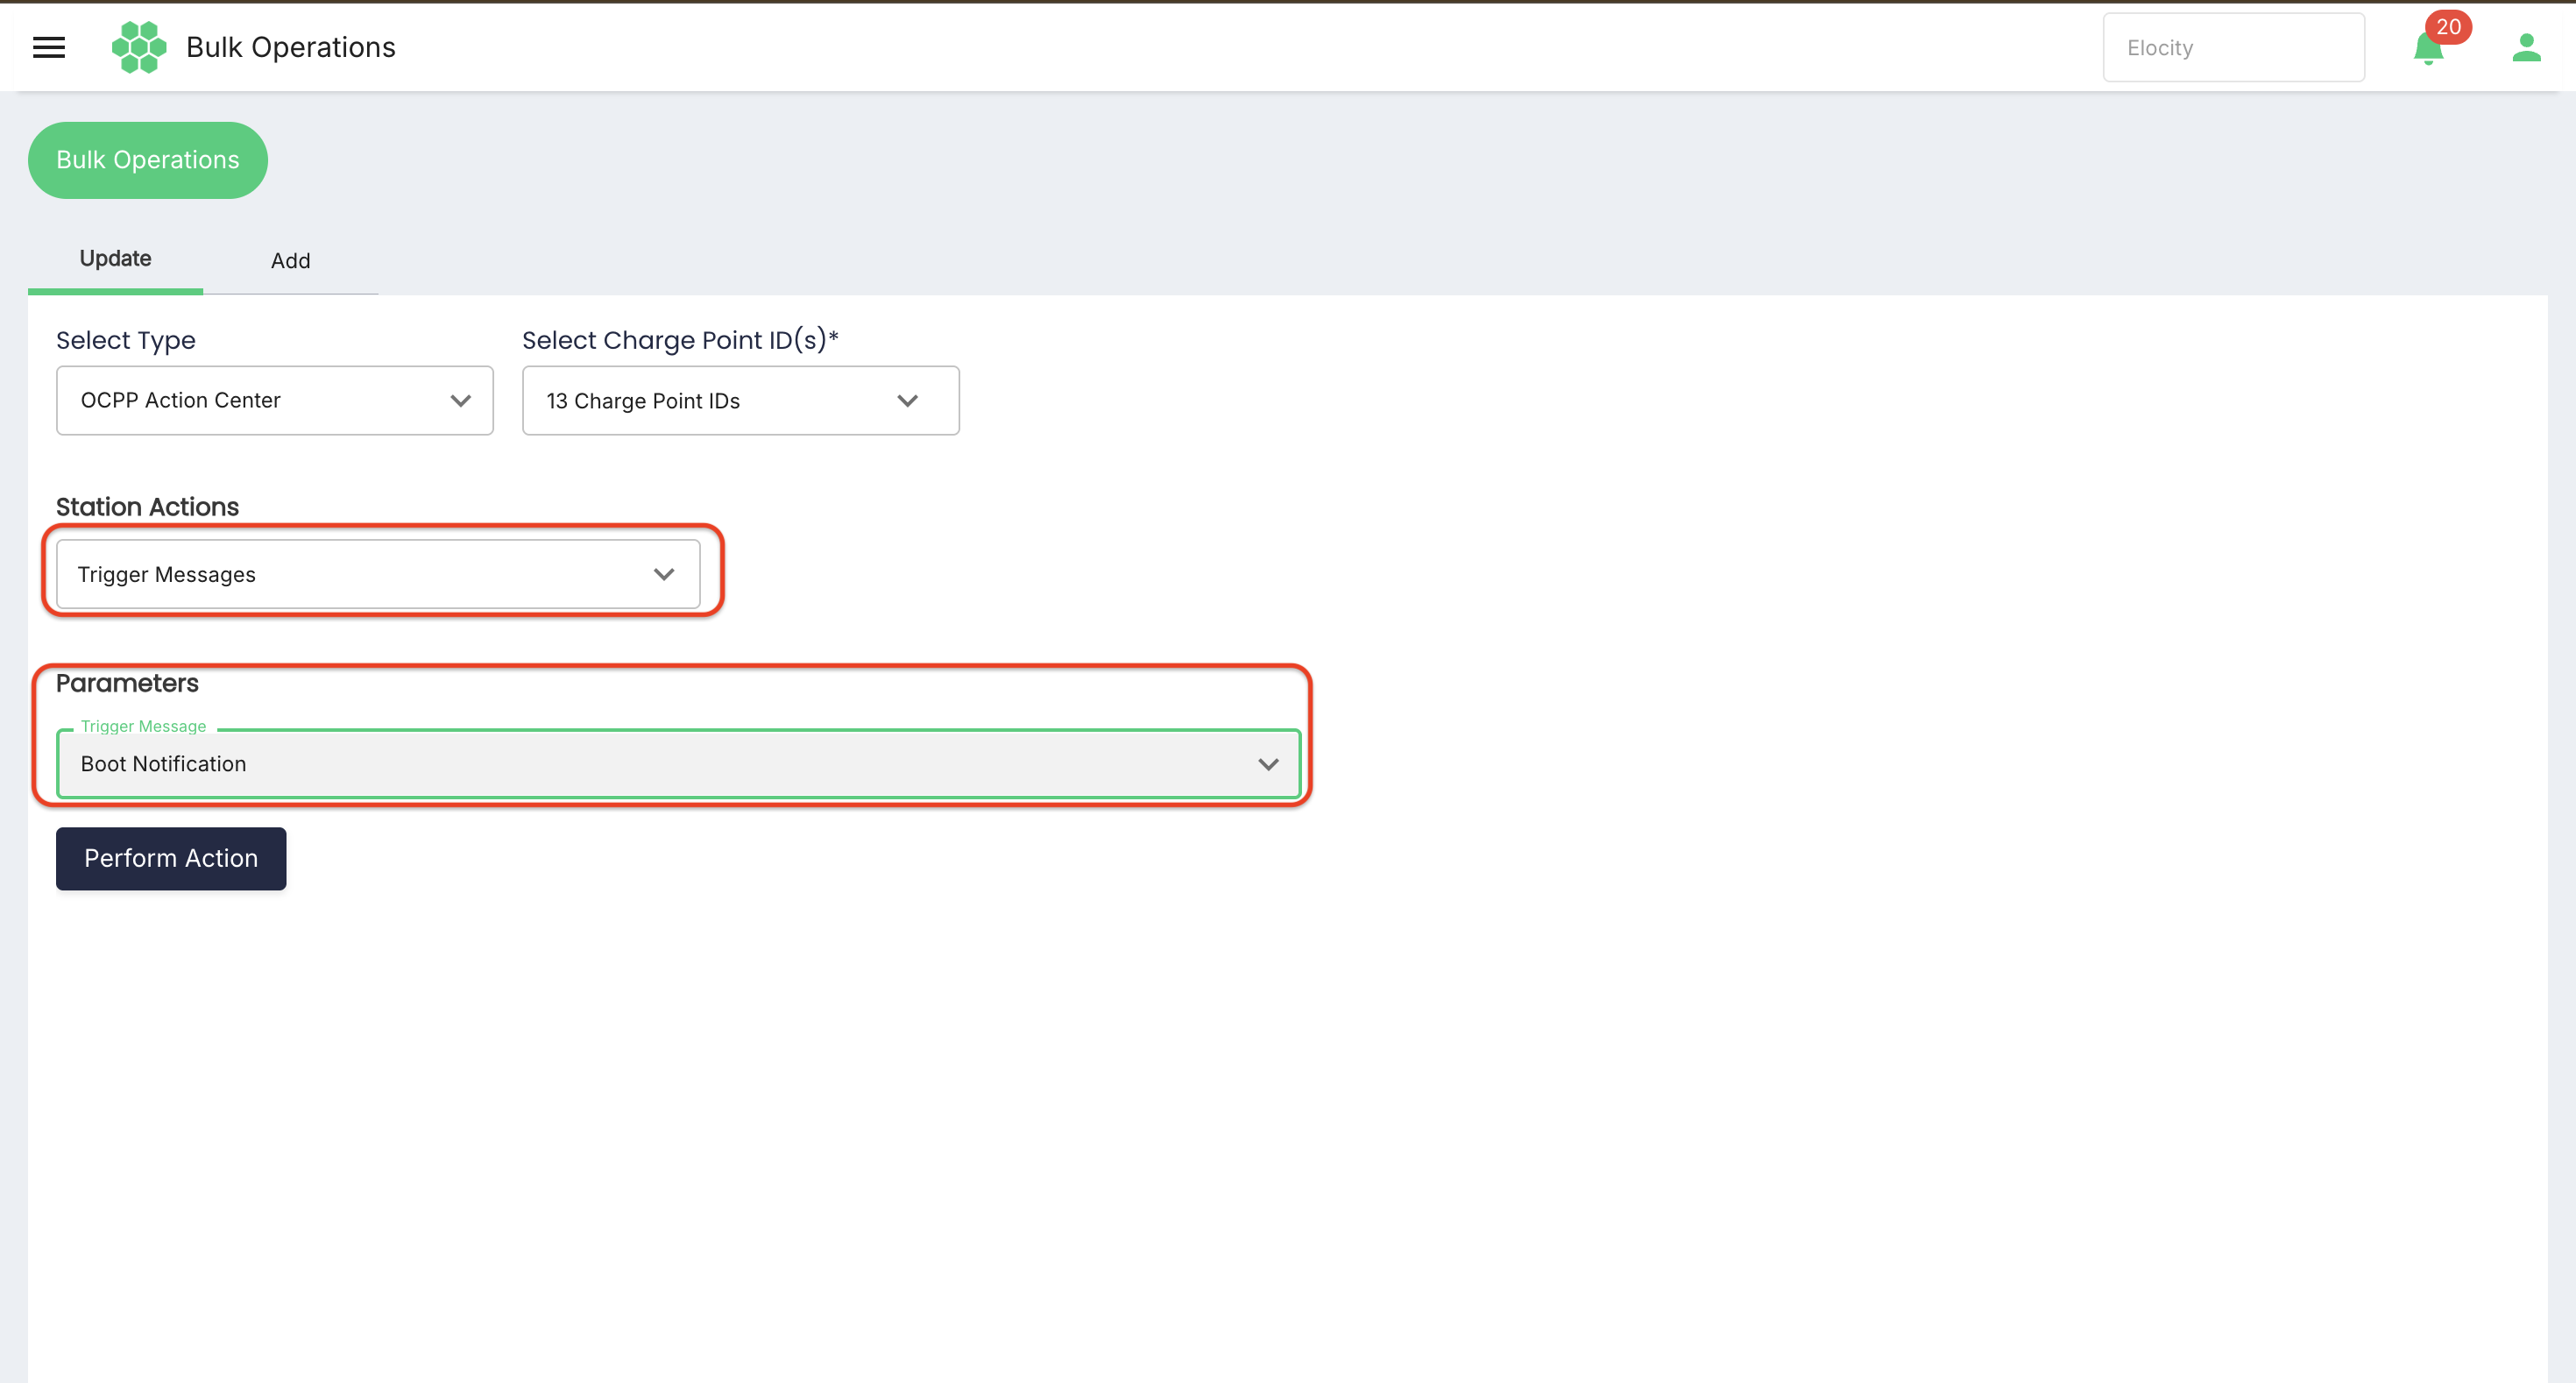
- Verify that each target sends the requested message within the expected interval.
8.5 OCPP use cases
- Mark a set of connectors Inoperative before electrical work.
- Restore charge points to Operative after verification.
- Soft reset offline or unresponsive stations after checking for sessions.
- Apply one approved configuration key to compatible chargers.
- Trigger Heartbeat or Status Notification during connectivity diagnosis.
- Trigger Meter Values for an operational data check.
9. Validation and execution behavior
The interface progressively enables fields as selections are made.
| Condition | Expected behavior | Resolution |
|---|---|---|
| No location selected | Message requests locations before a bulk operation can continue. | Select at least one location and choose Done. |
| No station selected | Message requests stations before parameters are displayed. | Select one or more stations and choose Done. |
| No charge point selected | Message requests charge point IDs before OCPP actions are displayed. | Select compatible charge point IDs and choose Done. |
| No update parameter selected | The screen asks the user to select a parameter. | Open the parameter selector and choose the intended fields. |
| Required parameter is empty | A field-level validation appears or the execution button remains disabled. | Supply a valid value for every selected parameter. |
| Change Configuration value is empty | Perform Action remains disabled. | Enter an approved value. |
| Unsupported or offline OCPP target | The target can reject or fail the command. | Review per-target results and retry only after correcting the cause. |
| Upload is not XLSX, exceeds 2 MB, or exceeds 50 entries | The import should be rejected or fail validation. | Correct the format, split the file, or reduce its size. |
10. Safe execution checklist
Complete this checklist immediately before execution:
- Correct HIEV business tenant selected.
- Correct Update or Add tab selected.
- Correct operation type selected.
- Target count reviewed.
- Search and hierarchy selection reviewed for unintended parent-level selection.
- Every selected parameter is intended to change.
- Values reviewed for format, units, currency, and time zone.
- Active sessions checked before disruptive station or OCPP actions.
- Charger compatibility checked for Make, Model, Security Profile, and OCPP keys.
- Required operational or finance approval obtained.
- A rollback or corrective plan is available.
After execution:
- Submission result reviewed.
- Failed or rejected targets recorded.
- Representative target records refreshed and verified.
- OCPP reconnection or requested messages confirmed when applicable.
- Change reference, operator, time, scope, and evidence retained.
11. Troubleshooting
11.1 Update or Perform Action is disabled
- Confirm that at least one target is selected.
- Confirm that at least one parameter or station action is selected.
- Complete every required field.
- For Change Configuration, enter a Value.
- Correct any field-level validation message.
11.2 A required parameter is not displayed
Some parameters can be role-, tenant-, protocol-, or feature-controlled. If GST IN, Reservation Type, Location Manager, Maintenance Period, or another required field is absent:
- Confirm that the correct operation type is selected.
- Confirm that your role has permission to edit the field.
- Confirm that the feature is enabled for the tenant.
- Confirm that the selected targets support the parameter.
- Use the approved individual-management workflow or contact the system administrator; do not substitute an unrelated field.
11.3 Only some targets were updated
- Review per-target validation or command results.
- Check whether some stations are offline or use an incompatible OCPP version.
- Check whether a selected configuration key is supported by every charger model.
- Refresh affected records before retrying.
- Retry only the failed targets after correcting the cause.
11.4 An uploaded file is rejected
- Use the latest downloaded template.
- Keep the
.xlsxformat. - Keep the file below 2 MB.
- Limit the file to 50 entries.
- Do not modify required headers.
- Remove duplicate or invalid records.
- Correct date, number, email, and identifier formats.
11.5 OCPP action was accepted but no result is visible
- Confirm charger connectivity.
- Allow the normal protocol response interval.
- Refresh station status and relevant logs.
- For Trigger Messages, check the expected inbound message type.
- For Reset, confirm reconnection and BootNotification.
- Escalate with the charge point IDs, command, timestamp, and response details.
12. Requirement coverage
| Requirement | Manual coverage |
|---|---|
| Application allows users to perform bulk operations | Sections 1–4 |
| Location: Payment Type | Section 6.2 |
| Location: GST IN | Section 6.2 and missing-field troubleshooting |
| Location: Reservation Type | Section 6.2; verified Reservable mapping noted |
| Location: Location Manager | Section 6.2 and missing-field troubleshooting |
| Location: Contact Email | Section 6.2 |
| Location: Contact Phone Number | Section 6.2 |
| Station: Minimum Wallet Balance | Section 7.2; verified Minimum Balance mapping noted |
| Station: Maintenance Period | Section 7.2 and missing-field troubleshooting |
| Station: Station State | Section 7.2 |
| Station: Make and Model | Section 7.2 |
| Station: Auto cut off on low wallet balance | Section 7.2; verified Auto Stop Charging mapping noted |
| OCPP: Change Configuration | Section 8.3 |
| OCPP: Trigger Messages | Section 8.4 |
| OCPP: Change Availability | Section 8.1 |
| OCPP: Reset Station | Section 8.2 |
13. Glossary
| Term | Definition |
|---|---|
| Bulk operation | One update, addition, or command applied to multiple selected targets. |
| Location | A charging site that contains one or more stations. |
| Station | A managed charging-station record within a location. |
| Charge Point ID | The OCPP identity used to communicate with a charger. |
| Prepaid | Payment model funded before charging. |
| Postpaid | Payment model billed after charging under approved terms. |
| Operative | Availability state that permits use, subject to the charger's actual status. |
| Inoperative | Availability state that prevents use. |
| Soft reset | Controlled software reset with lower expected disruption. |
| Hard reset | Full reset that can cause greater interruption. |
| Predefined key | Configuration key supplied by HIEV's supported-key list. |
| Custom key | Charger-specific configuration key entered by an authorized user. |
Verification note: This manual combines the supplied Bulk Operations requirements with read-only verification of the live HIEV CPMS Canada interface on 4 August 2026. No bulk update, upload, station reset, configuration change, availability change, or trigger command was executed during verification.