Manage Businesses
Purpose
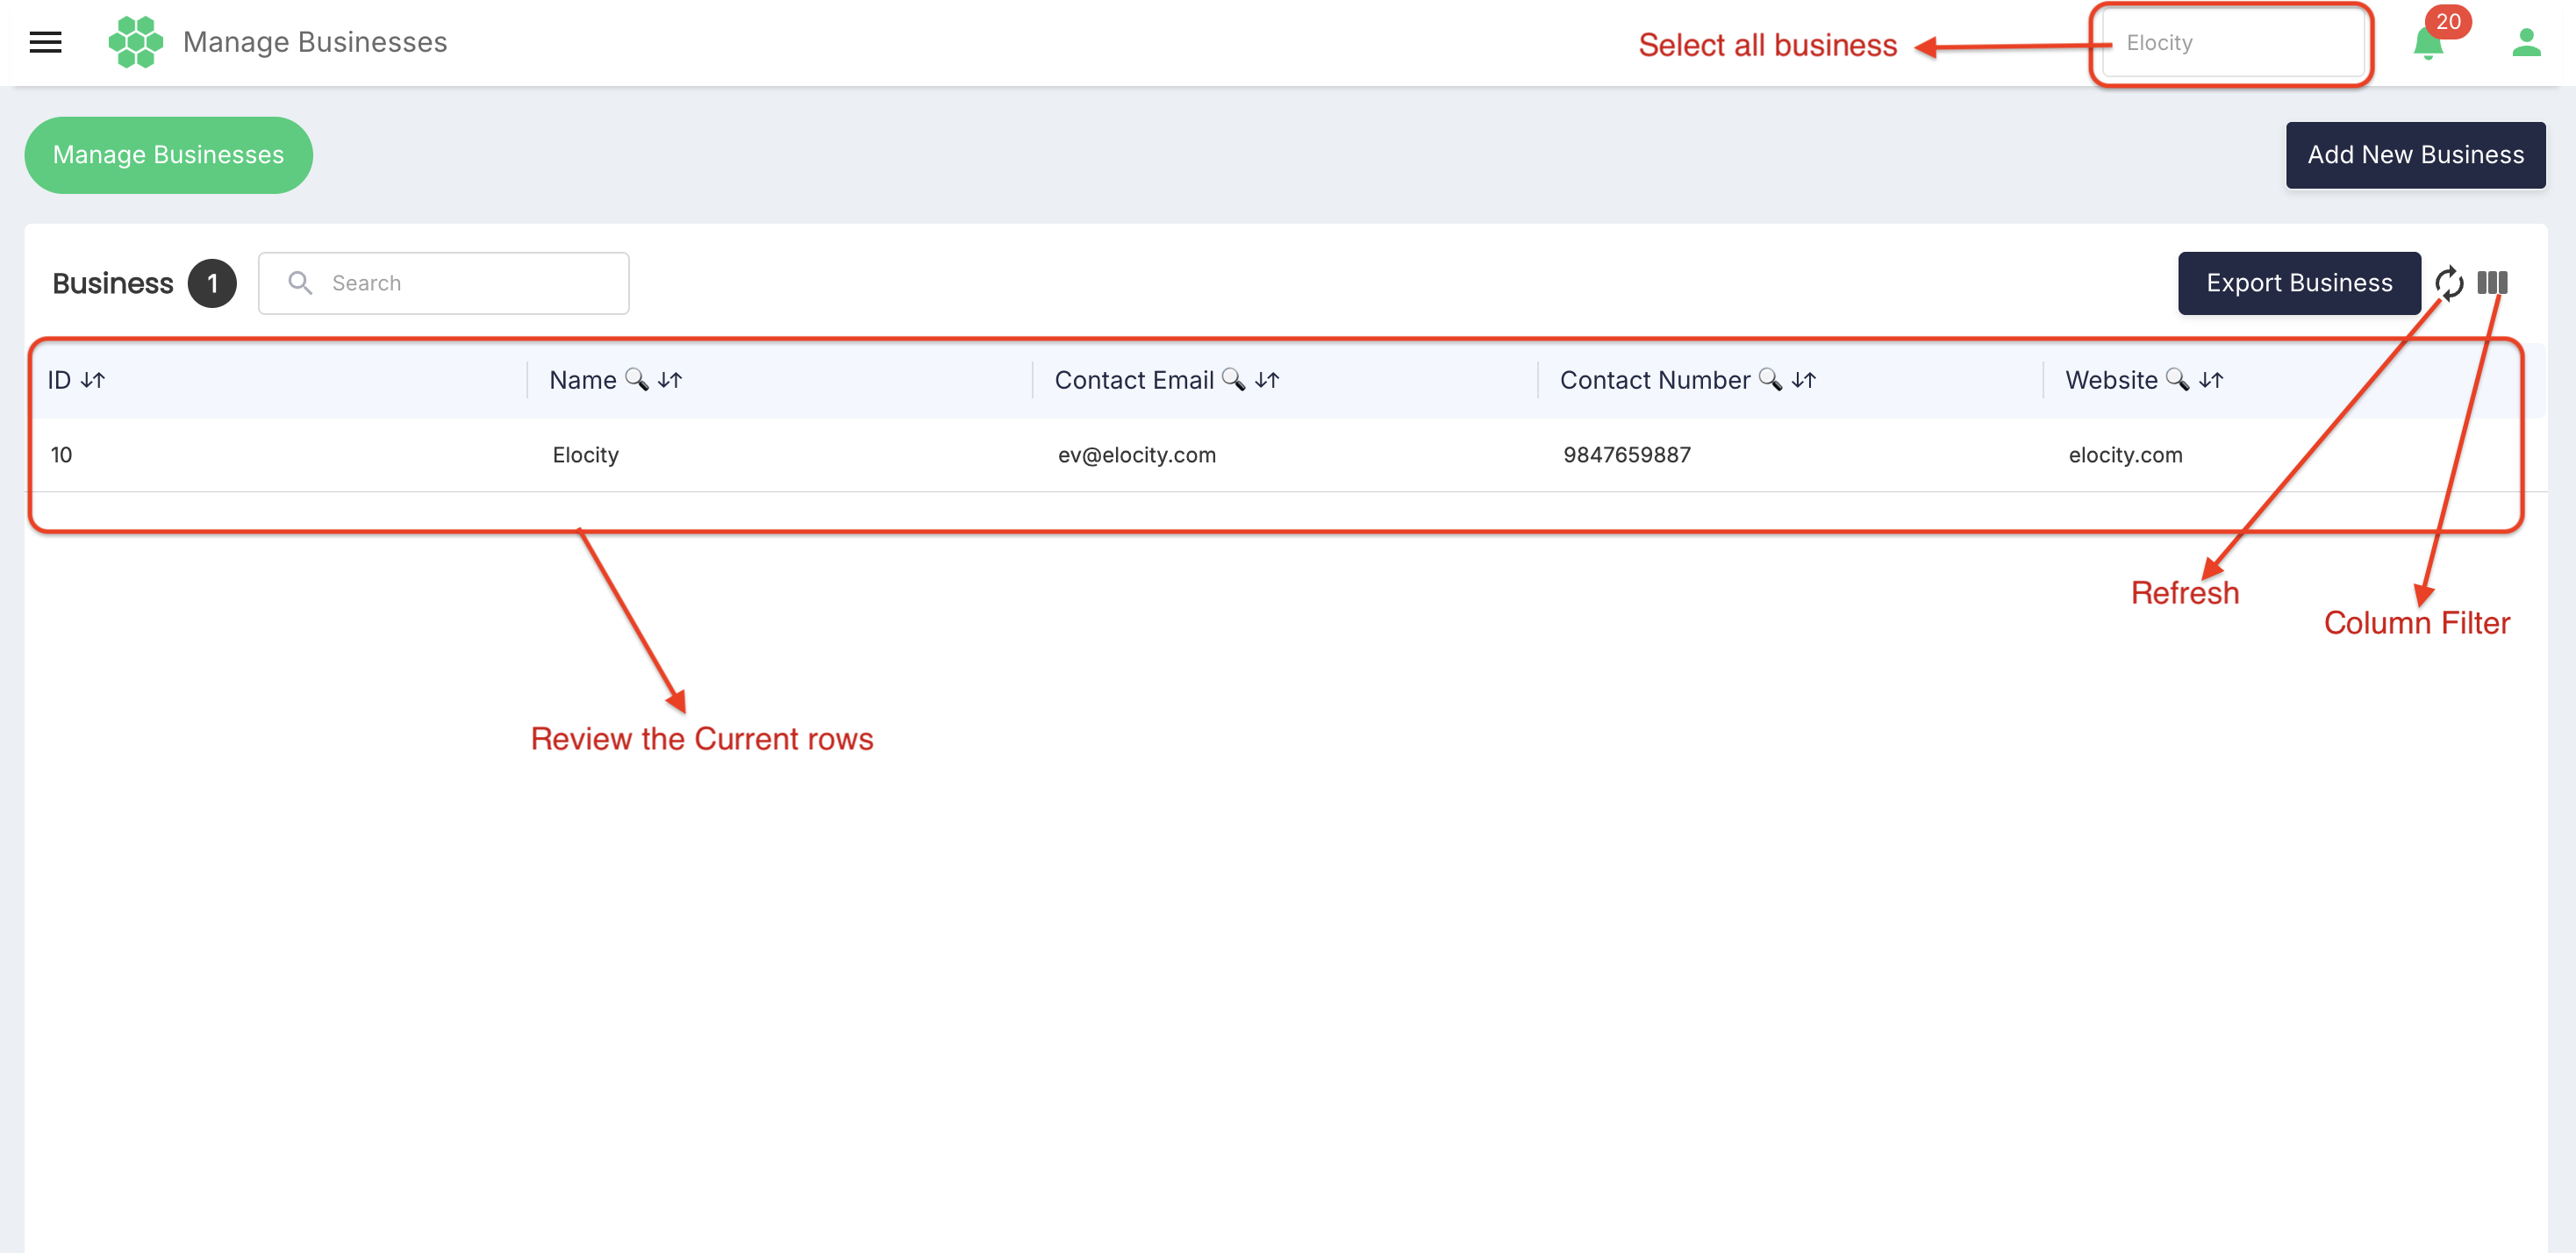
The Manage Businesses page provides a central place to view and maintain the business accounts available to the signed-in user. It presents business-level identity and contact information, including the business identifier, name, contact email, contact number, and website, in a single searchable grid.
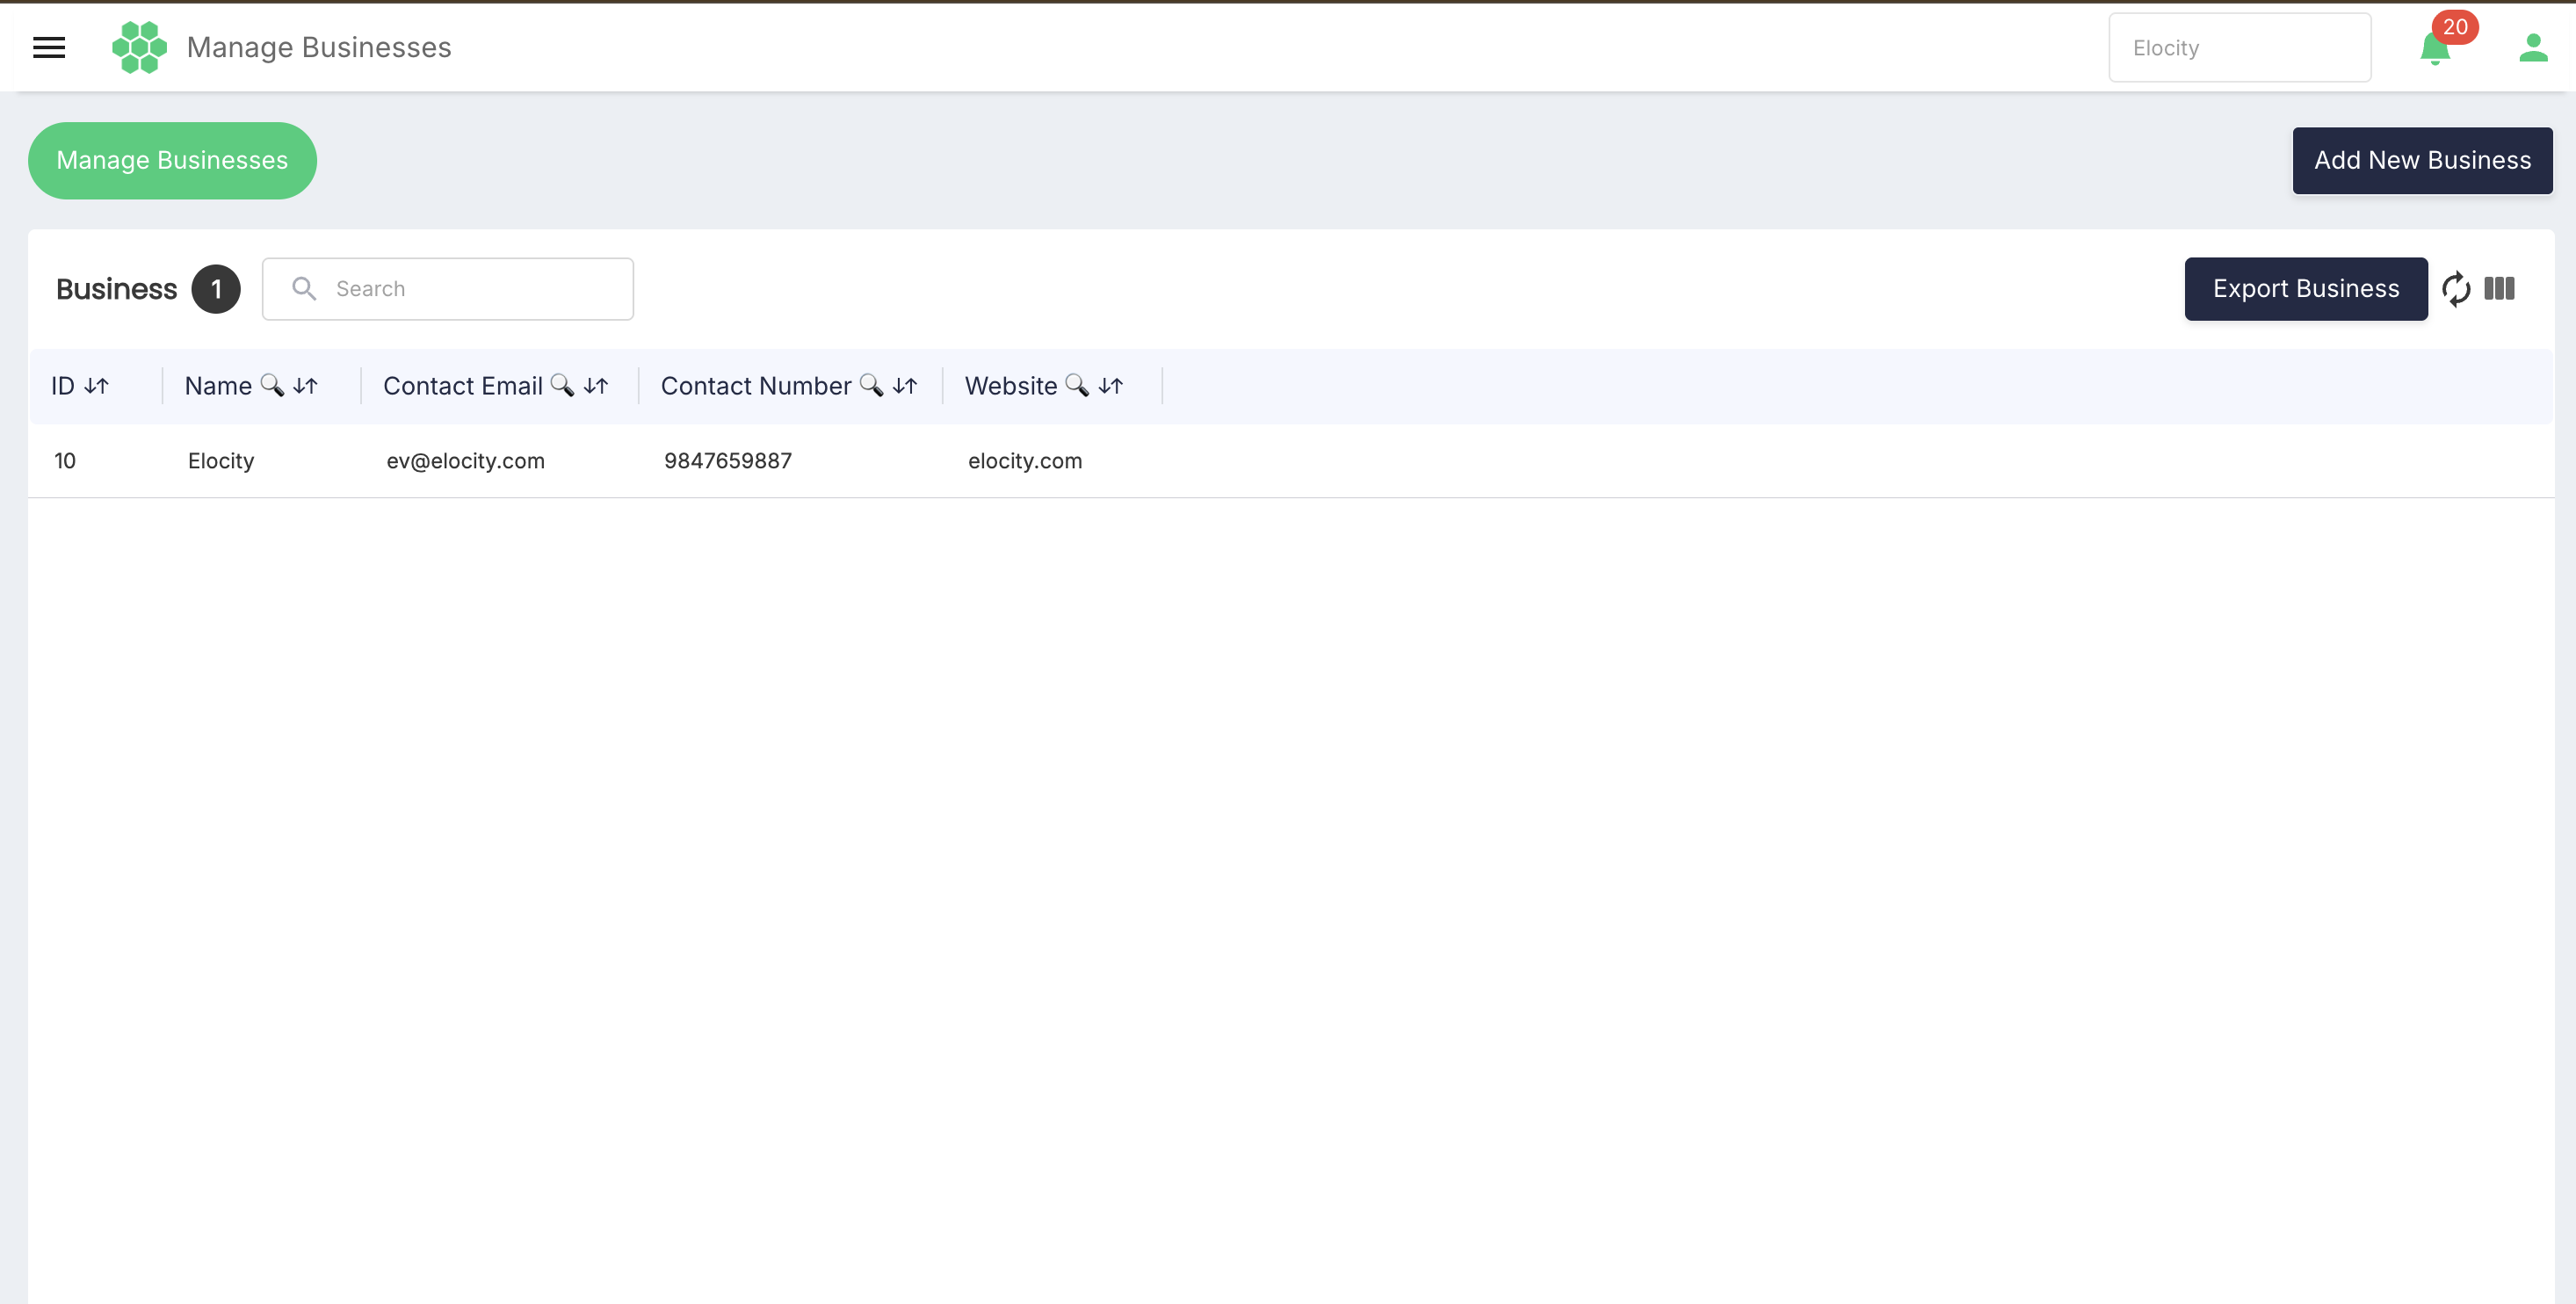
From this page, an authorized user can:
- Review the list of businesses available to the current user.
- Search the business inventory by keyword or by individual column.
- Export the displayed business data.
- Refresh the list to request the latest business information.
- Control which grid columns are visible.
- Open the business creation form to add a new business.
The businesses returned, the columns displayed, and the actions available depend on the user's business assignments and permissions. Application access is controlled through role-to-permission mapping, and a user's assigned role must contain the permissions required for each Manage Businesses page and action.
Accessing Manage Businesses
- Sign in to the HIEV portal.
- Open Business in the main navigation.
- Select Manage Businesses.
The page header also provides the All Businesses selector, which lists the businesses available to the current user and is used across the portal to set the active business context.
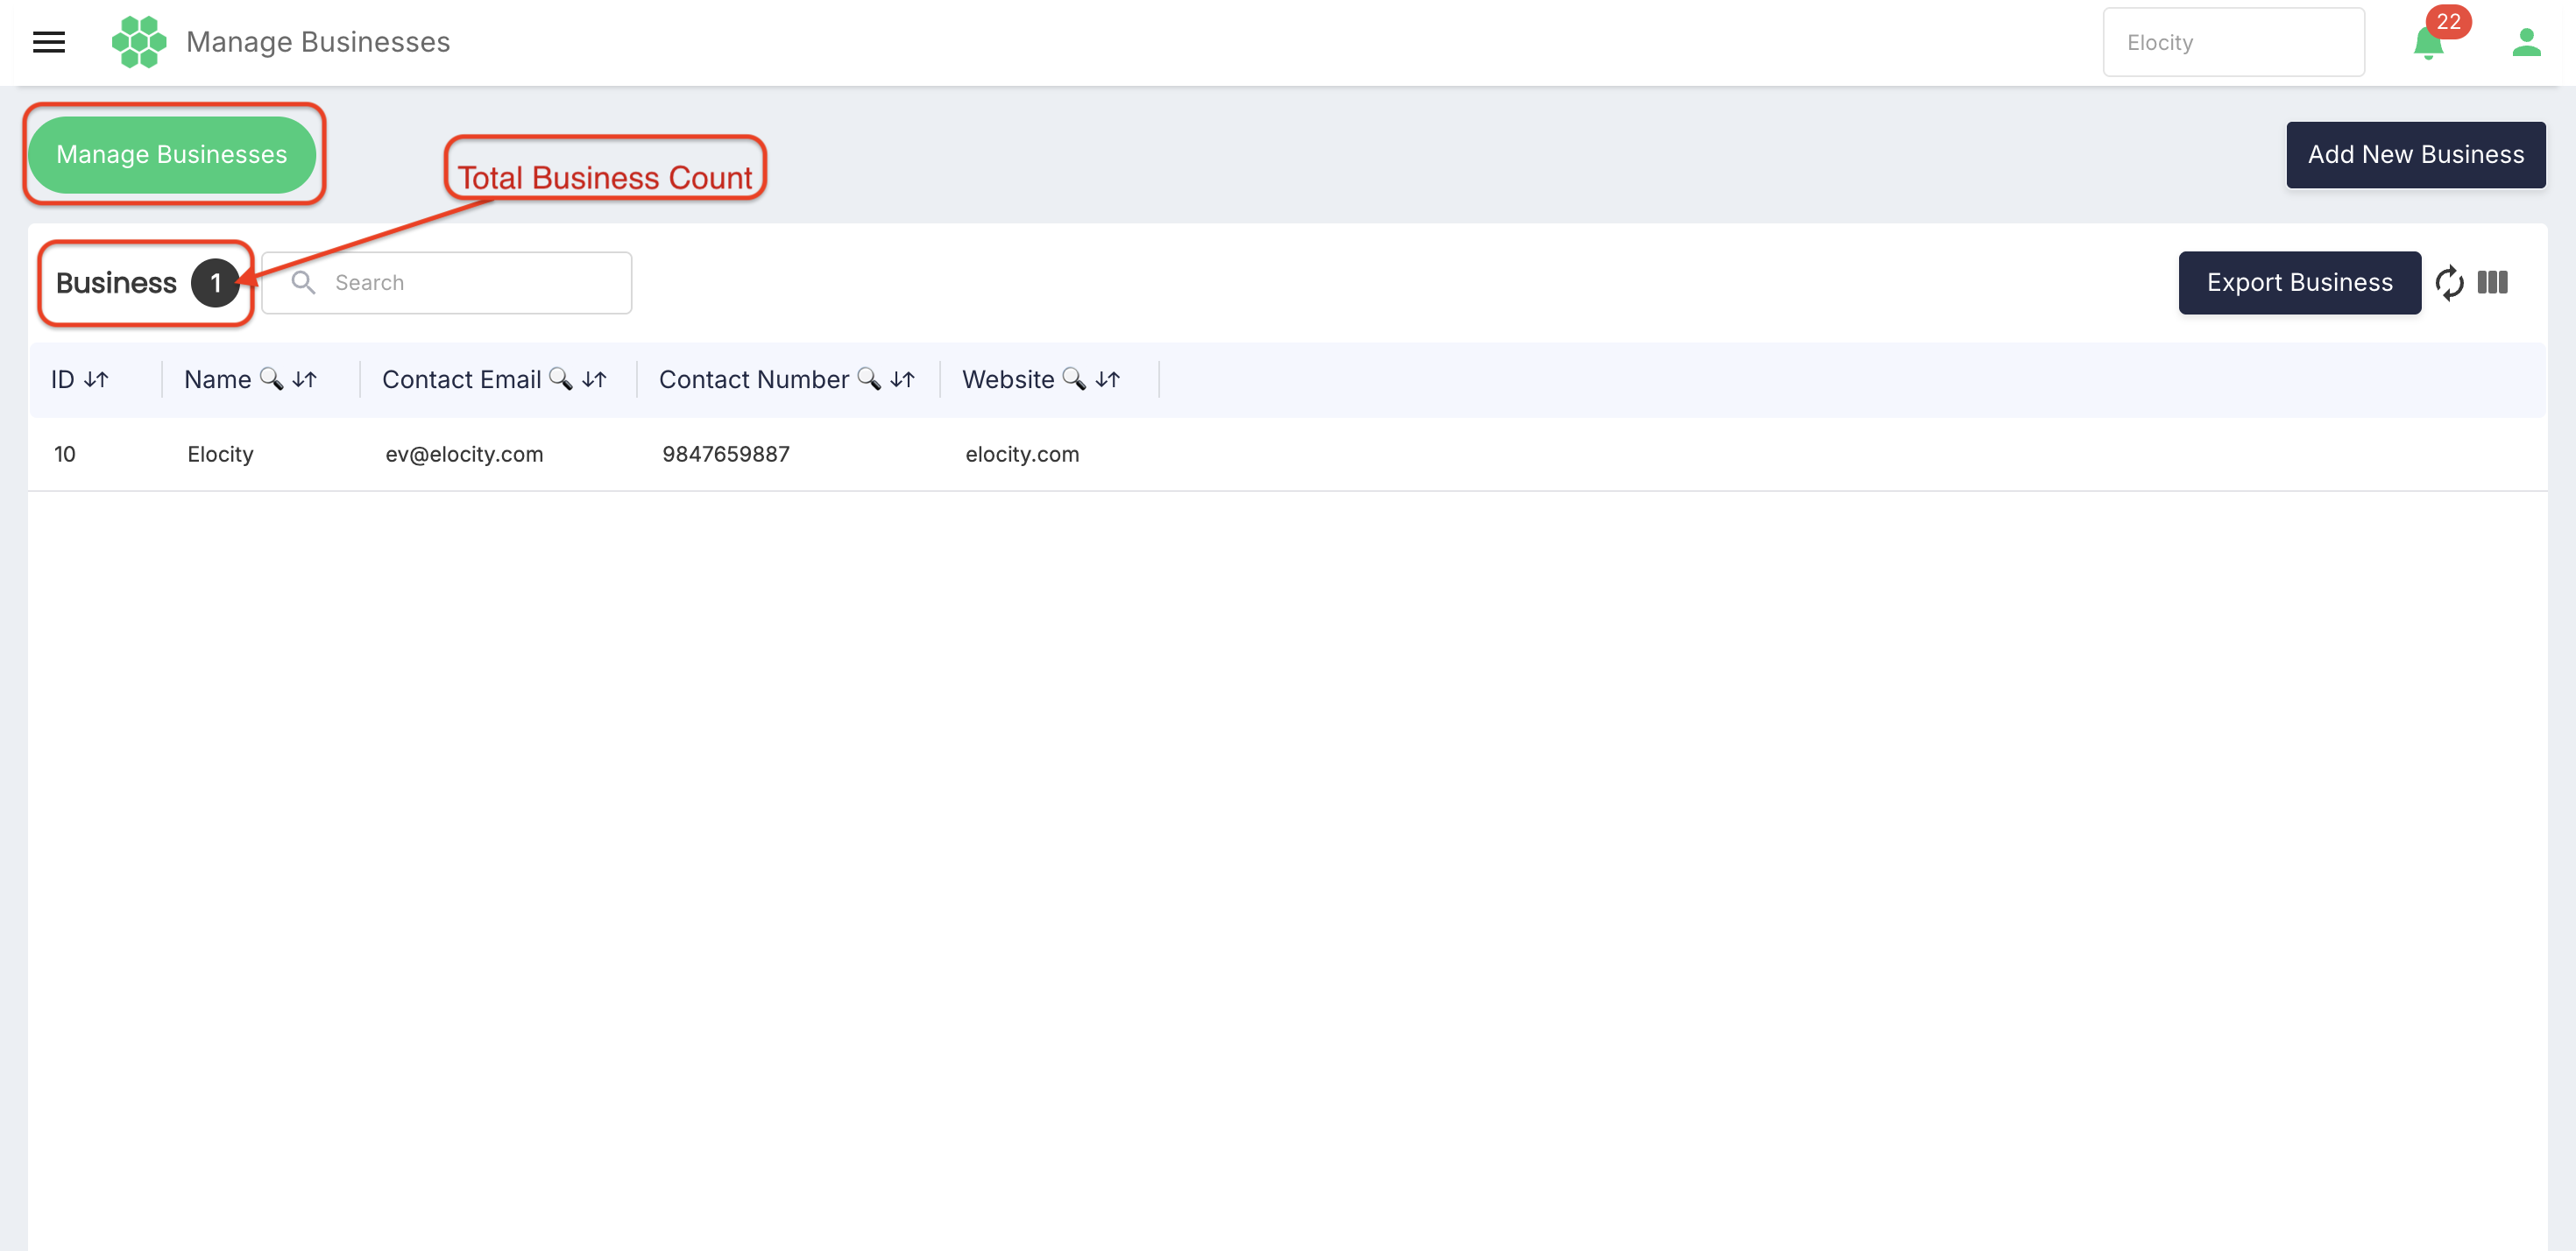
Page layout
The Manage Businesses page contains:
- Add New Business – opens the business creation form.
- Search – searches the business grid using entered text.
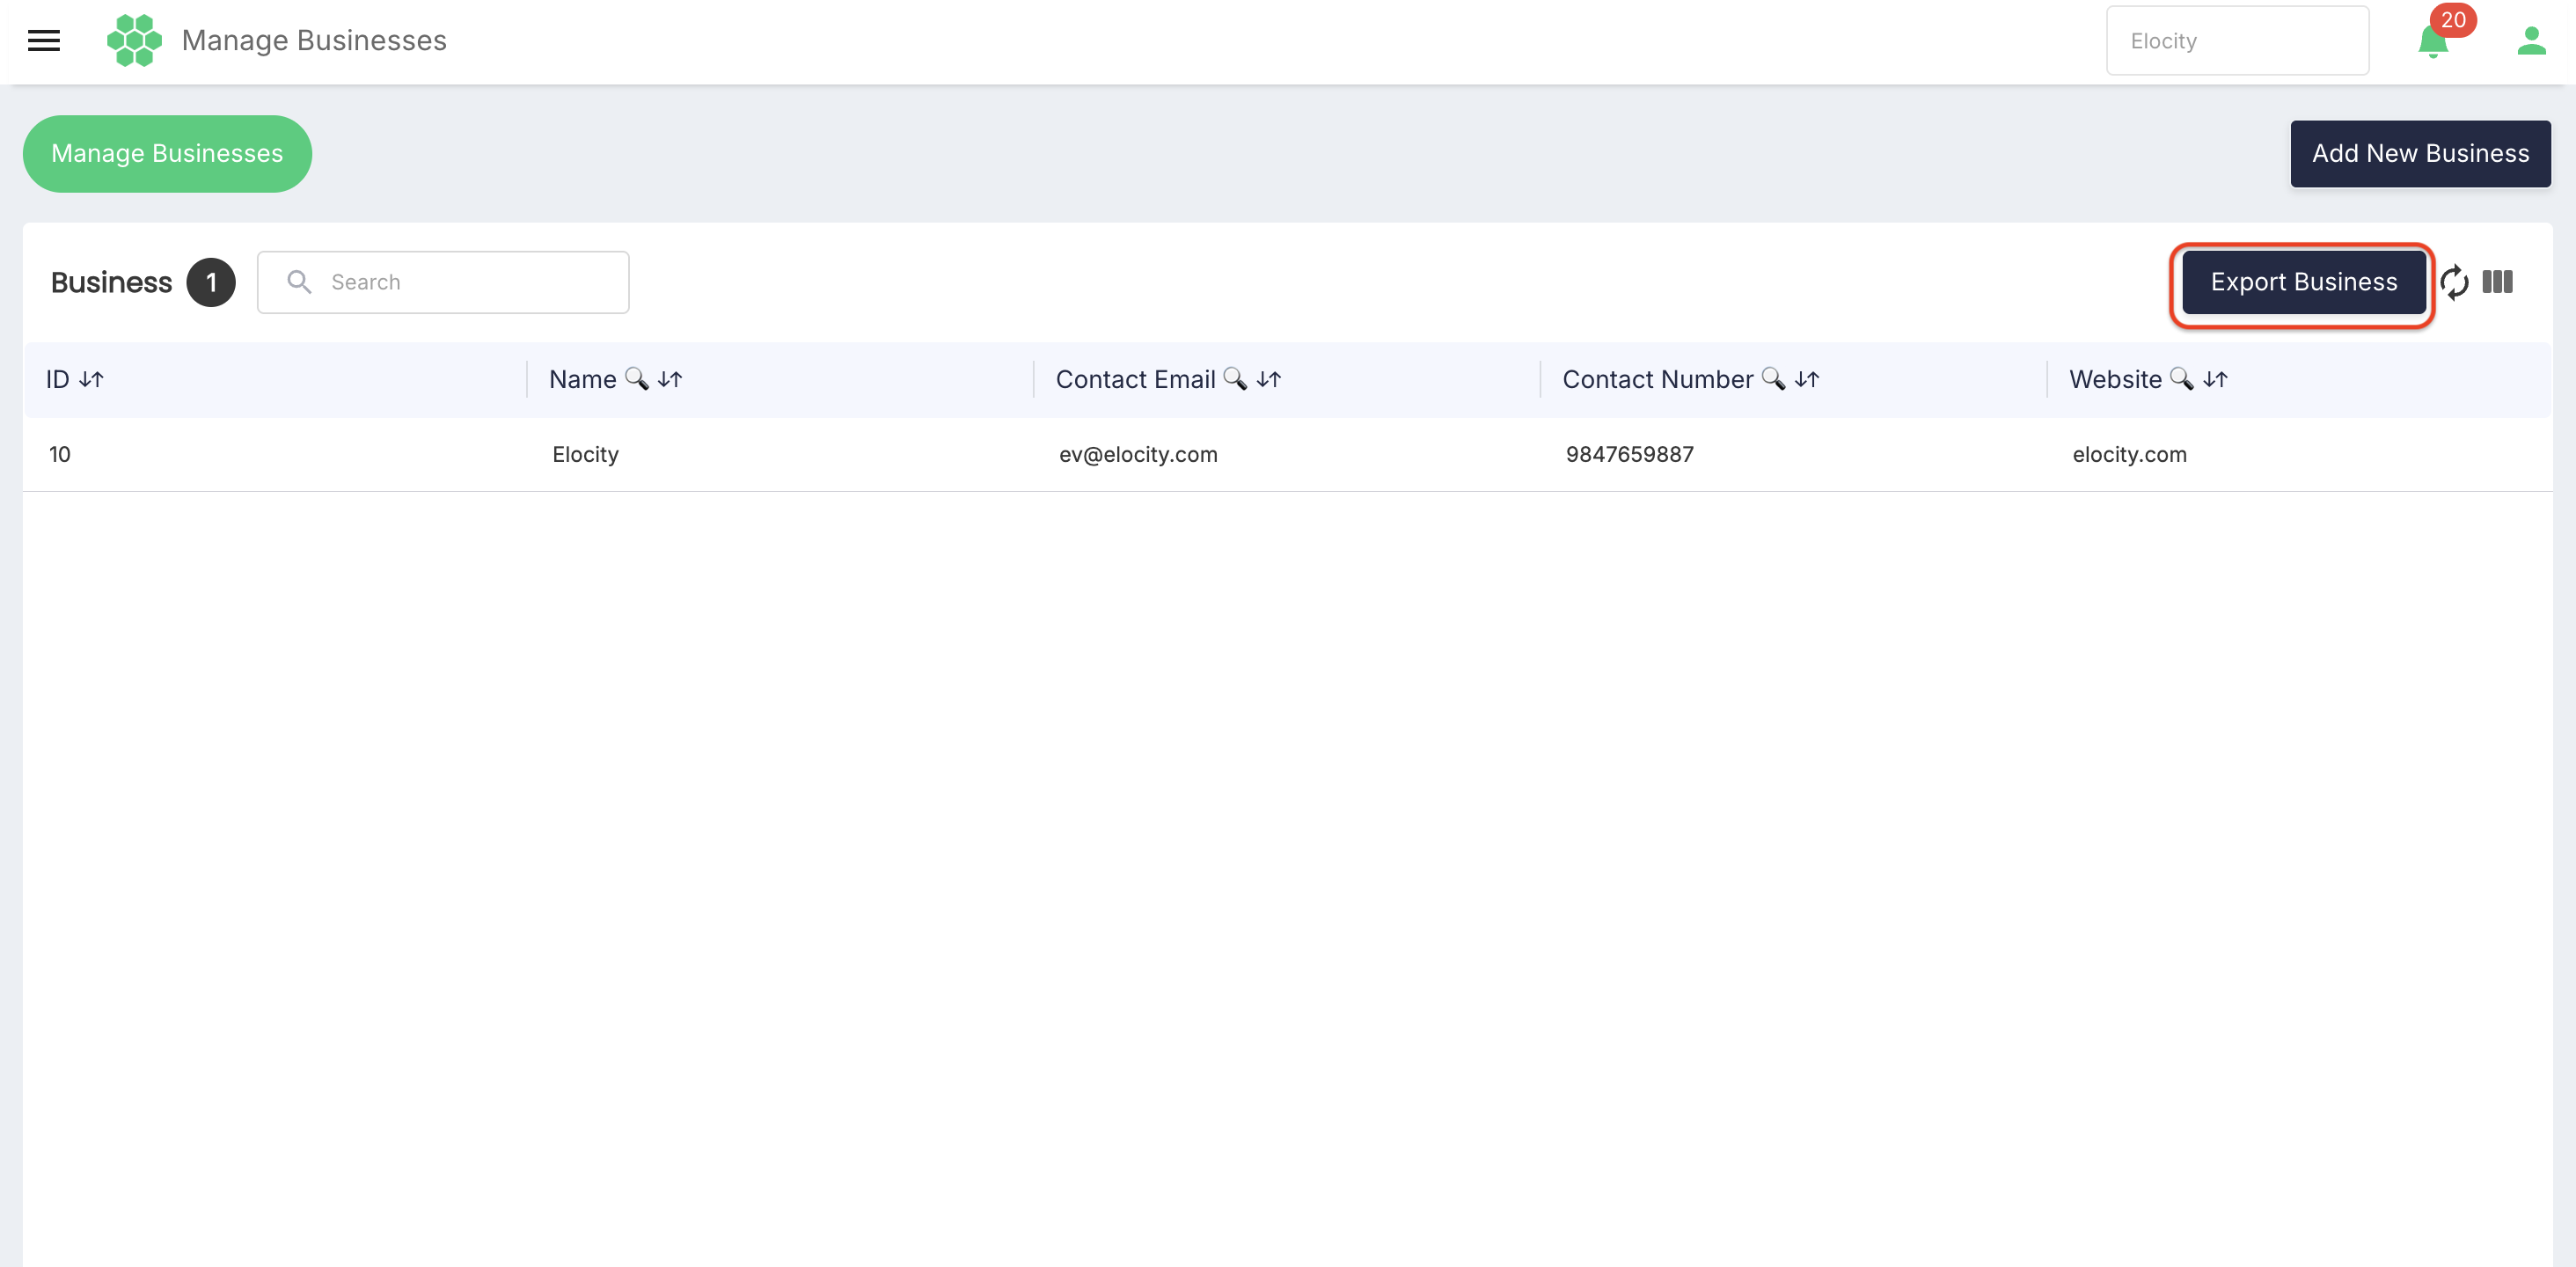
- Export Business – opens an export dialog and requests a file name.
- Refresh – requests the latest business information.
- Column Filter – controls which grid columns are visible.
- Business grid – displays one row for each returned business.
- Pagination controls – move through the returned records using First Page, Previous Page, Next Page, and Last Page.
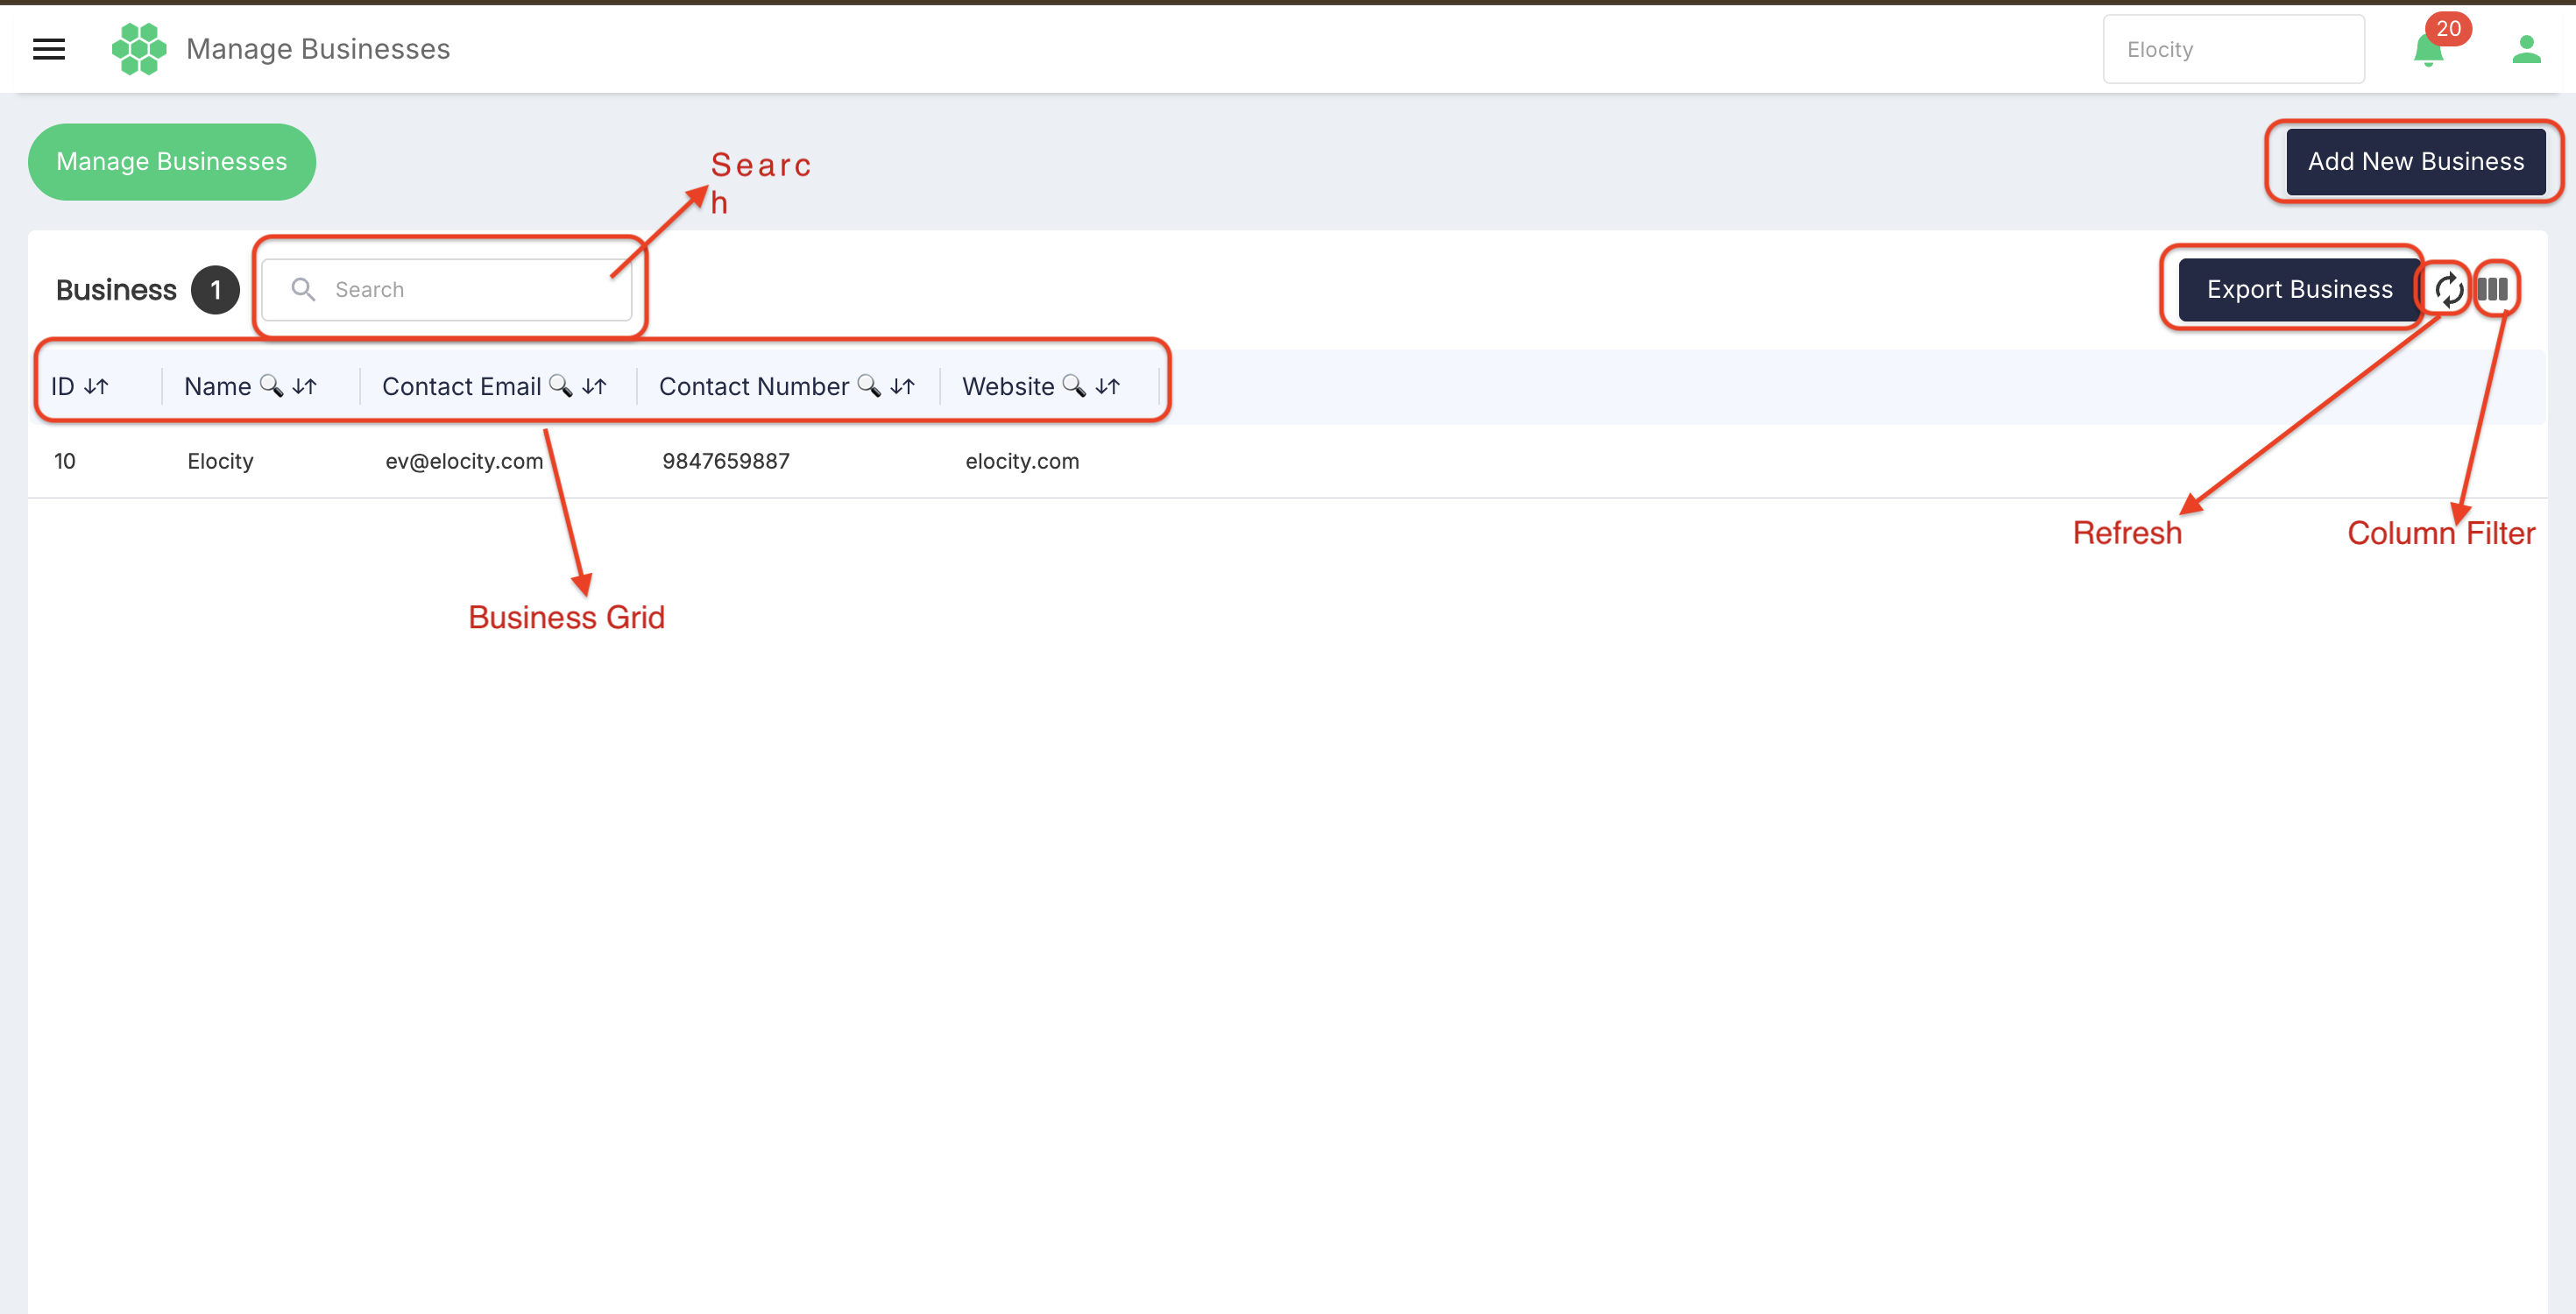
Business grid columns
Each grid row represents one business account.

| Column | Description | Interaction |
|---|---|---|
| ID | System-assigned identifier for the business. | Display only. Use this value when referencing a specific business record in support or reporting. |
| Name | Stored name of the business. | Supports a per-column search. Select the search icon in the column header to filter the grid by name. |
| Contact Email | Contact email address recorded for the business. | Supports a per-column search. Select the search icon in the column header to filter the grid by contact email. |
| Contact Number | Contact telephone number recorded for the business. | Supports a per-column search. Select the search icon in the column header to filter the grid by contact number. |
| Website | Website address recorded for the business. | Supports a per-column search. Select the search icon in the column header to filter the grid by website. |
A row can be selected in the grid. Selecting a row identifies the business for the grid actions that operate on a selected record.
Searching the grid
Enter text in Search to narrow the displayed grid records. The grid updates while search text is present. Clear the search field to restore the full list of businesses available to the user.
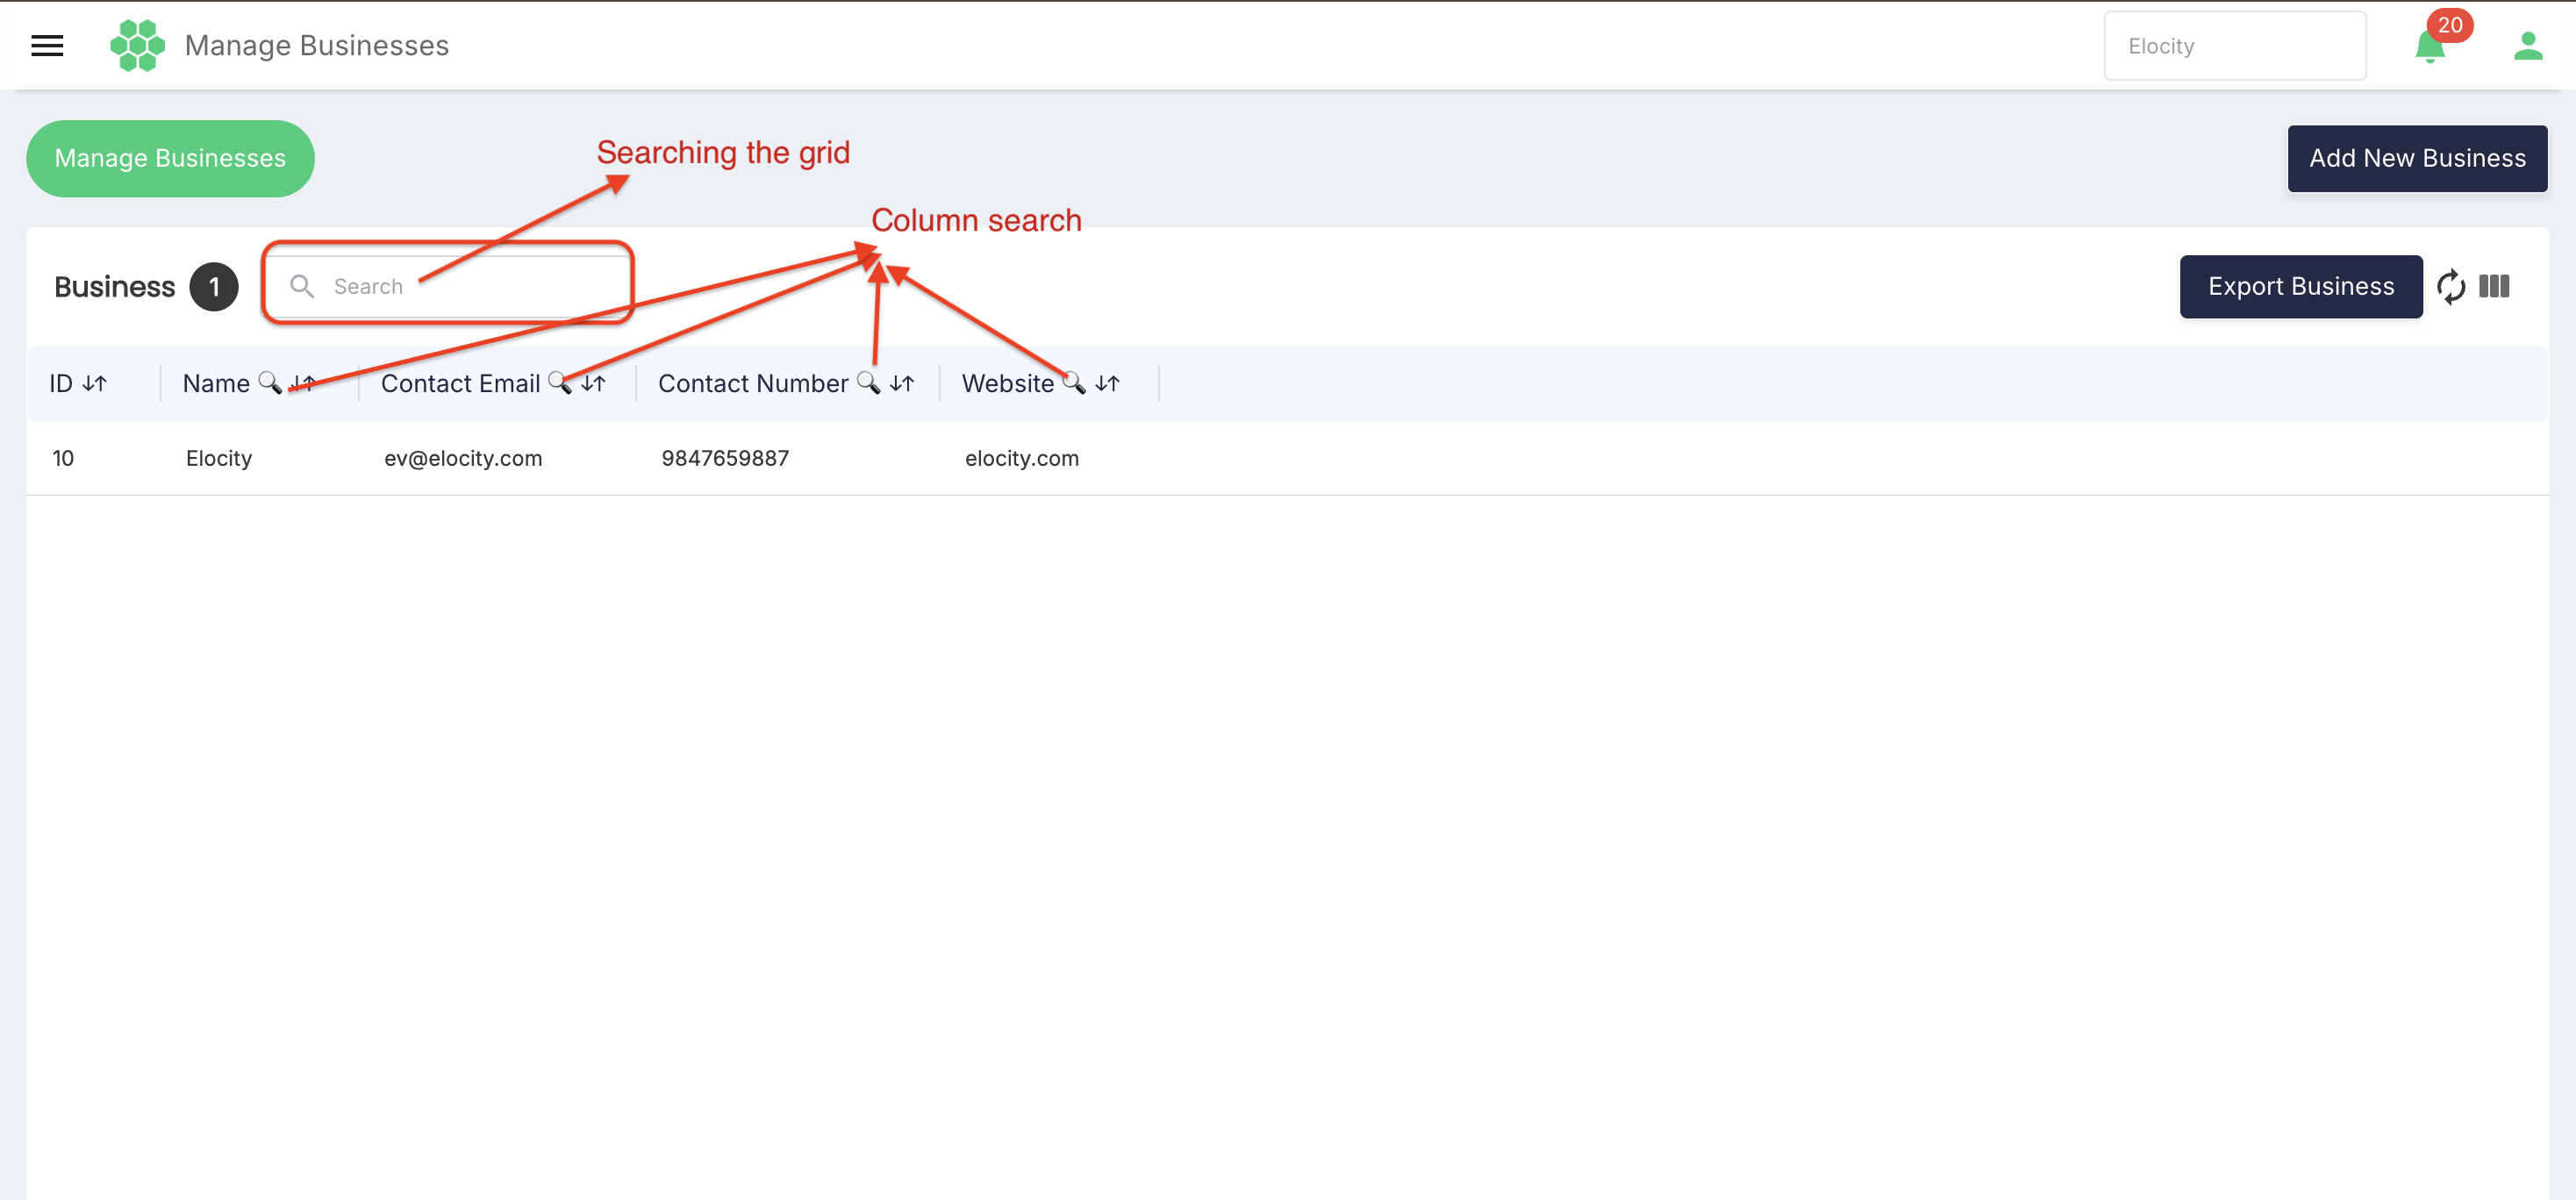
Column search
The Name, Contact Email, Contact Number, and Website column headers each provide a search icon. Select the icon in a column header to filter the grid by a value in that column. This is useful when the required business is known by a single attribute, such as its contact email or website.
Grid tools
Refresh
Select Refresh to request the latest business data from the system without leaving the page.
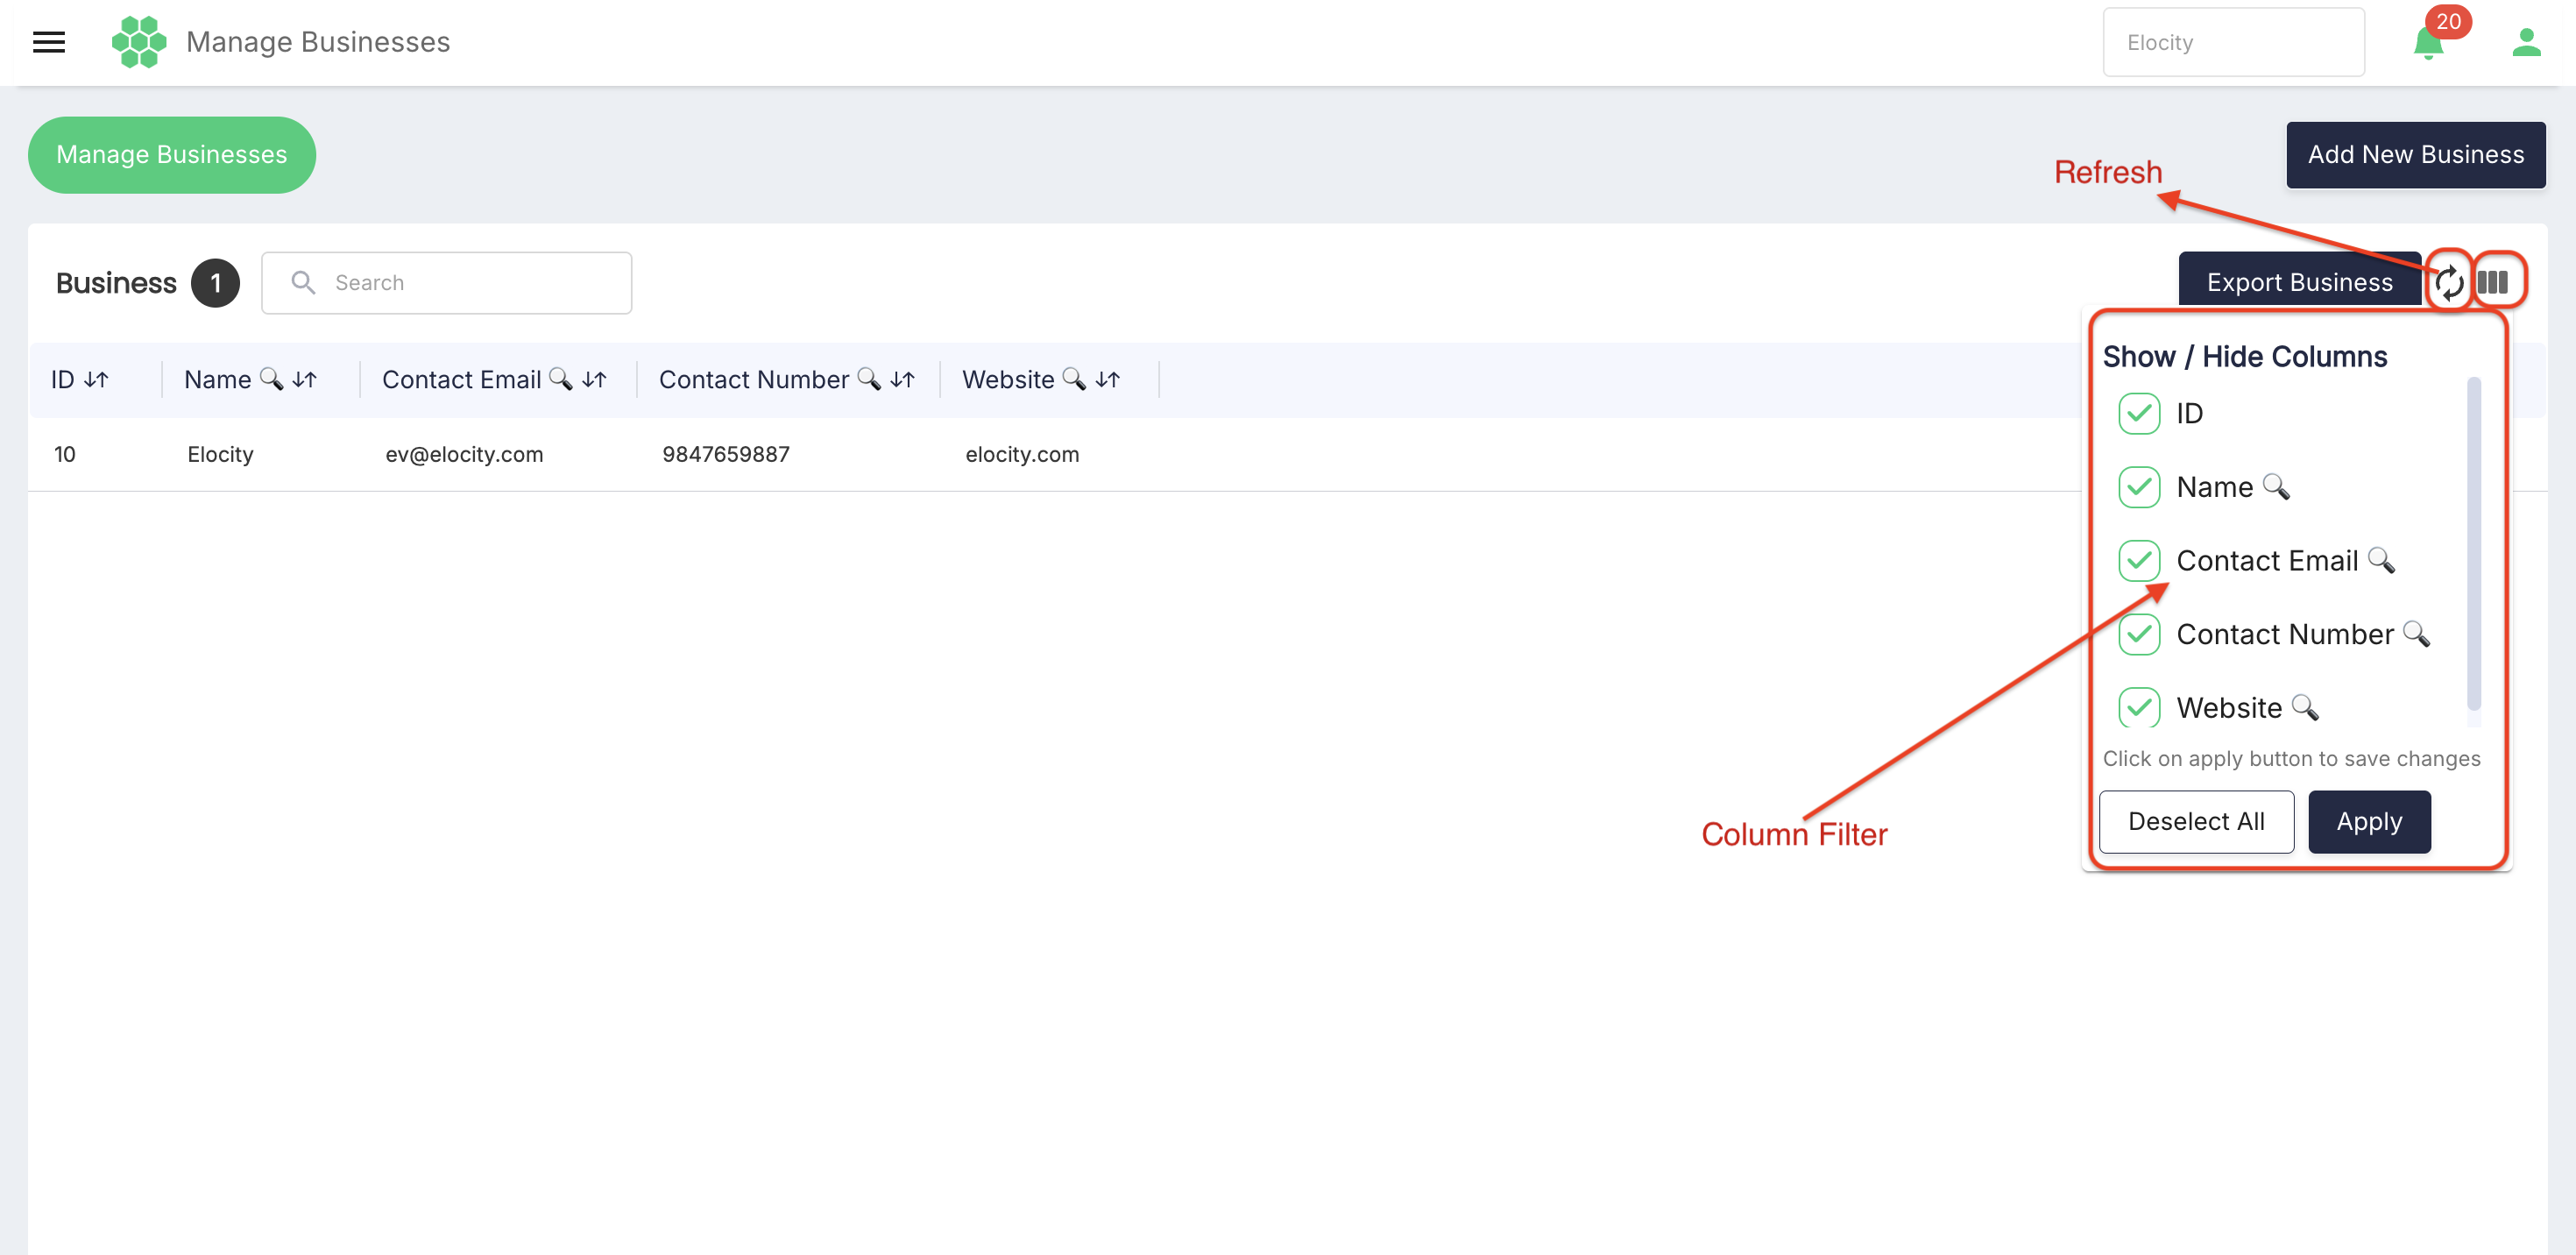
Column Filter
Select Column Filter to open the Show / Hide Columns menu. The menu contains a control for each grid column:
- ID
- Name
- Contact Email
- Contact Number
- Website
Select or clear individual columns, then select Apply inside the menu to save the visible-column selection. Use Deselect All to clear all column selections before choosing a new set.
Column visibility changes the on-screen grid layout; it does not change the underlying business records.
Export Business
- Apply the required search.
- Select Export Business.
- Enter a file name in the export dialog.
- Select OK to generate the export, or Cancel to close the dialog.
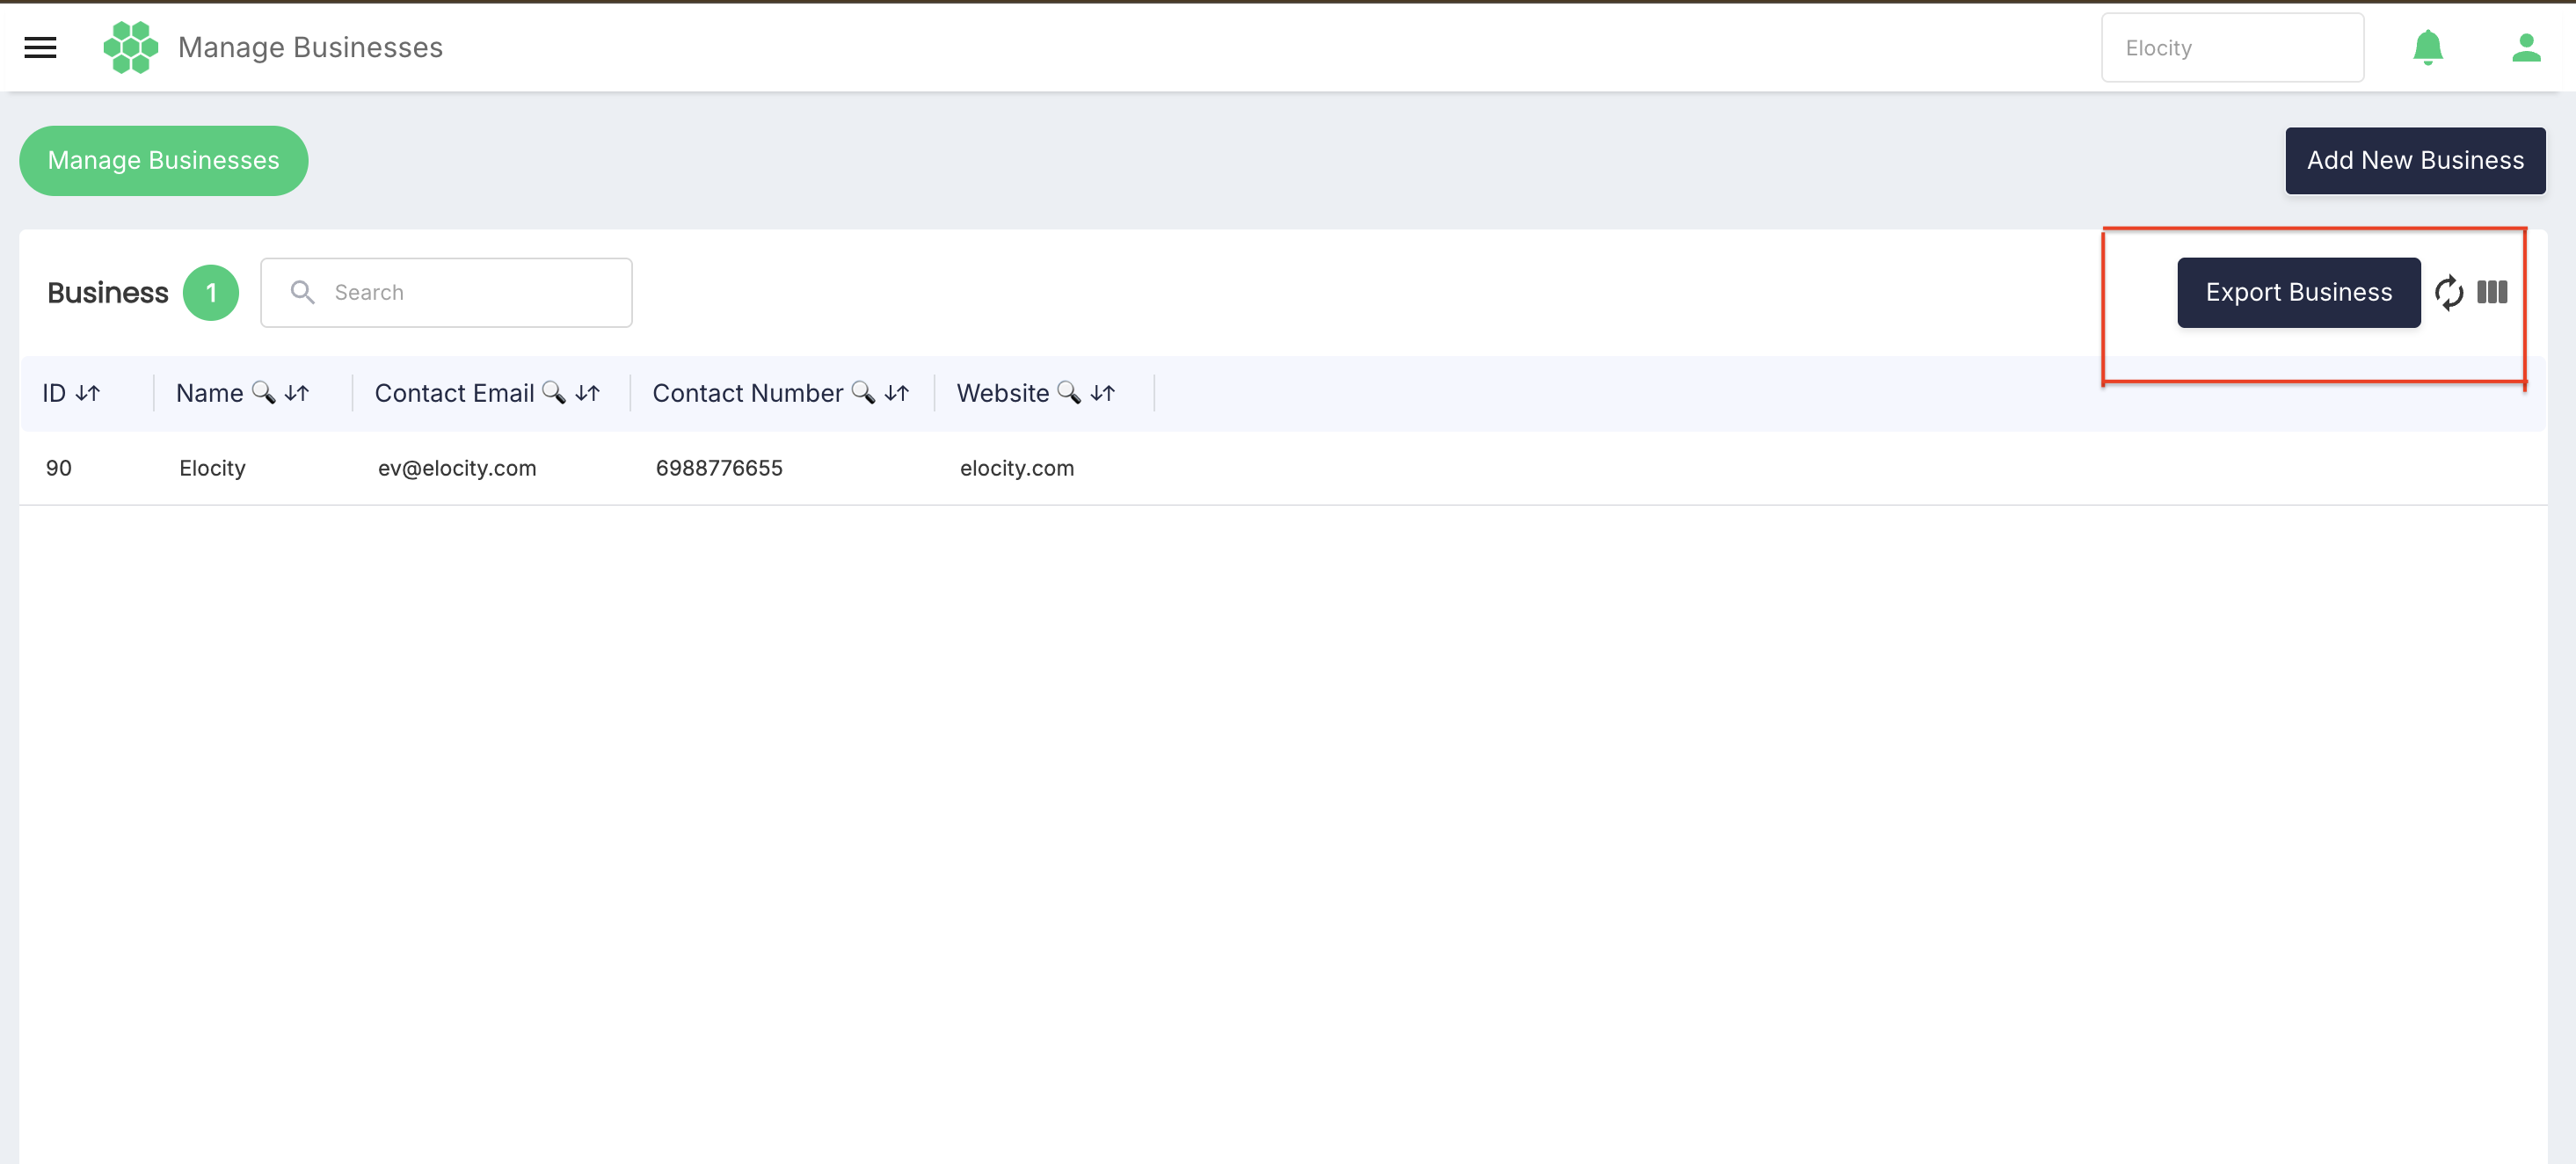
The export contains the columns currently visible in the grid. Configure Column Filter before exporting when a specific set of columns is required.
Pagination
The grid displays businesses across multiple pages when the number of returned records exceeds a single page. Use the pagination controls below the grid to navigate:
- First Page – returns to the first page of results.
- Previous Page – moves back one page.
- Next Page – moves forward one page.
- Last Page – advances to the final page of results.
Edit business details
Enter edit mode
- Open Manage Businesses.
- Search for and select the required business name.
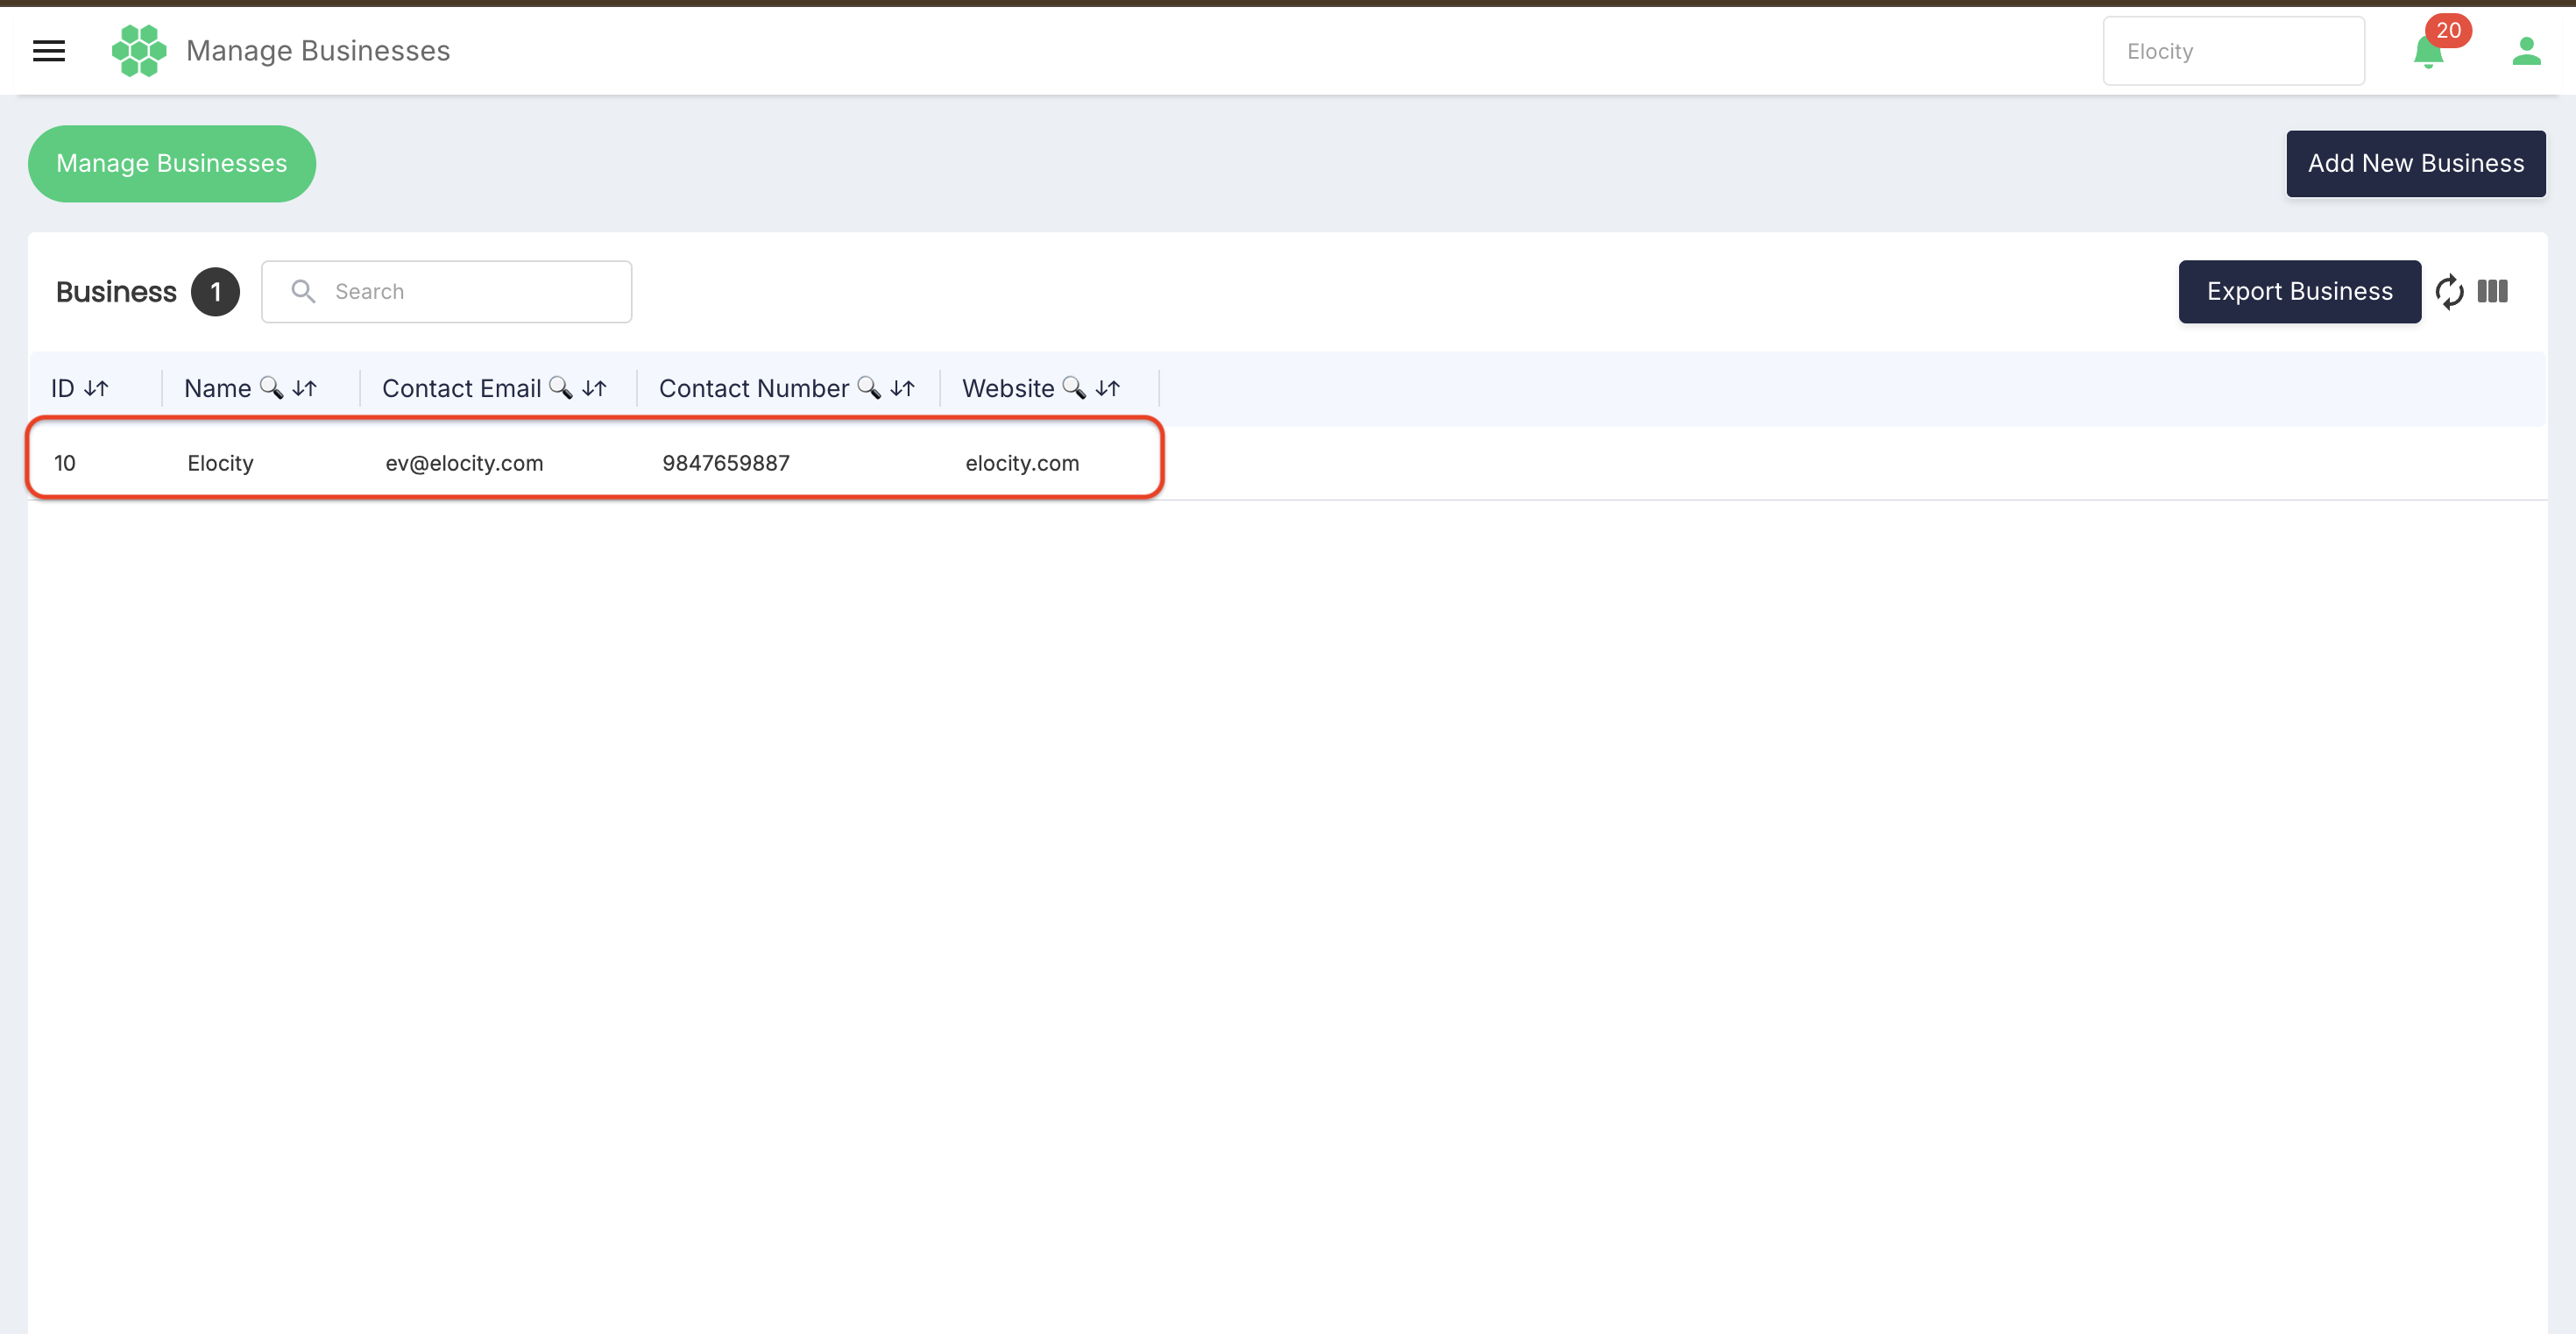
- Confirm that the correct business Info page is open.
- Record the current values if change-control or rollback evidence is required.
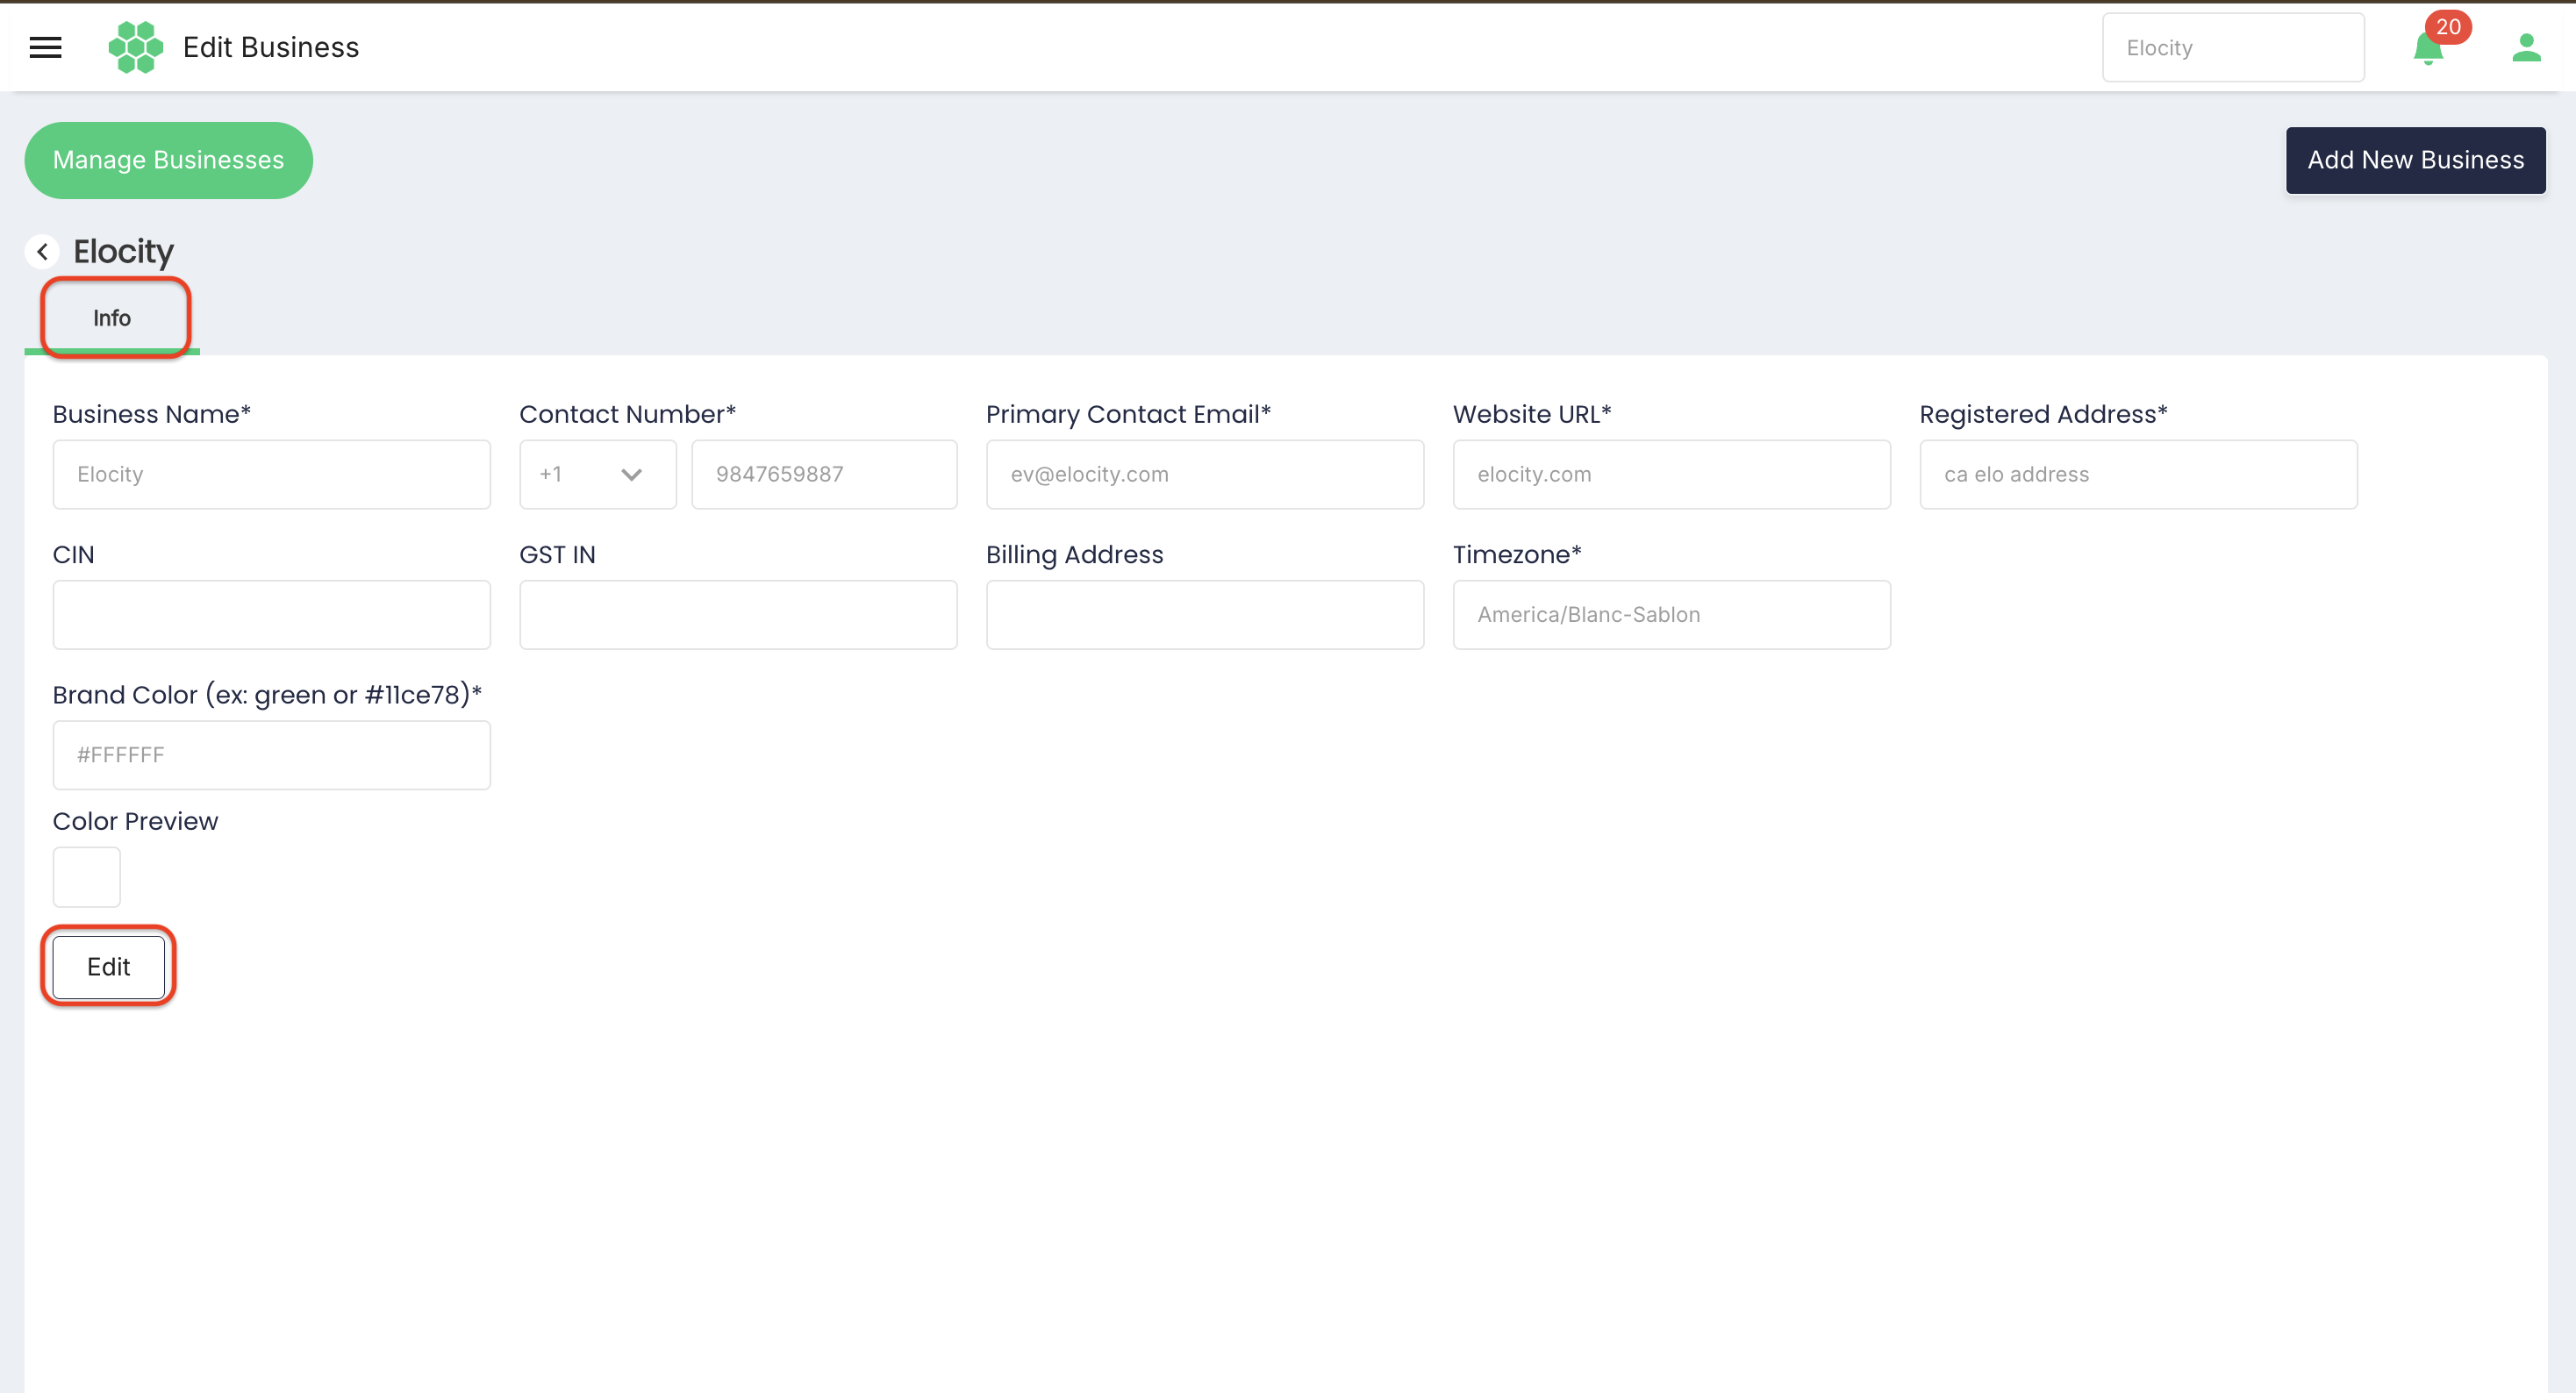
- Select Edit.
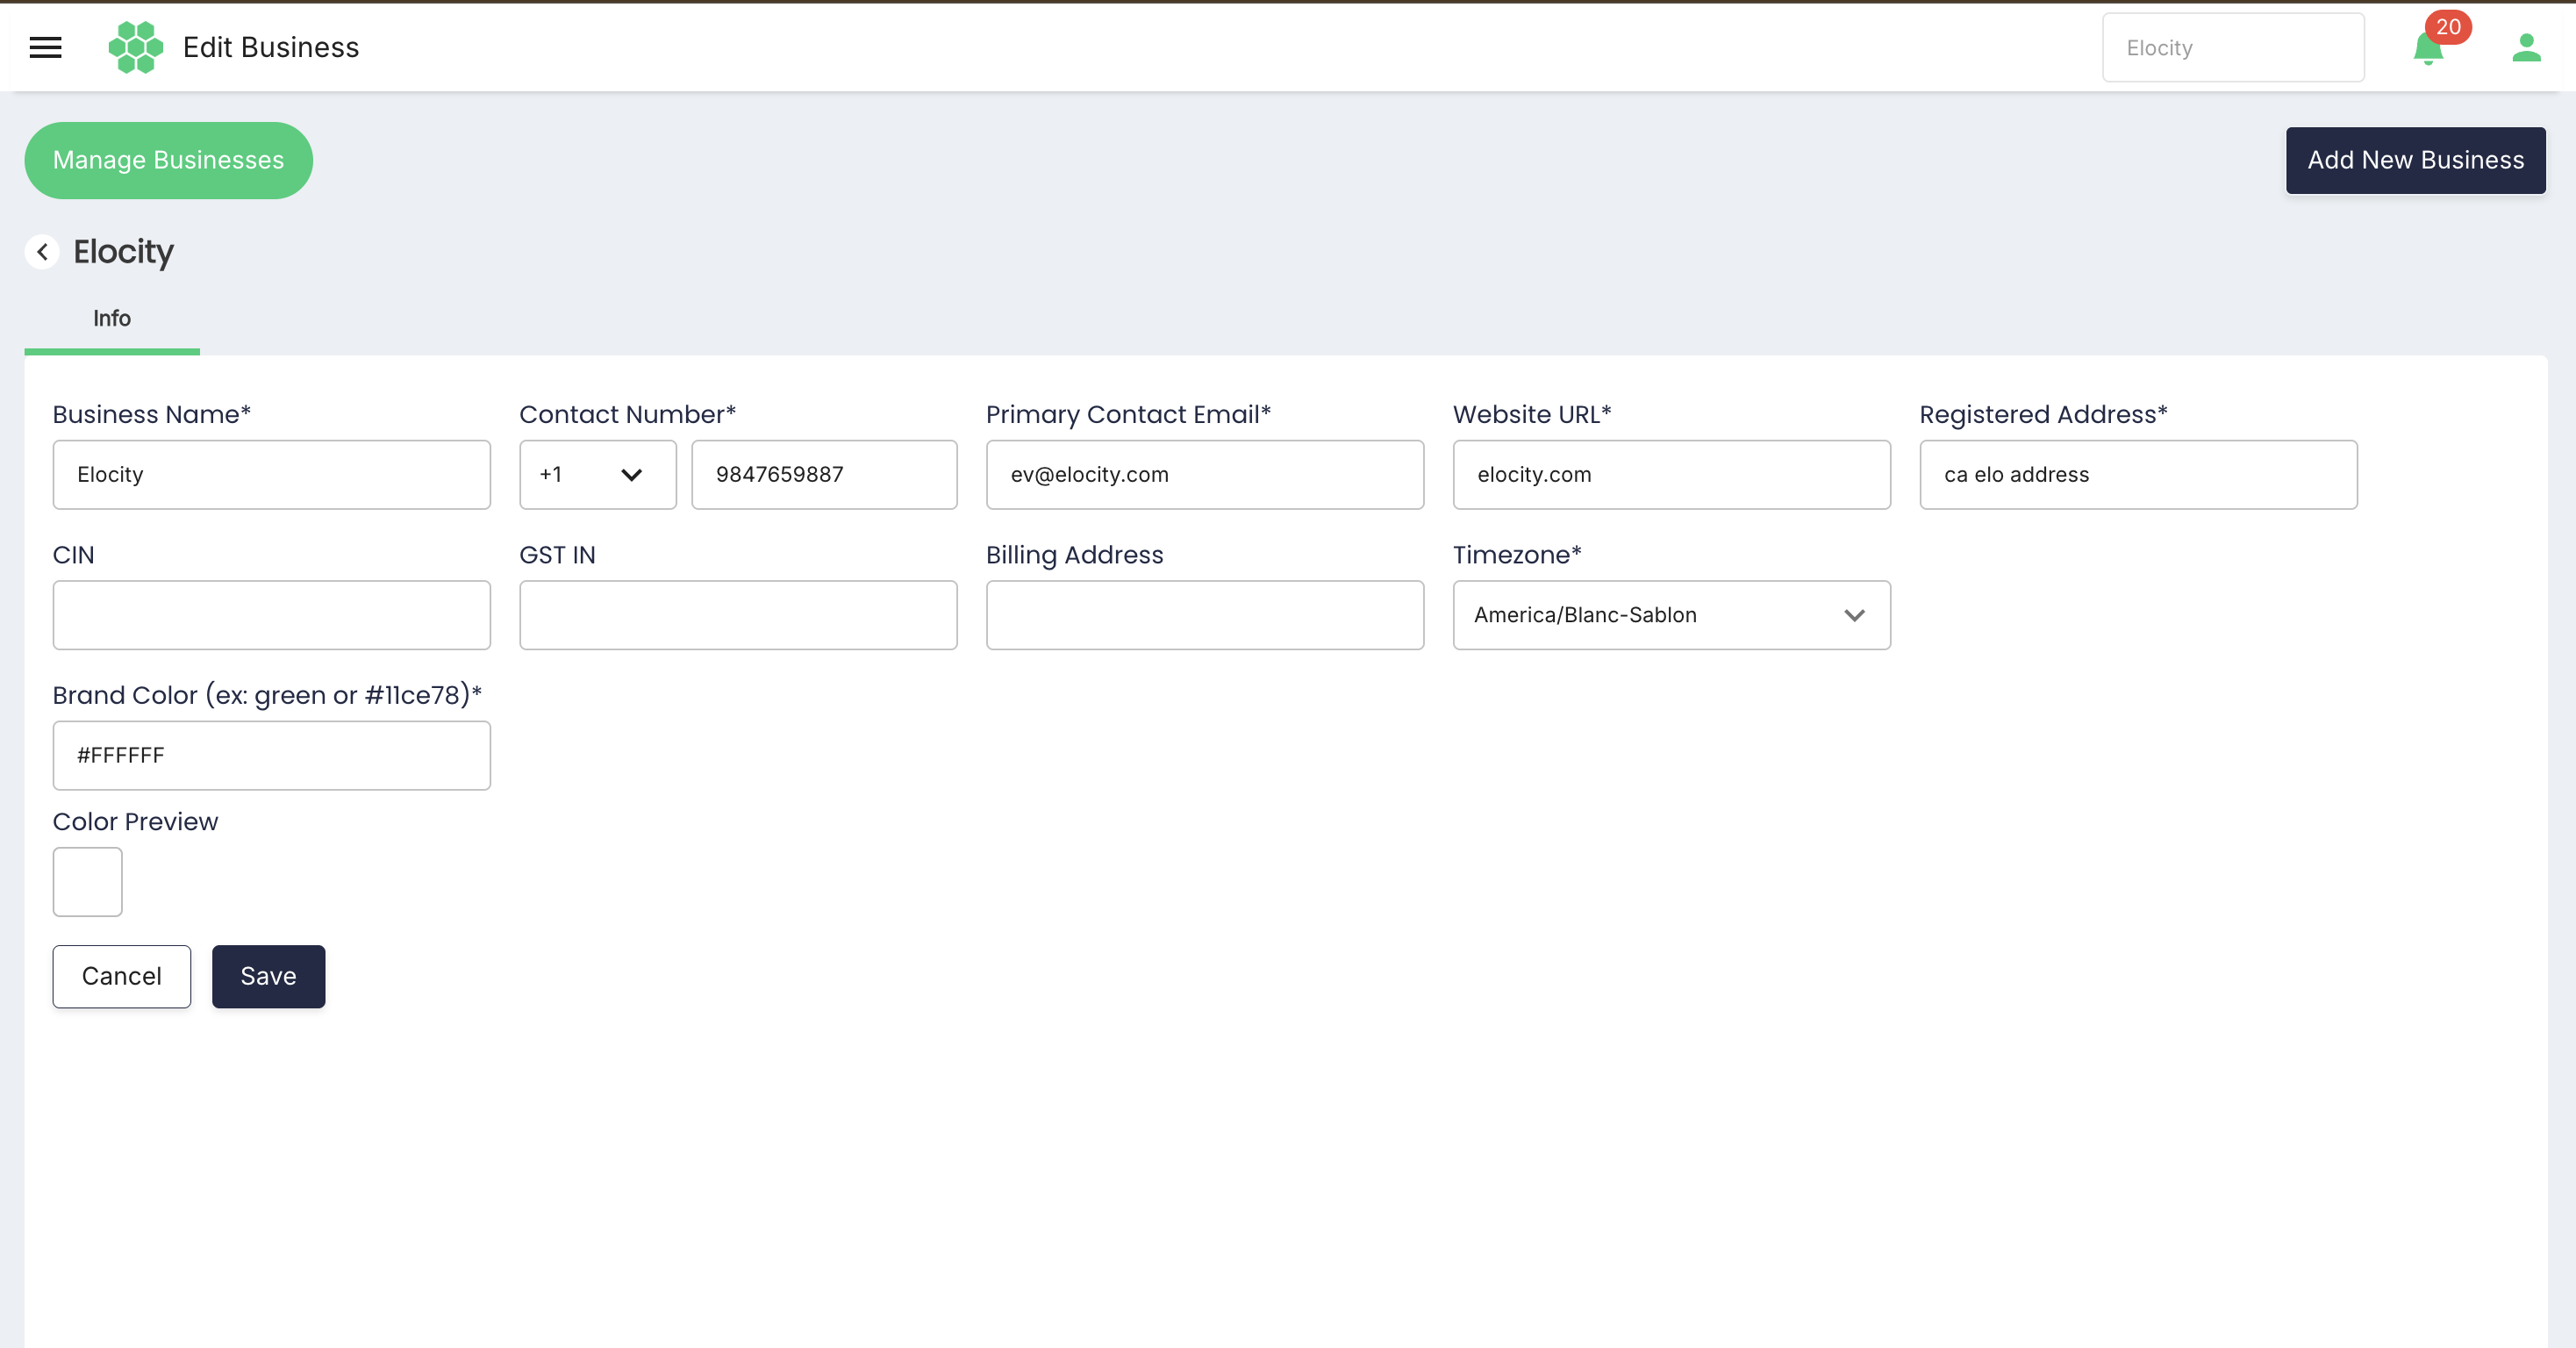
Editable controls become available, and Cancel and Save replace the Edit action.
Update Business Name
Enter the approved business name.
Consider the effect on:
- Business selectors.
- User-facing headers.
- Reports and exports.
- Billing and invoice presentation.
- External integrations that display the name.
Changing the business name does not change its system ID.
Update Contact Number
The field contains a country-code control and a telephone-number control.
- Select the correct country code.
- Enter the primary contact number.
- Remove unsupported formatting if validation rejects the value.
- Confirm that the number is monitored and appropriate for business communications.
Update Primary Contact Email
Enter a valid, monitored email address. Confirm ownership and spelling before saving because platform communications or support processes may use it.
The field should reject invalid email syntax.
Update Website URL
Enter the approved website address. Use a complete HTTPS URL where supported and verify that it opens the intended public destination.
Do not enter an internal-only URL unless that is explicitly required and approved.
Update Registered Address
Enter the official registered address used for business records. Follow the organization's approved formatting and include sufficient locality, region, postal code, and country information where supported.
Update Billing Address
Enter the billing address when it differs from the registered address. The reviewed field is optional.
If left blank, confirm whether downstream billing uses the Registered Address or another configured address.
Update Timezone
- Open the Timezone selector.
- Choose the business's approved IANA timezone, such as
America/Toronto. - Confirm daylight-saving behaviour and regional applicability.
A timezone change can affect the display or interpretation of schedules, reservations, exports, campaign dates, and operational reports. Historical records should retain their original timestamps and audit context.
Update Brand Color
The reviewed label accepts examples such as a named color (green) or hexadecimal value (#11ce78).
- Enter the approved named or hexadecimal color.
- Review Color Preview.
- Confirm adequate contrast and compliance with brand and accessibility standards.
Use a six-digit hexadecimal value where consistent rendering is important.
Save or cancel
- Select Save to validate and submit the edited business details.
- Select Cancel to discard unsaved changes and return to read-only mode.
After Save:
- Confirm success feedback.
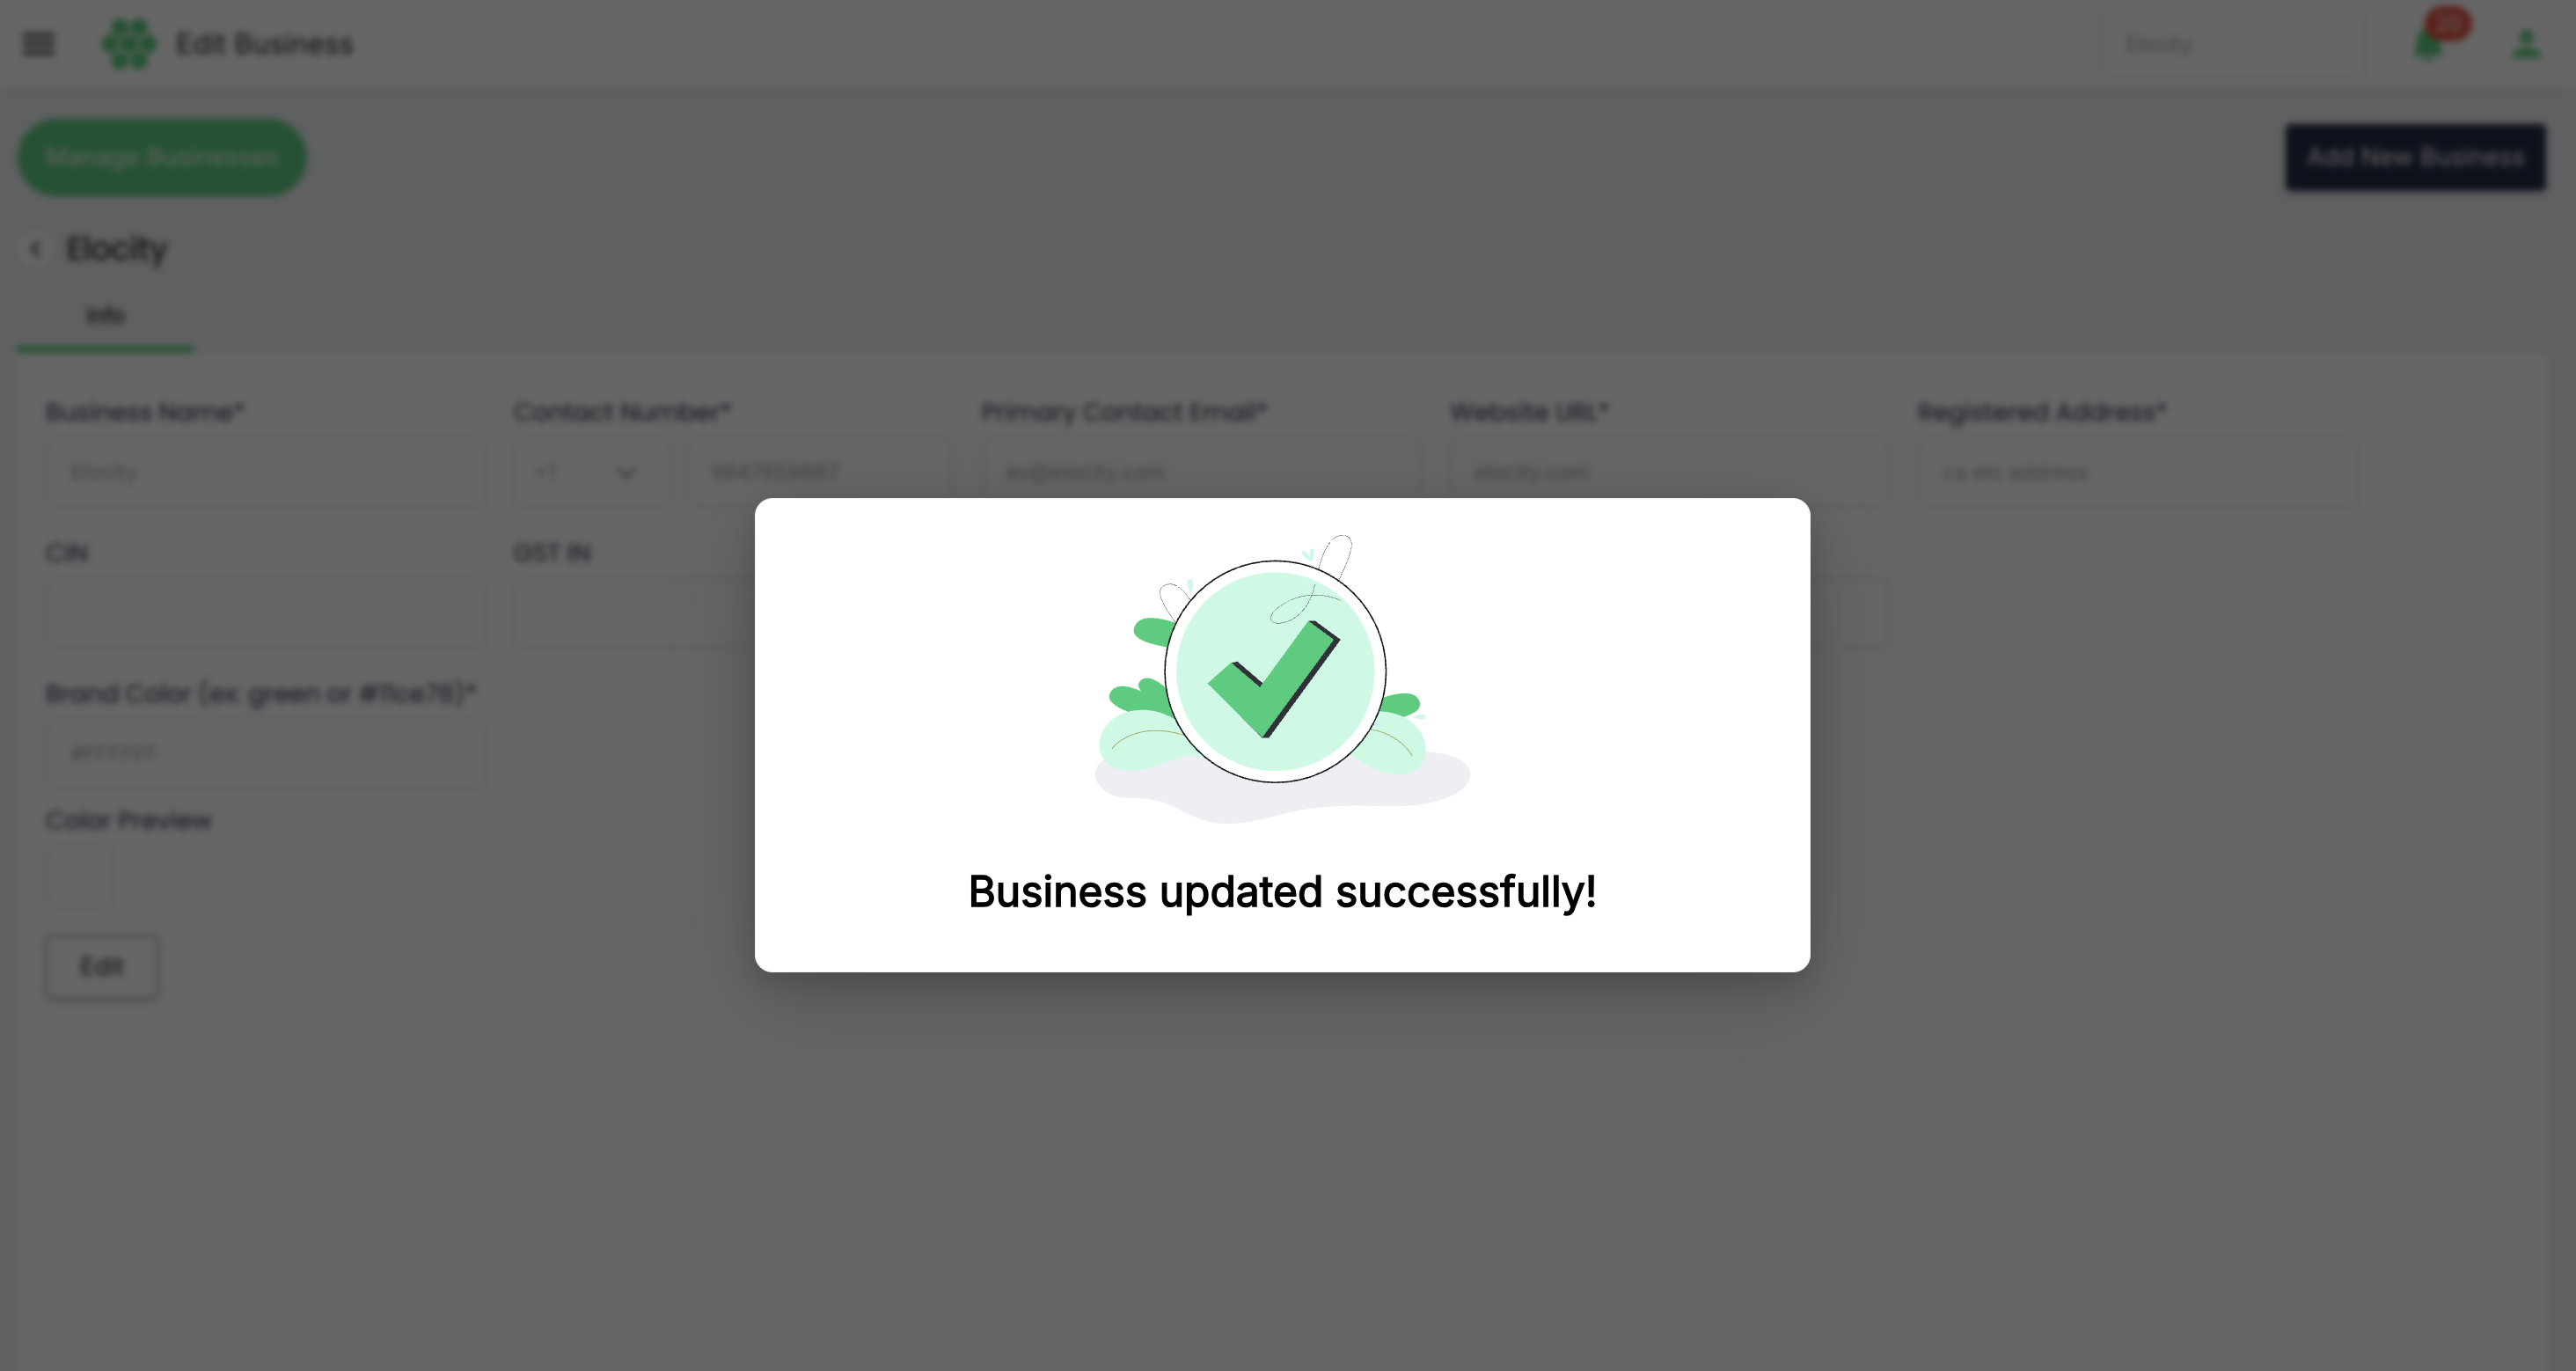
- Verify the values in read-only mode.
- Return to Manage Businesses.
- Select Refresh.
- Confirm that the grid shows the updated Name, Contact Email, Contact Number, or Website where applicable.
- Test affected business selectors, branding, reports, and timezone-sensitive workflows in proportion to the change.
Export Business module
The Export Business function creates an offline representation of business-grid data available to the current user.
Exports can contain business contact information. Generate, store, and share them only for an approved purpose.
Prepare the export
- Confirm the All Businesses or active context.
- Select Refresh to retrieve current records.
- Apply Search or column-search criteria when a subset is required.
- Use Column Filter to display the required fields.
- Review the current rows and visible columns.
- Confirm that you have permission and a legitimate purpose to export the data.
Generate the export
-
Select Export Business.
-
If a filename prompt appears, enter a clear filename without unsupported characters.
-
Confirm the export action.
-
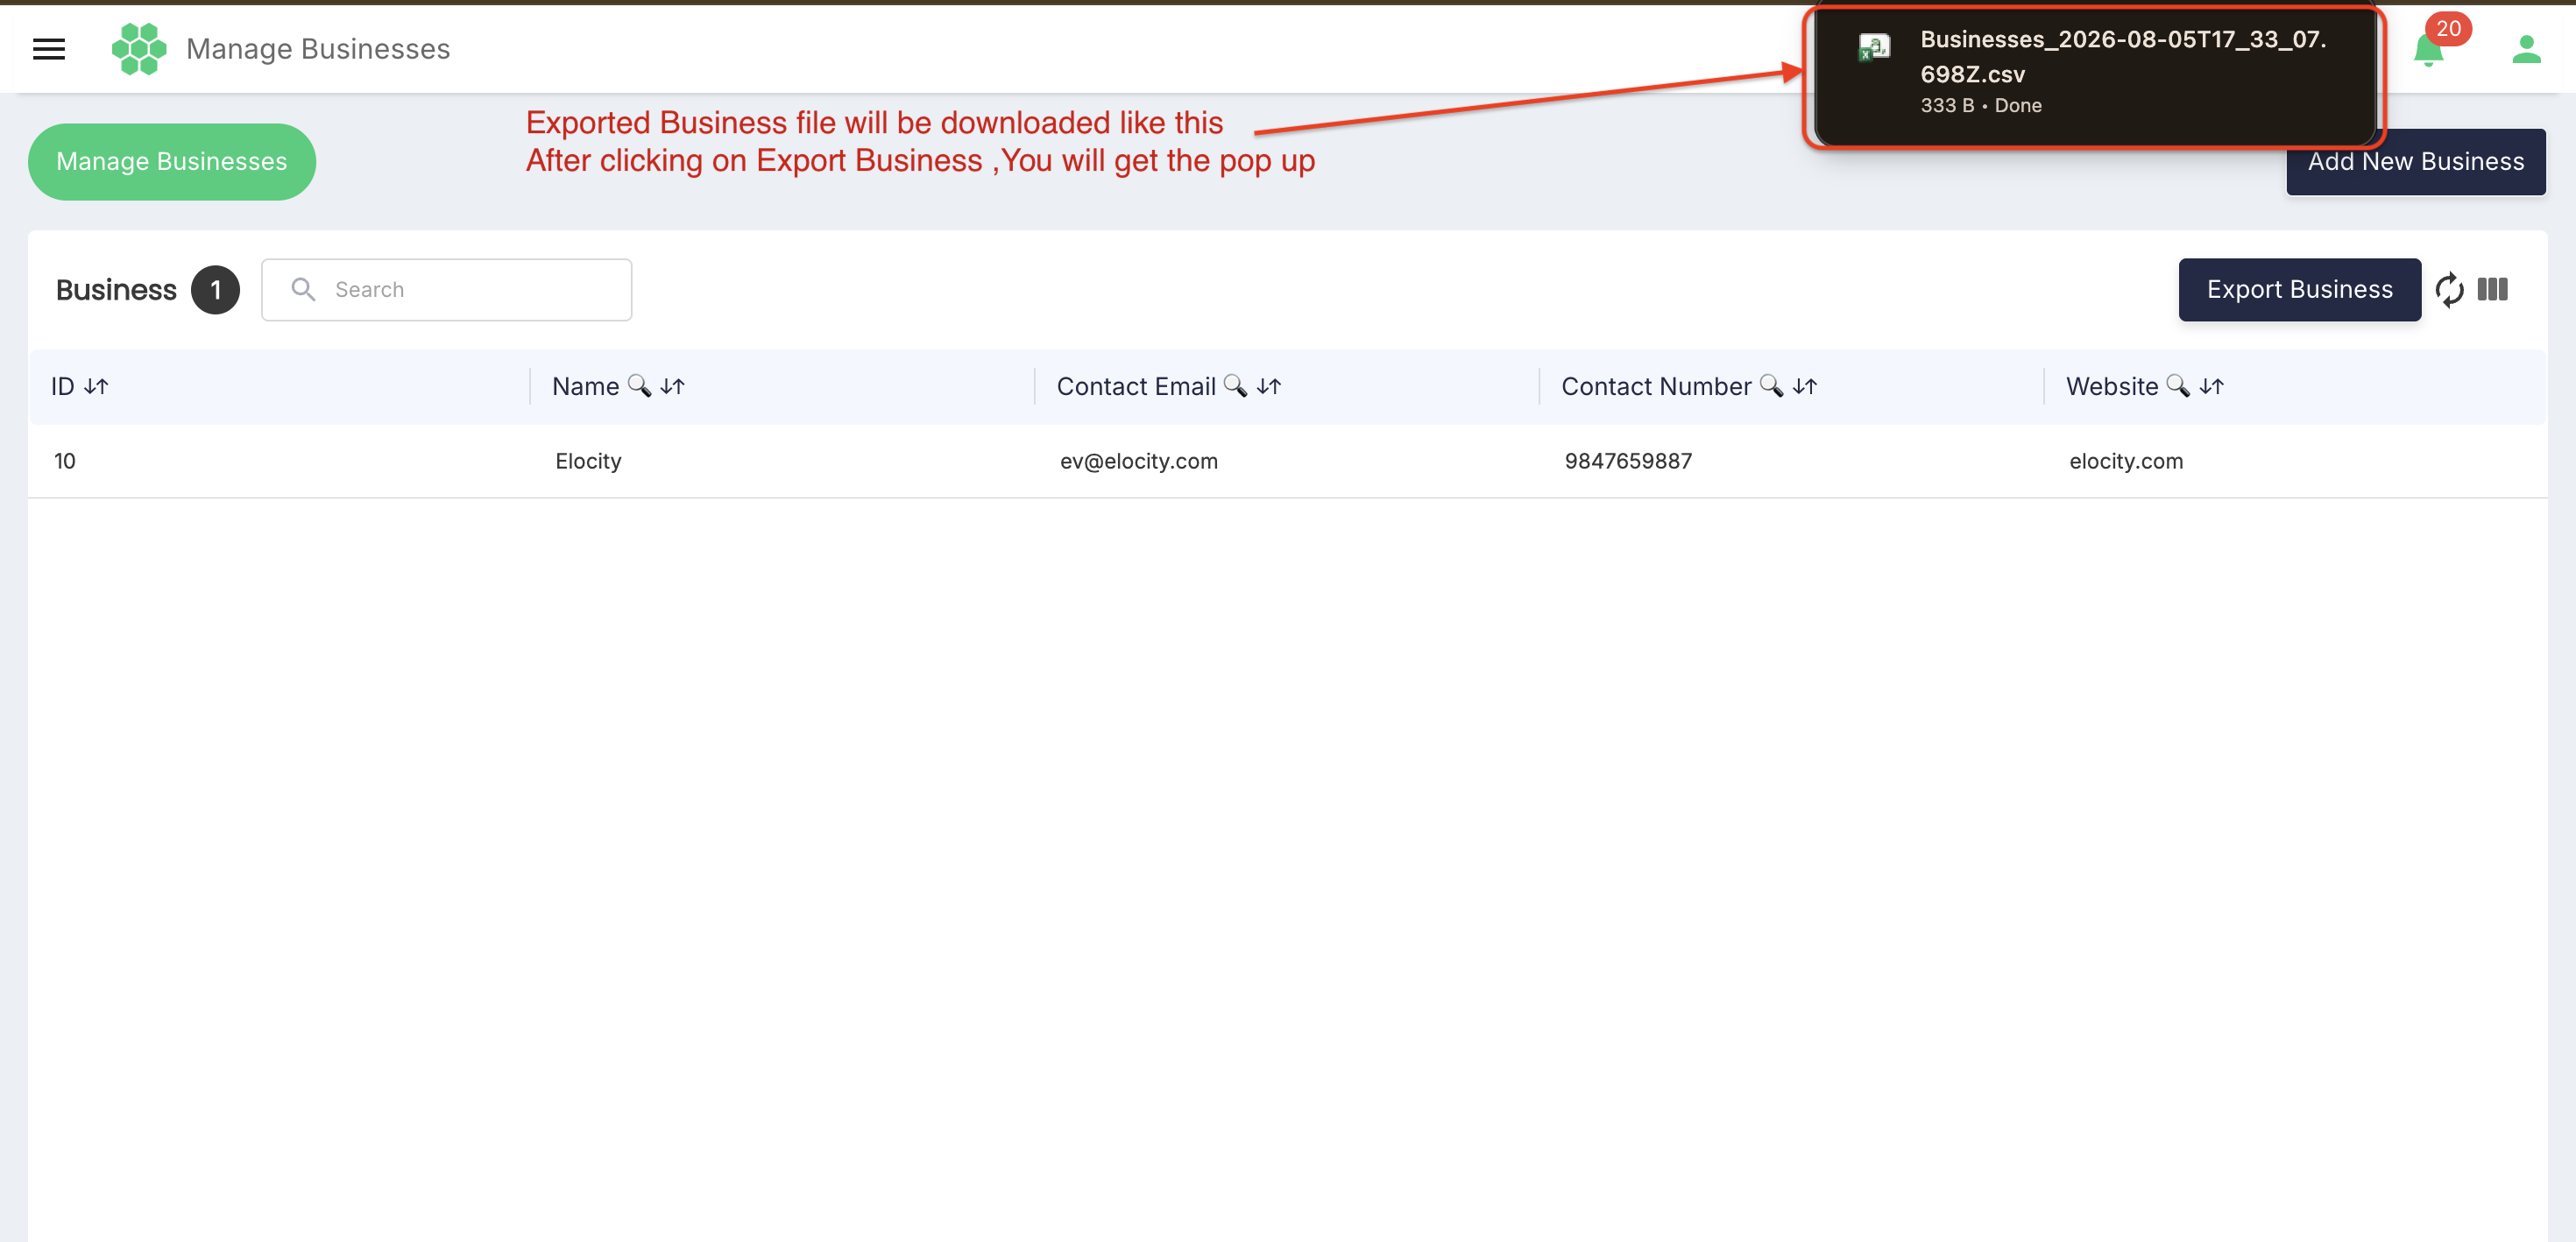
Wait for the file to be generated or downloaded.
-
Open the file using an approved application and verify its contents.
Suggested filename convention:
Businesses_<scope>_<YYYY-MM-DD>
Example: Businesses_All_2026-08-04.
Exported fields
The verified grid provides these business fields for display and export configuration:
- ID
- Name
- Contact Email
- Contact Number
- Website
The exact file format, export scope, and relationship to filters or visible columns can depend on deployment configuration. Before distributing the file, verify:
- Whether it contains all permitted records or only the filtered result.
- Whether it contains all columns or only visible columns.
- Whether pagination affects the result.
- The generated file type and character encoding.
Verify the export
Check that:
- The file opens successfully.
- The expected filename and format are used.
- Column headers are present and correctly ordered.
- Business IDs and names match the portal.
- Search and filter scope is correct.
- Contact information is complete and correctly formatted.
- No unauthorized businesses or fields are included.
- The row count is reasonable for the selected scope.
Export security
Exported files should be treated as controlled business data.
- Store the file only in an approved location.
- Do not send it to unauthorized recipients.
- Use approved encryption or secure transfer where required.
- Avoid placing exports in public or shared folders without access controls.
- Delete the file according to data-retention policy when it is no longer needed.
- Do not modify and re-import the file unless a separate approved import workflow exists.
Export troubleshooting
| Issue | Likely cause | Resolution |
|---|---|---|
| Export Business is unavailable | Role lacks export permission or the feature is disabled. | Confirm role permissions and tenant configuration. |
| No file is produced | Browser download policy, connectivity, or export processing failed. | Check permitted downloads, retry after Refresh, and review application feedback. |
| Export contains unexpected rows | Search/filter scope was not applied to export, or active context was incorrect. | Confirm the business context and documented export-scope behaviour. |
| Export is missing columns | Column visibility controls export fields, or permission excludes data. | Configure Column Filter and confirm export permissions. |
| Export includes more columns than shown | Export is configured to use the complete schema. | Remove unnecessary fields only in an approved copy and document the behaviour. |
| File cannot be opened | Generation was interrupted or the file type is unsupported by the chosen application. | Generate the export again and open it with an approved compatible application. |
| Special characters display incorrectly | Character encoding is not interpreted correctly. | Open or import the file using the correct encoding, normally UTF-8 where supported. |
Adding a new business
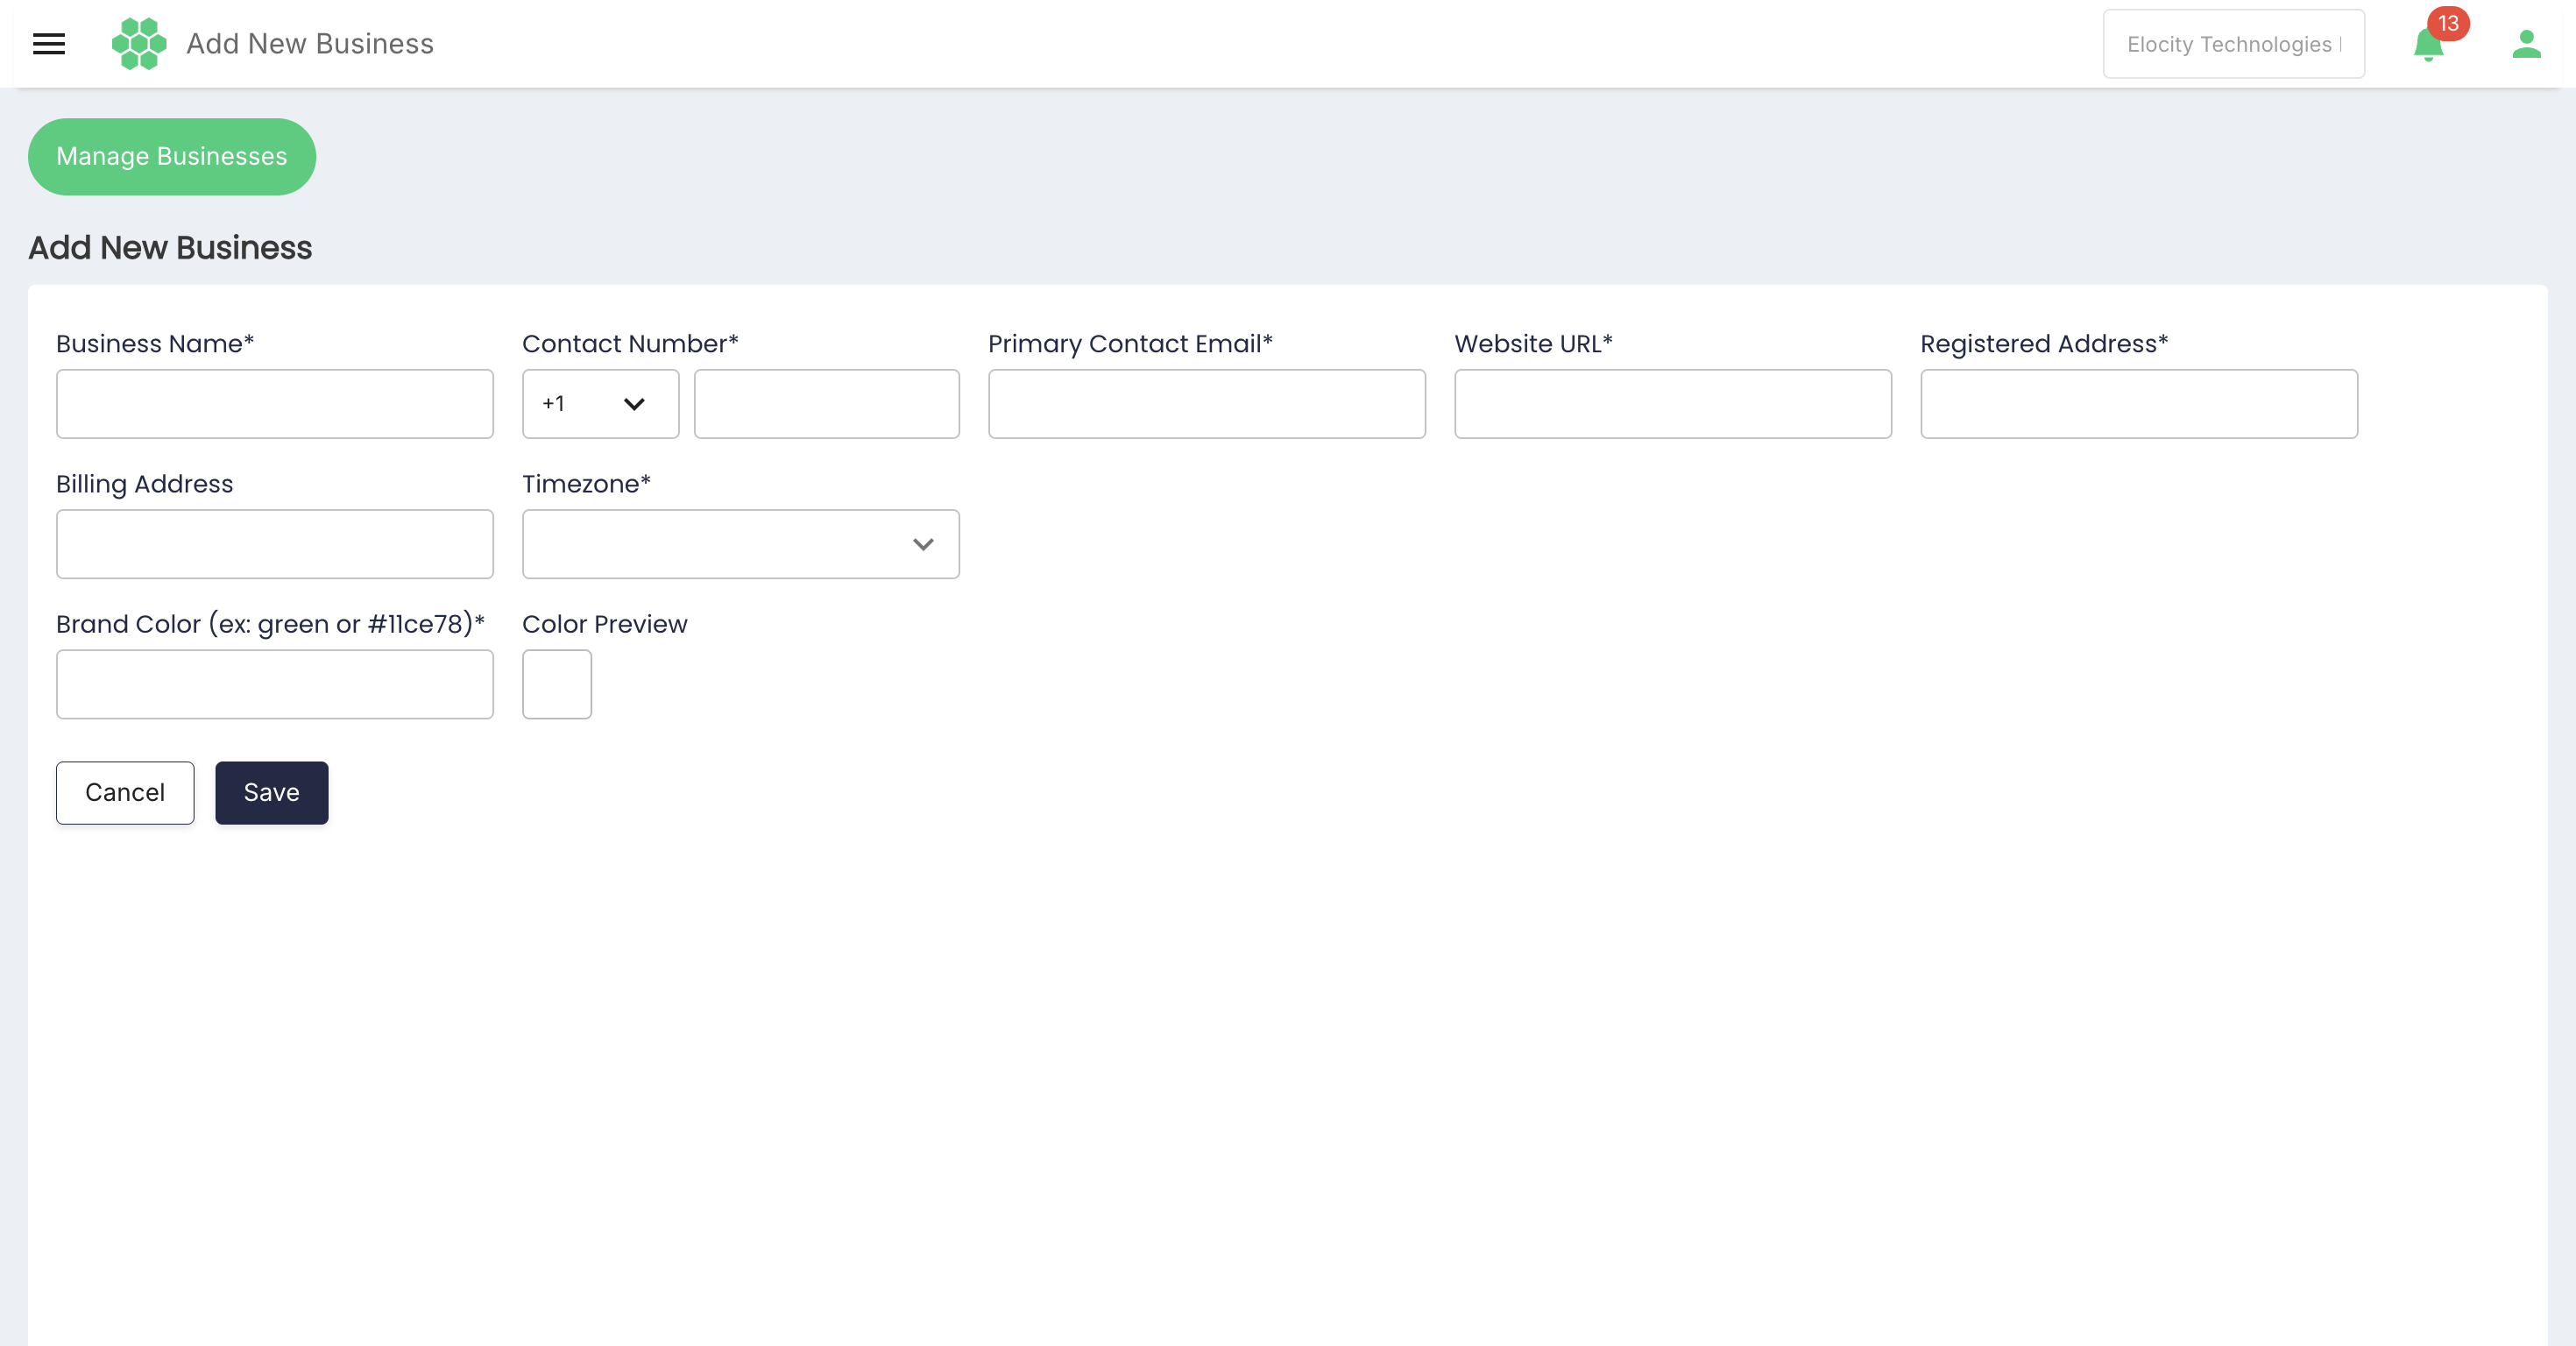
Select Add New Business to open the business creation form.
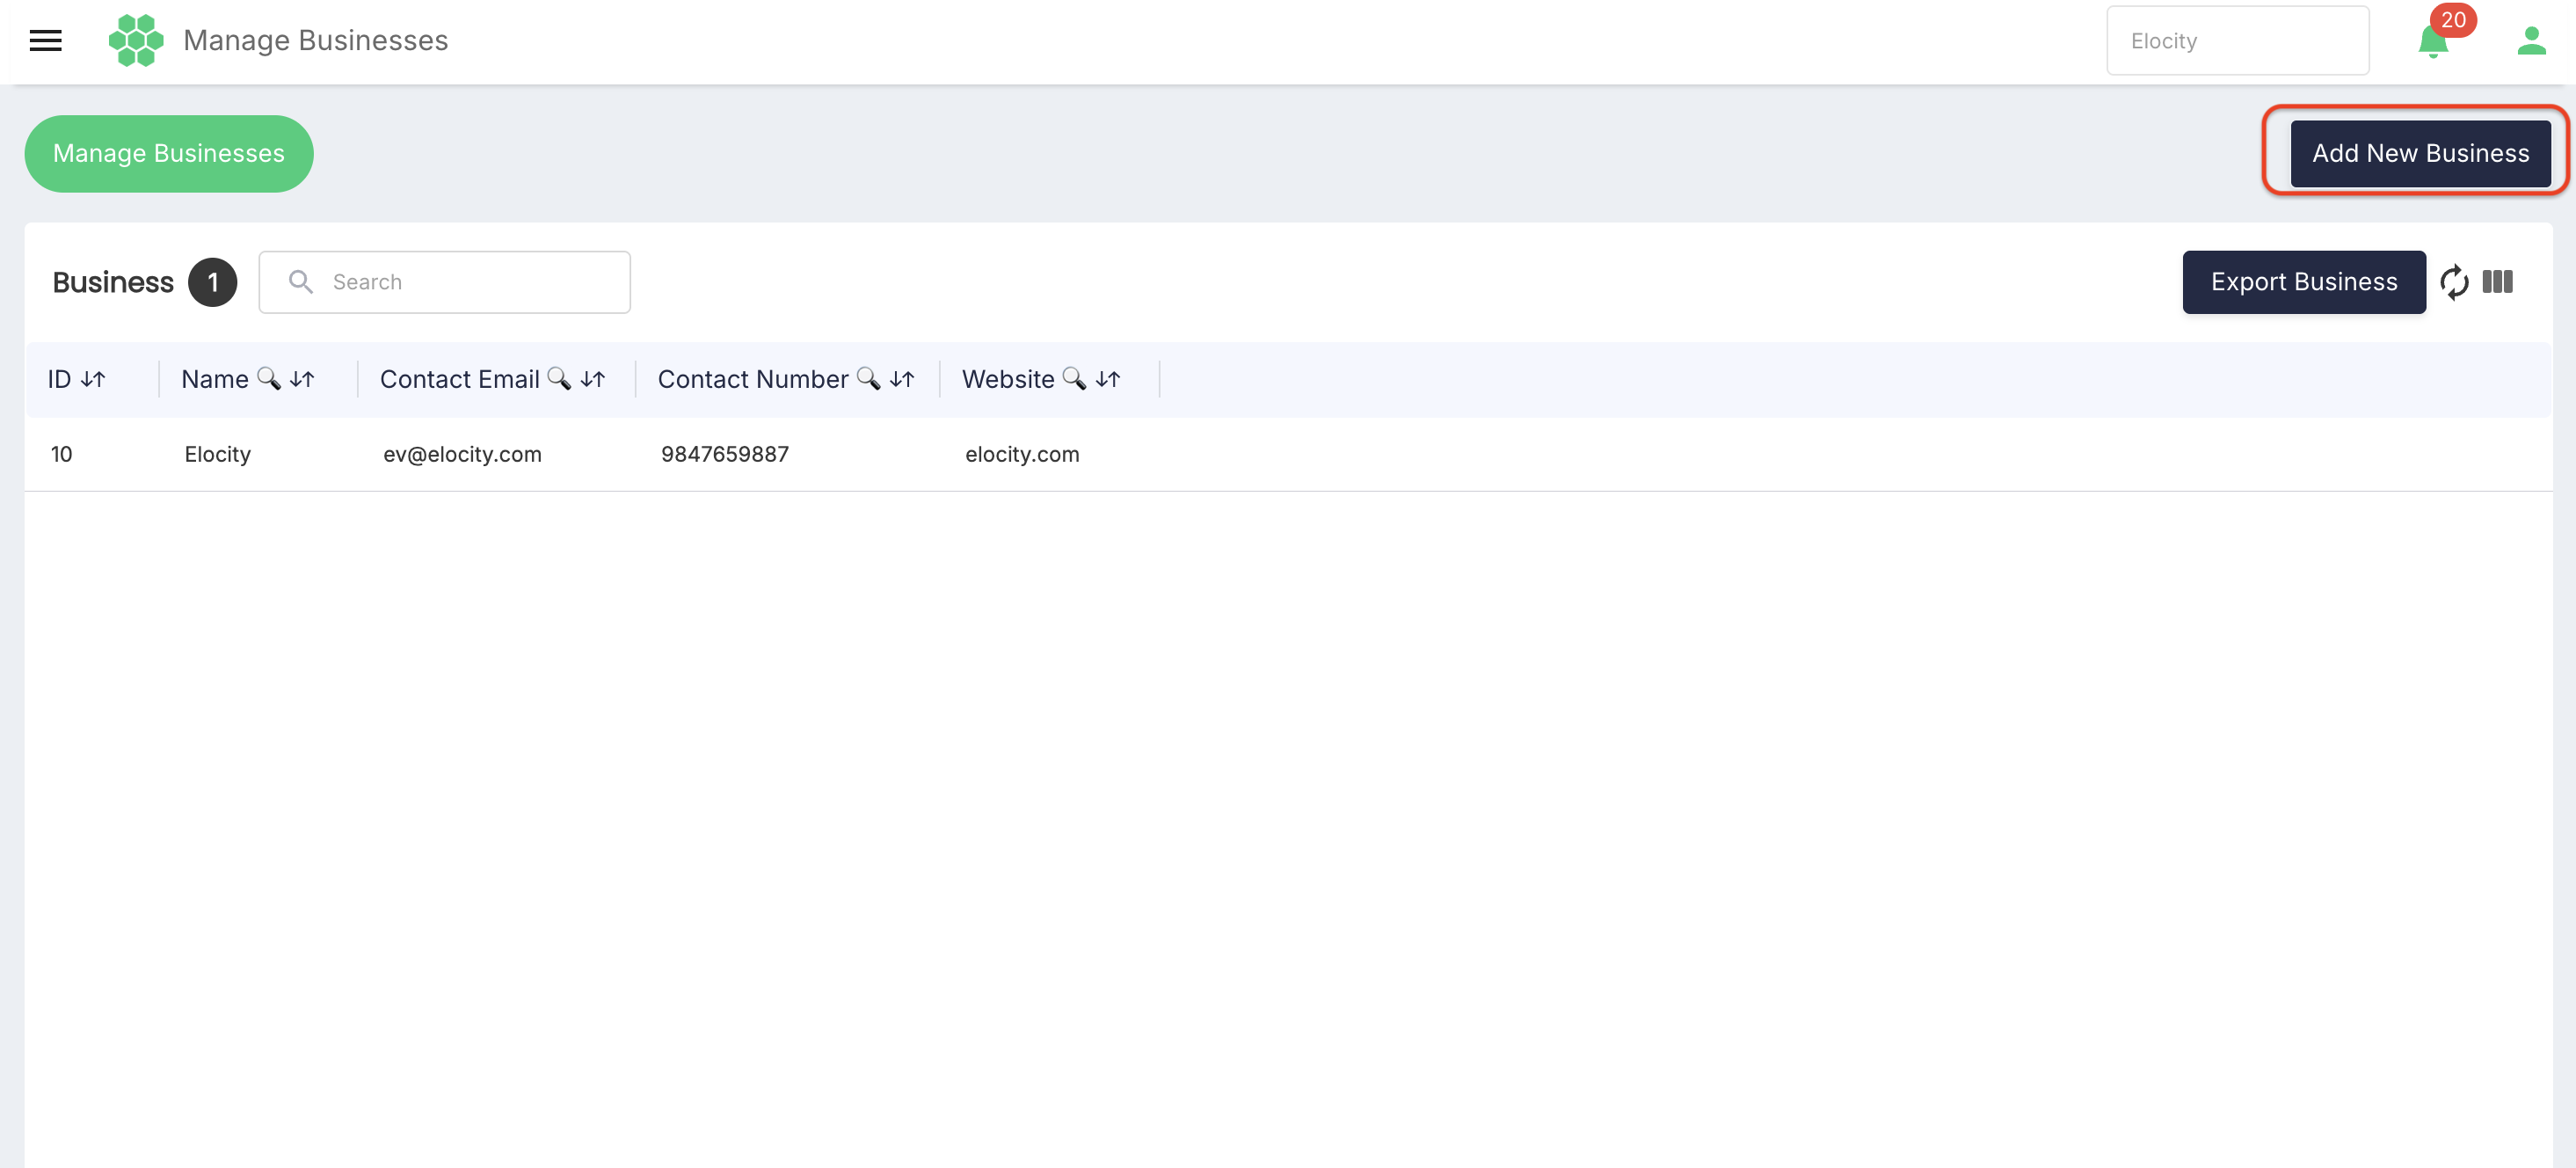
Complete the business creation form to add a new business record. The full set of creation fields and validation is presented on that form and is outside the scope of this list-page guide.
Recommended operating workflow
- Confirm the required business context using the All Businesses selector.
- Use Search, or a column search on Name, Contact Email, Contact Number, or Website, to locate a specific record.
- Review the relevant grid columns, using Column Filter to show or hide columns as required.
- Use the pagination controls when the required record is on another page.
- Select Refresh after changes to request the latest grid values.
- Edit a business details or update its details.
- Export businesses Configure filters and column visibility, then select Export Business to generate offline reports.
- Select Add New Business when a new business record must be created.
Notes
- The businesses shown, and the actions available, can differ between users because of business assignments, roles, and permissions.
- Column visibility and column-search selections affect only the current on-screen view; they do not change stored business records.
- A blank value in a column indicates that the information has not been recorded for that business.
- Refresh the grid before relying on the displayed values after a business record has been added or changed.