Corporate
Account setup, corporate groups, employees, RFID, charging sessions, settlement, exports, and access control.
- Document version: 1.0
- Prepared for: HIEV CPMS administrators and corporate operators
- Interface verified: 4 August 2026
- Functional baseline: Corporate flow requirements and the live HIEV Canada tenant
Document Control
| Item | Value |
|---|---|
| Title | HIEV CPMS - Corporate Module User Manual |
| Version | 1.0 |
| Status | Operational draft based on verified UI and approved Corporate flow requirements |
| Audience | CPO administrators, corporate administrators, finance users, support teams, and auditors |
| Product scope | HIEV CPMS Canada tenant - Corporate module and connected User Management / Exports functions |
| Prepared on | 4 August 2026 |
IMPORTANT: Tenant and permission differences Labels and controls can vary by role, business, network, or feature flag. Where the live tenant does not expose a required control — such as parent payment mode, a Corporate Access dropdown, or Request Physical RFID — this manual states the required business behavior and tells the administrator how to verify the configured outcome.
How to use this manual
Follow the procedures in order for a new rollout, or go directly to the relevant task for day-to-day operations. Each procedure identifies the user action, expected system result, and important business rule. The terms Corporate, parent, employee, child account, group, RFID, and wallet are defined in the glossary.
Source and verification basis
- Corporate flow requirements supplied in Confluence, including parent ID, wallet, groups, billing modes, employee removal, downloads, web-user access, and physical RFID processing charges.
- Read-only inspection of the live HIEV CPMS Canada Corporate screens on 4 August 2026.
- Verified related screens: User Management > Add New User and Administration > Exports.
- No production record was created, changed, removed, or downloaded during verification.
Contents
- Corporate Module Overview
- Roles, Permissions, and Access
- Corporate List and Navigation
- Create and Maintain a Corporate Account
- Configure Corporate Groups
- Manage Employees
- Manage Employee RFID
- Review Charging Sessions
- Parent Wallet, Billing, Discounts, and Settlement
- Downloads and Exports
- Grant Web Users Access to Corporates
- End-to-End Use Cases
- Validations, Exceptions, and Troubleshooting
- Operational Checklists
- Glossary
- Appendix A. Screen and Field Reference
- Appendix B. Requirement Coverage Matrix
1. Corporate Module Overview
The Corporate module allows an administrator to register an organization, scope it to a charging network, organize employees into groups, apply group discounts, manage RFID credentials, review charging activity, and settle the organization's combined charging costs.
KEY RULE: One financial owner The Corporate parent ID tag is the financial owner. It has the corporate wallet or billing account. Employees are associated child accounts and do not own individual wallets. Any employee balance shown in the interface is an informational or shared-account view; it does not change wallet ownership.
1.1 Corporate account model
| Level | Purpose | Financial behavior |
|---|---|---|
| Corporate parent | Owns the corporate identity, contract, network scope, and parent ID tag. | Owns the wallet or postpaid billing account. |
| Group | Organizes employees by department, location, policy, or settlement treatment. | Carries discount and bulk-settlement settings. |
| Employee | Represents an authorized driver associated with the parent and one corporate group. | Does not have an individual wallet; usage is charged to the parent. |
| Charging session | Captures the employee's charging transaction and operational details. | Feeds the parent wallet or bulk settlement. |
1.2 Operational lifecycle
- 1 - SET UP: Create the Corporate, choose network and contract dates, then verify parent ID, wallet, and payment mode.
- 2 - ORGANIZE: Create one or more groups; configure discount and bulk settlement; add or migrate employees.
- 3 - OPERATE: Assign RFID, allow charging, monitor sessions, settle costs, export records, and offboard safely.
1.3 Main features
- Corporate list with search, refresh, column visibility, status, and contract information.
- Corporate creation and editing with network and contract scope.
- Multiple corporate groups with percentage discounts and optional bulk settlement.
- Single employee onboarding, CSV bulk onboarding, and migration of existing customers.
- Employee group reassignment without recreating the employee.
- Per-employee RFID assignment, status, expiry, and physical-card request workflow when enabled.
- Corporate-level and employee-level charging-session review with operational and payment filters.
- Exports for customers, customer charging sessions, and corporate analytics.
- Role-based access through User Management, including network scope and Corporate Access when enabled.
2. Roles, Permissions, and Access
2.1 Typical roles
| Role | Typical responsibilities | Recommended access |
|---|---|---|
| CPO Administrator | Create corporates, set network scope, configure groups and billing, manage users. | Corporate View/Edit, User Management, RFID, Exports. |
| Corporate Administrator | Manage the assigned corporate's groups, employees, RFID, and reports. | Only assigned corporate and network locations. |
| Finance / Accounts | Review parent wallet, discount, settlement, costs, and exports. | Read access plus approved settlement/export actions. |
| Support / Operations | Troubleshoot employee access and charging sessions. | Read access, RFID actions, and limited employee actions. |
| Auditor / Viewer | Inspect configuration and historical activity. | Read-only access and approved exports. |
2.2 Prerequisites
- You are signed in to the correct HIEV business tenant.
- Your role includes the necessary Corporate permissions.
- The target charging network and locations already exist.
- The corporate's billing mode, contract dates, discount policy, and RFID fee policy are approved.
- For postpaid accounts, finance has approved credit and settlement terms.
- For prepaid accounts, the parent wallet can be funded before employee charging starts.
CAUTION: Least privilege Assign a web user only the corporates and network locations needed for their job. A role permission grants capability; the Corporate Access and Network selectors restrict the records the user can act on.
3. Corporate List and Navigation
3.1 Open the Corporate module
- Sign in to HIEV CPMS and select the required business tenant.
- Open Corporate from the application navigation.
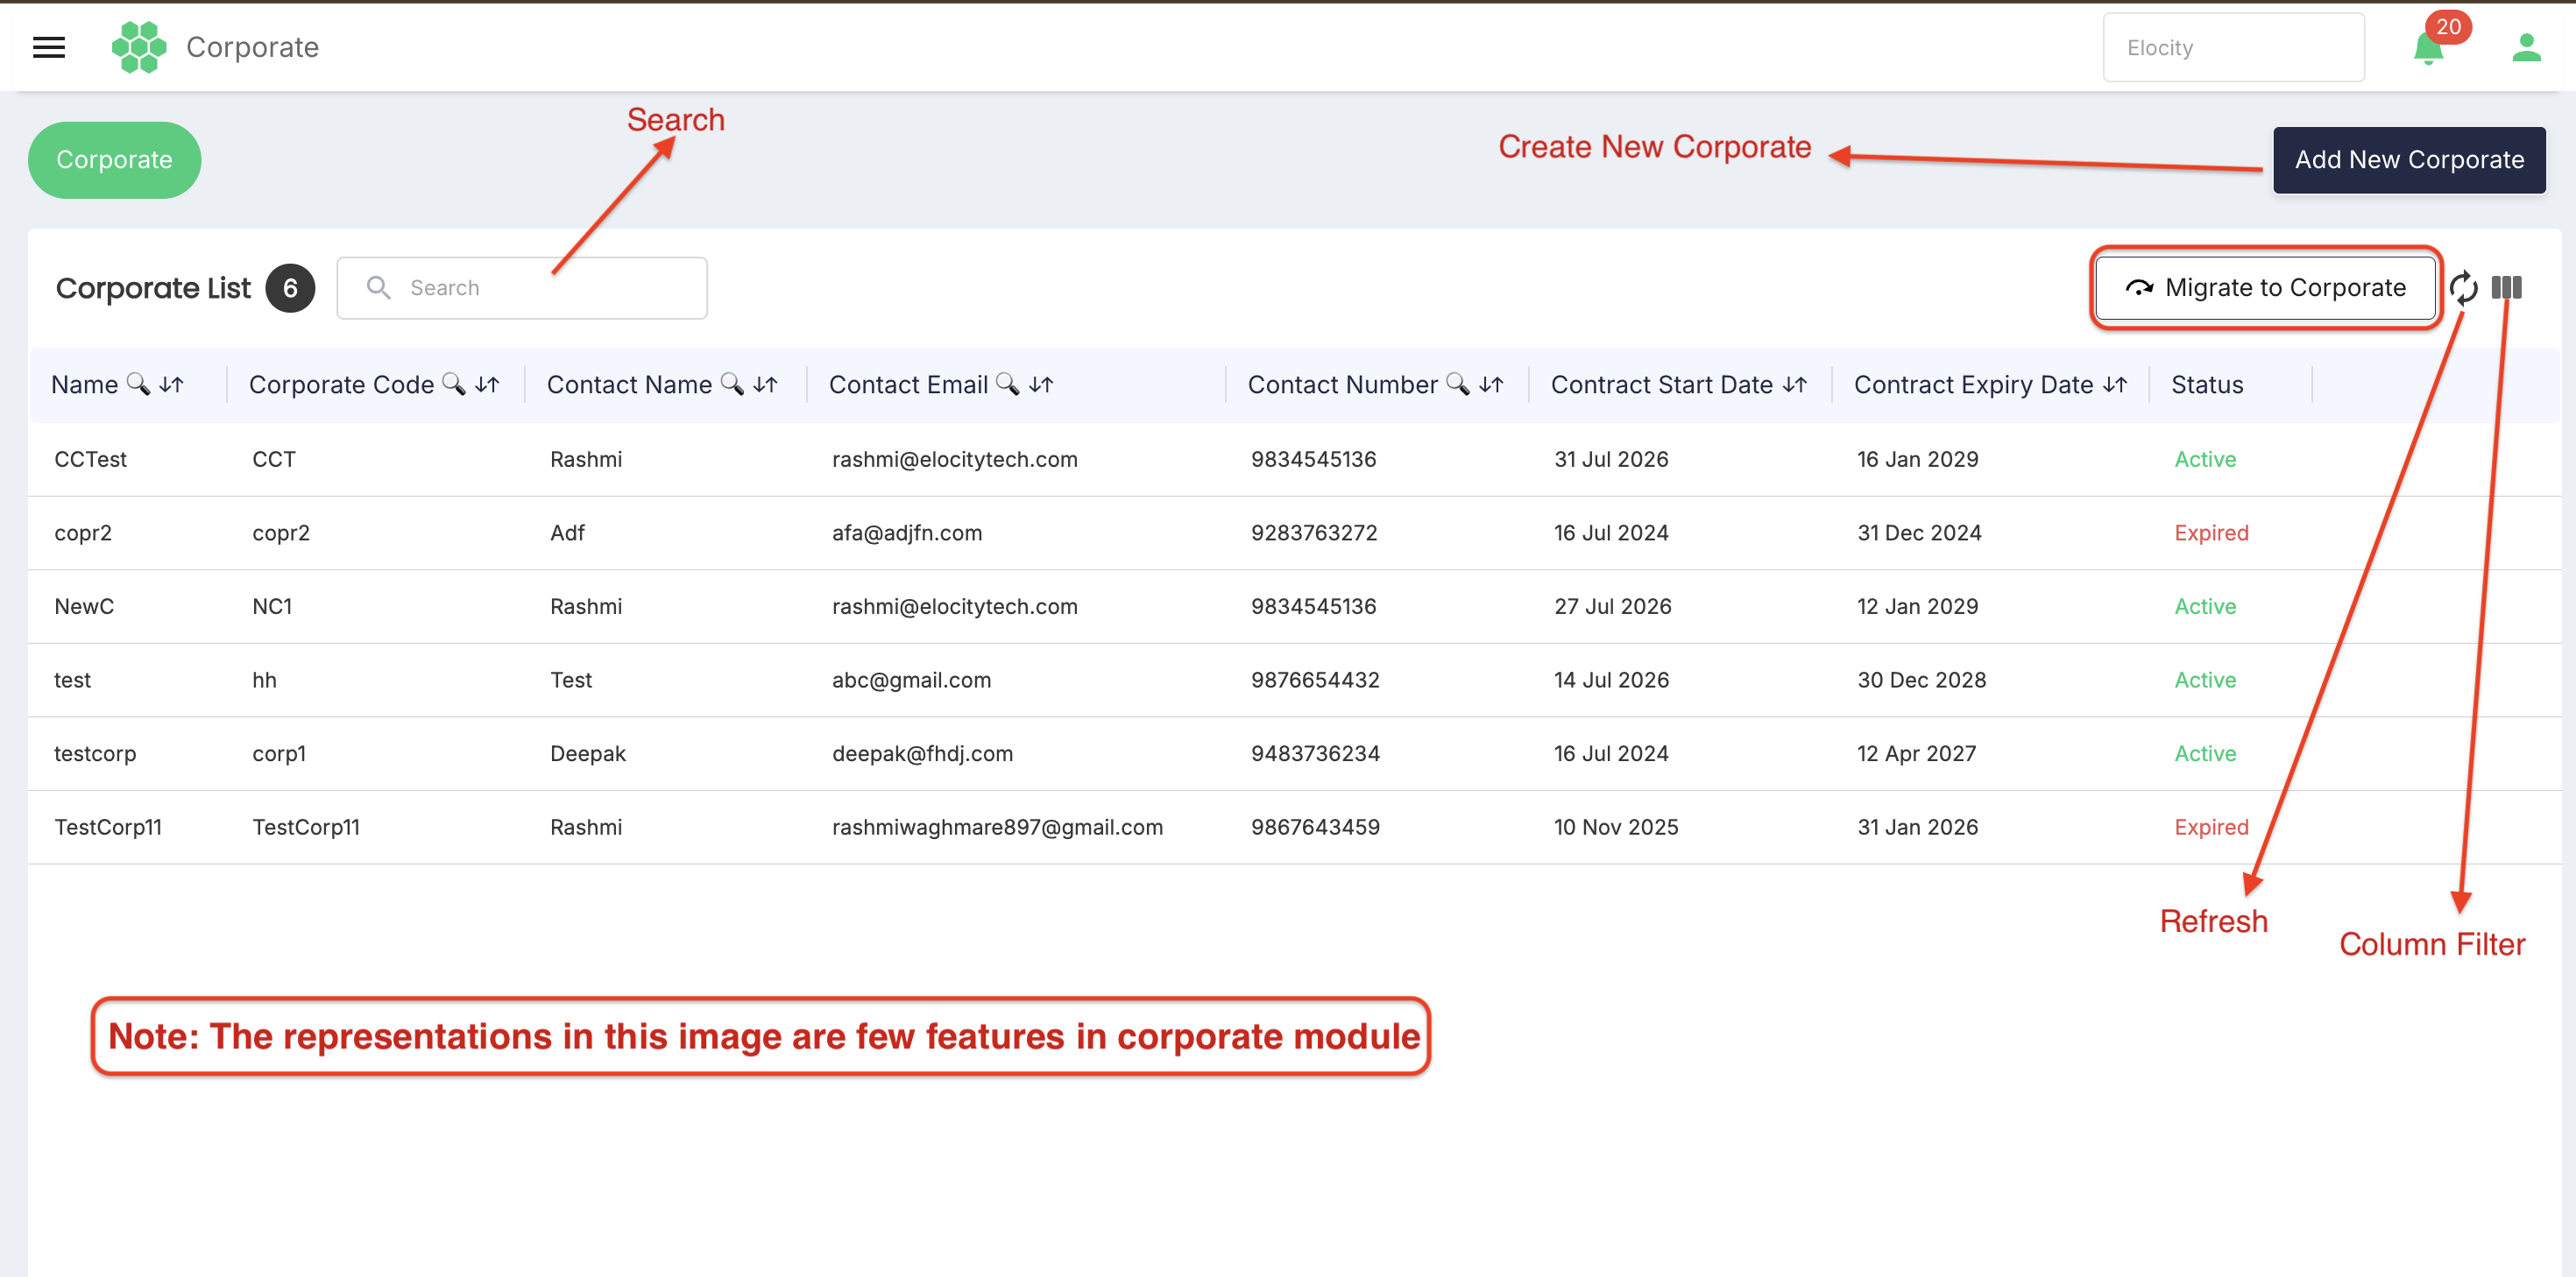
- Confirm the page shows Corporate List before proceeding.
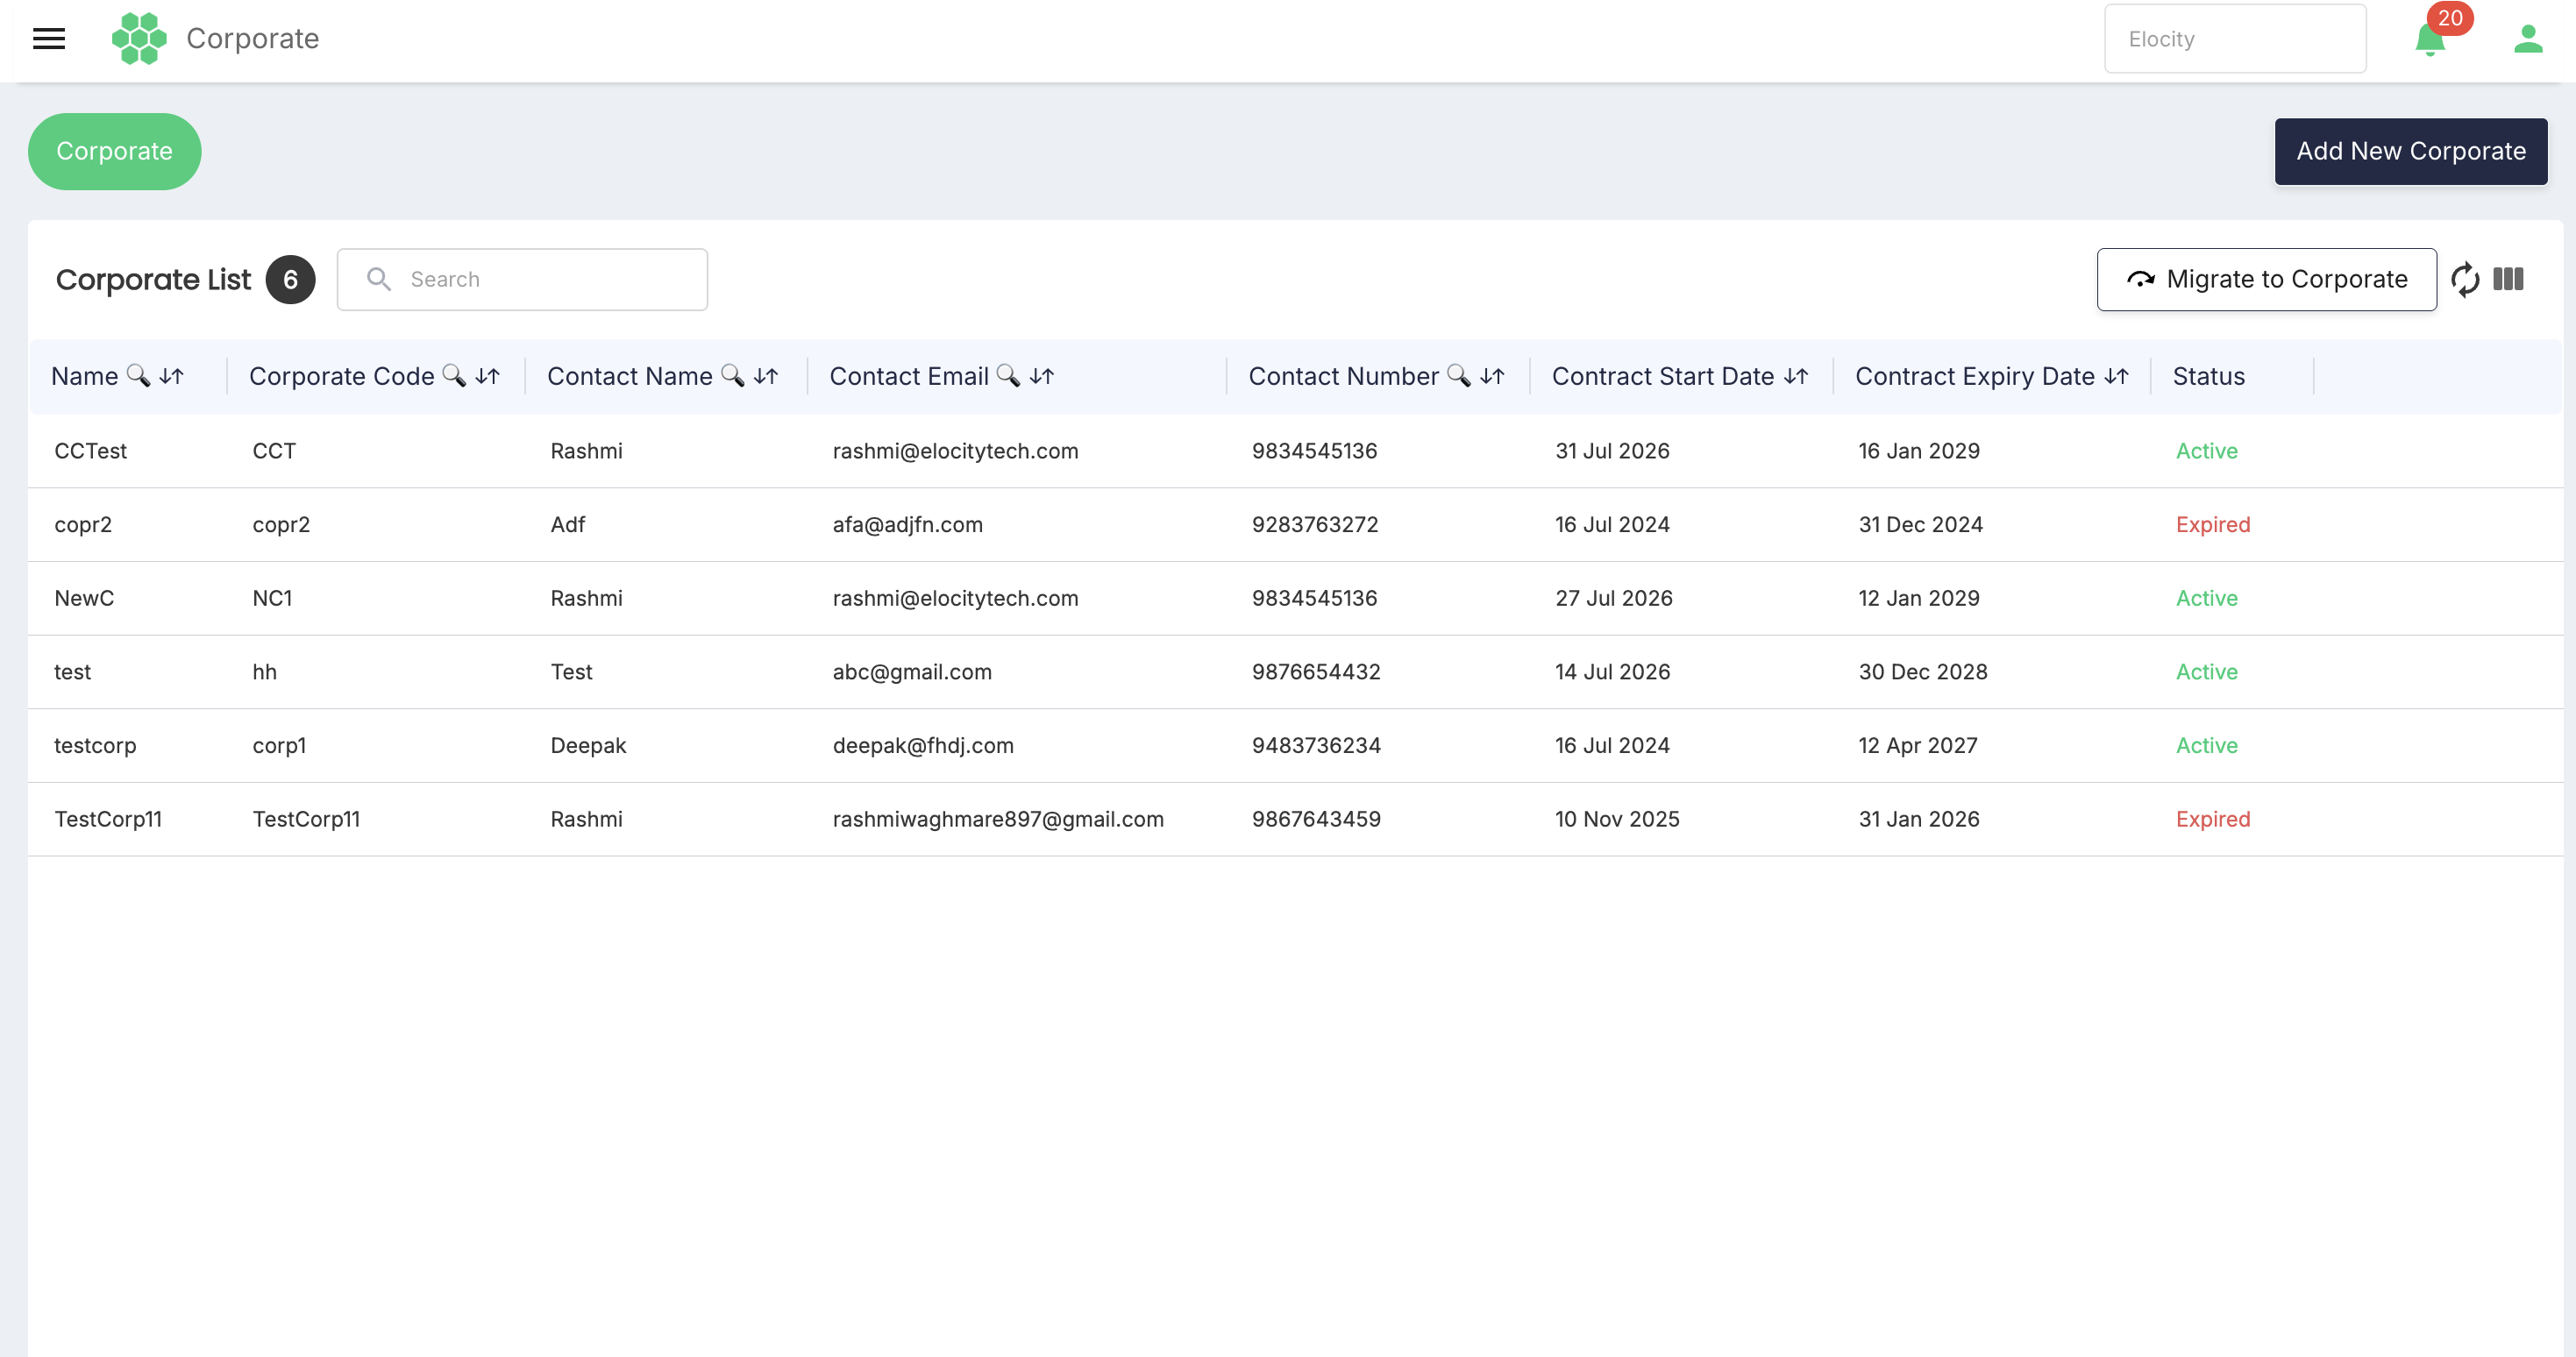
3.2 Corporate List controls
| Control | Use |
|---|---|
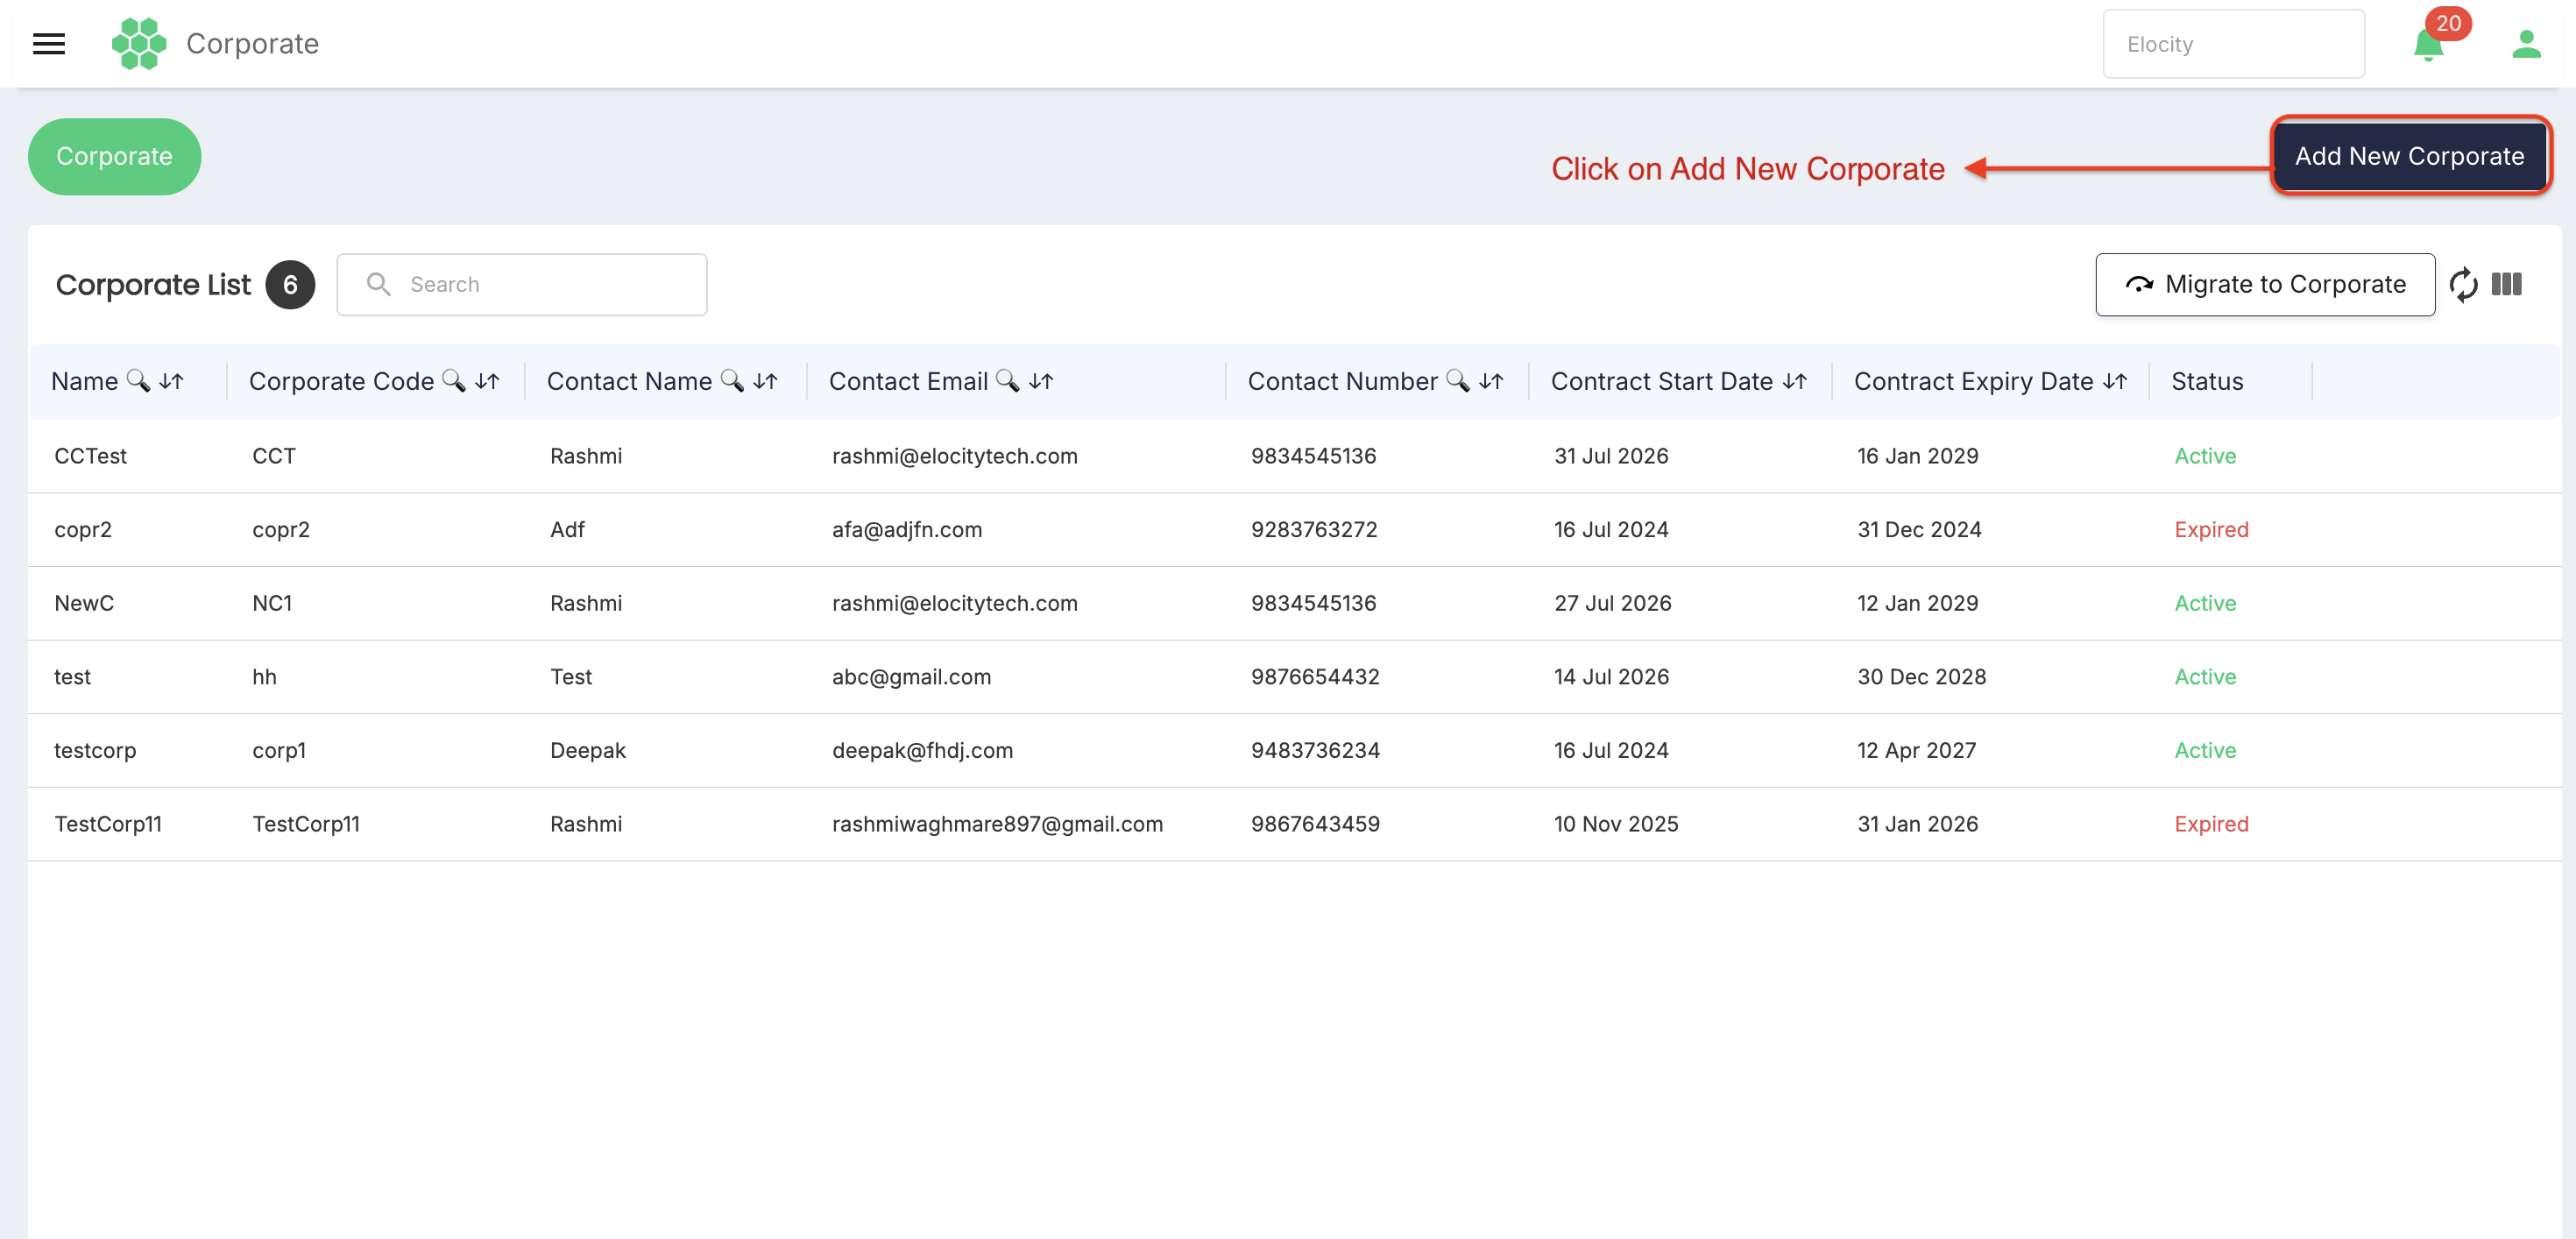
| Add New Corporate | Opens the corporate registration form. |
| Search | Searches the visible corporate list. |
| Migrate to Corporate | Adds eligible existing customers to a corporate workflow. |
| Refresh | Reloads the latest list data. |
| Column Filter | Shows or hides table columns for the current view. |
| Corporate row | Opens the selected corporate's details. |
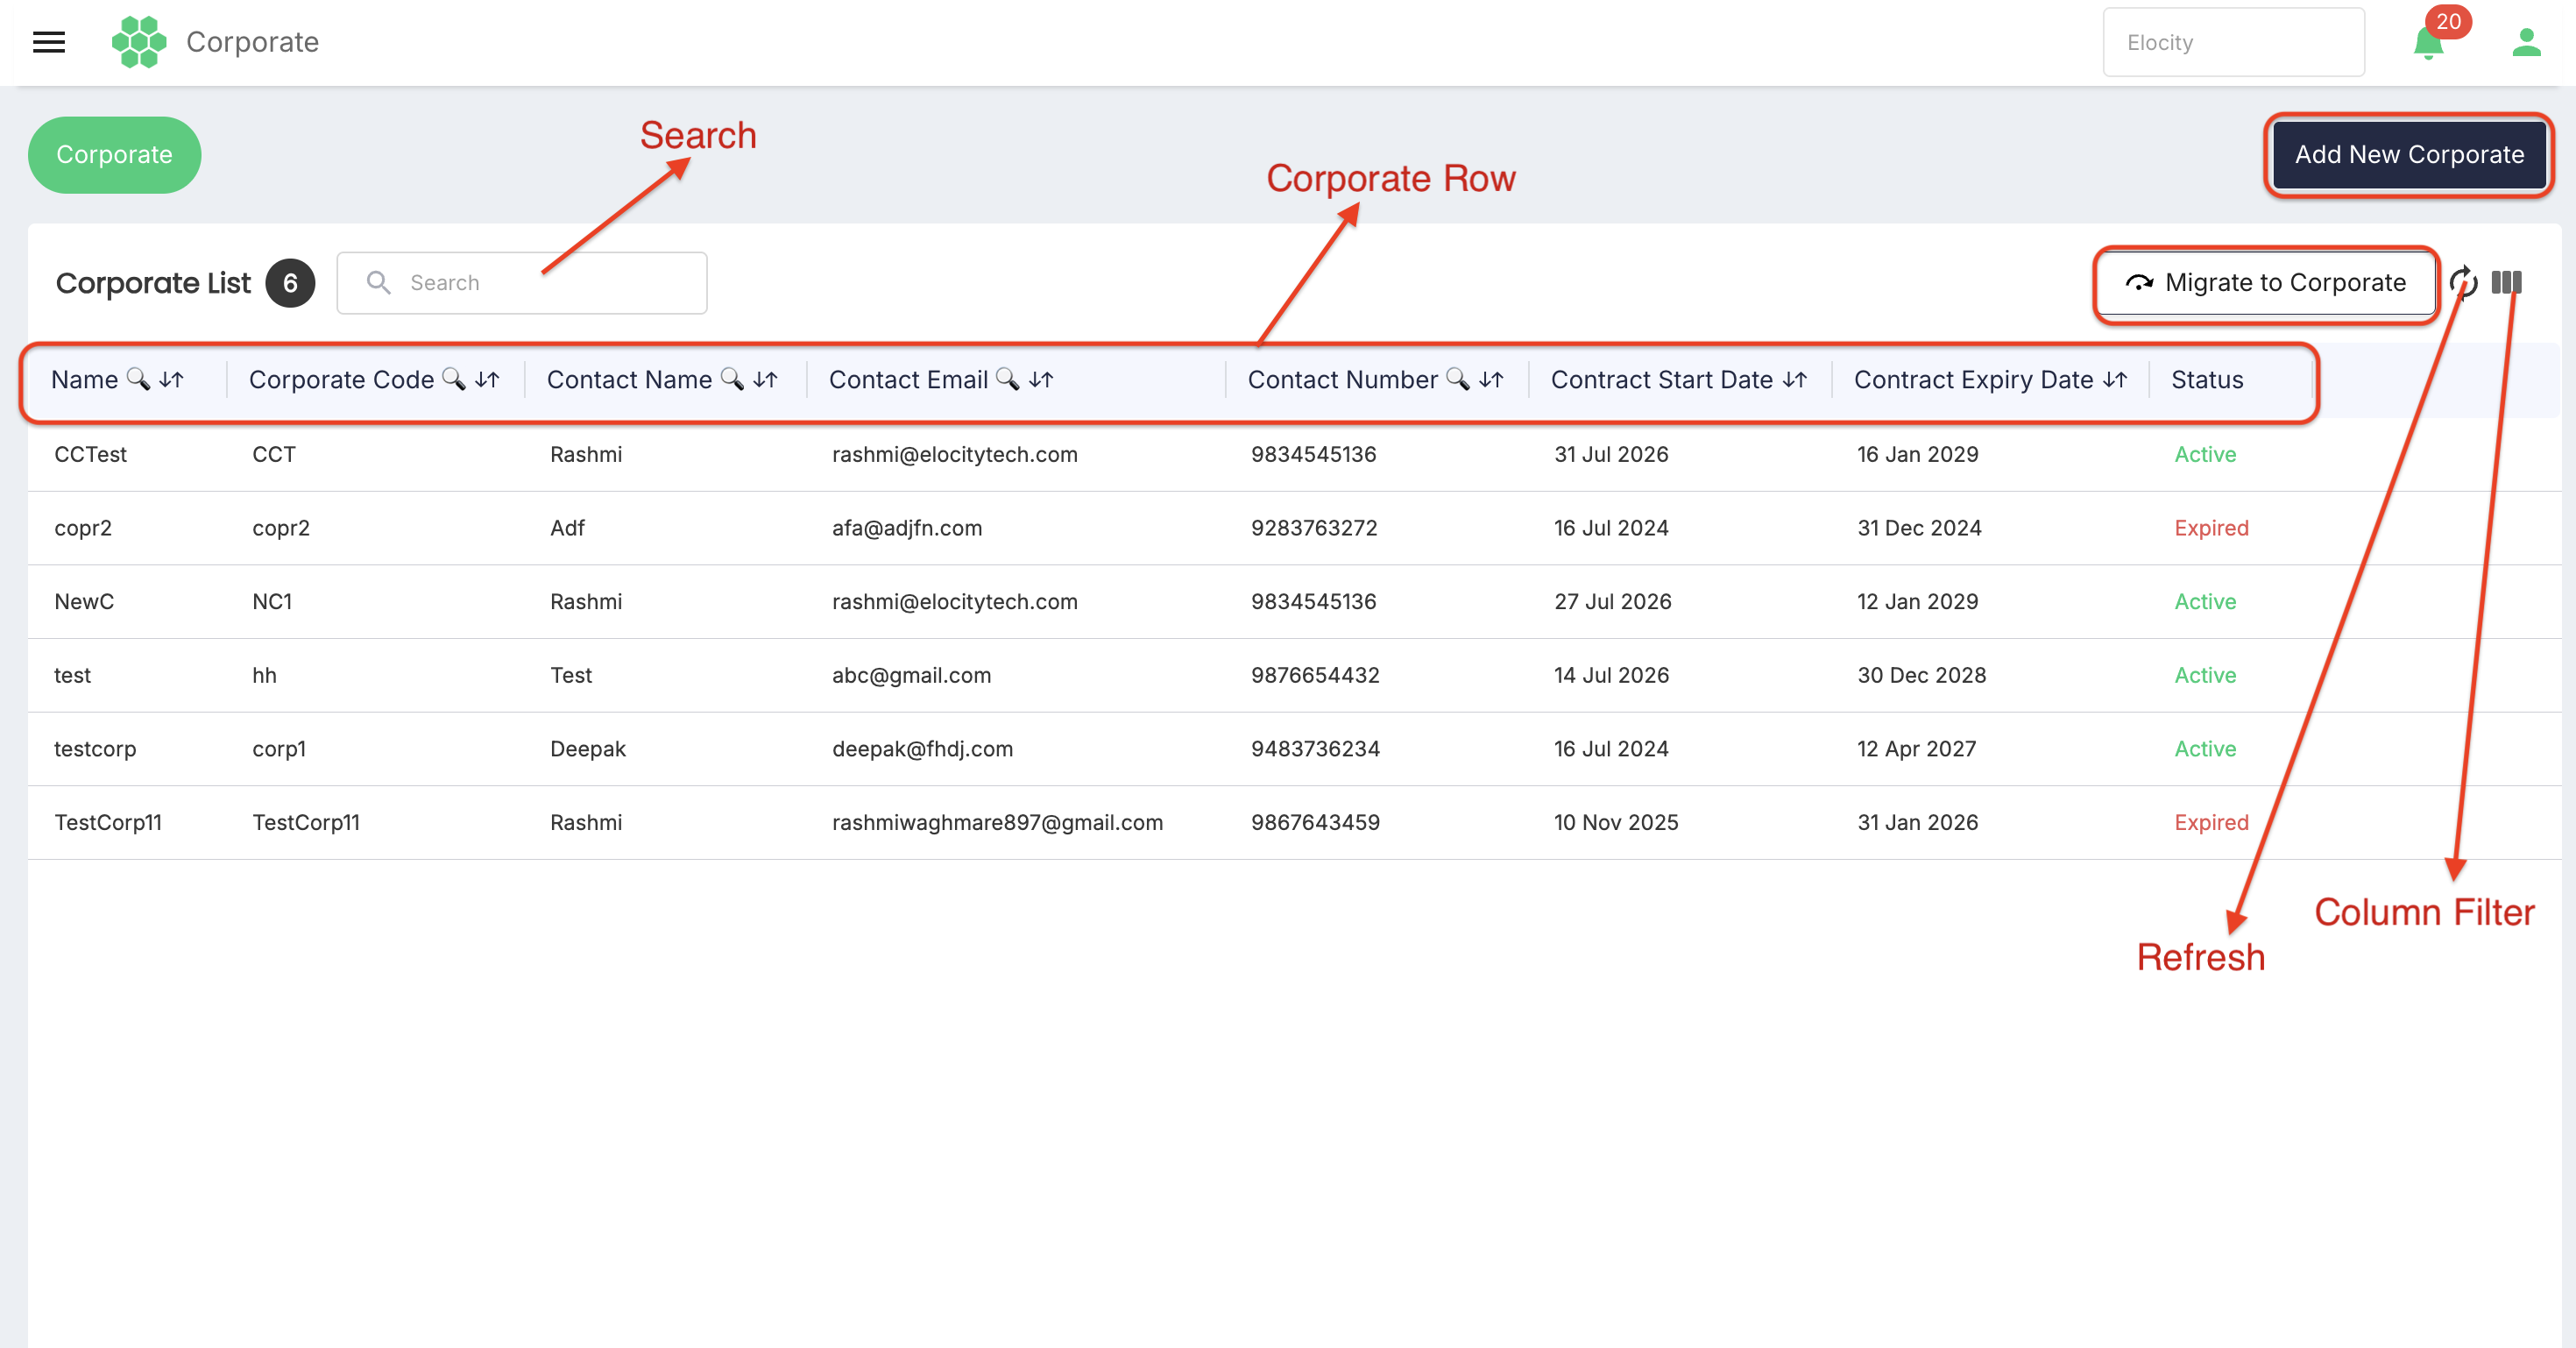
3.3 Corporate List columns
- Name
- Corporate Code
- Contact Name
- Contact Email
- Contact Number
- Contract Start Date
- Contract Expiry Date
- Status
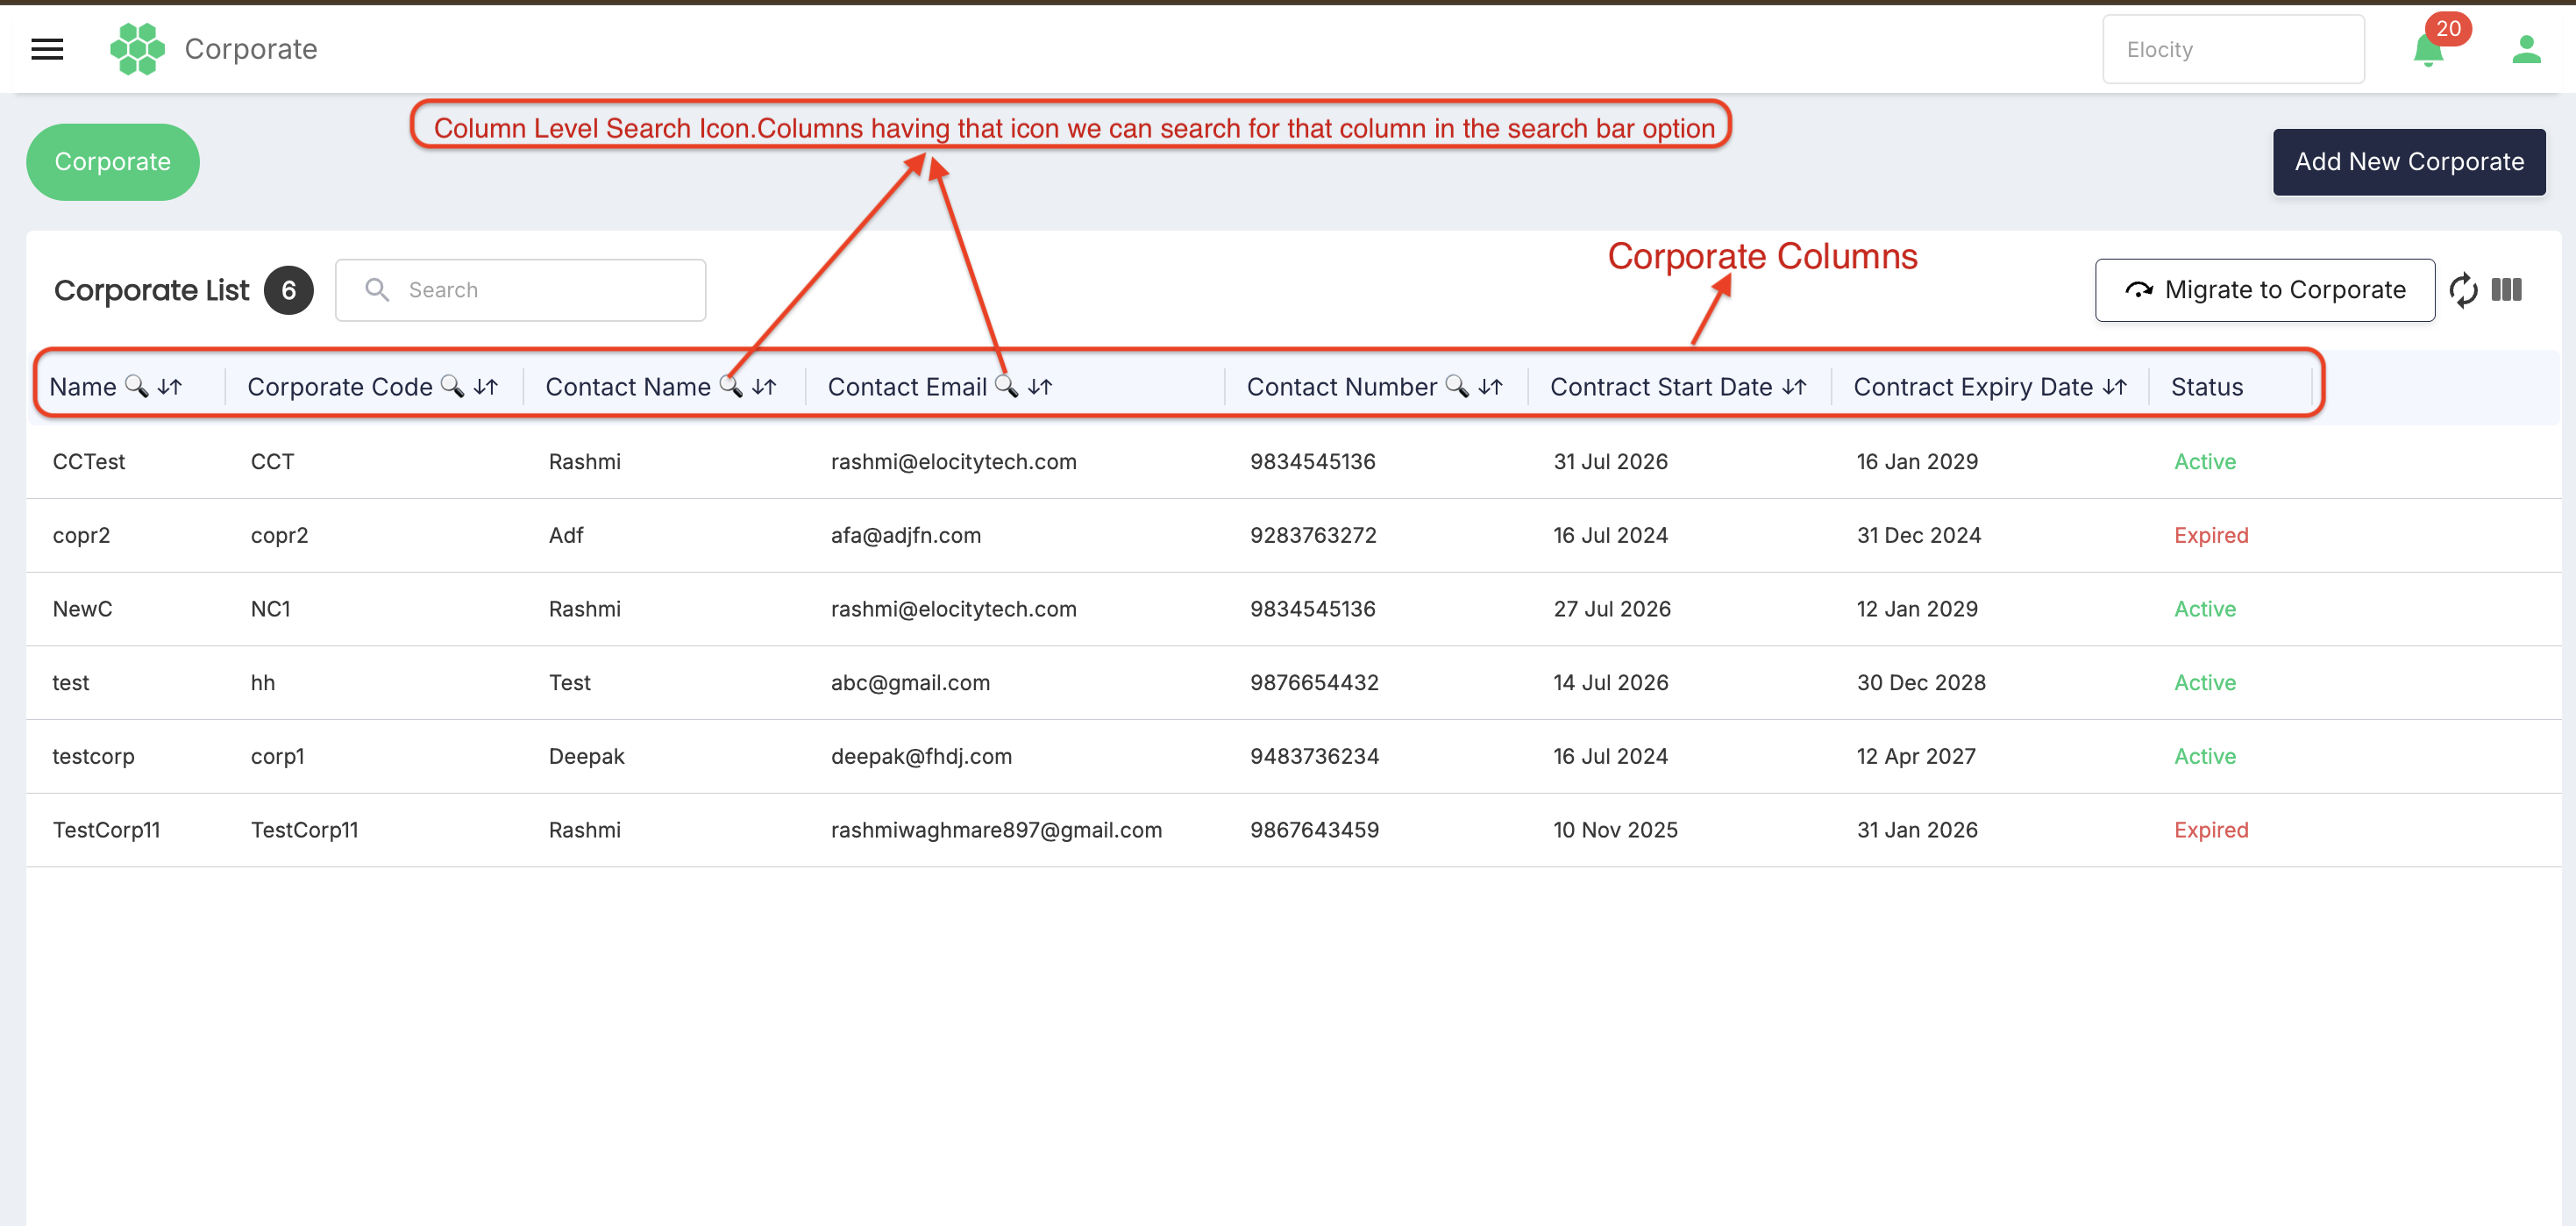
Tip: Use column-level search icons where available to narrow a specific column. Use Search for a broad lookup.
4. Create and Maintain a Corporate Account
4.1 Create a corporate
- From Corporate List, select Add New Corporate.
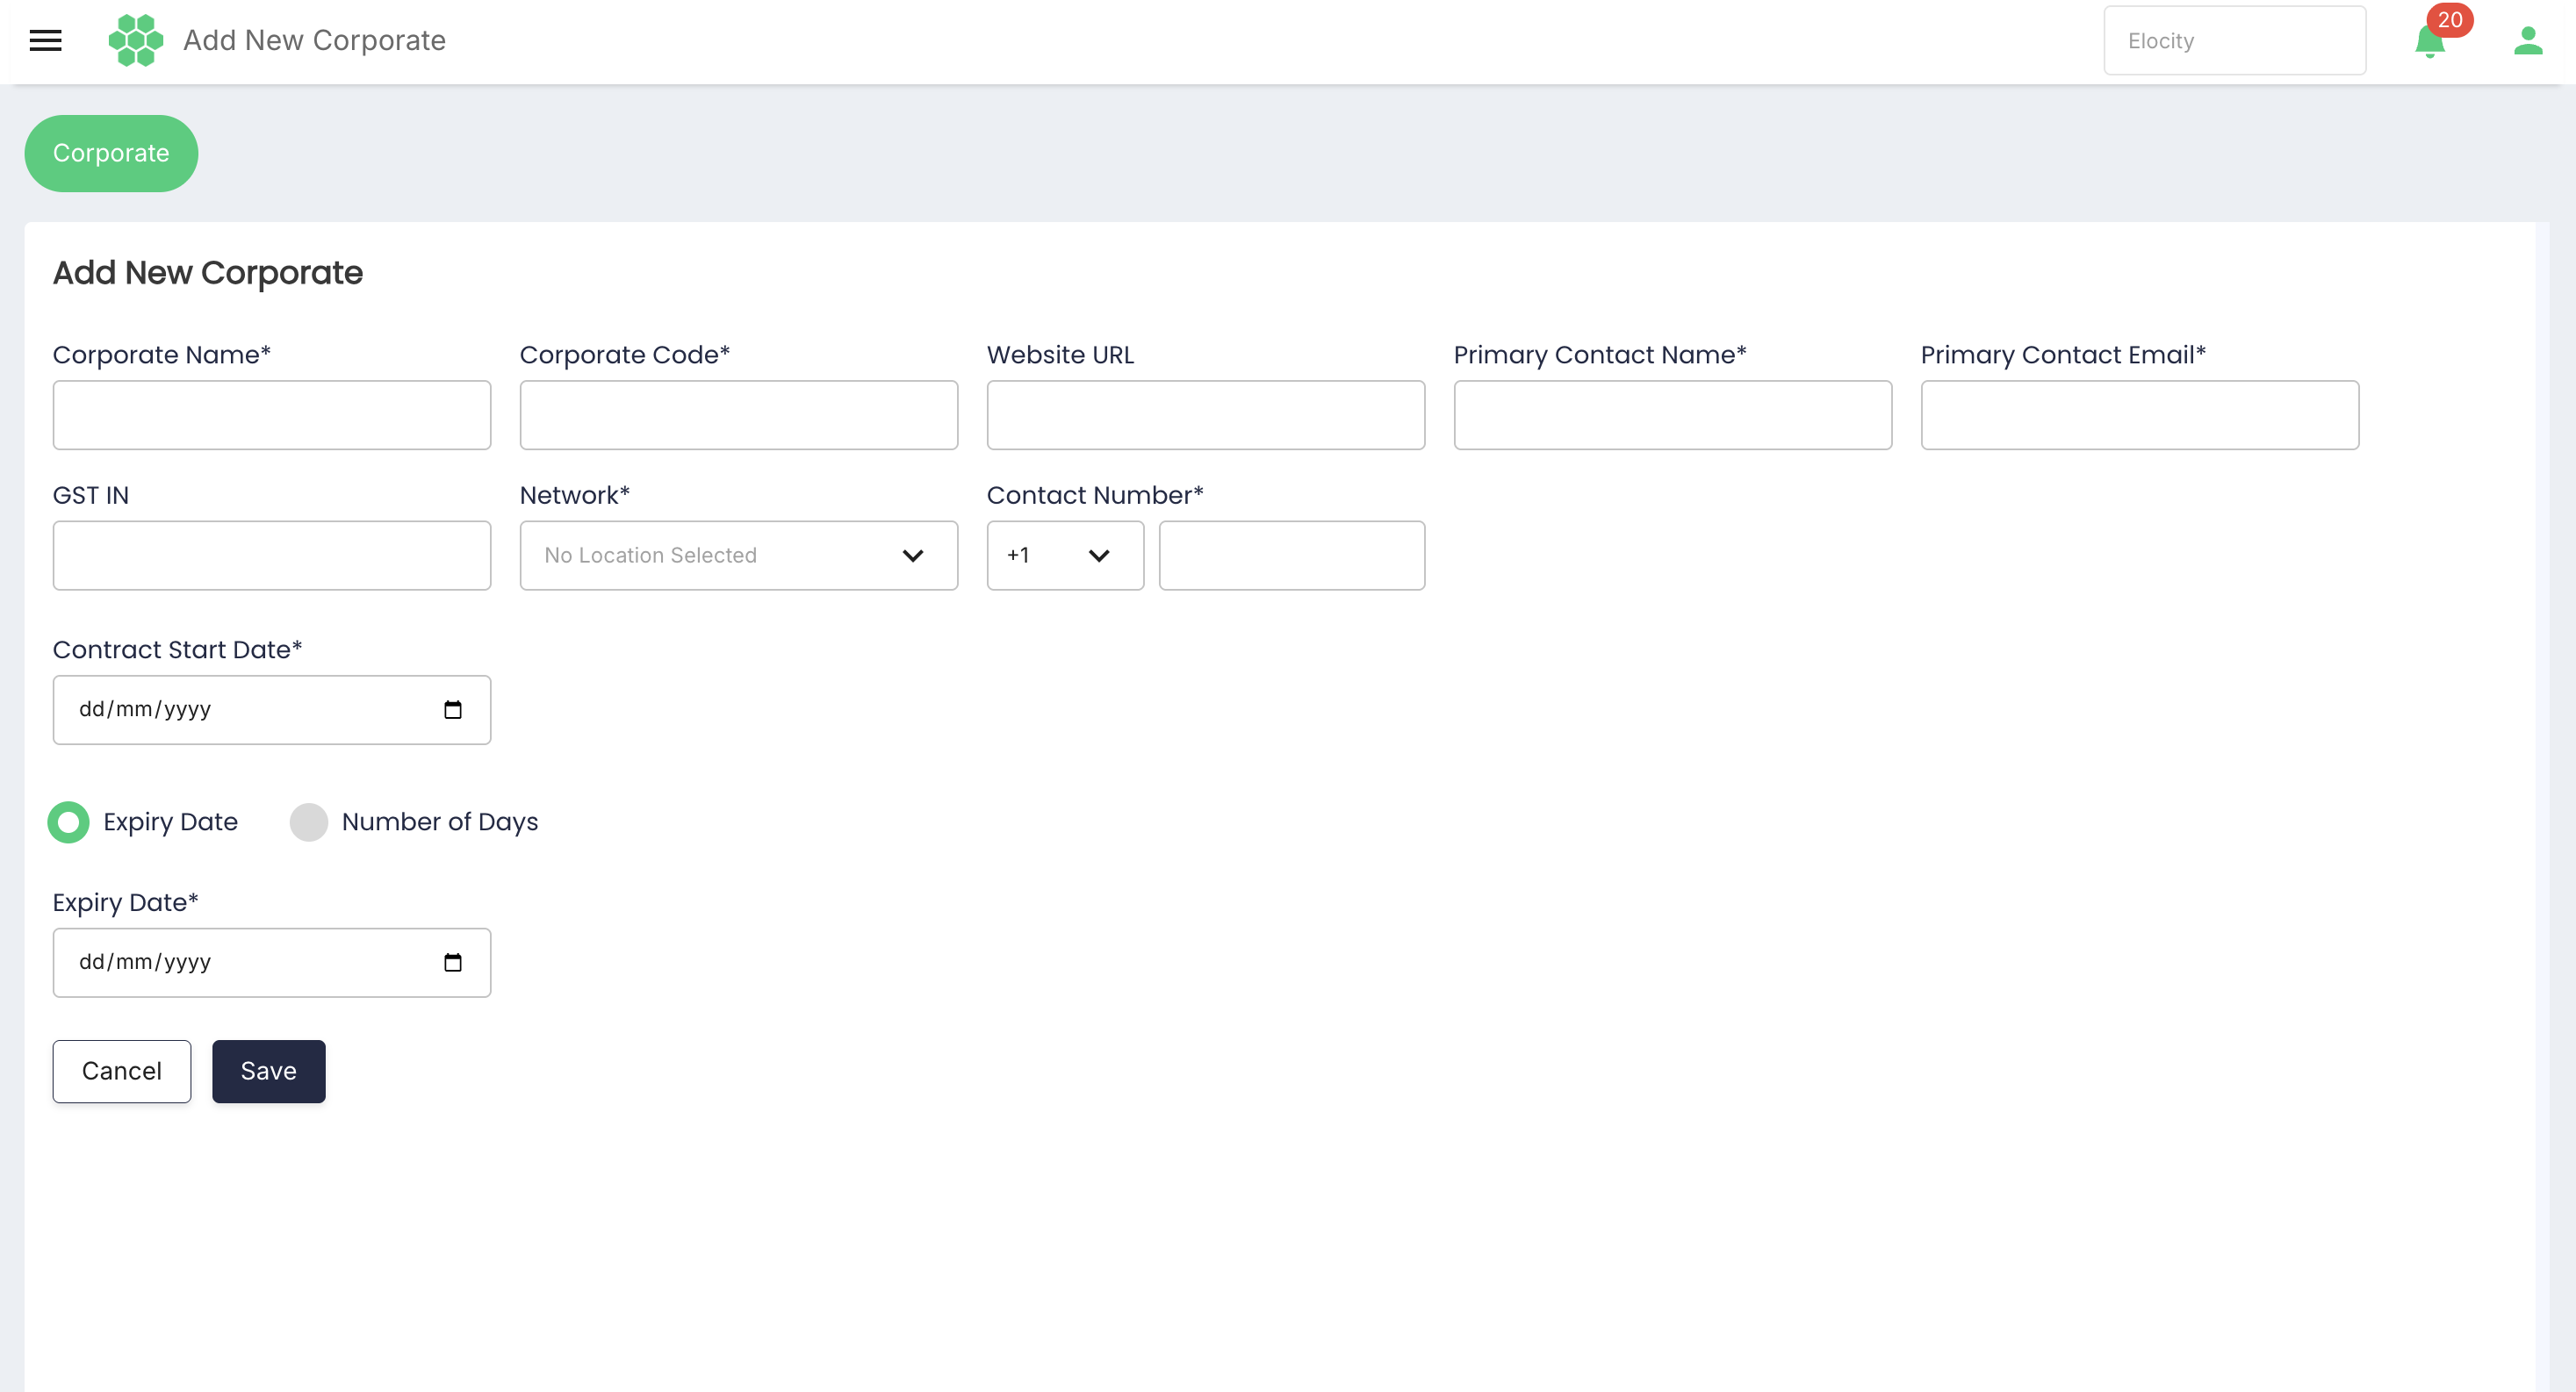
- Enter the Corporate Name and a unique Corporate Code.
- Optionally enter the corporate Website URL.
- Enter the Primary Contact Name, Primary Contact Email, and Contact Number.
- Select Network. In the location dialog, expand the hierarchy, select one or more permitted locations, and choose Done.
- Enter the Contract Start Date.
- Choose Expiry Date or Number of Days, then enter the corresponding contract-end value.
- Select Save.
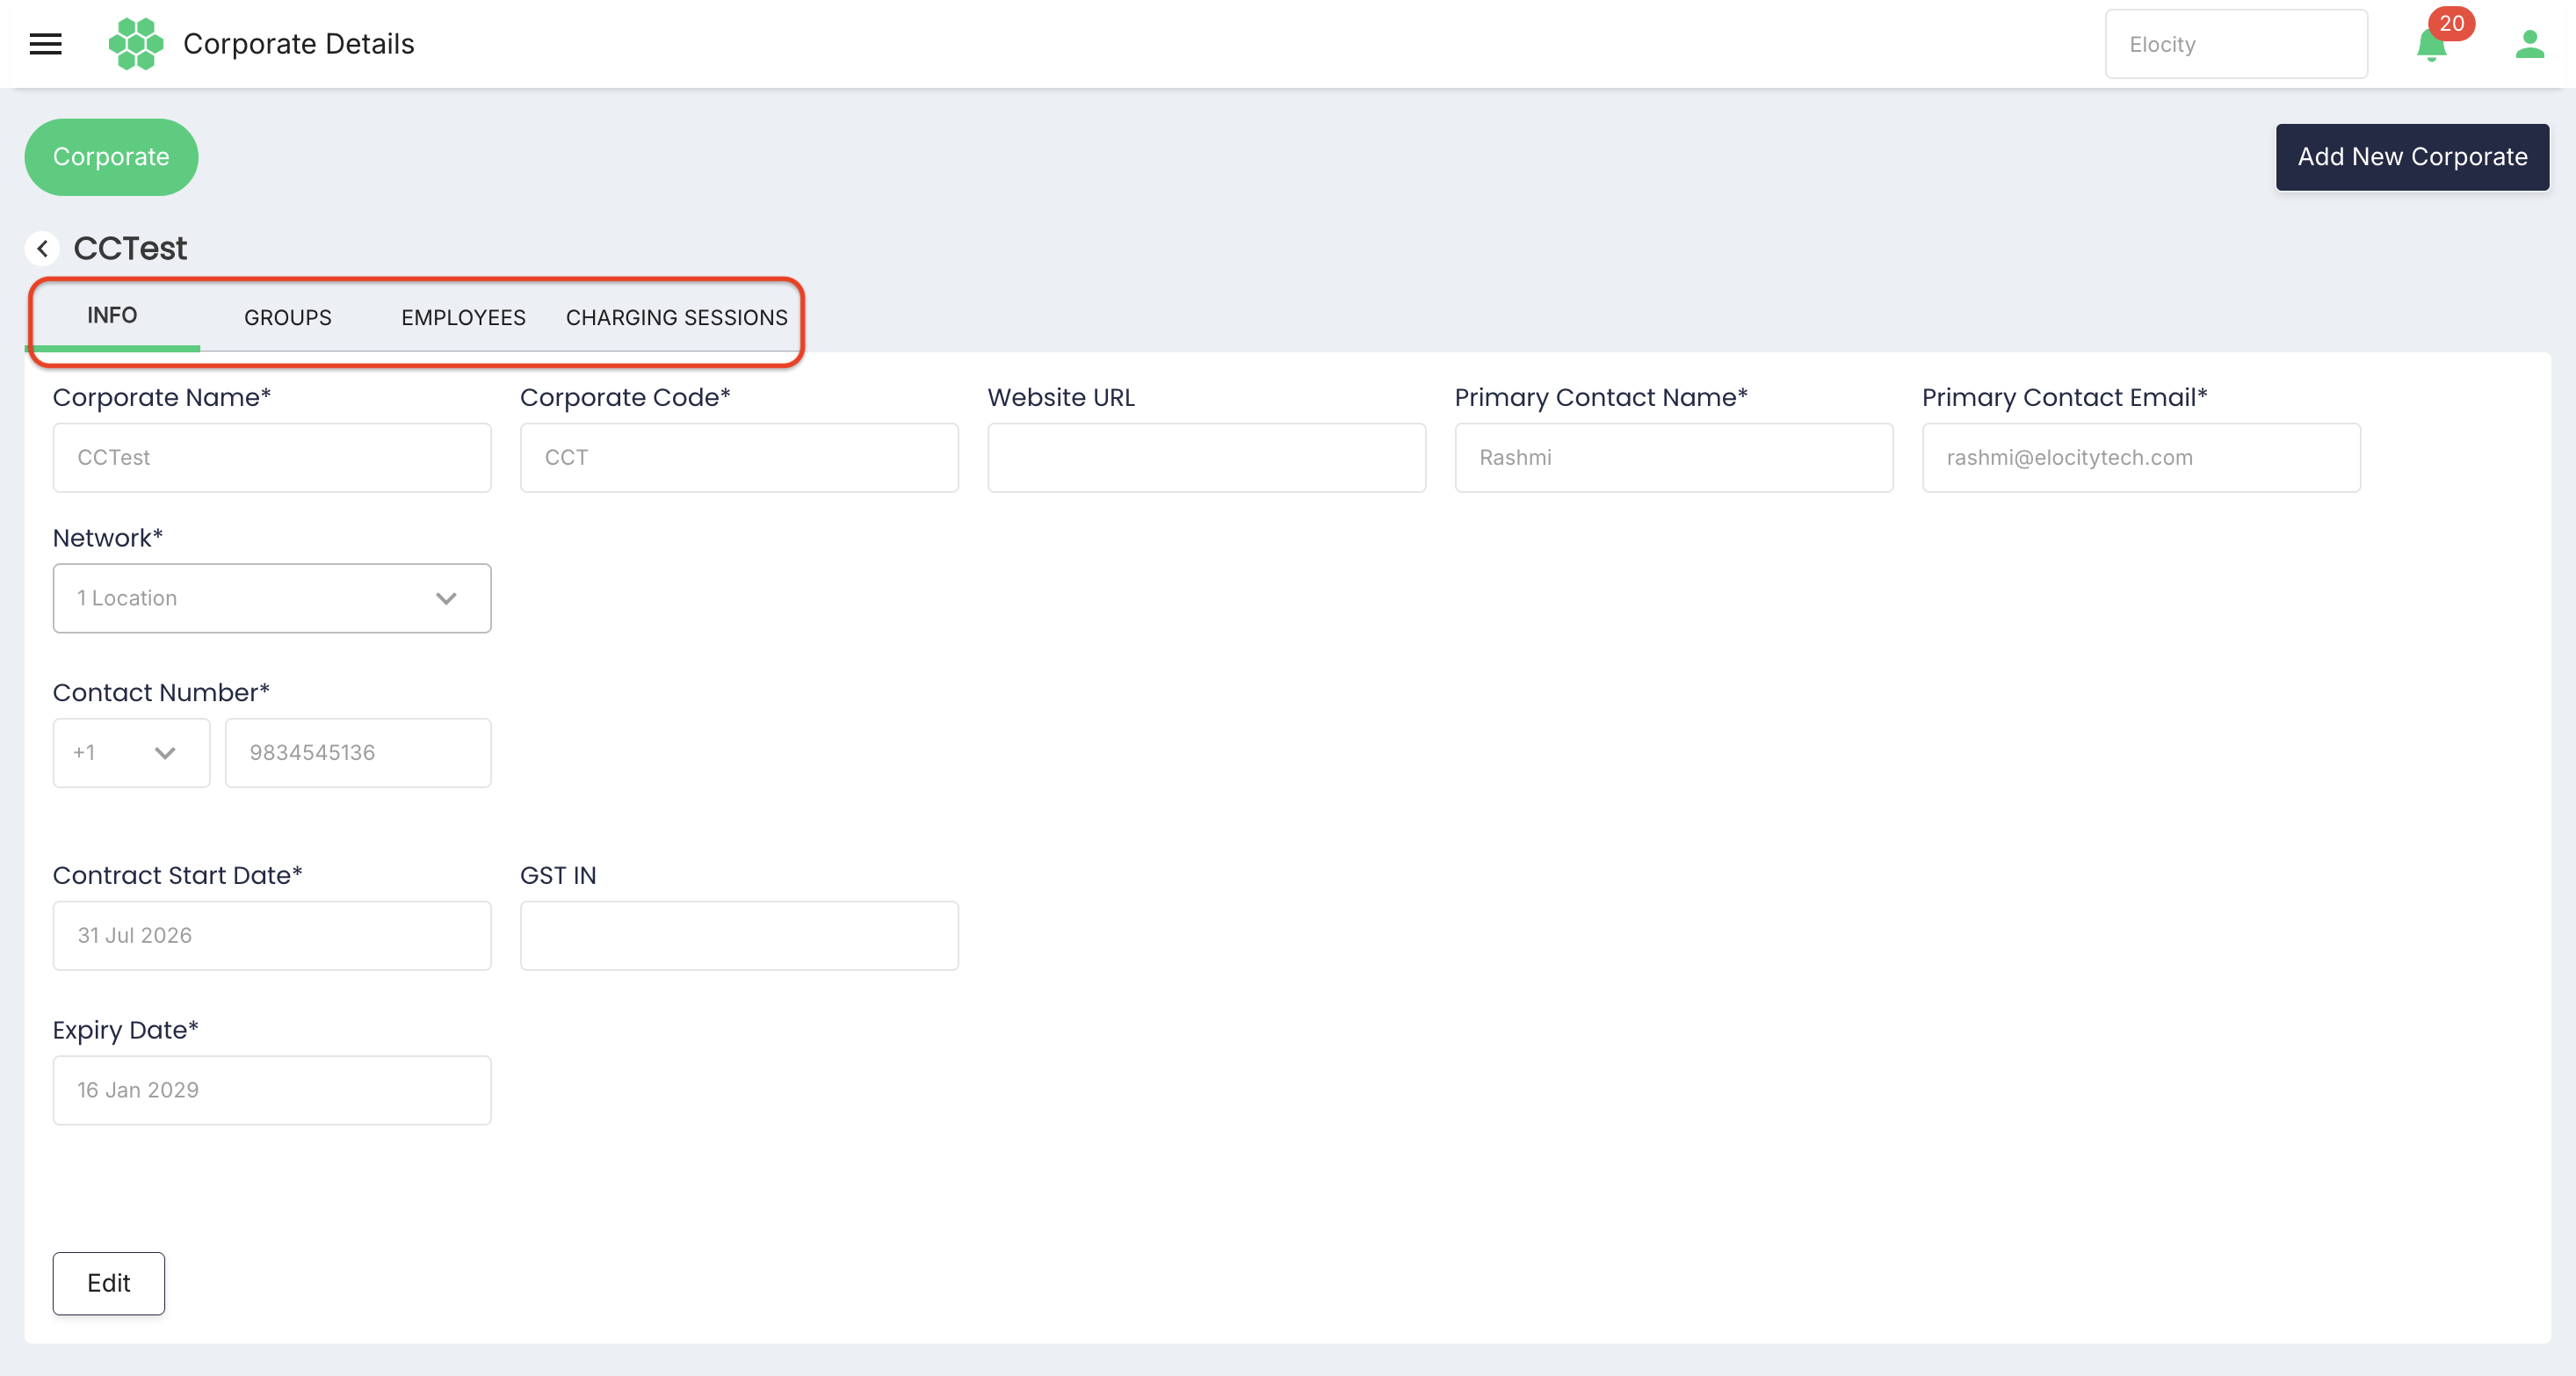
- Open the new Corporate and verify the INFO, GROUPS, EMPLOYEES, and CHARGING SESSIONS tabs.
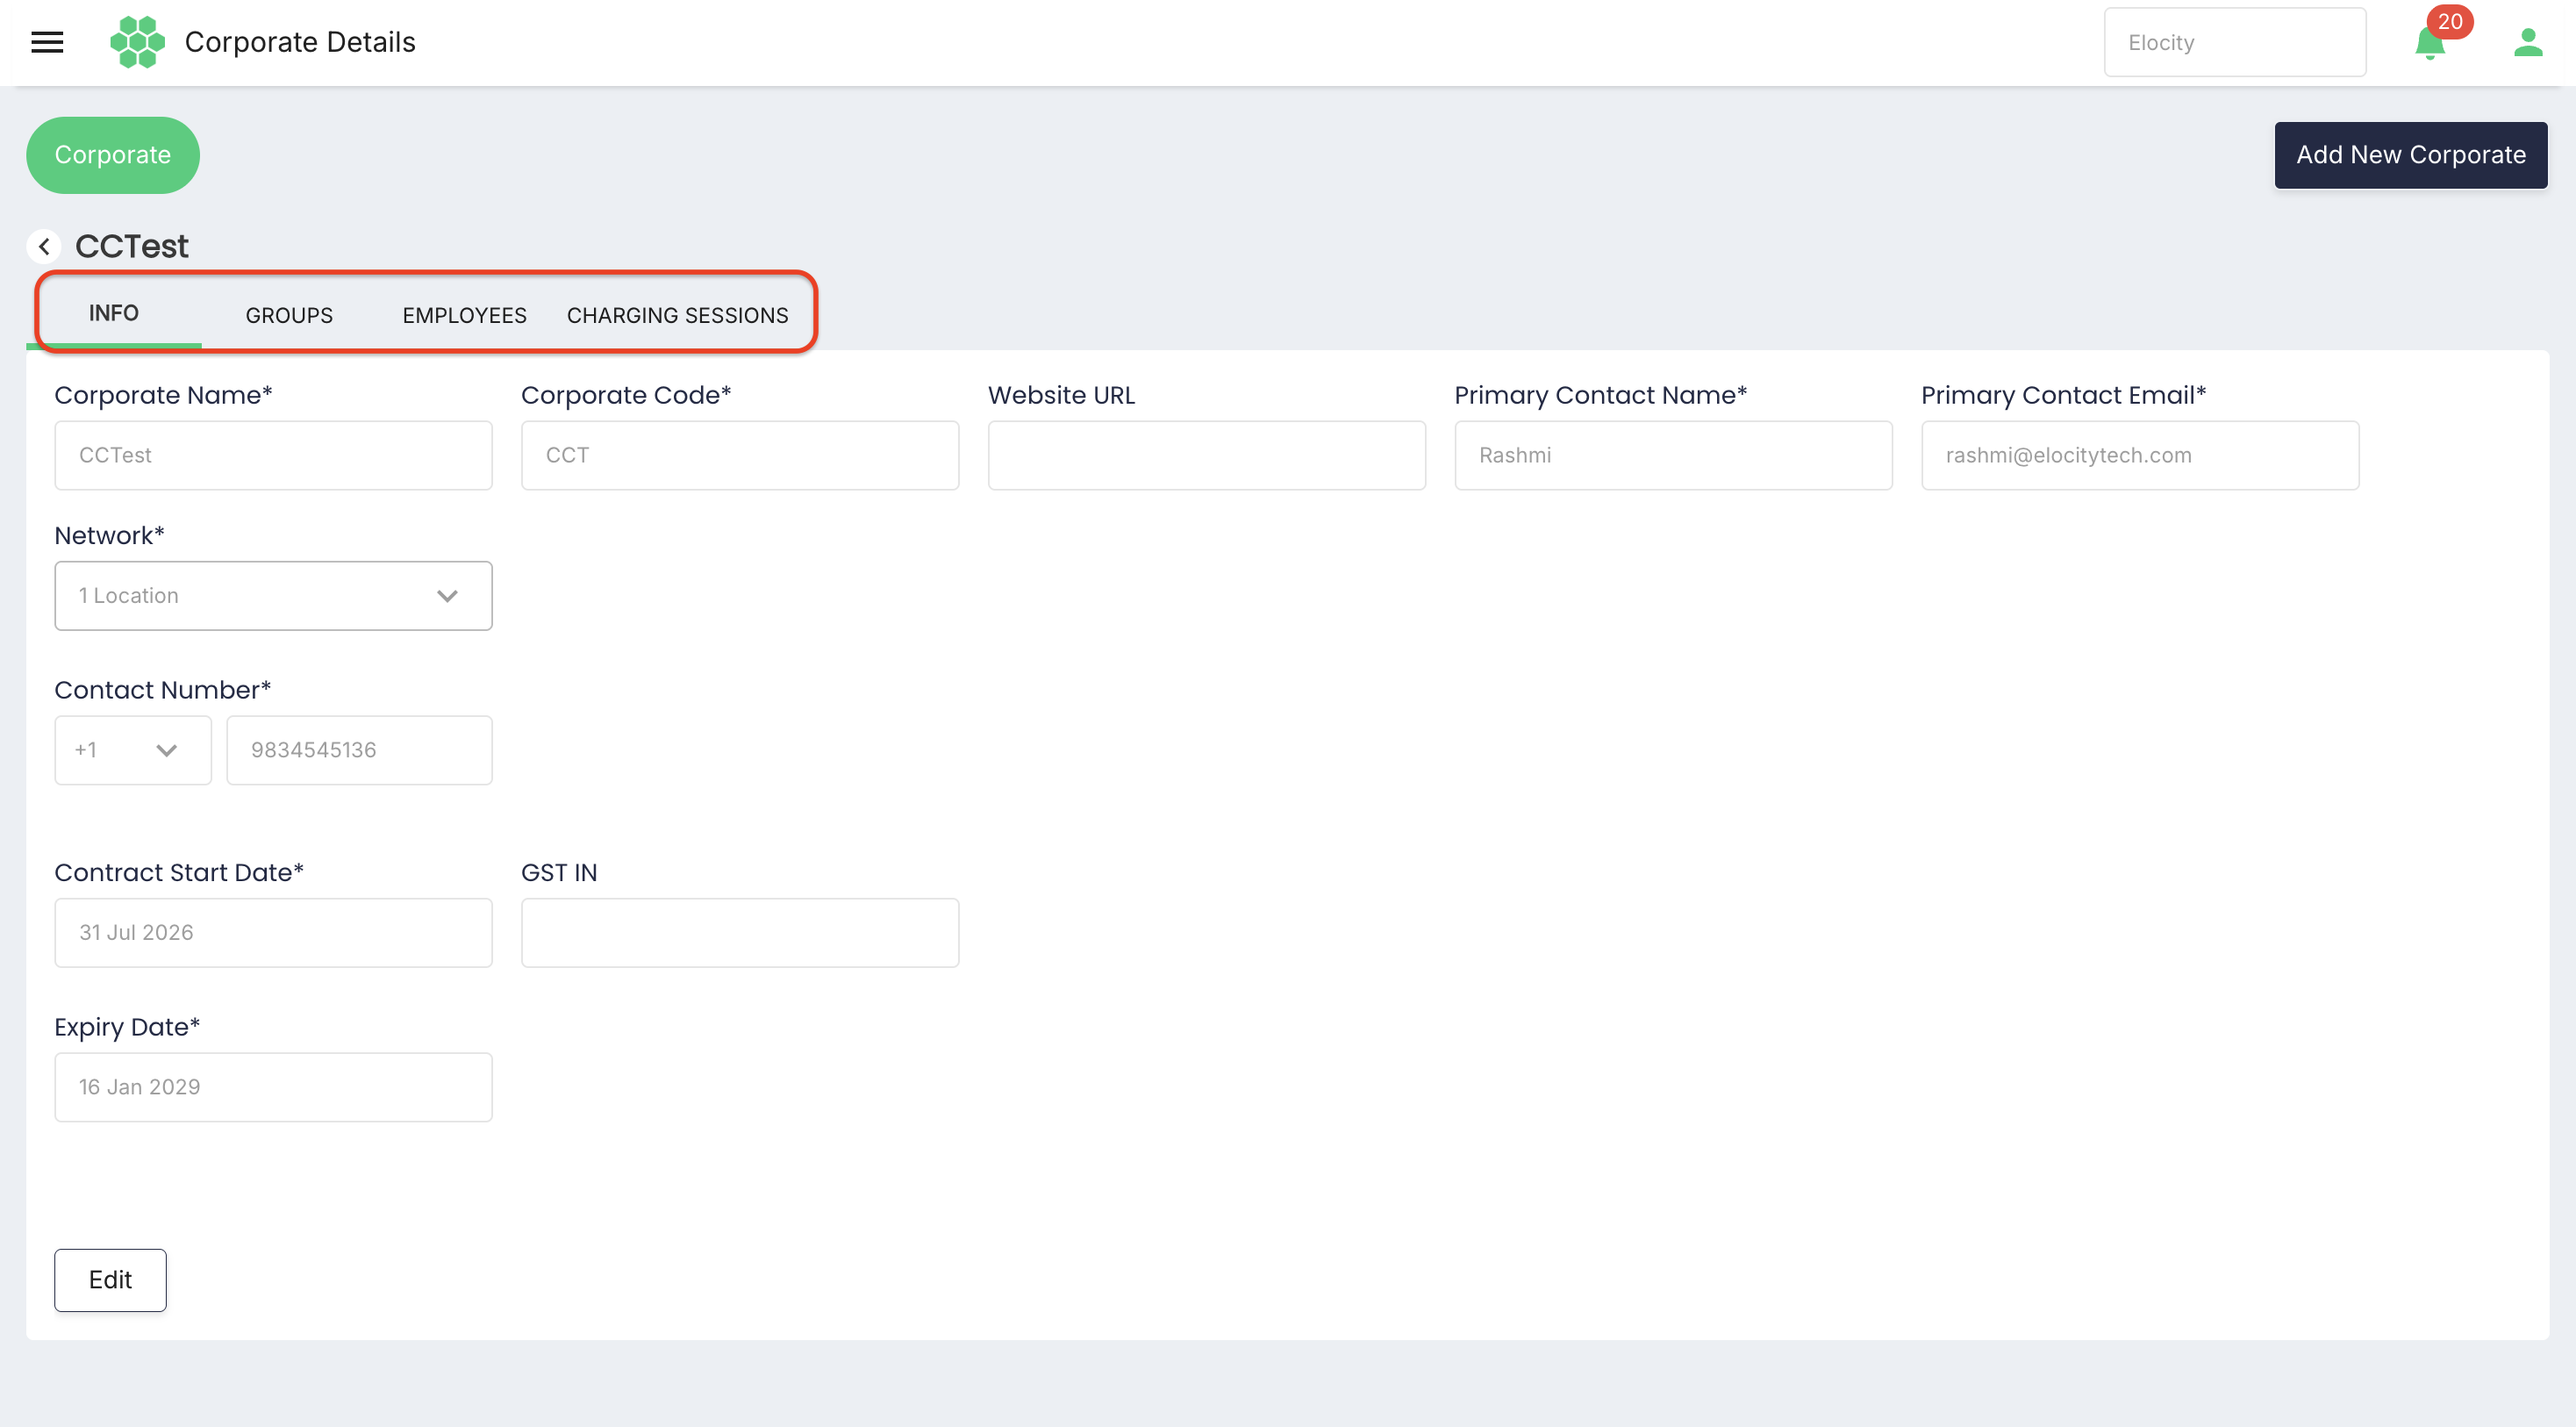
- Verify the unique parent ID tag, parent wallet/billing account, network scope, and prepaid/postpaid mode according to your deployment's billing controls.
4.2 Field reference
| Field | Required | Guidance |
|---|---|---|
| Corporate Name | Yes | Enter the legal or operational organization name. |
| Corporate Code | Yes | Use a unique, stable code; it may be used in references and integrations. |
| Website URL | No | Enter a valid corporate website when available. |
| Primary Contact Name | Yes | Enter the main administrative or billing contact. |
| Primary Contact Email | Yes | Use a monitored business email address. |
| Network | Yes | Select at least one location in the hierarchical location dialog. |
| Contact Number | Yes | Choose the country code and enter the number. |
| Contract Start Date | Yes | Date from which the Corporate is valid. |
| Expiry Date / Number of Days | Yes | Set a fixed end date or calculate term from a duration. |
IMPORTANT: System-provisioned parent relationship After save, the Corporate must have a unique parent ID tag and one parent wallet or billing account. Do not create wallets for employees. If the current tenant does not show parent-ID or payment-mode controls on INFO, verify them in the configured billing/customer administration screen before activating employees.
4.3 Network selection
The verified location selector is hierarchical. The top level can contain a country and its available location count; expand it to select the appropriate scope. The Done button remains unavailable until at least one location is selected.
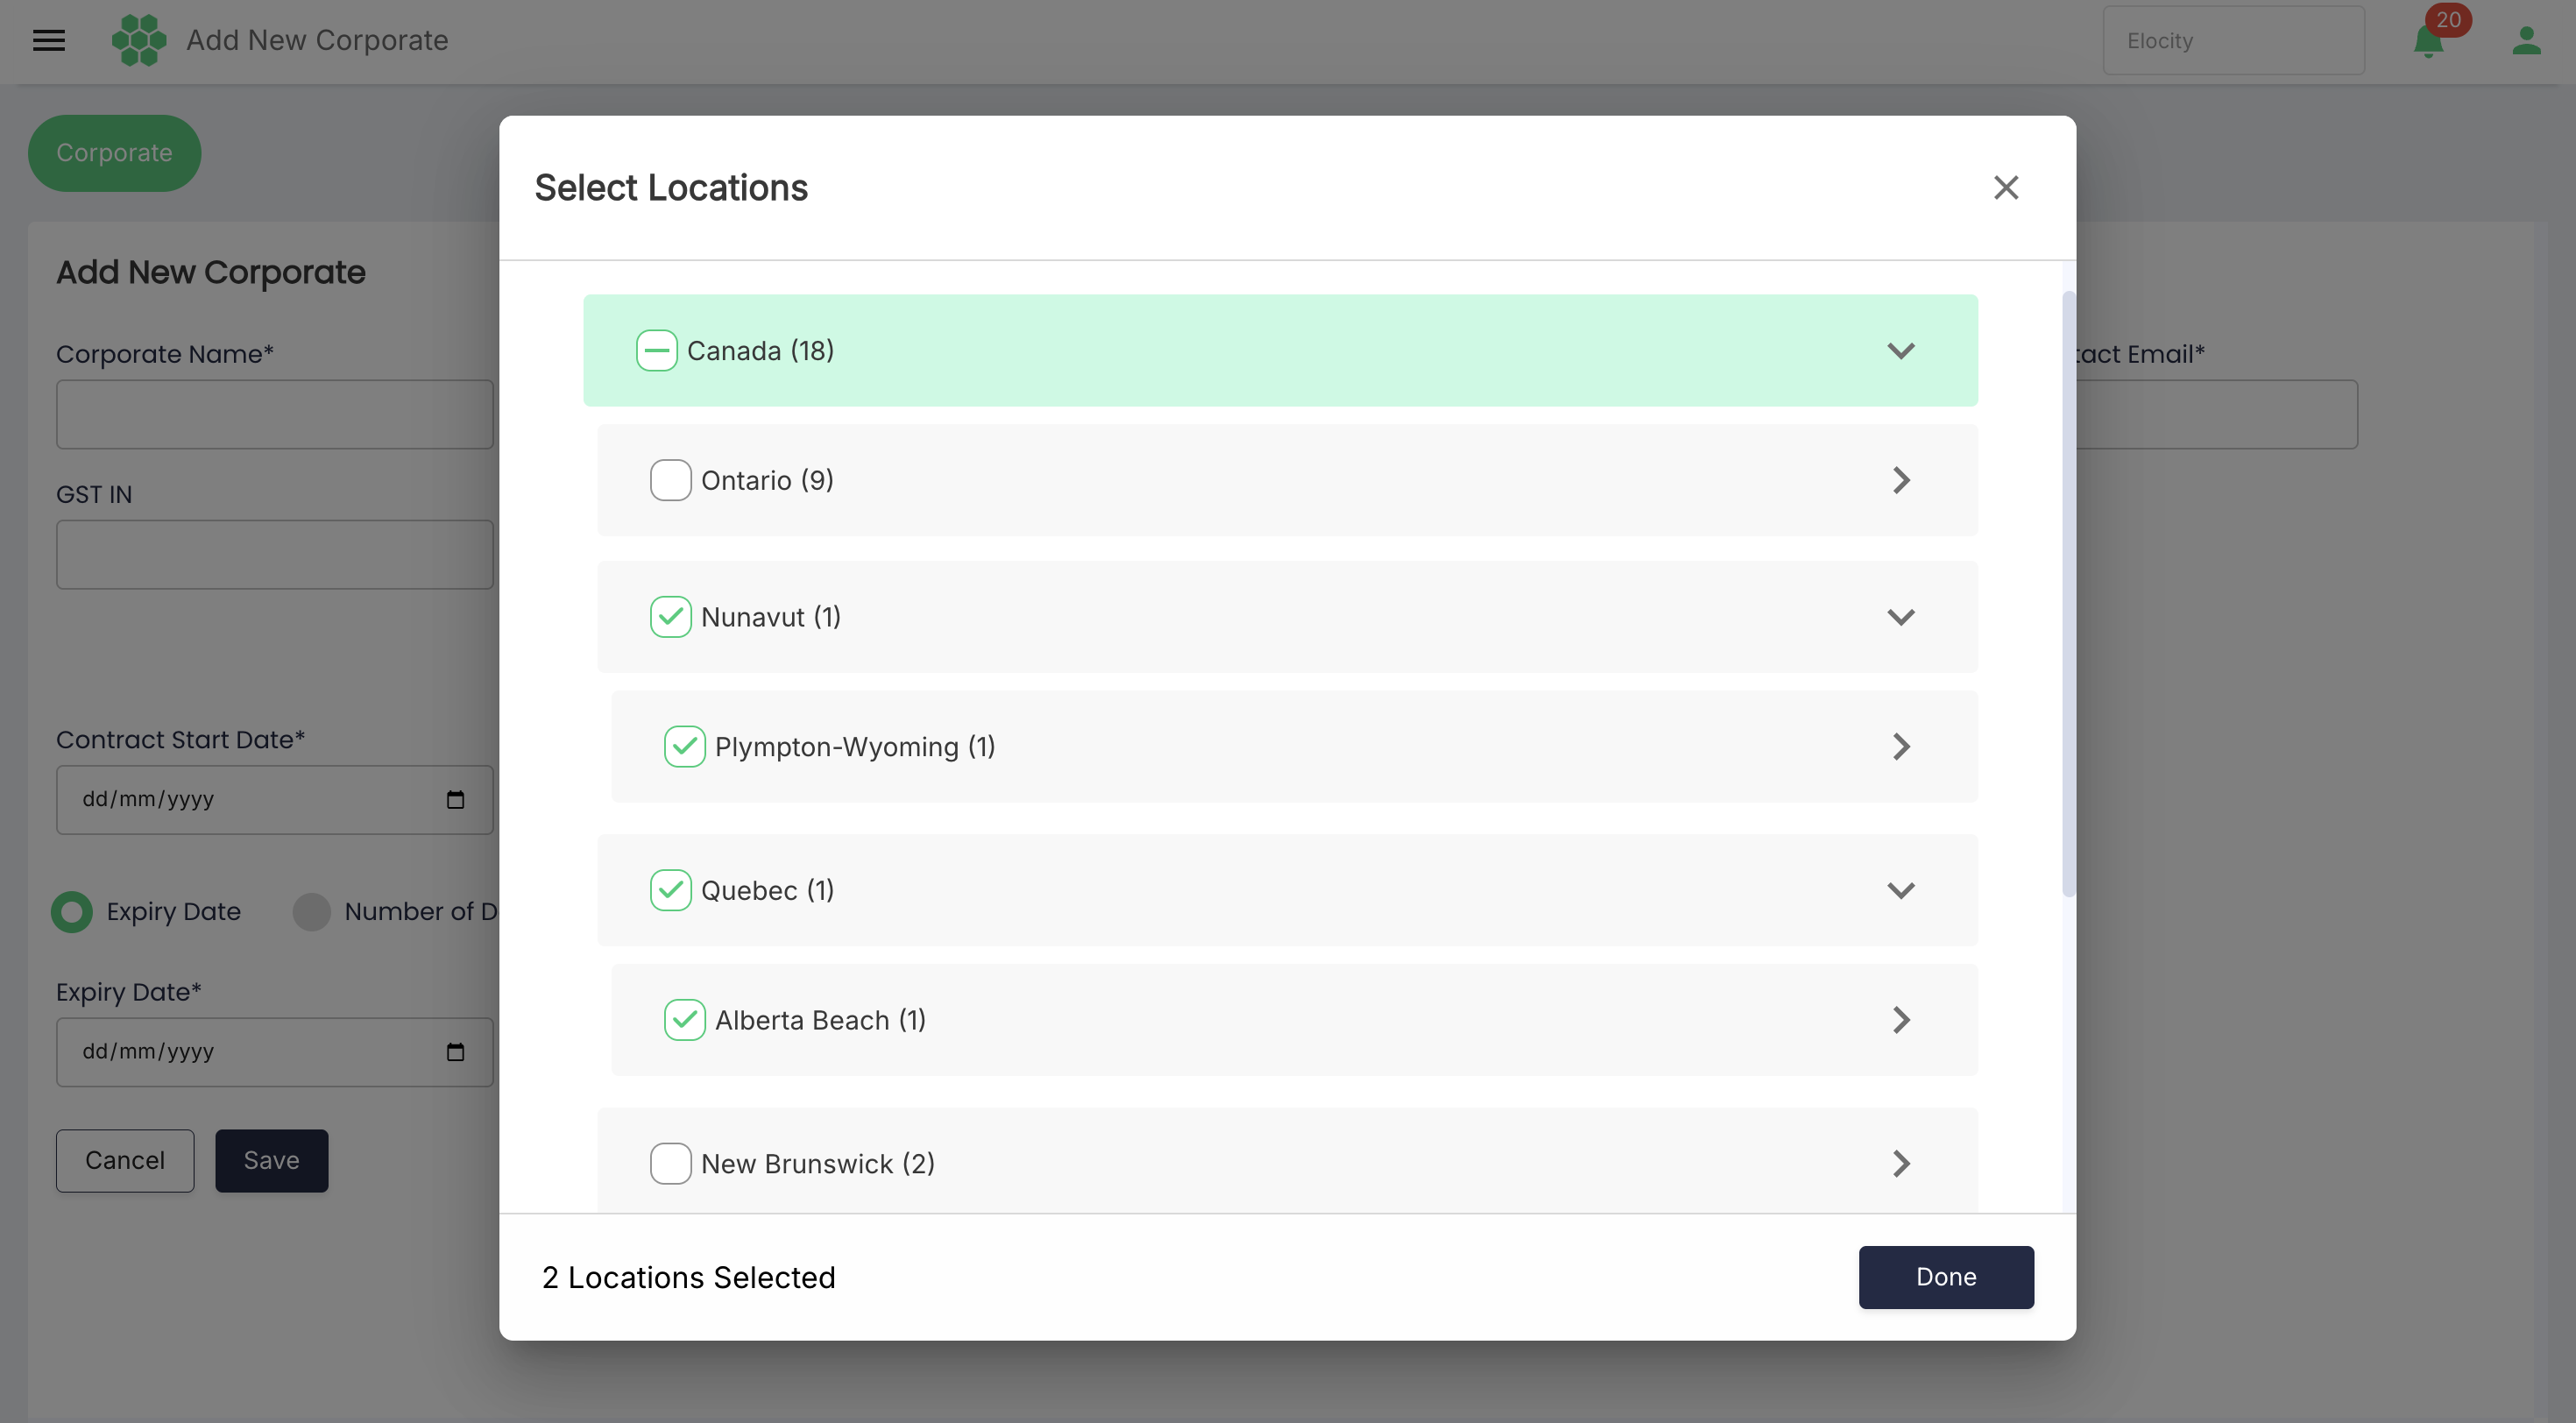
CAUTION: Required validation If no location is selected, the form shows: Network Location cannot be empty, at least one must be selected.
4.4 Choose prepaid or postpaid
| Mode | When to use | How charges are handled |
|---|---|---|
| Prepaid | The Corporate funds charging in advance. | Employee sessions and eligible RFID processing fees debit the parent wallet. Maintain sufficient balance. |
| Postpaid | The Corporate pays after usage under approved credit terms. | Costs accrue against the parent account and are included in the settlement cycle. |
The live Corporate INFO form verified for this manual does not display a prepaid/postpaid field. Treat payment mode as a required provisioning check and use the billing control available in your deployment. Do not infer payment mode from an employee's displayed balance.
4.5 Edit corporate information
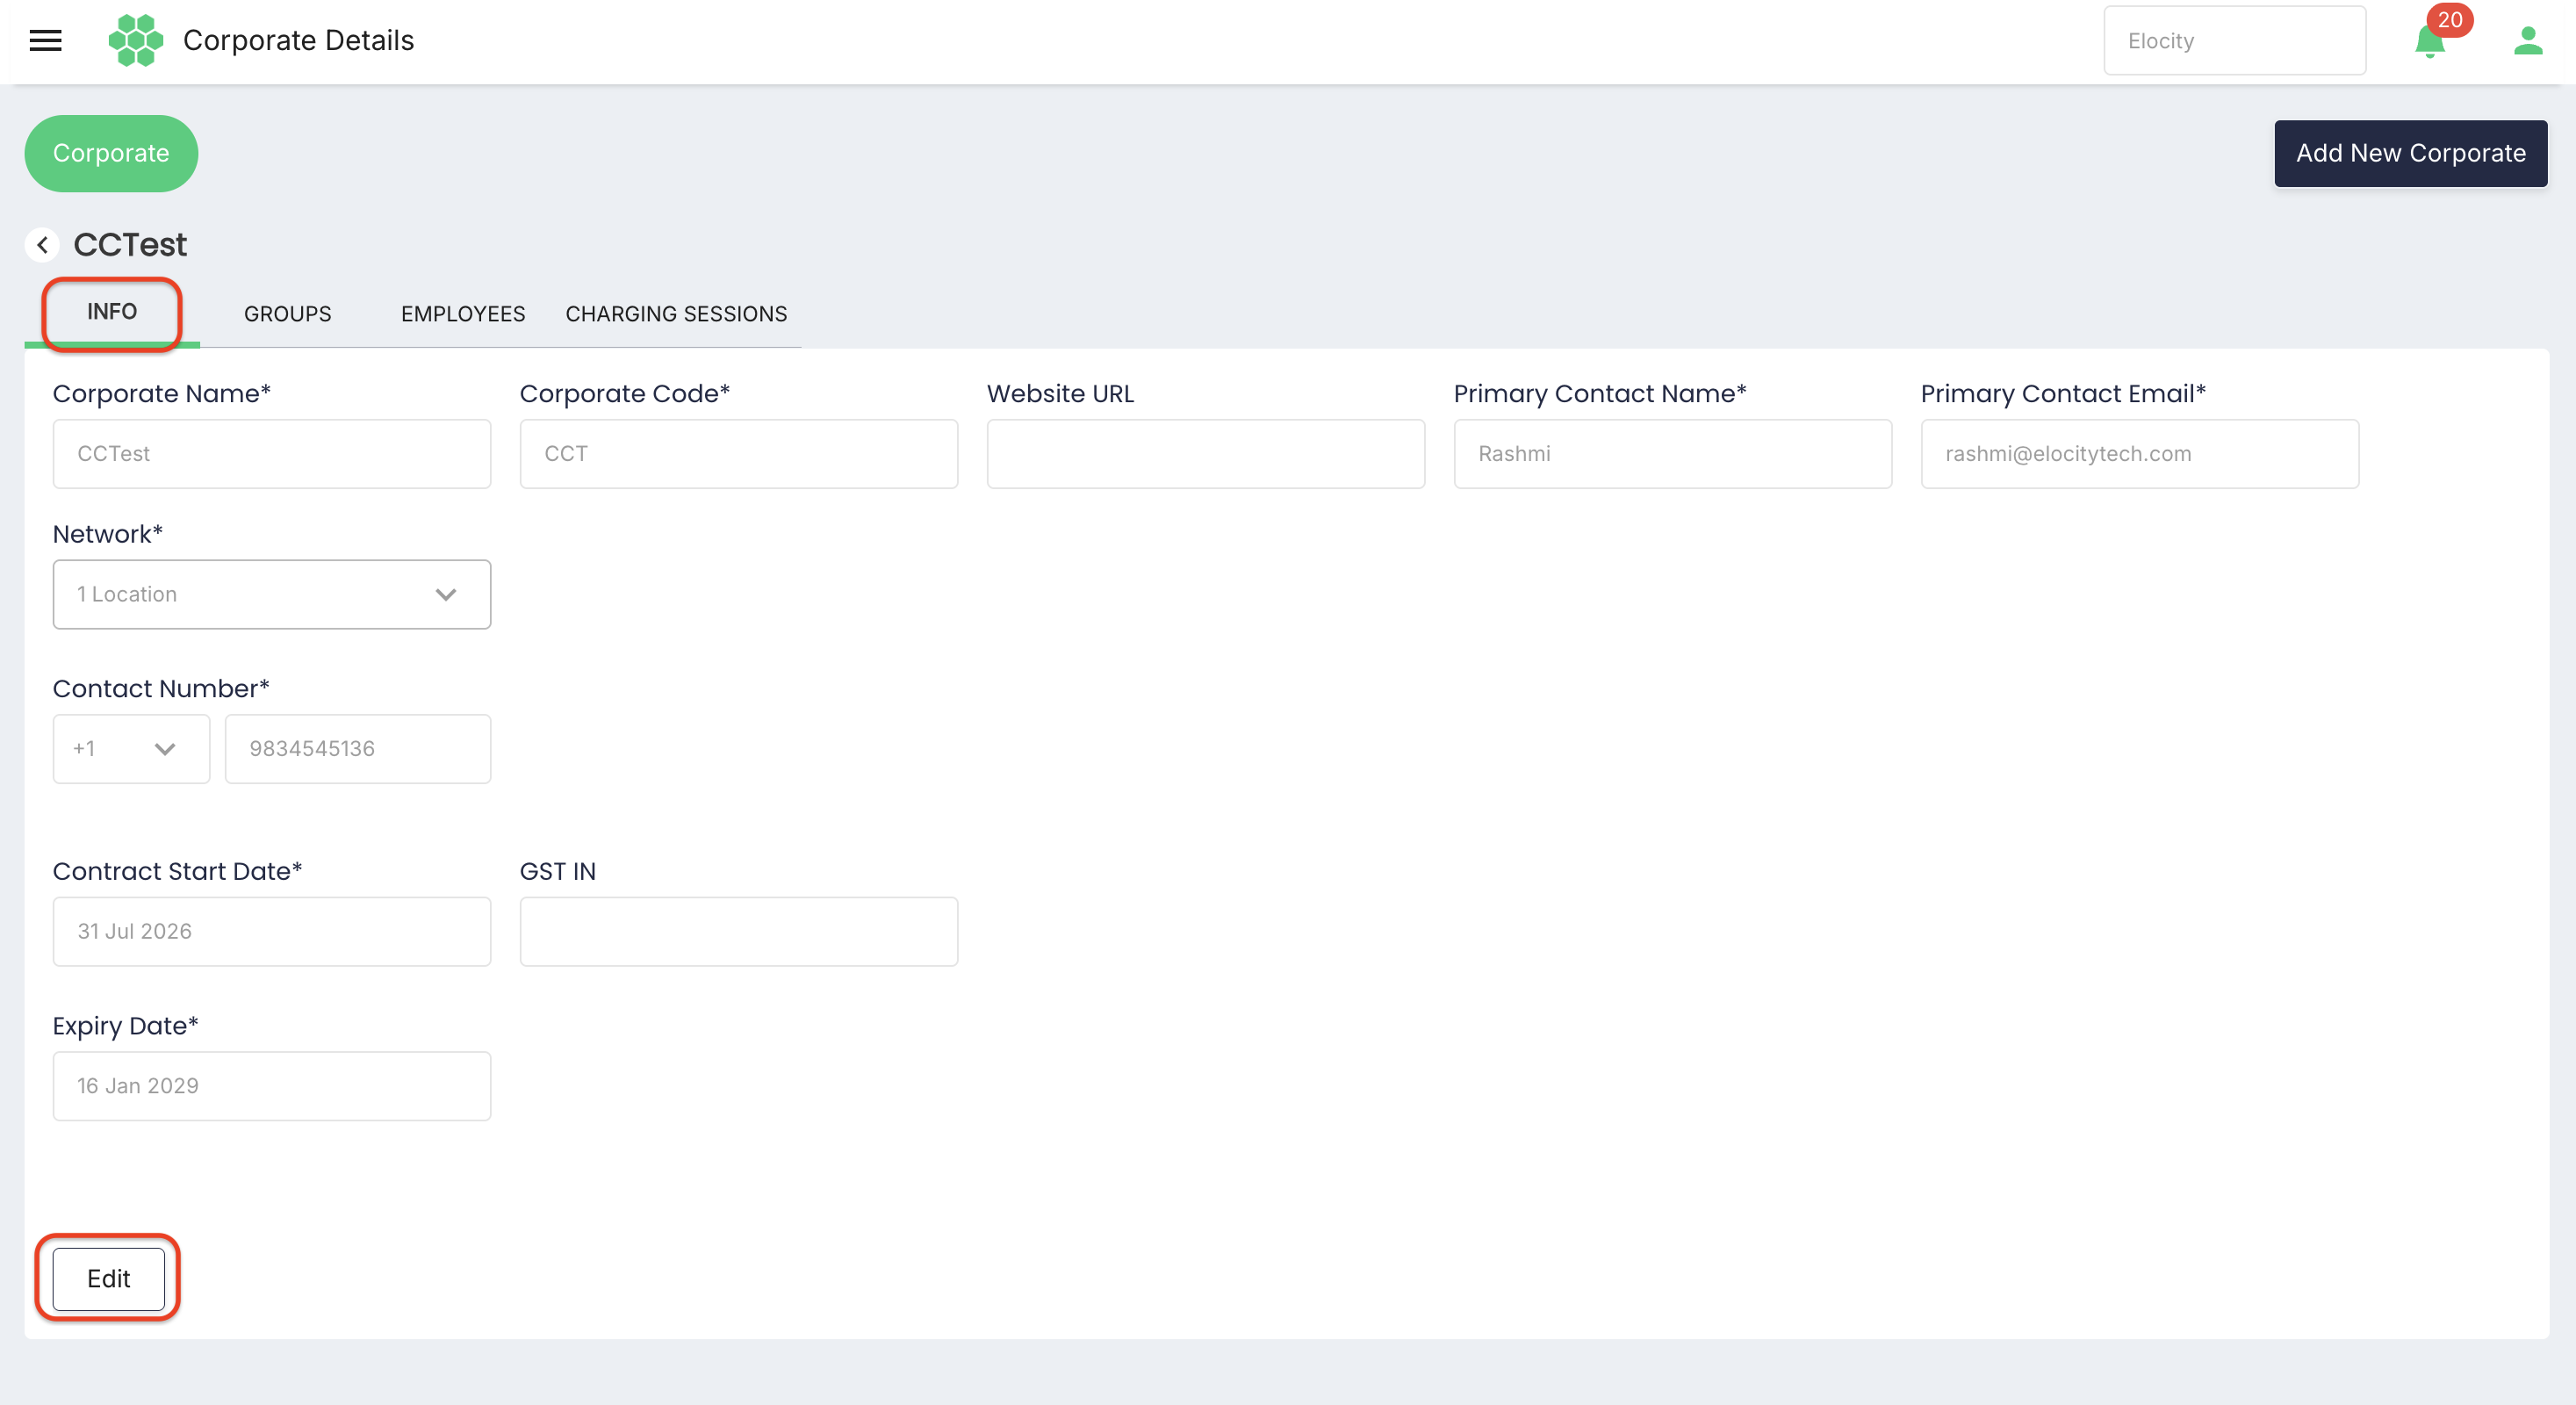
- Open the Corporate row from Corporate List.
- On INFO, review the read-only values.
- Select Edit.
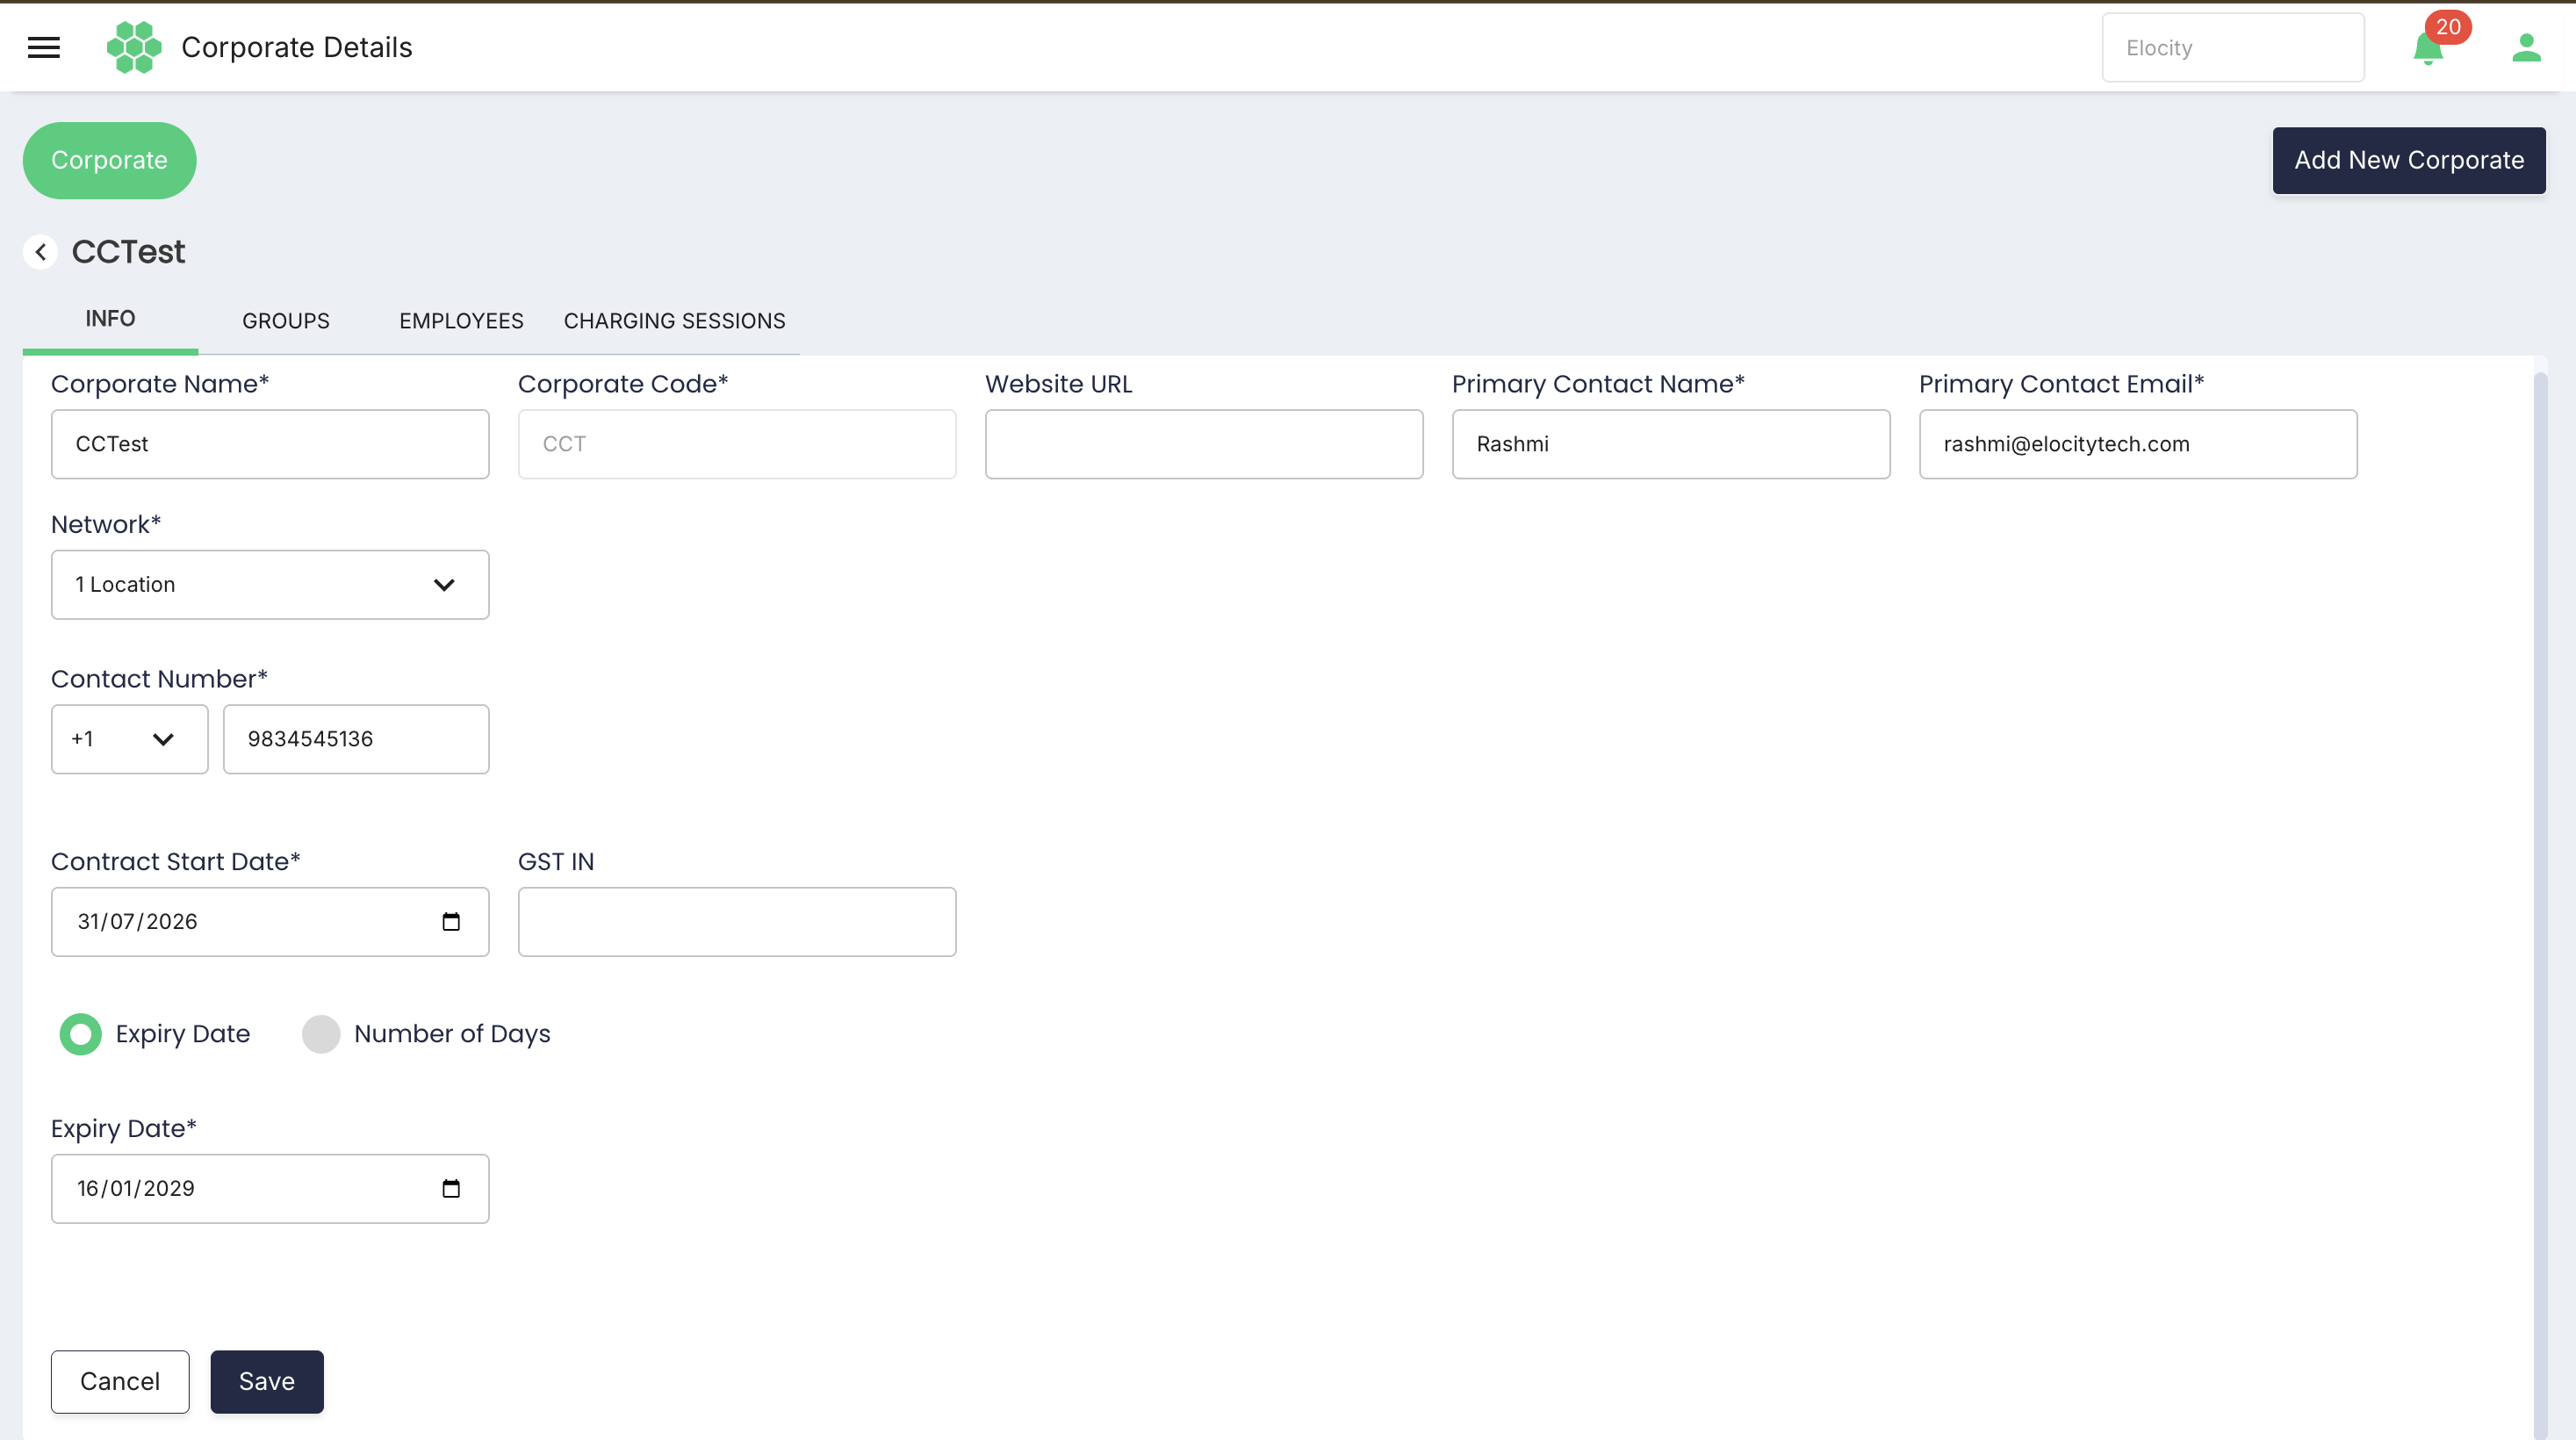
- Update only approved fields, including network or contract information if authorized.
- Save the changes, then re-open INFO and verify the updated values.
5. Configure Corporate Groups
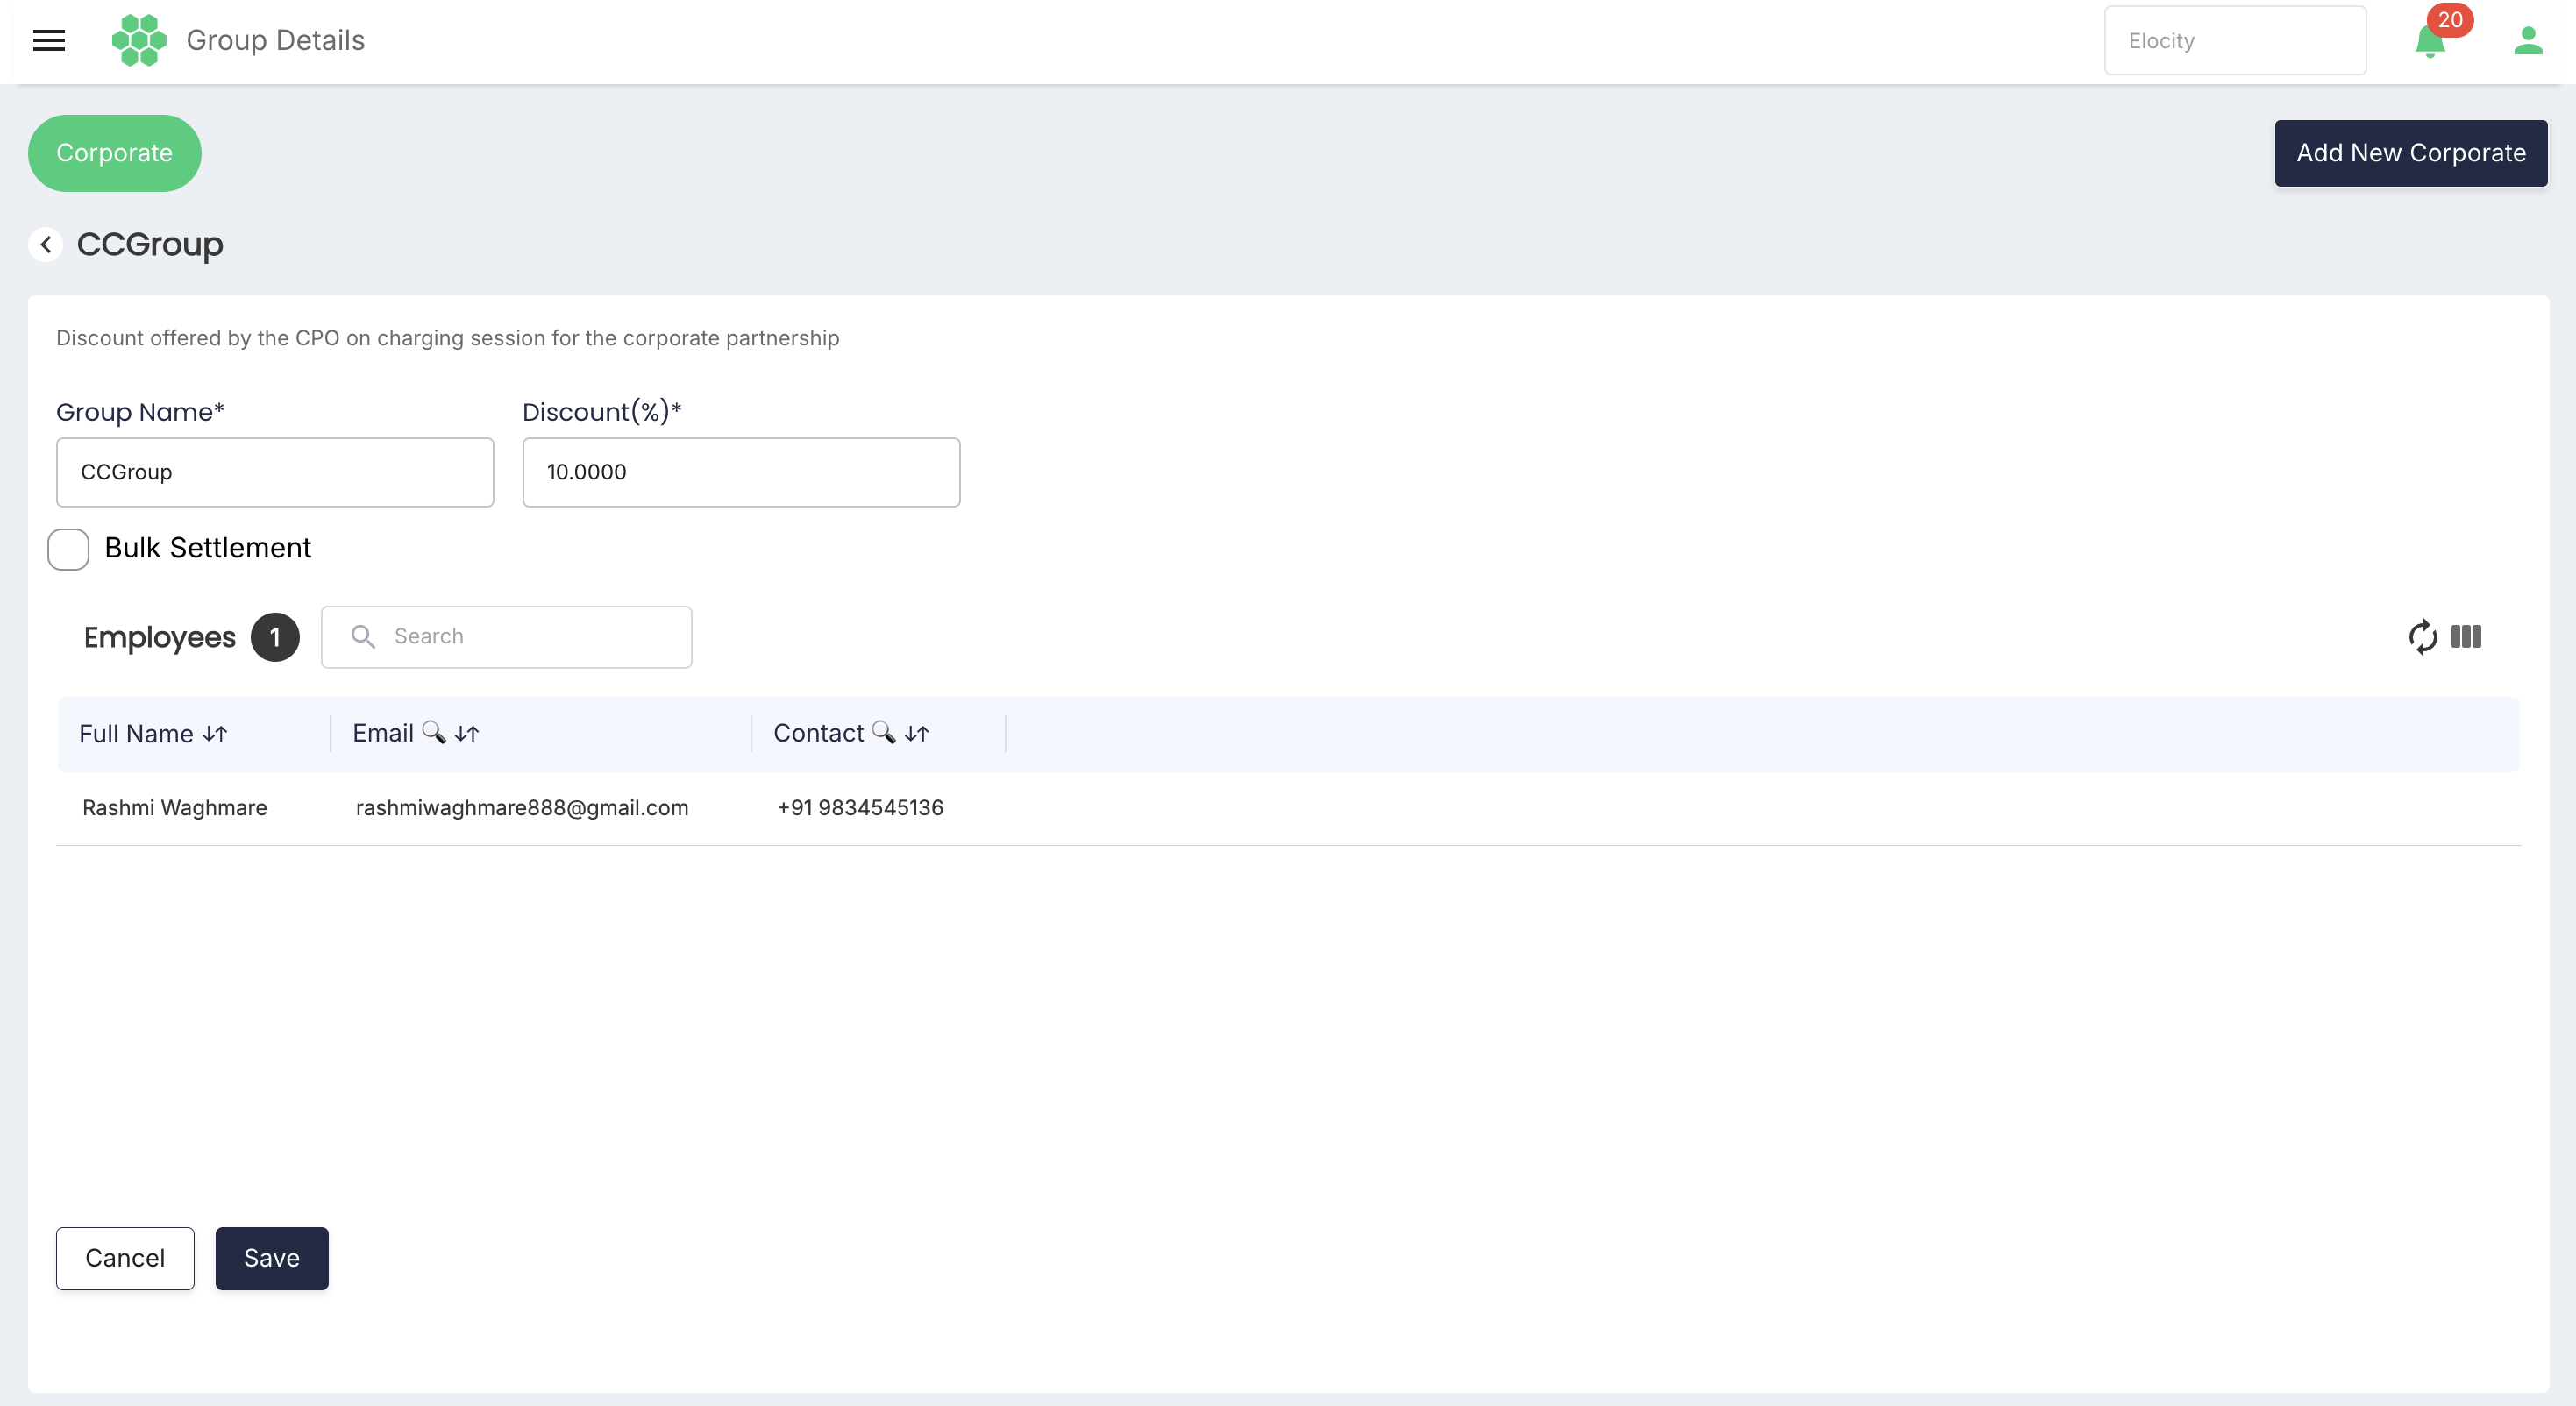
Groups divide employees into operational or financial cohorts. A Corporate can have multiple groups, each with its own name, percentage discount, and bulk-settlement setting.
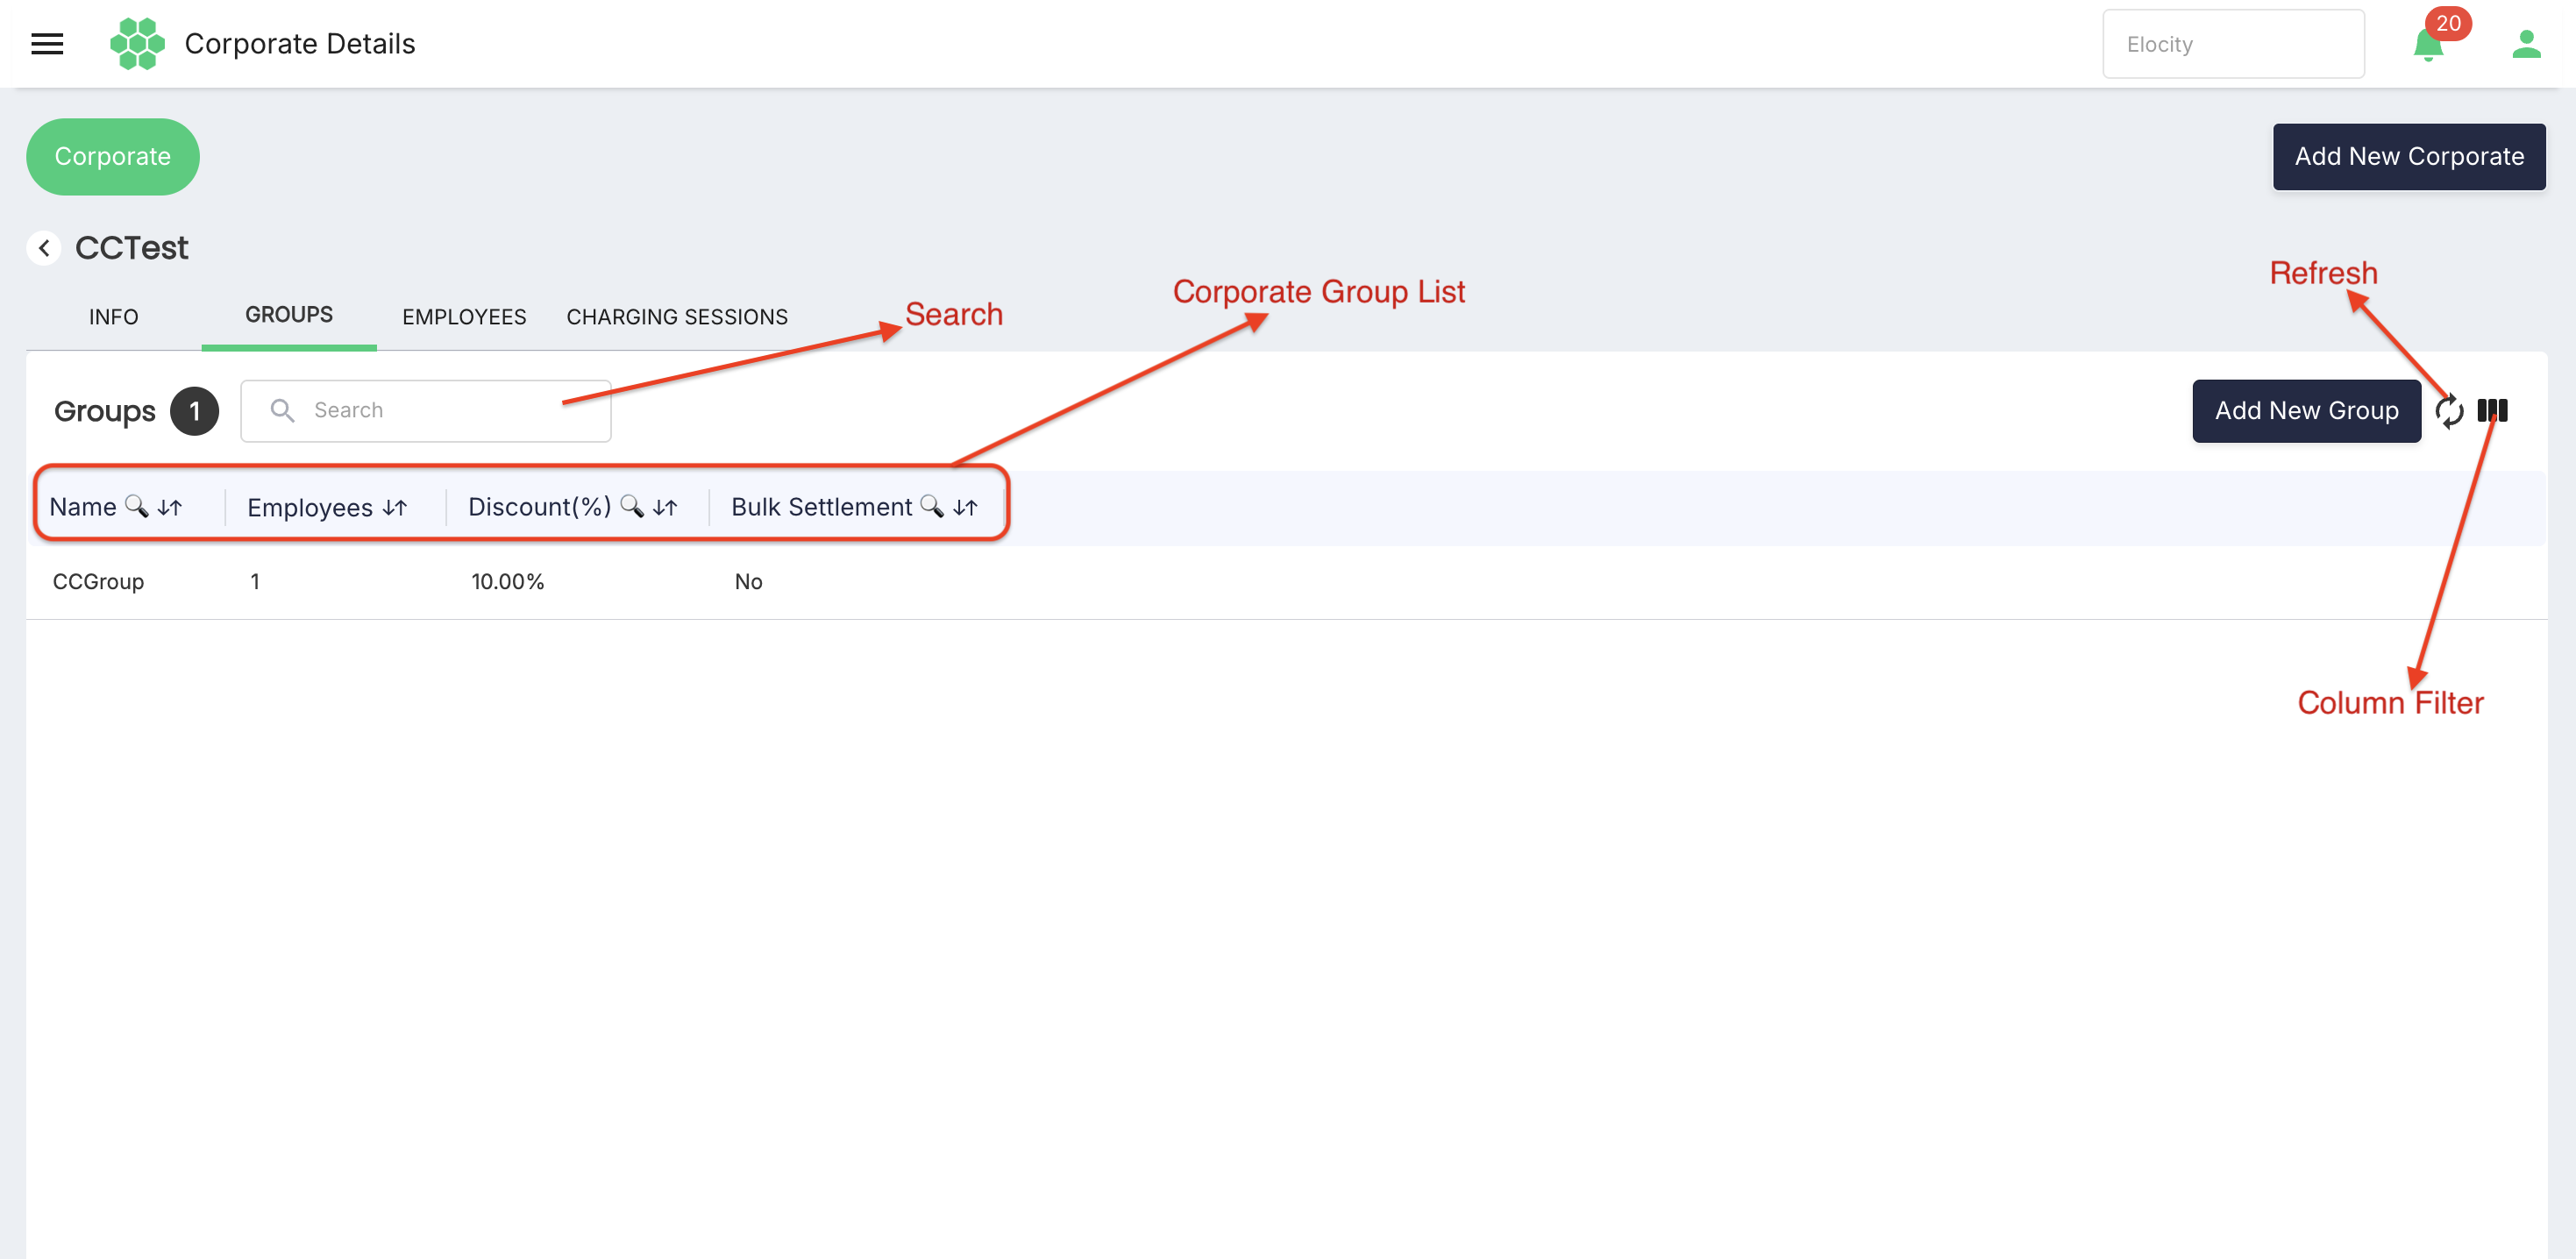
5.1 Groups list
- Name
- Employees
- Discount(%)
- Bulk Settlement
5.2 Add a group
- Open the Corporate and select GROUPS.
- Select Add New Group.
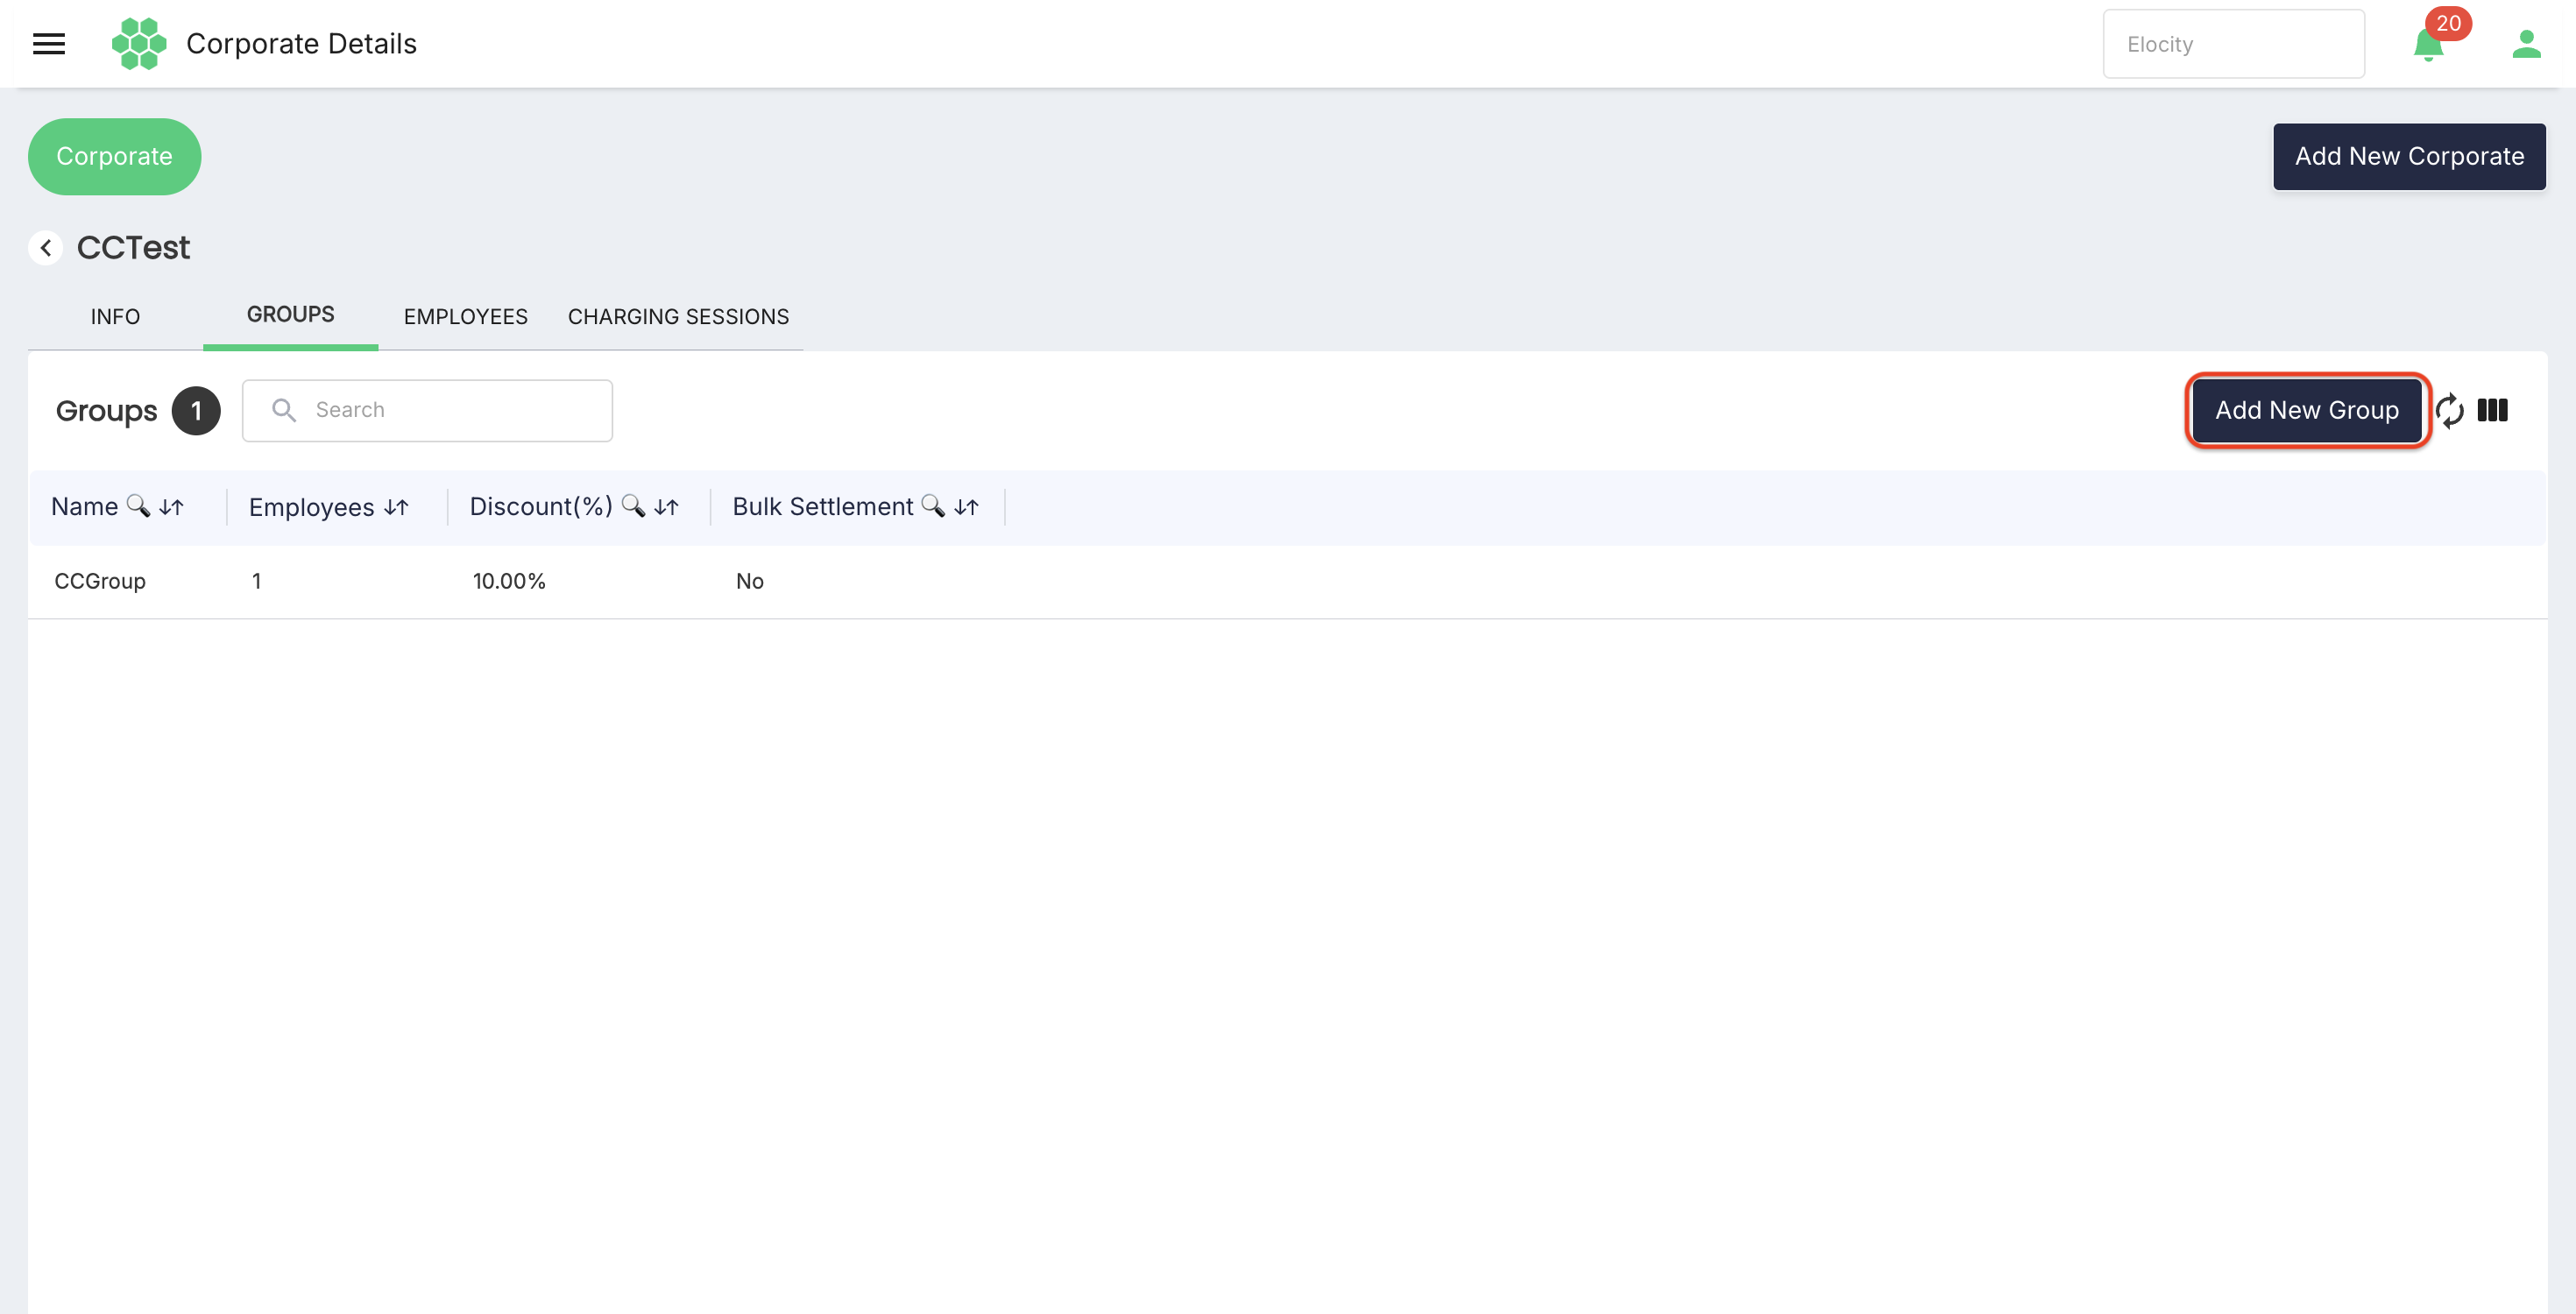
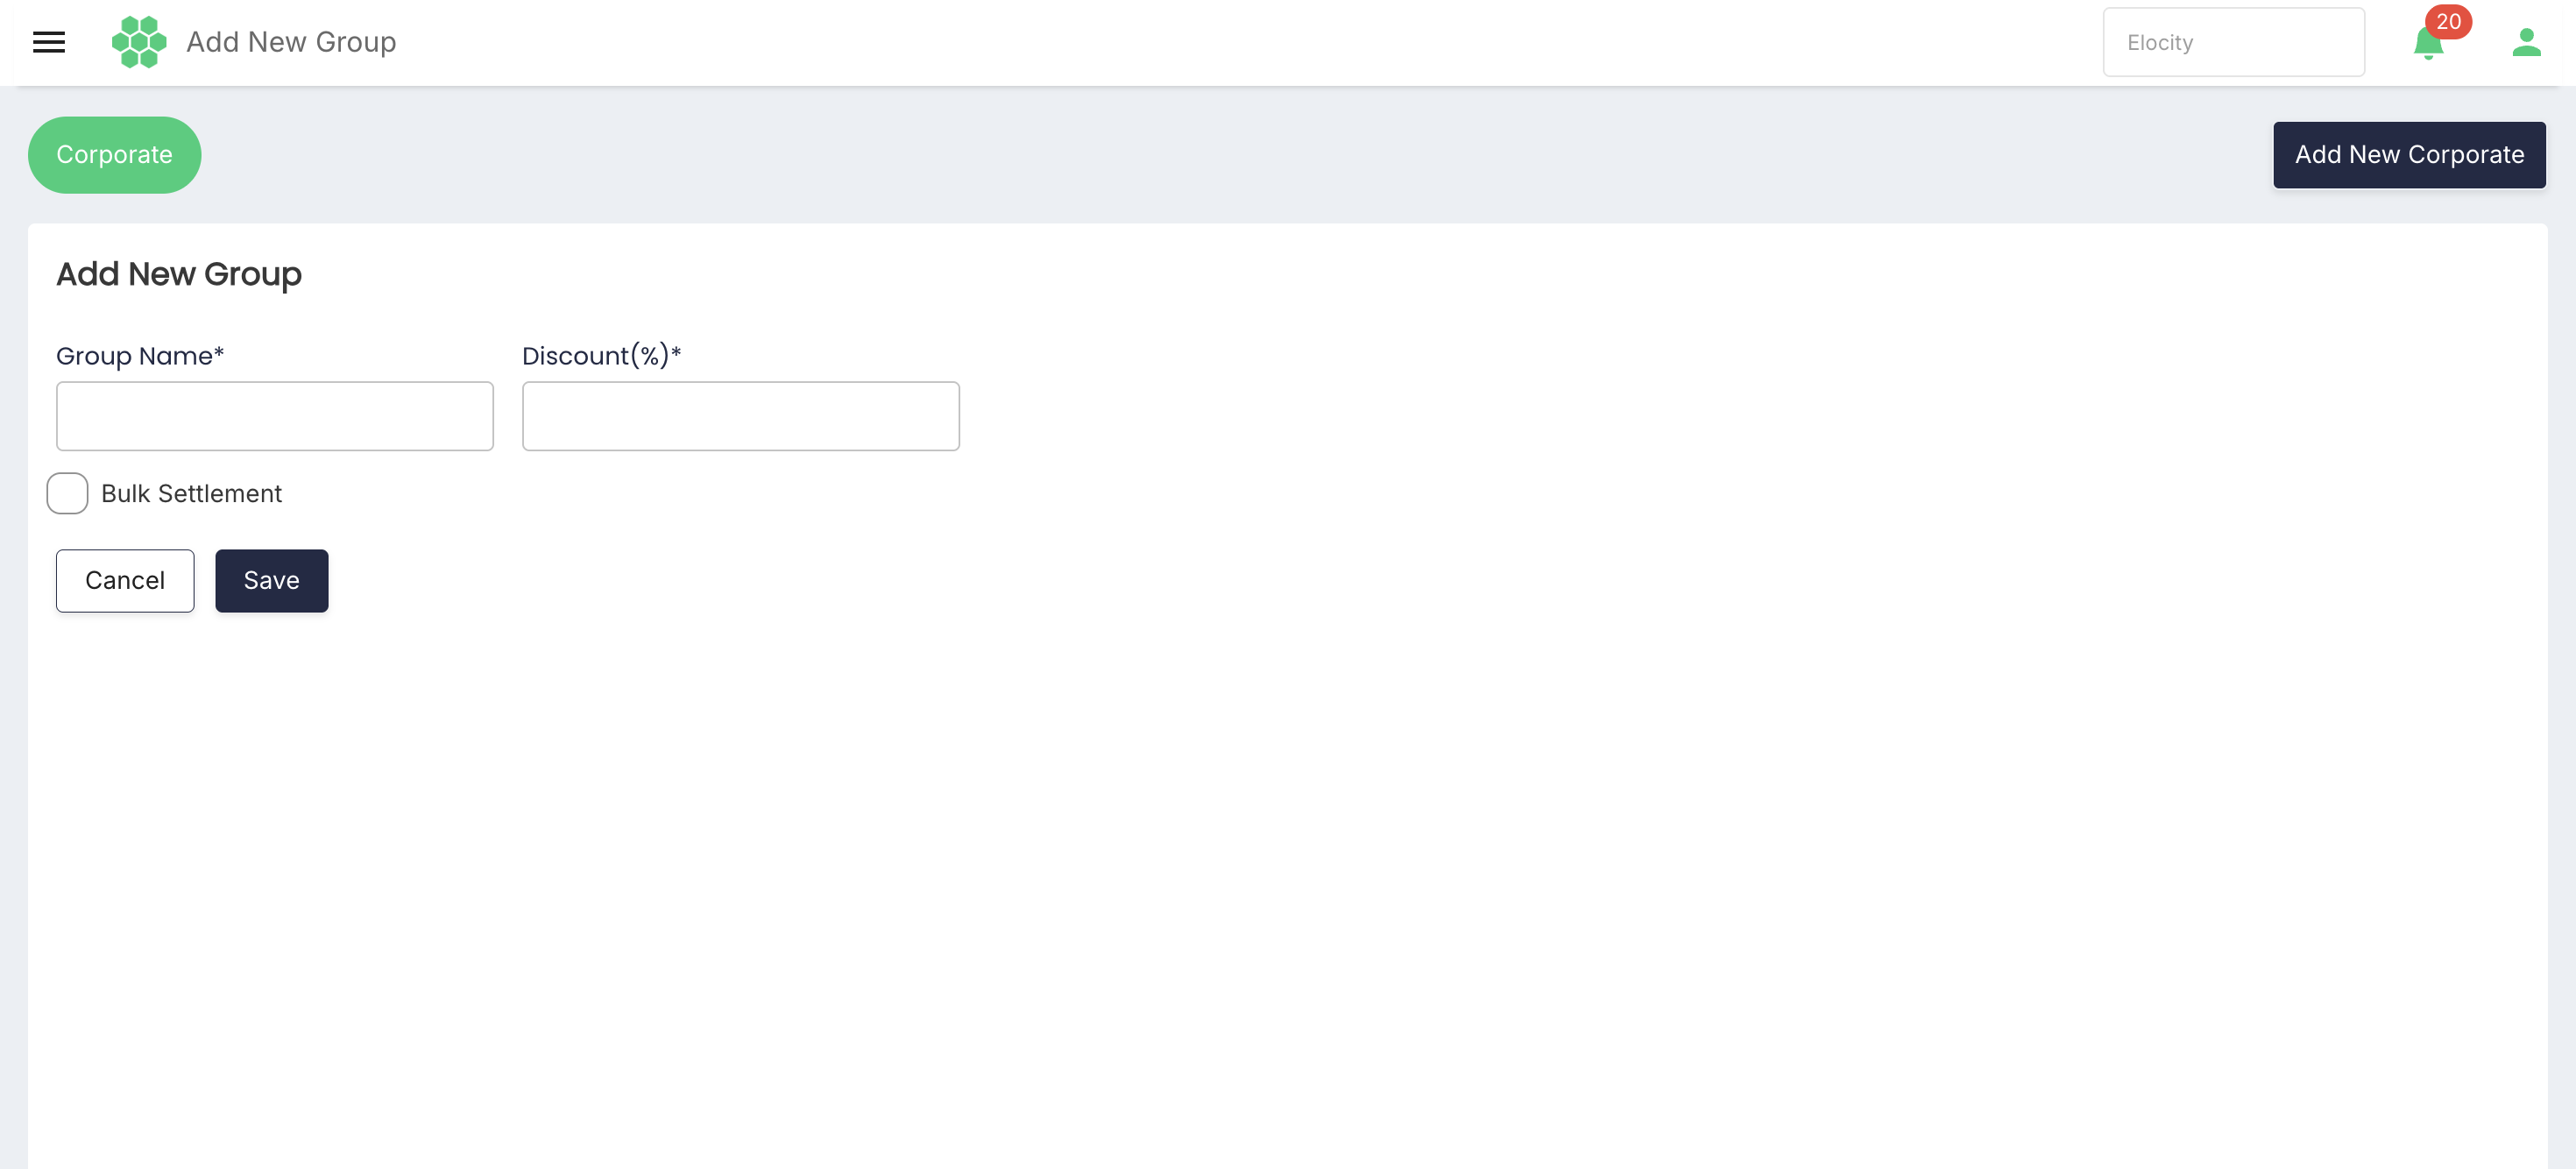
- Enter Group Name.
- Enter Discount(%). Use
0when no discount is offered. - Enable Bulk Settlement if the group's sessions should be consolidated for parent-level settlement.
- Select Save.
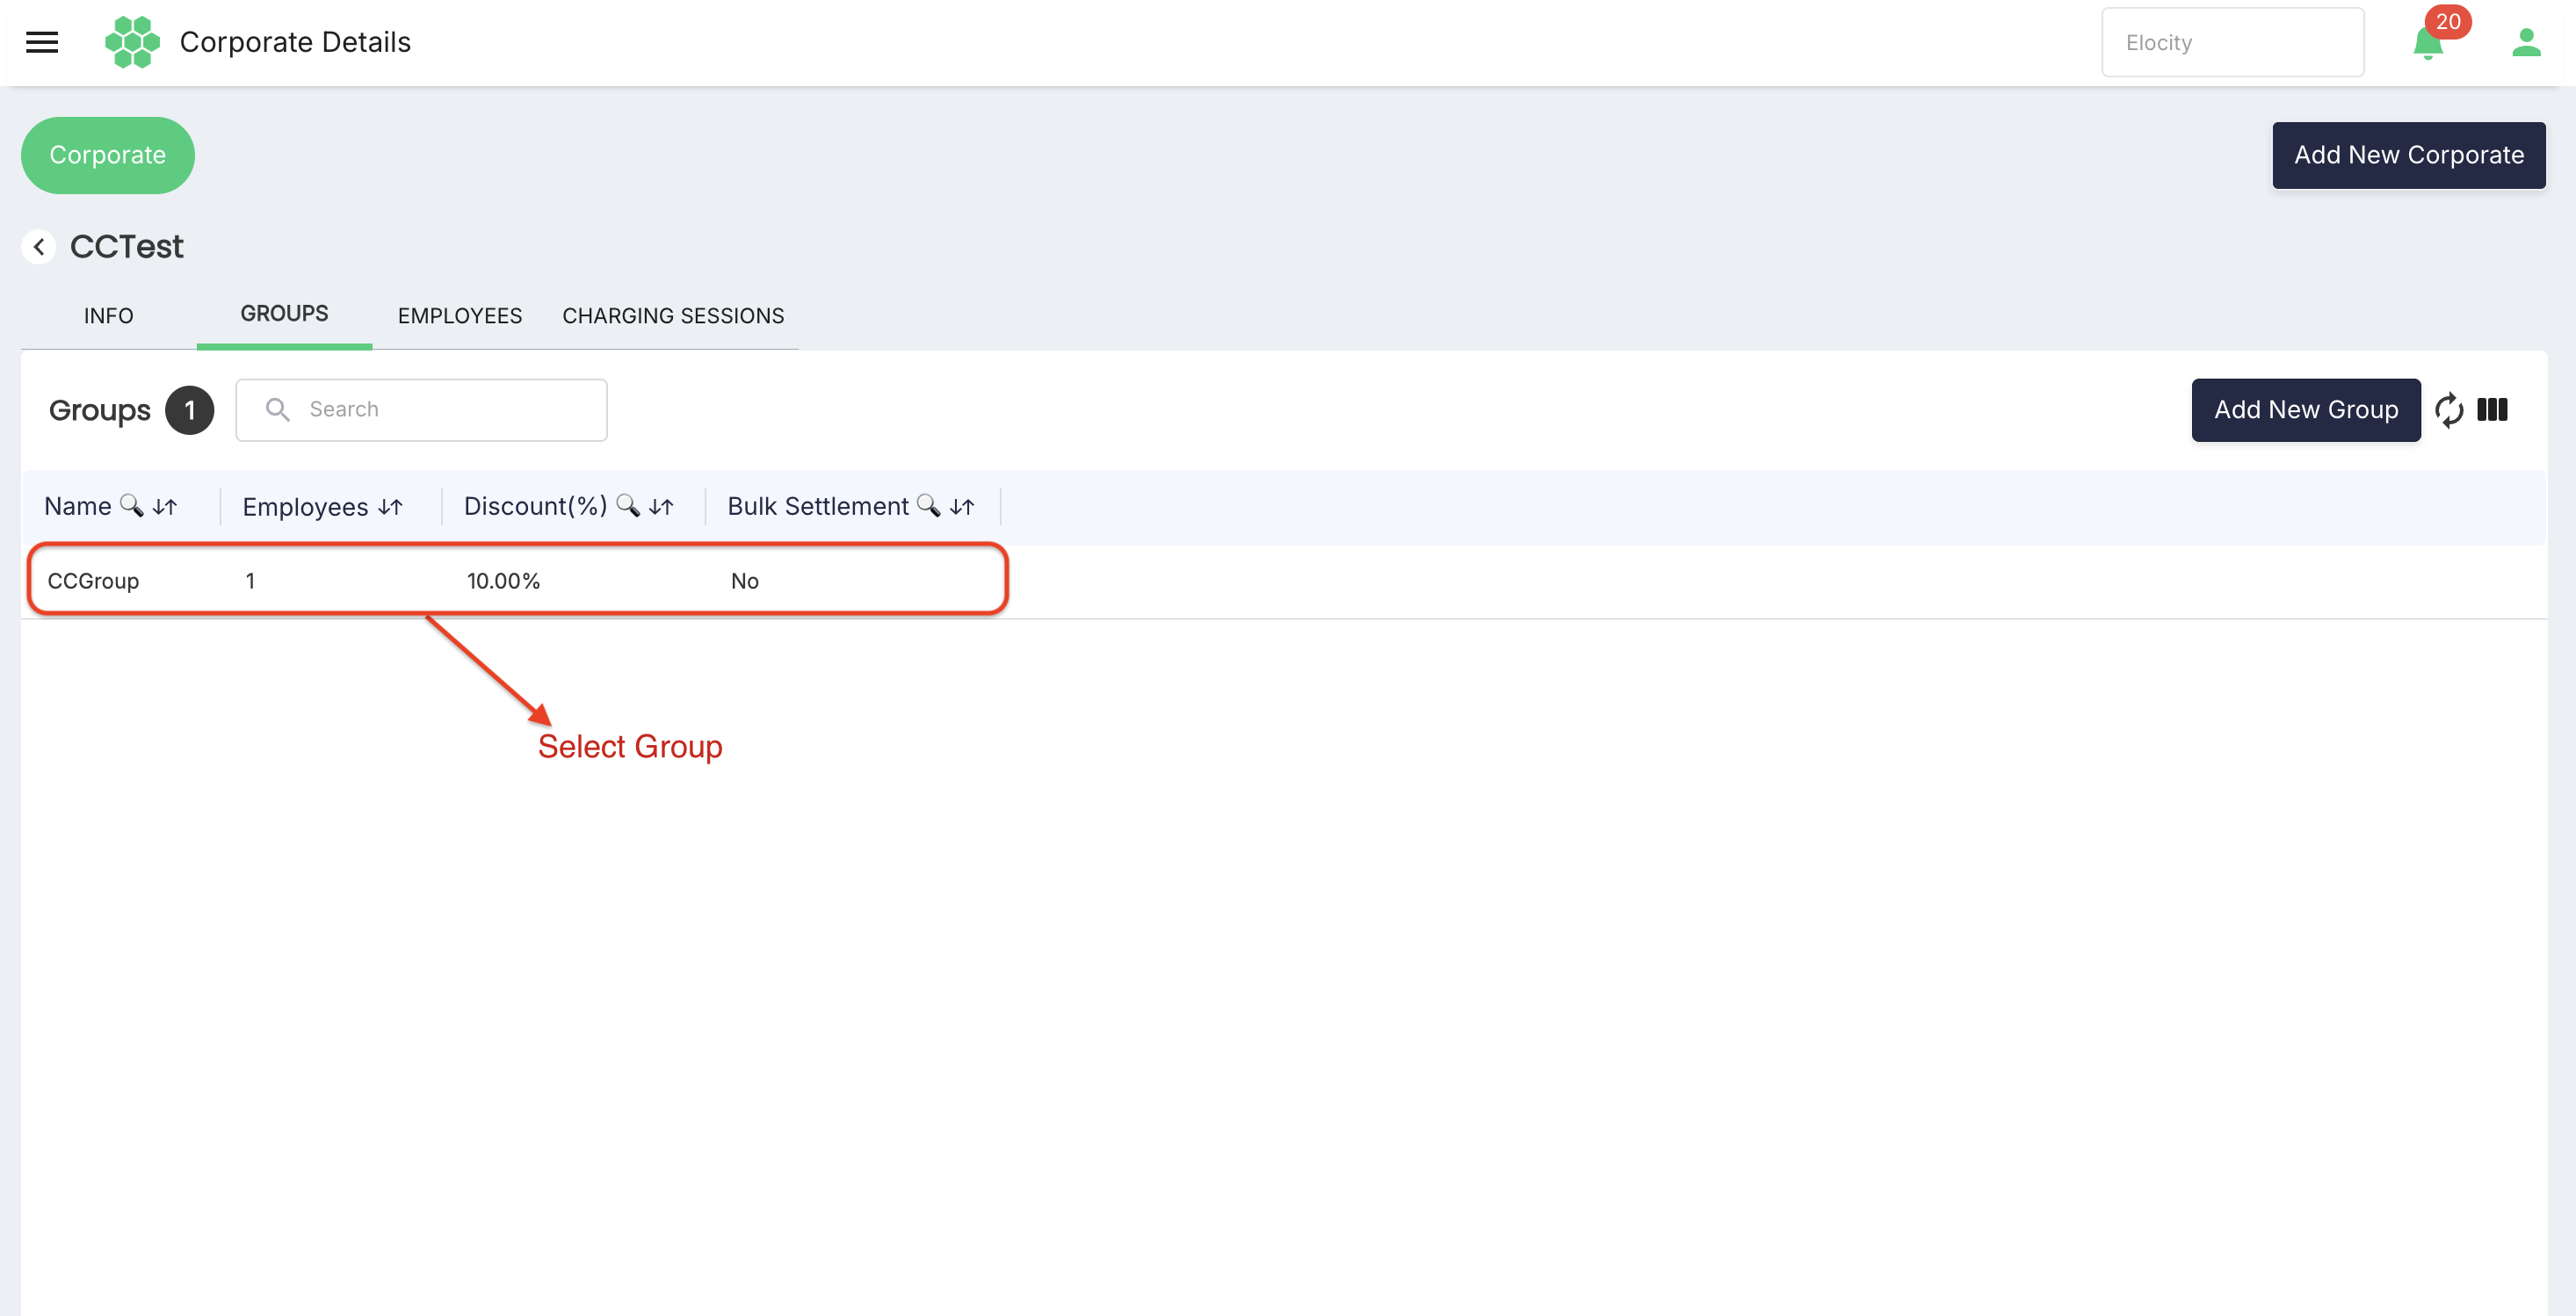
- Verify the group appears in the Groups list with the intended discount and bulk-settlement status.
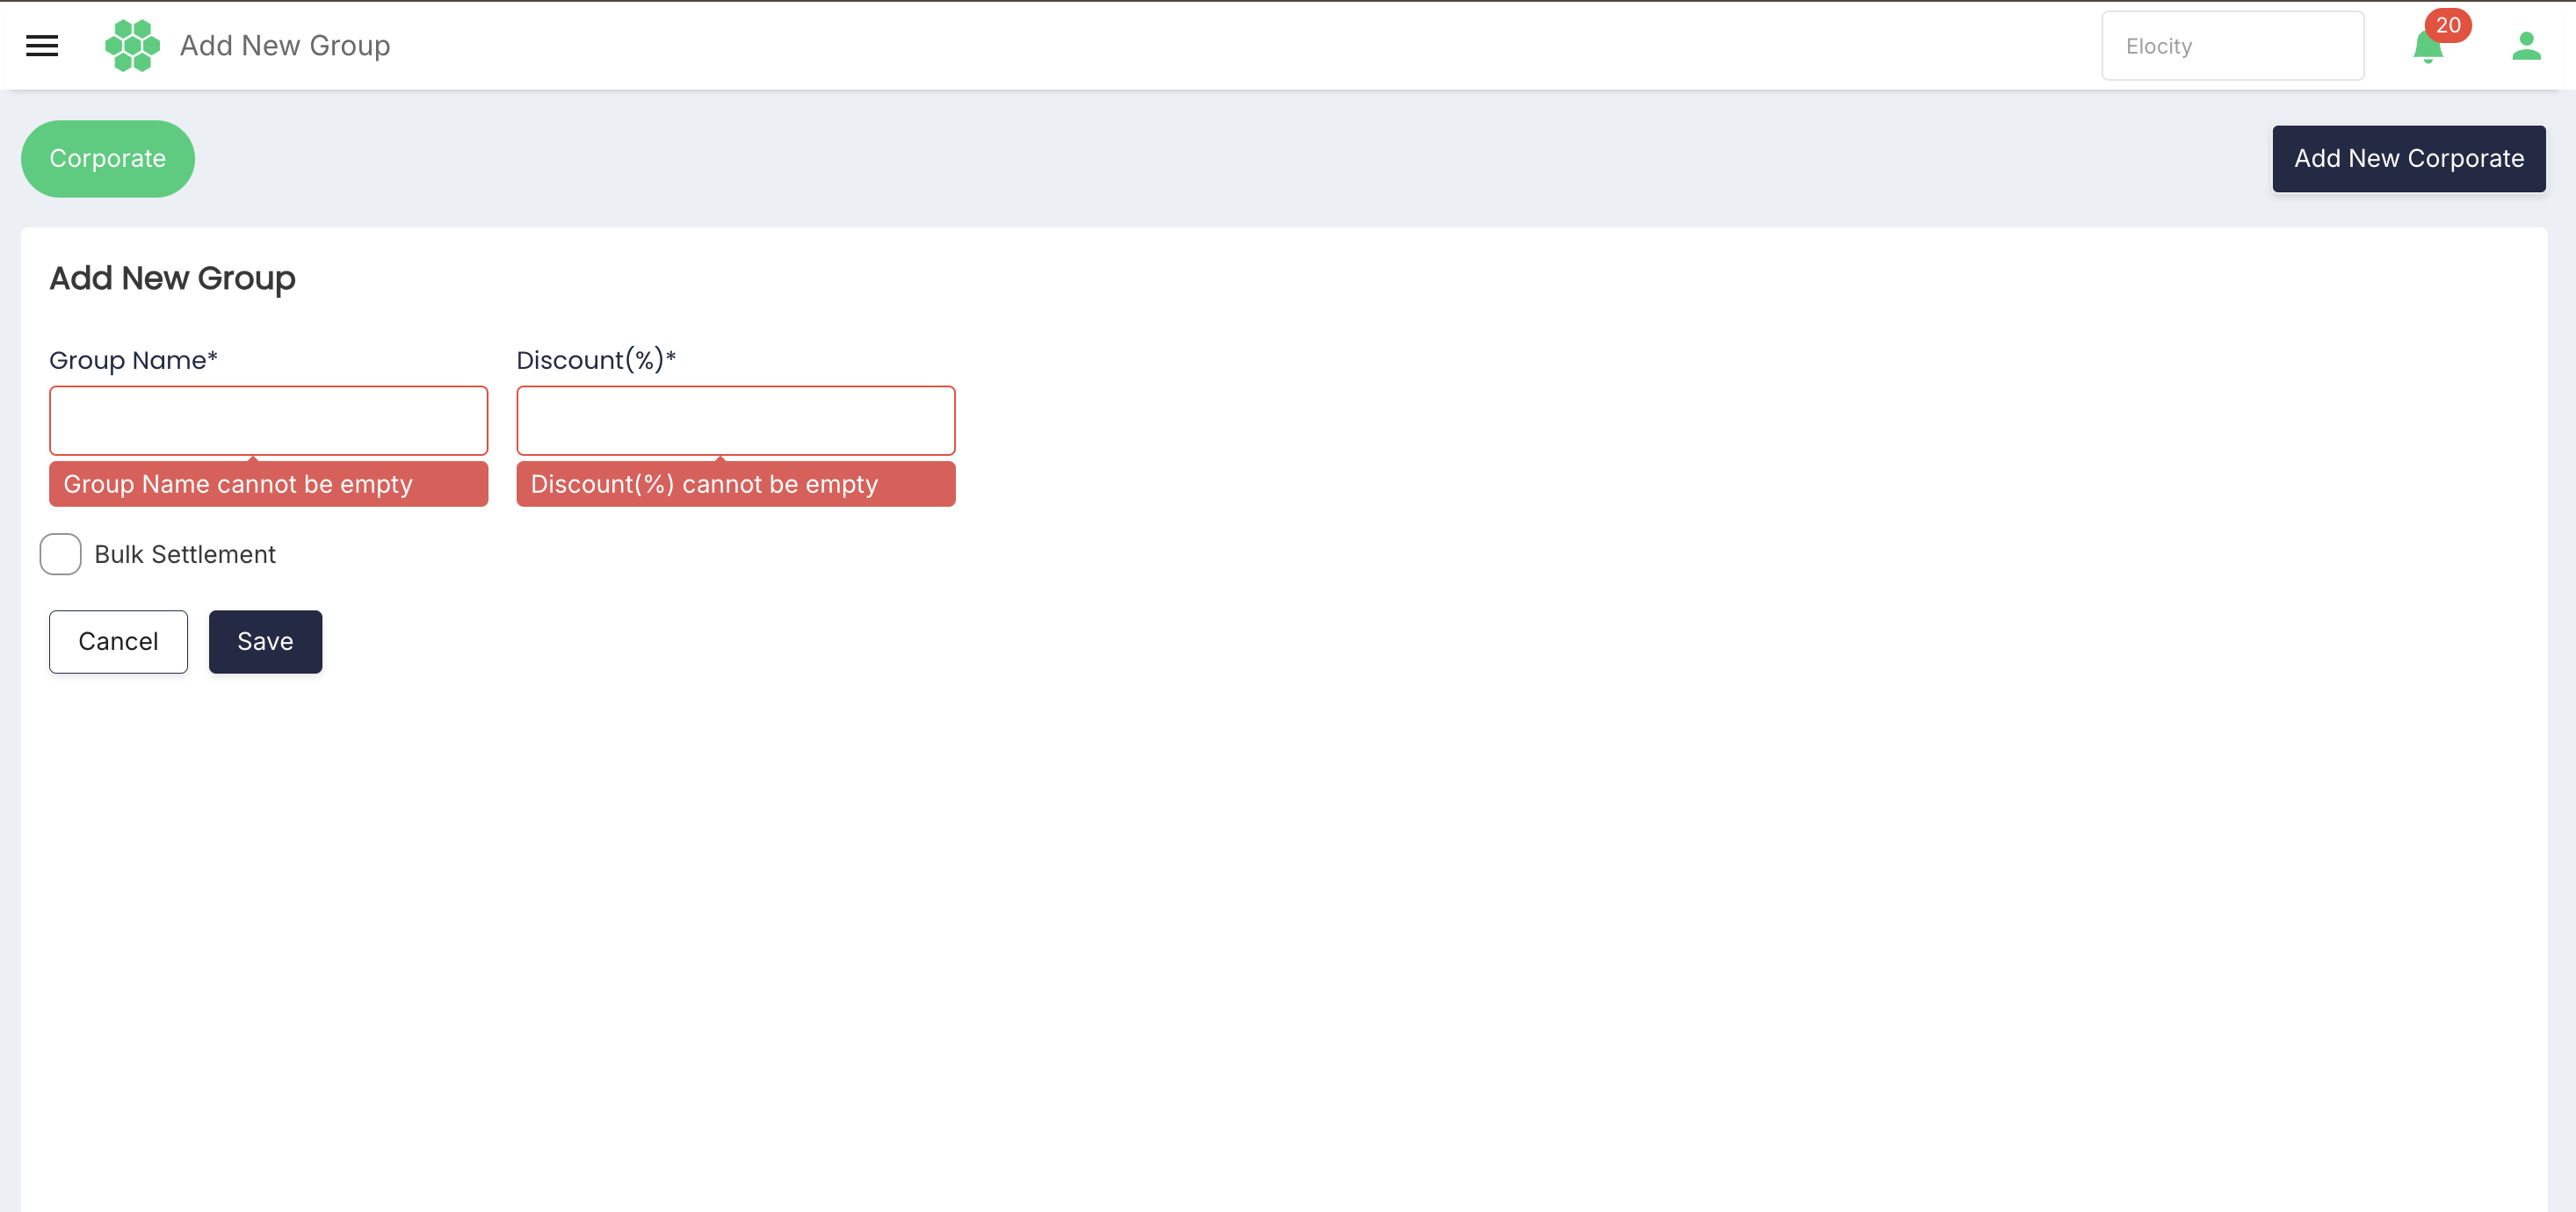
CAUTION: Verified validation Saving an empty group form shows Group Name cannot be empty and Discount(%) cannot be empty.
5.3 Group details
- Open a group row to review Group Name, Discount(%), Bulk Settlement, and the employee roster.
- The verified detail screen explains that the discount is offered by the CPO on the charging session for the corporate partnership.
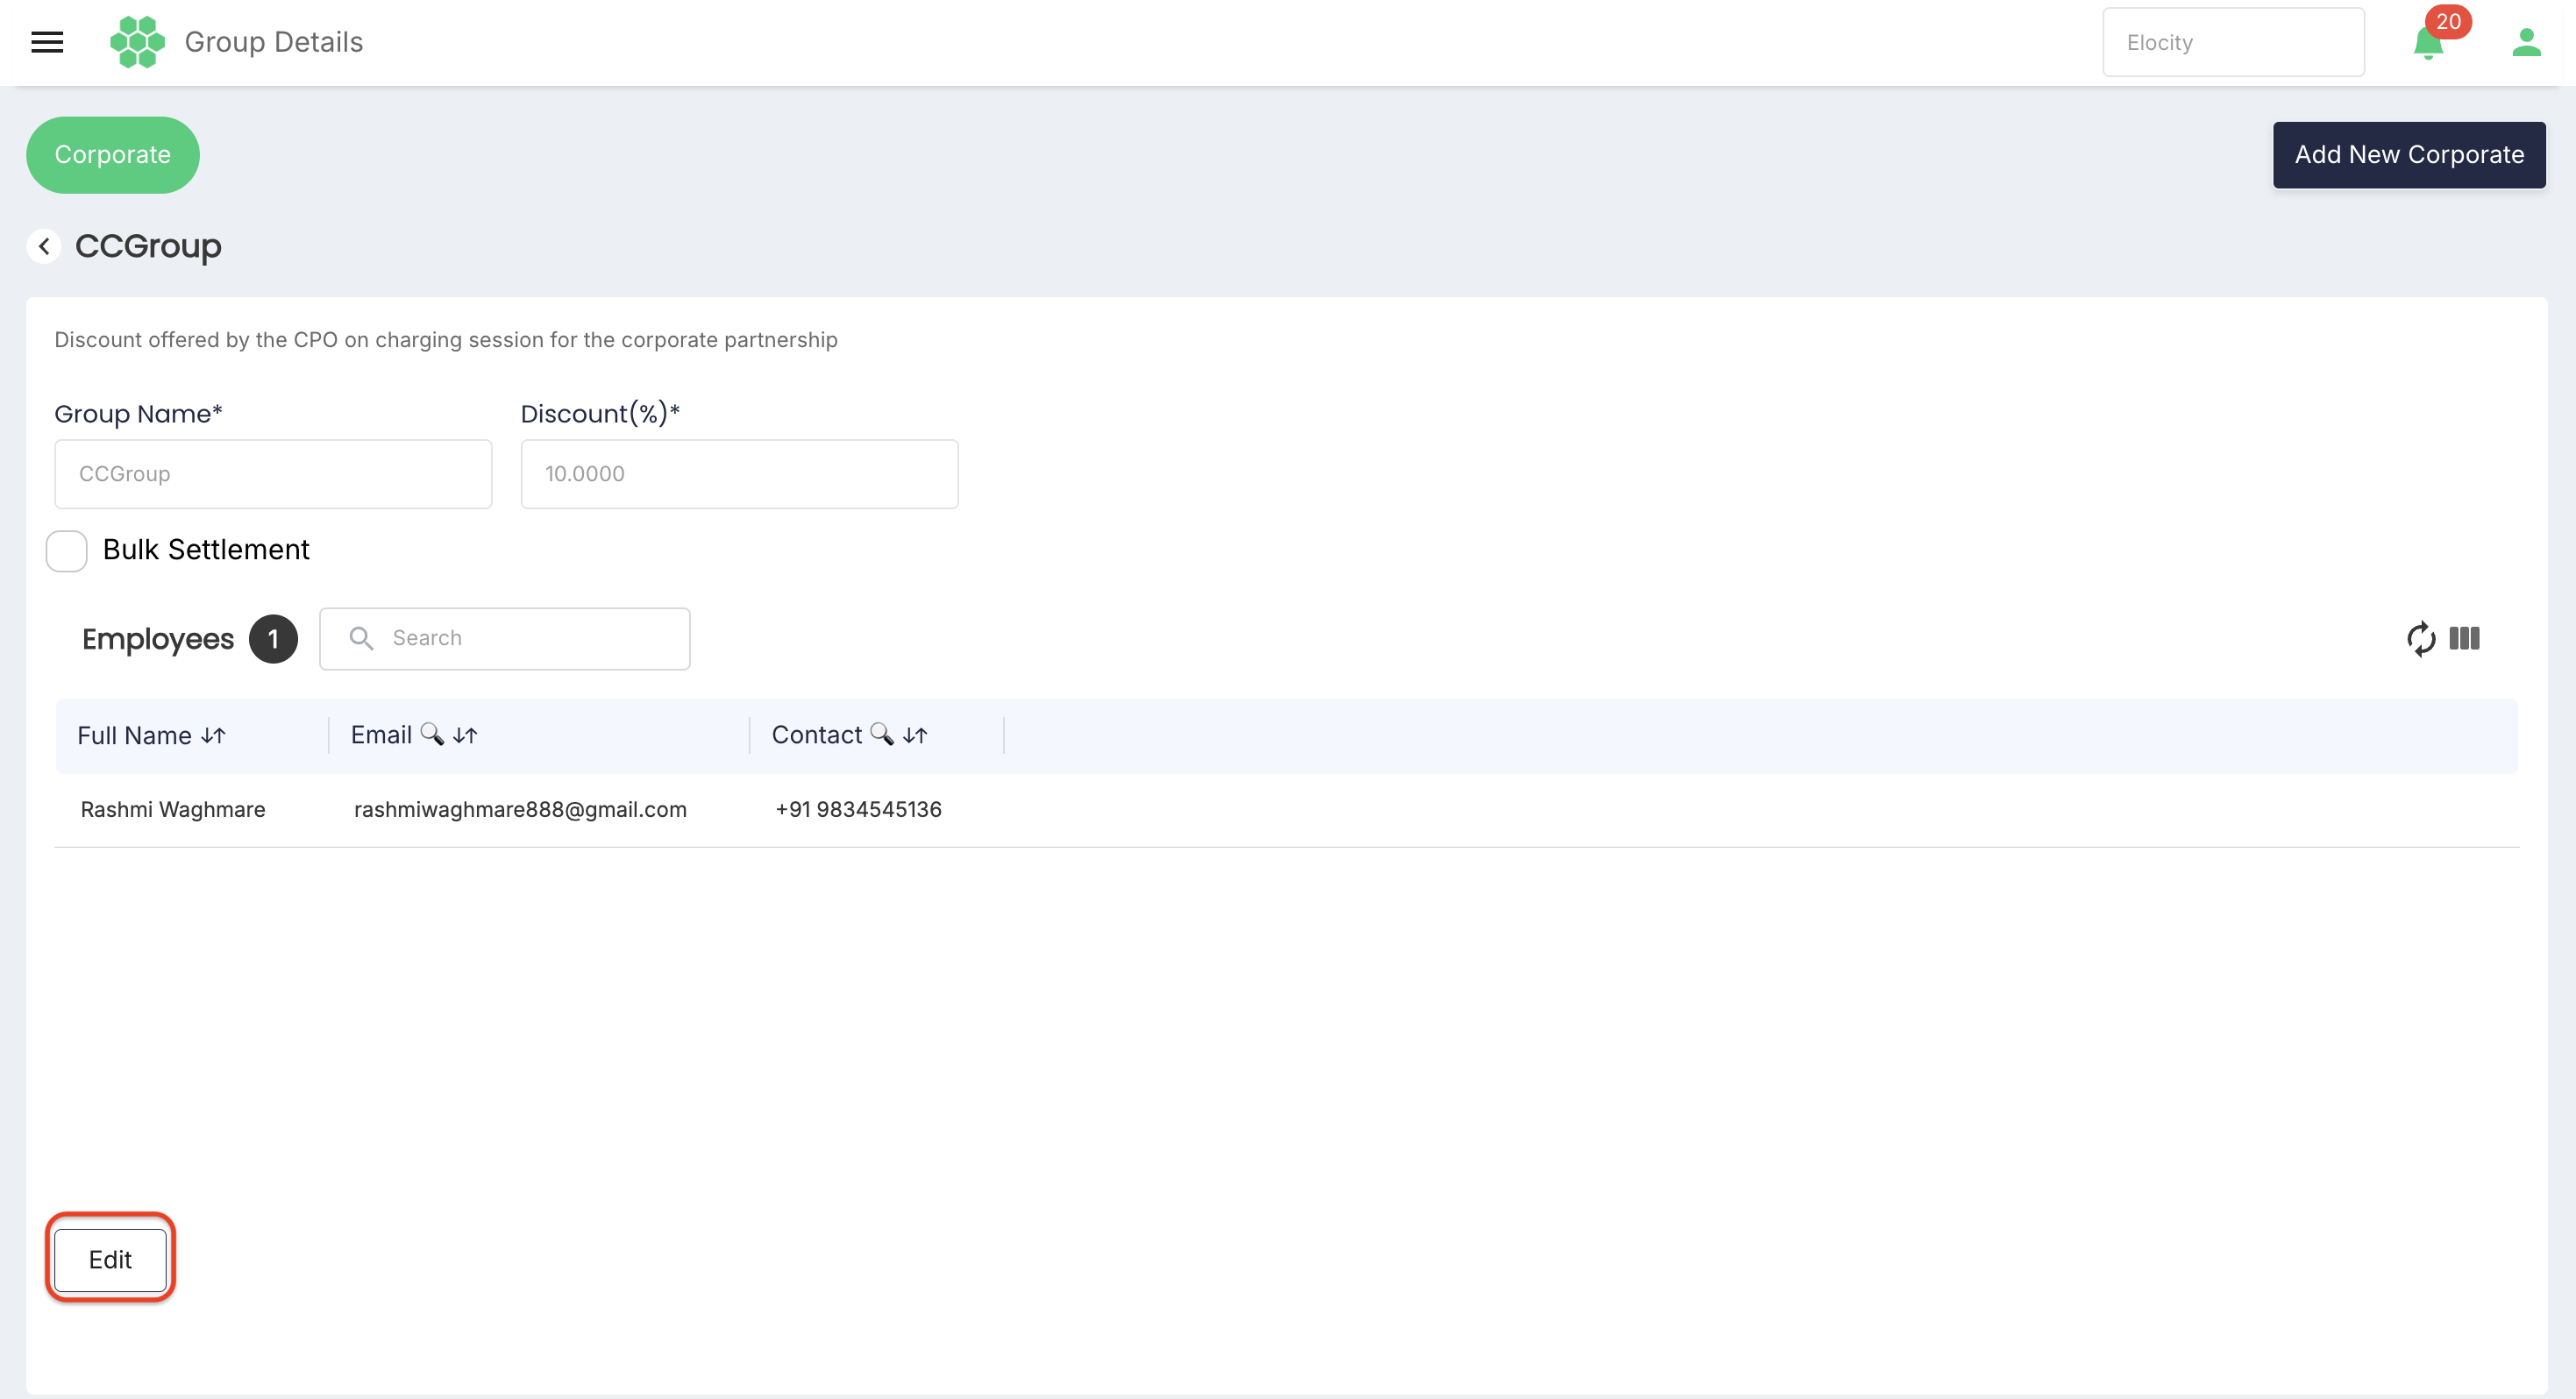
- Select Edit to change group configuration when authorized.
5.4 Discount and bulk settlement rules
- Discount is stored as a percentage and applies according to the active CPO-corporate pricing configuration.
- A zero discount is valid and means no corporate discount is applied.
- Bulk Settlement groups combine eligible employee session costs for parent-level reconciliation.
- Changing a group setting should affect eligible future transactions; do not retroactively adjust settled sessions unless finance approves a correction workflow.
- An employee should belong to the intended Corporate group before starting a charging session.
6. Manage Employees
6.1 Employees list
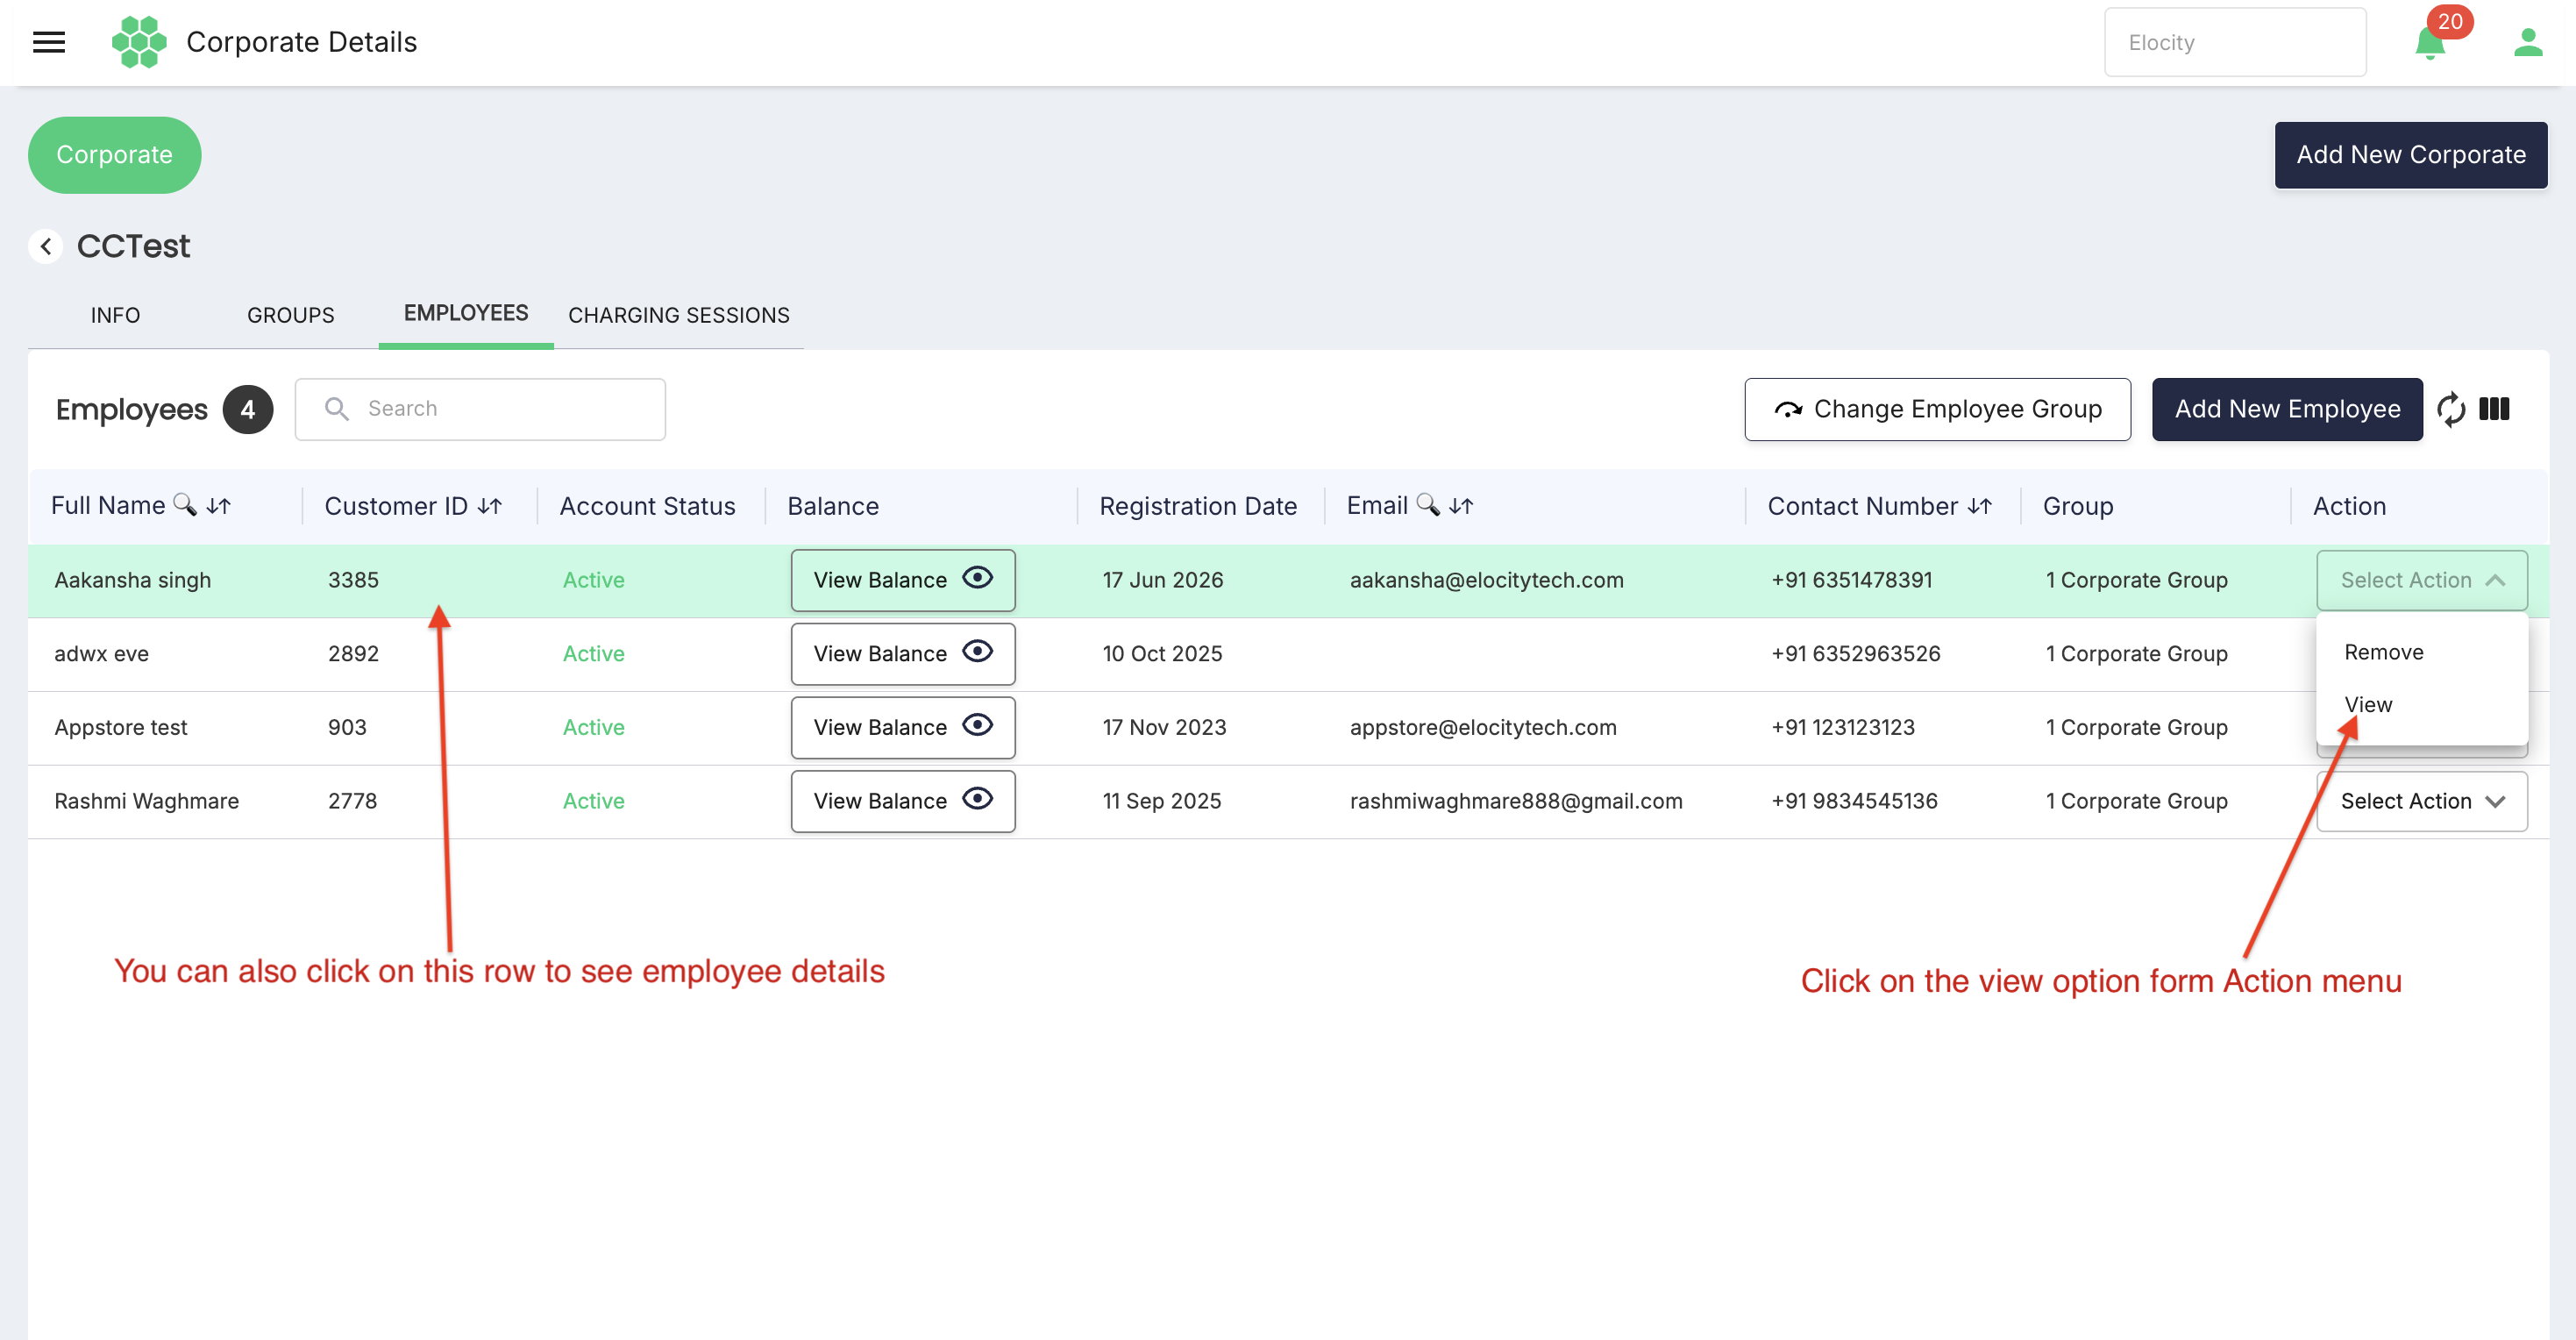
The EMPLOYEES tab shows the Corporate's child accounts. The verified screen includes account status, registration date, group, full name, customer ID, a View Balance action, email, contact number, and an Action menu.
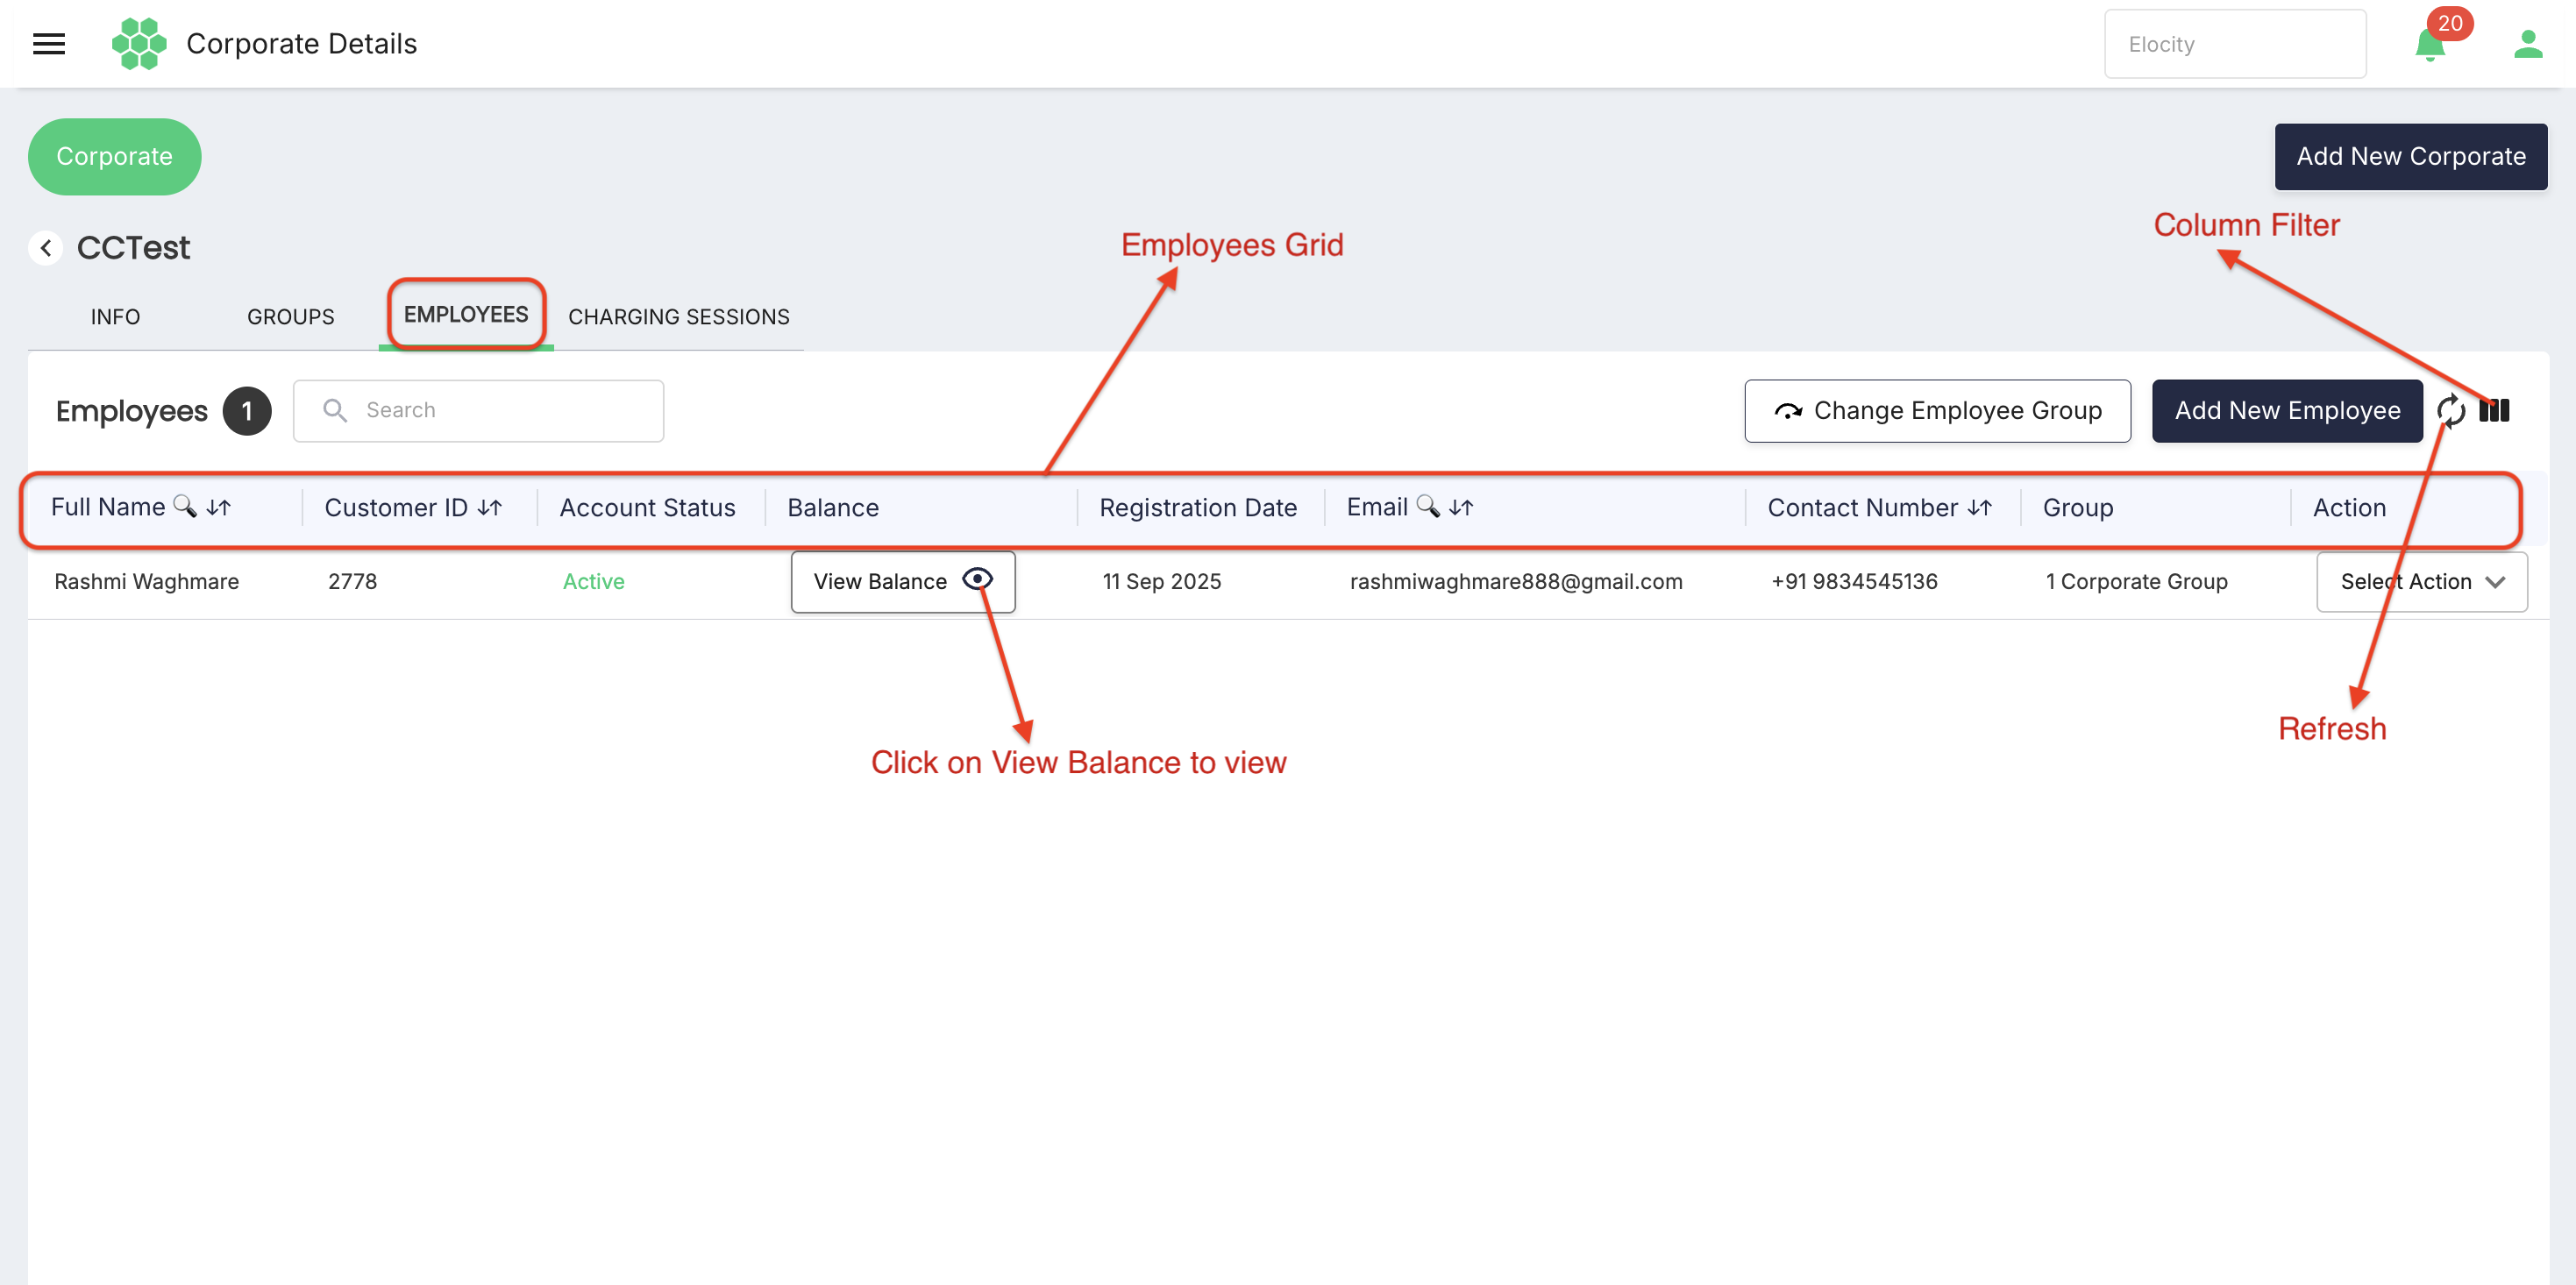
KEY RULE: No employee wallet View Balance does not make the employee a wallet owner. The parent account remains responsible for charging and RFID processing. Treat the value as an inherited or informational account view unless your deployment explicitly documents another calculation.
6.2 Add one employee
- Open the Corporate and select EMPLOYEES.
- Select Add New Employee and stay on SINGLE.
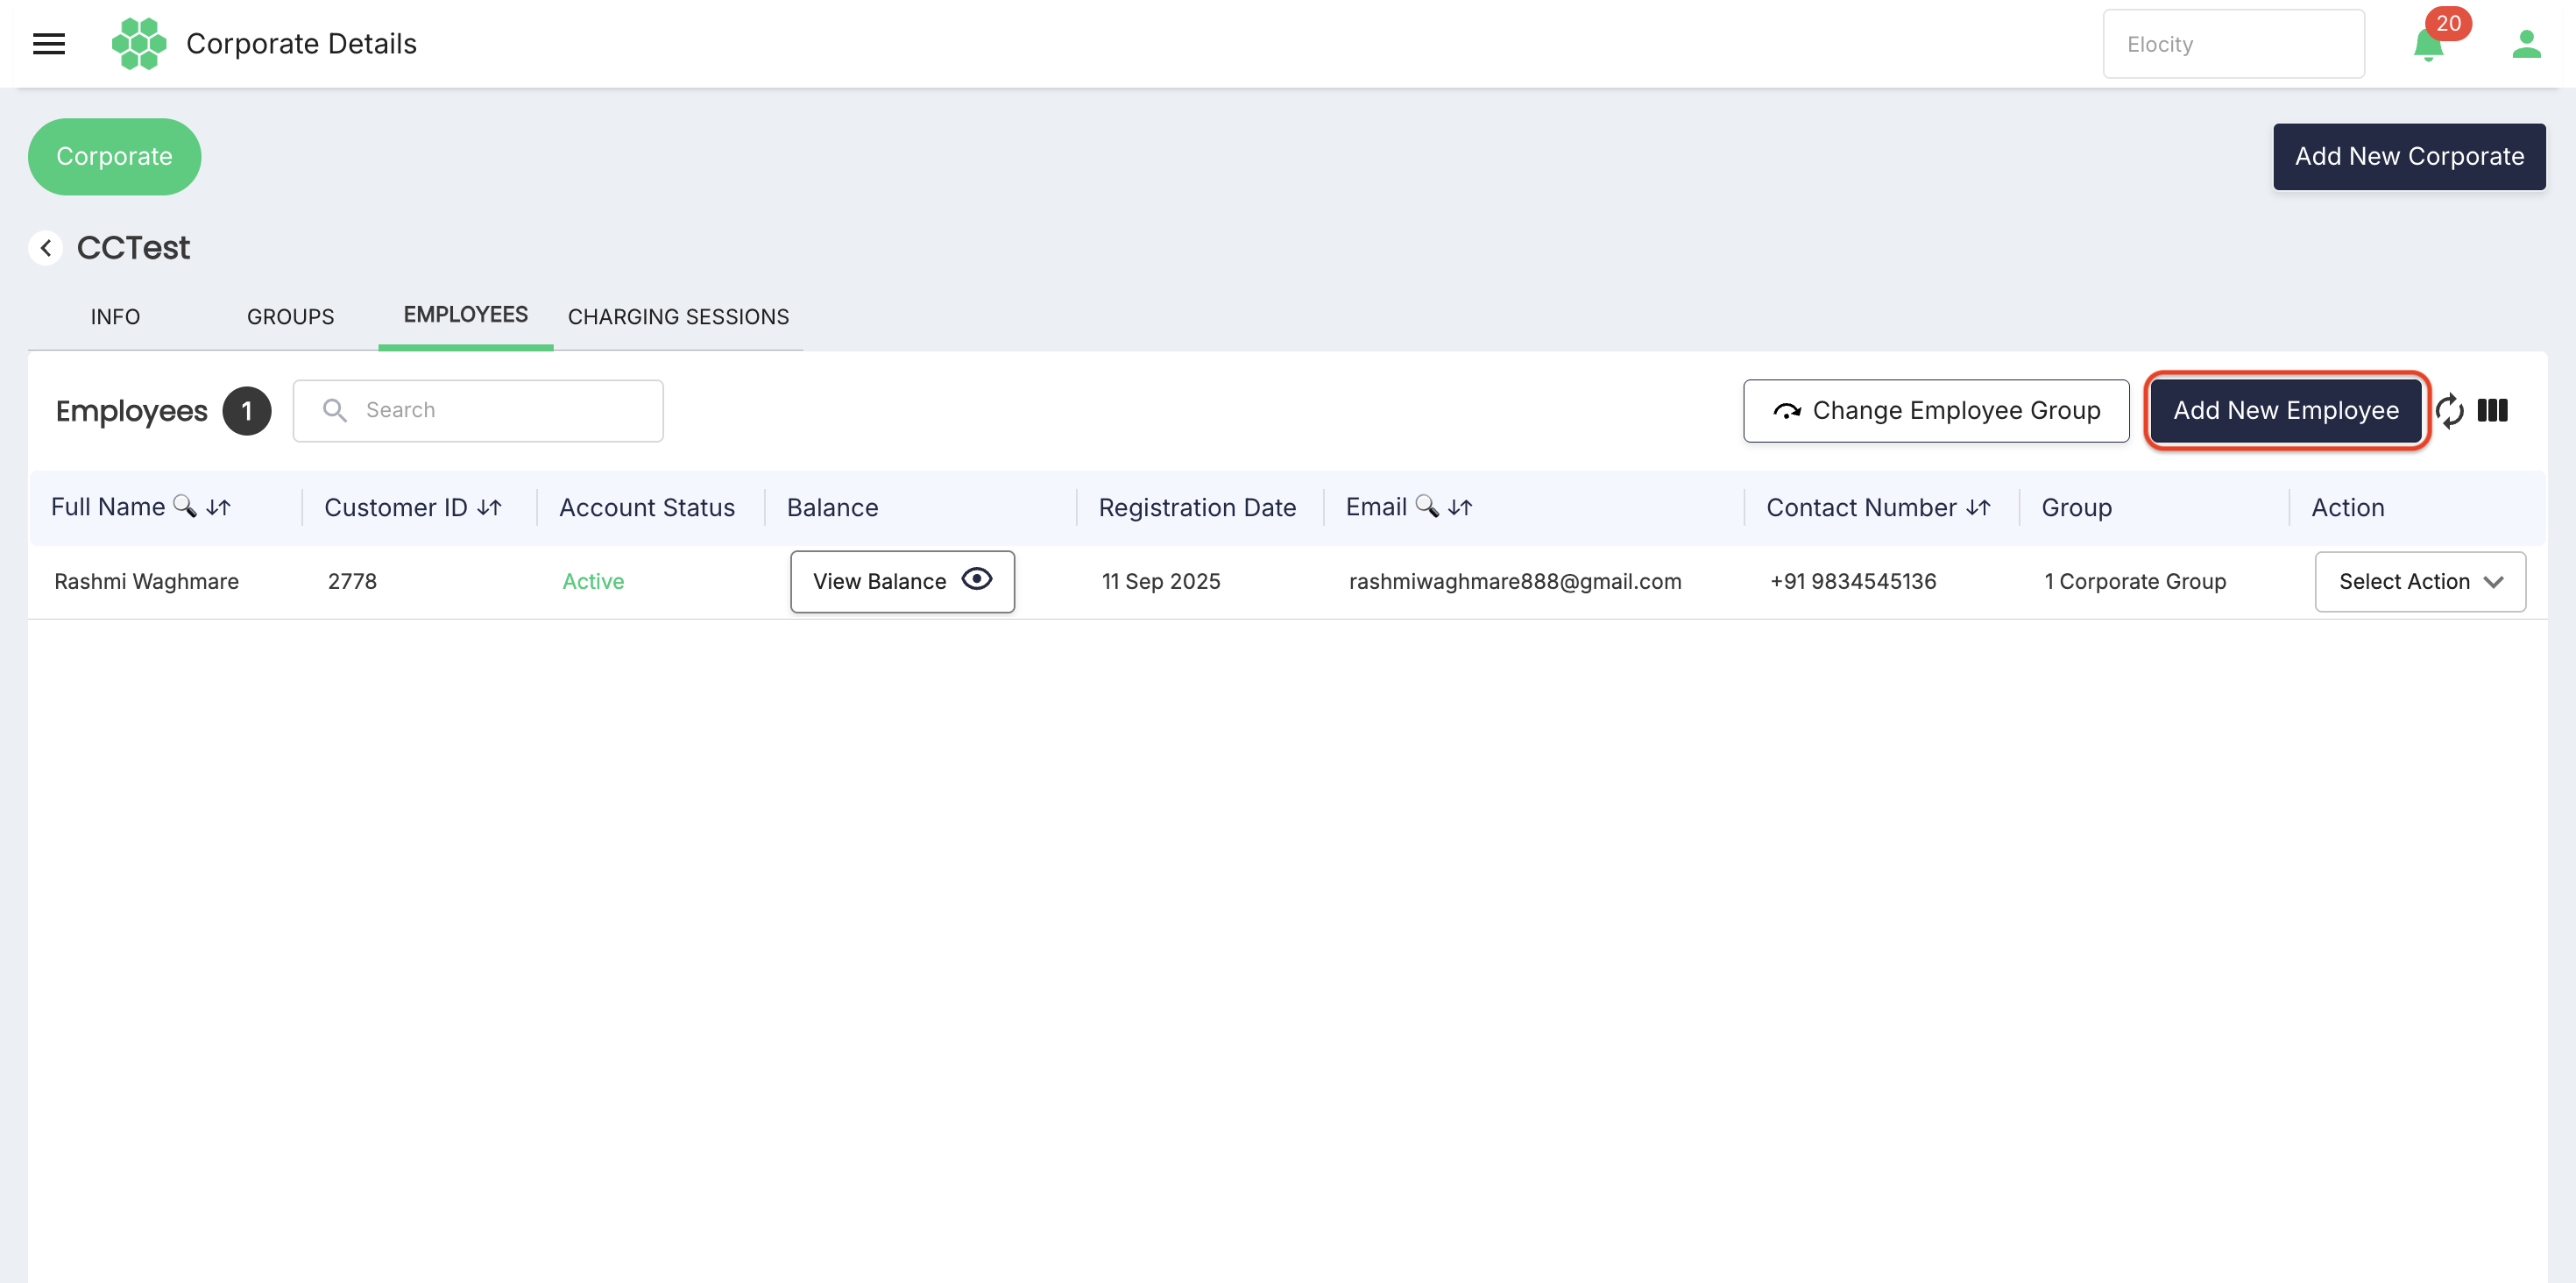
- Enter First Name, Last Name, Primary Email, and Contact Number.
- Select the Corporate group.
- Optionally enter an RFID identifier if the card is already available and approved for assignment.
- Select Save.
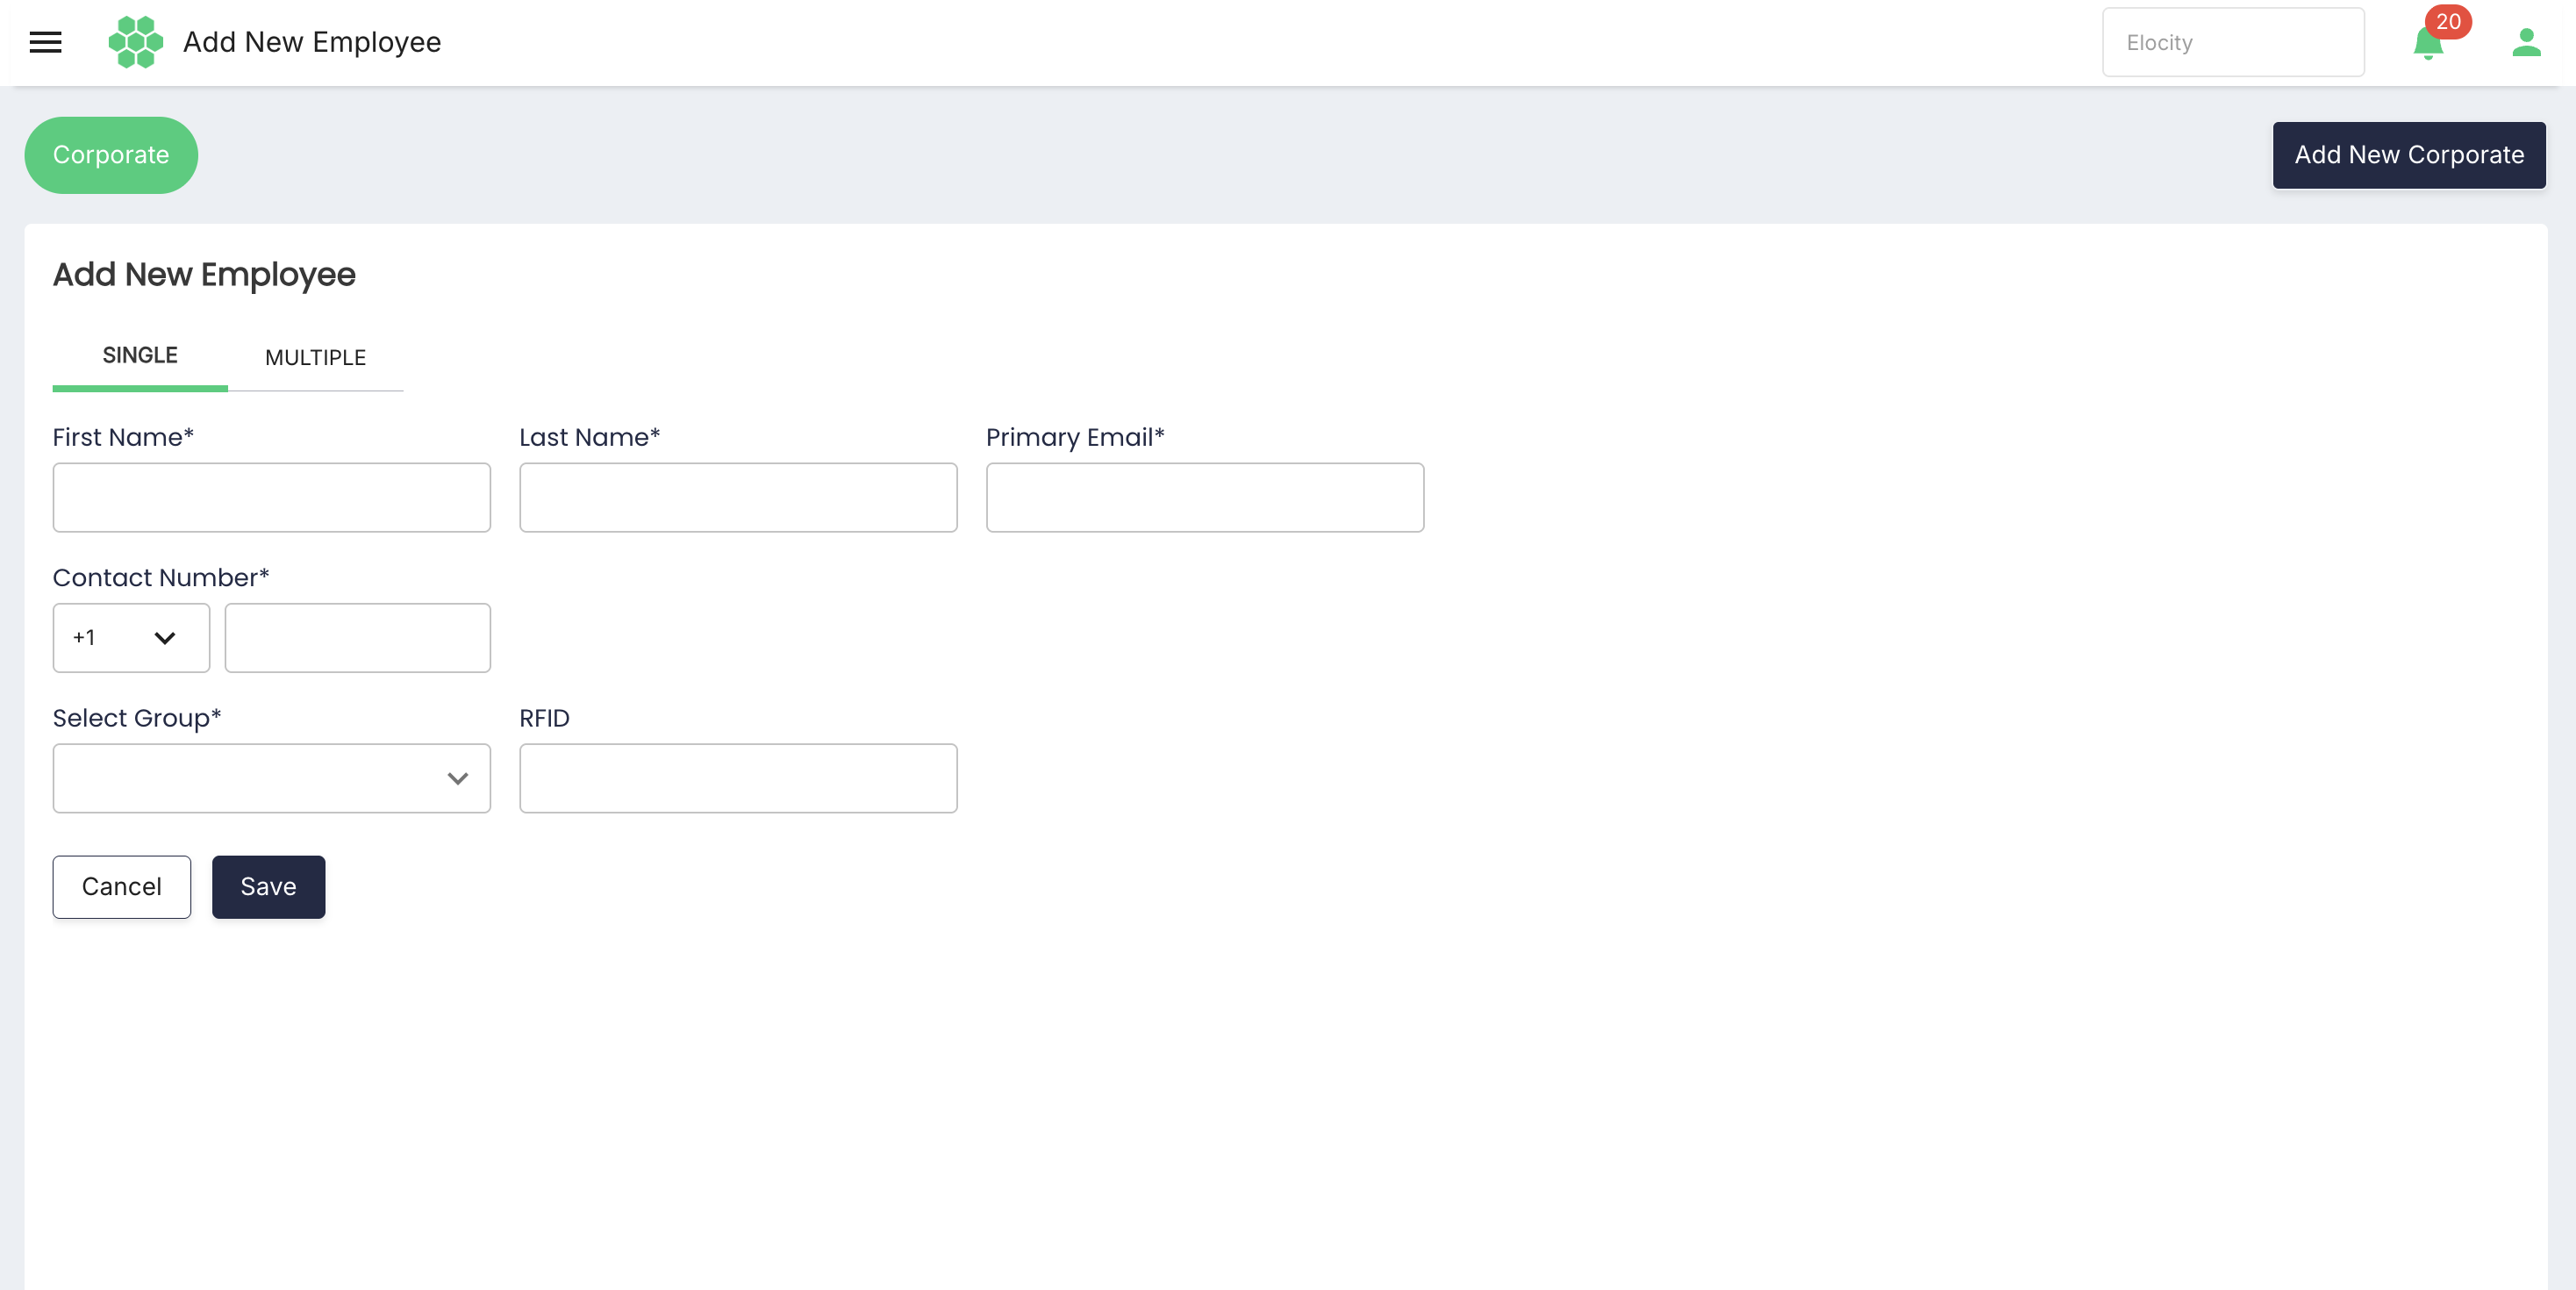
- Verify the employee appears with an Active account status and the correct group.
- Verify the employee is linked to the Corporate parent ID tag and does not have a separate wallet.
6.3 Required fields and validation
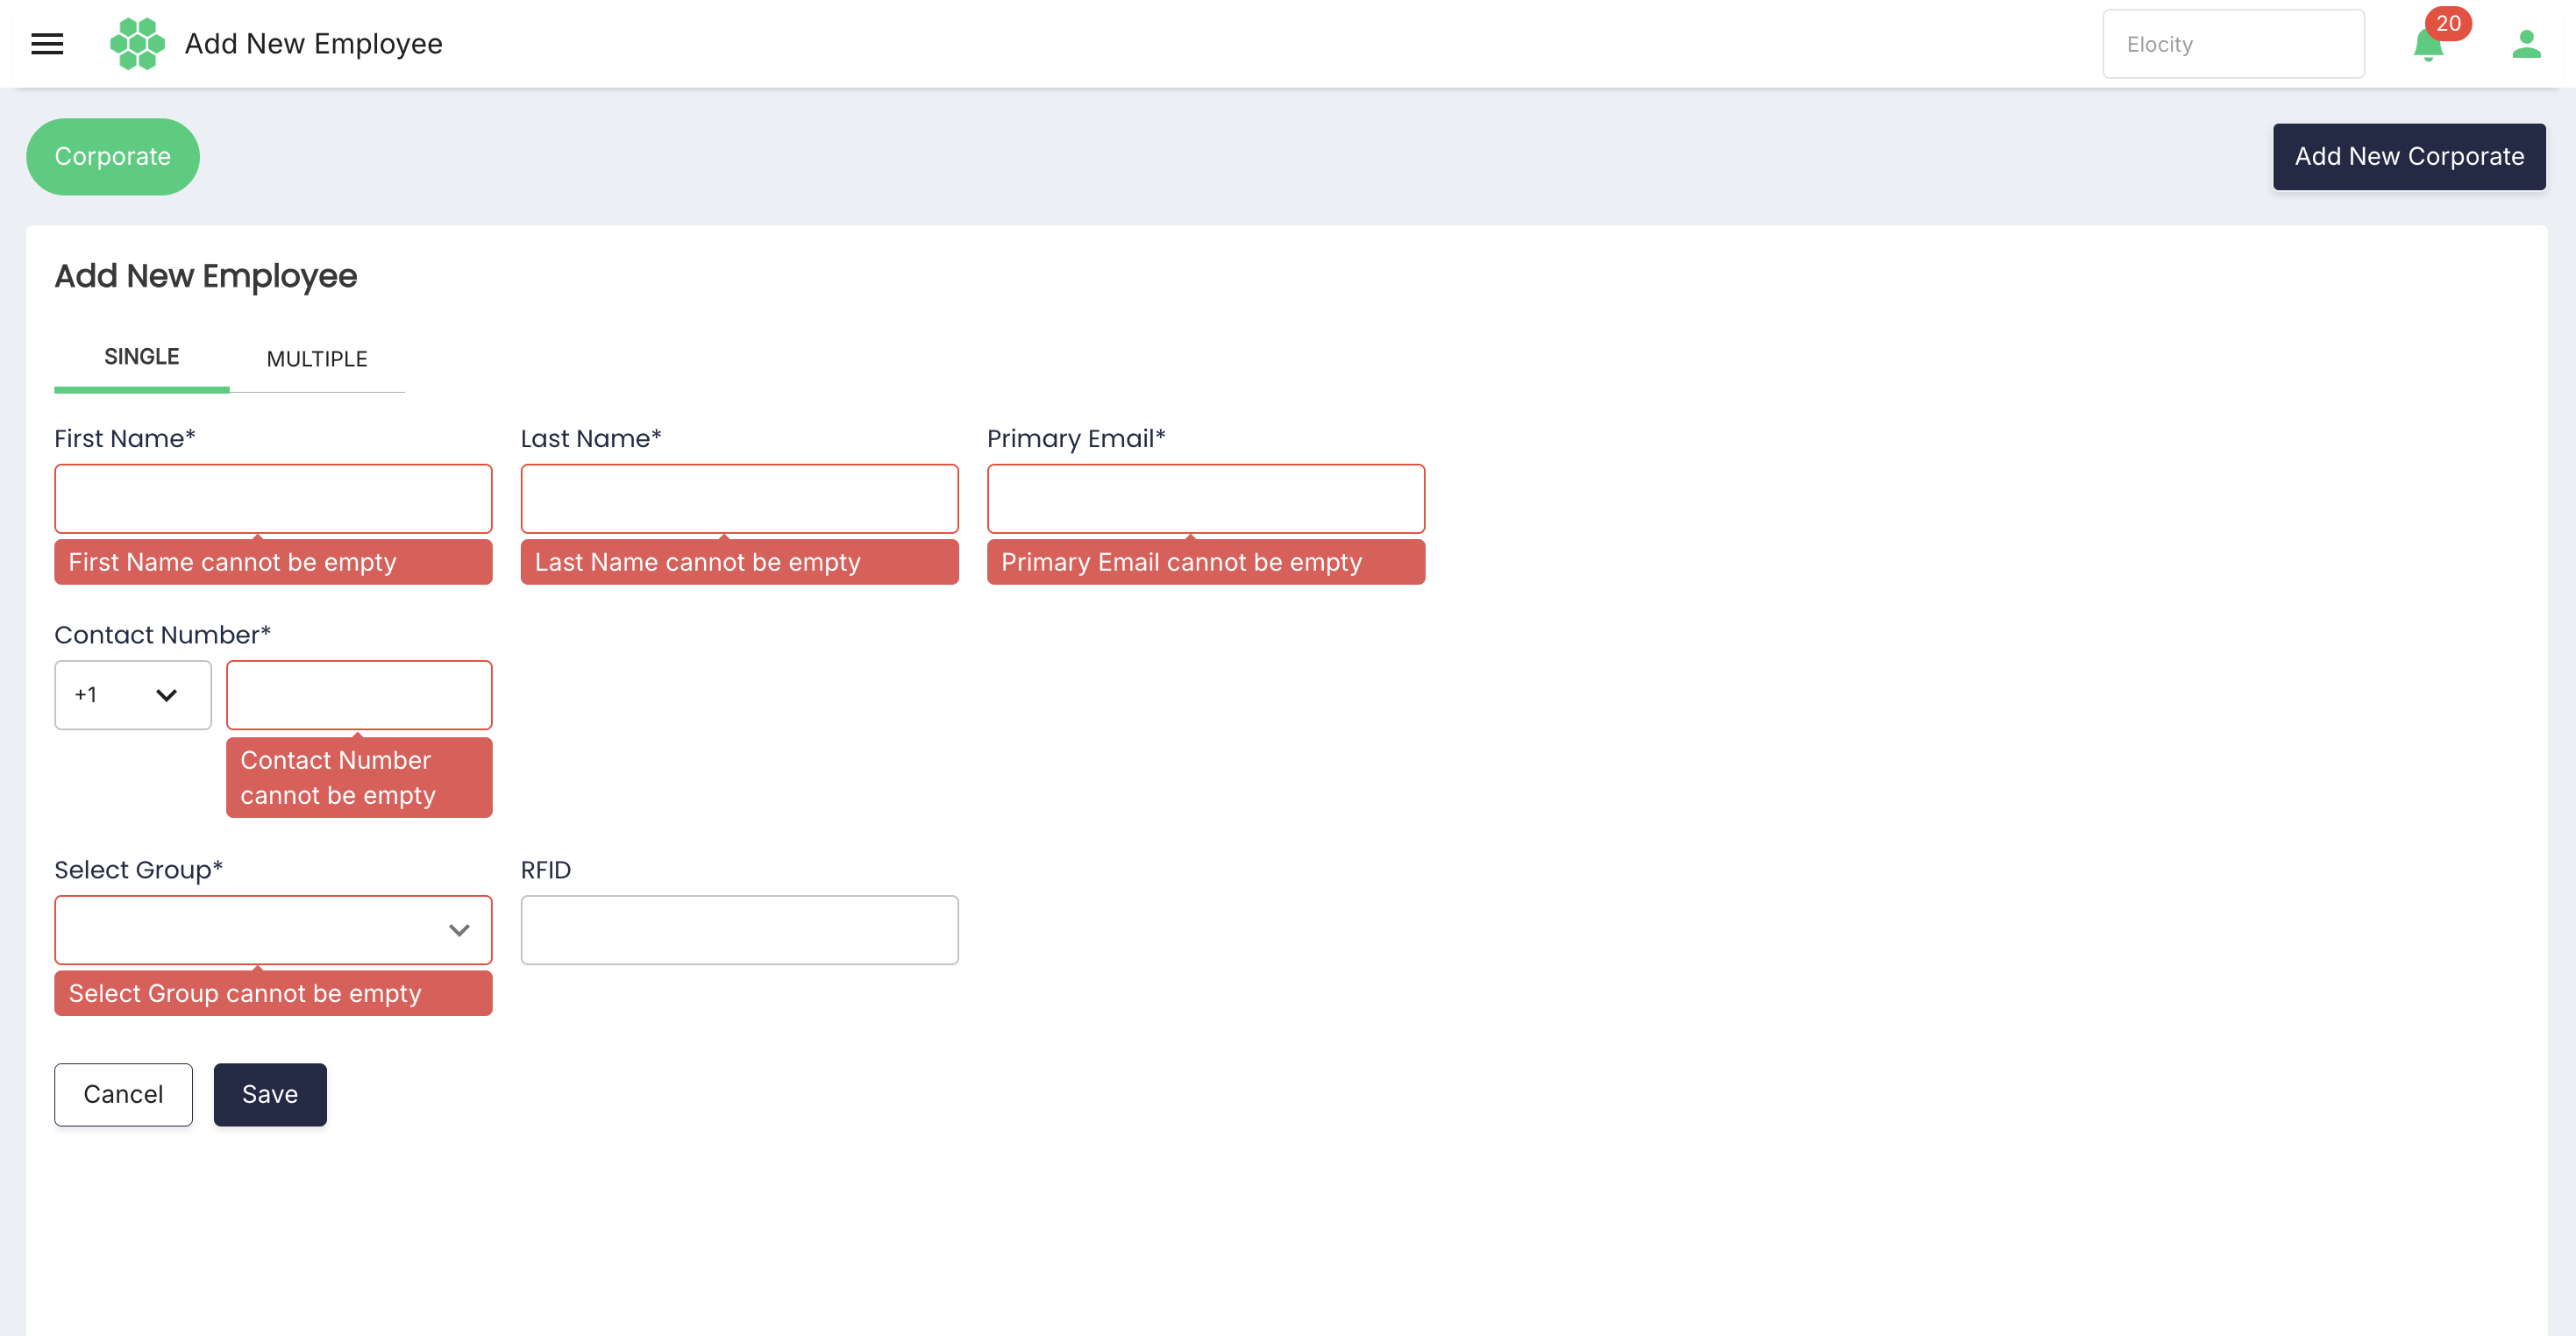
| Field | Validation shown when empty |
|---|---|
| First Name | First Name cannot be empty |
| Last Name | Last Name cannot be empty |
| Primary Email | Primary Email cannot be empty |
| Contact Number | Contact Number cannot be empty |
| Select Group | Select Group cannot be empty |
| RFID | Optional on the verified single-employee form |
6.4 Add multiple employees by CSV
- From Add New Employee, select MULTIPLE.
- Select Download CSV Template.
- Populate the template without changing required headers or file format.
- Use Choose csv file to upload the completed file.
- Review import results and correct any rejected rows.
- Verify each successful employee is assigned to the Corporate parent and intended group.
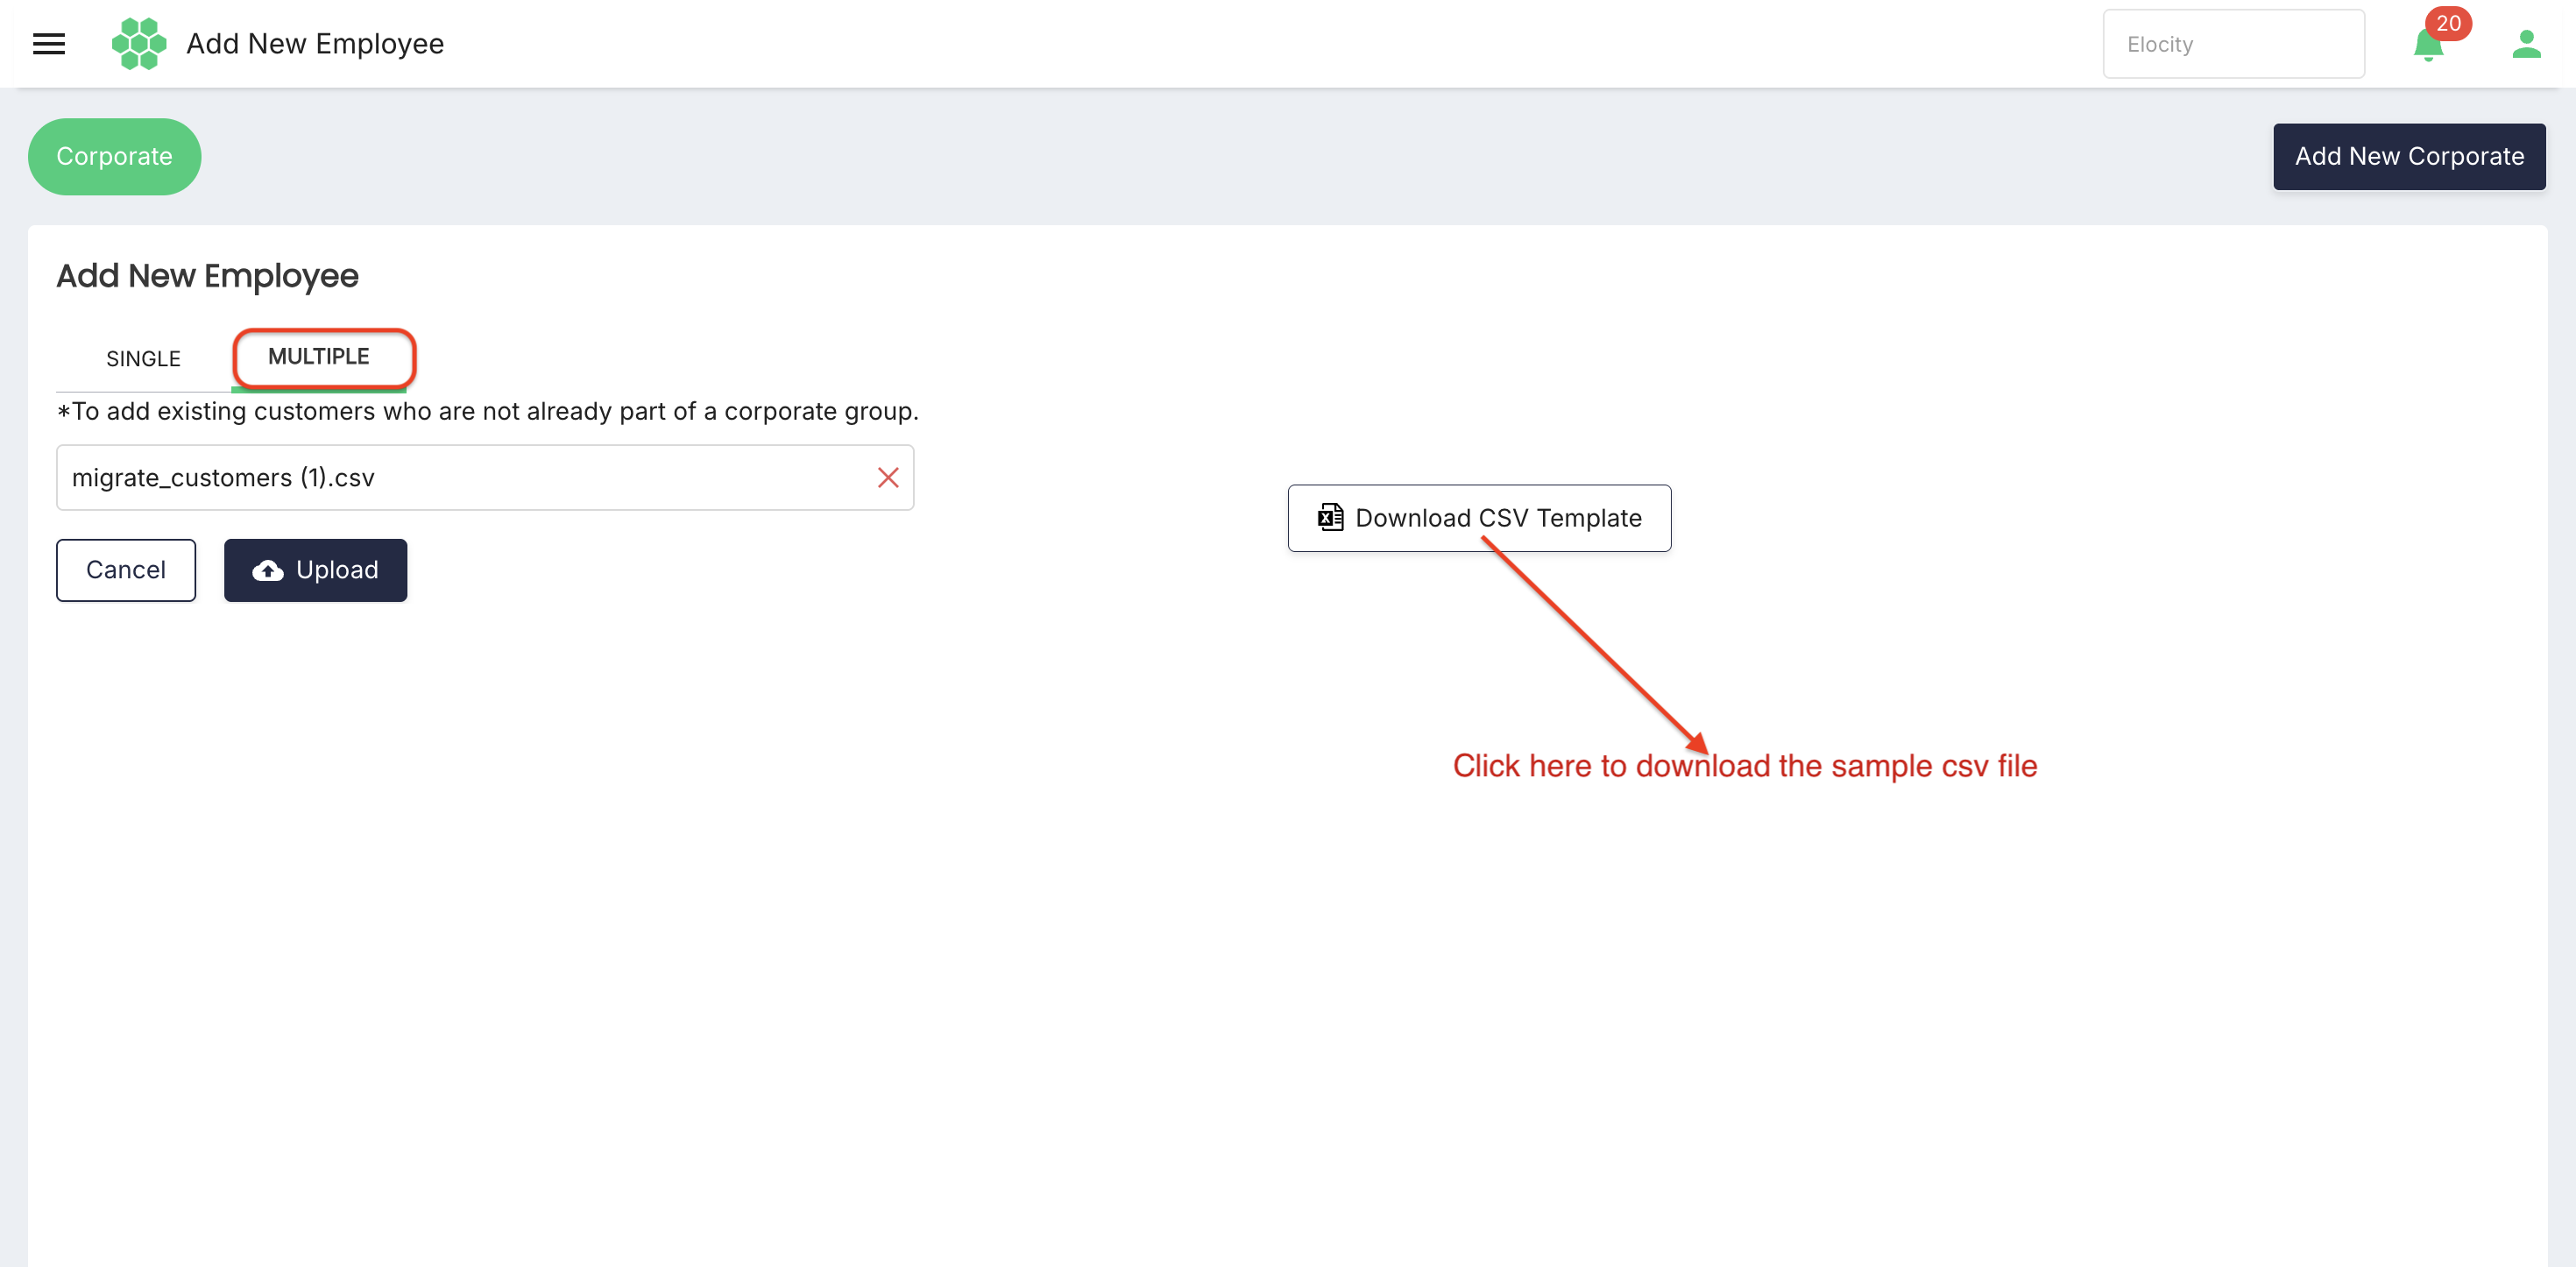
NOTE: Bulk-upload scope The verified screen states that the CSV workflow is for existing customers who are not already part of a corporate group. Avoid duplicate customer records; migrate or associate the existing customer where appropriate.
6.5 Migrate existing customers to a Corporate
- From Corporate List, select Migrate to Corporate.
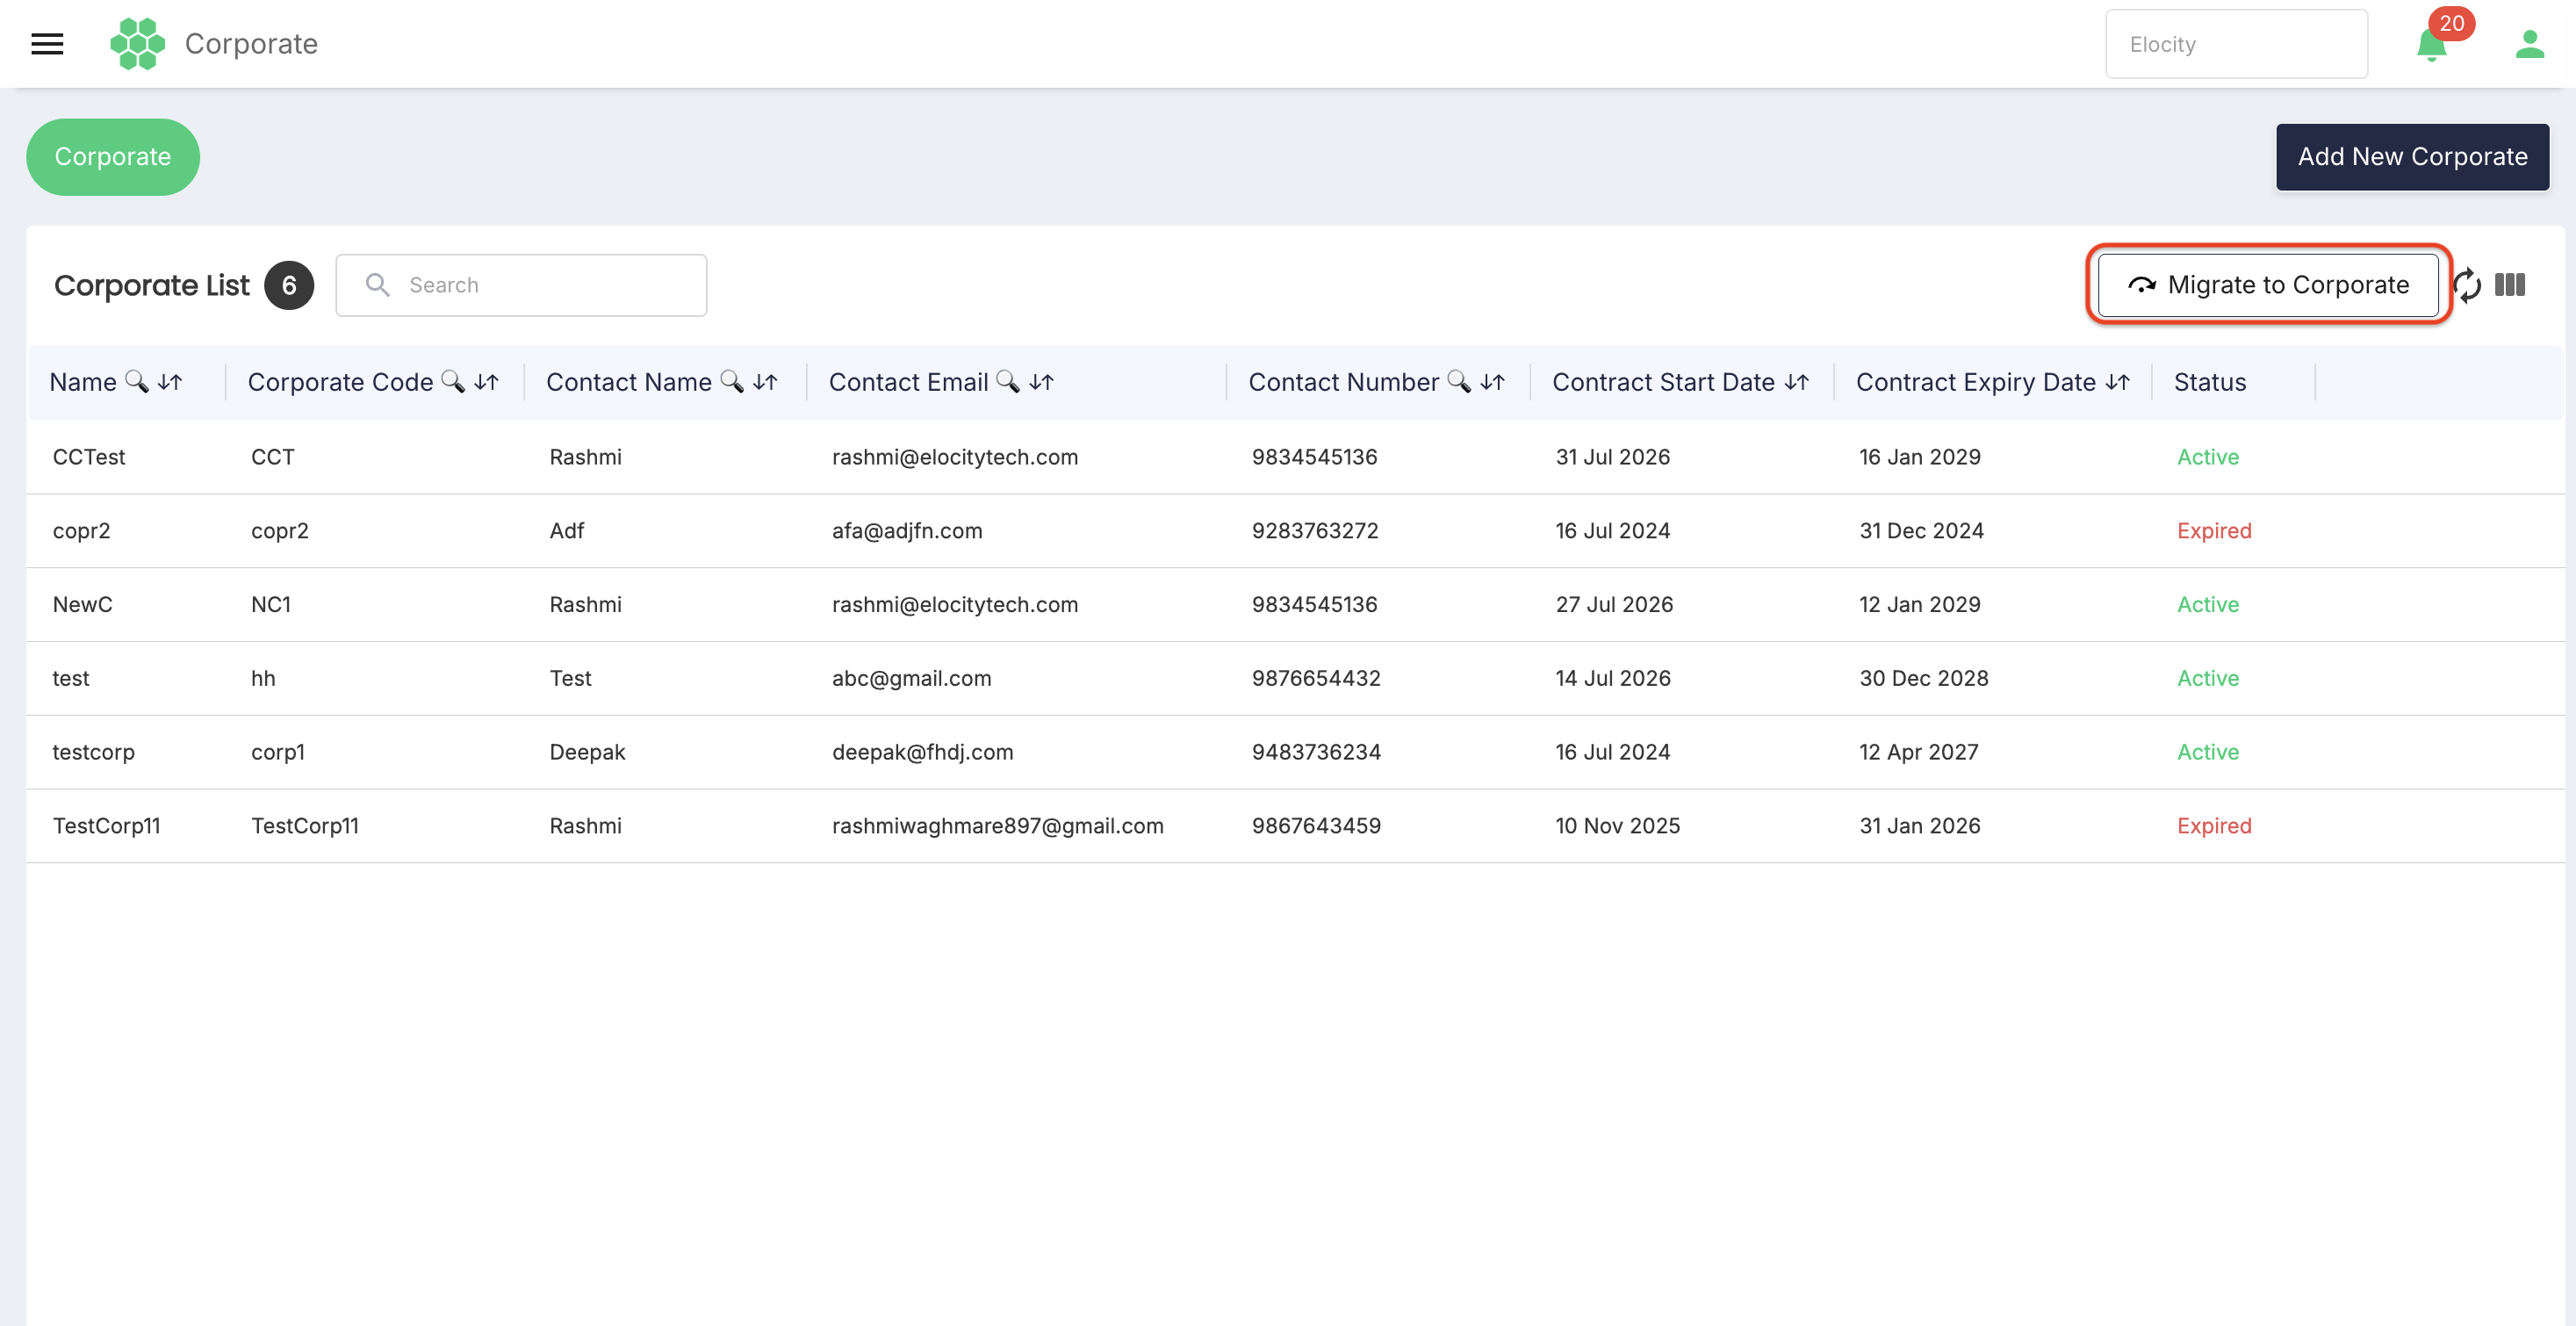
- Search the Customer List and select one or more eligible customers.
- Choose Select Corporates >.
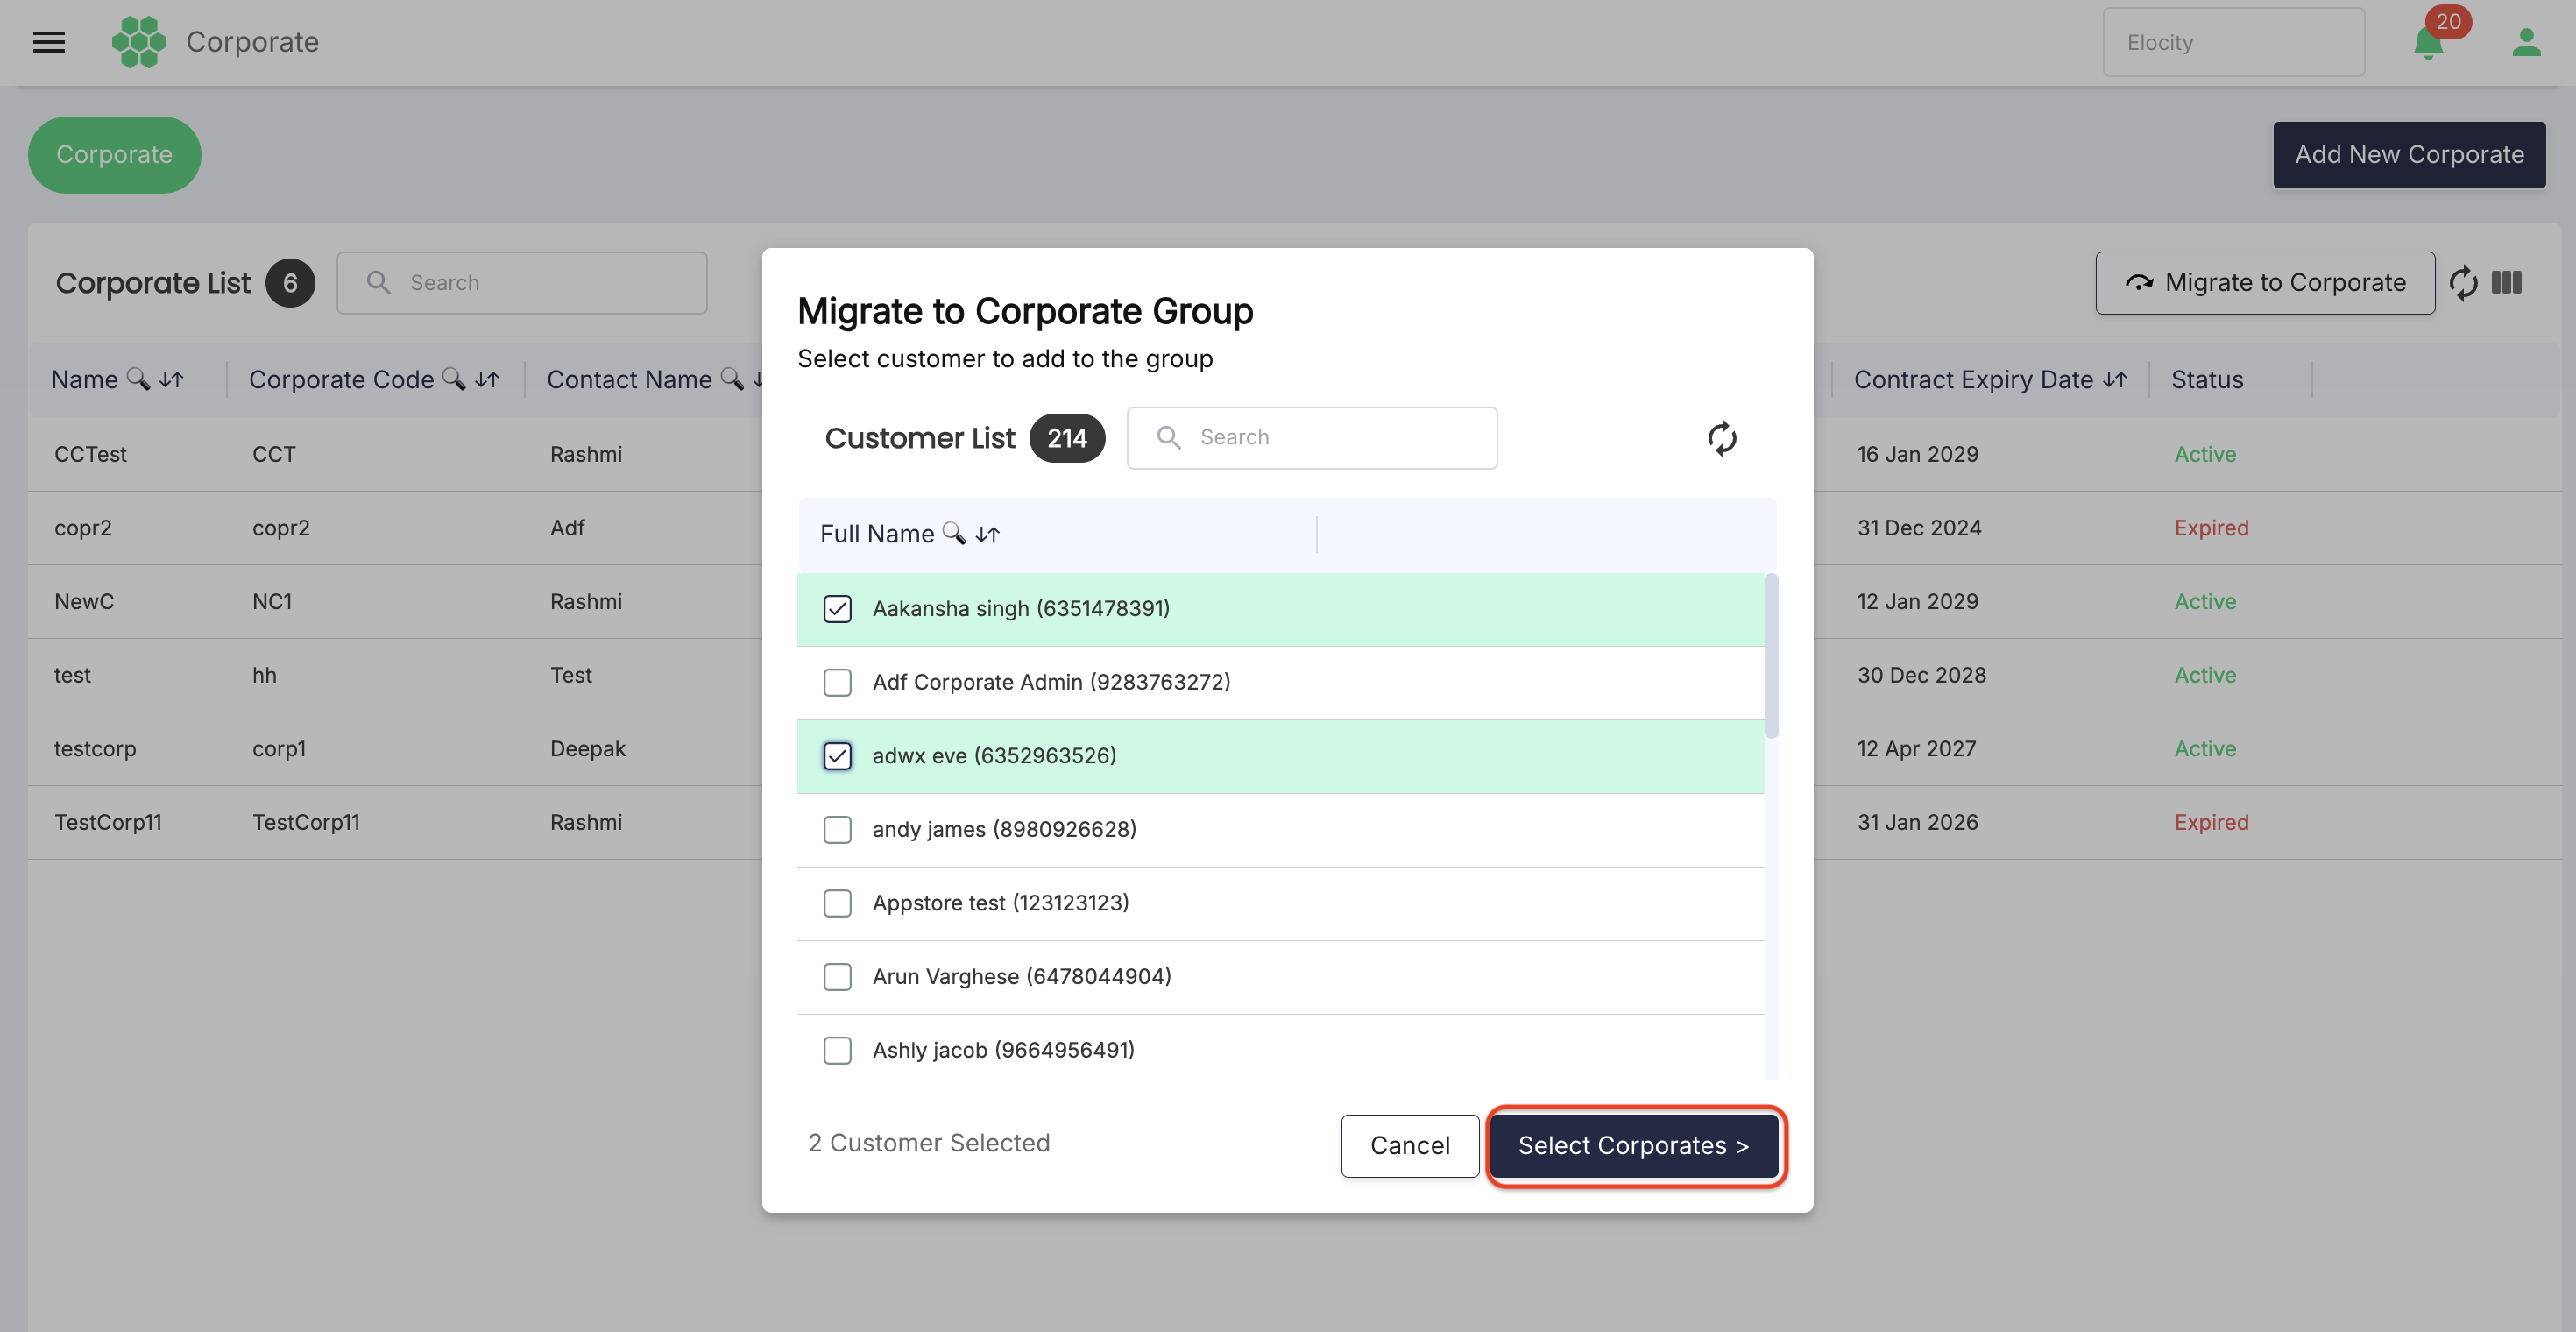
- Select the target Corporate and group as prompted.
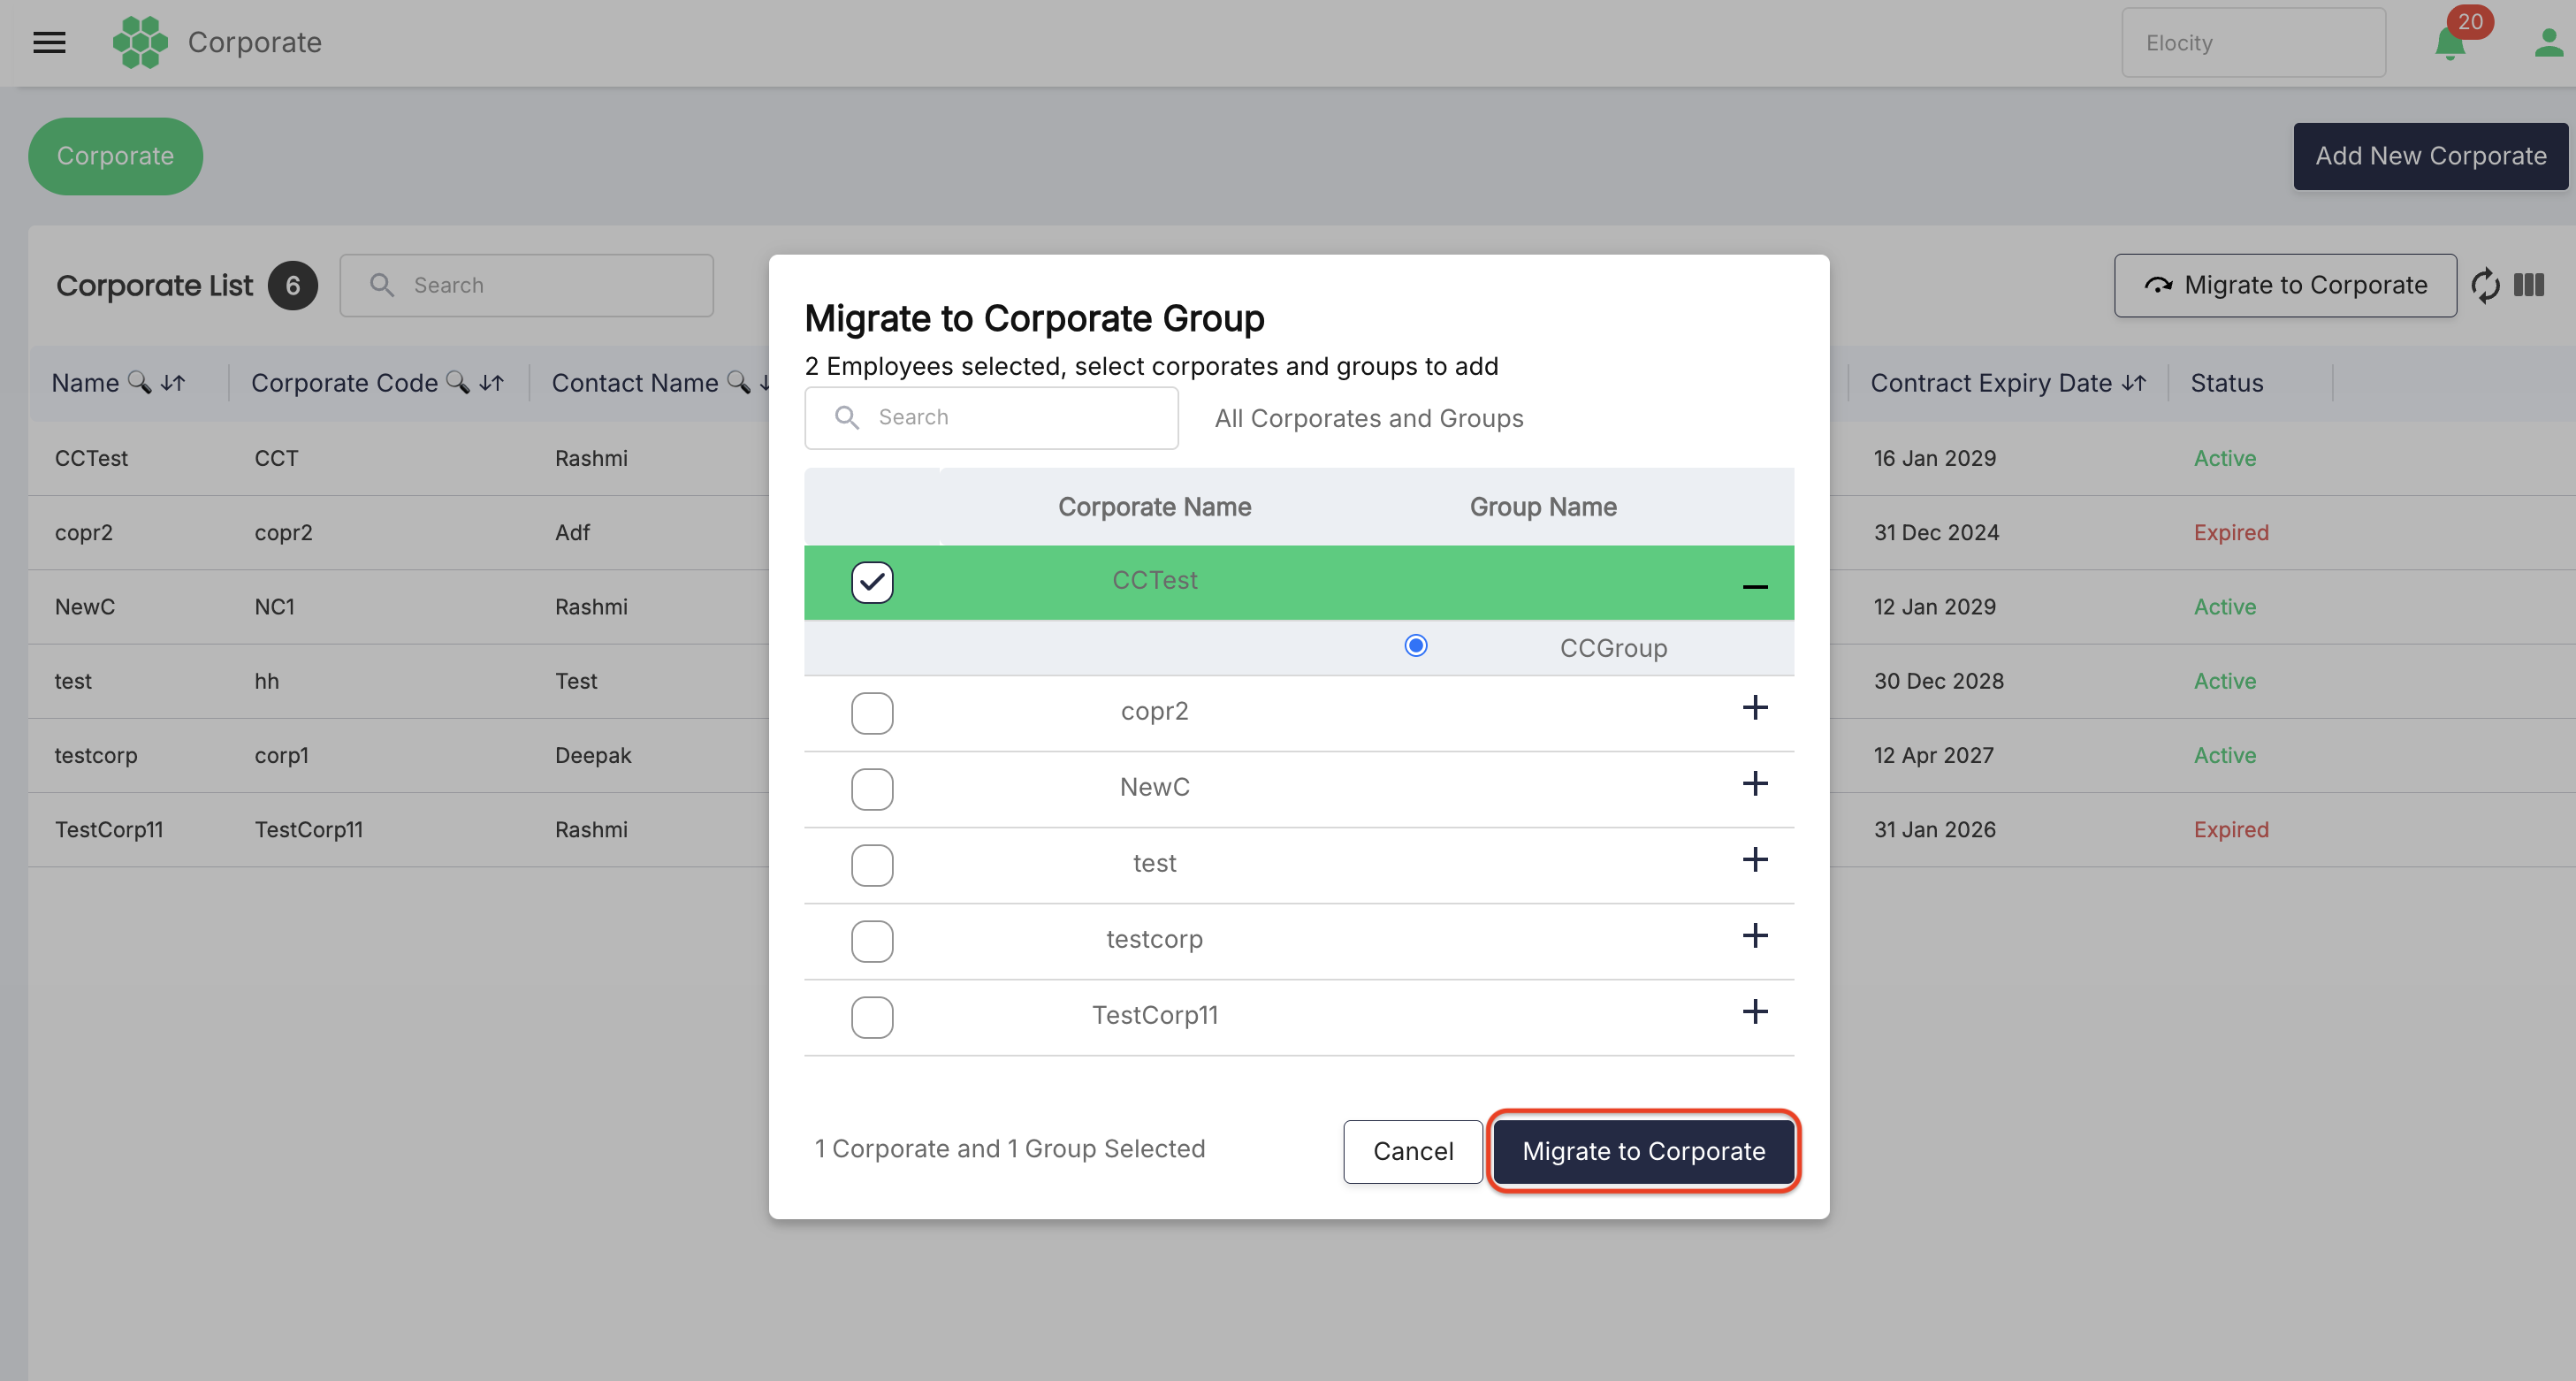
- Confirm the migration.
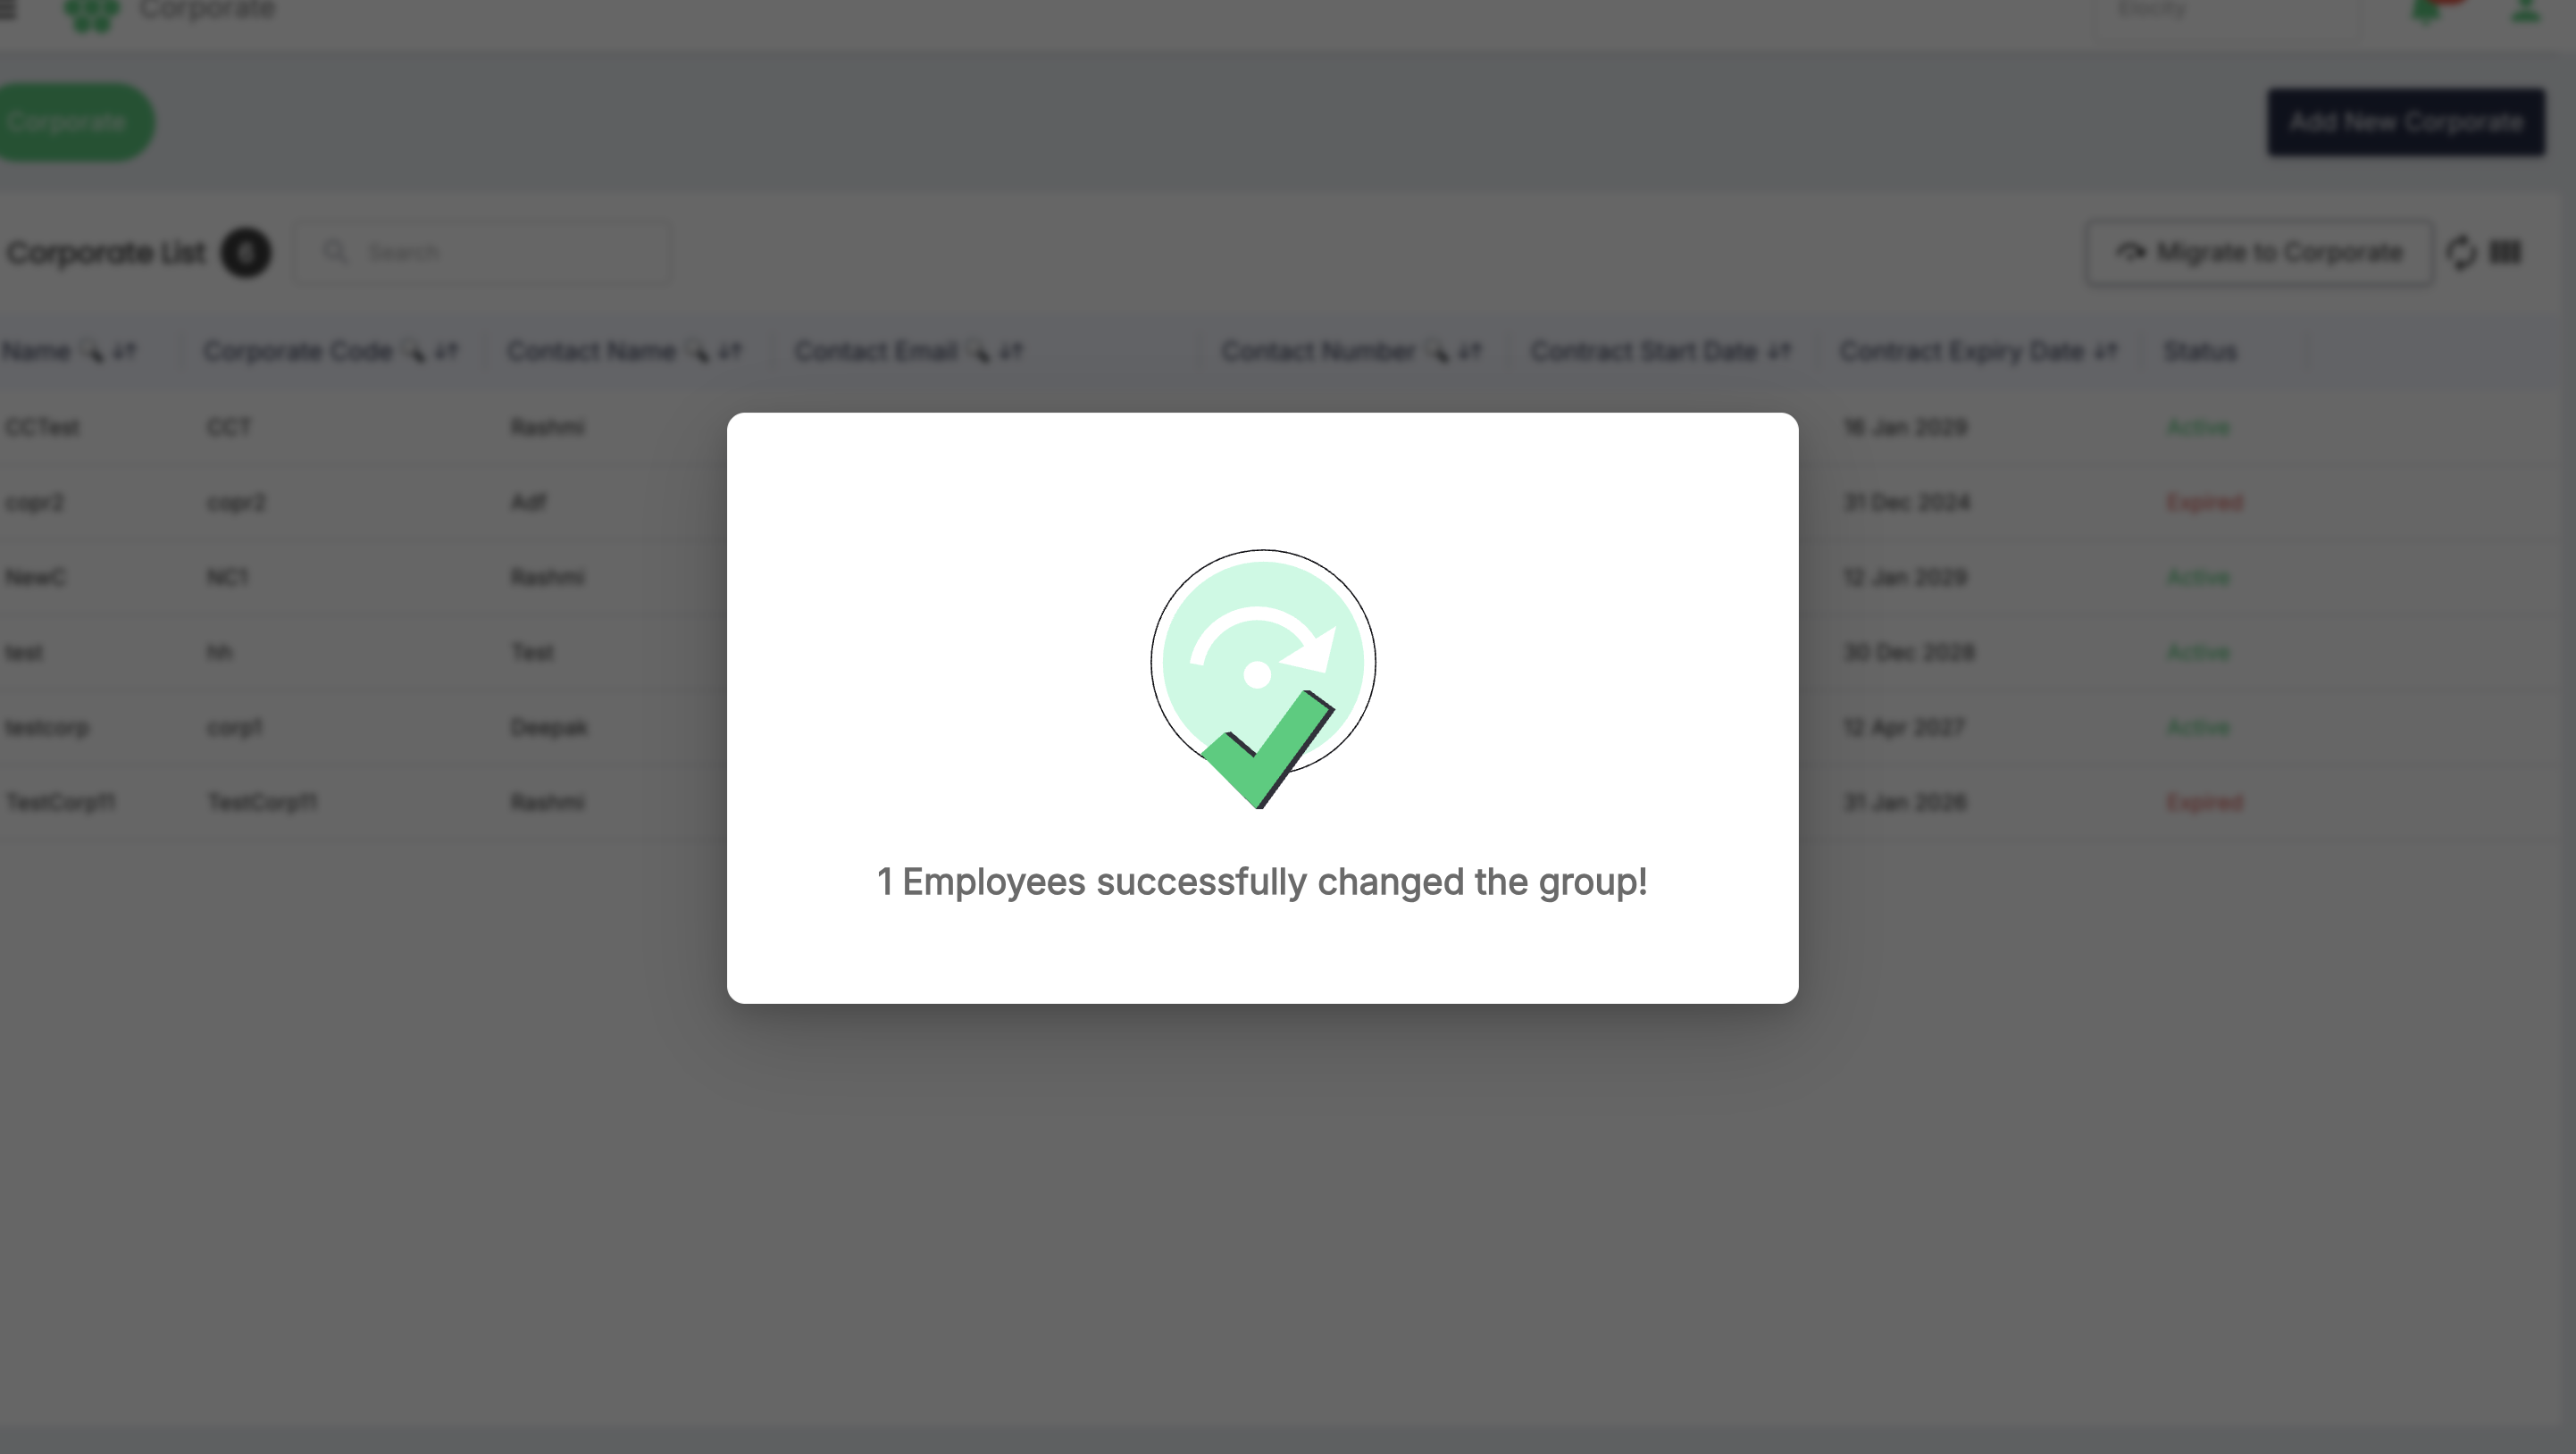
- Verify the customer now appears under the target Corporate and is no longer available for conflicting corporate-group assignment.
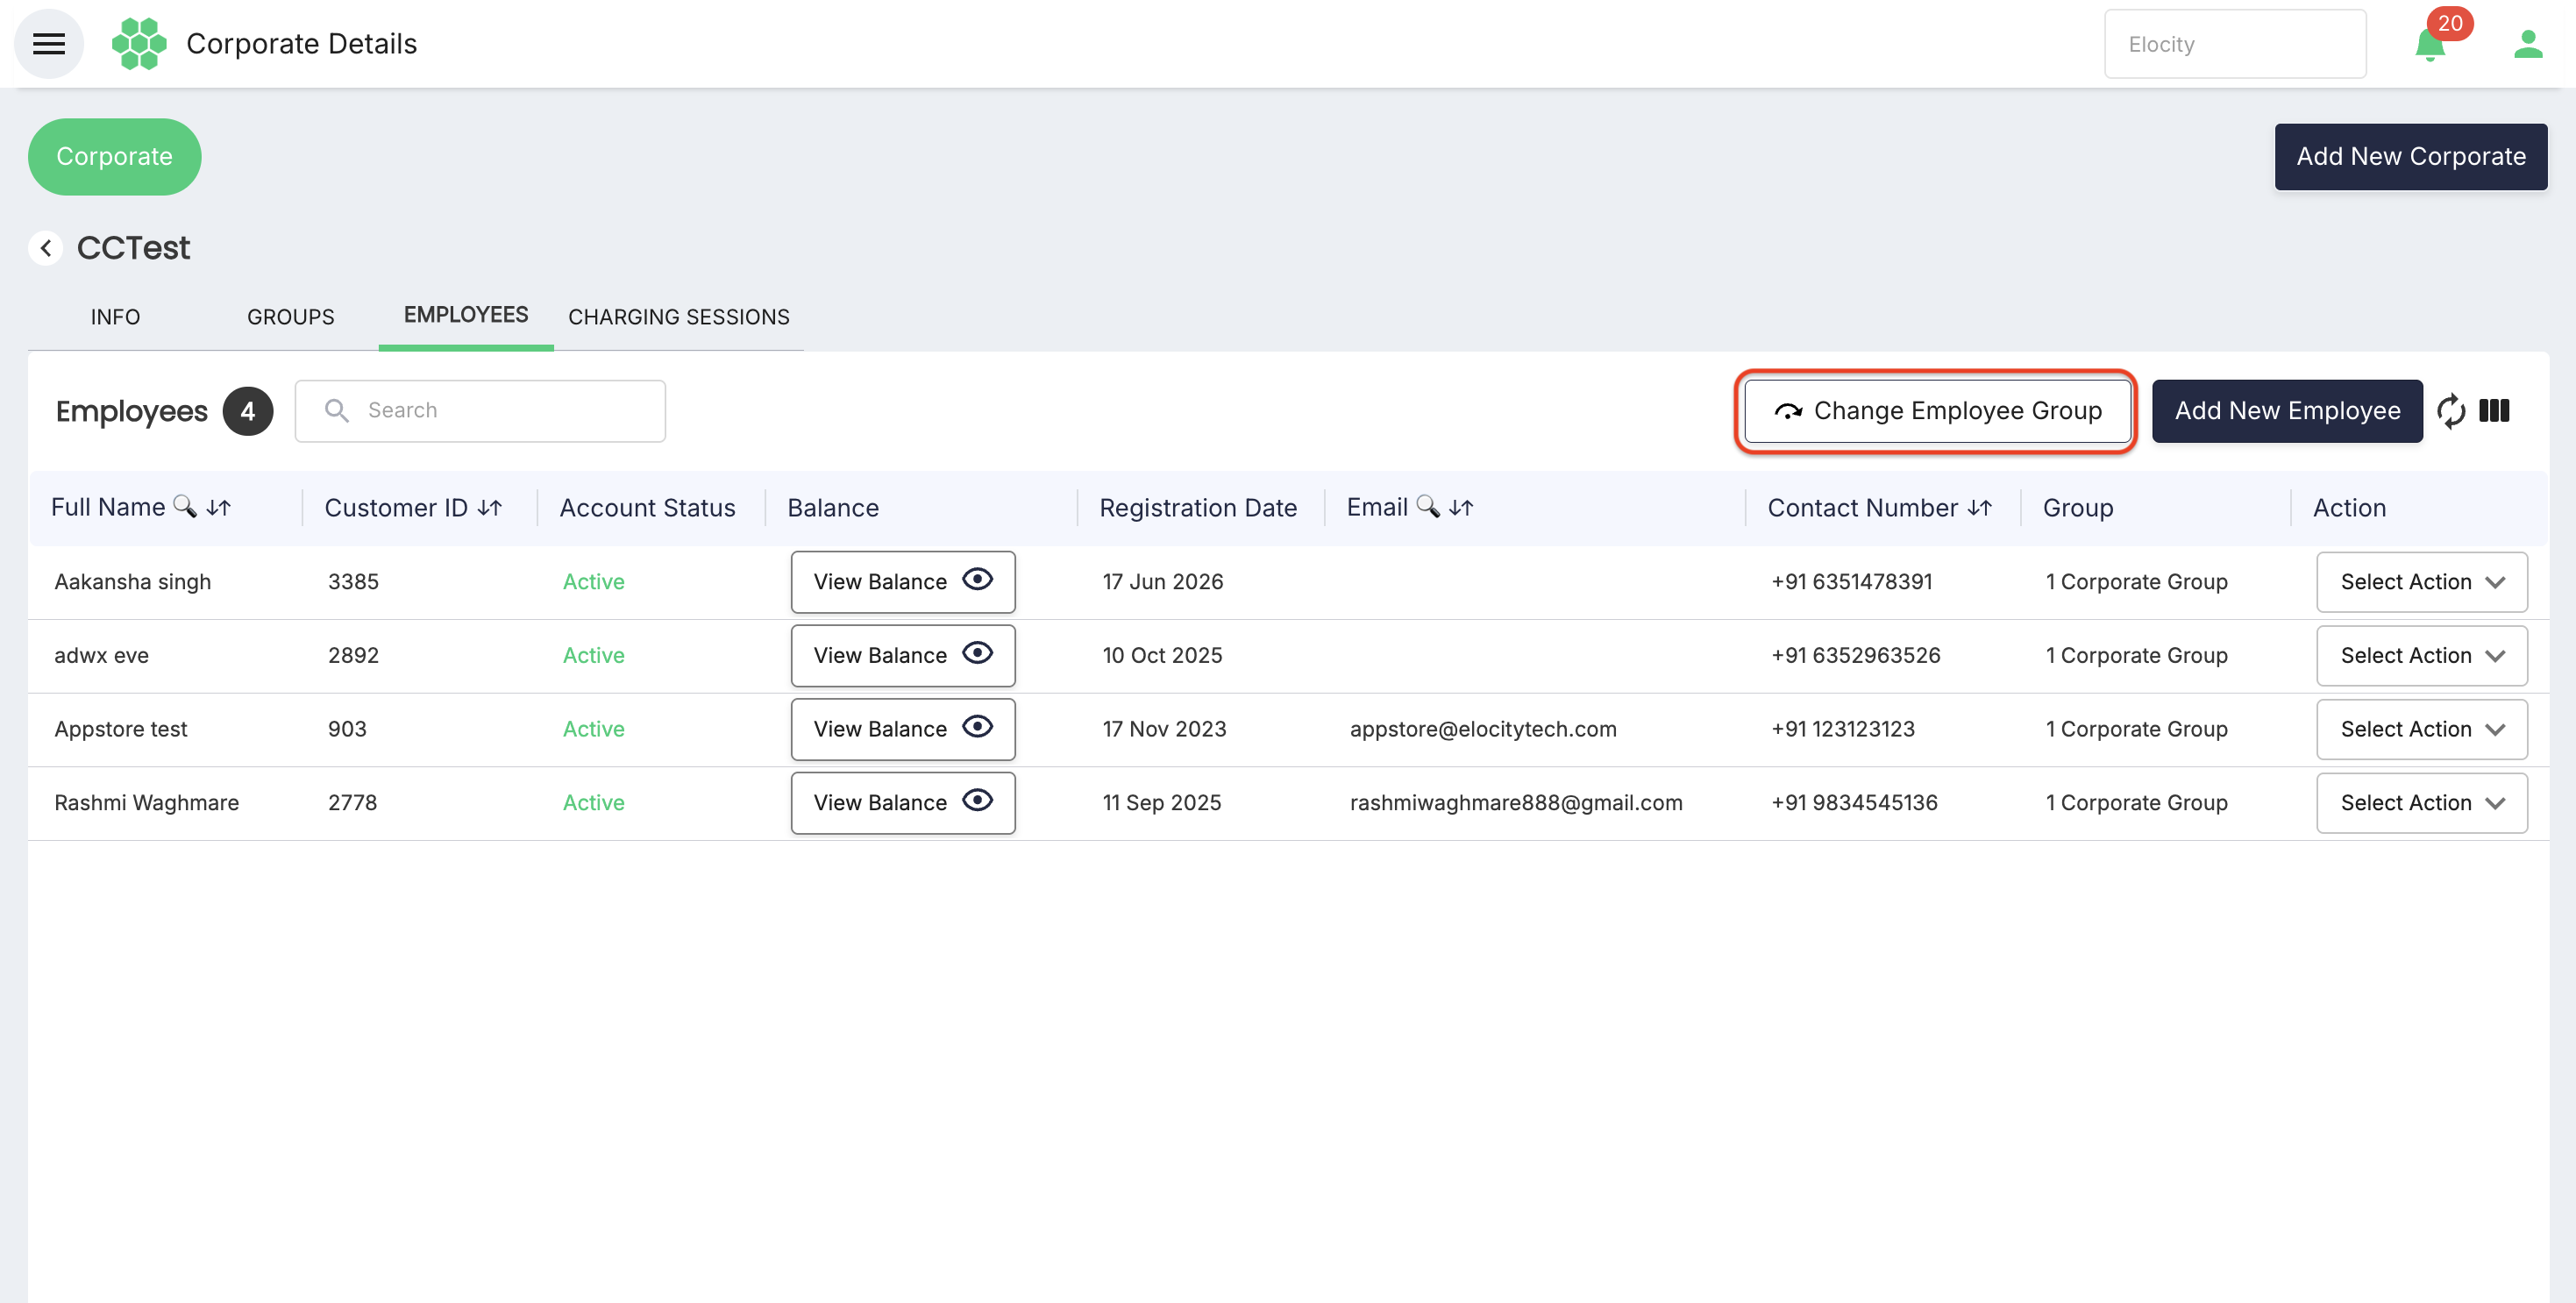
6.6 Change an employee's group
- Open the Corporate and select EMPLOYEES.
- Select Change Employee Group.
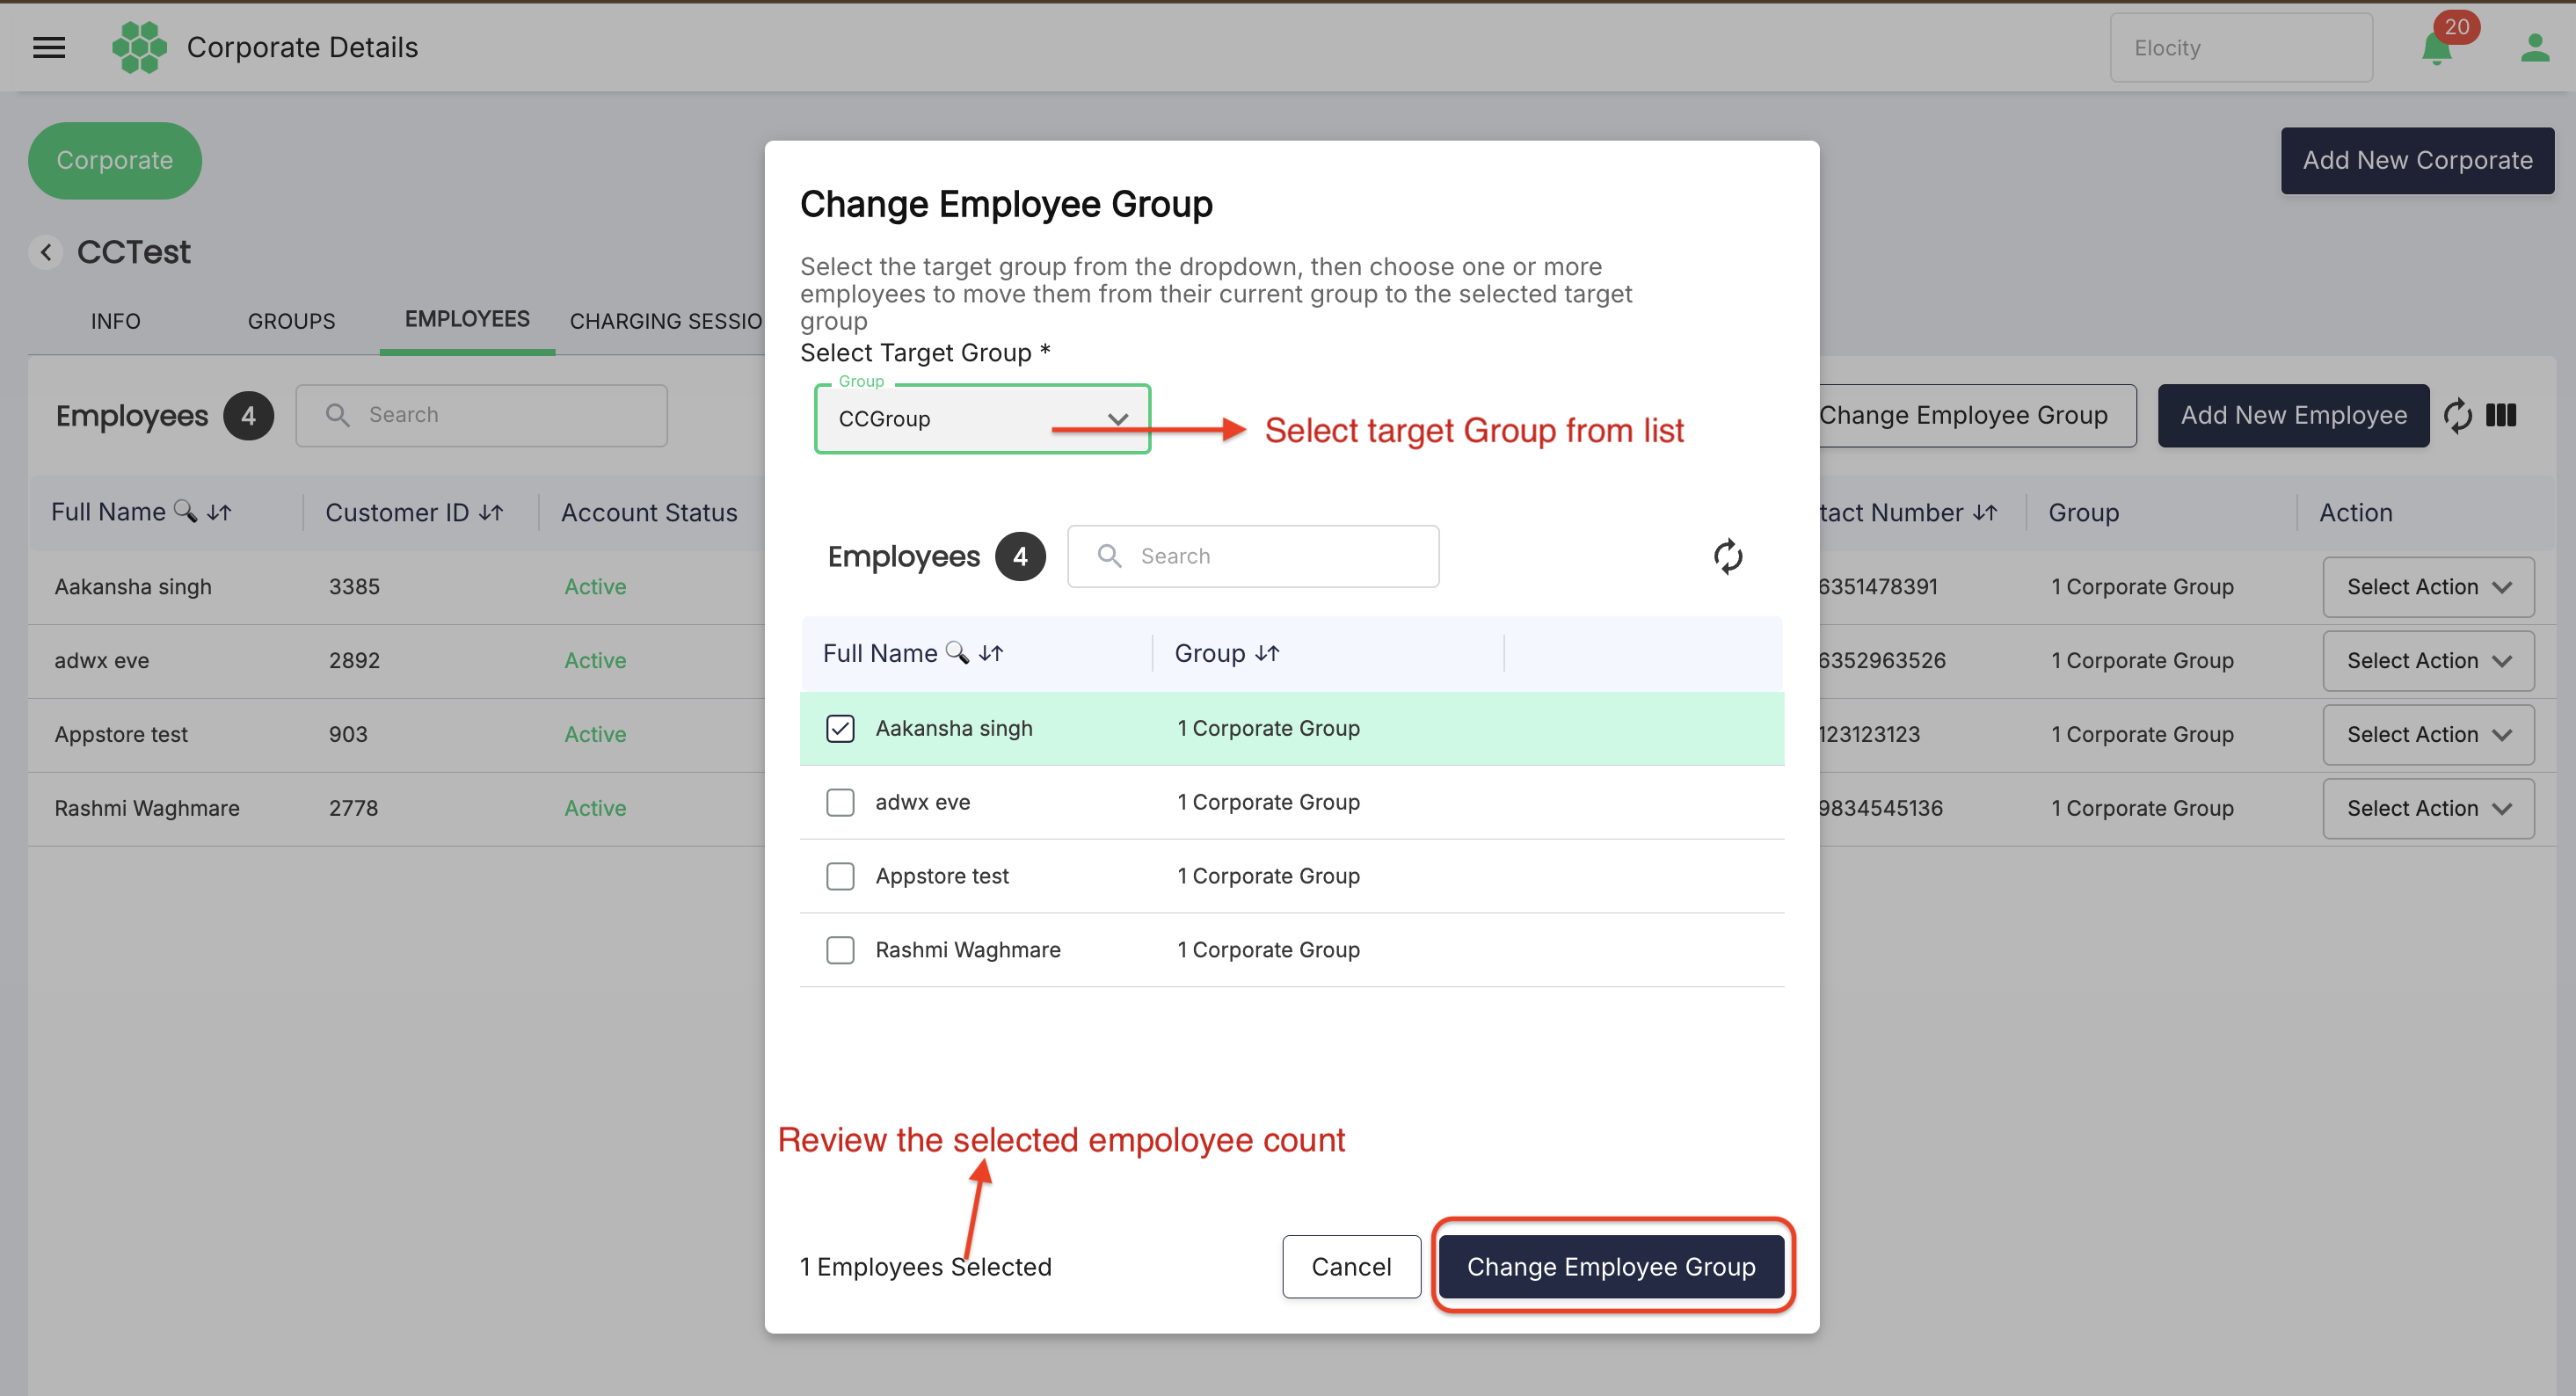
- Select the target group from the dropdown.
- Select one or more employees to move from their current group.
- Review the selected-employee count.
- Select Change Employee Group.
- Verify each employee now shows the target group.
6.7 View and edit an employee
- Open an employee row or choose View from the Action menu.
- The Employee Details screen has INFO, RFID, FEEDBACK, and CHARGING SESSIONS tabs.
- INFO shows registration date, name, email, group, and contact number.
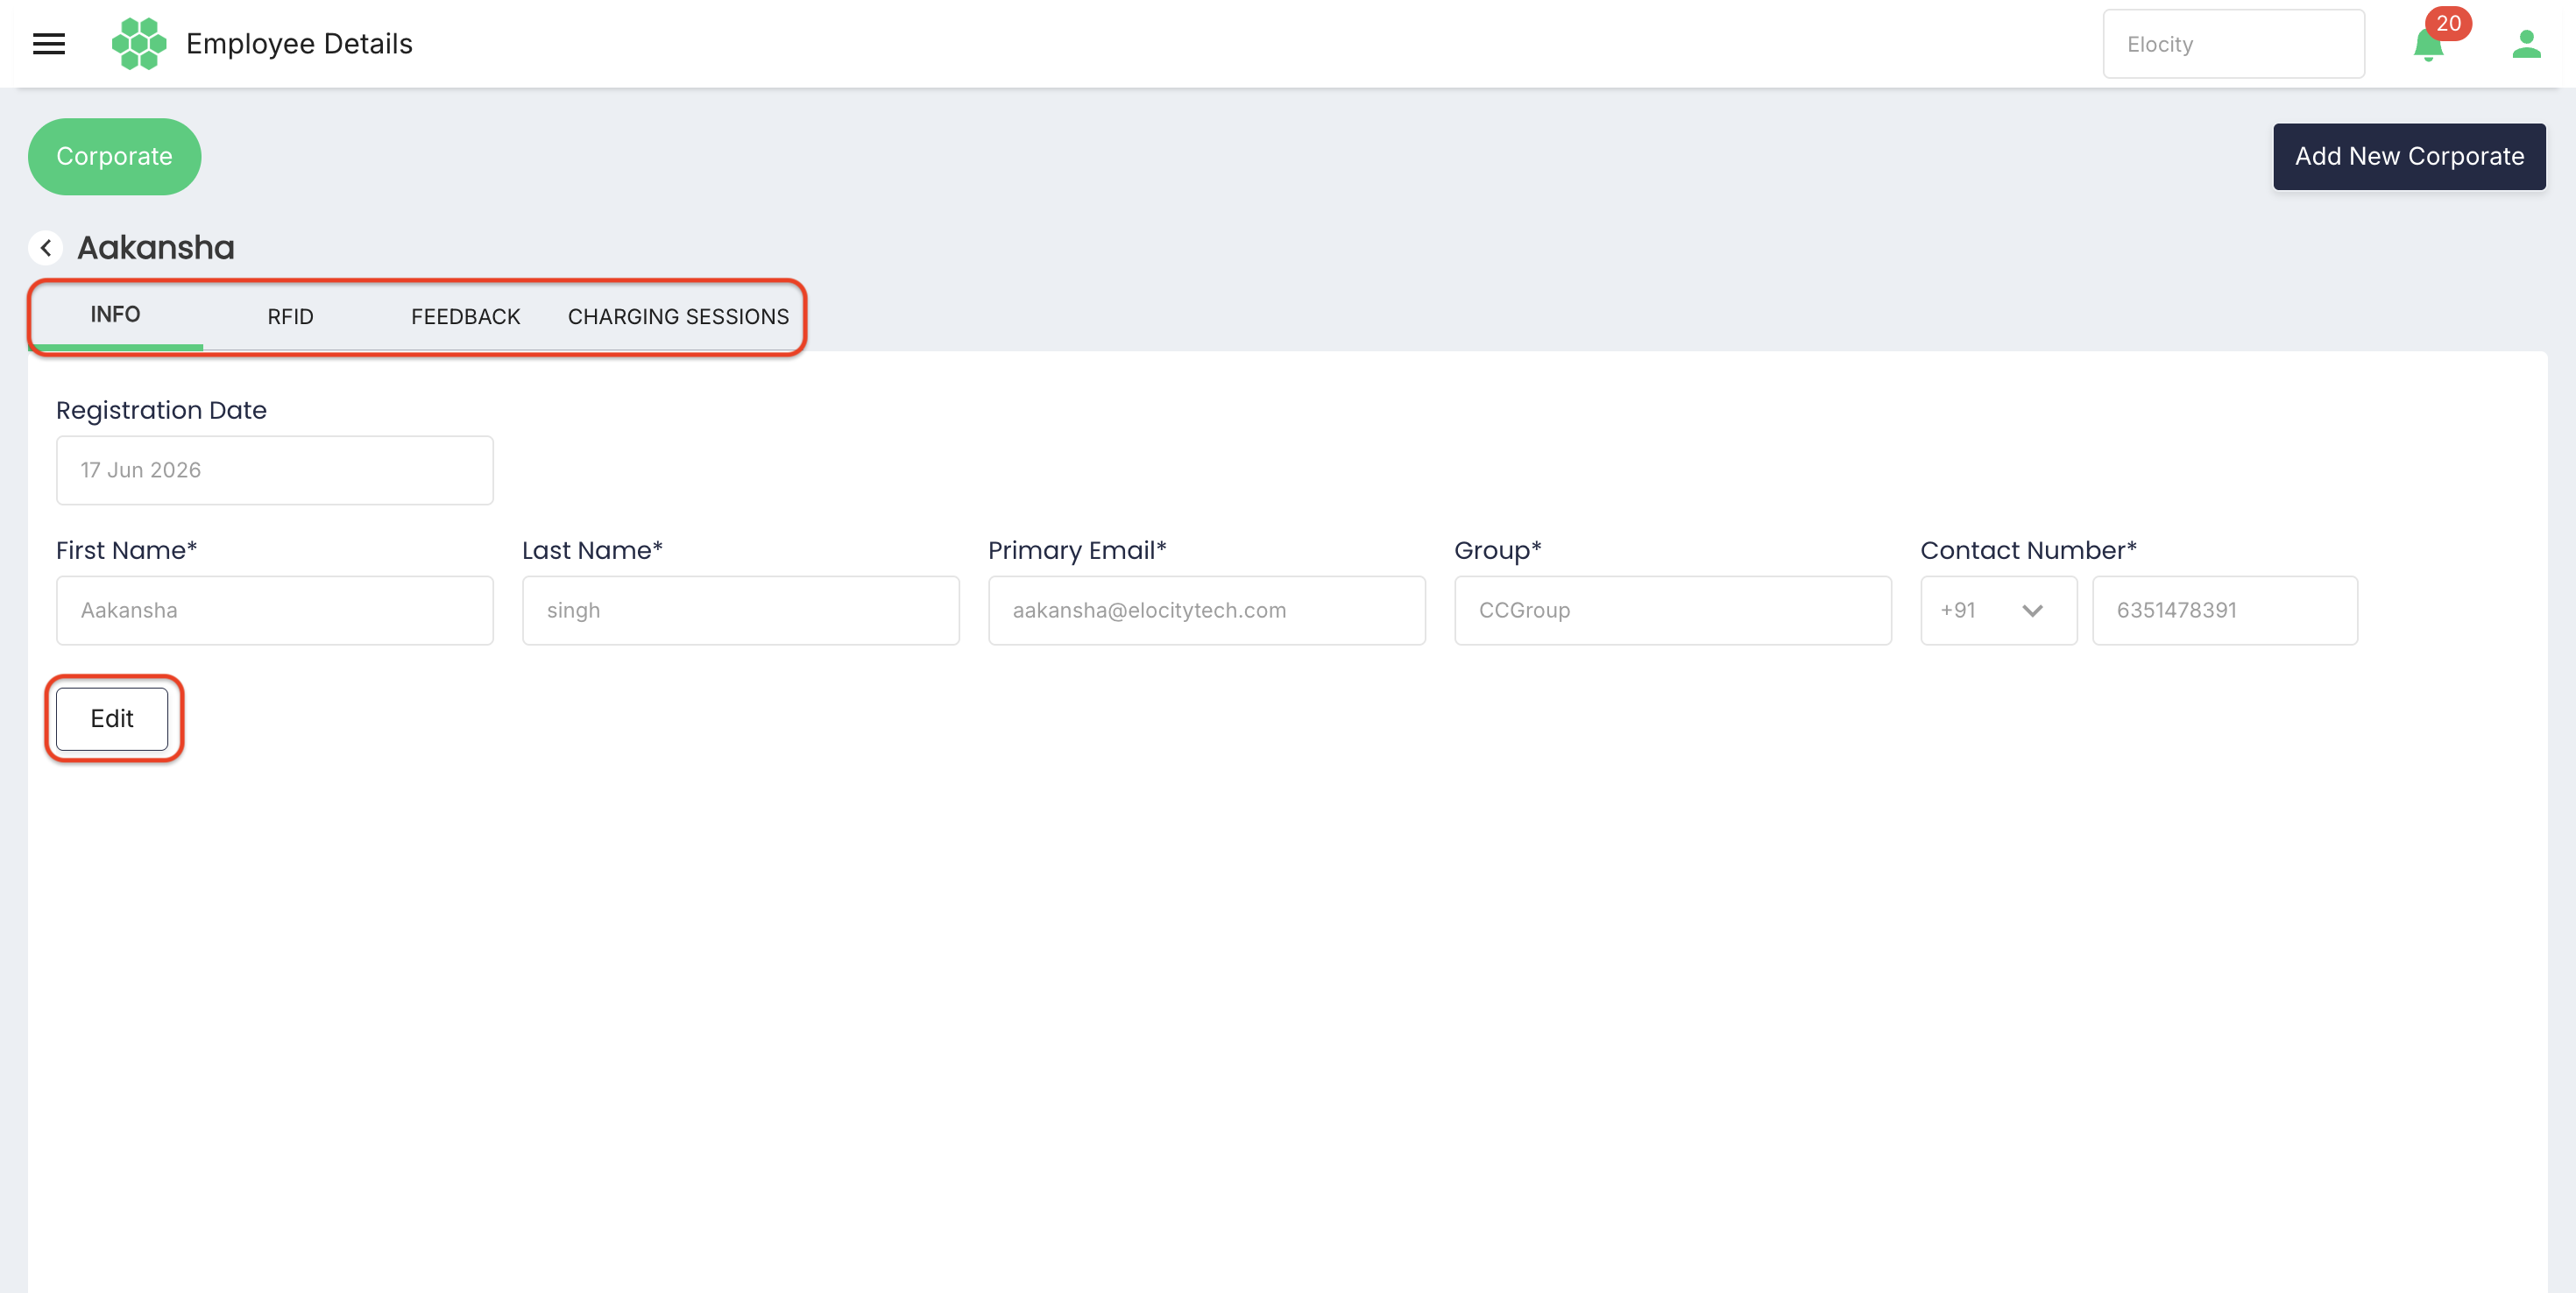
- Select Edit to update permitted values.
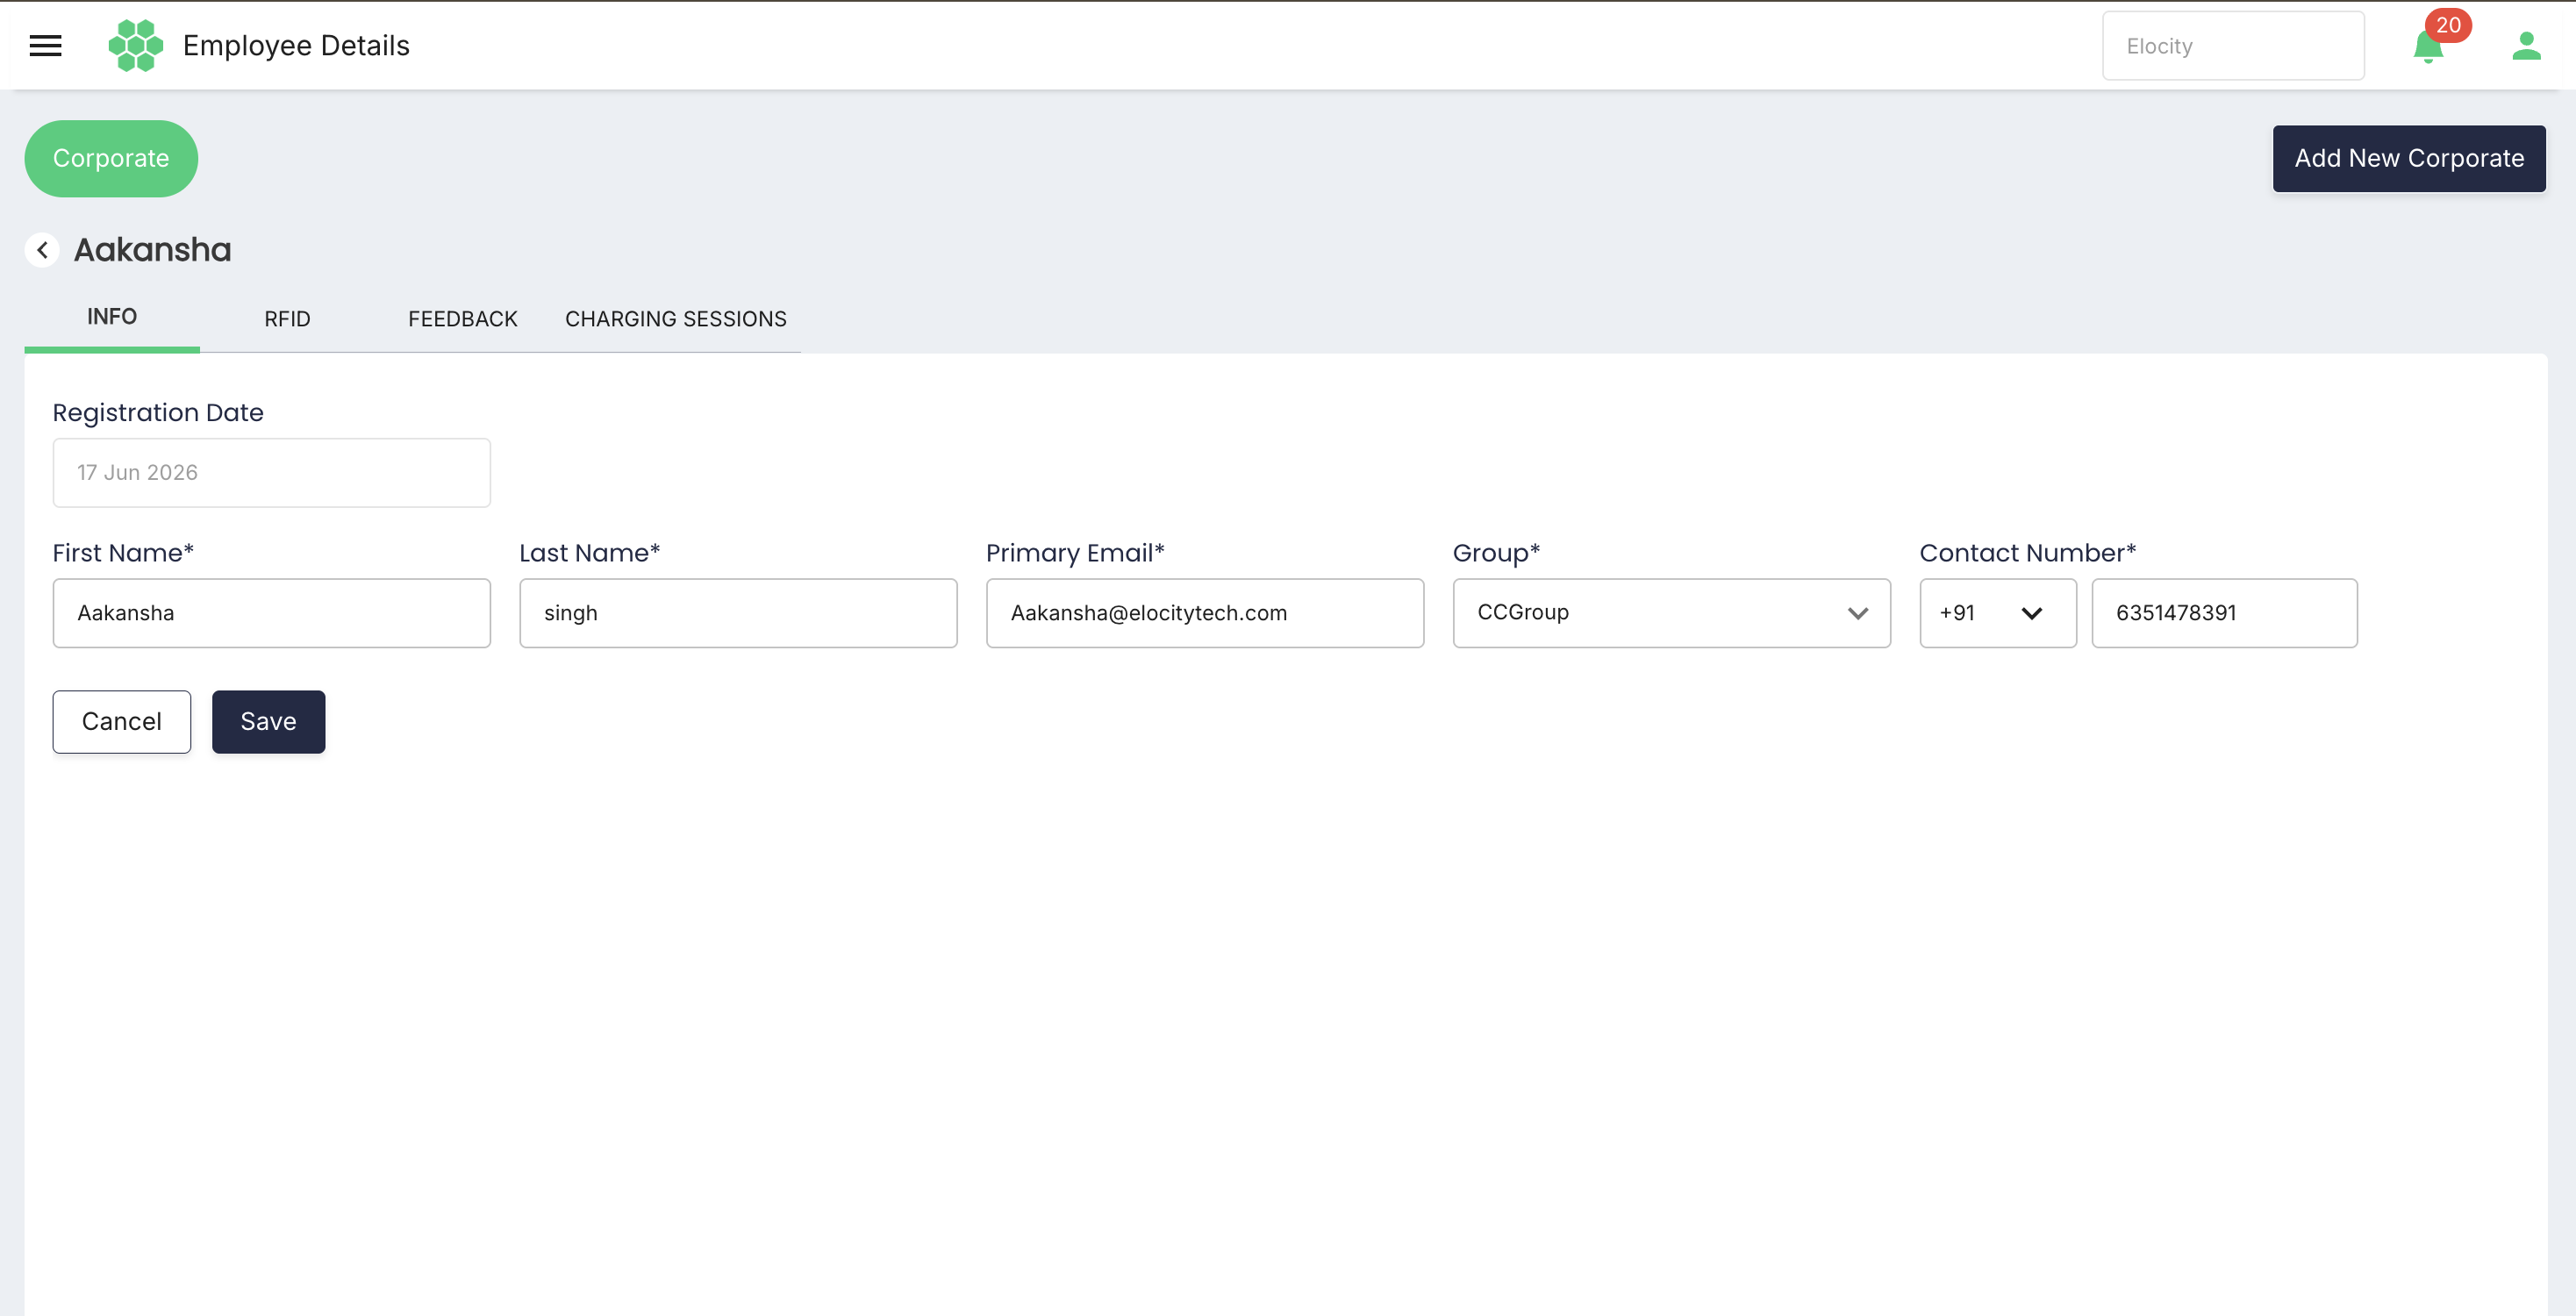
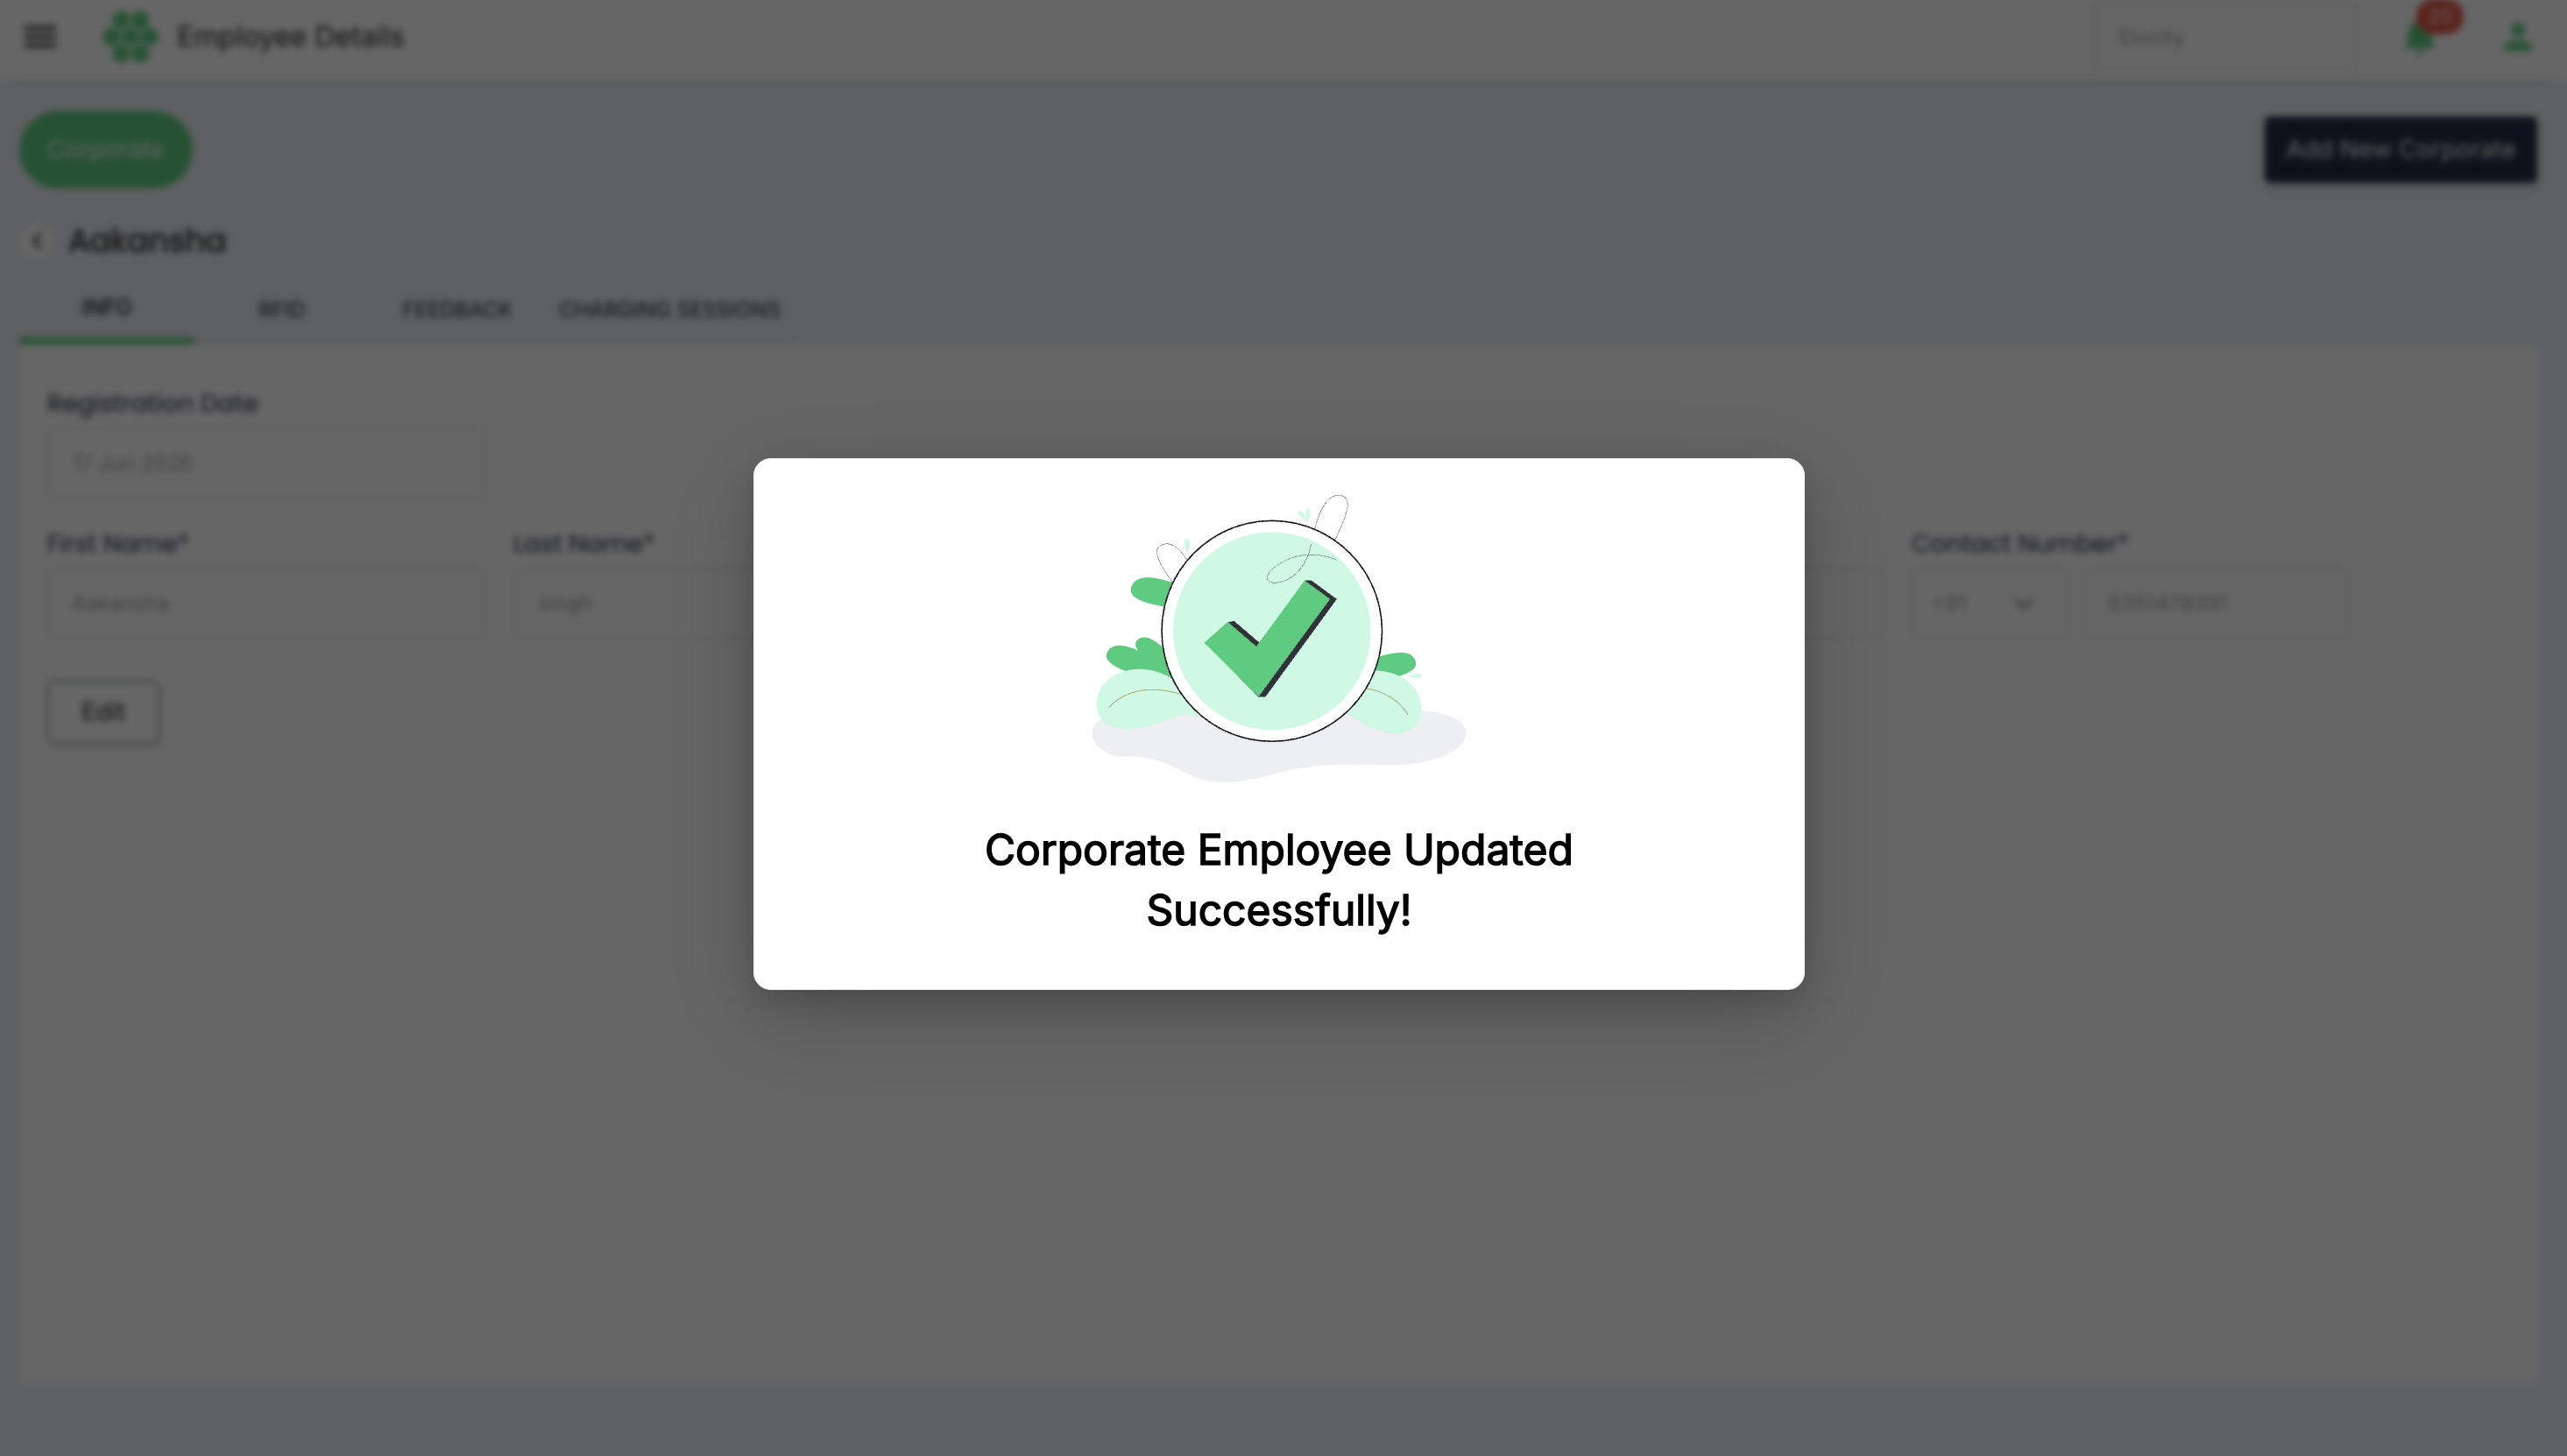
- Update the required fields and click Save and confirm the details.
6.8 Remove an employee safely
- Open EMPLOYEES and locate the employee.
- Open Select Action and choose Remove.
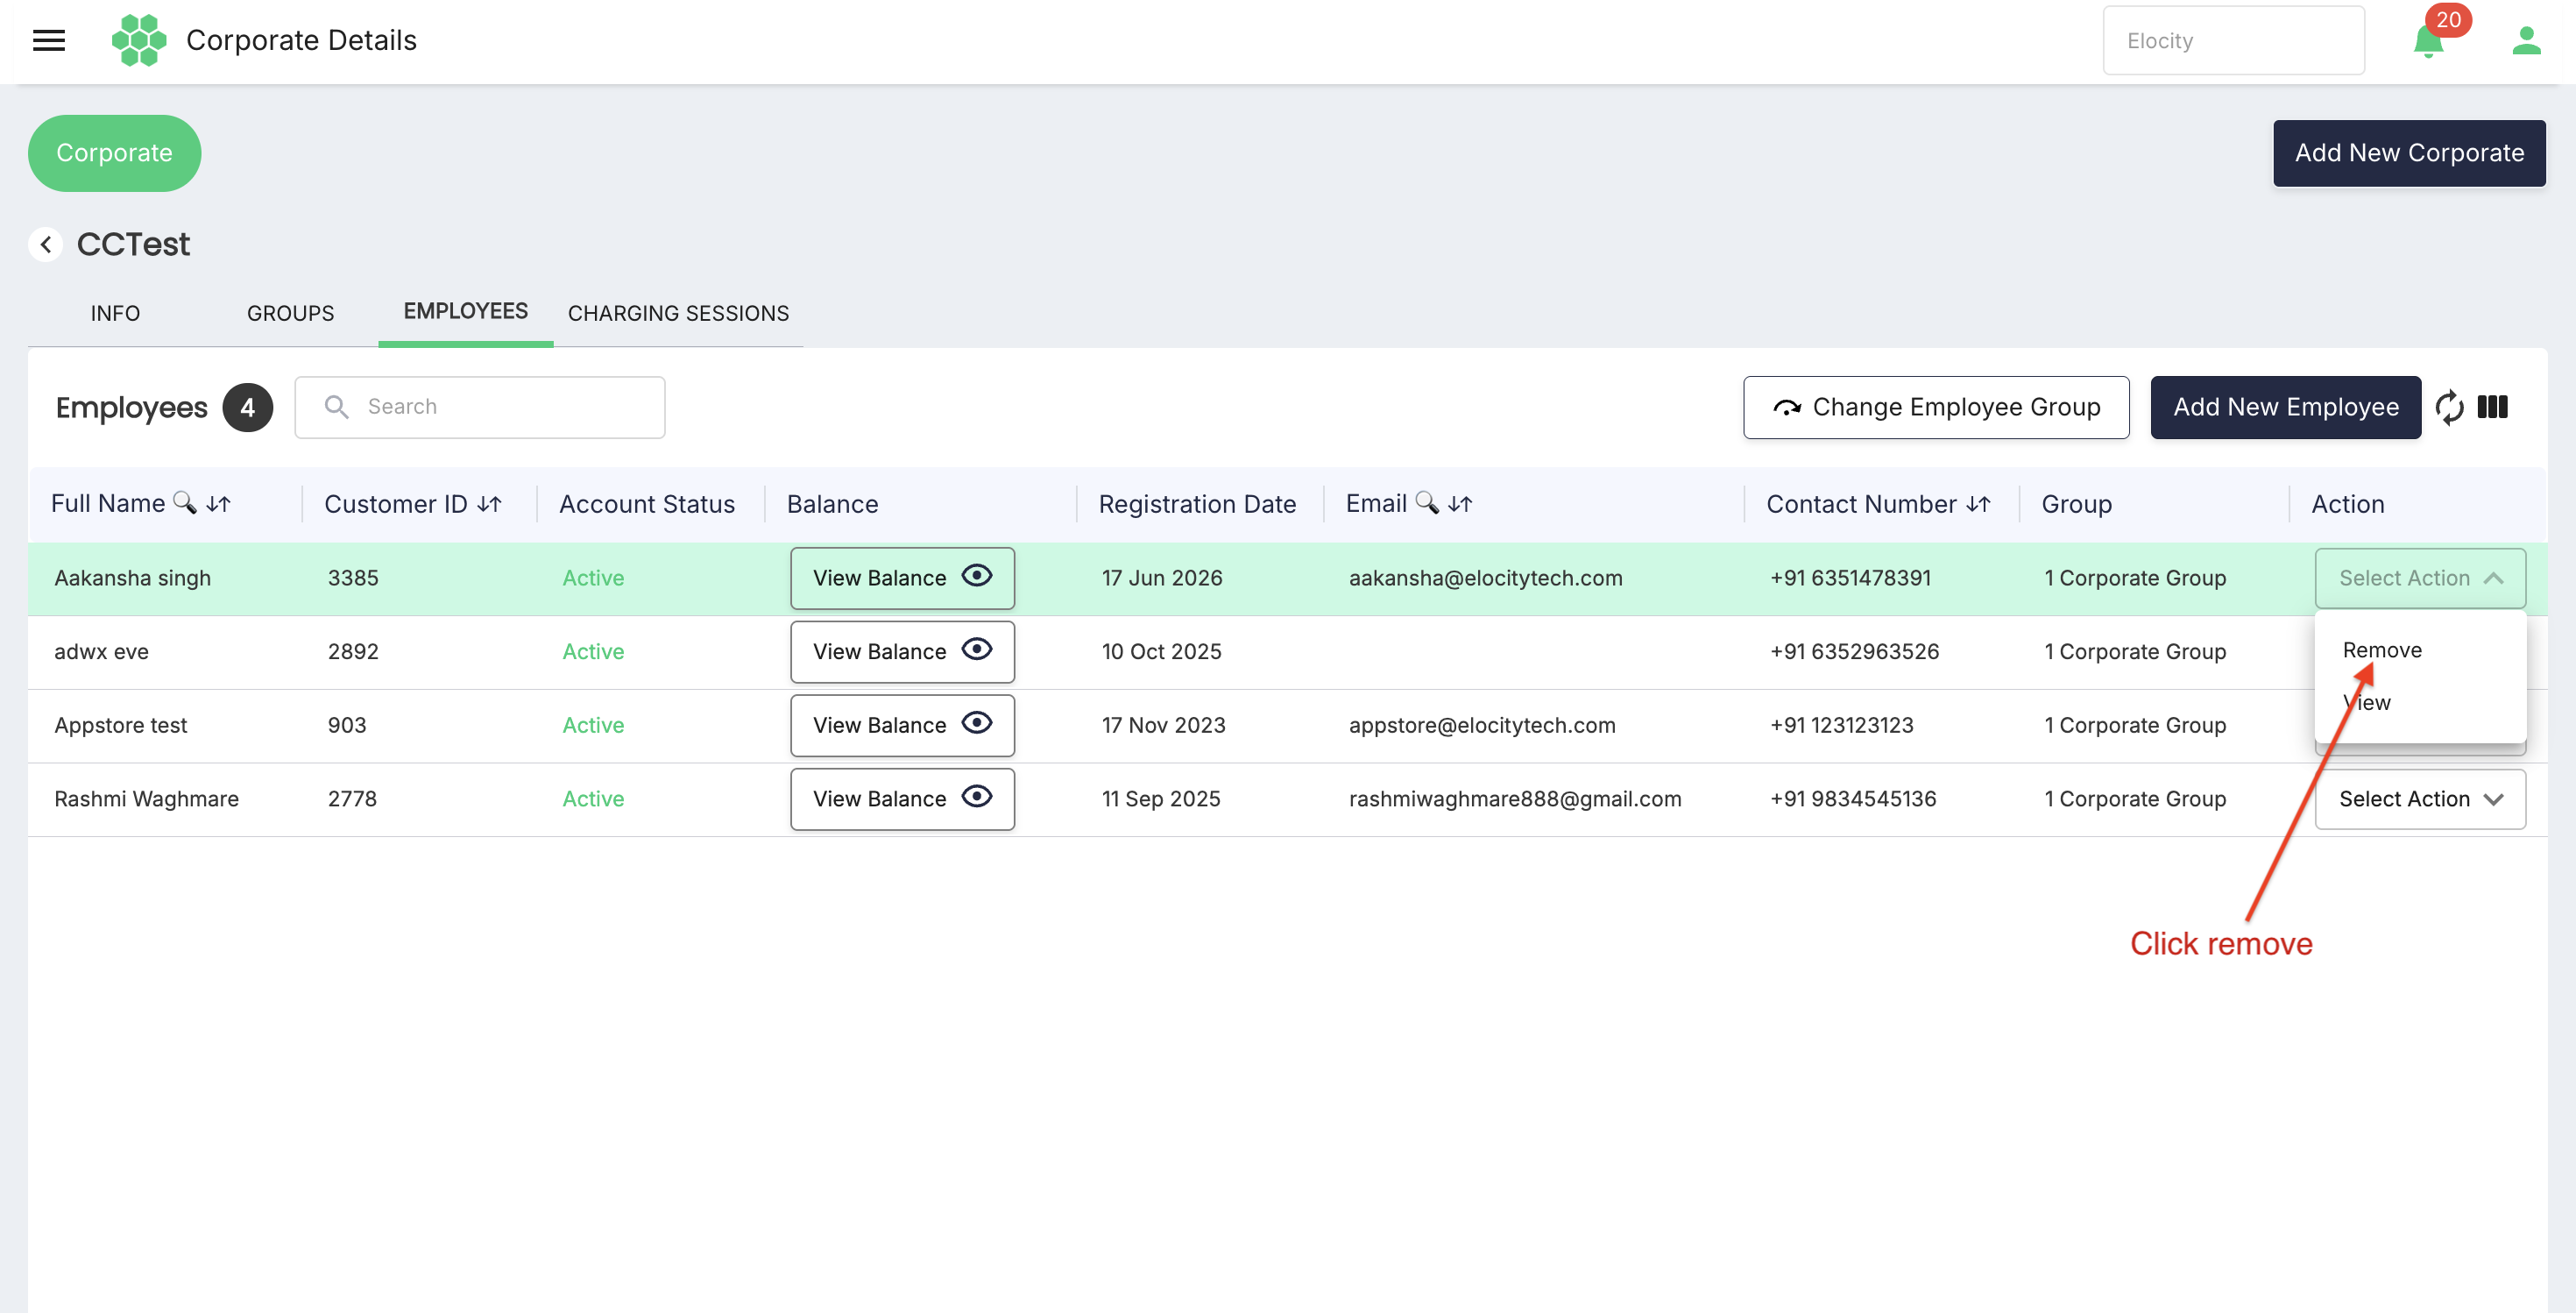
- Read the confirmation. The verified dialog states that the employee will also be deleted from the Corporate group.
- Before confirming, check the employee's CHARGING SESSIONS tab and confirm there is no ongoing or in-progress session.
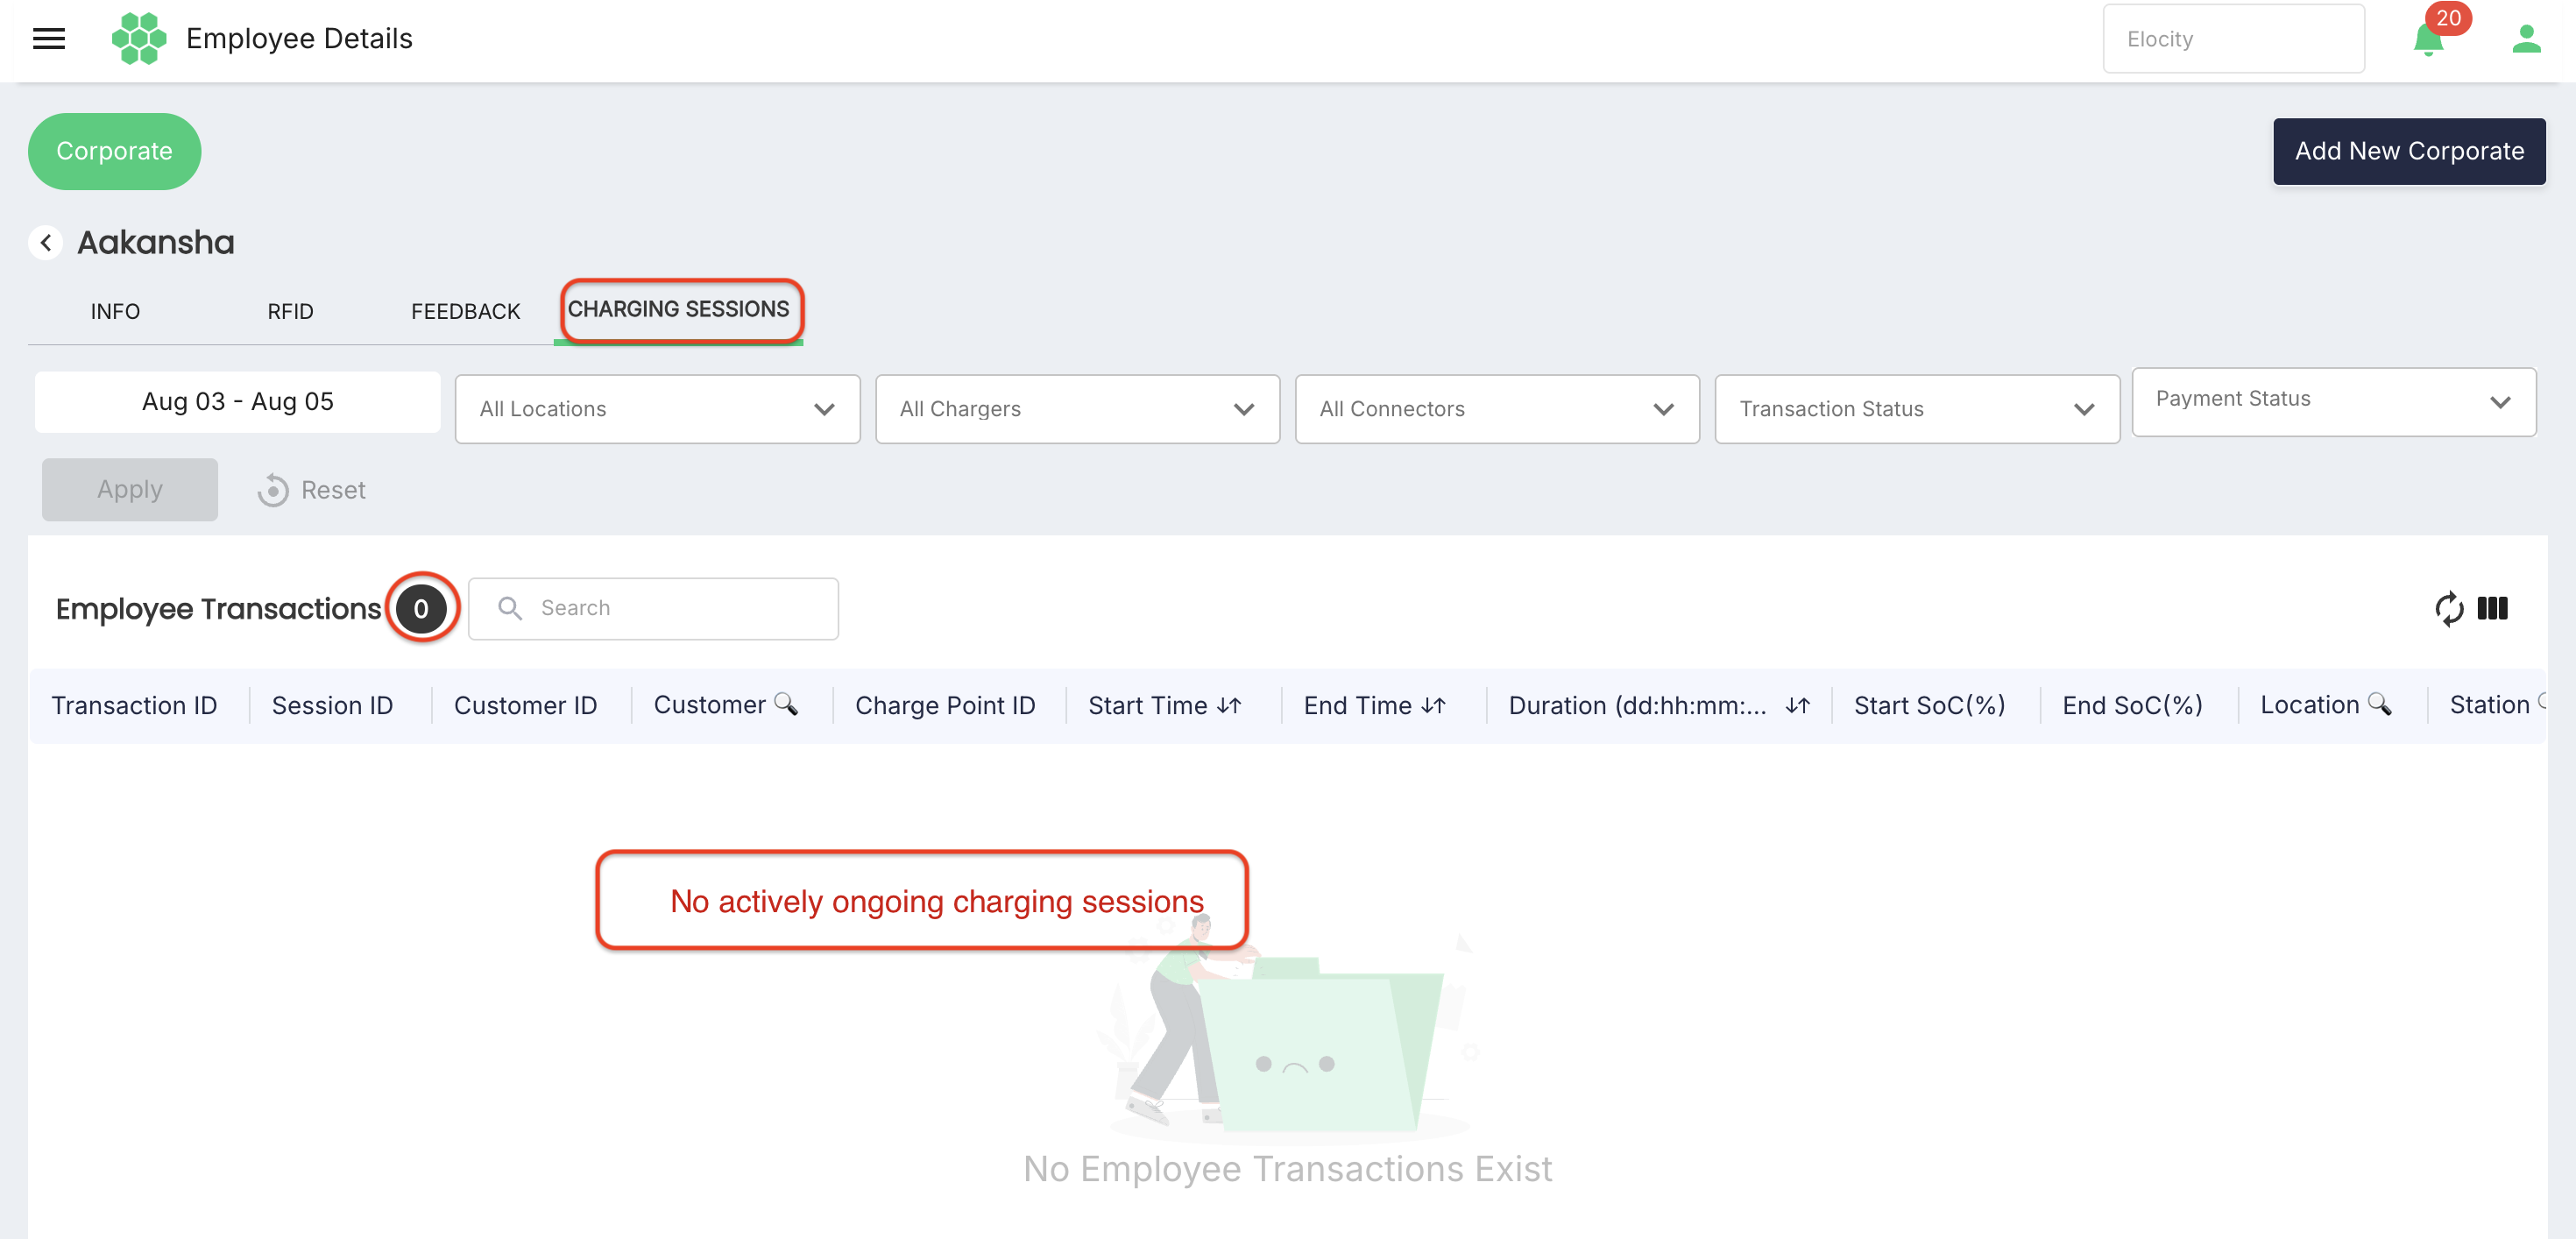
- If an ongoing session exists, do not remove the employee. Allow the session to end and settle, refresh the data, and retry.
- If no ongoing session exists, confirm Remove.
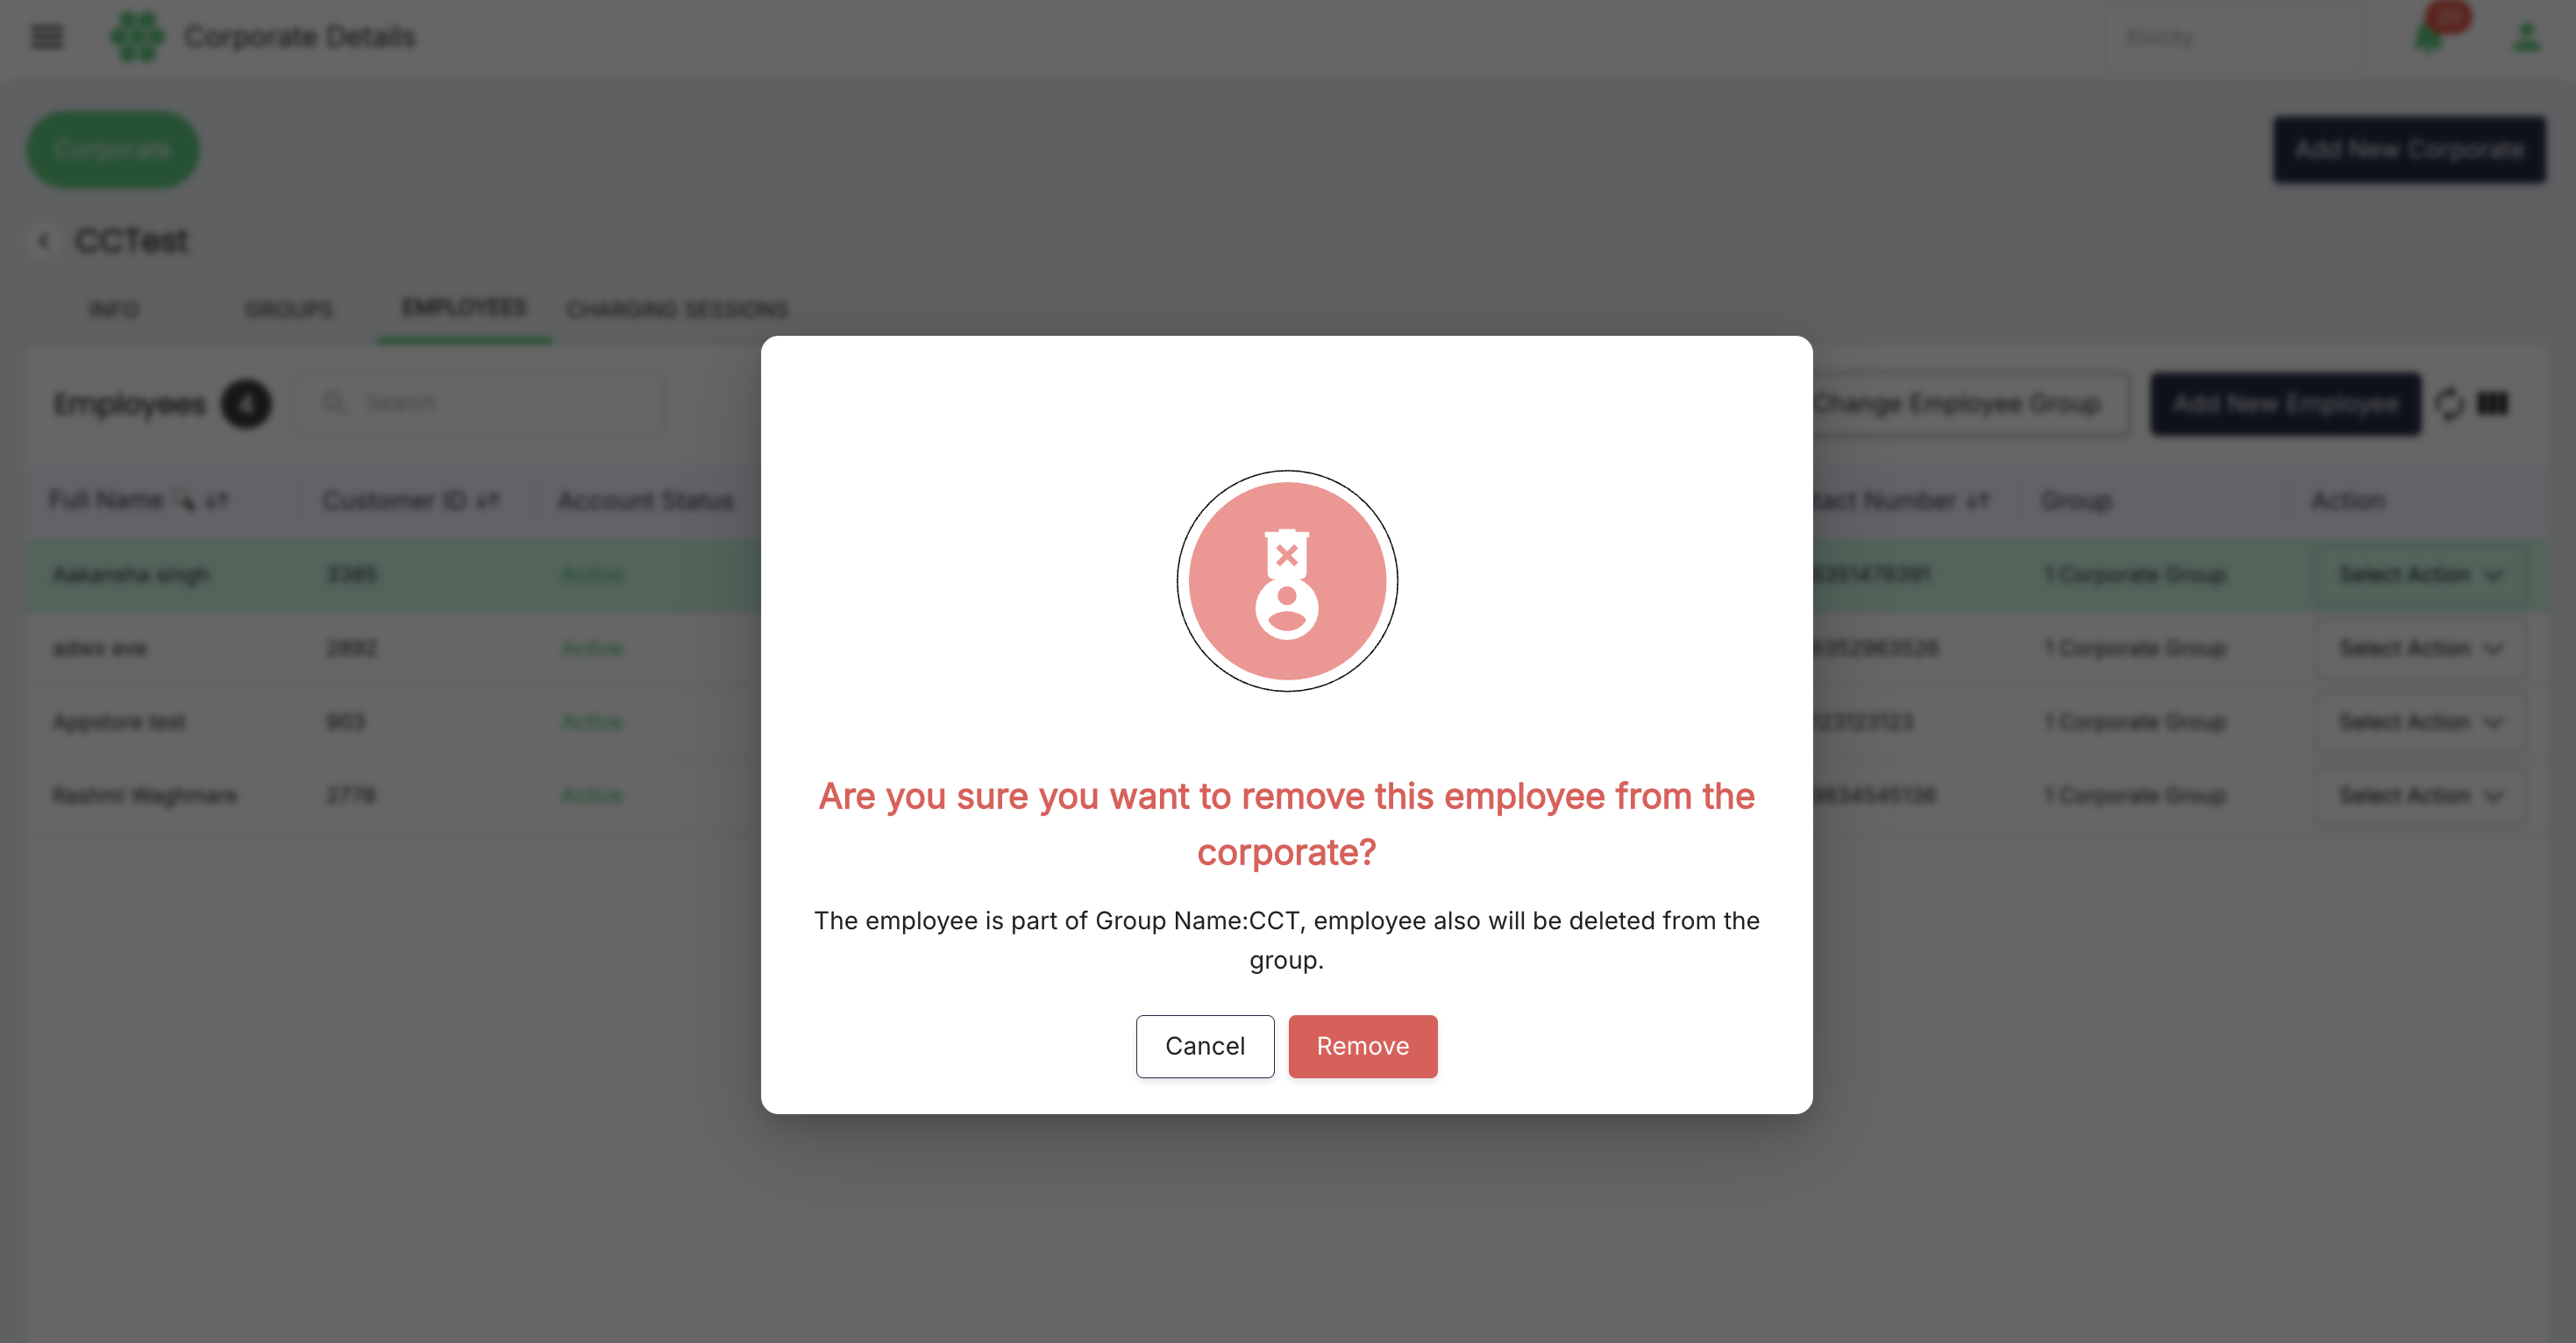
- Verify the employee no longer appears in the Corporate or group roster and can no longer start a Corporate-funded session.
- Retain historical charging and settlement records according to data-retention policy.
CAUTION: Mandatory active-session guard The system must check for an ongoing charging session before removal. A failed check must block removal; an administrator must never force-delete the child relationship while charging is active.
7. Manage Employee RFID
7.1 RFID list
- Open an employee and select RFID.
- The verified list shows RFID, RFID Status, Expiry Date, and an Action menu.
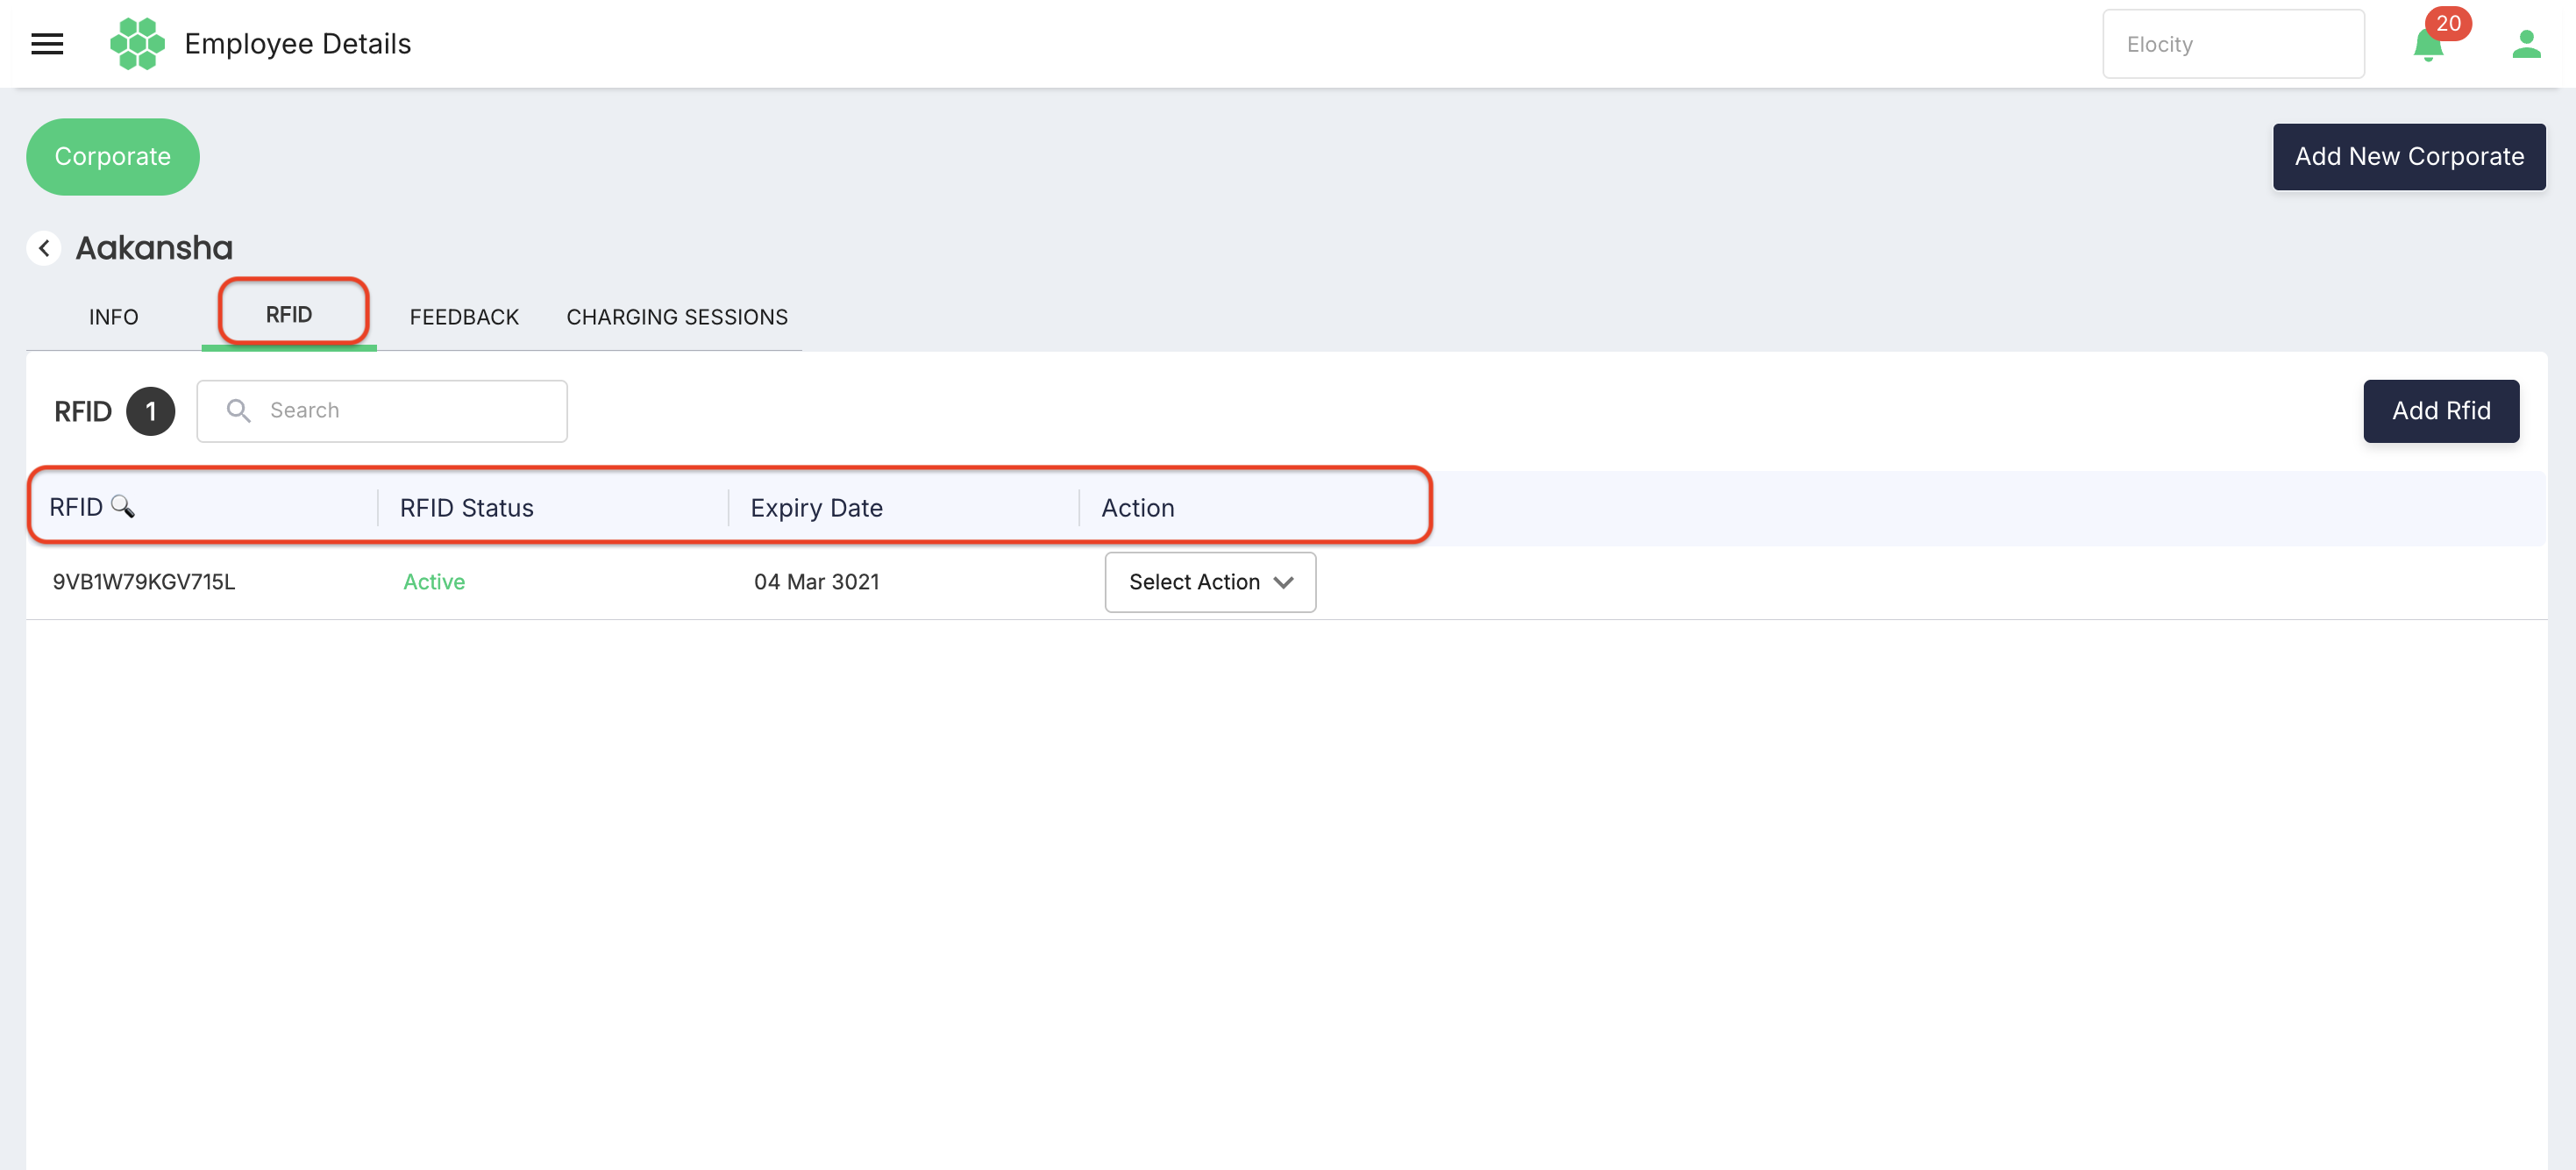
- More than one RFID can be associated with an employee when permitted by policy.
7.2 Assign an RFID identifier
- From Employee Details > RFID, select Add Rfid.
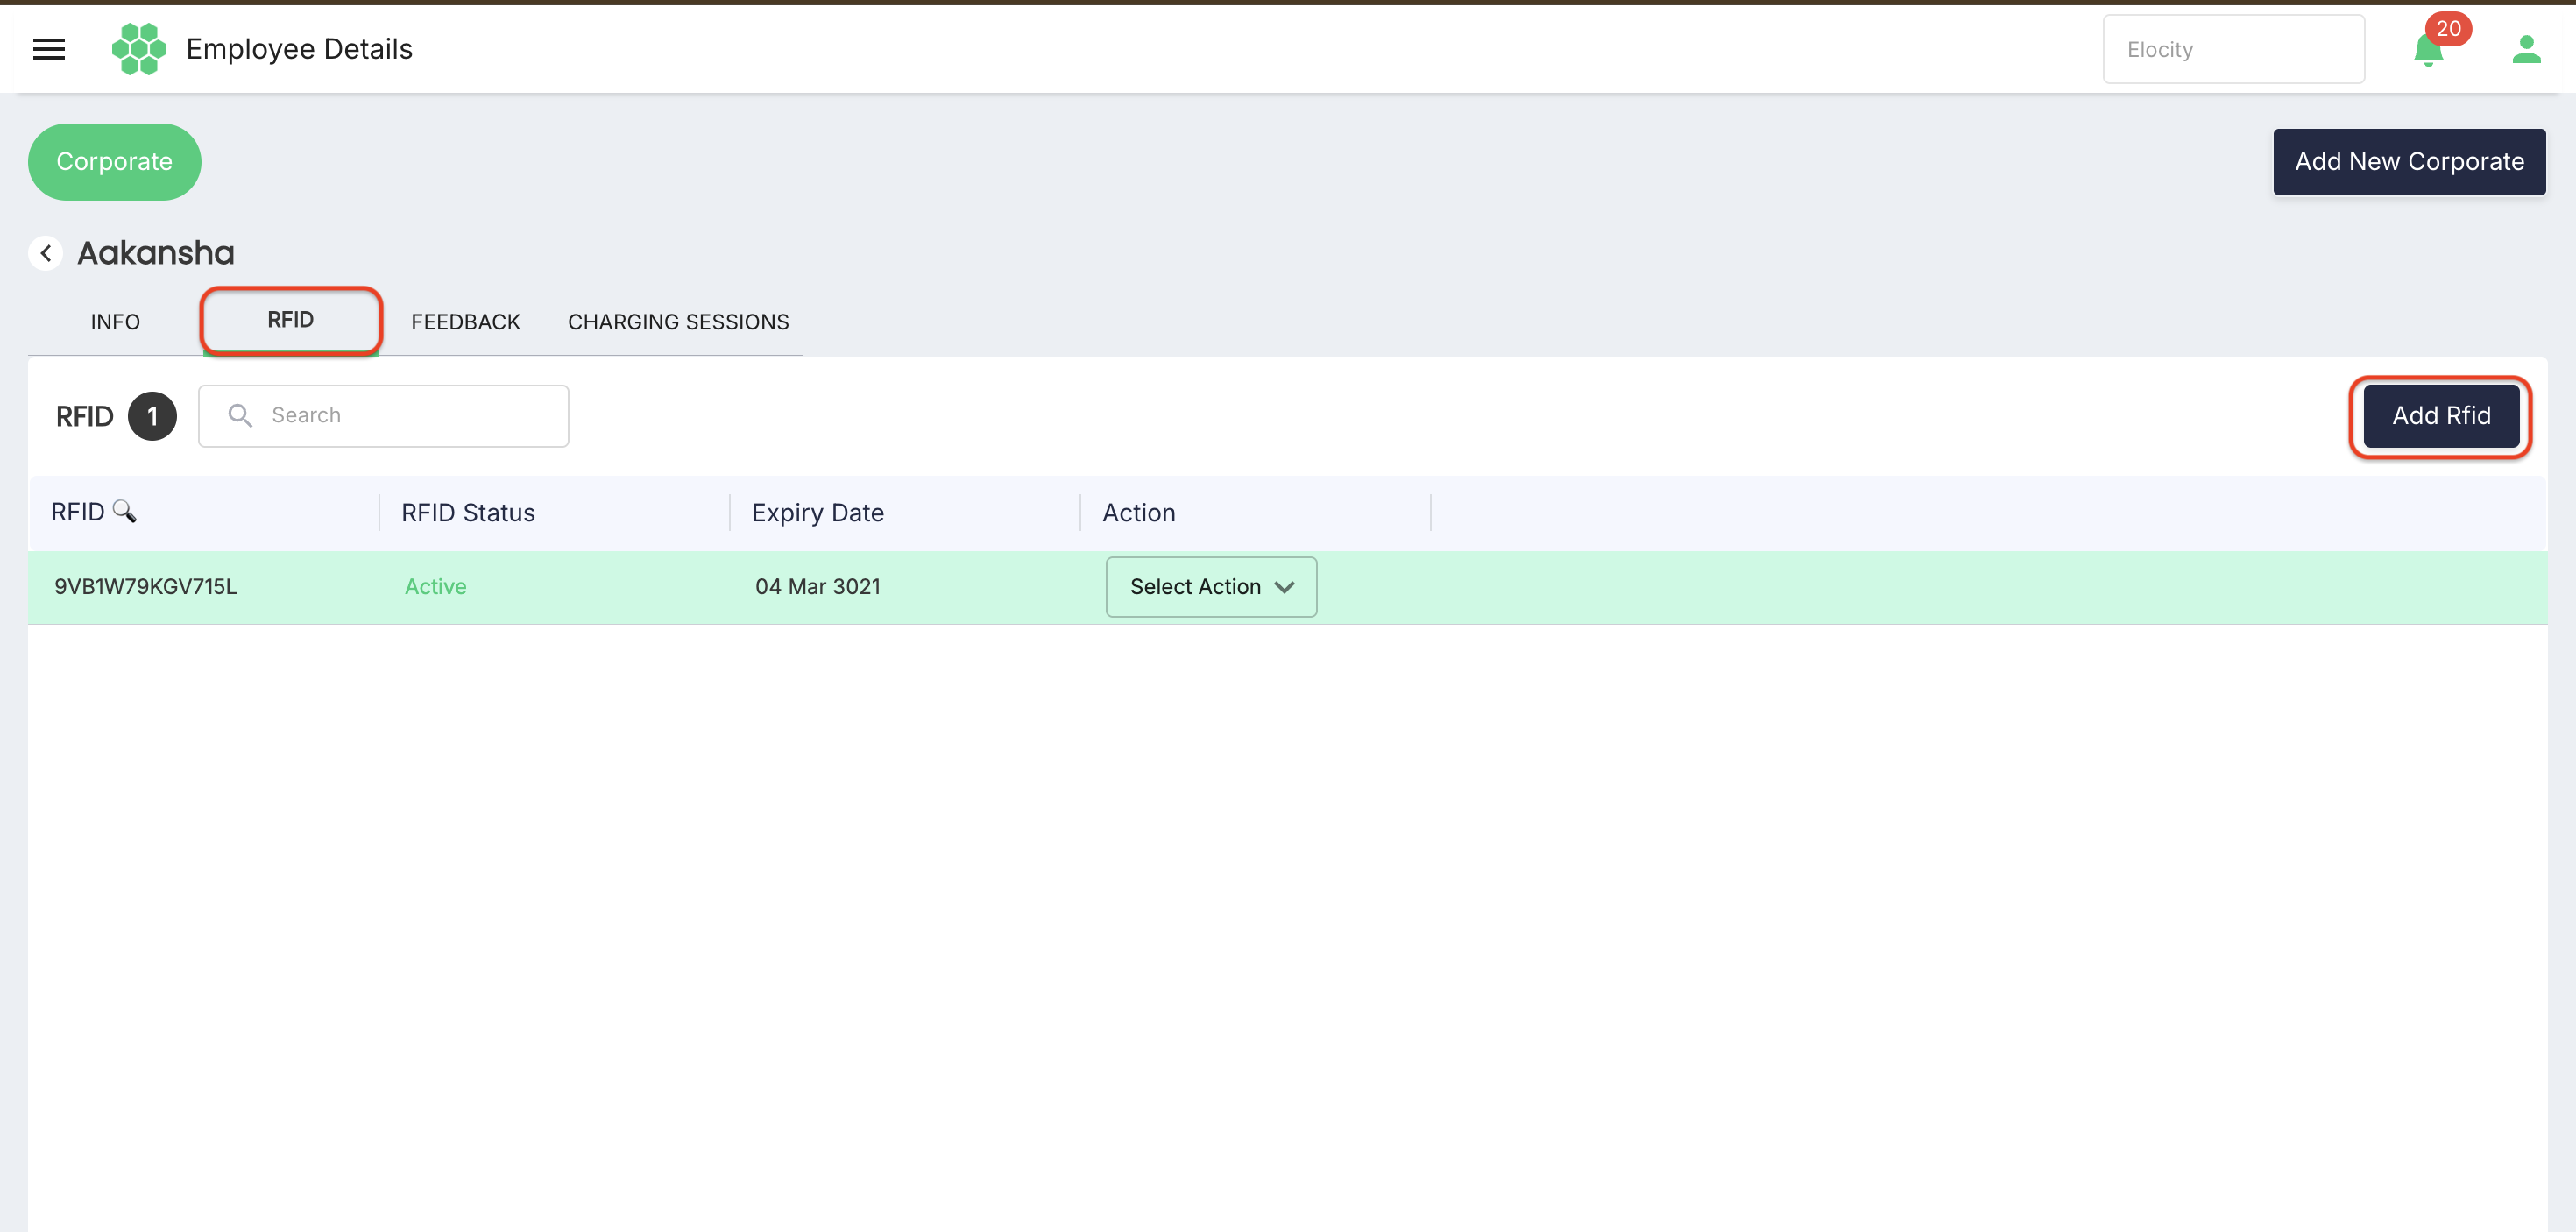
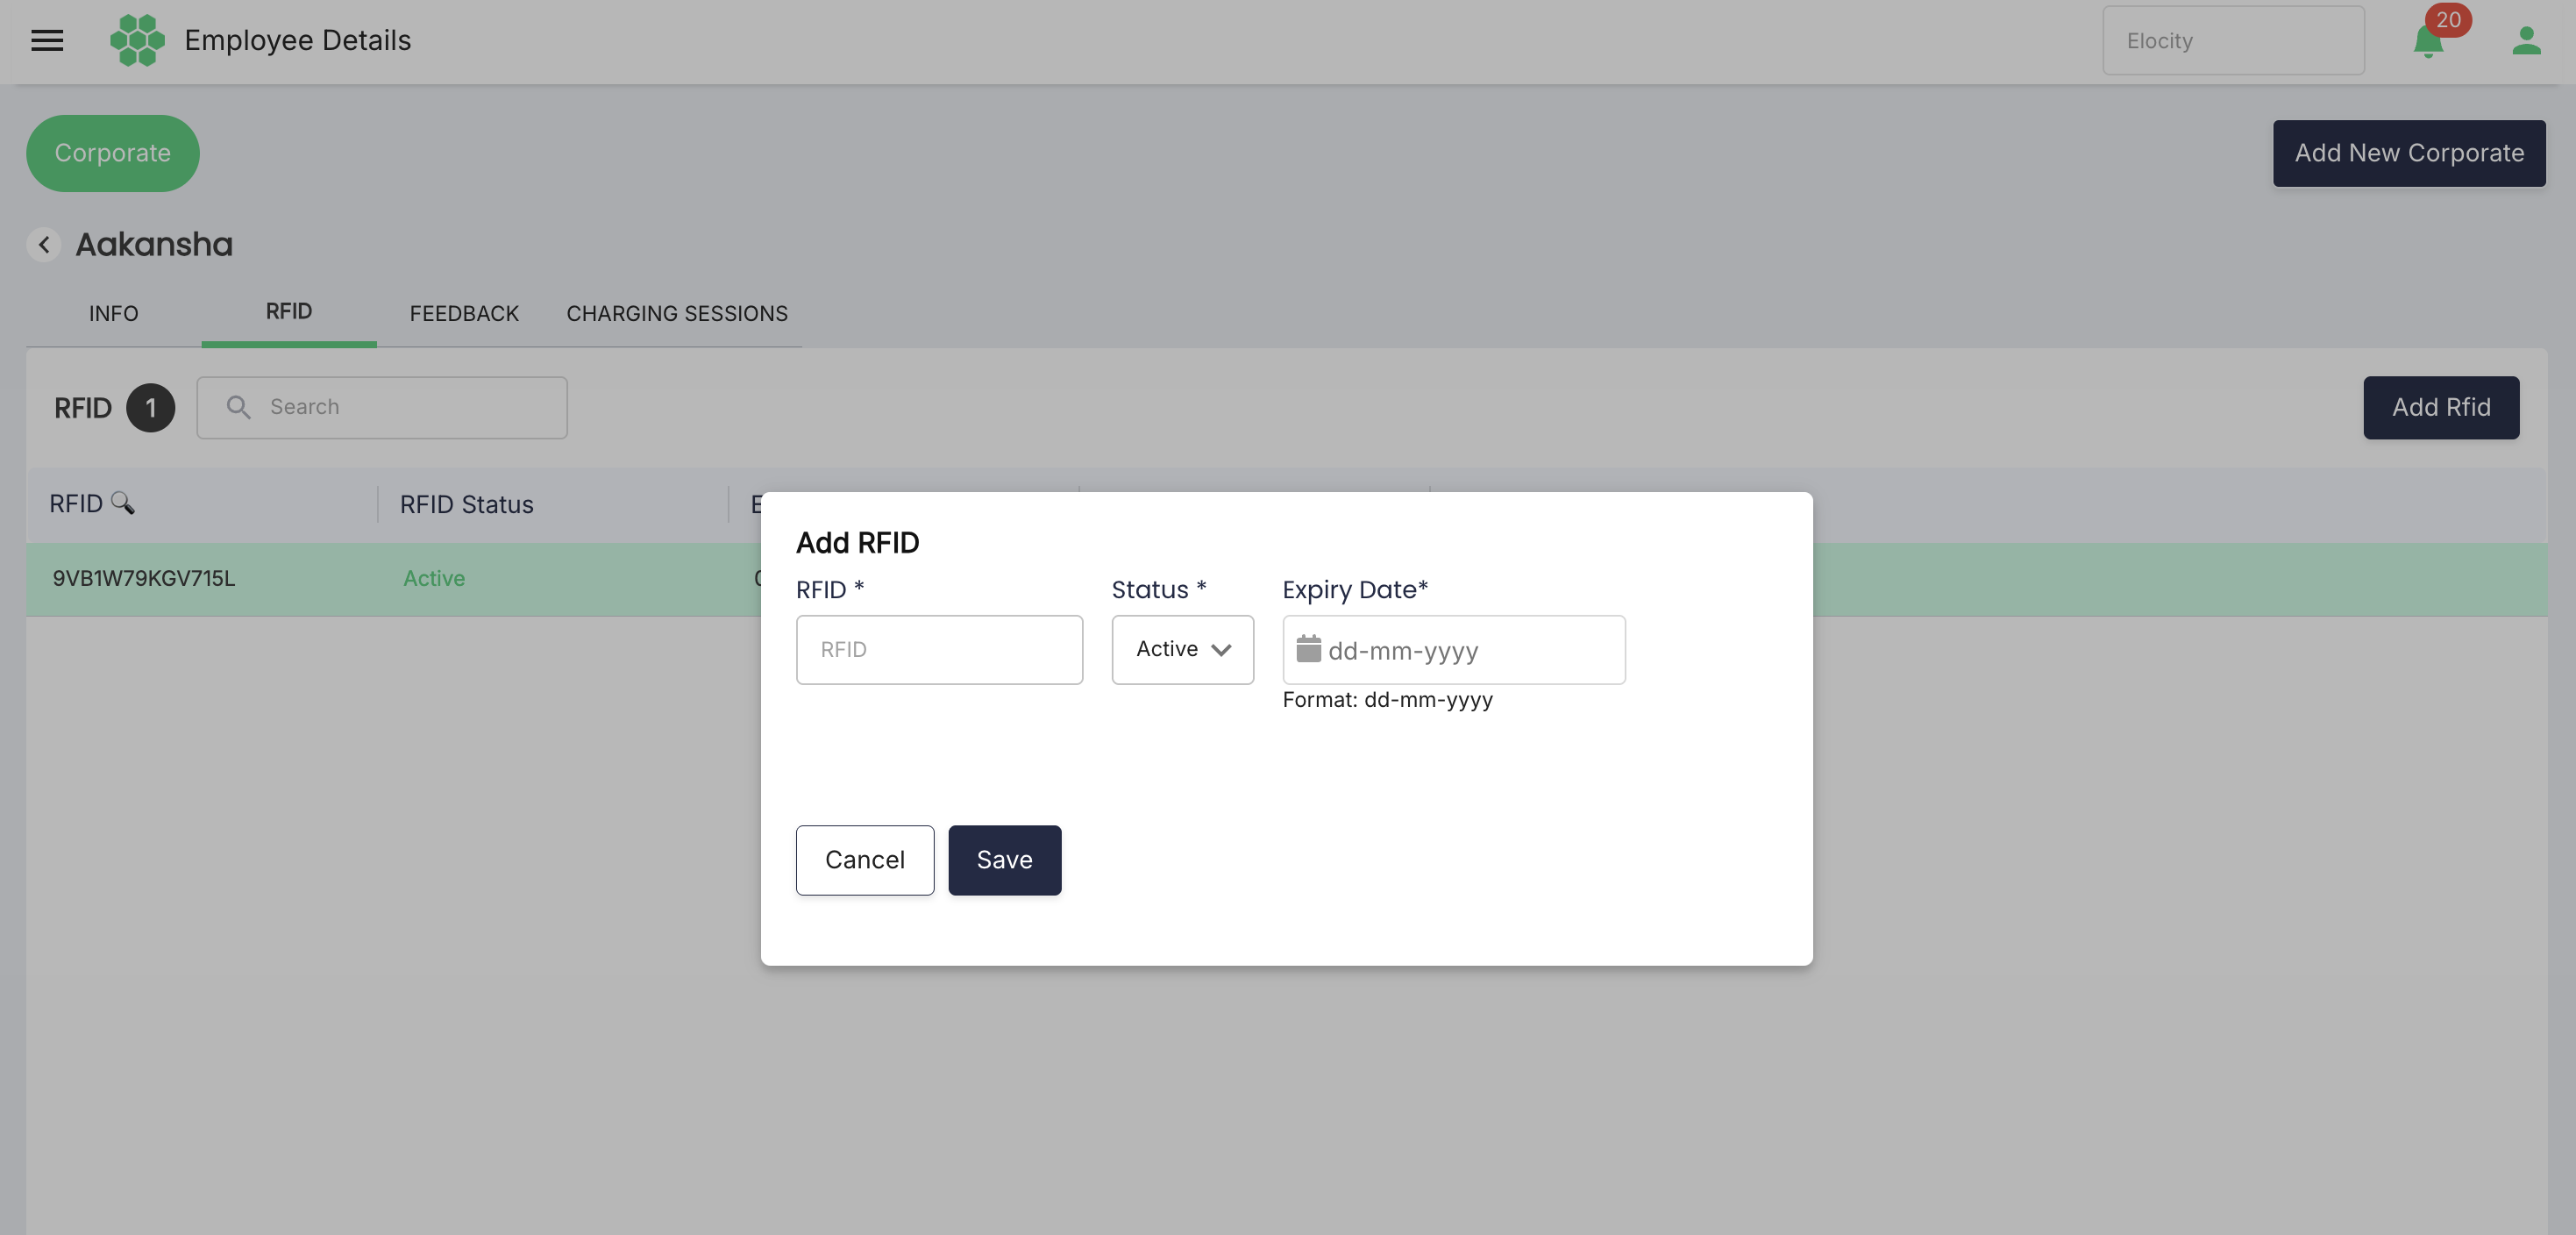
- Enter RFID.
- Select Status, for example Active when the credential is ready for use.
- Enter Expiry Date in
dd-mm-yyyyformat. - Select Save.
- Verify the RFID appears with the correct status and expiry date.
7.3 Request a physical RFID card
- Open the employee's RFID tab.
- Select Request Physical RFID when the feature is enabled for the tenant. If the button is not available, use the approved support or fulfillment workflow for your deployment.
- Confirm the employee and delivery details.
- Review the RFID processing charge and parent-account funding status.
- Submit the request.
- Verify the processing charge is deducted from the parent ID tag's prepaid wallet or posted to the parent postpaid account — never to an employee wallet.
- After fulfillment, add or activate the delivered RFID and set its expiry date.
KEY RULE: RFID fee ownership Physical-card processing charges belong to the parent account. If a prepaid parent wallet has insufficient funds, the request should remain unsubmitted or pending according to the configured policy; do not create a negative employee balance.
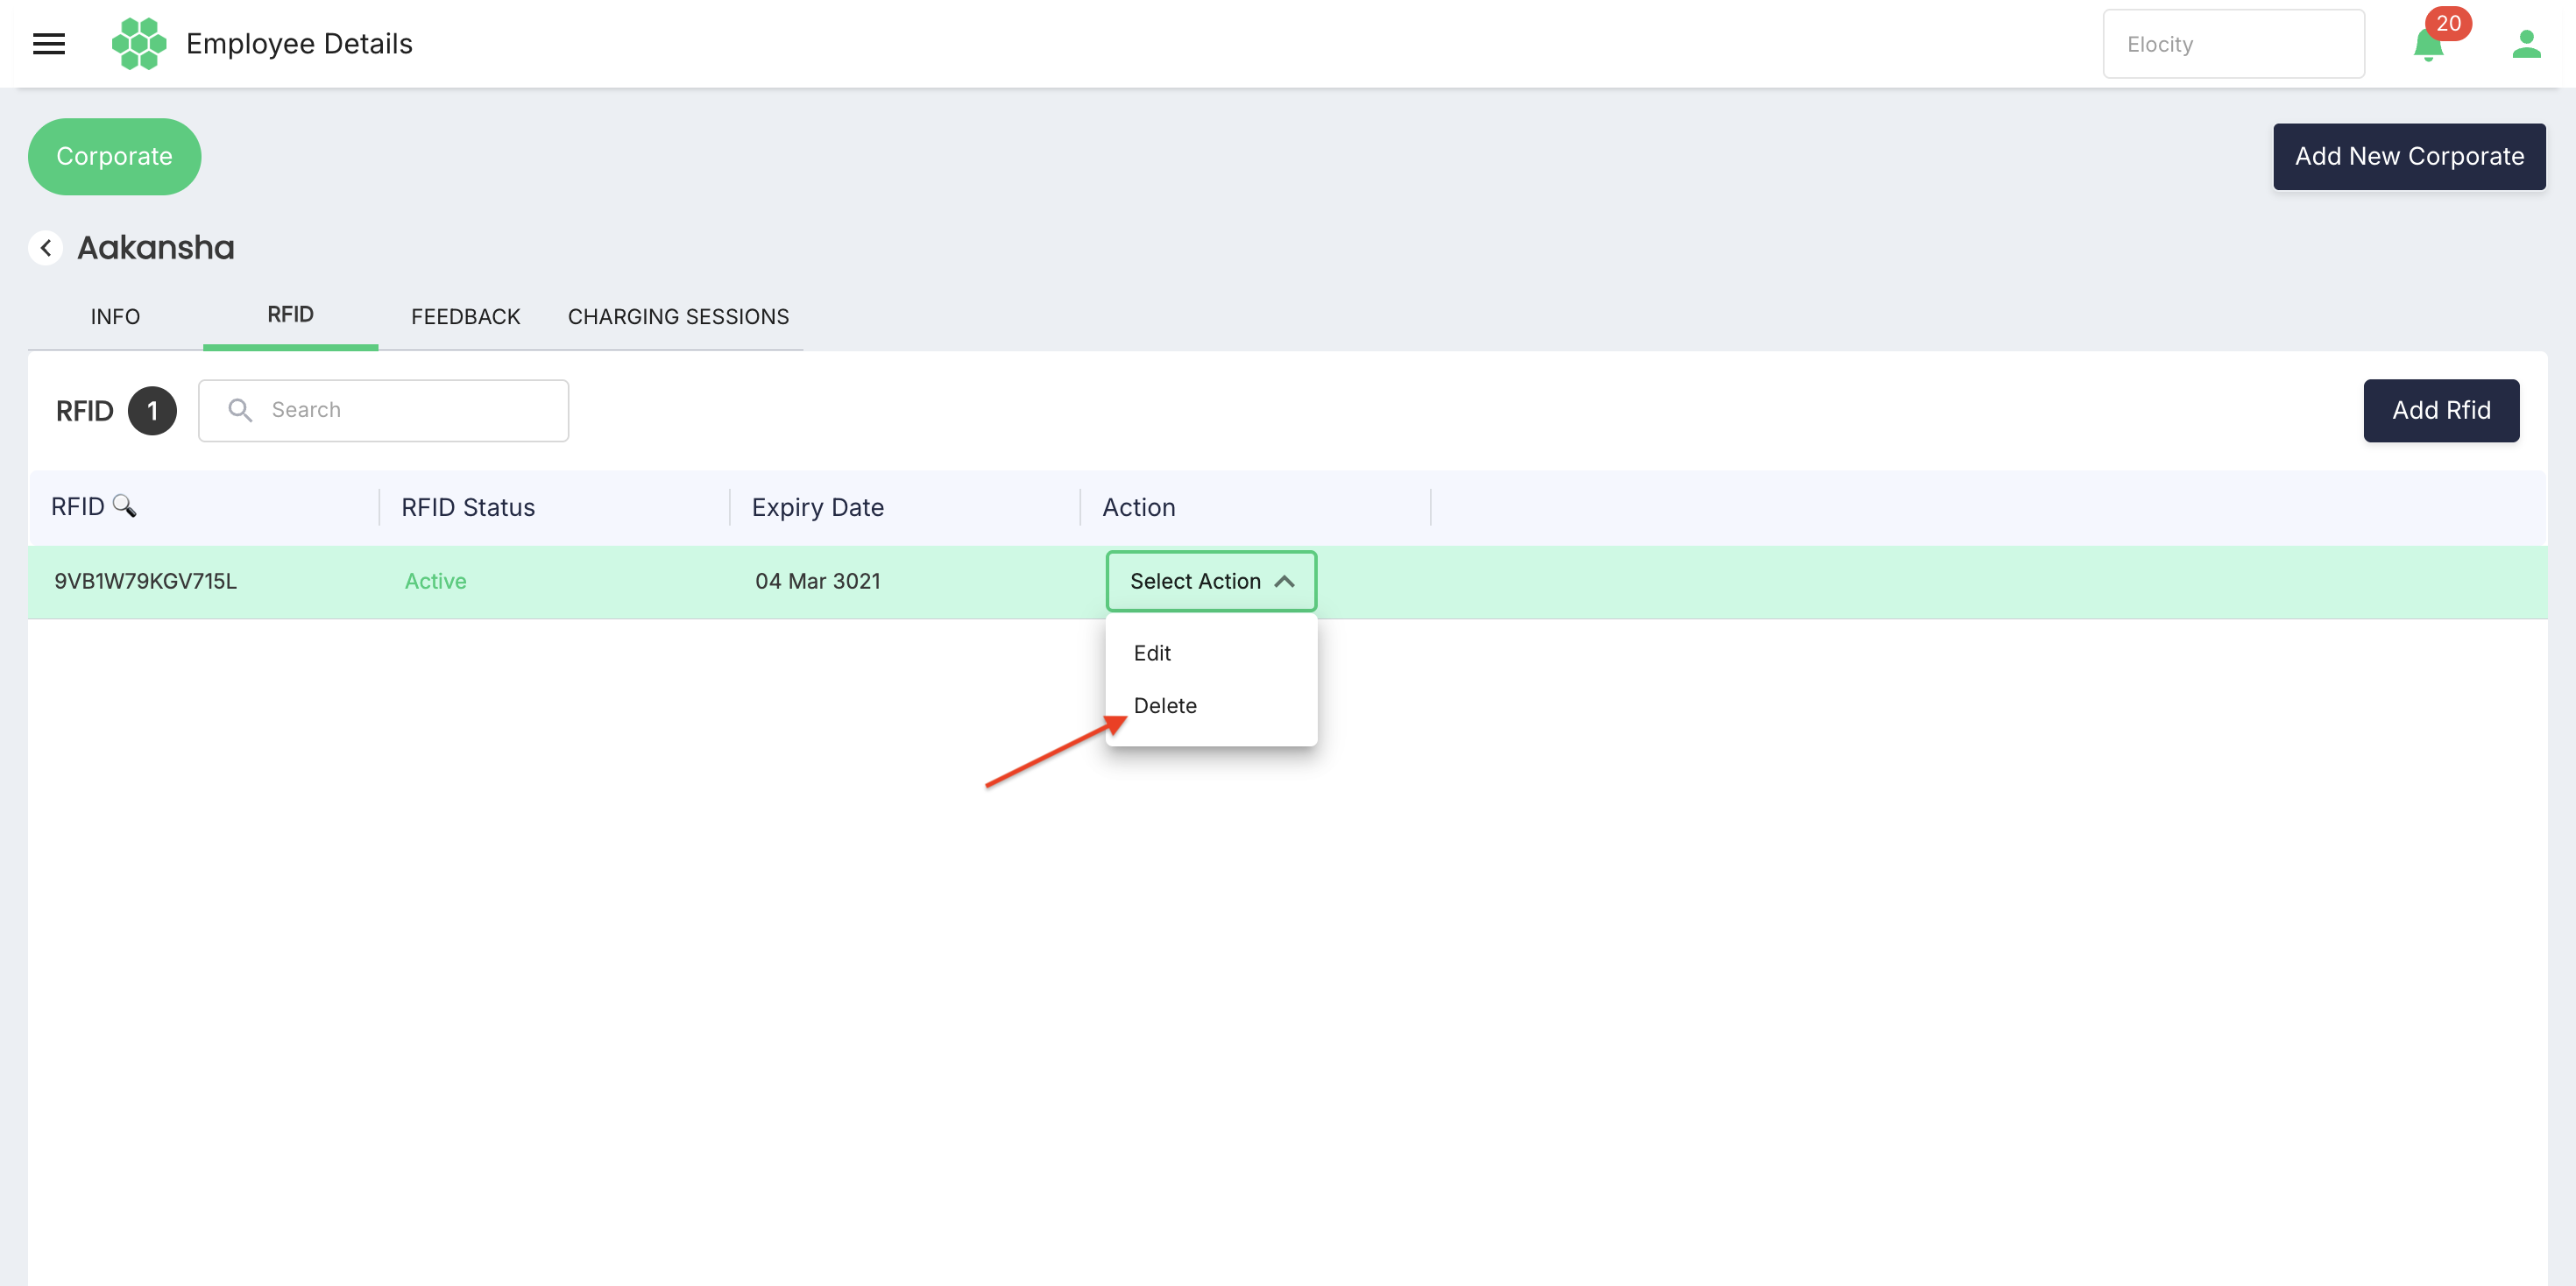
7.4 Manage RFID card
You can manage RFID card by using the following steps:
- From Employee Details > RFID.
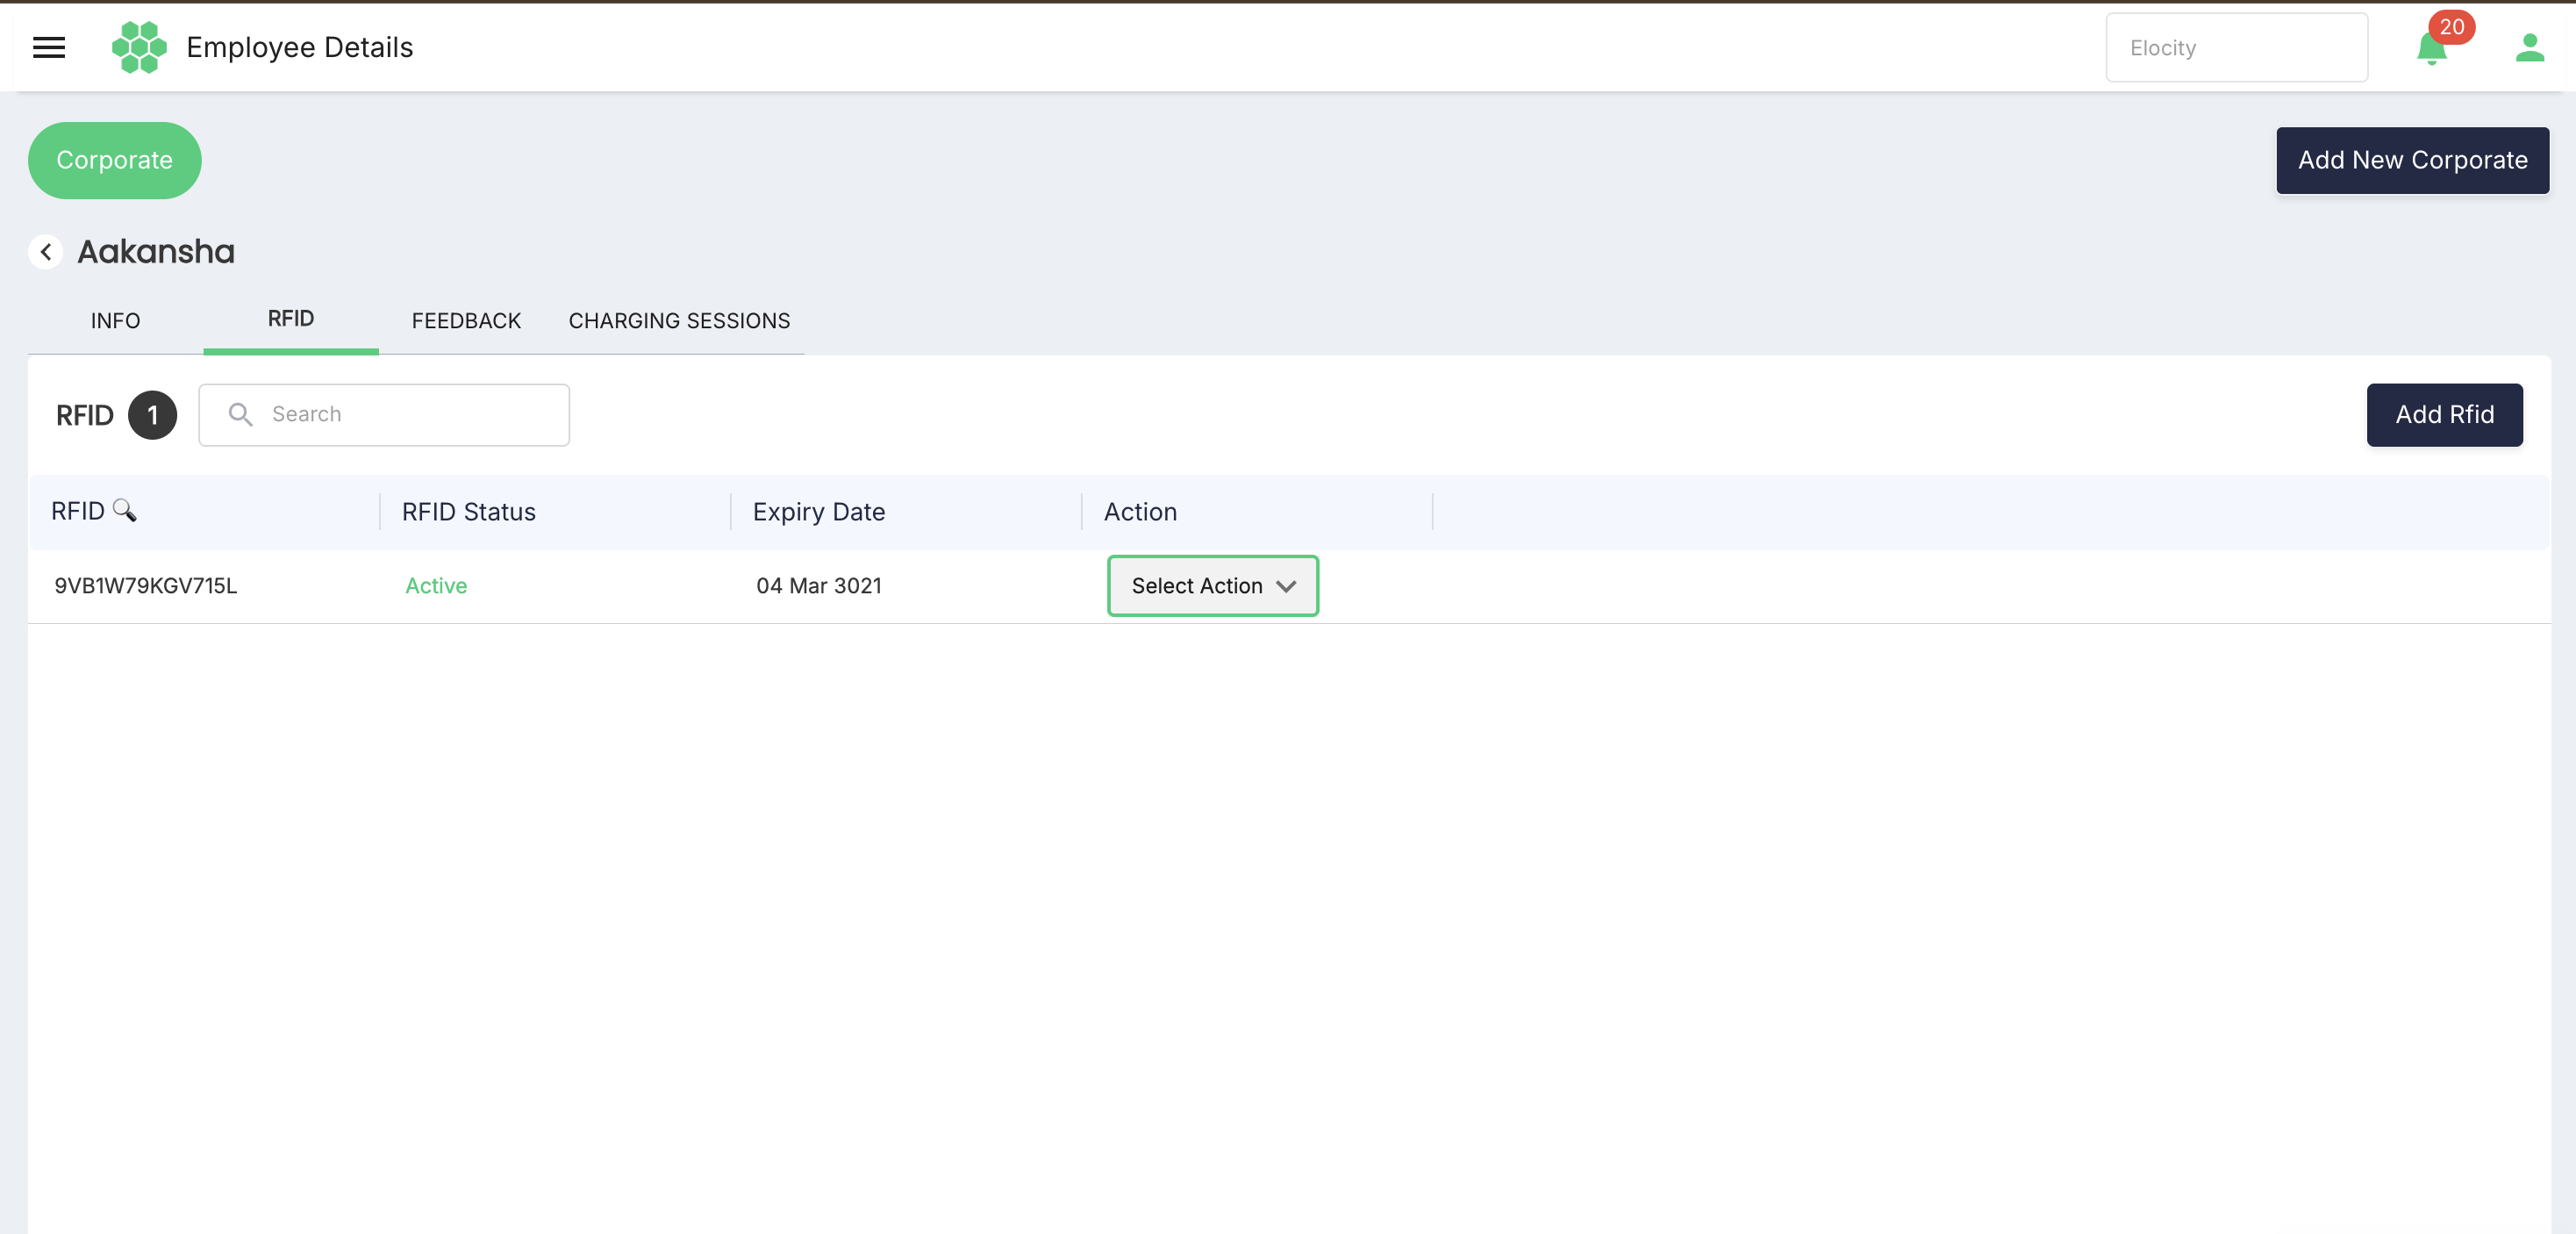
- The verified list shows RFID, RFID Status, Expiry Date, and an Action menu.
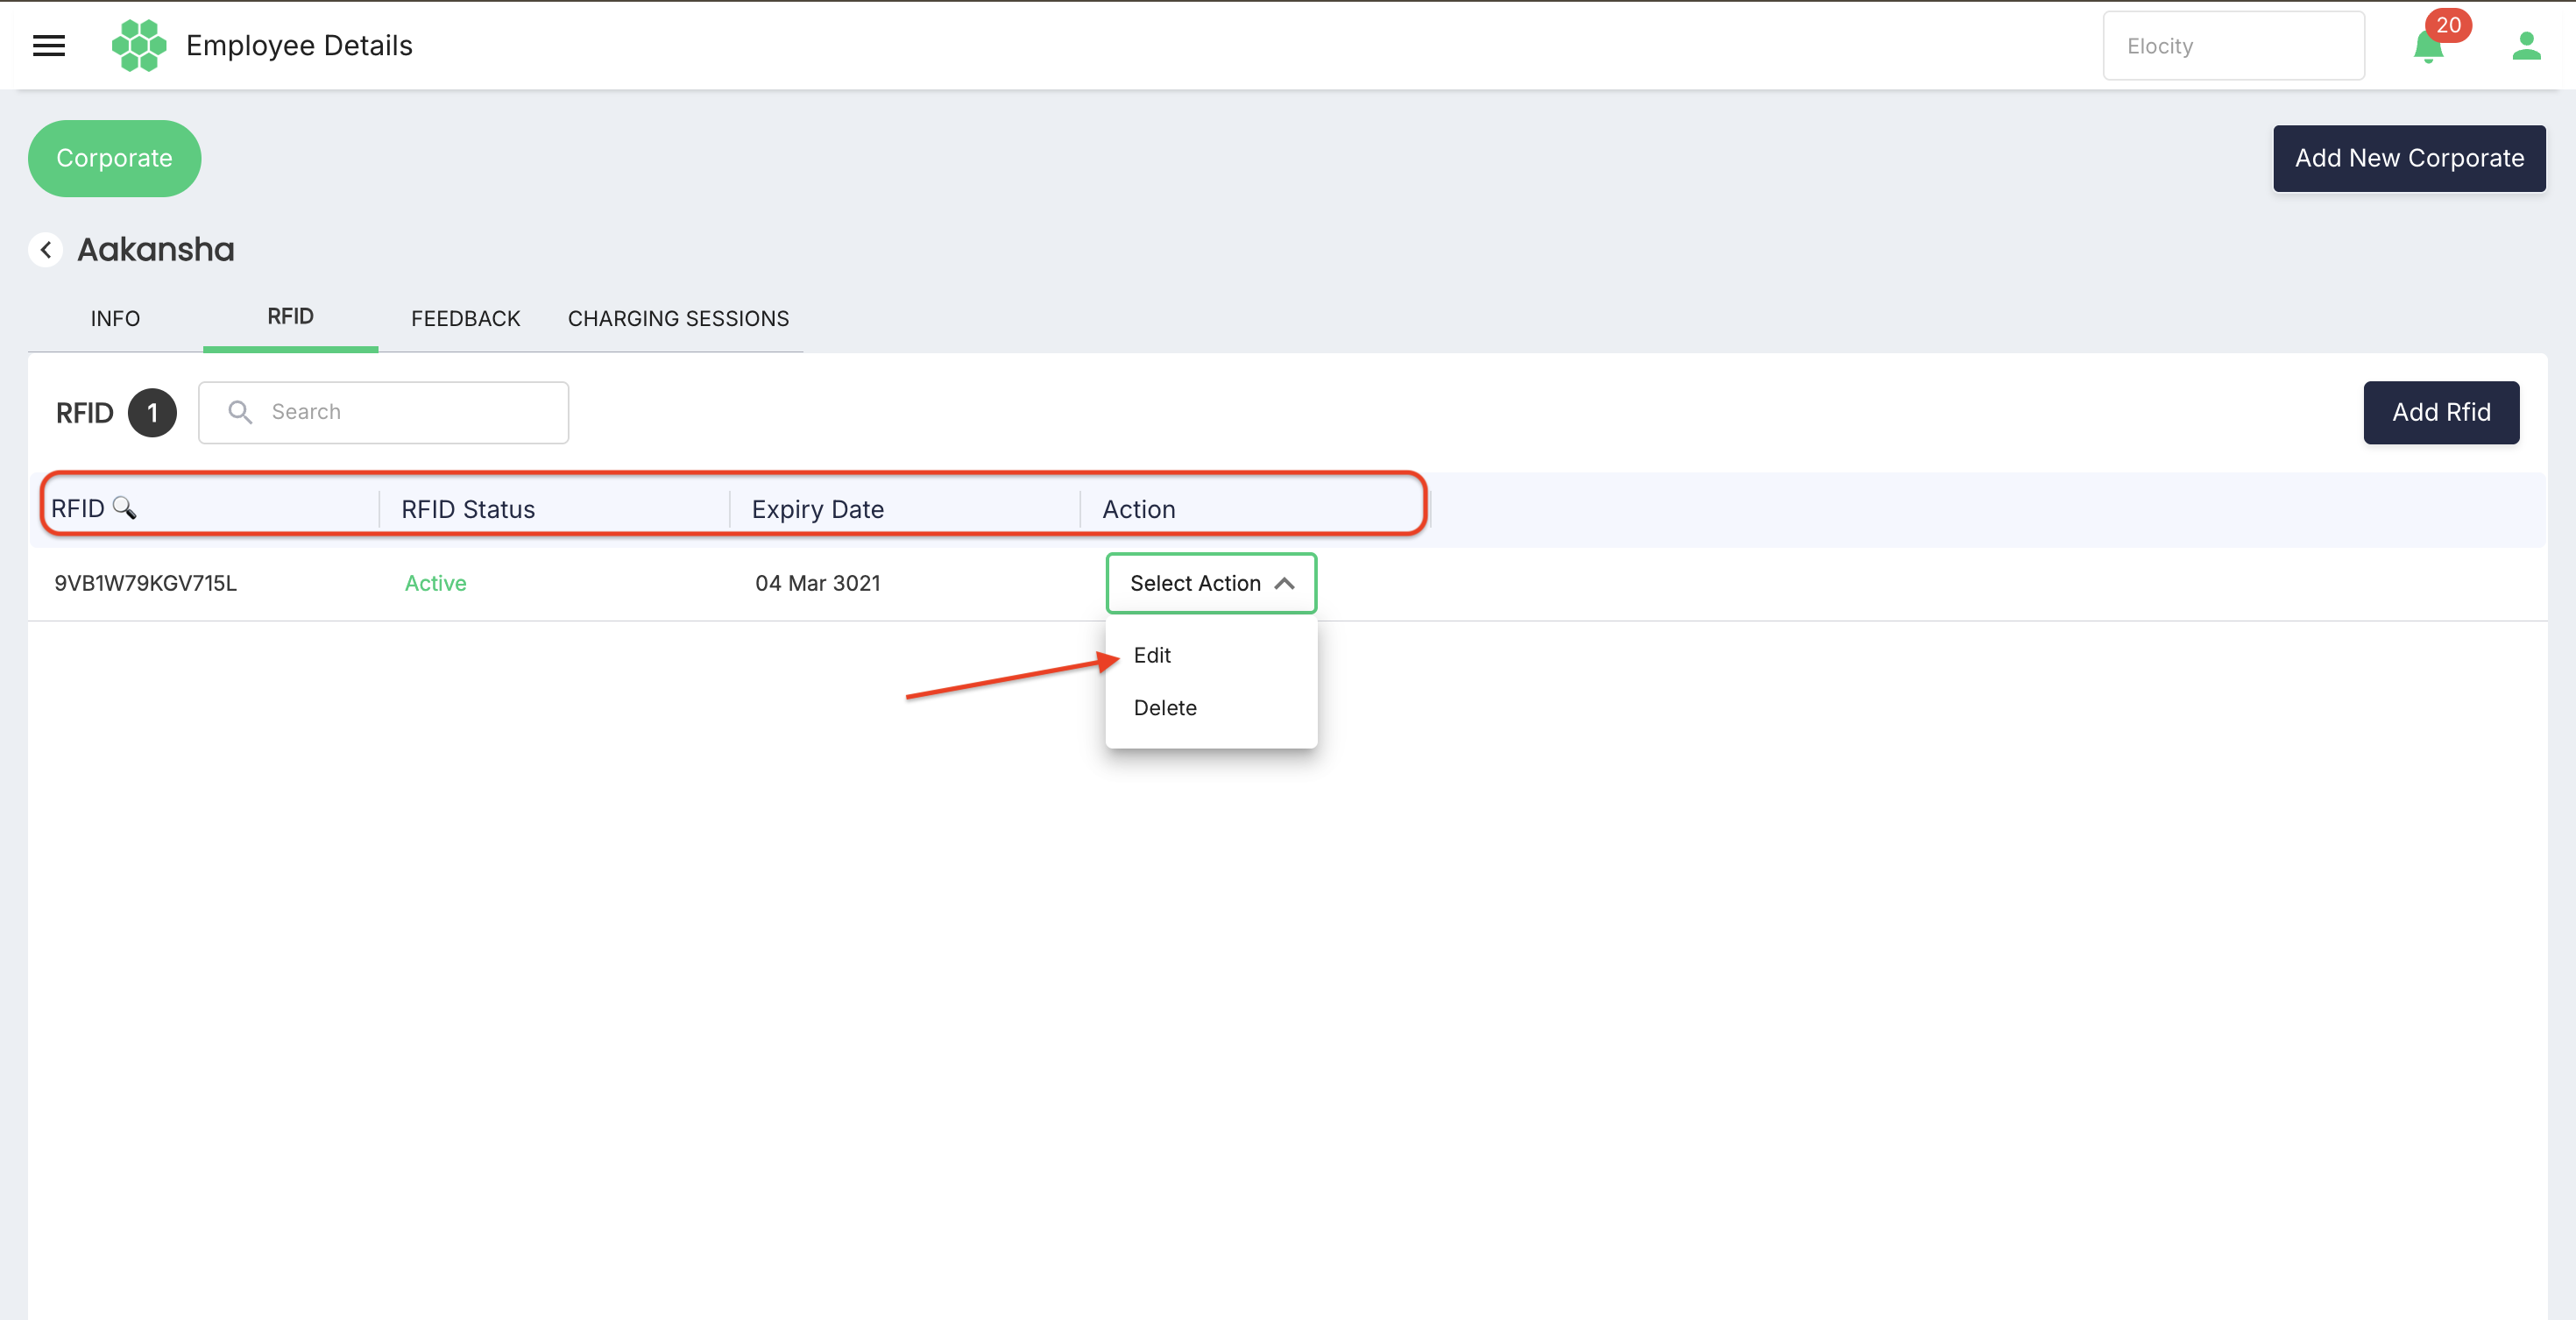
- From Action menu select Edit to edit the RFID details.
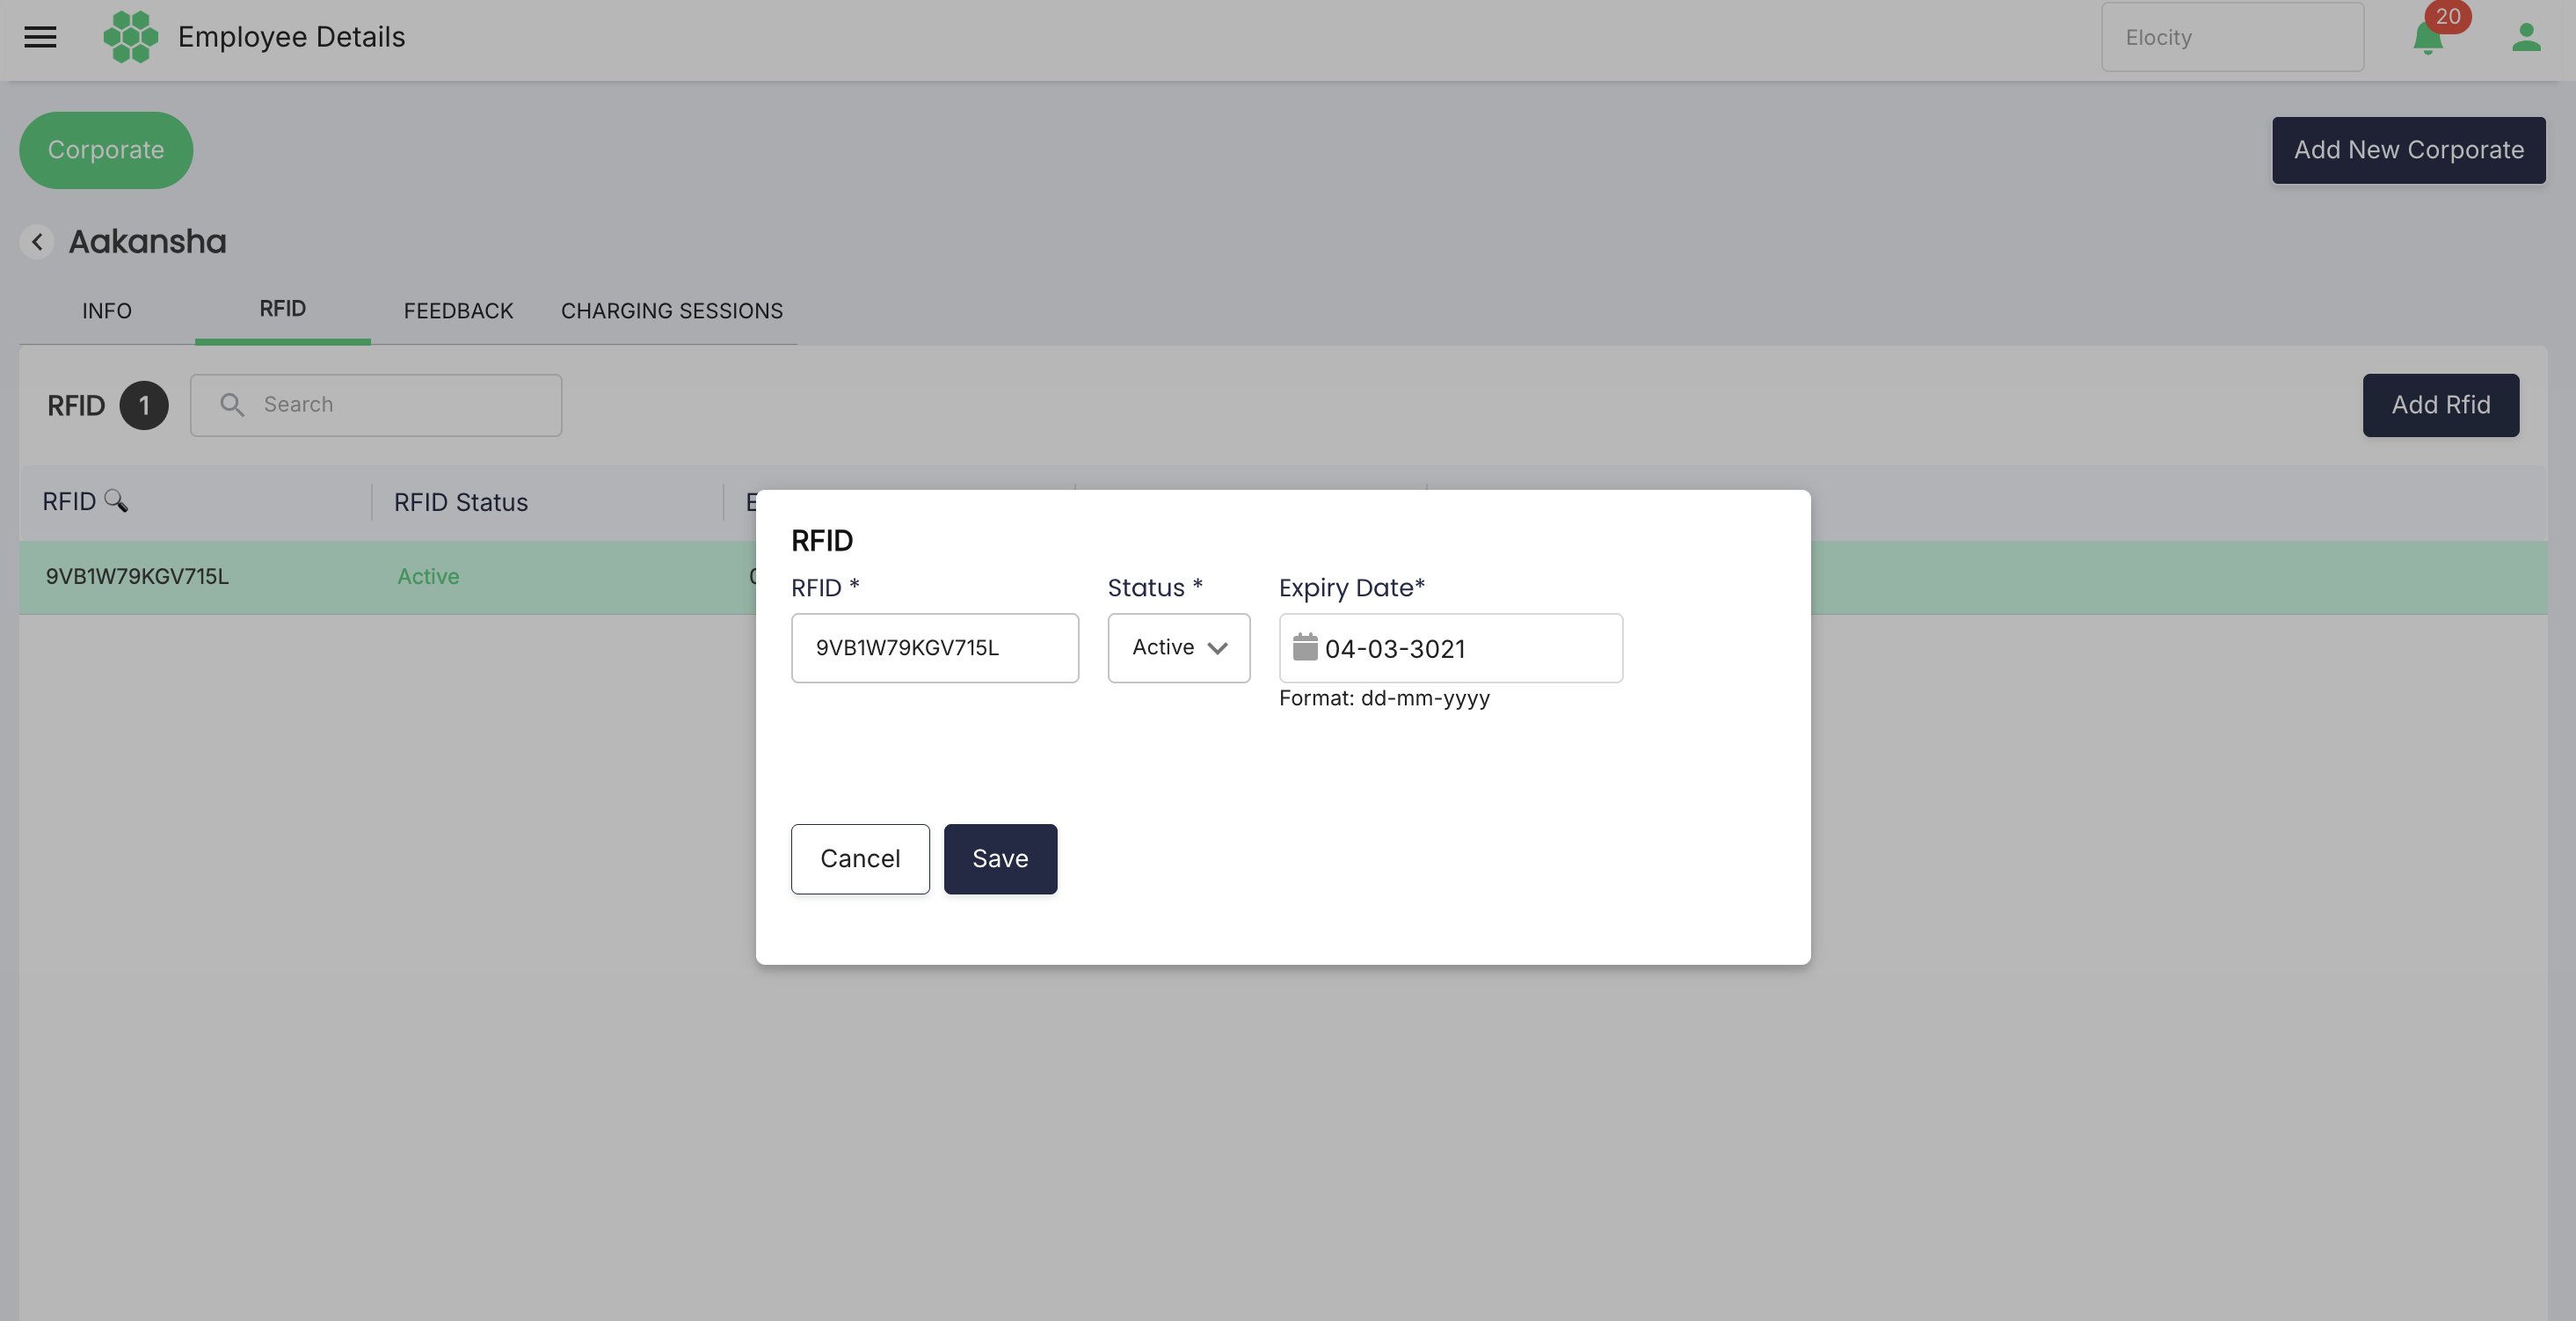
- Update the fields and click Save.
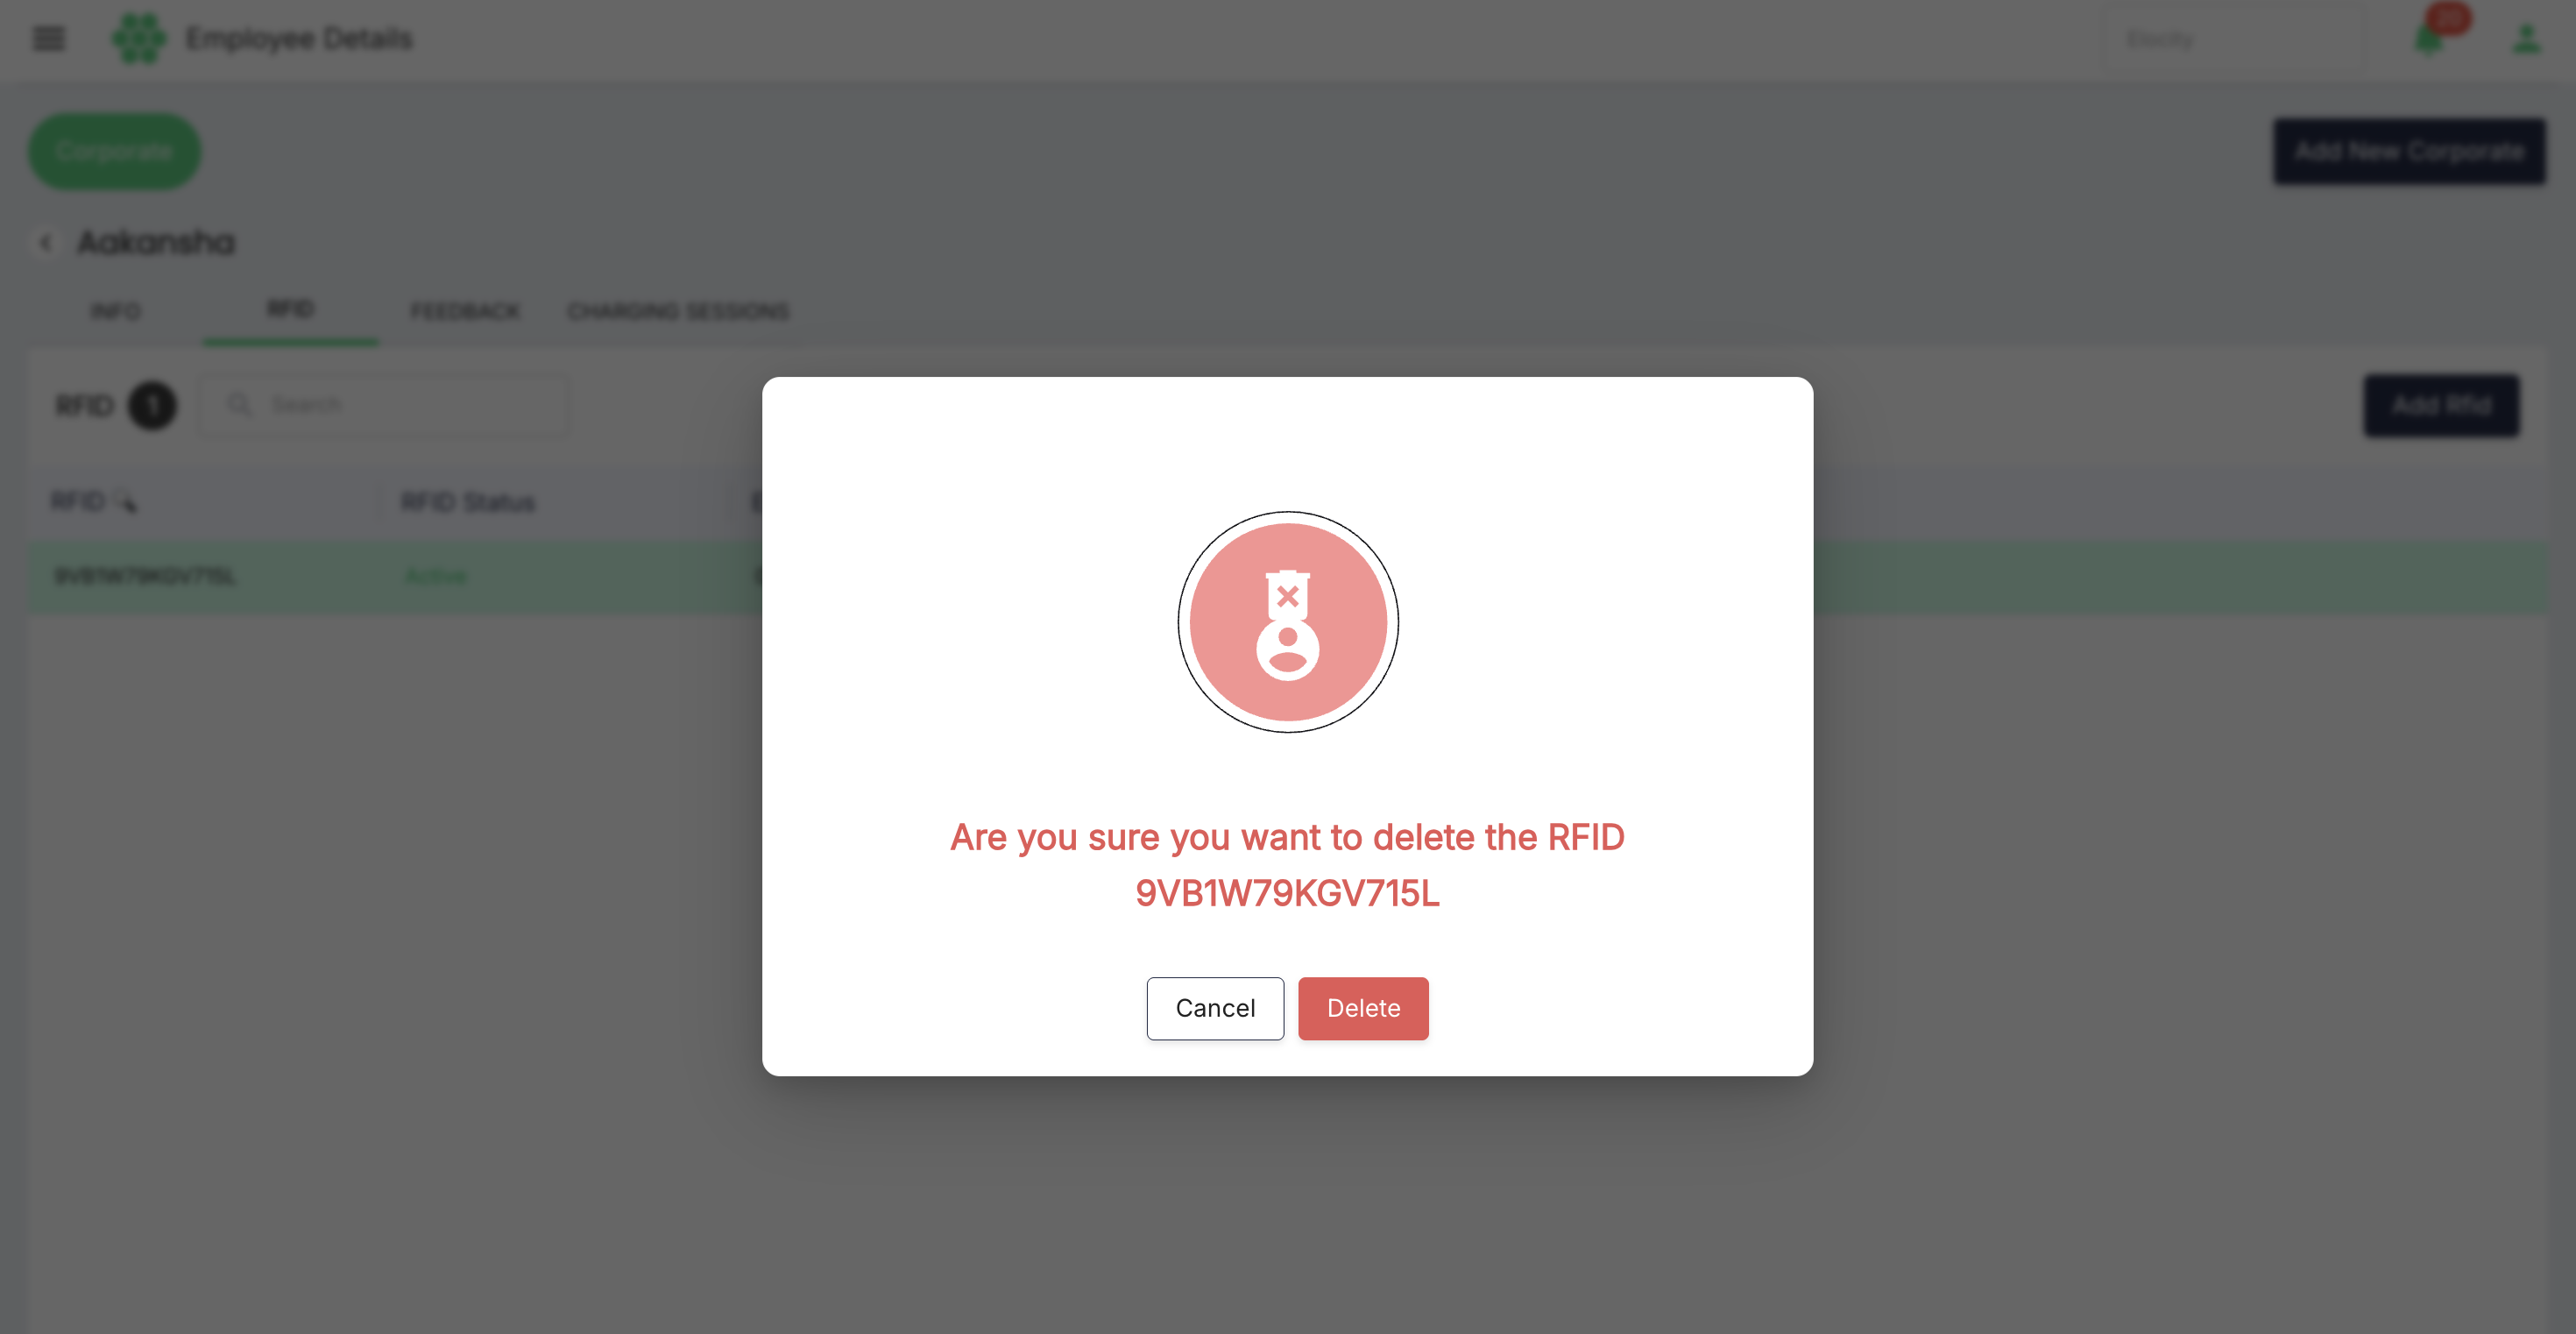
- Similairly select the Delete from action menu to delete
- Click on Delete to confirm.
7.5 RFID lifecycle controls
- Use Active only for a valid, issued credential.
- Deactivate lost, stolen, replaced, or unauthorized credentials promptly.
- Set and monitor expiry dates.
- Confirm the employee remains associated with the Corporate parent and an eligible group.
- Review RFID actions before offboarding the employee.
8. Review Charging Sessions
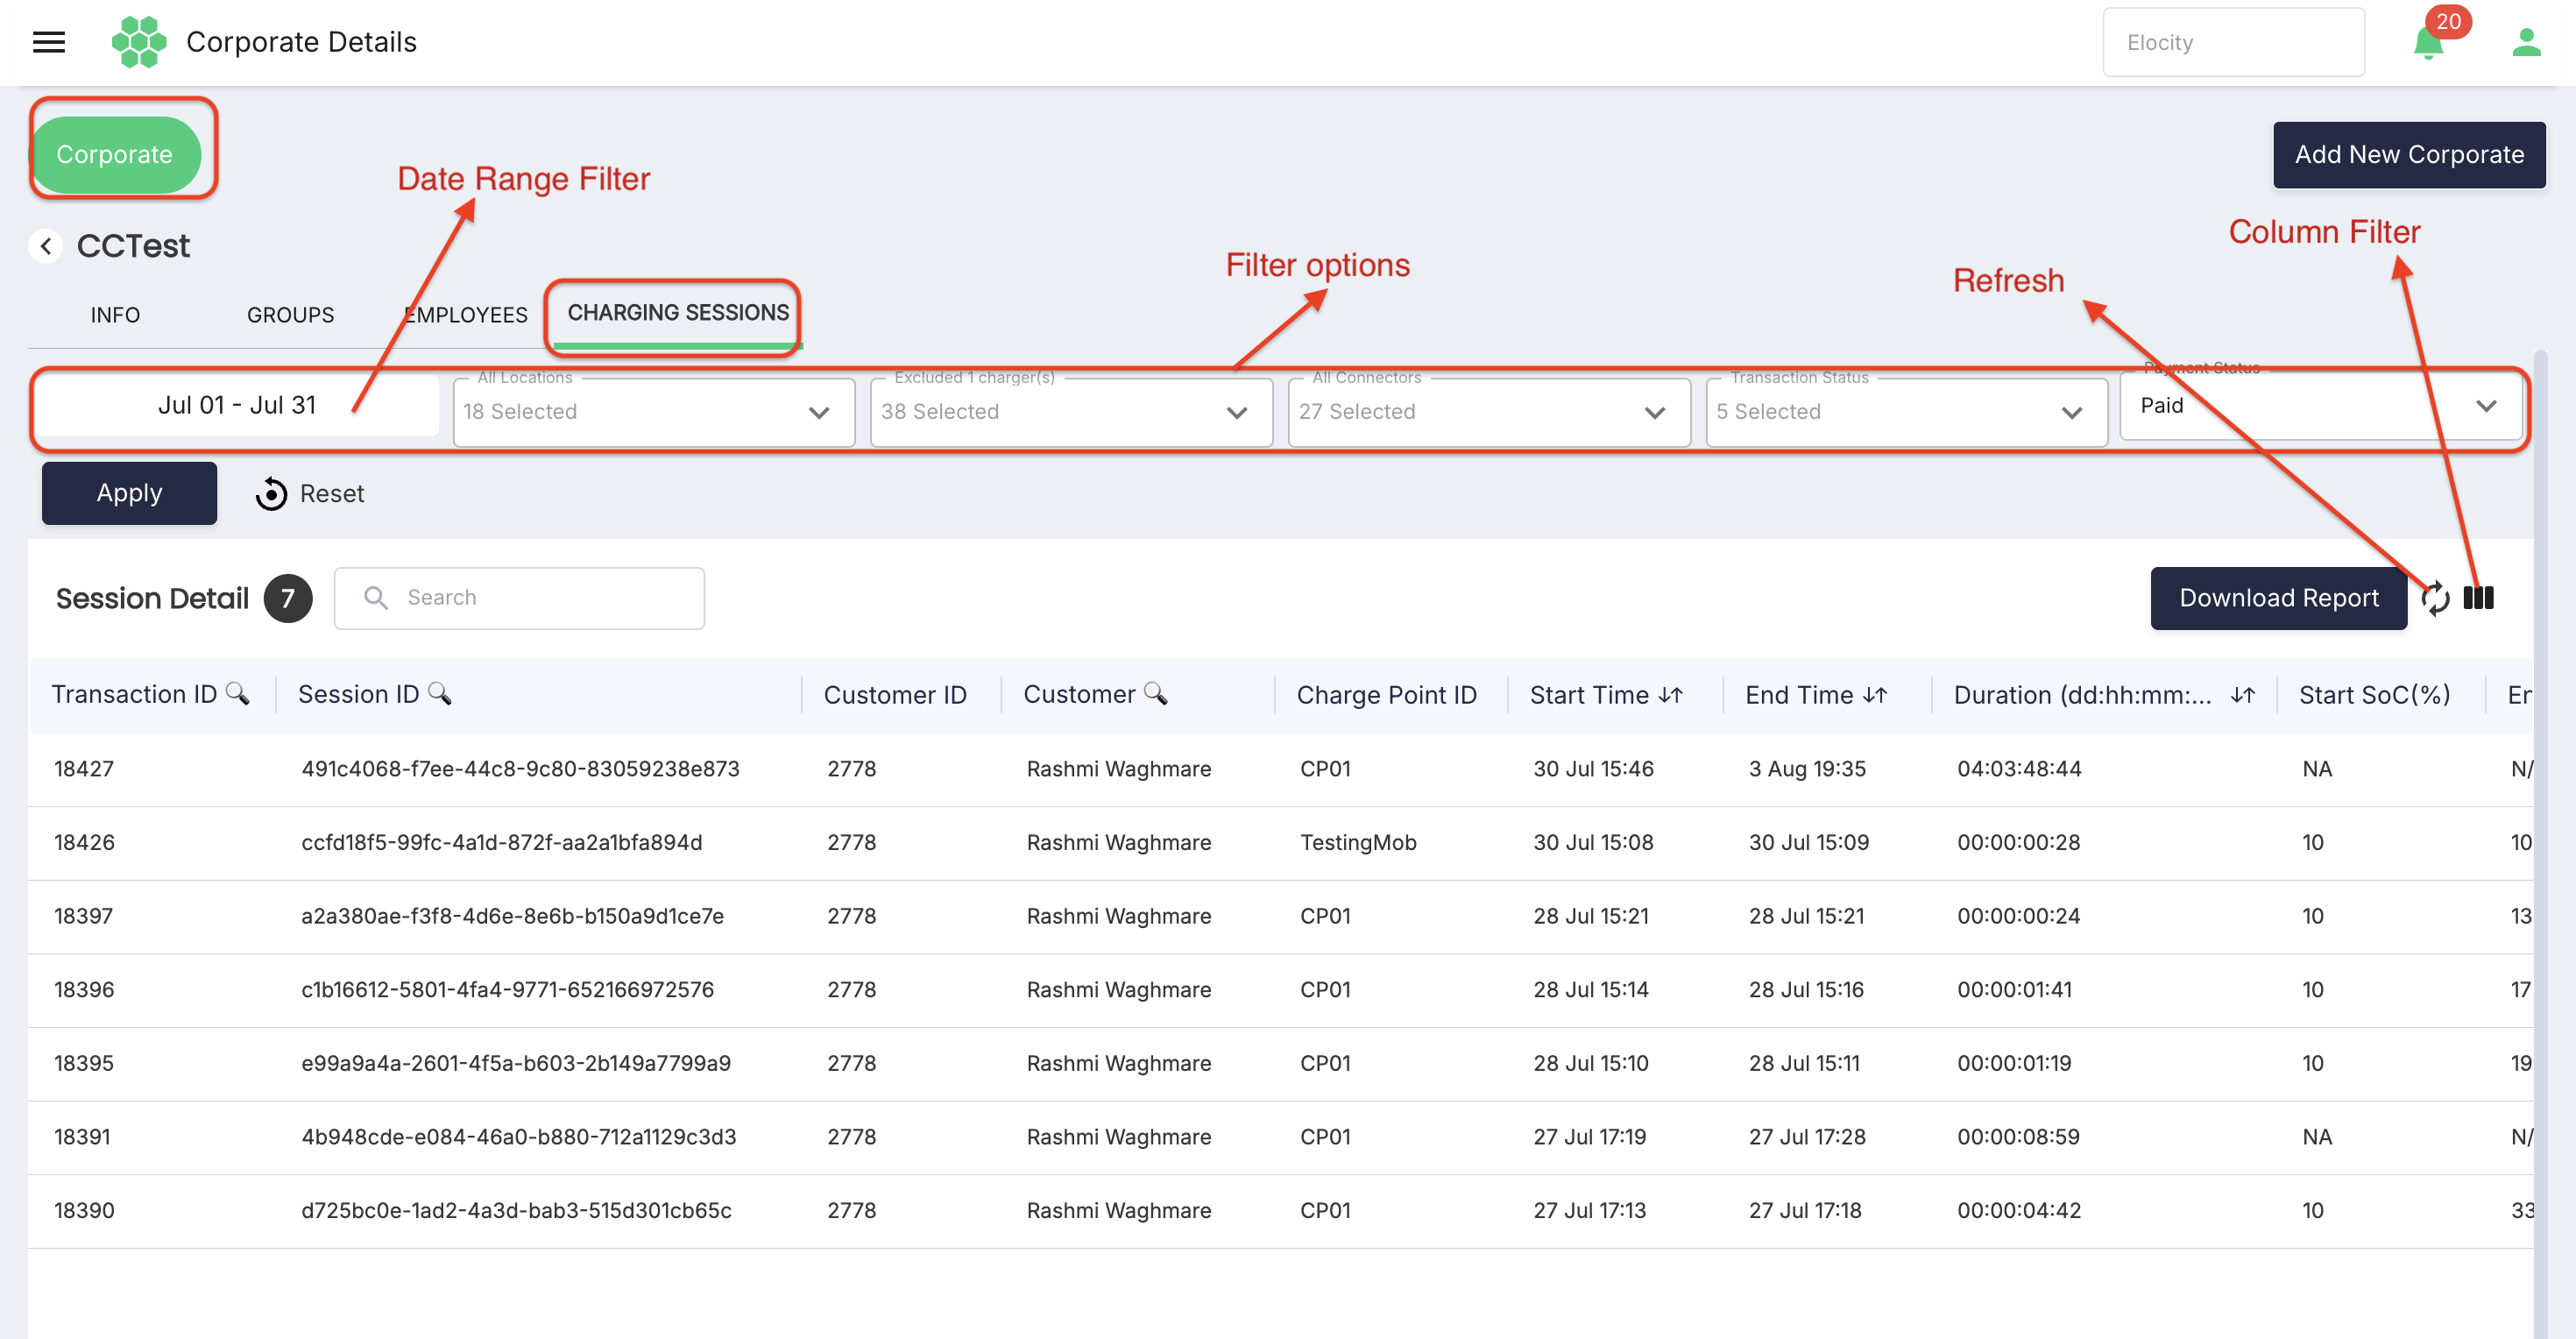
8.1 Corporate-wide sessions
- Open a Corporate and select CHARGING SESSIONS.
- Set the date range.
- Optionally filter by Location, Charger, Connector, Transaction Status, and Payment Status.
- Select Apply. Use Reset to clear filters.
- Review the Session Detail grid.
- Use Refresh for the latest data and Column Filter to adjust visible columns.
8.2 Session columns verified in the live module
| Identity | Timing | Charging and financial |
|---|---|---|
| Transaction ID; Session ID; Customer ID; Customer; Charge Point ID | Start Time; End Time; Duration (dd:hh:mm:ss) | Start SoC(%); End SoC(%); Location; Station; Connector; Energy Consumed (kWh); Cost |
8.3 Employee-specific sessions
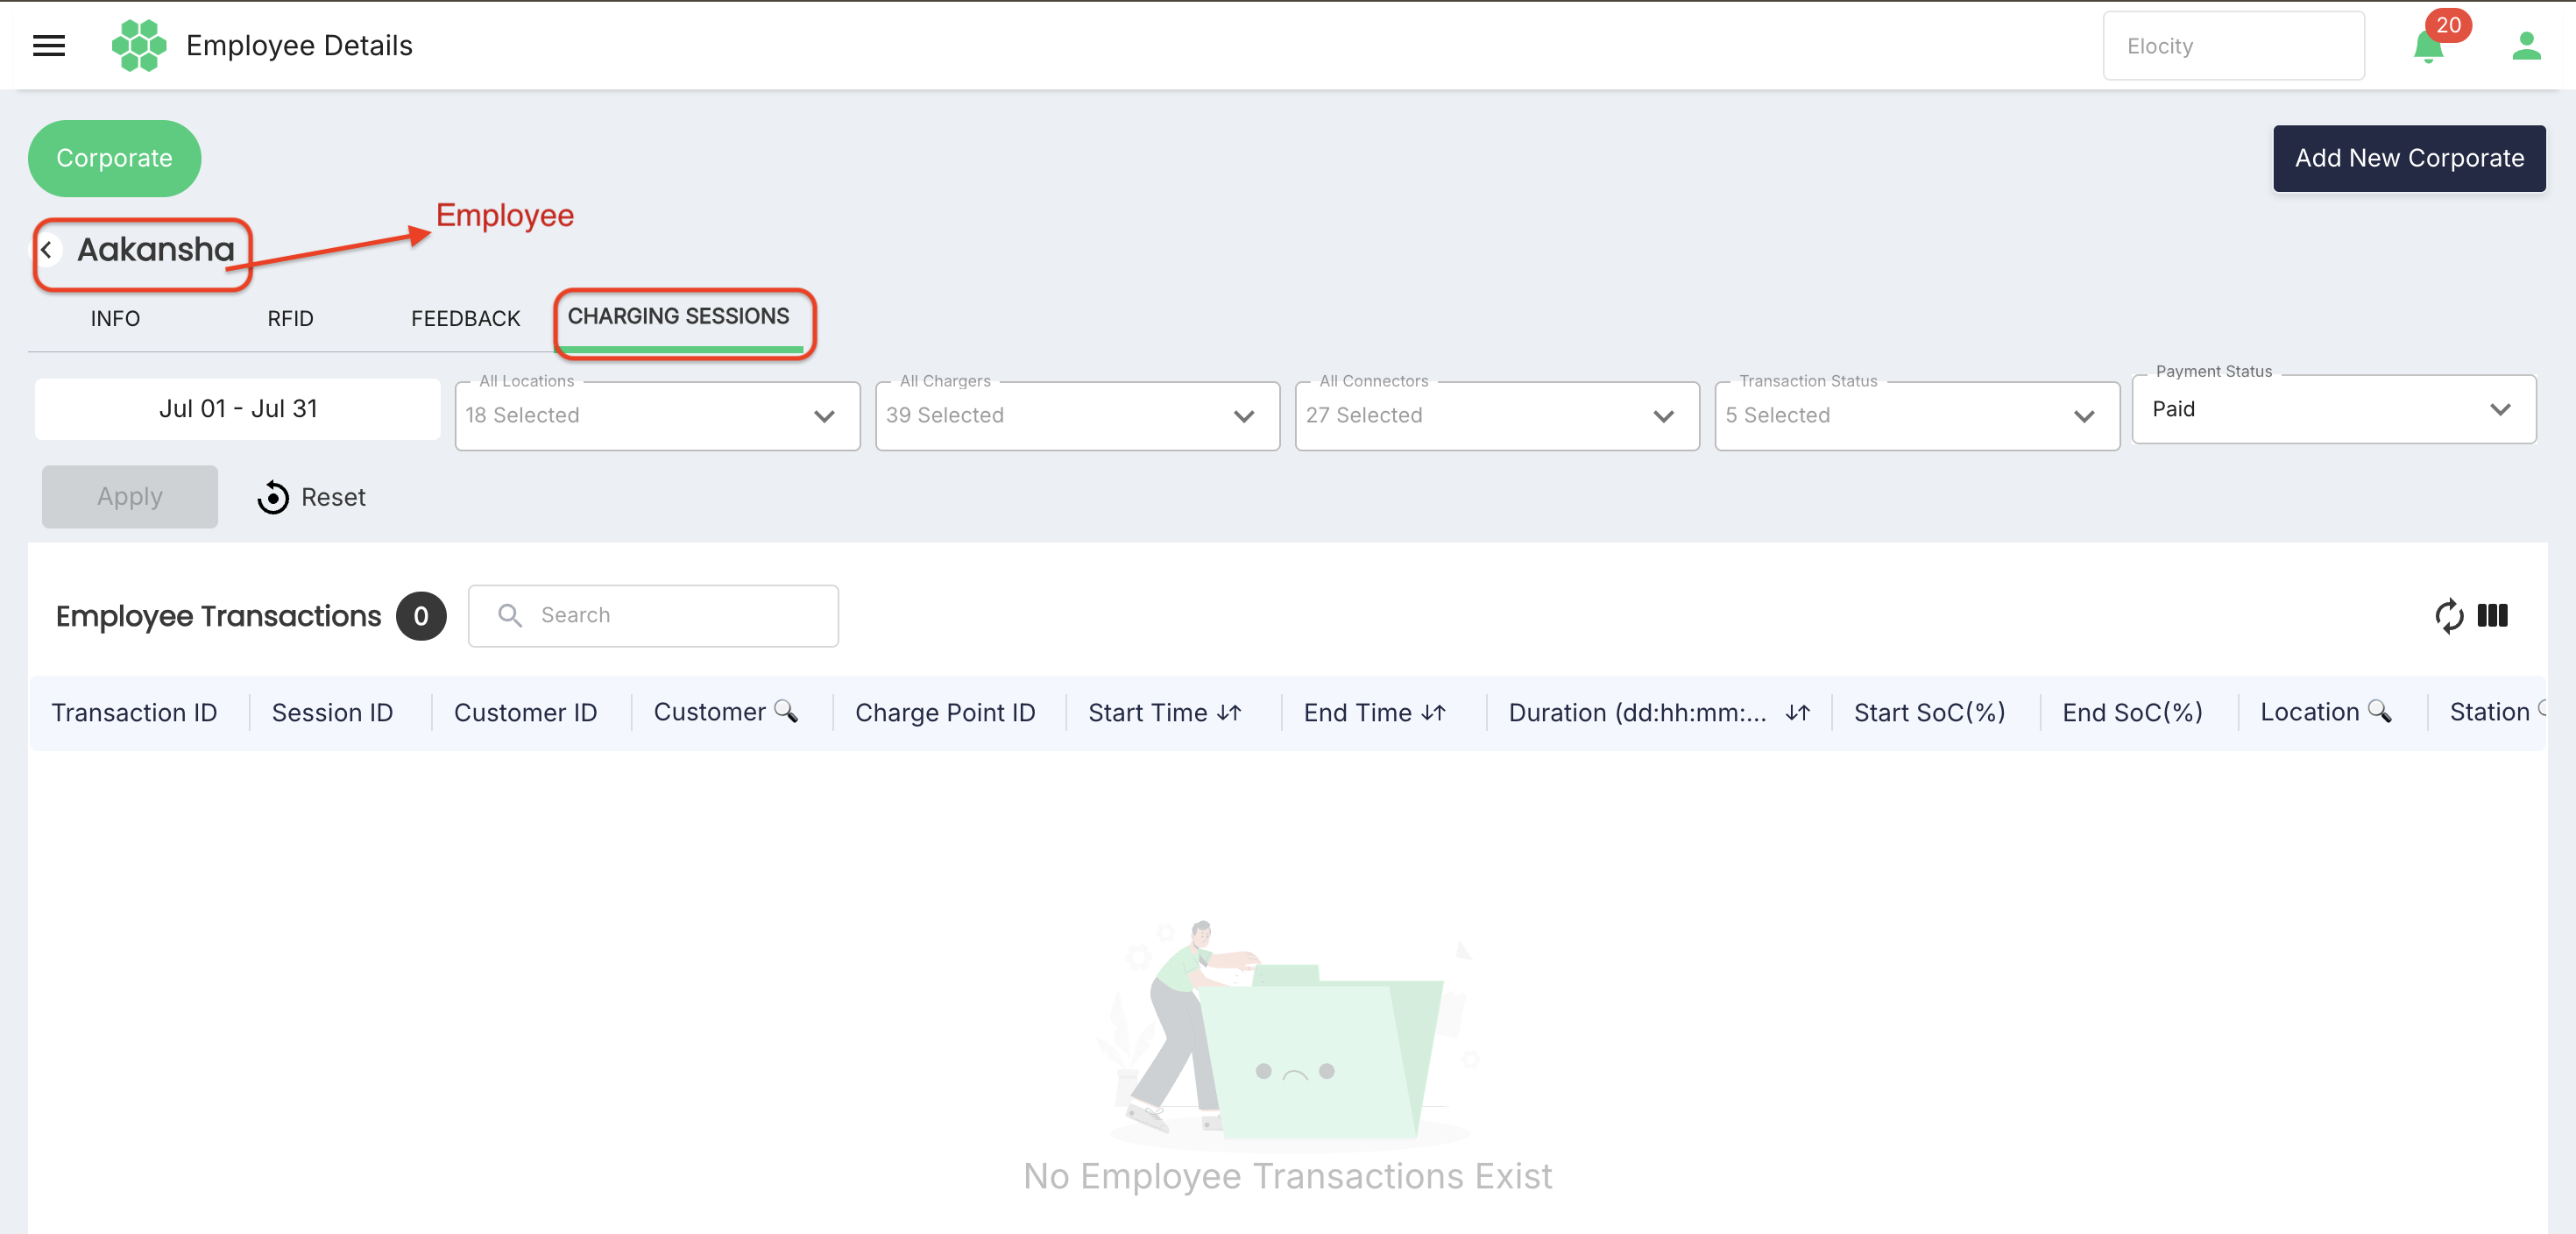
Open an employee and select CHARGING SESSIONS to limit the same operational analysis to that employee. This is the preferred check before removing an employee or investigating an RFID issue.
8.4 Ongoing-session check
- Filter Transaction Status for active, started, or in-progress records as implemented by the tenant.
- A session without a completed end state must be treated as ongoing.
- Do not remove the employee or parent association until the session ends and the session state refreshes.
- If a session appears stuck, follow the station/session support procedure before modifying the Corporate relationship.
9. Parent Wallet, Billing, Discounts, and Settlement
9.1 Financial flow
| Step | System behavior |
|---|---|
| 1. Authorization | Employee starts a session with an associated RFID under the Corporate parent. |
| 2. Pricing | Applicable network tariff and group discount are evaluated. |
| 3. Funding | Prepaid debits the parent wallet; postpaid accrues the cost to the parent account. |
| 4. Recording | The session remains attributable to the employee, group, Corporate, and location. |
| 5. Settlement | Bulk-settlement groups consolidate eligible session costs for parent reconciliation. |
| 6. Reporting | Corporate sessions and customer/session exports support audit and finance review. |
9.2 Prepaid operational controls
- Fund the parent wallet before employee charging or physical RFID processing.
- Monitor parent balance and configured low-balance behavior.
- Do not transfer funds into employee wallets; employees are child accounts only.
- Reconcile wallet debits to session and RFID-processing records.
9.3 Postpaid operational controls
- Confirm credit approval, billing contact, settlement frequency, and contract dates.
- Review unsettled and failed-payment sessions before closing a settlement period.
- Reconcile group discounts and bulk-settlement totals to the parent account.
- Restrict changes to payment mode after charging starts; use an approved finance change process.
9.4 Bulk settlement
- Enable Bulk Settlement on the intended group.
- Confirm the group's employee roster and discount.
- At the settlement cutoff, filter or export the Corporate's charging sessions for the period.
- Review completed sessions, payment status, energy, cost, and discounts.
- Resolve failed, disputed, or ongoing sessions before finalization.
- Settle the combined amount against the parent wallet or postpaid account.
- Archive the settlement reference and supporting export.
10. Downloads and Exports
10.1 Download child accounts
Corporate administrators must be able to download the Corporate's child-account list. Use the Corporate EMPLOYEES download/export action when it is enabled. If the current tenant presents exports centrally, request or filter a Customers export scoped to the target Corporate, then download the completed job.
10.2 Download charging sessions
- Apply the required Corporate and date scope.
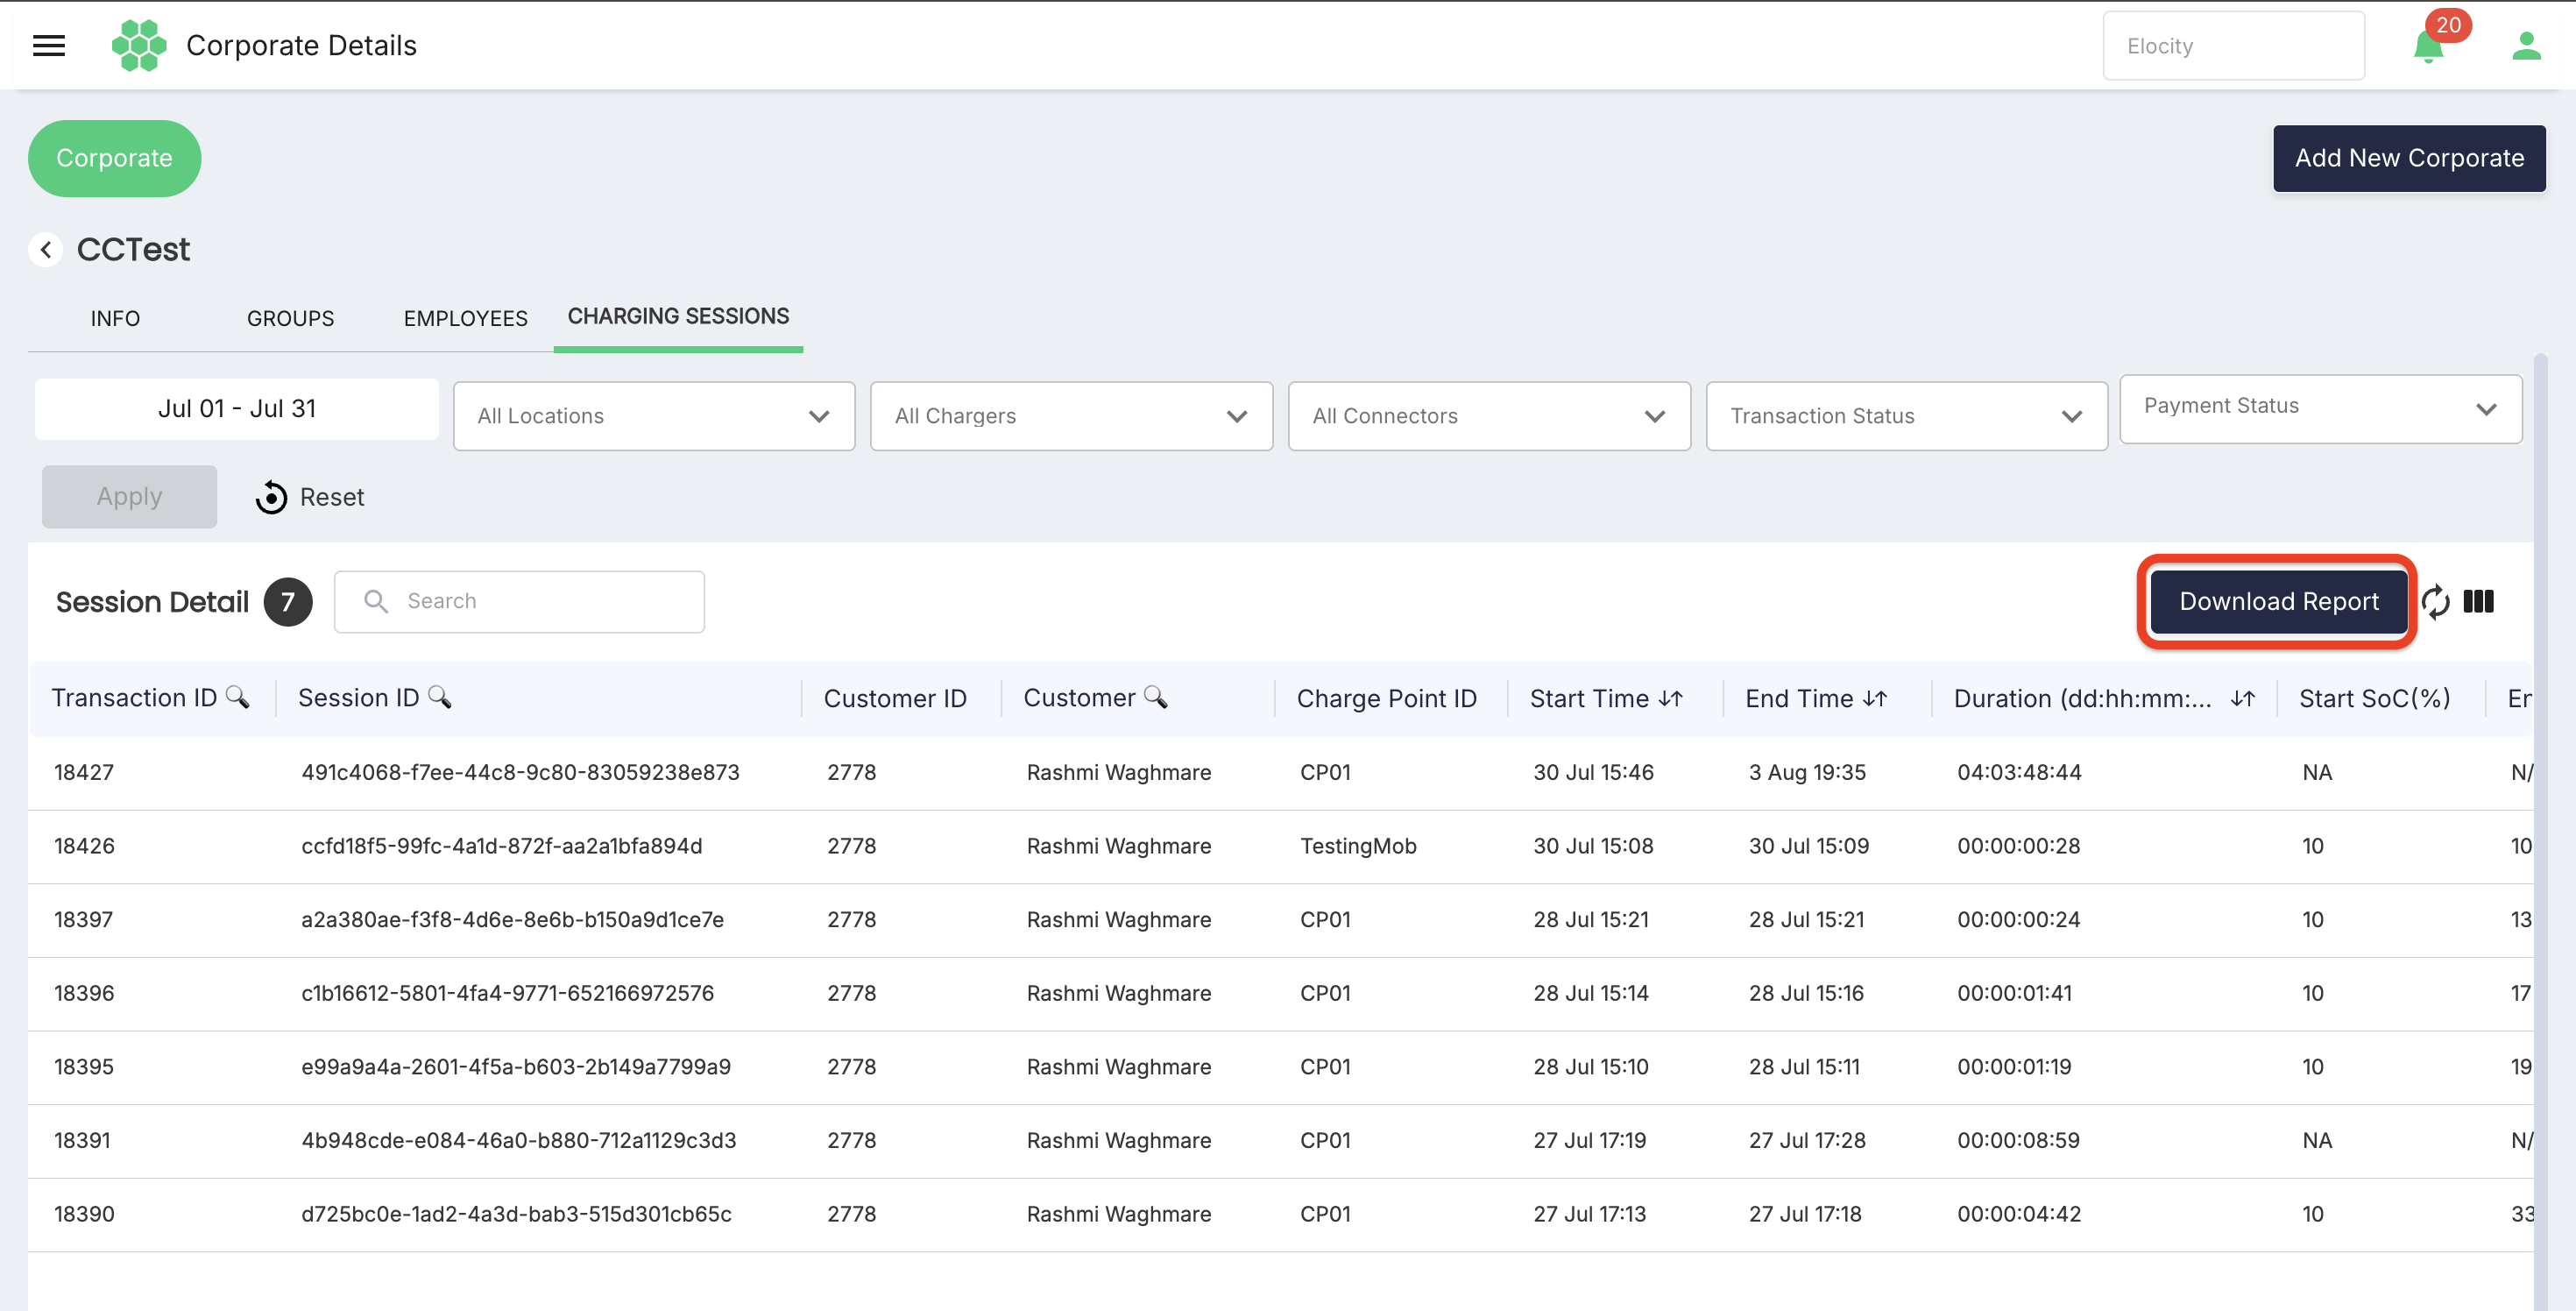
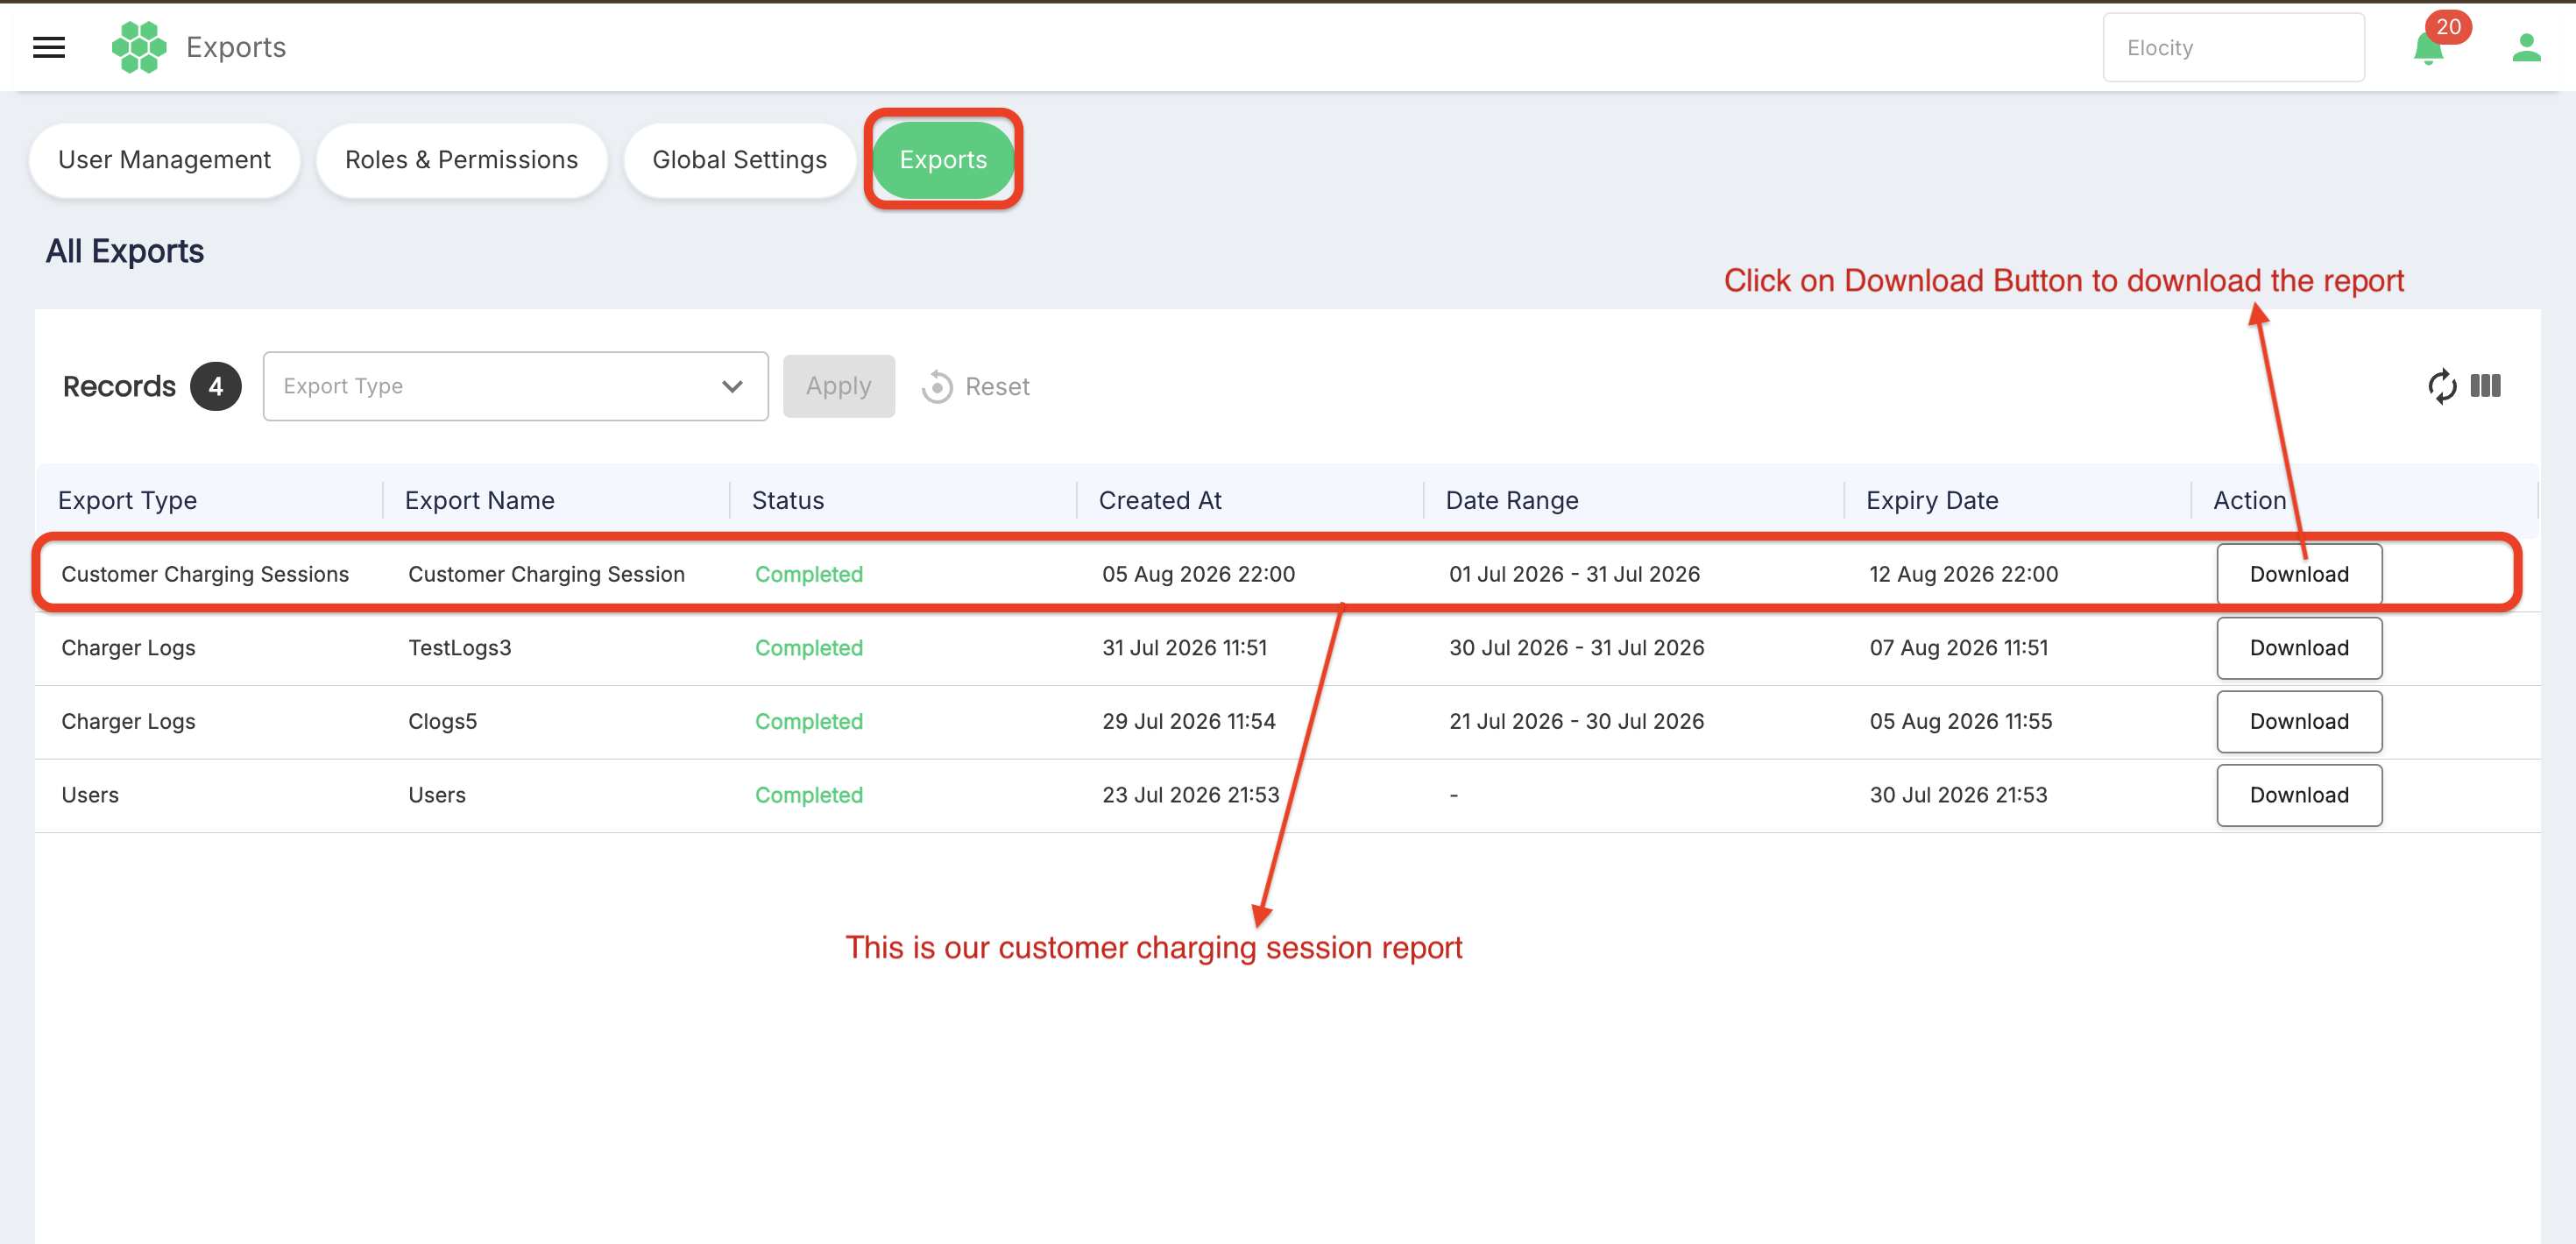
- Use the Corporate CHARGING SESSIONS export action when enabled, or open Administration > Exports.
- Choose Customer Charging Sessions or the approved session export type.
- Set the date range and Corporate/customer scope, then submit the export request.
- Monitor the export registry until Status is Completed.
- Select Download before the listed Expiry Date.
- Store the file in the approved business location and follow data-retention rules.
10.3 Export registry
The verified Exports screen provides Export Type filtering and a registry with Export Type, Export Name, Status, Created At, Date Range, Expiry Date, and Action. Completed jobs expose Download.
10.4 Relevant verified export types
- Customers
- Customer Charging Sessions
- Charging Session
- Transactions Data
- Top Corporates By Sessions
- Top Corporates By Revenue
- Top Corporates By Discounts
- Charging Cost and Energy Consumed analytics
CAUTION: Time-limited files Completed exports include an Expiry Date. Download and store approved files before expiry; regenerate an expired job rather than using an untracked copy.
11. Grant Web Users Access to Corporates
11.1 Add a web user
- Open Administration > User Management.
- Select Add New User.
- Enter First Name, Last Name, Primary Email, and Contact Number.
- Select the required Role.
- Select the permitted Network locations.
- Use the Corporate Access dropdown to select one or more Corporates when the control is enabled for the chosen role and tenant.
- Leave two-factor authentication enabled unless an approved policy permits Disable Two-Factor Authentication.
- Select Save and complete activation as required.
- Sign in or impersonate only through an approved test method and verify that the user can see only assigned Corporates and networks.
IMPORTANT: Corporate Access control The verified Add New User screen showed Role, Network, and two-factor controls, but the current role did not expose a Corporate Access dropdown. If the dropdown is absent, verify that the chosen role has Corporate permissions and that Corporate Access is enabled for the tenant; do not broaden network access as a substitute.
11.2 Access review
- Review Corporate access when a user's job changes.
- Remove access promptly during offboarding.
- Confirm finance users have only the exports and settlement capabilities they need.
- Keep two-factor authentication enabled by default.
- Periodically compare role permissions, network scope, and Corporate assignments.
12. End-to-End Use Cases
| ID | Use case | Primary flow |
|---|---|---|
| UC-01 | Onboard a new Corporate | Create Corporate; select network and contract; verify unique parent ID, parent wallet, and payment mode; create at least one group. |
| UC-02 | Organize departments | Create multiple groups such as Operations, Executives, or Parking; configure discount and bulk-settlement behavior per group. |
| UC-03 | Add one new employee | Use SINGLE; enter identity and contact details; choose group; optionally assign RFID; verify parent relationship and no employee wallet. |
| UC-04 | Bulk onboard employees | Download the CSV template; populate eligible customers; upload; correct failures; verify group and parent association. |
| UC-05 | Migrate existing customers | Use Migrate to Corporate; select eligible customers; select Corporate and group; verify no conflicting corporate-group membership. |
| UC-06 | Move employees between groups | Choose Change Employee Group; select target group and employees; confirm; verify new discount/settlement policy for future activity. |
| UC-07 | Issue physical RFID | Request physical card; charge processing fee to parent; fulfill card; add/activate RFID with expiry; confirm employee association. |
| UC-08 | Safely remove an employee | Check employee sessions; block removal if ongoing; remove from Corporate and group after completion; retain history. |
| UC-09 | Reconcile a prepaid Corporate | Review parent wallet debits, group discount, RFID fees, and sessions; top up as needed; export evidence. |
| UC-10 | Settle a postpaid Corporate | Review period sessions and exceptions; consolidate bulk-settlement groups; reconcile parent invoice or settlement. |
| UC-11 | Audit Corporate usage | Filter Corporate sessions; inspect energy and cost; export customers and charging sessions; retain approved evidence. |
| UC-12 | Grant delegated web access | Create web user; choose role, network, and Corporate Access; retain 2FA; verify least-privilege visibility. |
12.1 New Corporate rollout sequence
- Approve corporate contract, contacts, network scope, payment mode, discounts, RFID fees, and settlement policy.
- Create the Corporate and verify parent financial provisioning.
- Create groups and configure discount / bulk settlement.
- Create restricted web-user access for corporate administrators.
- Add or migrate employees and assign each to a group.
- Assign or request RFID credentials.
- Run a controlled charging test and verify parent funding, session attribution, and discount.
- Validate exports and settlement evidence before production launch.
13. Validations, Exceptions, and Troubleshooting
13.1 Validation summary
| Situation | Expected behavior | Operator response |
|---|---|---|
| No network selected | Corporate form blocks completion and shows the network-location validation. | Select at least one eligible location. |
| Group name or discount empty | Group form shows the verified required-field messages. | Enter both values; use 0 for no discount. |
| Employee required field empty | Employee form shows a field-specific error. | Complete name, email, contact, and group. |
| Duplicate Corporate Code | Save should be rejected because the code must be unique. | Use the approved unique code; do not rename another Corporate casually. |
| Employee already in a corporate group | Bulk/migration workflow should not create conflicting membership. | Use View or Change Employee Group instead of duplicating. |
| Employee has ongoing session | Removal must be blocked. | End and settle the session, refresh, then retry. |
| Insufficient prepaid parent balance | Charging or physical-RFID fee may be blocked or pending. | Fund the parent wallet and retry according to policy. |
| Corporate Access dropdown absent | Role or feature configuration does not expose the control. | Verify Corporate permission and feature enablement; do not over-scope Network. |
| Export not completed | Download is unavailable until processing completes. | Refresh later and review failed-job details if status does not advance. |
| Export expired | The prior download is no longer available. | Generate a new approved export. |
13.2 Corporate or group is not visible
- Confirm the correct business tenant is selected.
- Clear Search and column filters, then Refresh.
- Verify the web user's Corporate Access and Network scope.
- Verify contract and account status.
- Ask an administrator to review role permissions if the module or action is hidden.
13.3 Employee cannot charge
- Confirm employee Account Status is Active.
- Confirm the employee belongs to the correct Corporate group.
- Confirm RFID status is Active and the expiry date has not passed.
- Confirm the location is in the Corporate network scope.
- For prepaid, confirm the parent wallet can cover the session.
- Review session or station logs through the approved support workflow.
13.4 Discount or settlement appears incorrect
- Confirm the employee's group at session start.
- Confirm the group's Discount(%) and Bulk Settlement setting.
- Confirm the CPO-corporate pricing agreement is active for the location and date.
- Compare the session tariff, discount, cost, and settlement export.
- Do not edit settled transactions directly; use the approved adjustment process.
14. Operational Checklists
14.1 Corporate launch checklist
- Corporate name and unique code verified.
- Primary contact and contract dates verified.
- Network location scope verified.
- Parent ID tag created and unique.
- Parent wallet or postpaid account created.
- Prepaid/postpaid mode verified.
- Groups, discount, and bulk settlement verified.
- Web-user Corporate Access and Network scope tested.
- Employees associated with parent and no individual wallets created.
- RFID and physical-card charge policy tested.
- Test charging session appears under Corporate and employee.
- Customer and session export process tested.
14.2 Monthly finance checklist
- Confirm settlement period and contract status.
- Review completed, failed, and ongoing sessions.
- Reconcile energy, cost, group discount, and RFID fees.
- Validate prepaid wallet debits or postpaid accruals.
- Complete bulk settlement and record reference.
- Download customer and session evidence before export expiry.
- Restrict and archive files according to policy.
14.3 Employee offboarding checklist
- Confirm employee identity and Corporate group.
- Check for ongoing charging sessions.
- Deactivate or recover physical RFID as policy requires.
- Remove the employee only after the session check passes.
- Verify removal from Corporate and group.
- Retain historical session and settlement records.
15. Glossary
| Term | Definition |
|---|---|
| Corporate | An organization registered in HIEV CPMS with a contract, network scope, parent identity, groups, and employees. |
| Parent ID tag | The unique parent identifier that owns or represents the Corporate's financial account. |
| Parent wallet | The prepaid wallet or financial account that funds Corporate charging and eligible RFID processing charges. |
| Child account | An employee customer record associated with the Corporate parent. |
| Employee | An authorized Corporate driver. The employee has no individual wallet in the required Corporate model. |
| Corporate group | A collection of employees sharing a group discount and bulk-settlement configuration. |
| Discount | A percentage reduction configured for eligible Corporate group charging sessions. |
| Bulk settlement | Consolidated settlement of eligible employee sessions at the Corporate parent level. |
| RFID | A radio-frequency identifier used to authorize charging for an employee. |
| Prepaid | A payment mode in which the parent wallet is funded before use and debited for charges. |
| Postpaid | A payment mode in which charges accrue and are paid later according to approved terms. |
| Ongoing session | A charging session that has started but has not reached a completed end state. |
| Corporate Access | Web-user scope limiting which Corporates the user can view or manage. |
Appendix A. Screen and Field Reference
A.1 Corporate screens
| Screen | Key controls / fields |
|---|---|
| Corporate List | Add New Corporate; Search; Migrate to Corporate; Refresh; Column Filter; corporate rows. |
| Add New Corporate | Corporate Name; Corporate Code; Website URL; Primary Contact Name/Email; Network; Contact Number; Contract Start Date; Expiry Date or Number of Days; Cancel; Save. |
| Corporate Details - INFO | Read-only corporate fields and Edit. |
| Corporate Details - GROUPS | Search; Add New Group; Refresh; Column Filter; Name; Employees; Discount(%); Bulk Settlement. |
| Corporate Details - EMPLOYEES | Search; Change Employee Group; Add New Employee; Refresh; Column Filter; status, identity, group, balance view, contact, and Action. |
| Corporate Details - CHARGING SESSIONS | Date, location, charger, connector, transaction status, payment status, Apply, Reset, Search, Refresh, Column Filter, session data. |
A.2 Employee and RFID screens
| Screen | Key controls / fields |
|---|---|
| Add New Employee - SINGLE | First Name; Last Name; Primary Email; Contact Number; Select Group; optional RFID; Cancel; Save. |
| Add New Employee - MULTIPLE | Choose csv file; Download CSV Template. |
| Change Employee Group | Target Group; employee search/selection; selected count; Cancel; Change Employee Group. |
| Employee Details - INFO | Registration Date; First Name; Last Name; Primary Email; Group; Contact Number; Edit. |
| Employee Details - RFID | Search; Add Rfid; RFID; RFID Status; Expiry Date; Action. |
| Add RFID | RFID; Status; Expiry Date (dd-mm-yyyy); Cancel; Save. |
| Employee Details - FEEDBACK | Employee feedback records when available. |
| Employee Details - CHARGING SESSIONS | Date and operational/payment filters plus employee transaction grid. |
A.3 Connected administration screens
| Screen | Key controls / fields |
|---|---|
| User Management - Add New User | Name, email, contact, Role, Network, Corporate Access when enabled, Disable Two-Factor Authentication, Cancel, Save. |
| Exports | Export Type filter; Apply; Reset; Export Type; Export Name; Status; Created At; Date Range; Expiry Date; Download. |
Appendix B. Requirement Coverage Matrix
| Requirement | Manual coverage | Operational interpretation |
|---|---|---|
| Unique parent ID and wallet | Sections 1, 4, 9 | Parent is the only wallet/billing owner; provisioning verification is mandatory. |
| Multiple groups, discount, bulk settlement | Sections 5 and 9 | Group creation, discount, bulk settlement, and reconciliation documented. |
| Network and prepaid/postpaid | Sections 4 and 9 | Network selection verified; payment mode documented as deployment billing configuration. |
| Employees linked to parent, no wallet | Sections 1 and 6 | Explicit ownership rule and onboarding verification included. |
| Remove employee after ongoing-session check | Sections 6 and 8 | Safe removal guard and blocking behavior documented. |
| Download child accounts and sessions | Section 10 | Customers and Customer Charging Sessions export paths documented. |
| Corporate dropdown for web user | Section 11 | Corporate Access flow and missing-control remediation documented. |
| Physical RFID and parent processing charge | Section 7 | Request, fulfillment, fee ownership, and insufficient-funds behavior documented. |
NOTE: End of manual Before relying on a newly enabled feature, test it in the intended tenant and role. Record tenant-specific deviations in local operating procedures without changing the parent-wallet or active-session safety rules.