Customers
Purpose
The Customers module allows an authorized administrator to manage customer accounts and review the customer-related records maintained by the HIEV platform.
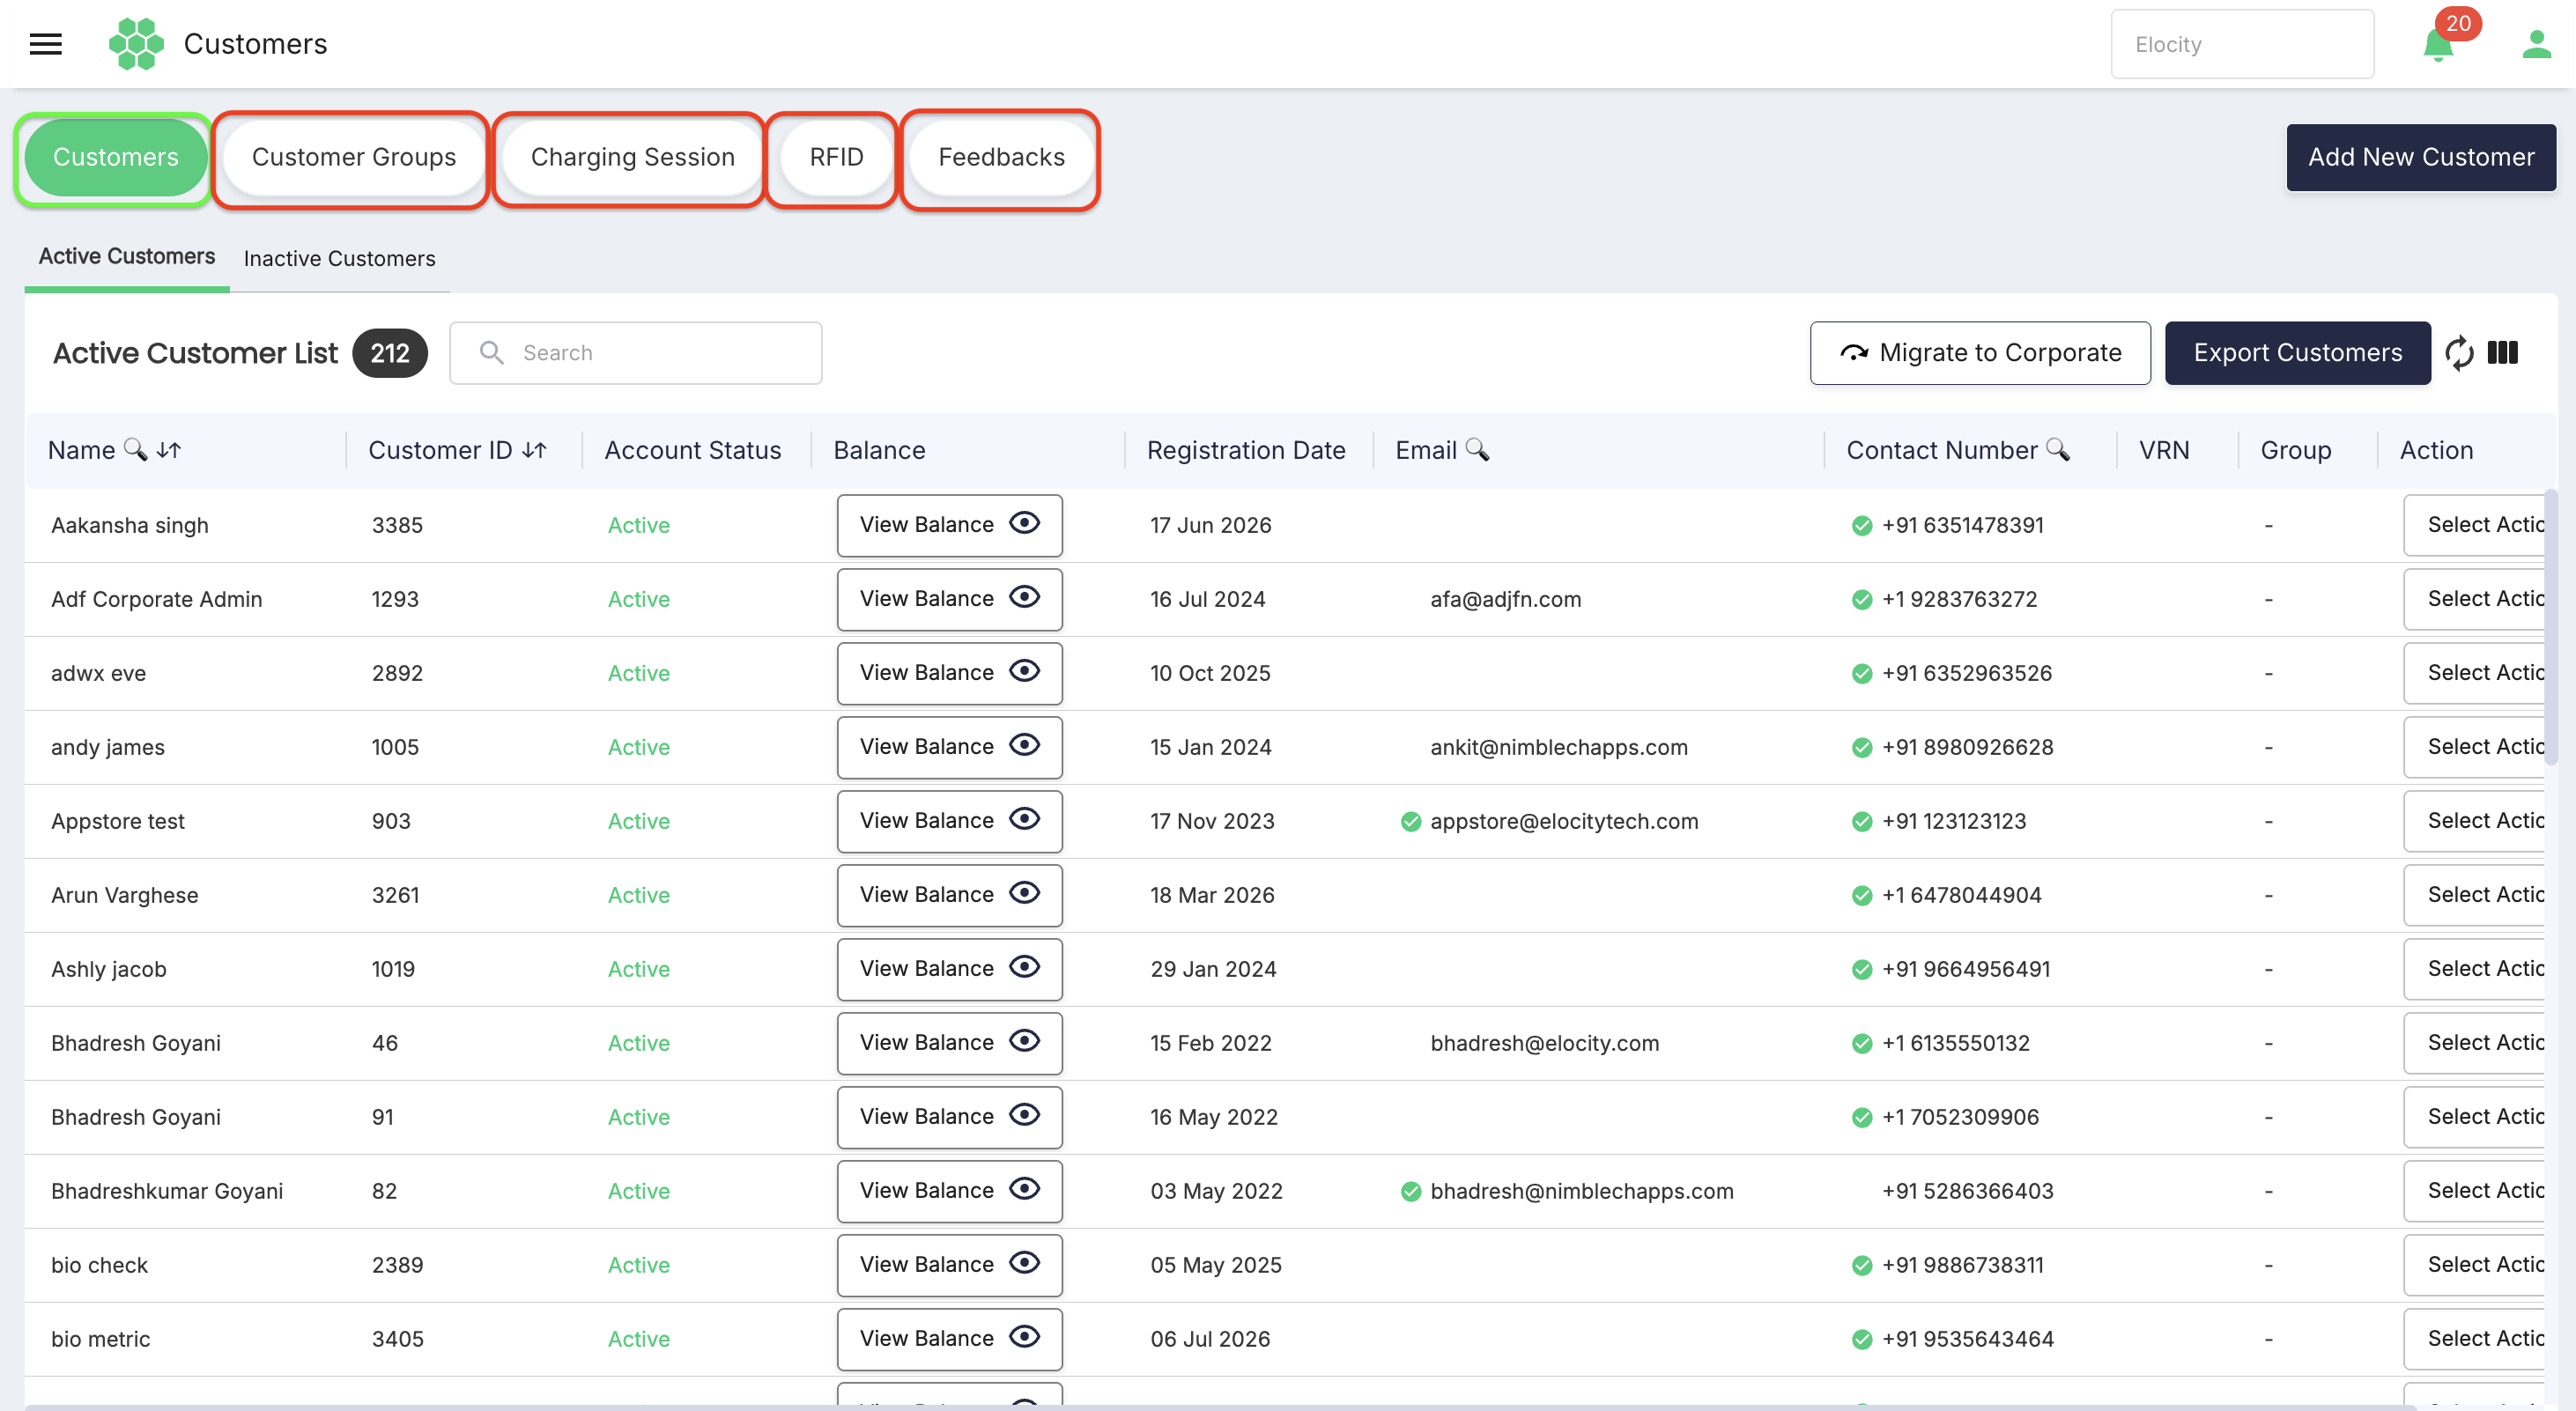
The module combines five connected work areas:
- Customers — Create customer accounts, review active and inactive customers, view customer details, edit profiles, check balances, recover accounts, export records, and migrate customers to corporate groups.
- Customer Groups — Organize customers into groups and maintain group membership.
- Charging Session — Review charging transactions across customers, filter the results, download reports, and access invoice-related actions.
- RFID — Review and maintain RFID credentials associated with customers.
- Feedbacks — Review customer ratings and written feedback associated with charging sessions.
Customer details can include personal contact information, vehicle records, RFID credentials, wallet information, corporate associations, charging transactions, and feedback. Handle this information in accordance with the organization's privacy, retention, and access-control policies.
Customer management lifecycle
- Create a customer account in Add New Customer.
- Add address, vehicle, and RFID information when required.
- Review the account under Customers > Active Customers.
- Open the customer record to review profile information, RFID credentials, feedback, wallet status, and charging sessions.
- Add the customer to a customer group when group-based organization is required.
- Migrate the customer to a corporate group when the customer should become part of a corporate structure.
- Move an account to Inactive Customers when it should no longer remain active.
- Use Recover Account when an inactive account should be restored.
Accessing the module
-
Sign in to the HIEV portal.
-
Confirm the required business in the business selector.
-
Open Customers from the navigation menu.
-
Select the required page:
- Customers
- Customer Groups
- Charging Session
- RFID
- Feedbacks
The records and actions available in the module depend on the selected business and the signed-in user's role-based access control (RBAC) permissions.
Customers page
The Customers page contains separate tabs for active and inactive accounts.
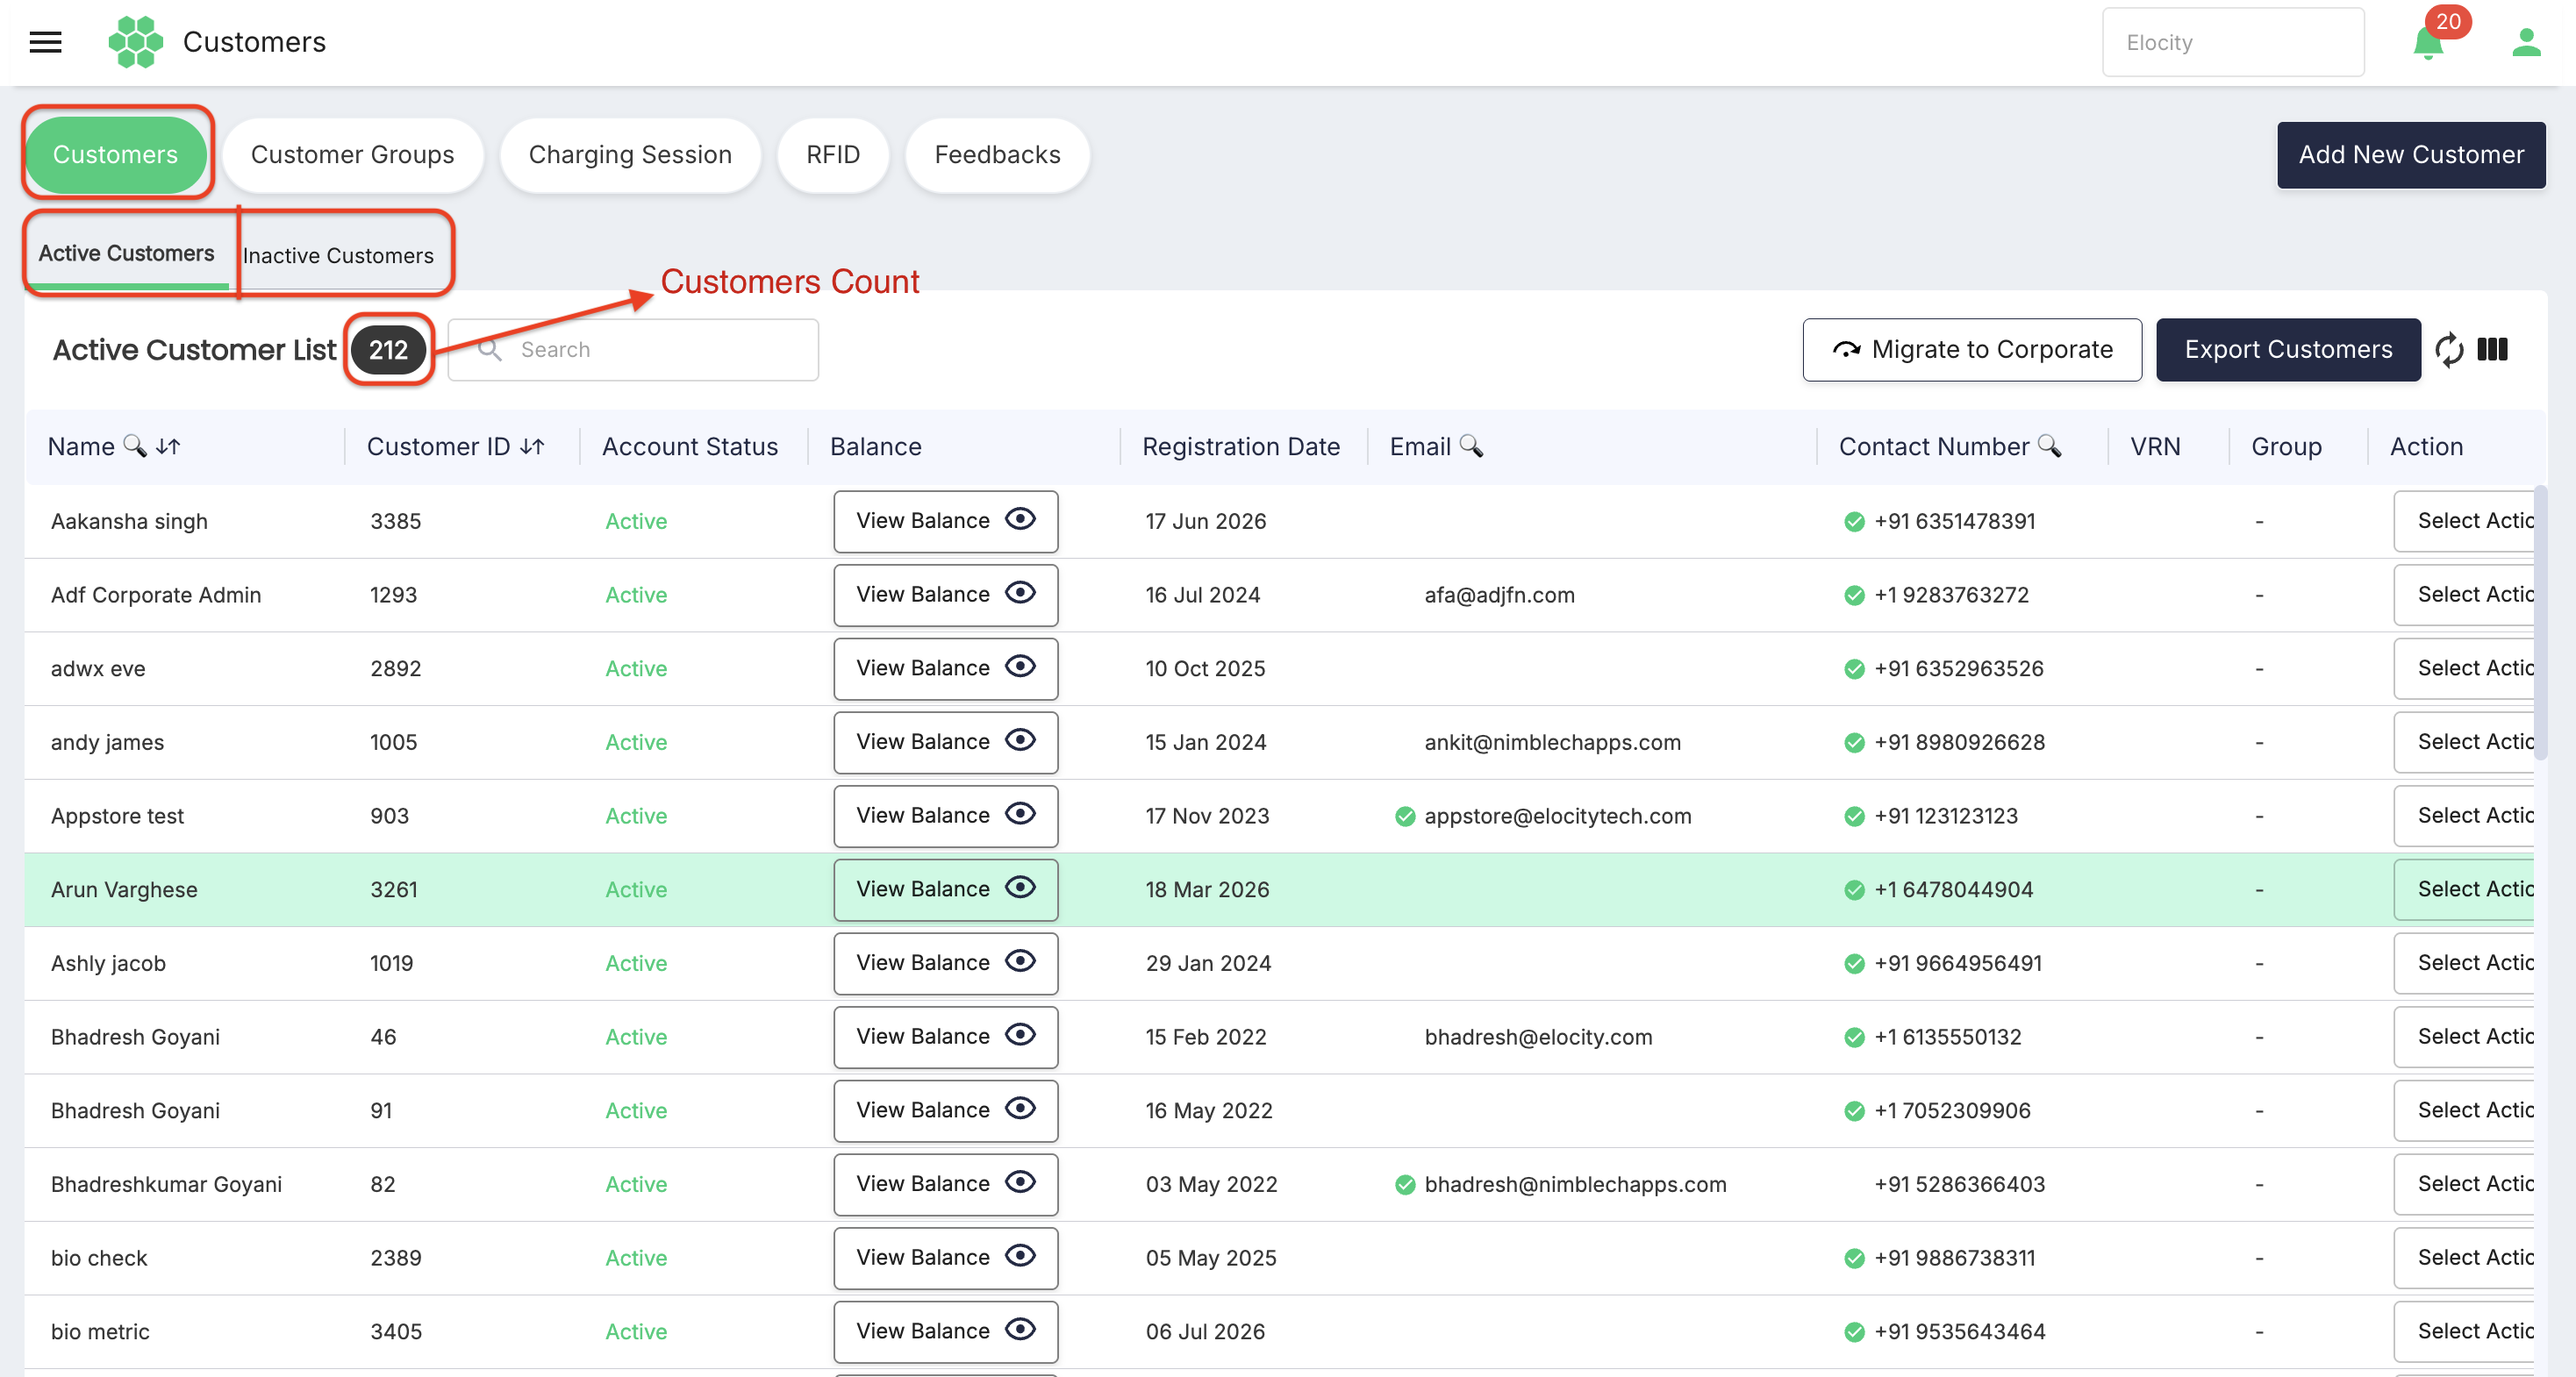
The counter beside the list heading shows the number of customers returned for the selected business and current tab.
Active Customers tab
The Active Customers tab lists customer accounts that are currently active.
| Column | Description |
|---|---|
| Name | Shows the customer's display name. A column-search control is available. |
| Customer ID | Shows the system-generated customer identifier. |
| Account Status | Shows the current account state. The inspected active records displayed Active. |
| Balance | Provides View Balance for displaying the customer's current balance. |
| Registration Date | Shows when the customer account was registered. |
| Shows the primary email when available. A column-search control is available. | |
| Contact Number | Shows the country code and phone number. A column-search control is available. |
| VRN | Shows a vehicle registration number when one is associated with the customer. |
| Group | Shows the customer-group assignment when available. |
| Action | Provides the record-level View and Delete actions in the inspected deployment. |
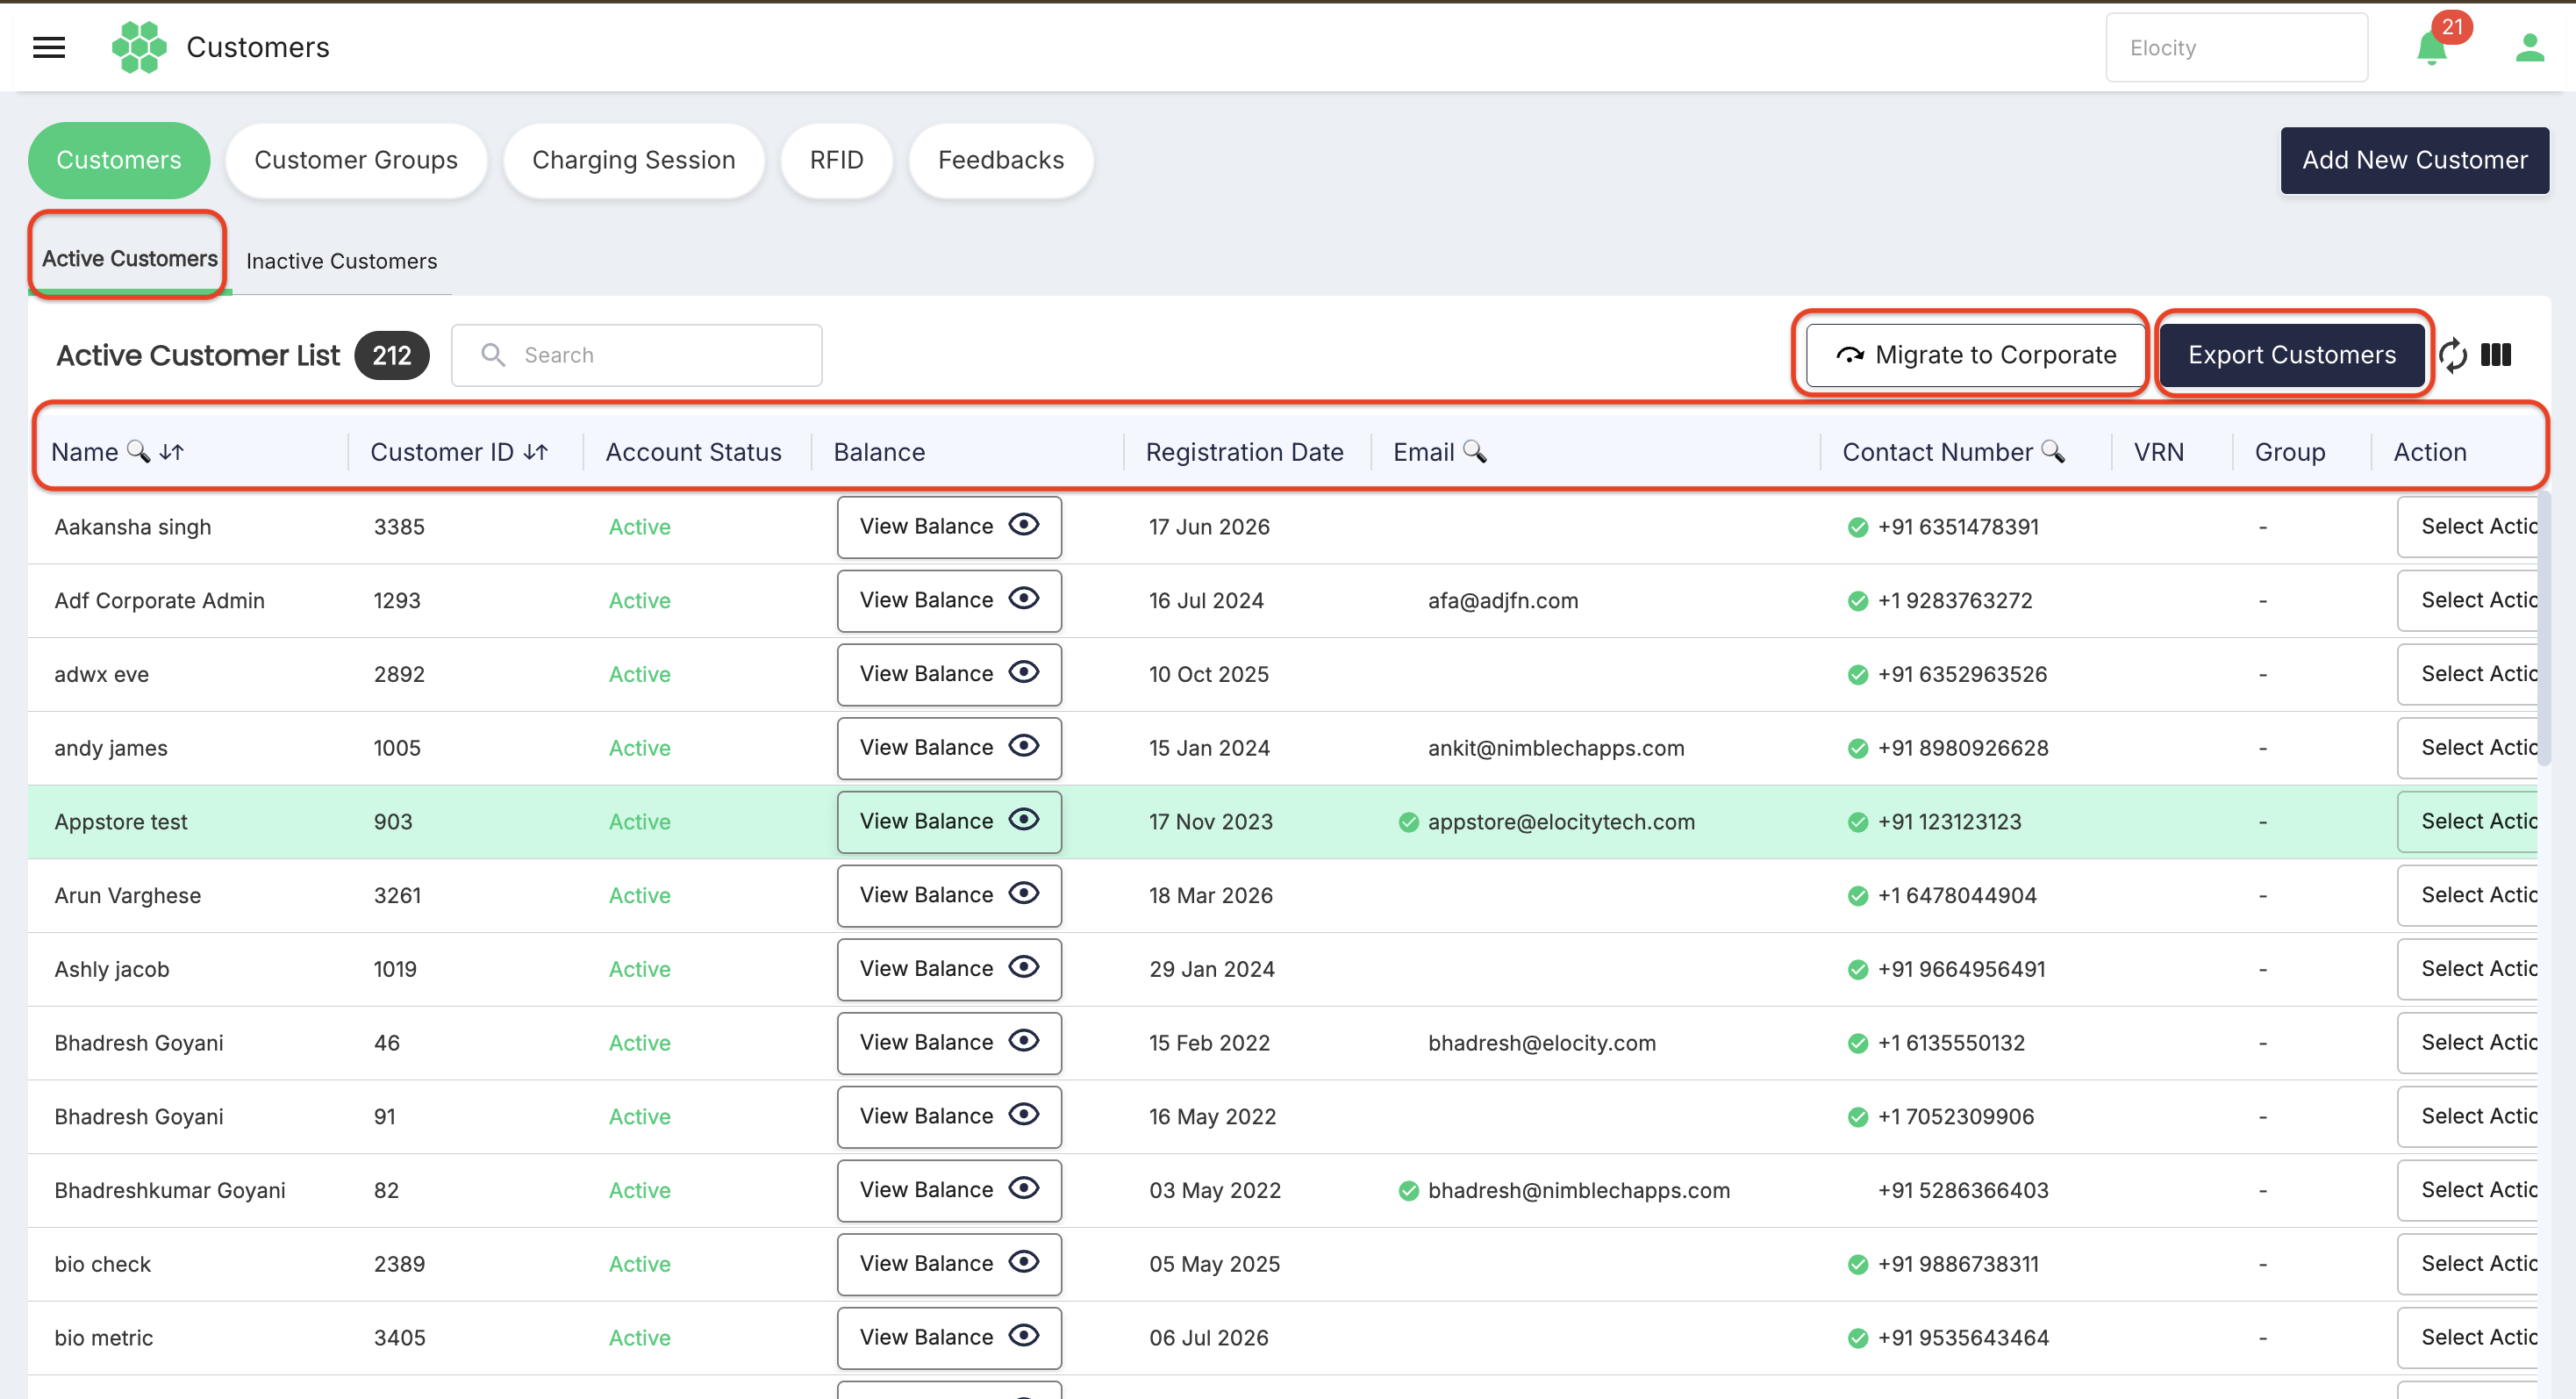
Use Migrate to Corporate to begin the corporate-migration workflow.
Use Export Customers to download the active-customer records as a CSV report. The export is limited to the currently applied filters.
Inactive Customers tab
The Inactive Customers tab lists accounts that have been moved out of active status.
| Column | Description |
|---|---|
| Name | Shows the customer's display name. |
| Customer ID | Shows the system-generated customer identifier. |
| Shows the primary email when available. | |
| Contact Number | Shows the country code and phone number. |
| Deletion Date | Shows when the account was moved to inactive status. |
| Account Status | Shows the current state. The inspected records displayed Inactive. |
| Action | Provides View and Recover Account. |
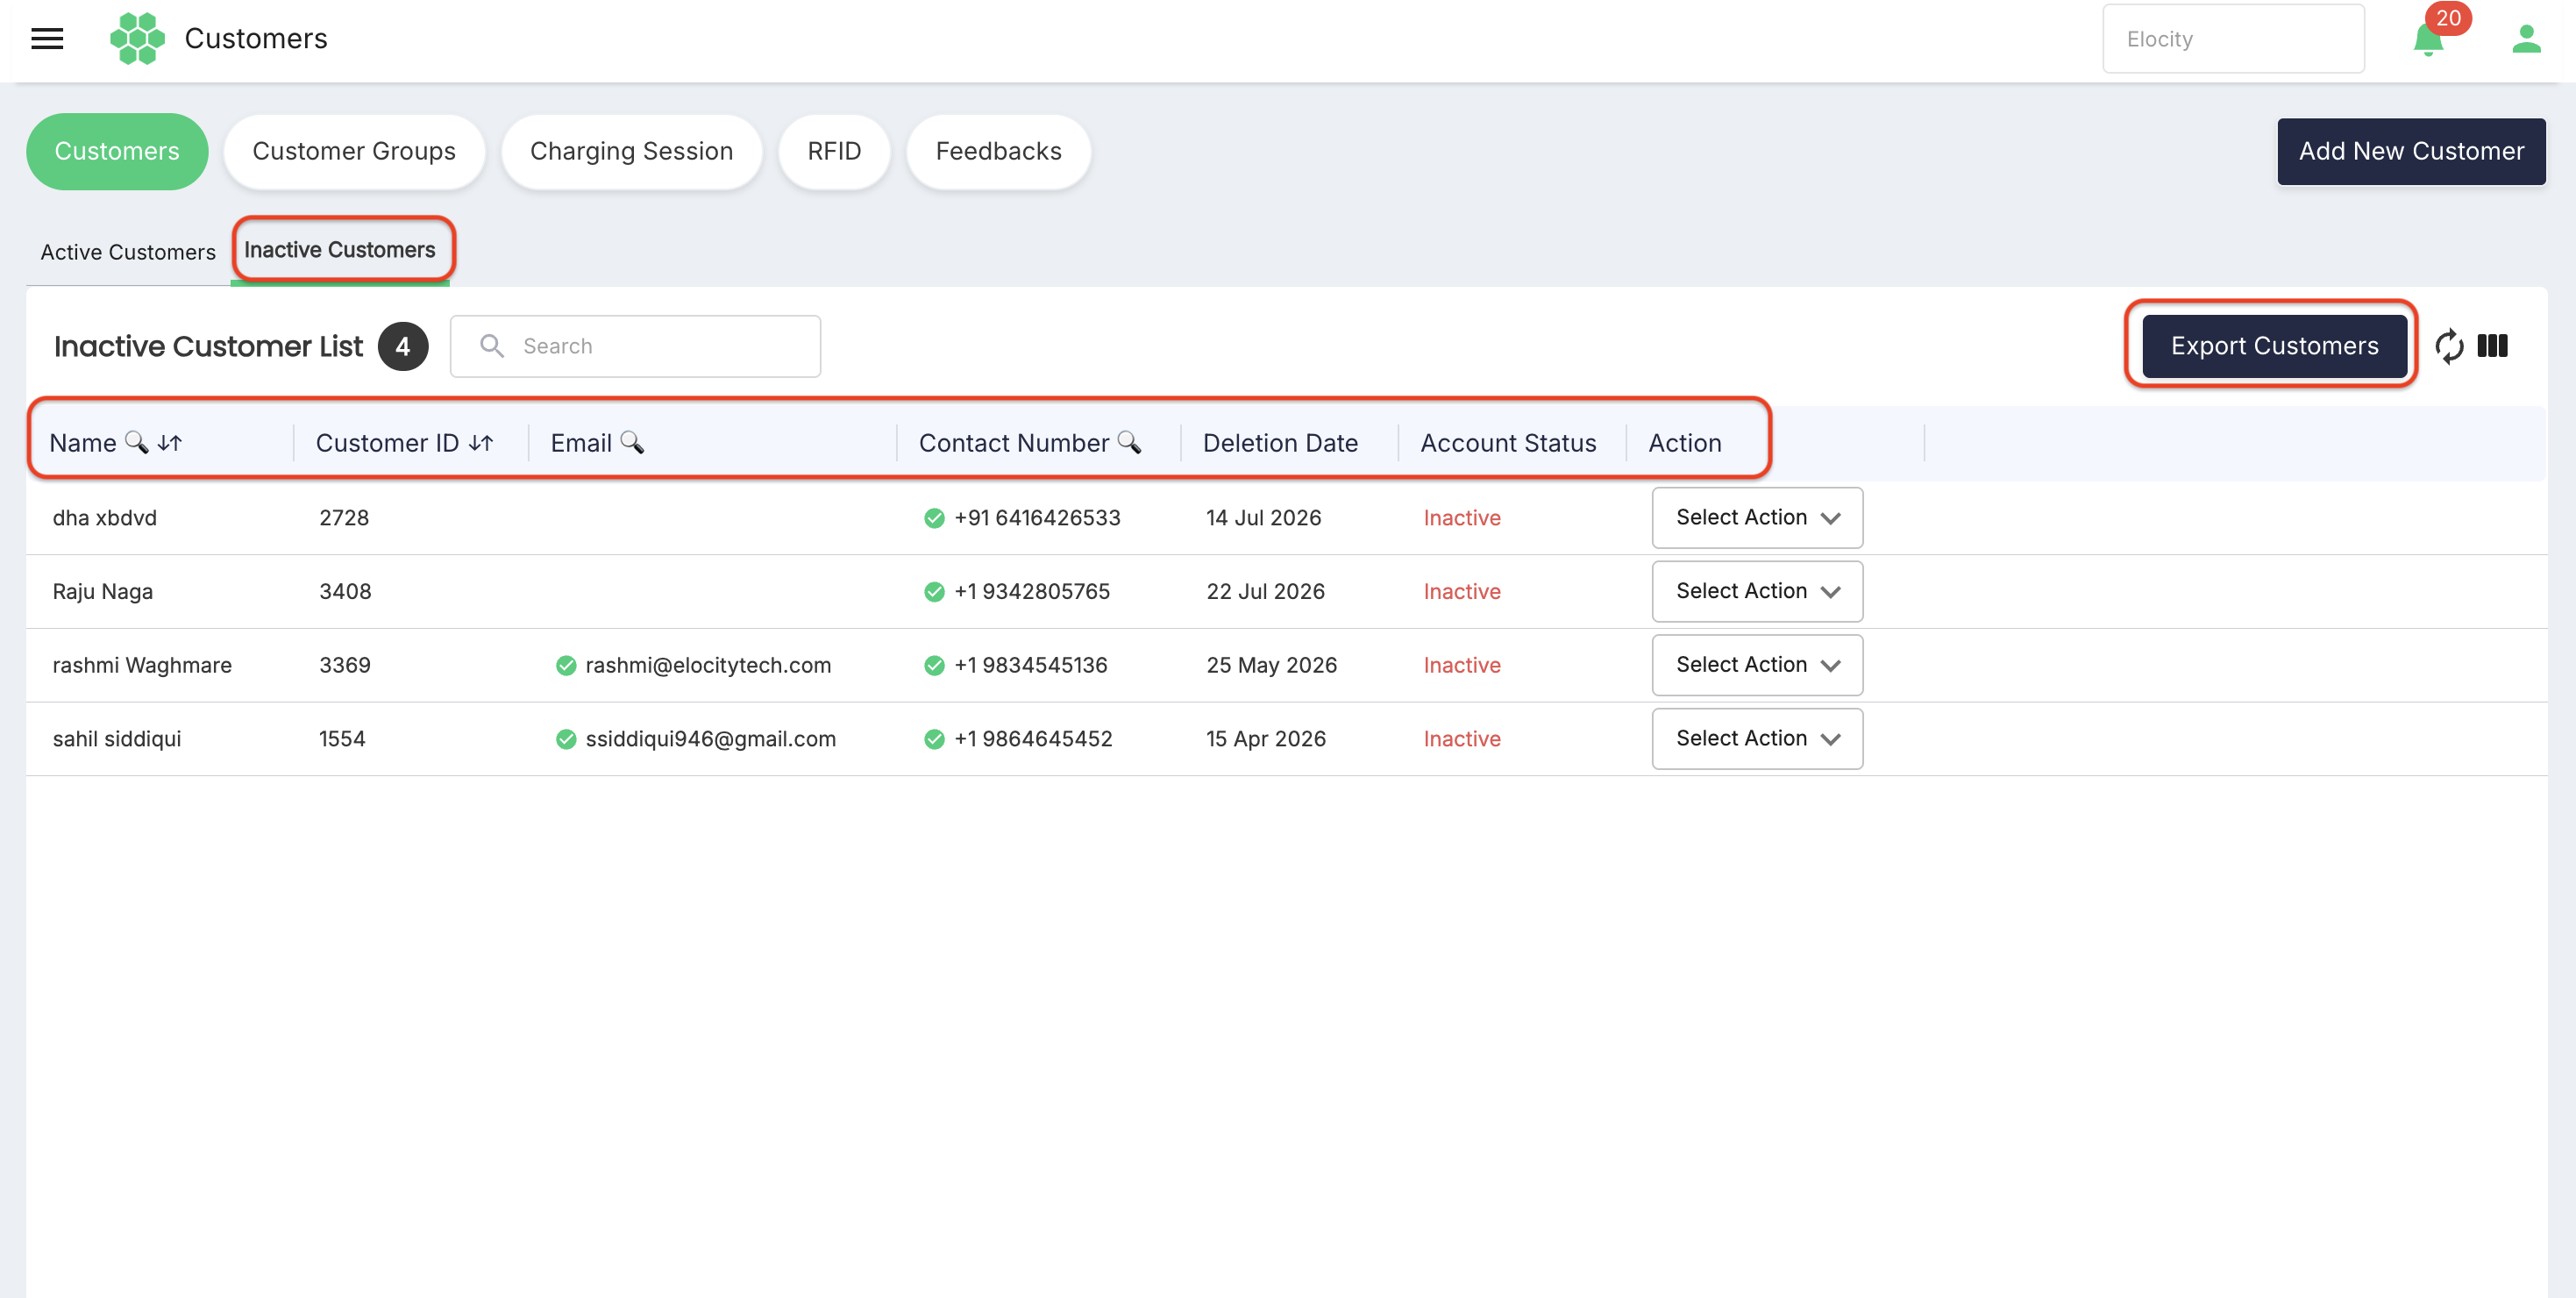
Use Export Customers to download the inactive-customer records as a CSV report. The export is limited to the currently applied filters.
Search, refresh, and column controls
Use Search to filter the records in the current tab.
Where a magnifier is displayed in a column heading, use it to apply a column-specific search.
Select Refresh to request the latest available customer data.
Select Column Filter to open Show / Hide Columns. Select or clear the required columns, then select Apply in the column menu. Deselect All clears the column selections.
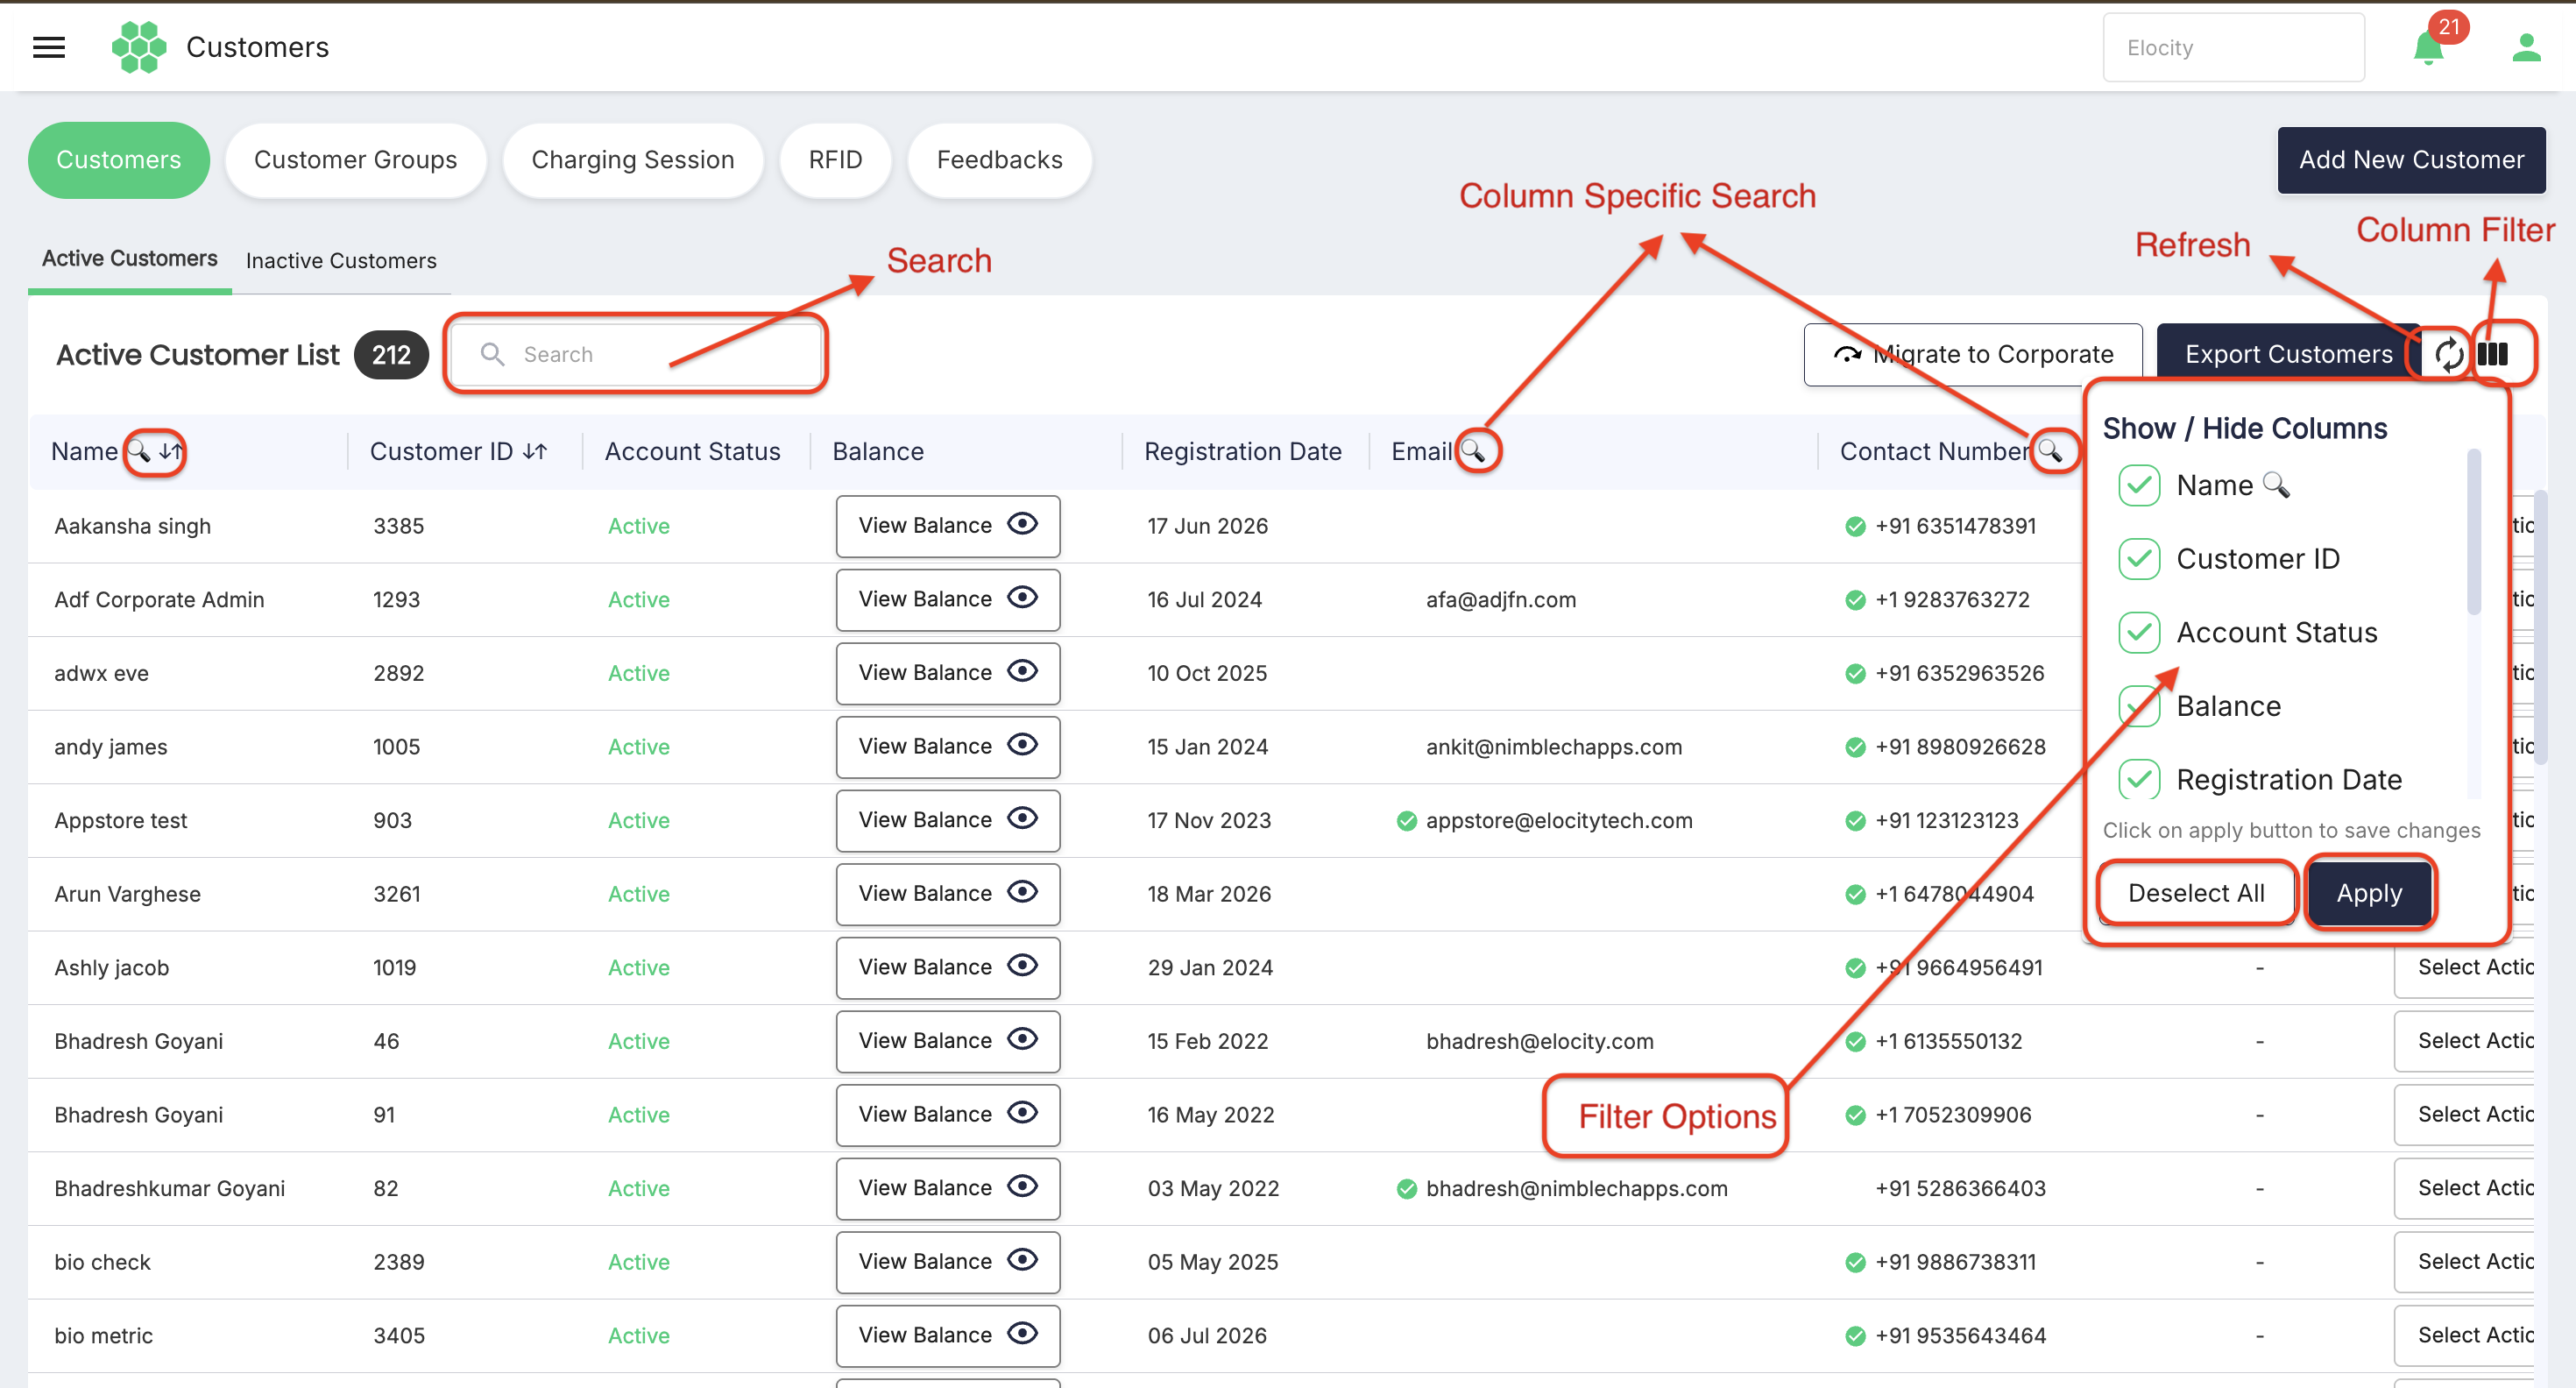
Column visibility changes the on-screen grid layout; it does not change the underlying customer records.
Adding a new customer
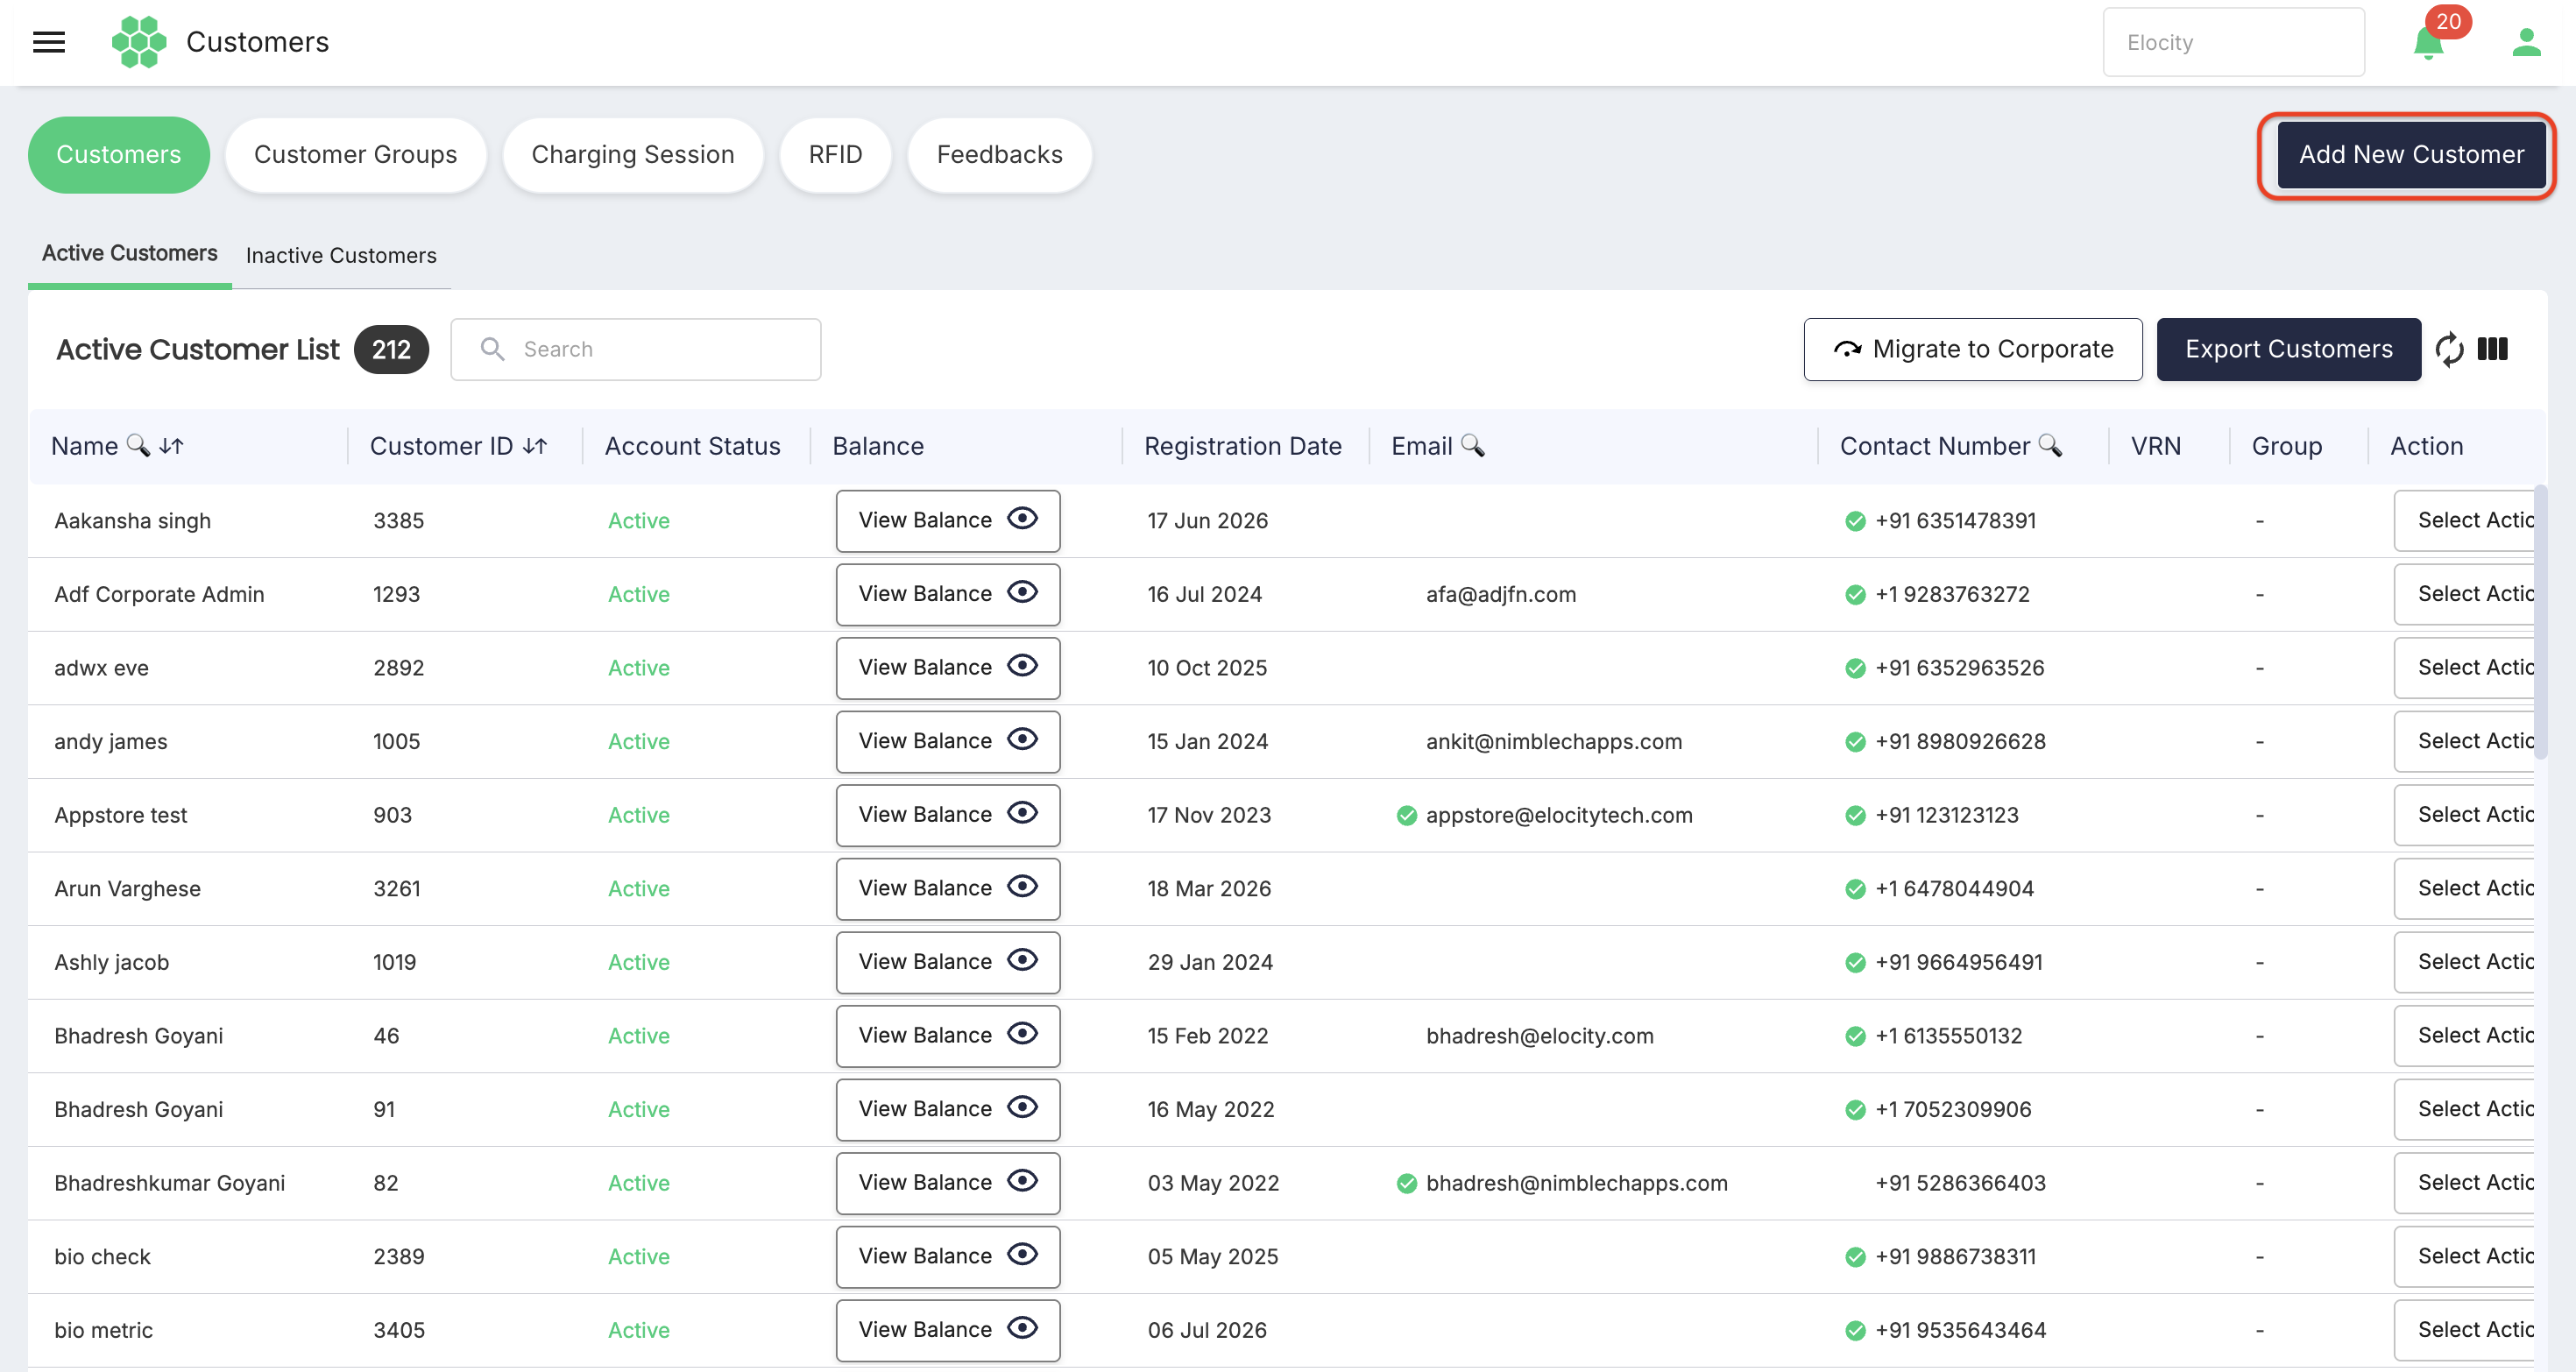
- Open Customers.
- Select Add New Customer.
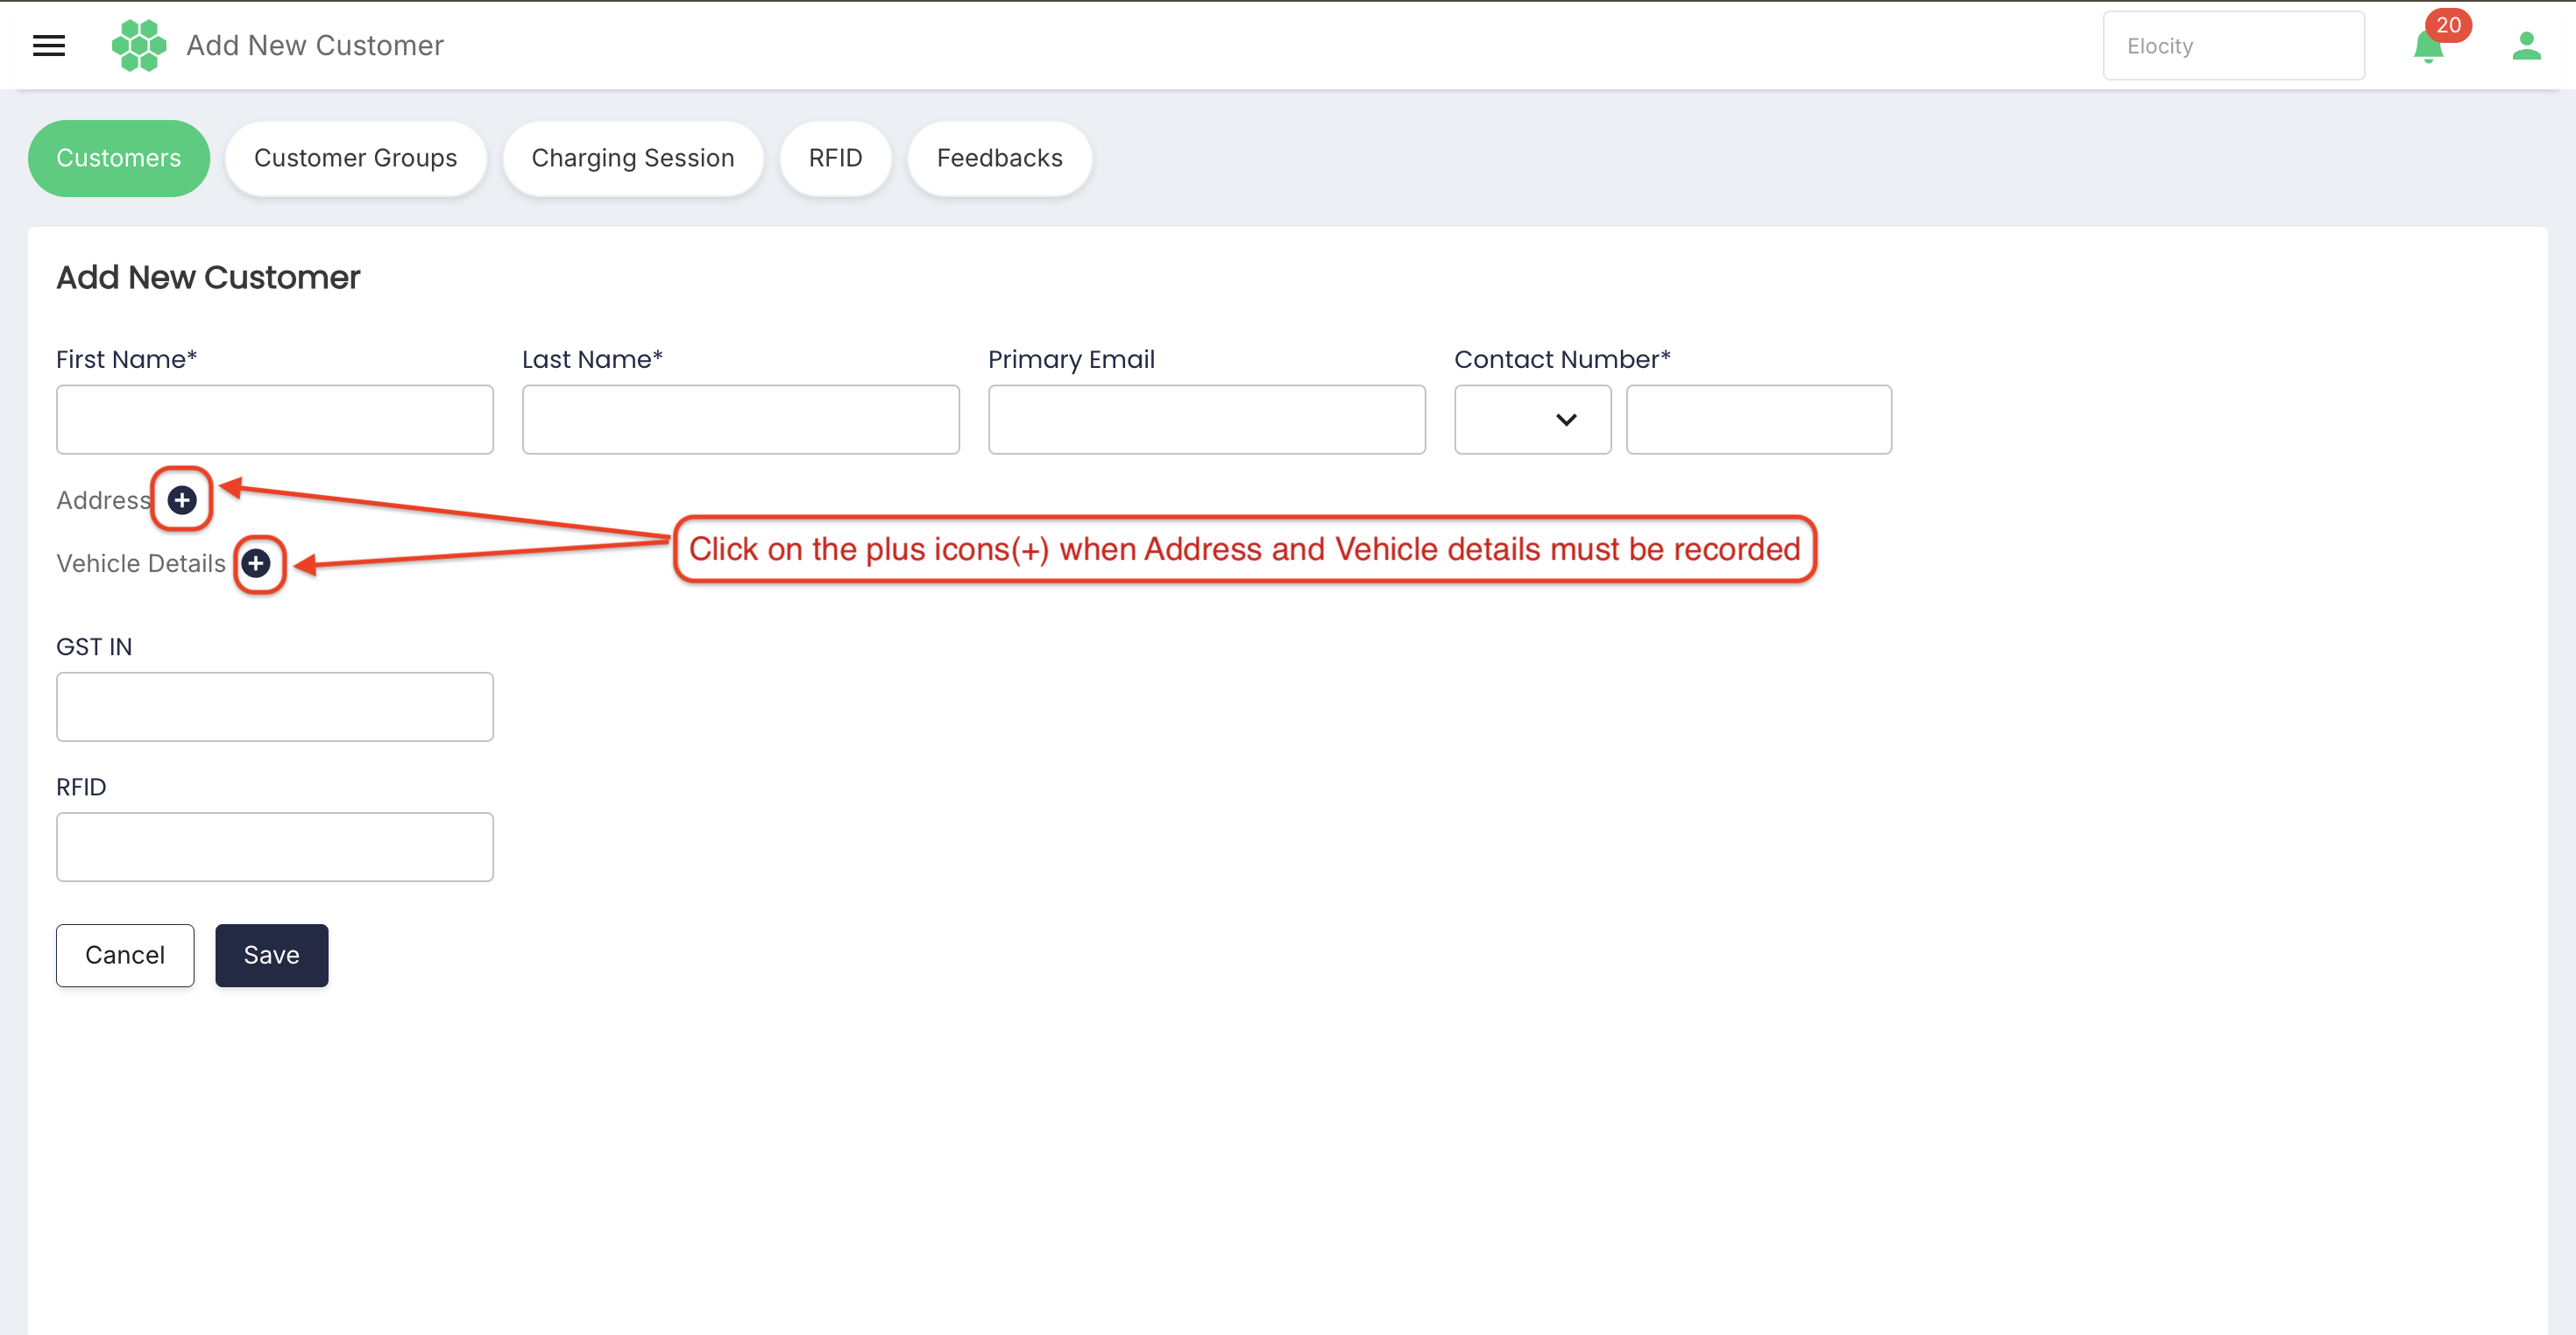
- Complete the required customer fields.
- Select the plus icon beside Address when address details must be recorded.
- Select the plus icon beside Vehicle Details when vehicle details must be recorded.
- Enter an RFID value when one should be associated during customer creation.
- Select Save.
Select Cancel to return without creating the customer.
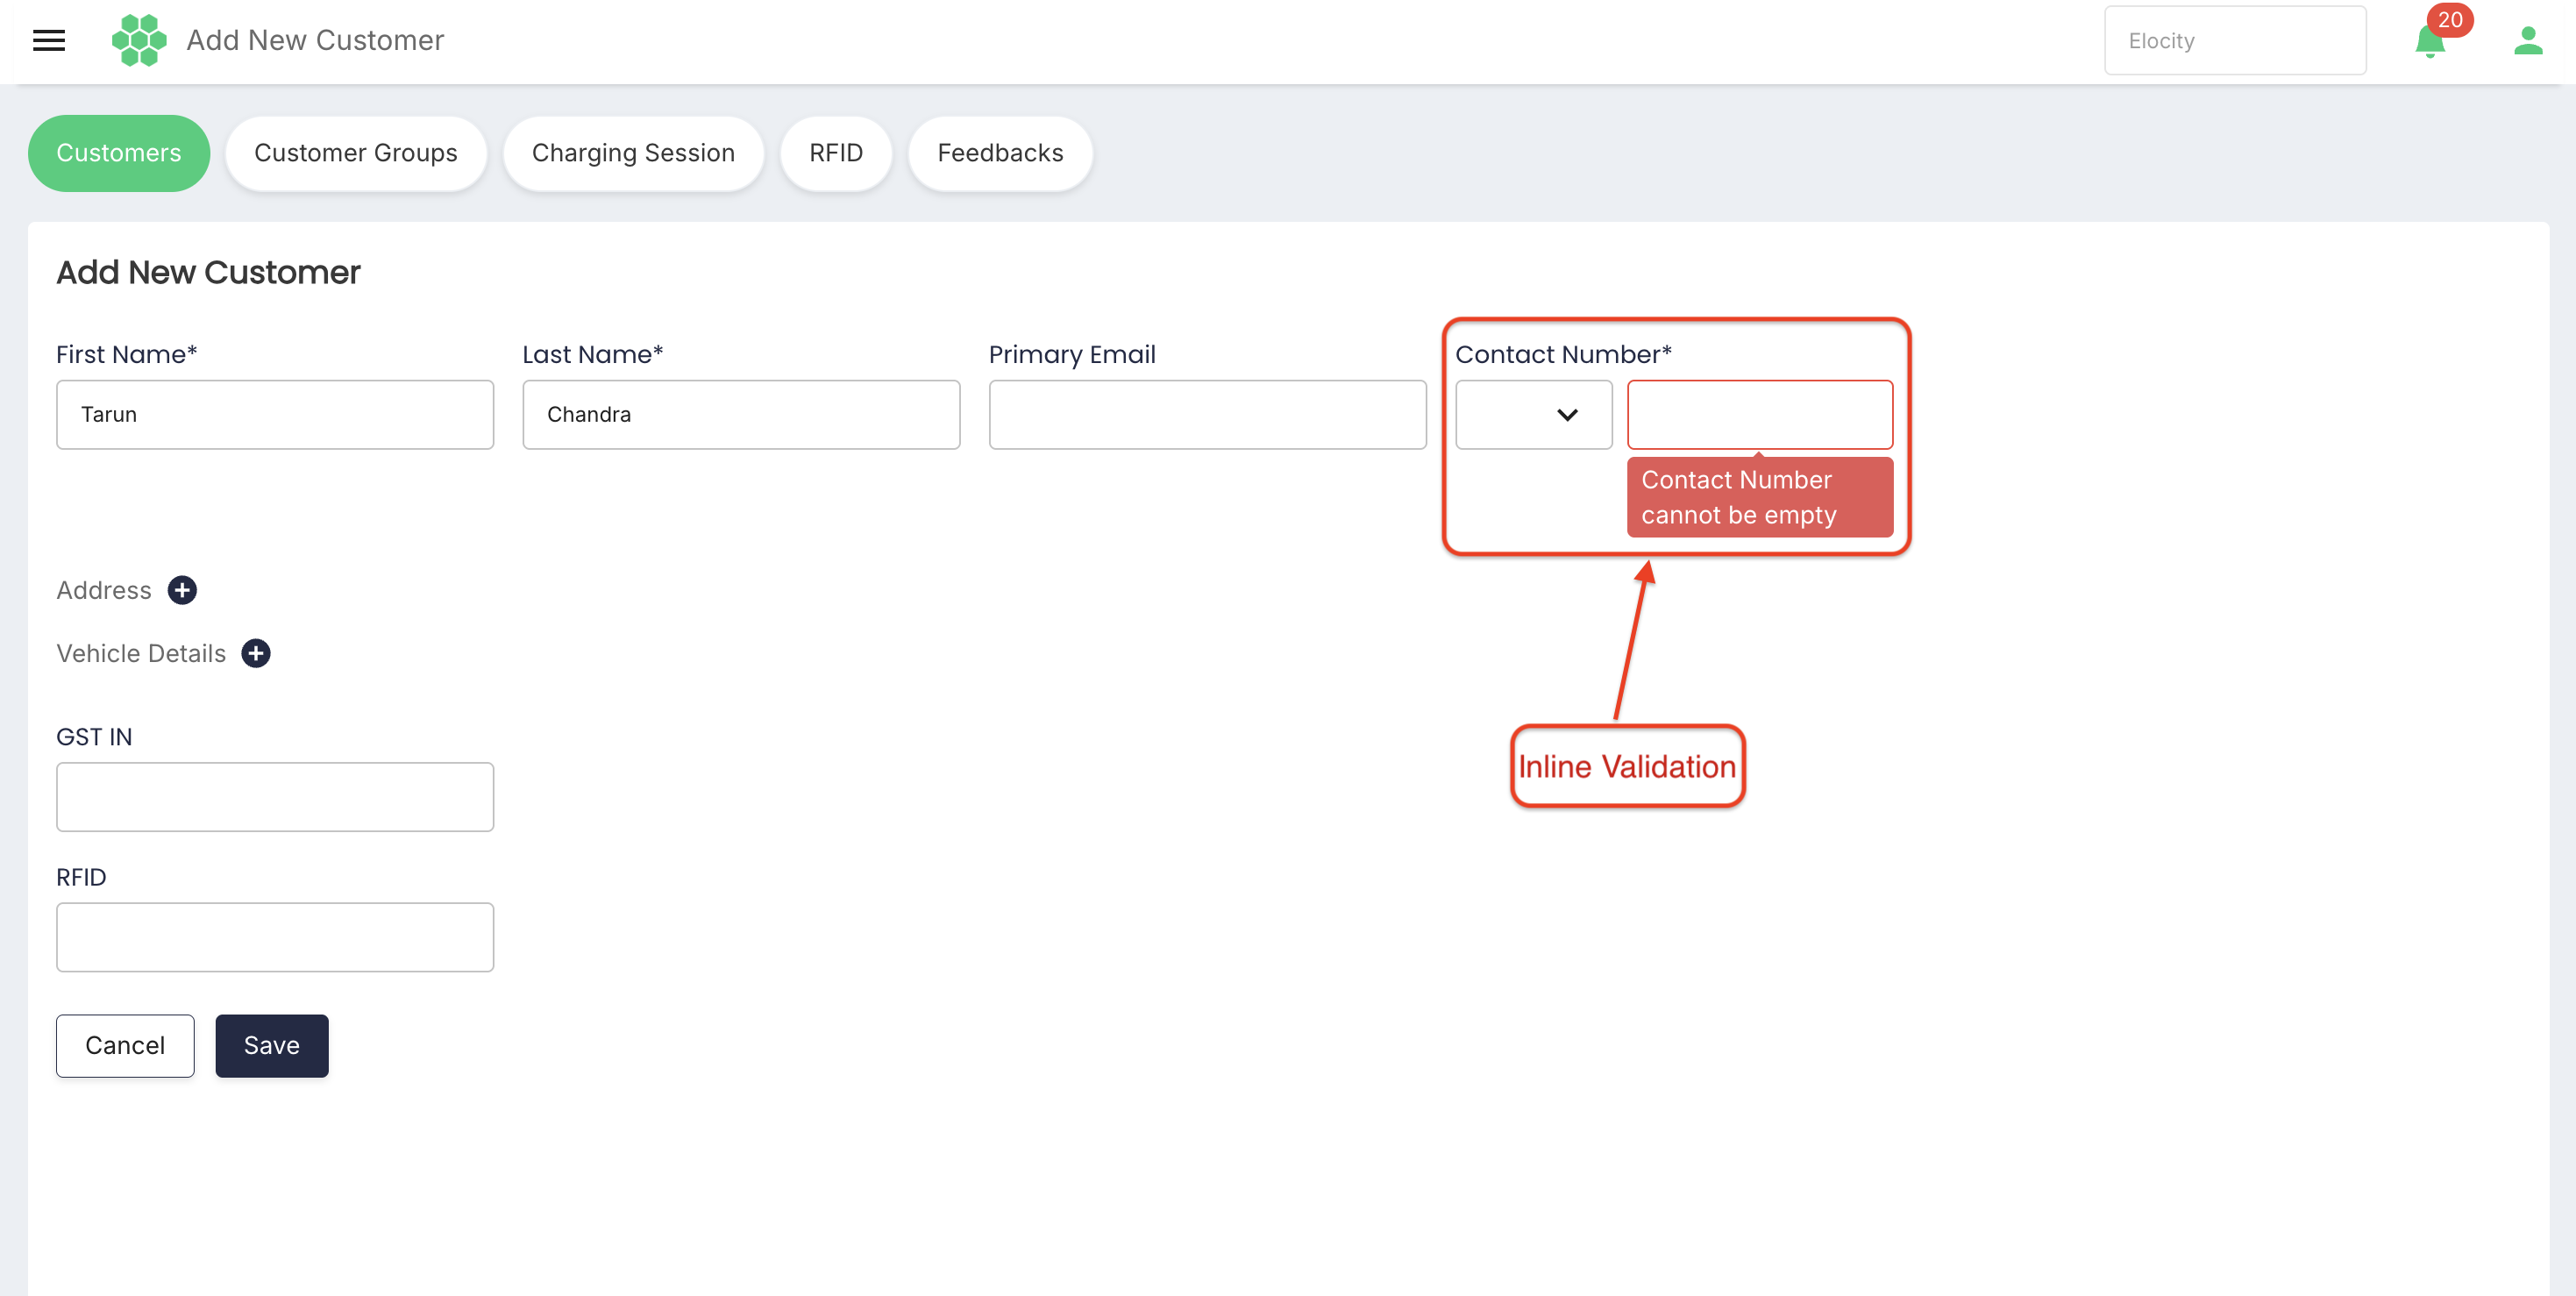
The form displays an inline validation message when a required field is empty.
Core customer fields
| Field | Requirement | Description |
|---|---|---|
| First Name | Required | Customer's first name. The empty-form validation states that First Name cannot be empty. |
| Last Name | Required | Customer's last name. The empty-form validation states that Last Name cannot be empty. |
| Primary Email | Optional | Customer's primary email address. When provided, it must use a valid email format and must be unique. |
| Contact Number | Required | Country-code selector and customer phone number. |
| RFID | Not marked as required | Optional RFID value associated during account creation. |
Address details
Address fields are not displayed until the plus icon beside Address is selected.
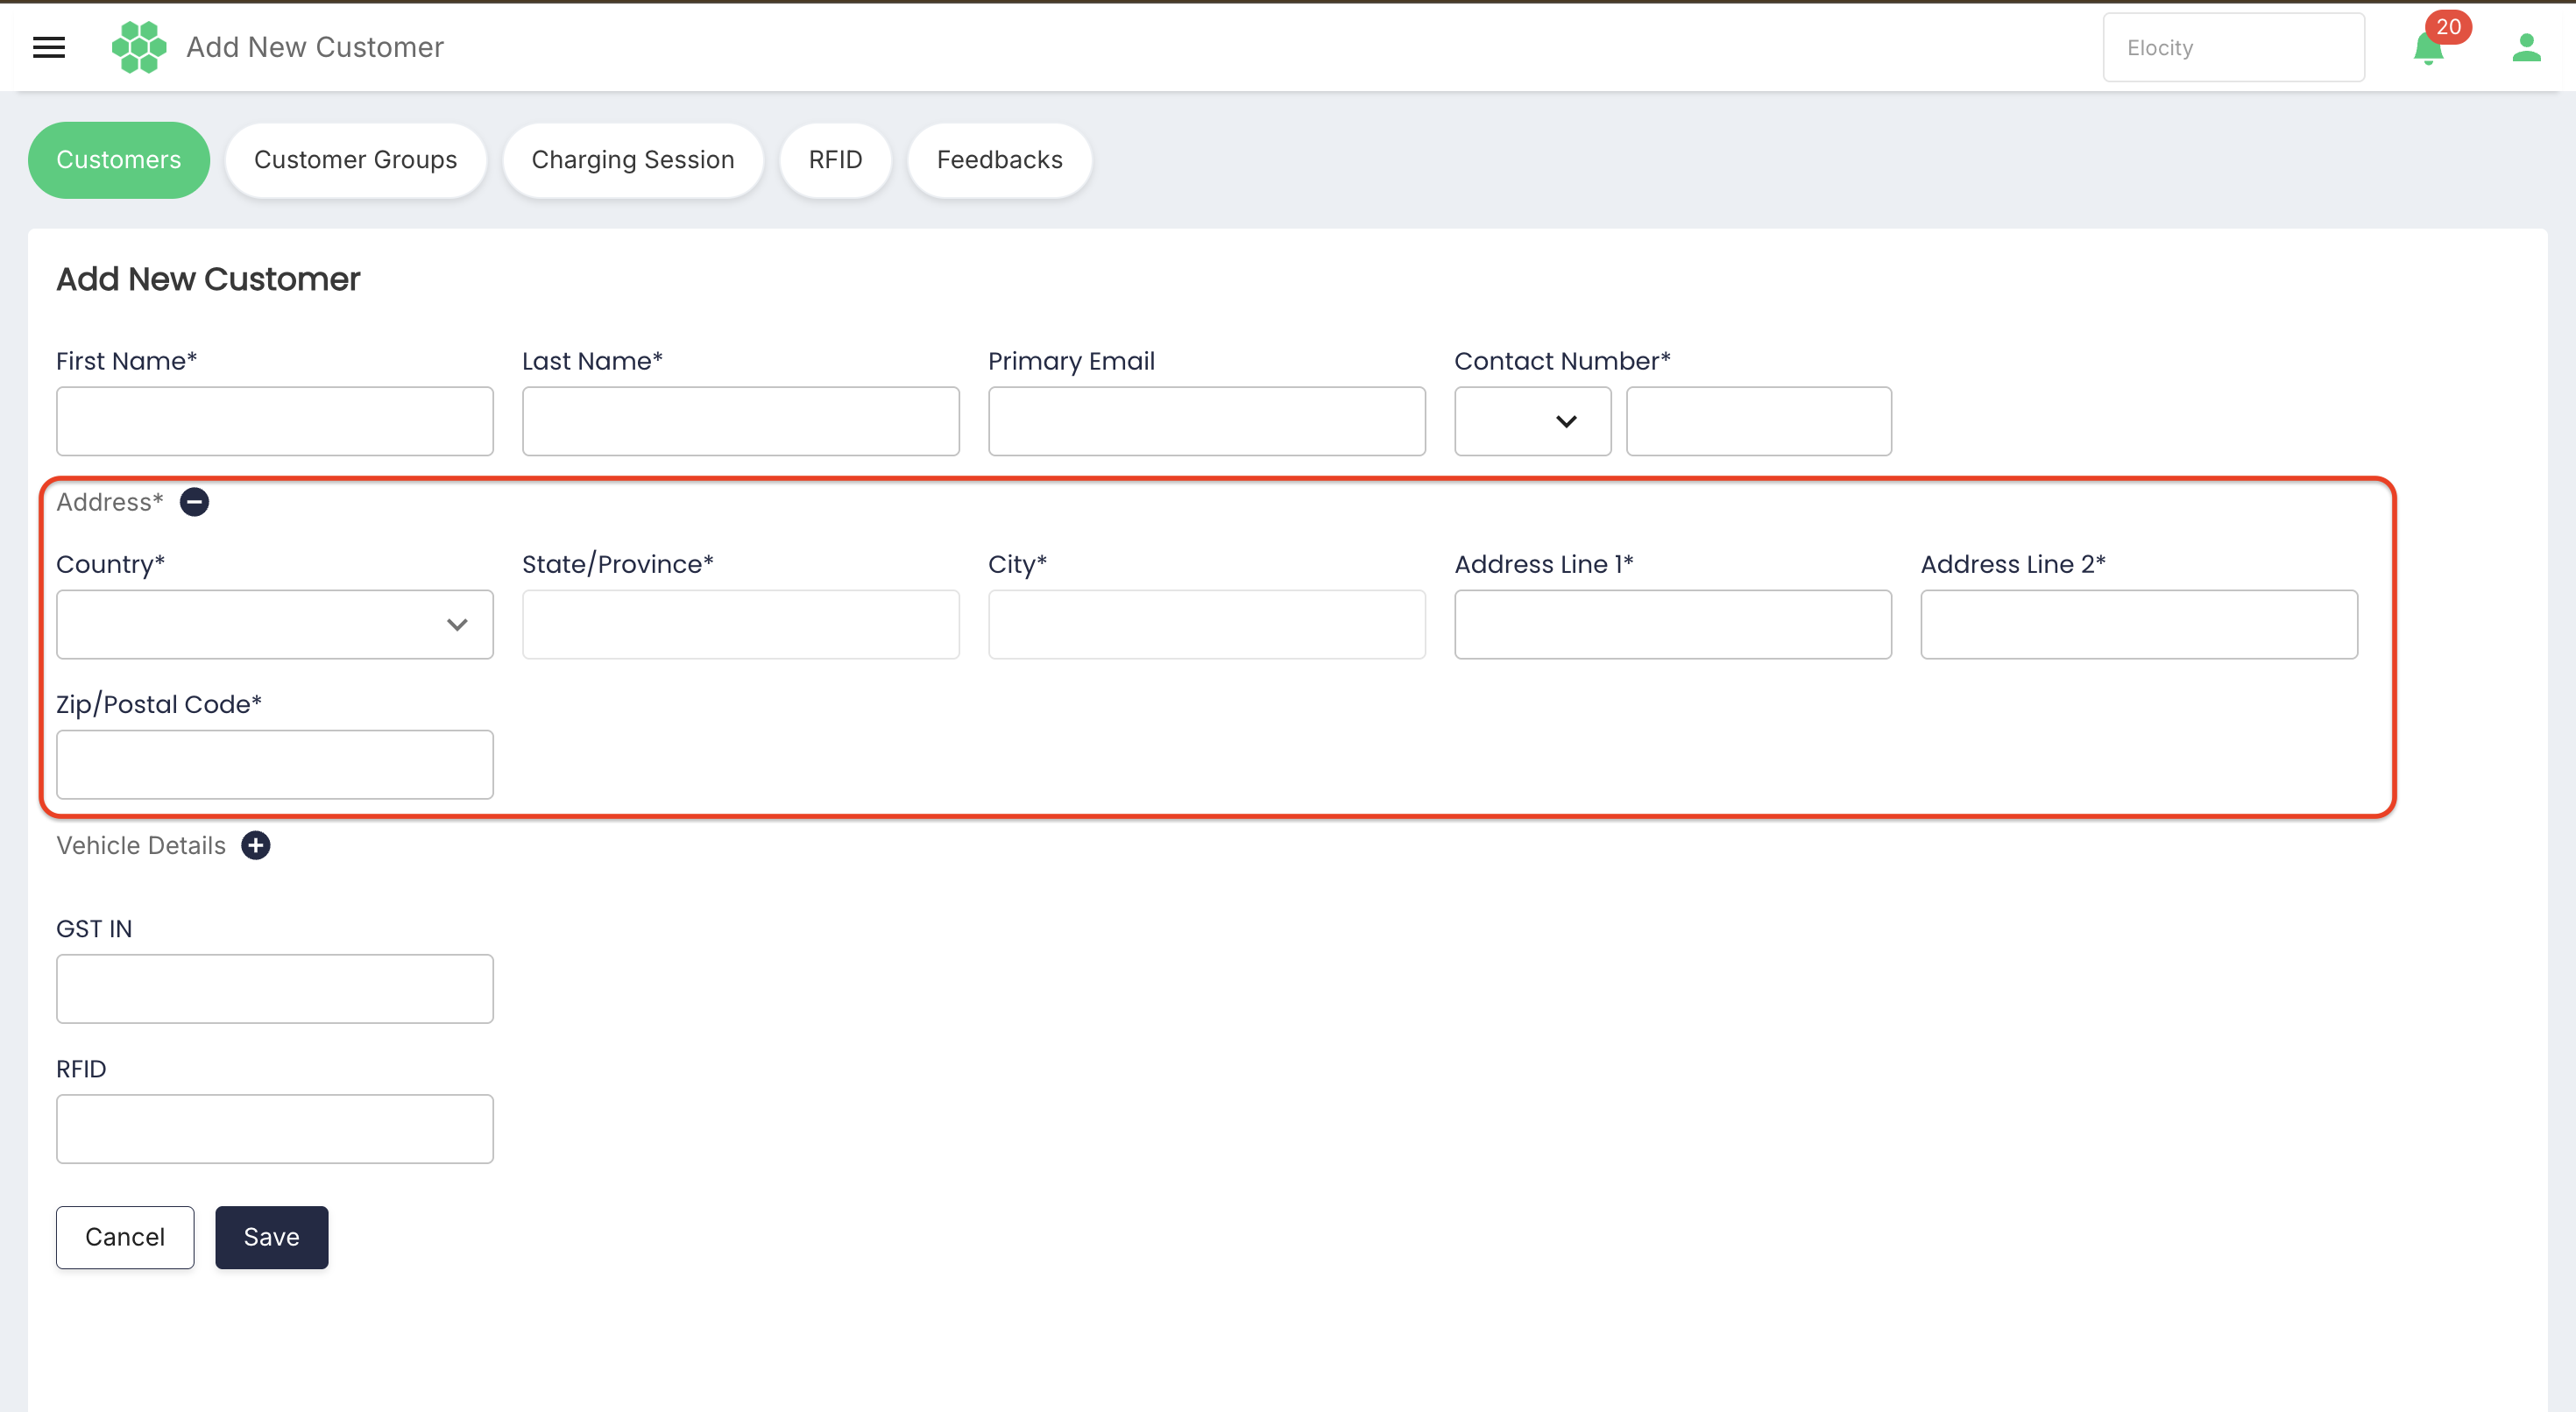
Once the section is expanded, the inspected form provides:
| Field | Behavior |
|---|---|
| Country | Required. Select this value before completing the dependent location fields. |
| State/Province | Required and initially disabled until the required earlier location selection is made. |
| City | Required and initially disabled until the required earlier location selection is made. |
| Address Line 1 | Required when the Address section is open. |
| Address Line 2 | Marked as required in the inspected form. |
| Zip/Postal Code | Required when the Address section is open. |
Expanding the Address section introduces required fields. Do not open the section unless address information is available to complete it.
Vehicle details
Vehicle fields are not displayed until the plus icon beside Vehicle Details is selected.
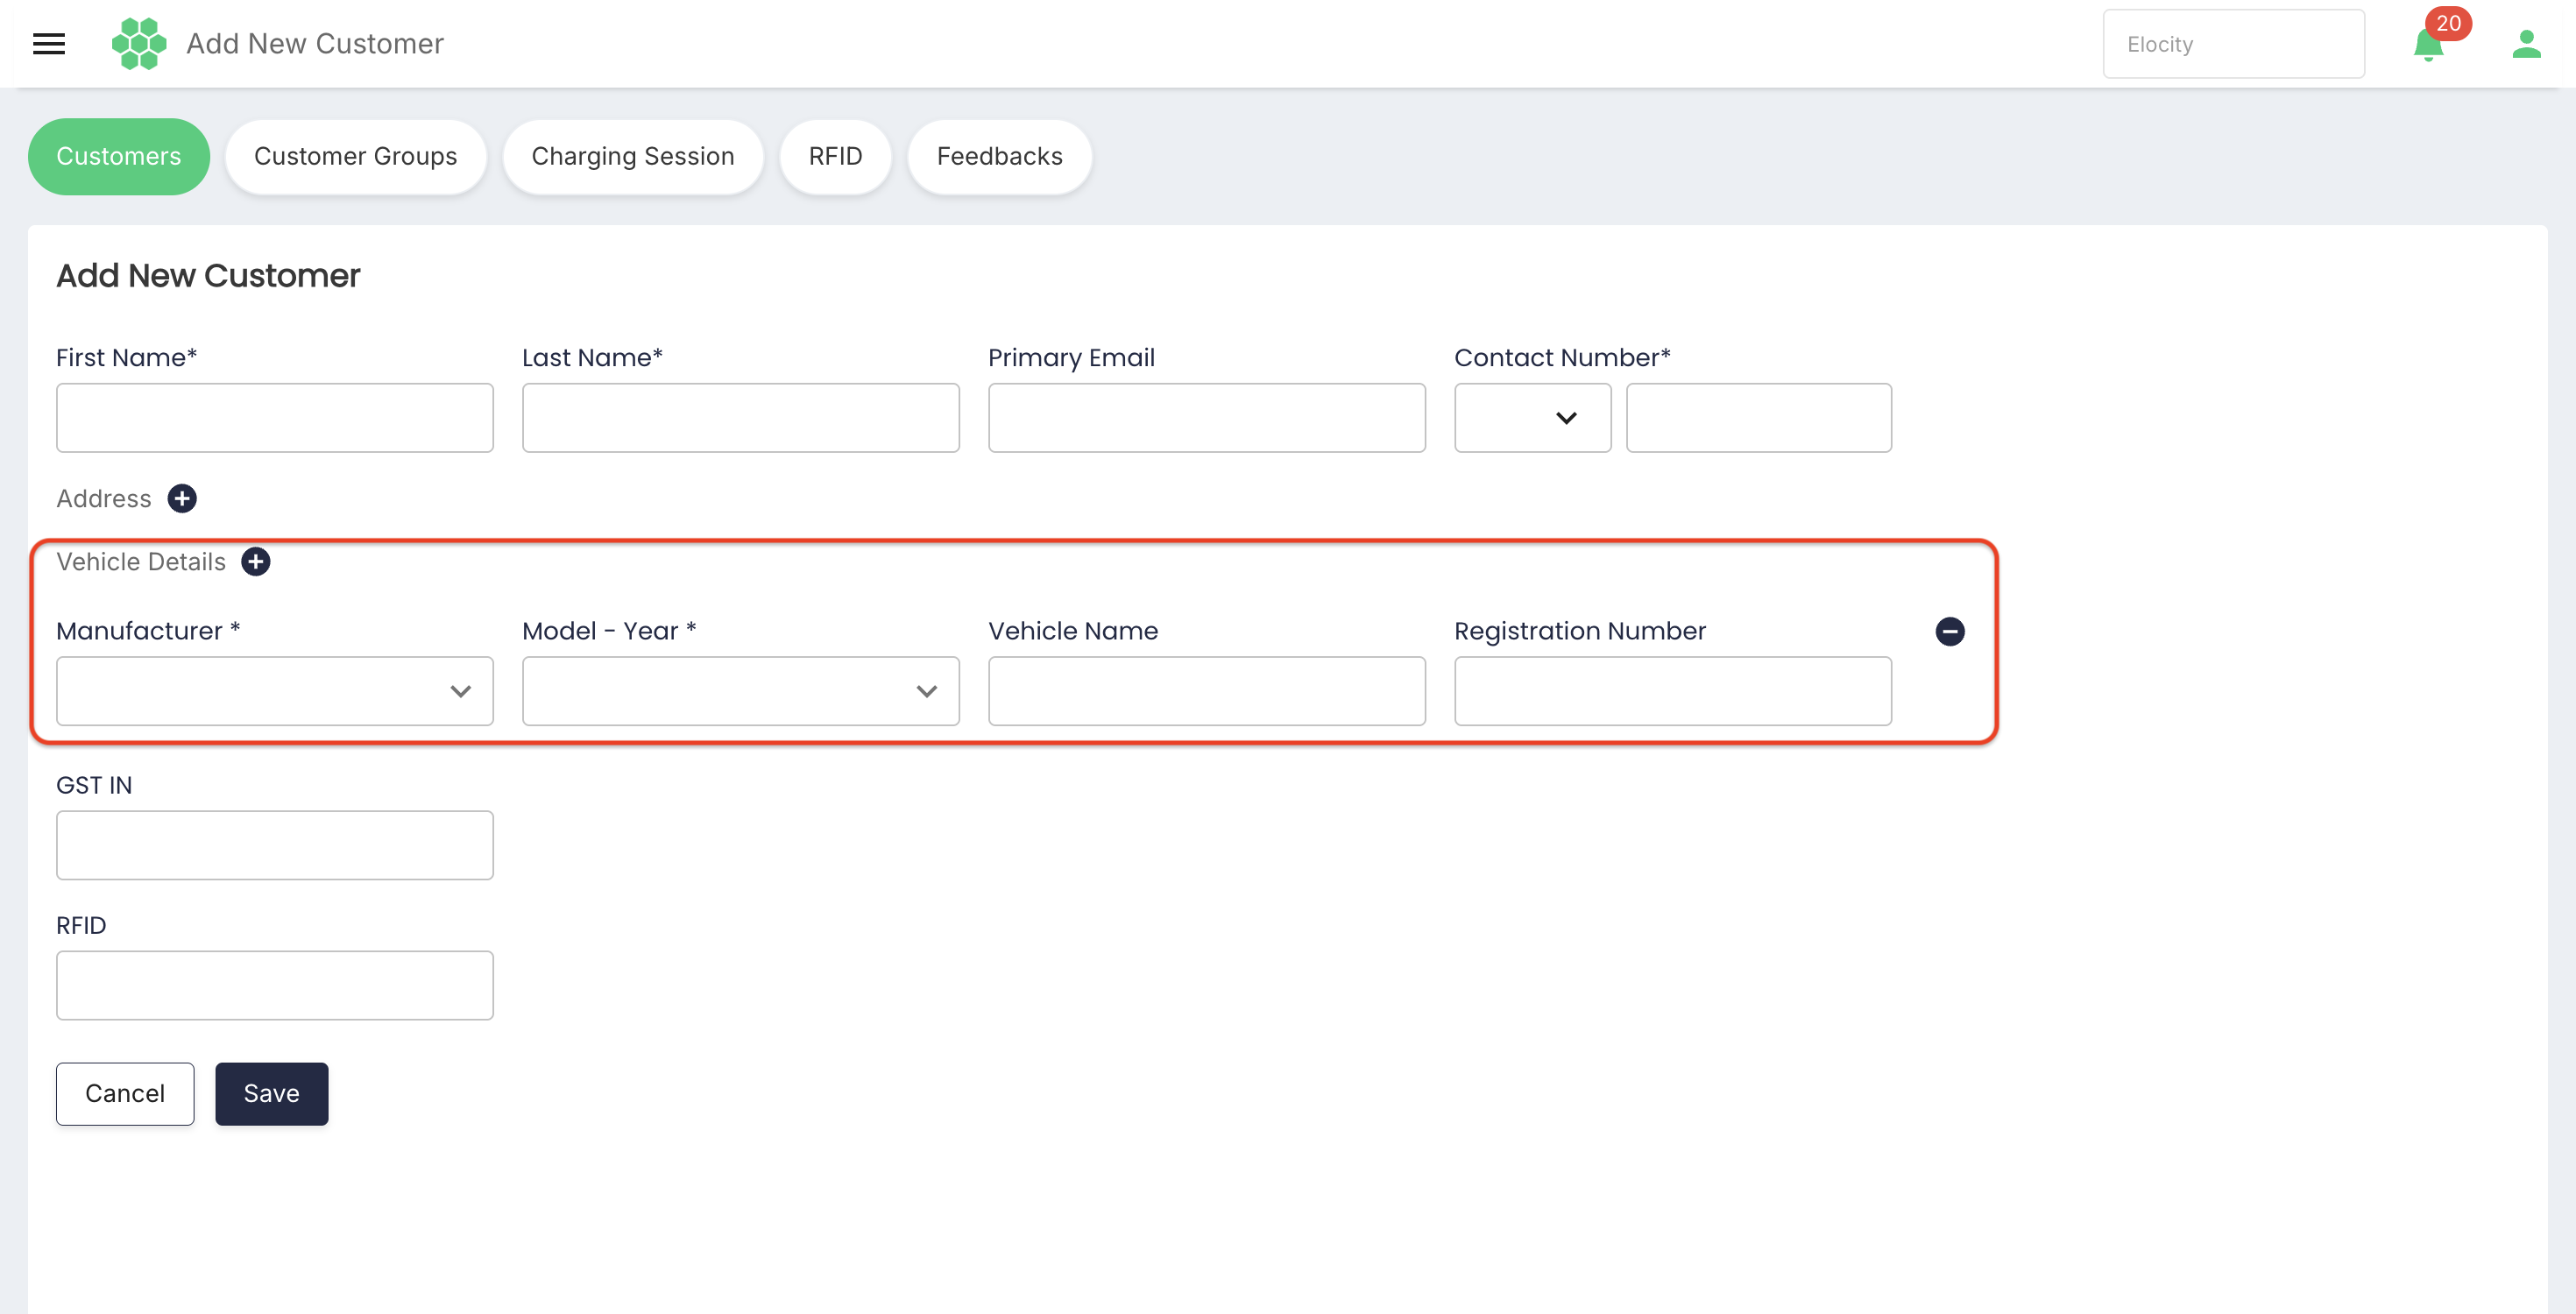
| Field | Requirement | Description |
|---|---|---|
| Manufacturer | Required when the section is open | Select the vehicle manufacturer. |
| Model - Year | Required when the section is open | Select the vehicle model and year. |
| Vehicle Name | Not marked as required | Optional label used to identify the vehicle. |
| Registration Number | Not marked as required | Vehicle registration number or VRN. |
The older Admin Guide states that more than one vehicle can be associated with a customer. The inspected empty form confirmed the vehicle section and its fields but did not establish the current maximum number of vehicle records.
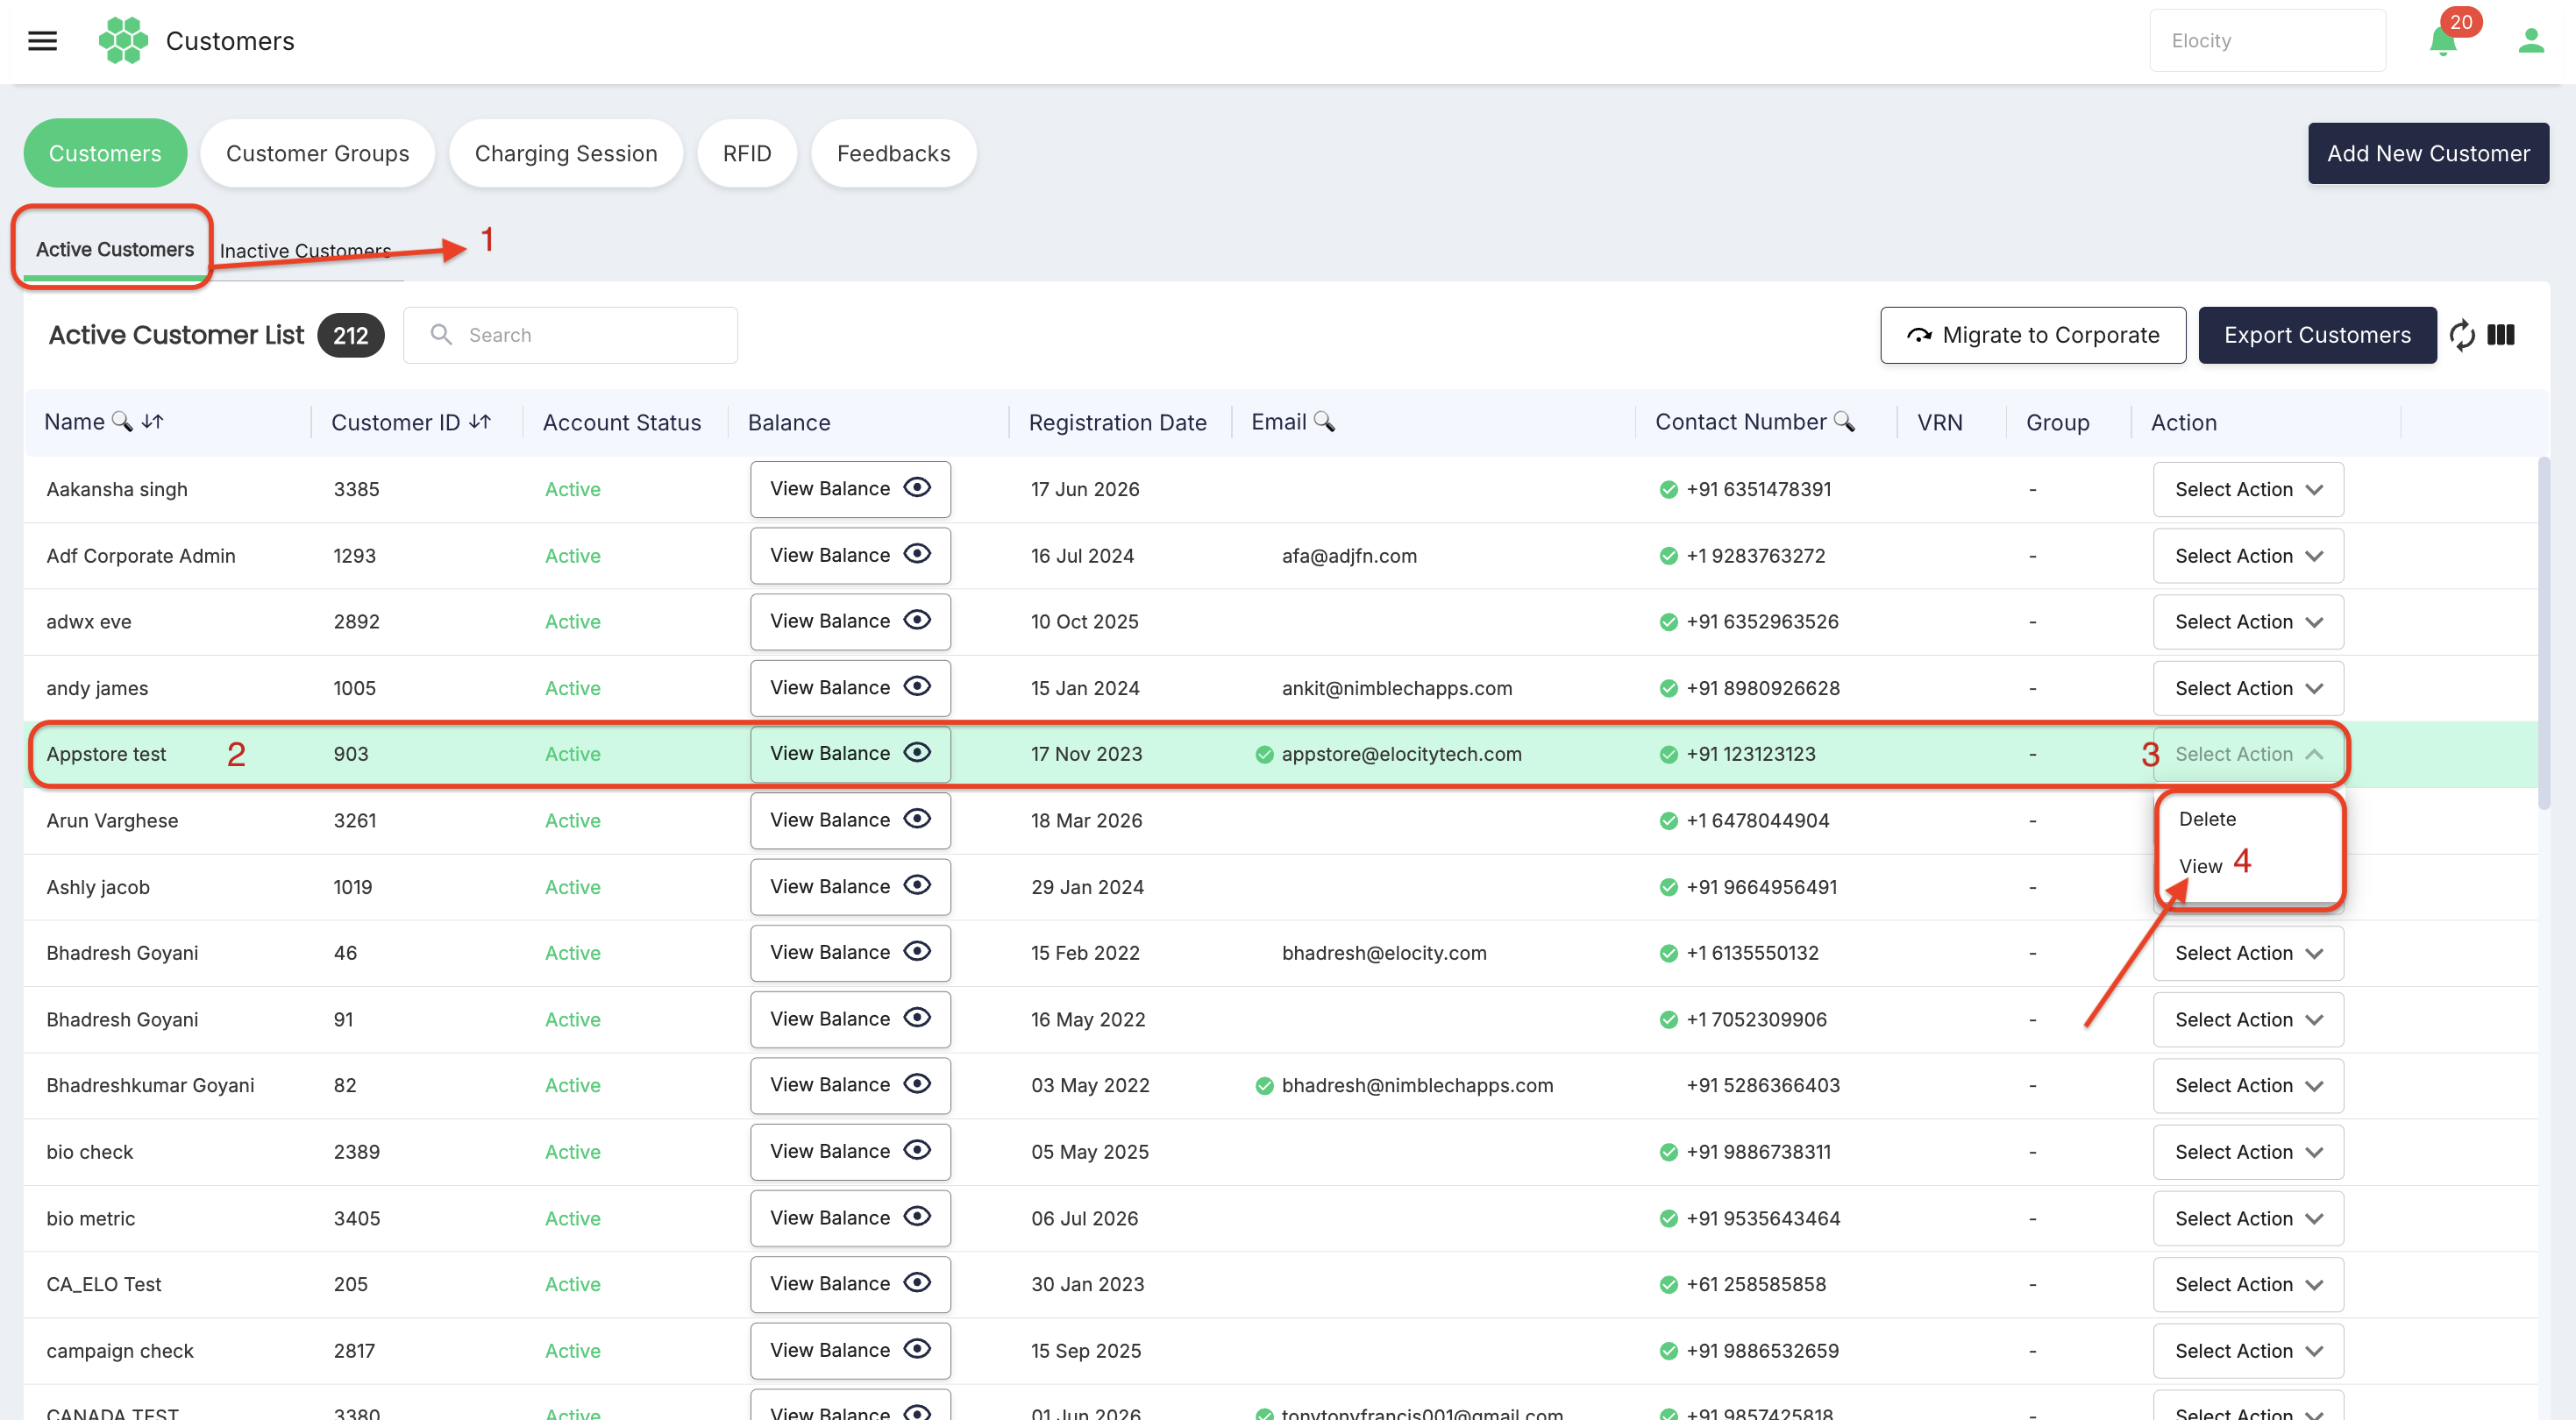
Viewing customer details
- Open Customers > Active Customers.
- Locate the required customer.
- Open Select Action.
- Select View.
The customer page contains the following tabs:
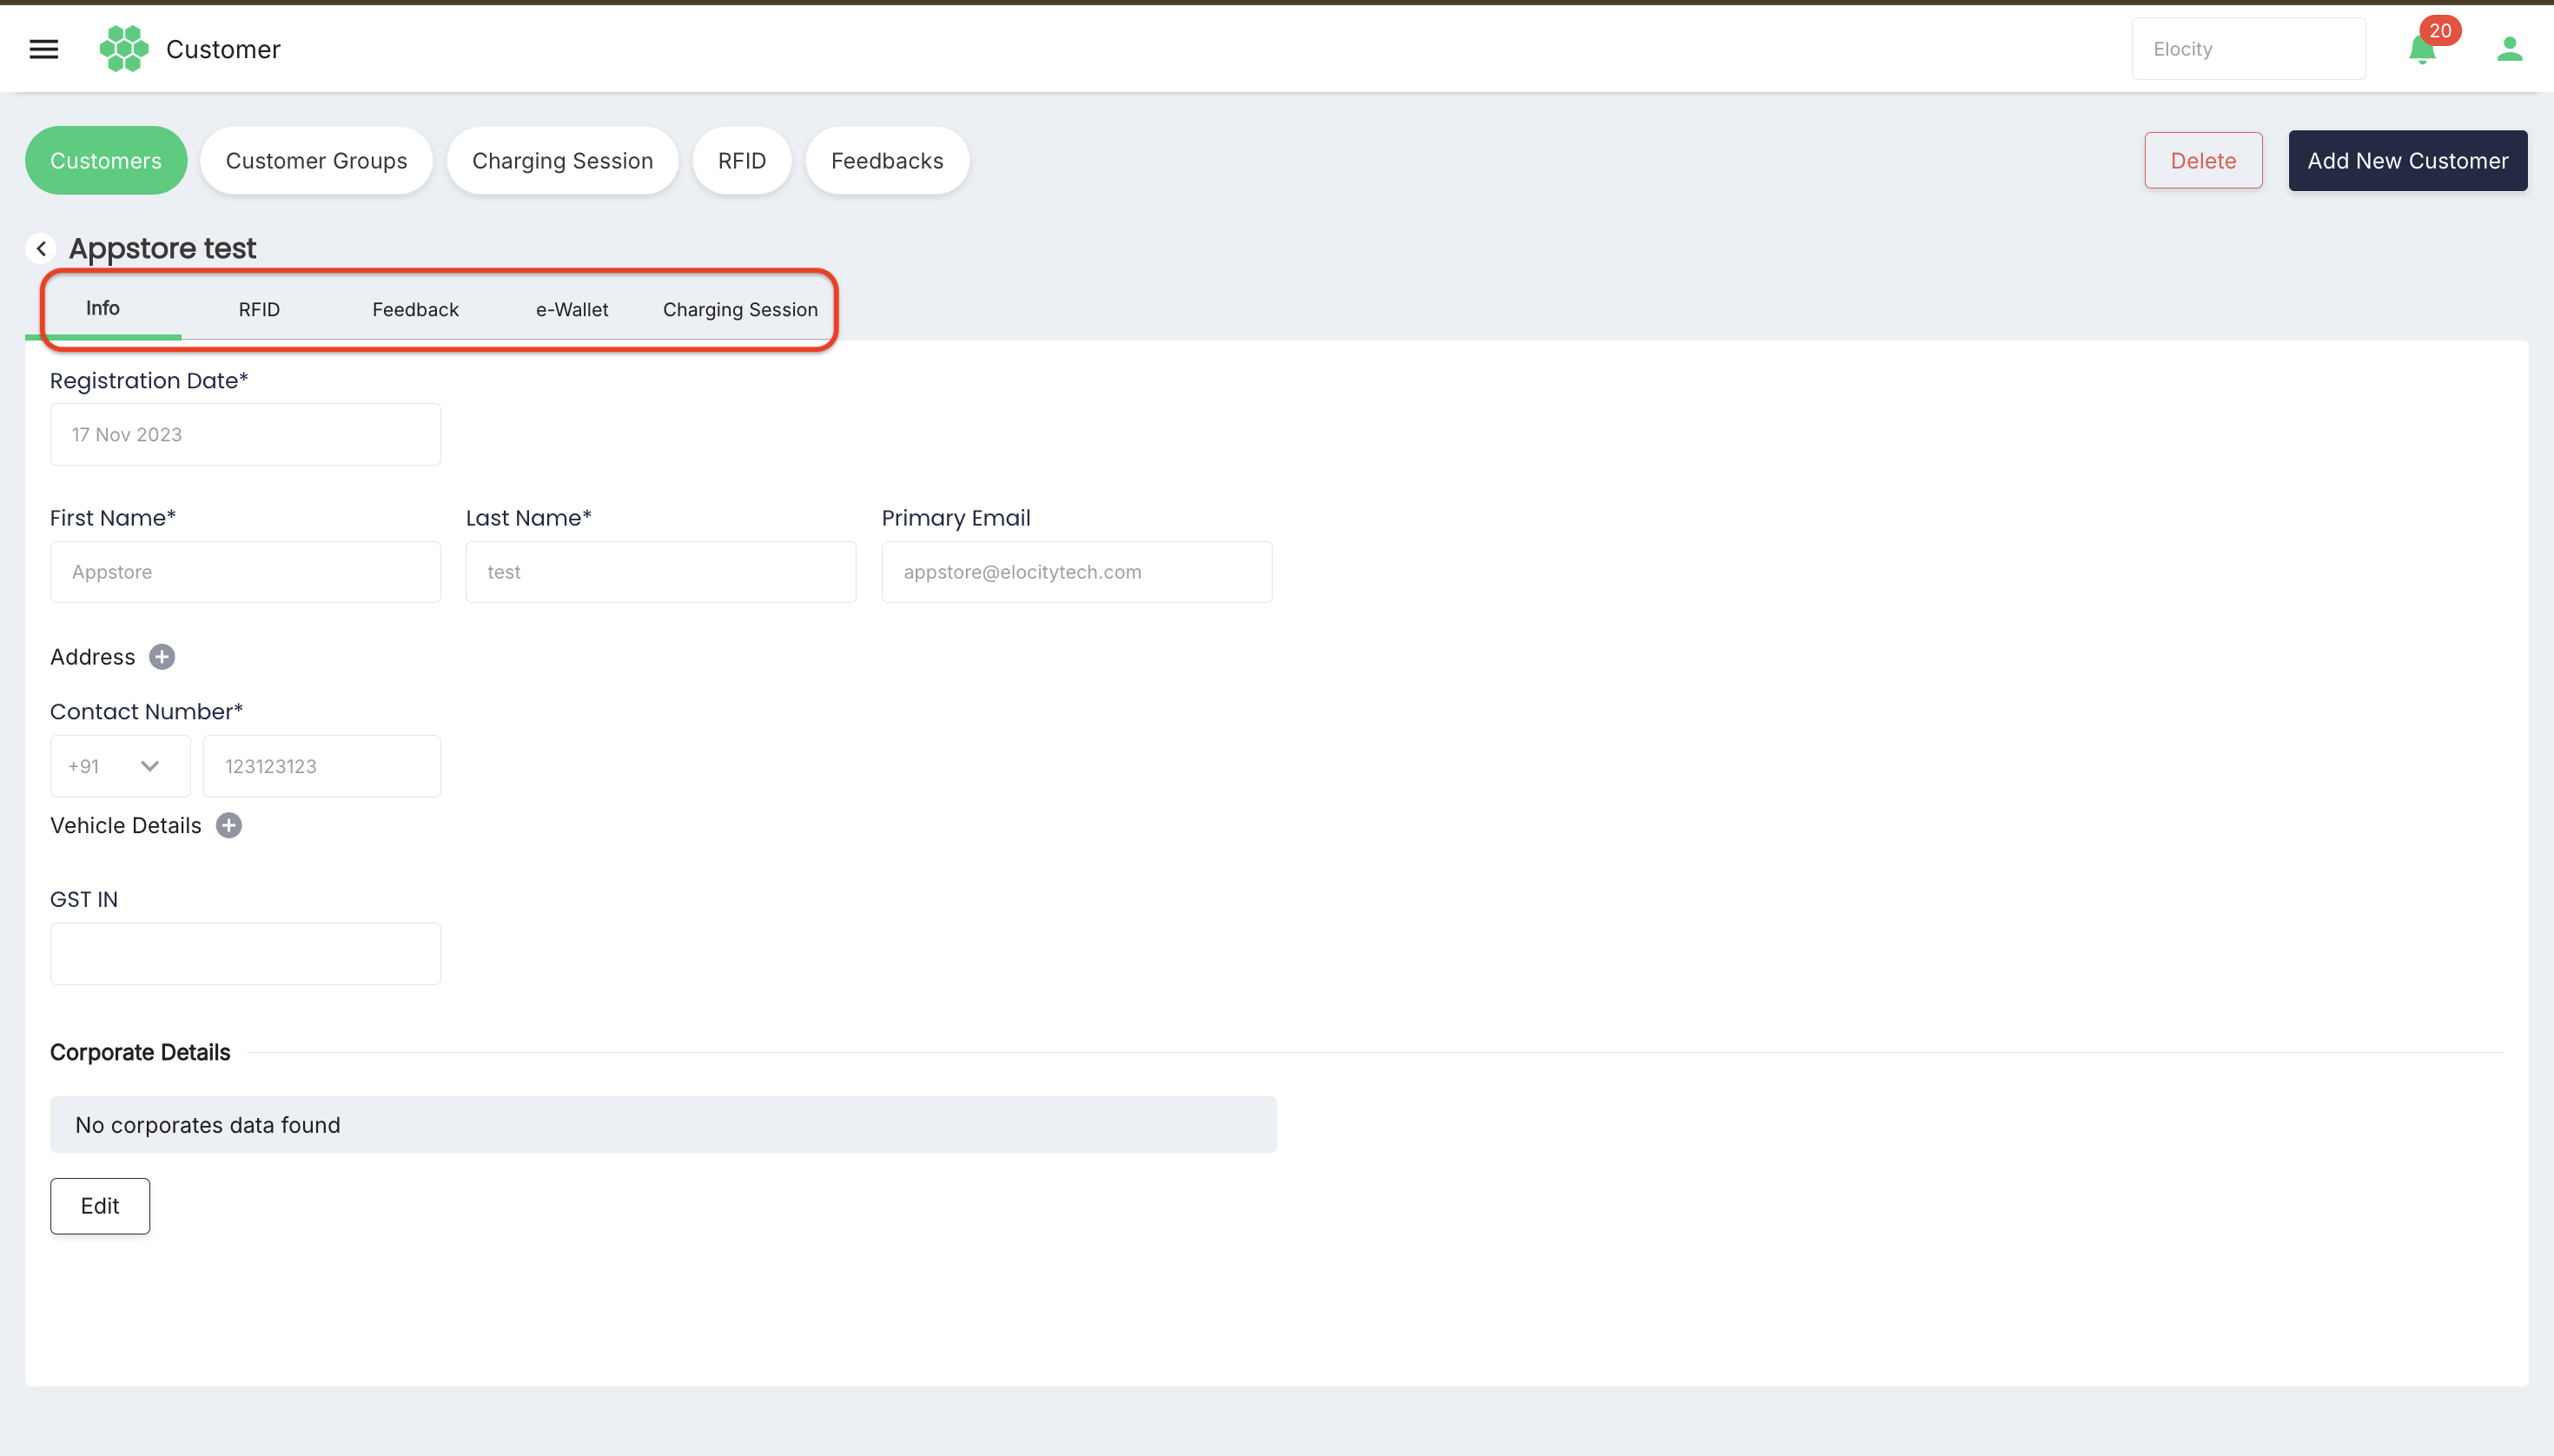
| Tab | Description |
|---|---|
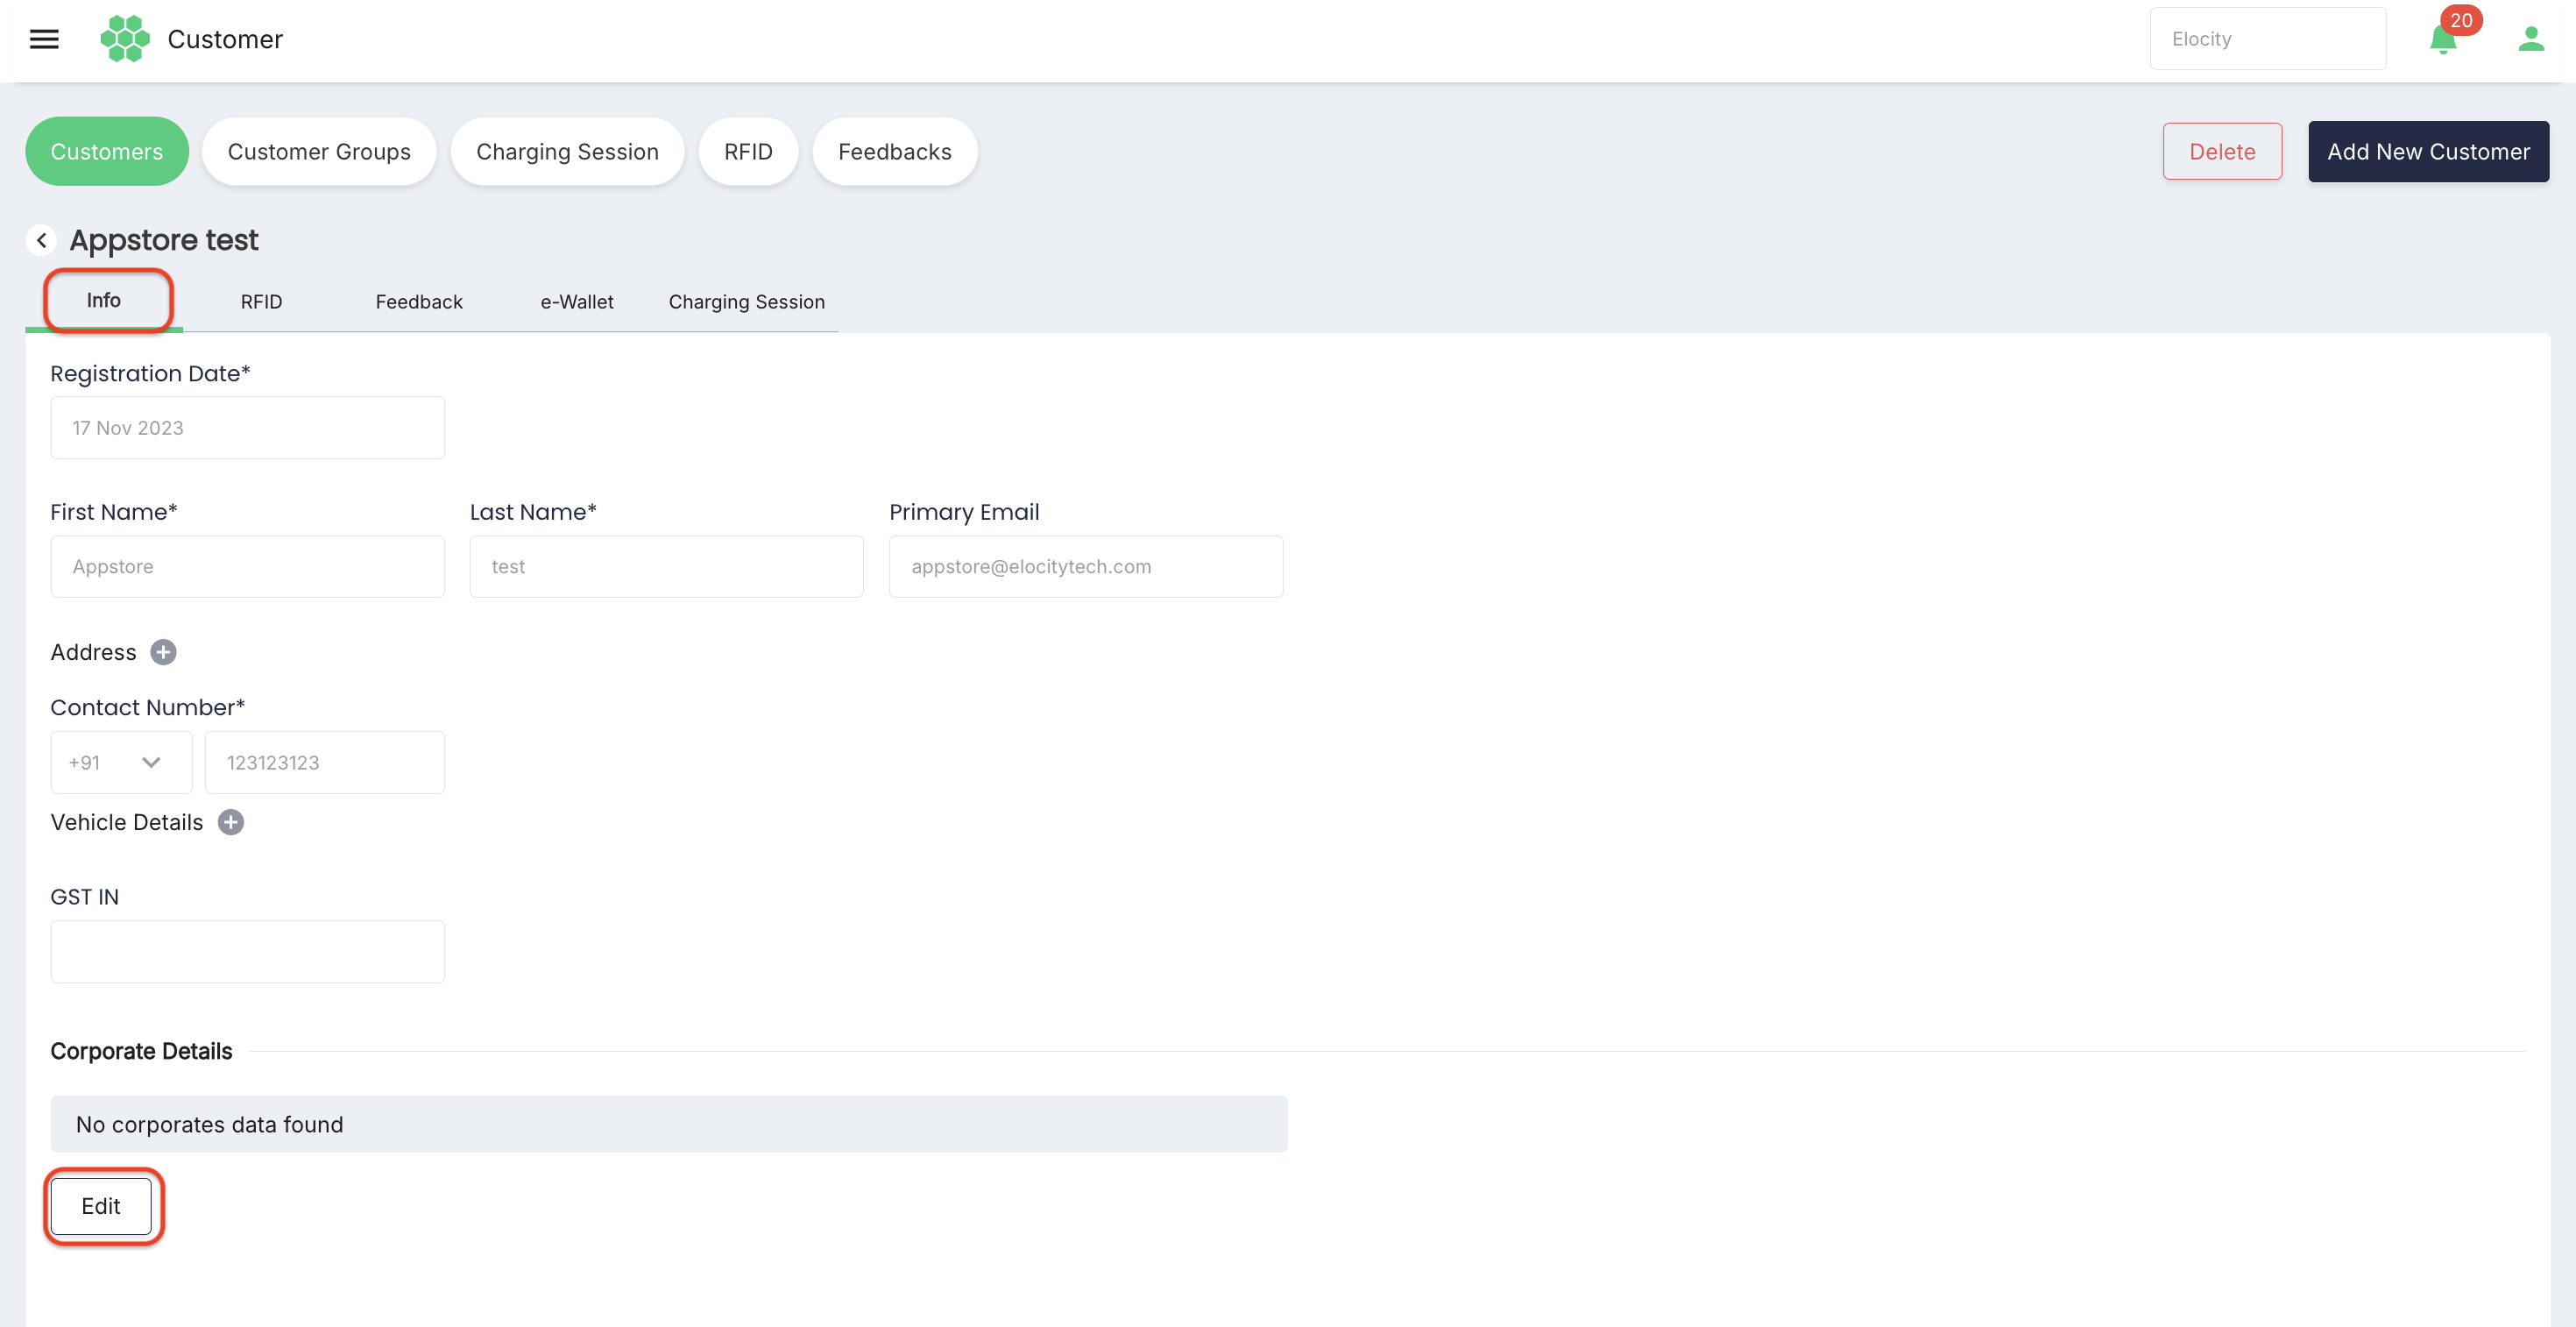
| Info | Shows profile information, registration date, address, contact information, vehicle details, and corporate details. |
| RFID | Shows RFID value, RFID status, and expiry date for credentials associated with the customer. |
| Feedback | Shows feedback associated with the customer. The inspected record displayed No Review Exist. |
| e-Wallet | Shows wallet status and all wallet-related debit and credit records. An e-Wallet is created automatically when the customer account is created. The inspected record displayed E-Wallet is not active. |
| Charging Session | Shows charging sessions associated with the customer and provides session filters. |
Editing customer information
- Open the required customer record.
- Select the Info tab.
- Select Edit.
- Update the required fields.
- Select Save.
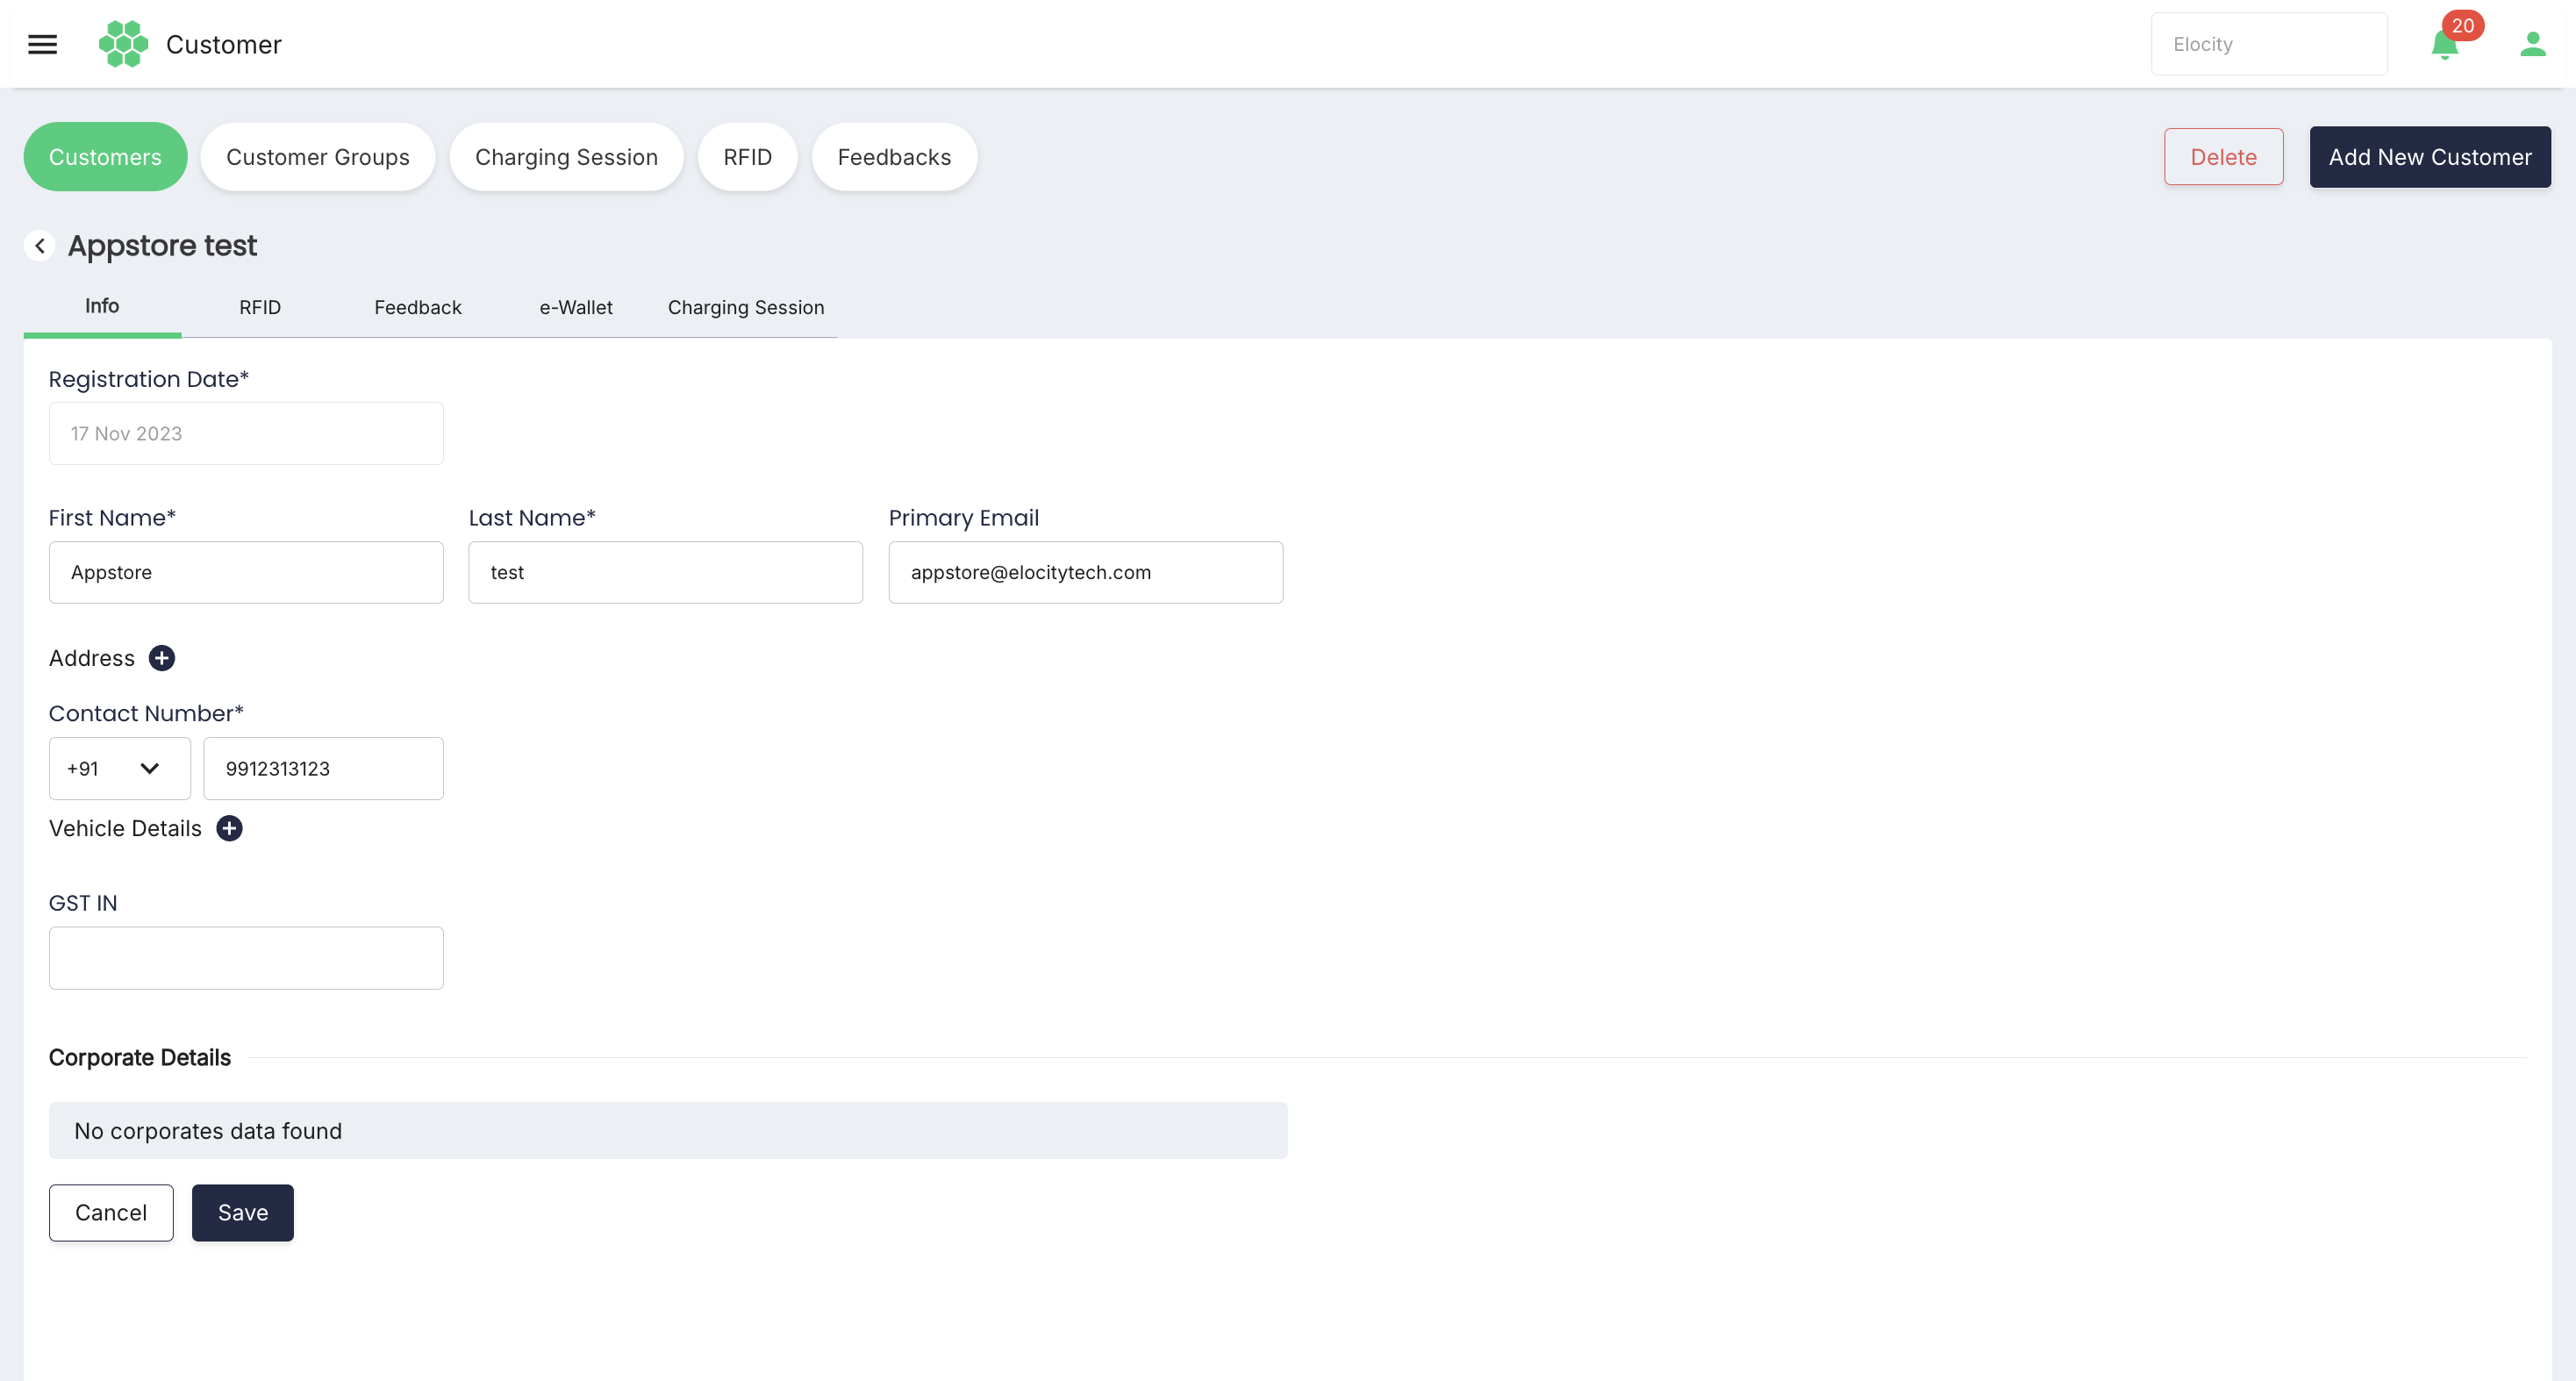
Select Cancel to leave edit mode without saving the pending changes.
The inspected edit view made First Name, Last Name, Primary Email, and Contact Number editable. Registration Date remained read-only.
If the portal displays a validation message, correct the affected field before saving.
Moving a customer to inactive status
-
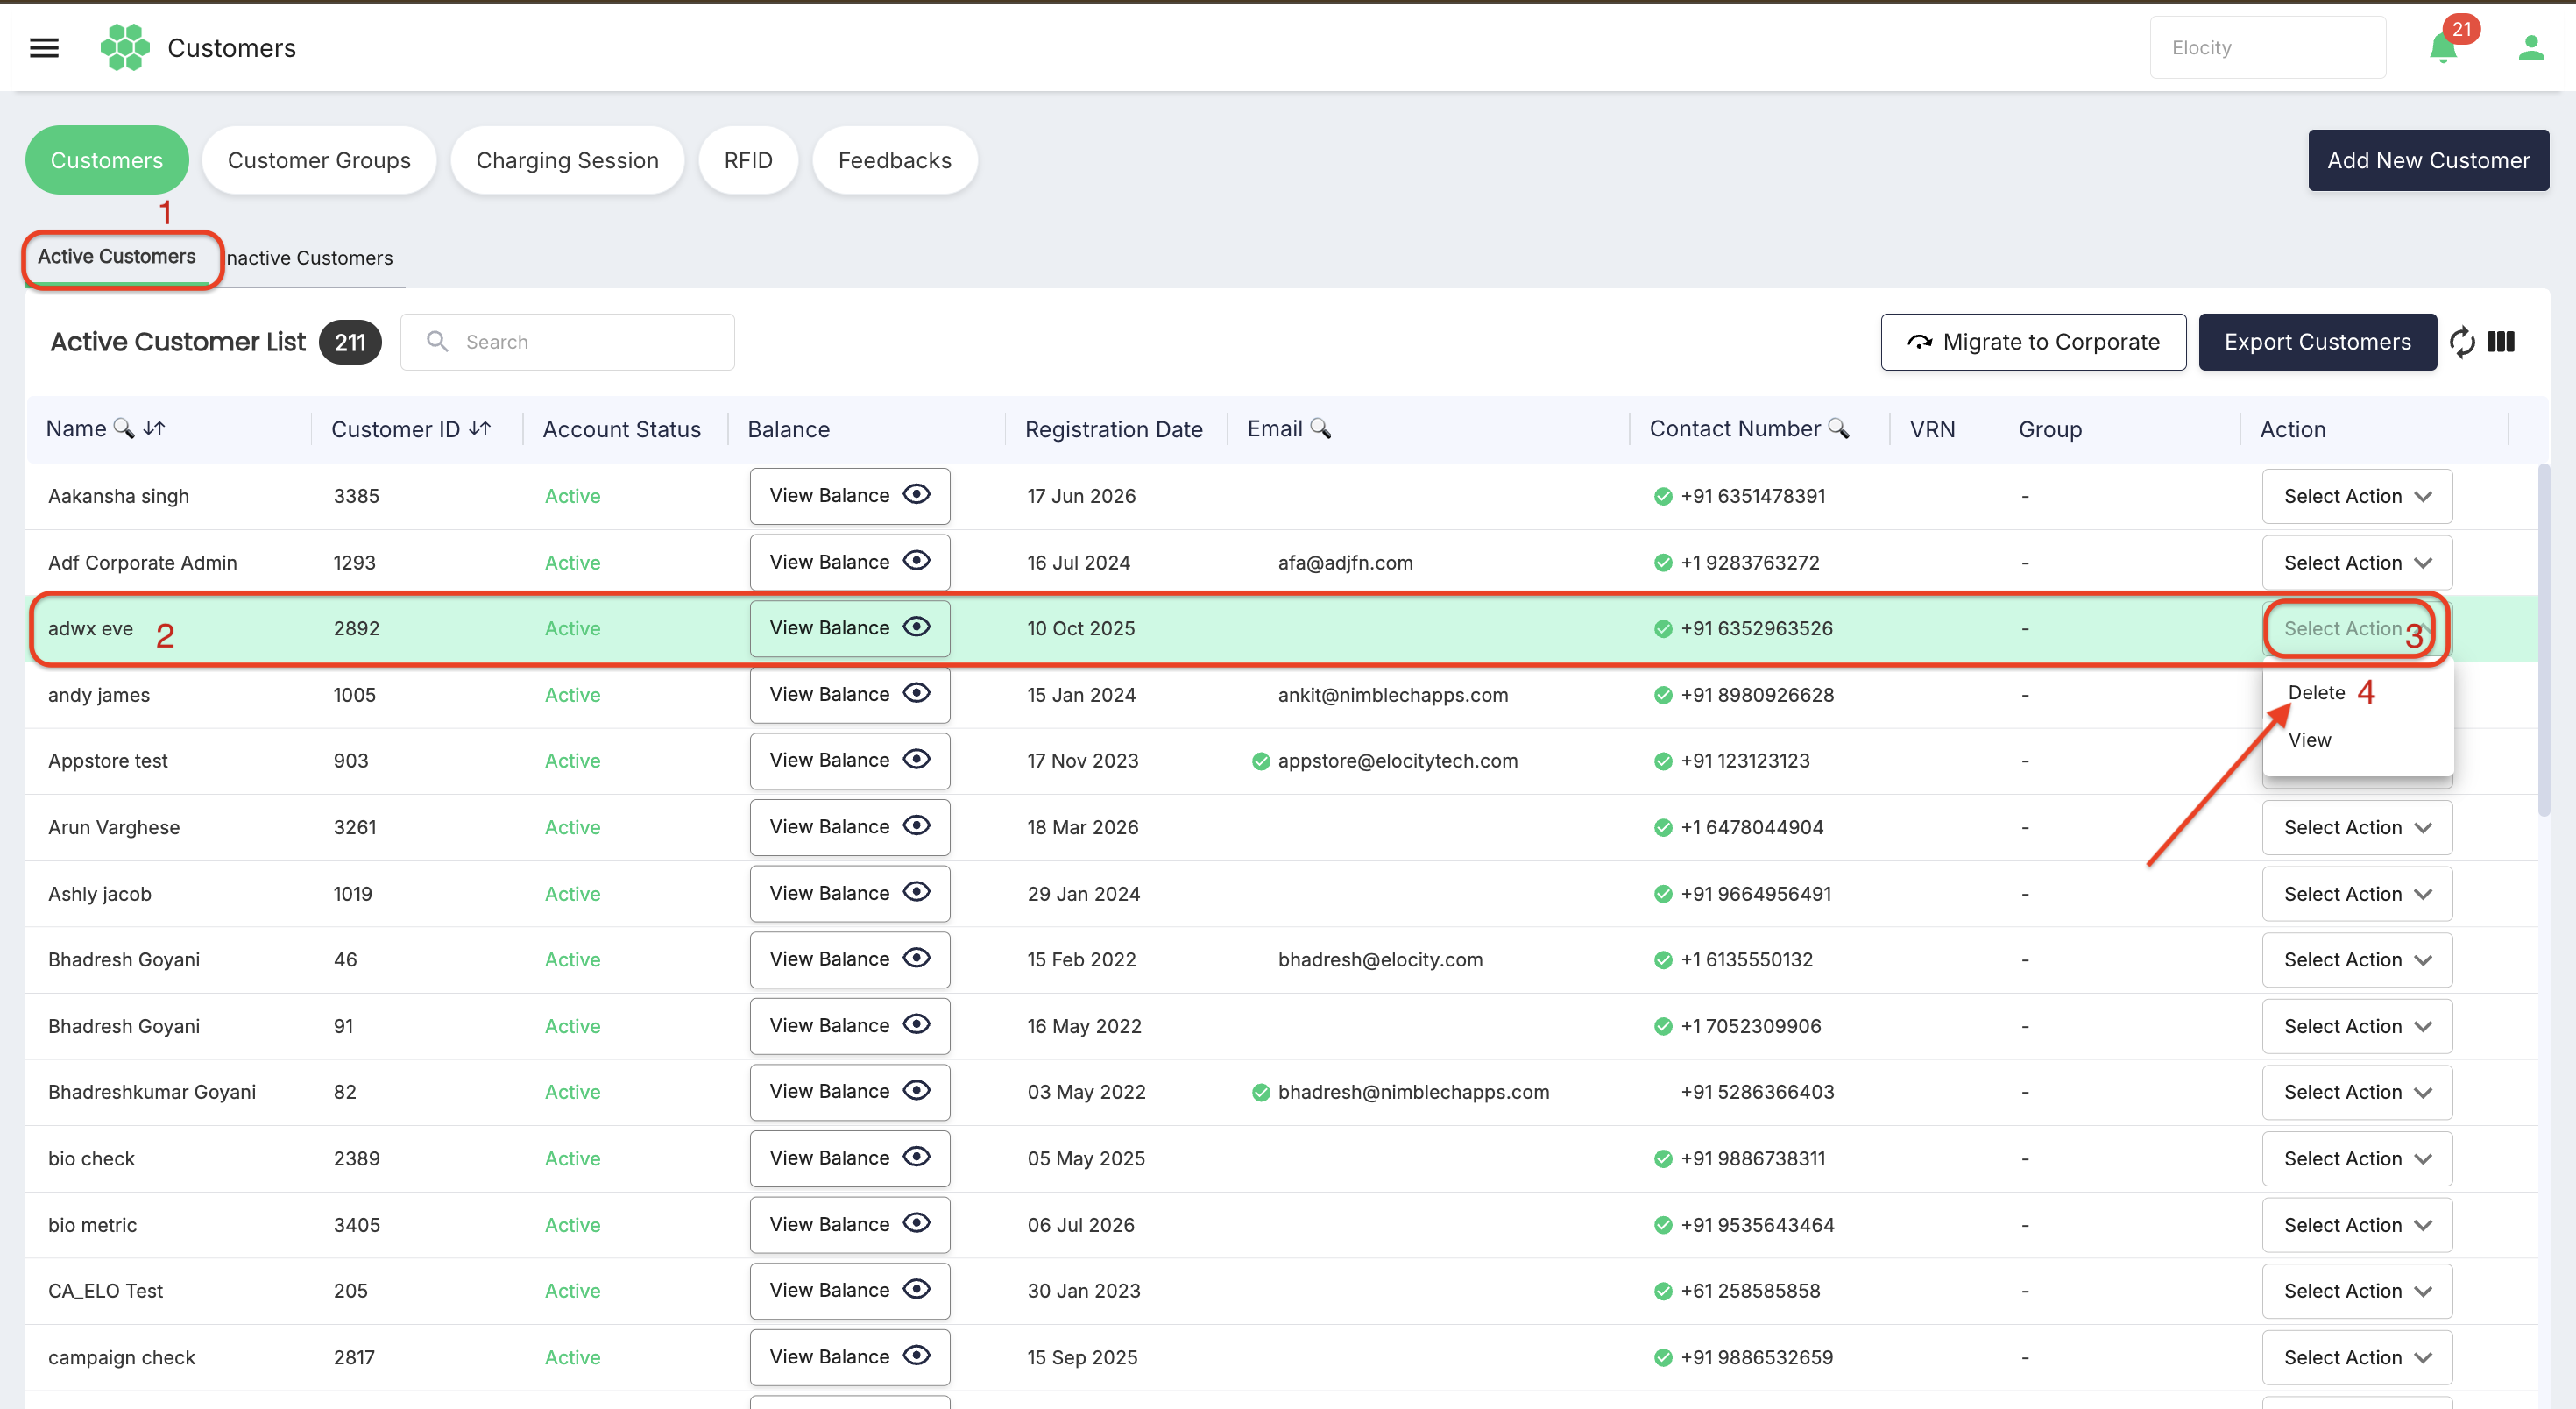
Open Customers > Active Customers.
-
Verify the customer using Customer ID and available contact details.
-
Open Select Action.
-
Select Delete.
-
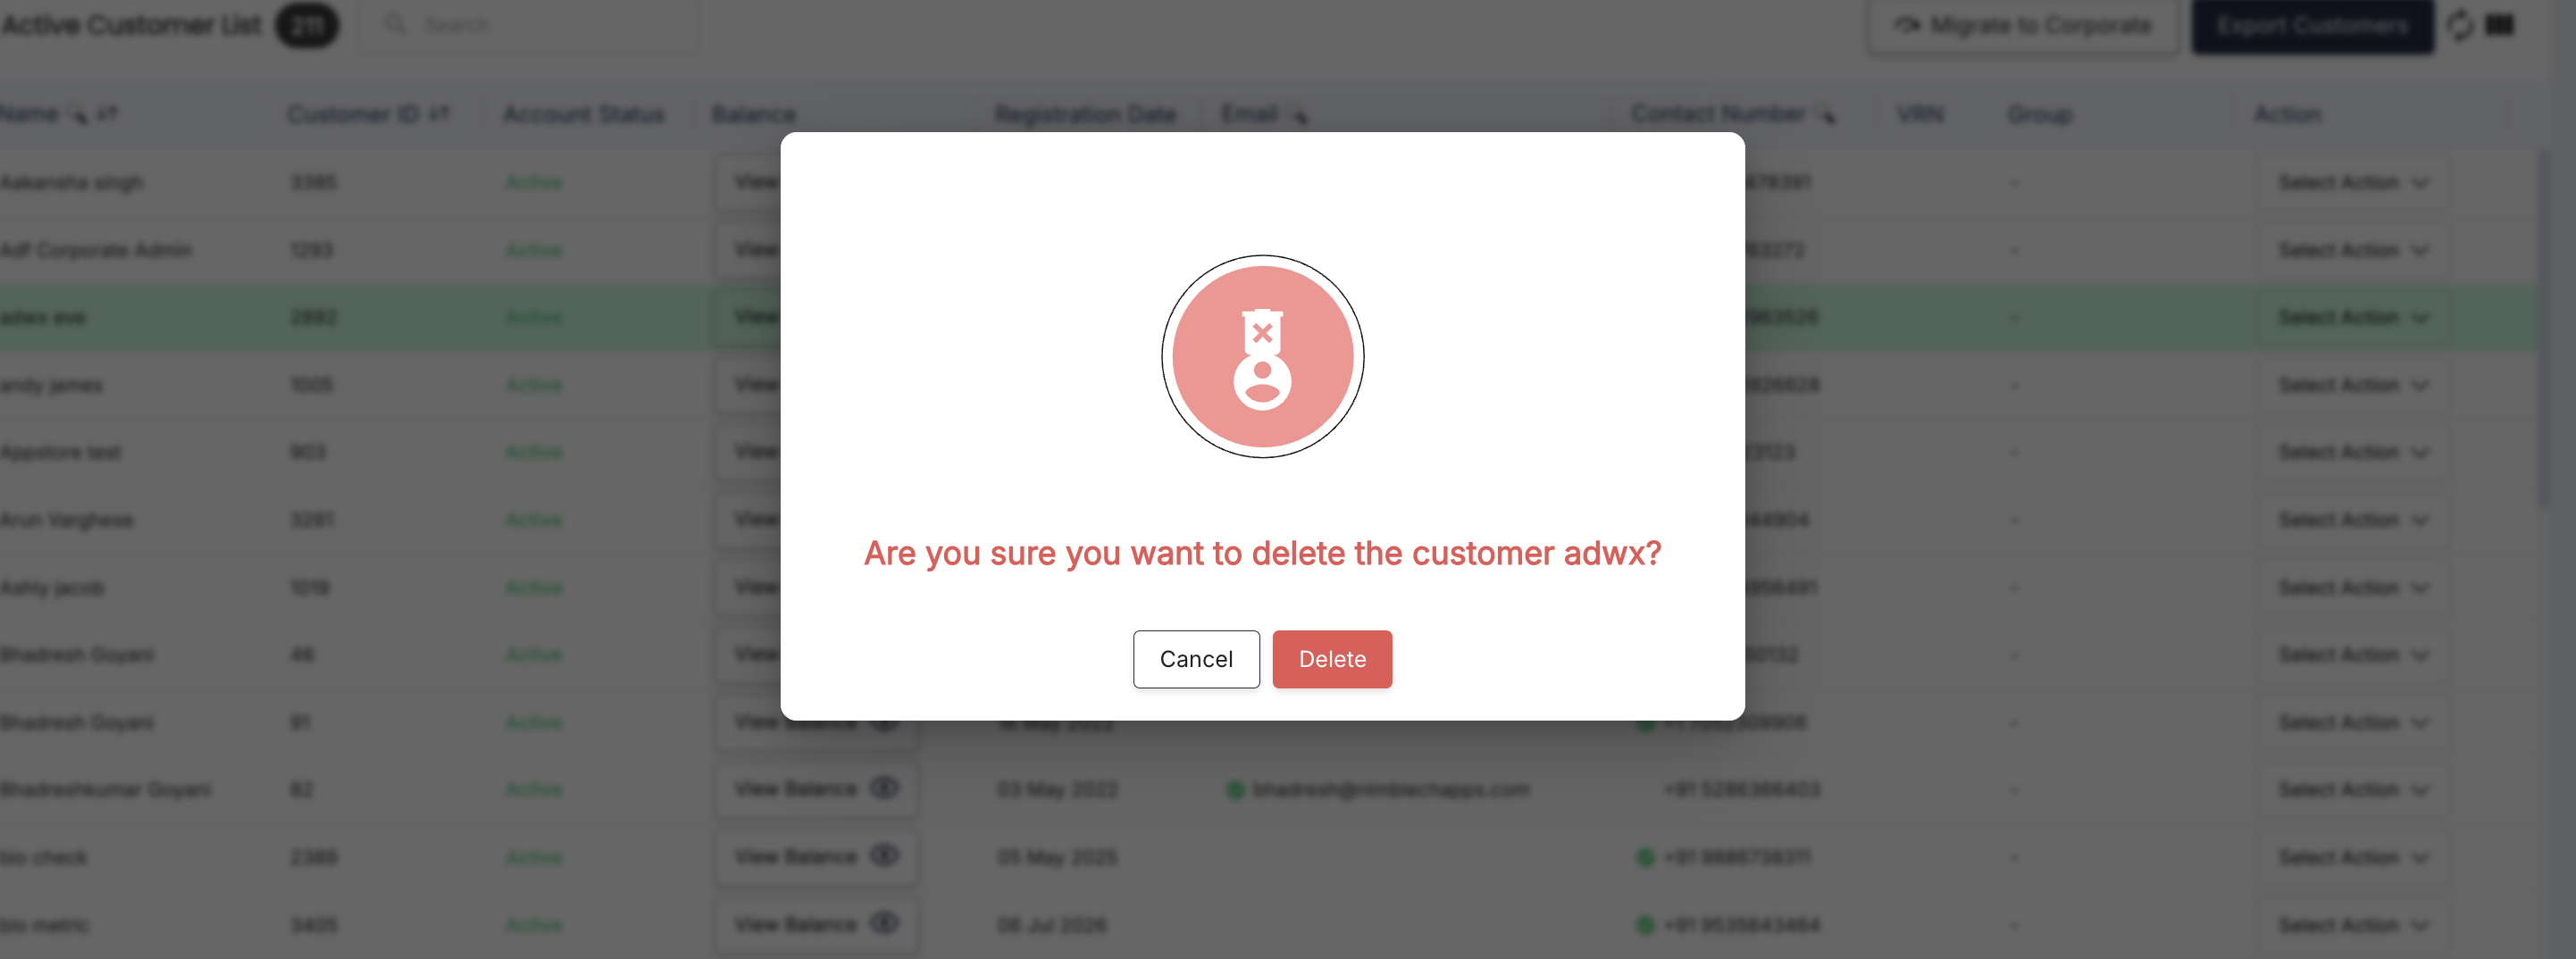
Review the confirmation before proceeding. This action does not immediately remove the customer record. The account is moved to Inactive Customers and retained for 180 days. The customer's previous charging-session history and associated RFID records remain available while the account is inactive.
Recovering an inactive customer
- Open Customers > Inactive Customers.
- Verify the customer record.
- Open Select Action.
- Select Recover Account.
- Review the confirmation before proceeding.
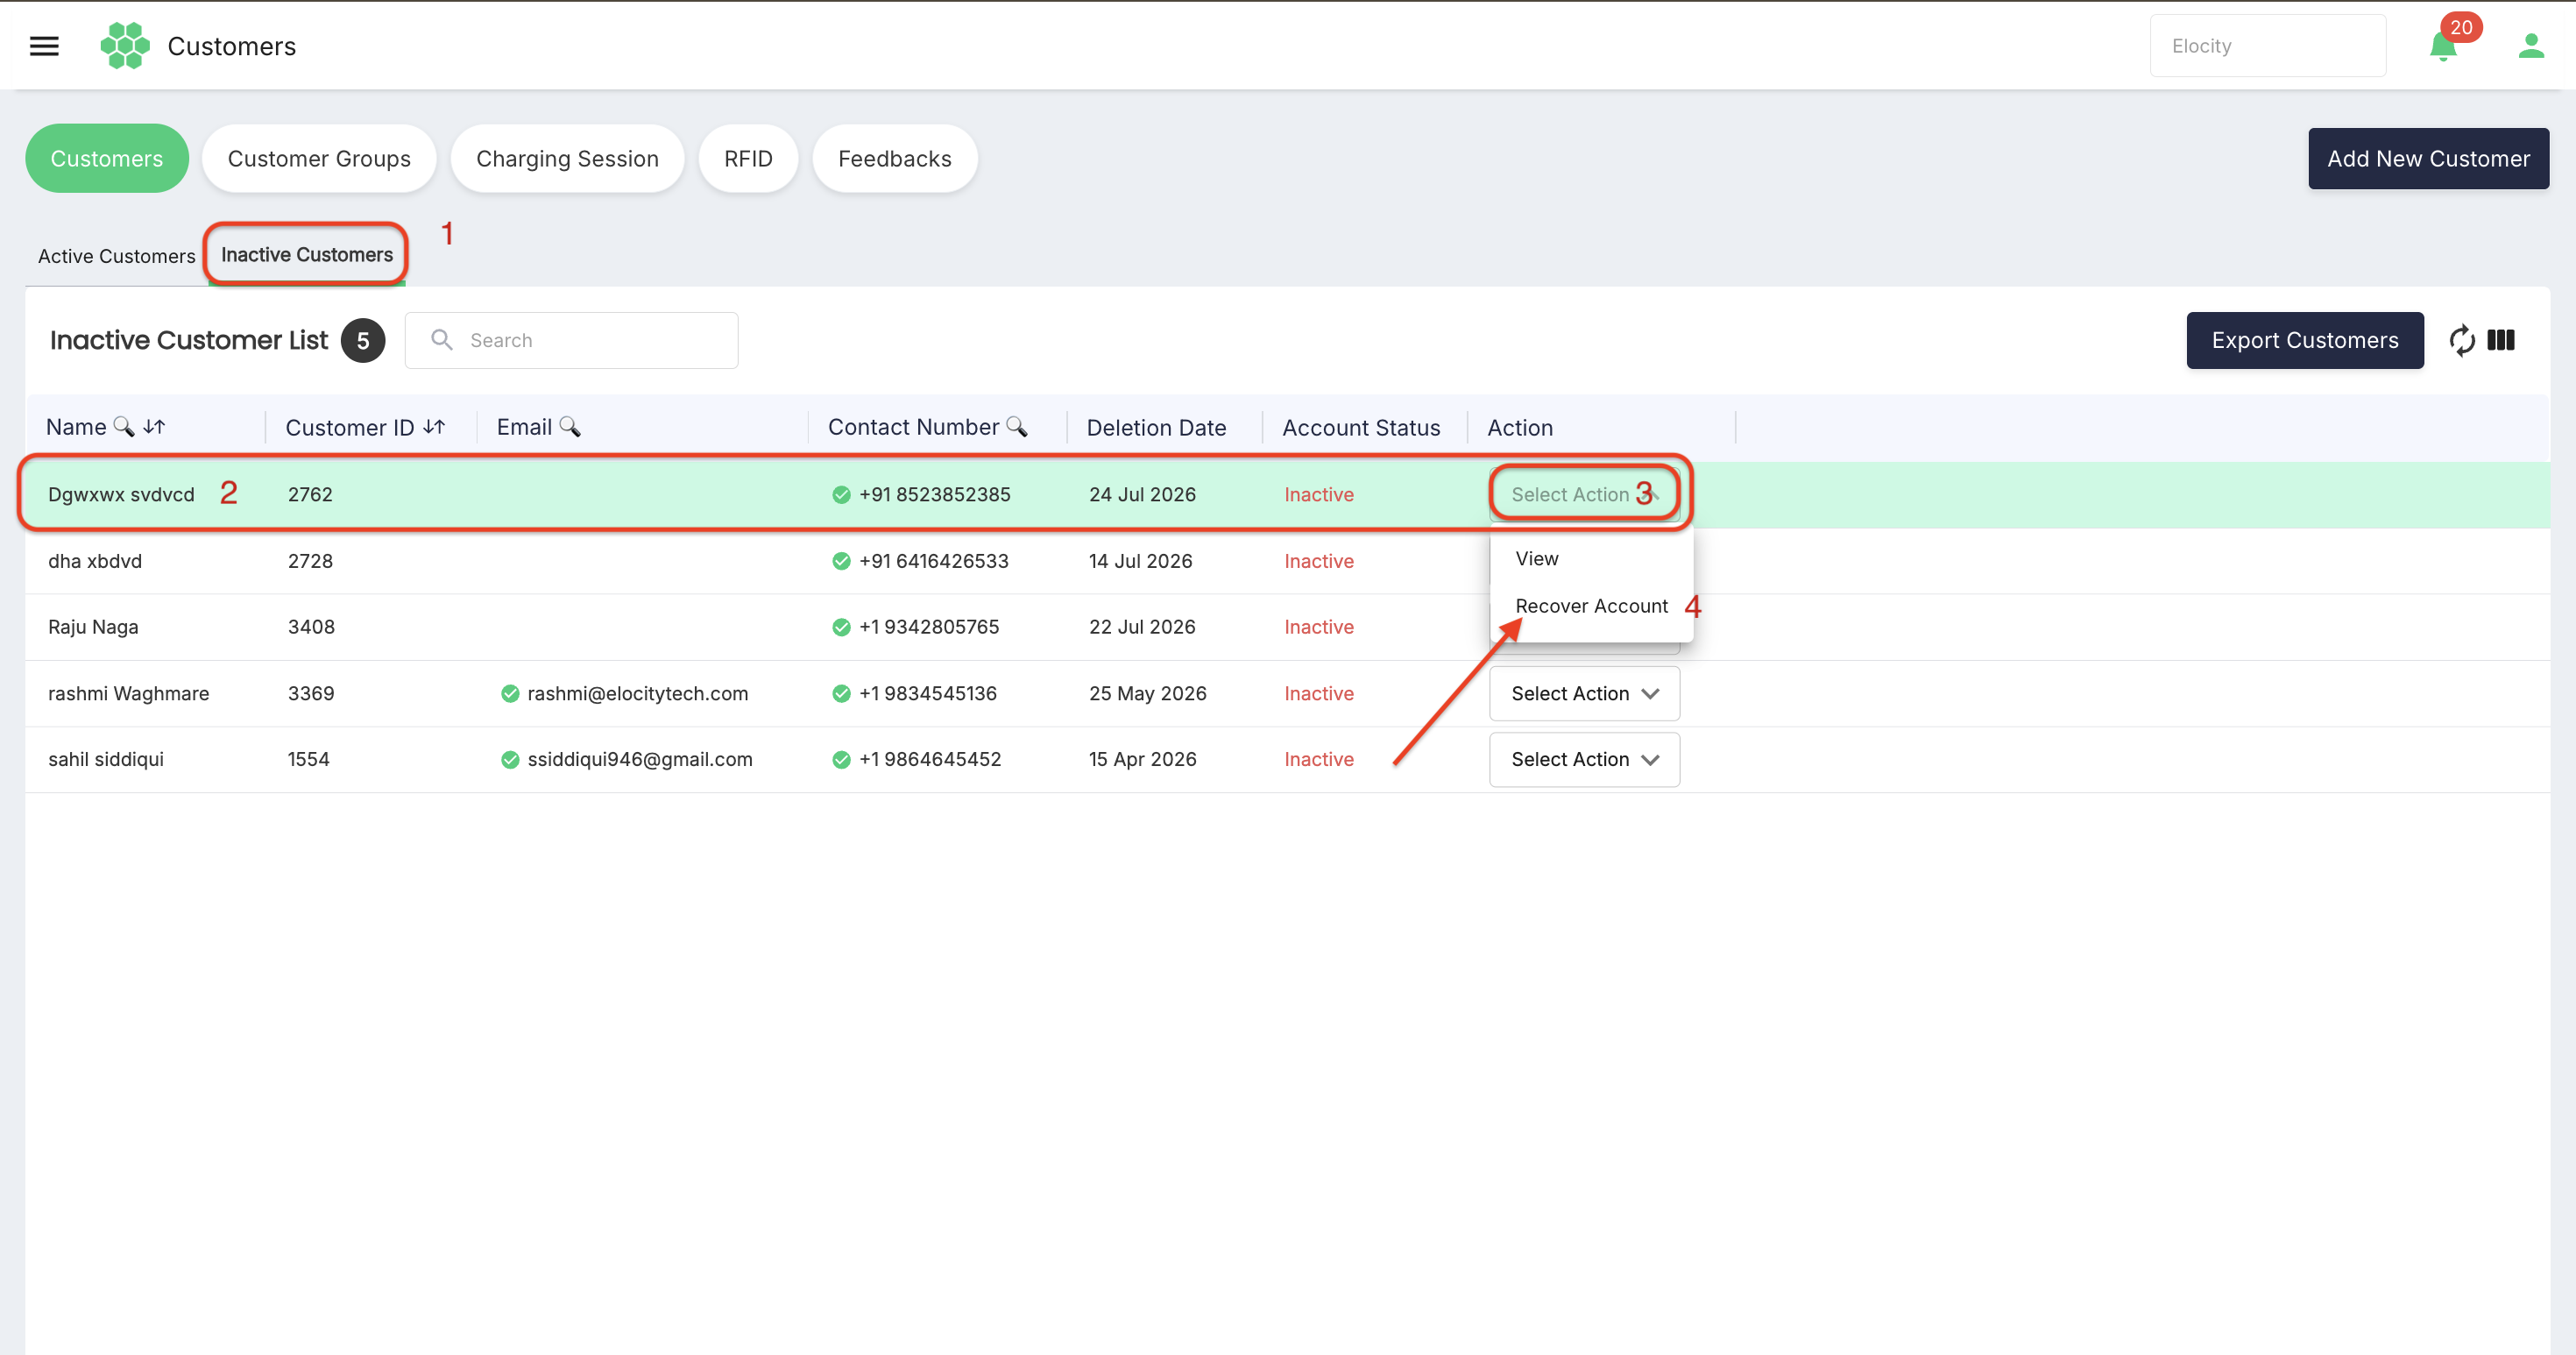
The recovered customer returns to Active Customers. The customer's existing wallet, RFID, customer-group, corporate-relationship, and other account configuration is reactivated.
Viewing customer balance and wallet information
Select View Balance in the active-customer grid to display the customer's current balance.
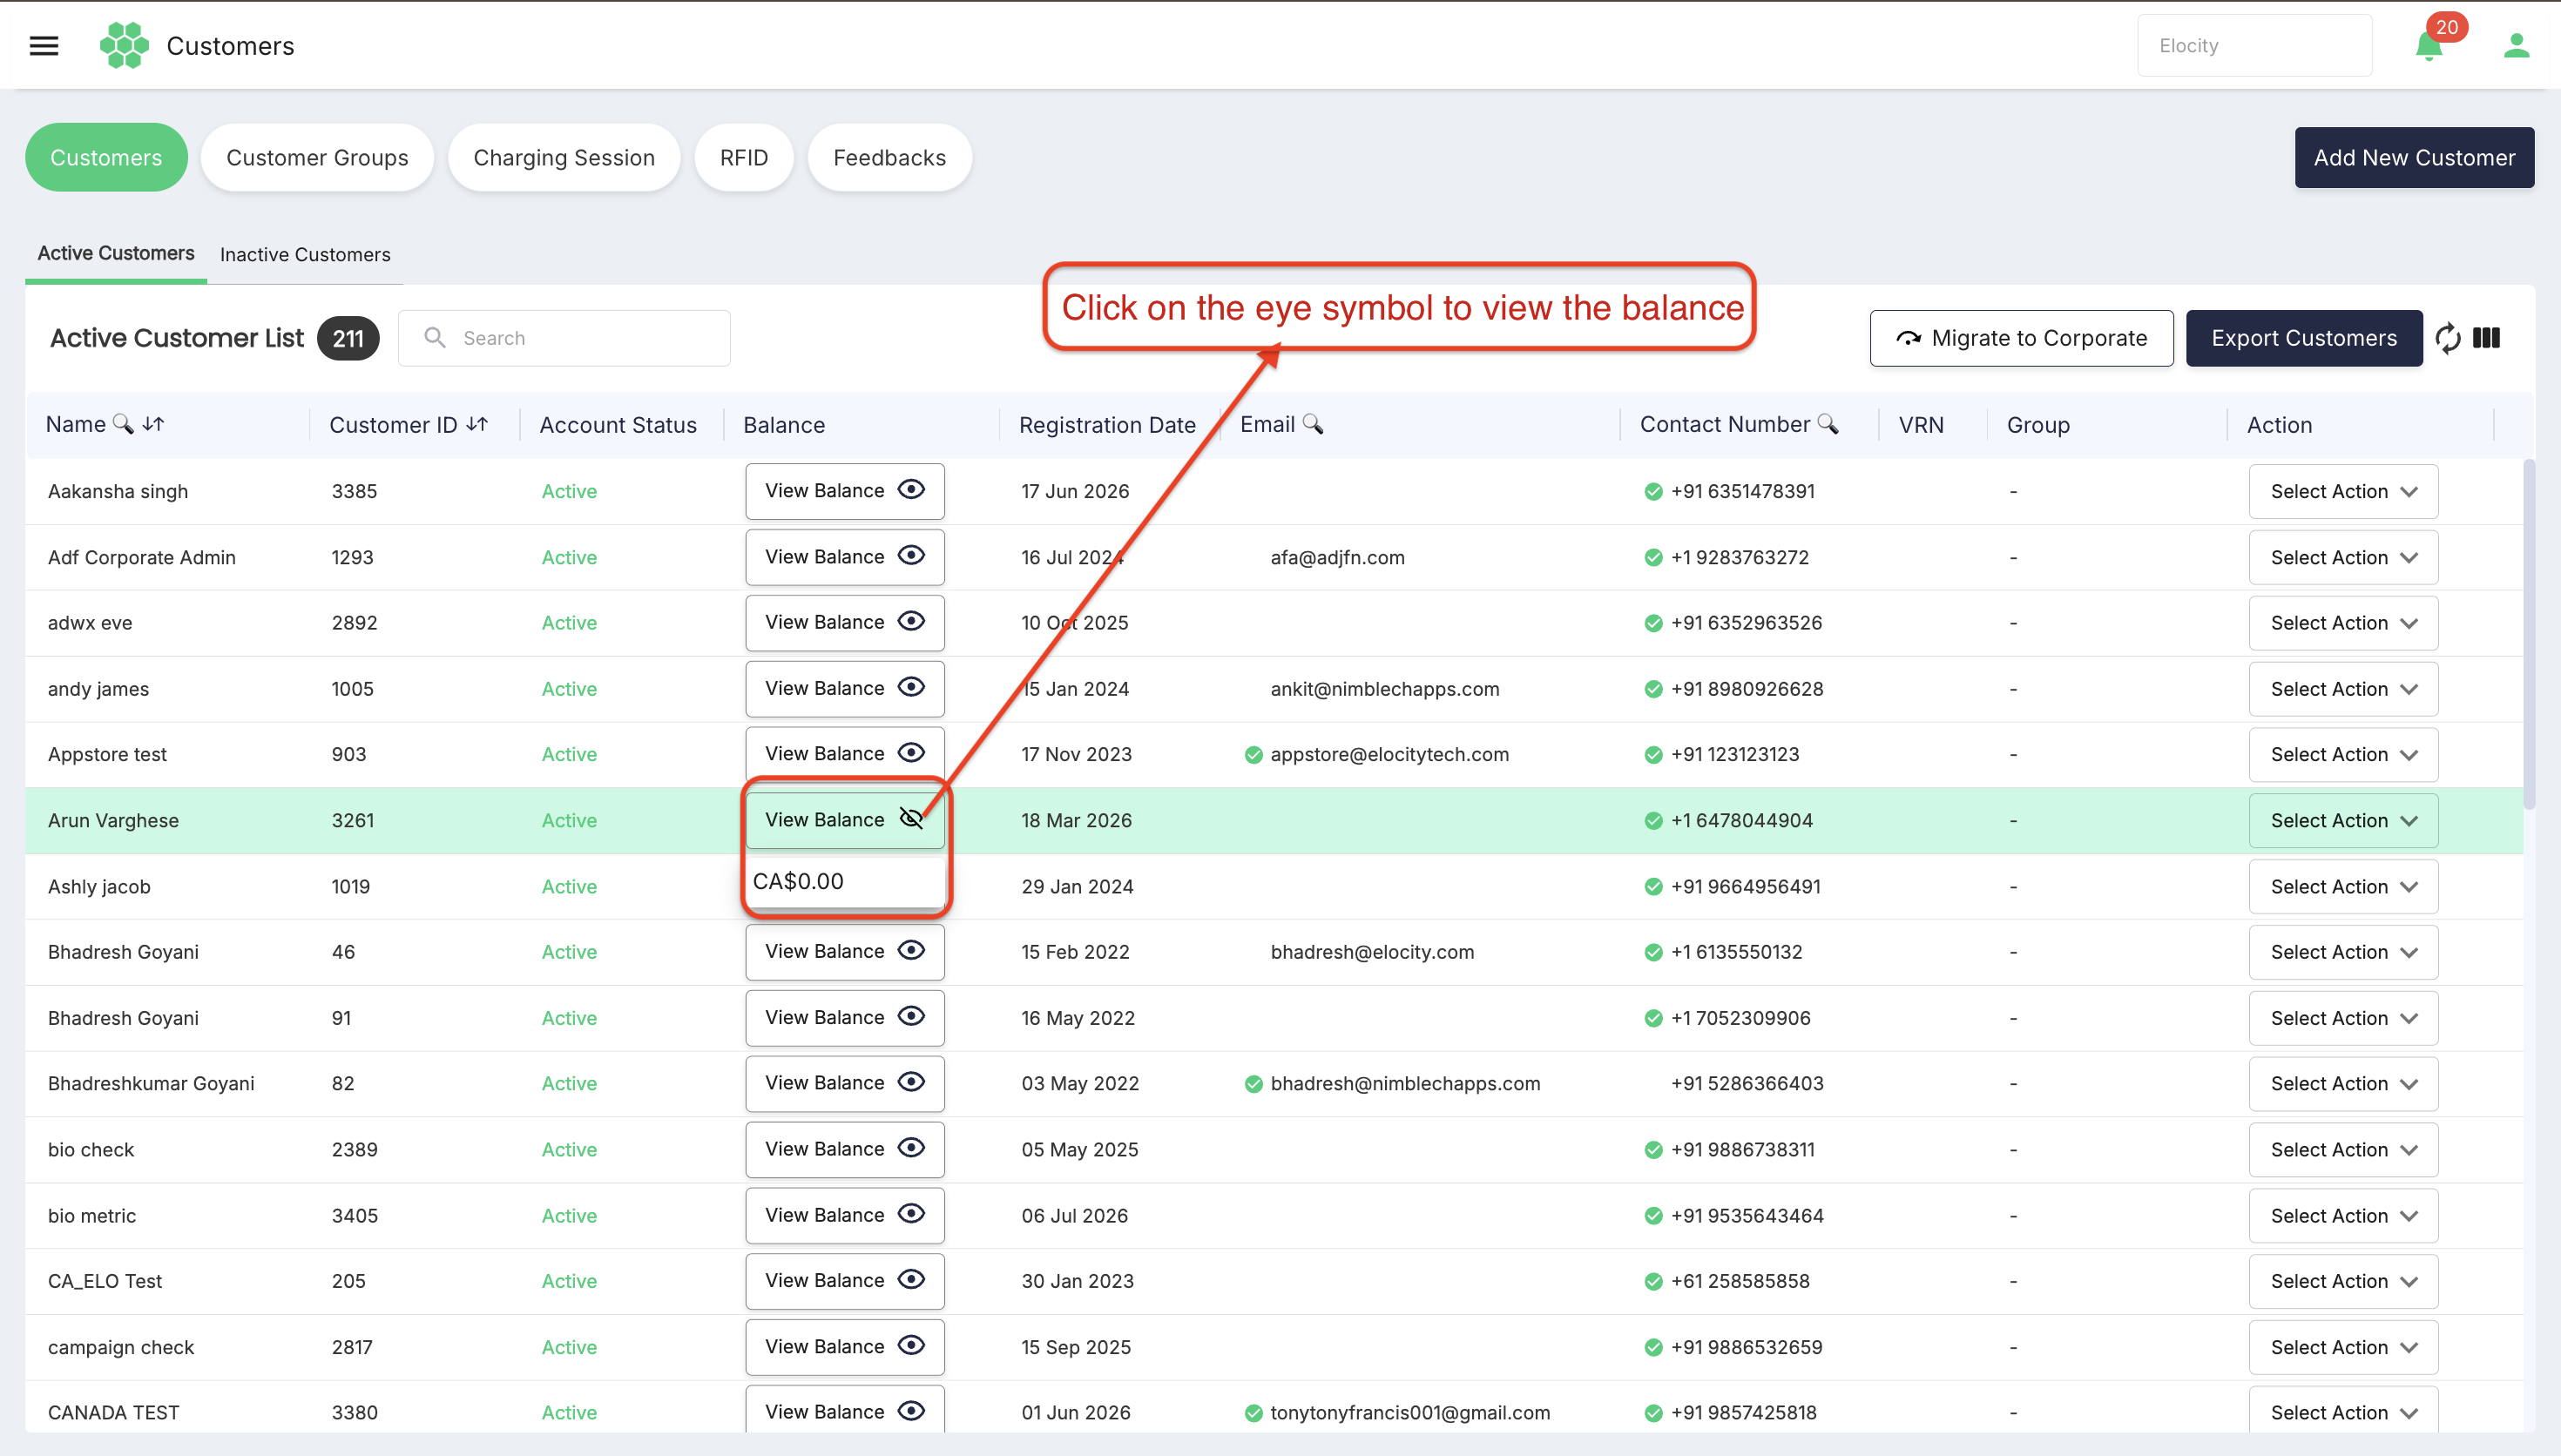
For additional wallet information:
- Open the customer record.
- Select e-Wallet.
- Review the displayed wallet status or transaction history.
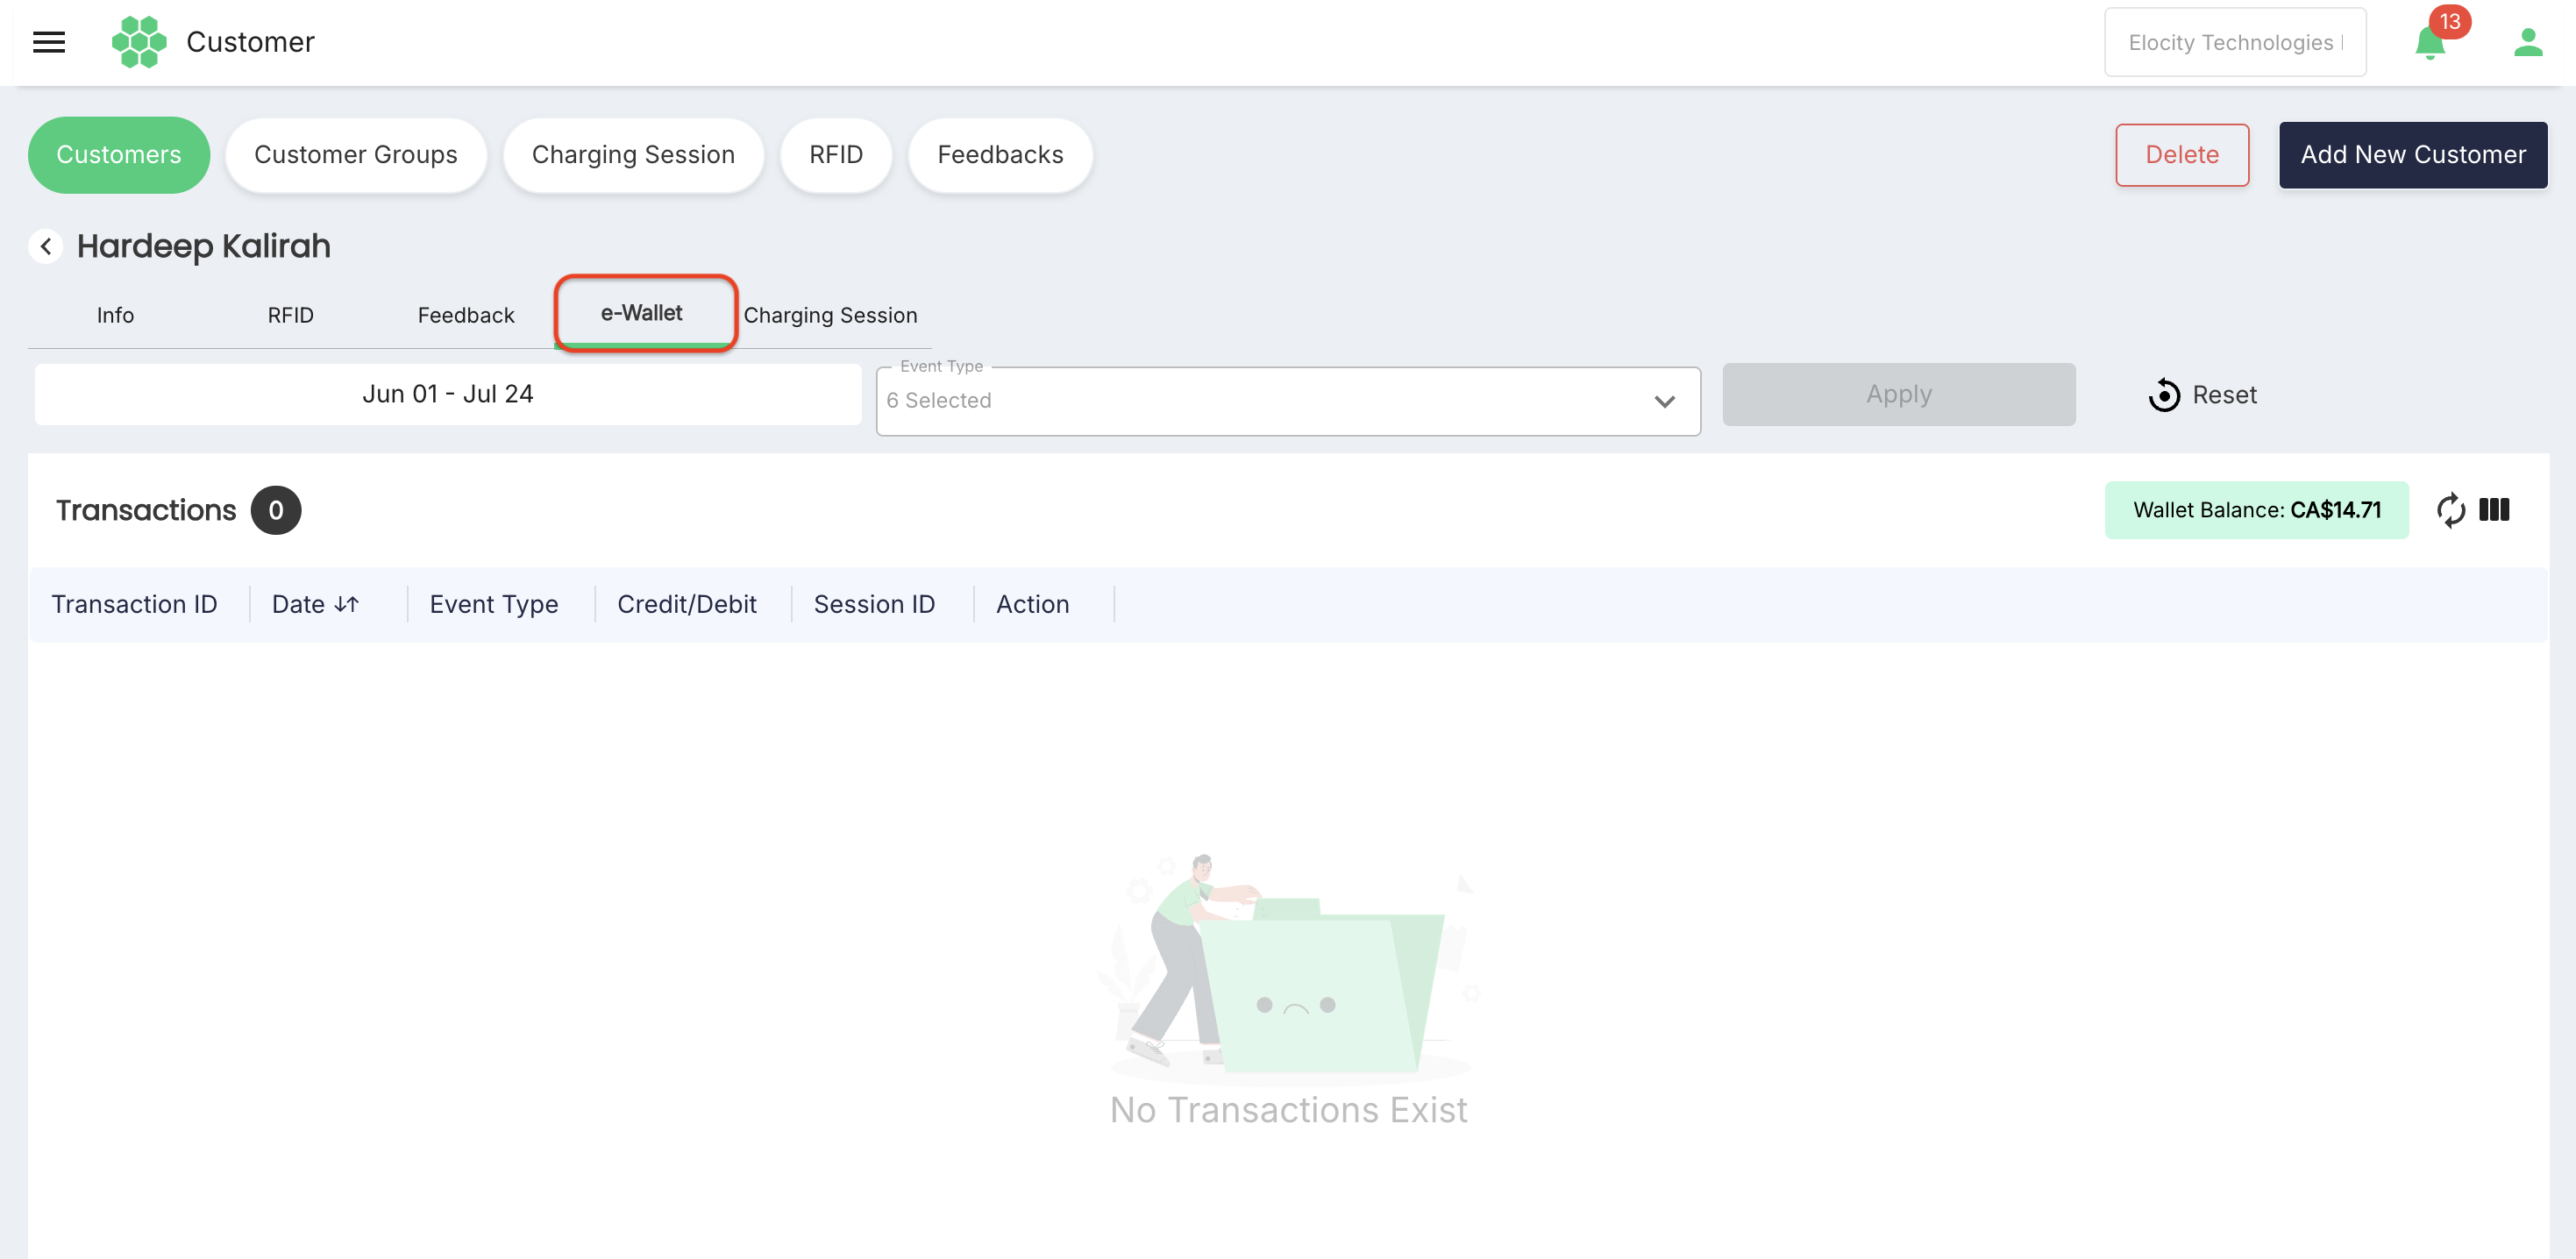
An e-Wallet is created automatically when the customer account is created. All wallet-related debits and credits are available in the wallet record.
The older Admin Guide describes Date and Event Type filters for wallet transactions. These controls could not be verified because the inspected customer wallet was inactive.
Migrating customers to a corporate group
Corporate migration is a two-stage selection process.
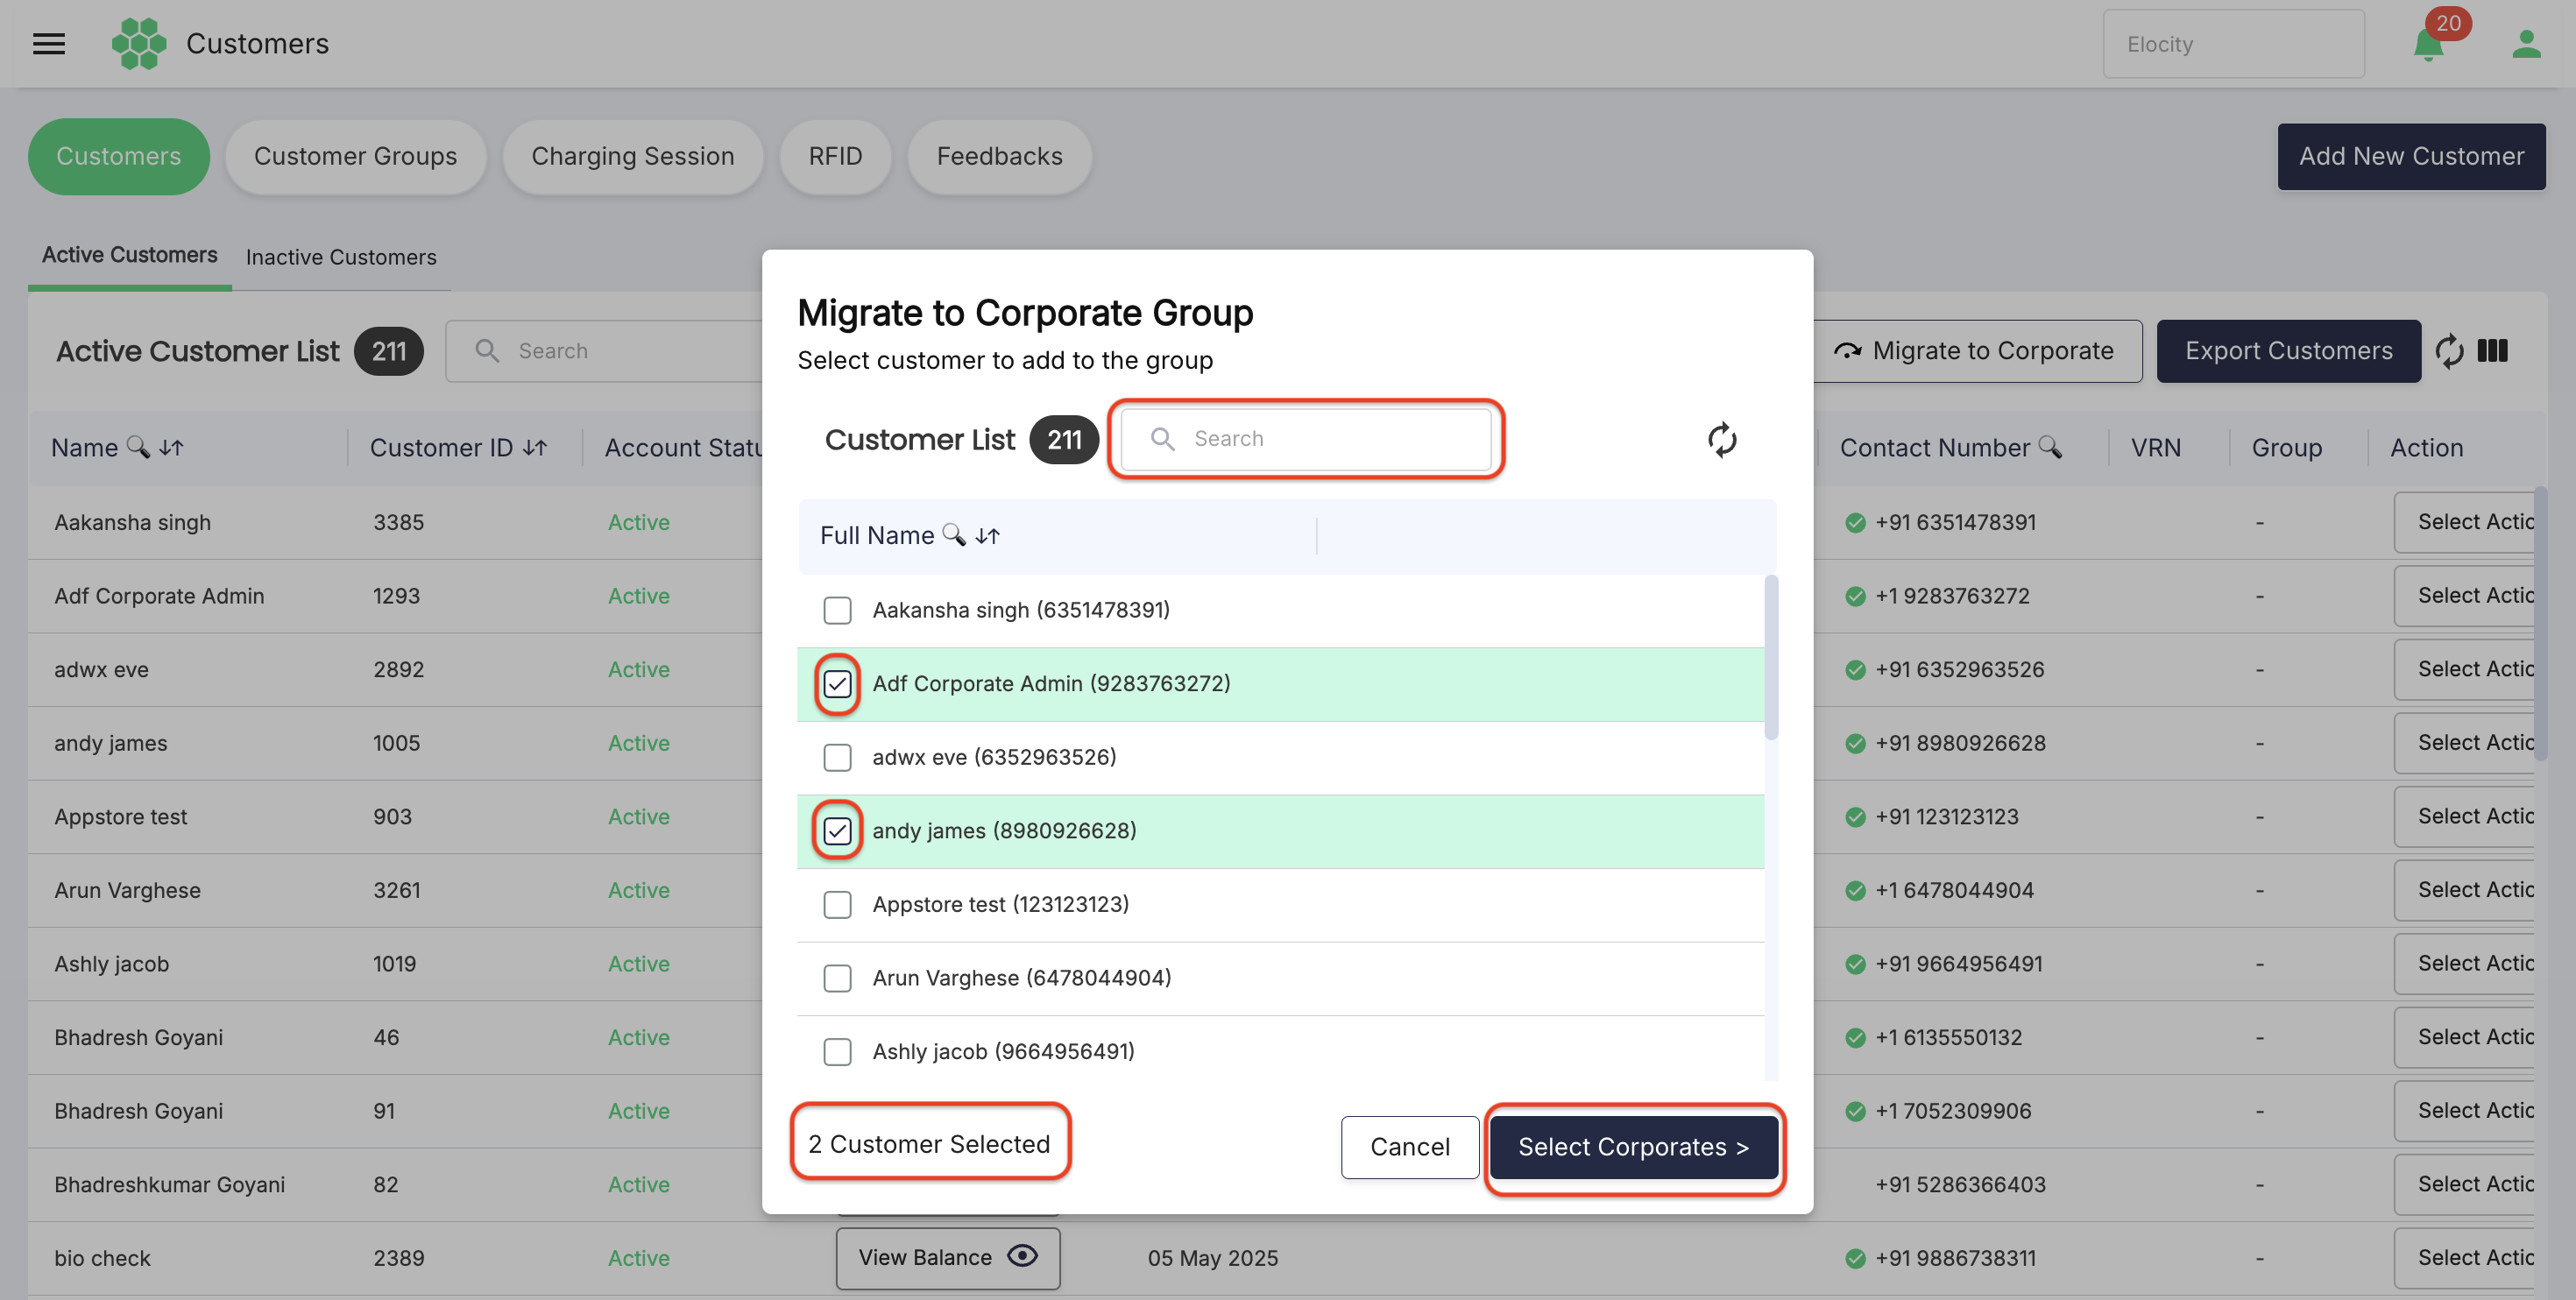
- Open Customers > Active Customers.
- Select Migrate to Corporate.
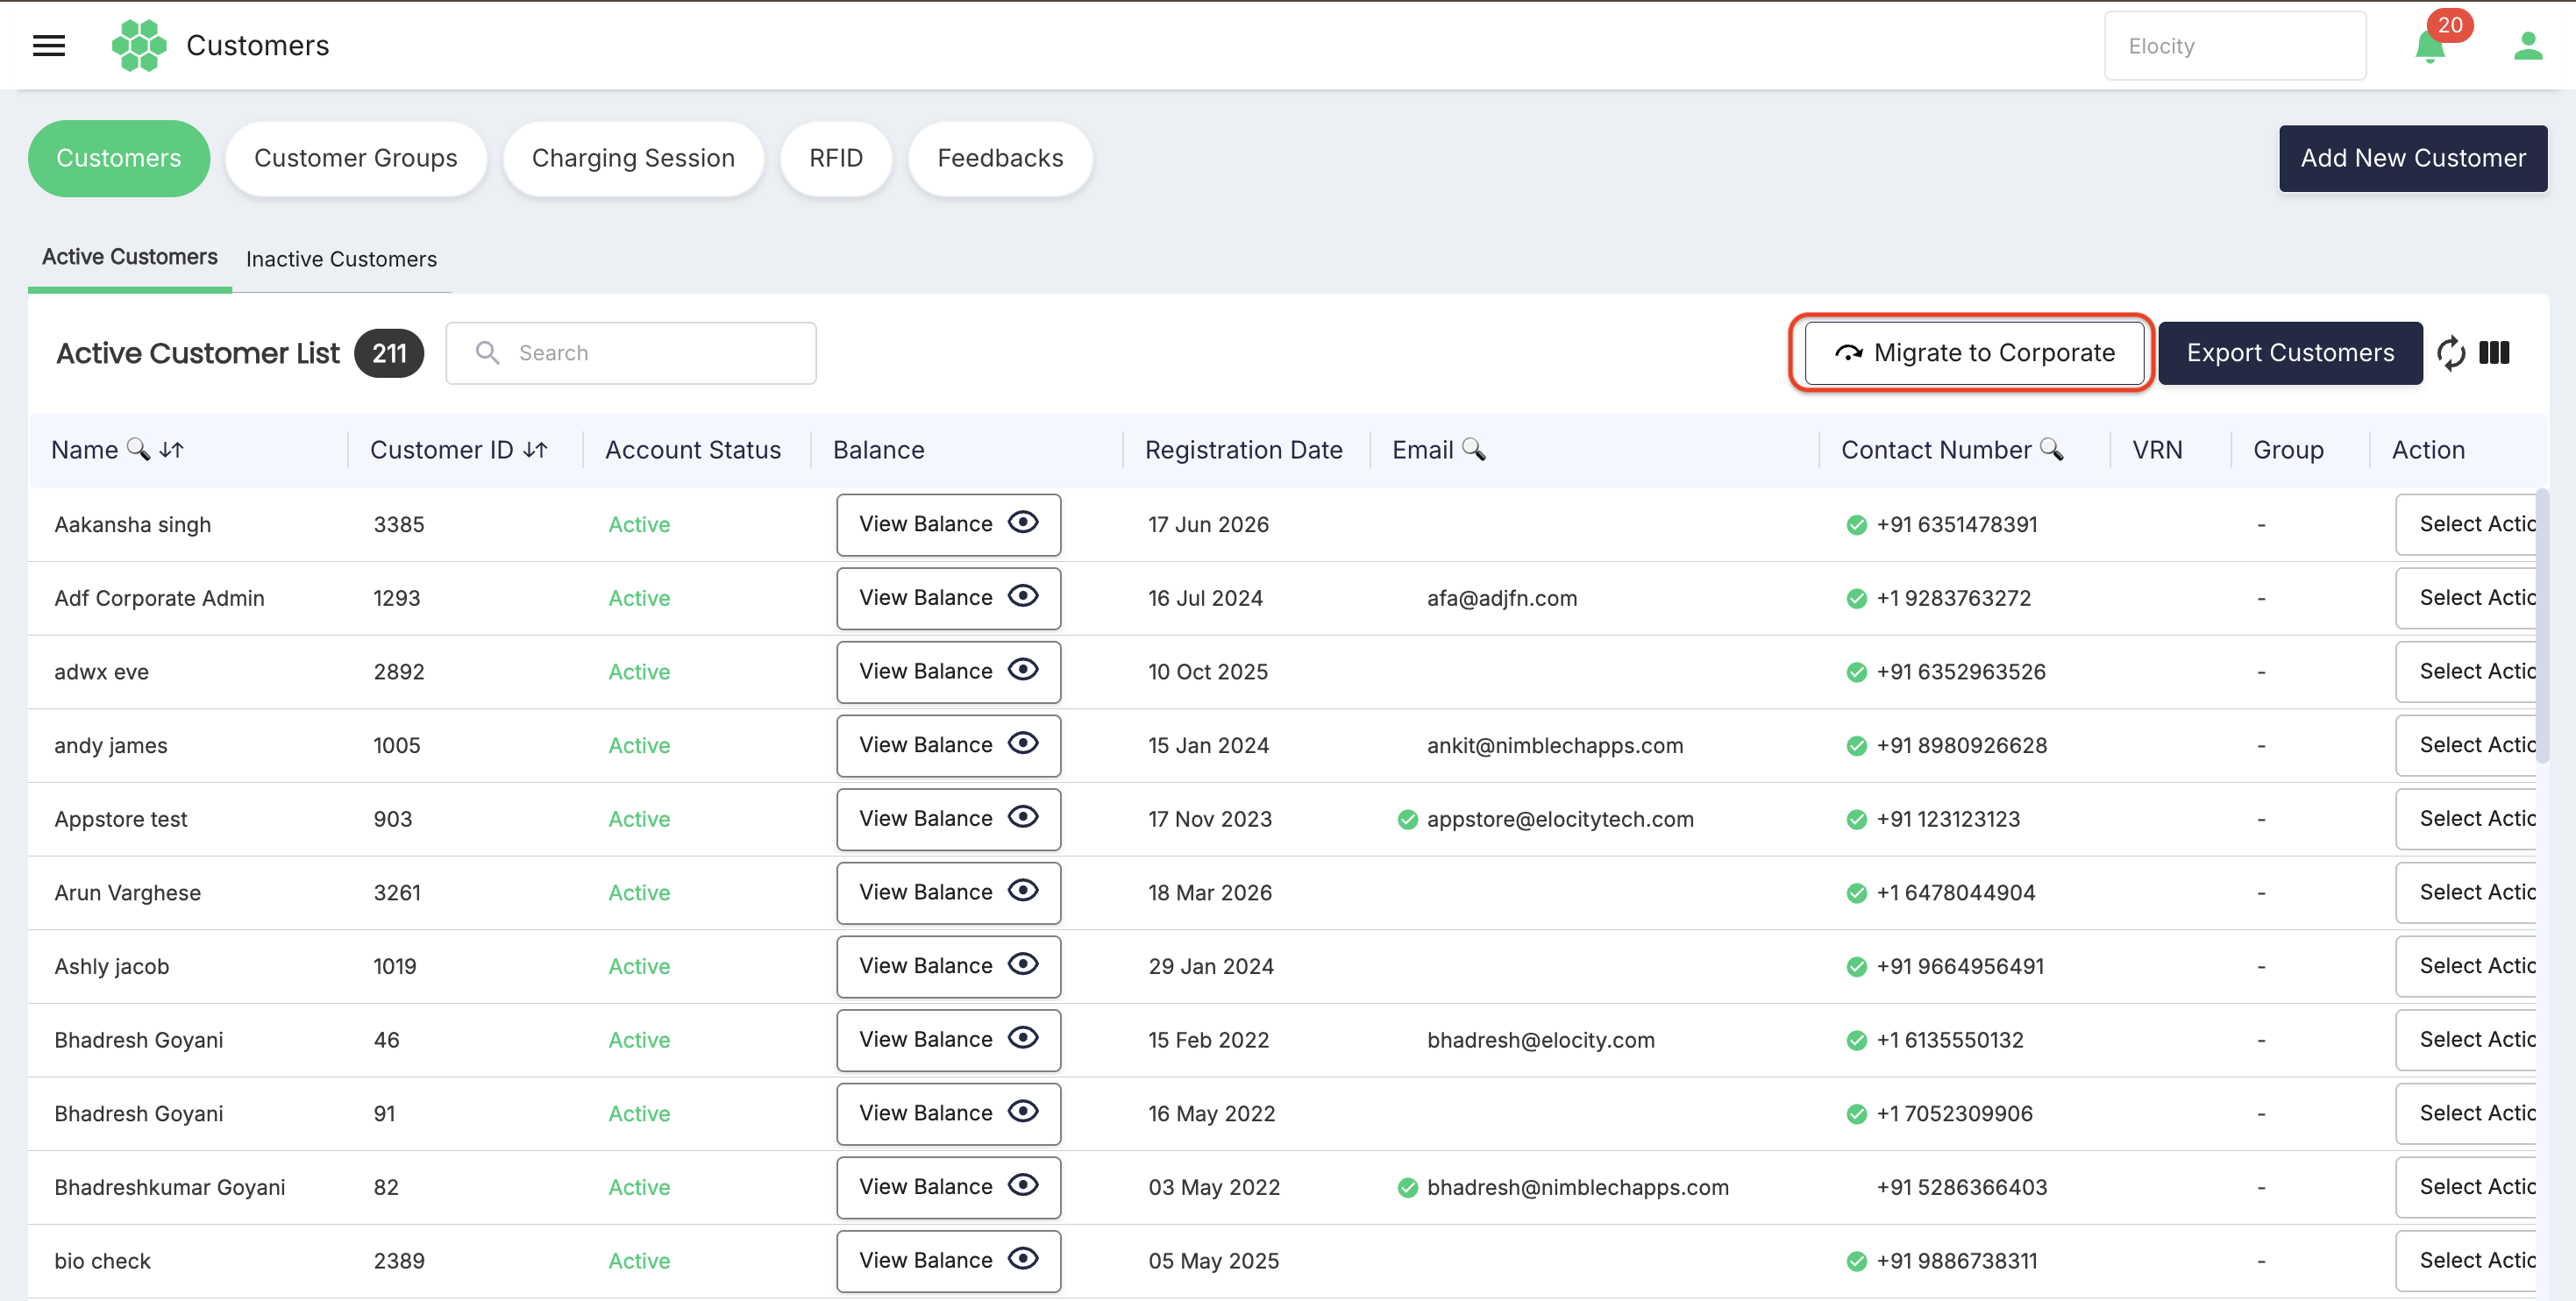
- Search or browse the Customer List.
- Select one or more customer checkboxes.
- Confirm the selected-customer count.
- Select Select Corporates >.
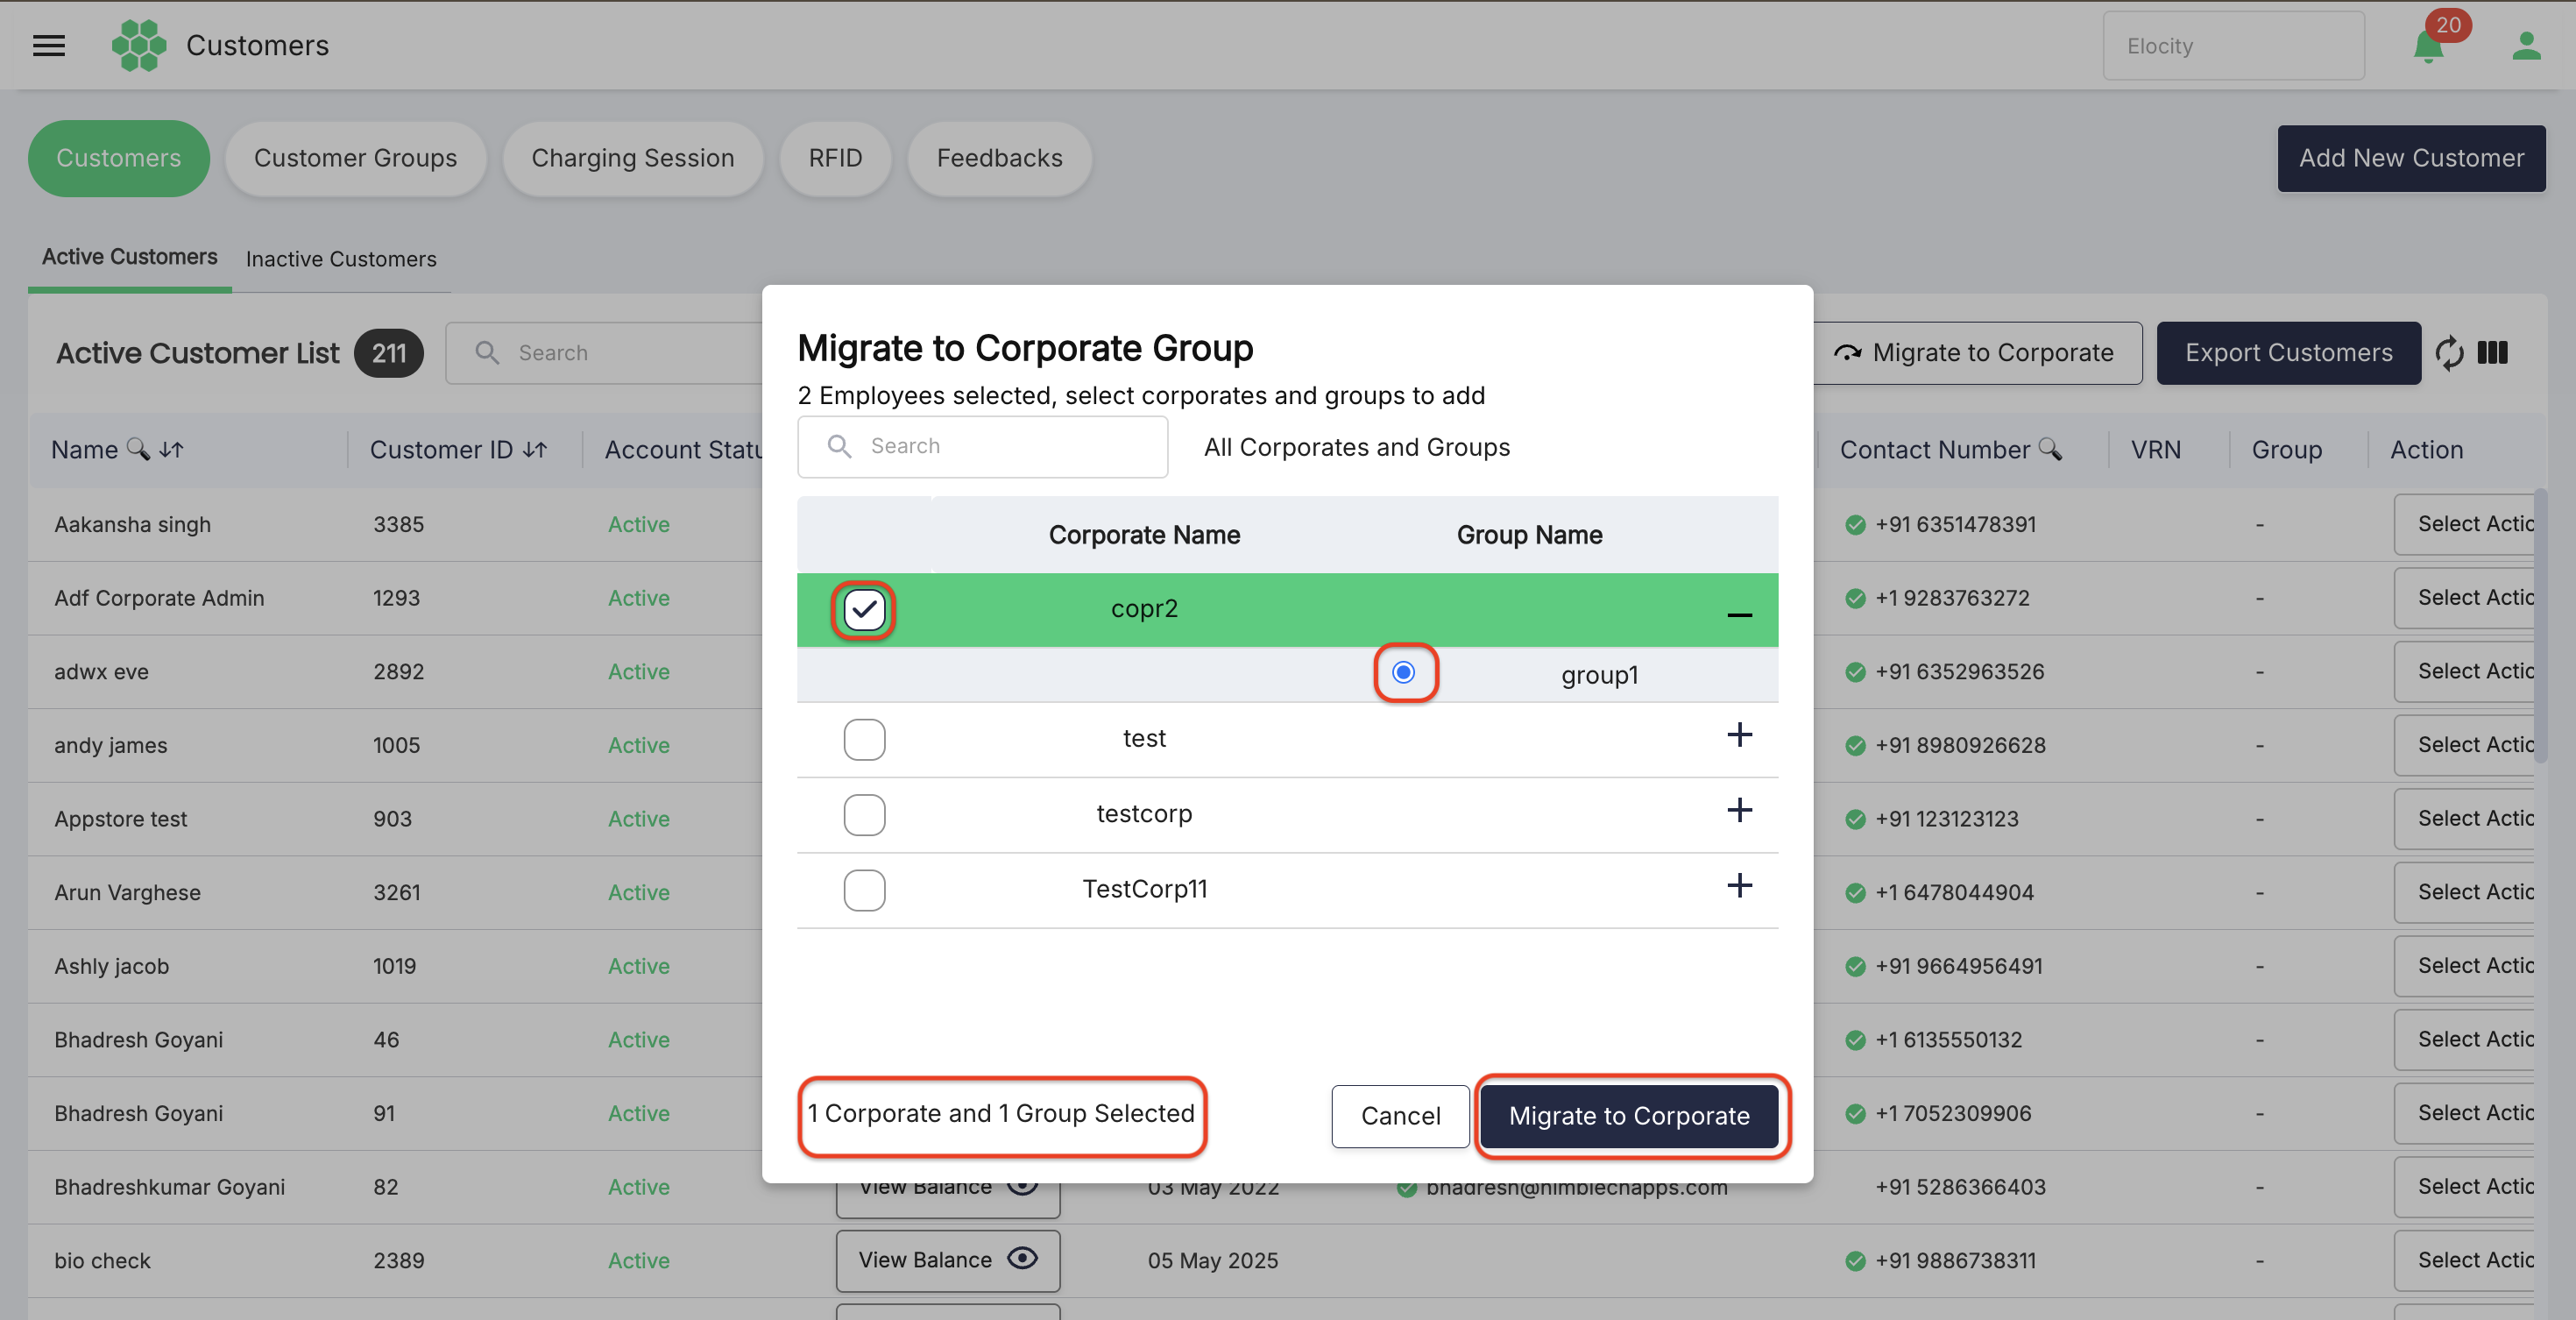
- Search or browse All Corporates and Groups.
- Select the required corporate and associated group.
- Review the selected corporate and group count.
- Select Migrate to Corporate.
Select Corporates > remains disabled until at least one customer is selected.
The final Migrate to Corporate button remains disabled until the required destination selection is complete.
Migration is reversible. A migrated corporate customer can receive access to designated chargers and exclusive pricing configured for corporate users.
Before proceeding, verify the selected customers, destination corporate, and destination group. Current product guidance does not define how migration affects an existing non-corporate group membership or prior business visibility.
Customer Groups page
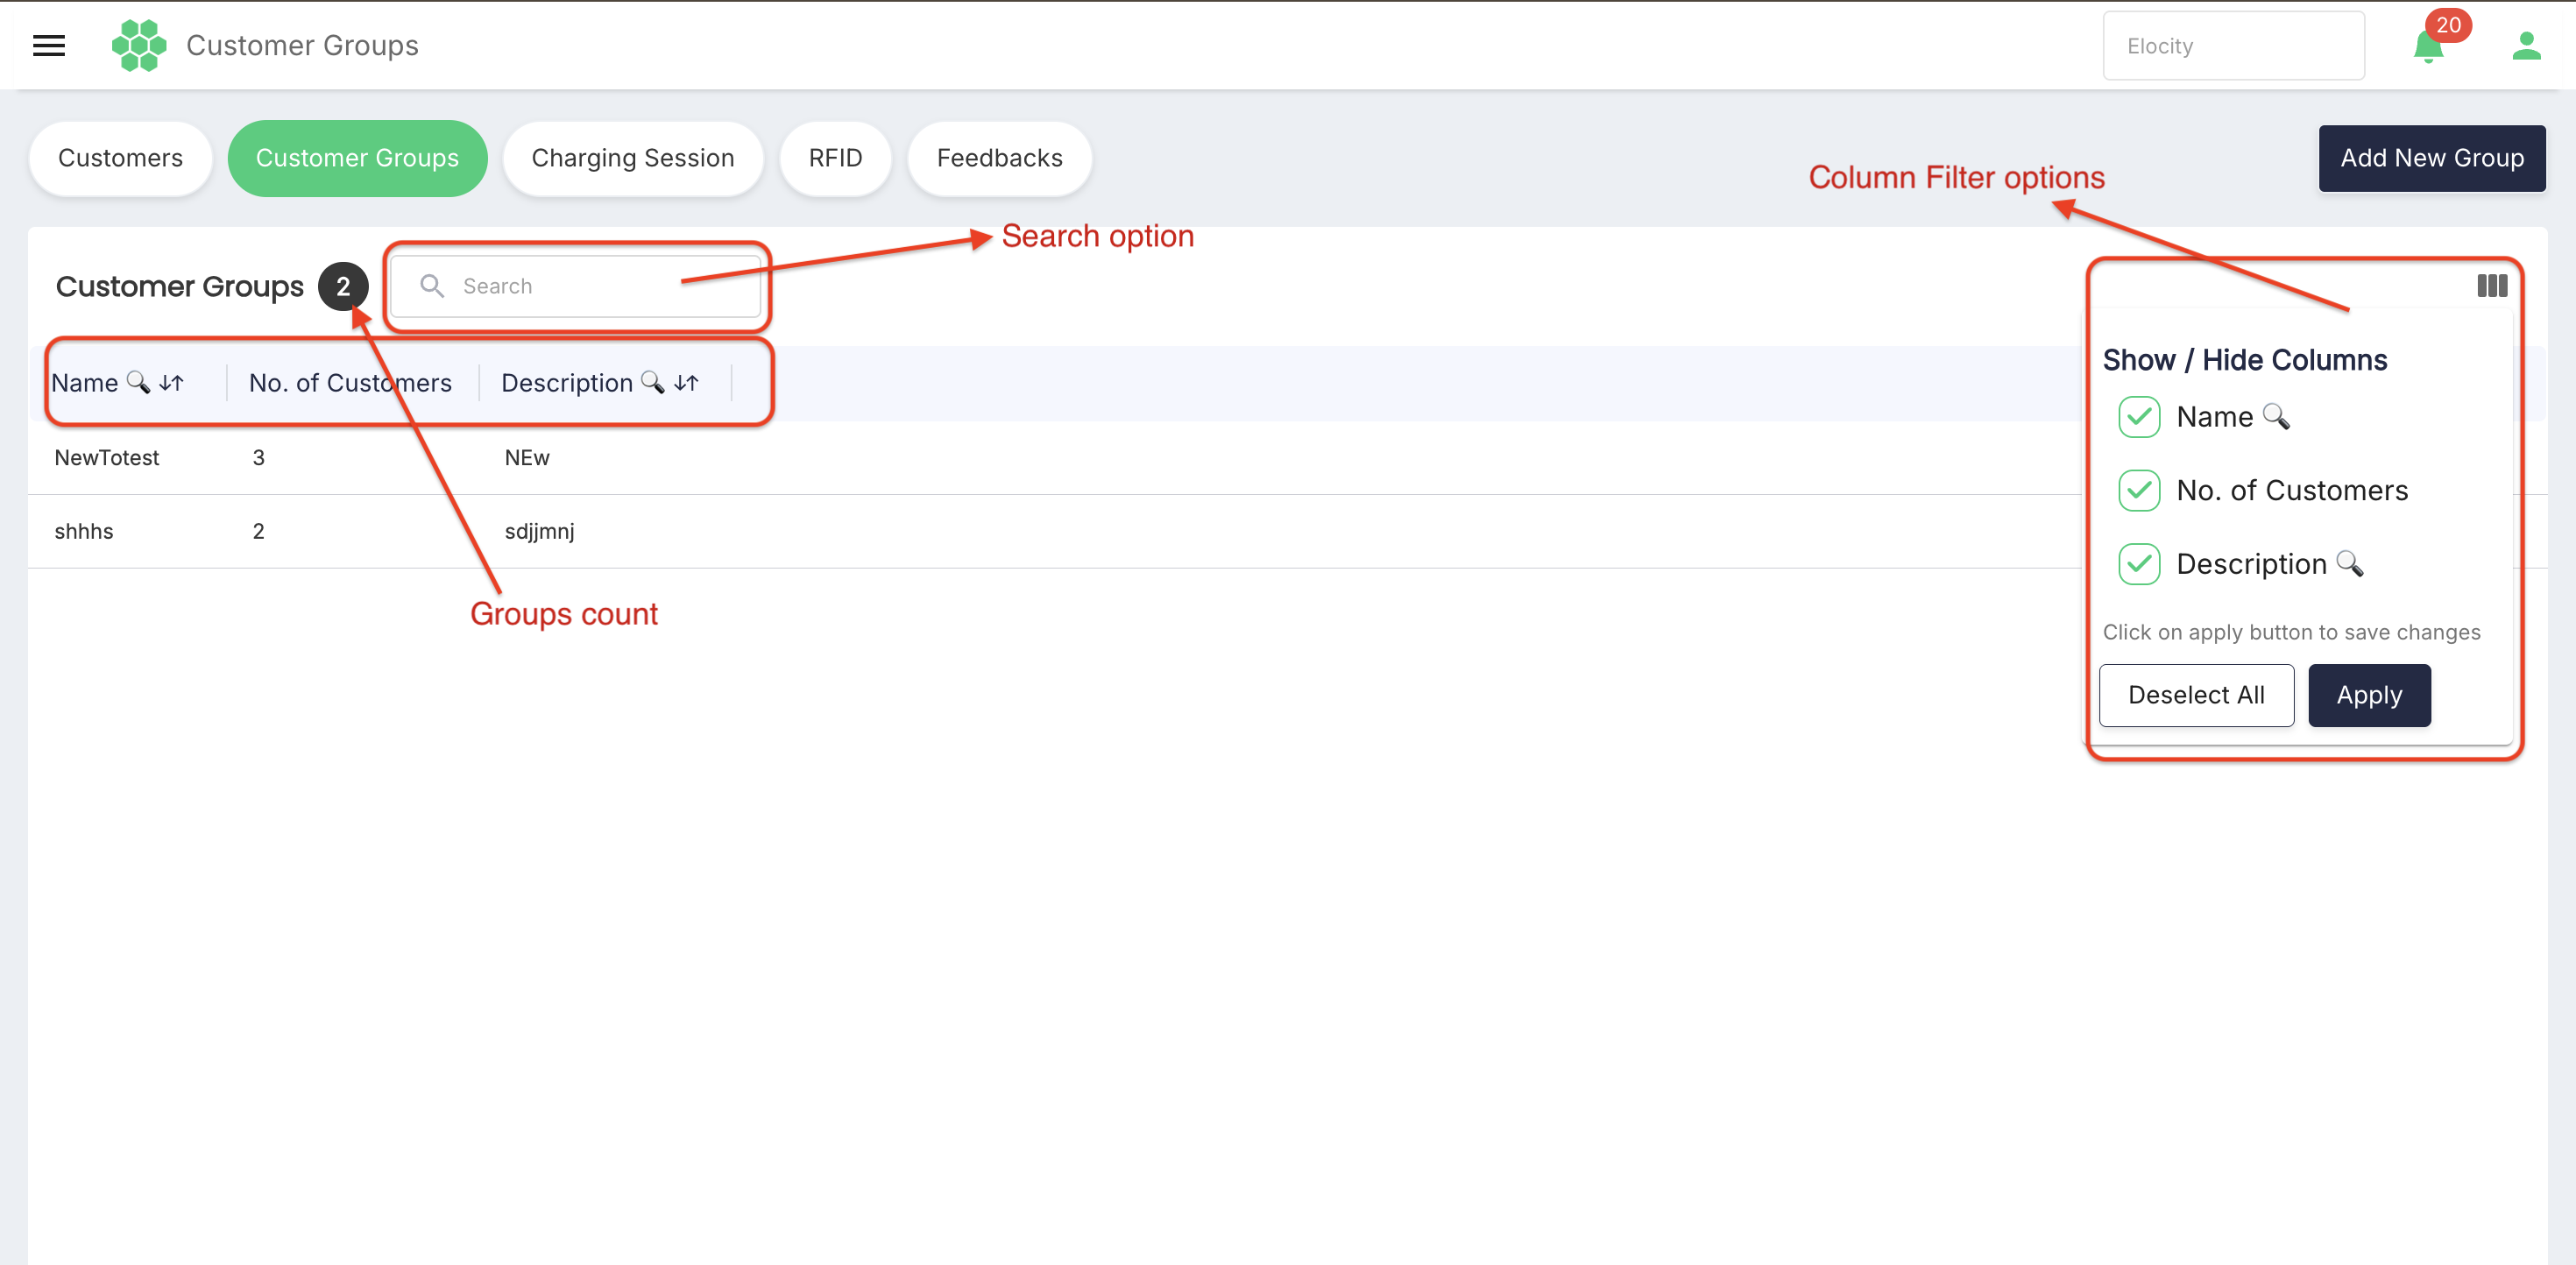
The Customer Groups page organizes customers into named groups within the selected business context.
The counter beside Customer Groups shows the number of groups returned for the current business.
| Column | Description |
|---|---|
| Name | Shows the group name. A column-search control is available. |
| No. of Customers | Shows the number of customers currently associated with the group. |
| Description | Shows the purpose or reference description. A column-search control is available. |
Use Search to filter the current group list.
Use Column Filter to control the visible group columns.
Adding a customer group
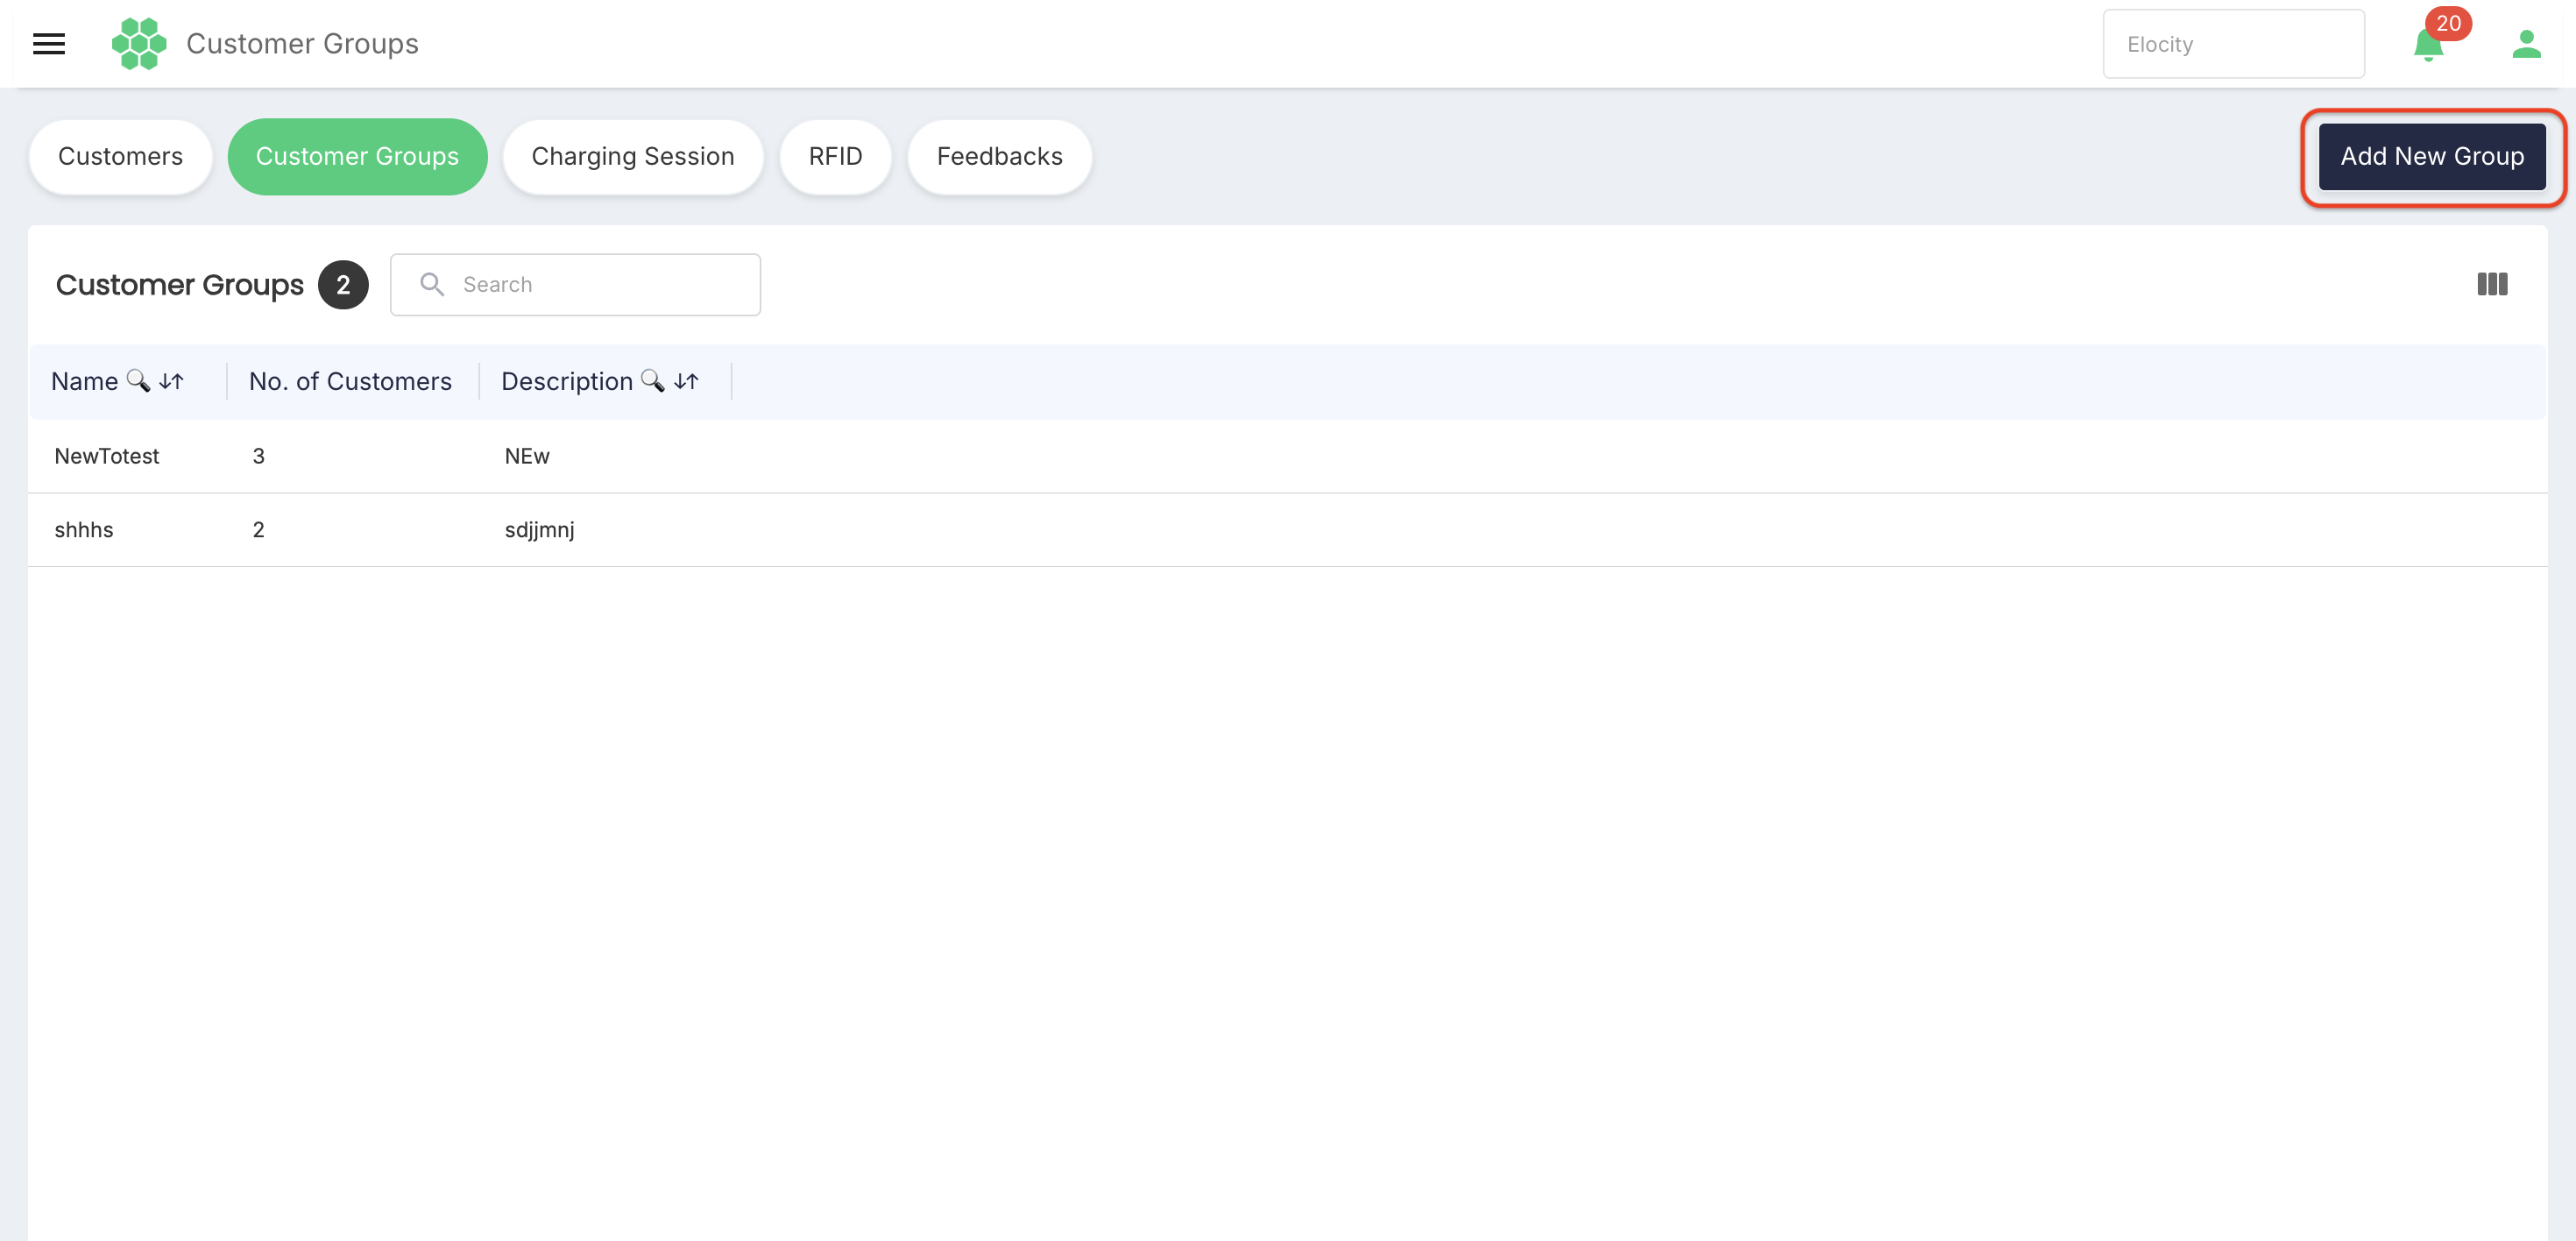
- Open Customer Groups.
- Select Add New Group.
- Enter Group Name.
- Enter Description.
- Select Save.
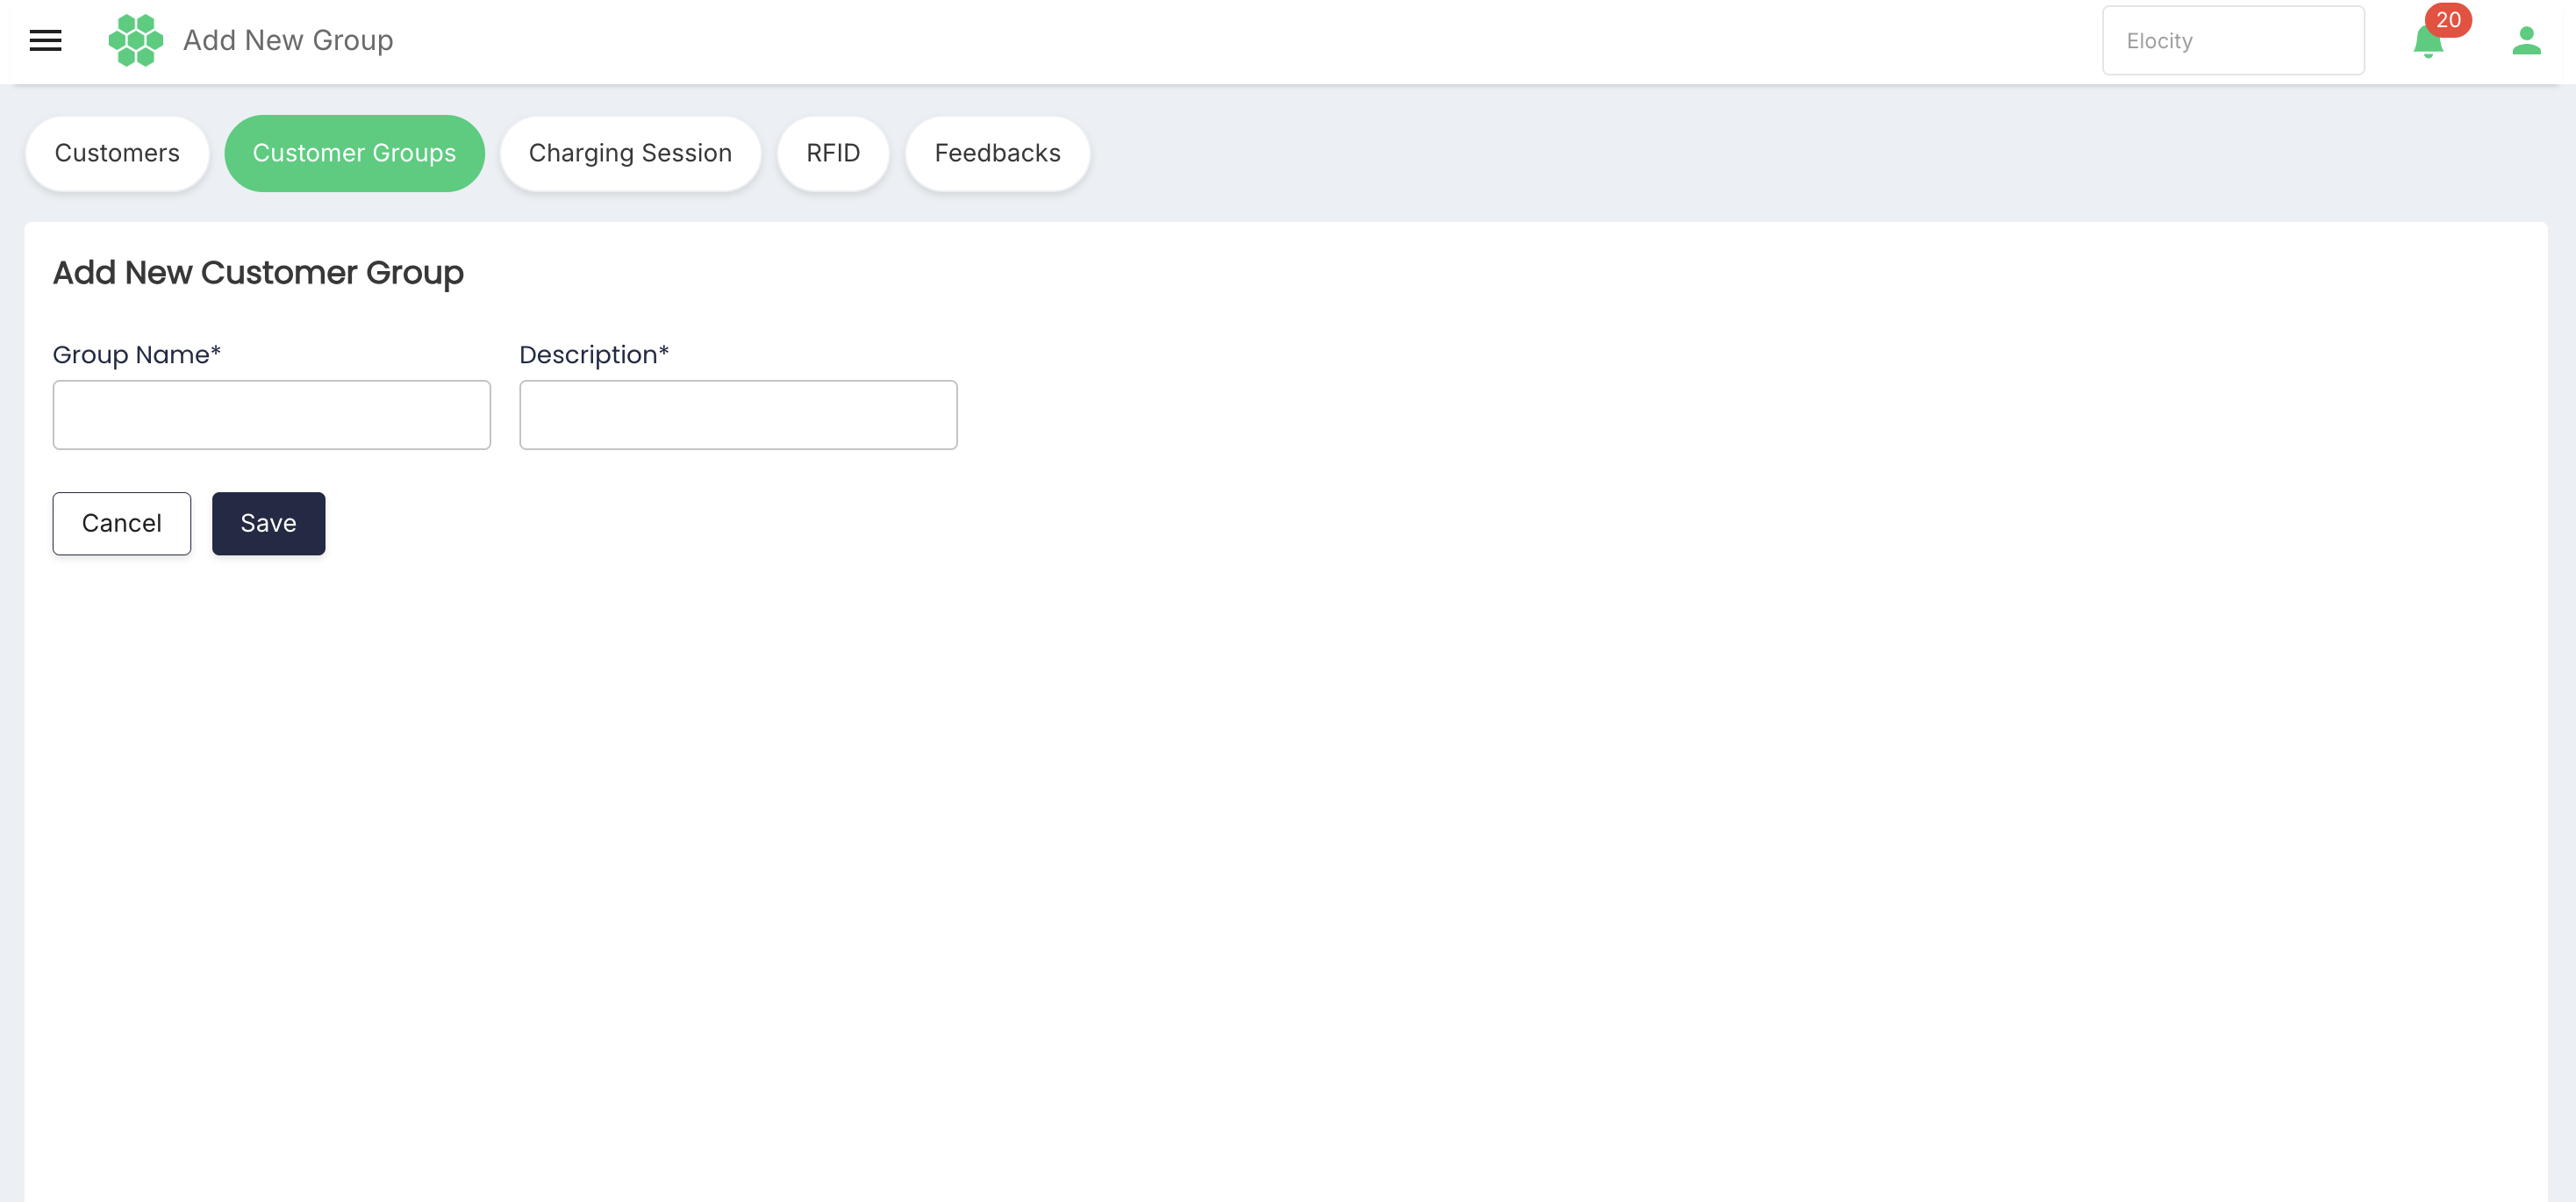
Both fields are marked as required.
Select Cancel to return without creating the group.
The current form does not select customers during group creation. This differs from the older Admin Guide. Add customers after the group has been created.
Viewing and editing a customer group
- Select a group record.
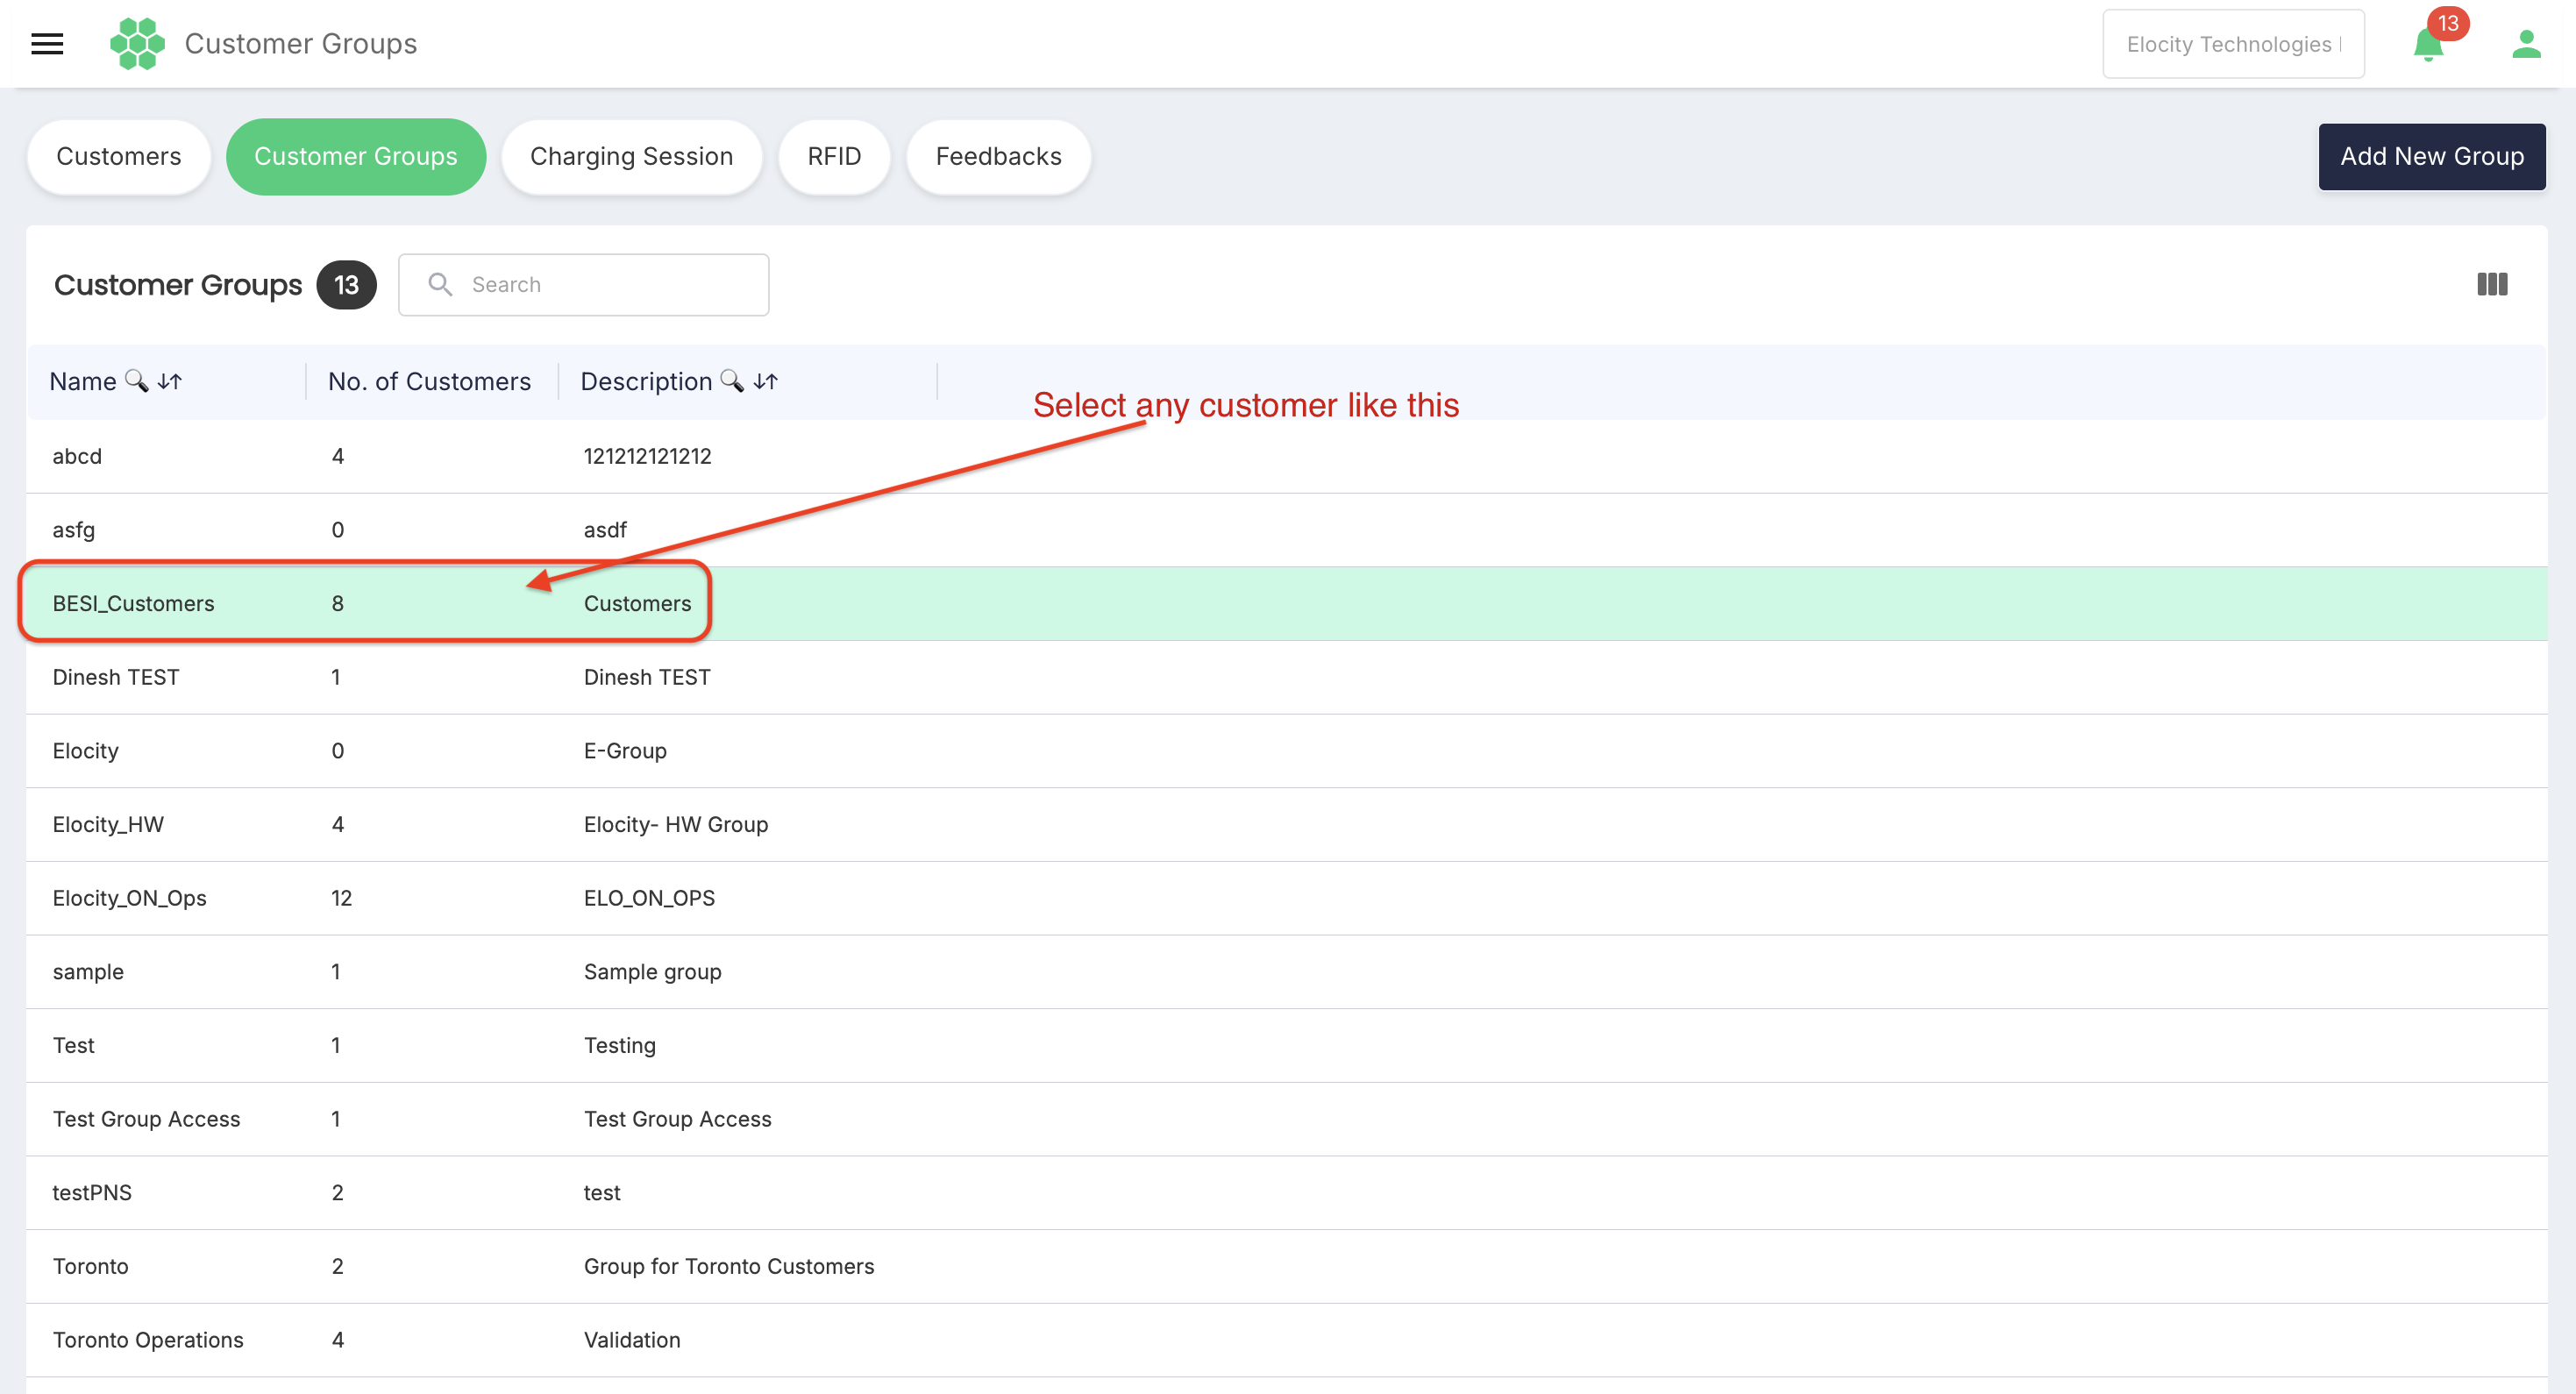
- Review Group Name and Description under Info.
- Select Edit when changes are required.
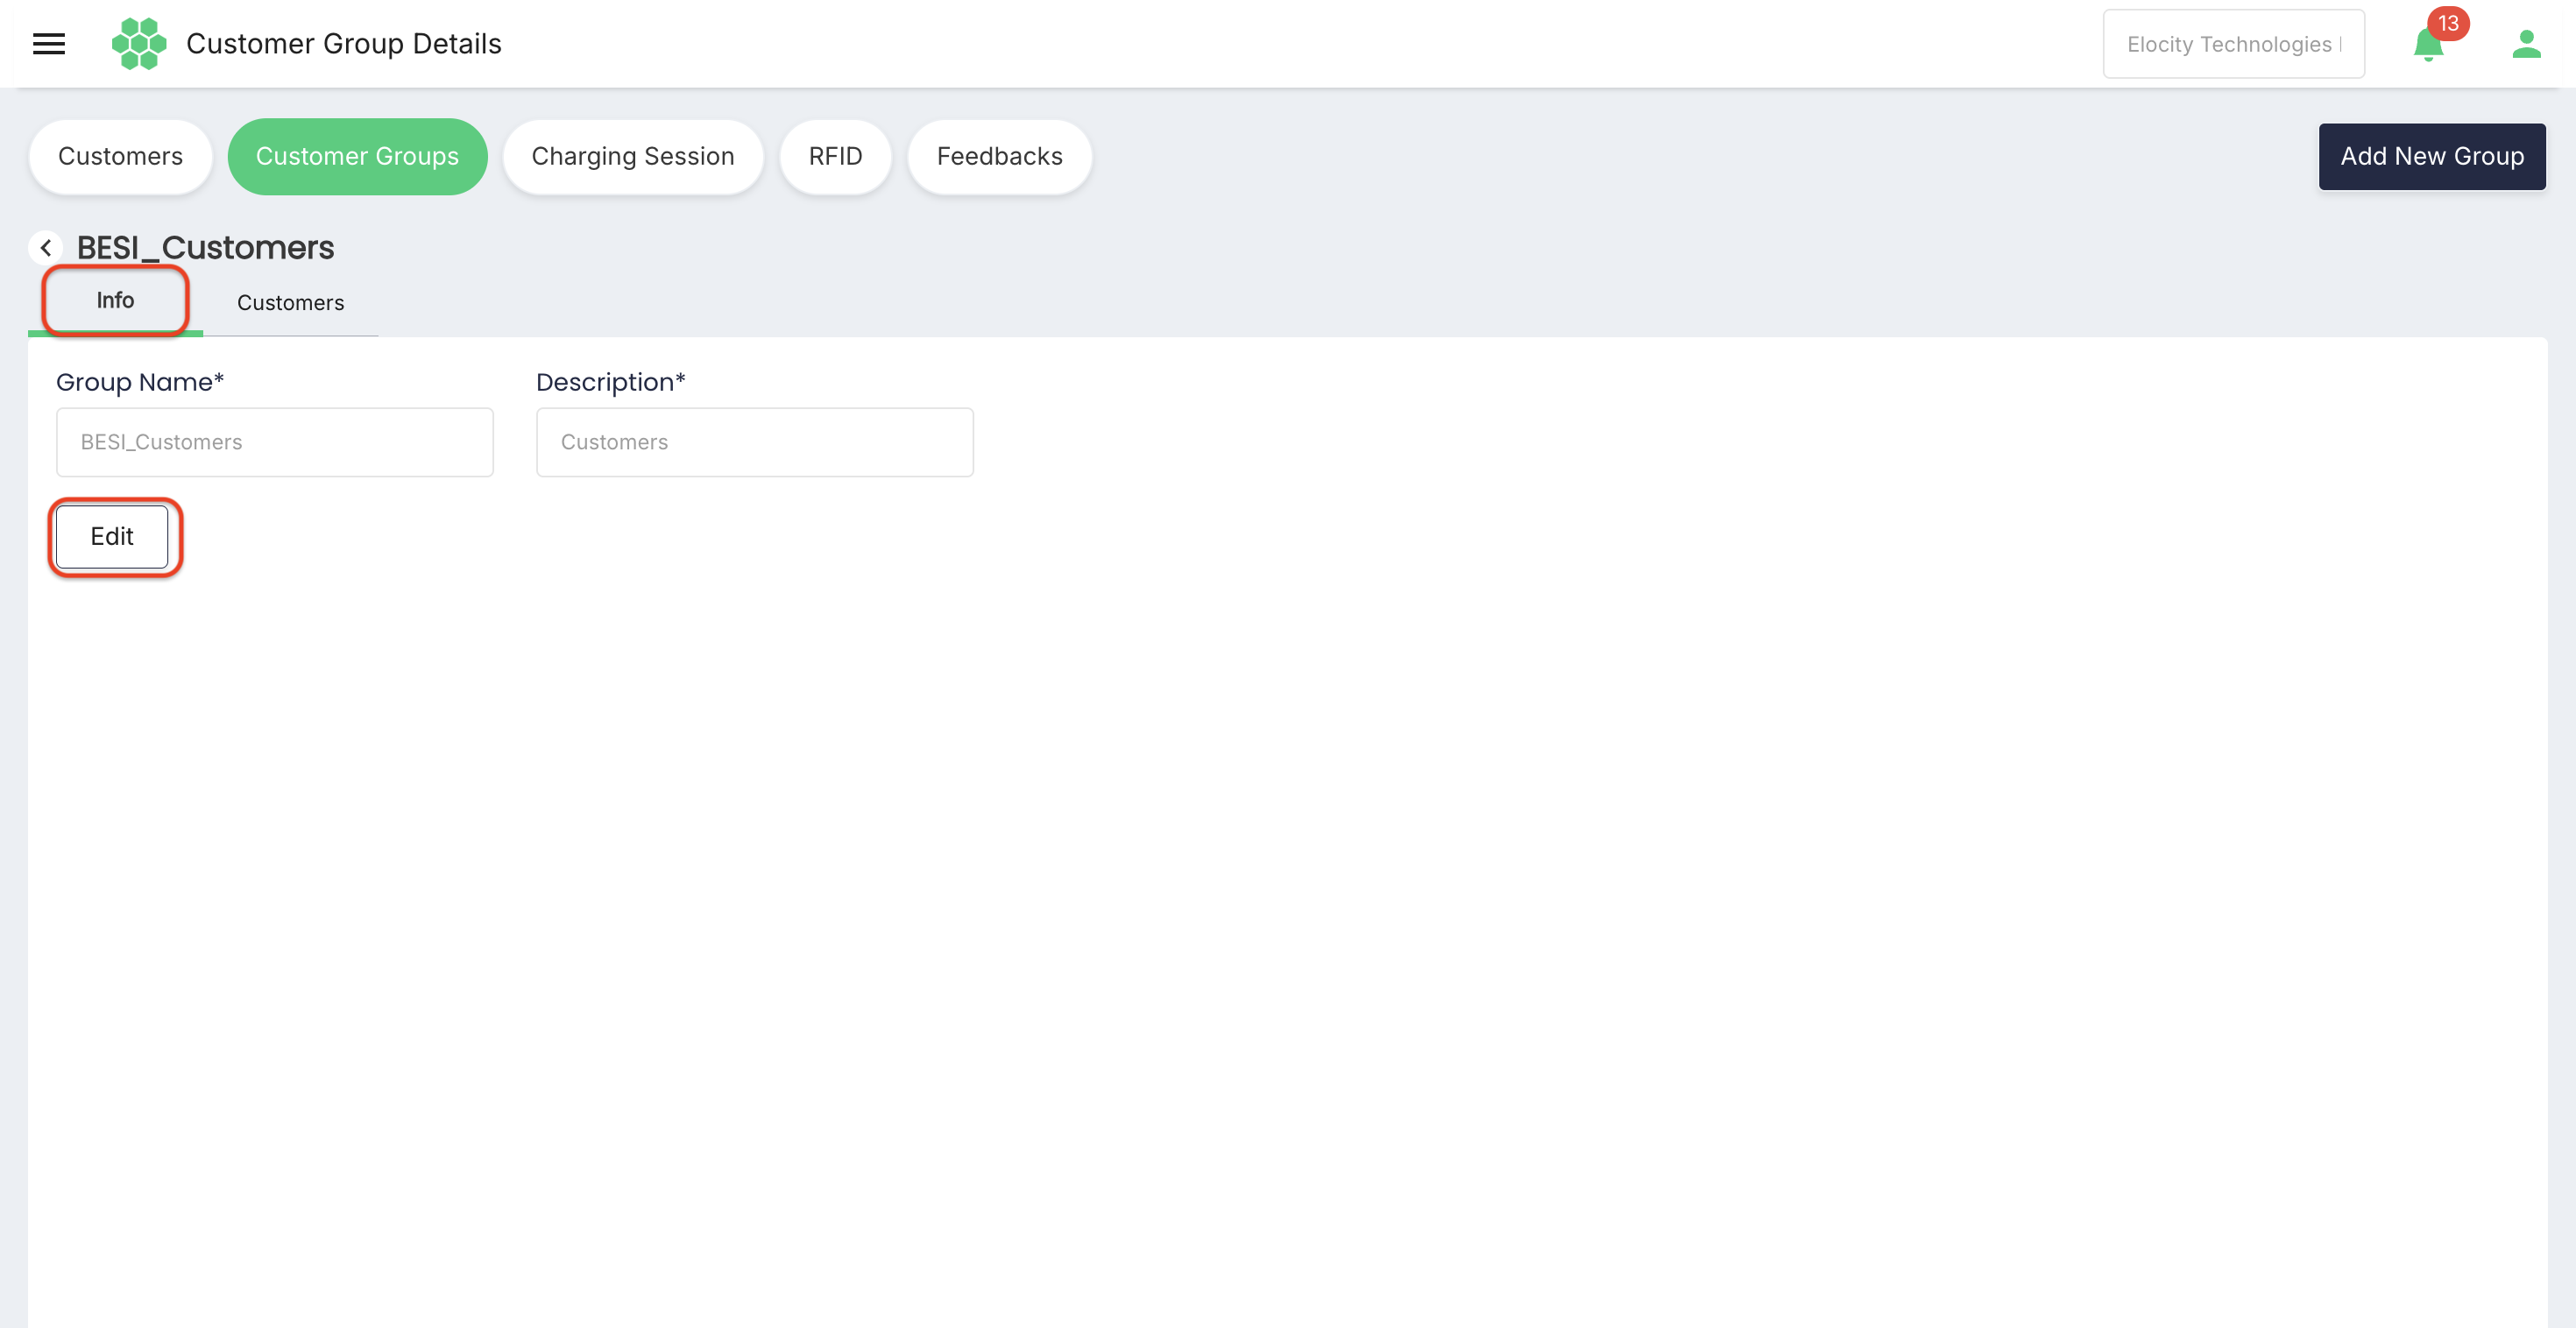
- Update the fields.
- Select Save.
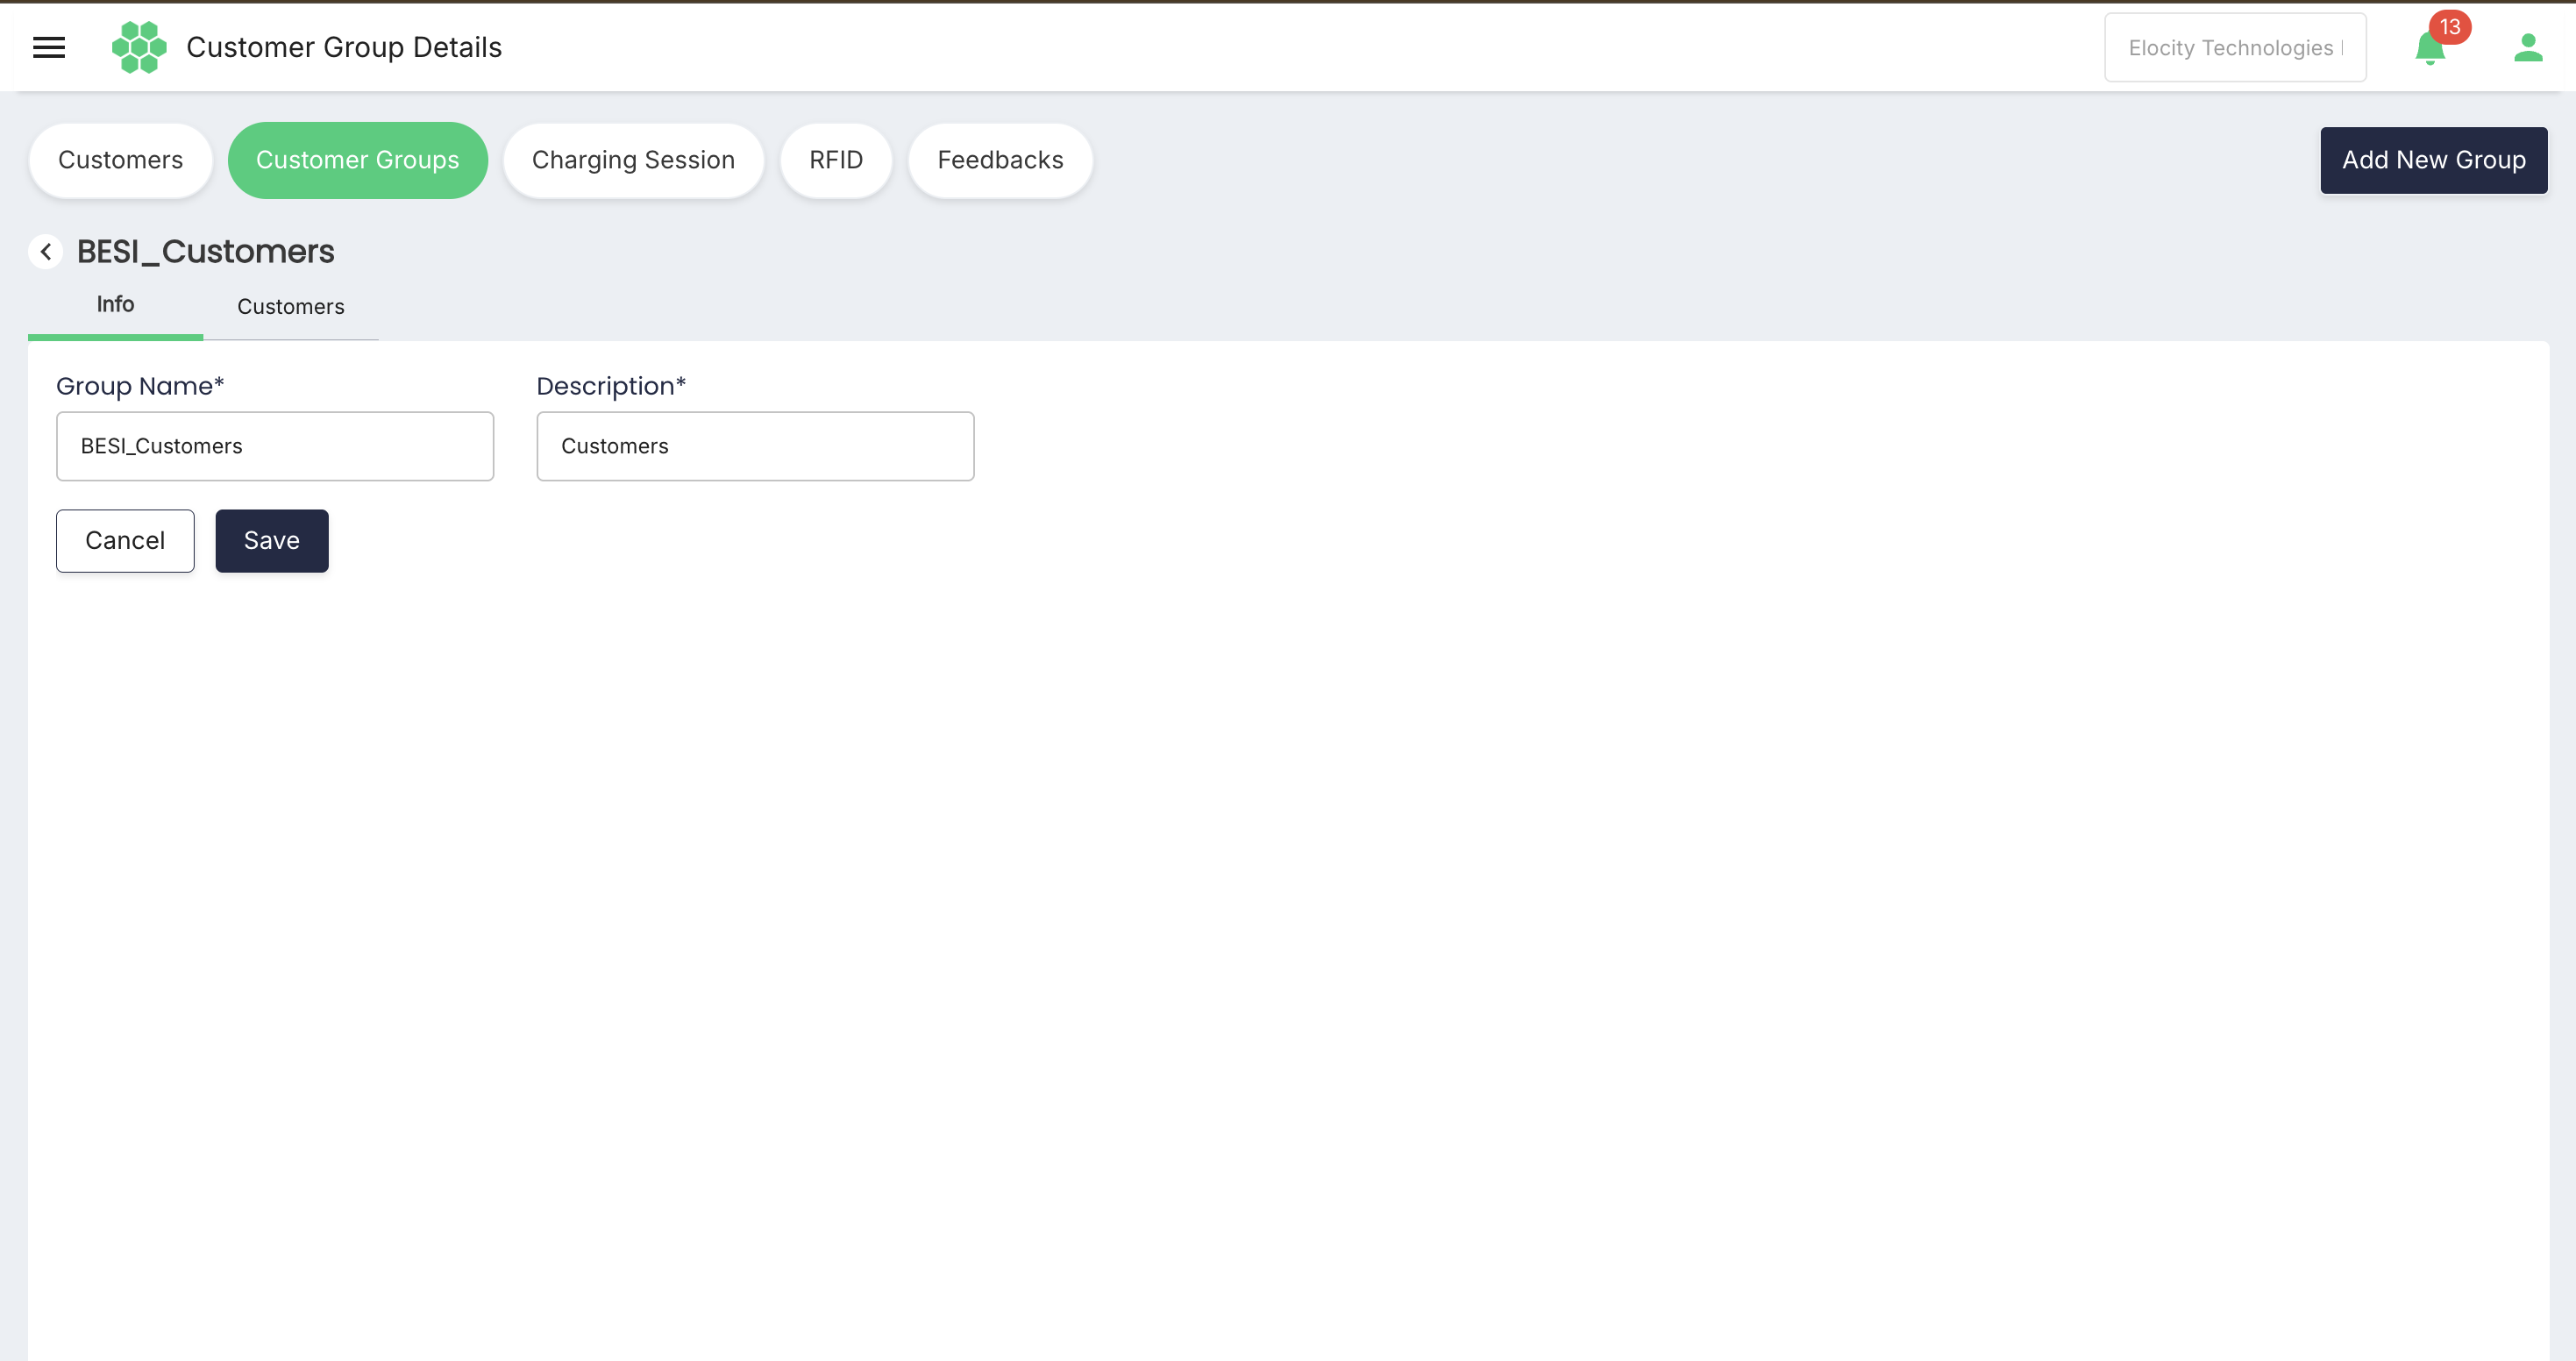
Select Cancel to leave edit mode without saving.
Group Customers tab
Open a group and select Customers to review its members.
| Column | Description |
|---|---|
| Full Name | Shows the customer name and provides the row-selection checkbox. |
| Account Status | Shows the current customer status. |
| Shows the primary email when available. | |
| Contact Number | Shows the customer phone number. |
| Registration Date | Shows when the customer registered. |
| RFID / View RFID | Opens RFID information associated with the customer. |
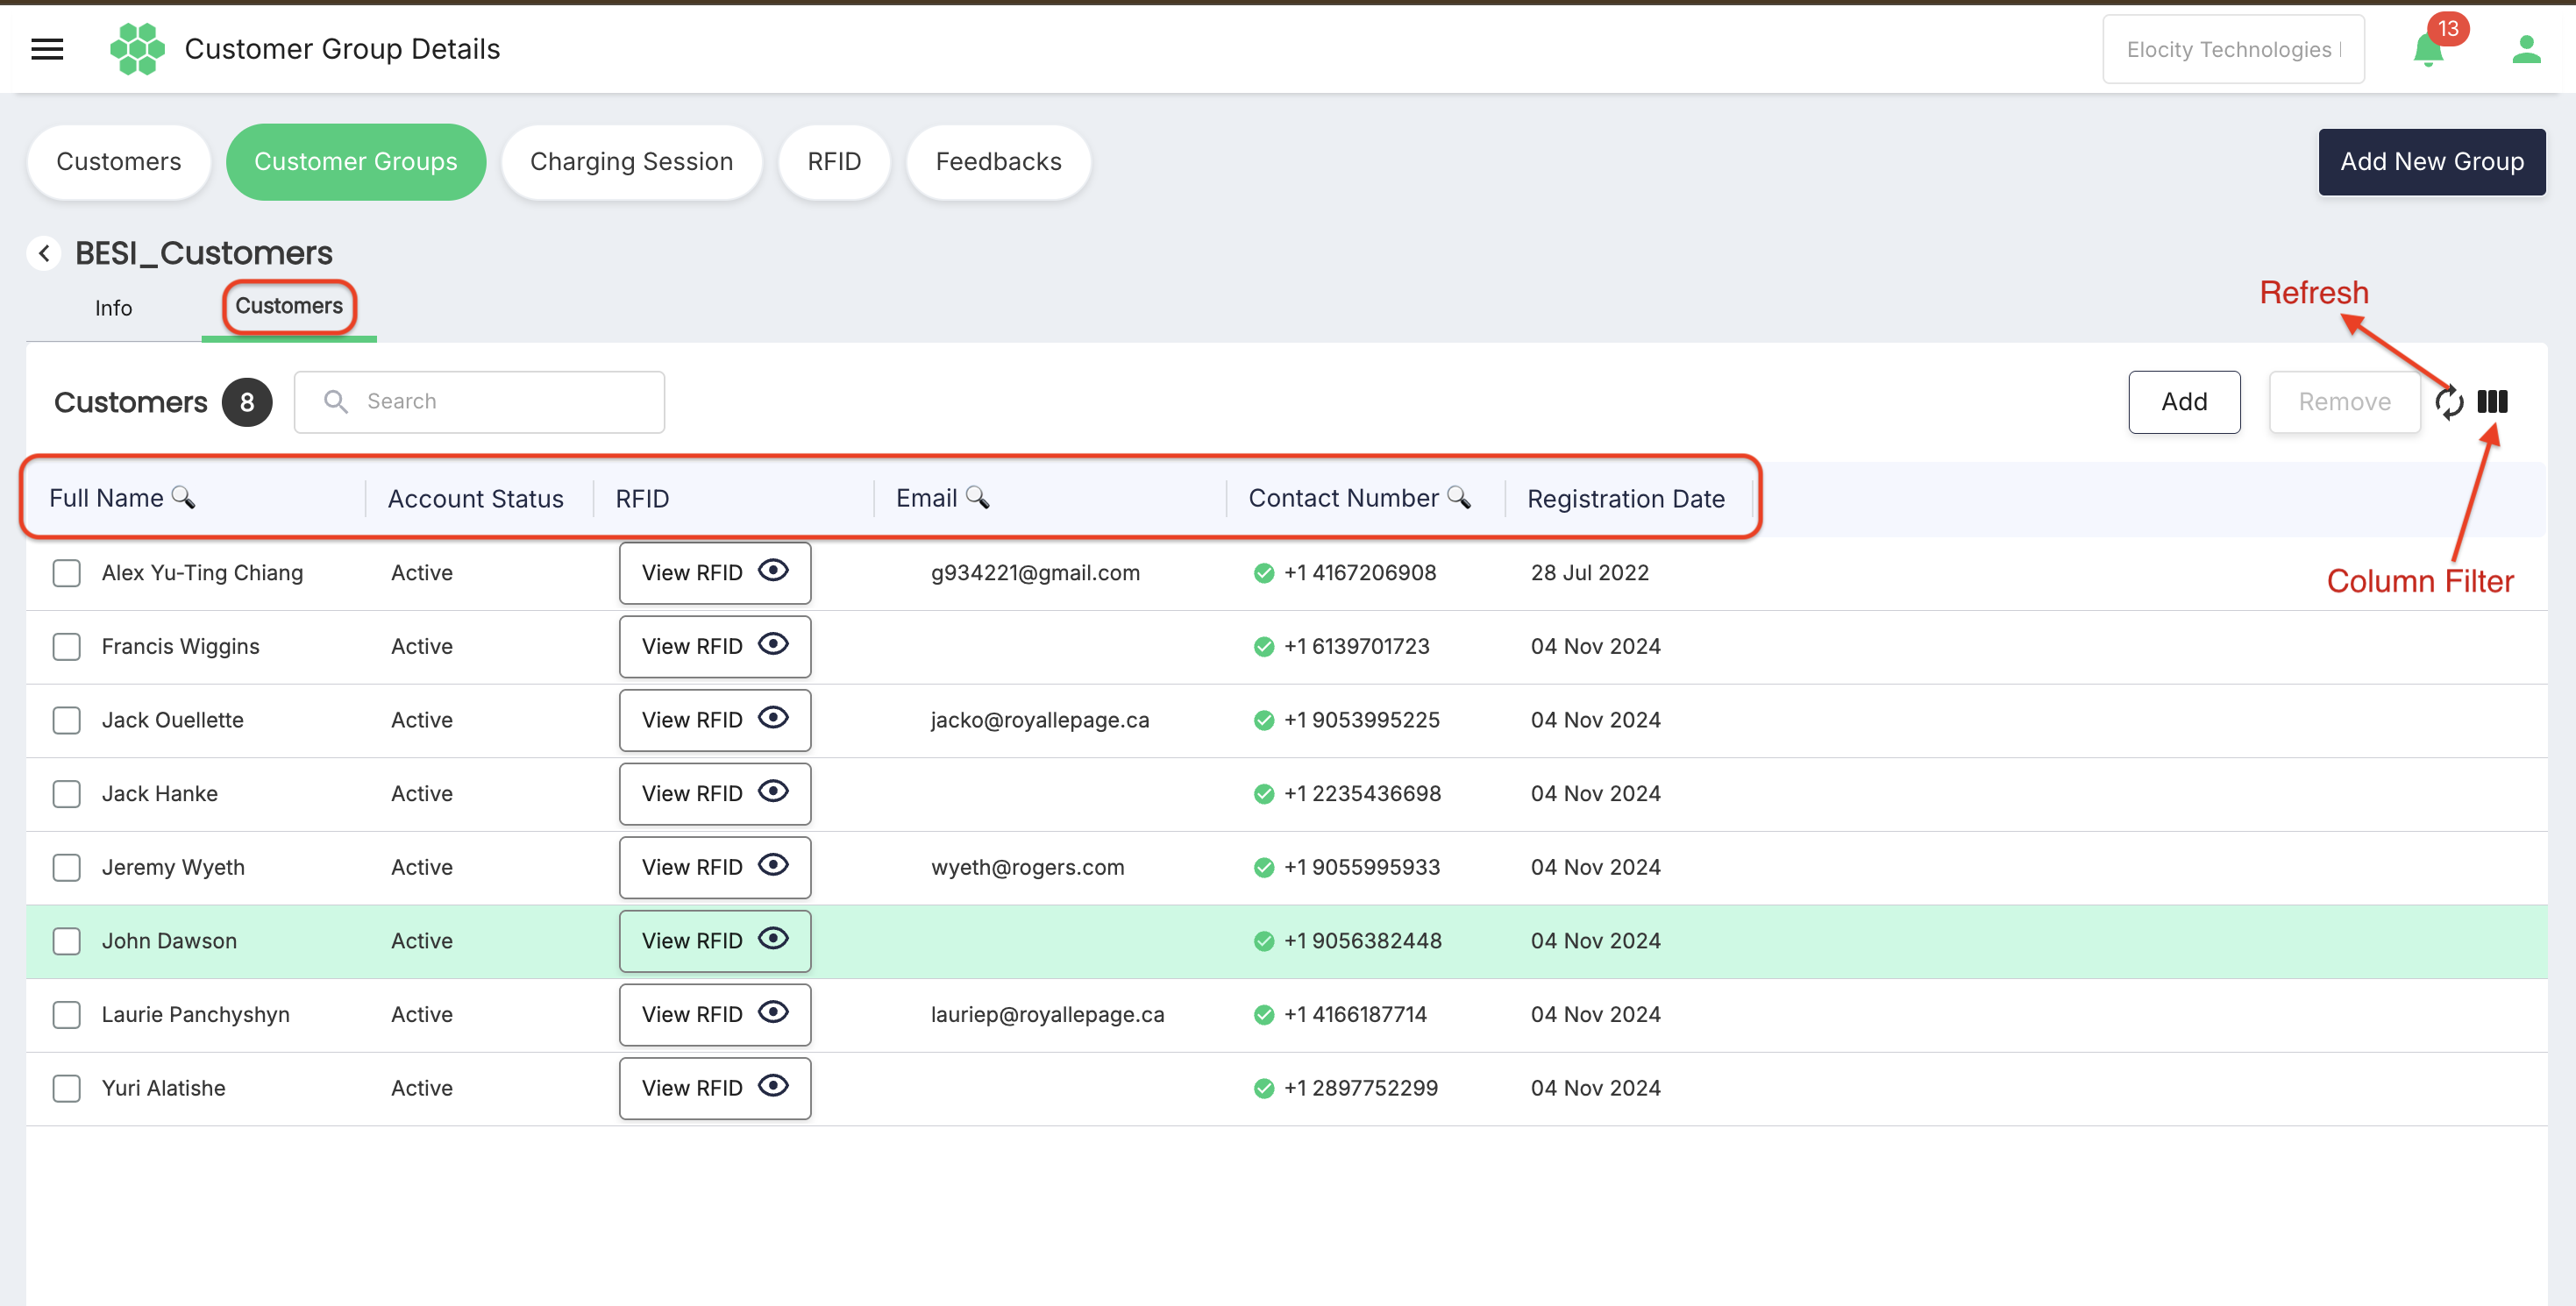
Use Refresh to request the latest membership data.
Use Column Filter to control the visible member columns.
Adding customers to a group
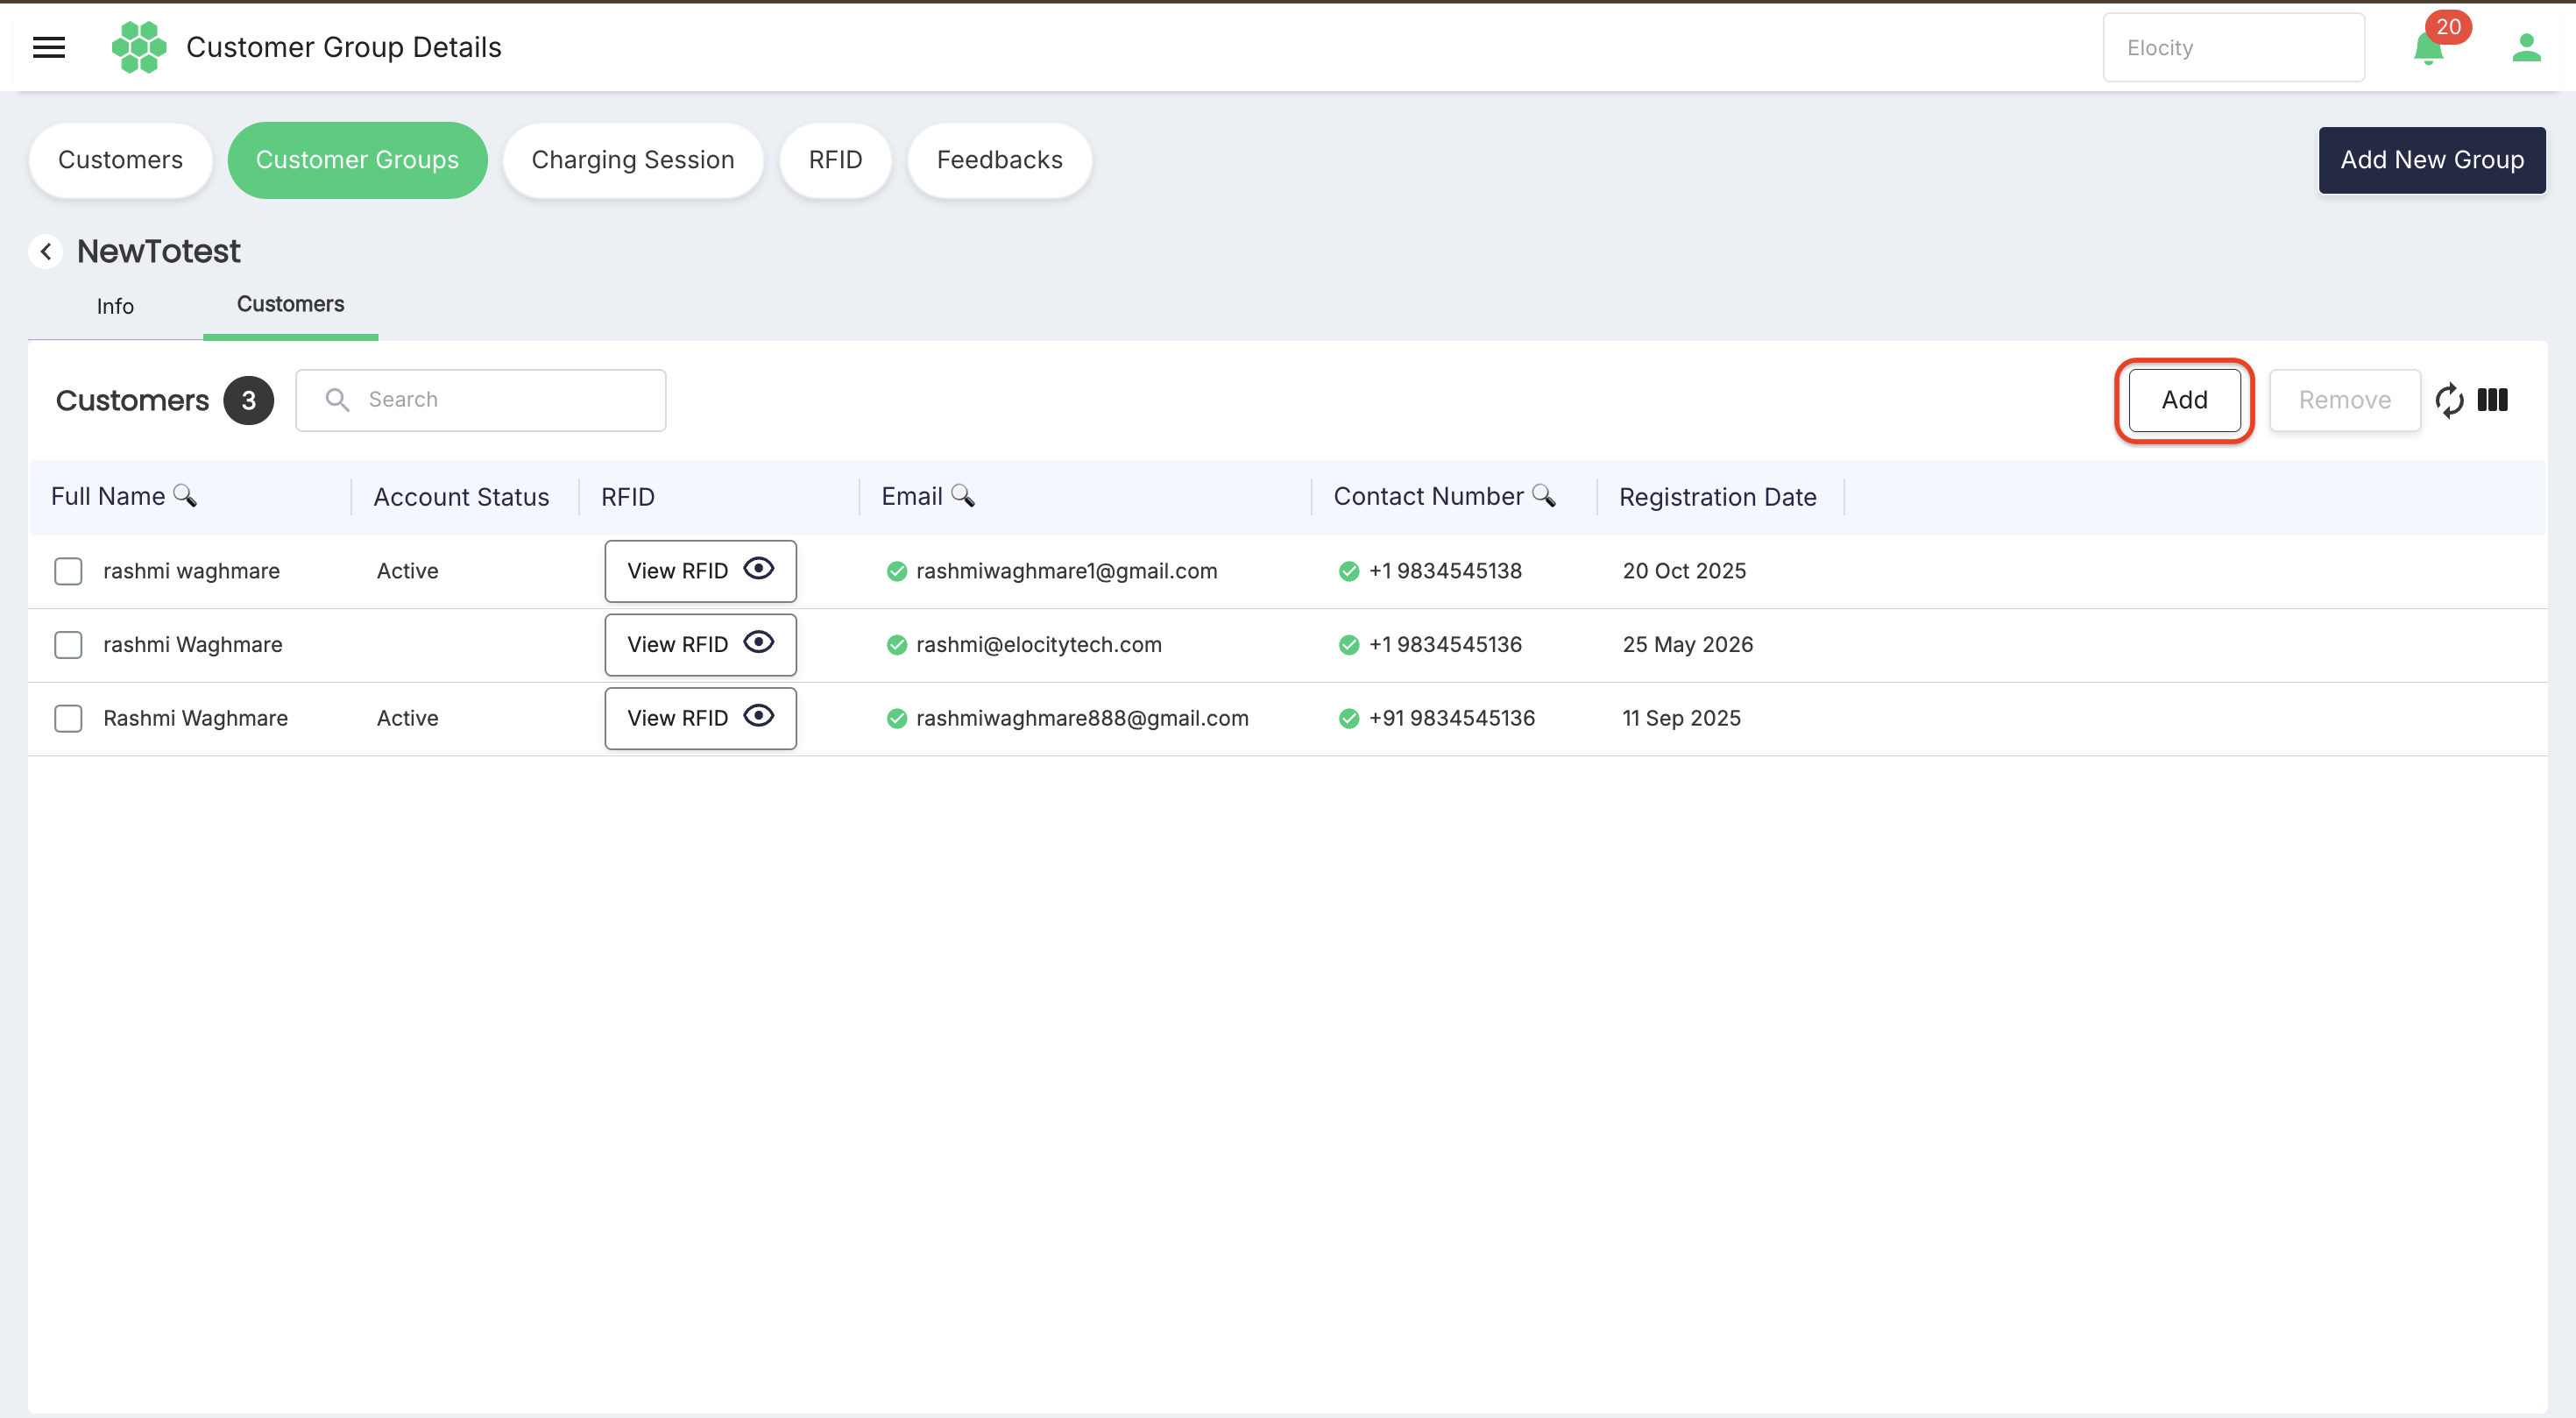
- Open the required customer group.
- Select the Customers tab.
- Select Add.
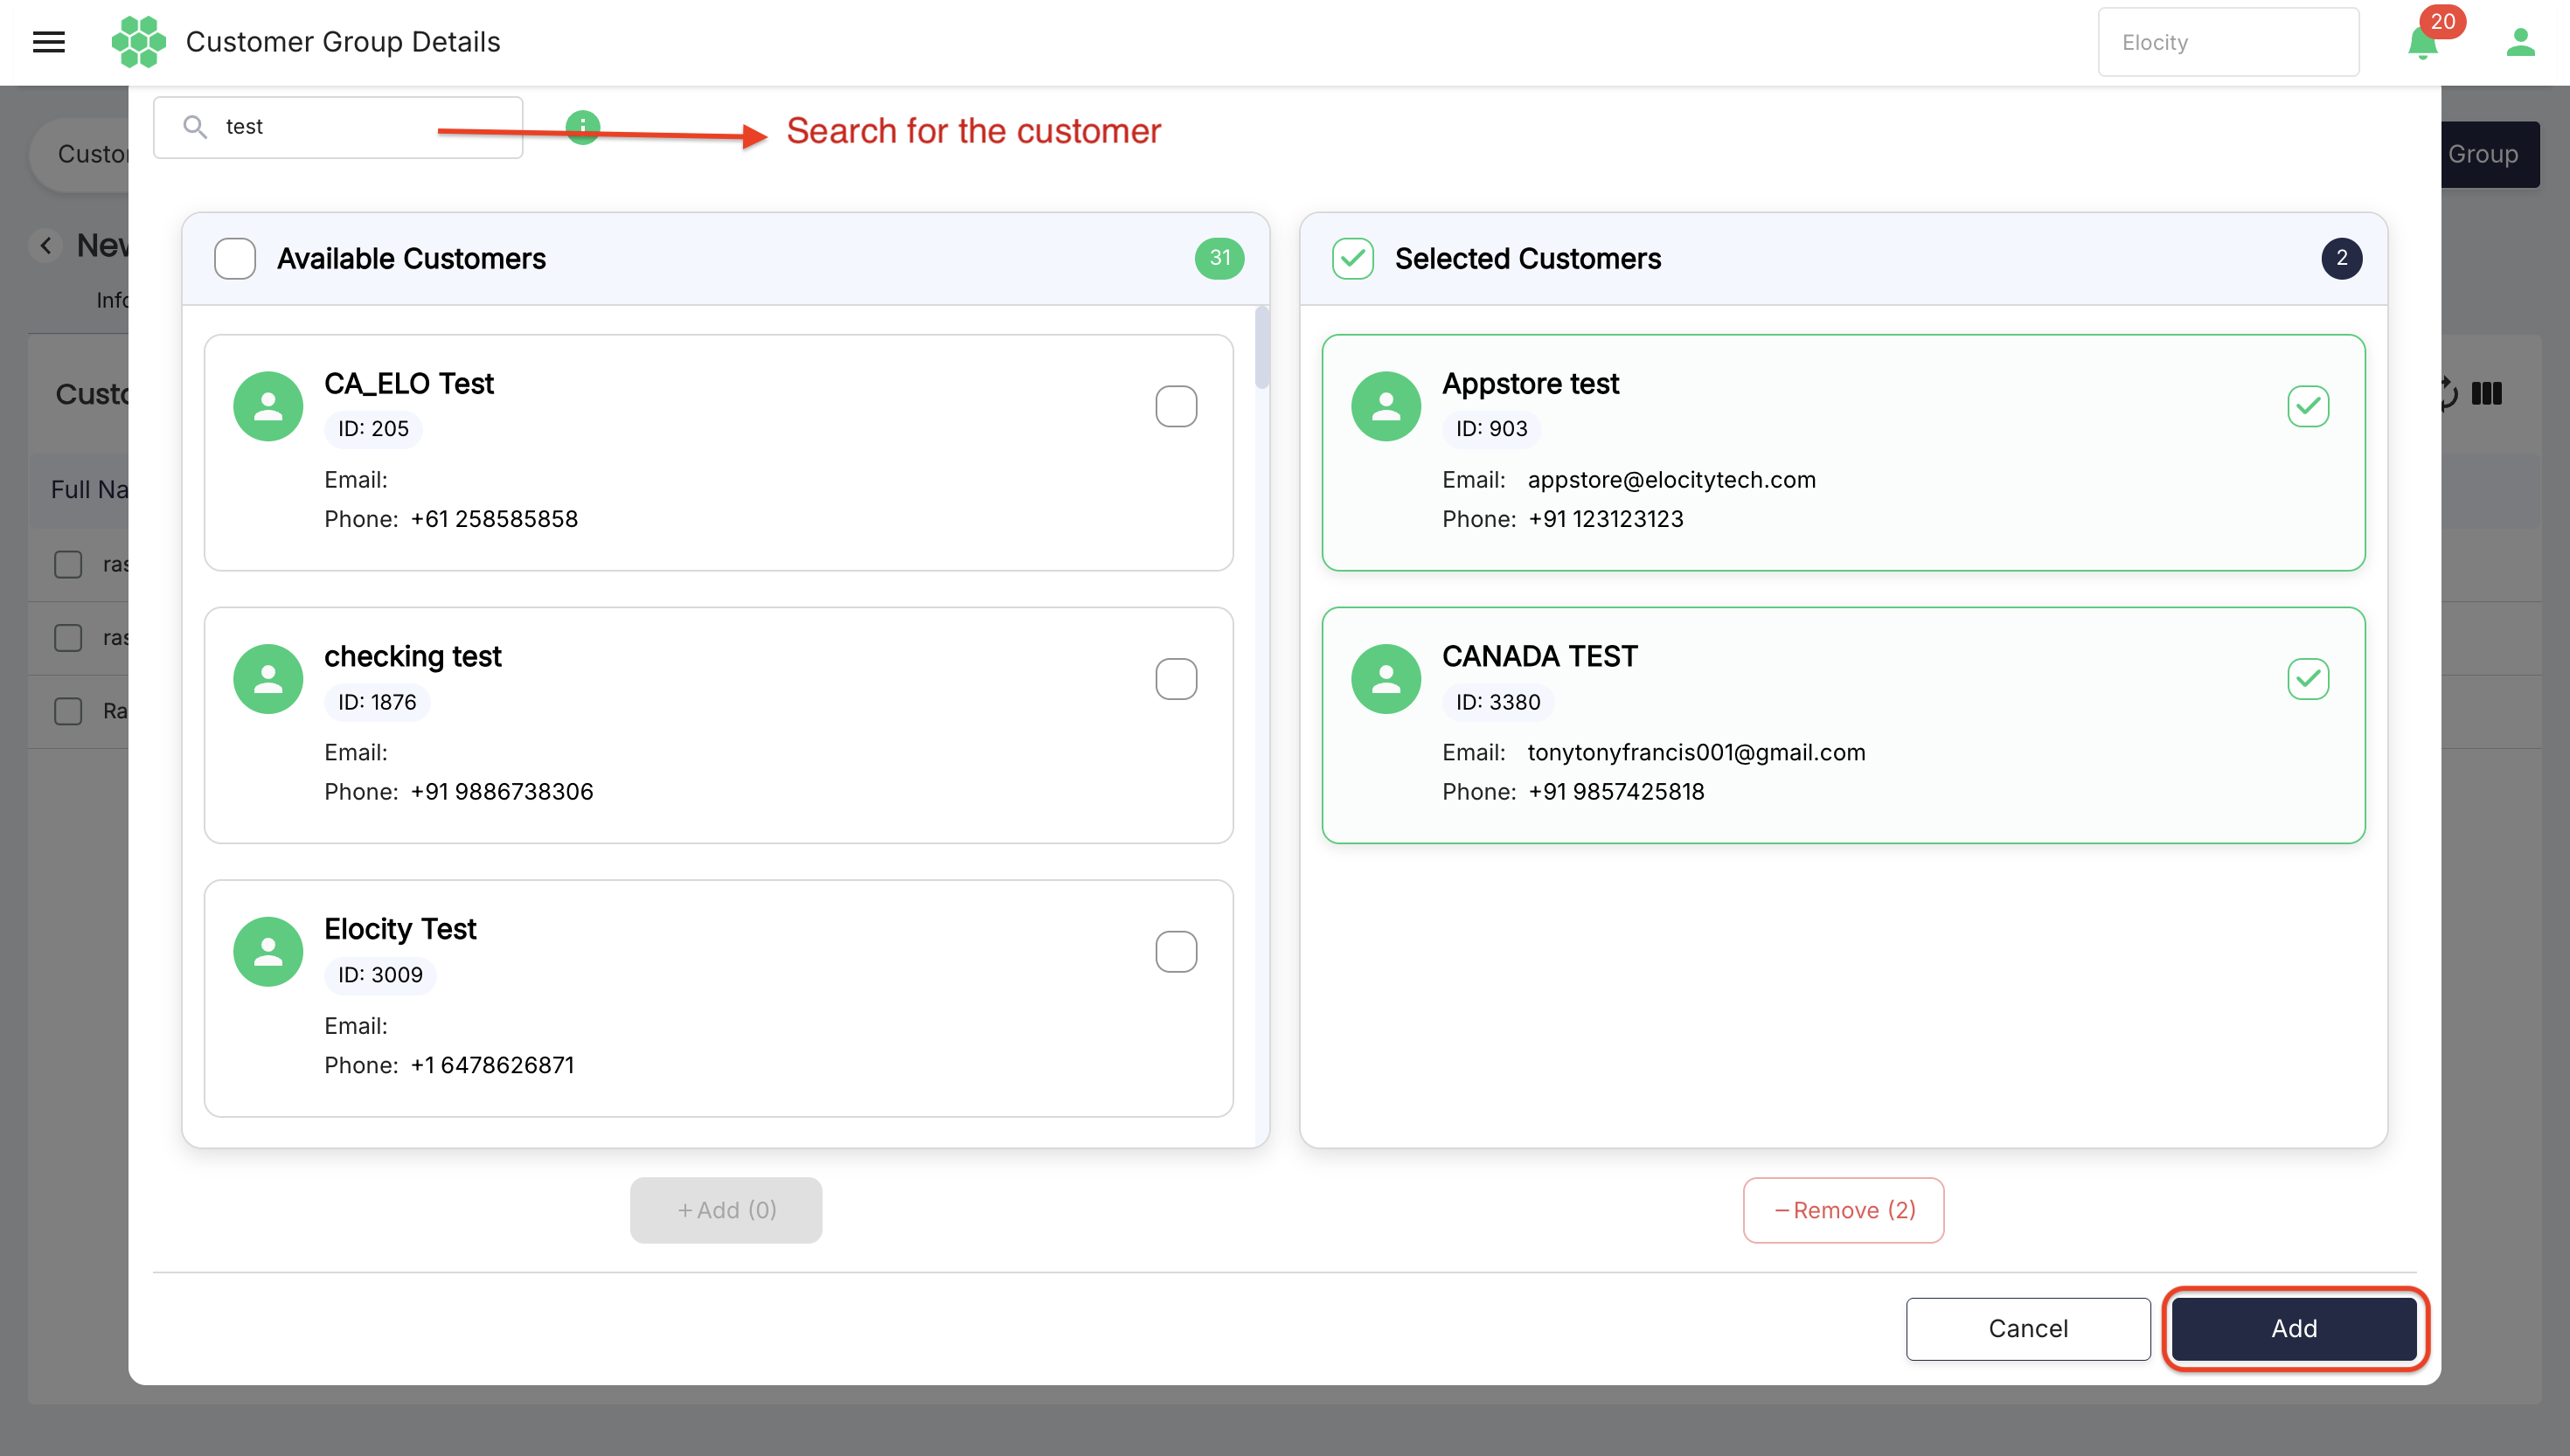
- Search for the customer.
- Select the required result.
- Select Add when the action becomes available.
Removing customers from a group
- Open the group's Customers tab.
- Select one or more customer checkboxes.
- Confirm the selected records.
- Select Remove.
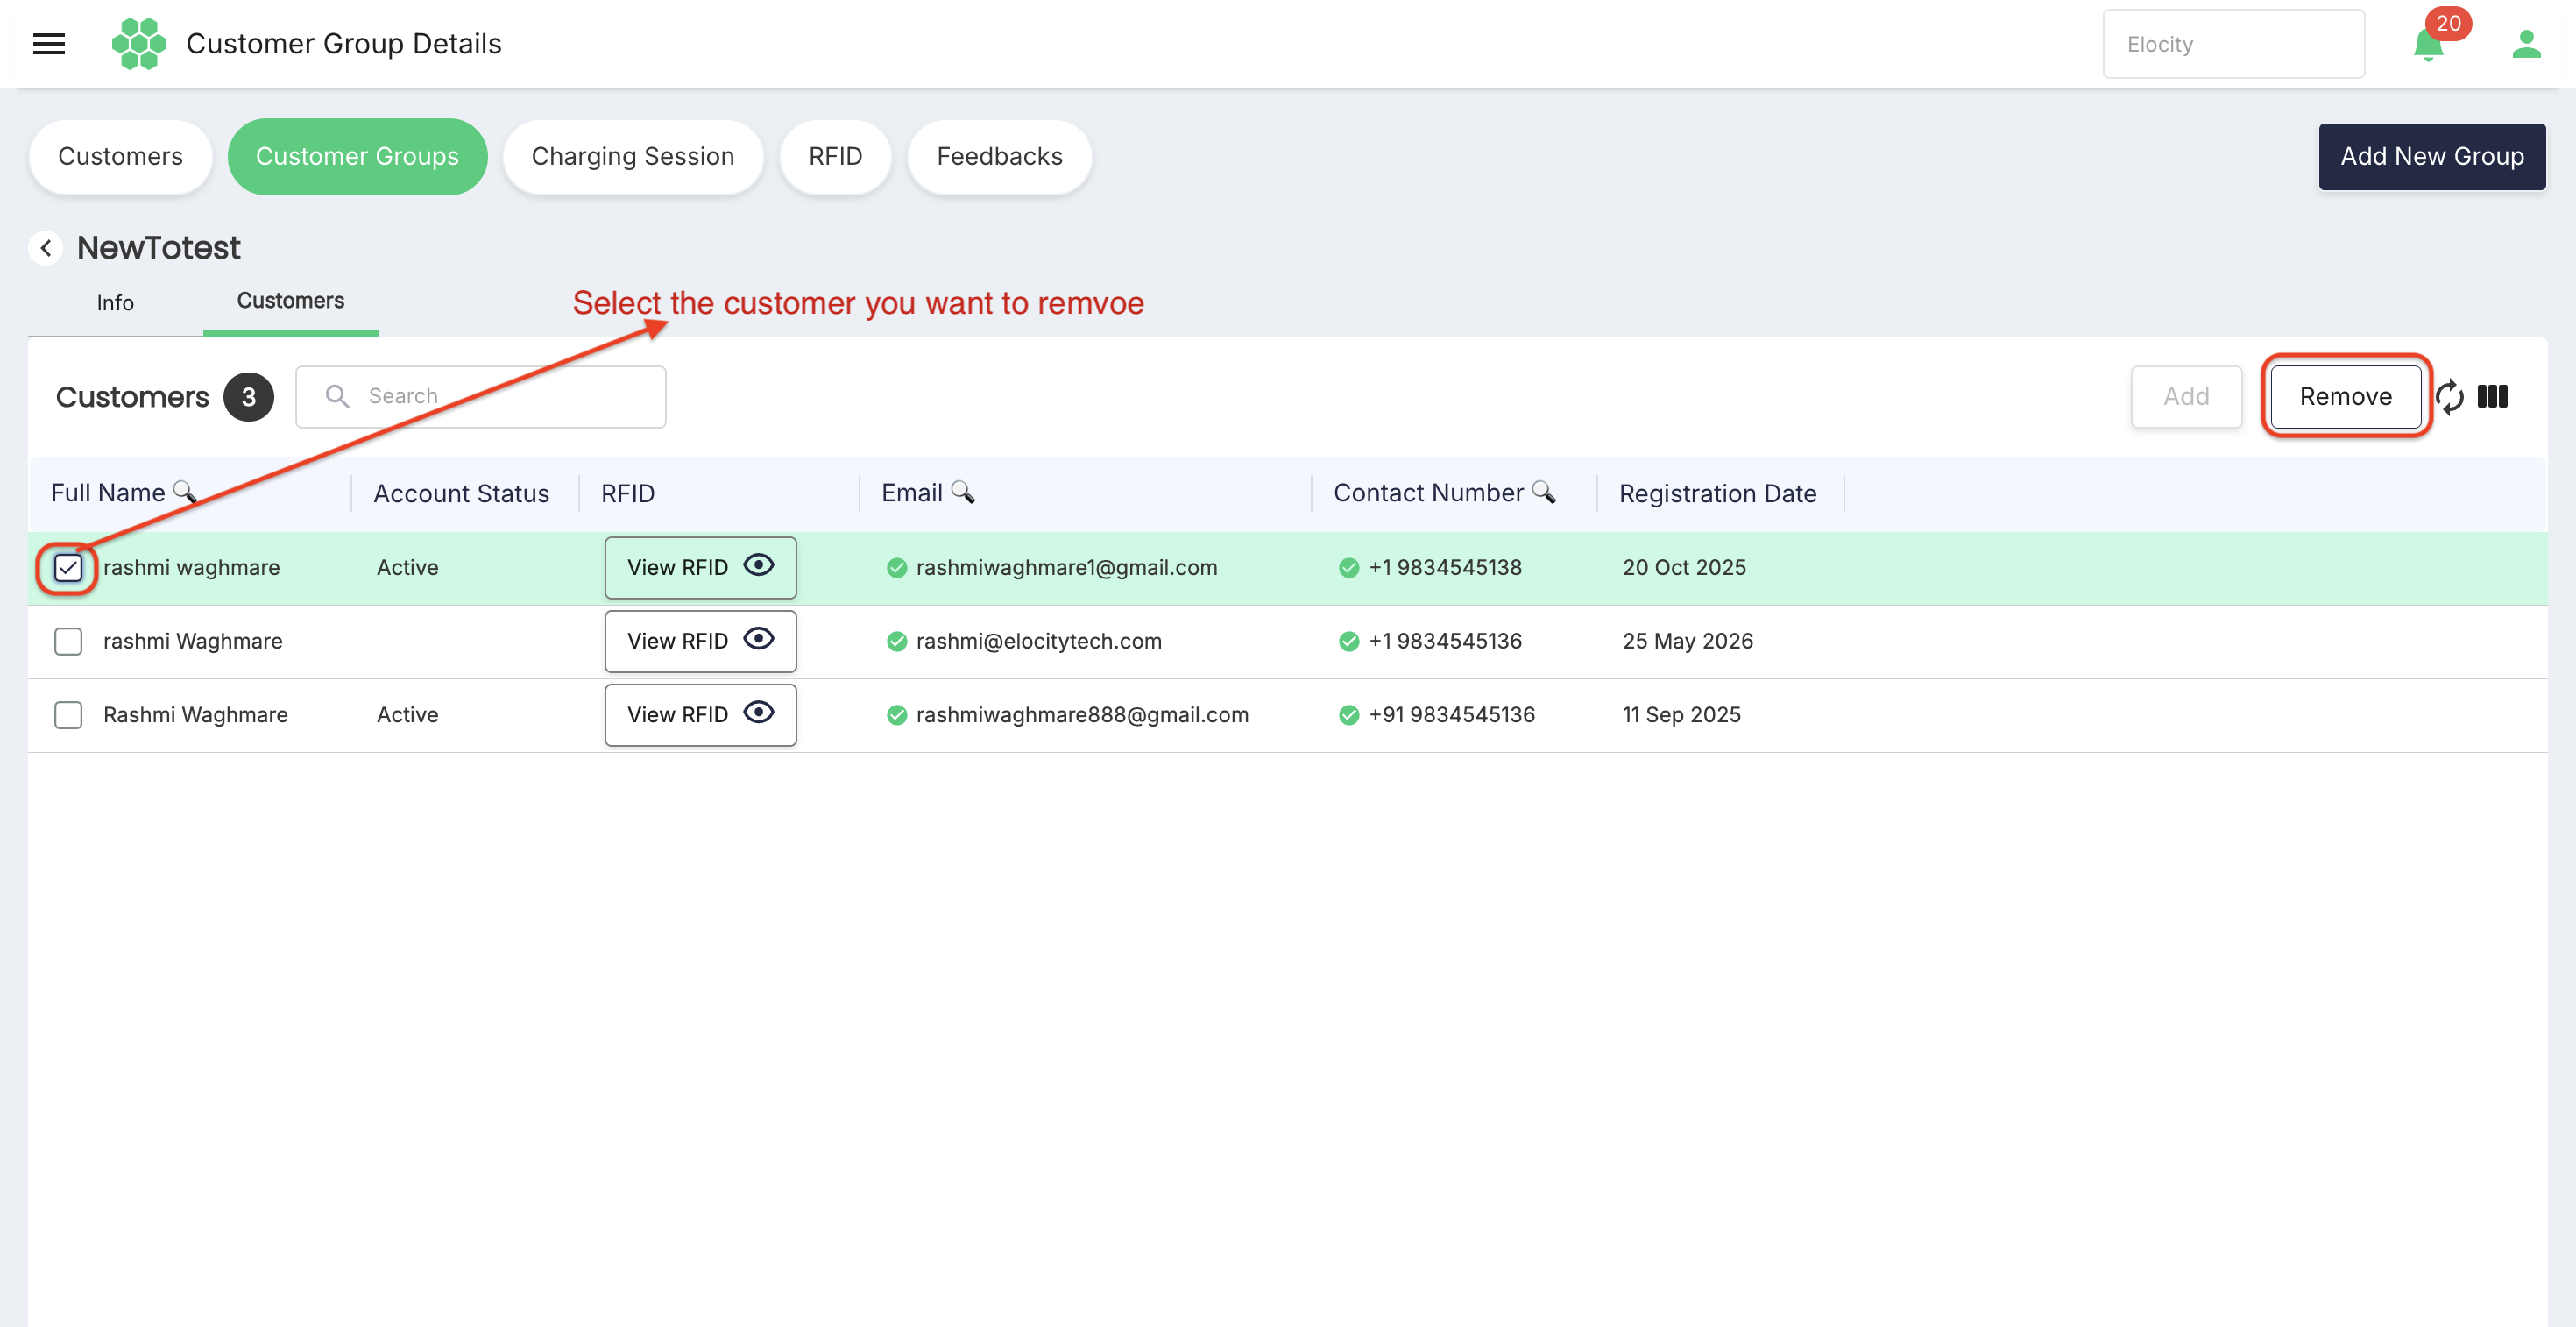
- Review the confirmation before proceeding.
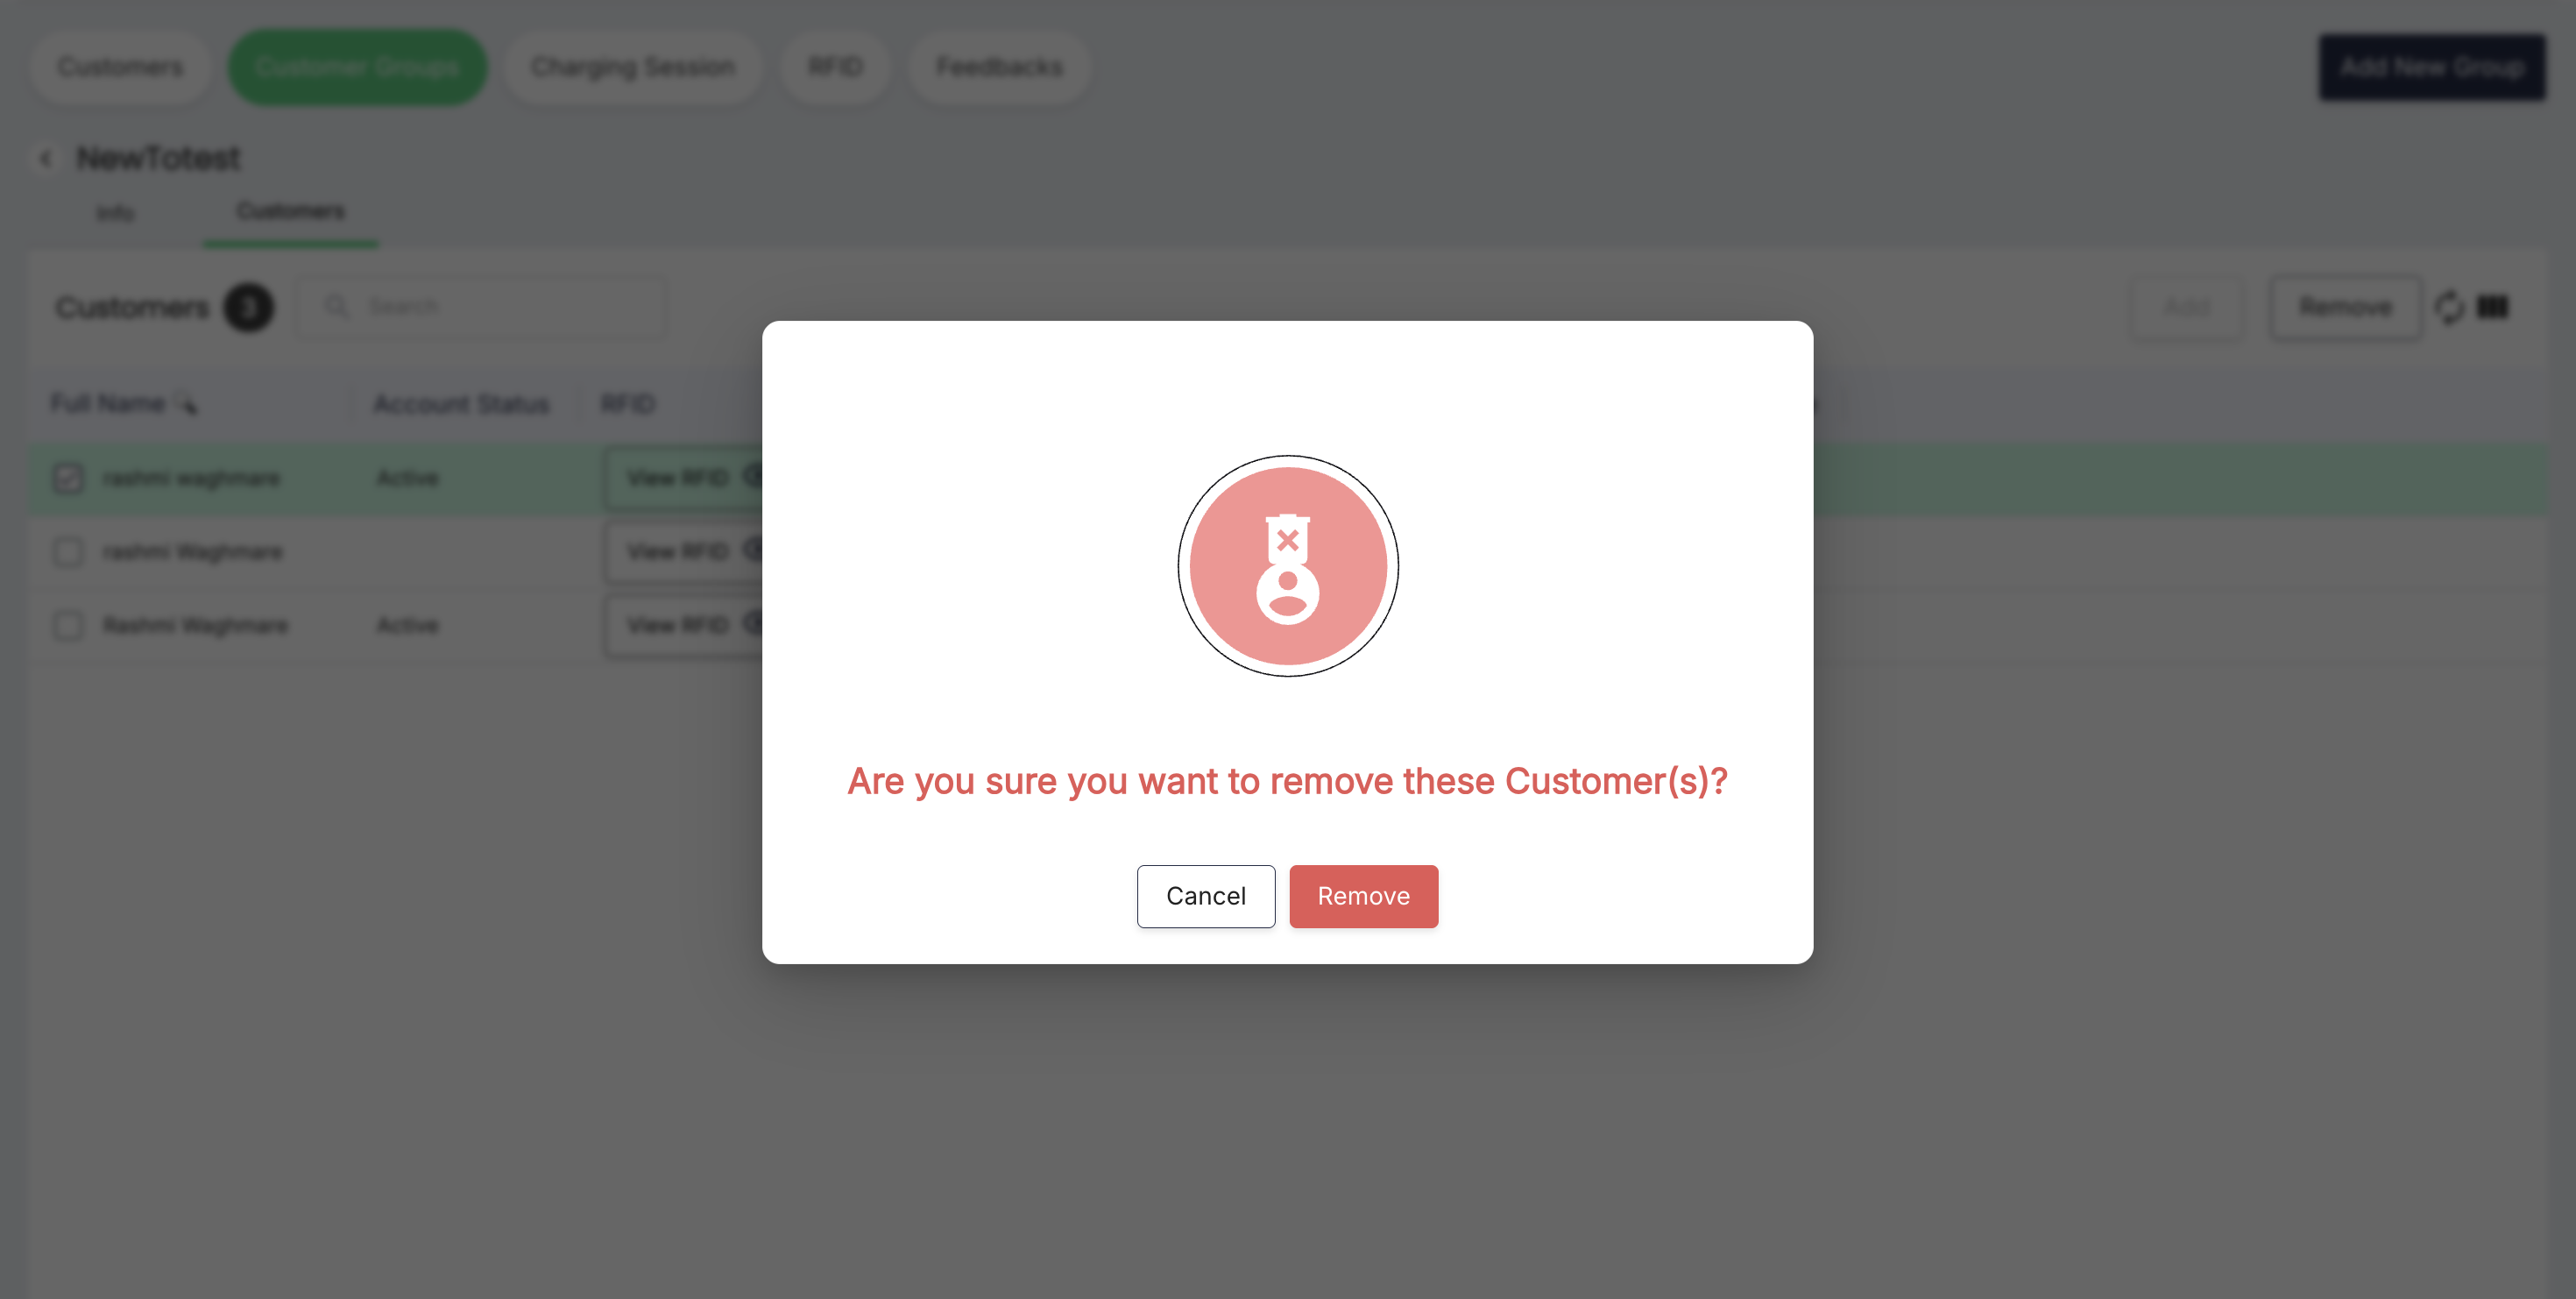
Remove remains disabled until at least one member is selected.
Charging Session page
The Charging Session page provides transaction information across customers in the selected business scope.
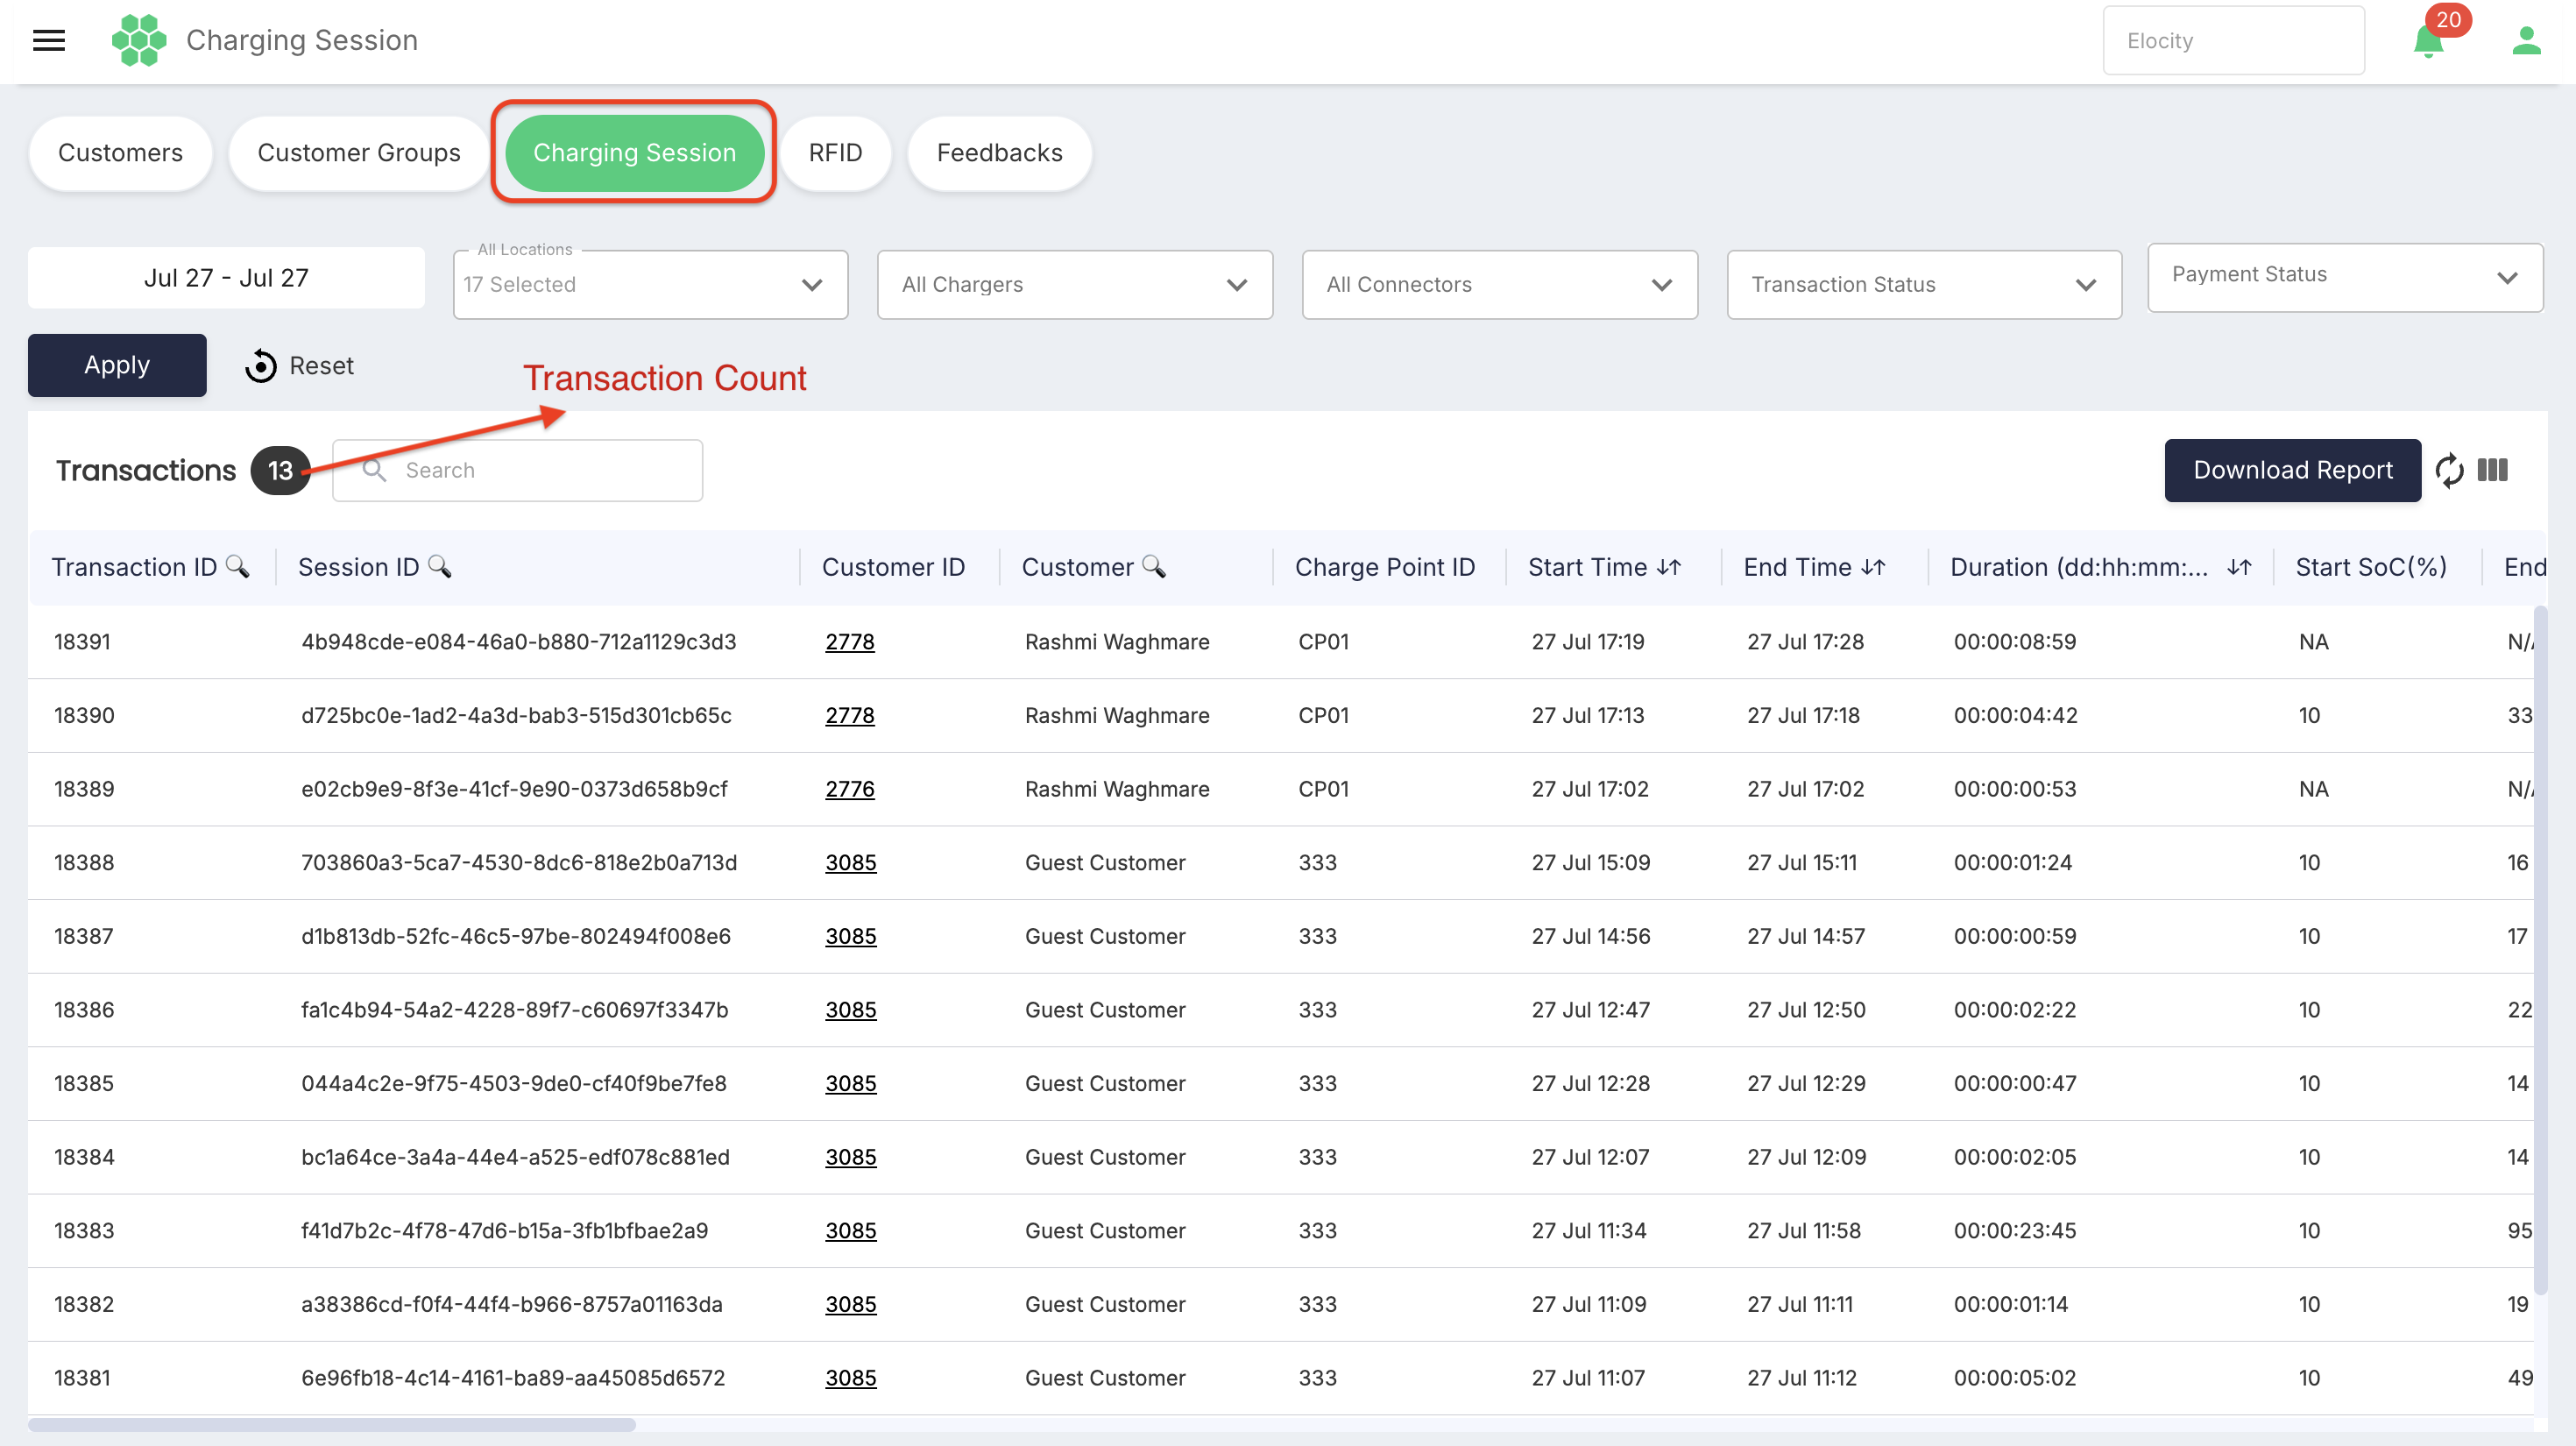
The Transactions counter shows the number of records returned for the current filters.
Charging-session filters
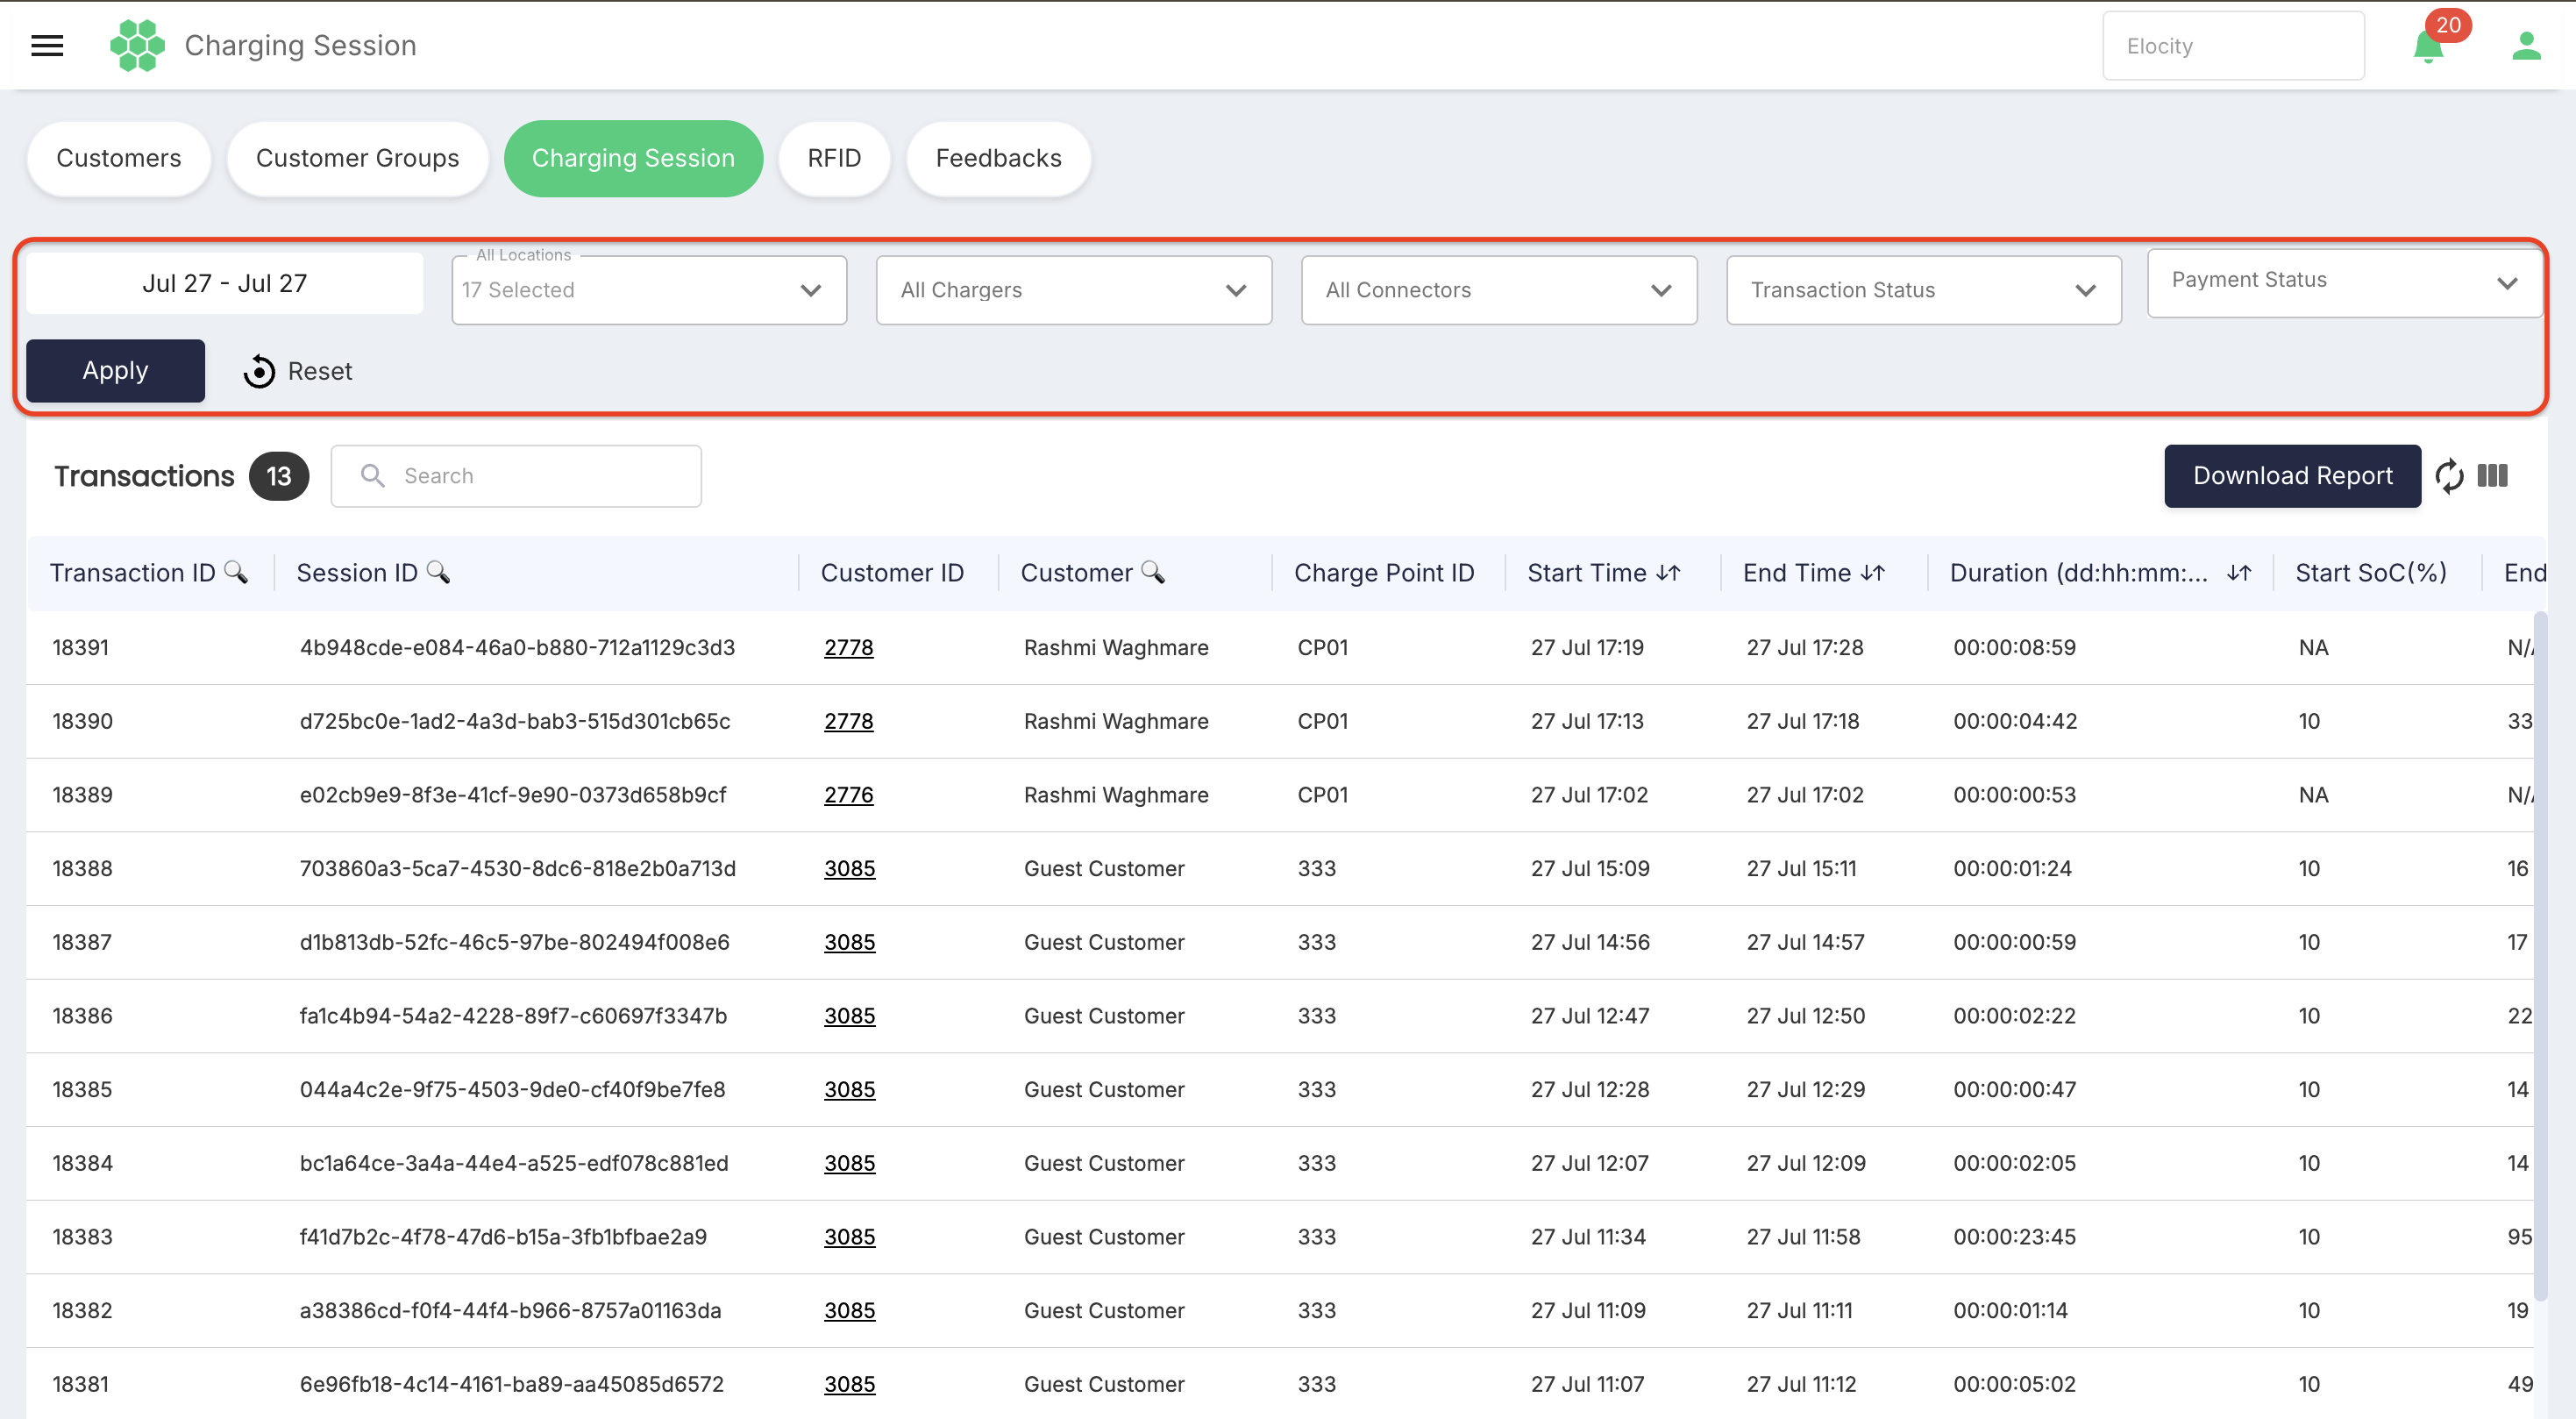
| Filter | Description |
|---|---|
| Date range | Defines the transaction period. |
| All Locations | Limits results to one or more locations. |
| All Chargers | Limits results to selected charging stations or charge points. |
| All Connectors | Limits results to selected connectors. |
| Transaction Status | Multi-select transaction-state filter. |
| Payment Status | Limits results by payment state. |
The inspected Transaction Status selector contained:
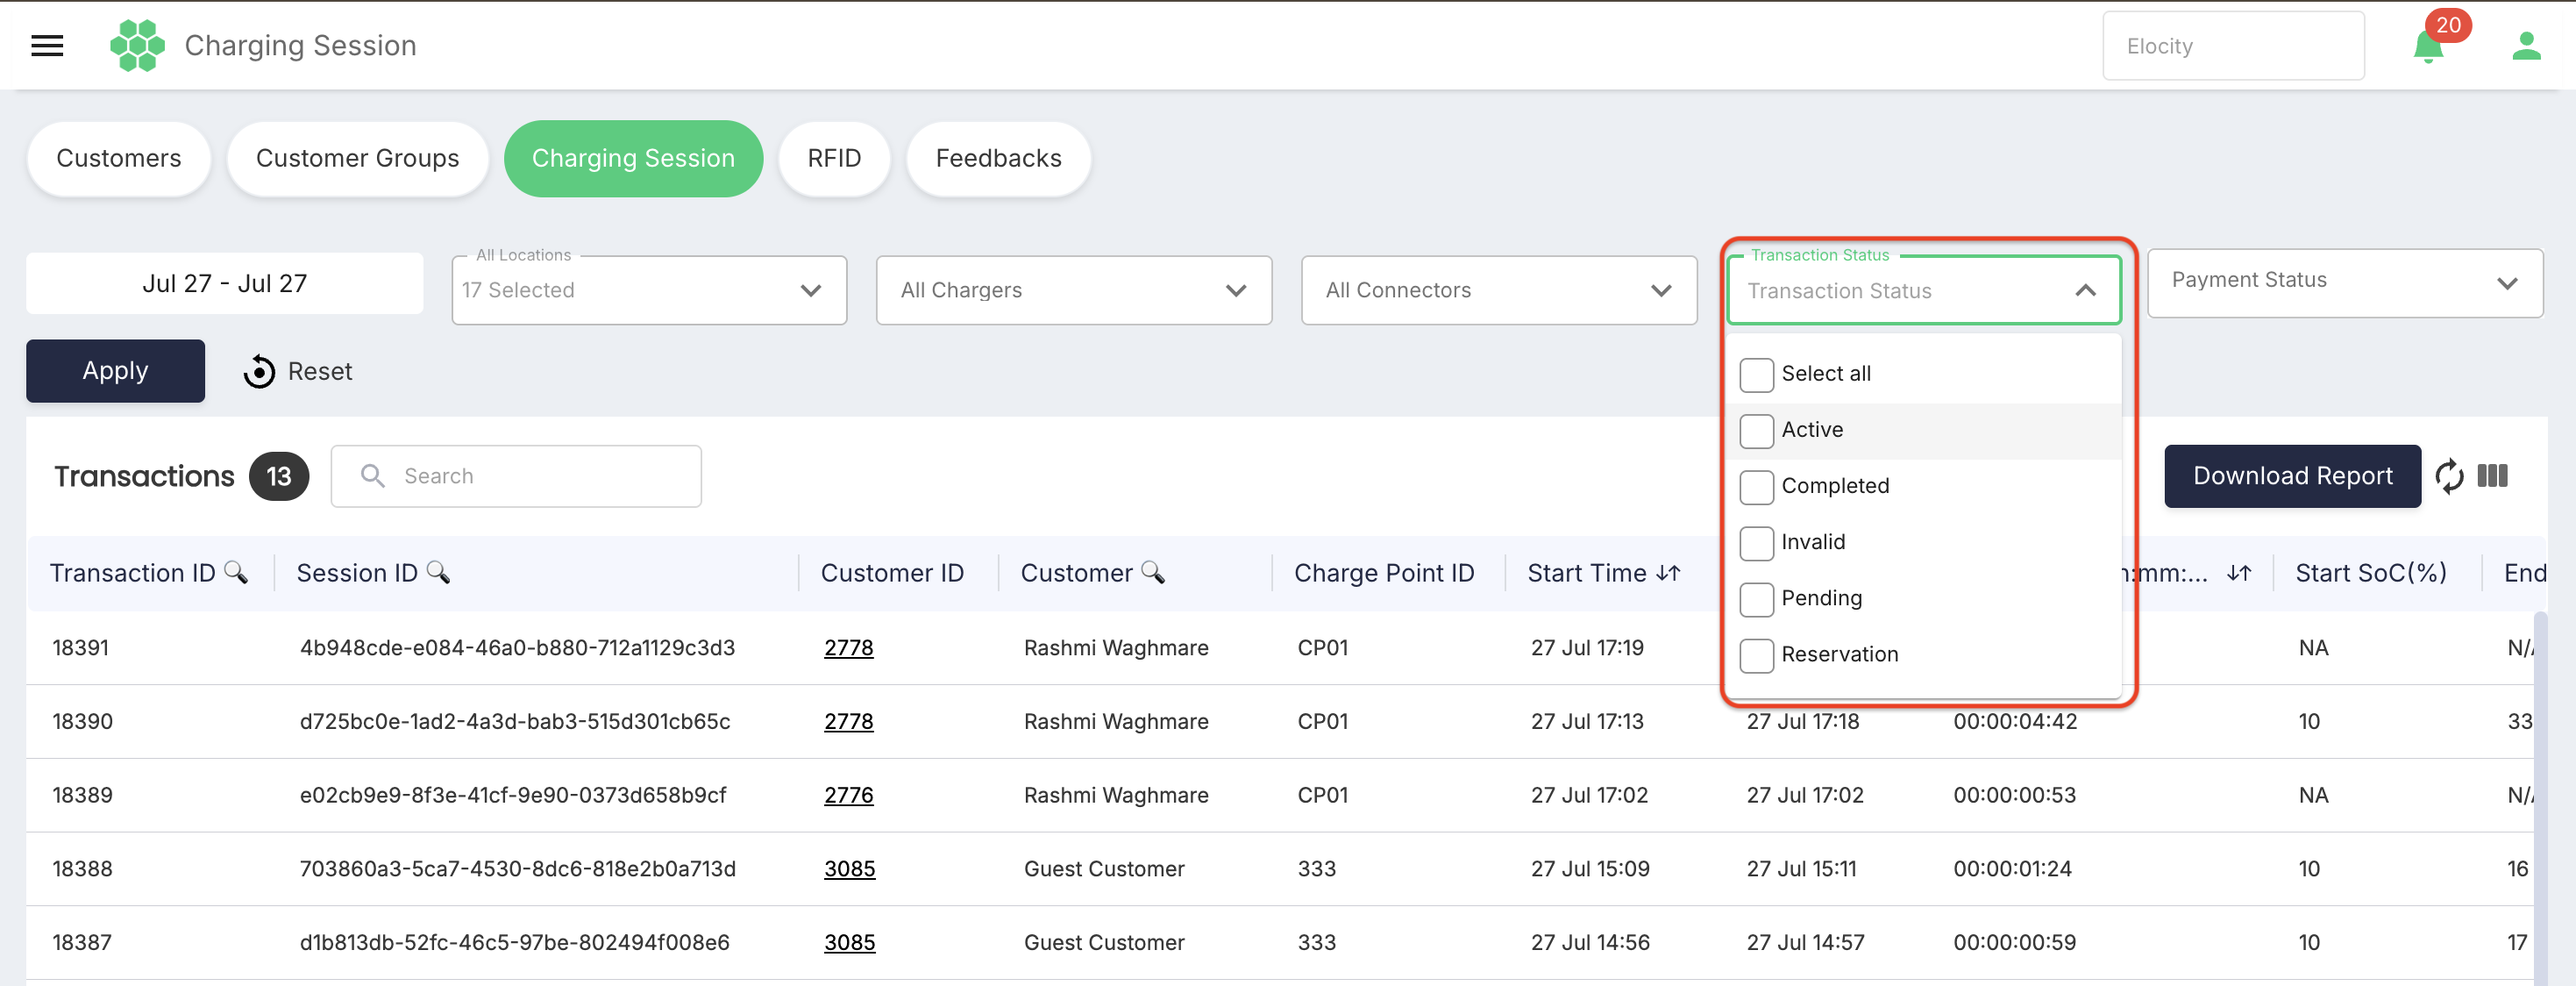
- Select all
- Active
- Completed
- Invalid
- Pending
- Reservation
The inspected Payment Status selector contained:
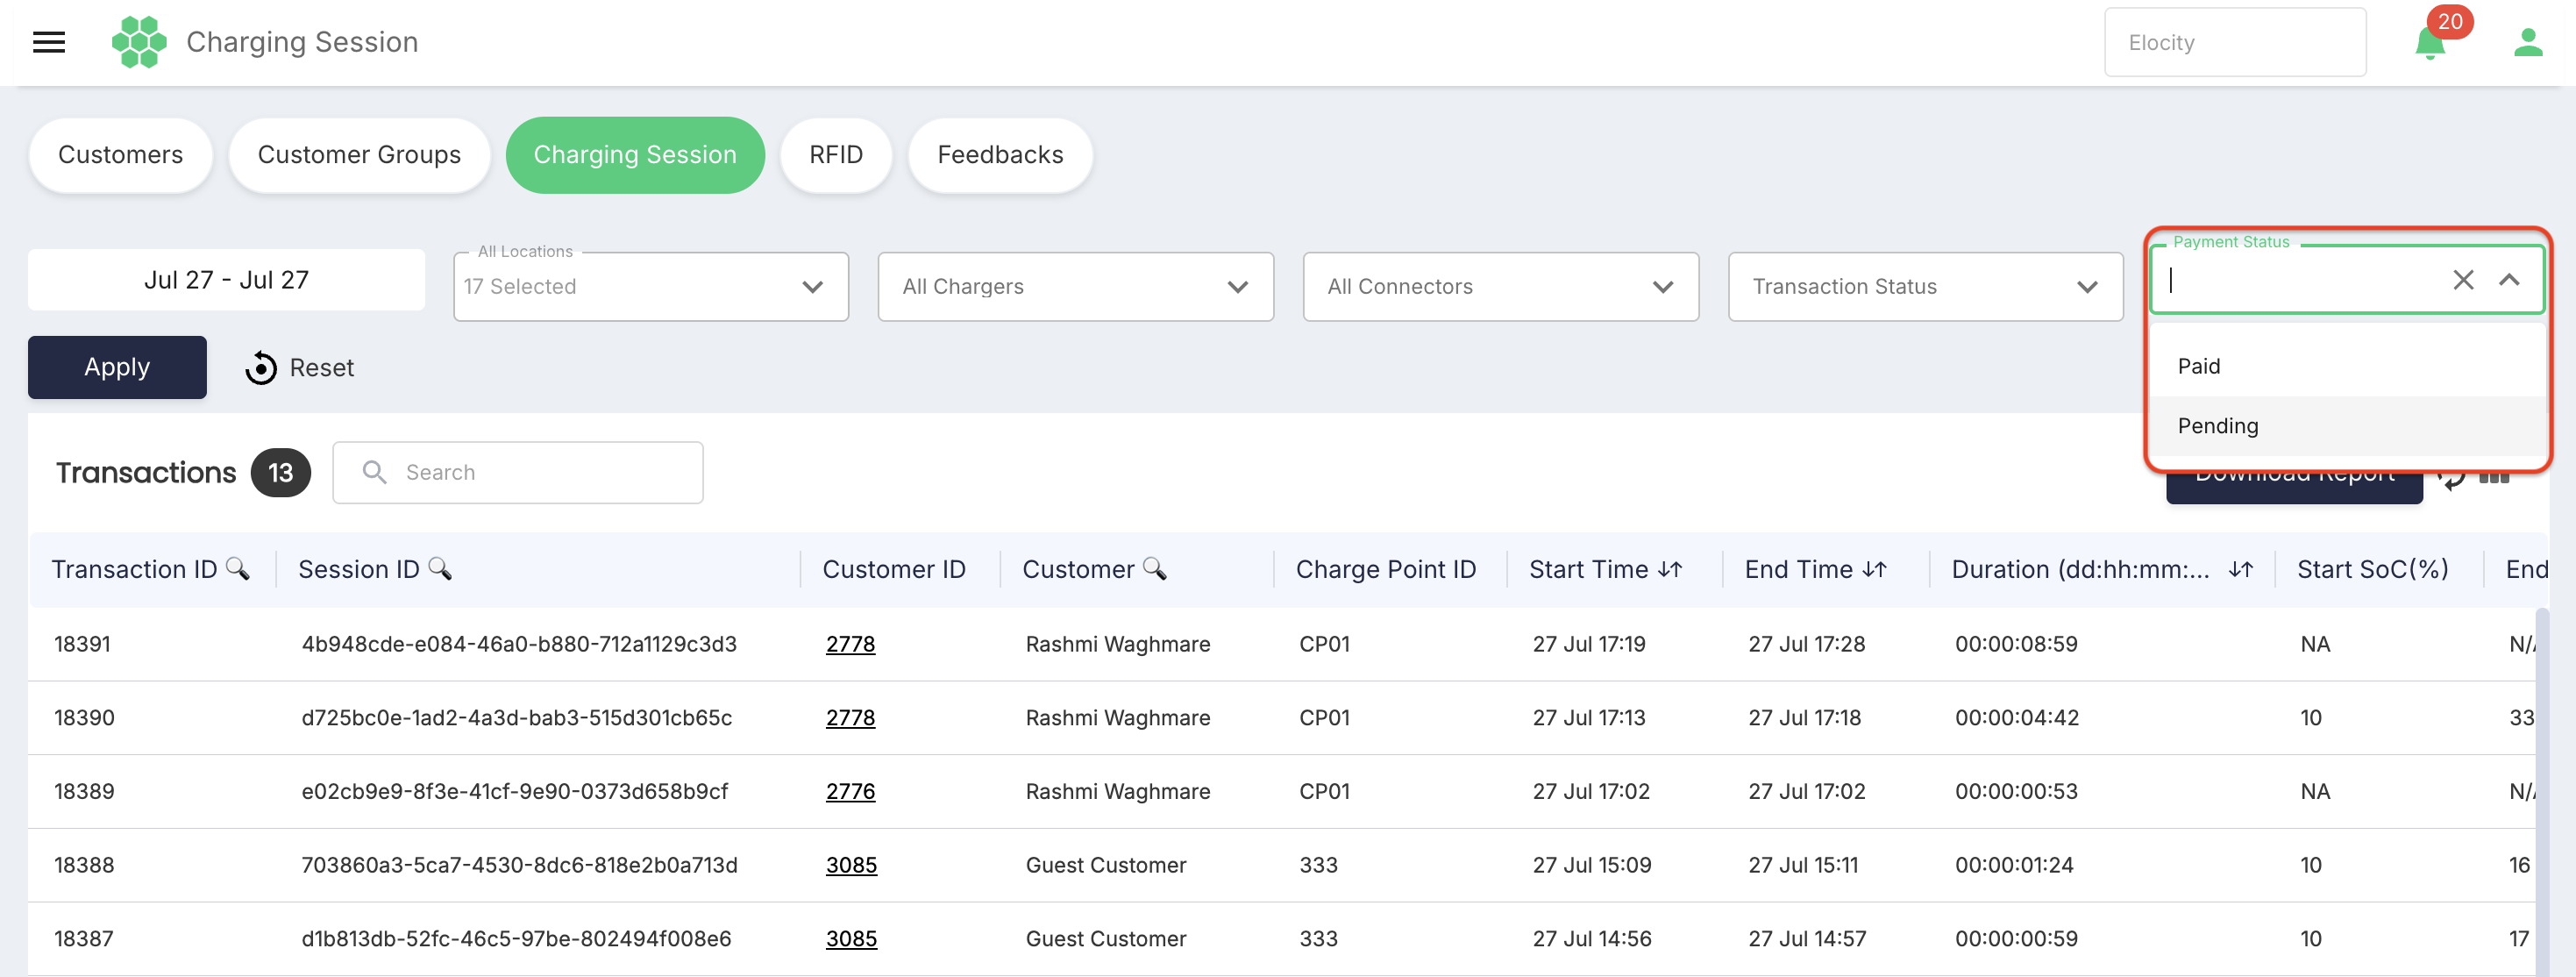
- Paid
- Pending
After changing a filter, select Apply. Select Reset to clear the page-level filter selections.
Charging-session grid
The grid is wider than the page. Use the horizontal scrollbar to review columns on the right.
| Column group | Included fields |
|---|---|
| Identity | Transaction ID, Session ID, Customer ID, Customer, Charge Point ID |
| Time and location | Start Time, End Time, Duration (dd:hh:mm:ss), Location, Station, Connector |
| Vehicle and energy | Start SoC (%), End SoC (%), Energy Consumed (kWh), Start meter Values, Stop meter Values |
| Cost | Cost, Cost Before Discount, Discount, Cost Round Off, Refunded Amount |
| Status and payment | Transaction Status, Payment Type, Payment Status, Billing ID, Order ID, Payment Date |
| Service records | Invoice, Remark, Action |
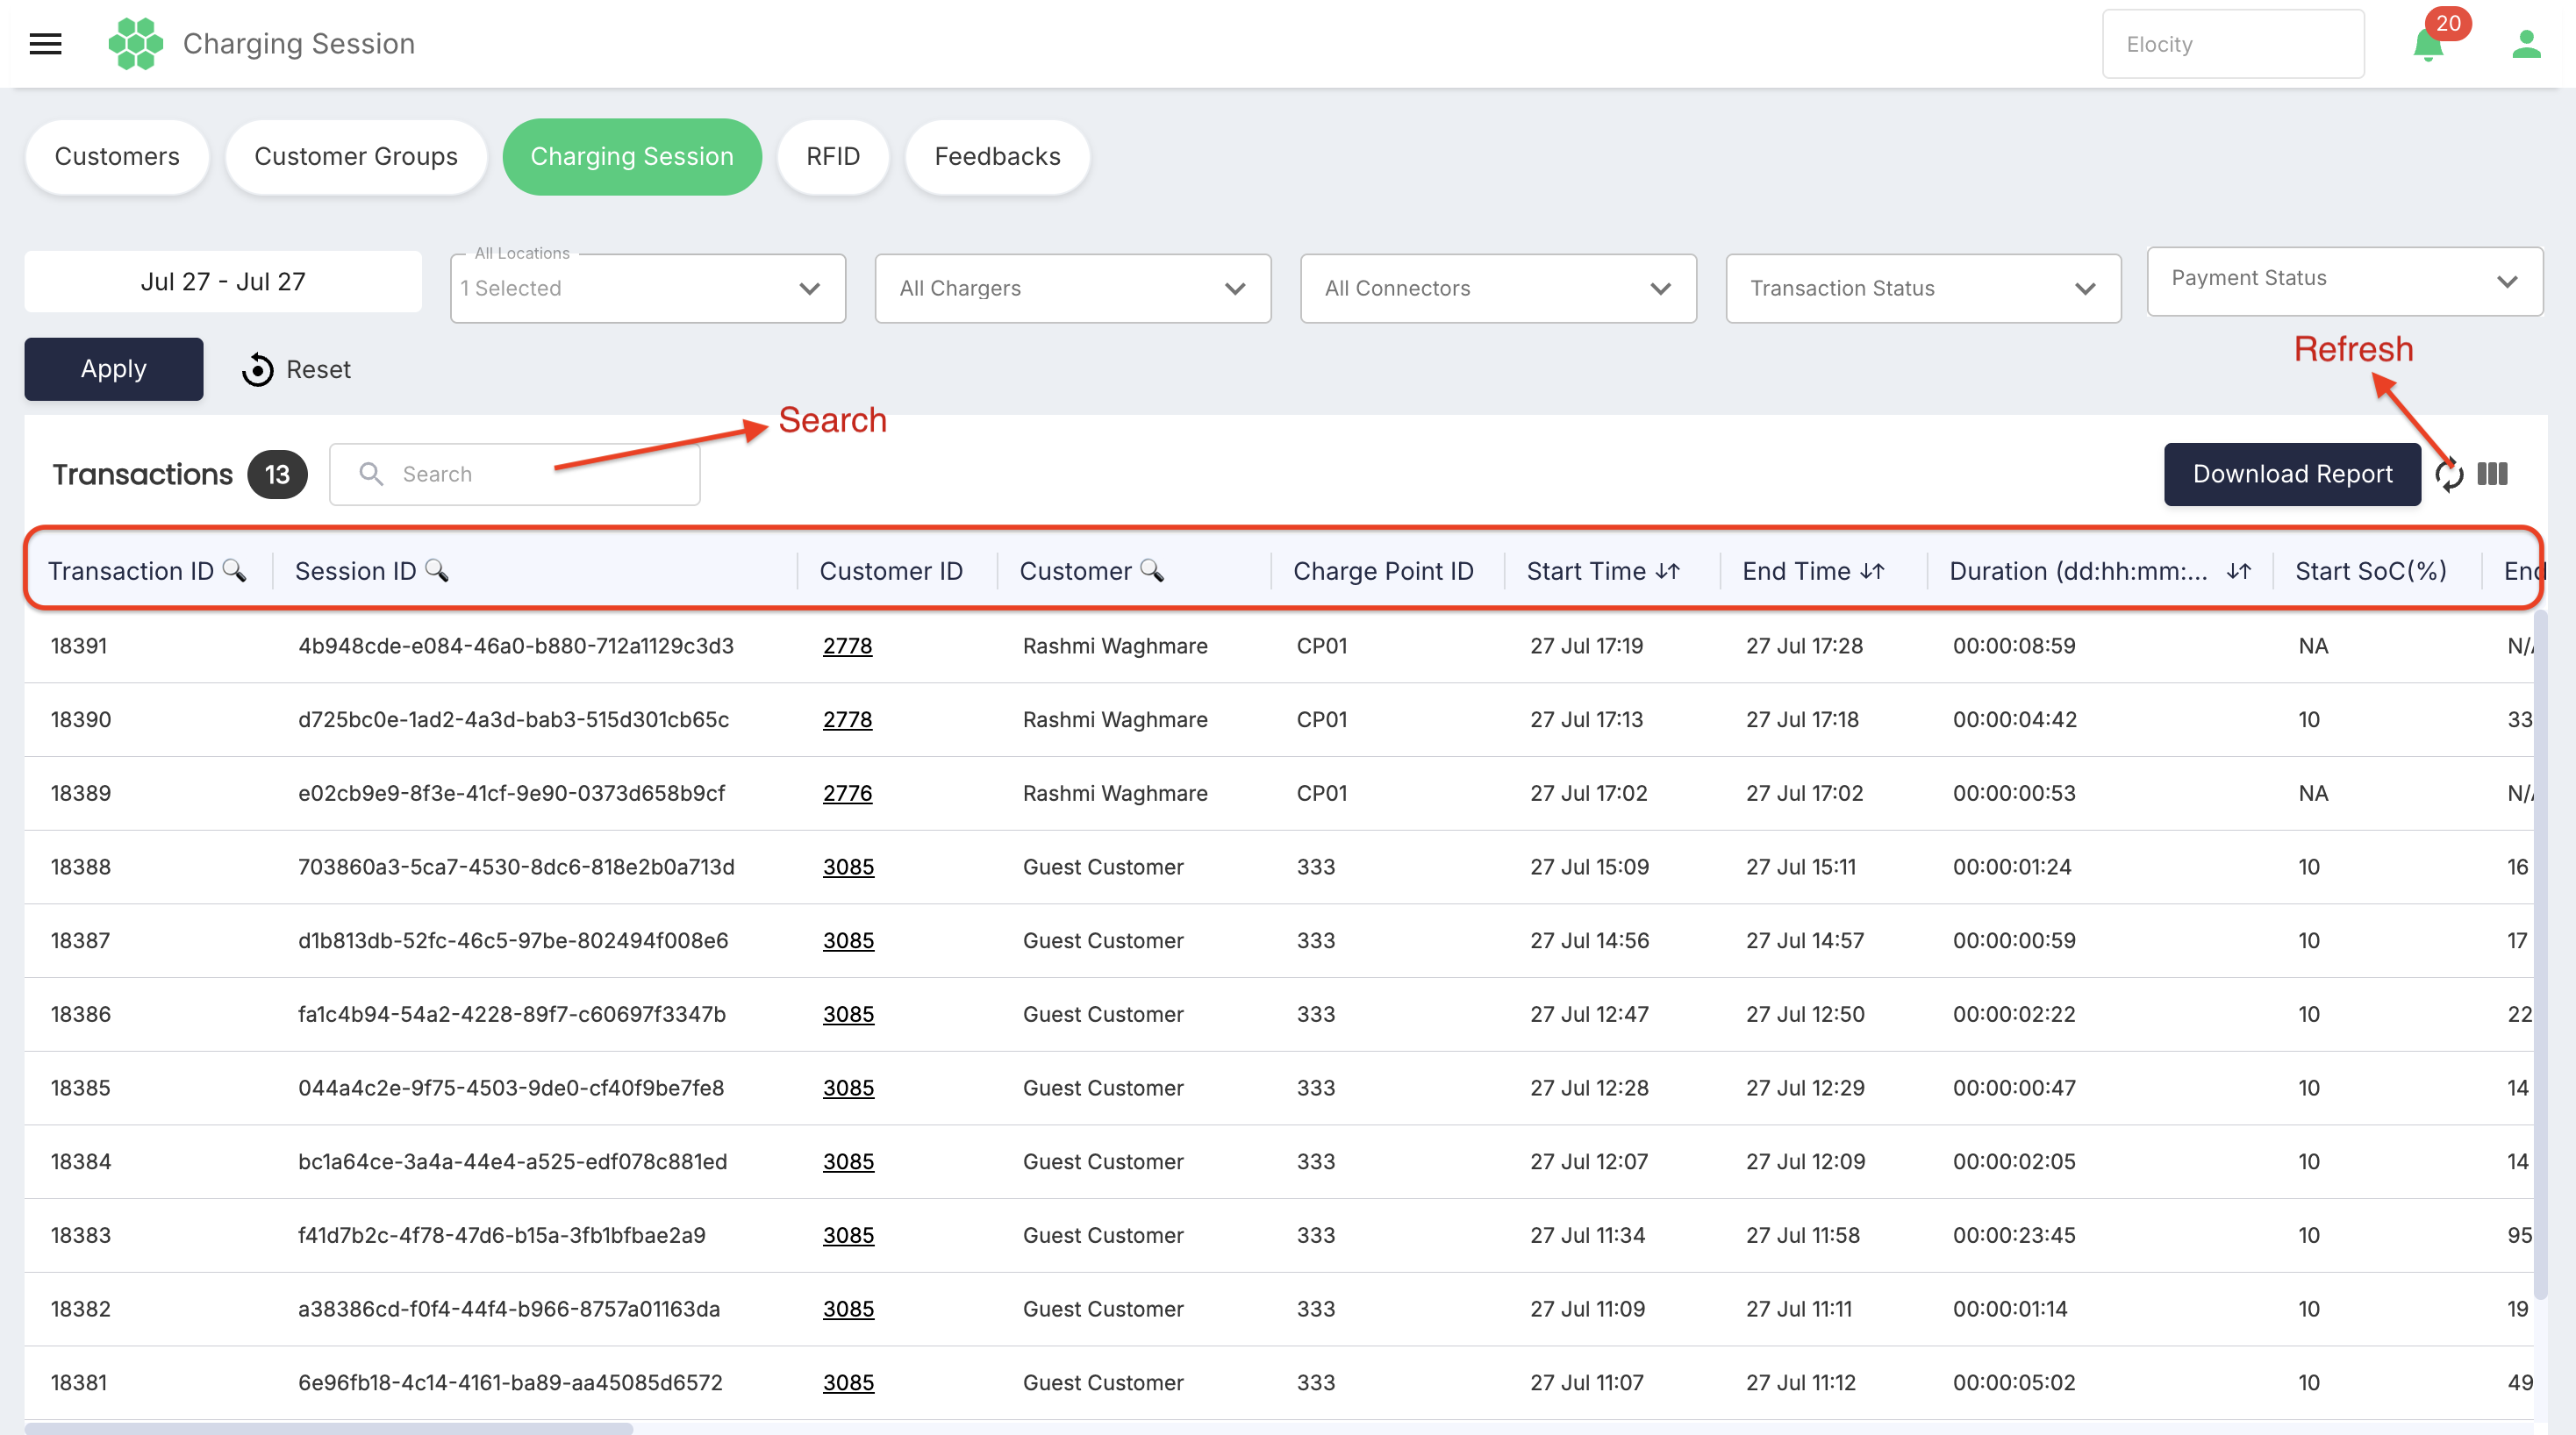 Use Search to filter the current transaction list.
Select Refresh to request the latest transaction data.
Showing and hiding transaction columns
Select Column Filter to open Show / Hide Columns. The inspected menu contained:
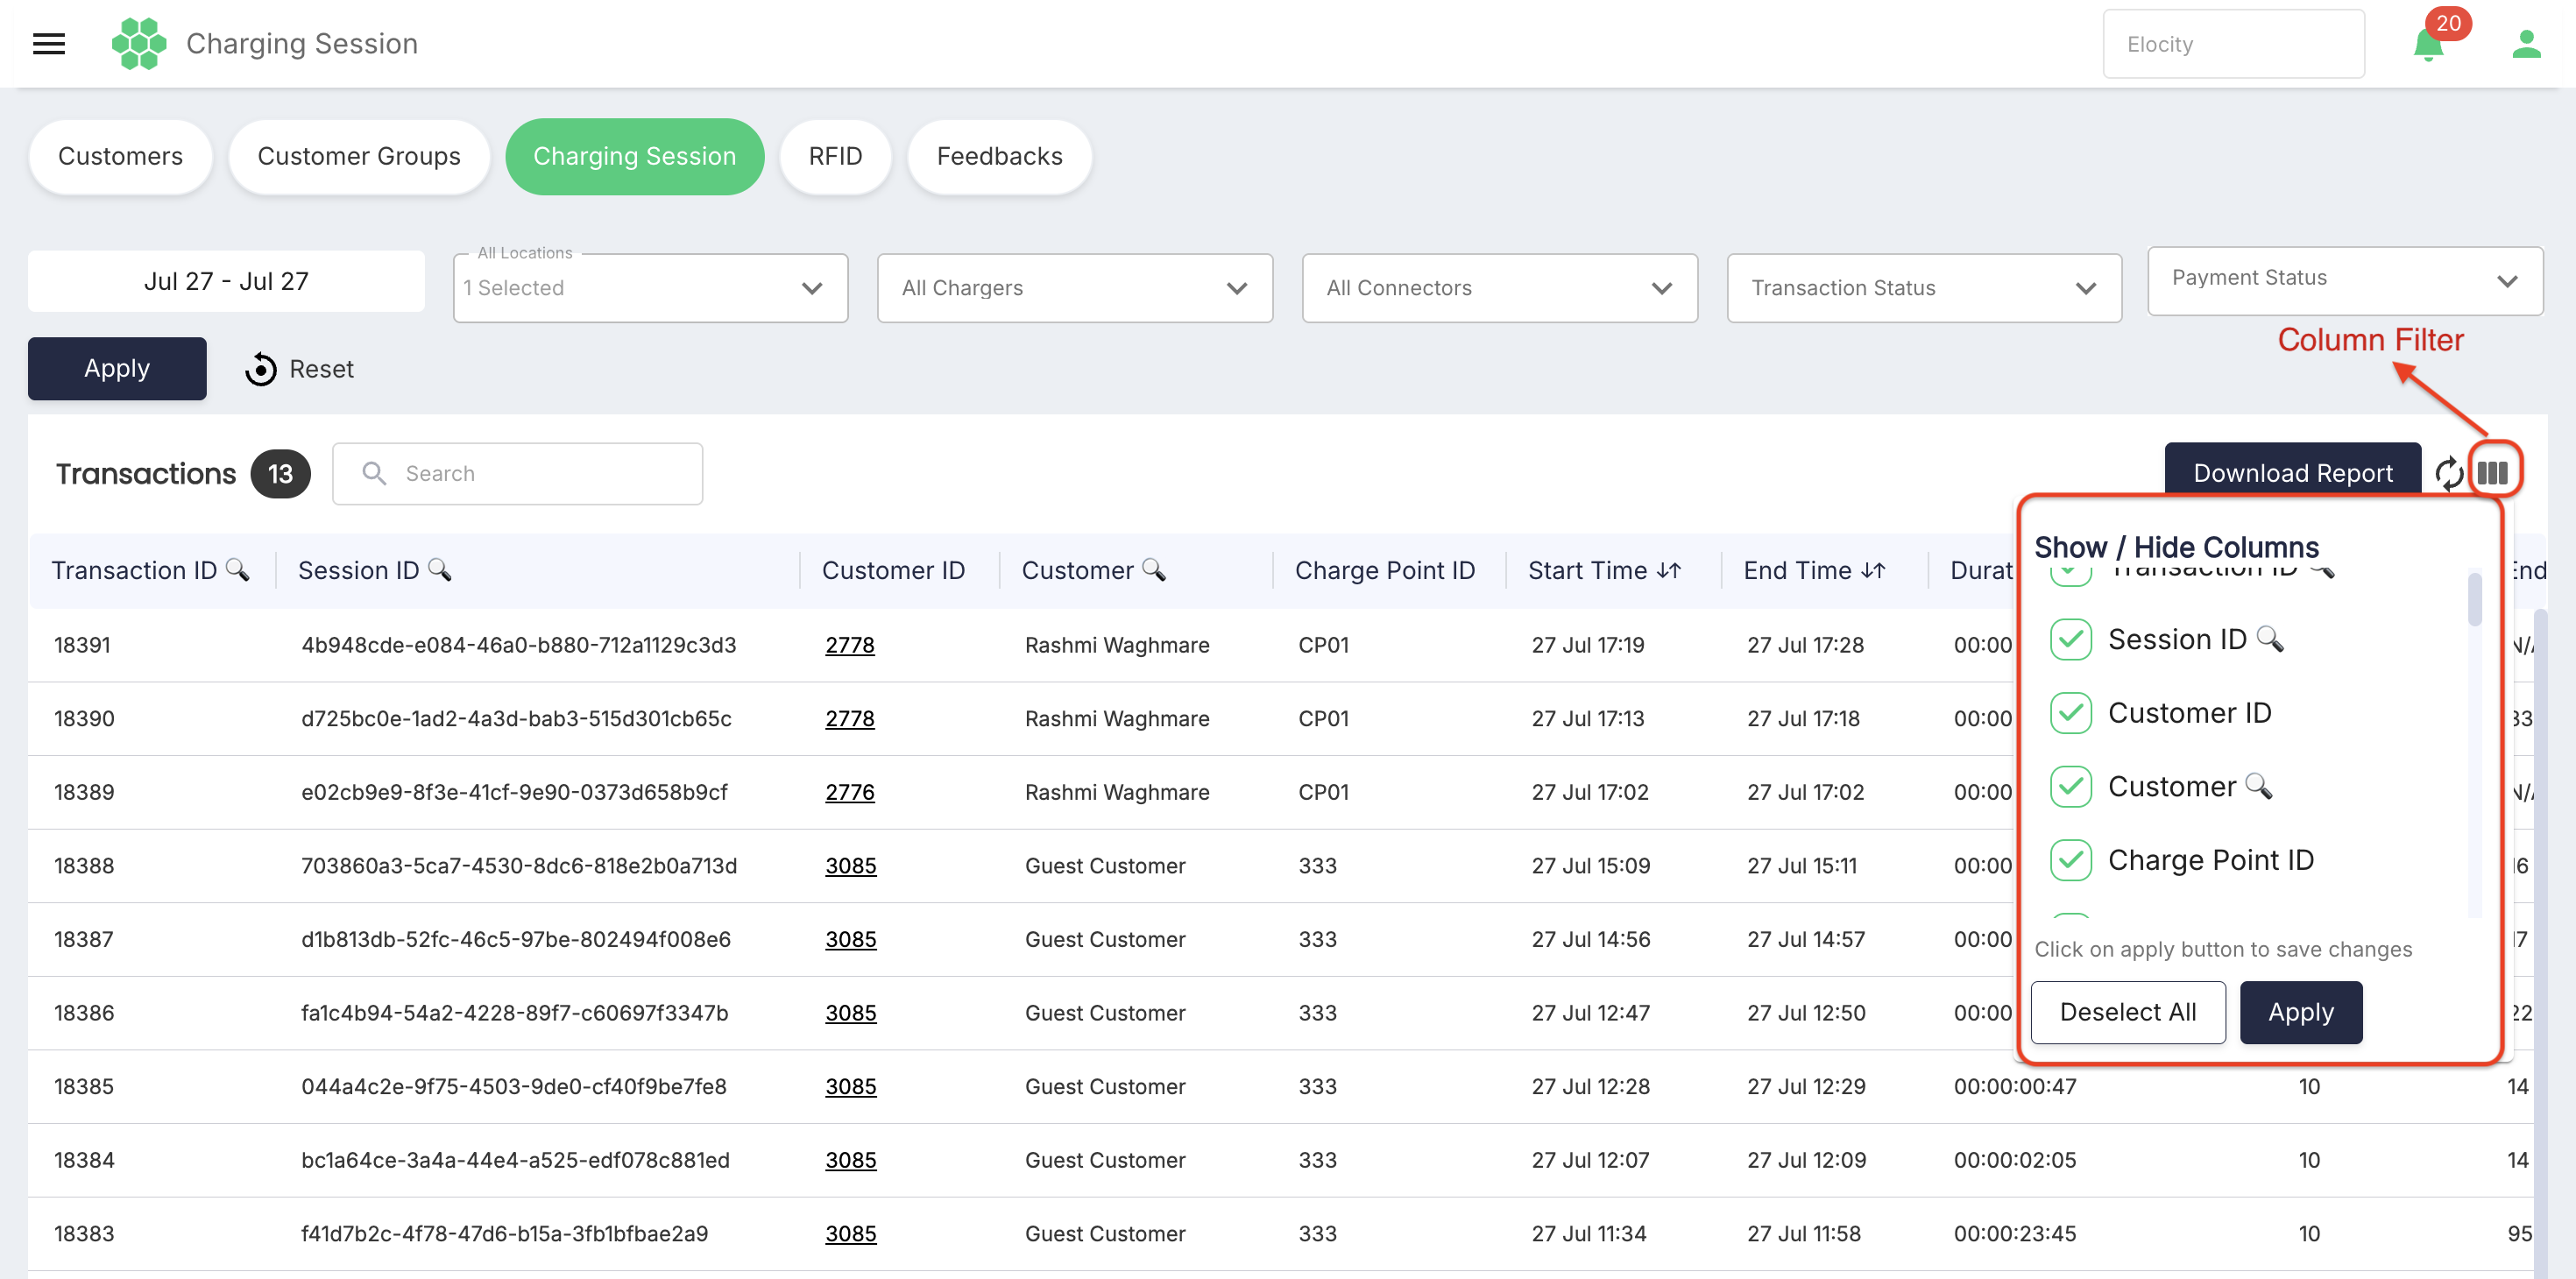
- Transaction ID
- Session ID
- Customer ID
- Customer
- Charge Point ID
- Start Time
- End Time
- Duration (dd:hh:mm:ss)
- Start SoC (%)
- End SoC (%)
- Location
- Station
- Connector
- Energy Consumed (kWh)
- Cost
- Cost Before Discount
- Discount
- Cost Round Off
- Transaction Status
- Payment Type
- Payment Status
- Billing ID
- Order ID
- Invoice
- Payment Date
- Start meter Values
- Stop meter Values
- Remark
- Refunded Amount
- Action
Select or clear the required checkboxes, then select Apply in the column menu. Deselect All clears the column selections.
Downloading the transaction report
- Confirm the selected business.
- Set the required date range and page filters.
- Select Apply.
- Review the Transactions counter and visible records.
- Select Download Report.
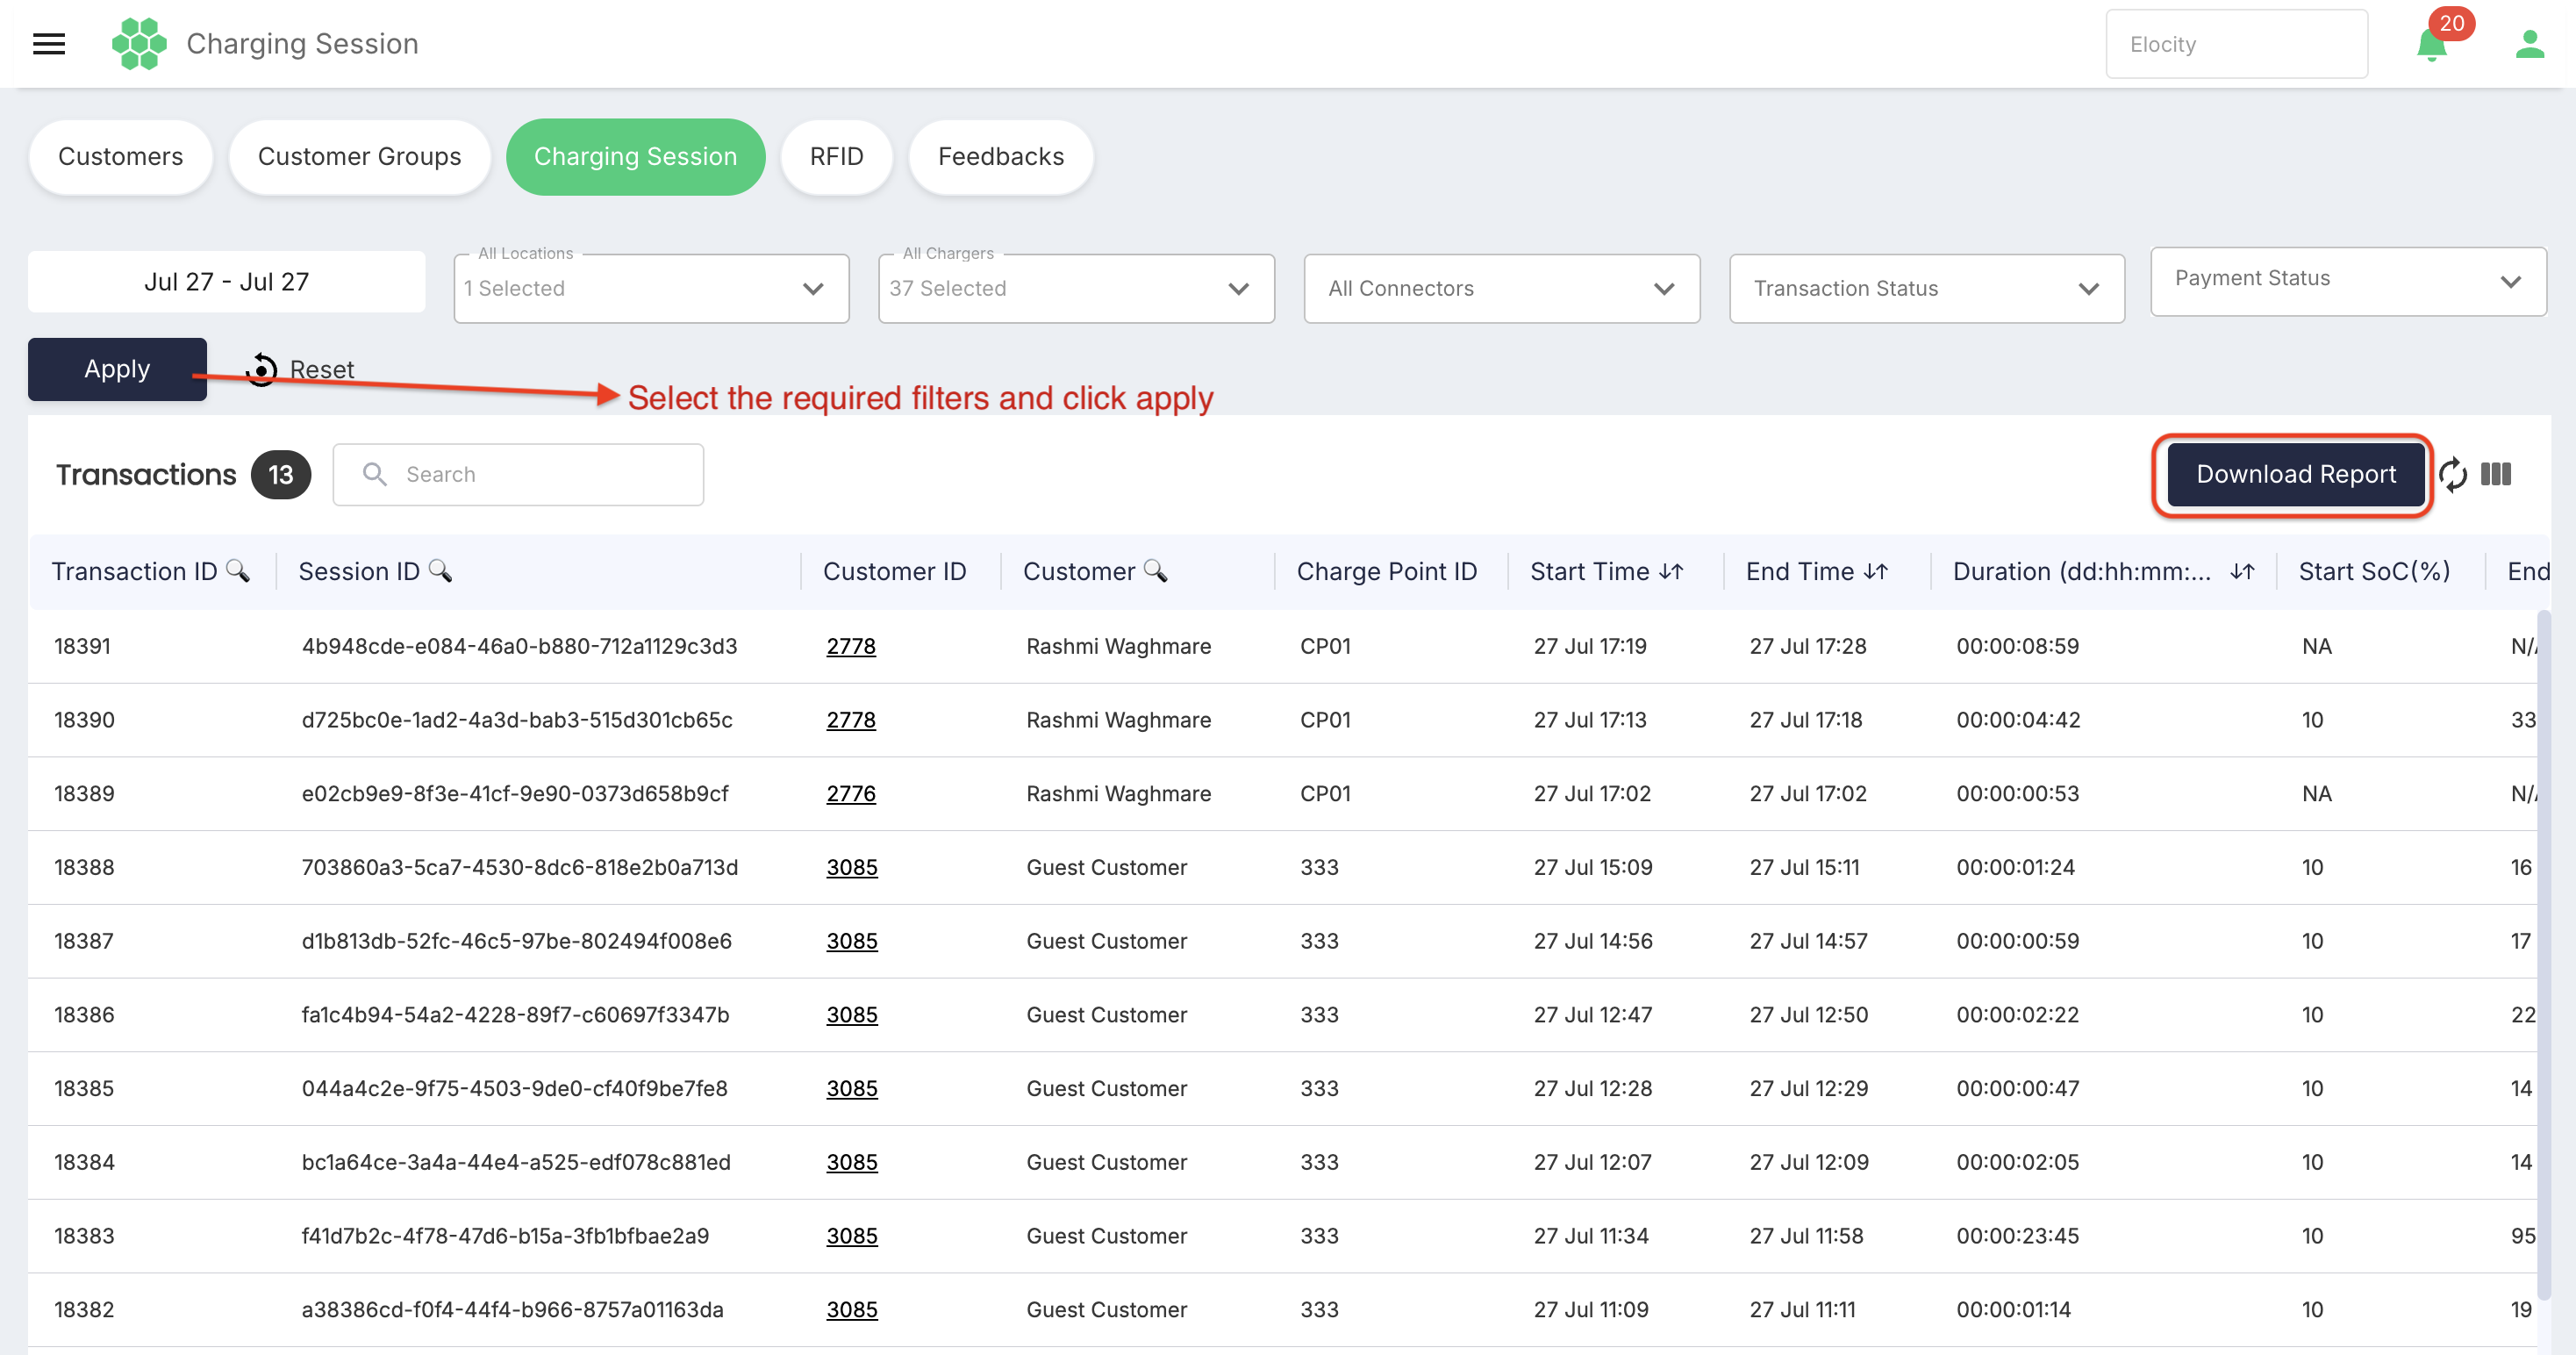
The report is downloaded in CSV format and is limited to the currently applied filters. Check the downloaded file before importing or forwarding it.
Invoice and transaction actions
Scroll to the right side of the grid to reach the Invoice, Remark, Refunded Amount, and Action columns.
The inspected populated rows provided:
- View / Download Invoice — Opens or downloads the transaction invoice.
- Email Invoice — Sends the invoice using the portal workflow.
- View Description — Displays the transaction remark or termination description when available.
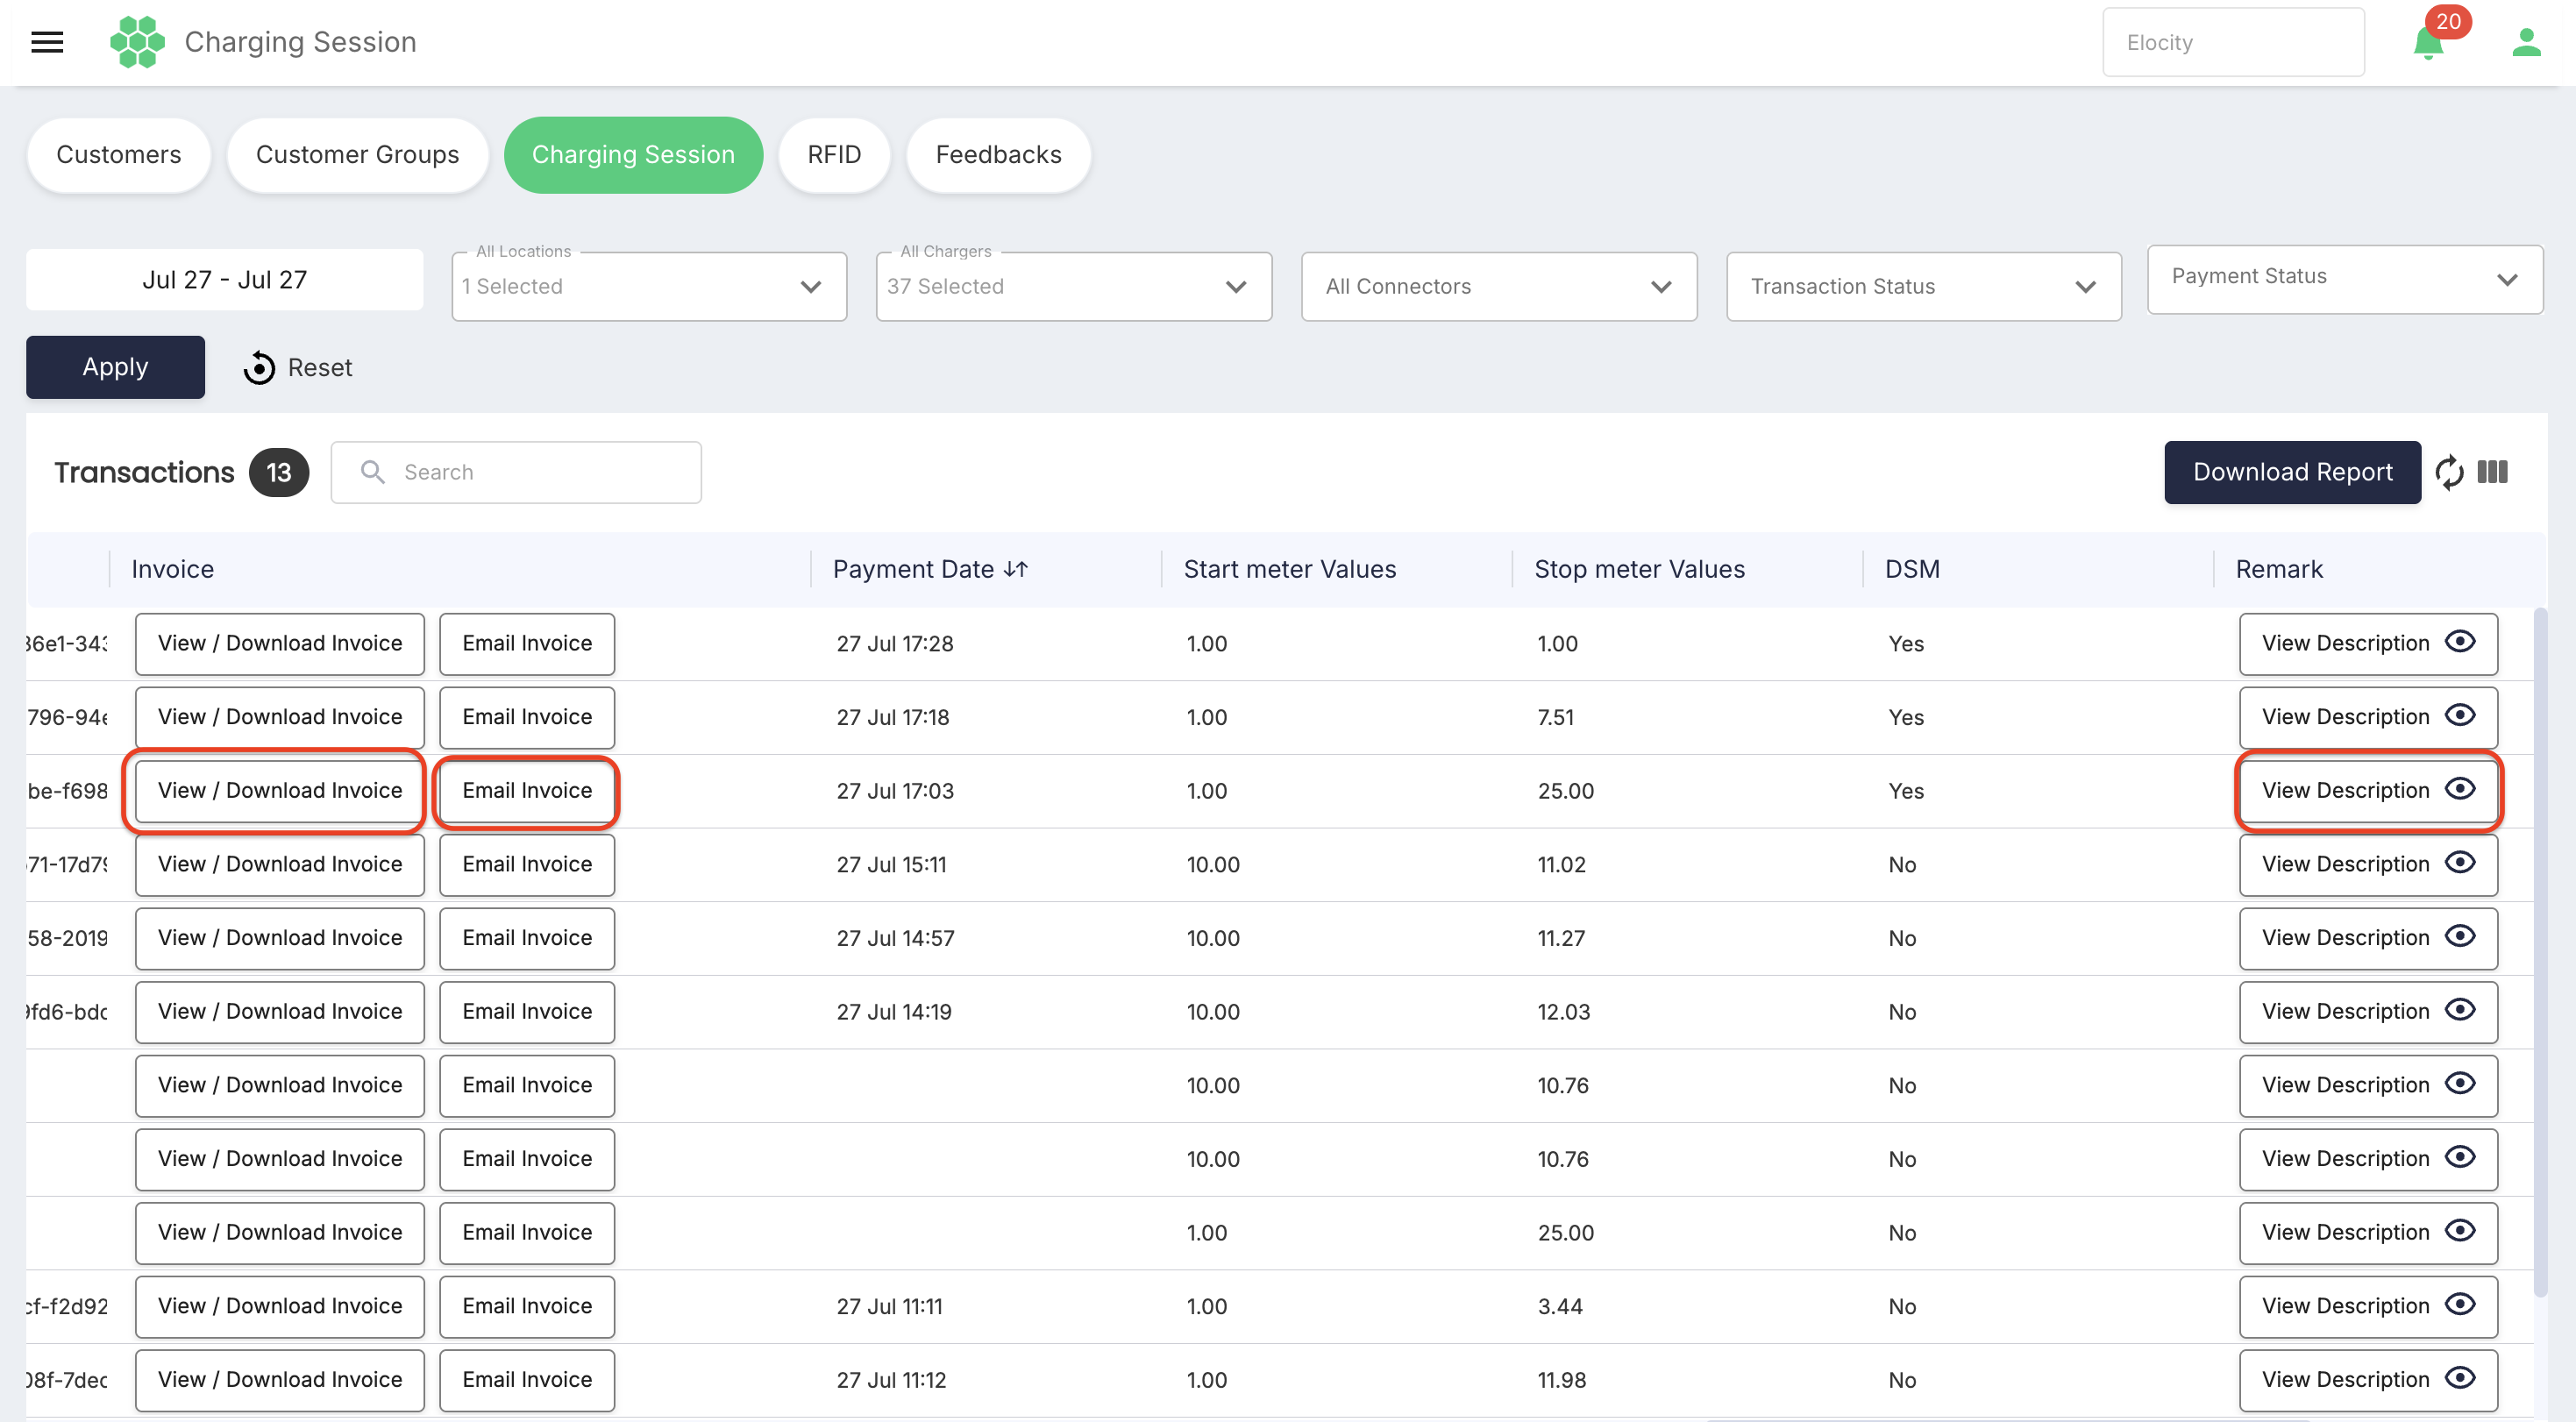
Confirm the customer and intended recipient before using Email Invoice.
All charging-session payments are eligible for refund after review by an operator. Refunds are credited to the customer's e-Wallet.
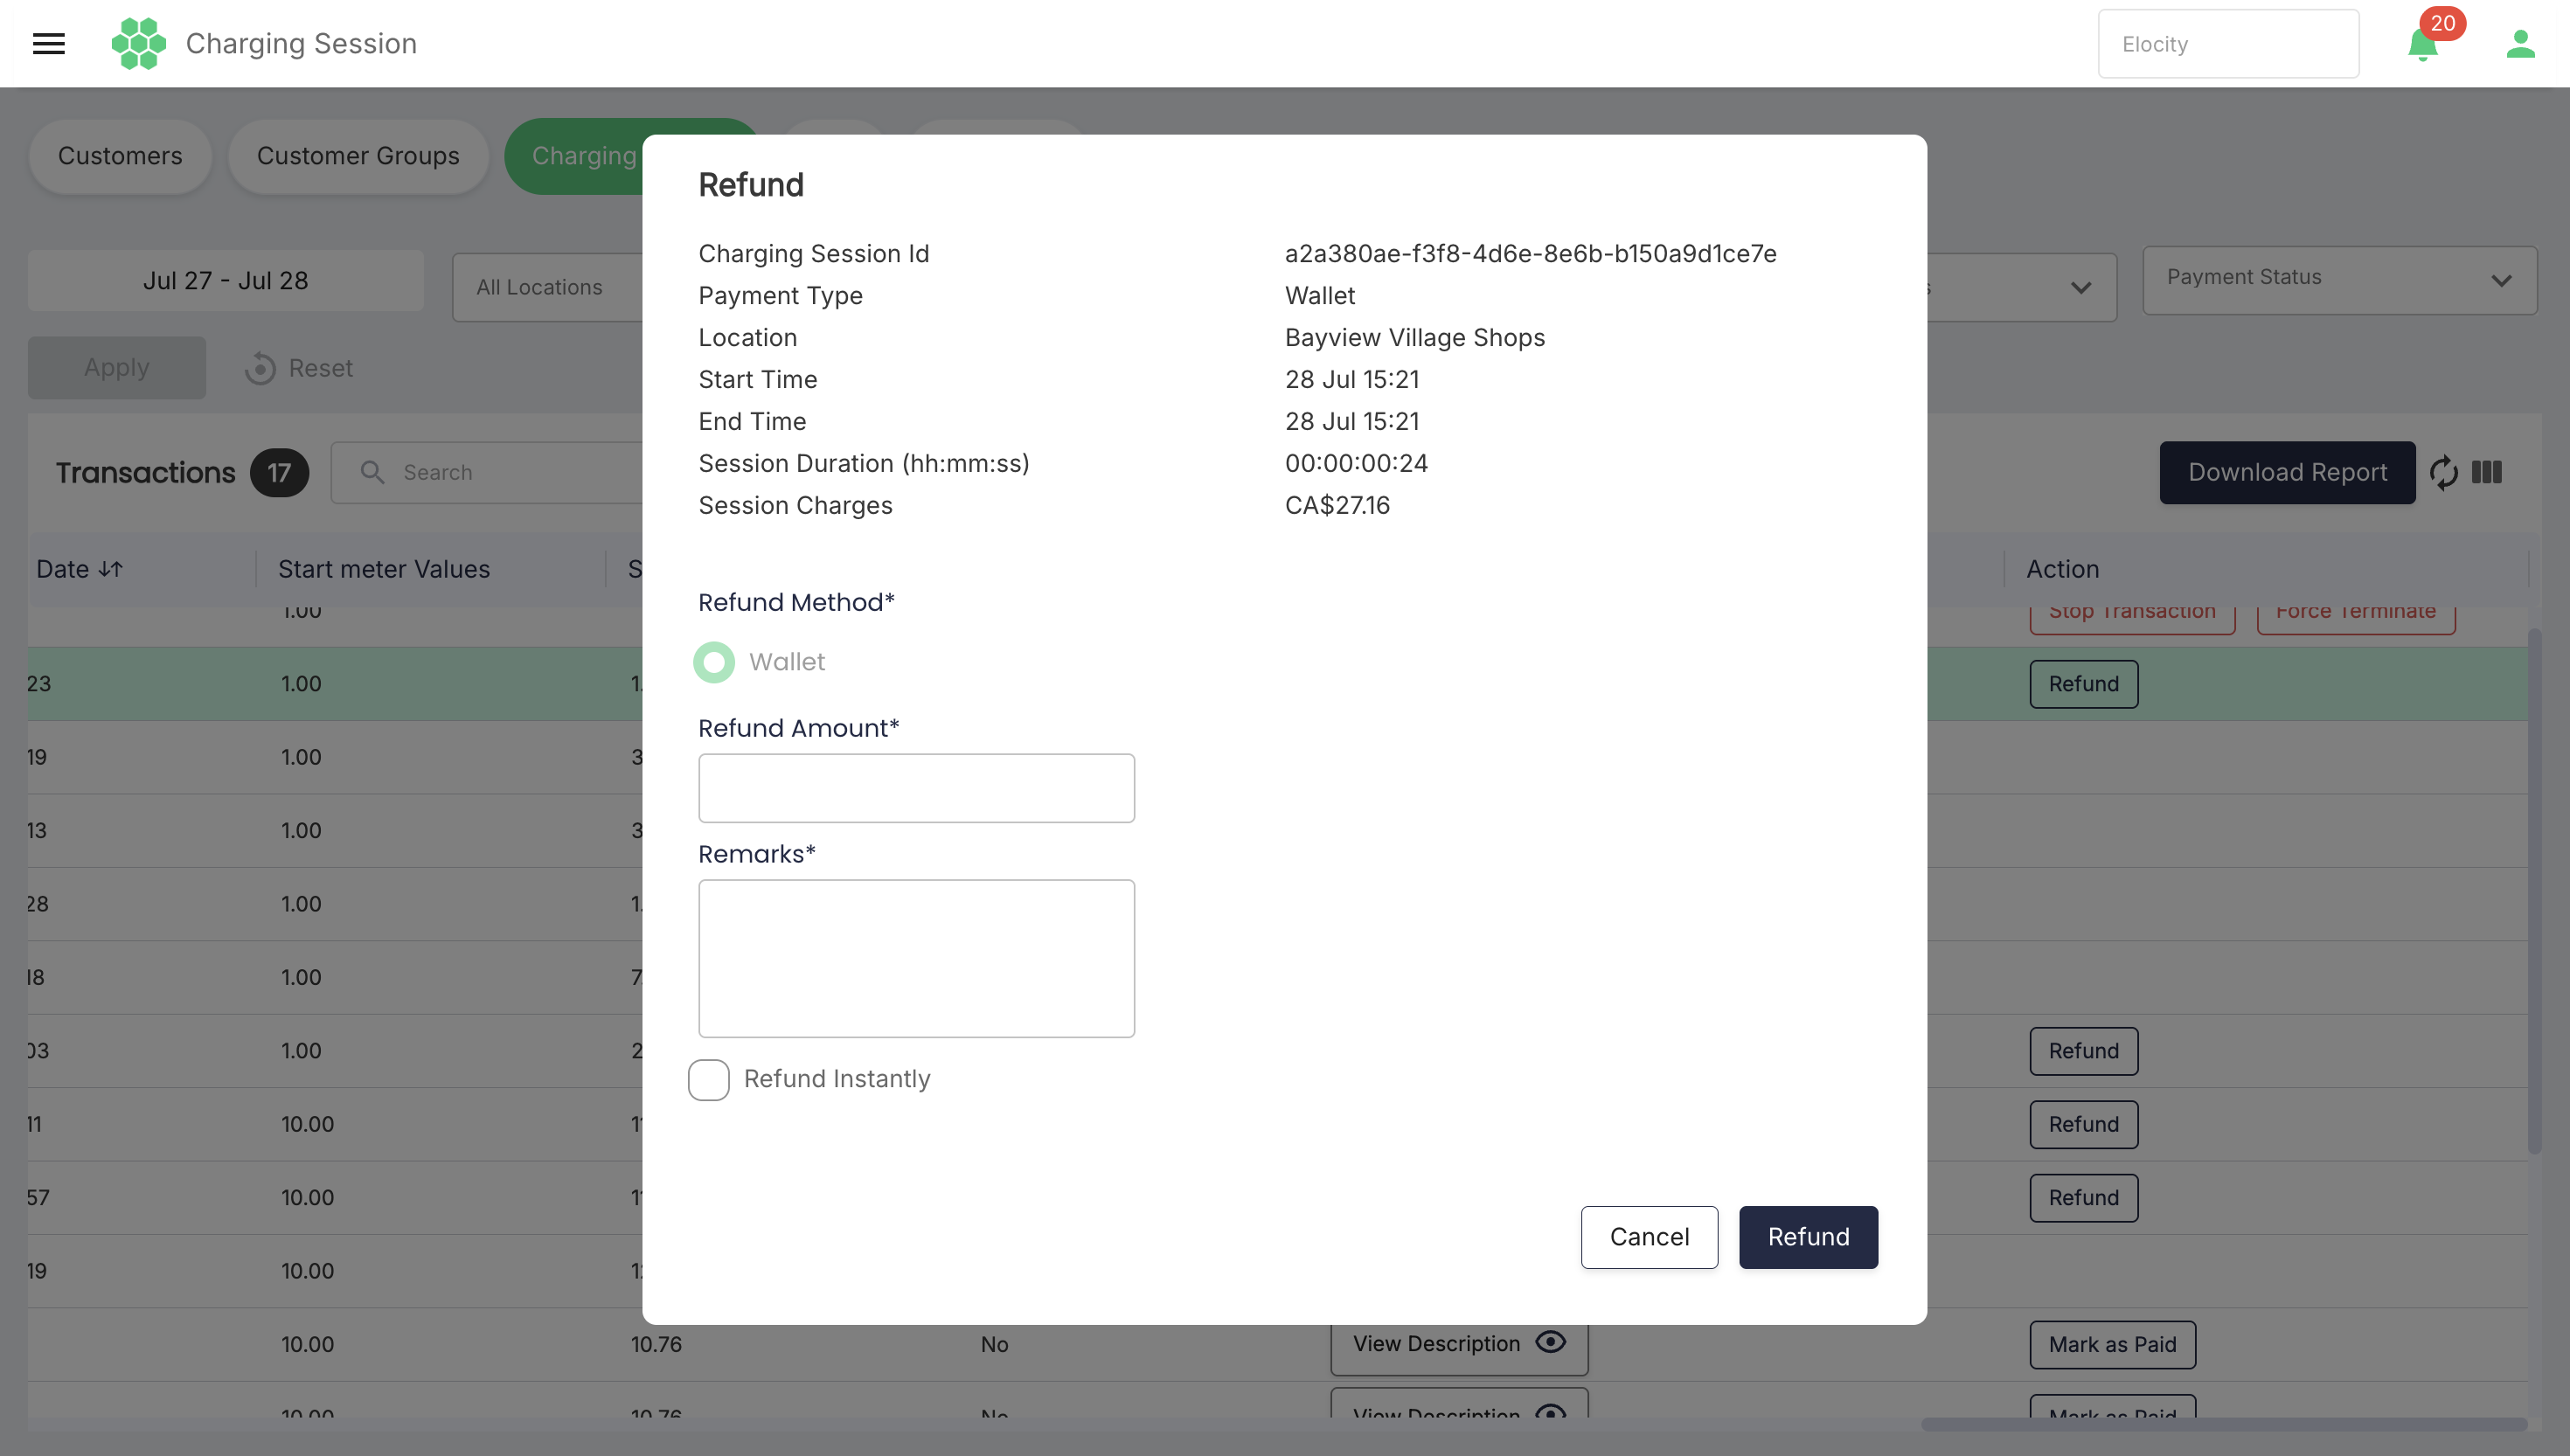
The customer support executive decides whether to issue a refund after analyzing what occurred during the charging session. The refund amount must not exceed the cost of that charging session.
When Refund is available:
- Review the charging-session and payment details.
- Select Refund.
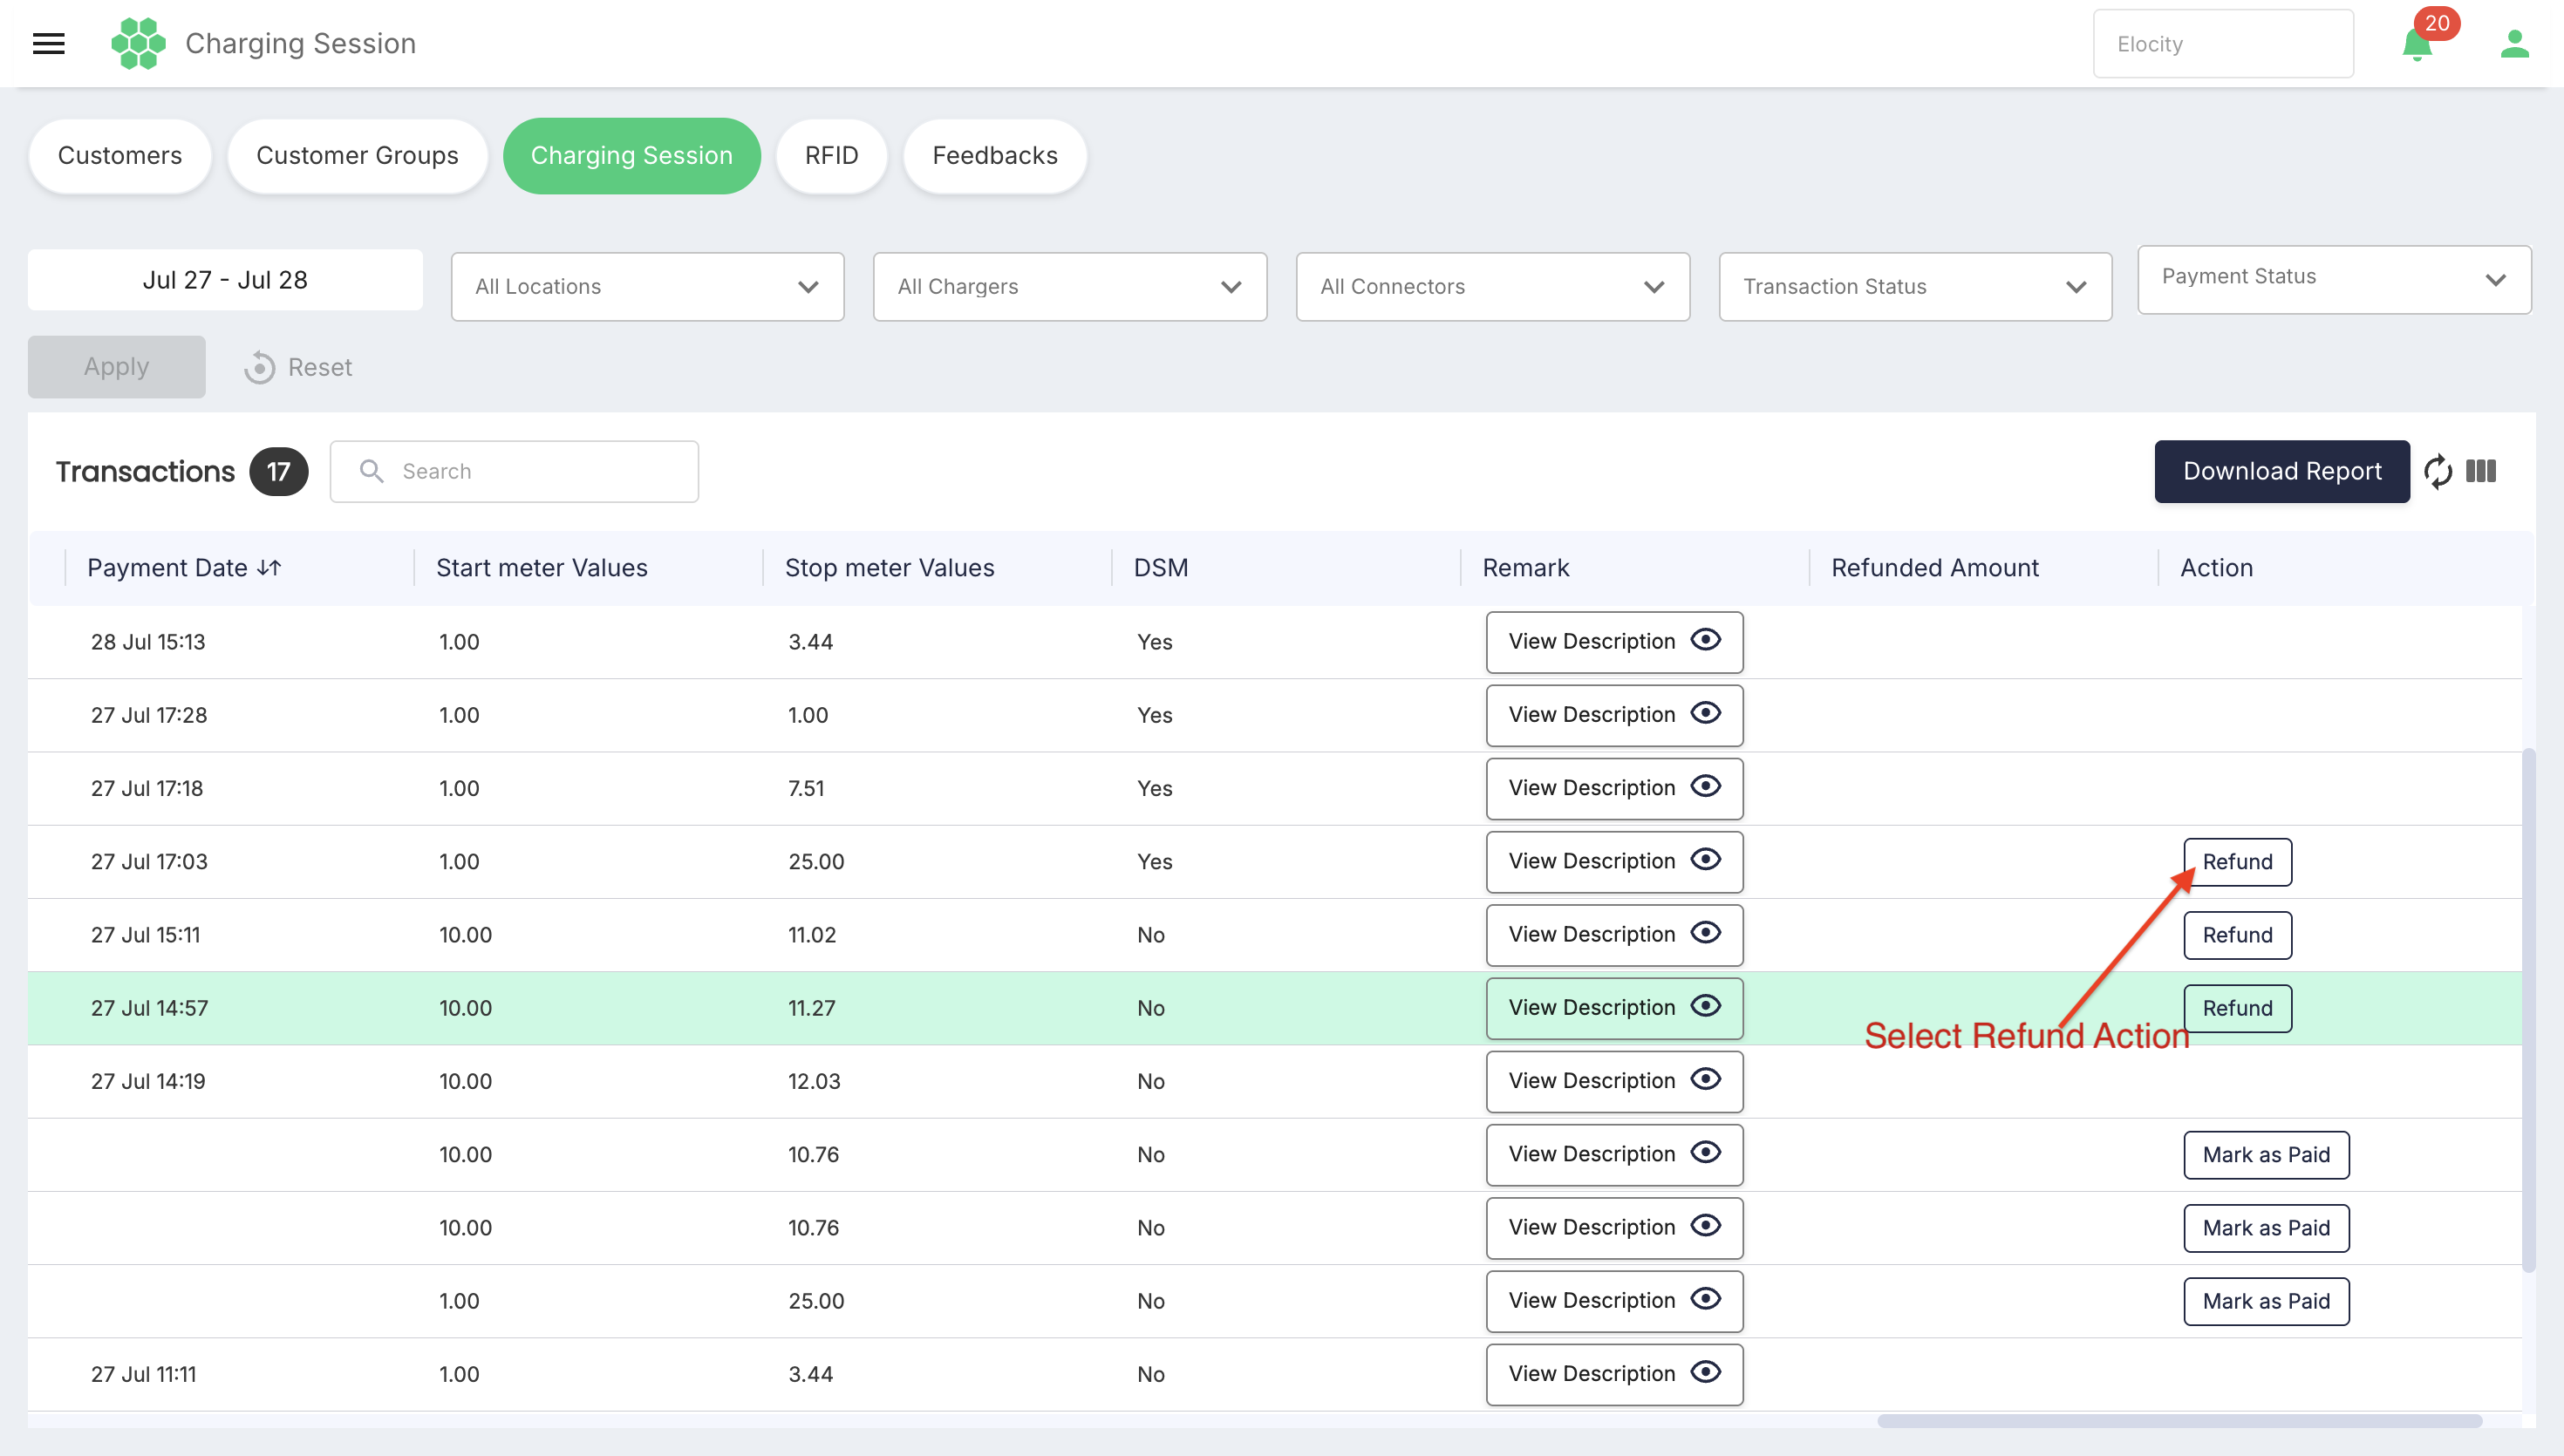
- Enter the Refund Amount. Do not enter an amount greater than the charging-session cost.
- Enter Remarks when the field is displayed.
- Review and submit the refund.
The Refund button was not displayed for the inspected zero-cost transactions.
Customer-specific charging sessions
Open a customer record and select Charging Session to review transactions for that customer.
The customer-specific view provides:
- Date range
- All Locations
- All Chargers
- All Connectors
- Transaction Status
- Payment Status
- Apply
- Reset
- Search
- Refresh
- Column Filter
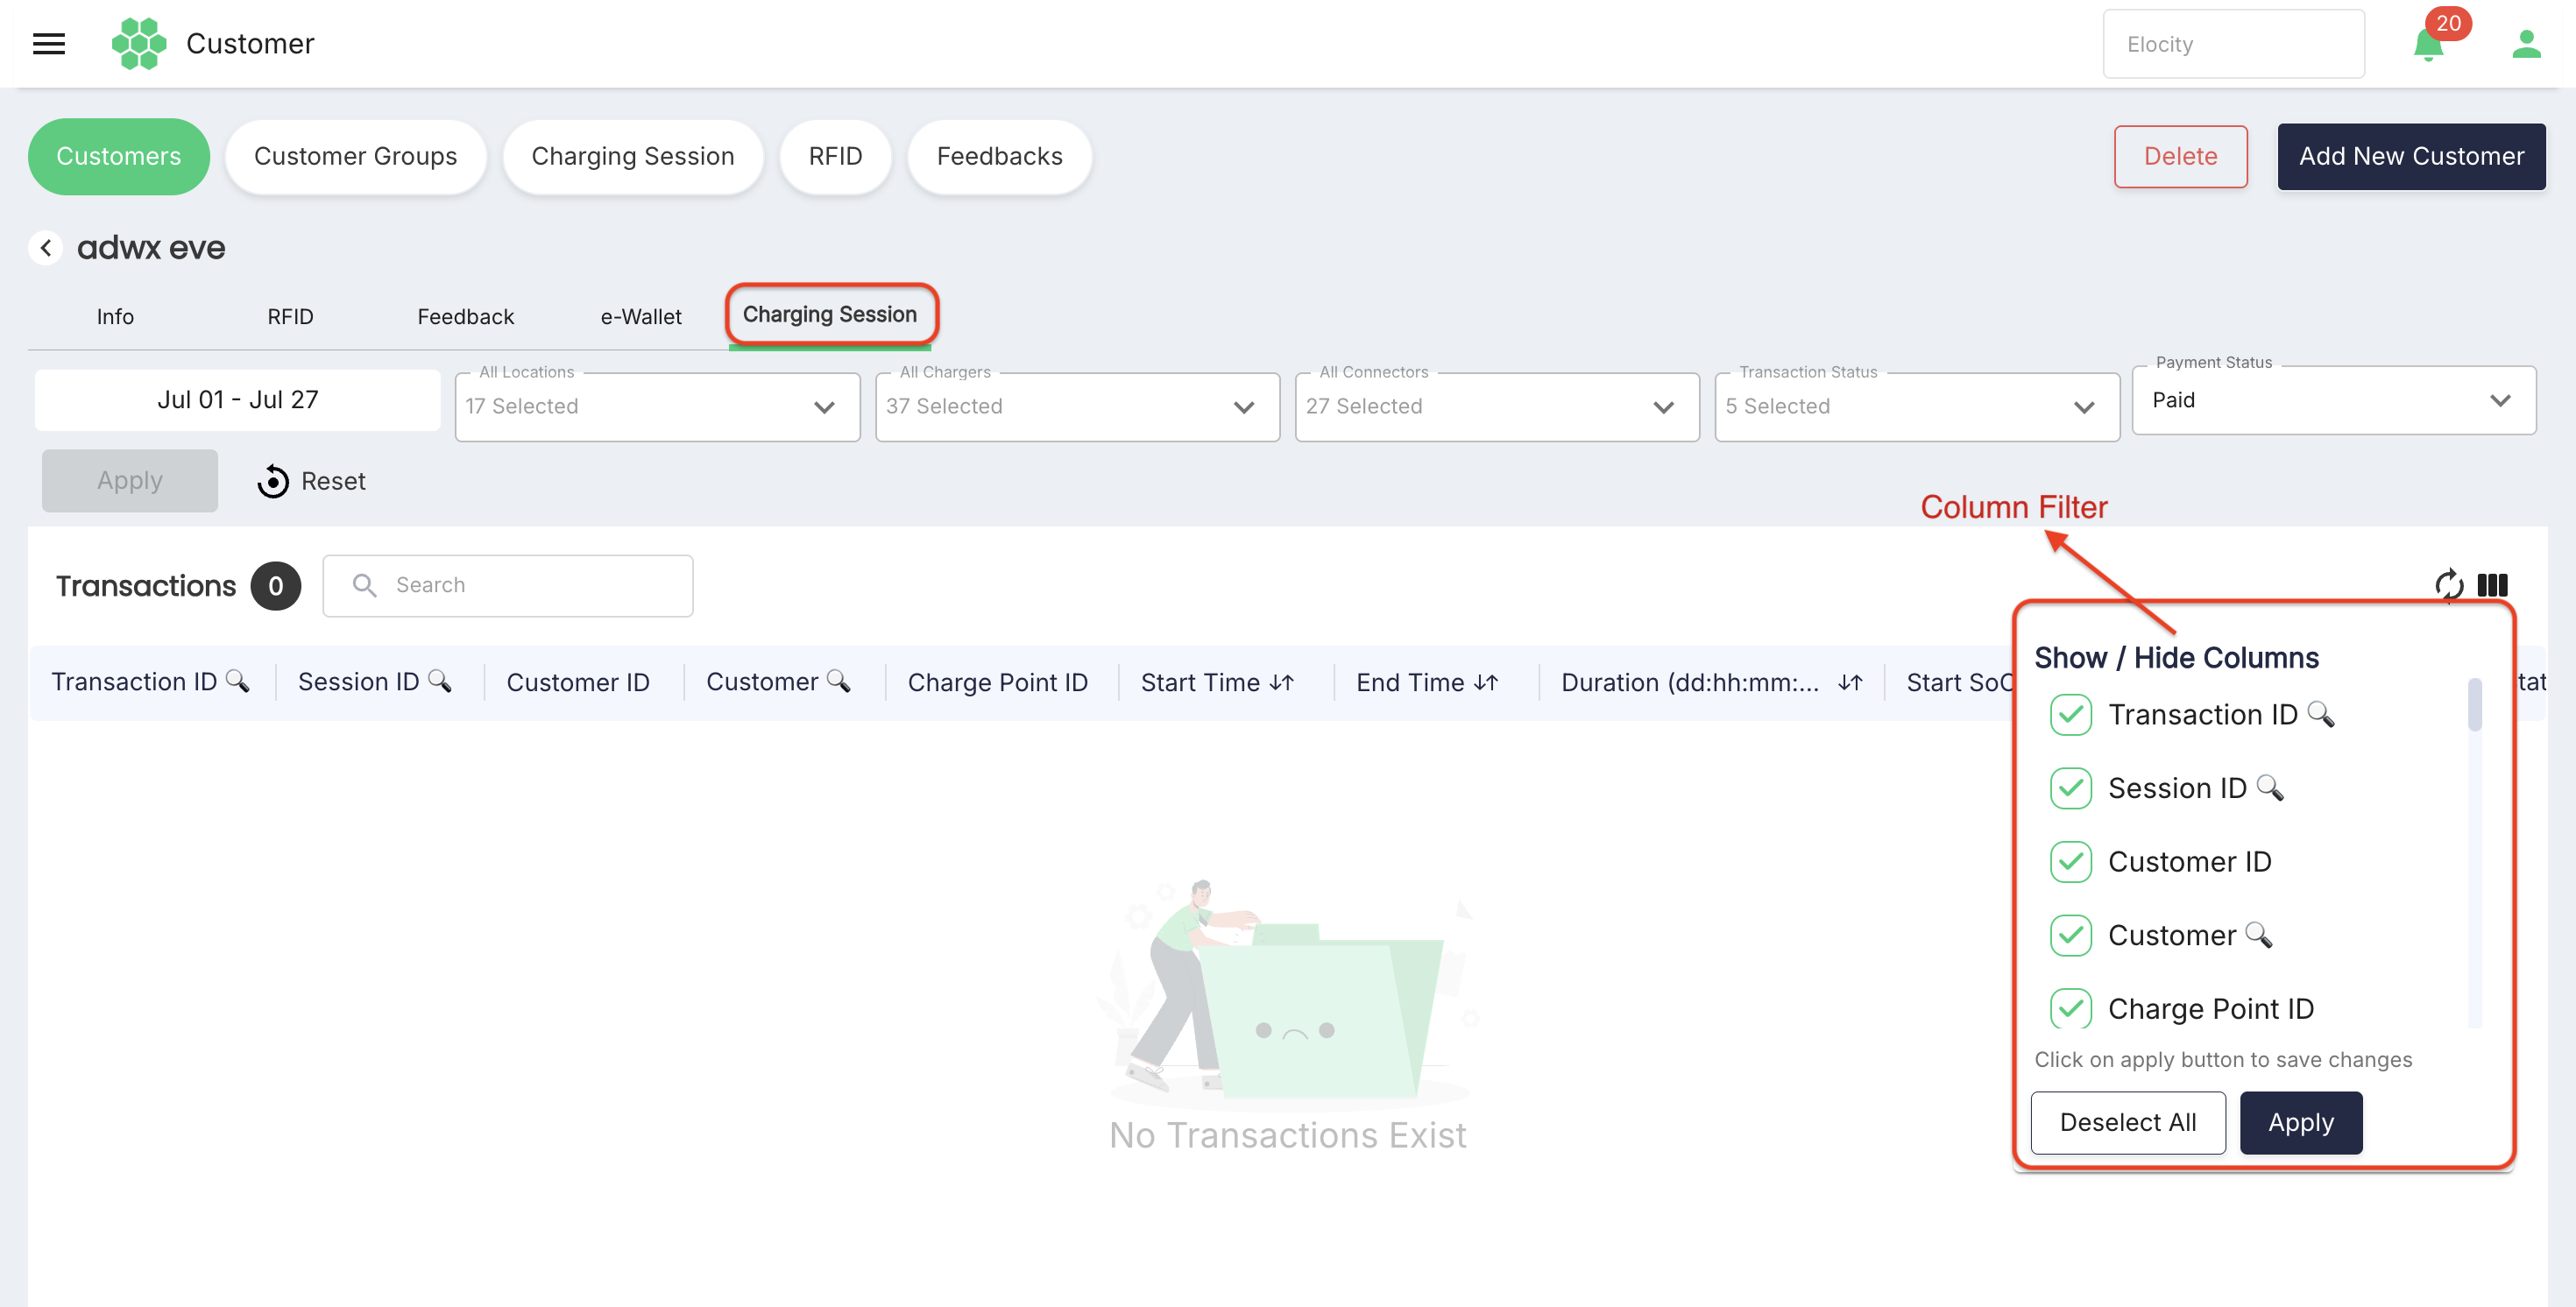
The inspected customer had no transactions in the selected date range.
RFID page
The RFID page provides a cross-customer list of RFID credentials.
| Column | Description |
|---|---|
| RFID | Shows the credential identifier. A column-search control is available. |
| Customer ID | Shows the associated customer identifier. |
| RFID Status | Shows the current credential state. The inspected list contained Active and Inactive. |
| Customer Name | Shows the customer associated with the RFID. |
| Expiry Date | Shows the configured credential expiry date. |
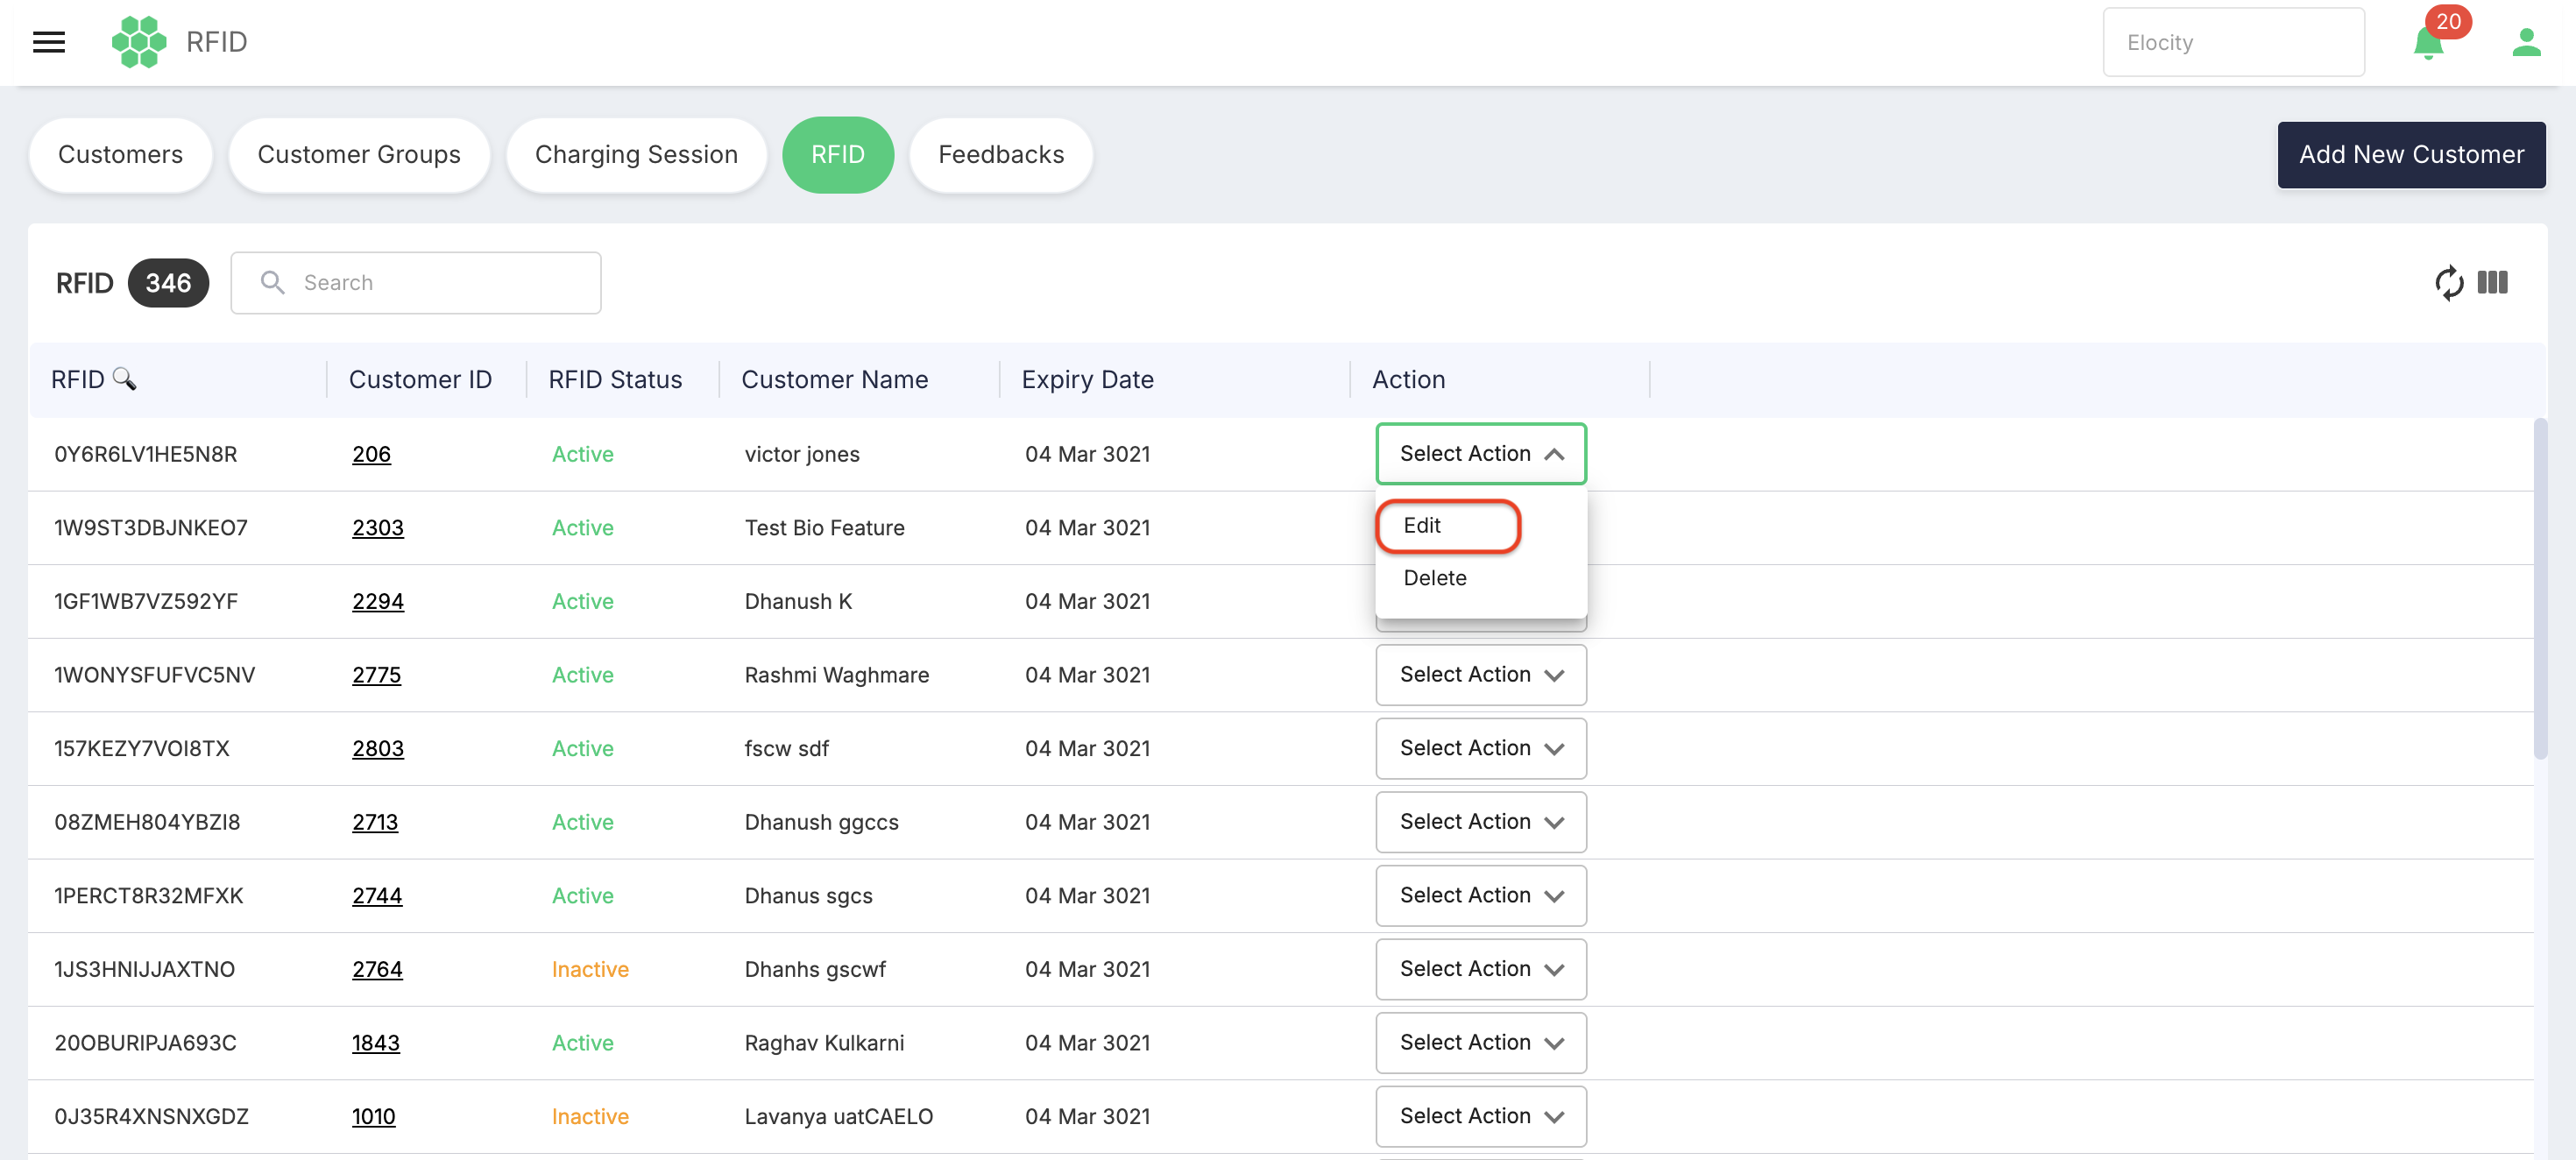
| Action | Provides Edit and Delete in the inspected deployment. |
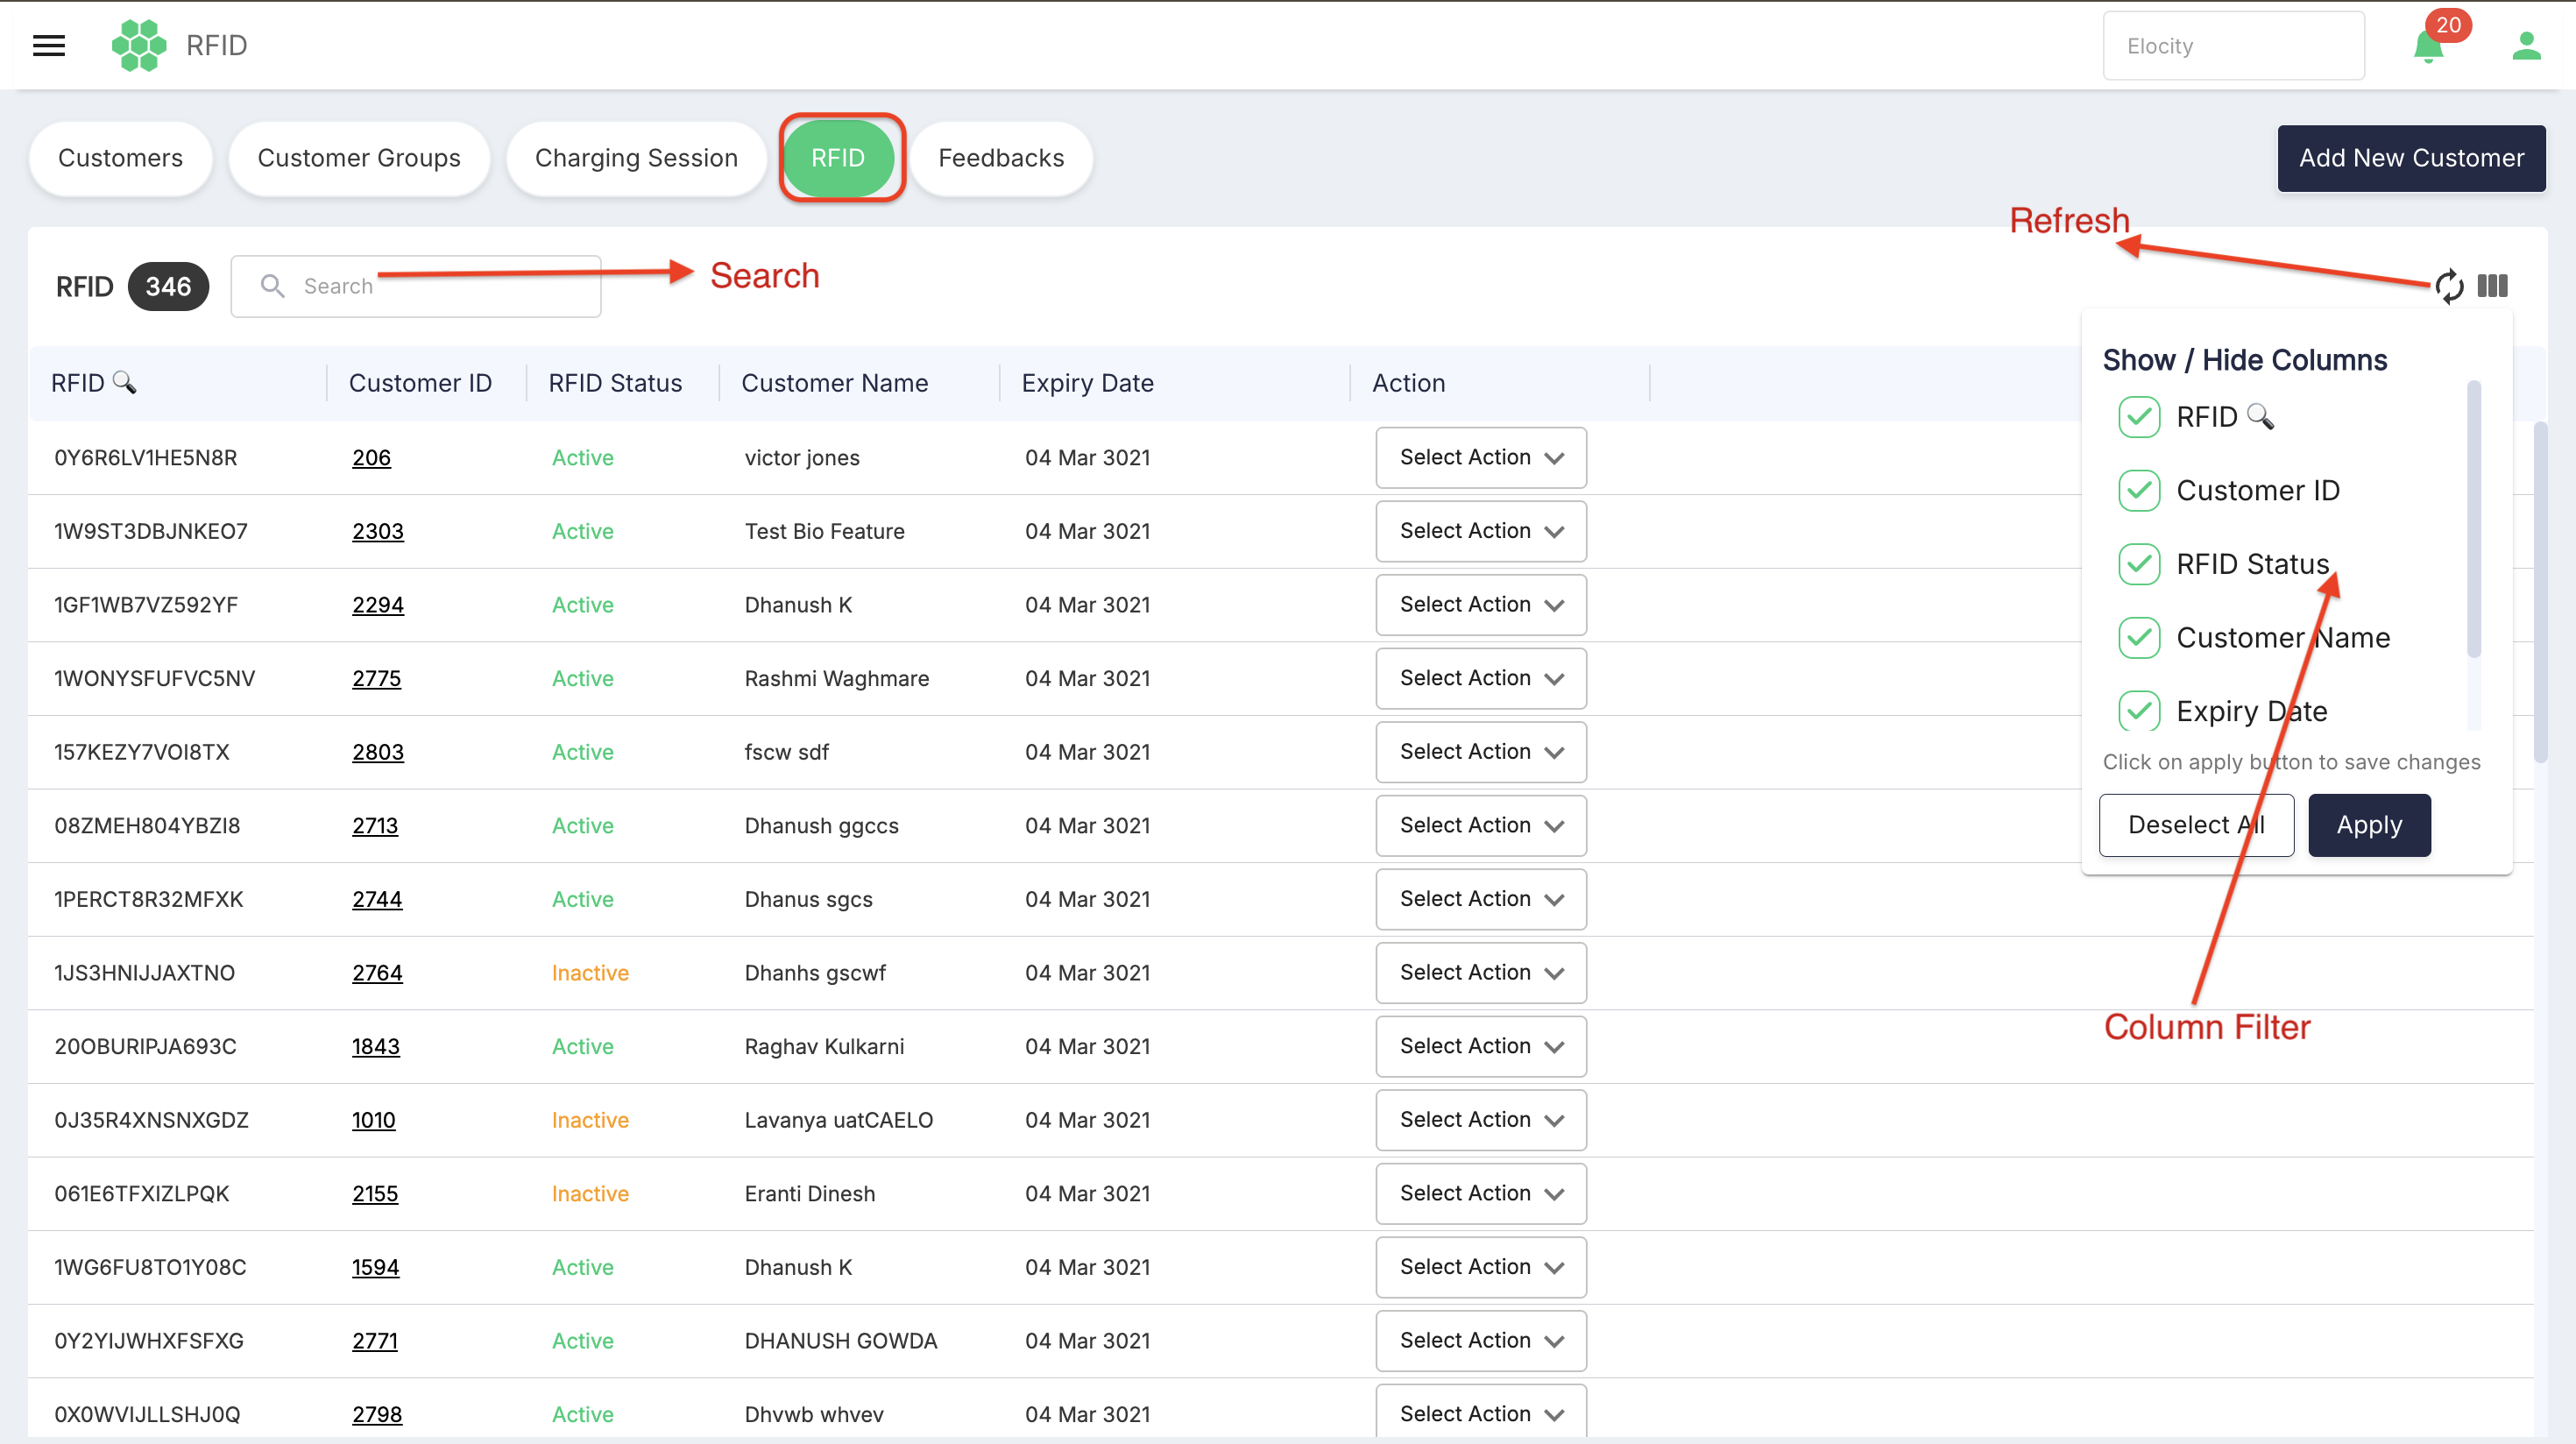
Use Search, Refresh, and Column Filter to locate and organize RFID records.
Editing an RFID
-
Locate the required RFID.
-
Open Select Action.
-
Select Edit.
-
Review or update:
- RFID
- Status
- Expiry Date
-
Enter the expiry date in the displayed
dd-mm-yyyyformat. -
Select Save.
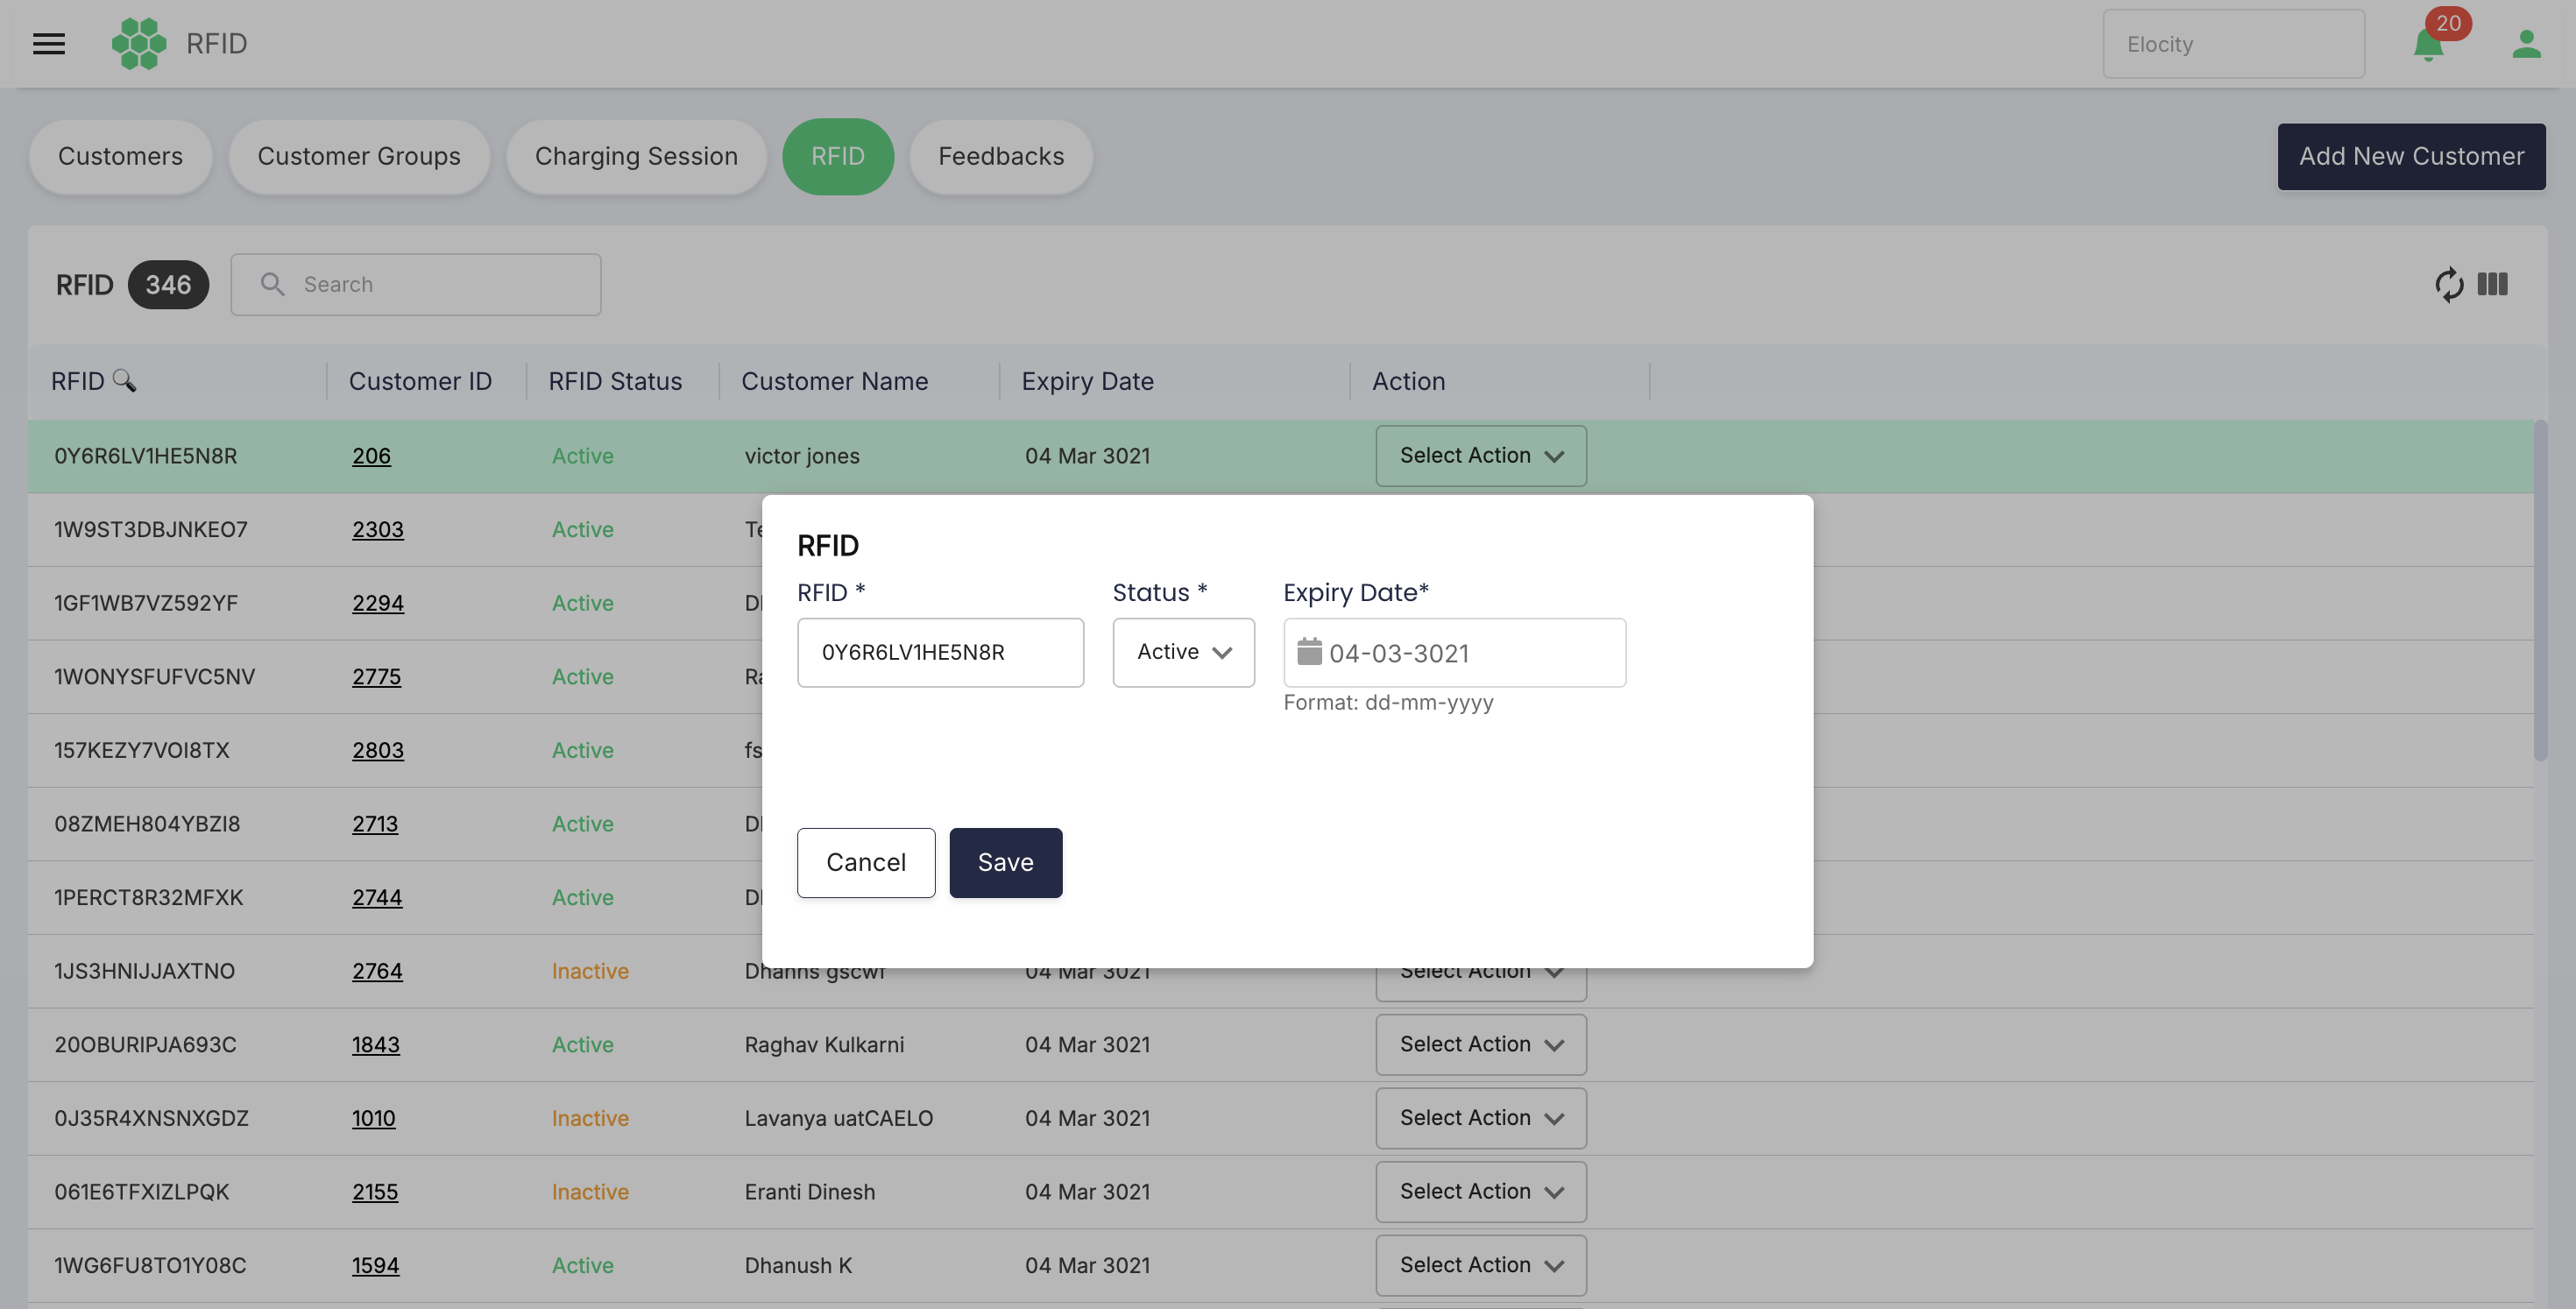
Select Cancel to close the dialog without saving.
Deleting an RFID
- Locate the required RFID.
- Confirm the RFID value, Customer ID, and Customer Name.
- Open Select Action.
- Select Delete.
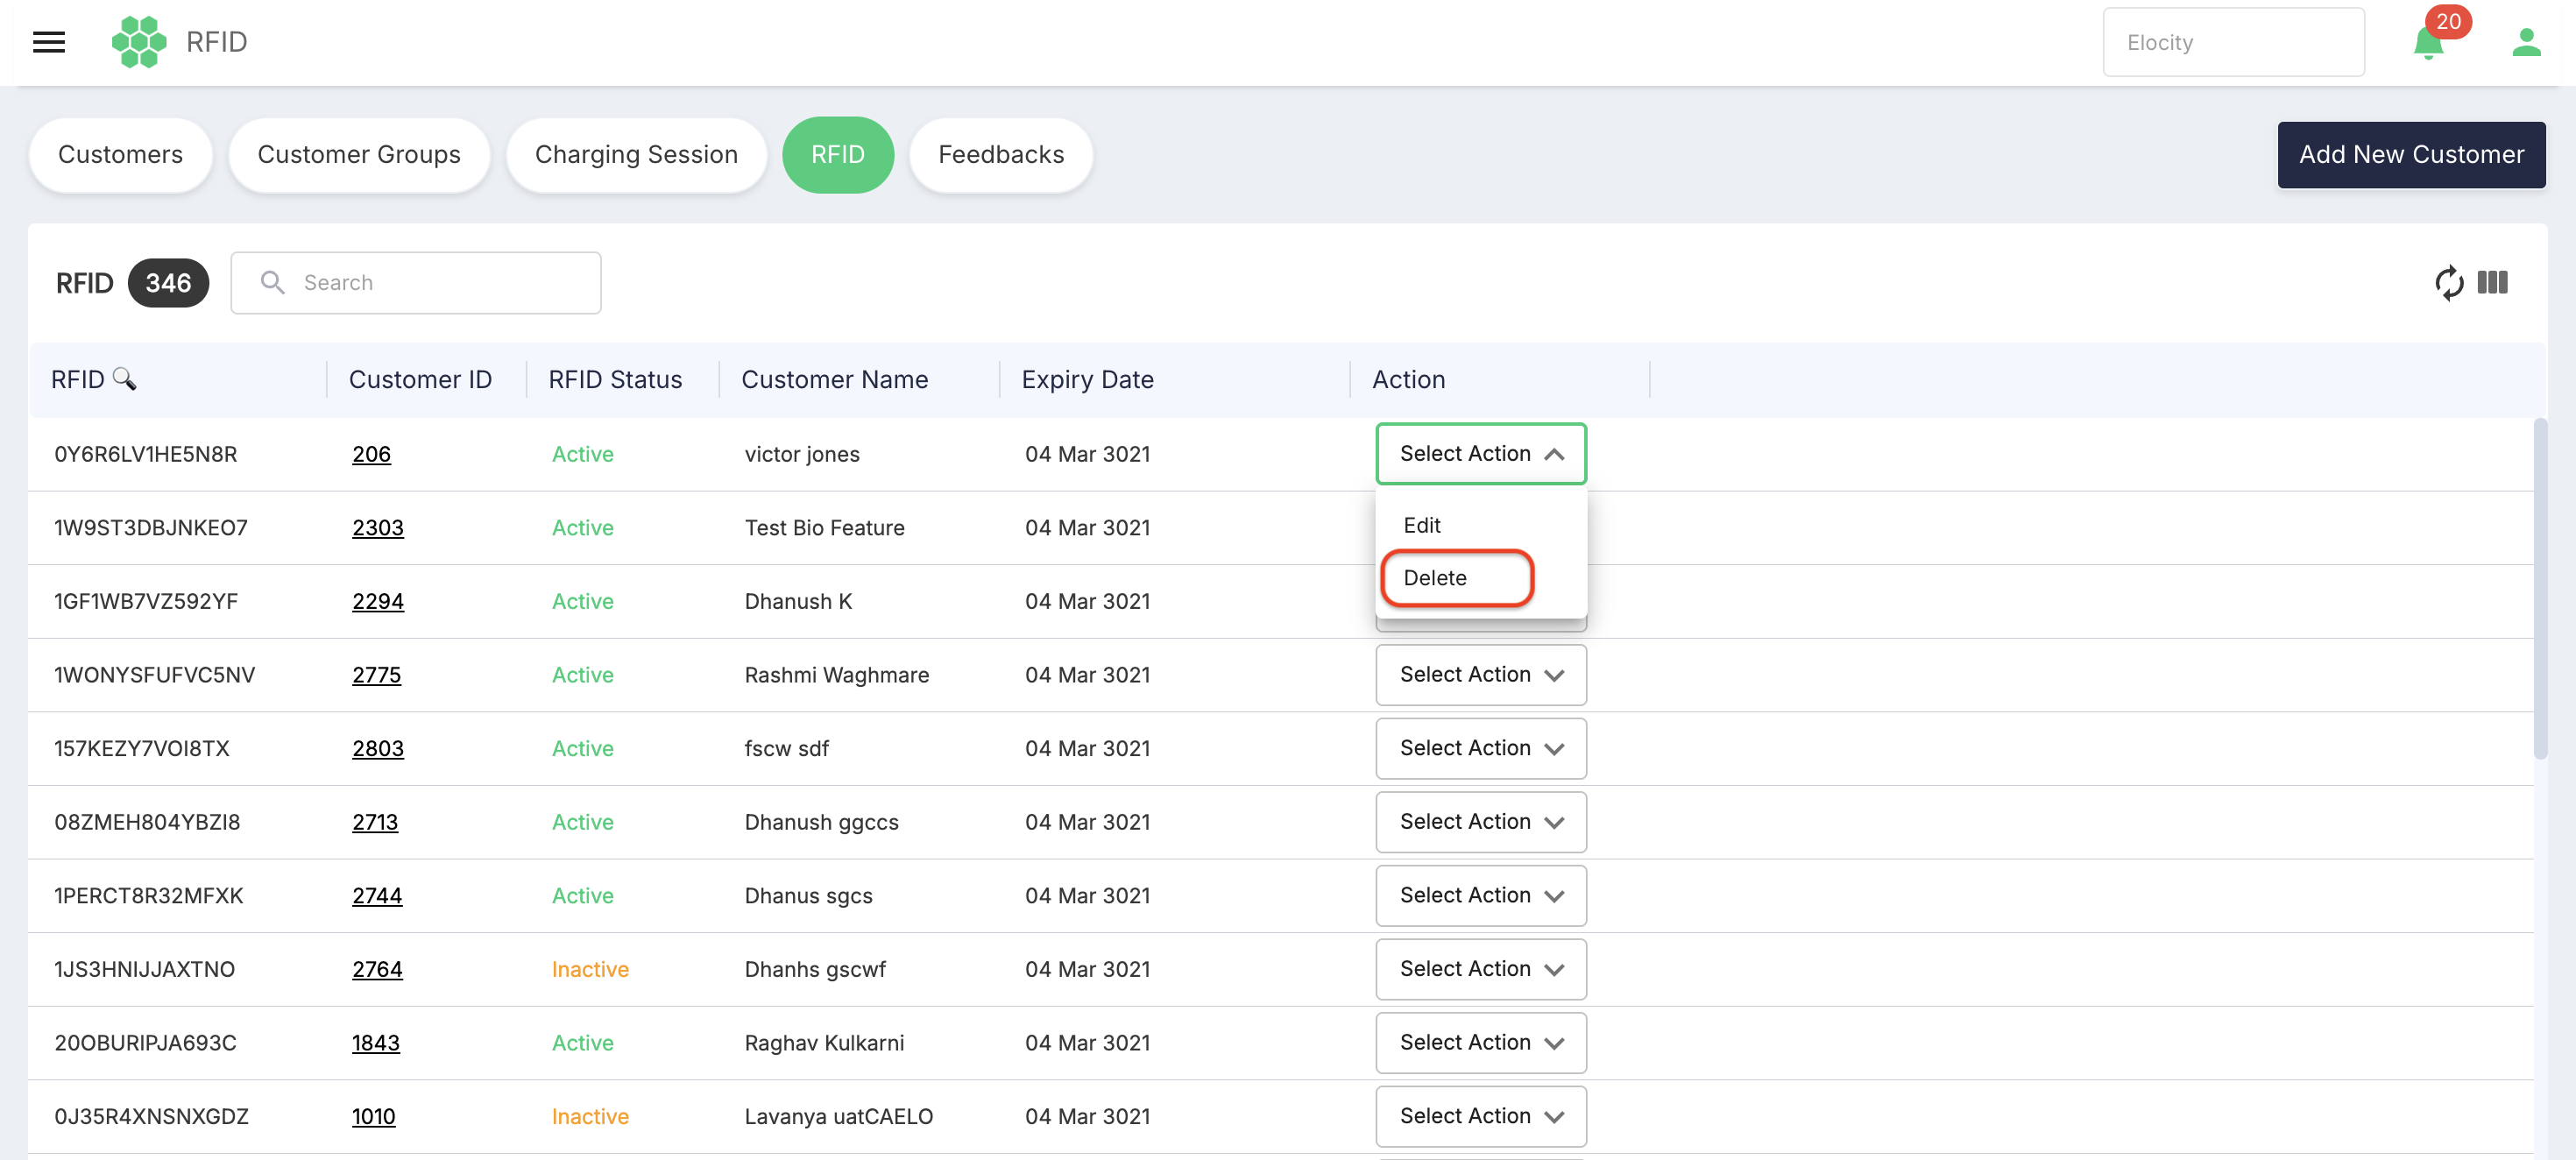
- Review the confirmation before proceeding.
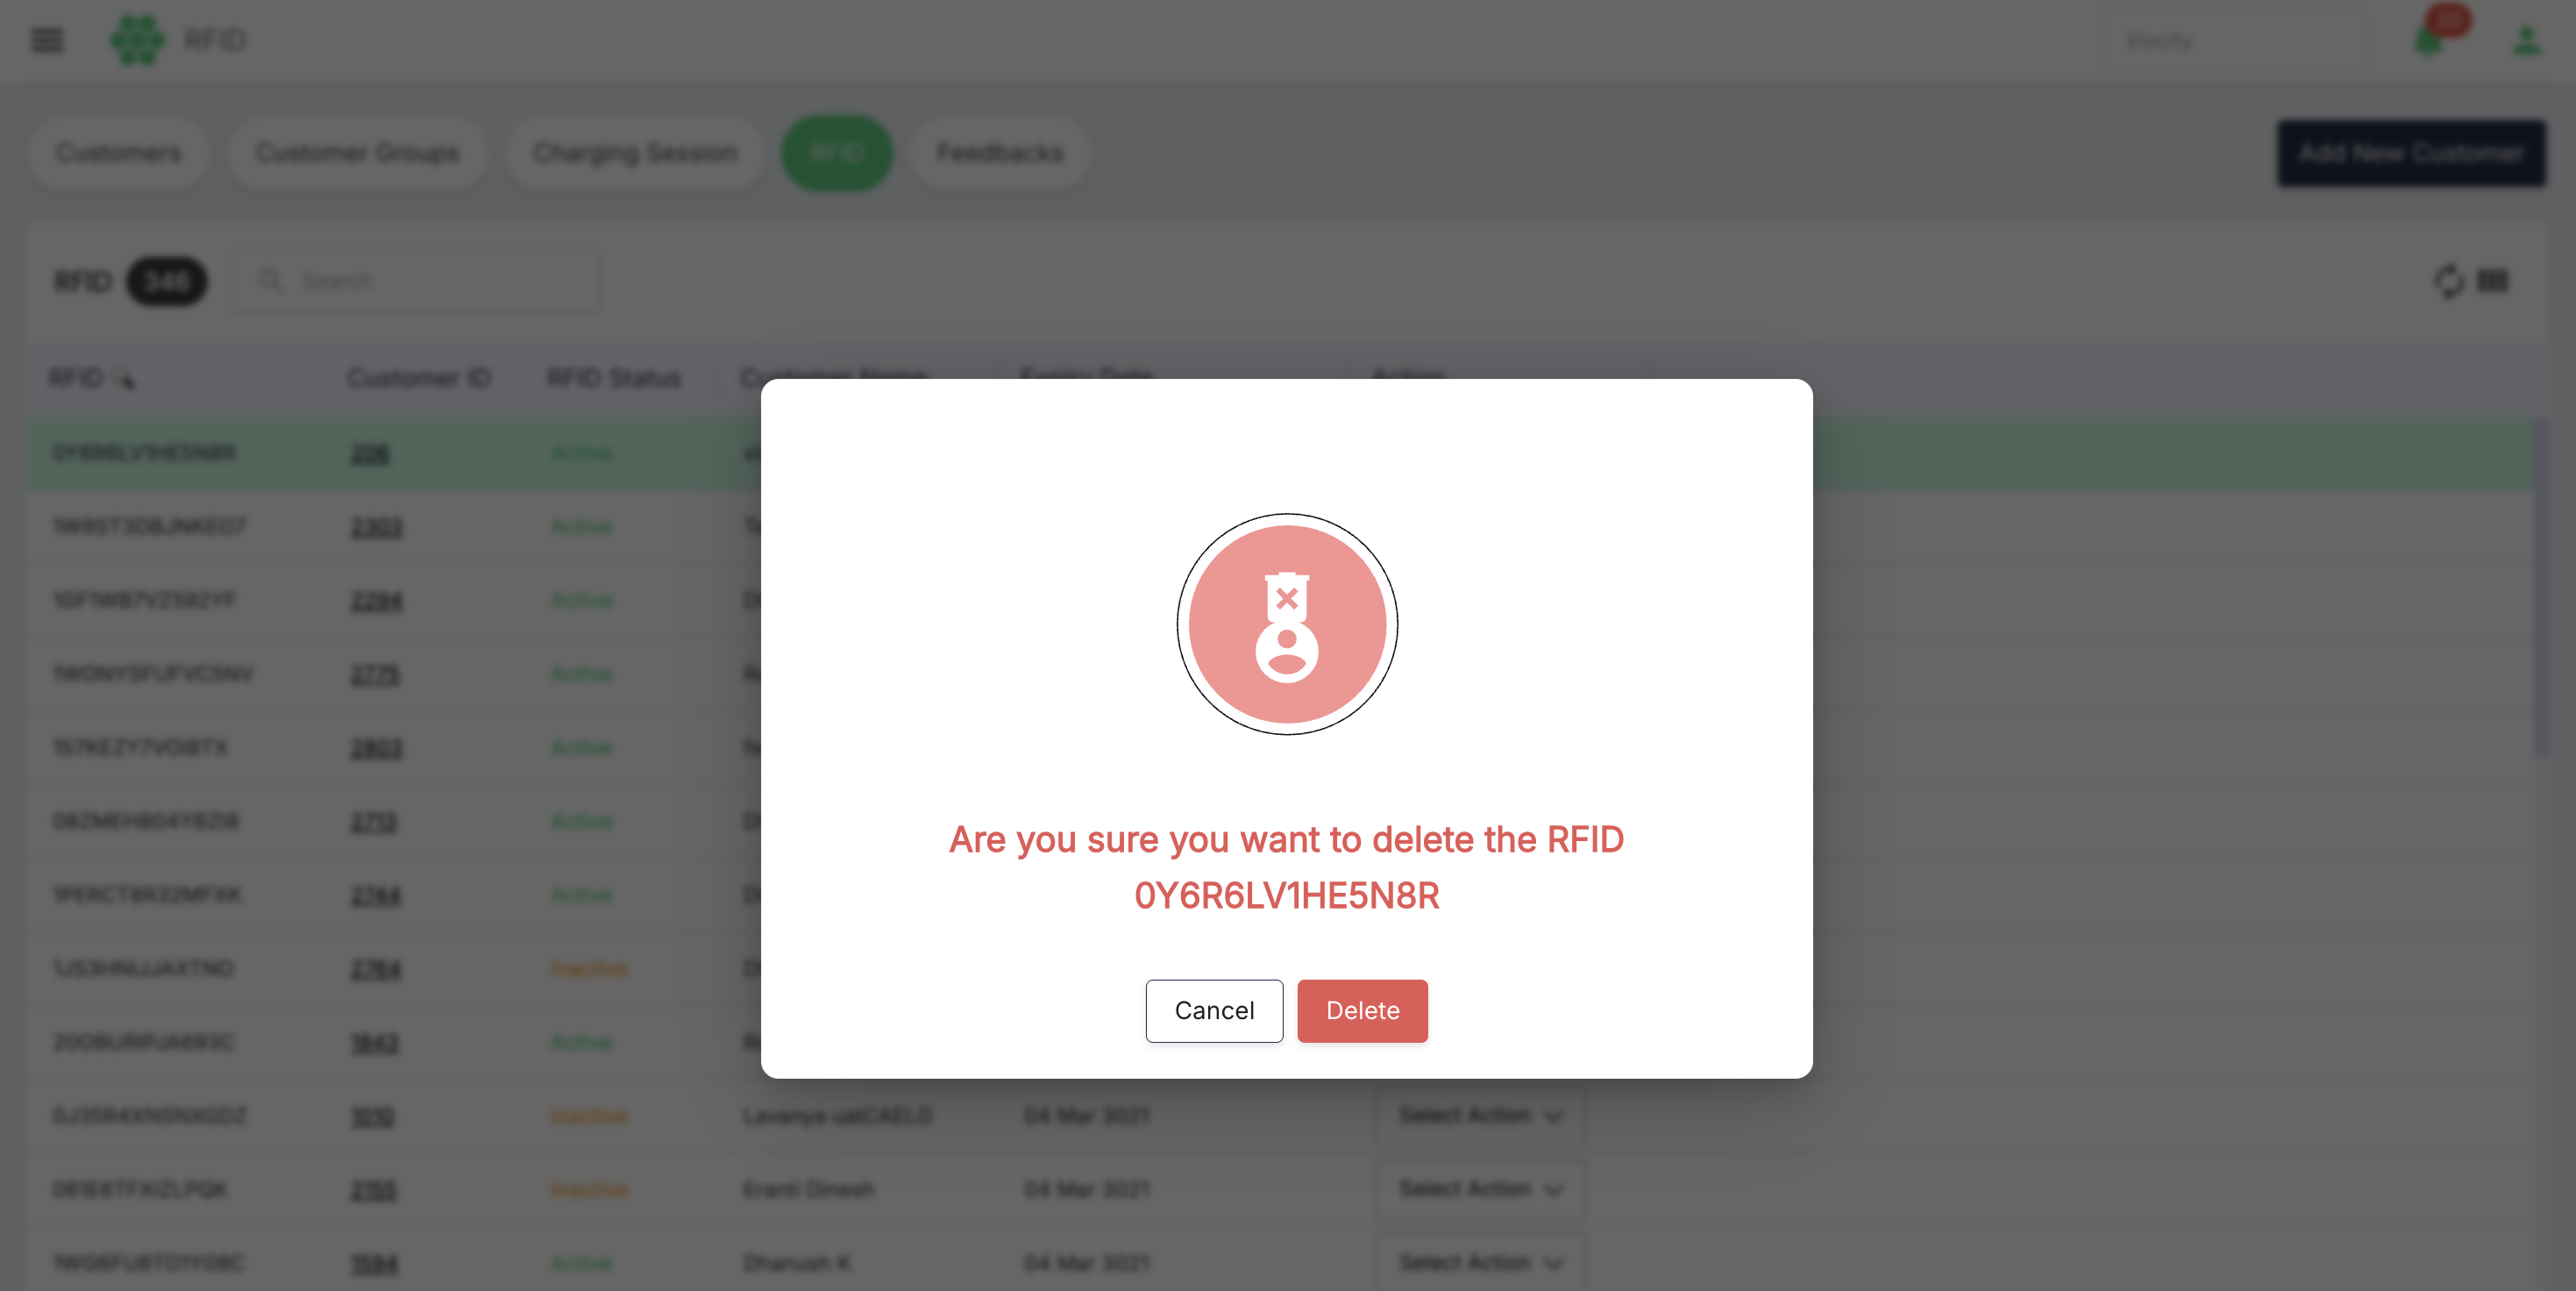
The default RFID expiry is intentionally set to a date far in the future—beyond a normal human lifetime. The inspected data included an expiry year of 3021.
Feedbacks page
The Feedbacks page centralizes customer ratings and reviews.
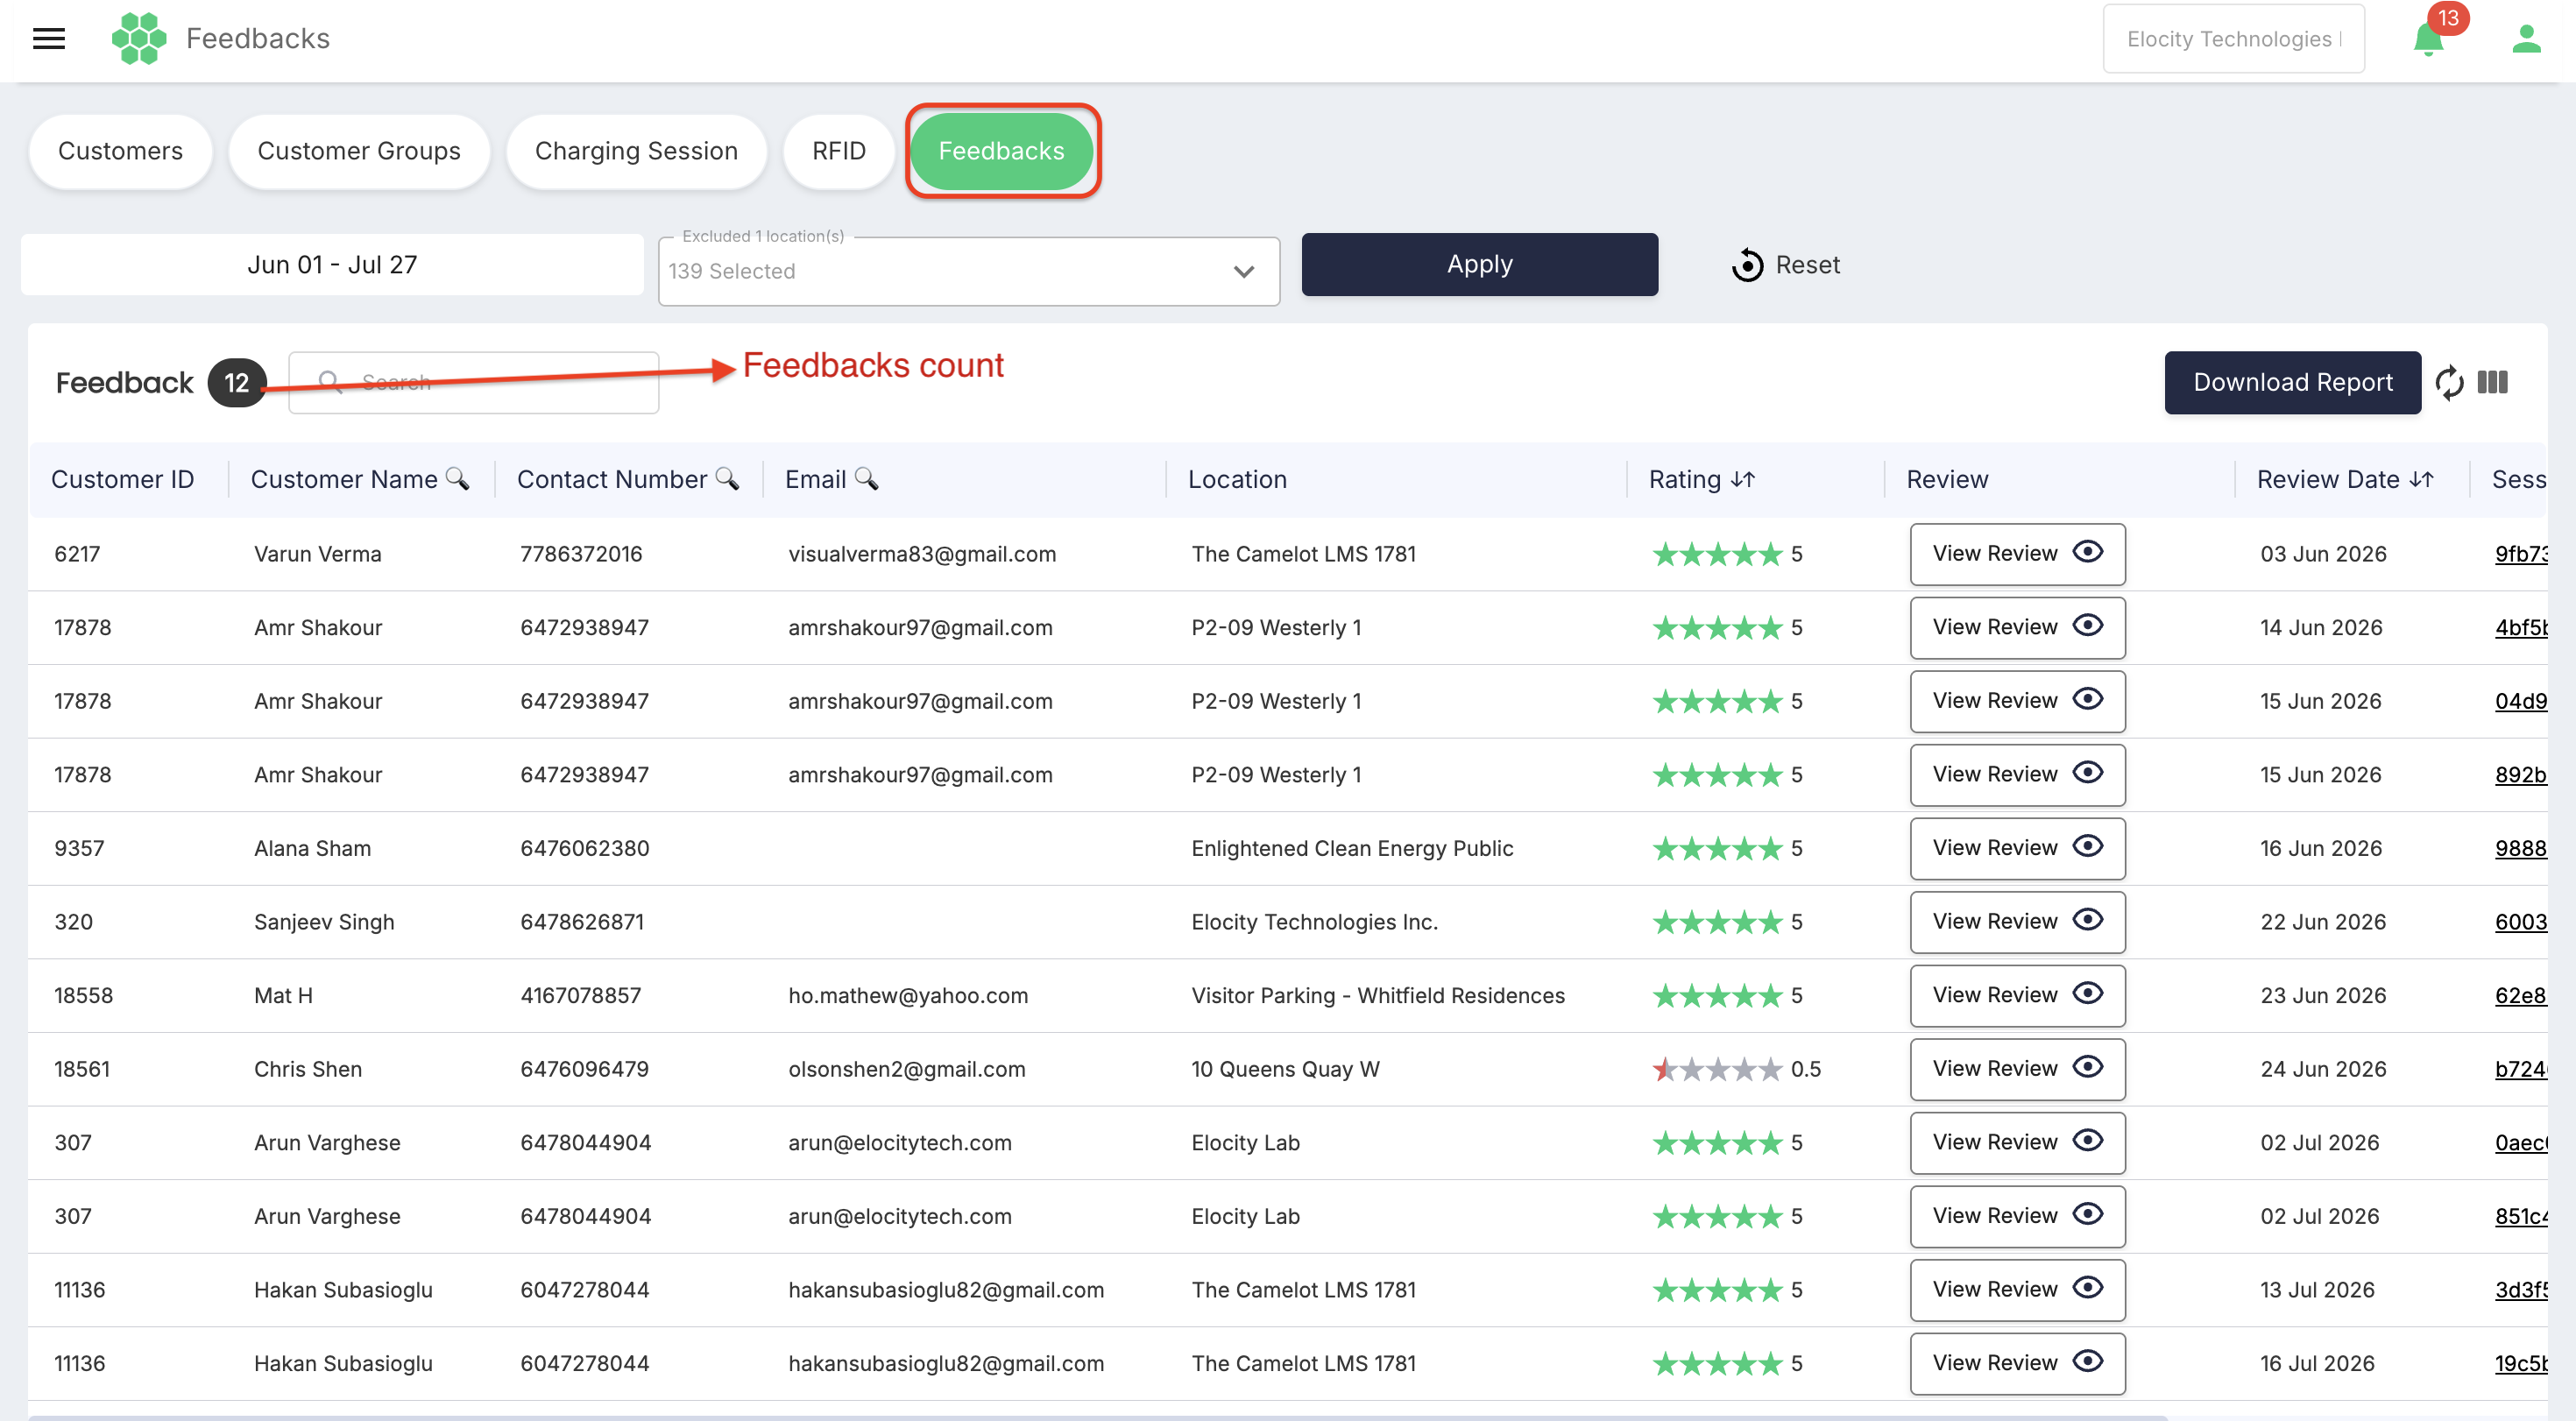
The Feedback counter shows the number of records returned for the current filters.
Feedback filters
| Filter | Description |
|---|---|
| Date range | Limits feedback by review date. |
| All Locations | Limits feedback to selected charging locations. |
| Apply | Retrieves feedback for the selected criteria. |
| Reset | Clears the page-level filter selections. |
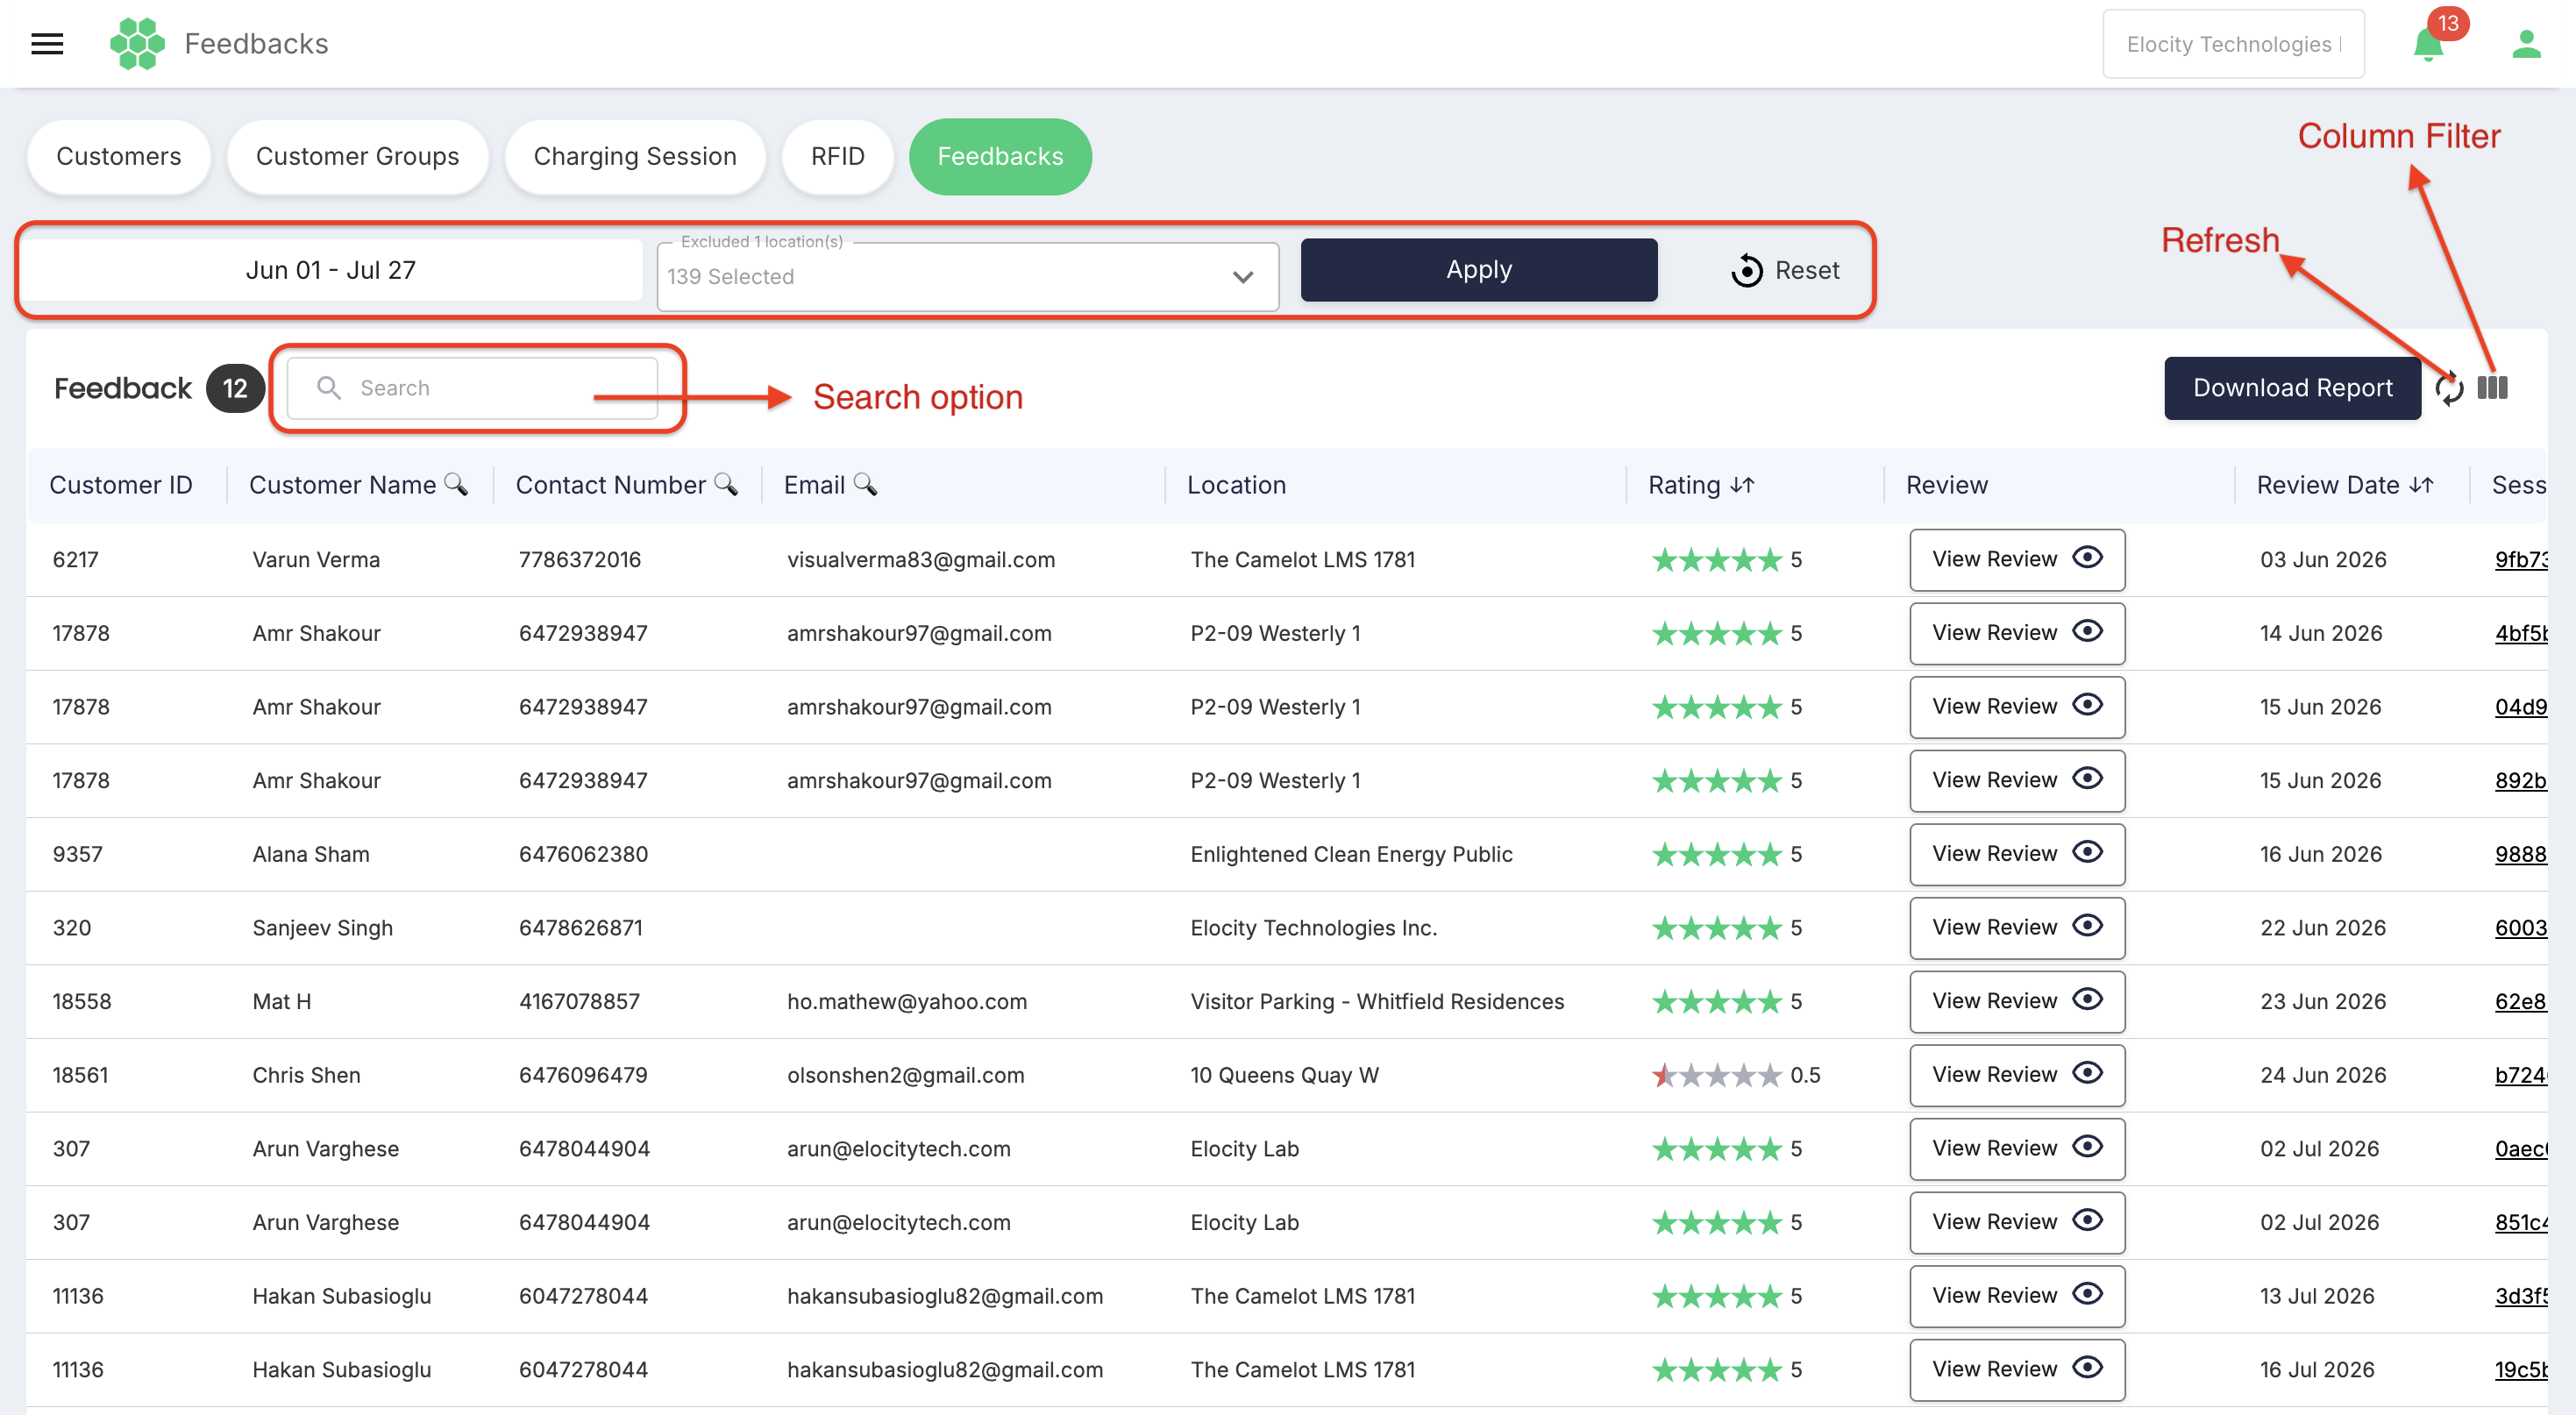
Use Search to filter the displayed feedback records.
Select Refresh to request the latest feedback data.
Use Column Filter to control the visible feedback columns.
Feedback grid
| Column | Description |
|---|---|
| Customer ID | Shows the customer identifier. |
| Customer Name | Shows the customer display name. A column-search control is available. |
| Contact Number | Shows the customer phone number. A column-search control is available. |
| Shows the customer email. A column-search control is available. | |
| Location | Shows the location associated with the feedback. |
| Rating | Shows the customer rating. Sort controls are available. |
| Review | Shows the written review or review control. |
| Review Date | Shows when the review was submitted. Sort controls are available. |
| Session ID | Shows the related charging-session identifier. |
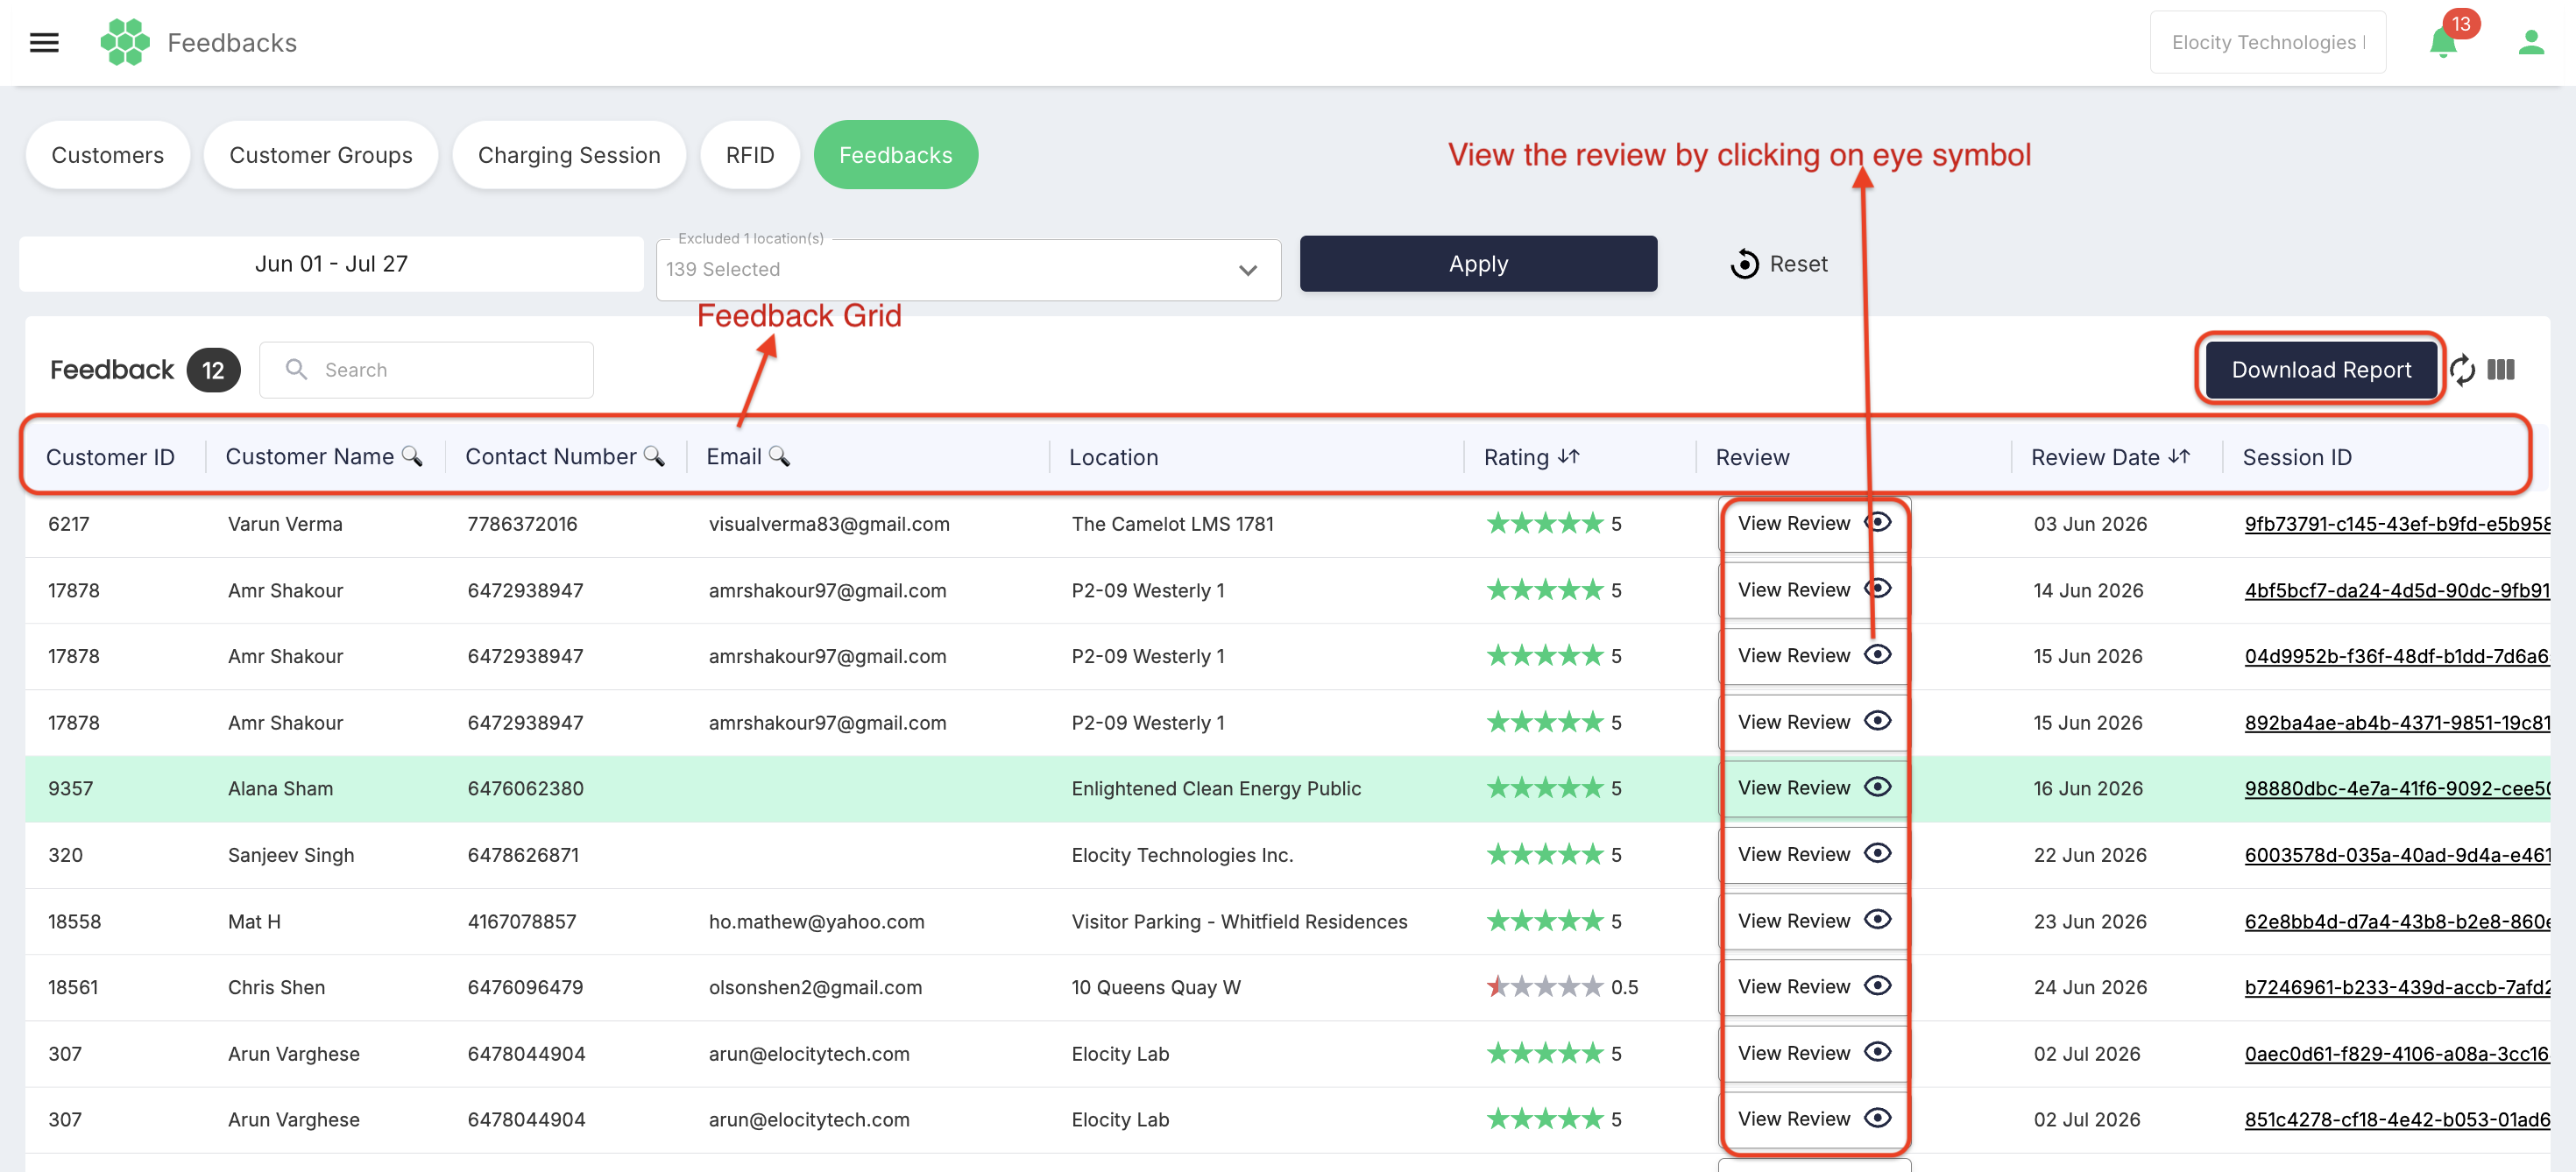
The inspected business had no feedback records.
When feedback records are available, the page provides:
- Download Report for downloading feedback in CSV format.
- View Review for opening an individual review in a new window.
The downloaded CSV report is limited to the currently applied filters. These populated-record actions were not displayed in the inspected empty state.
Recommended operating workflow
- Confirm the selected business.
- Open Customers > Active Customers and verify the customer count.
- Use Search or column search to locate the required customer.
- Match the record using Customer ID and at least one contact field.
- Open View before editing, deleting, recovering, or migrating a customer.
- Review Info, RFID, Feedback, e-Wallet, and Charging Session as required.
- Add or edit customer details only after verifying the source information.
- Use customer groups to maintain operational segmentation.
- Verify selected records before adding or removing group members.
- For corporate migration, verify the selected-customer count and destination corporate/group.
- Apply the required Charging Session filters before downloading a report or using invoice actions.
- Confirm the customer and recipient before emailing an invoice.
- Verify RFID value, customer association, status, and expiry before editing or deleting a credential.
- Refresh the relevant page after a change and confirm that the expected state is displayed.
Interpretation and safety notes
- The selected business defines the organizational scope of the displayed records.
- Search applies to the current page or filtered result set.
- Column visibility changes the grid layout; it does not remove underlying data.
- A blank field can mean that the information was not provided or is not associated with the record.
- Account deletion moves the customer to Inactive Customers for a 180-day retention period. Historical charging sessions and associated RFID records remain available while the account is inactive.
- Account recovery returns the customer to Active Customers and reactivates the existing customer configuration.
- Customer-group creation and membership are separate operations in the current interface.
- Corporate migration is reversible and can give the customer access to designated corporate chargers and exclusive corporate pricing. Verify the destination before migrating.
- View Balance shows the current displayed balance. The e-Wallet is created automatically at account creation, and its records include all wallet-related debits and credits.
- Transaction reports, invoices, and customer exports can contain personal or payment-related information.
- Email Invoice can transmit customer information externally. Verify the intended recipient before using it.
- All charging-session payments are eligible for operator-reviewed refunds. A refund cannot exceed the charging-session cost and is credited to the customer's e-Wallet.
- The default RFID expiry date is intentionally set beyond a normal human lifetime.
- Feedback records provide Download Report and View Review actions when records exist.
- Available records and actions differ between users according to business assignments and RBAC permissions.
Remaining product questions to confirm
- Which customer relationships, other than historical charging sessions and associated RFID records, remain accessible while an account is inactive?
- How does corporate migration affect an existing non-corporate group membership and the customer's prior business visibility?
- What exact labels appear in the e-Wallet Event Type filter?
- What refund audit evidence and mandatory remarks must be retained in addition to the customer support executive's review?
- What exact date is used as the default RFID expiry, and what is the maximum permitted expiry date?
- Which RBAC permission names map to view, add, edit, delete, recover, migrate, export, refund, and invoice-email actions?