Rewards
Application: HIEV Administration Portal
Page: Rewards > Promo Codes
Page URL: https://hiev.ca/ca/promocode-management
Document status: Revised draft based on the live interface, the existing Rewards documentation, and product clarifications reviewed on 24 July 2026
Publication note: The administration procedures in this document were verified in the live portal without saving, launching, deleting, or deactivating a promo code. The customer redemption workflow is released, but it could not be tested end to end because no approved test customer and charger are available. Items that still require product confirmation are listed in Section 16.
1. Overview
Rewards are incentives offered to customers for their loyalty, engagement, or qualifying actions. In the current HIEV Administration Portal, the Rewards module provides Promo Code Management.
Promo Code Management allows an authorized user to:
- View promo codes in the DESIGNED and LAUNCHED stages.
- Add a flat or percentage-based promo code.
- View and edit a designed promo code.
- Delete a designed promo code from edit mode.
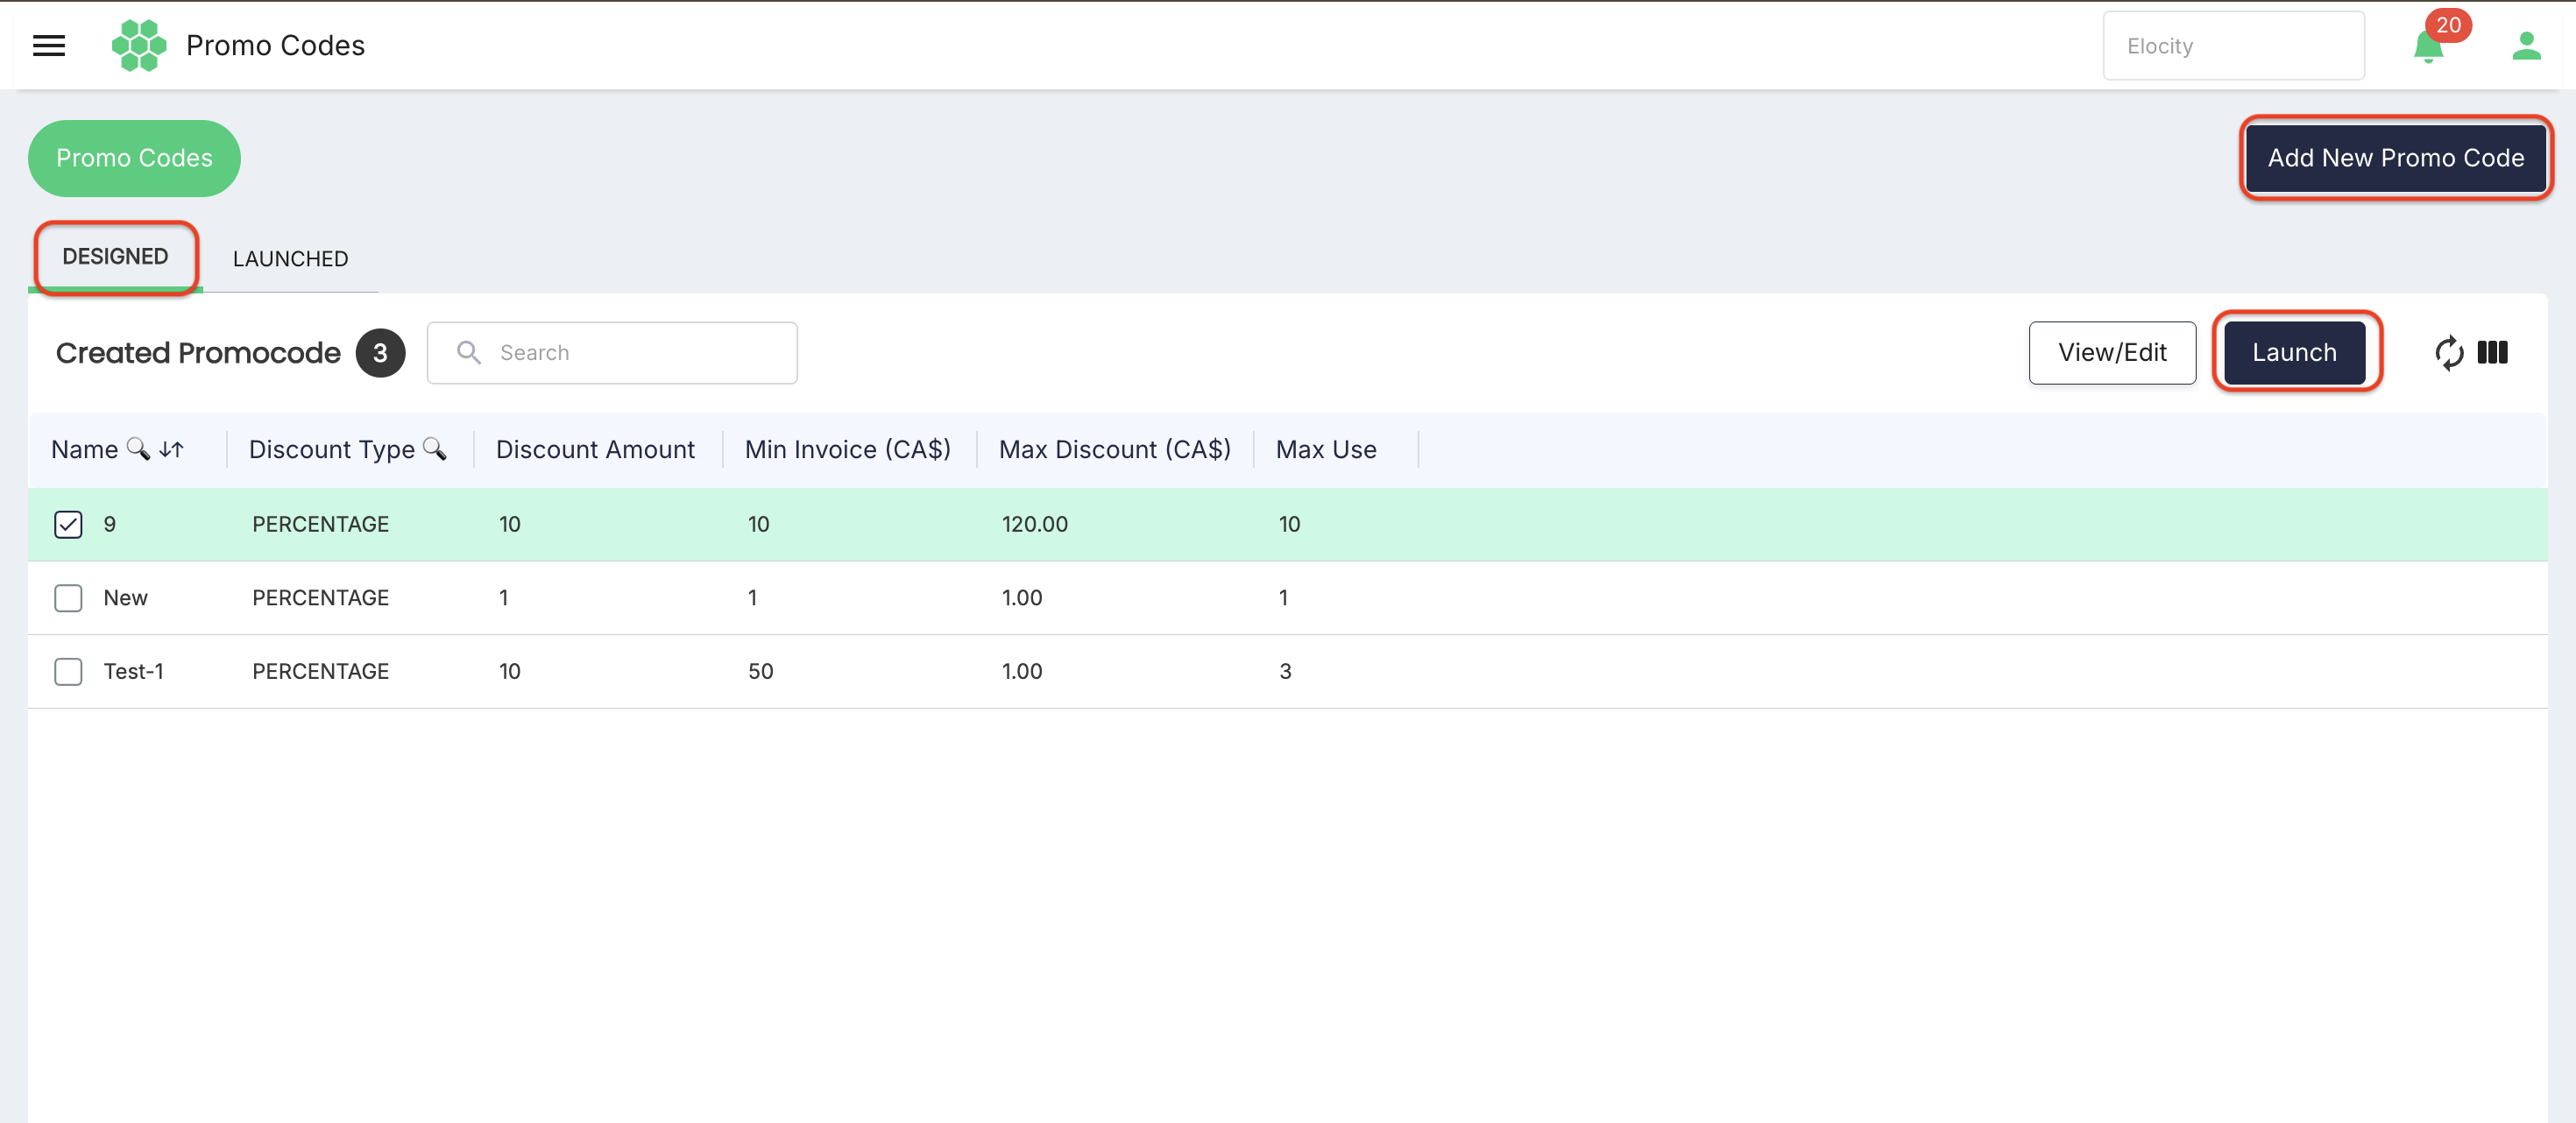
- Launch a designed promo code for selected network locations and a defined period.
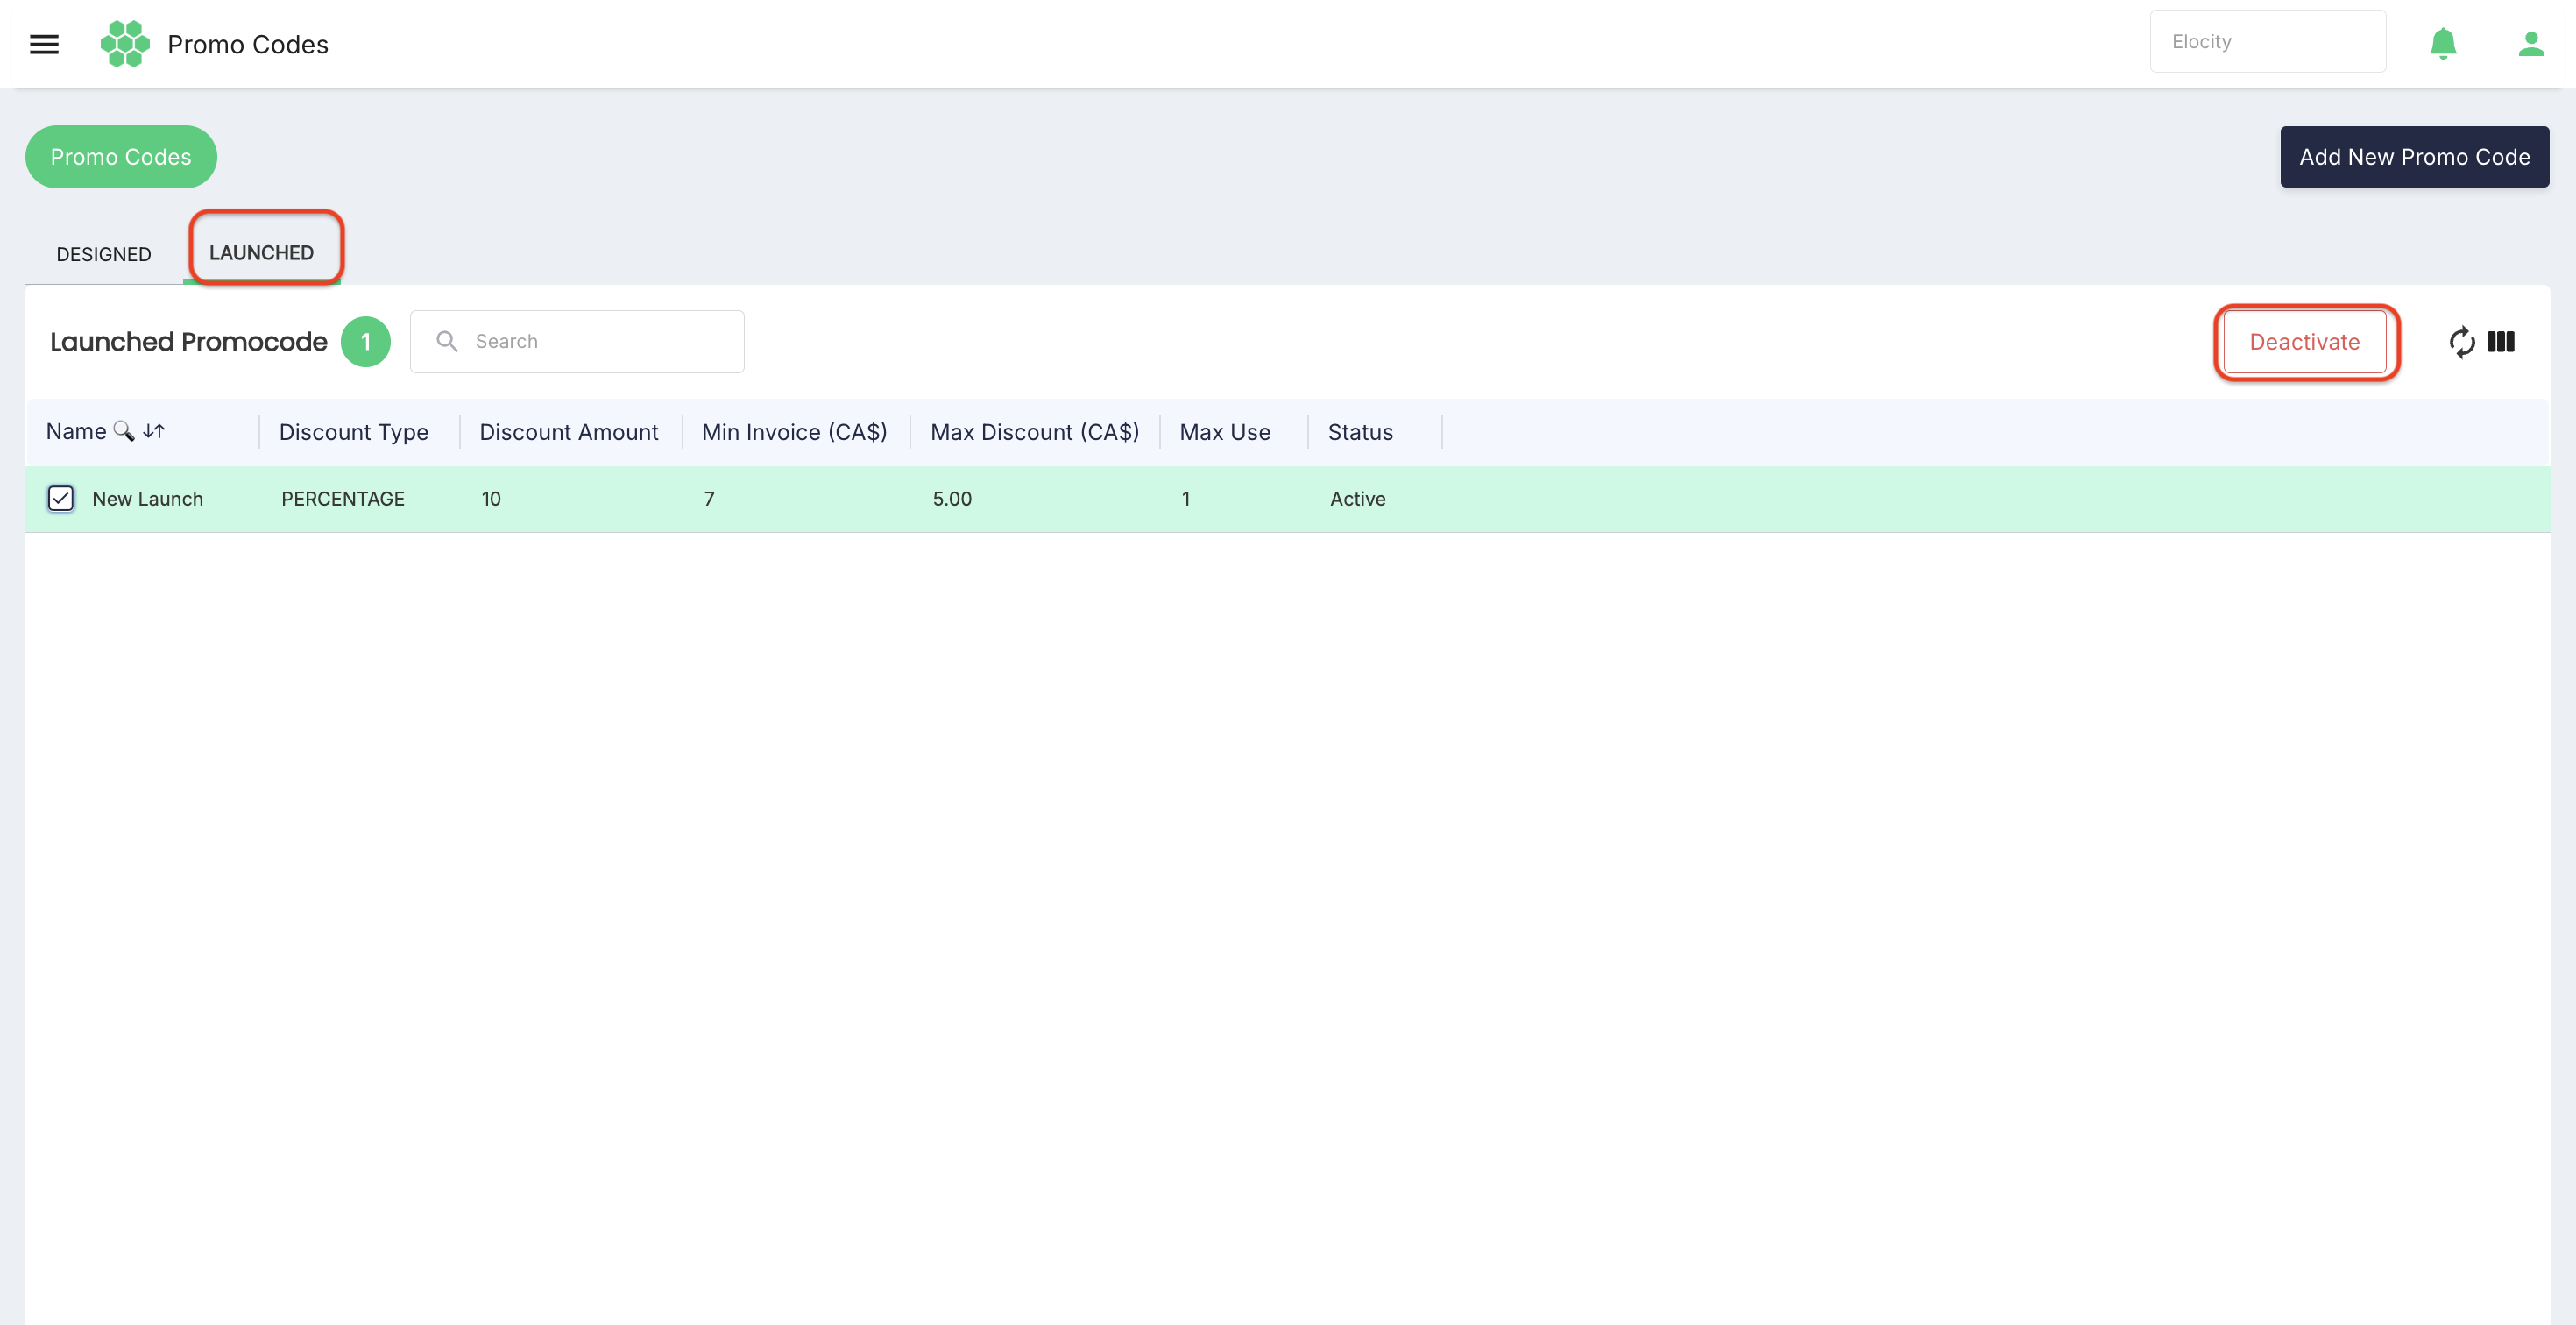
- View launched promo codes and their status.
- Deactivate a selected launched promo code.
- Search, refresh, and control the columns displayed in each promo-code grid.
The current Rewards documentation contains three topics:
- Viewing and Editing Promo Code
- Adding a New Promo Code
- Launching a Promo Code
No other reward type was visible in the current Rewards documentation or on the reviewed Promo Codes page.
2. Promo-Code Lifecycle
A promo code moves through the following administrative stages:
- Create — enter the promo-code discount and usage rules.
- Designed — review, edit, delete, or prepare the promo code for launch.
- Launch — assign a launch name, network locations, and launch period.
- Launched — make the launched promotion available to the applicable customer flow.
- Deactivate — stop a launched promo code according to the system's deactivation rules.
Creating a promo code does not launch it. A saved promo code first appears under DESIGNED and must be launched separately.
3. Accessing Promo Codes
To open Promo Code Management, follow these steps:
- Sign in to the HIEV Administration Portal.
- Navigate to Rewards > Promo Codes.
- Verify the business displayed in the business selector.
- Select DESIGNED or LAUNCHED, depending on the required task.
Business selector
Promo-code lists are displayed in the selected business context.
- Select the current business name.
- Use Search... to find a business, if required.
- Select the required business.
- Review the refreshed promo-code list.
The reviewed account displayed multiple available businesses. The exact relationship between a promo code, its owning business, and the network locations selected during launch requires confirmation.
4. Promo Codes Page
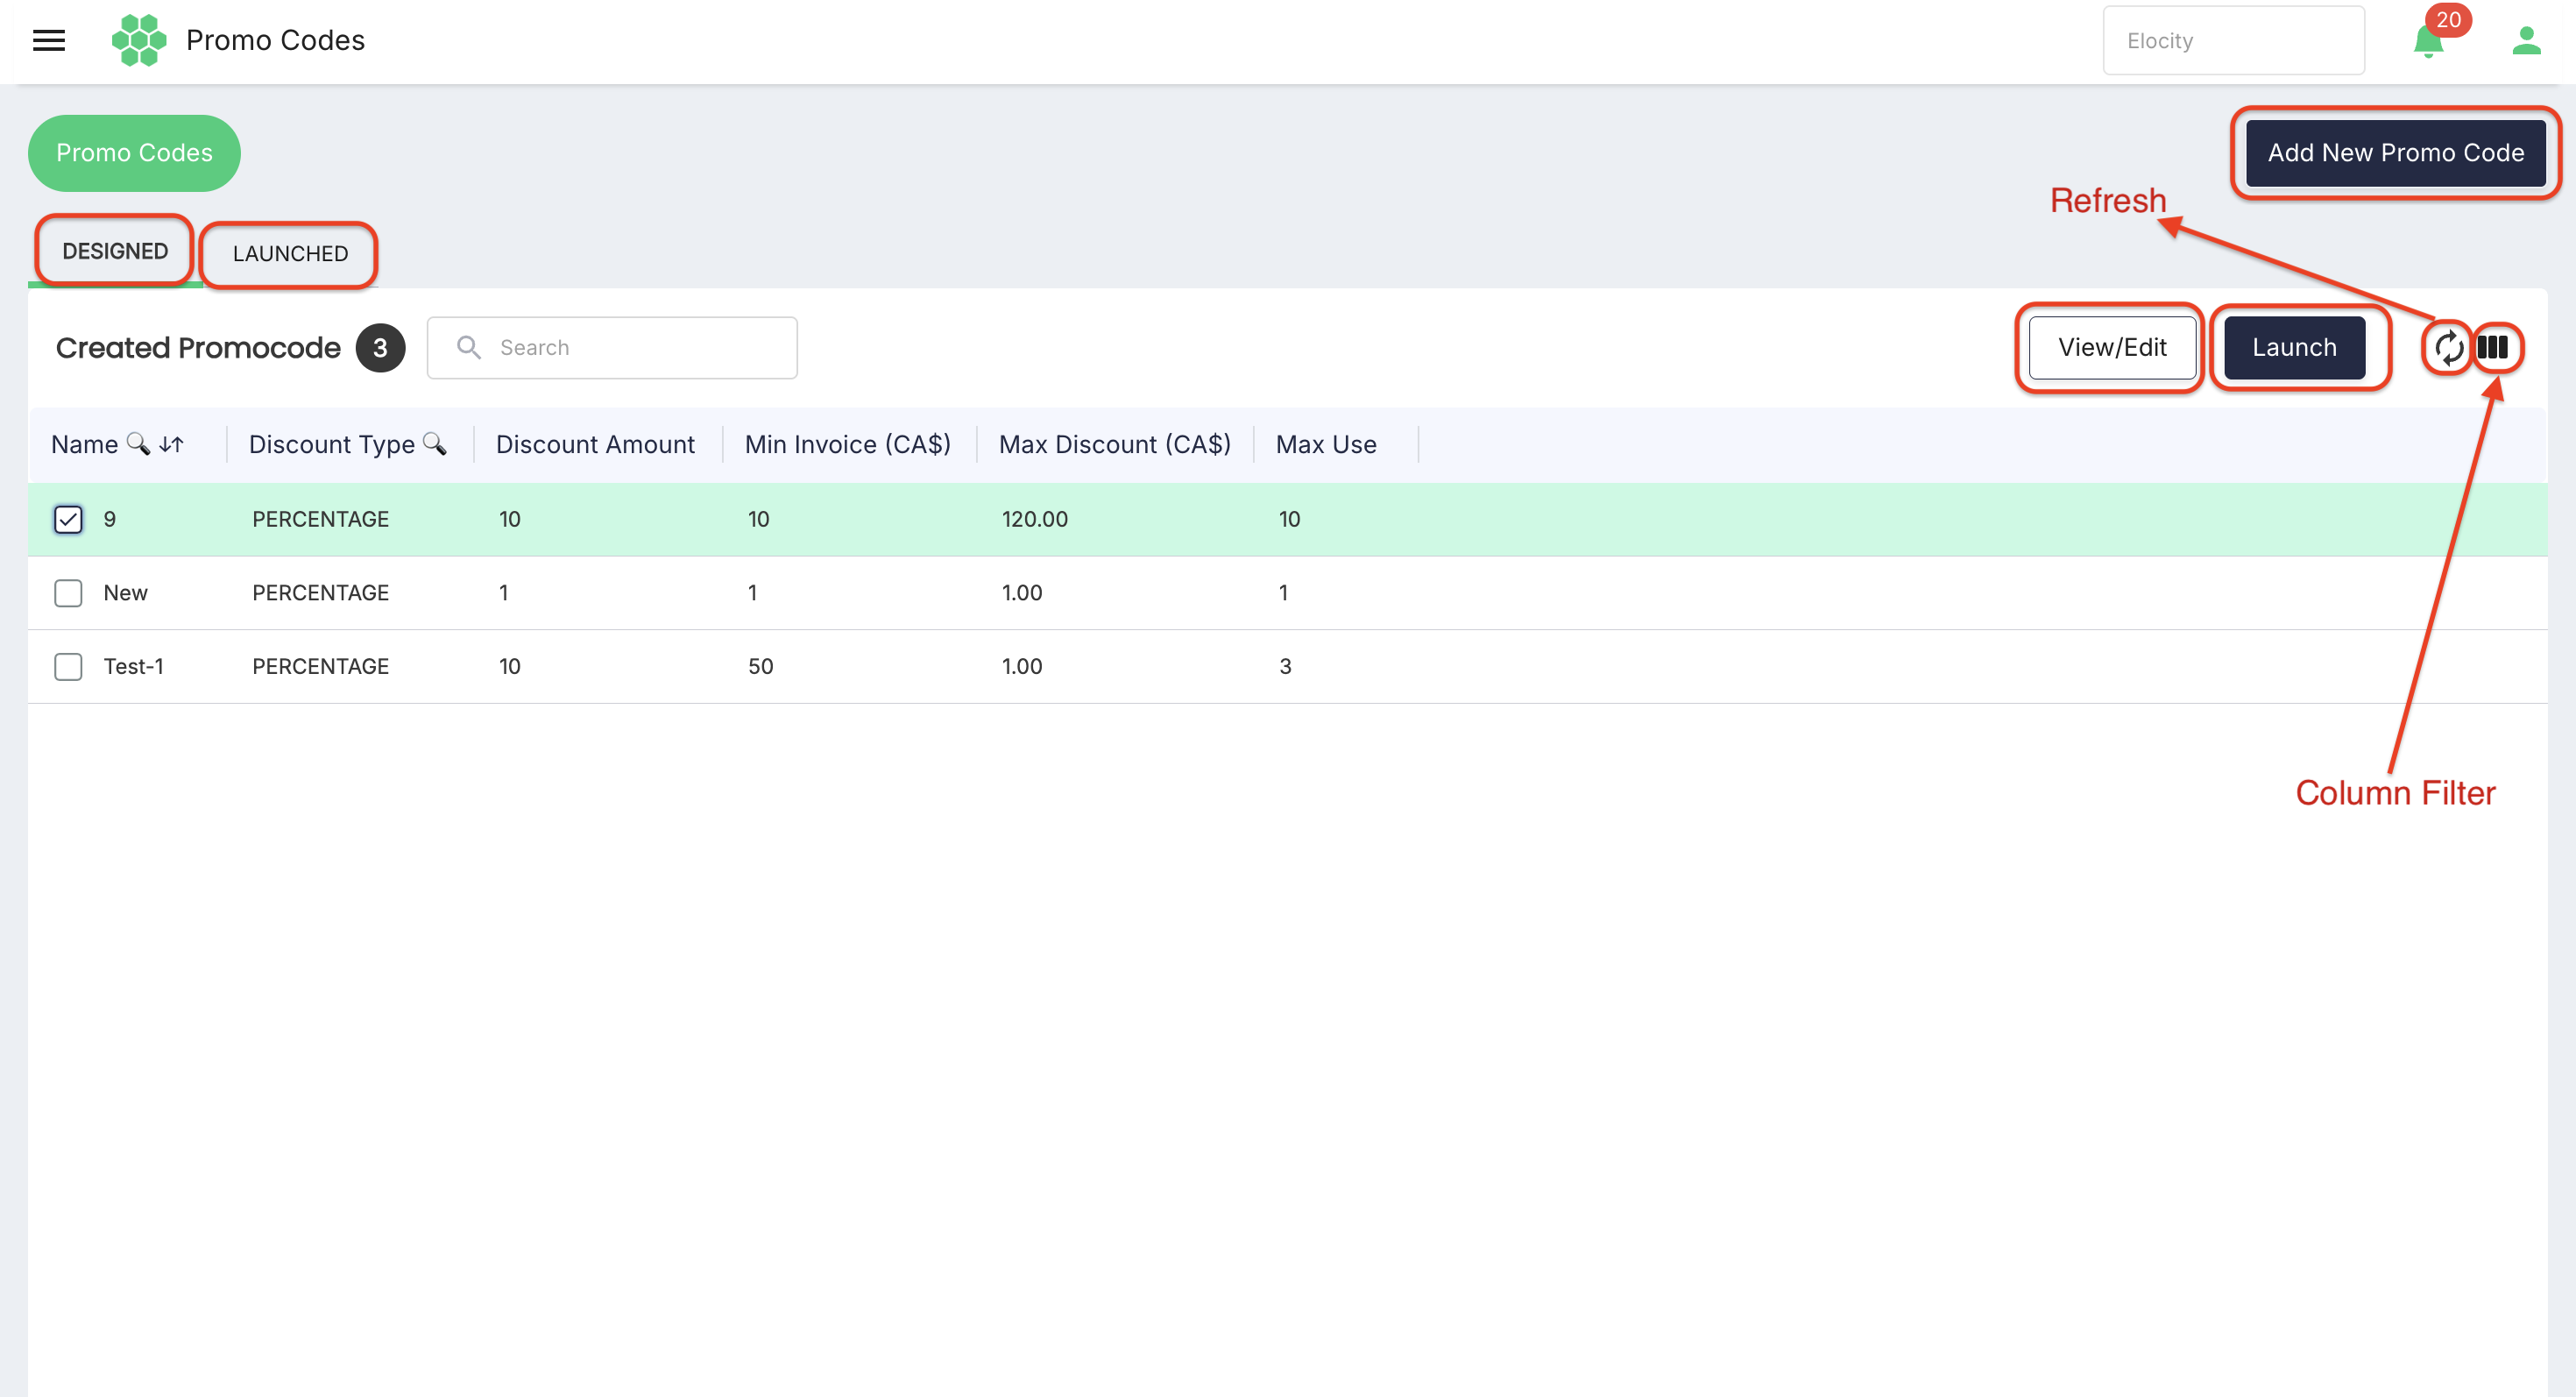
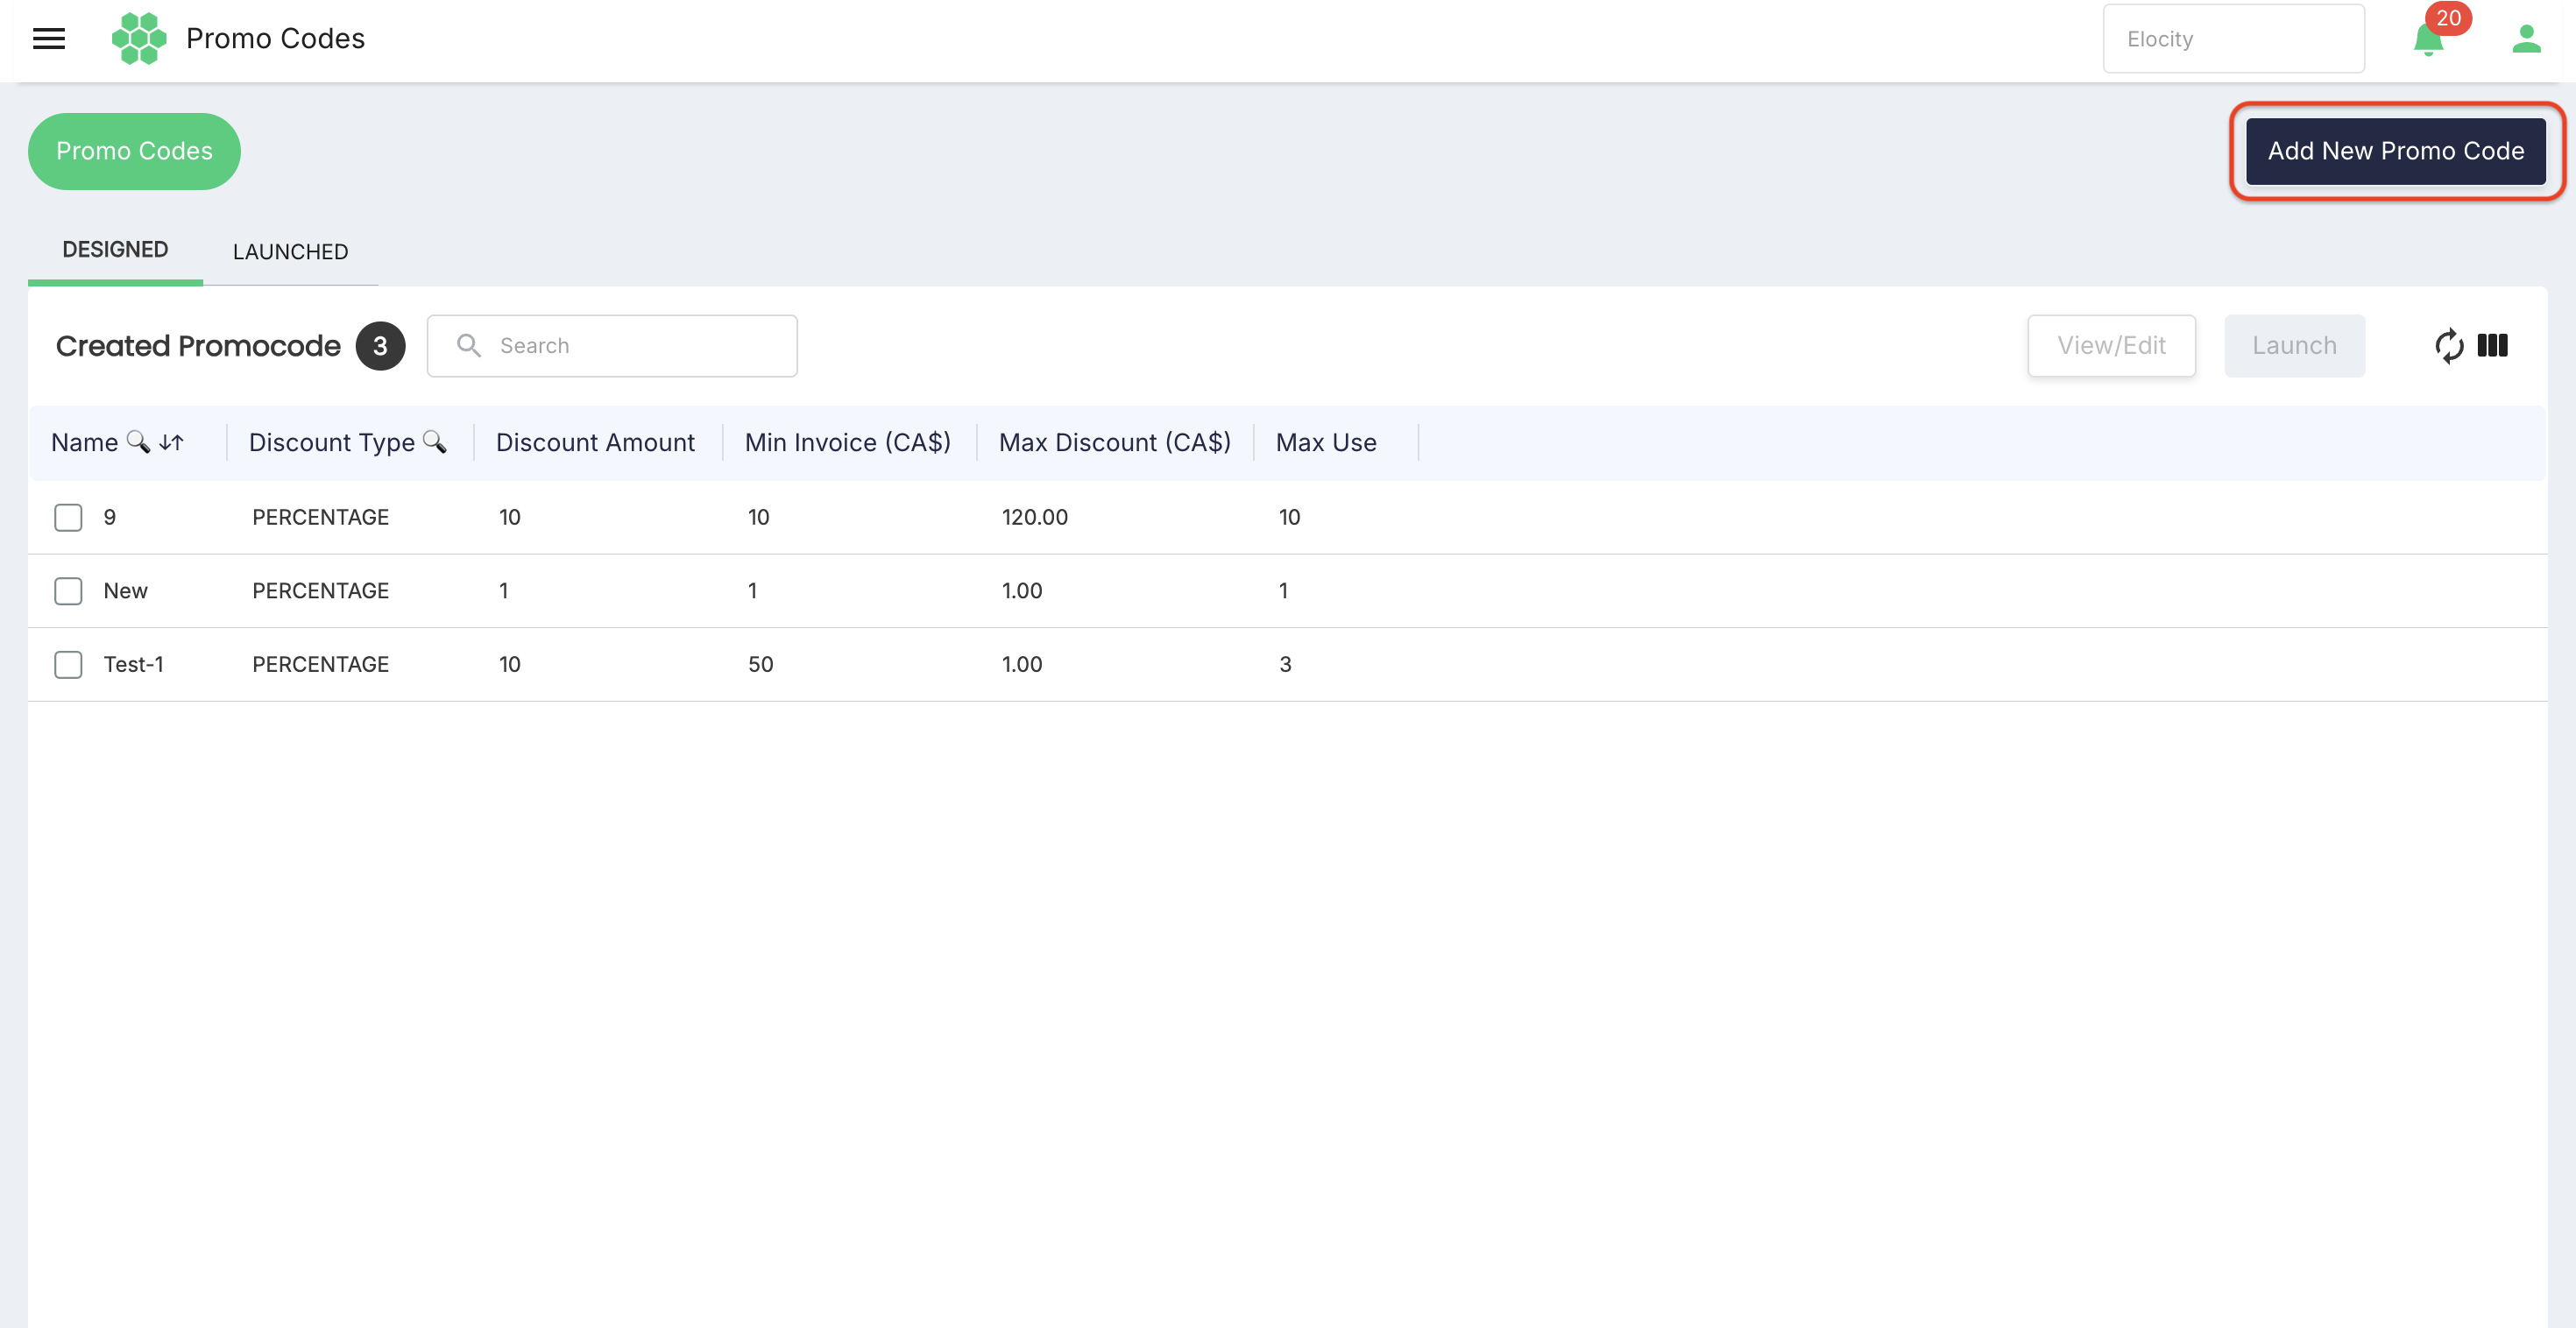
The Promo Codes page contains:
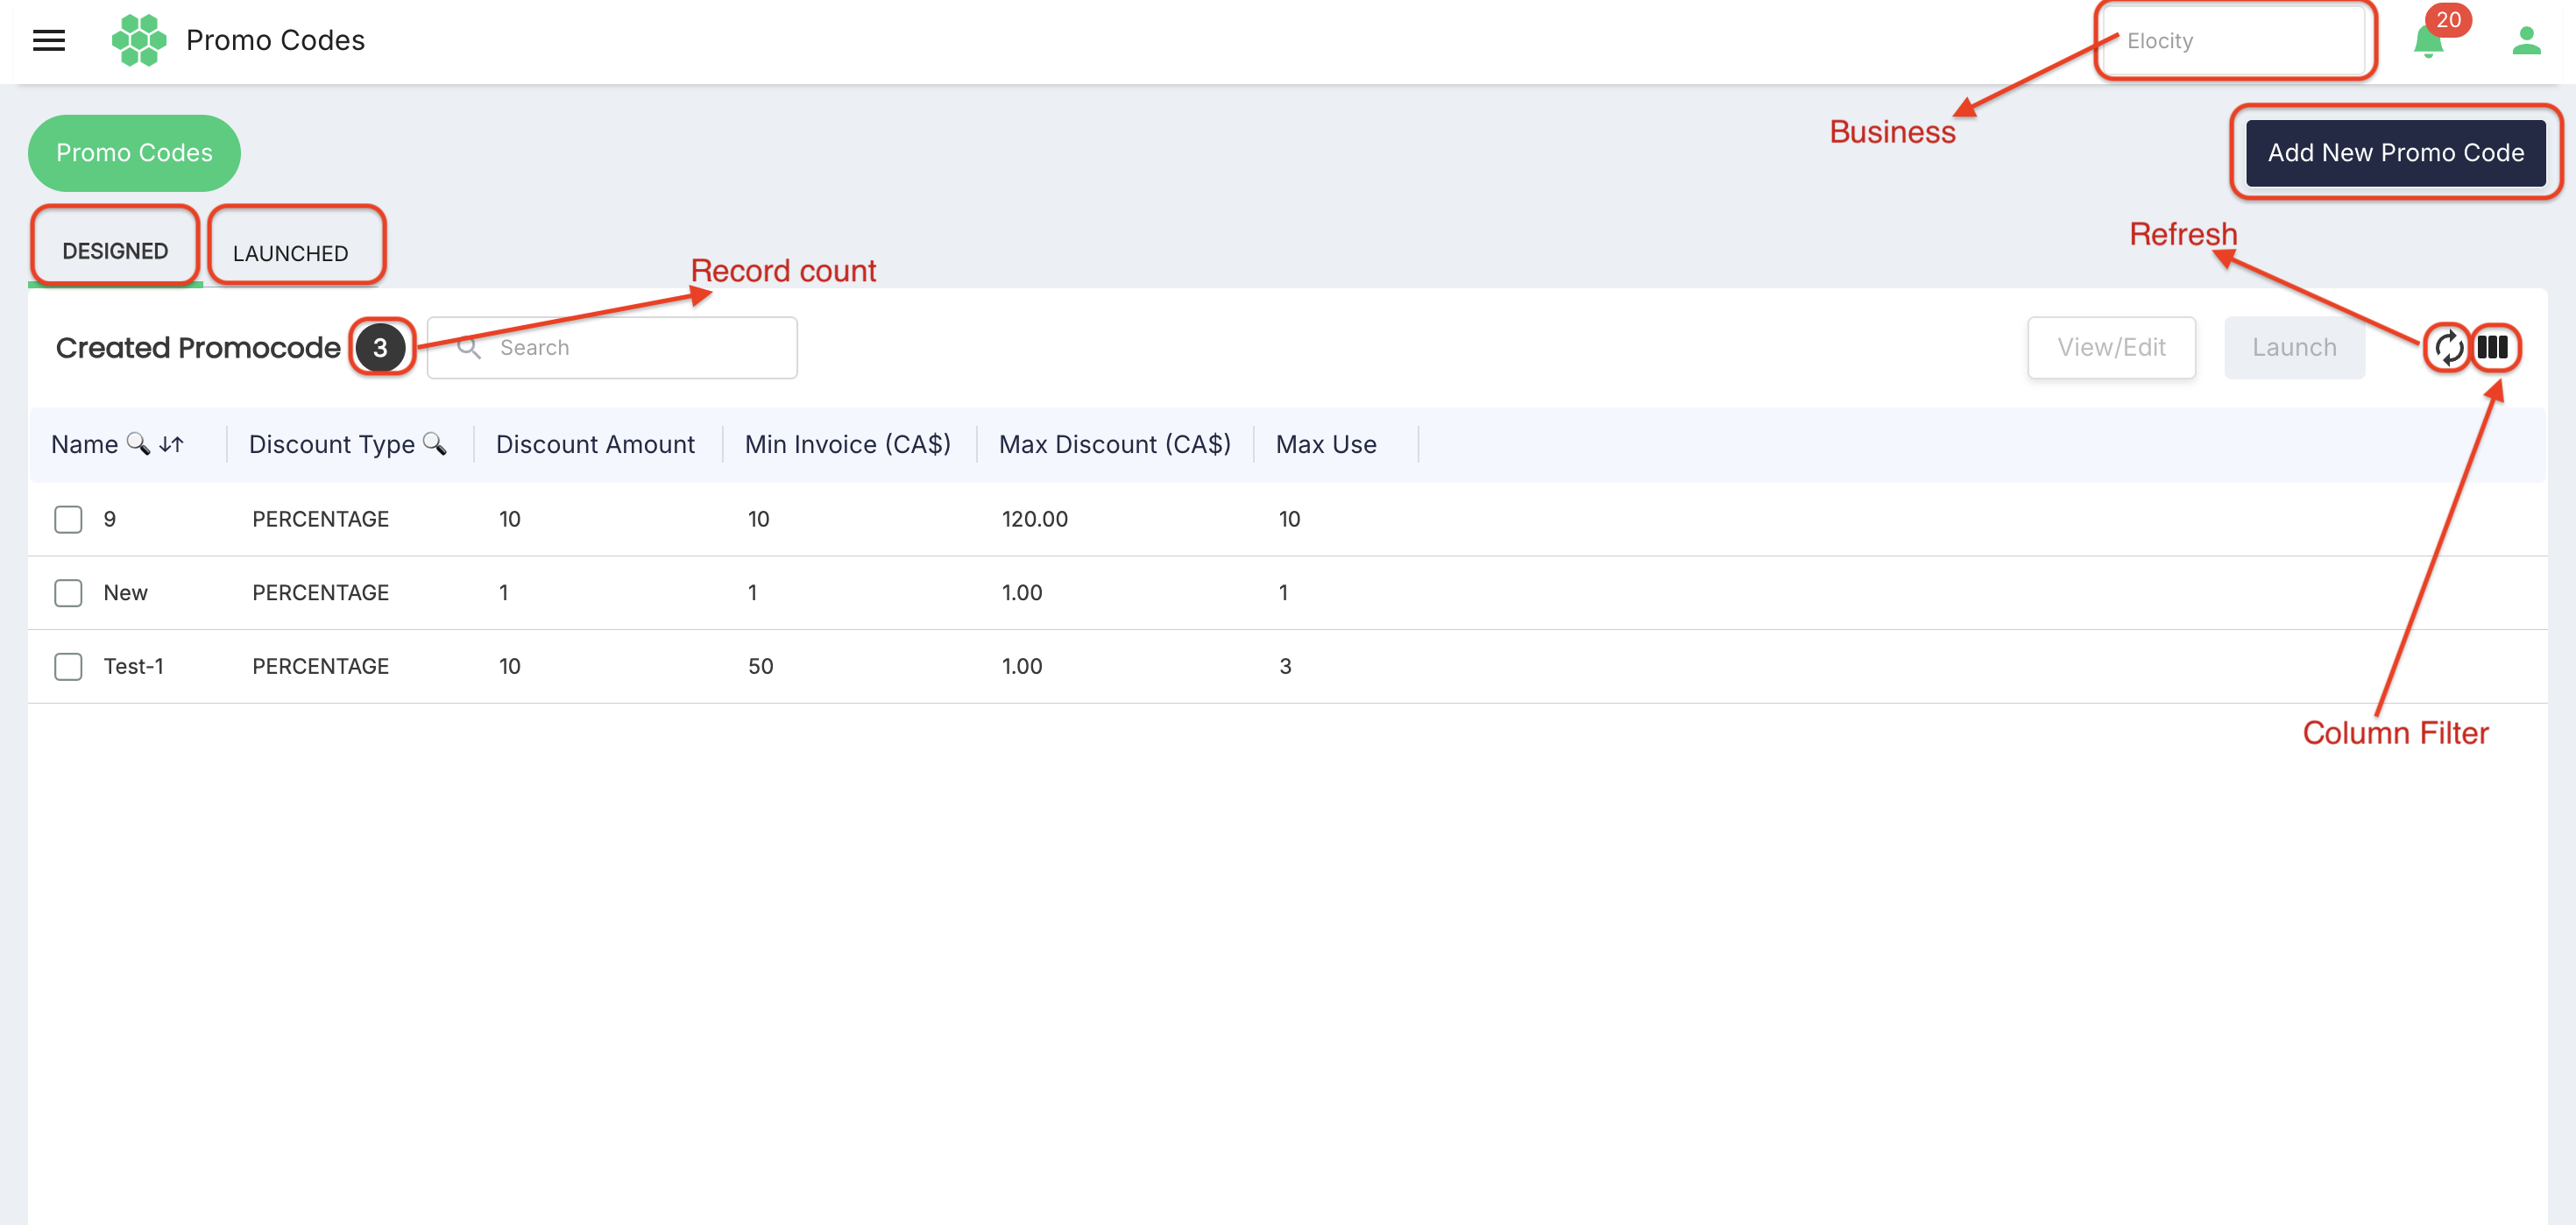
- Add New Promo Code
- Business selector
- DESIGNED tab
- LAUNCHED tab
- Record count for the selected tab
- Search
- Context-sensitive record actions
- Refresh
- Column Filter
- Promo-code grid
4.1 Designed tab
The DESIGNED tab displays promo codes that have been created but not launched.
The page displays:
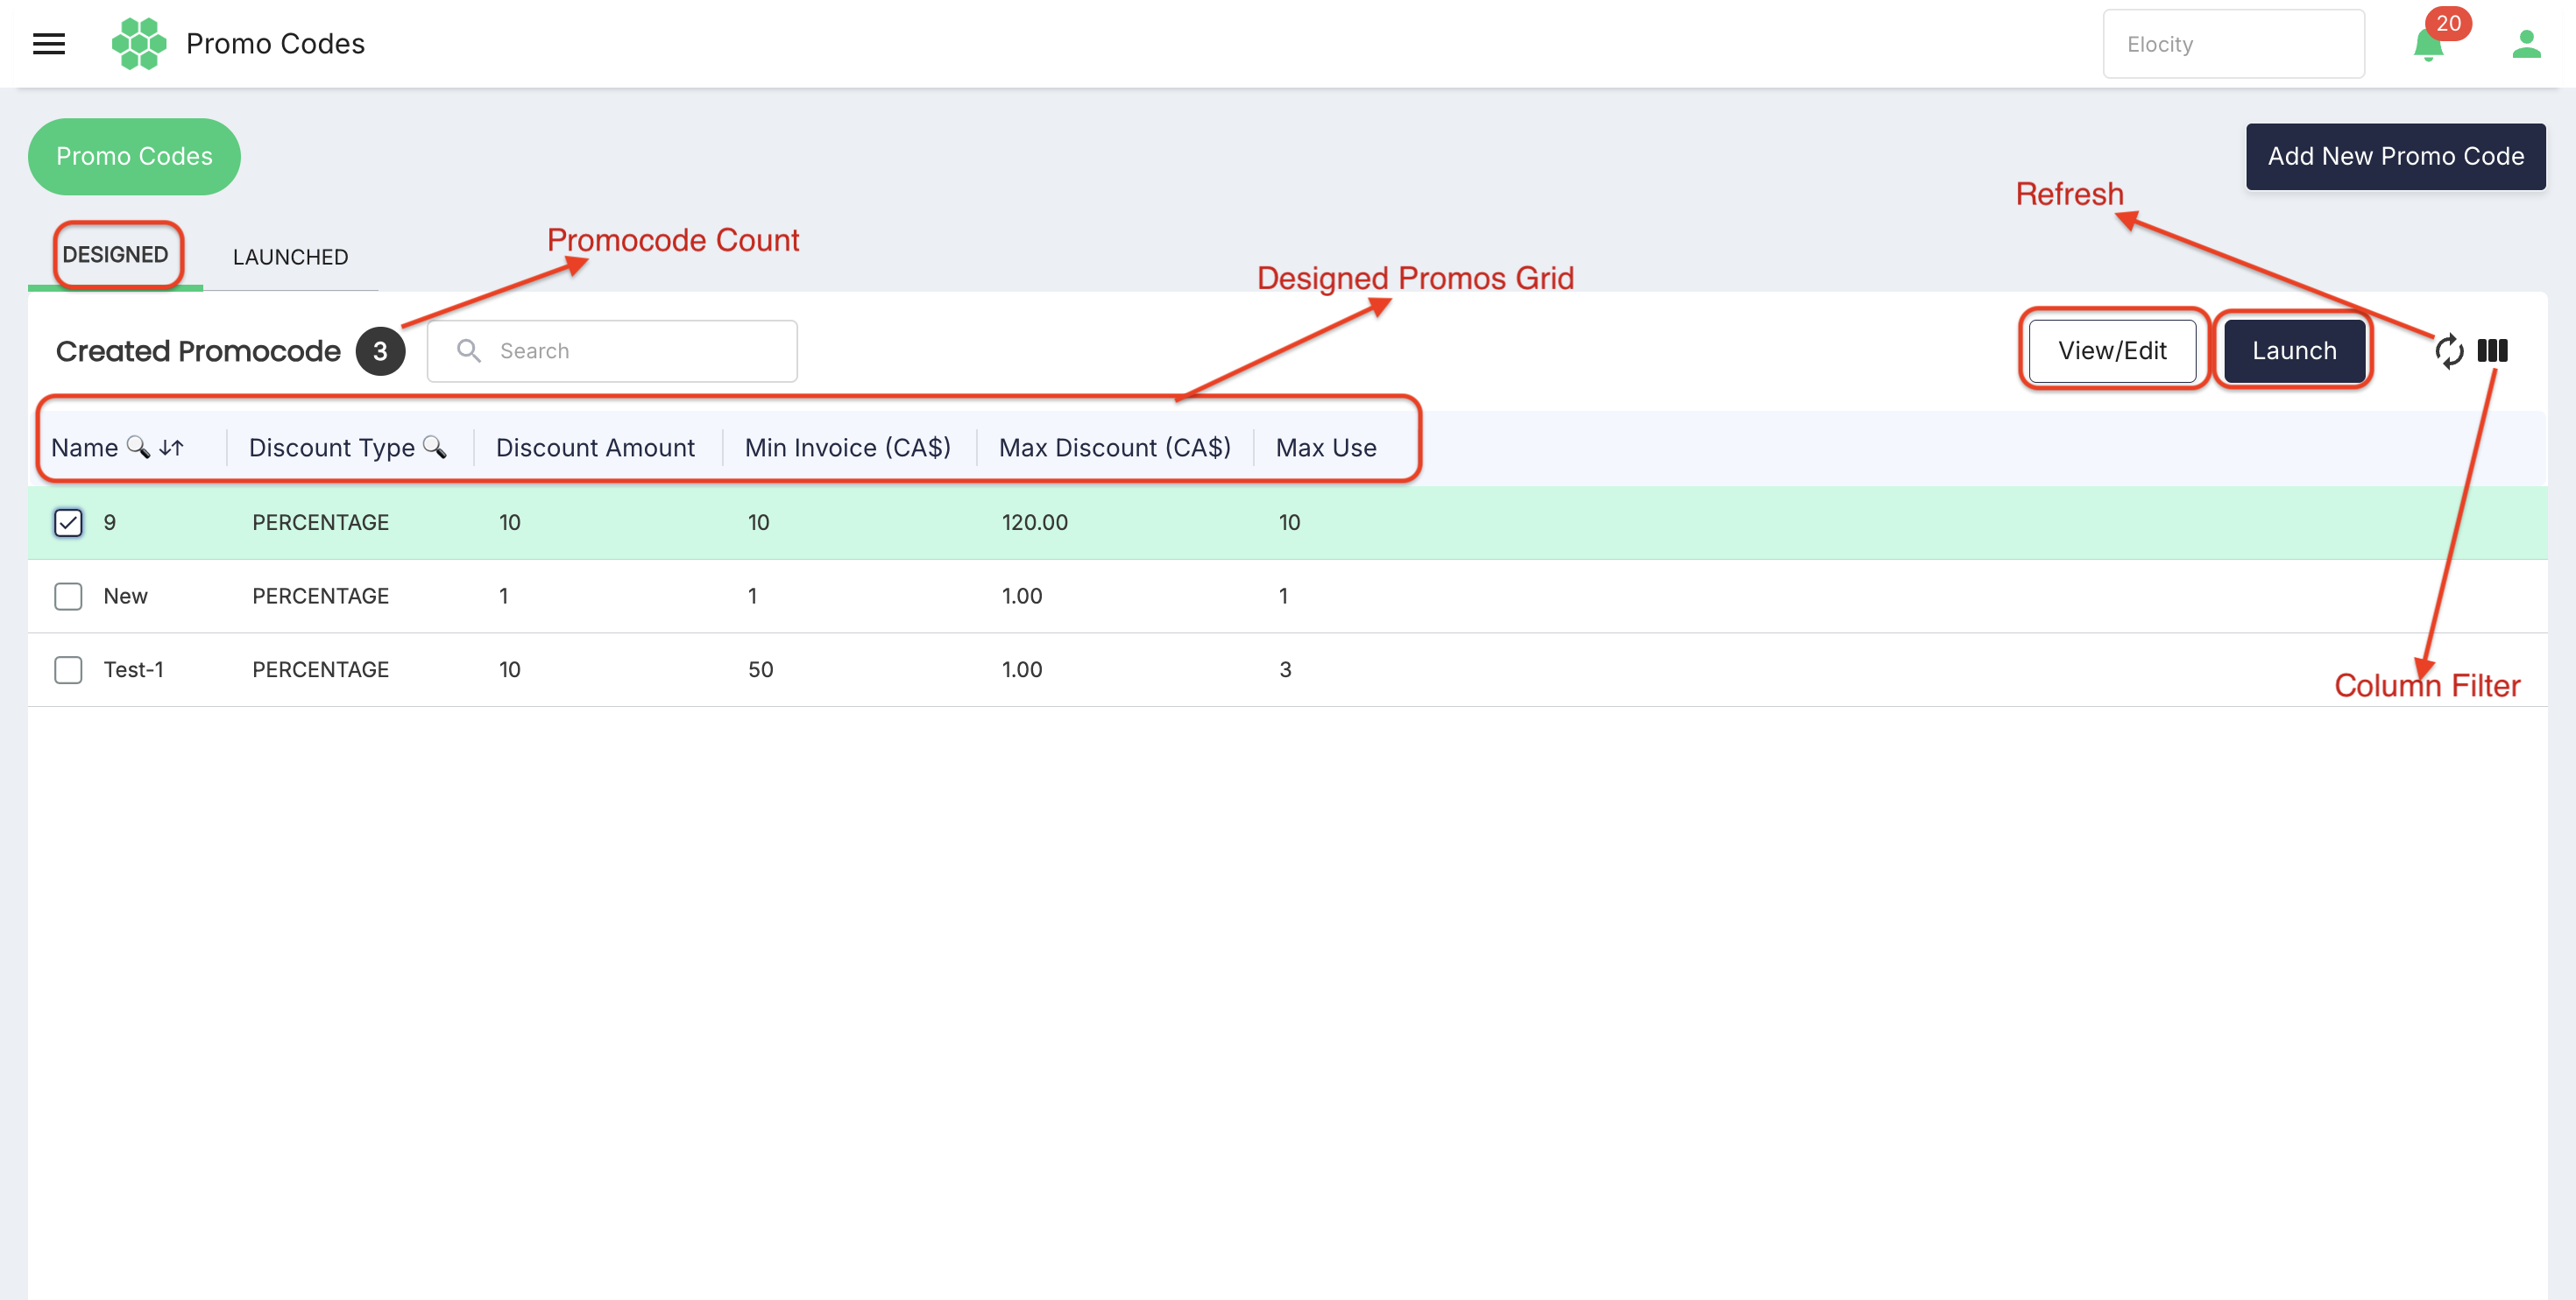
- Created Promocode count
- View/Edit
- Launch
- Refresh
- Column Filter
View/Edit and Launch remain unavailable until a promo-code row is selected.
The Designed grid contains the following information:
| Field | Description |
|---|---|
| Name | Promo Name entered when the promo code was created. Promo Name is the code that the customer enters. |
| Discount Type | FLAT or PERCENTAGE. |
| Discount Amount | Flat currency value or percentage value, depending on Discount Type. |
| Min Invoice (CA$) | Minimum invoice value configured for the promo code. |
| Max Discount (CA$) | Maximum discount configured for a percentage promo code. Flat records displayed 0 in this column in the reviewed list. |
| Max Use | Maximum usage value configured per user. |
The live Designed grid displayed search indicators on Name and Discount Type. The exact difference between the page-level Search box and column search controls requires confirmation.
4.2 Launched tab
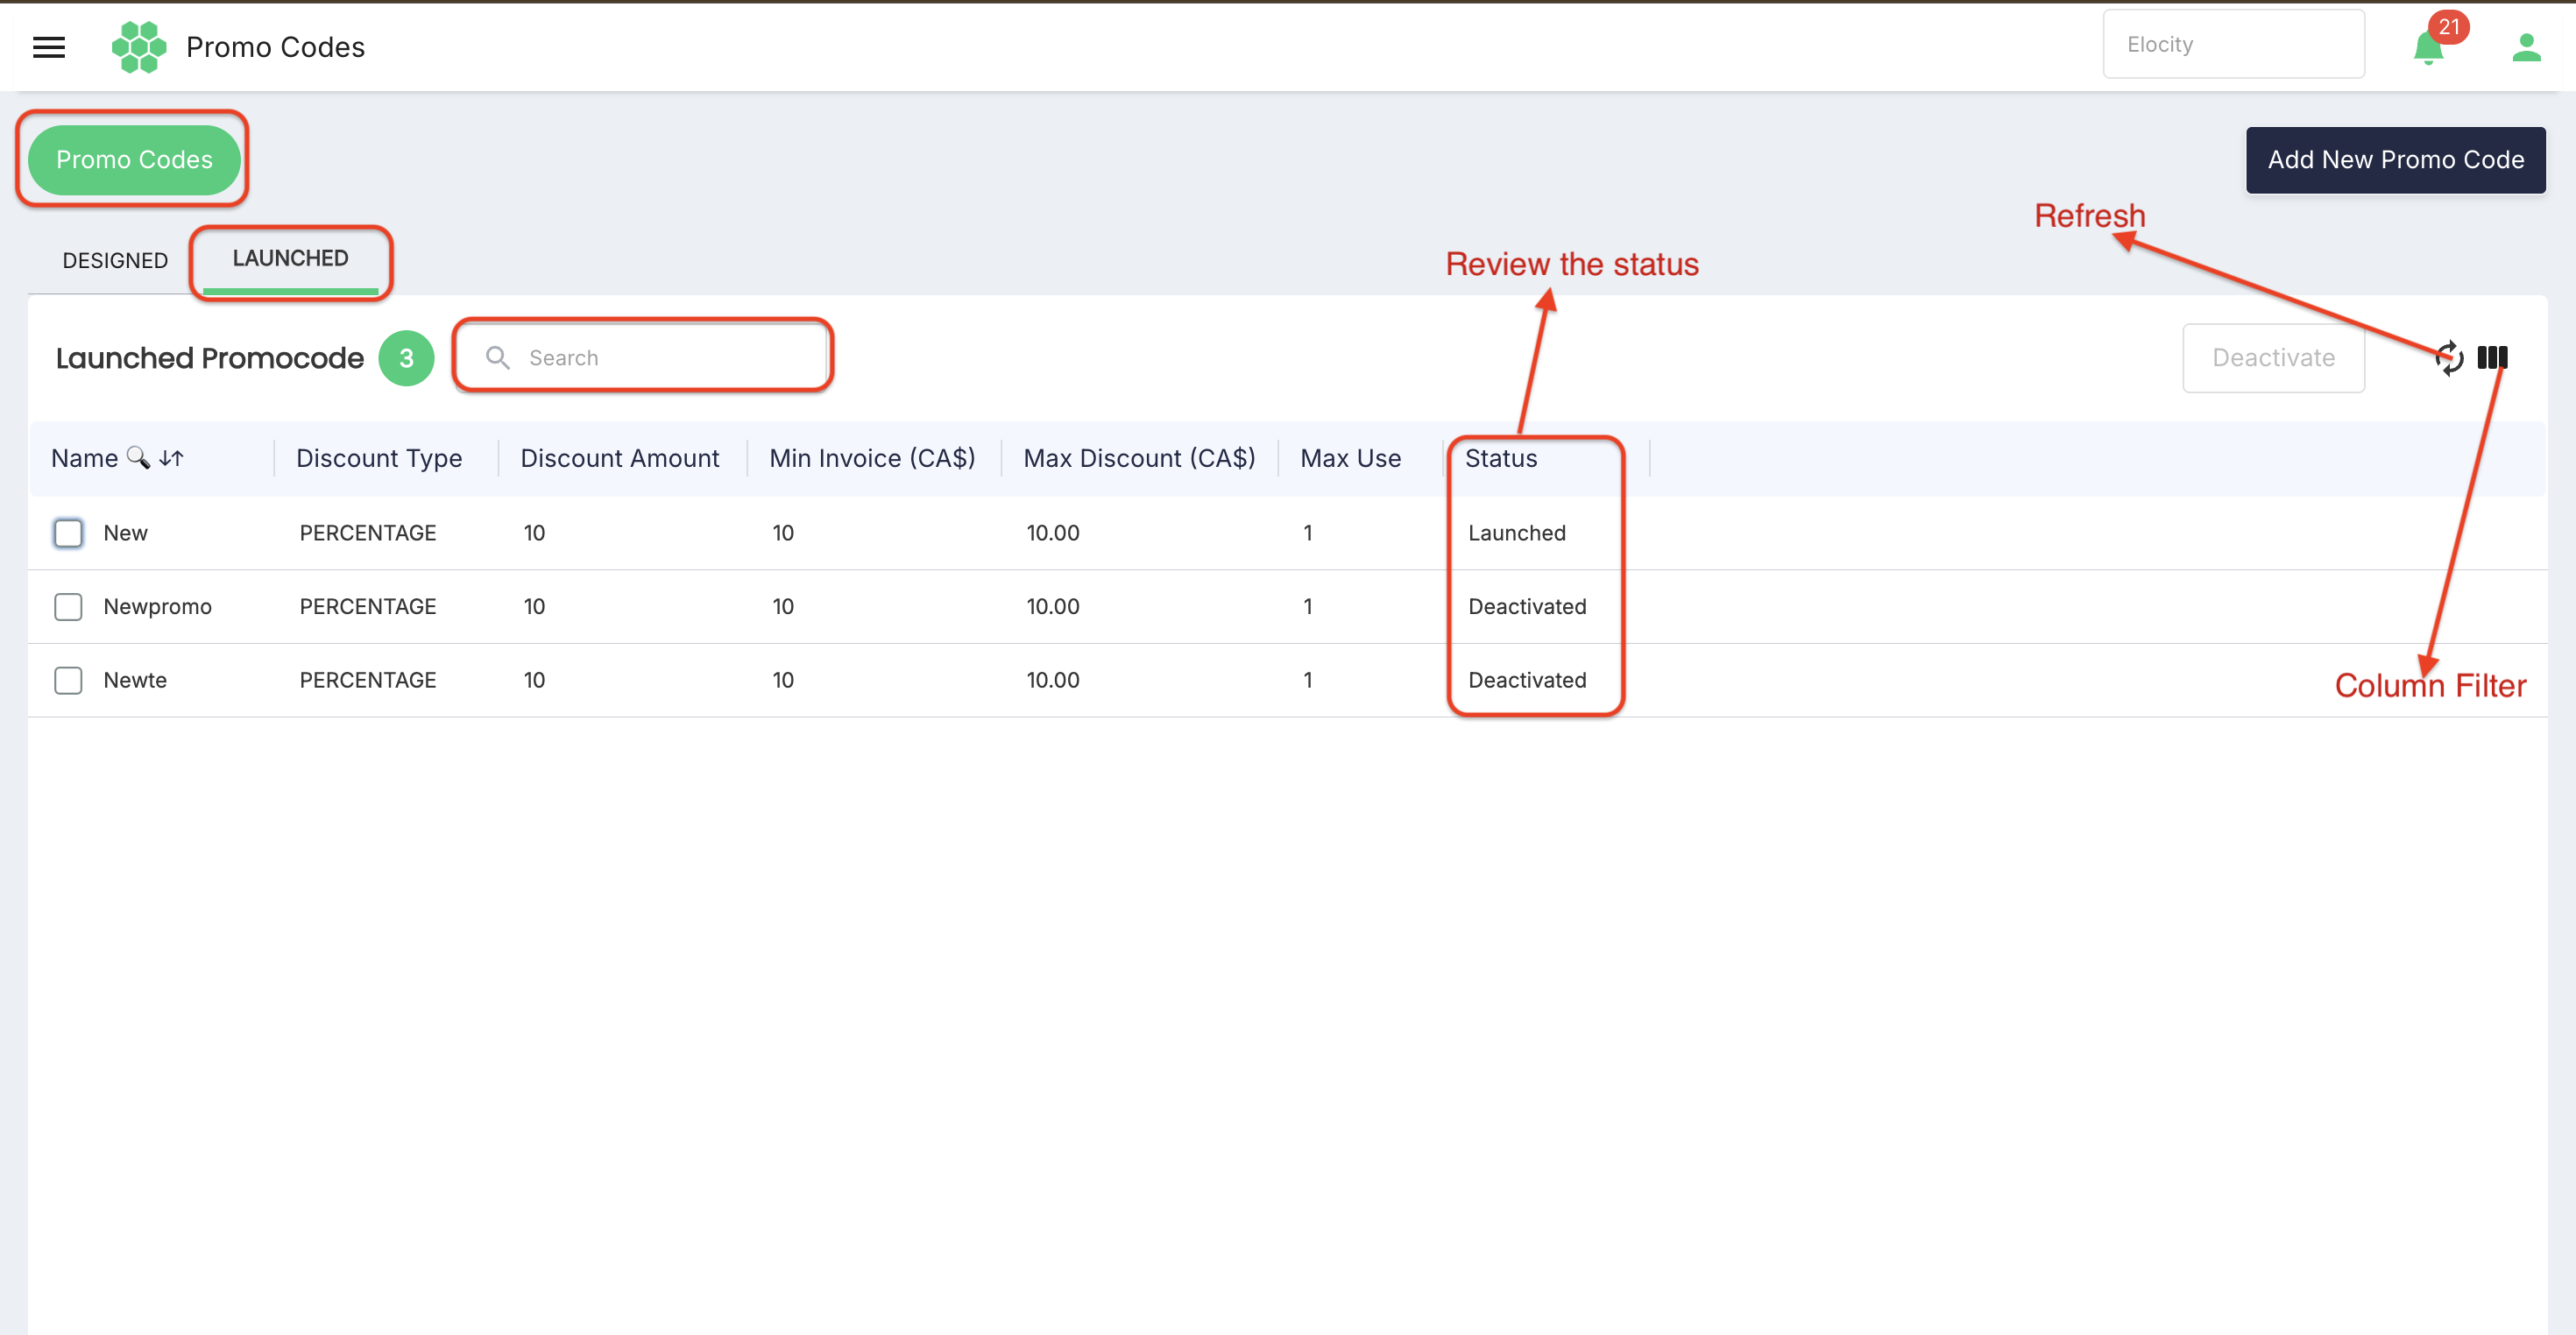
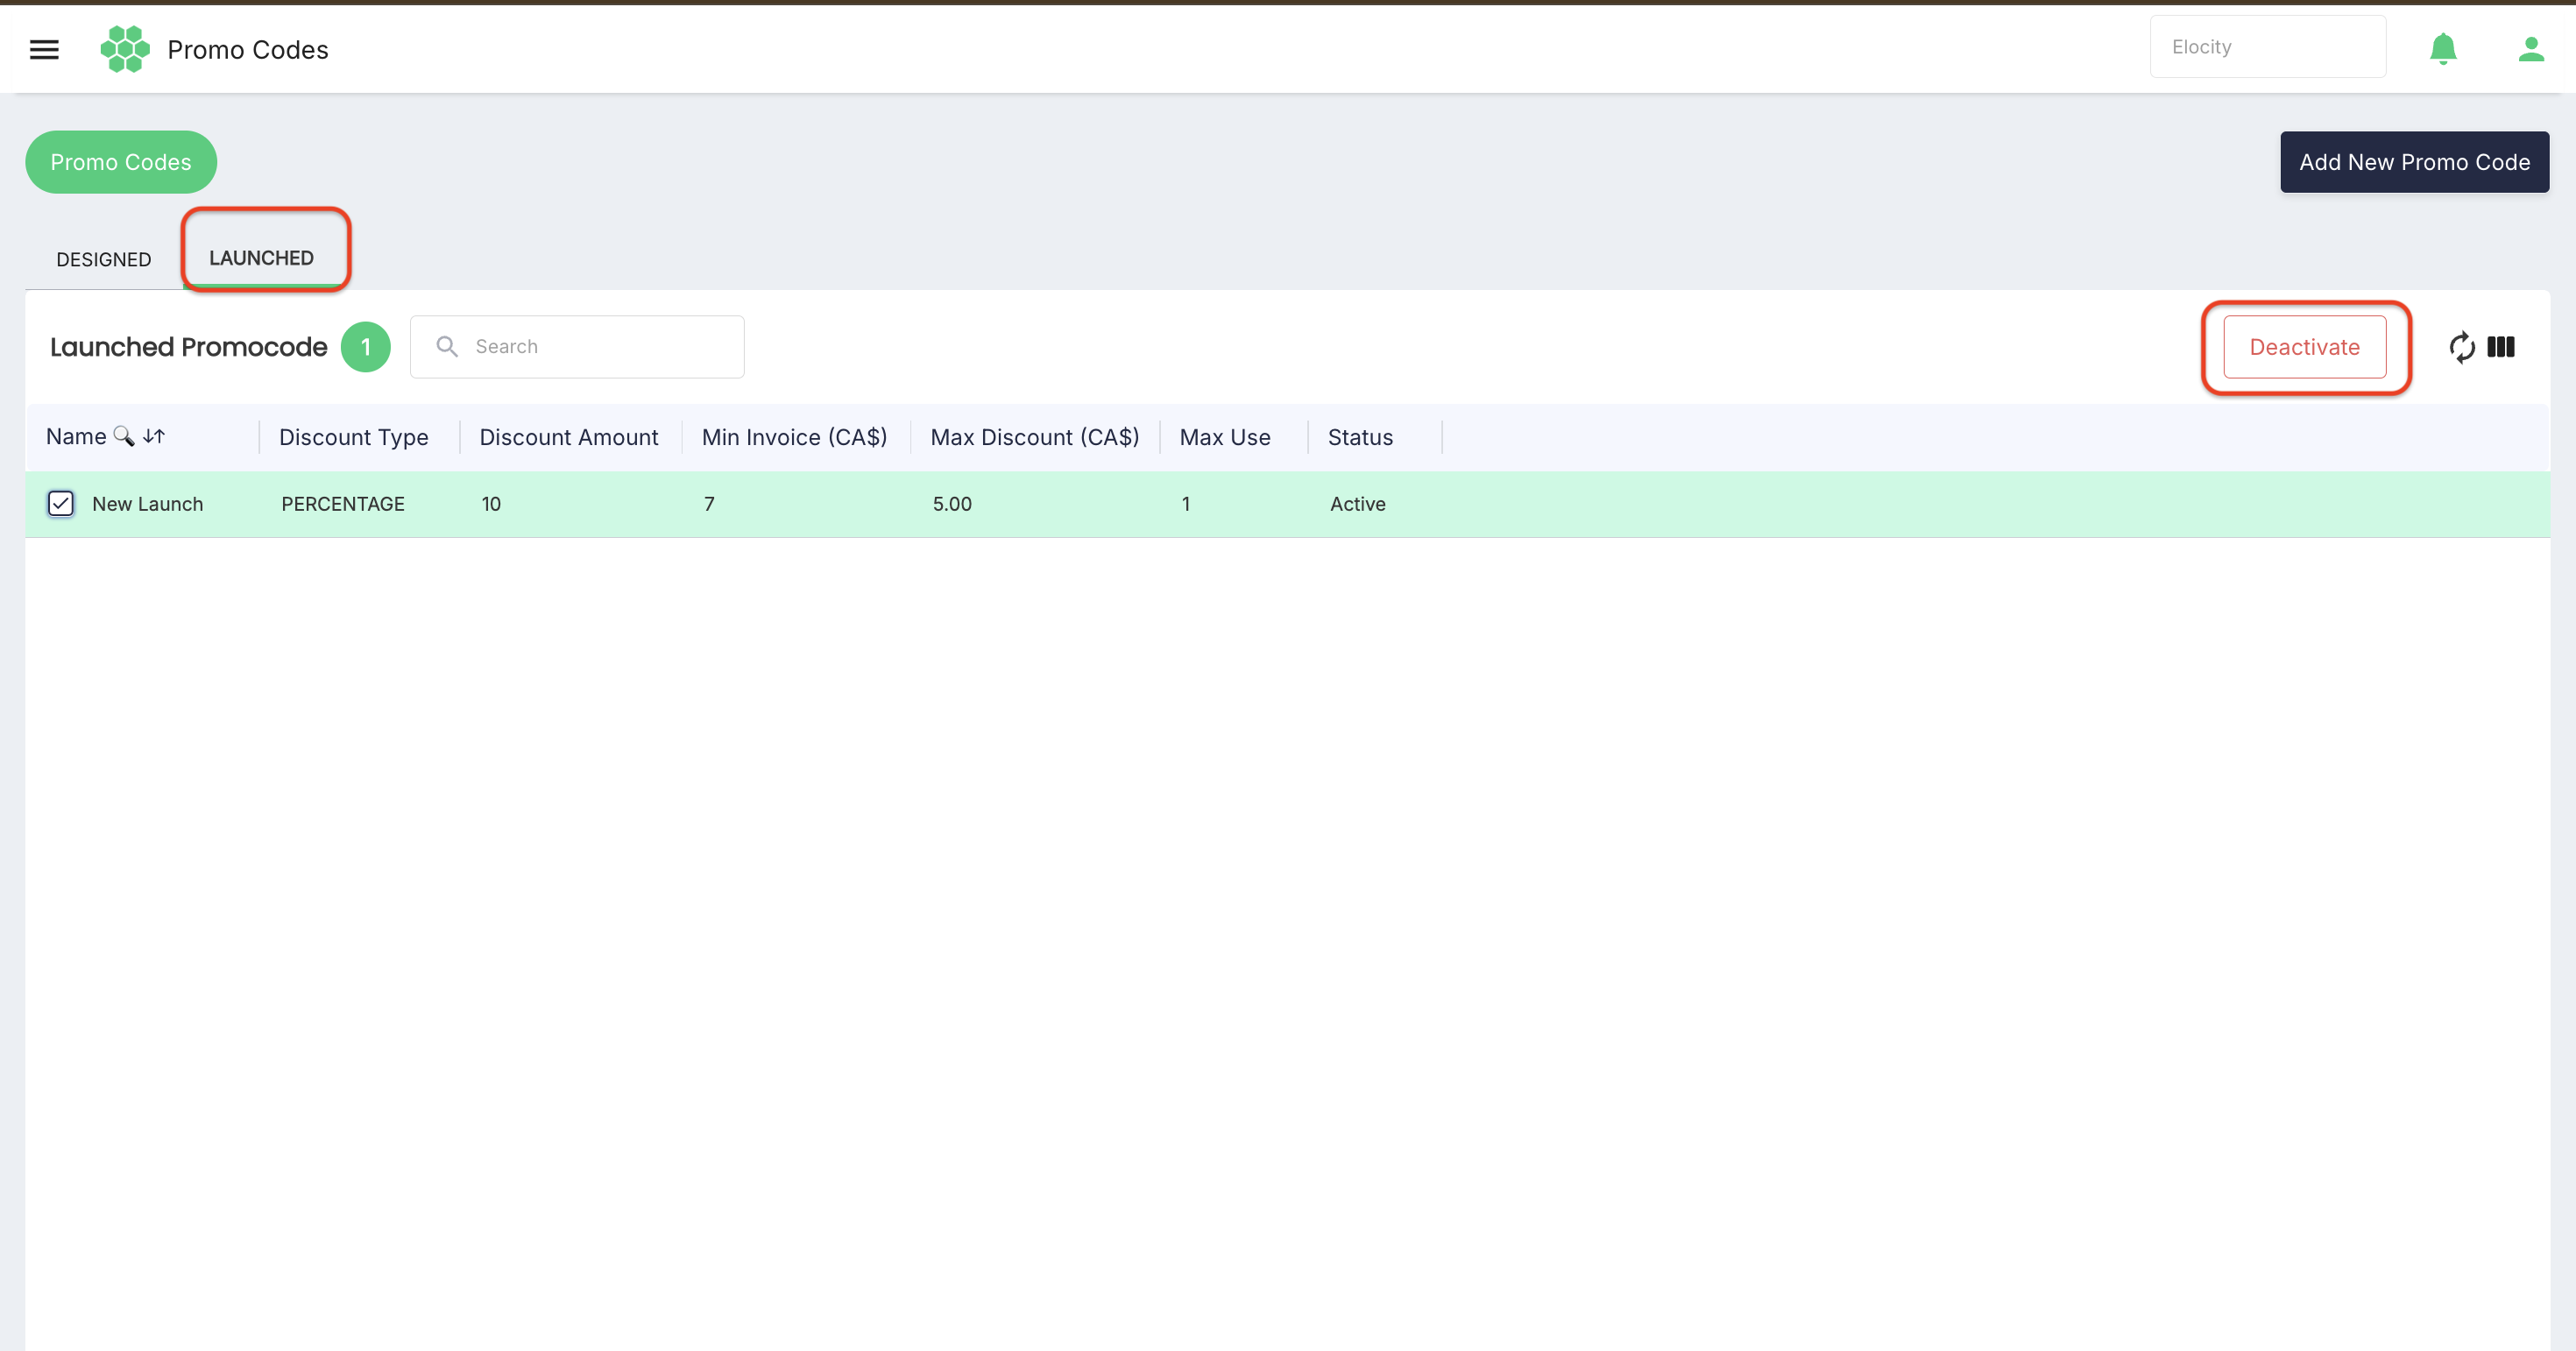
The LAUNCHED tab displays launched promo-code records.
The page displays:
- Launched Promocode count
- Deactivate
- Refresh
- Column Filter
Deactivate remains unavailable until a launched record is selected.
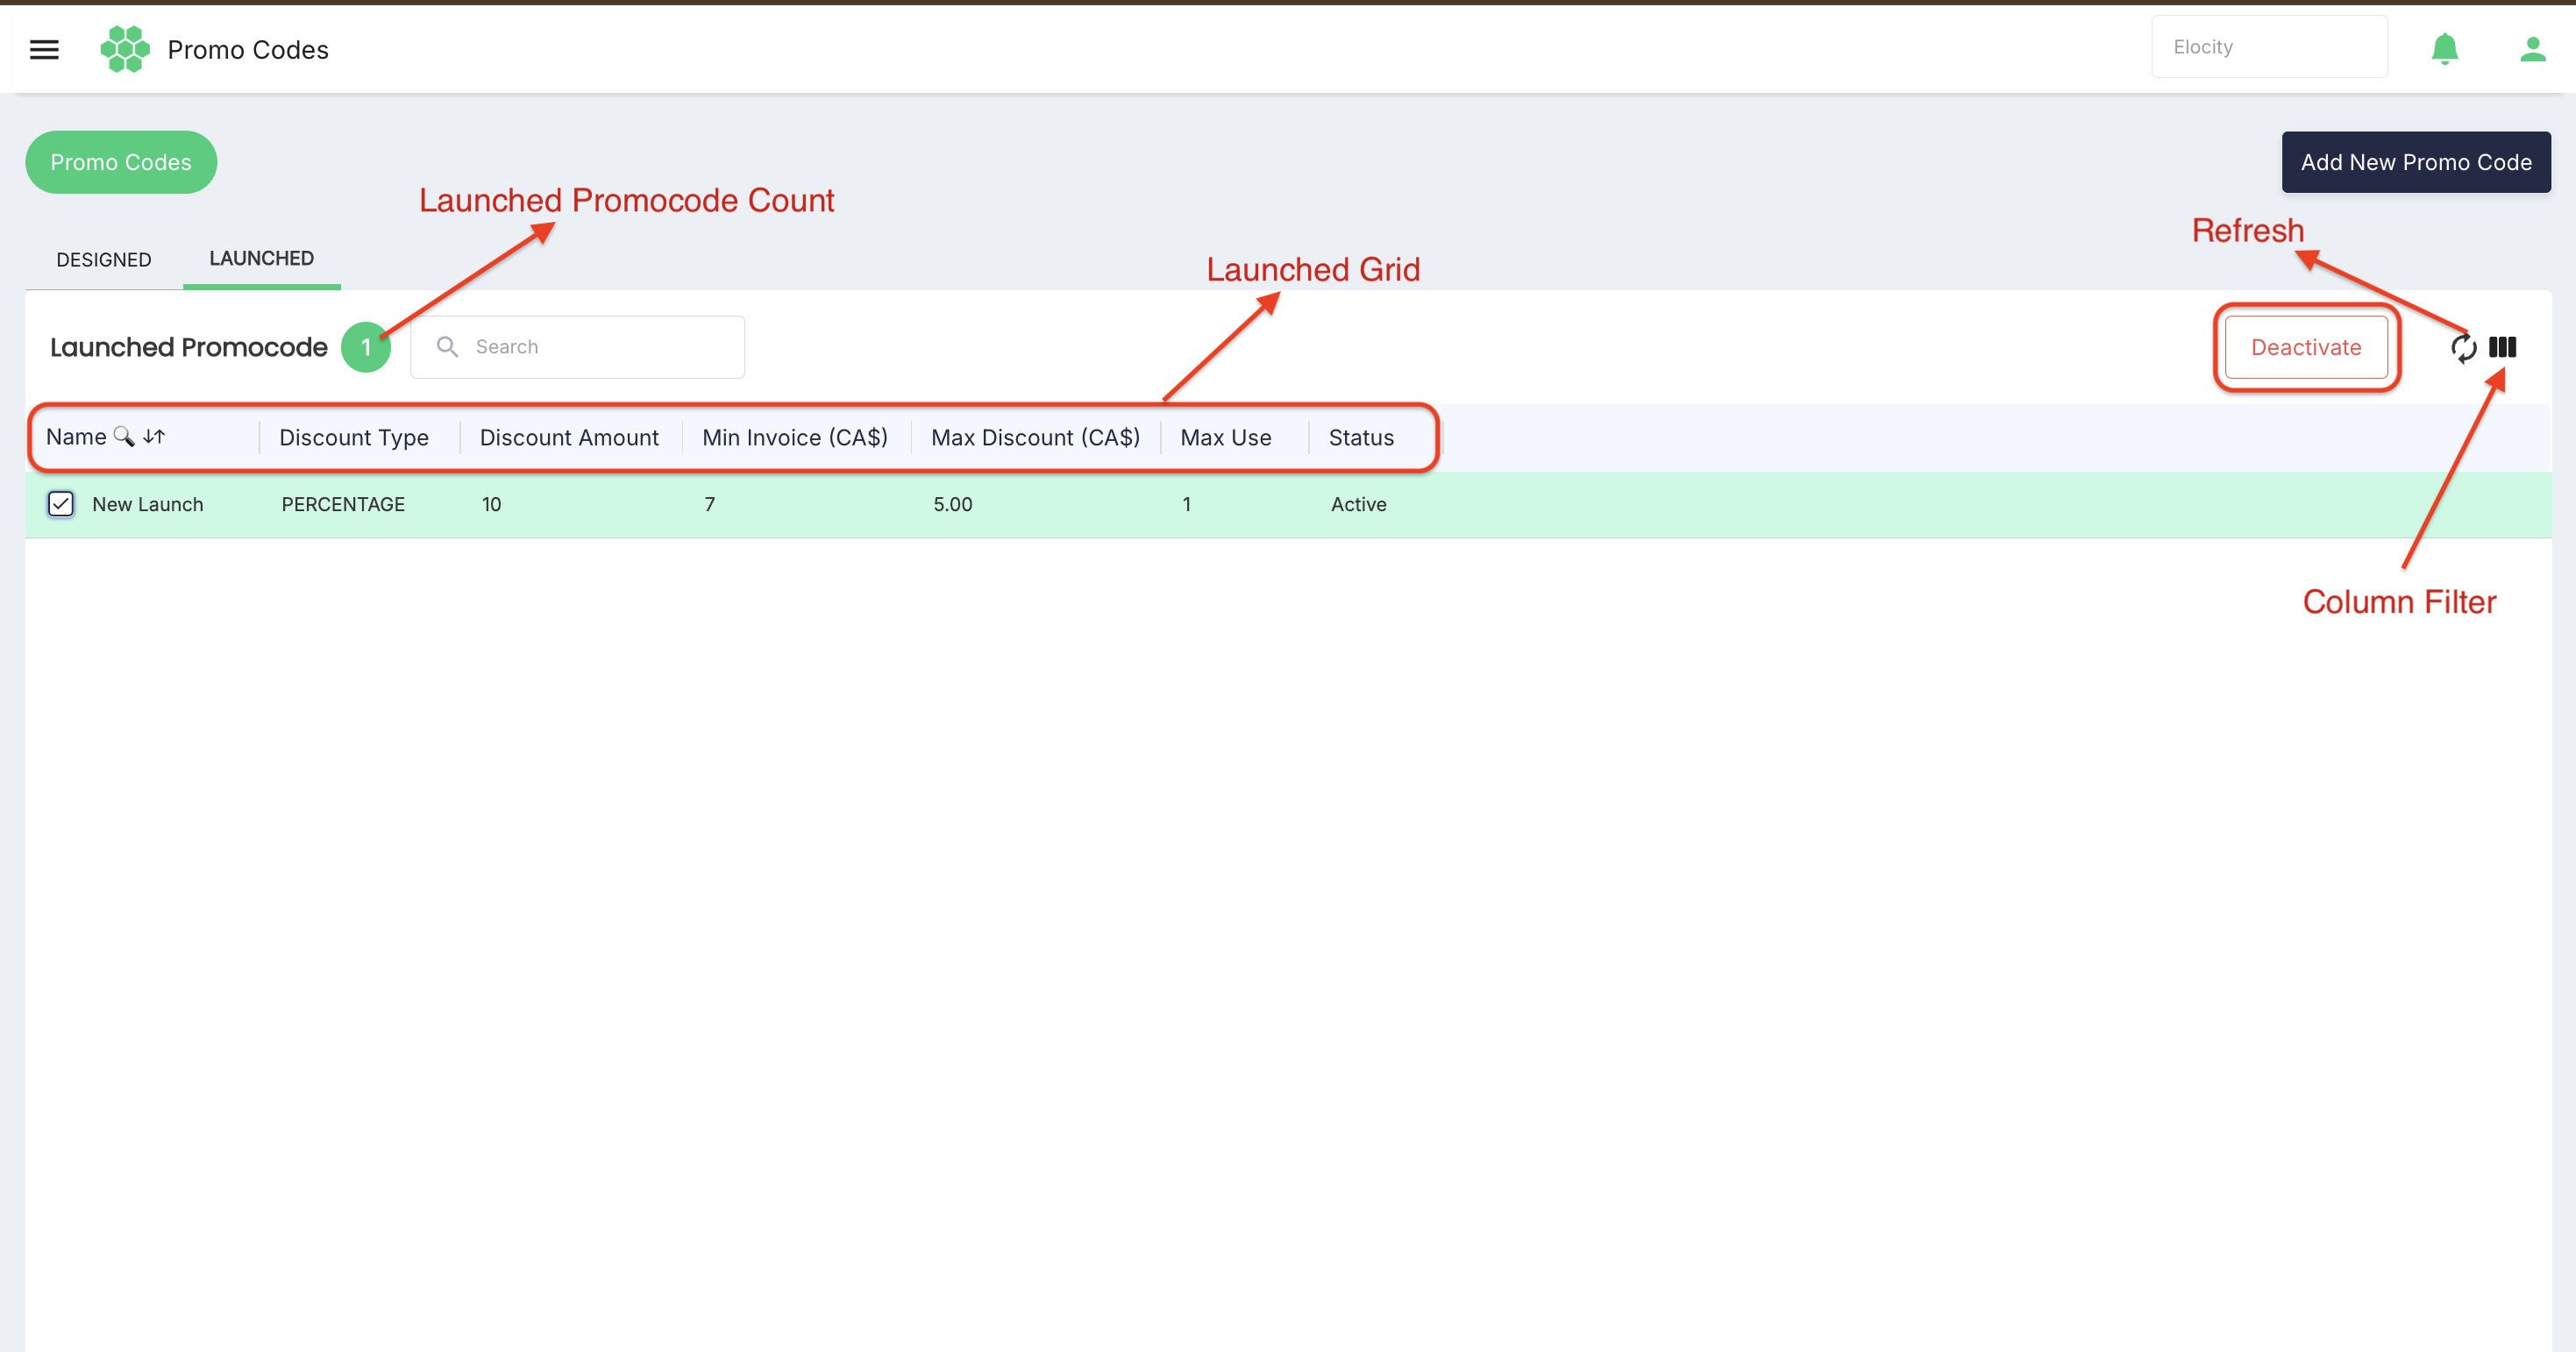
The Launched grid contains:
| Field | Description |
|---|---|
| Name | Name displayed for the launched promo-code record. Whether this is Promo Name or Launch Name requires confirmation. |
| Discount Type | Flat or percentage discount type. |
| Discount Amount | Discount value assigned to the promo code. |
| Min Invoice (CA$) | Configured minimum invoice value. |
| Max Discount (CA$) | Configured maximum percentage-discount value. |
| Max Use | Configured maximum usage per user. |
| Status | Current launched promo-code status. The available status values require confirmation. |
No launched record was available in the reviewed business contexts, so record details and the complete deactivation workflow could not be verified.
5. Common Grid Functions
5.1 Selecting a promo code
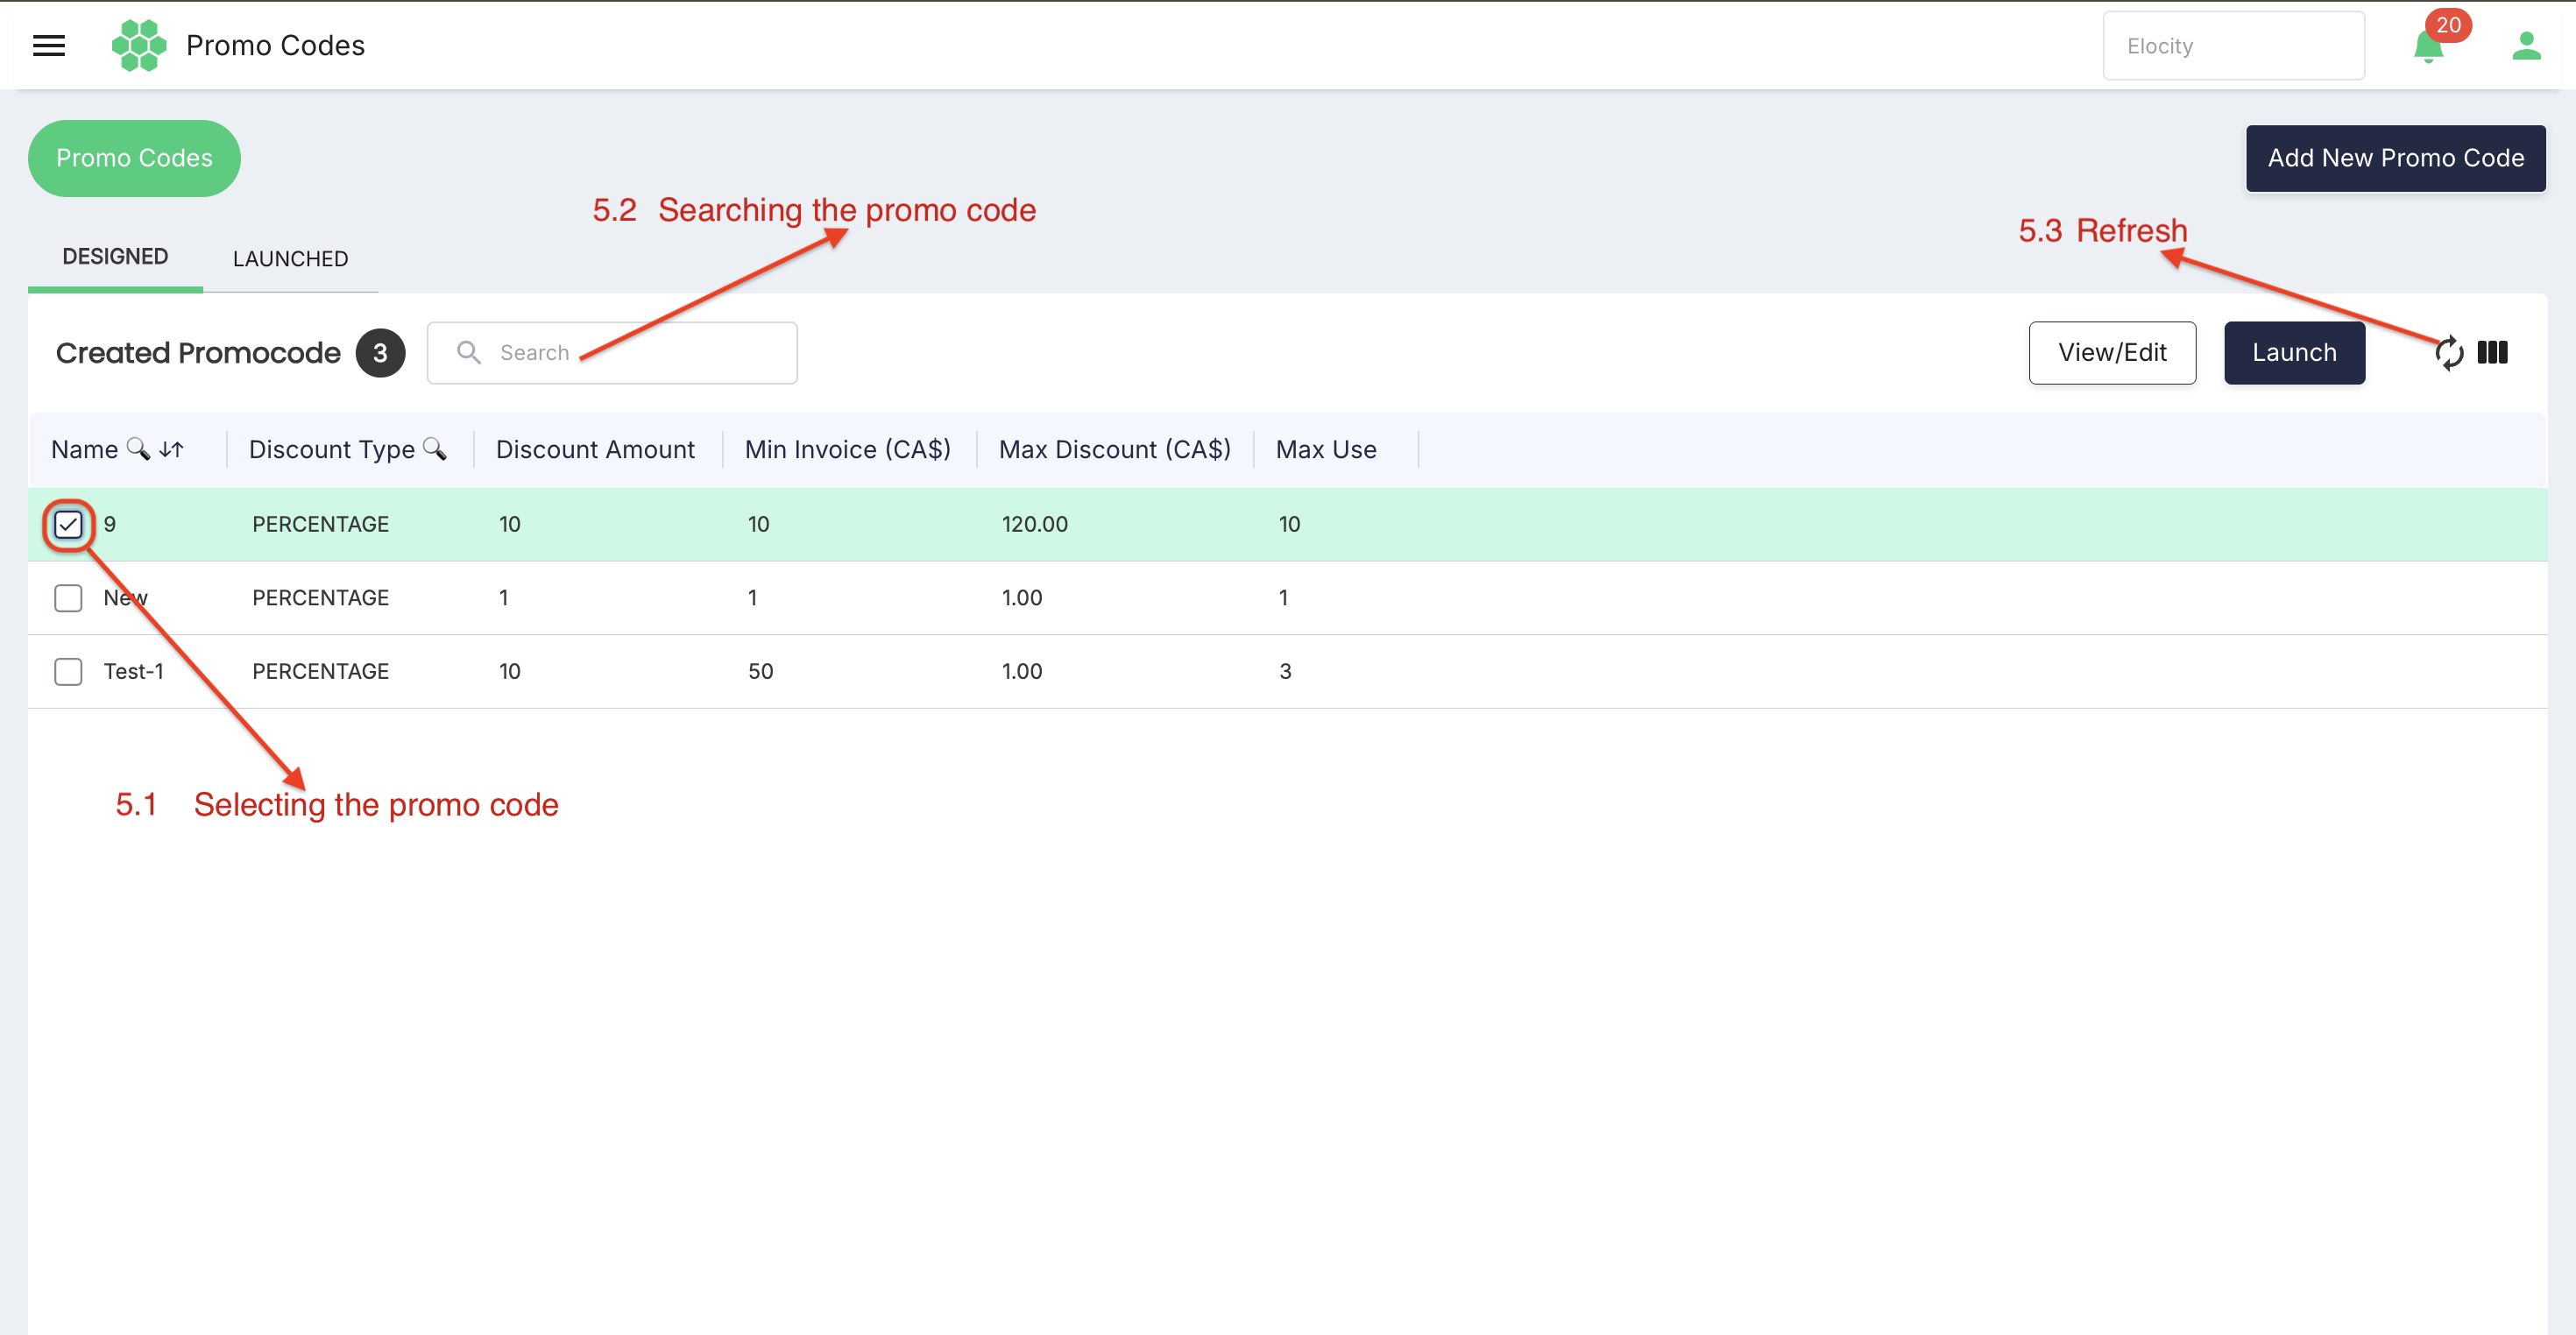
Select the checkbox in a promo-code row to make its available actions active. Select the checked row again to clear the selection.
Only one selected record was used during the review. Bulk edit, launch, or deactivate behavior was not tested.
5.2 Search
Enter a value in Search to narrow the records displayed in the active tab. Clear the value to restore the unfiltered list.
The exact columns searched by the page-level Search box require confirmation.
5.3 Refresh
Select Refresh to request the latest records for the active tab. Refresh and Column Filter can be temporarily unavailable while the list is loading.
5.4 Column Filter
Use Column Filter to show or hide grid columns.
- Select Column Filter.
- Select or clear the checkbox beside each column.
- Select Deselect All to clear every column selection, if required.
- Select Apply to save the display change.
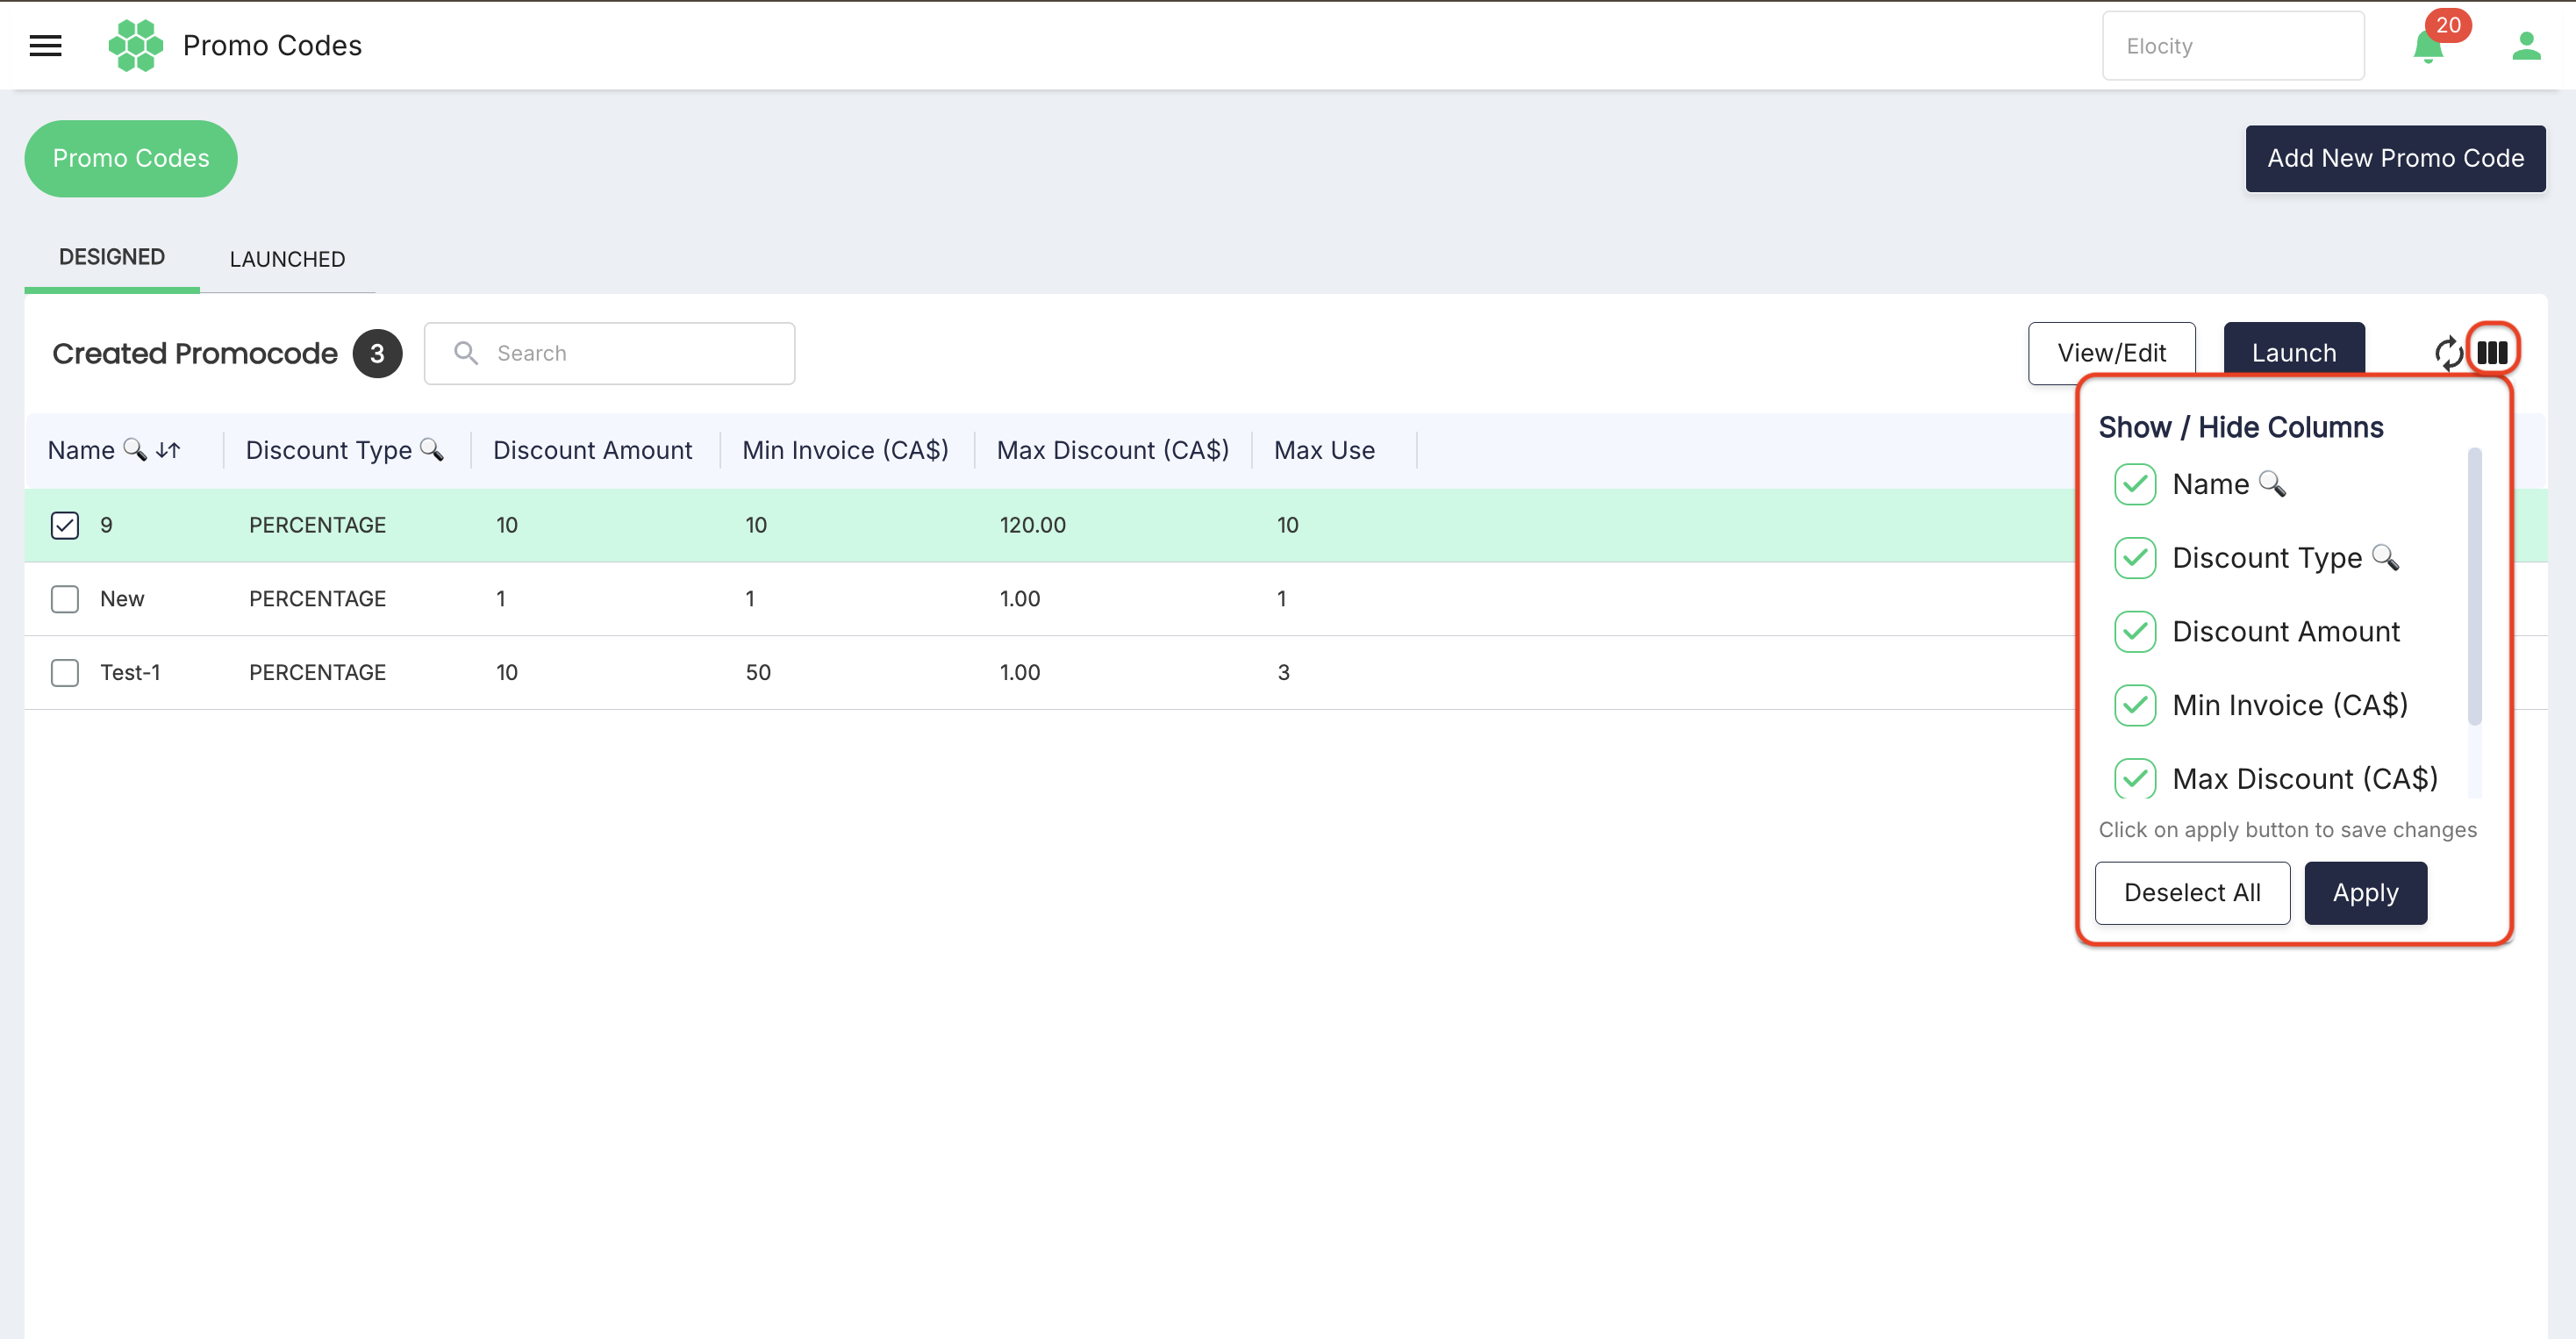
The Designed panel contains:
- Name
- Discount Type
- Discount Amount
- Min Invoice (CA$)
- Max Discount (CA$)
- Max Use
The Launched panel also contains Status.
Changing column visibility changes only the grid presentation. It does not change the promo-code record.
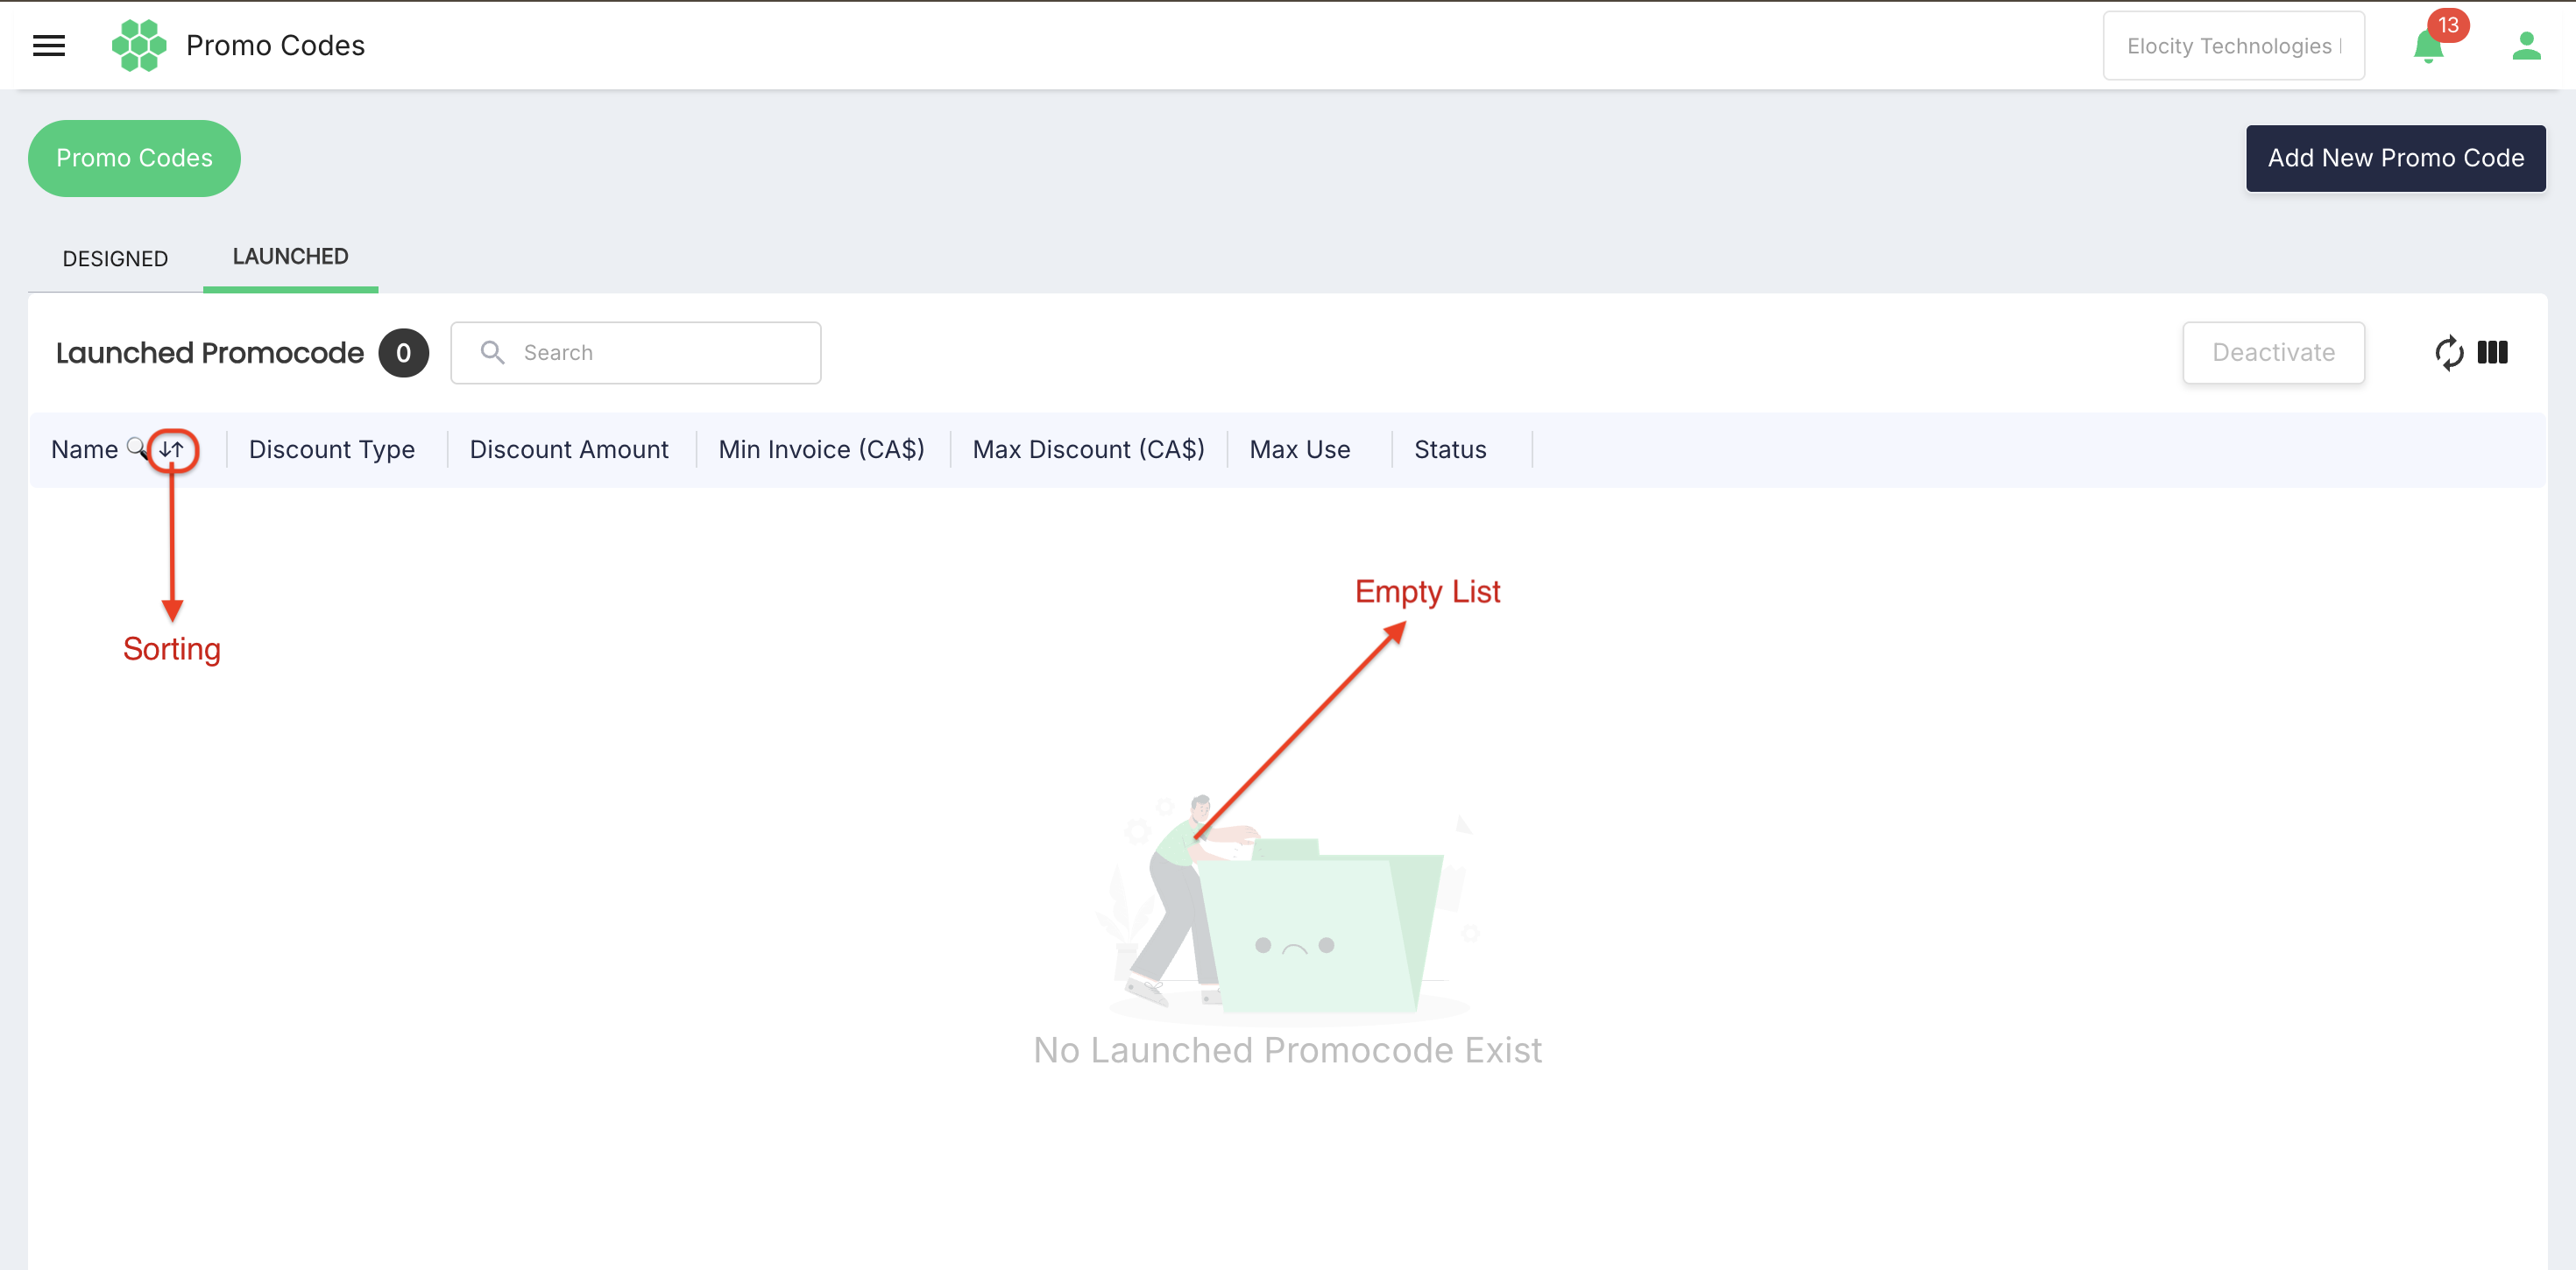
5.5 Sort
In both grids, Name was the only column identified by the live interface as sortable. Select the Name heading to change its sort order. The other visible headings were not identified as sortable during the review.
5.6 Empty list
If no record exists for the selected business and tab, the page displays:
- No Created Promocode Exist on the Designed tab.
- No Launched Promocode Exist on the Launched tab.
6. Promo-Code Fields
The creation and edit forms contain the following fields.
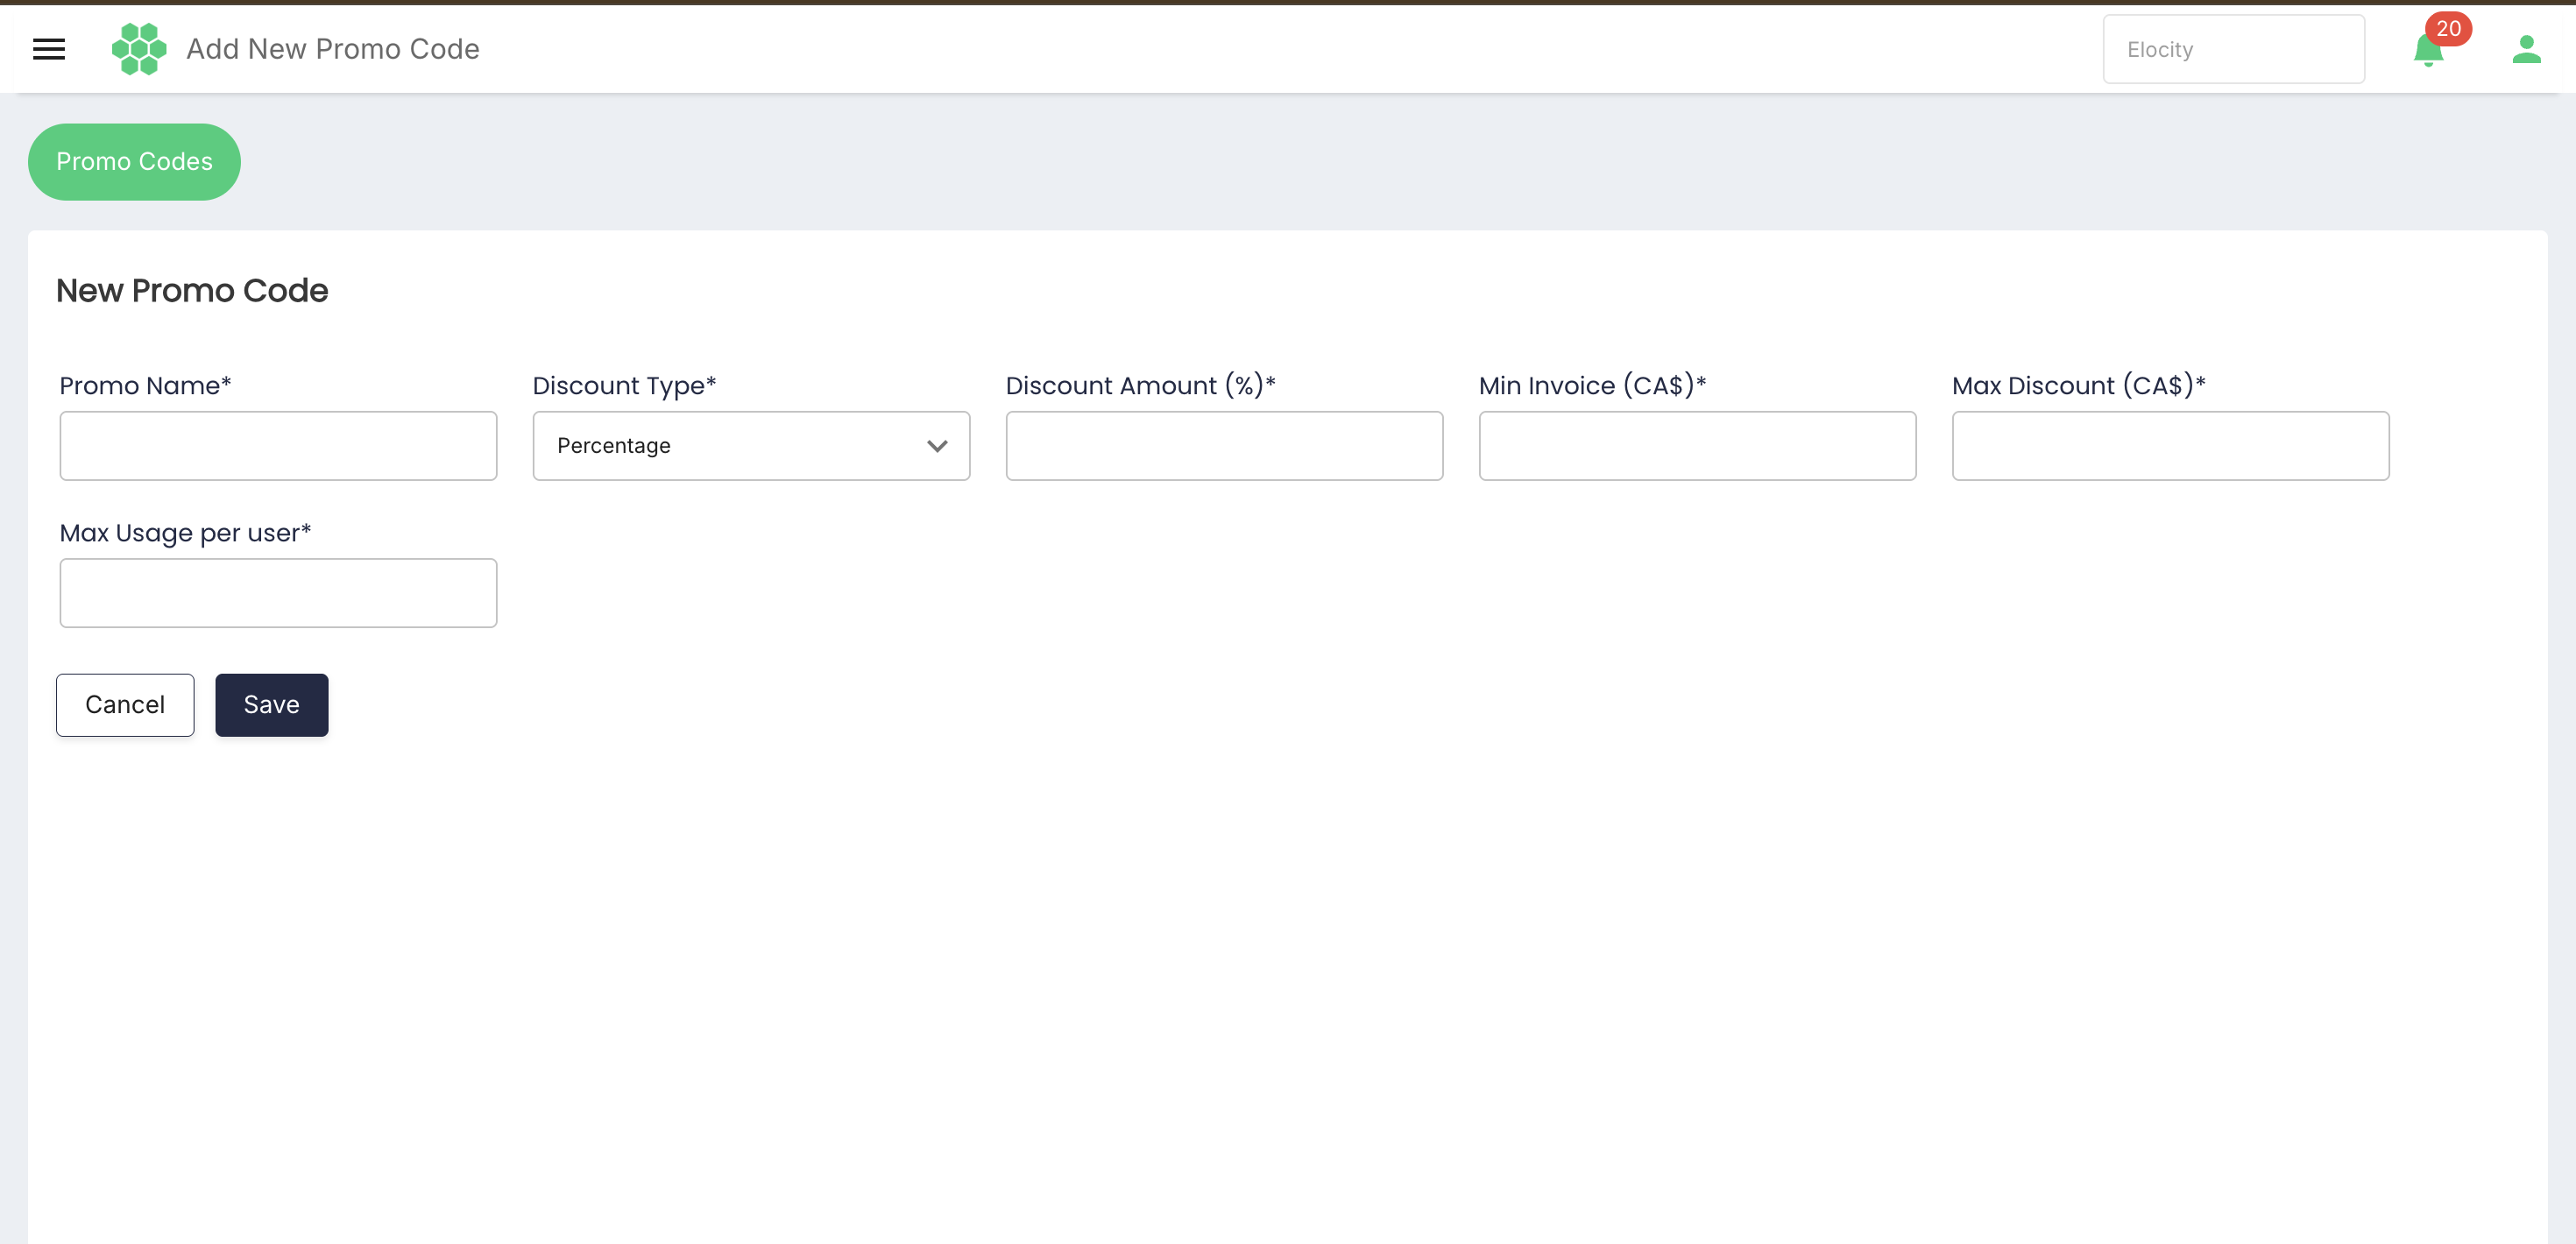
| Field | Required | Description |
|---|---|---|
| Promo Name | Yes | Customer-entered promo-code value. The value saved in this field is the code the customer enters when applying the promotion. |
| Discount Type | Yes | Select Flat or Percentage. |
| Discount Amount (CA$) | Yes for Flat | Currency discount value used for a flat promo code. |
| Discount Amount (%) | Yes for Percentage | Percentage discount value used for a percentage promo code. |
| Min Invoice (CA$) | Yes | Minimum invoice value on which the configured discount is applicable. |
| Max Discount (CA$) | Yes for Percentage | Maximum currency discount that can be applied when the percentage calculation exceeds this value. This field is not displayed for Flat. |
| Max Usage per user | Yes | Maximum number of times the promo code can be used by a user. The definition of “user” and the event that consumes a use require confirmation. |
All visible creation fields are marked with an asterisk.
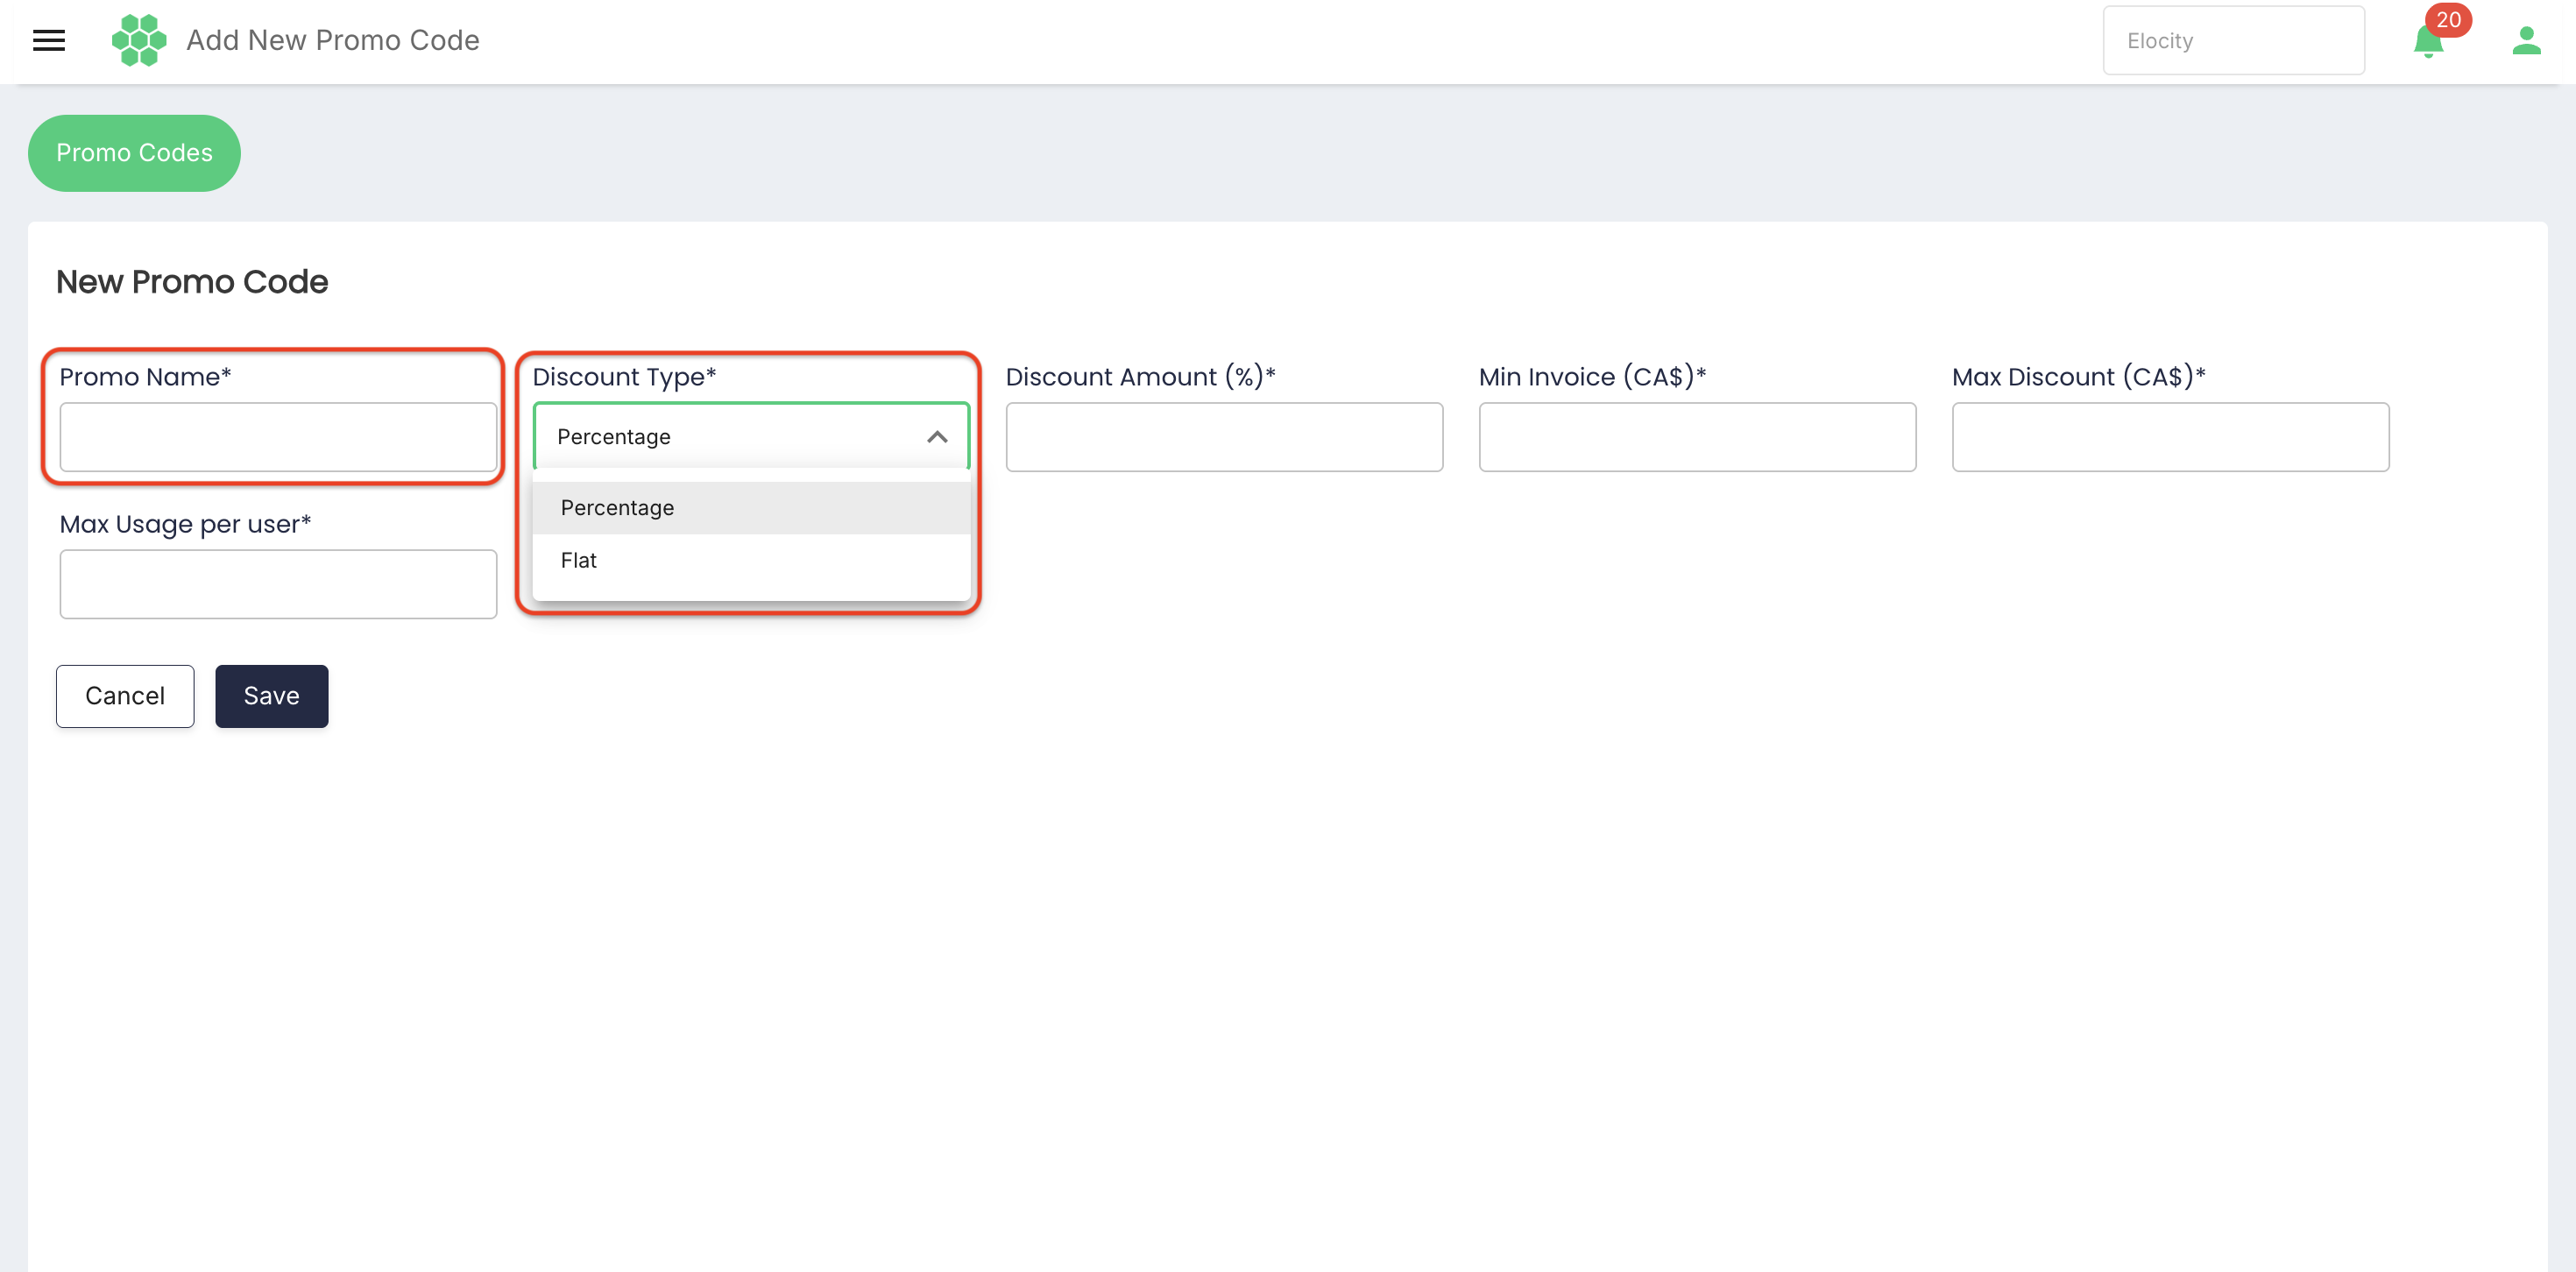
The reviewed New Promo Code form initially selected Percentage. Change Discount Type to Flat when a fixed currency discount is required.
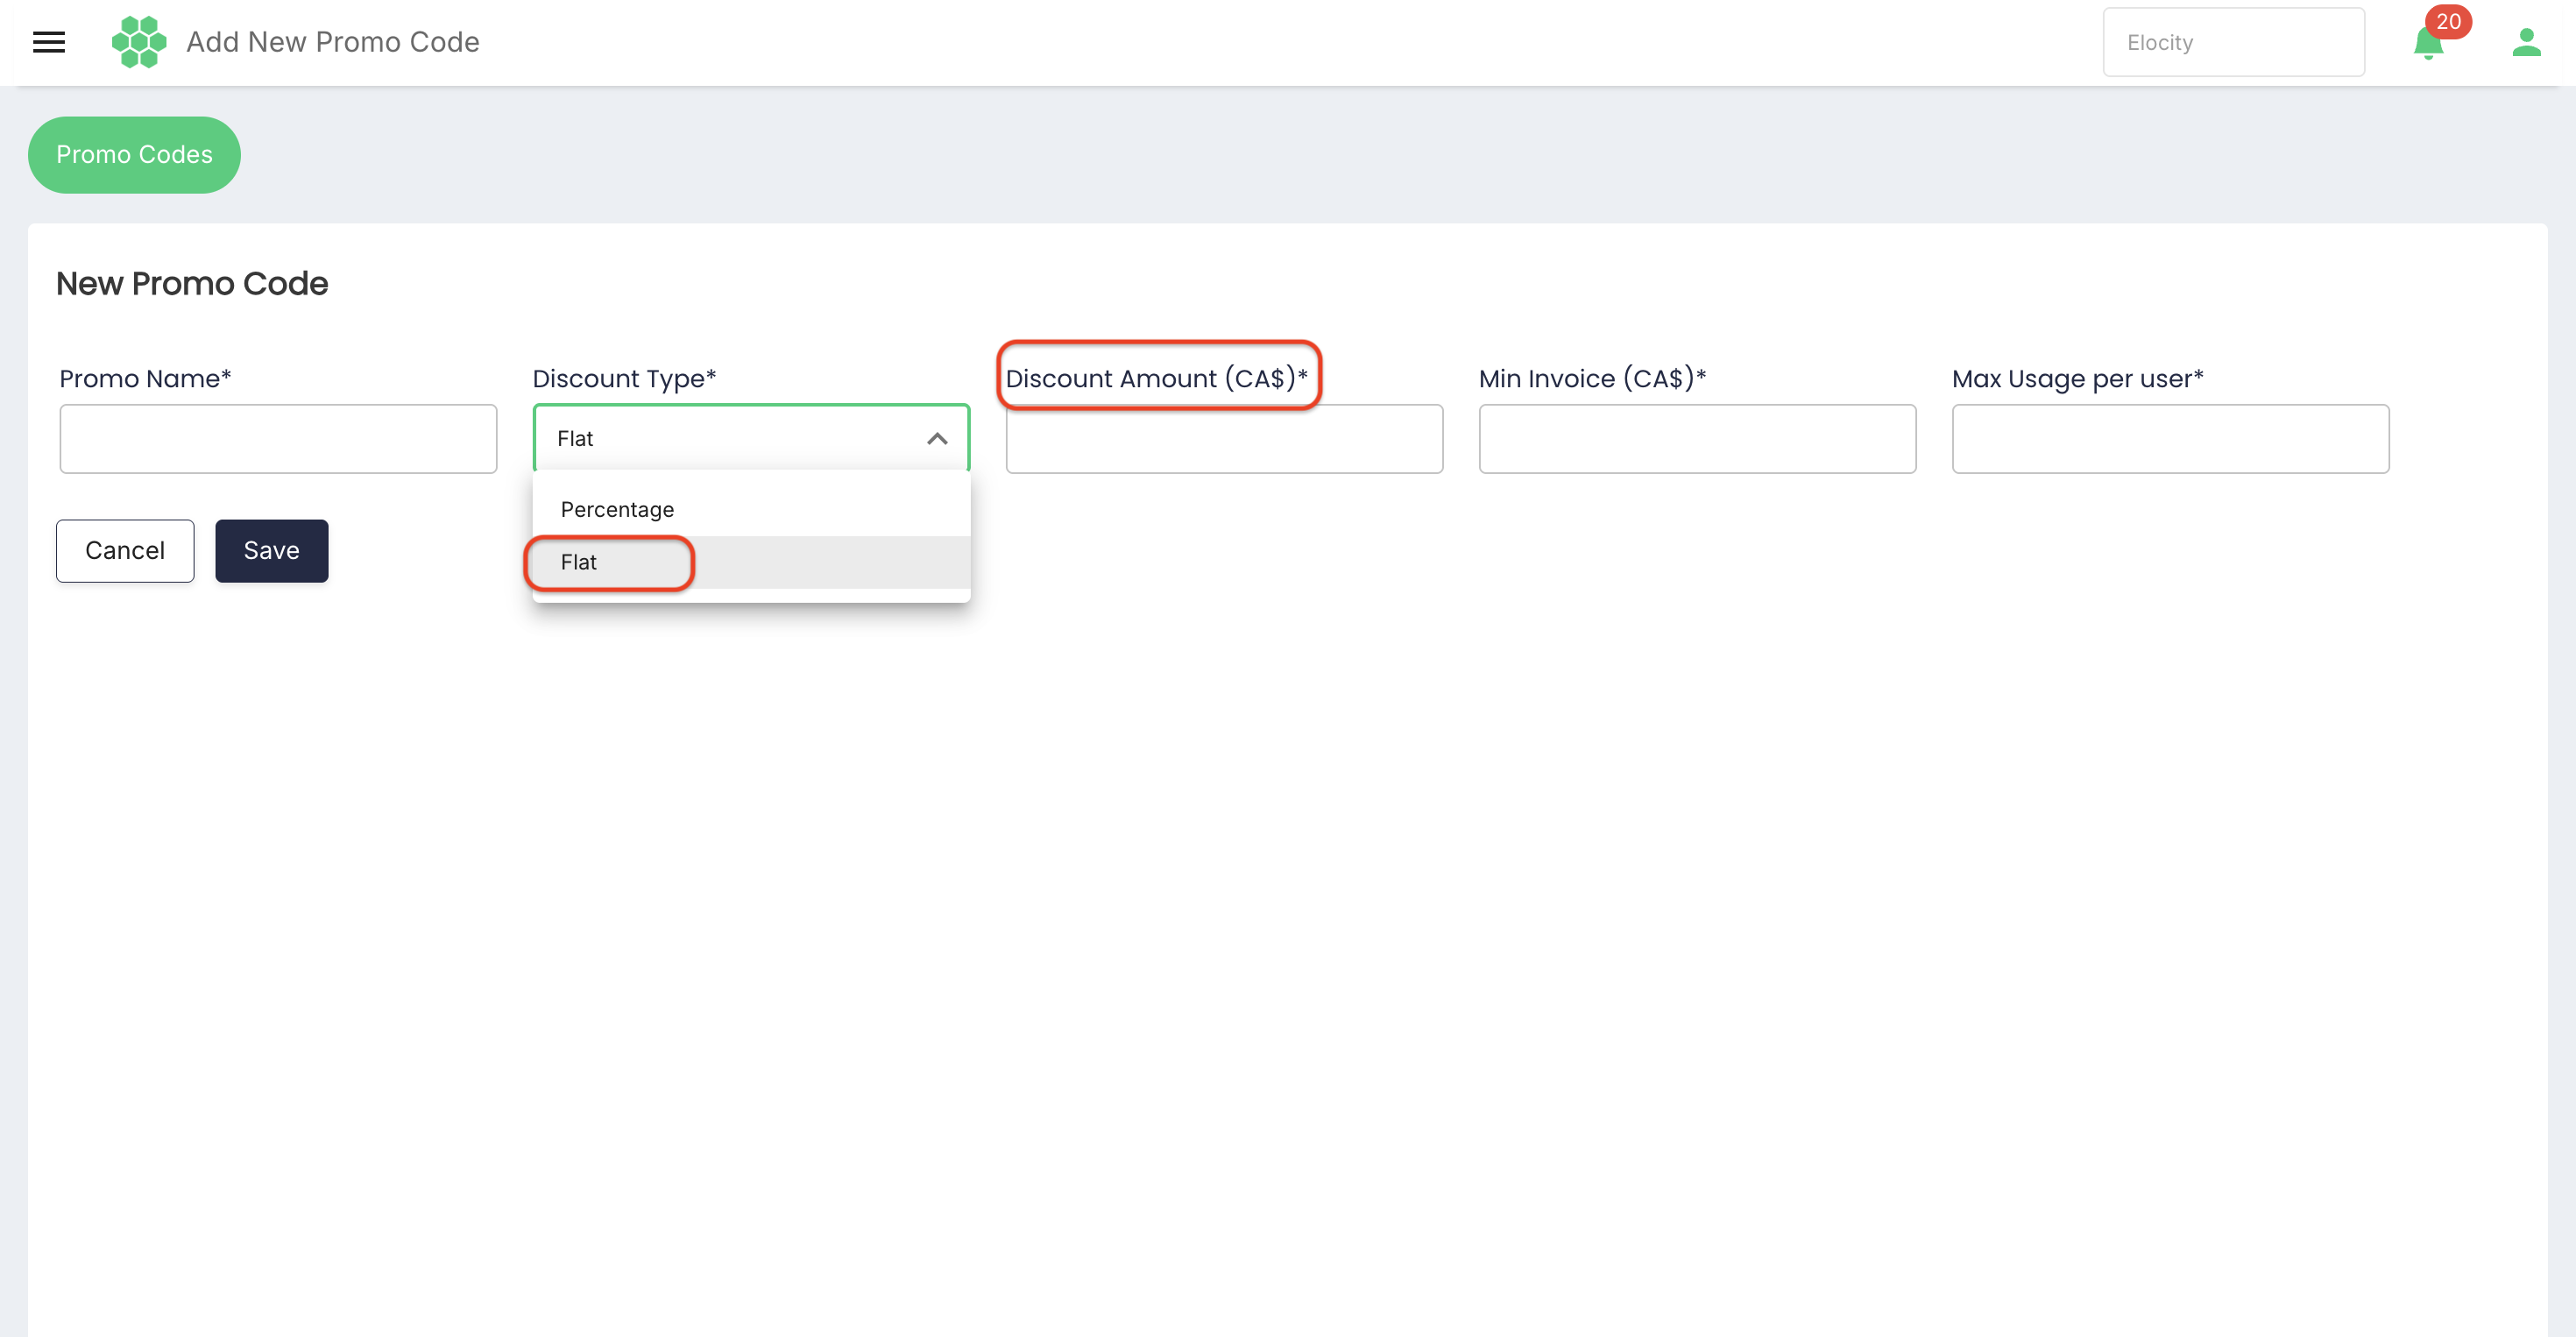
6.1 Flat discount
A flat promo code applies a configured currency amount, subject to its minimum invoice and usage rules.
When Flat is selected, the form displays:
- Promo Name
- Discount Type
- Discount Amount (CA$)
- Min Invoice (CA$)
- Max Usage per user
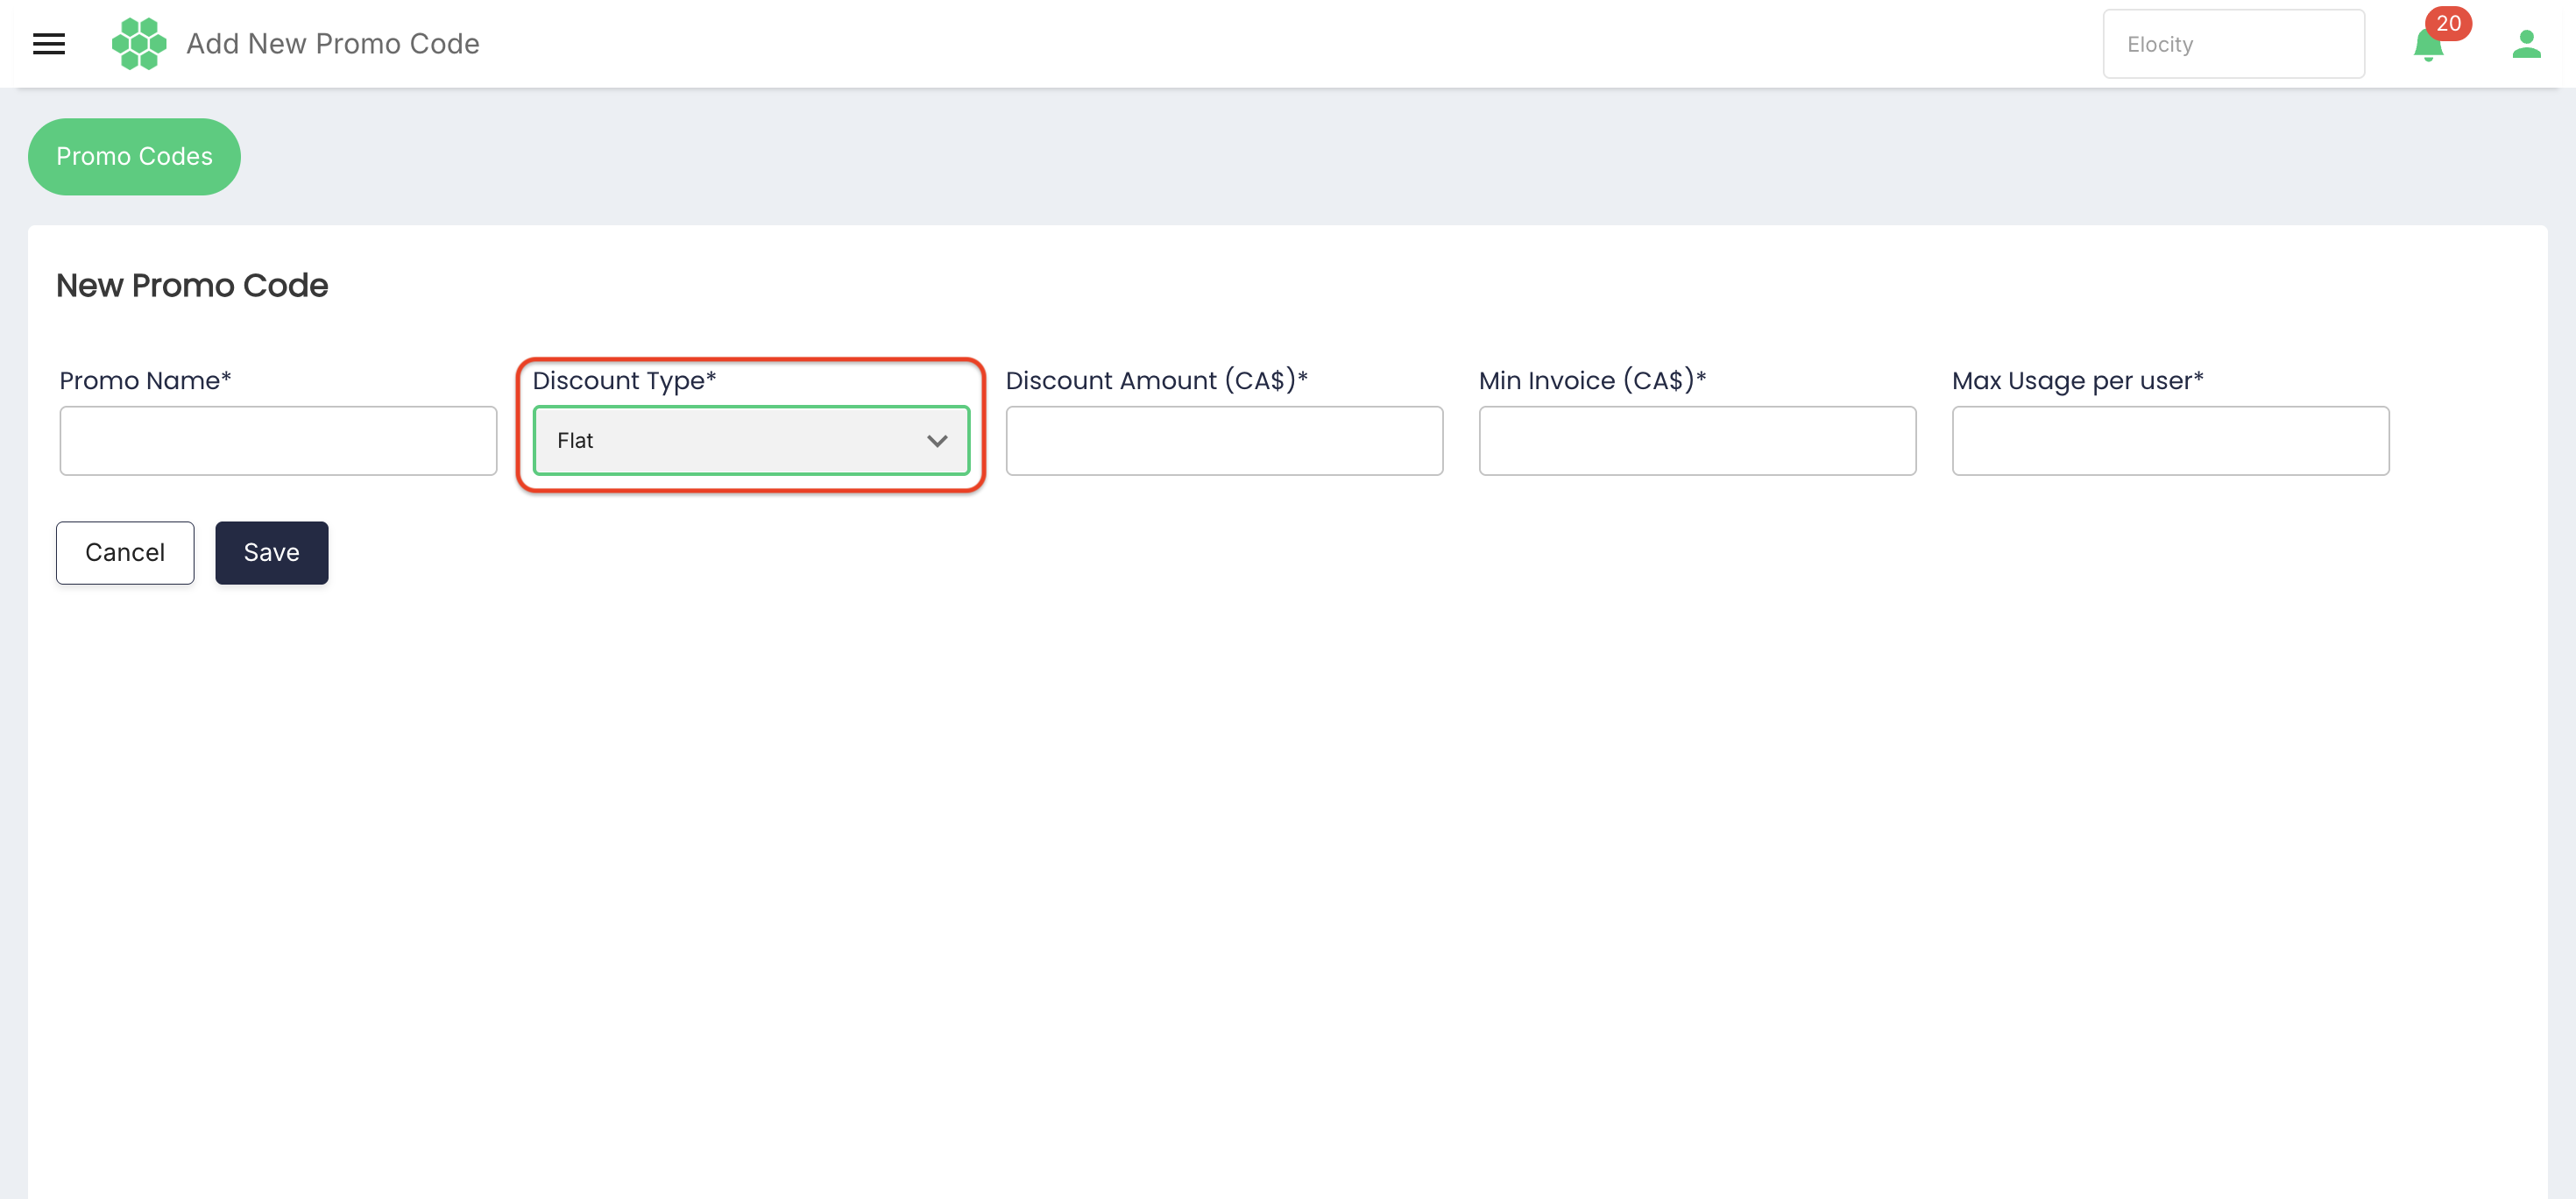
The Max Discount (CA$) field is not displayed for a flat promo code.
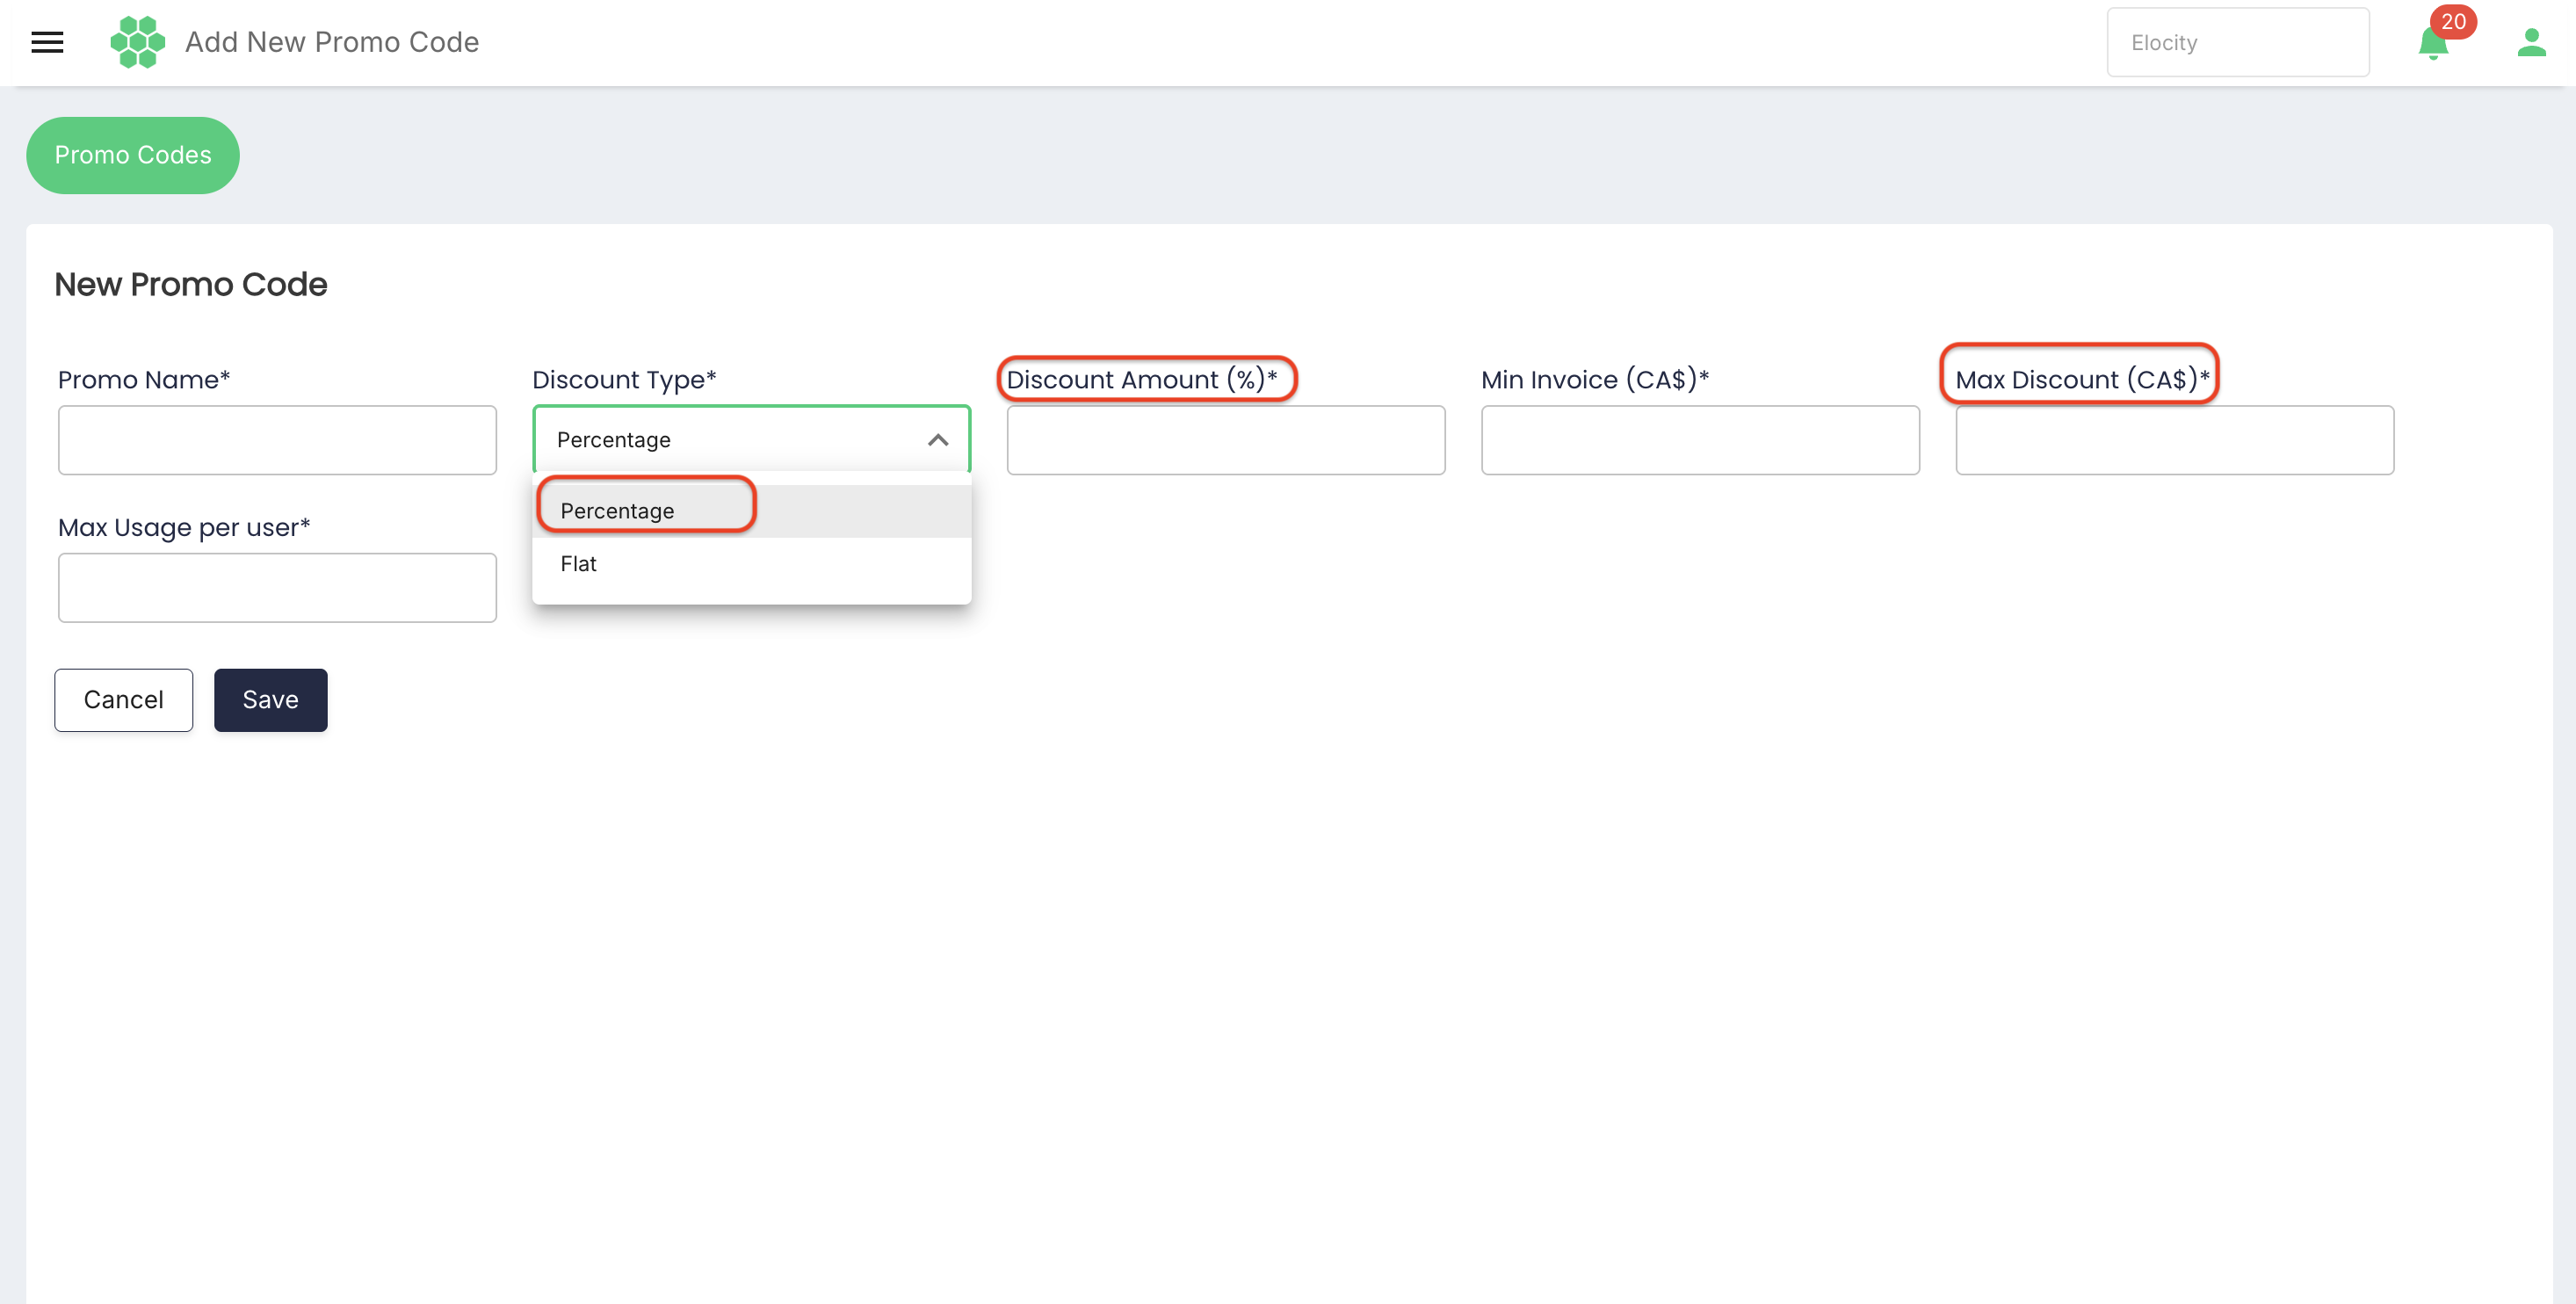
6.2 Percentage discount
A percentage promo code applies a configured percentage, subject to its minimum invoice, maximum discount, and usage rules.
When Percentage is selected, the form displays:
- Promo Name
- Discount Type
- Discount Amount (%)
- Min Invoice (CA$)
- Max Discount (CA$)
- Max Usage per user
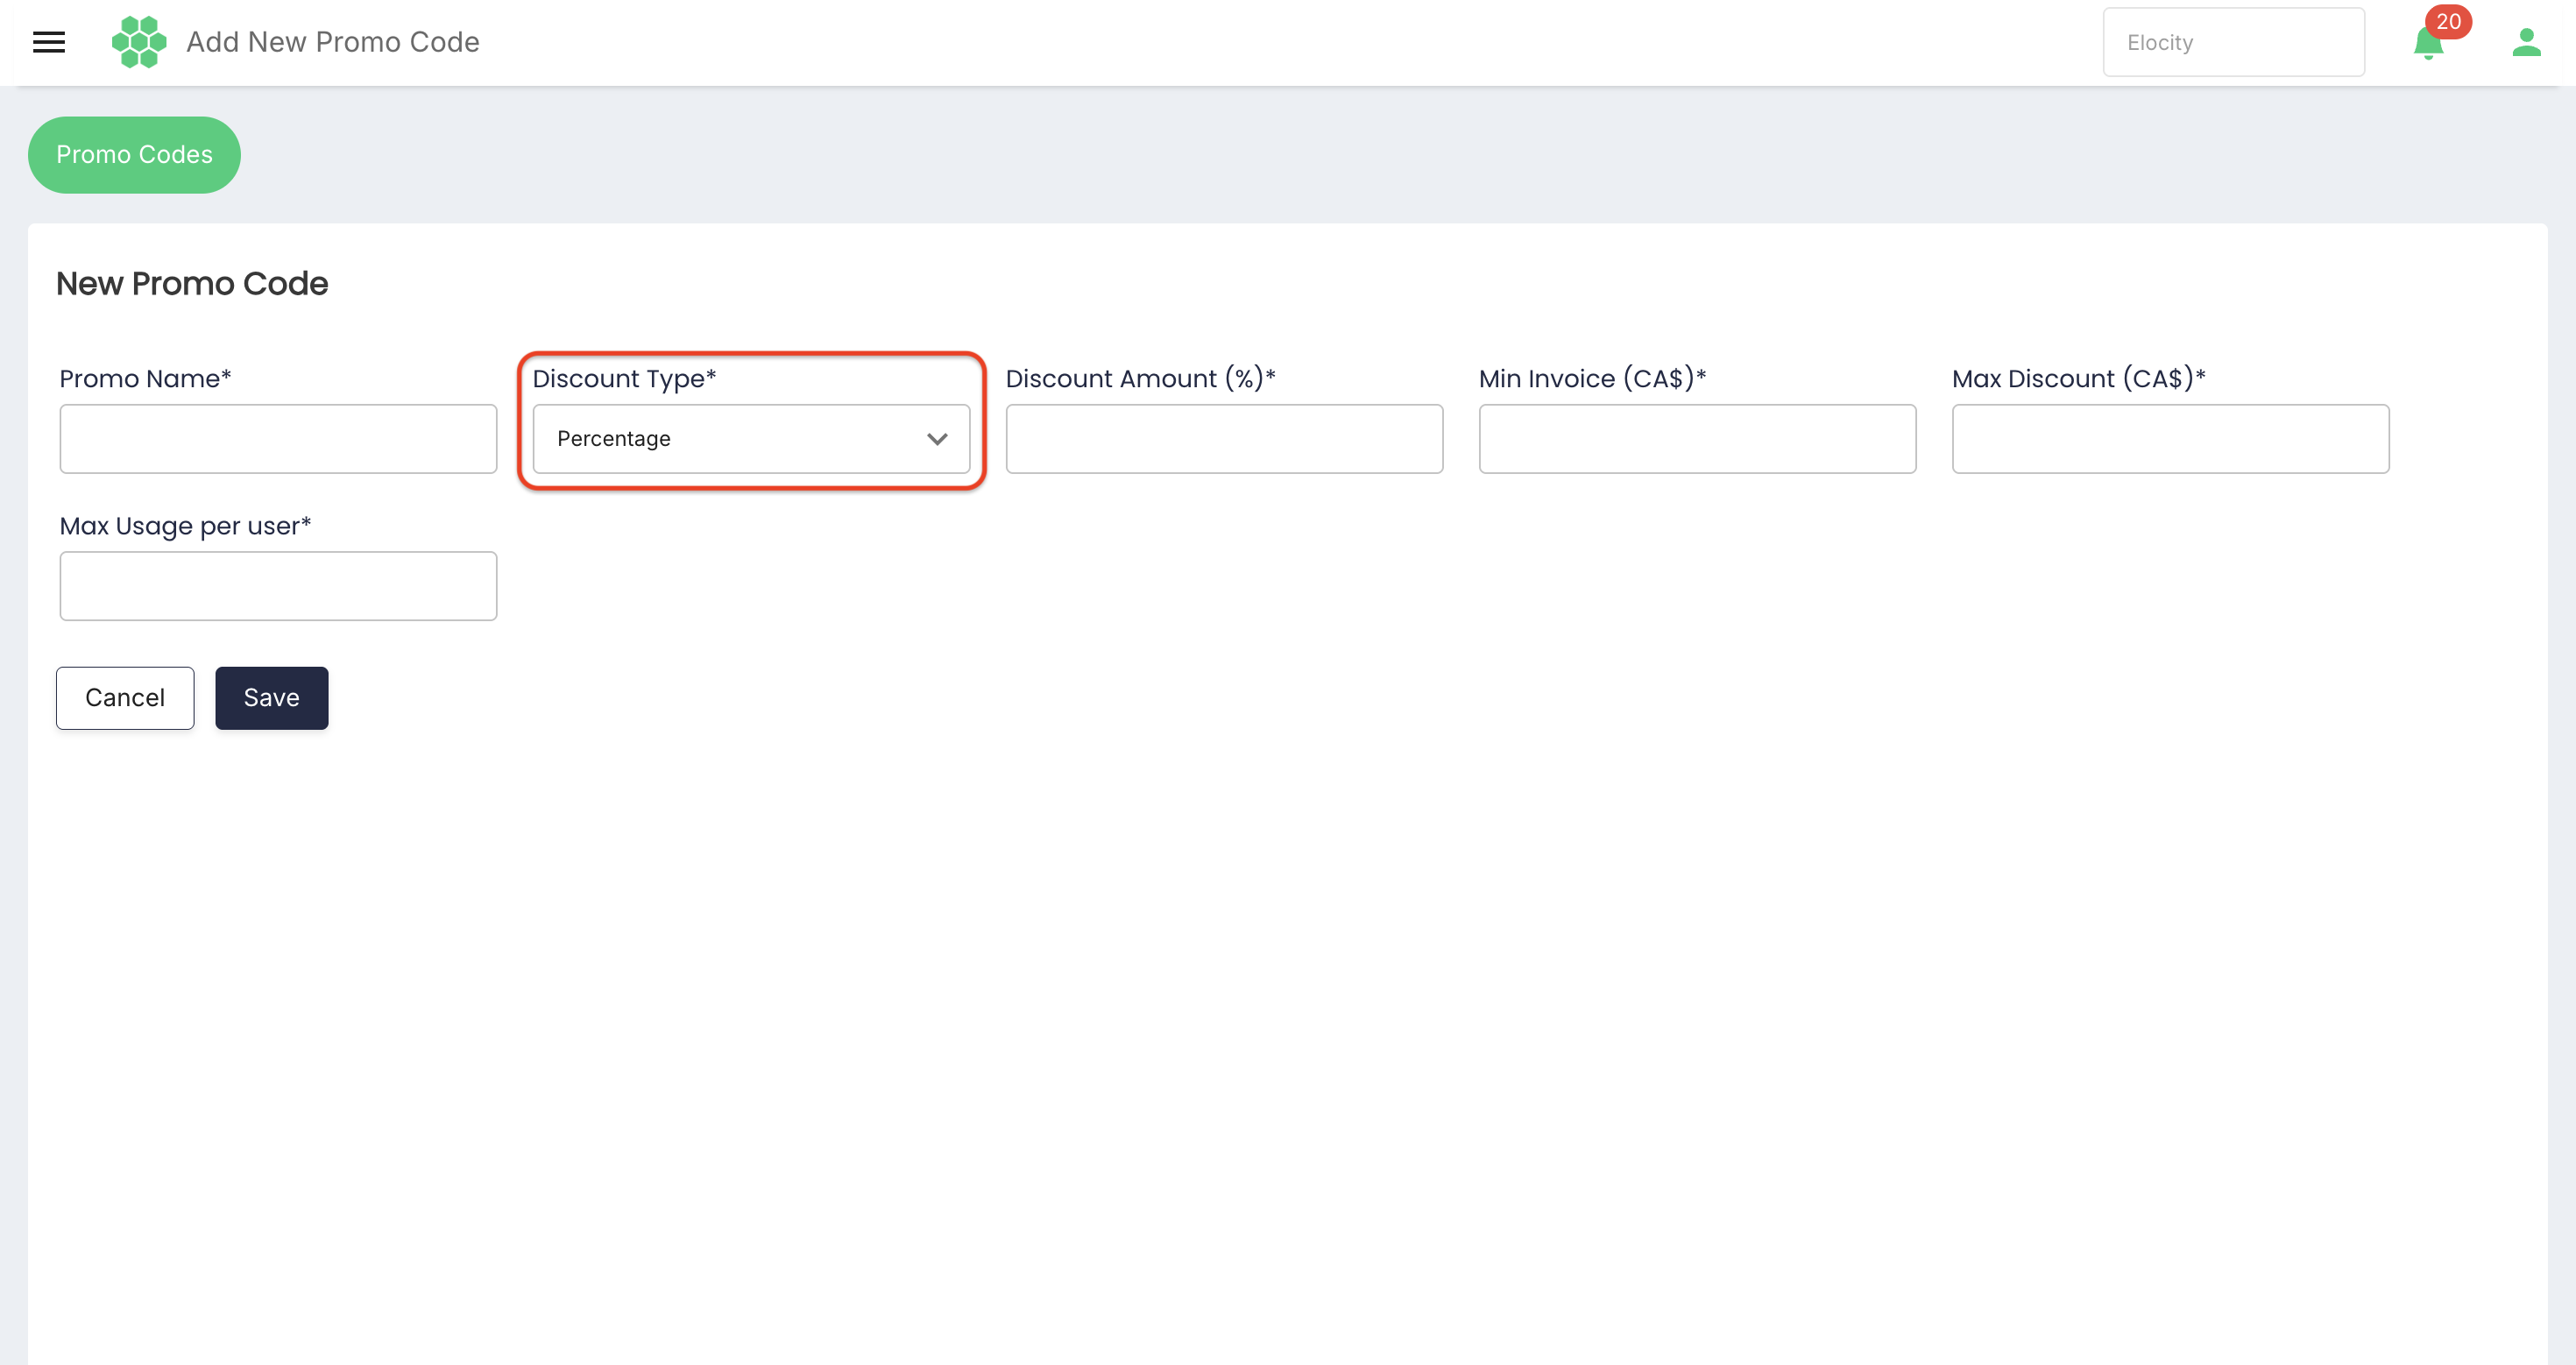
For example, if a percentage calculation exceeds Max Discount, the intended function of Max Discount is to cap the discount. The calculation base, tax treatment, and rounding rules require confirmation before a numerical example can be published.
7. Adding a New Promo Code
To add a new promo code, follow these steps:
- Navigate to Rewards > Promo Codes.
- Verify the selected business.
- Select Add New Promo Code.
- Enter the Promo Name. This is the code that the customer will enter.
- Select Flat or Percentage from Discount Type.
- Enter the required discount values:
- For Flat, enter Discount Amount (CA$).
- For Percentage, enter Discount Amount (%) and Max Discount (CA$).
- For Flat, enter Discount Amount (CA$).
- Enter Min Invoice (CA$).
- Enter Max Usage per user.
- Review every value.
- Select Save to create the designed promo code, or Cancel to leave without saving.
The live review selected Cancel and did not create a promo code. Numeric limits, duplicate-name rules, allowed characters, and the exact validation messages were not tested.
8. Viewing a Promo Code
To view a designed promo code, follow these steps:
- Navigate to Rewards > Promo Codes.
- Select the DESIGNED tab.
- Select the checkbox for the required promo code.
- Select View/Edit.
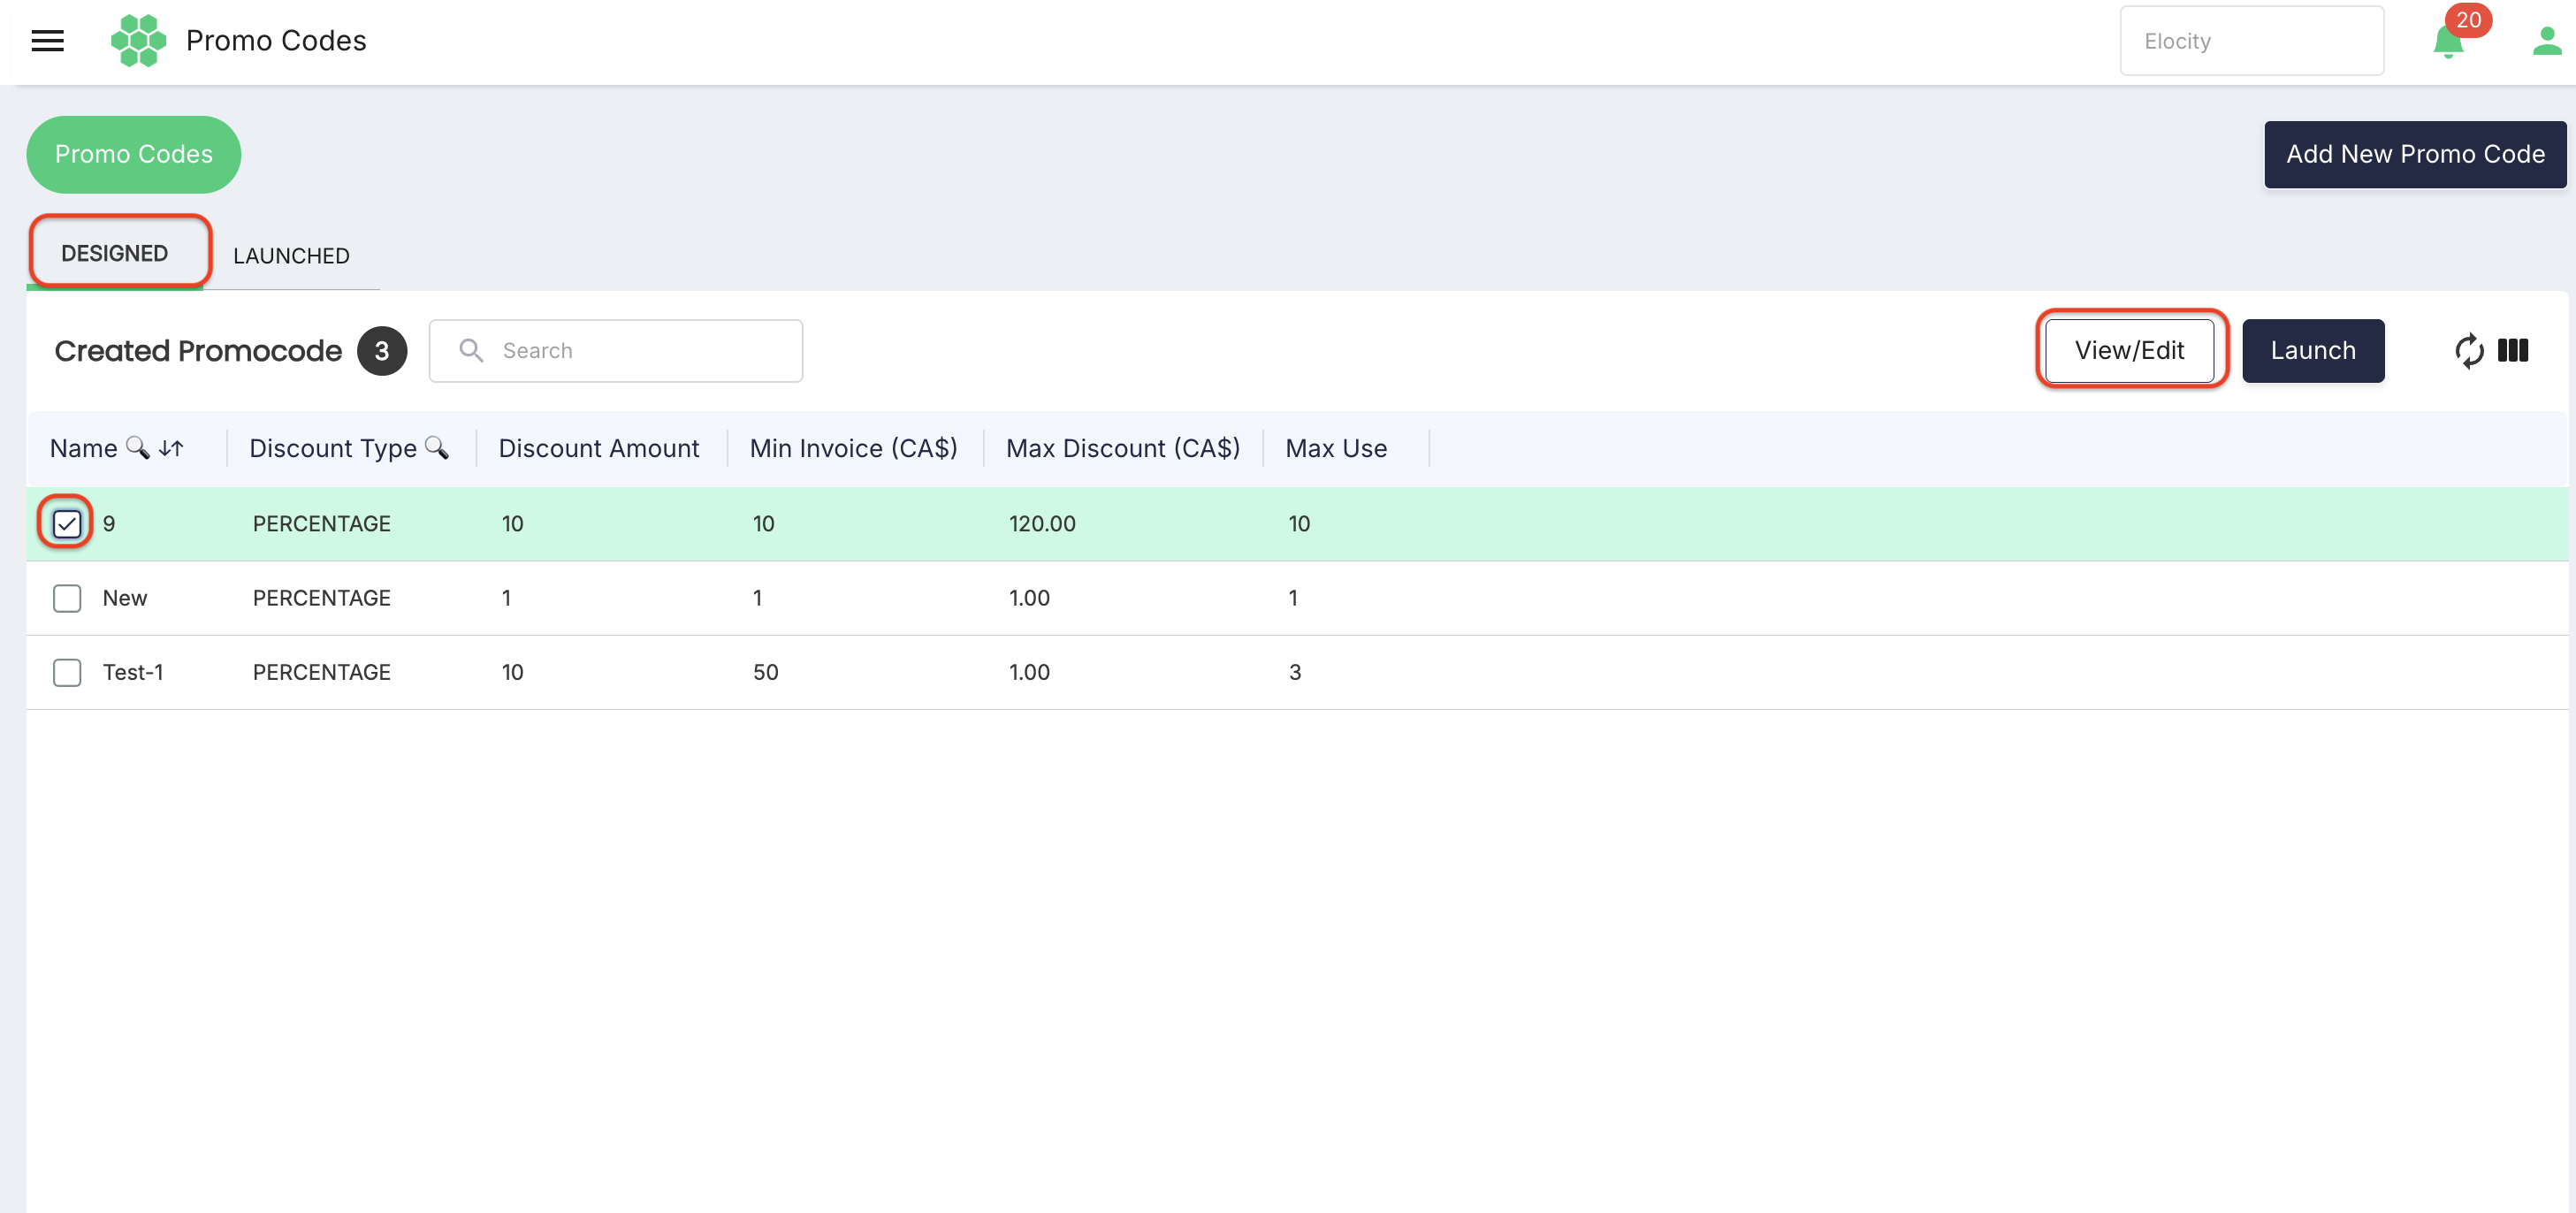
The View Promo Code page displays the promo-code values as read-only fields and provides Edit.
The reviewed page displayed:
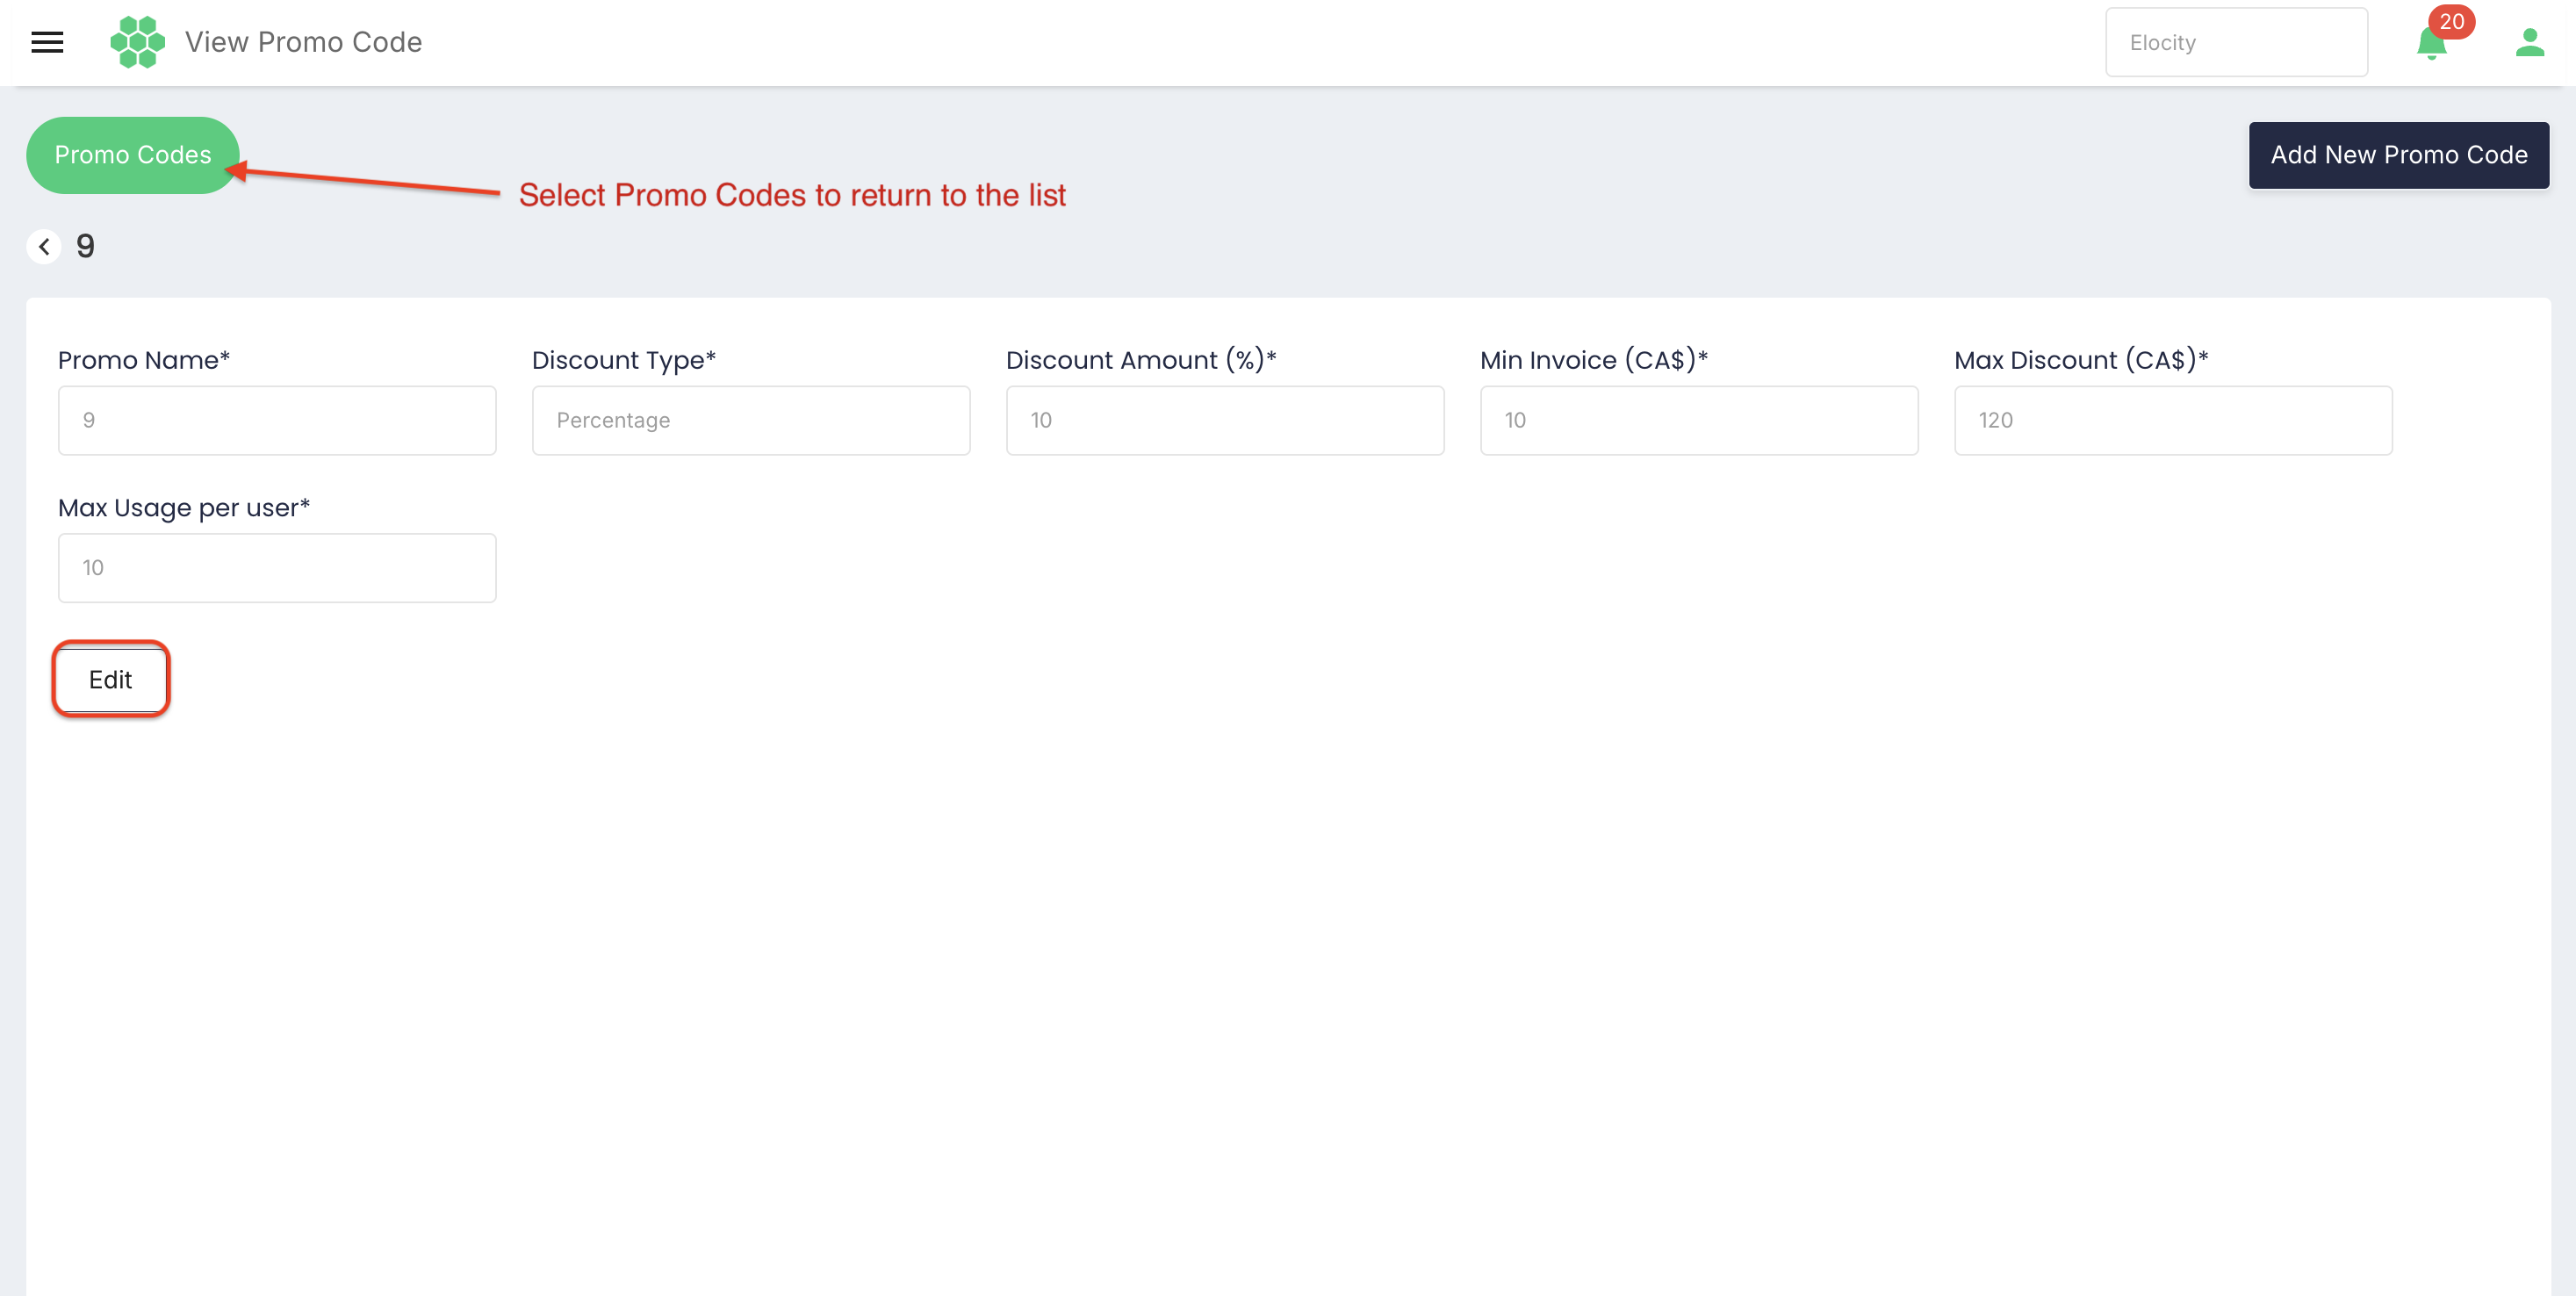
- Business
- Promo Name
- Discount Type
- Discount Amount
- Min Invoice
- Max Discount for a percentage promo code
- Max Usage per user
Select Promo Codes to return to the list.
9. Editing a Designed Promo Code
To edit a designed promo code, follow these steps:
- Open the promo code as described in Section 8.
- Select Edit.
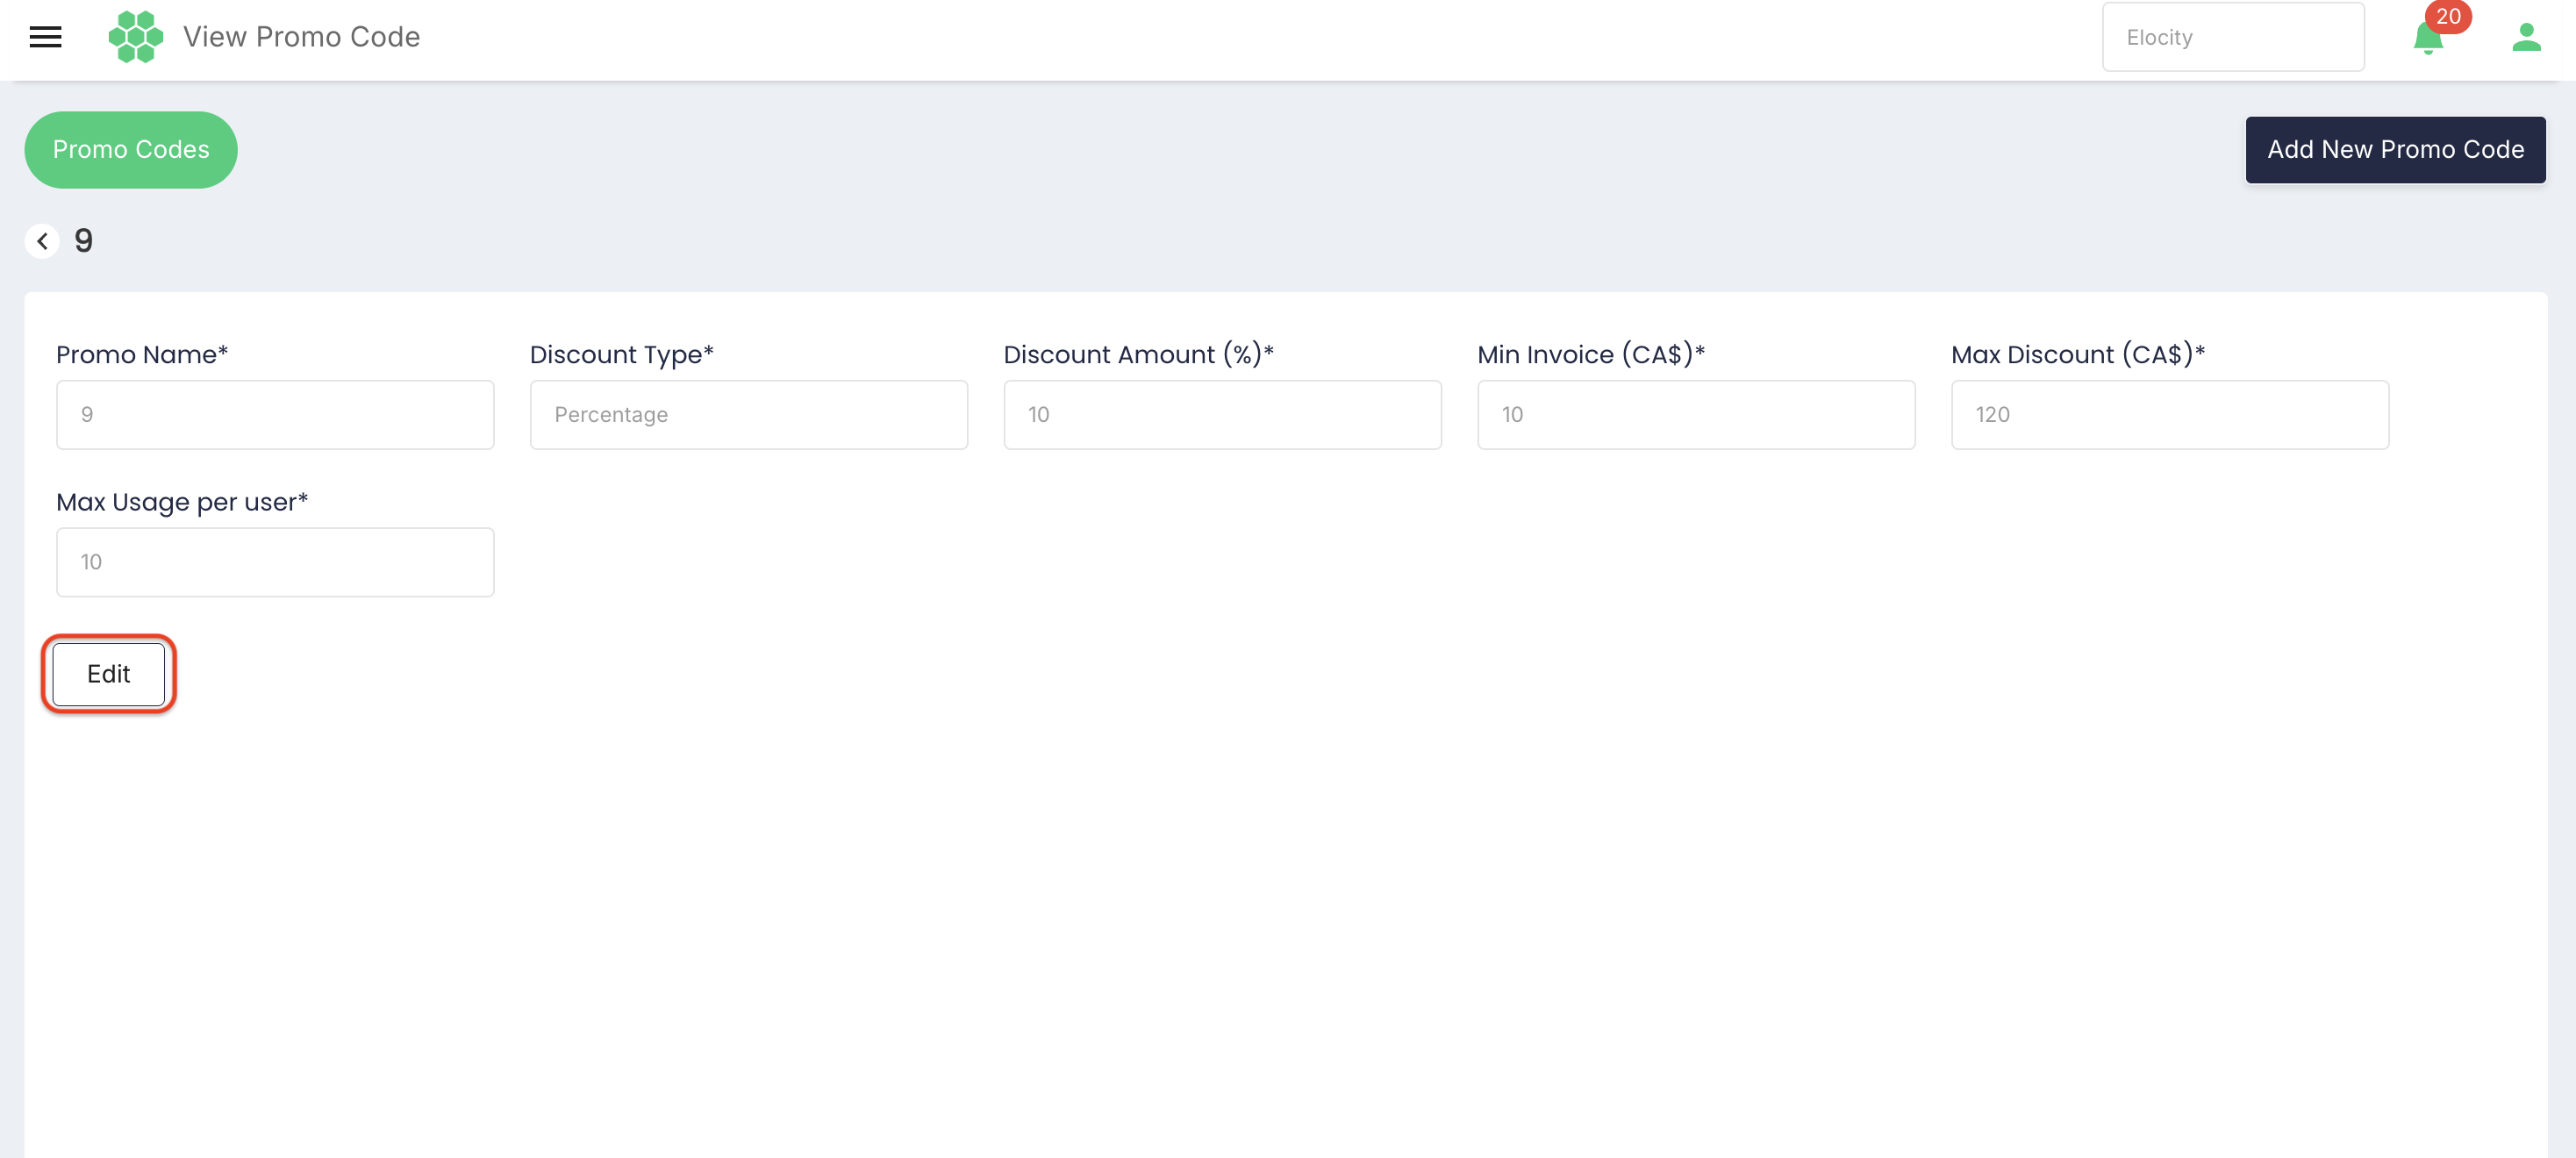
- Make the required changes.
- Review all values.
- Select Save to retain the changes, or Cancel to return to read-only view without saving.
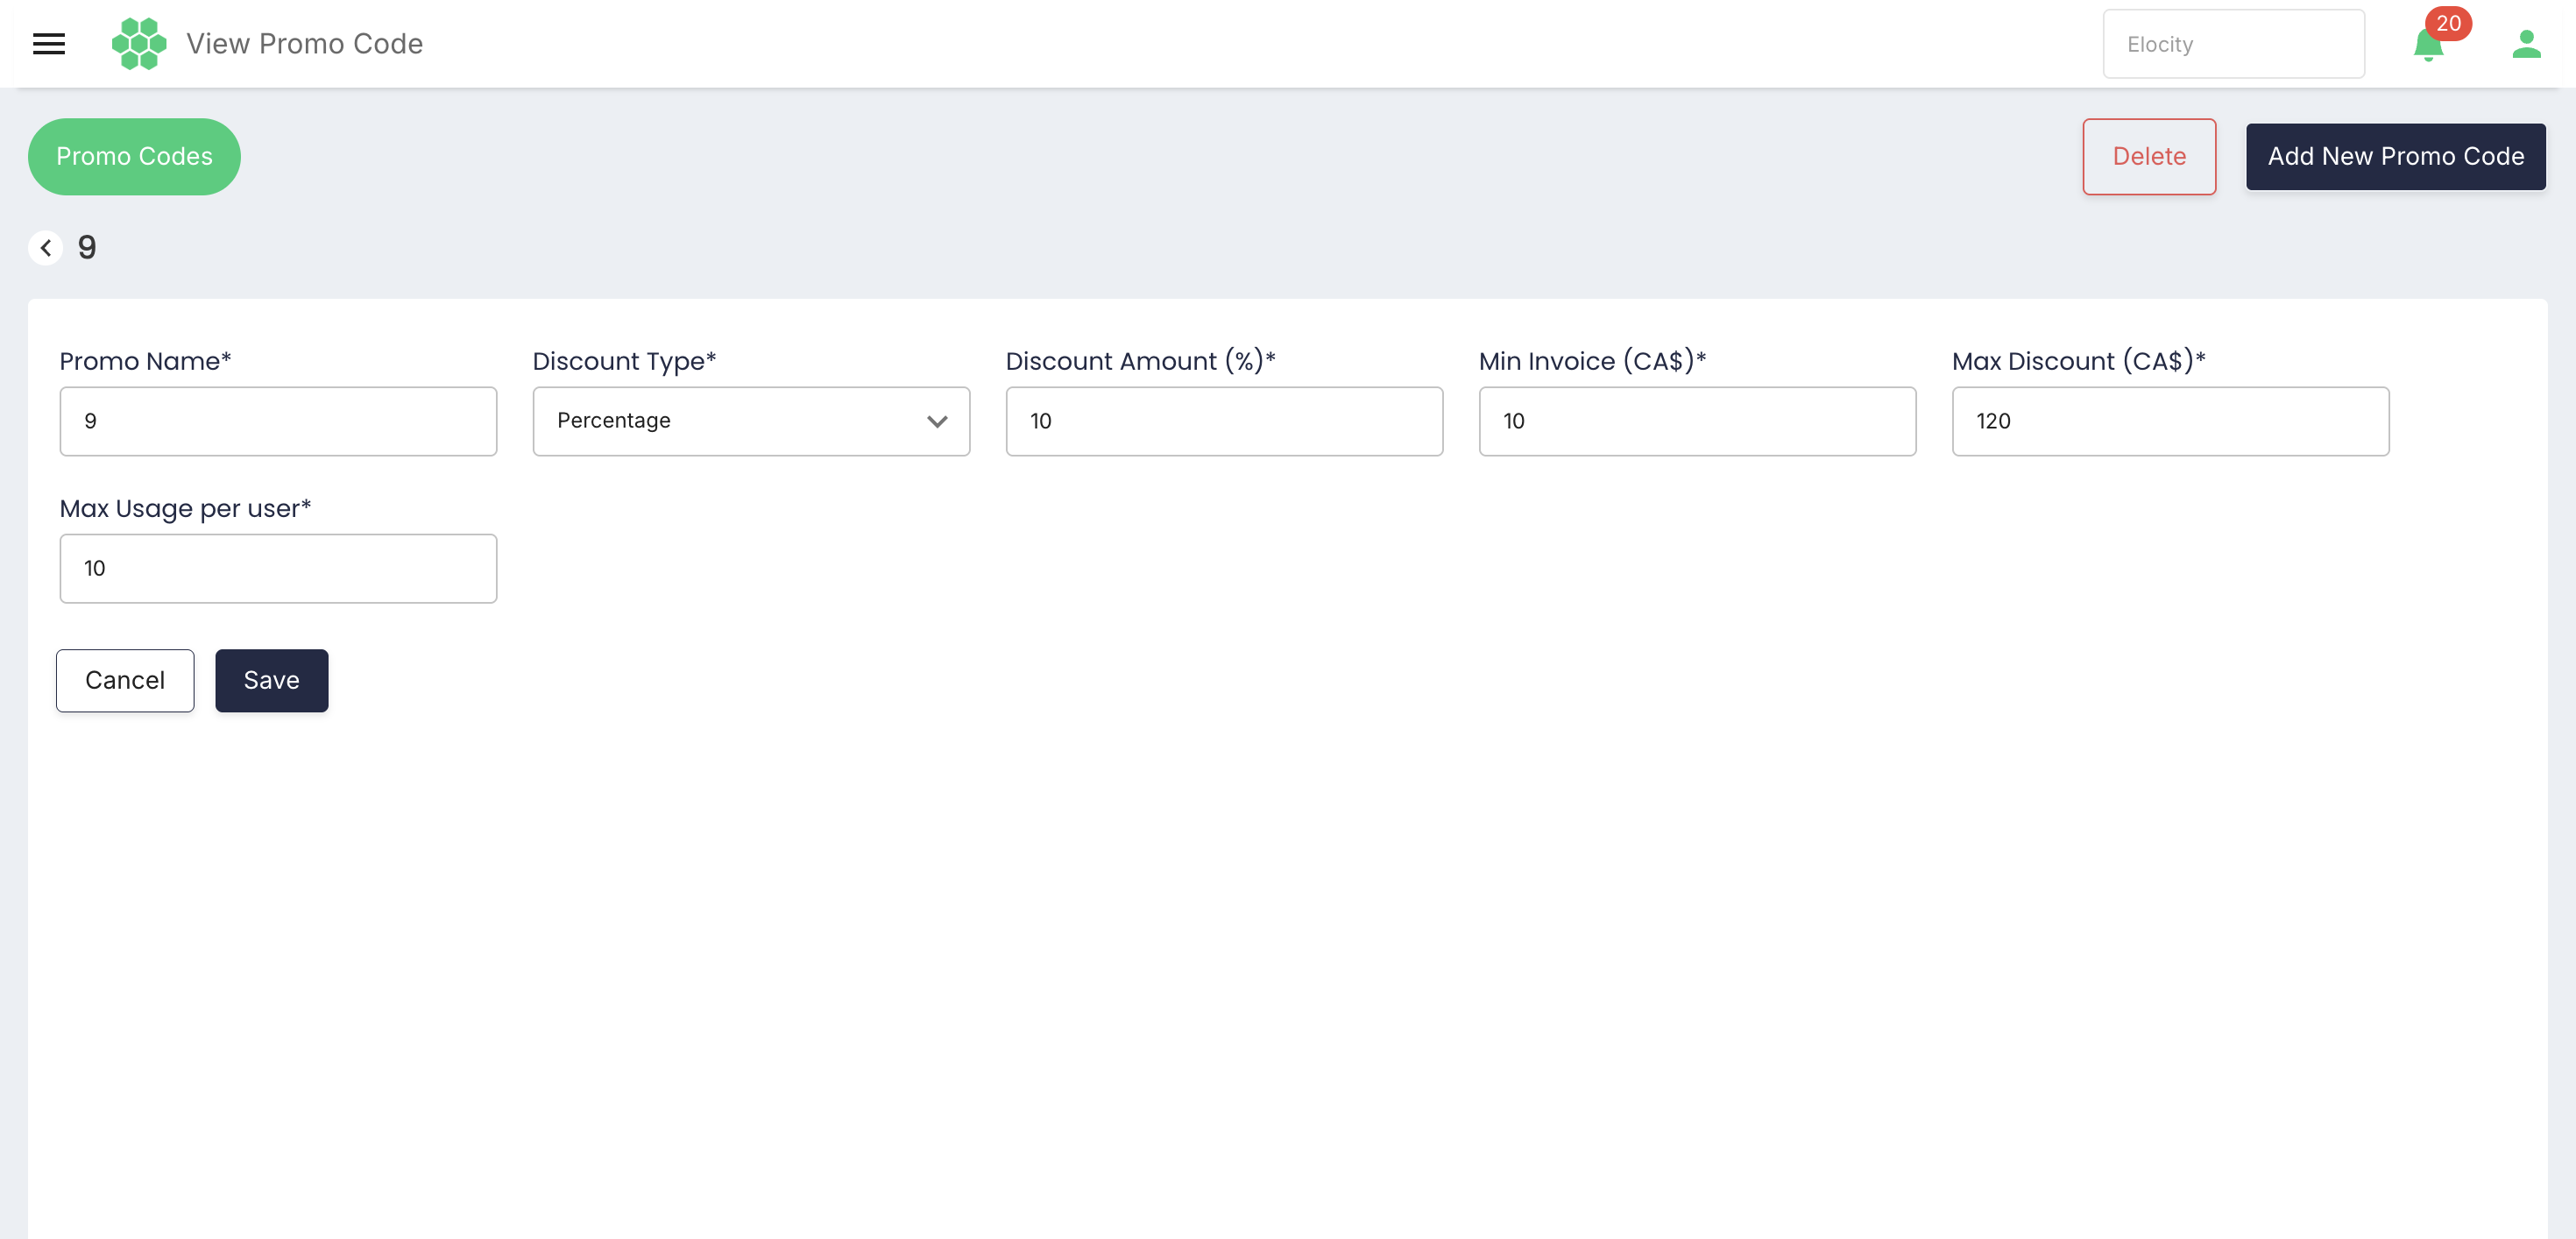
In edit mode, all promo-code definition fields were presented as editable, including Discount Type.
The edit page also displays Delete. Deletion was not selected because it is destructive. The confirmation message, deletion restrictions, audit behavior, and recovery options require confirmation.
10. Launching a Promo Code
Launching a promo code makes a designed promotion available for the selected network locations and launch period.
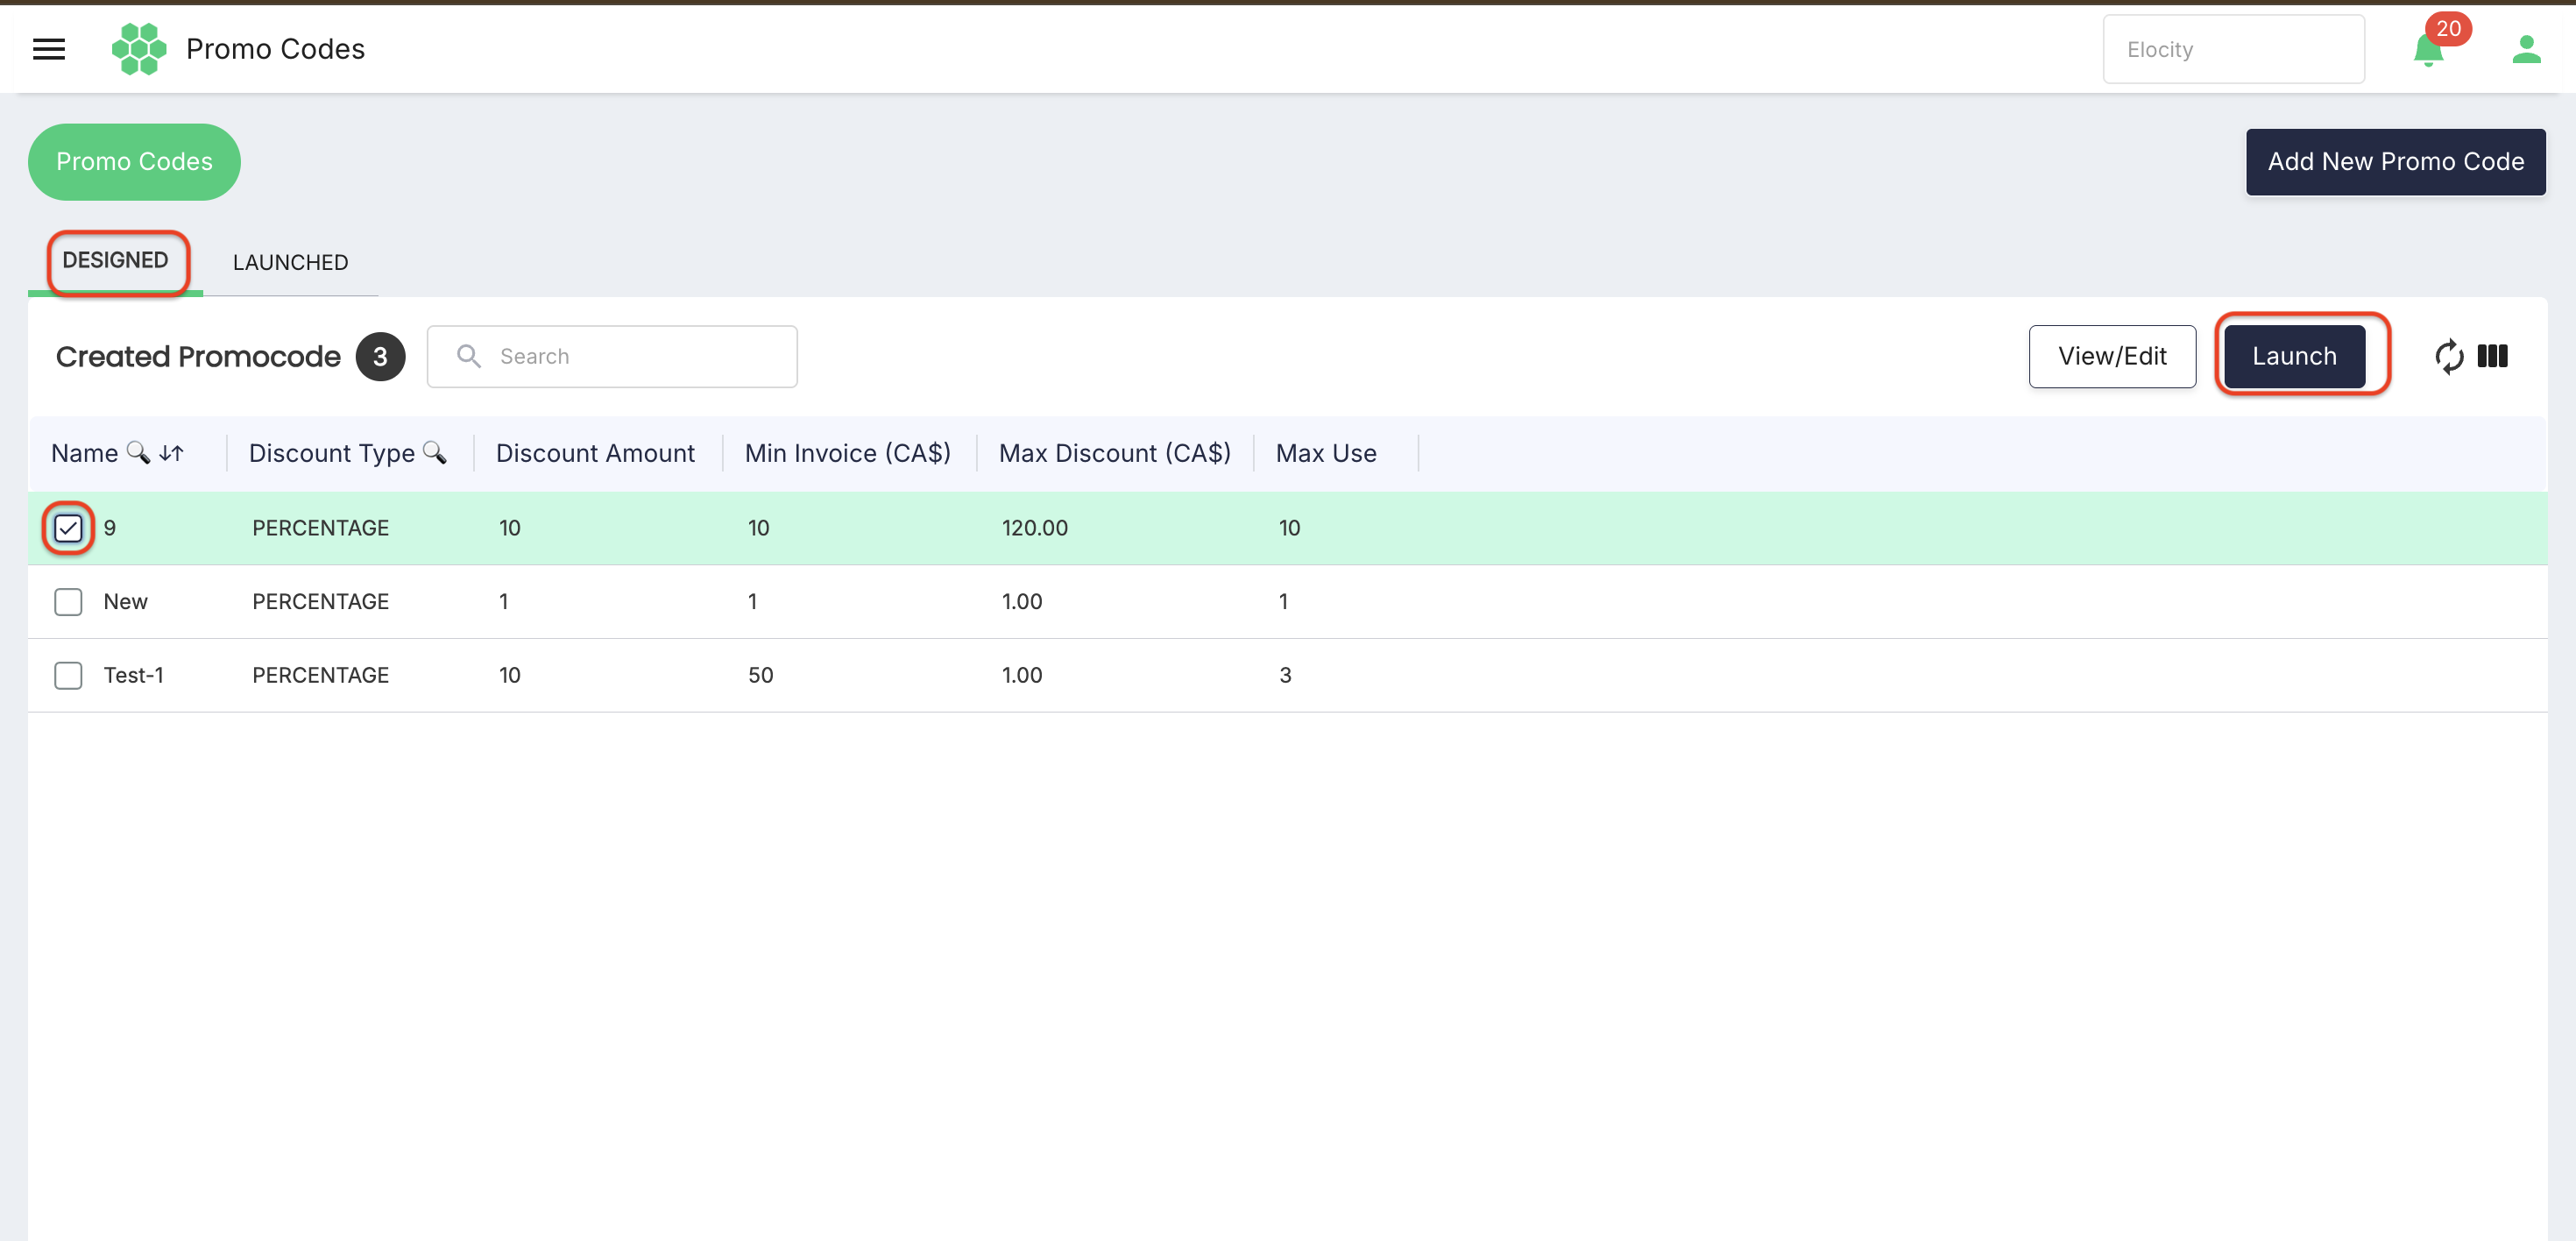
To open the launch form, follow these steps:
- Navigate to Rewards > Promo Codes.
- Select the DESIGNED tab.
- Select the promo code you want to launch.
- Select Launch.
10.1 Launch form
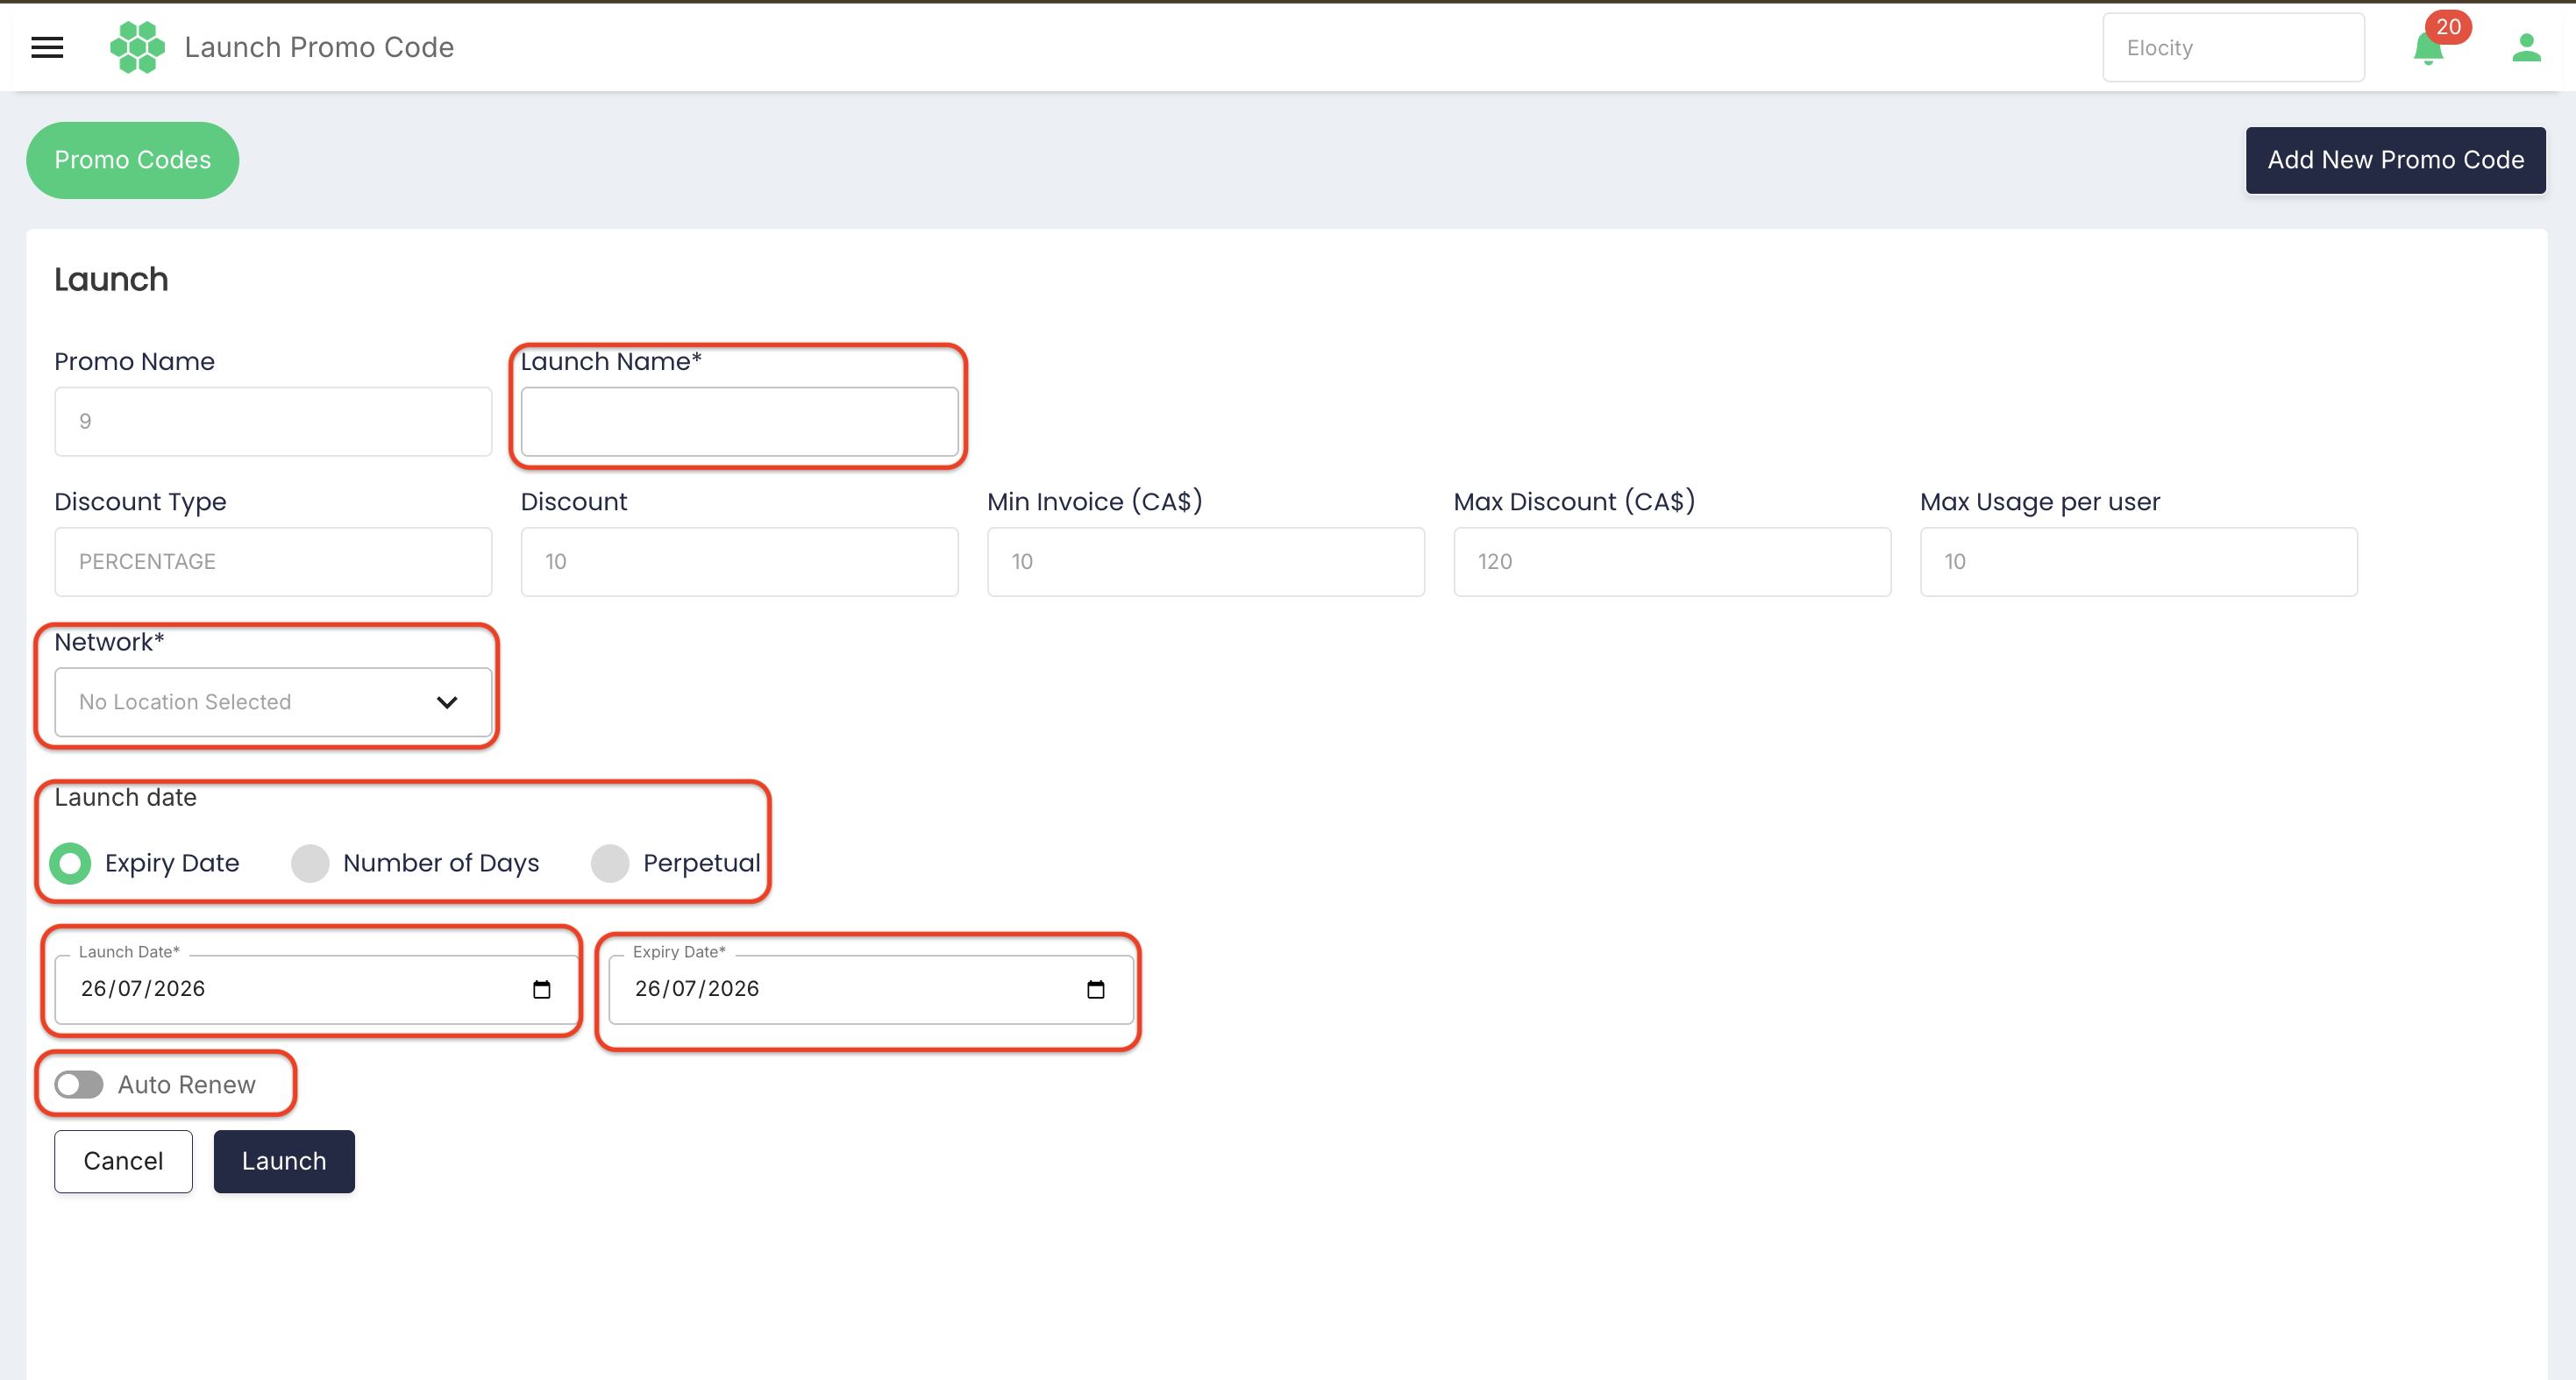
The launch form displays the following promo-code values as read-only:
- Promo Name
- Discount Type
- Discount
- Min Invoice (CA$)
- Max Discount (CA$), when applicable
- Max Usage per user
The following launch fields must be completed:
| Field | Required | Description |
|---|---|---|
| Launch Name | Yes | Name assigned to this launch. Its uniqueness rules and customer visibility require confirmation. |
| Network | Yes | Opens Select Locations so the user can choose the locations at which the promotion is launched. |
| Launch date option | Yes | Select Expiry Date, Number of Days, or Perpetual. |
| Launch Date | Yes | Date on which the launch begins. The timezone and start-of-day rules require confirmation. |
| Expiry Date | Yes when Expiry Date is selected | Date on which an expiry-based launch ends. |
| Number of Days | Yes when Number of Days is selected | Duration entered for a day-based launch. |
| Auto Renew | Available for Expiry Date and Number of Days | Renewal option displayed for the two limited launch periods. Its renewal behavior requires confirmation. |
Auto Renew was not displayed when Perpetual was selected.
In the reviewed launch form, Expiry Date was initially selected. Launch Date and Expiry Date were initially populated with the review date, and Auto Renew was not selected. Always verify these values instead of relying on the initial state.
10.2 Selecting network locations
To select network locations, follow these steps:
- Select Network.
- In Select Locations, select Toggle to expand the location hierarchy.
- Expand the required country and province or region.
- Select the required location checkboxes.
- Review the selected-location summary.
- Select Done.
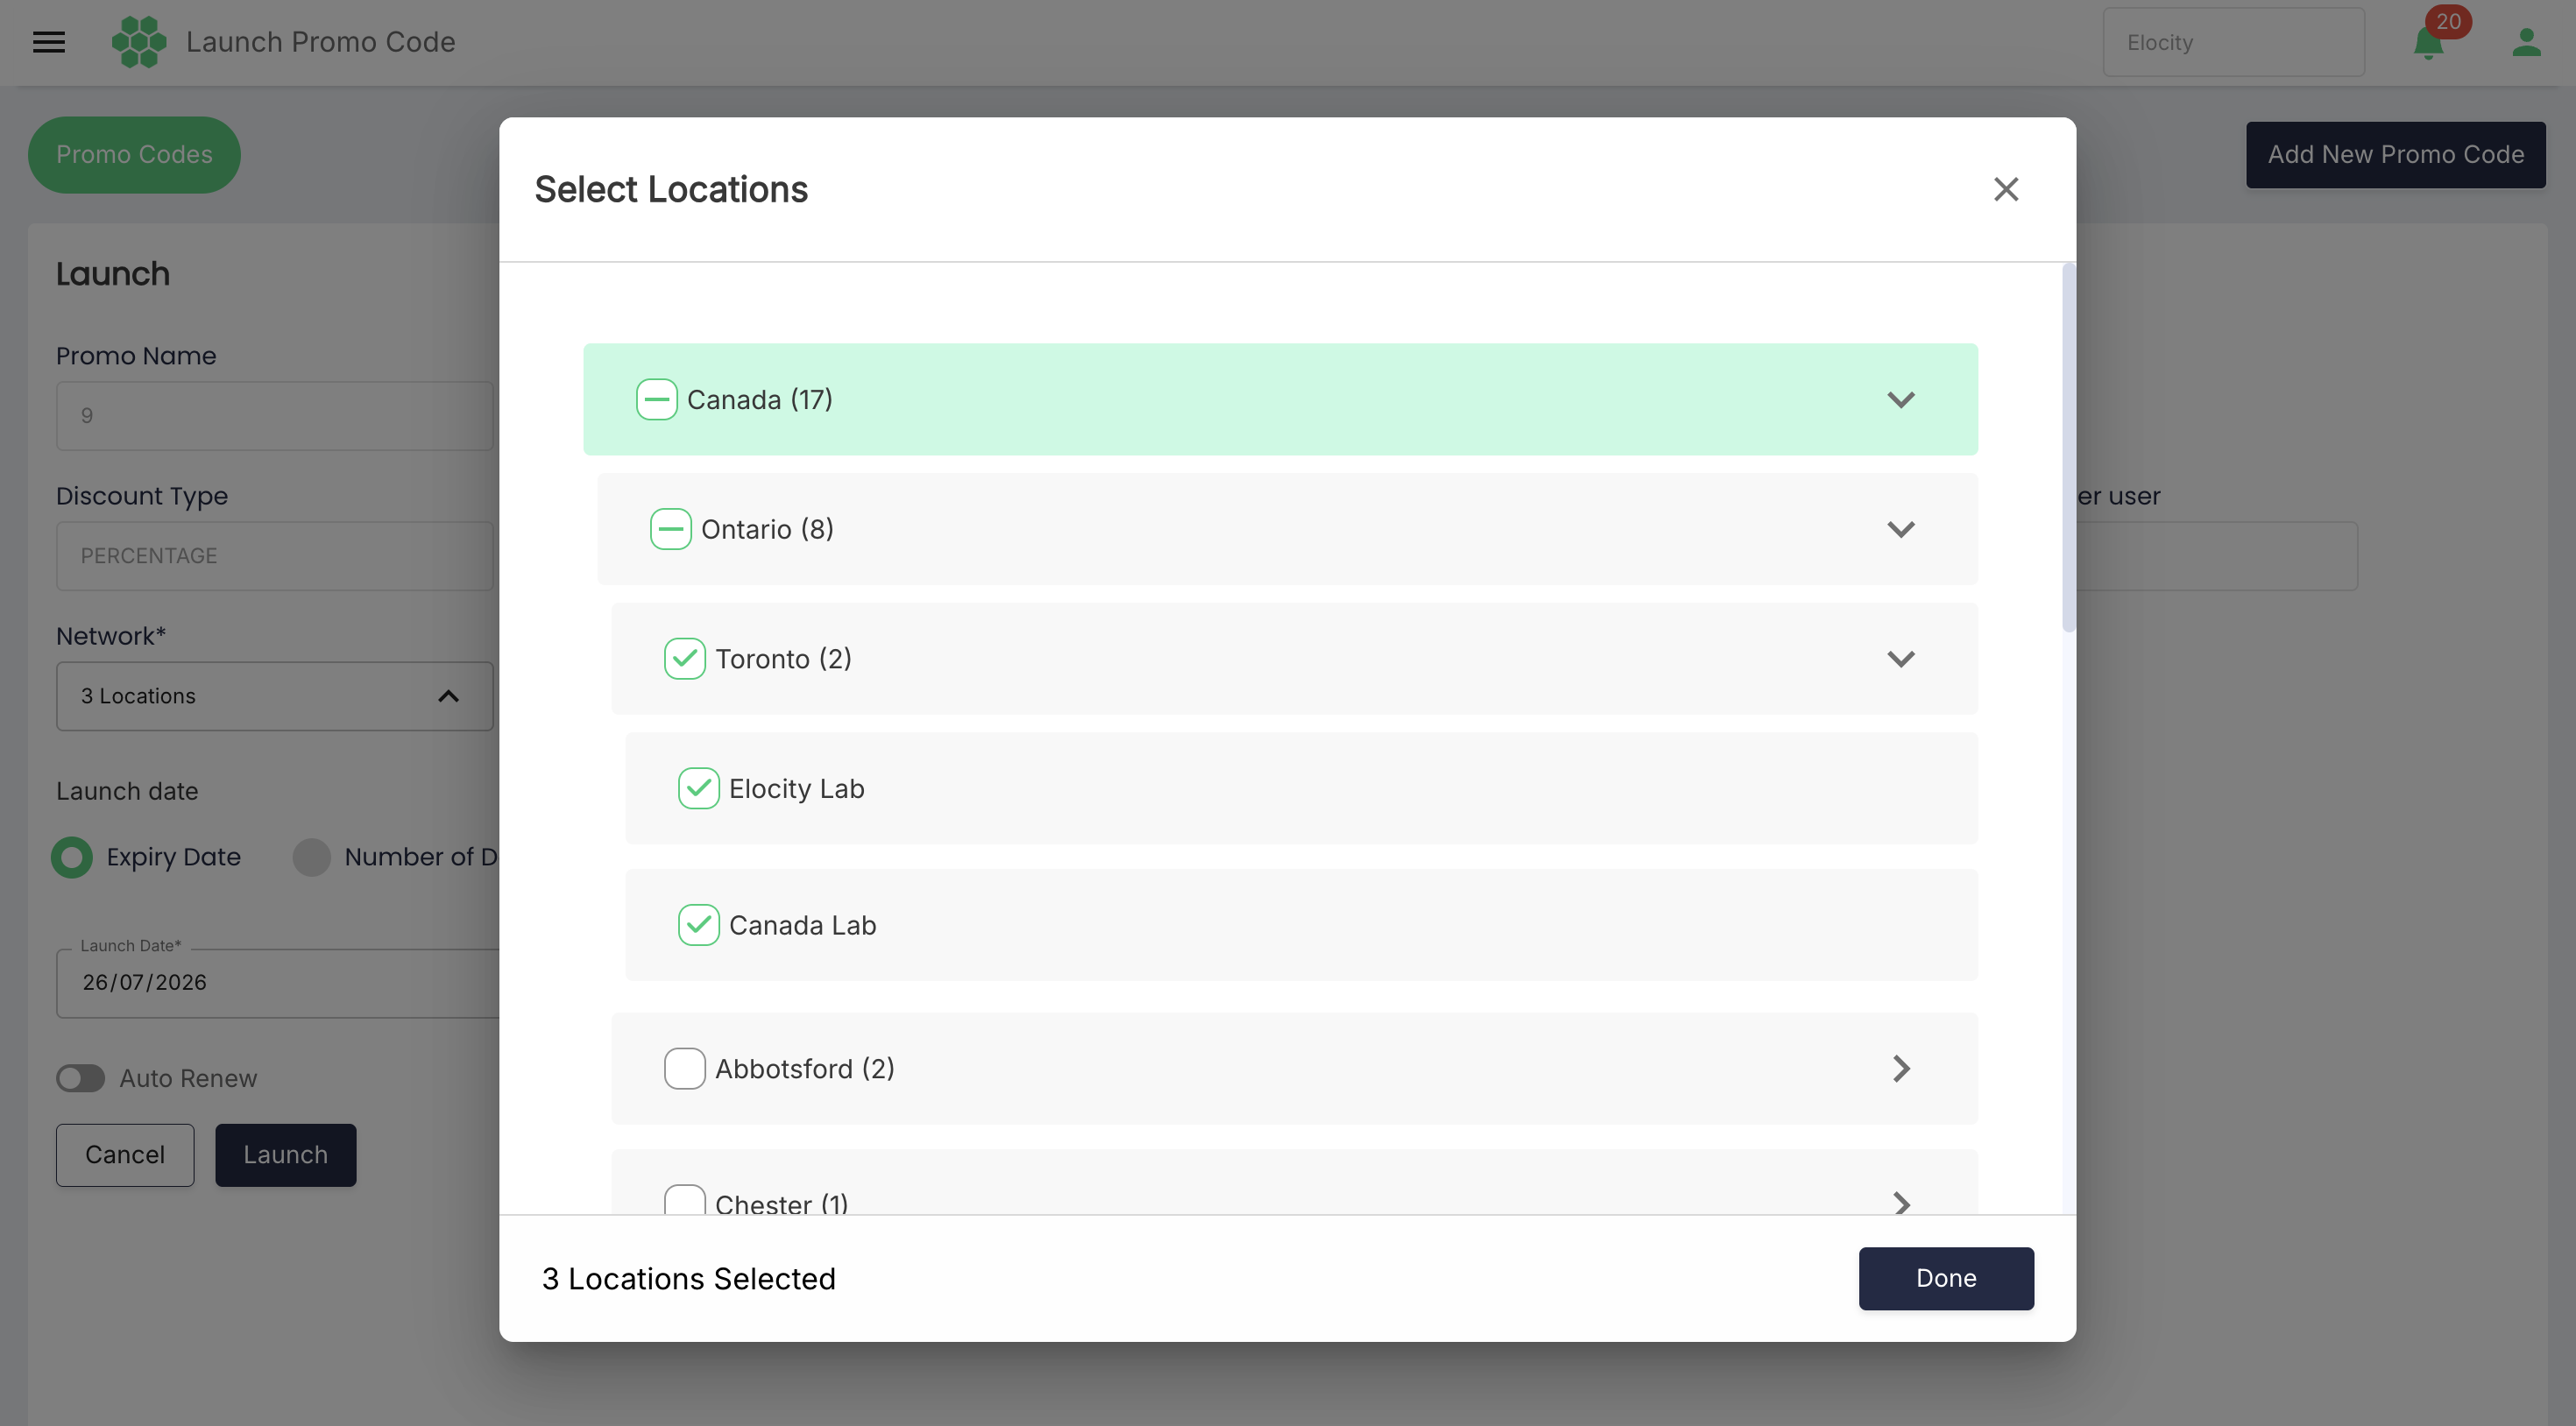
In the reviewed account, the hierarchy began with Canada, followed by Alberta, British Columbia, and Ontario, and then their available locations.
Done remains unavailable while no location is selected. Closing the dialog with no selection displayed:
Network Location cannot be empty, at least one must be selected
10.3 Choosing the launch period
Expiry Date
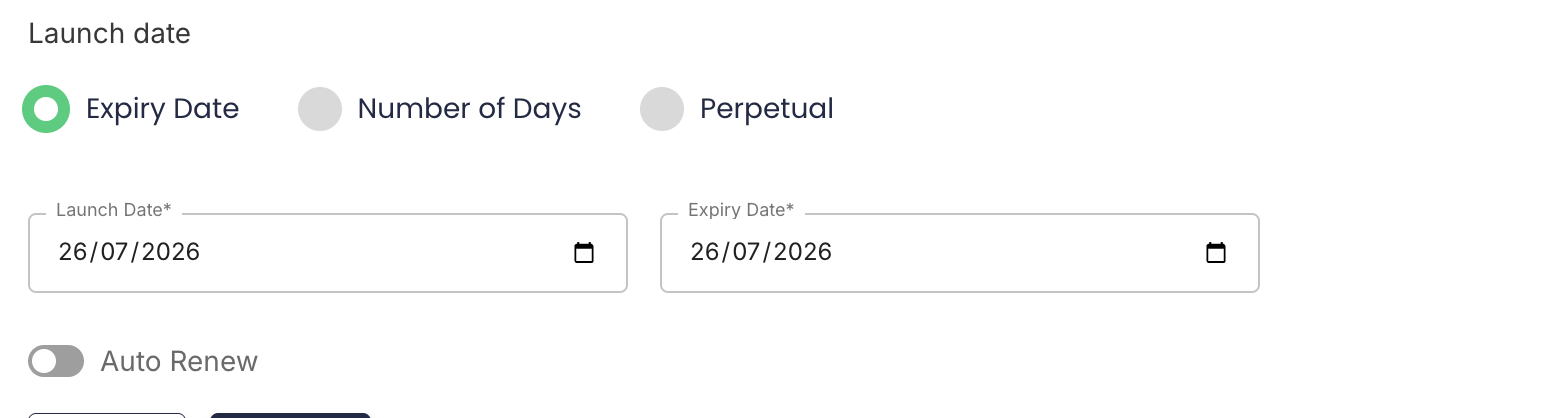
Select Expiry Date to enter:
- Launch Date
- Expiry Date
- Auto Renew, if required
Number of Days
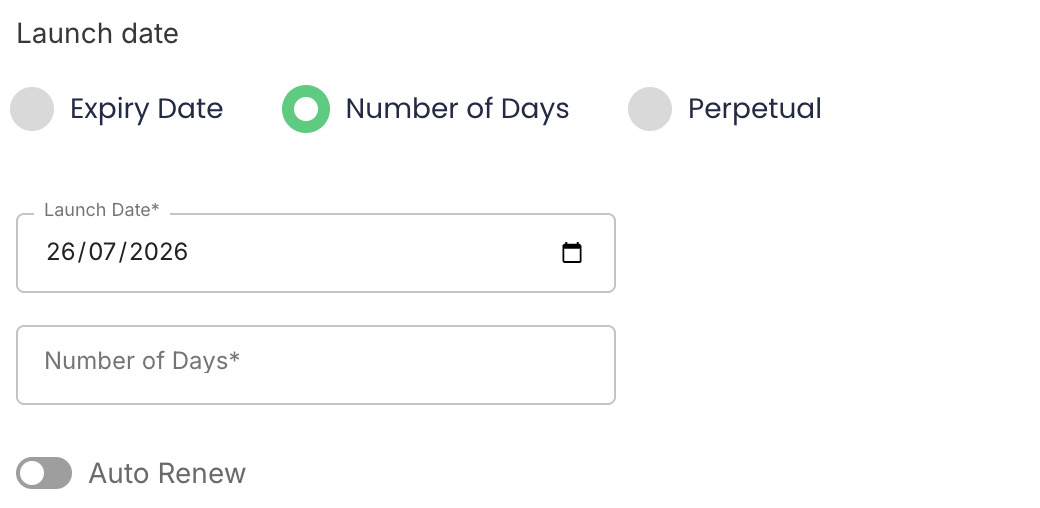
Select Number of Days to enter:
- Launch Date
- Number of Days
- Auto Renew, if required
Perpetual
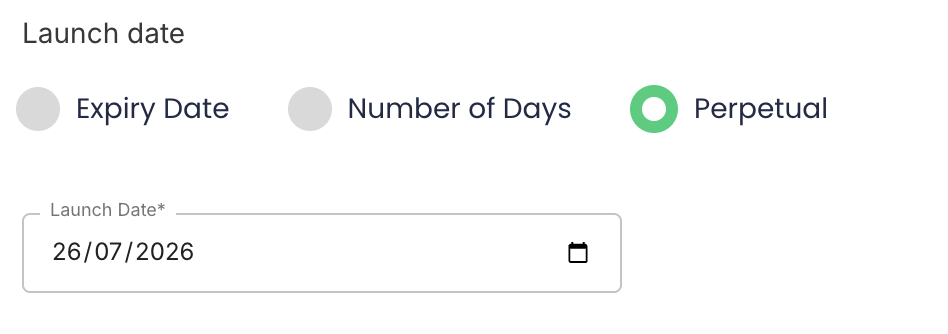
Select Perpetual to enter only the Launch Date. The live form did not display Expiry Date, Number of Days, or Auto Renew in this mode.
10.4 Completing the launch
- Enter Launch Name.
- Select one or more network locations.
- Select the required launch-date option.
- Enter the required date or duration.
- Select Auto Renew, if required and available.
- Review the promo-code values, locations, and launch period.
- Select Launch to complete the action, or Cancel to return without launching.
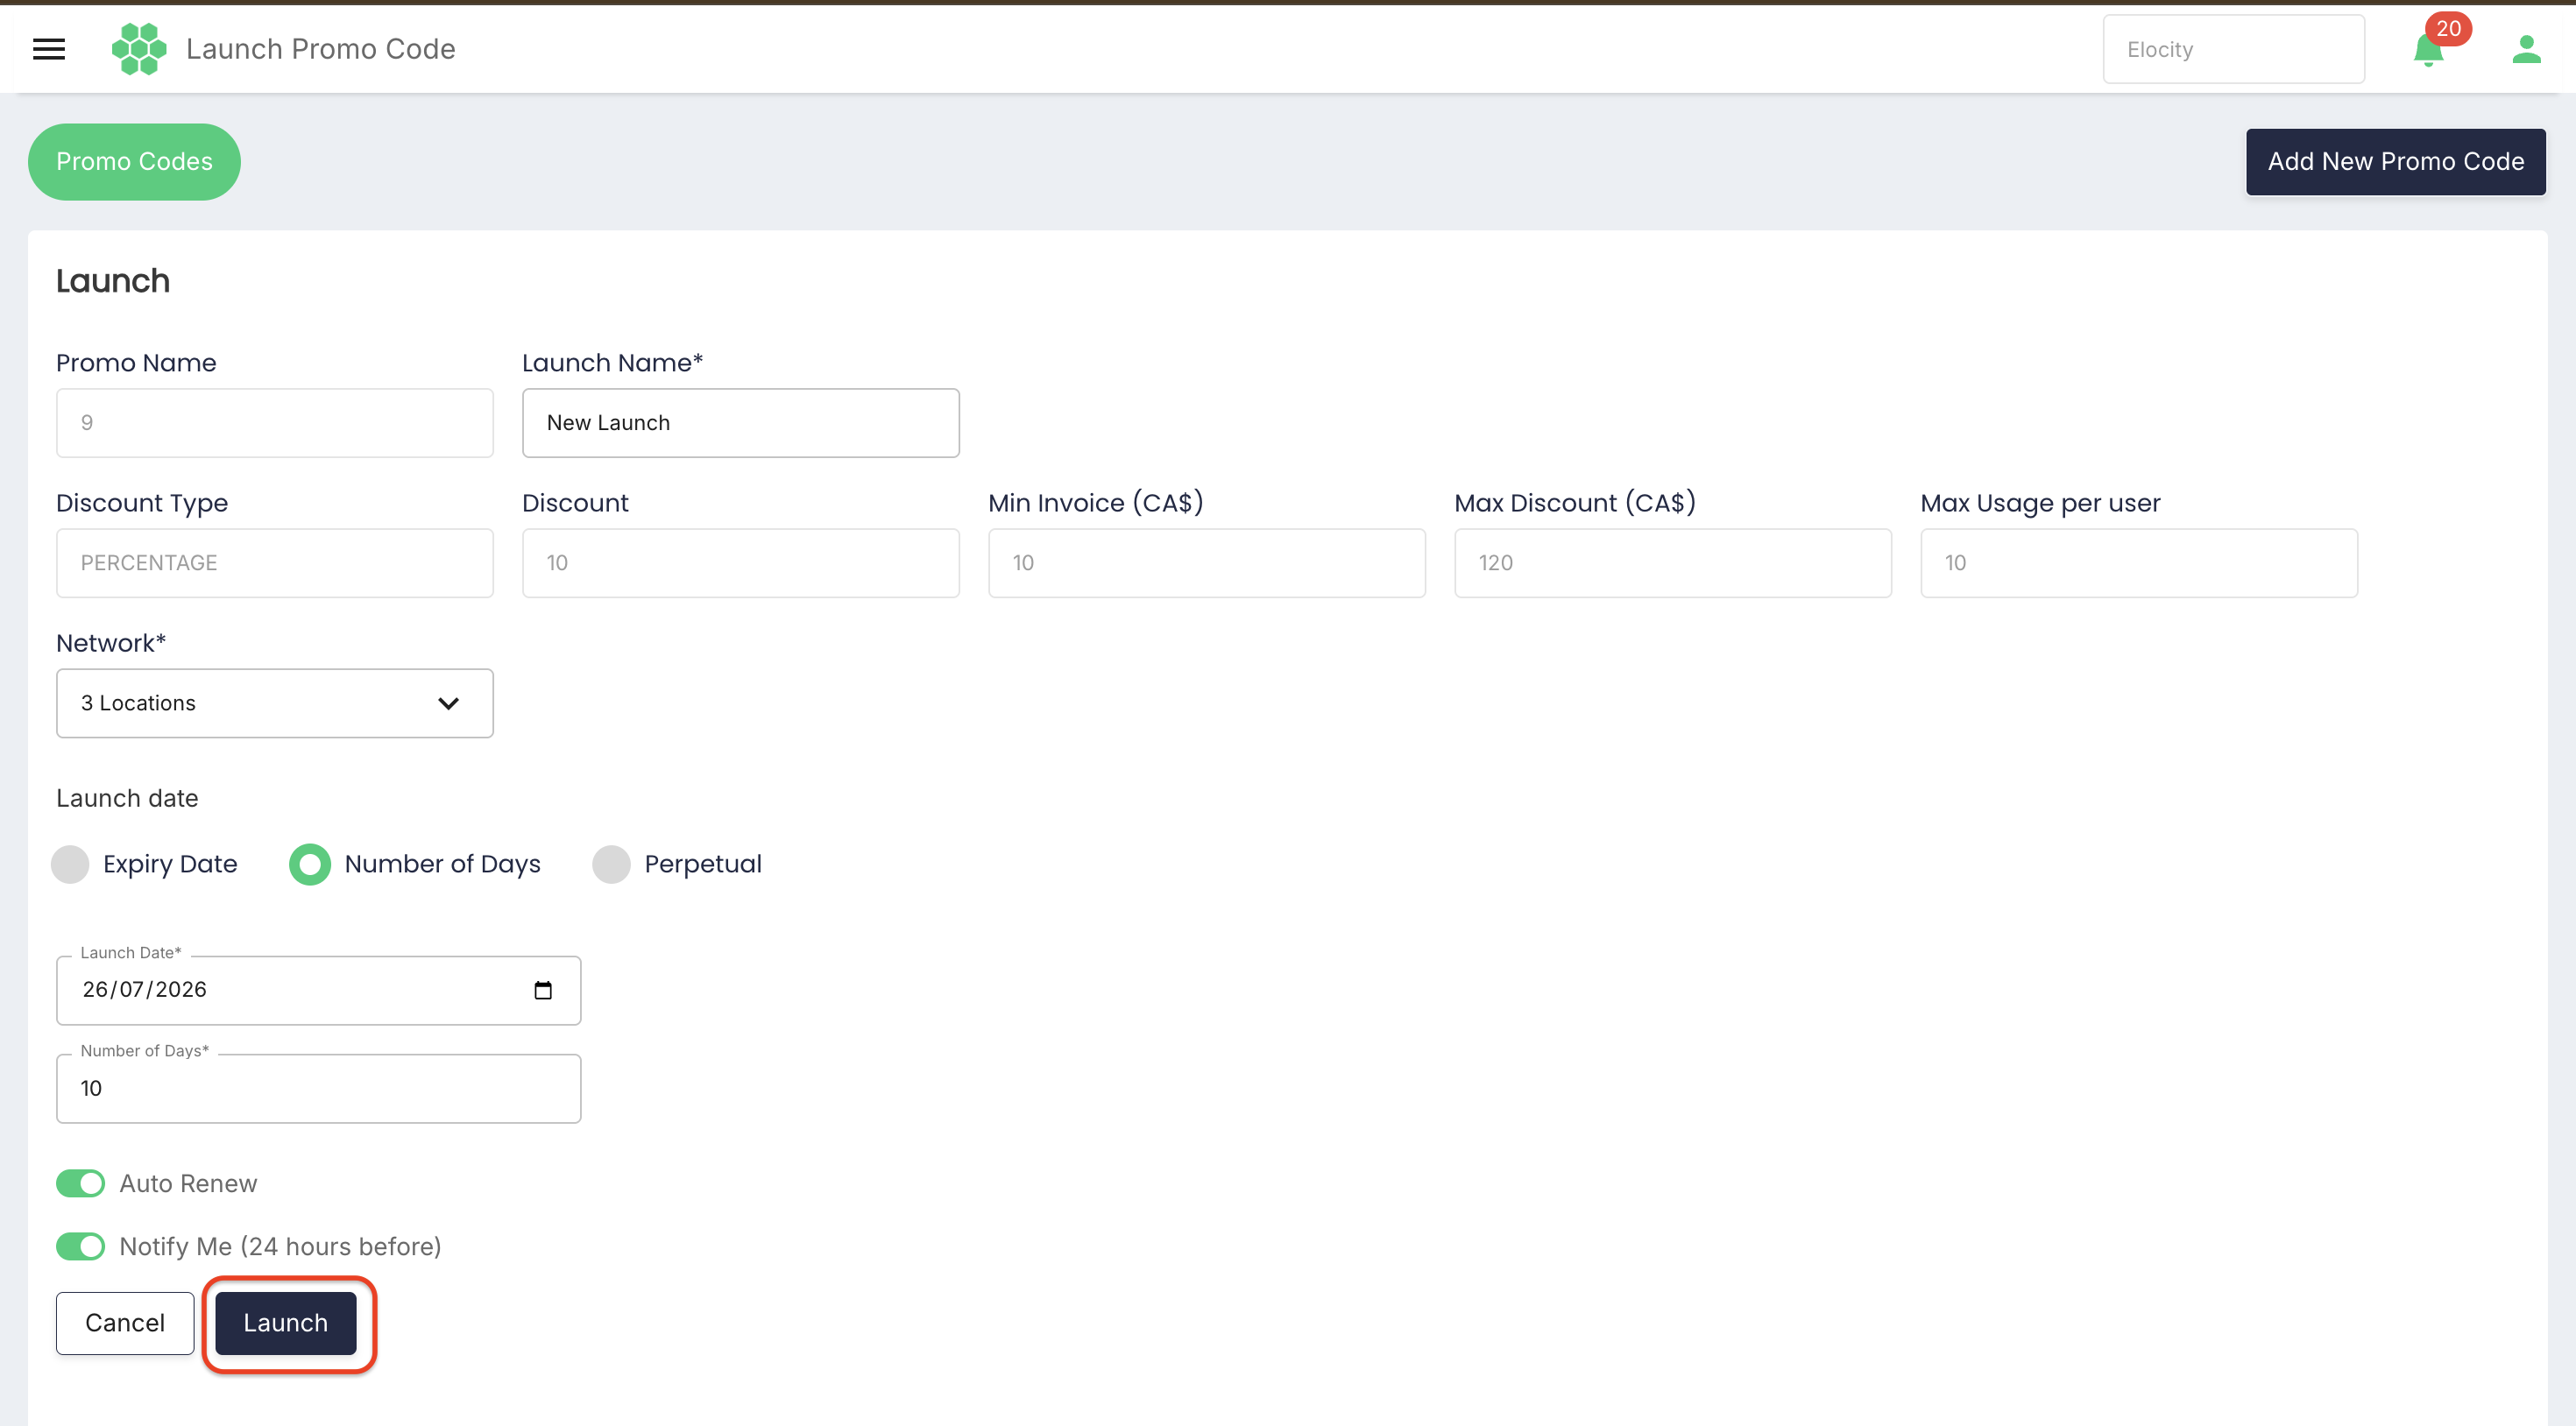
The live review selected Cancel and did not launch a promo code. The existing documentation states that the promo code is then shown under the Launched tab; the success message and final status were not verified in the current portal.
11. Viewing Launched Promo Codes
To view launched promo codes, follow these steps:
- Navigate to Rewards > Promo Codes.
- Verify the selected business.
- Select the LAUNCHED tab.
- Use Search, Refresh, or Column Filter as required.
- Review the Status and other displayed values.
Elocity Technologies Inc was confirmed as the business approved for read-only verification of a launched promo code. During the latest review, however, its Launched tab displayed a record count of 0 and No Launched Promocode Exist, including after Refresh. No launched record could therefore be opened in the current session.
The following behavior remains unverified:
- Whether selecting a launched row opens a separate details page.
- Whether Promo Name, Launch Name, or both are displayed.
- Whether launch locations and launch dates can be reviewed.
- Whether any launched values can be edited.
- Which status values are available.
12. Deactivating a Promo Code
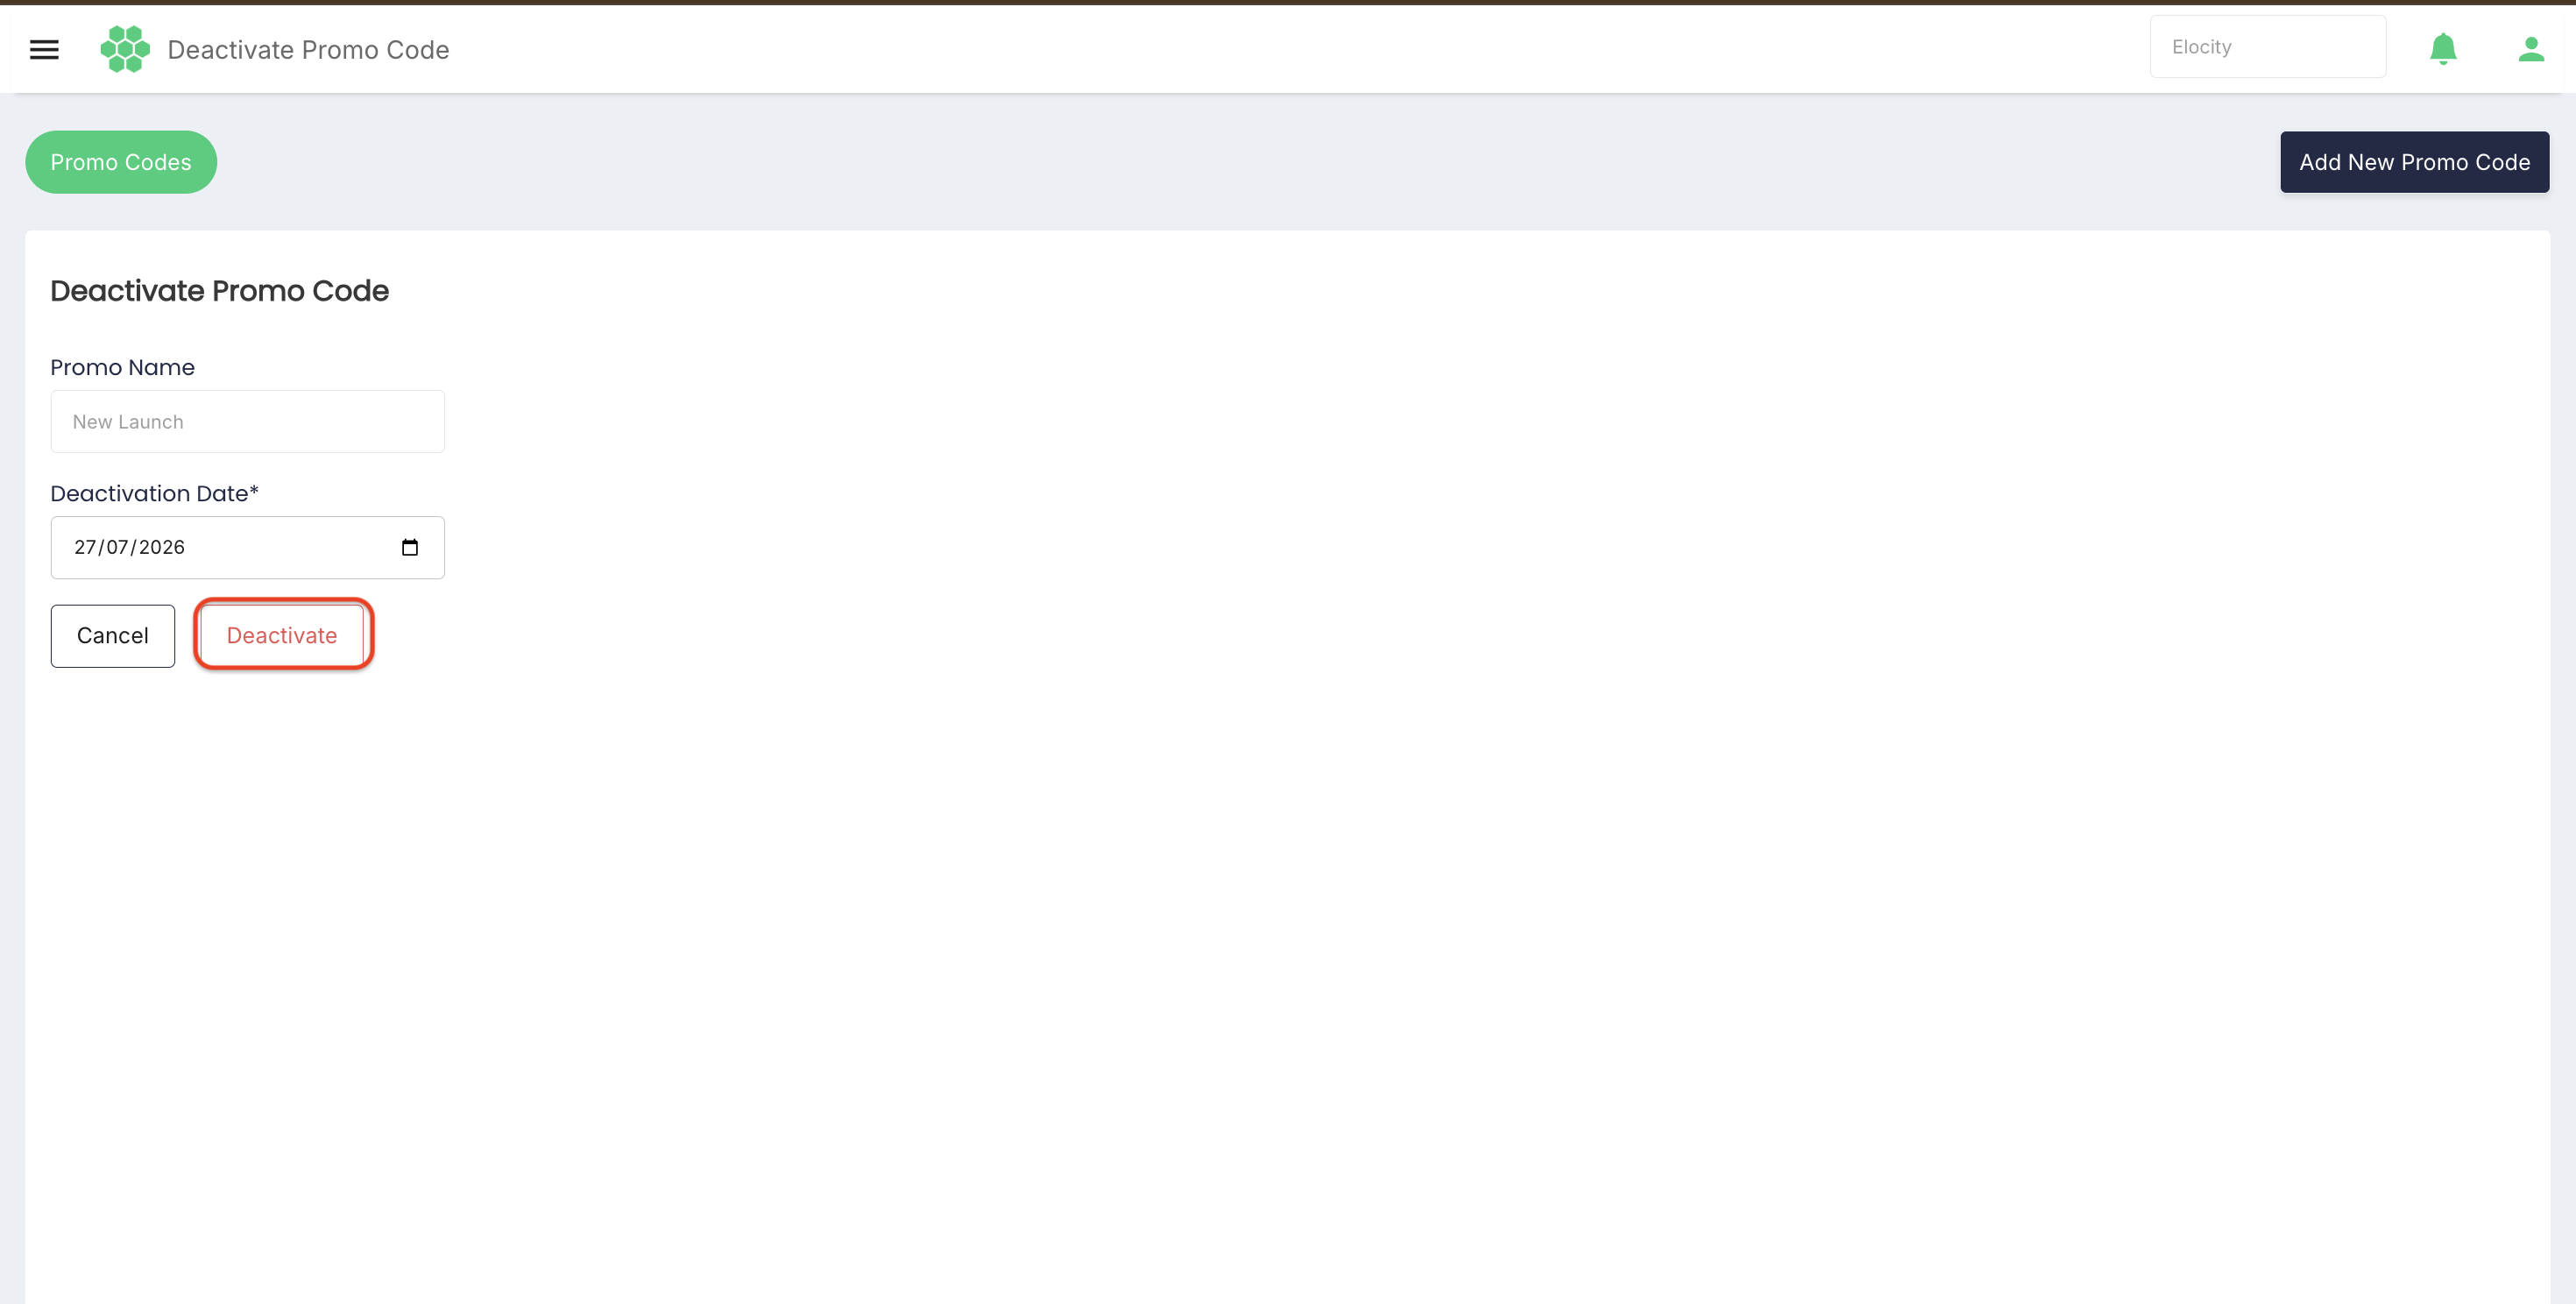
The Launched tab contains a Deactivate action. The action remains unavailable until a launched promo-code row is selected.
The complete deactivation procedure could not be verified because the confirmed test business did not return a launched record in the current session. Before publication, confirm:
-
Whether deactivation is immediate or can be scheduled.
-
Whether a confirmation dialog is displayed.
-
Whether deactivation affects sessions that have already started.
-
Whether an unused or reserved customer redemption is released.
-
Whether a deactivated launch can be reactivated or launched again.
-
Which status is displayed after deactivation.
13. Customer Redemption Flow
The refactored customer redemption flow is released. It was not tested during this review because no approved test customer and charger are available.
The released flow is:
- The customer scans the QR code on a charger.
- The customer application opens the Start Charging screen.
- The customer selects the option to apply a promo code.
- The customer enters the Promo Name value as the promo code. The supplied flow also describes the application showing promo codes available for the selected charger; the exact released screen presentation could not be verified.
- The customer confirms the promo code.
- The application returns the customer to the Start Charging screen.
- The customer starts the charging session.
- The backend considers the applicable discount when calculating the final invoice.
Why the promo code is applied before charging
Wallet payment occurs automatically after the charging session. A customer therefore cannot add a promo code after that automatic payment has been processed. The released workflow applies and validates the promo code before the session starts.
The supplied test scenarios also mention applying a code during or after a session “if supported.” These are test possibilities and are not part of the confirmed refactored flow.
Customer-entered code
Promo Name is the customer-entered code. The administration form does not contain a separate code-value field. Use a Promo Name that follows the approved code format and can be entered accurately by customers.
The supplied refactored-flow description also states that the customer is shown available promo codes for the charger. Whether the released application provides both a list and manual entry, or only manual entry, could not be verified without an approved test account.
14. Discount, Eligibility, and Billing Behaviour
Customer eligibility is based on the configured Min Invoice (CA$) value. No customer-type, payment-type, customer-tier, or similar eligibility restriction is supported in the confirmed Rewards configuration.
The administration form supports:
- Flat discount value
- Percentage discount value
- Minimum invoice
- Maximum percentage discount
- Maximum usage per user
- Selected launch locations
- Launch start and duration
Network selection determines where the promo code is launched. This location assignment is separate from the invoice-based customer eligibility check.
The test scenarios discuss additional conditions such as normal or corporate customer type, prepaid or postpaid payment, customer tiers, new-user status, partner location, charger type, city, region, and country. These are test ideas and are not configurable eligibility restrictions in the confirmed Rewards feature.
Minimum invoice
The promo code is eligible when the qualifying invoice value meets the configured minimum. The following calculation details still require confirmation:
- Whether a value equal to the minimum qualifies.
- Whether the comparison uses estimated cost or final invoice cost.
- Whether the comparison is made before or after tax, parking fees, idle fees, tariff adjustments, and other charges.
- What happens if the estimated cost qualifies but the final cost does not.
Maximum discount
For percentage promo codes, Max Discount is intended to cap the currency value of the discount. Confirm the calculation order, rounding precision, and treatment of tax and fees.
Maximum usage
Max Usage per user is intended to limit how many times a user can use the promo code. Confirm:
- How a user is identified.
- Whether personal and corporate profiles share the same usage count.
- Whether the count is reserved when the promo is selected, when charging starts, when charging ends, or when payment succeeds.
- Whether a canceled or failed session returns the use.
Final invoice
The released flow applies the discount when the backend calculates the final invoice. Confirm where the customer sees:
- The selected promo code.
- Estimated discount before charging.
- Final discount after charging.
- Original amount, discount amount, tax, and final payable amount.
- A message when the promo code is no longer eligible at final calculation.
15. Error and Exception Handling
The supplied test coverage identifies the following conditions that may apply to the confirmed feature. The exact behavior and message text still require verification:
- Expired promo code
- Minimum invoice not met
- Application attempted at an unsupported stage
- Invalid or malformed code
- Usage limit exceeded
- Promo code not available for the selected launch location
- Network interruption during validation
- Session canceled after promo-code selection
- Multiple promo codes selected
- Repeated attempts or promo-code abuse
The customer-type, payment-type, tier, new-user, partner, charger-type, city, region, and country eligibility cases in the test document are not supported eligibility restrictions for the confirmed Rewards feature.