Tariff
Purpose
The Tariff module allows an authorized administrator to define how charging sessions are priced and then apply the approved pricing structure to the required charging network.
A tariff profile is a reusable pricing template. Designing and saving a profile does not make it operational. Launching the profile is a separate step that creates an active tariff assignment for selected locations and connector characteristics over a defined period.
This separation allows the same pricing structure to be reviewed before activation and launched with a distinct name, description, scope, and validity period.
Tariff lifecycle
- Create a pricing template in Design New Tariff.
- Review the saved template under Tariff Profiles > Designed.
- Select the template and choose Launch.
- Define the network scope, applicable power and connector types, description, launch date, and tariff period.
- Review the active assignment under Tariff Profiles > Launched.
- View the locations and connectors covered by the launch.
- Deactivate the launched tariff when it should no longer apply.
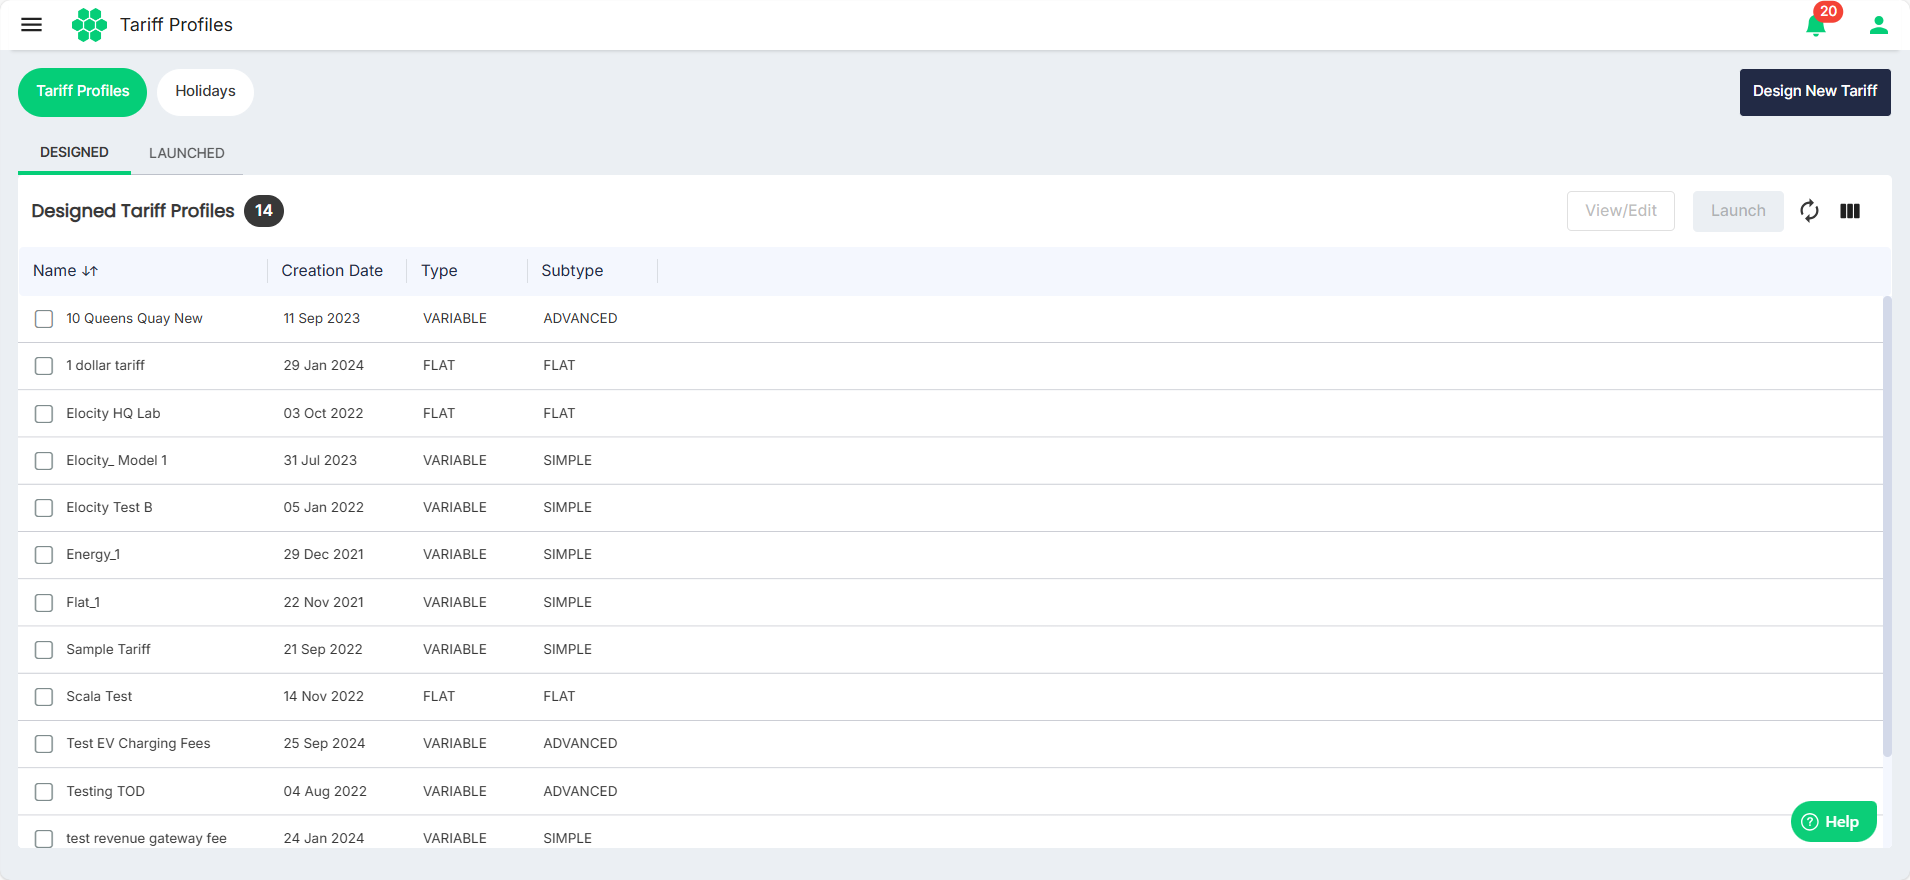
Accessing the module
-
Sign in to the HIEV portal.
-
Confirm the required business in the business selector.
-
Open Tariff from the navigation menu.
-
Select one of the following pages:
- Tariff Profiles — review designed and launched tariff records.
- Holidays — maintain the holiday-date list available to the Tariff module.
- Design New Tariff — create a new tariff template.
The records and locations available in the module depend on the selected business and the user's permissions. Viewing, editing, launching, and other tariff operations each require their corresponding permission.
Tariff Profiles page
The page contains two tabs that represent different stages of the tariff lifecycle.
Designed tab
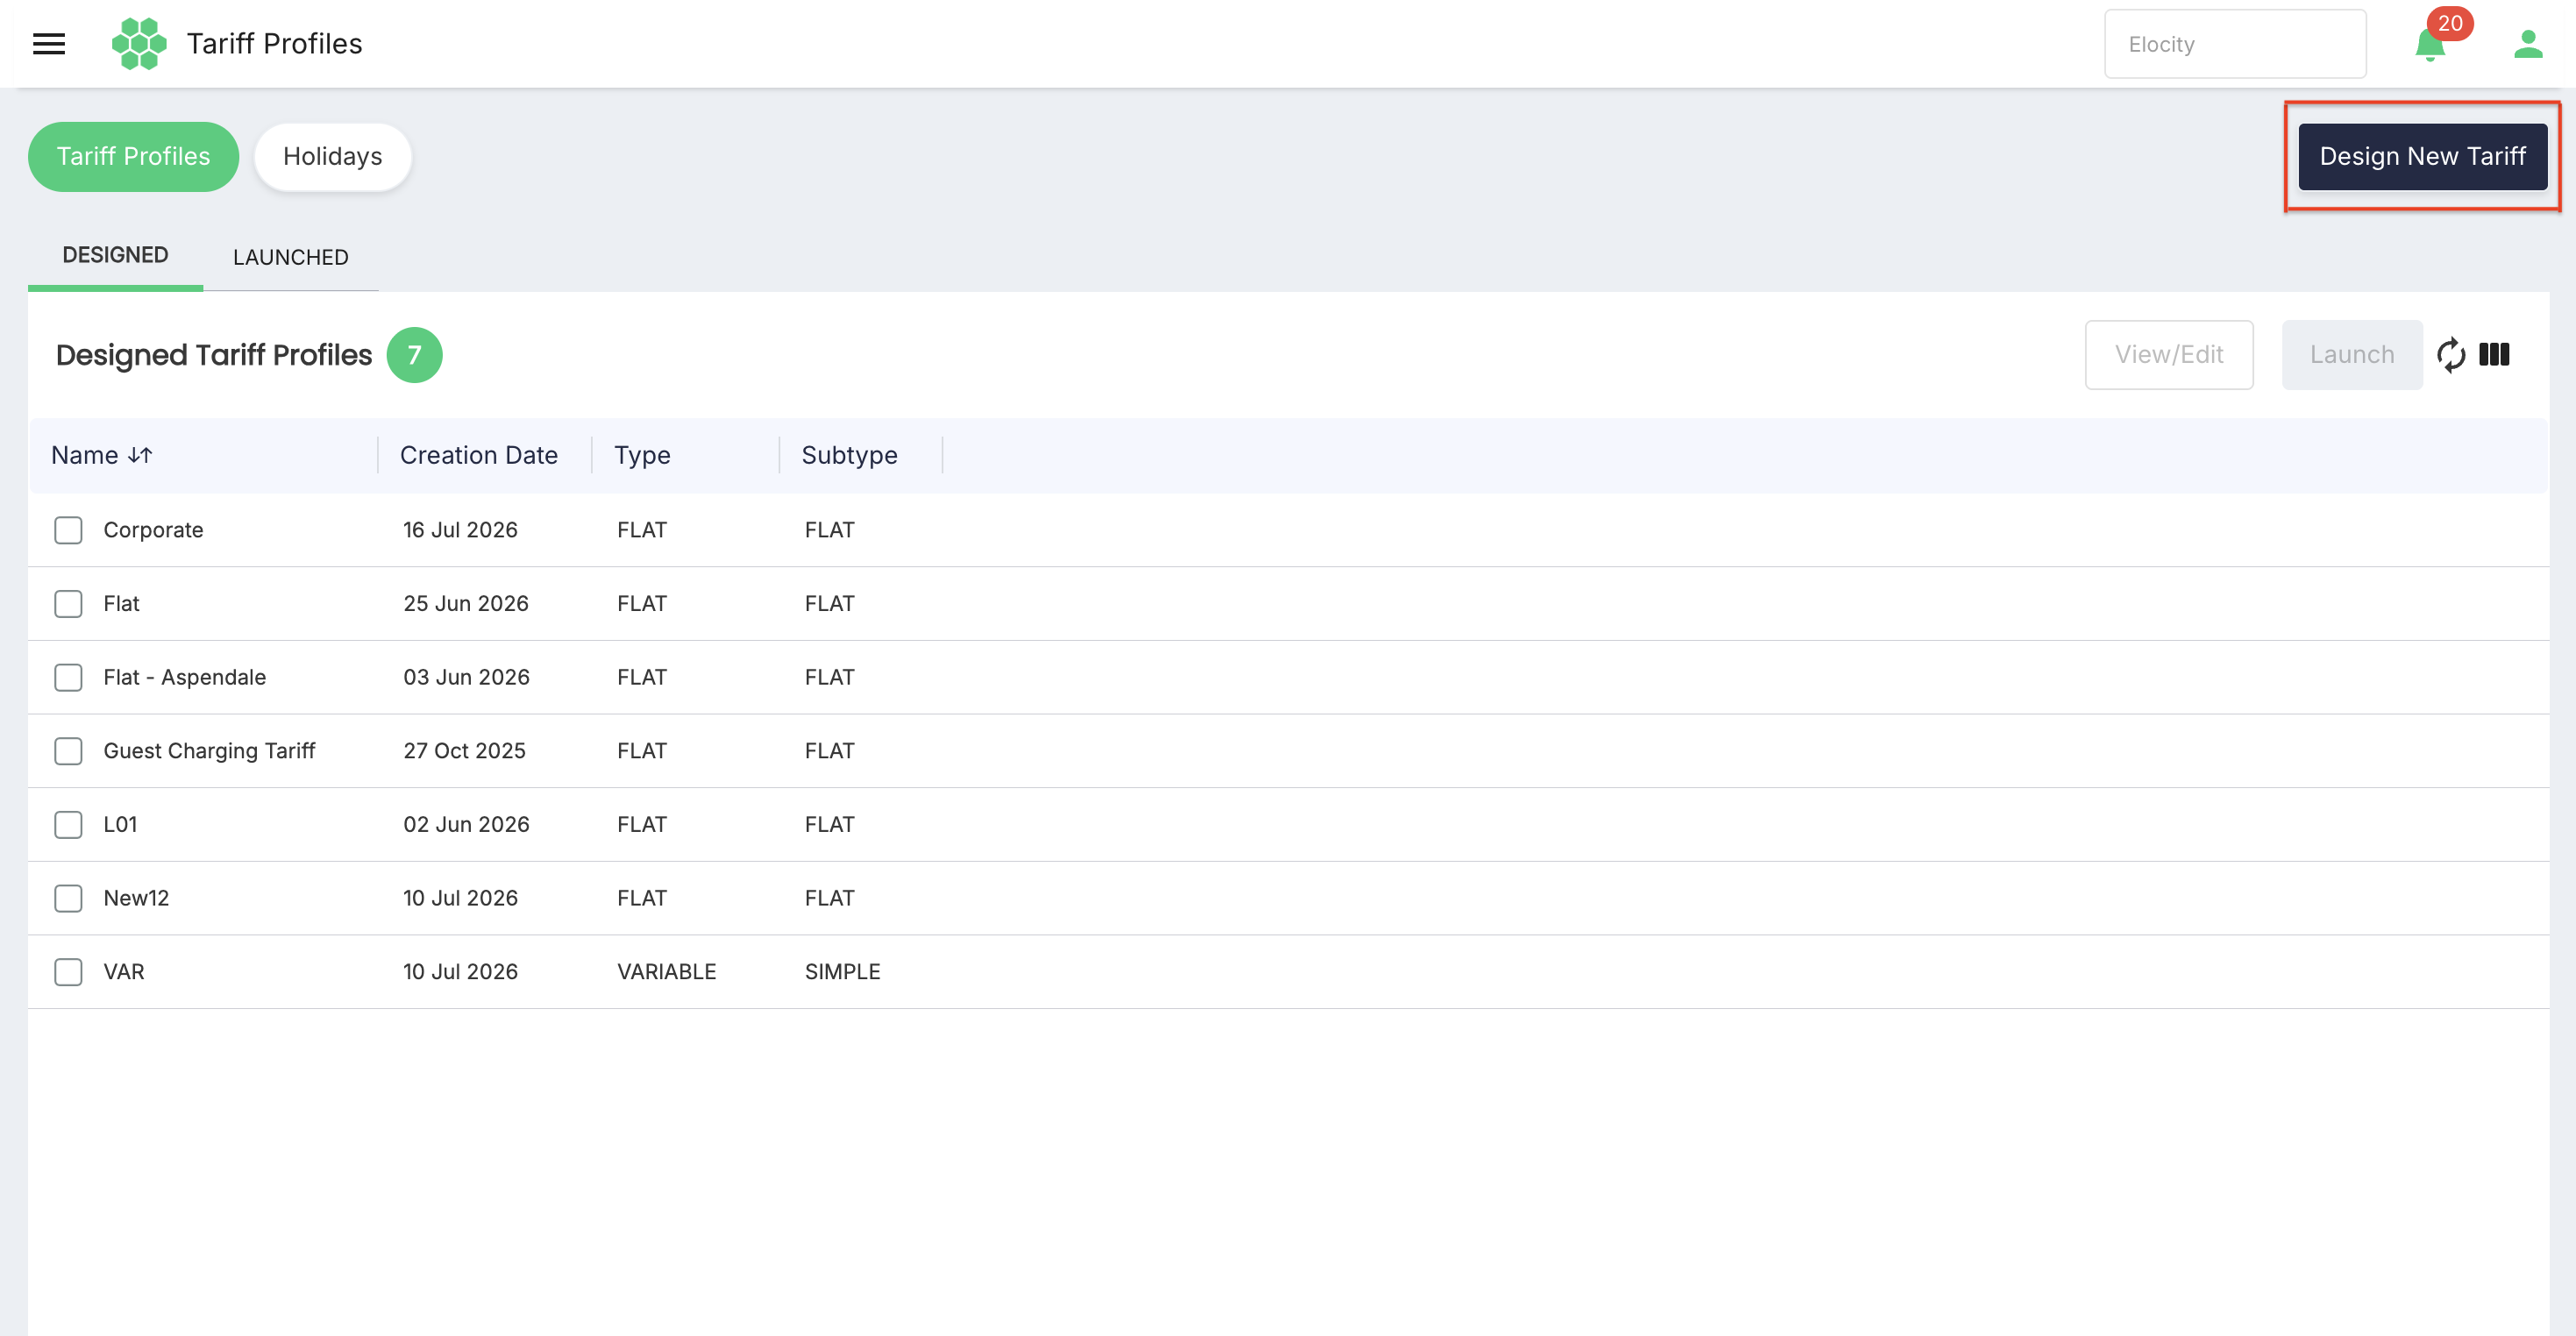
The Designed tab lists saved tariff templates that can be reviewed, edited, deleted, or launched. The number beside Designed Tariff Profiles is the number of profiles currently returned for the selected business.
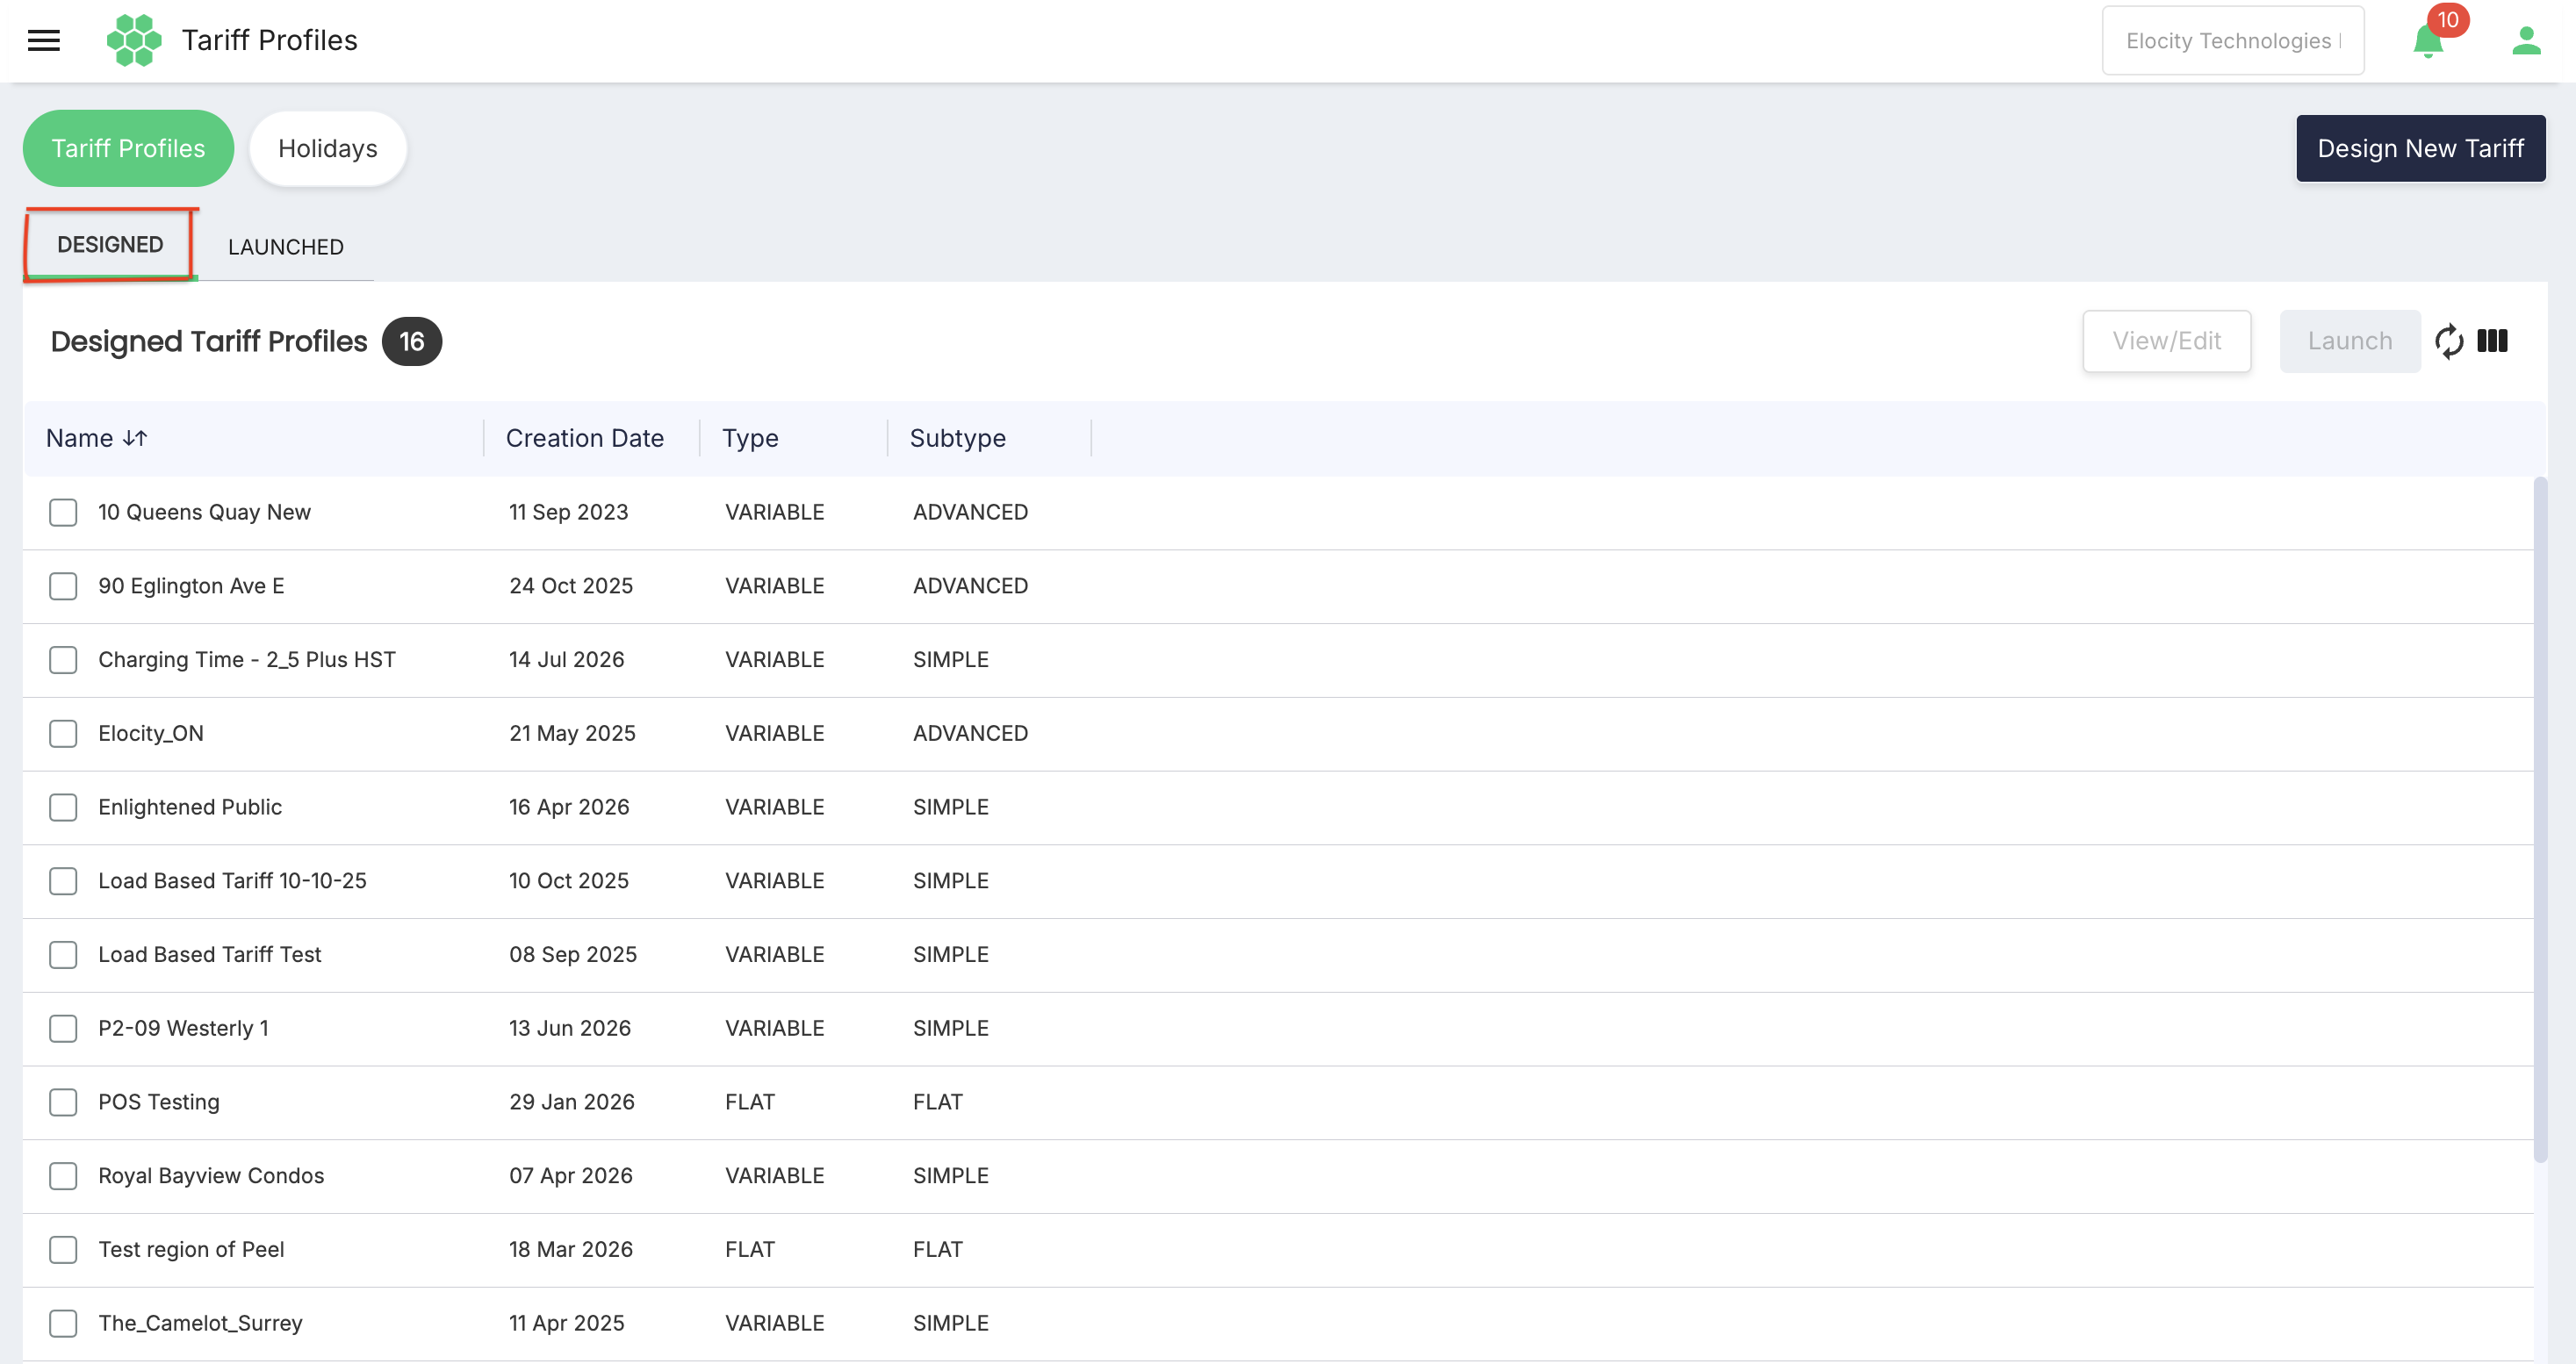
Each grid row represents one tariff profile. Select a row to enable View/Edit and Launch.
| Column | Description |
|---|---|
| Name | Identifies the saved tariff template. Use a name that distinguishes the pricing purpose, customer group, property, or commercial use case. |
| Creation Date | Shows when the profile was created. |
| Type | Shows whether the profile is Flat or Variable. |
| Subtype | Shows Flat, Simple, or Advanced, according to the selected profile structure. |
The grid also provides:
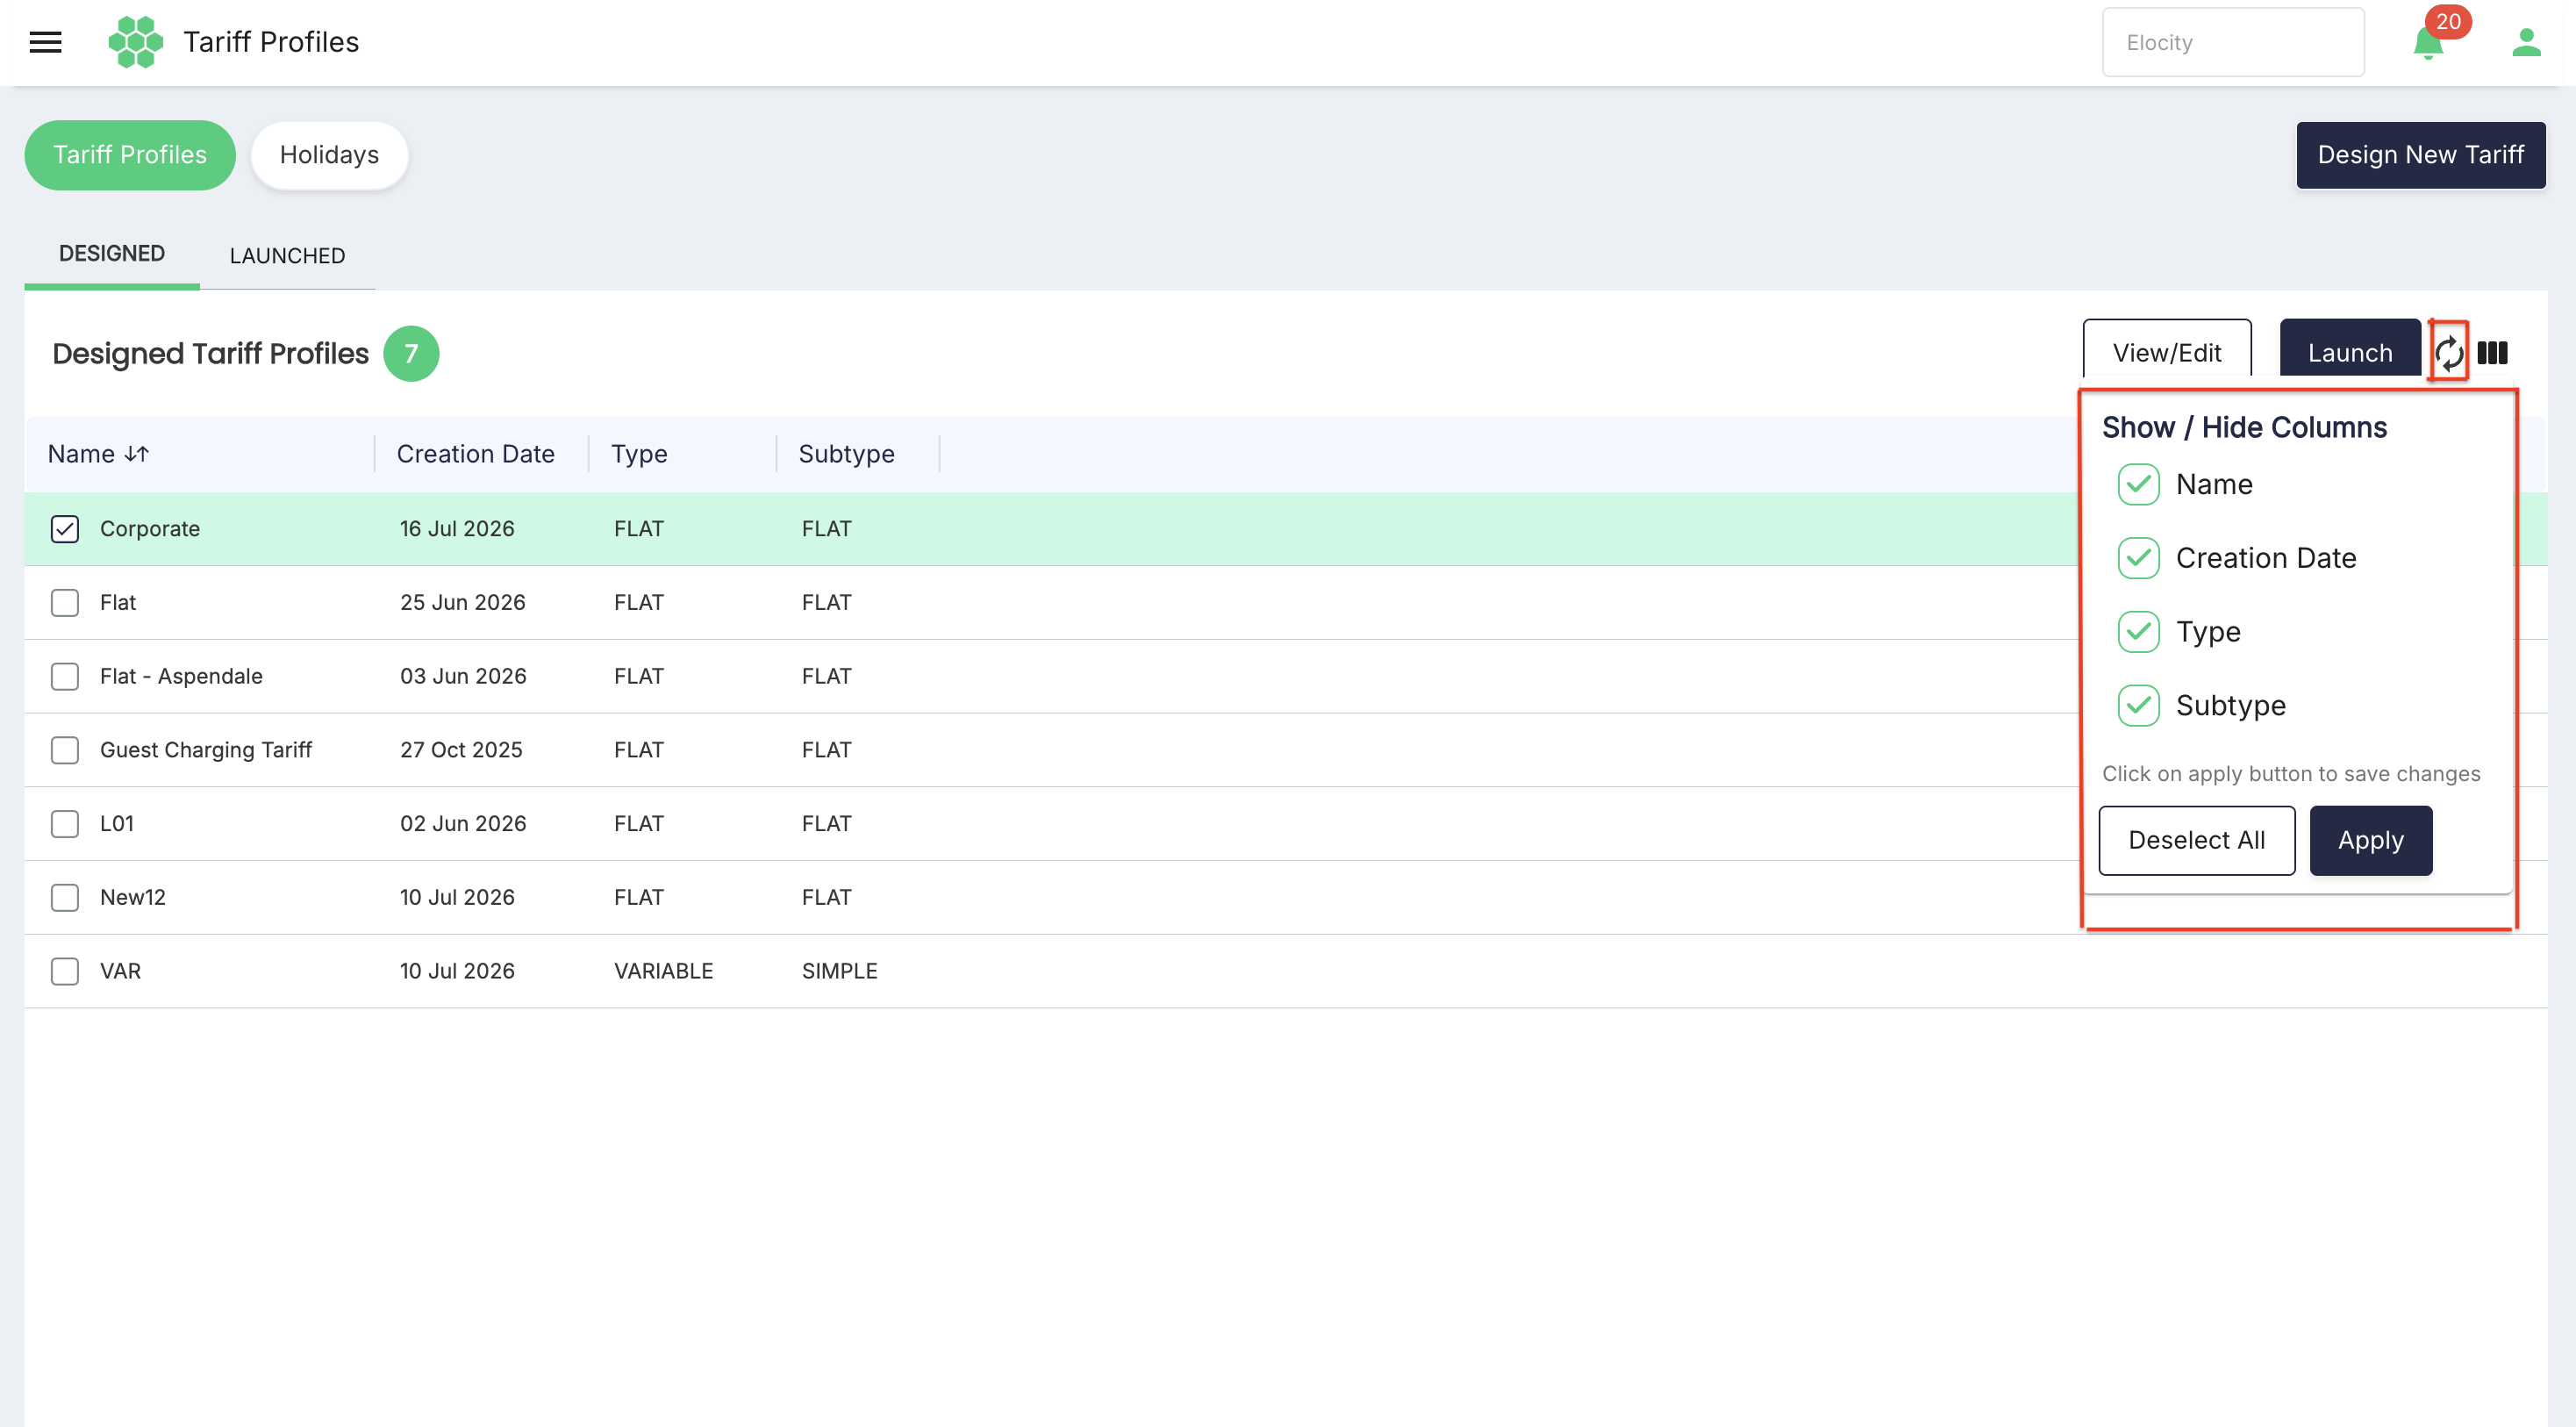
- Refresh to request the latest designed-profile data.
- Column-header controls for the grid functions made available by the page.
- Column Filter to show or hide Name, Creation Date, Type, and Subtype. Select Apply inside the column menu to save the visible-column selection, or Deselect All to clear it.
Launched tab
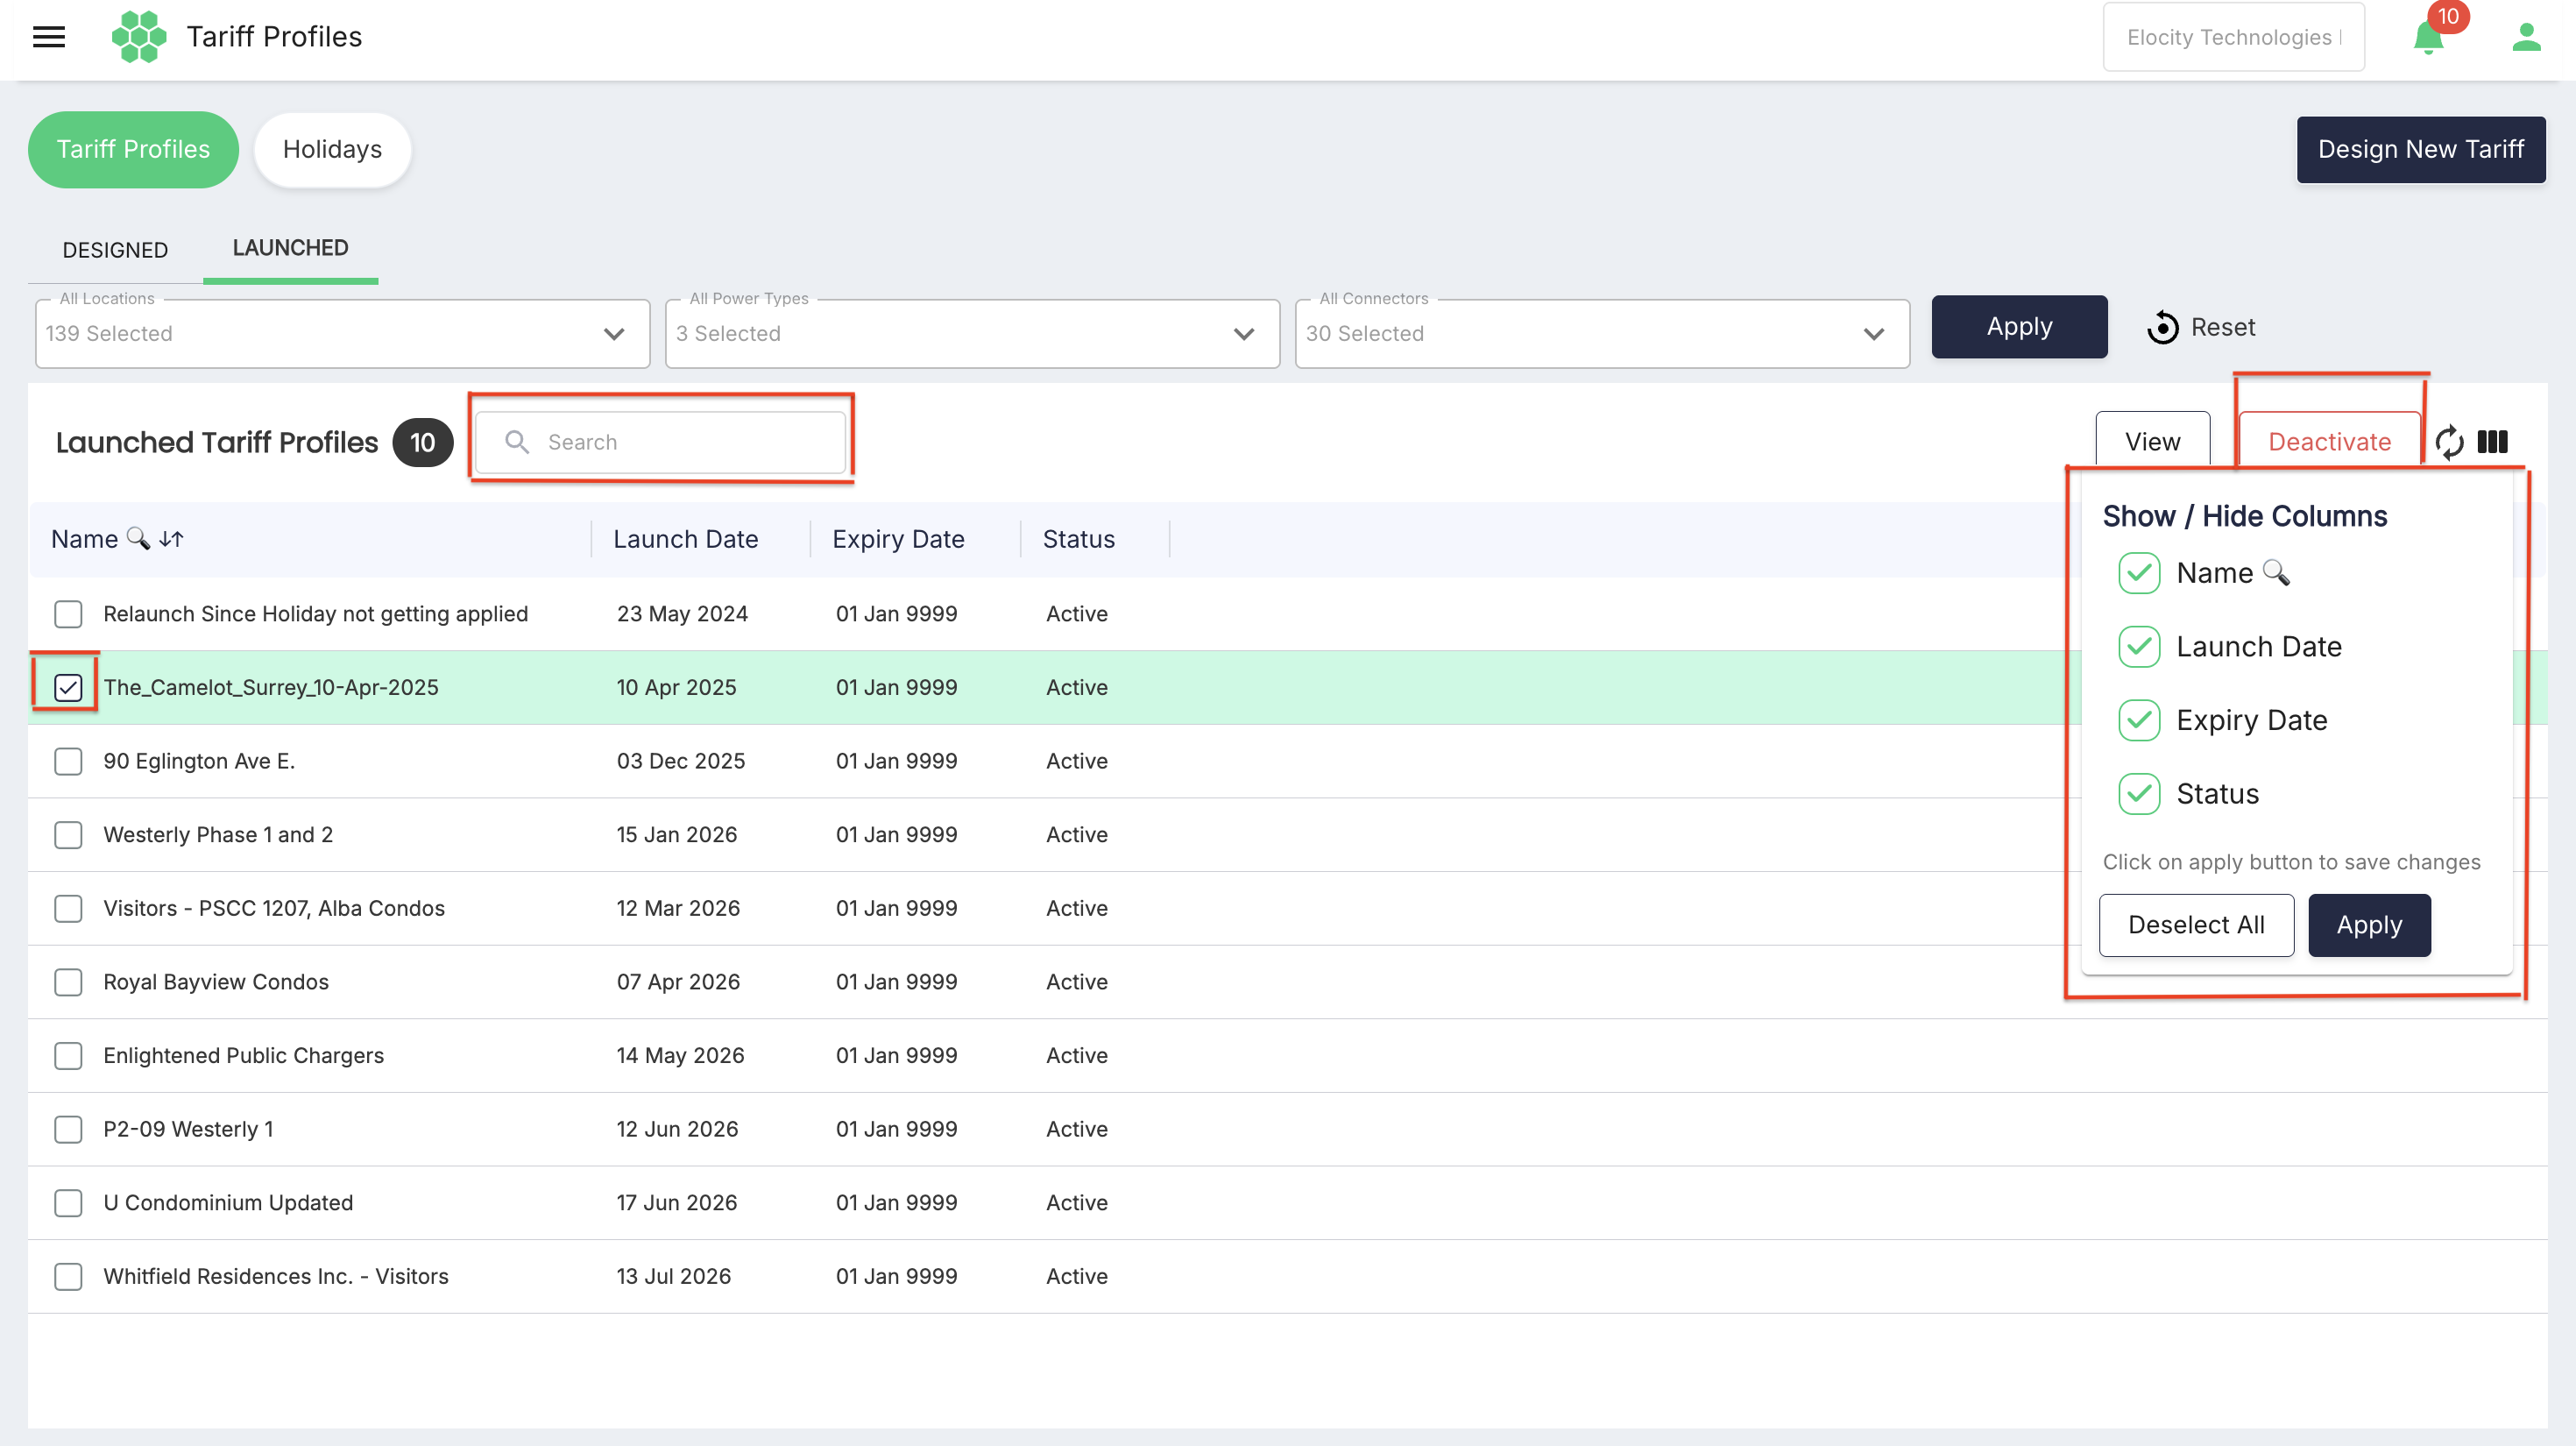
The Launched tab lists tariff assignments that have been activated for a network scope. The page provides three multi-select filters:
- All Locations
- All Power Types
- All Connectors
After changing a filter, select Apply. Select Reset to clear the page-level filter selections.
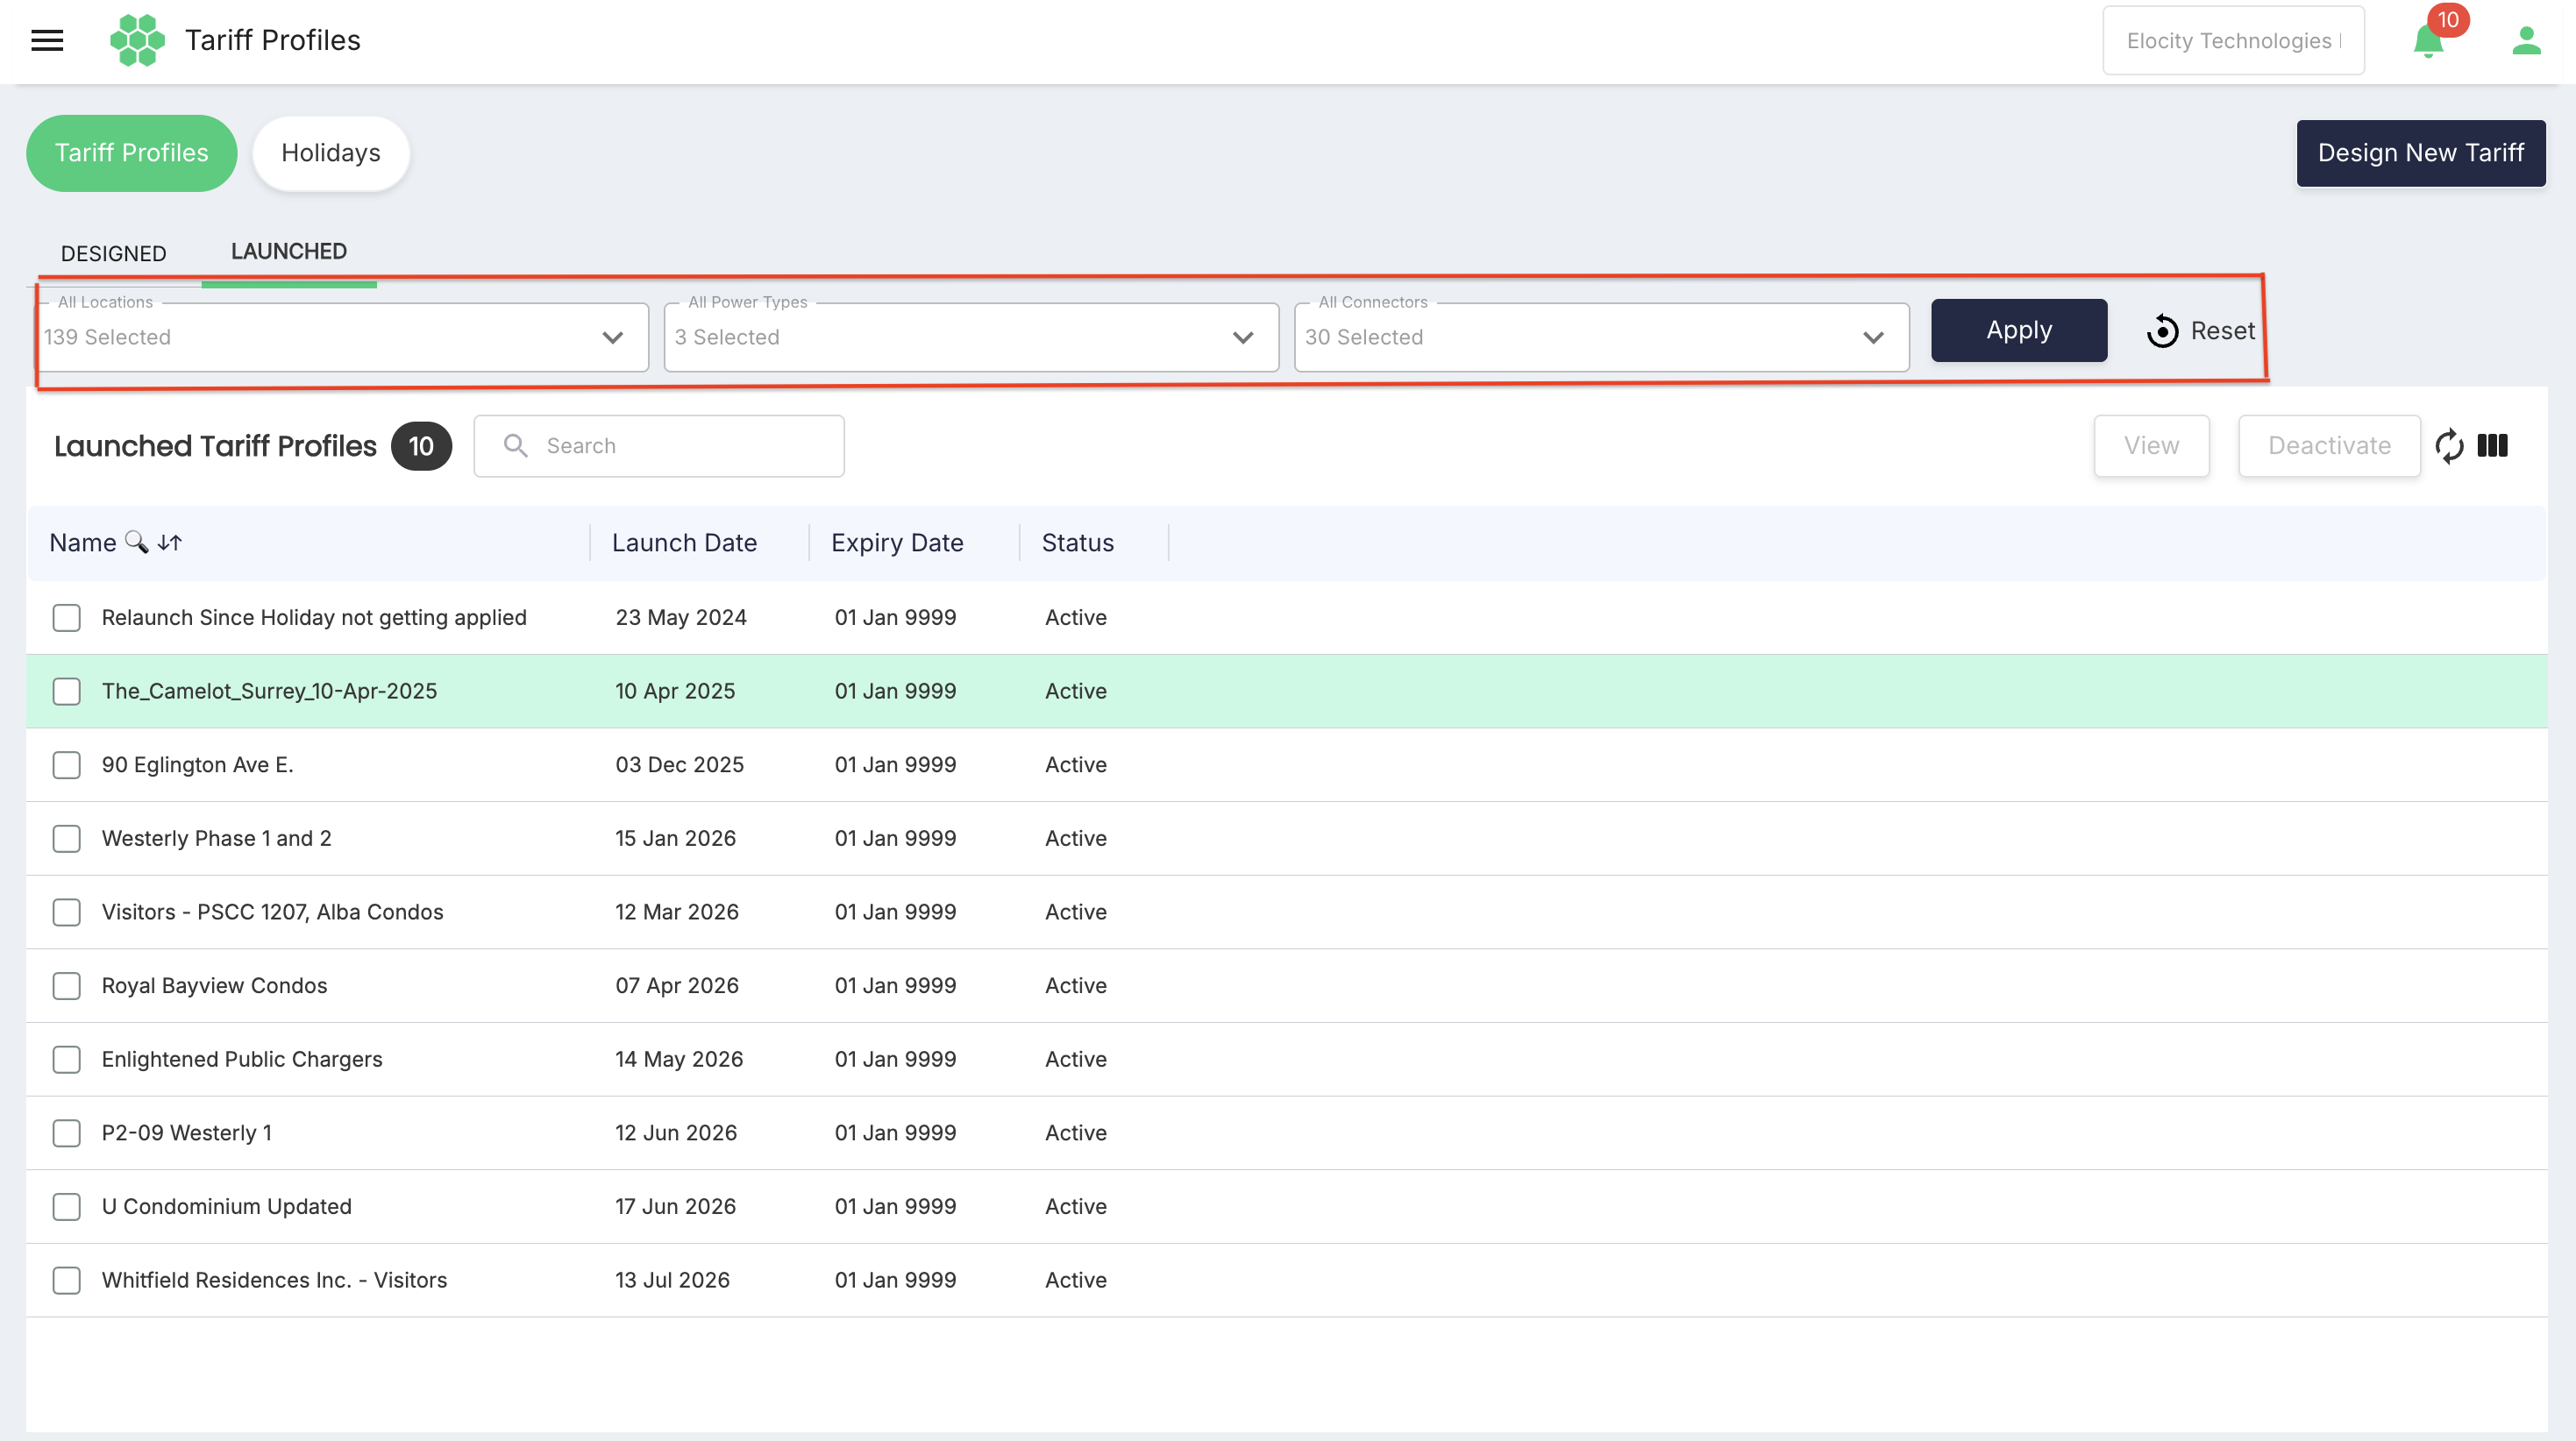 The launched grid provides the following information:
| Column | Description |
|---|---|
| Name | Shows the launch name assigned when the tariff was activated. |
| Launch Date | Shows the date on which the launched tariff begins. |
| Expiry Date | Shows the configured end date. Perpetual launches do not require an expiry date during setup. |
| Status | Shows the current status of the launched tariff, such as Active. |
Use Search to locate a launched record by the values supported by the grid. Select one row to enable View and Deactivate. Refresh requests the latest data, and Column Filter controls which launched-grid columns are visible.
Designing a tariff profile
Open Tariff > Design New Tariff, or select Design New Tariff from the Tariff Profiles page.
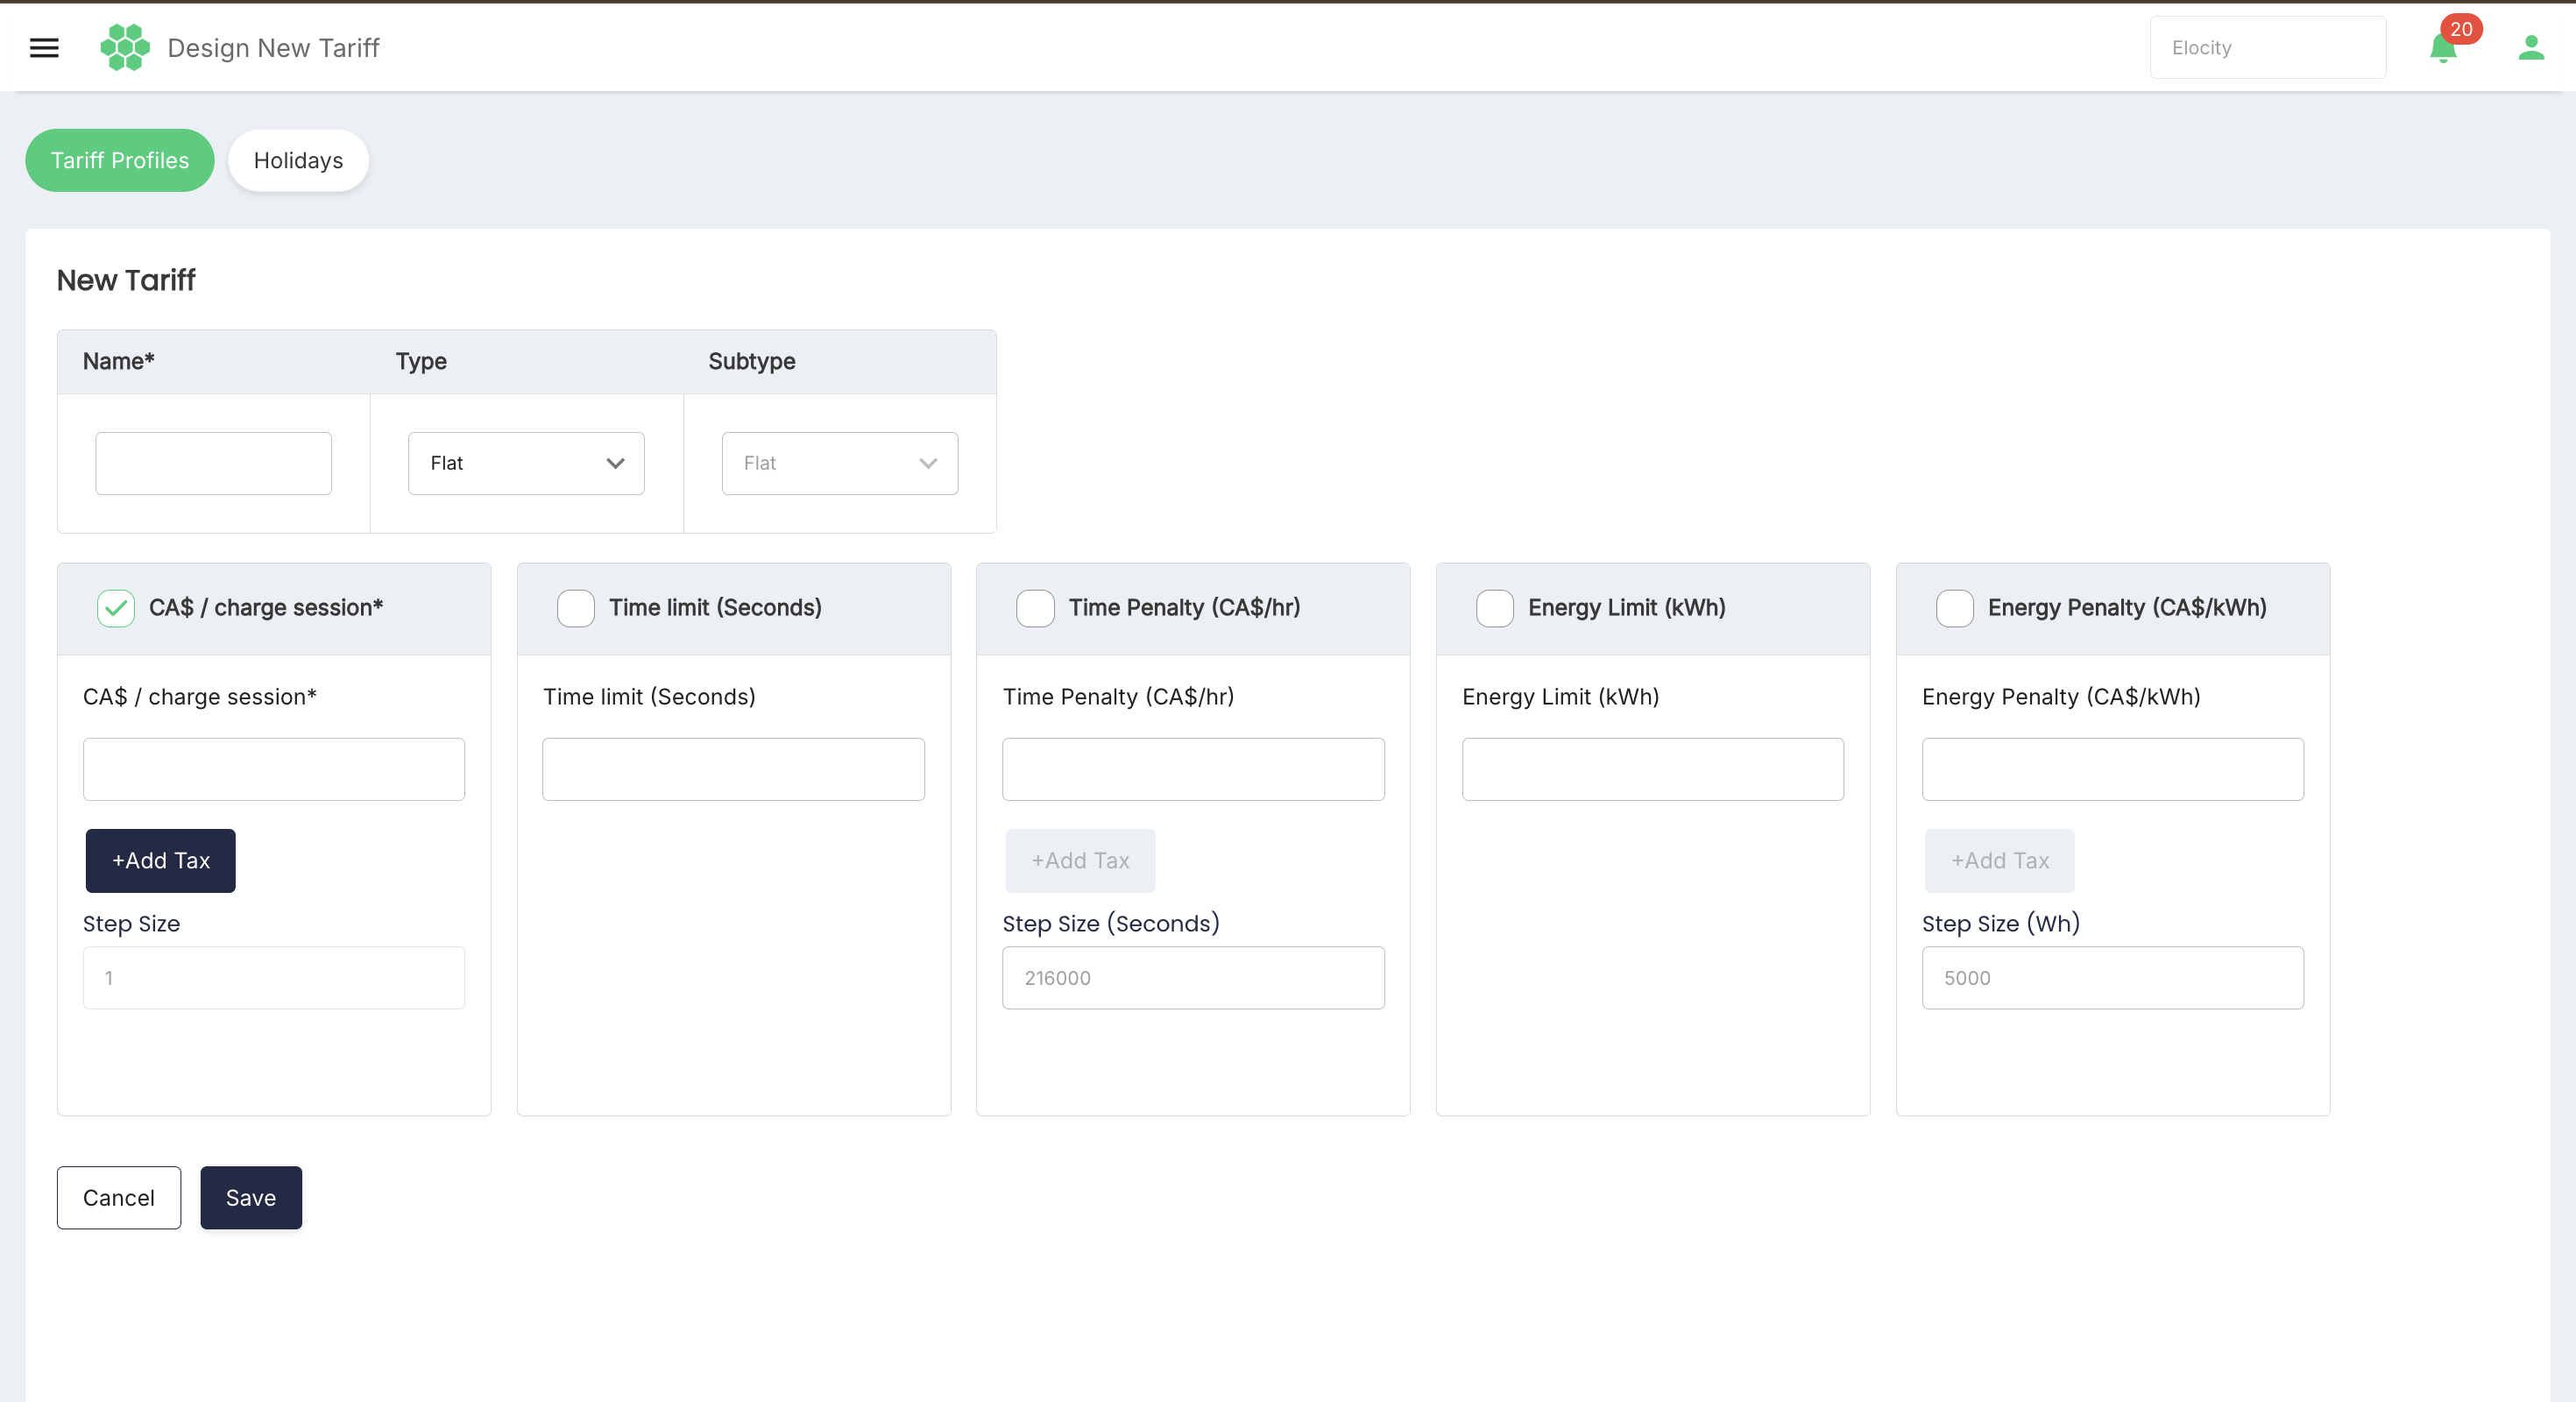
Every new profile begins with these fields:
| Field | Description |
|---|---|
| Name | Required profile name used to identify the reusable template. |
| Type | Select Flat or Variable. |
| Subtype | Displays Flat for a Flat tariff. For a Variable tariff, select Simple or Advanced. |
The inspected deployment displays monetary labels in CA$. Tariff currency is inherited from the deployment configuration; it is not selected separately in an individual tariff profile.
For each enabled monetary component, +Add Tax opens fields for New Tax Name and Value (%). Enter only taxes that have been approved for the tariff's jurisdiction and business use case.
Select Save to create the designed profile. Select Cancel to leave the form without saving.
Profile structure 1: Flat Tariff
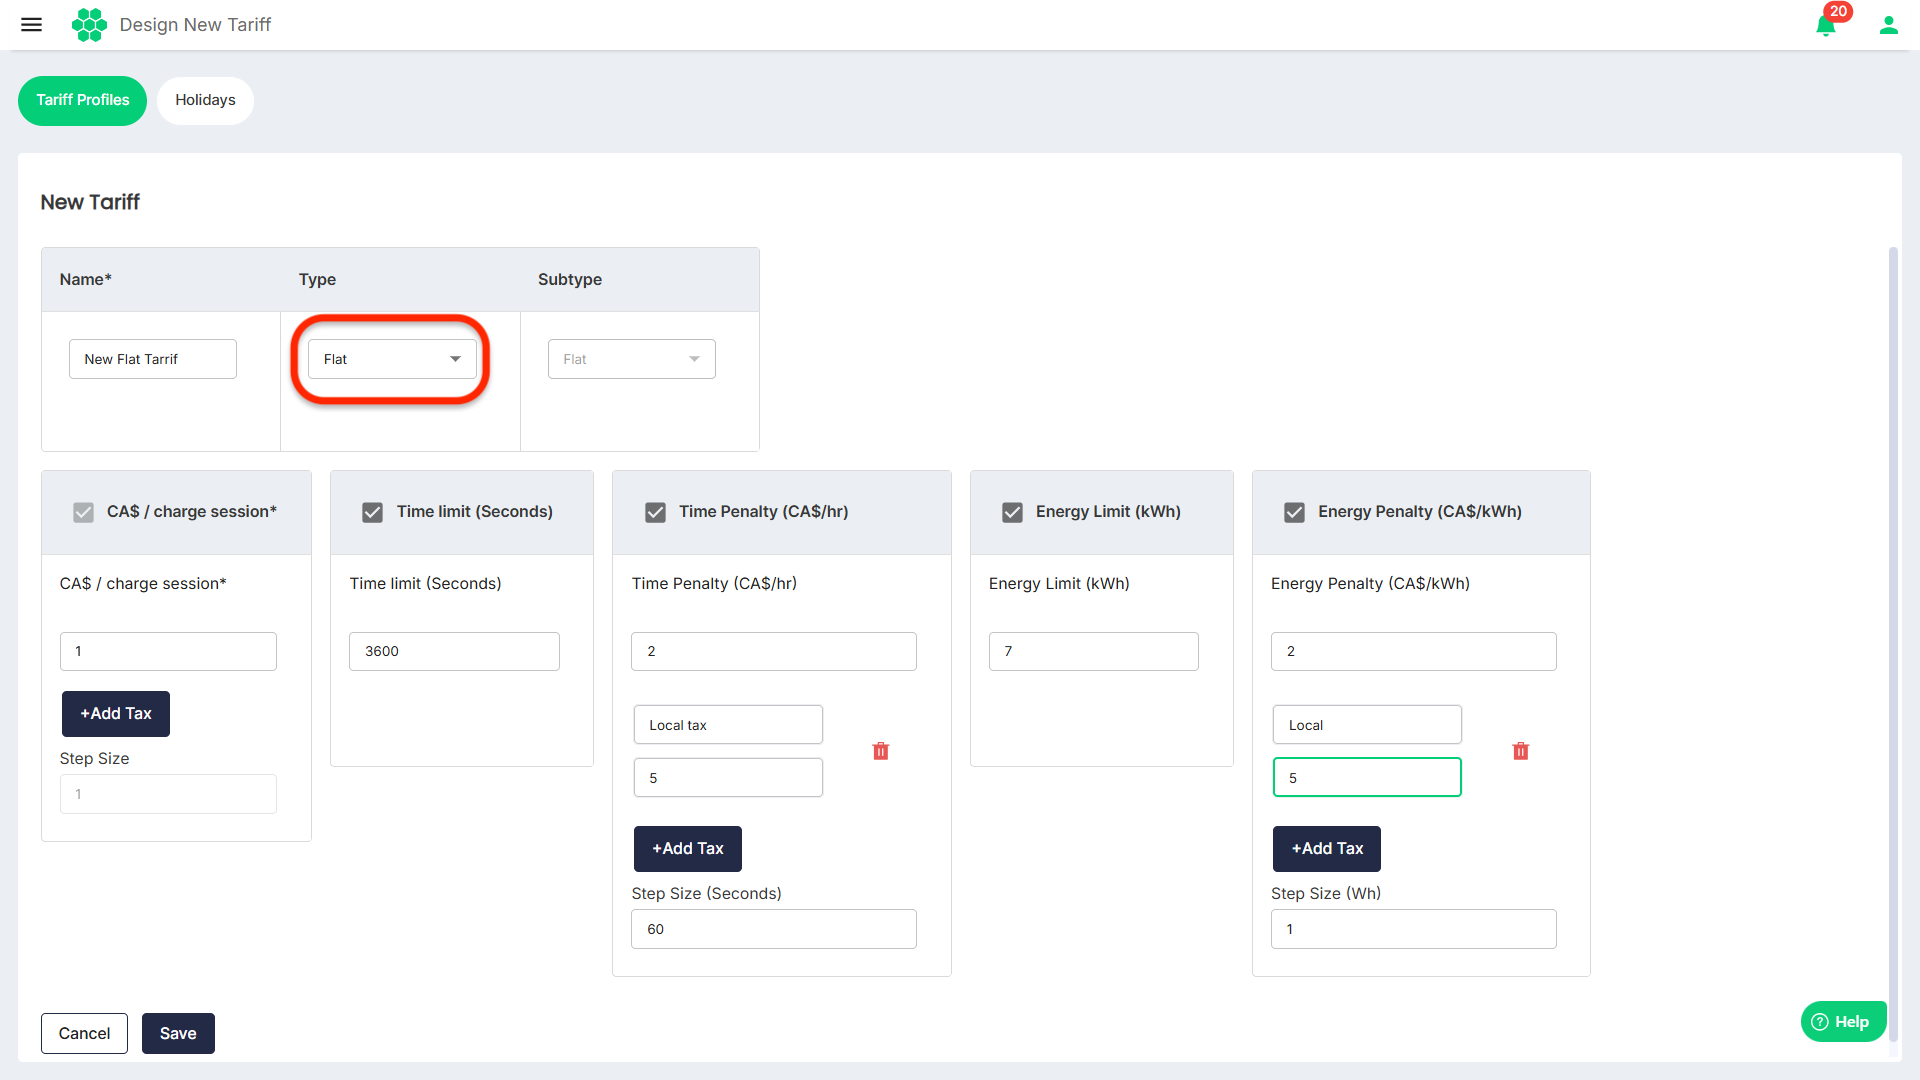
A Flat Tariff provides a fixed charge for the charging session and can add threshold-based time or energy penalties.
| Component | UI unit | Purpose |
|---|---|---|
| Charge session | Currency per charge session | Required base amount charged for the session. The component supports tax entries. |
| Time Limit | Seconds | Optional charging-session time threshold. |
| Time Penalty | Currency per hour | Optional time-based penalty amount. It supports tax entries and a step size expressed in seconds. |
| Energy Limit | kWh | Optional energy-consumption threshold. |
| Energy Penalty | Currency per kWh | Optional energy-based penalty amount. It supports tax entries and a step size expressed in Wh. |
The live form displays a fixed step size of 1 for the per-session charge, a default time-penalty step size of 3600 seconds, and a default energy-penalty step size of 1 Wh. Optional fields remain unavailable until their checkboxes are selected.
Use the relevant limit together with its corresponding penalty when the intended pricing rule is to apply an additional charge after a threshold is exceeded.
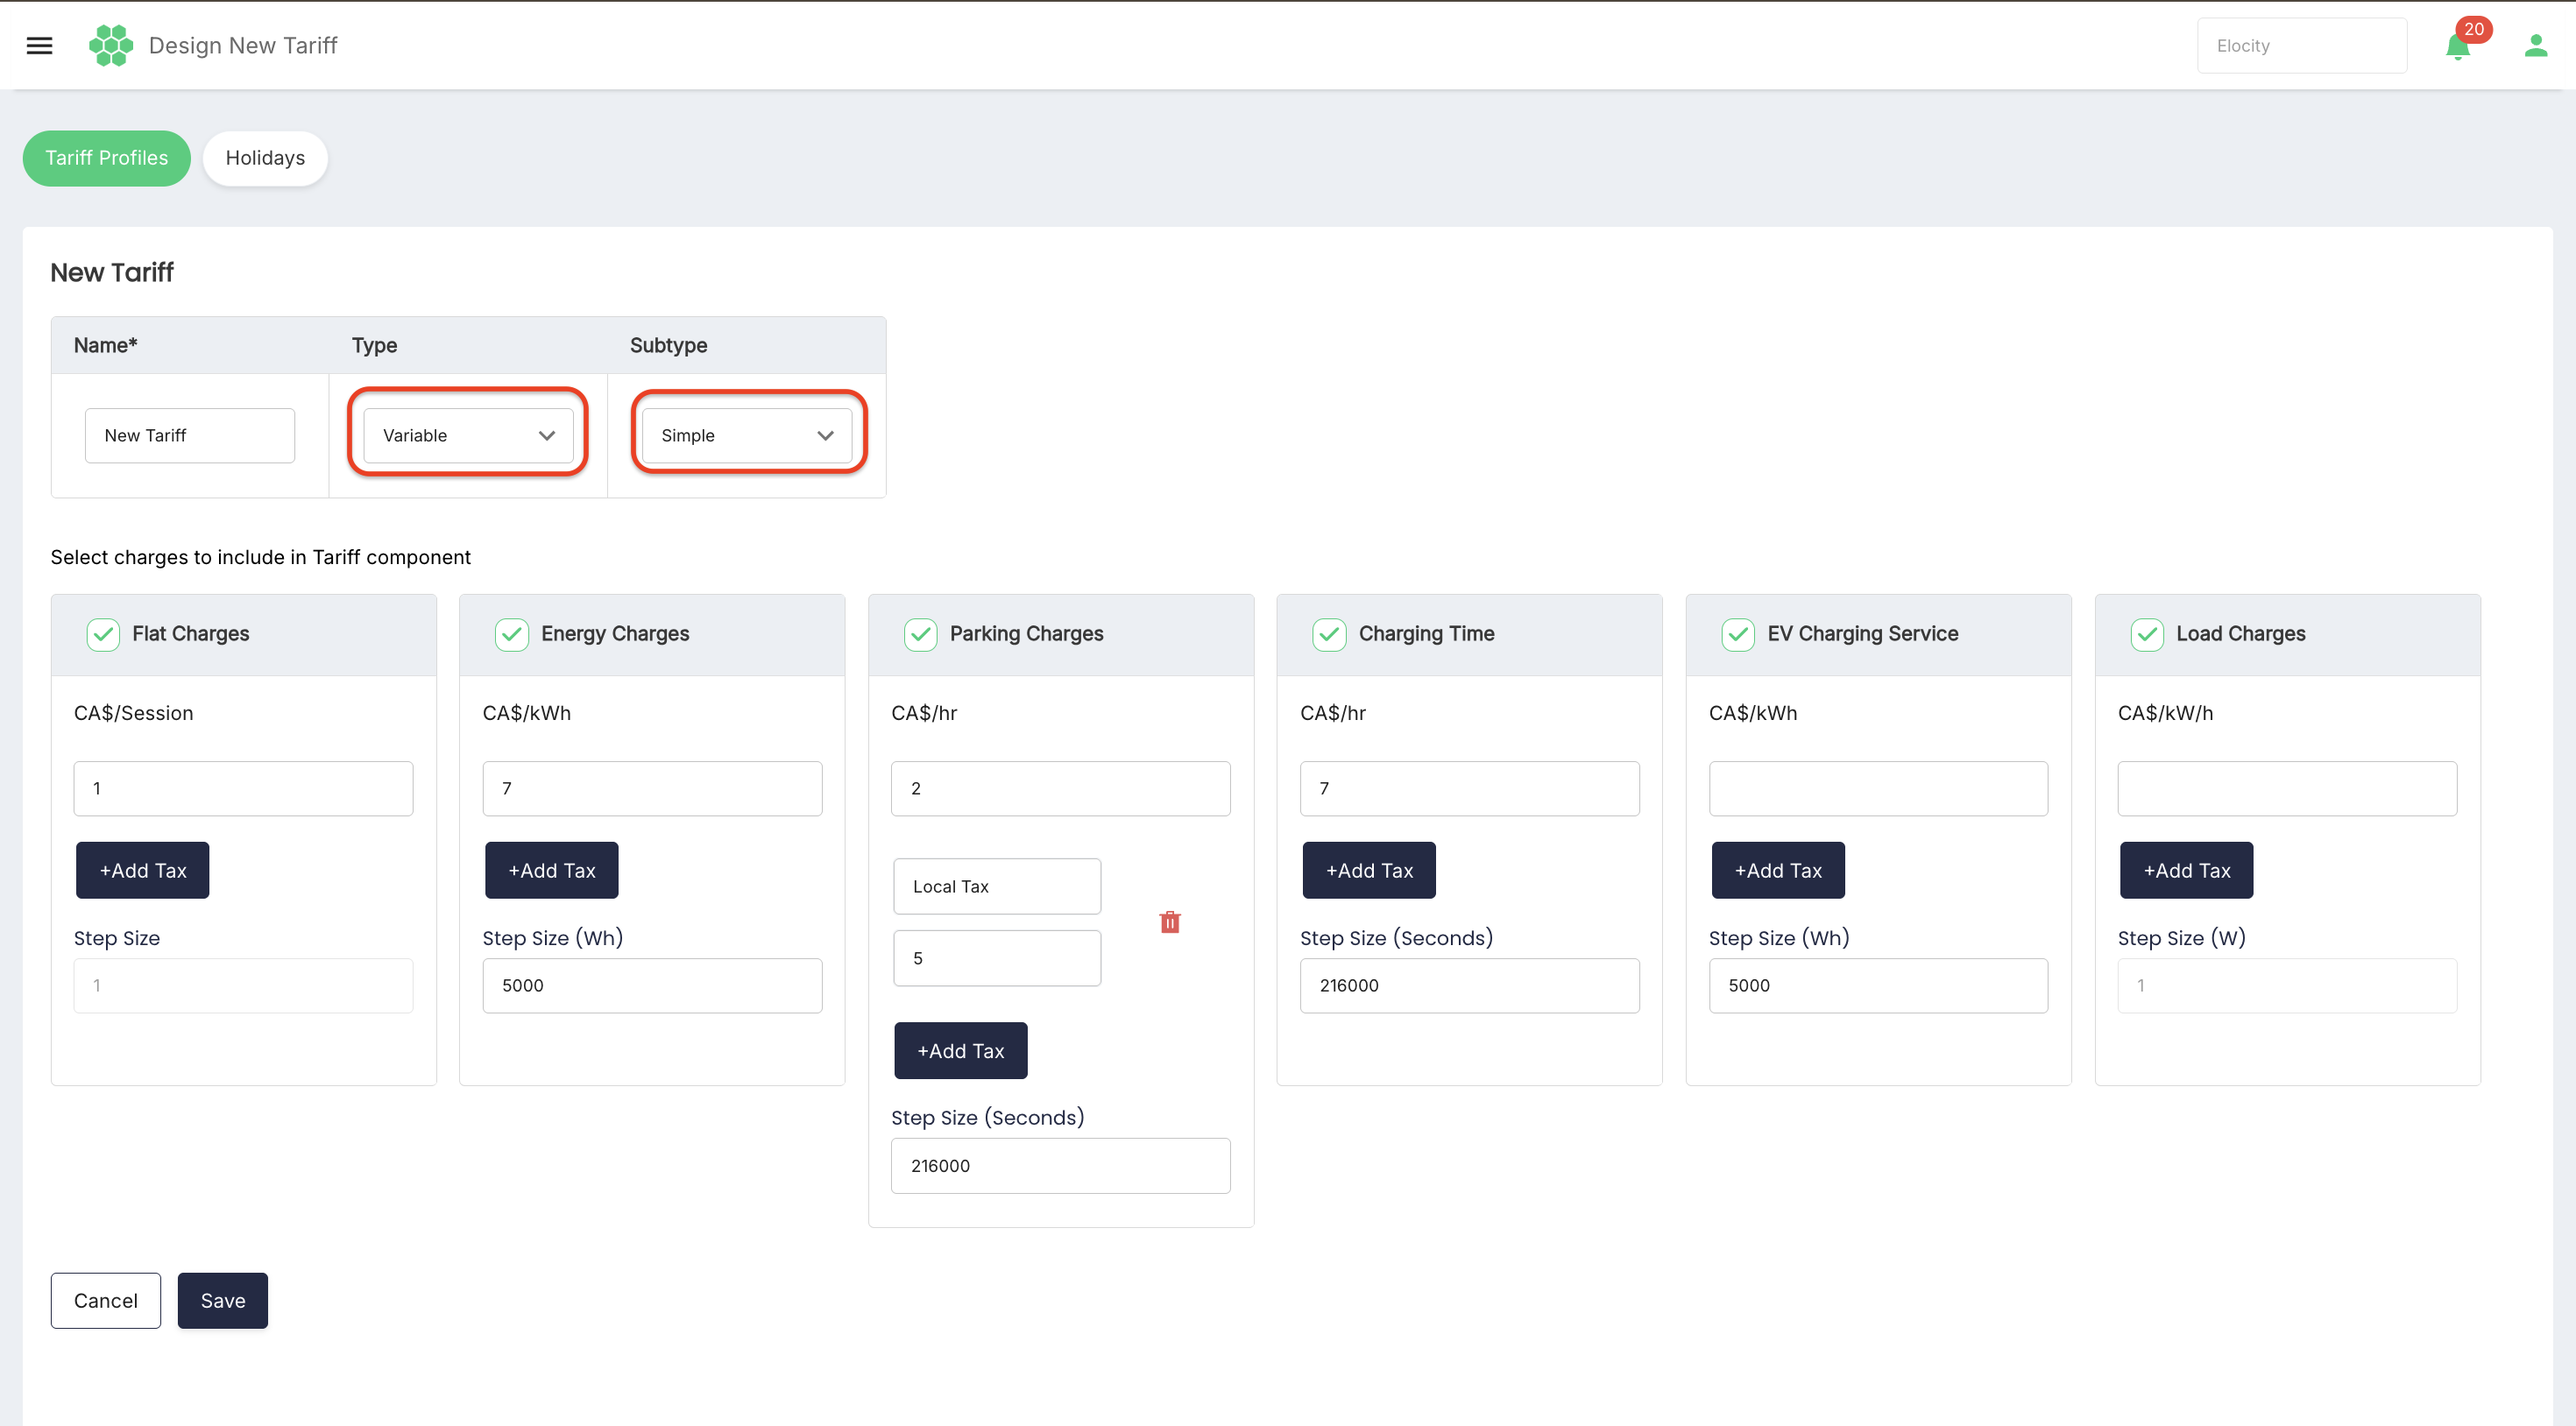
Profile structure 2: Simple Variable Tariff
A Simple Variable Tariff combines one or more standard pricing components. Select the checkbox beside each component that should be included; its amount, tax, and step-size controls then become available.
| Component | UI unit | What it represents in the form |
|---|---|---|
| Flat Charges | Currency per session | A fixed amount associated with each charging session. Default step size: 1. |
| Energy Charges | Currency per kWh | A usage charge based on energy. Step size is entered in Wh; the live default is 1. |
| Parking Charges | Currency per hour | Applies after active charging has stopped while the vehicle remains connected. The charge begins only after the configured grace period, such as 5 or 15 minutes. Step size is entered in seconds; the live default is 3600. |
| Charging Time | Currency per hour | Applies from the successful charging-session start until the stop-charging event. Step size is entered in seconds; the live default is 3600. |
| EV Charging Service | Currency per kWh | An operator-defined service charge used to recover charging-service or back-office operating costs. It is calculated against the energy consumed during the charging session. Step size is entered in Wh; the live default is 1. |
| Load Charges | Currency per kW/h | Calculates cost from the charger's average delivered load per hour. For example, at CA$1 per kW/h, an average load of 5 kW for the hour produces a CA$5 load charge. Step size is entered in W; the live default is 1. |
The selected components form one tariff template. The current live form includes Load Charges, although this component is missing from the older Tariff help text.
Profile structure 3: Advanced Variable Tariff
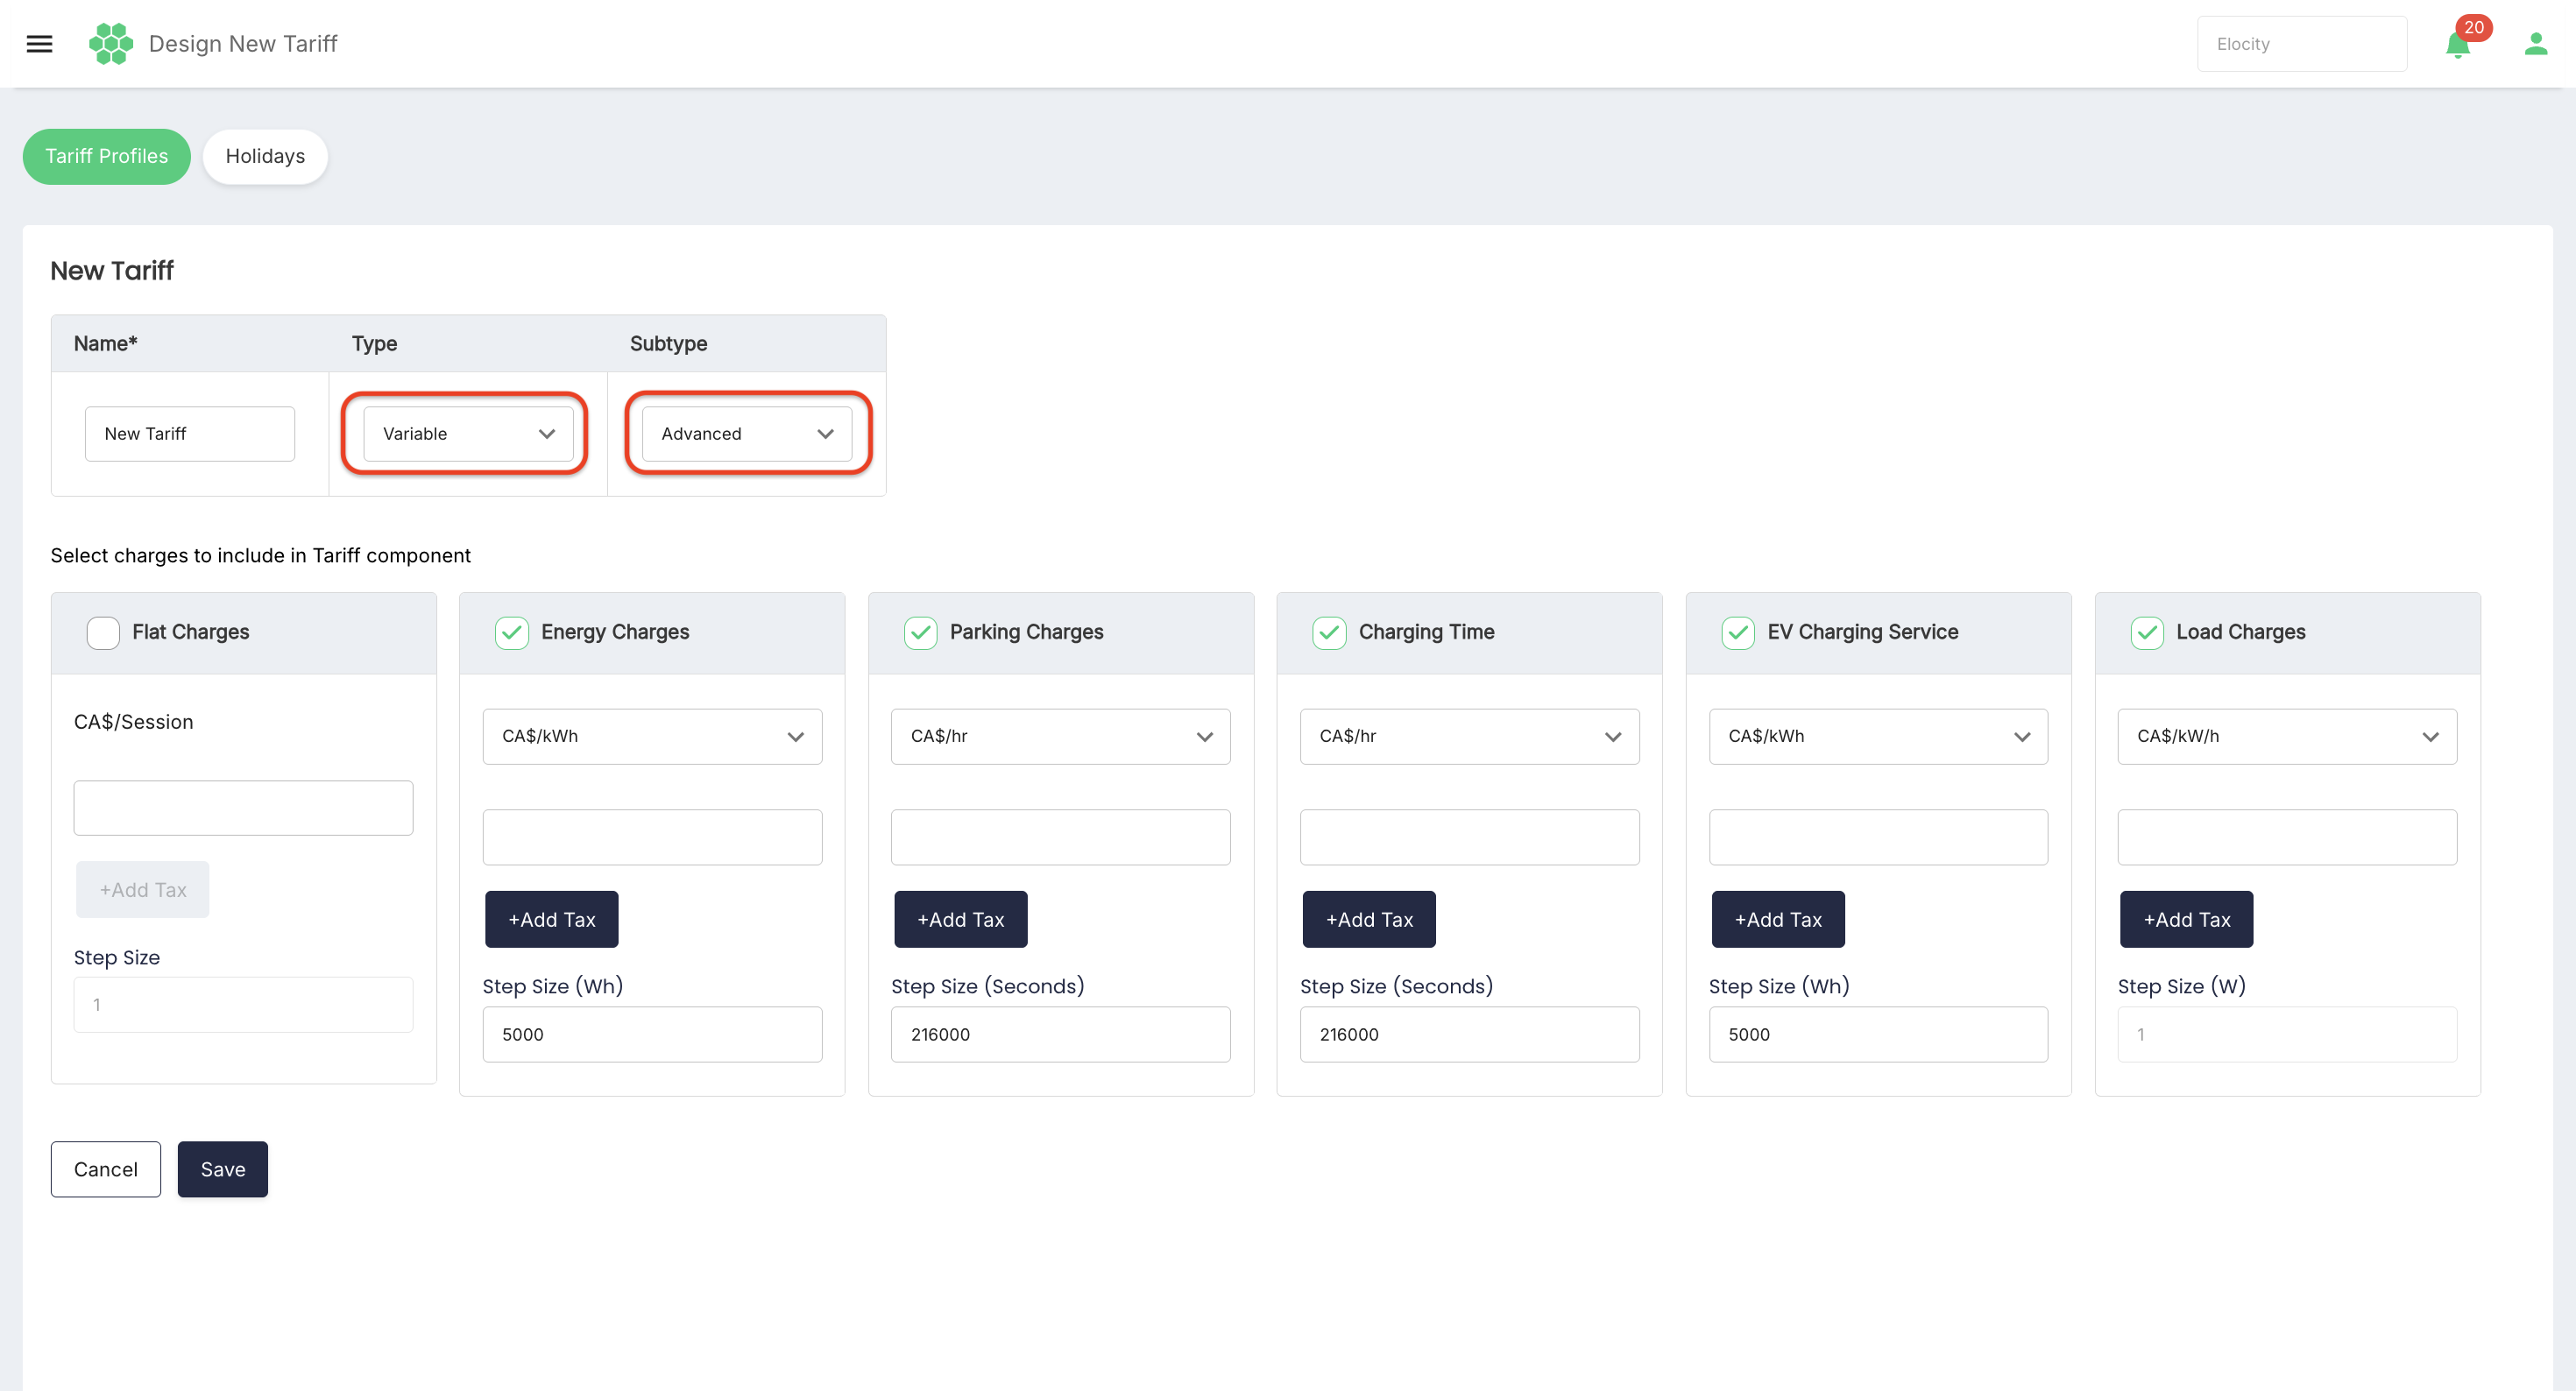
An Advanced Variable Tariff provides the same six selectable charge components as the Simple profile and adds pricing-style controls to the non-flat components.
For each of the following components, the rate selector provides the component's normal unit rate and Time of day:
| Component | Standard rate option | Alternate option |
|---|---|---|
| Energy Charges | Currency per kWh | Time of day |
| Parking Charges | Currency per hour | Time of day |
| Charging Time | Currency per hour | Time of day |
| EV Charging Service | Currency per kWh | Time of day |
| Load Charges | Currency per kW/h | Time of day |
Flat Charges remains a per-session amount and does not display a Time-of-Day selector.
Standard unit-rate configuration
Keep the component's standard rate option when one amount should apply without a Time-of-Day schedule. Enter the amount, add applicable tax entries, and confirm the step size for the selected component.
Time-of-Day configuration
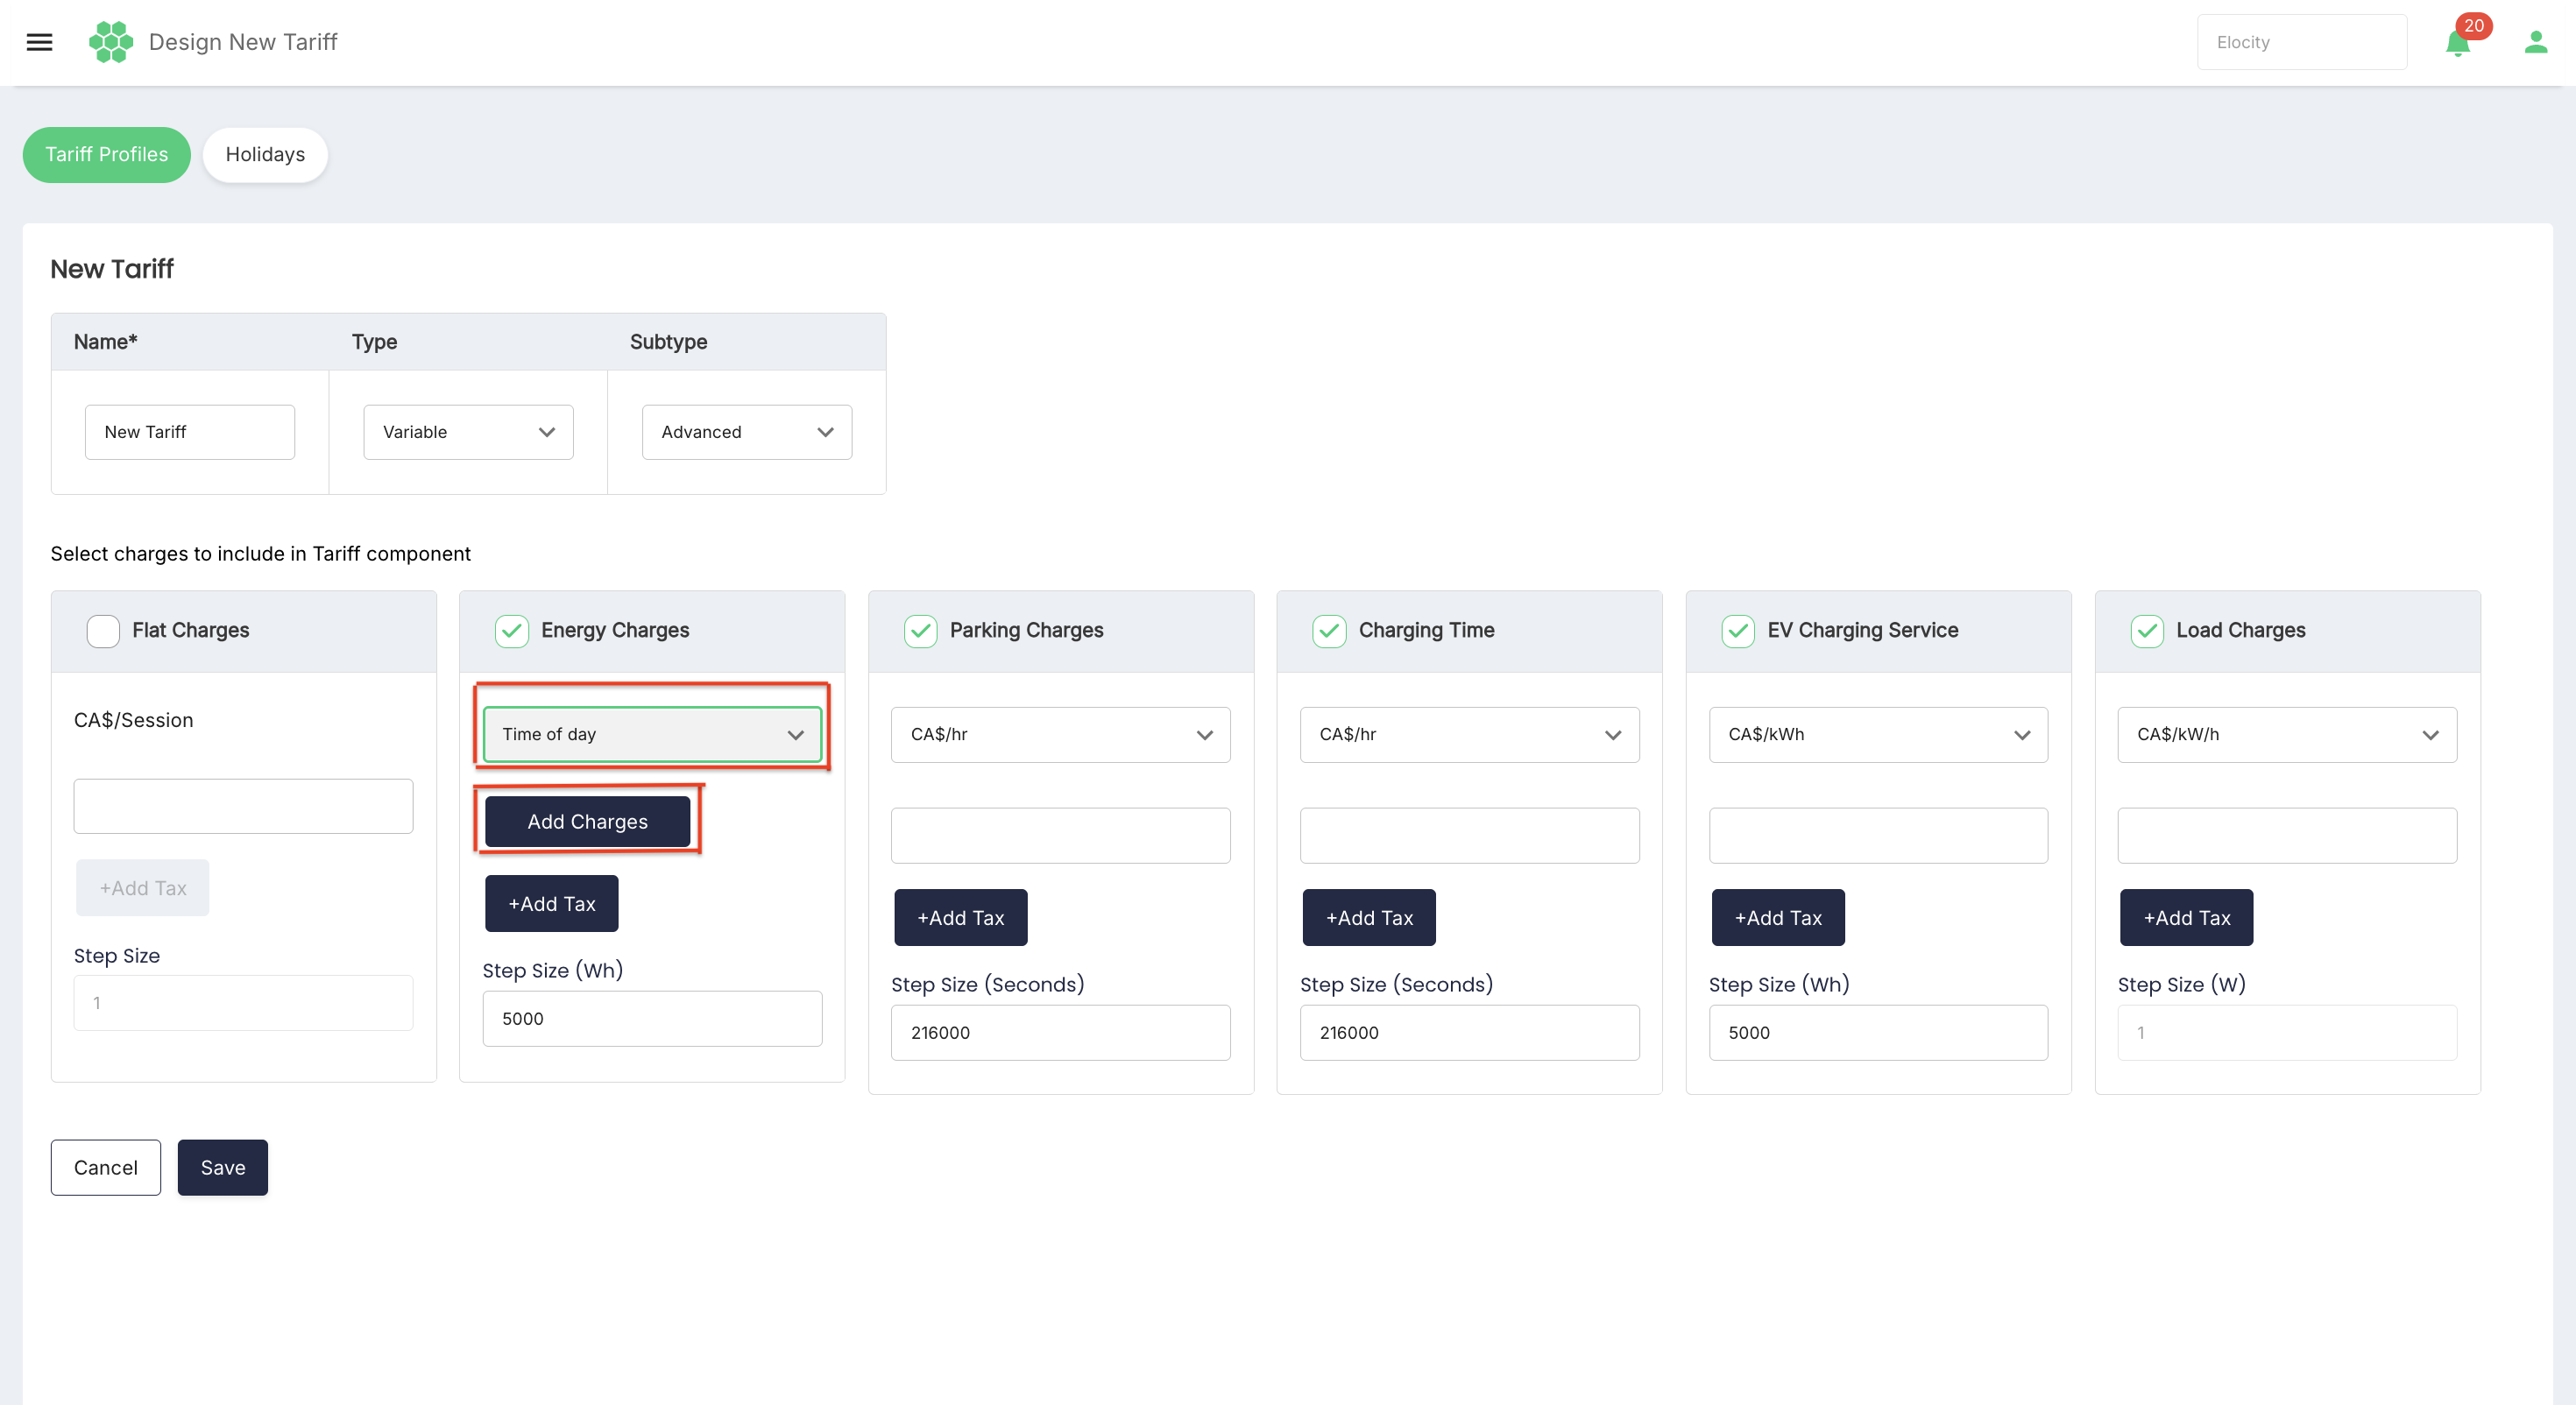
Choose Time of day, then select Add Charges to open the charge editor.
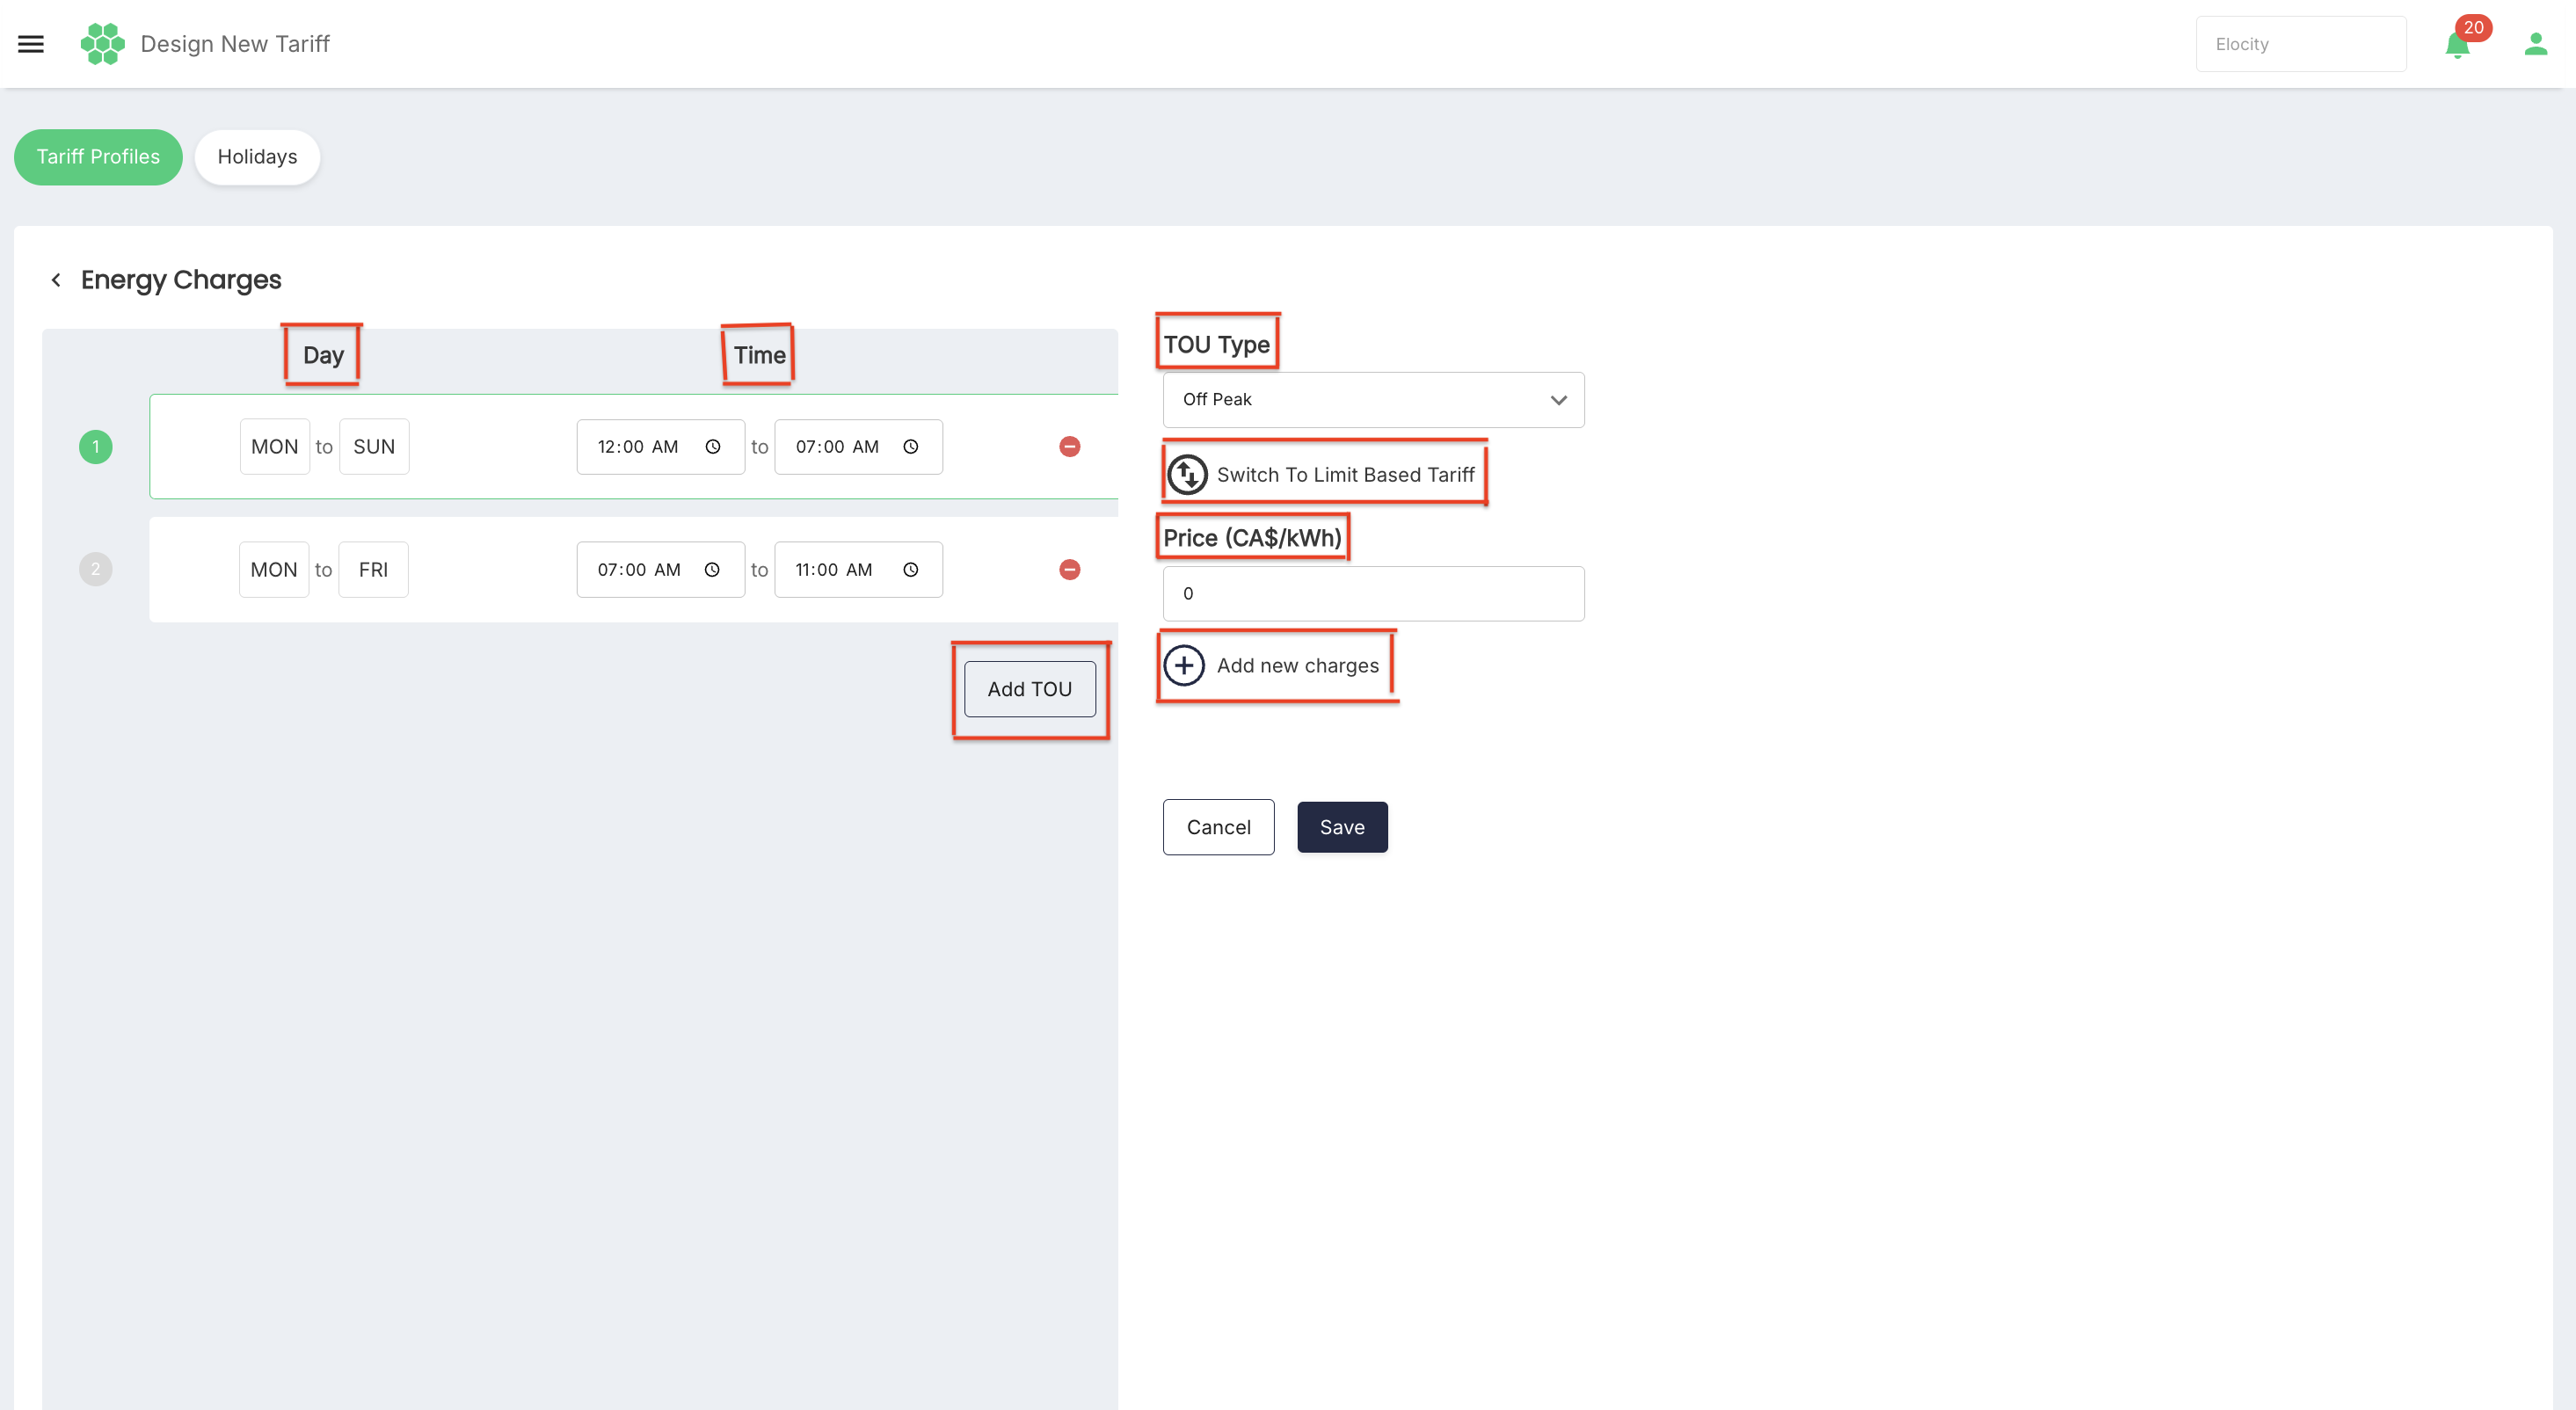
 The inspected Energy Charges editor contains:
| Control | Description |
|---|---|
| Day | Defines the start and end day for a Time-of-Use period. The live editor displays days from Monday through Sunday. |
| Time | Defines the start and end time for the period. |
| Add TOU | Adds another Time-of-Use period so additional day/time ranges can be configured. |
| TOU Type | Classifies the period as Off Peak, Mid Peak, or On Peak. |
| Price | Records the price for the period. For Energy Charges, the field is labelled as currency per kWh. |
| Add new charges | Adds another price entry to the Time-of-Day configuration. |
| Switch To Limit Based Tariff | Replaces the price-entry view with the limit-based view. |
Select Save in the charge editor to retain the Time-of-Day configuration, or Cancel to return without retaining the editor changes.
 Time-of-Day rules use the local timezone in which the charger operates. A Time-of-Day profile must price the complete 24-hour day for every day of the week. The platform validates the schedule and displays an error when time ranges overlap or leave a gap. Daylight-saving-time changes are handled using the charger's operating timezone.
When holiday pricing is required, select the holiday-pricing option in the Time-of-Day configuration and enter the applicable price. The dates maintained under Tariff > Holidays identify which calendar dates the platform treats as holidays.
Limit-based Time-of-Day configuration
In the Time-of-Day charge editor, select Switch To Limit Based Tariff. The inspected Energy Charges editor then provides:
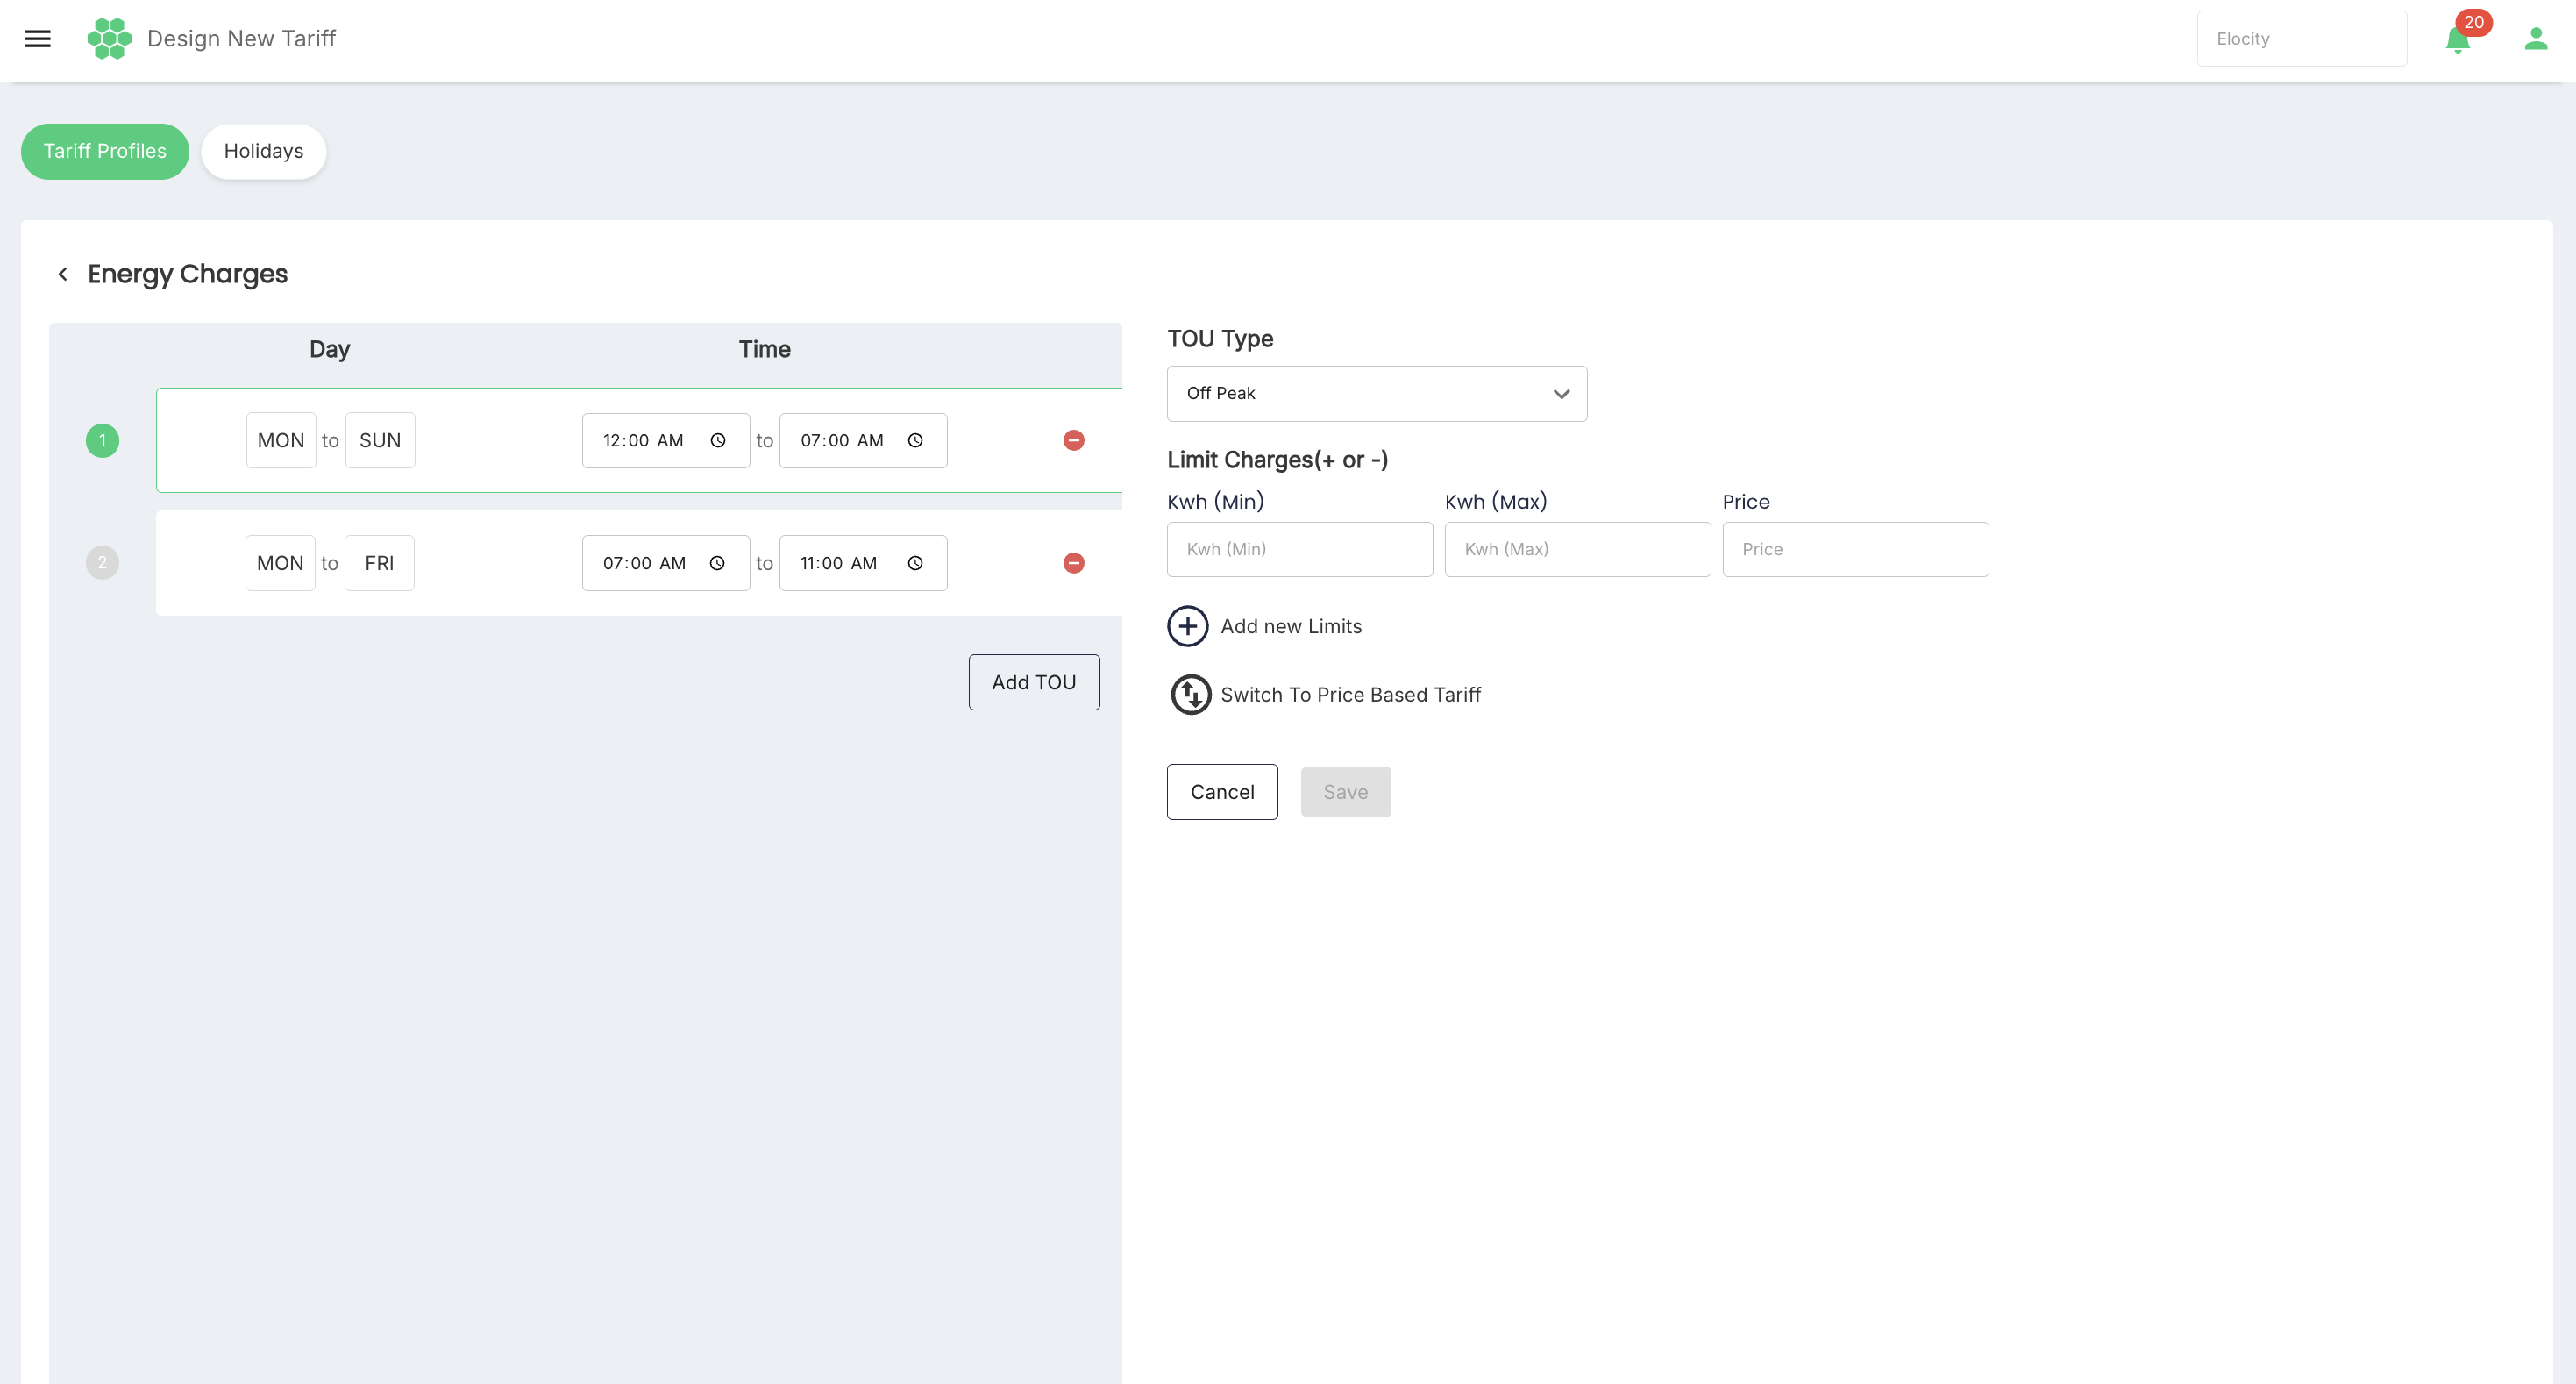
| Field | Description |
|---|---|
| kWh (Min) | Lower energy boundary for the limit entry. |
| kWh (Max) | Upper energy boundary for the limit entry. |
| Price | Price assigned to the entered energy range. |
| Add new Limits | Adds another minimum/maximum/price entry. |
| Switch To Price Based Tariff | Returns to the Time-of-Day price-entry view. |
The day, time, and TOU classification remain part of the editor when the limit-based view is selected. Limit-based pricing is progressive: consumption is charged through the configured ranges in sequence rather than applying one final band to the entire session quantity.
Understanding step size
Step size is the billing increment for a specific pricing dimension. It can represent time, energy, load, or another supported measure. The unit depends on the component:
- Session charges: unit step.
- Energy and EV Charging Service: Wh.
- Parking and Charging Time: seconds.
- Load Charges: W.
For example, a time component with a 3600-second step represents a one-hour billing increment. A smaller configured increment provides more granular billing.
When a measured value contains a partial step, the platform rounds the number of steps upward to the next complete increment. Administrators should therefore select step sizes carefully because any partial time, energy, or load increment is billed as a full step.
Adding taxes
- Enable the required monetary component.
- Select +Add Tax.
- Enter the New Tax Name.
- Enter the tax Value (%).
- Review the amount, tax, and step size together before saving the profile.
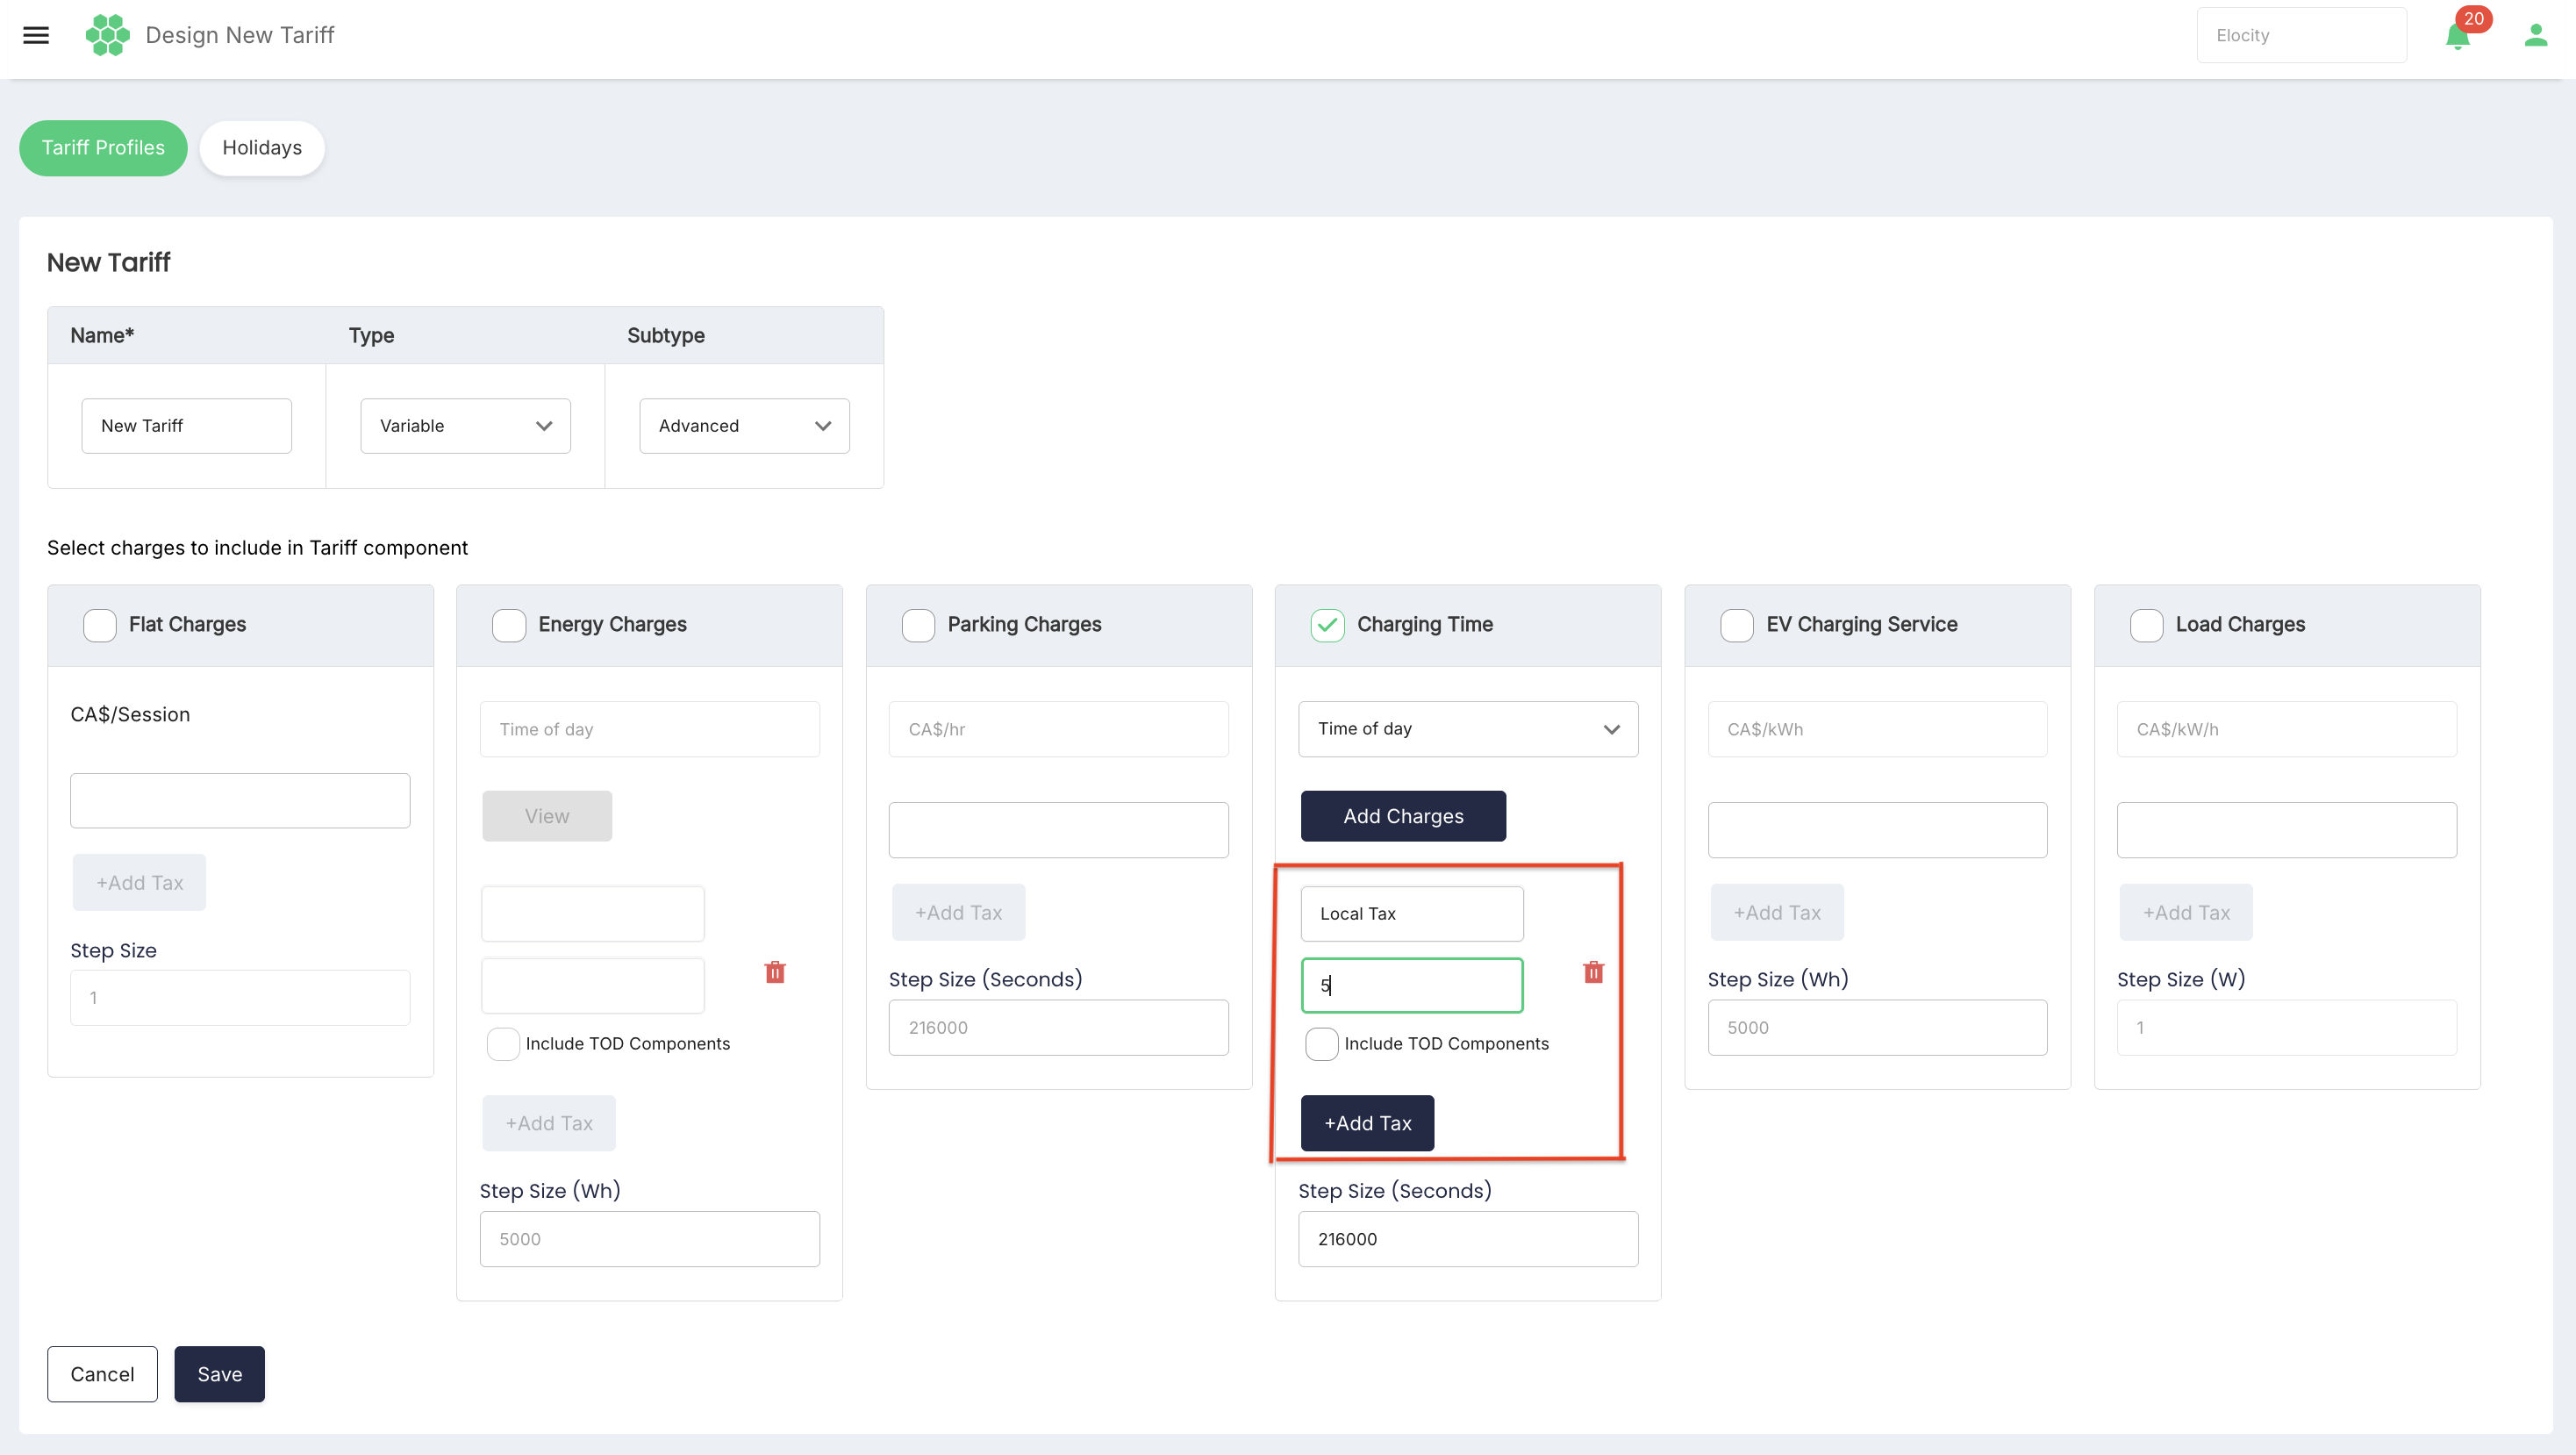 Tax fields are associated with individual charge components. Taxes are additional to the configured base amount. When more than one tax applies, each tax is calculated independently on the base charge; a tax is not calculated on top of another tax.
Reviewing, editing, and deleting a designed profile
View a profile
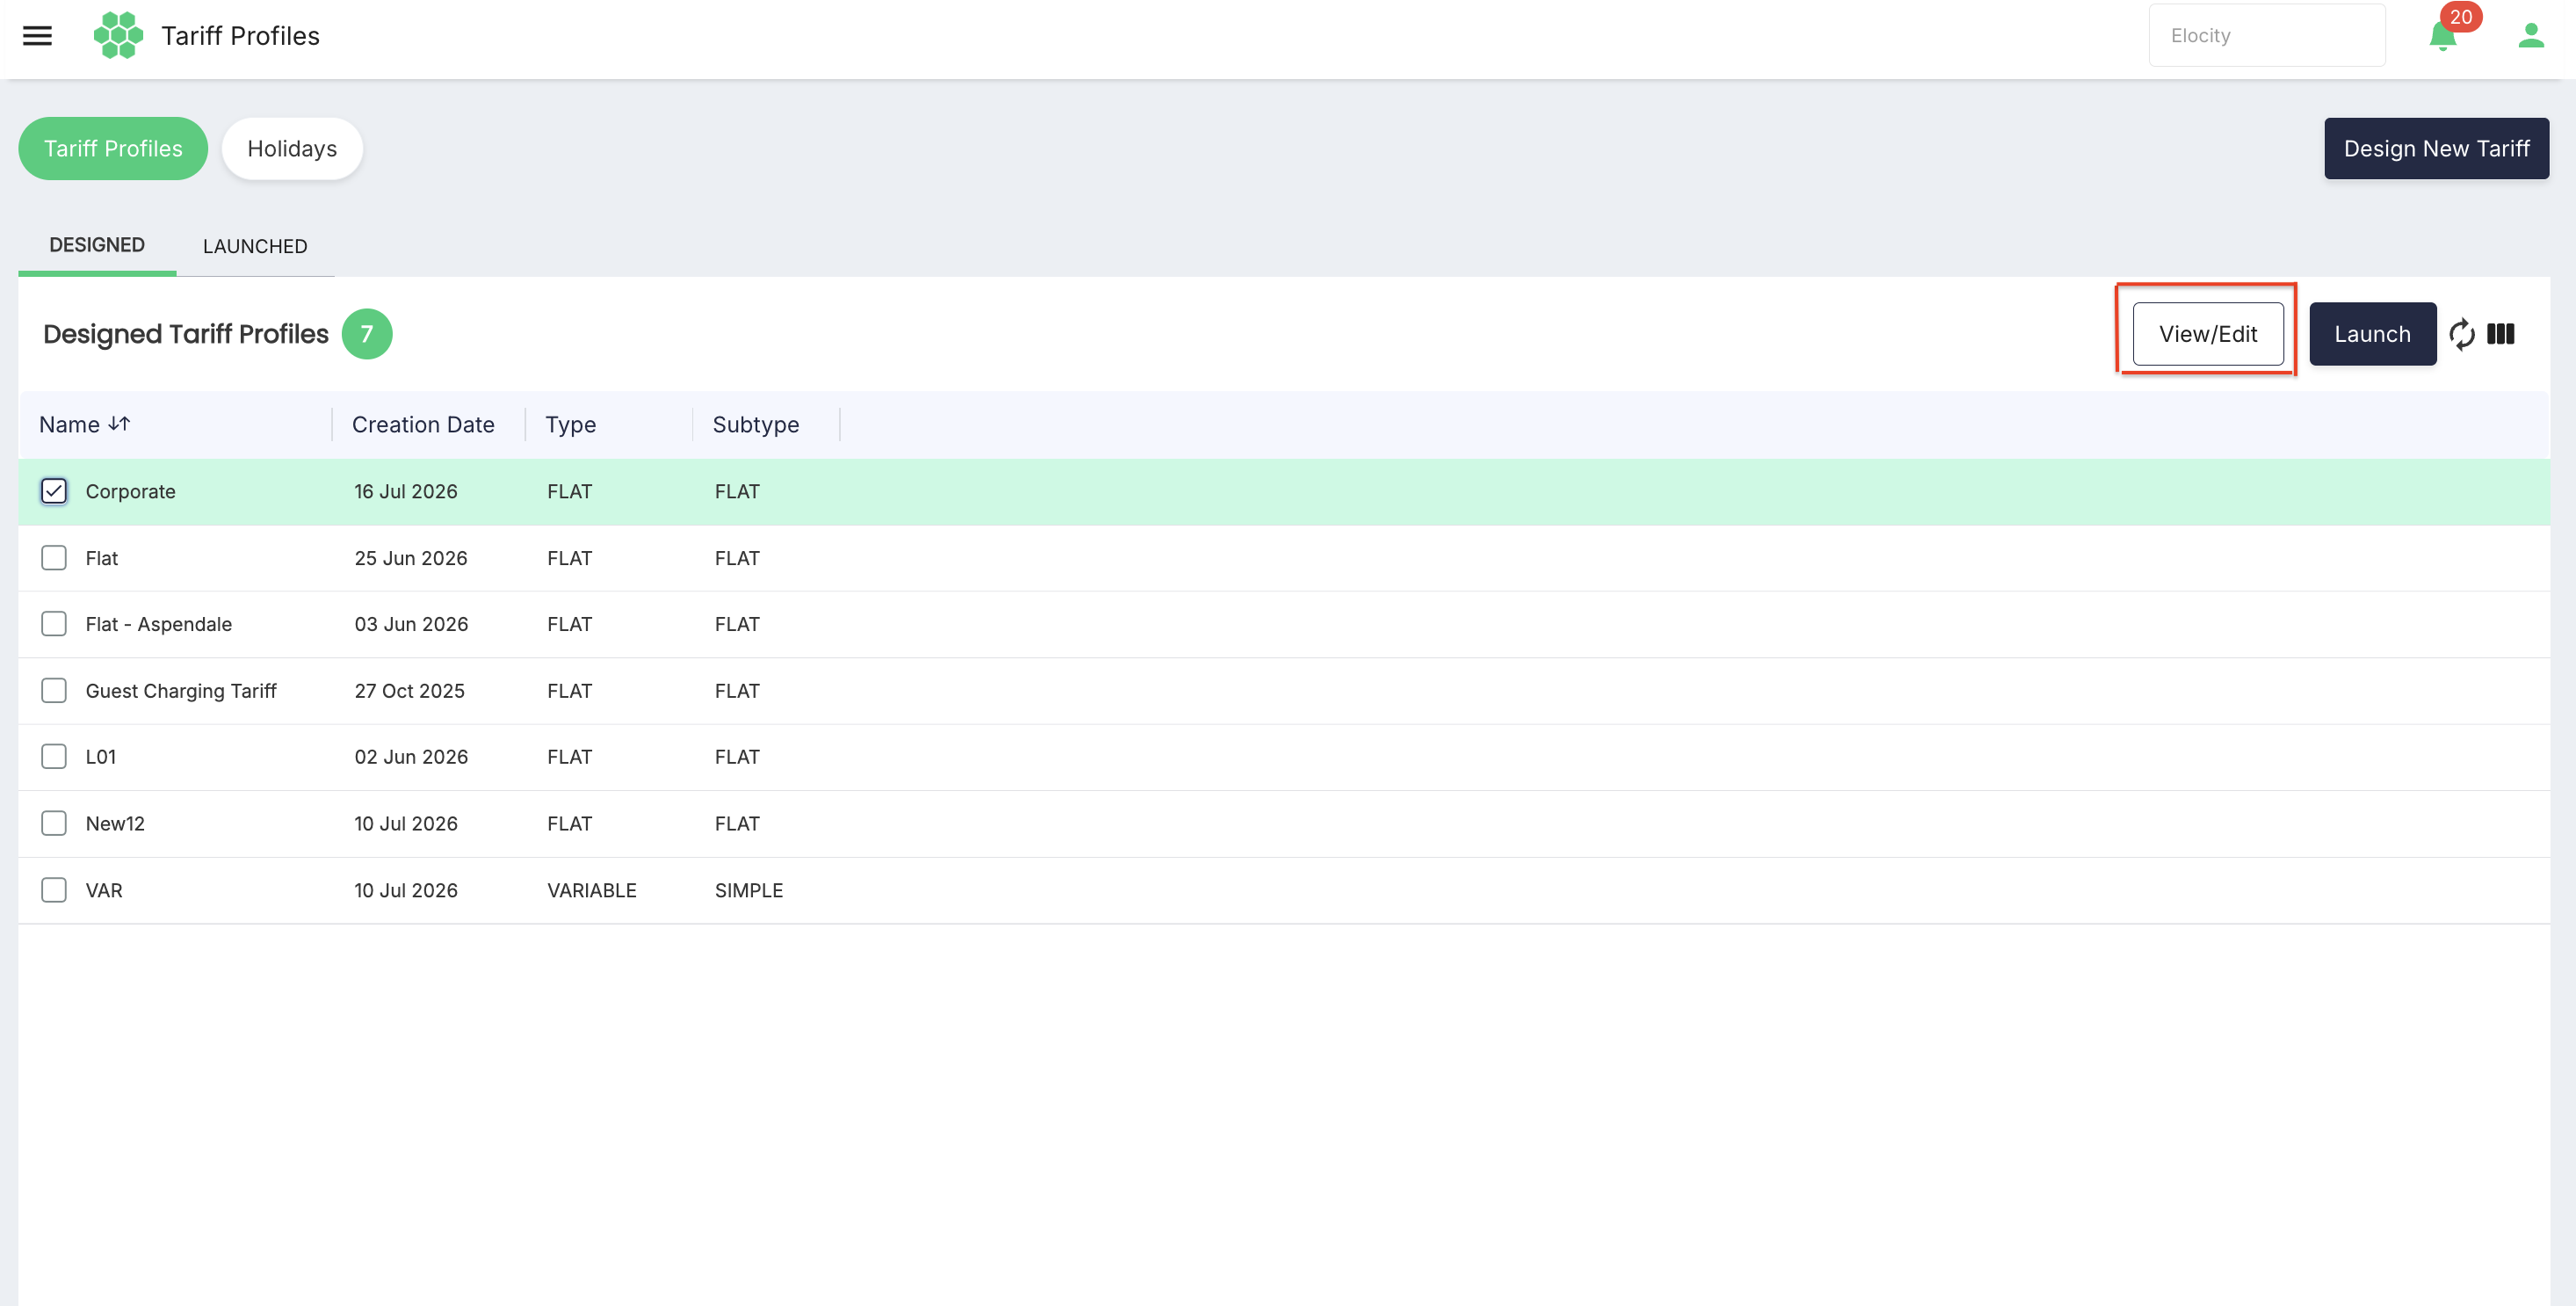
- Open Tariff > Tariff Profiles > Designed.
- Select one profile row.
- Select View/Edit.
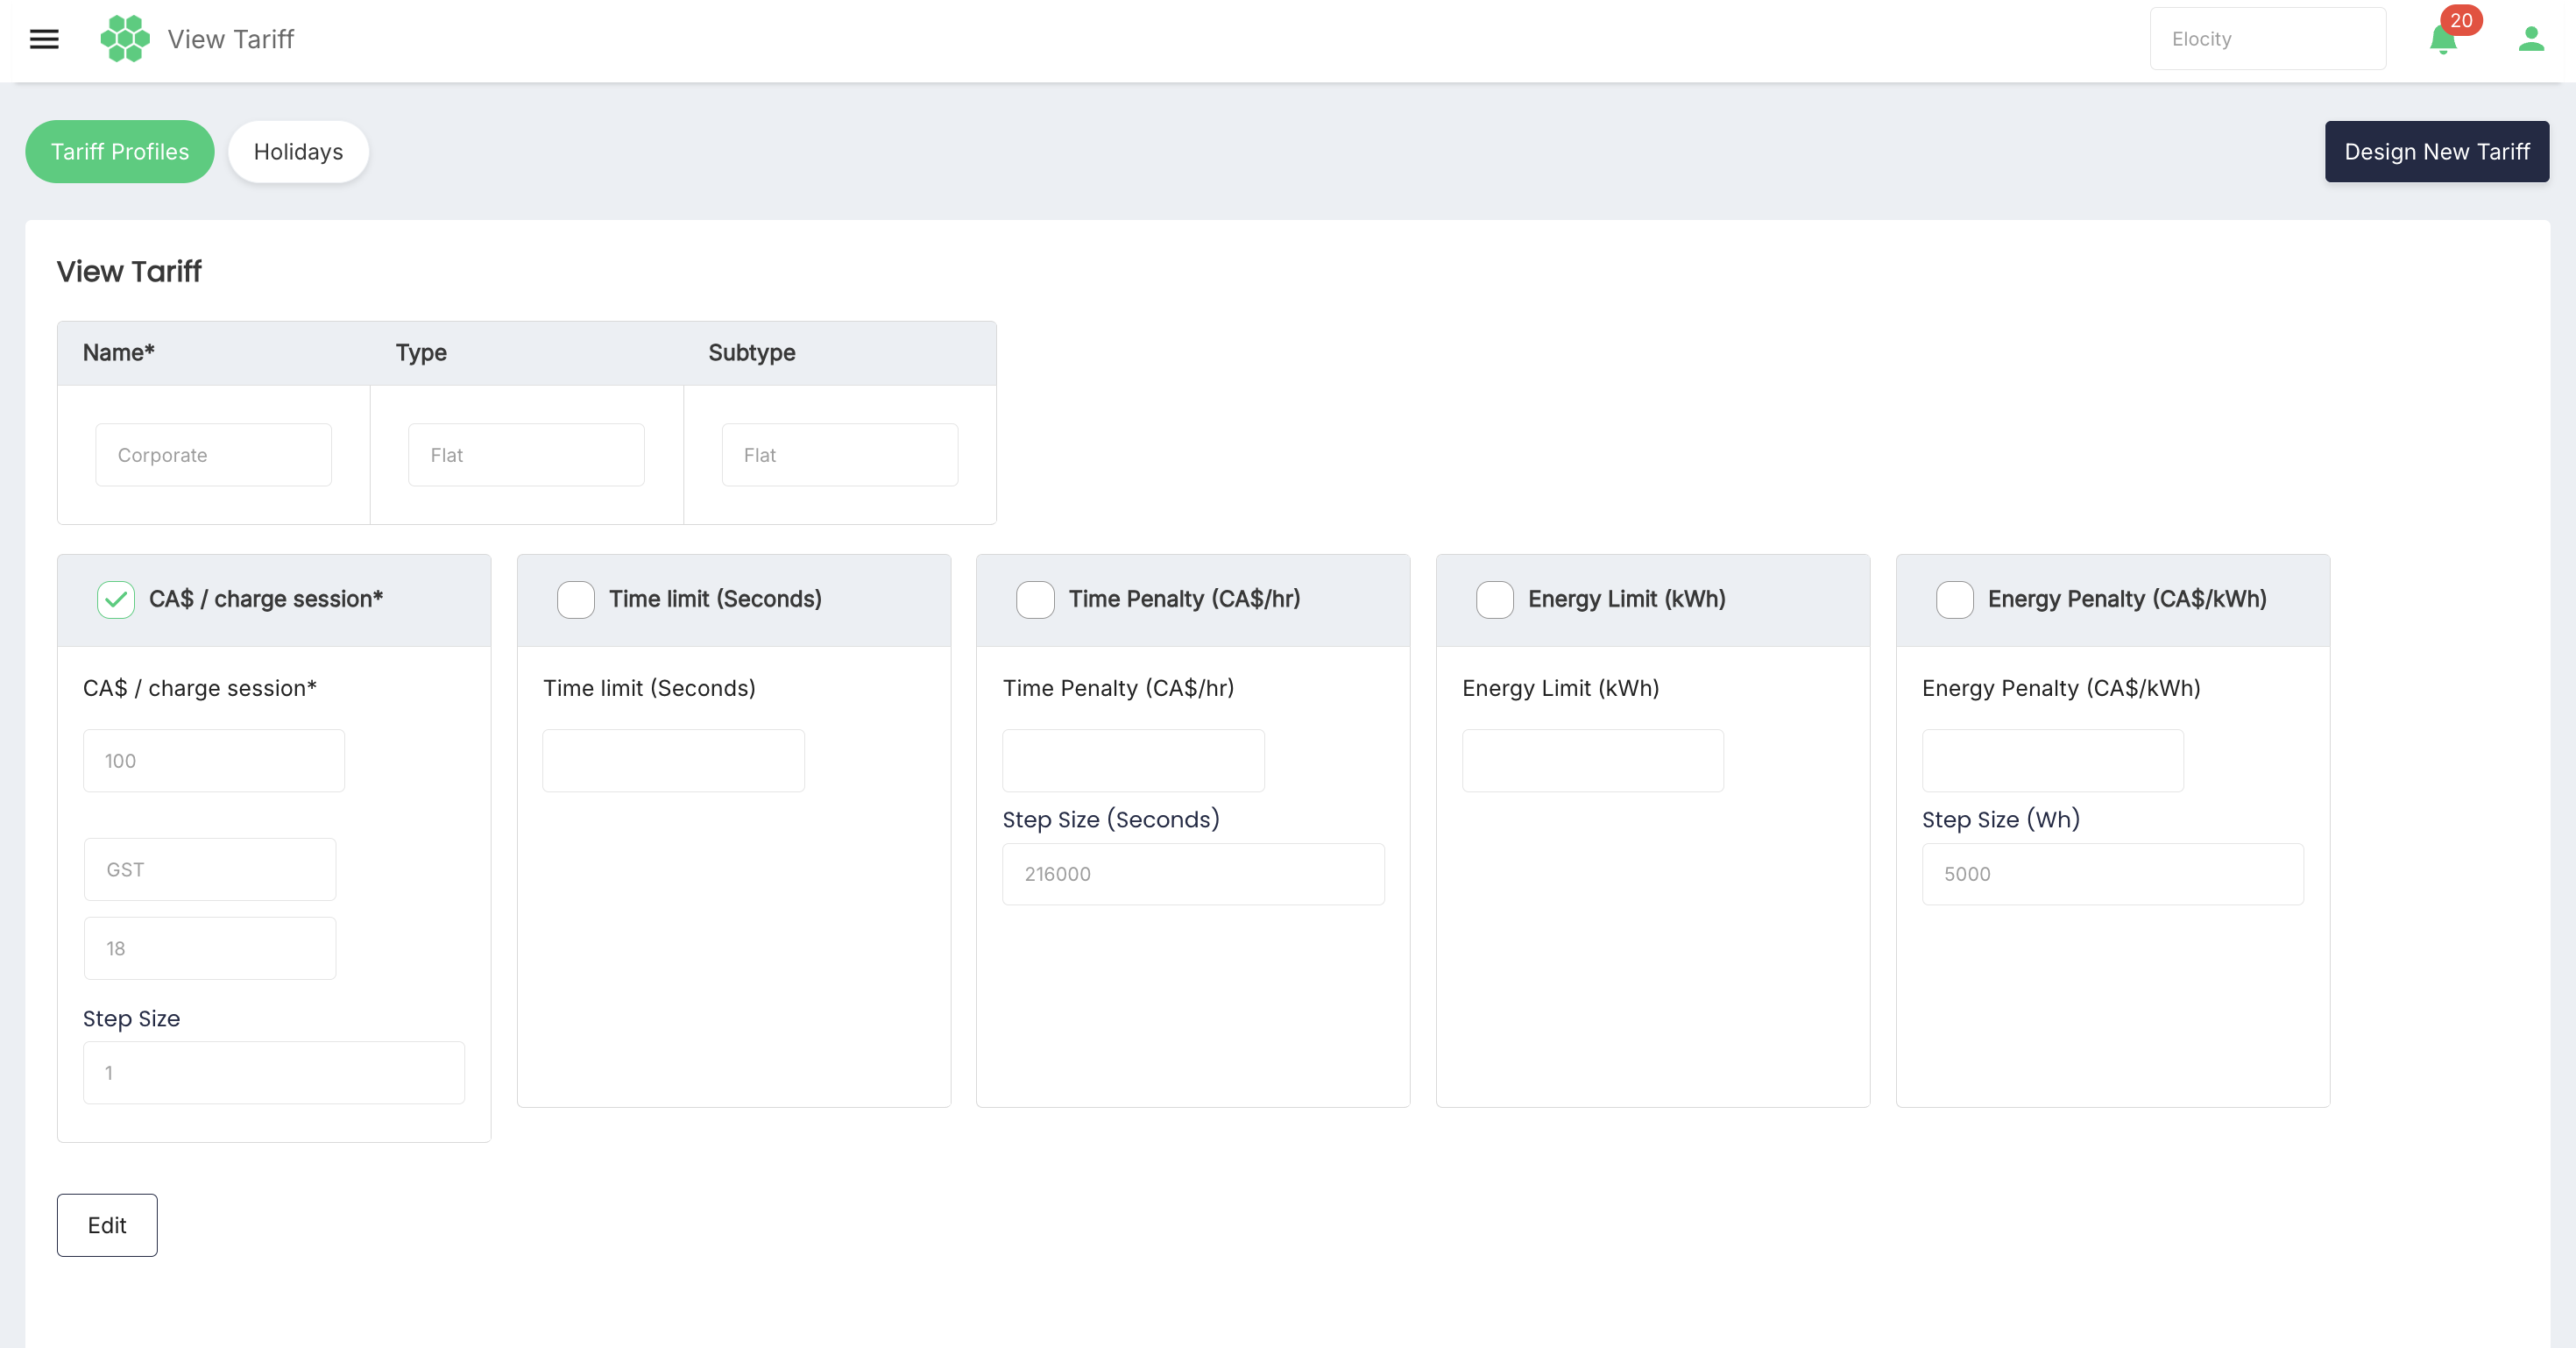
The view page shows the profile name, type, subtype, selected components, amounts, taxes, limits, and step sizes in read-only form.
Edit a profile
- From the read-only profile page, select Edit.
- Update the required template fields.
- Select Save.
Select Cancel to leave the edit form without saving the pending changes.
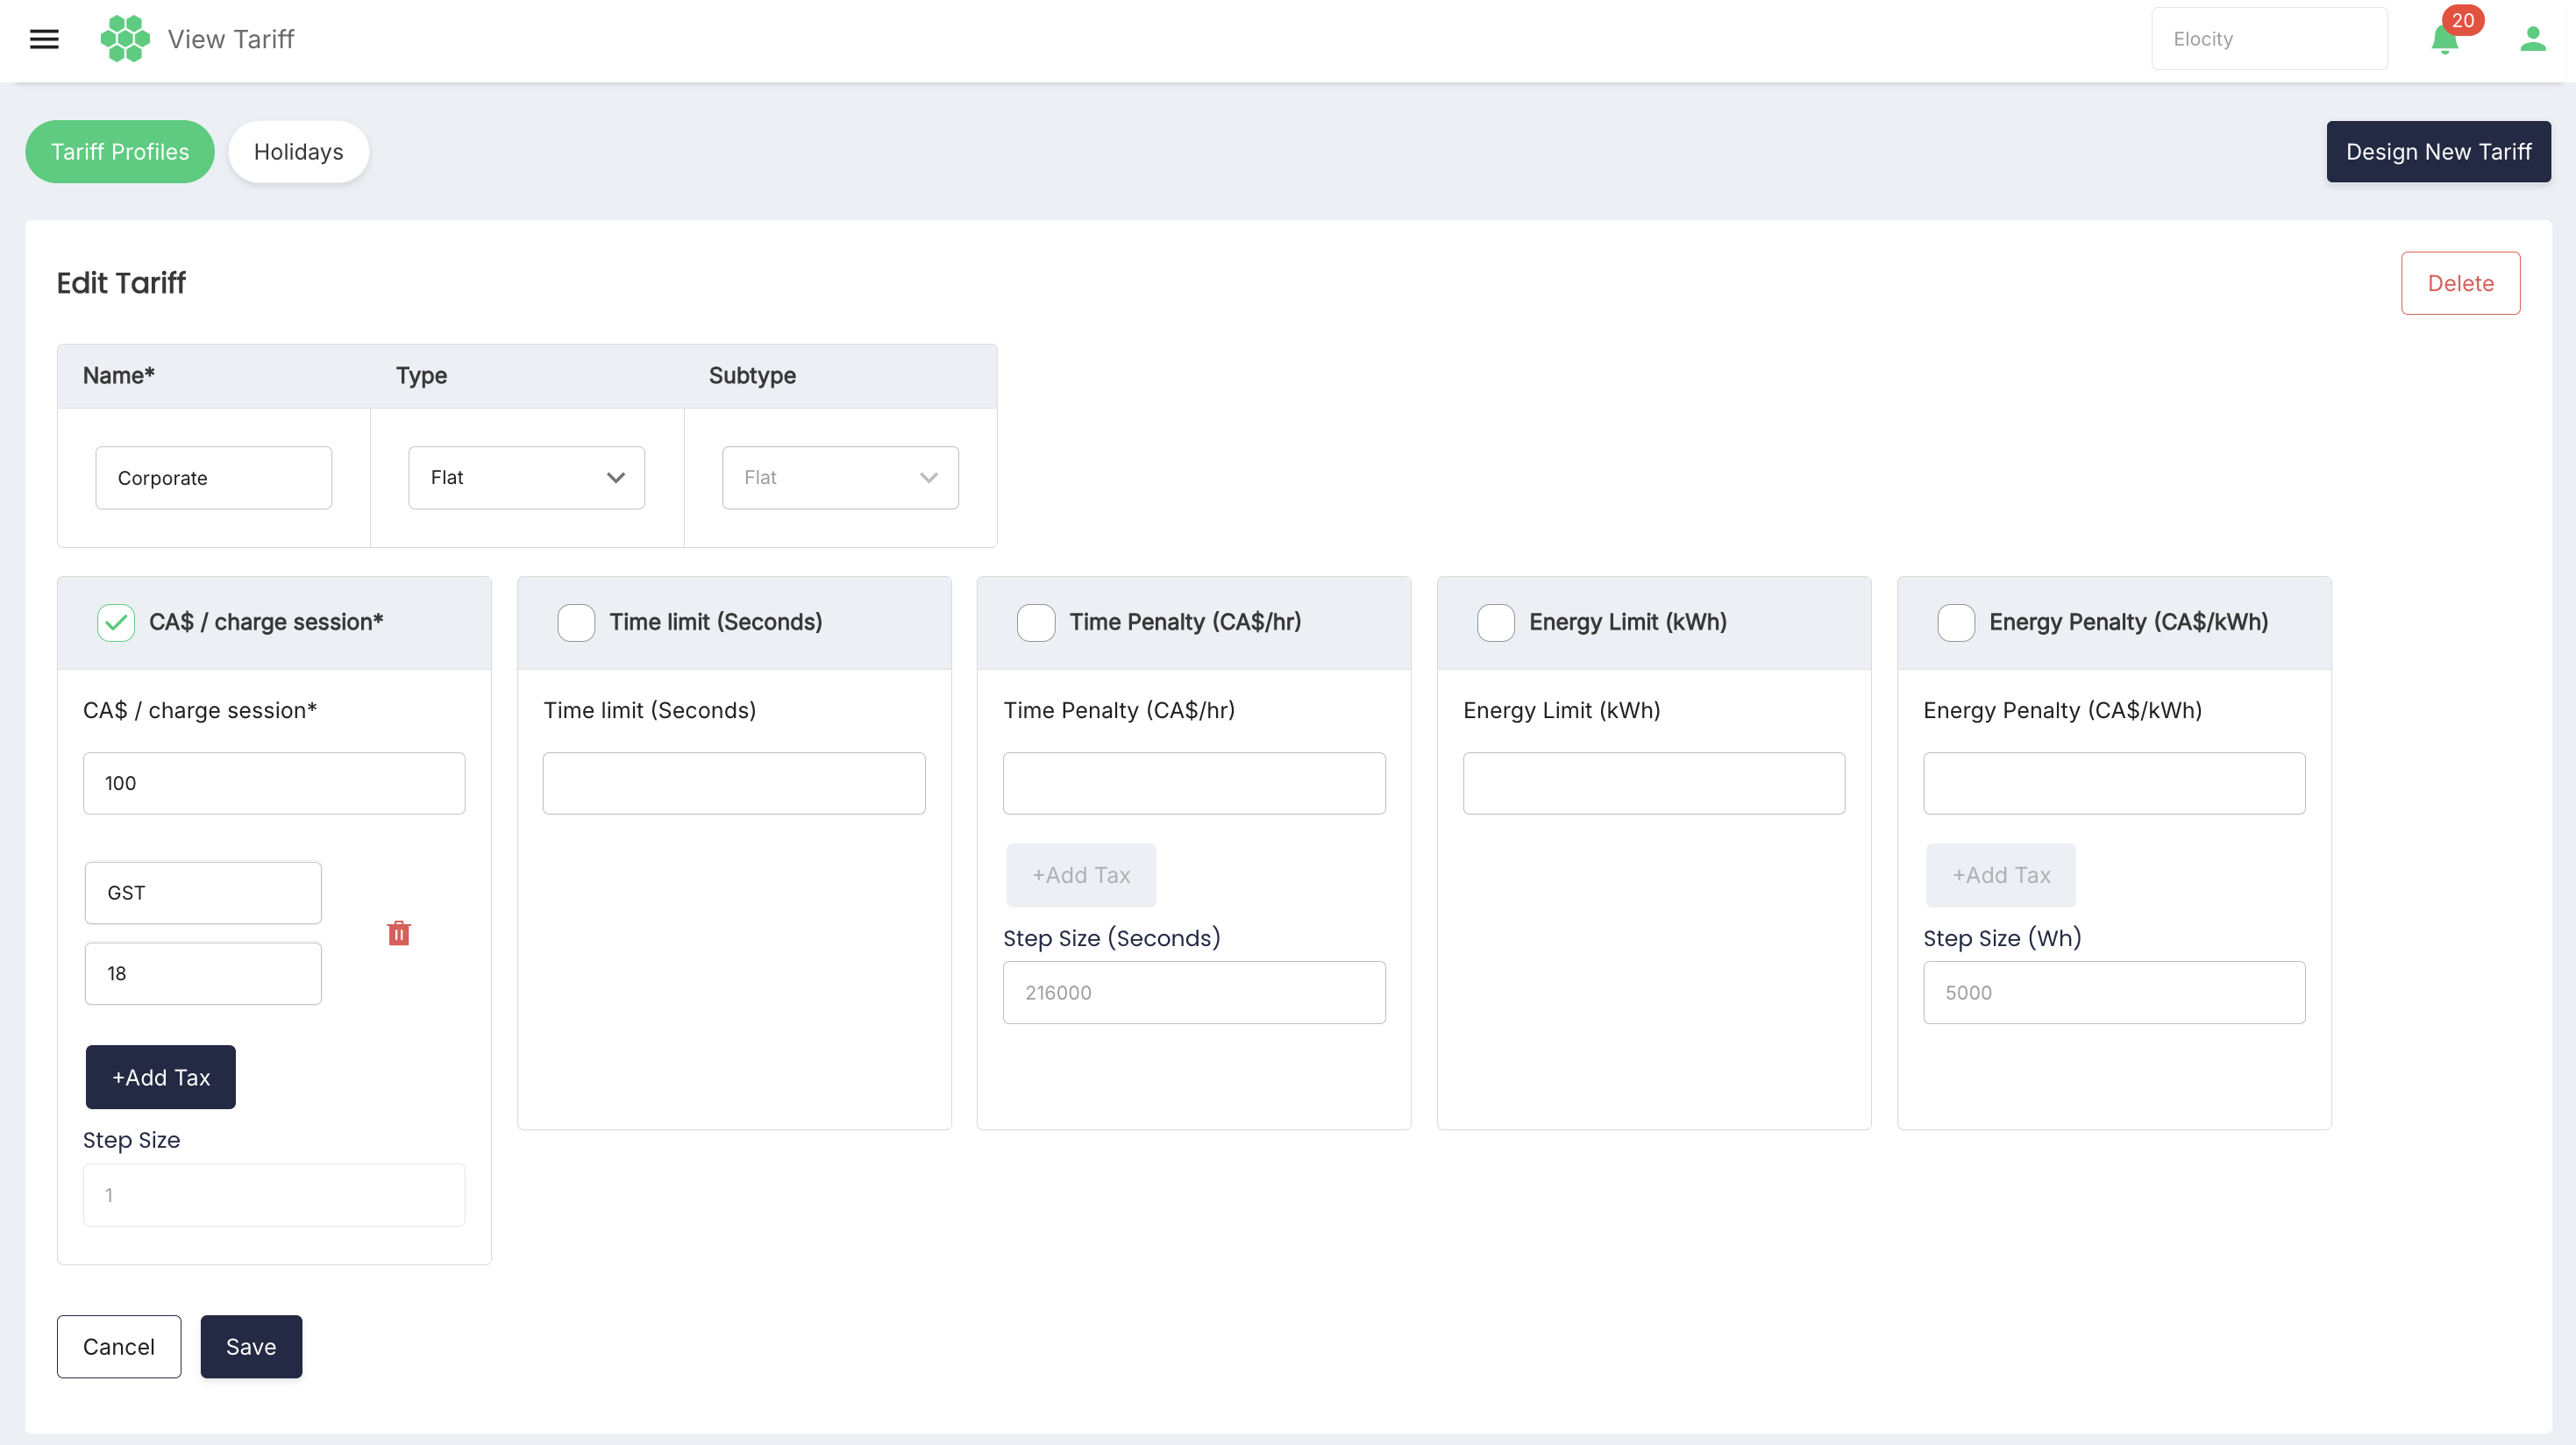
Editing a designed profile does not modify a tariff that has already been launched. The saved changes are used only for future launches of that profile.
Delete a profile
- Open the designed profile through View/Edit.
- Select Edit.
- Select Delete.
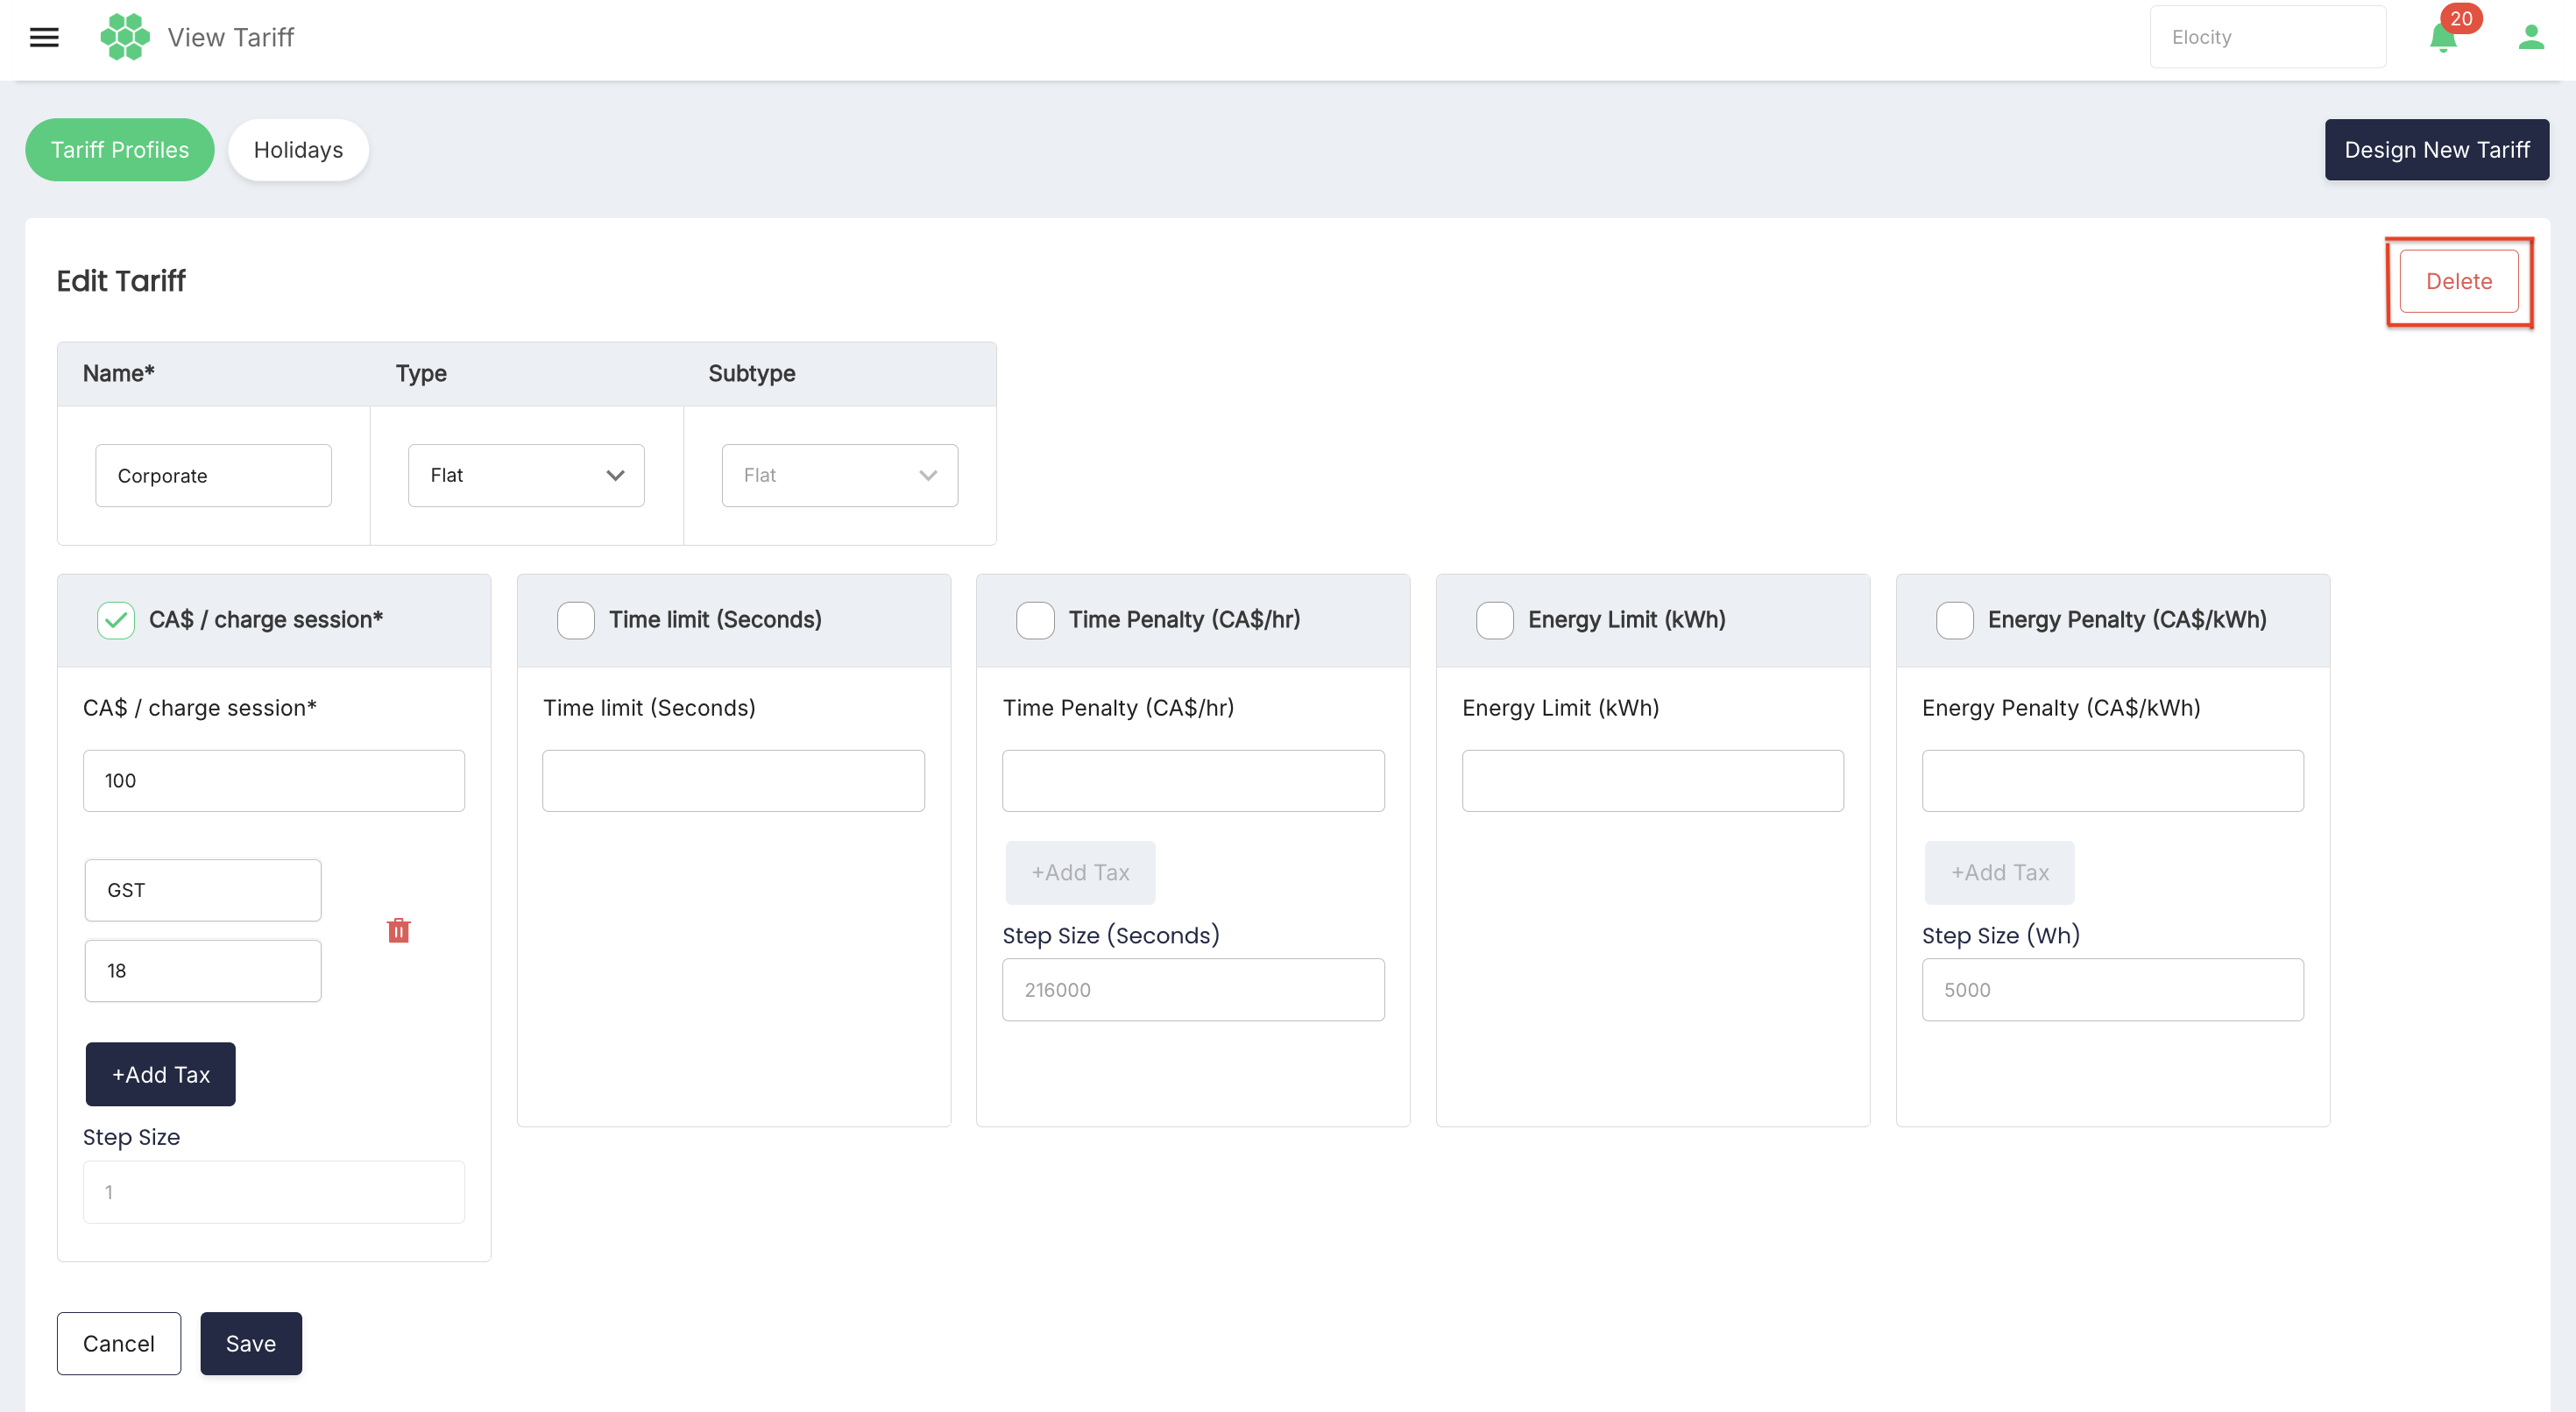
- Review the confirmation message: Are you sure you want to delete this Tariff Template?
- Select Delete to confirm, or Cancel to keep the profile.
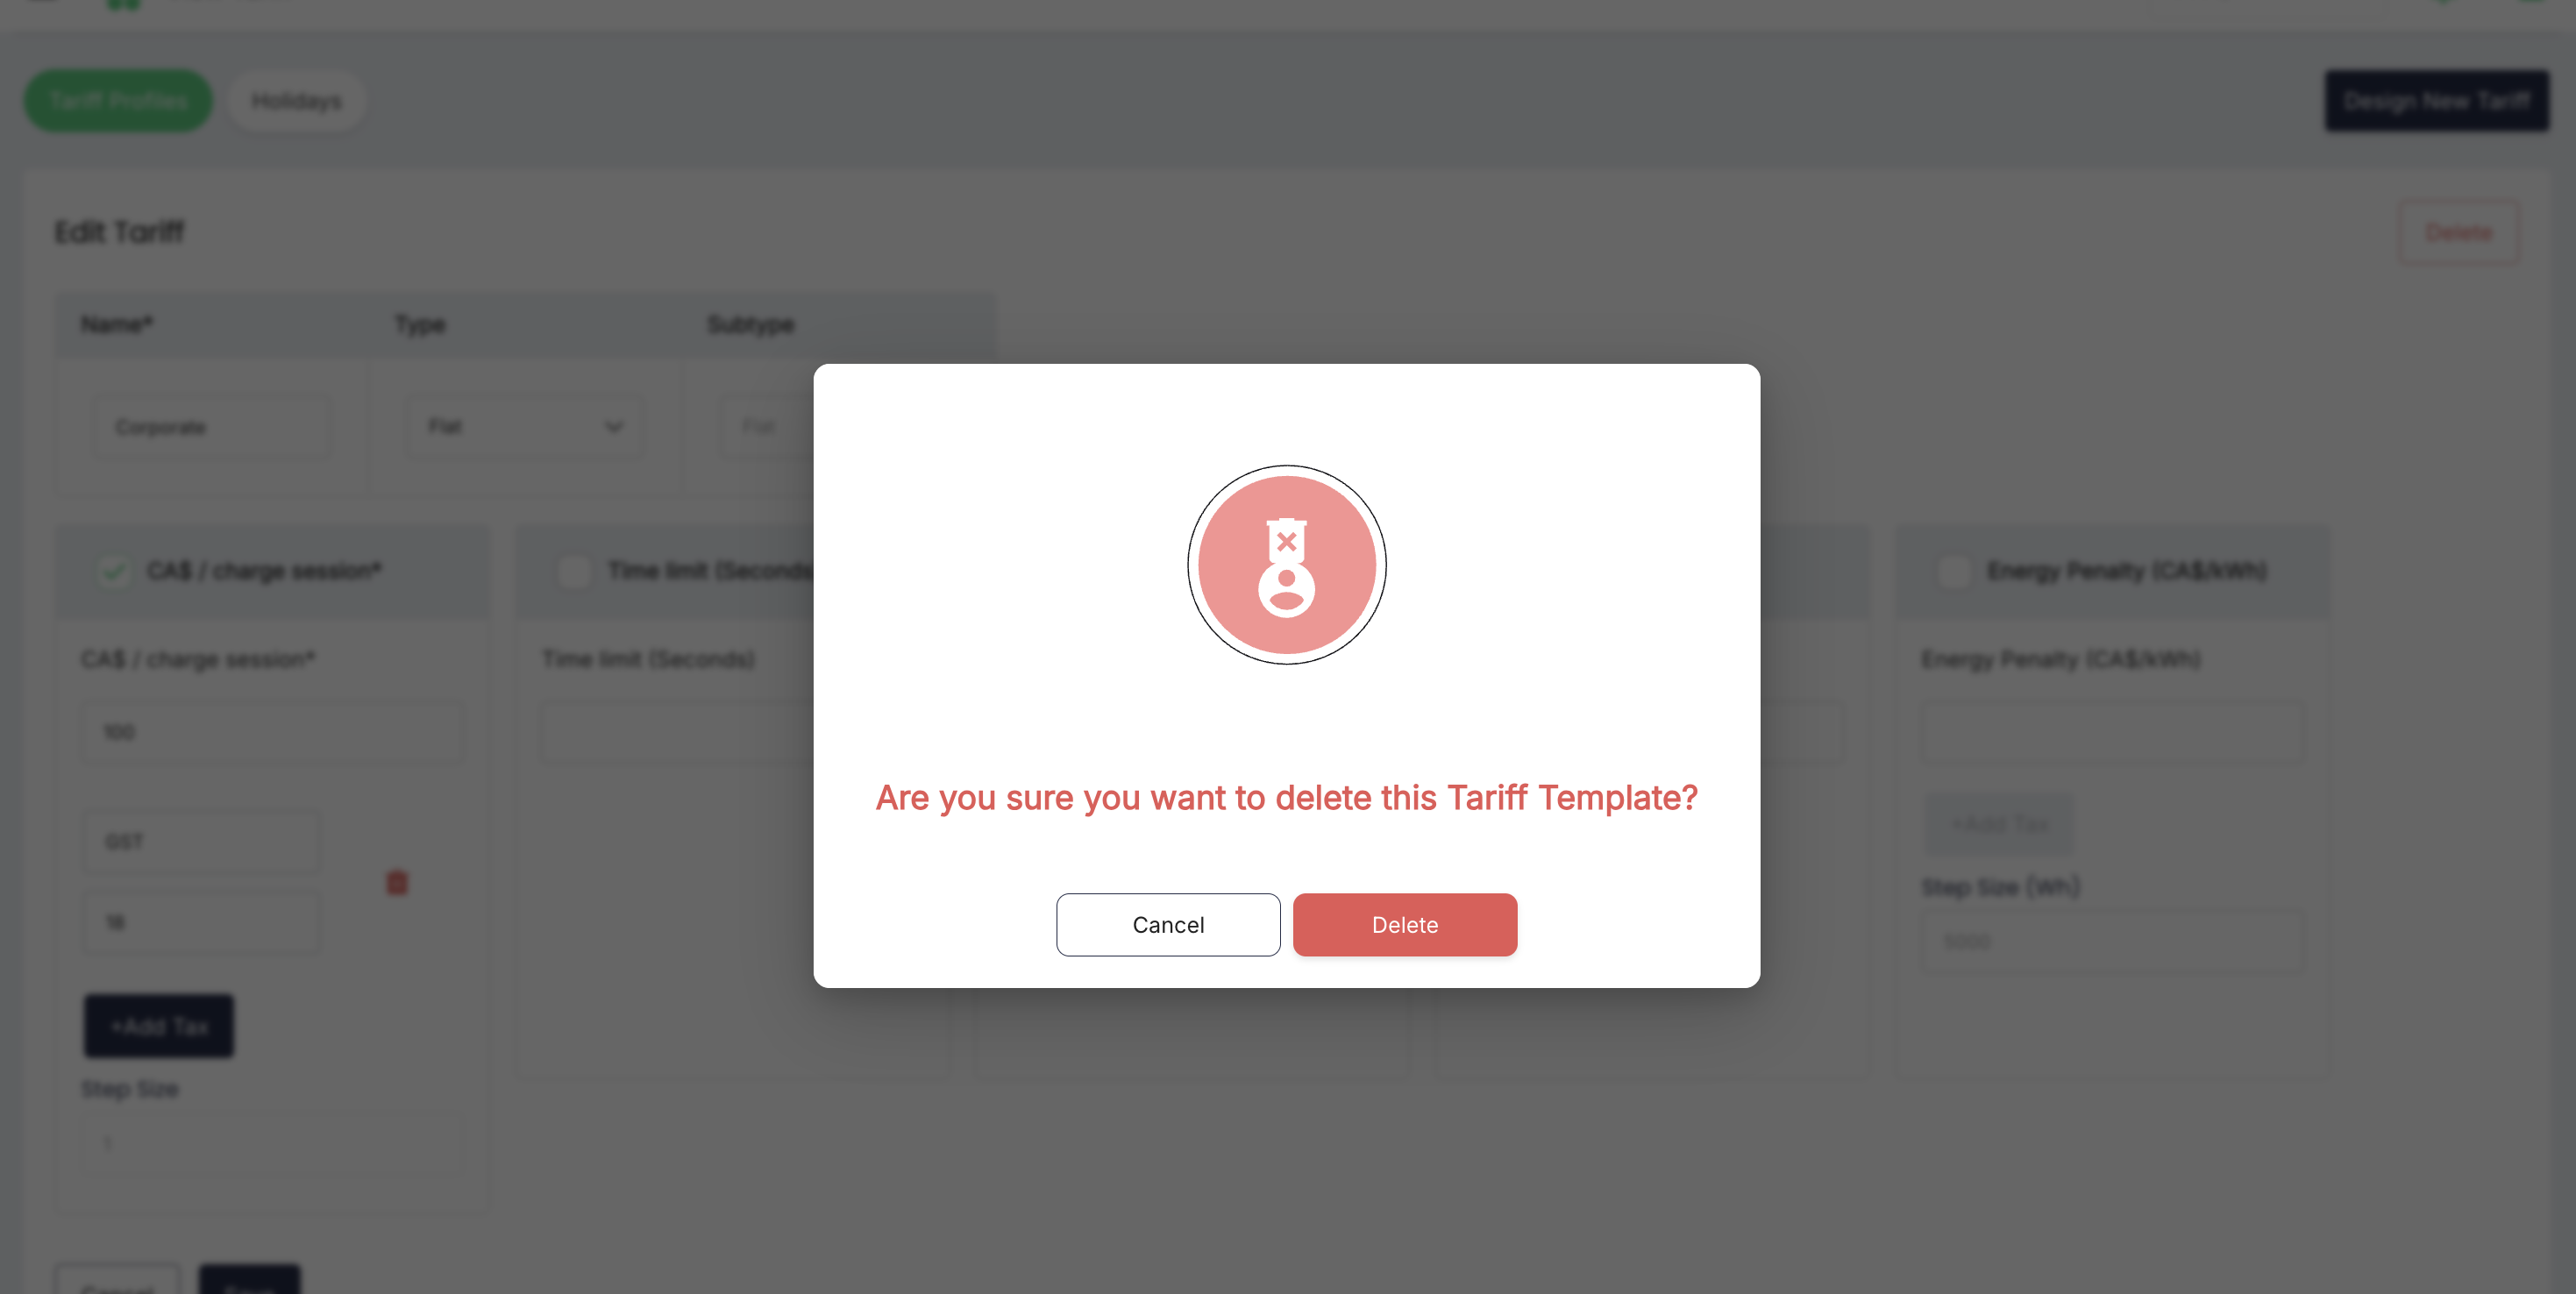
Deleting a designed profile is separate from deactivating a launched tariff assignment.
Launching a tariff profile
Launching is the activation step. It assigns a saved pricing template to a selected network scope and validity period.
- Open Tariff > Tariff Profiles > Designed.
- Select one designed profile.
- Select Launch.
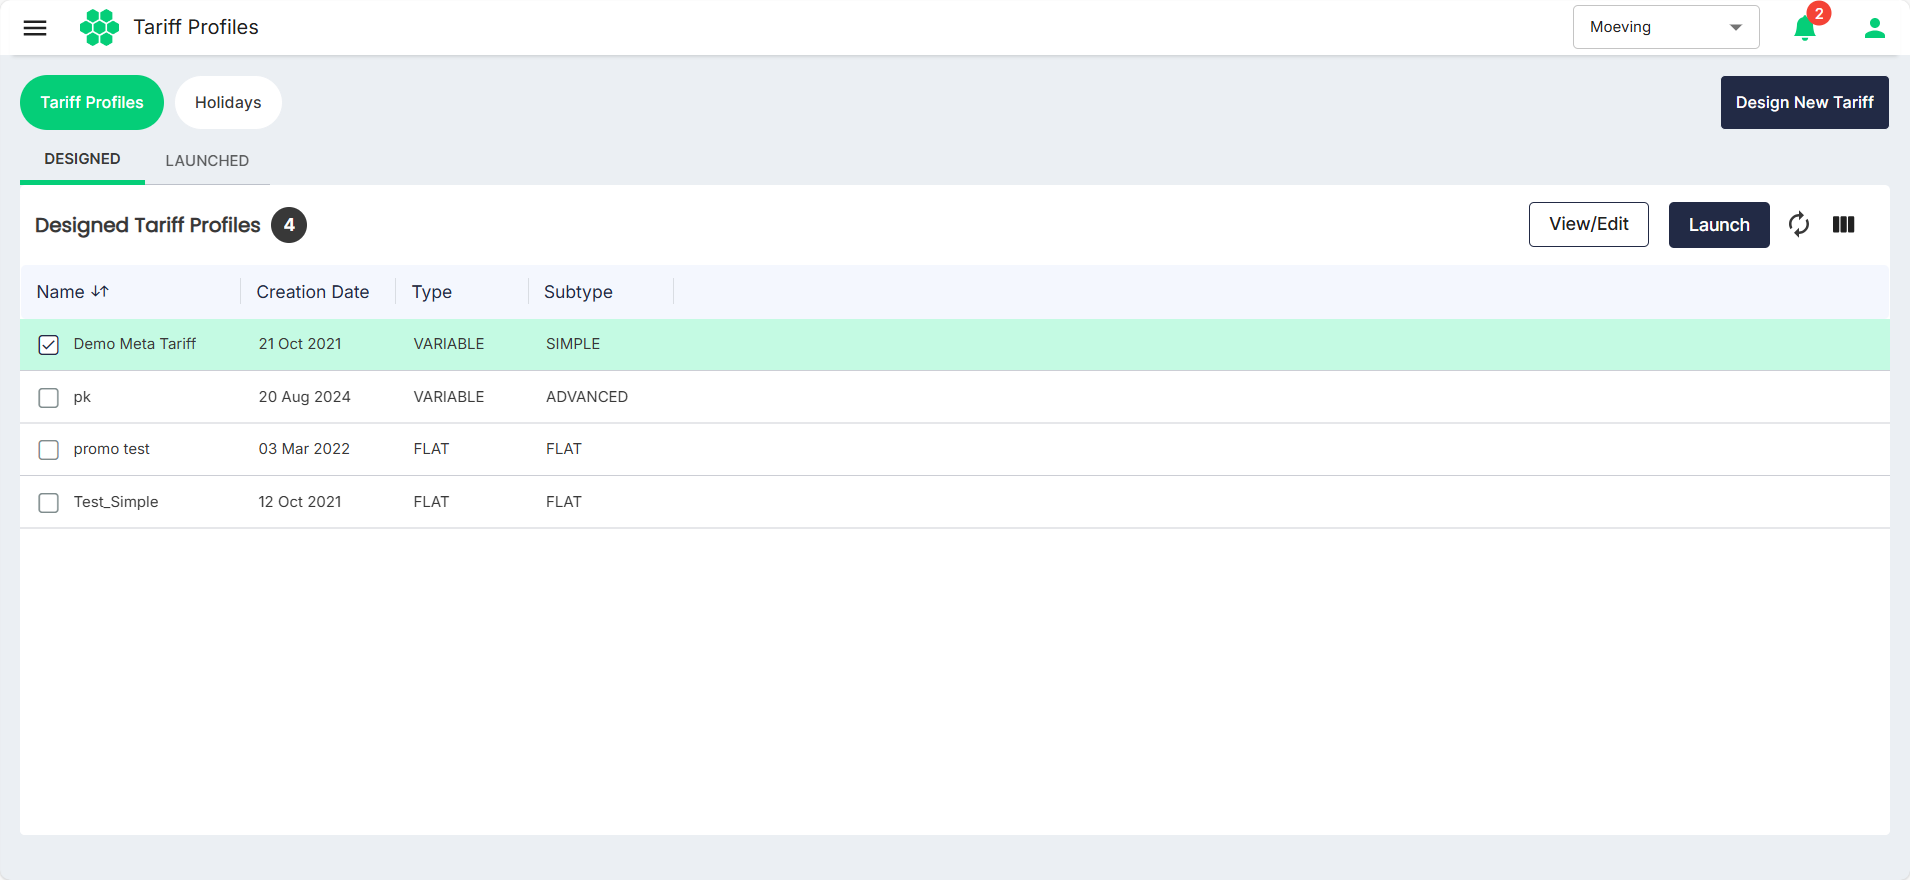
- Complete the launch form.
- Review the template, scope, and dates.
- Select Launch only when the assignment is ready to become operational.
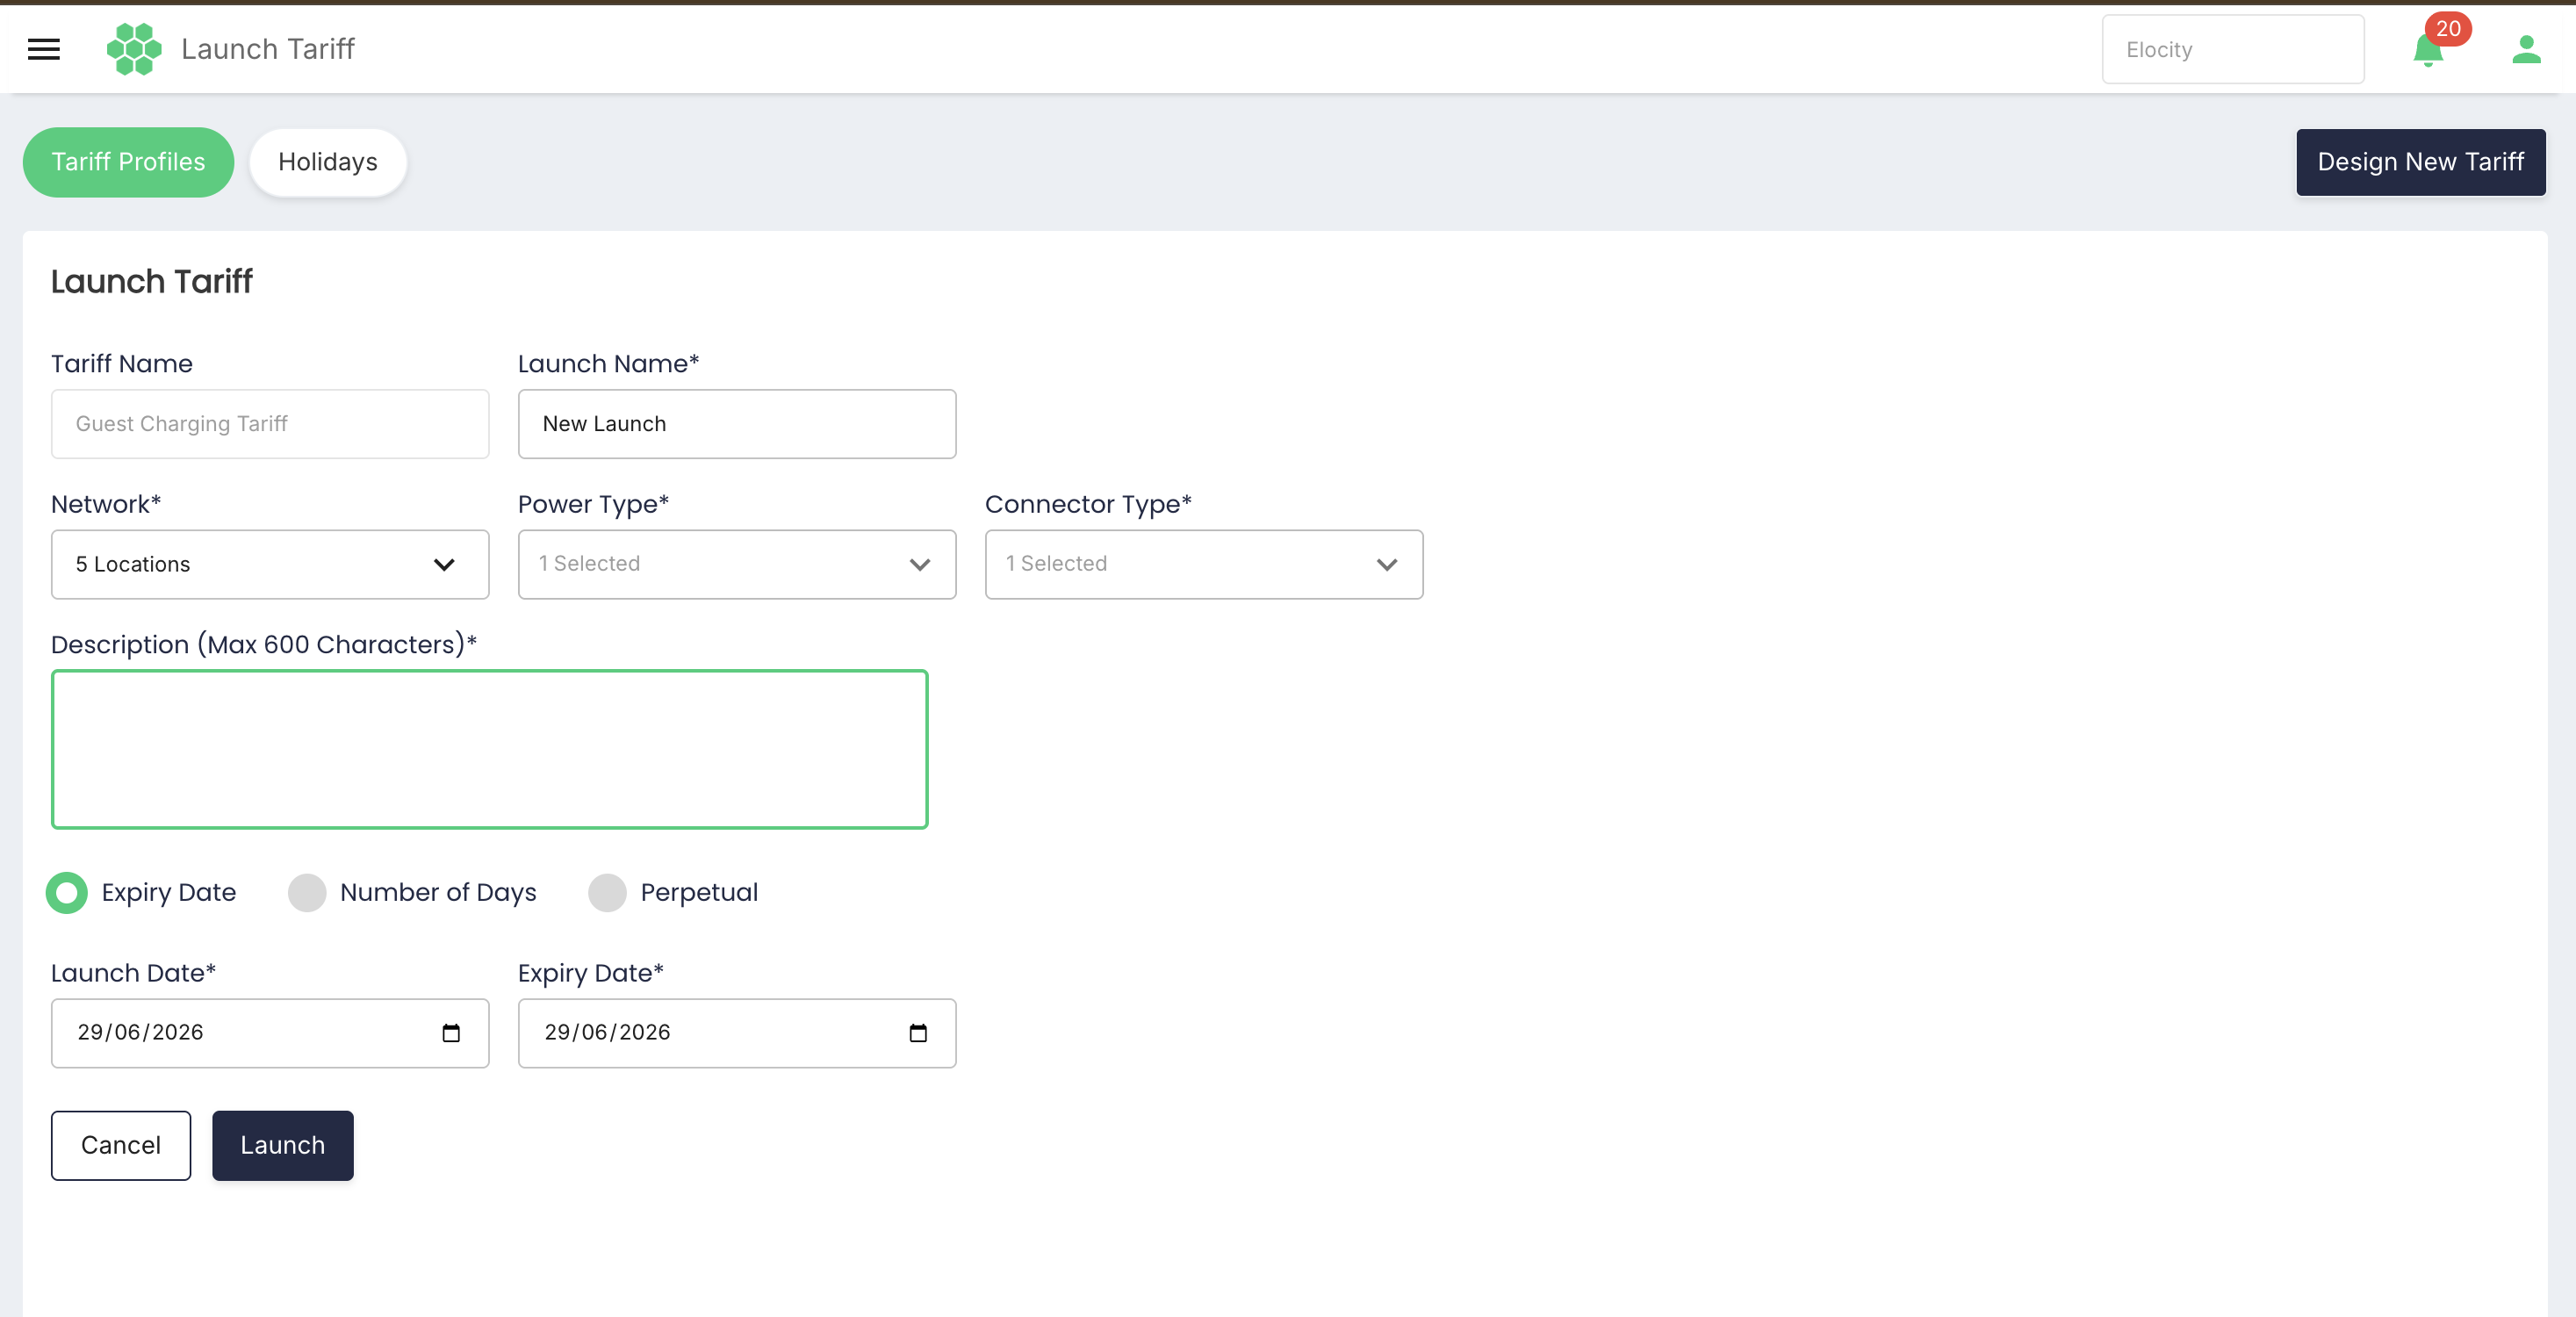
Launch form
| Field | Description |
|---|---|
| Tariff Name | Read-only name of the designed profile being launched. |
| Launch Name | Required name for this particular active assignment. Use a name that distinguishes the property, customer, pricing period, or rollout. |
| Network | Required location selector. It supports multi-selection through a Country > Province/State > City > Location hierarchy. The current live business displays Canada, provinces, cities, and individual locations. |
| Power Type | Required multi-select list of power types available at the selected locations. It includes Select all. |
| Connector Type | Required multi-select list of connector types available for the selected locations and selected power types. It includes Select all. |
| Description | Required reference description with a maximum length of 600 characters. |
| Launch Date | Required date on which the assignment starts. |
The available power and connector types are location-dependent. In the inspected example, selecting a location exposed AC_1_PHASE, followed by SAE J1772 as the connector type.
The launch form does not select individual connector IDs. The platform evaluates the chosen locations, power types, and connector types, then applies the tariff to every connector that matches all three selections. If the proposed launch would overlap another tariff on a matching connector, the platform blocks the launch and displays an error; two overlapping tariffs cannot be active on the same connector.
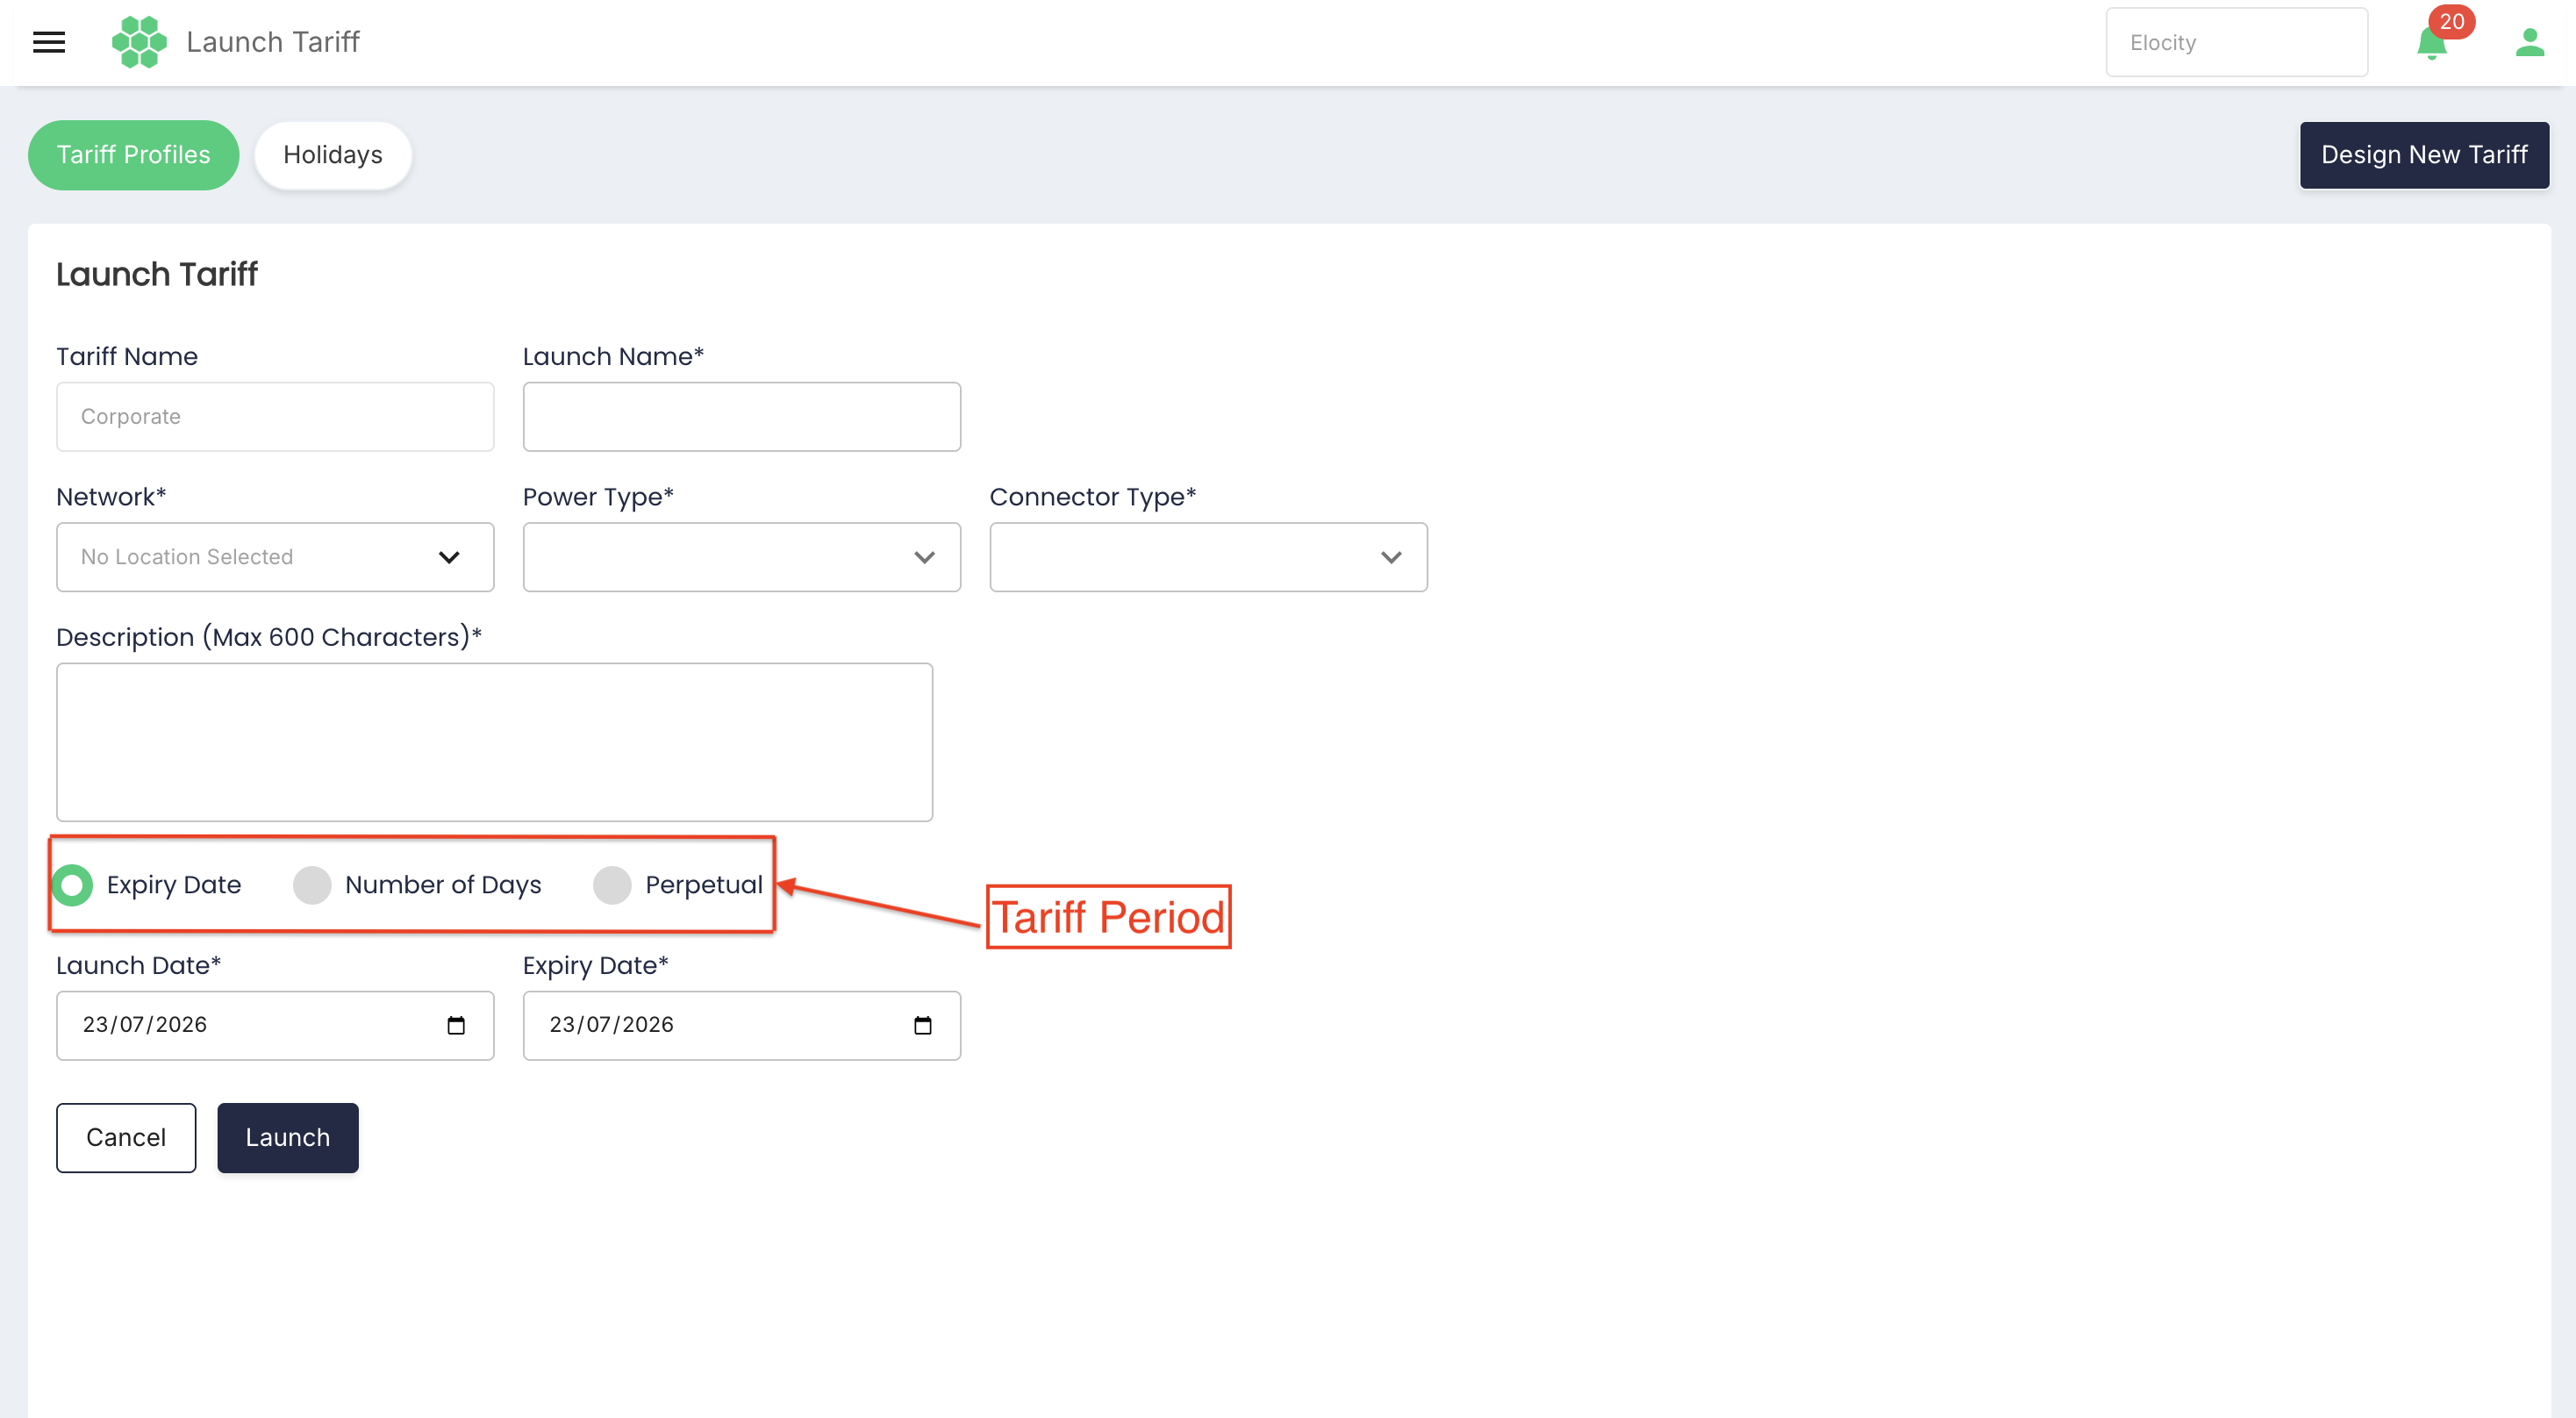
Tariff period
Choose one of the following options:
| Option | Additional field | Description |
|---|---|---|
| Expiry Date | Expiry Date | Applies the configured start and end dates. |
| Number of Days | Number of Days | Applies the tariff from the launch date for the entered duration. |
| Perpetual | None | Leaves the launch active without a user-entered expiry date until it is replaced, deactivated, or otherwise ended according to the product rules. |
Viewing a launched tariff
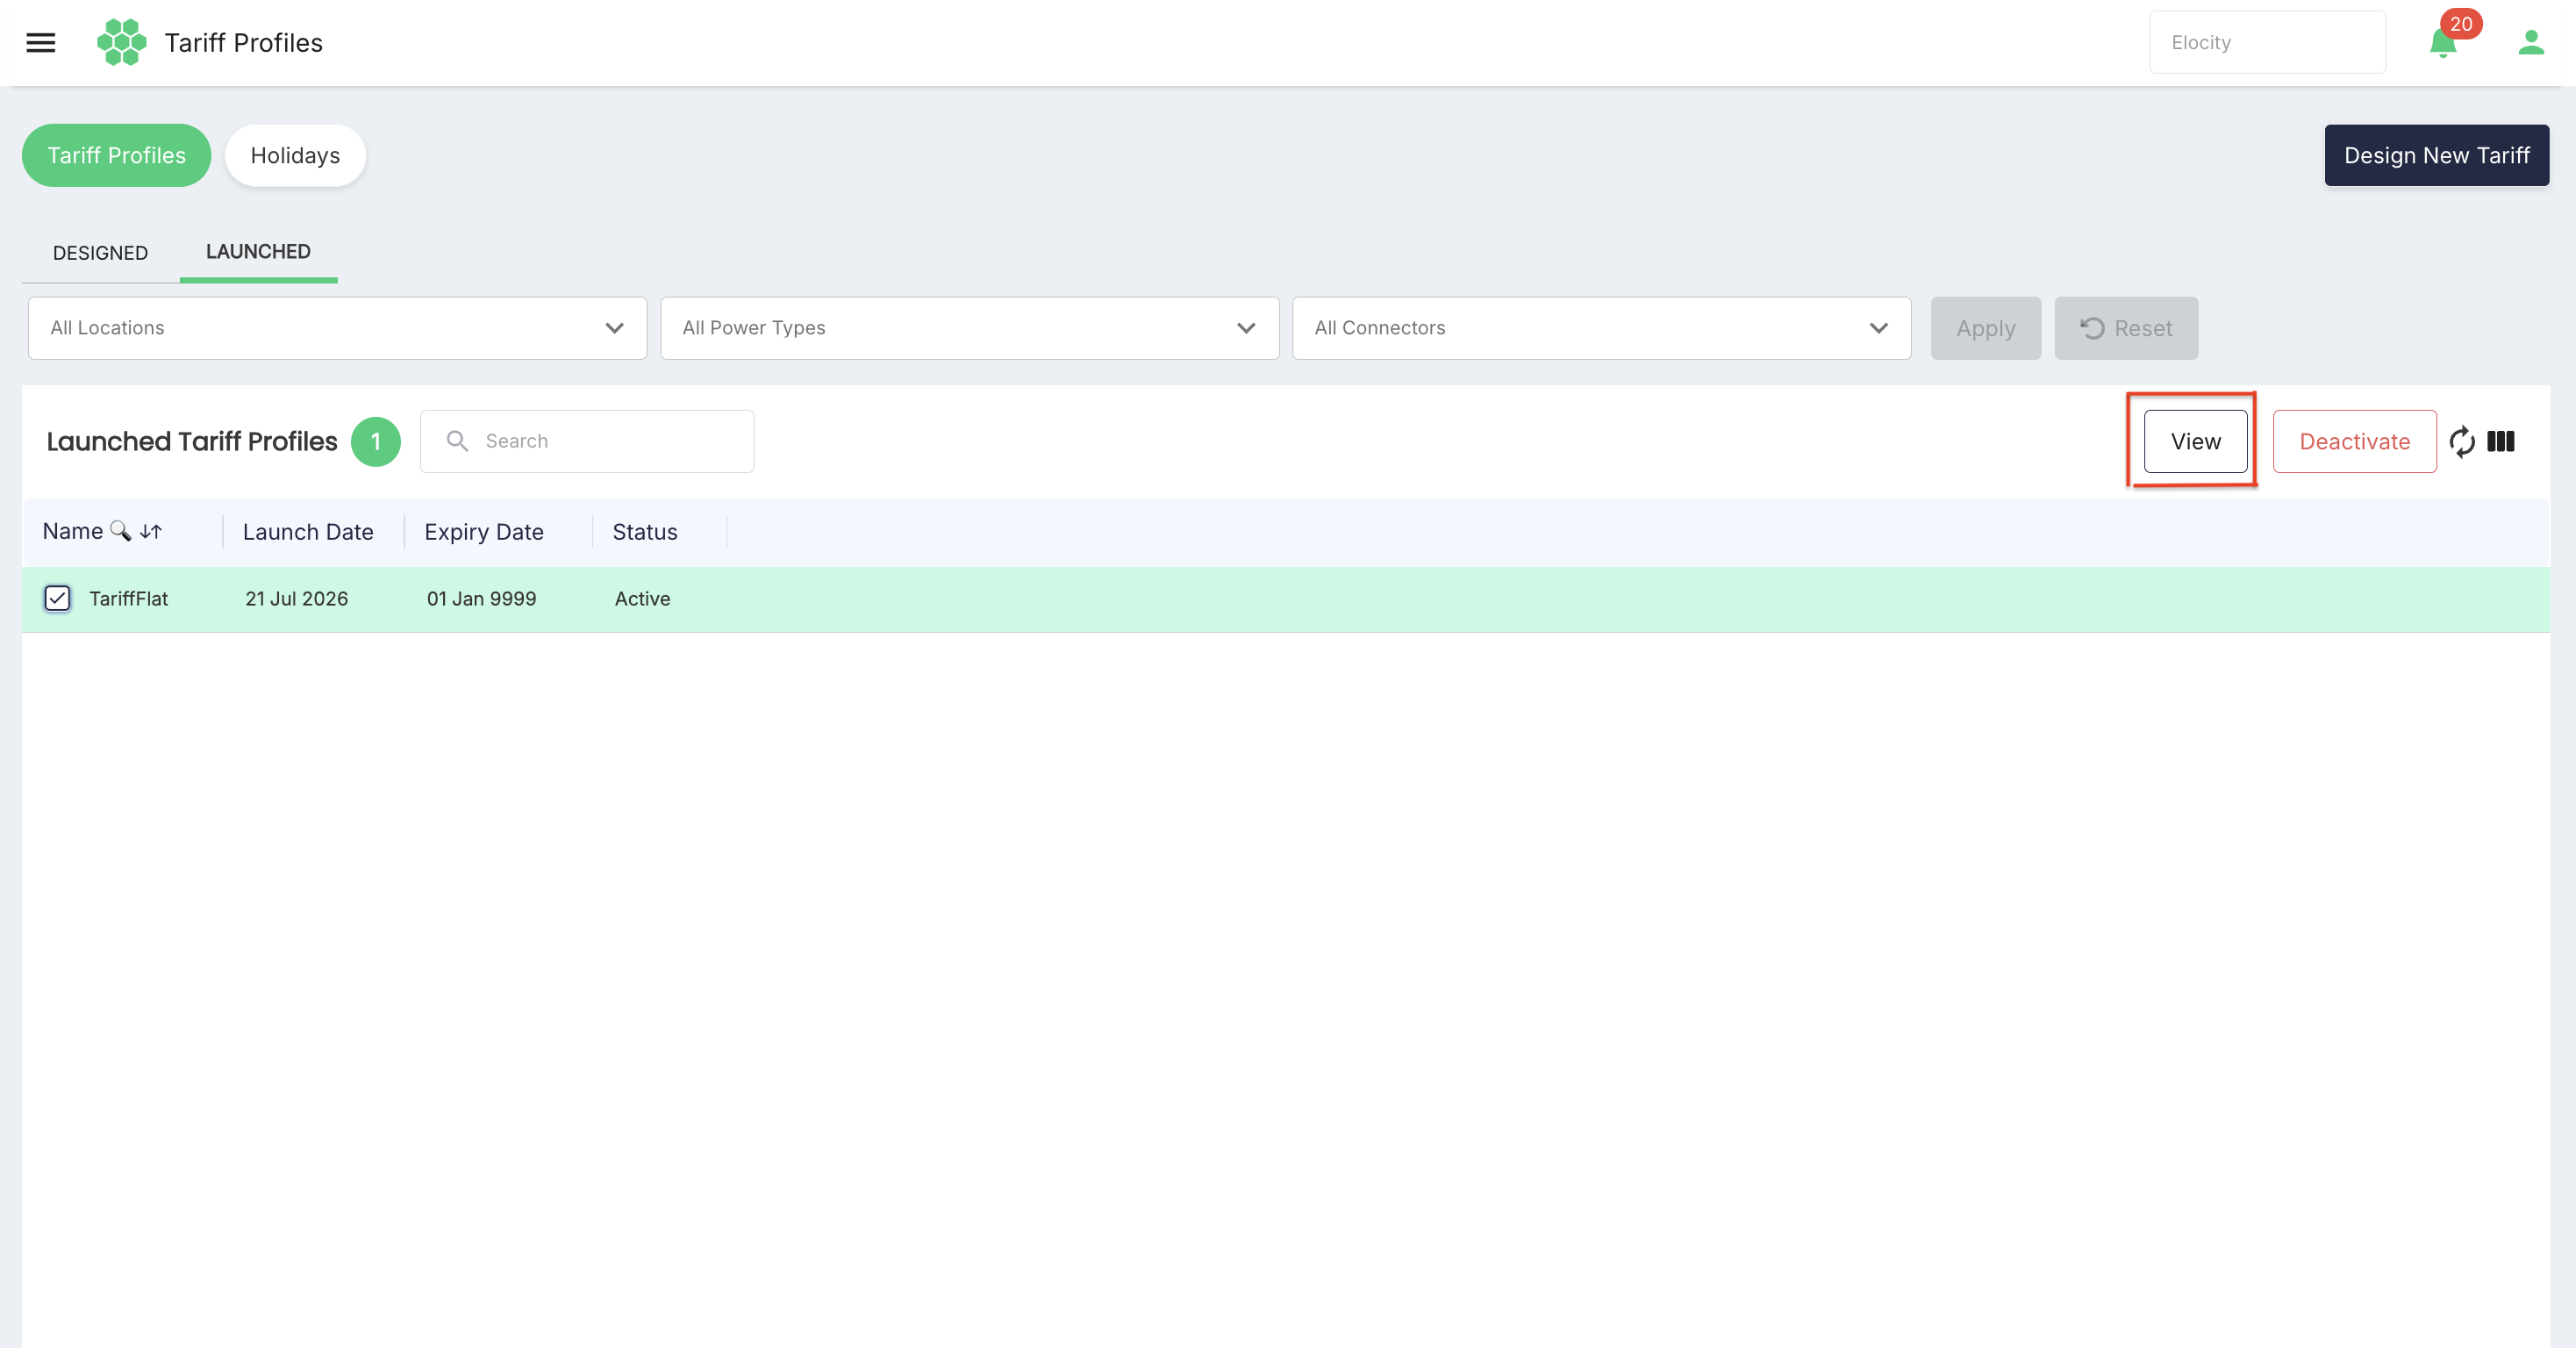
- Open Tariff > Tariff Profiles > Launched.
- Select the required launch row.
- Select View.
The Launched Tariff Details page shows:
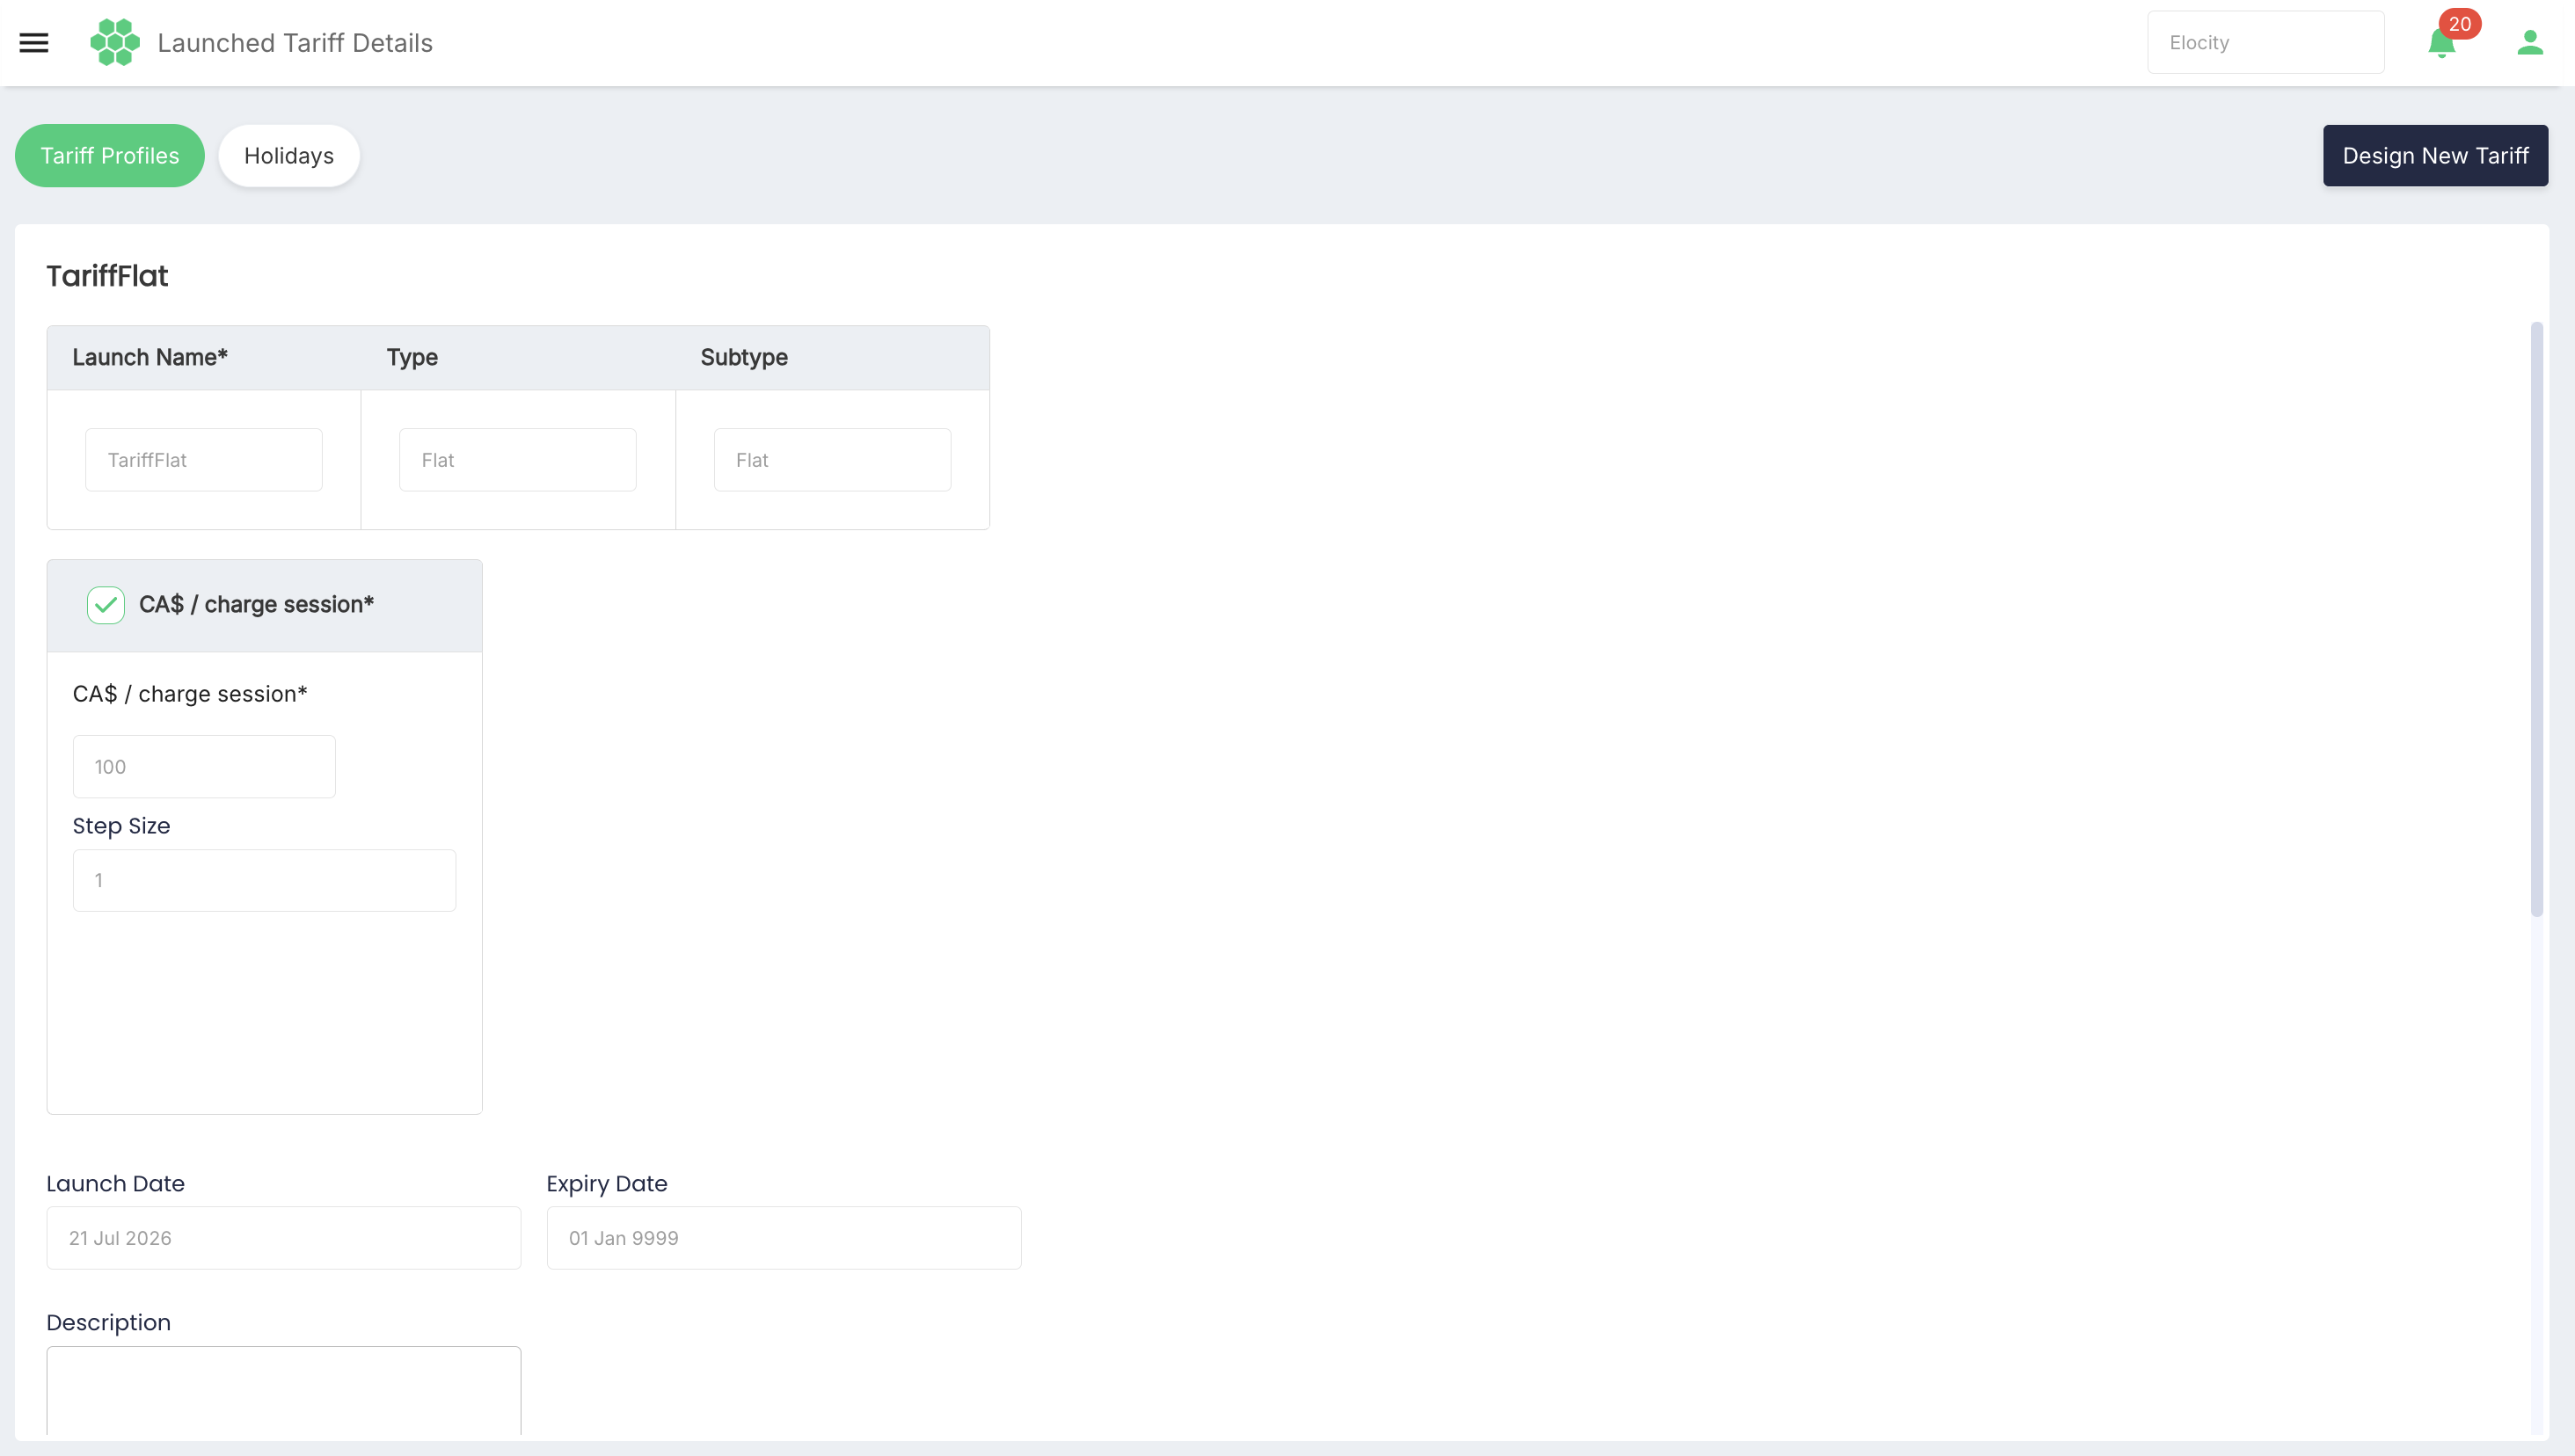
- Launch name, profile type, and subtype.
- Selected charge components, amounts, and step sizes.
- Launch date and expiry date.
- Description.
- The locations covered by the launch.
The location section provides filters for All Locations, All Connectors, and All Power Types, followed by Apply and Reset.
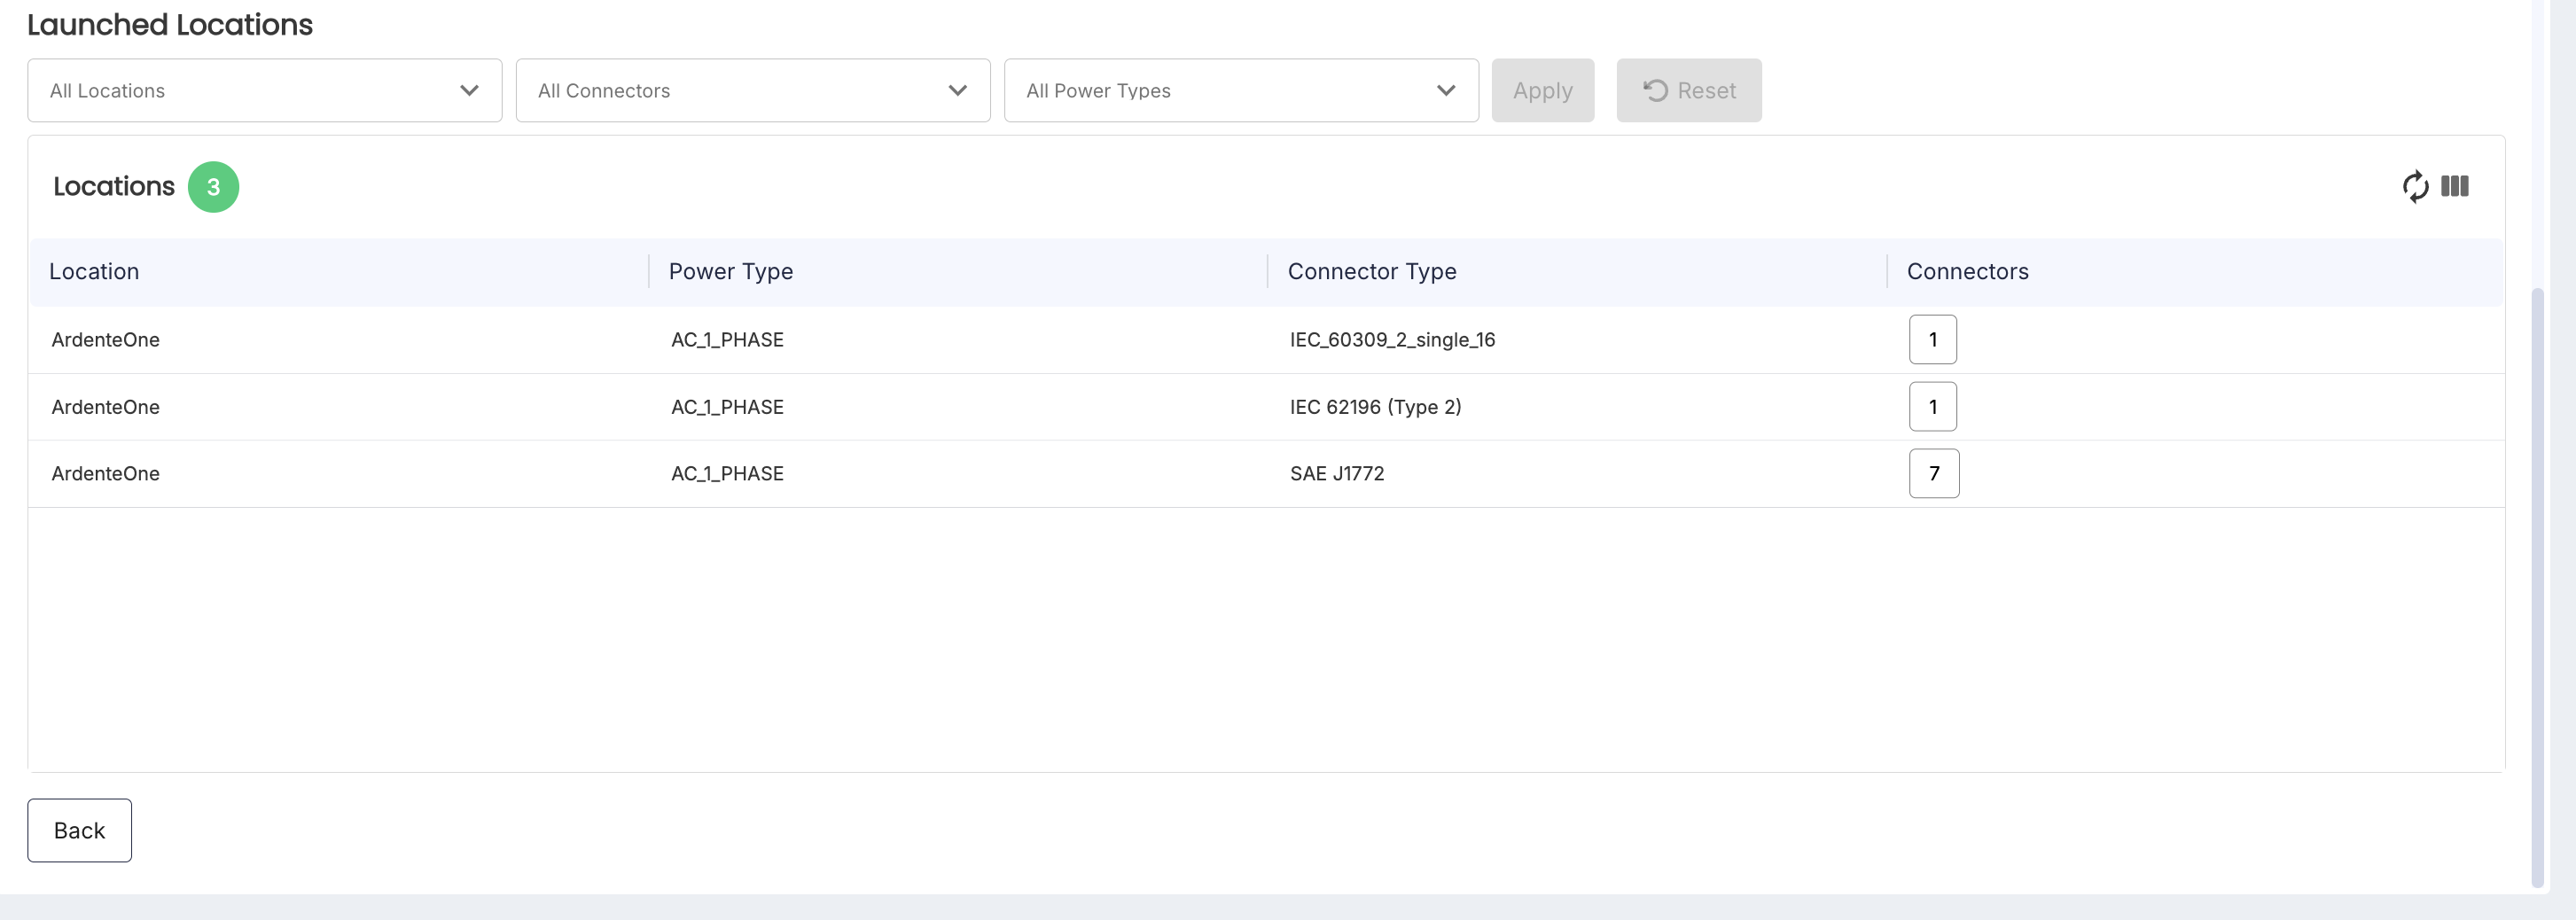
Each location row identifies:
| Column | Description |
|---|---|
| Location | Charging location included in the launch. |
| Power Type | Power type covered at that location. |
| Connector Type | Connector standard covered at that location. |
| Connectors | Number of matching connectors included in the launched assignment. |
Select the connector count to open Connectors Information. The dialog identifies each covered connector using:
- Charger Name
- Chargepoint ID
- Connector Sequence
This drill-down should be used to verify the exact connector coverage after launch.
Deactivating a launched tariff
- Open Tariff > Tariff Profiles > Launched.
- Select one launched tariff.
- Select Deactivate.
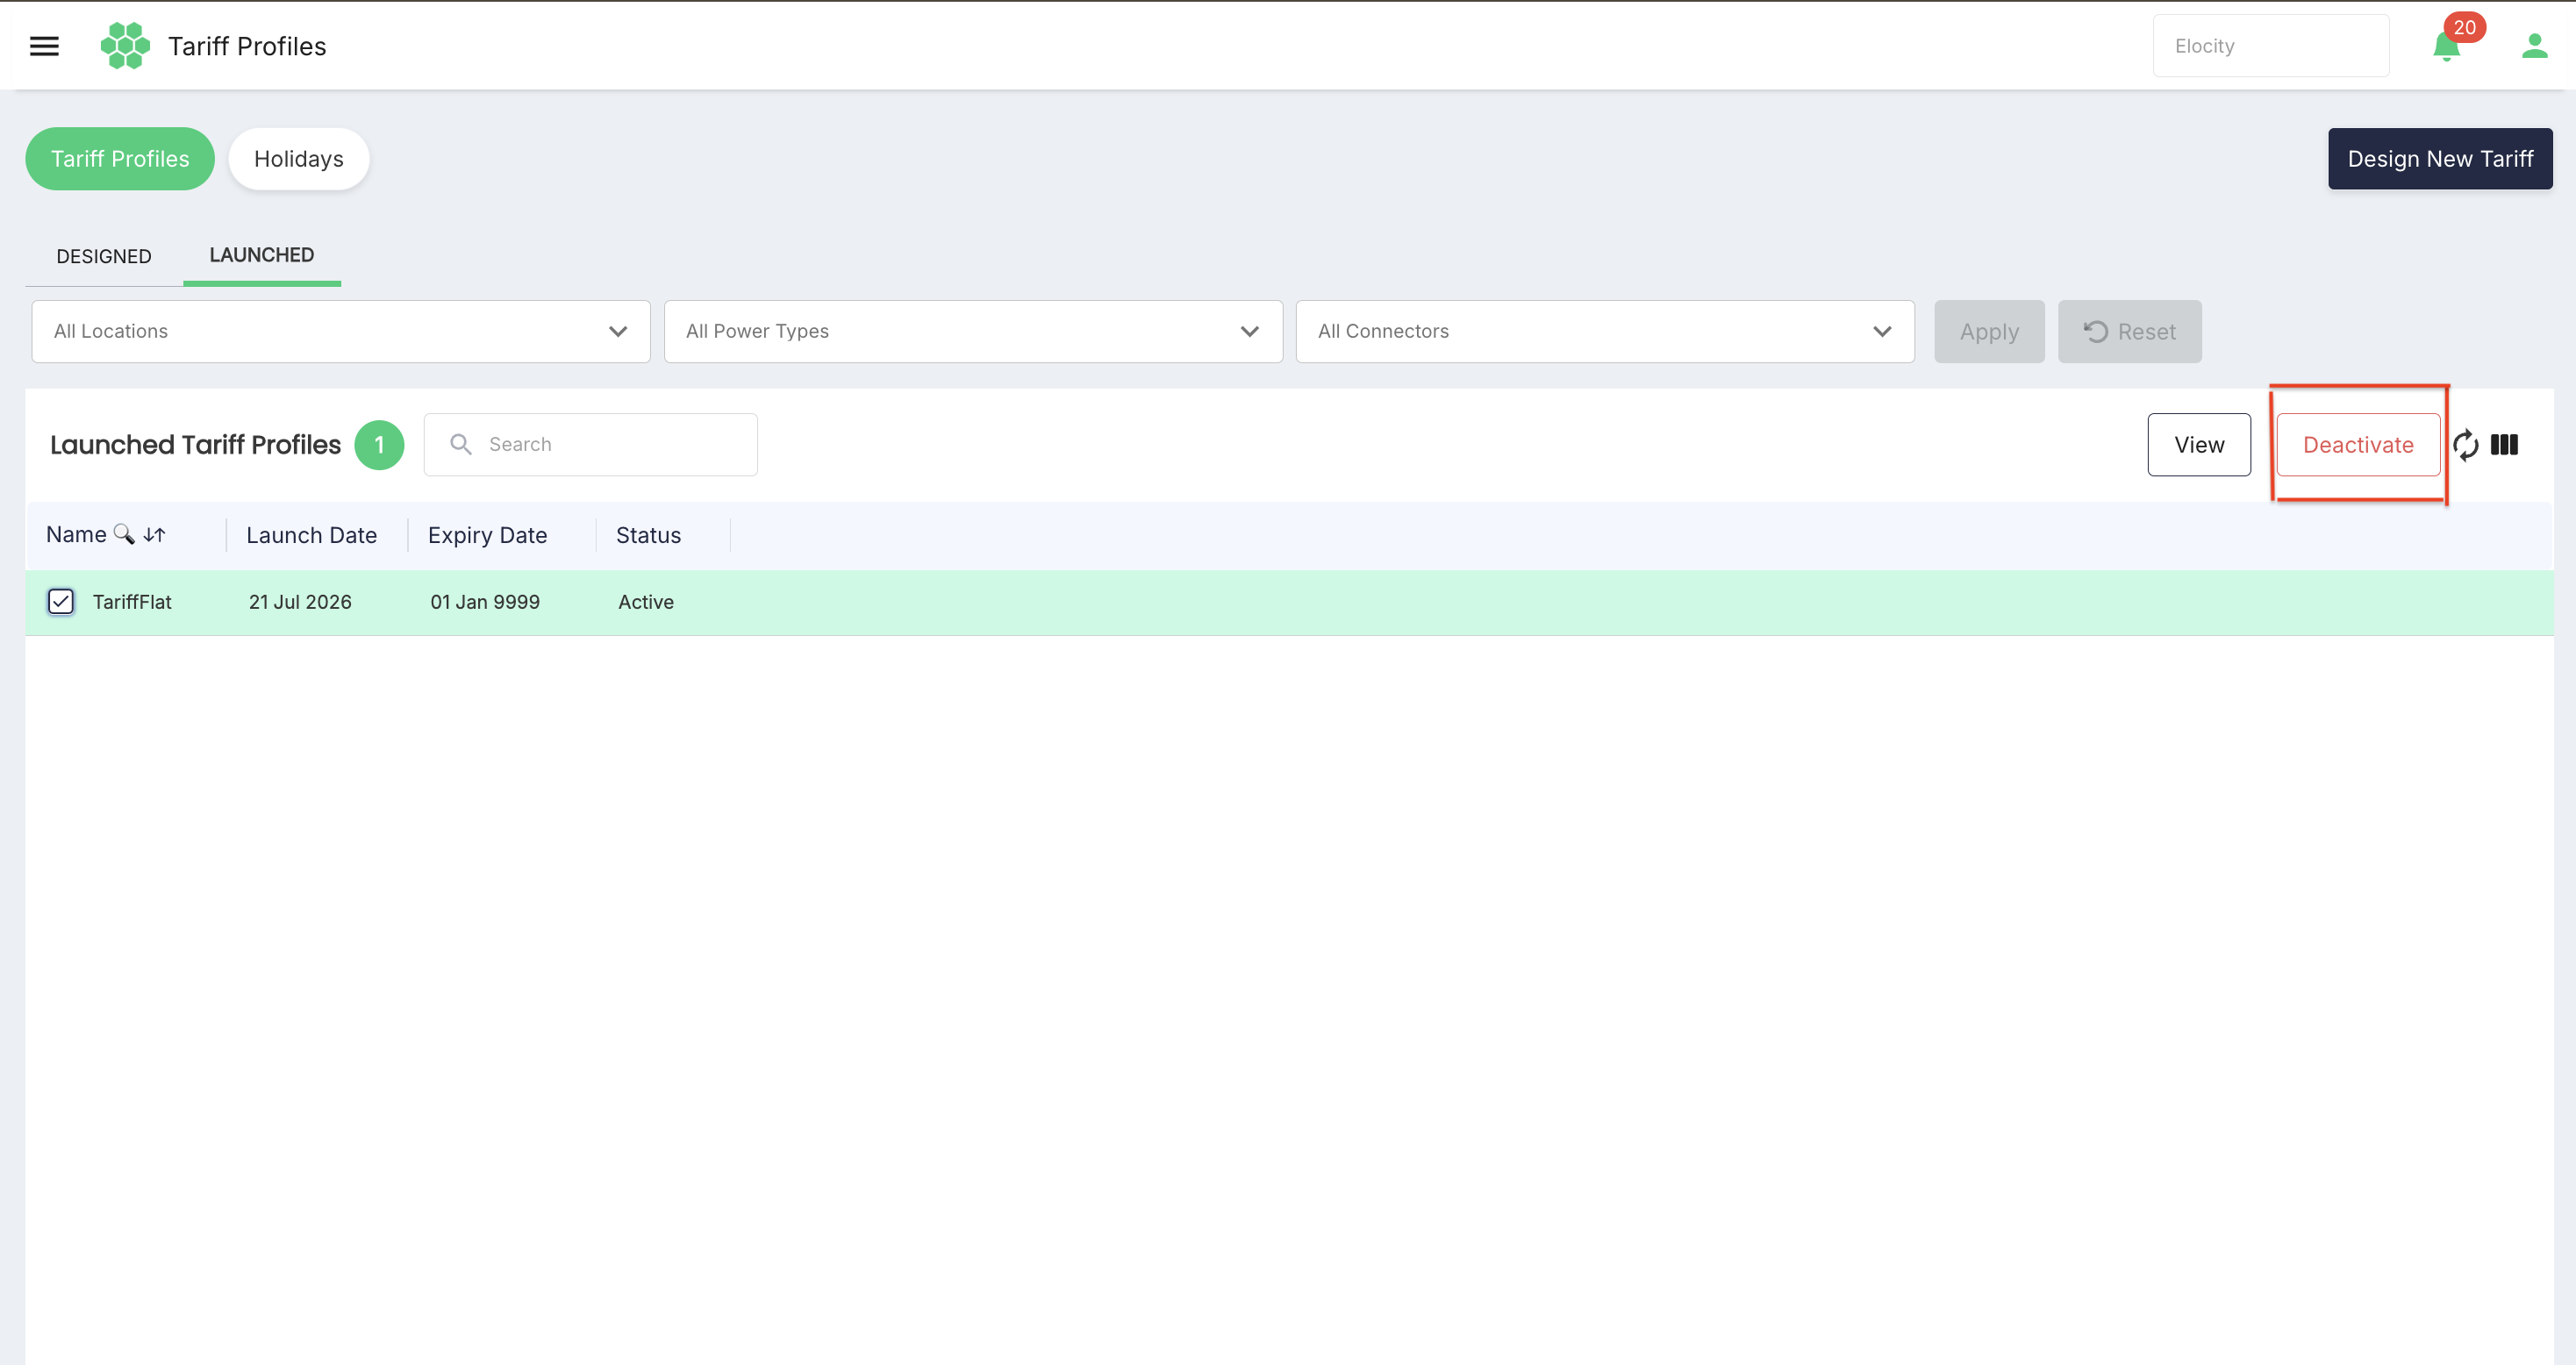
- Review the read-only Tariff Name.
- Enter the Deactivation Date.
- Select Deactivate to proceed, or Cancel to leave the launch unchanged.
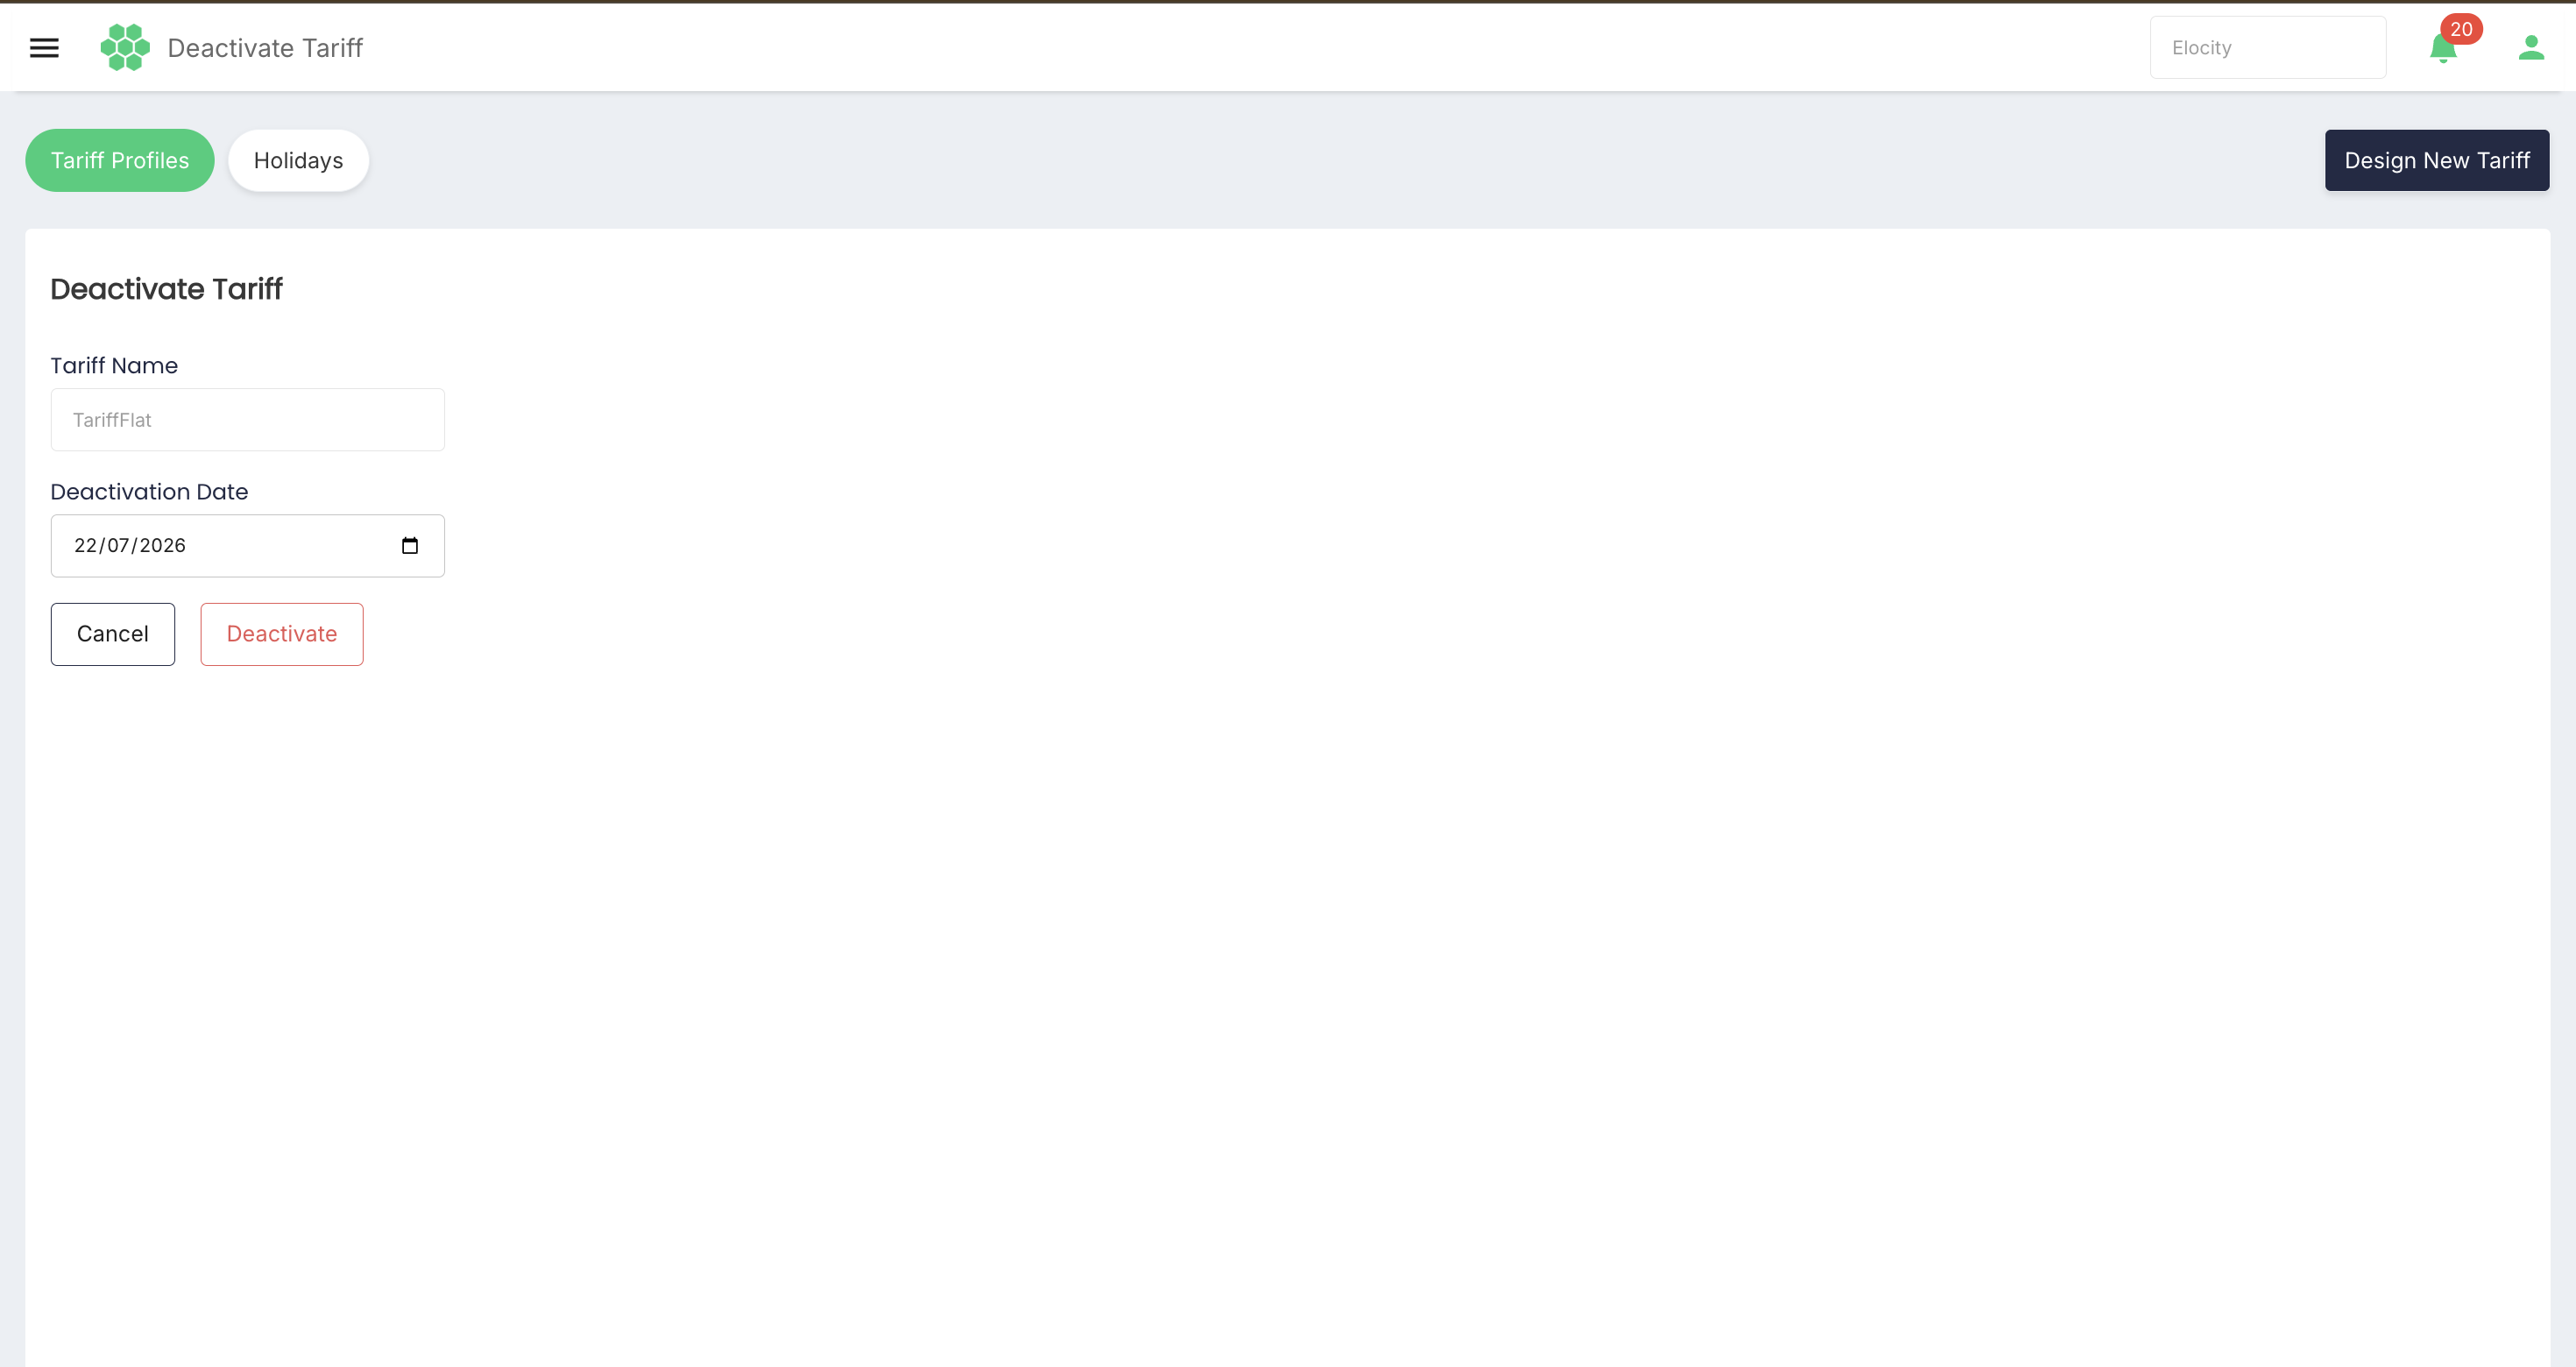
Deactivation ends a launched assignment; it does not delete the underlying designed tariff template. Tariff charges are calculated only while the tariff is active. If the tariff becomes inactive during a charging session, the remaining portion of that session is not charged under the inactive tariff.
Managing holidays
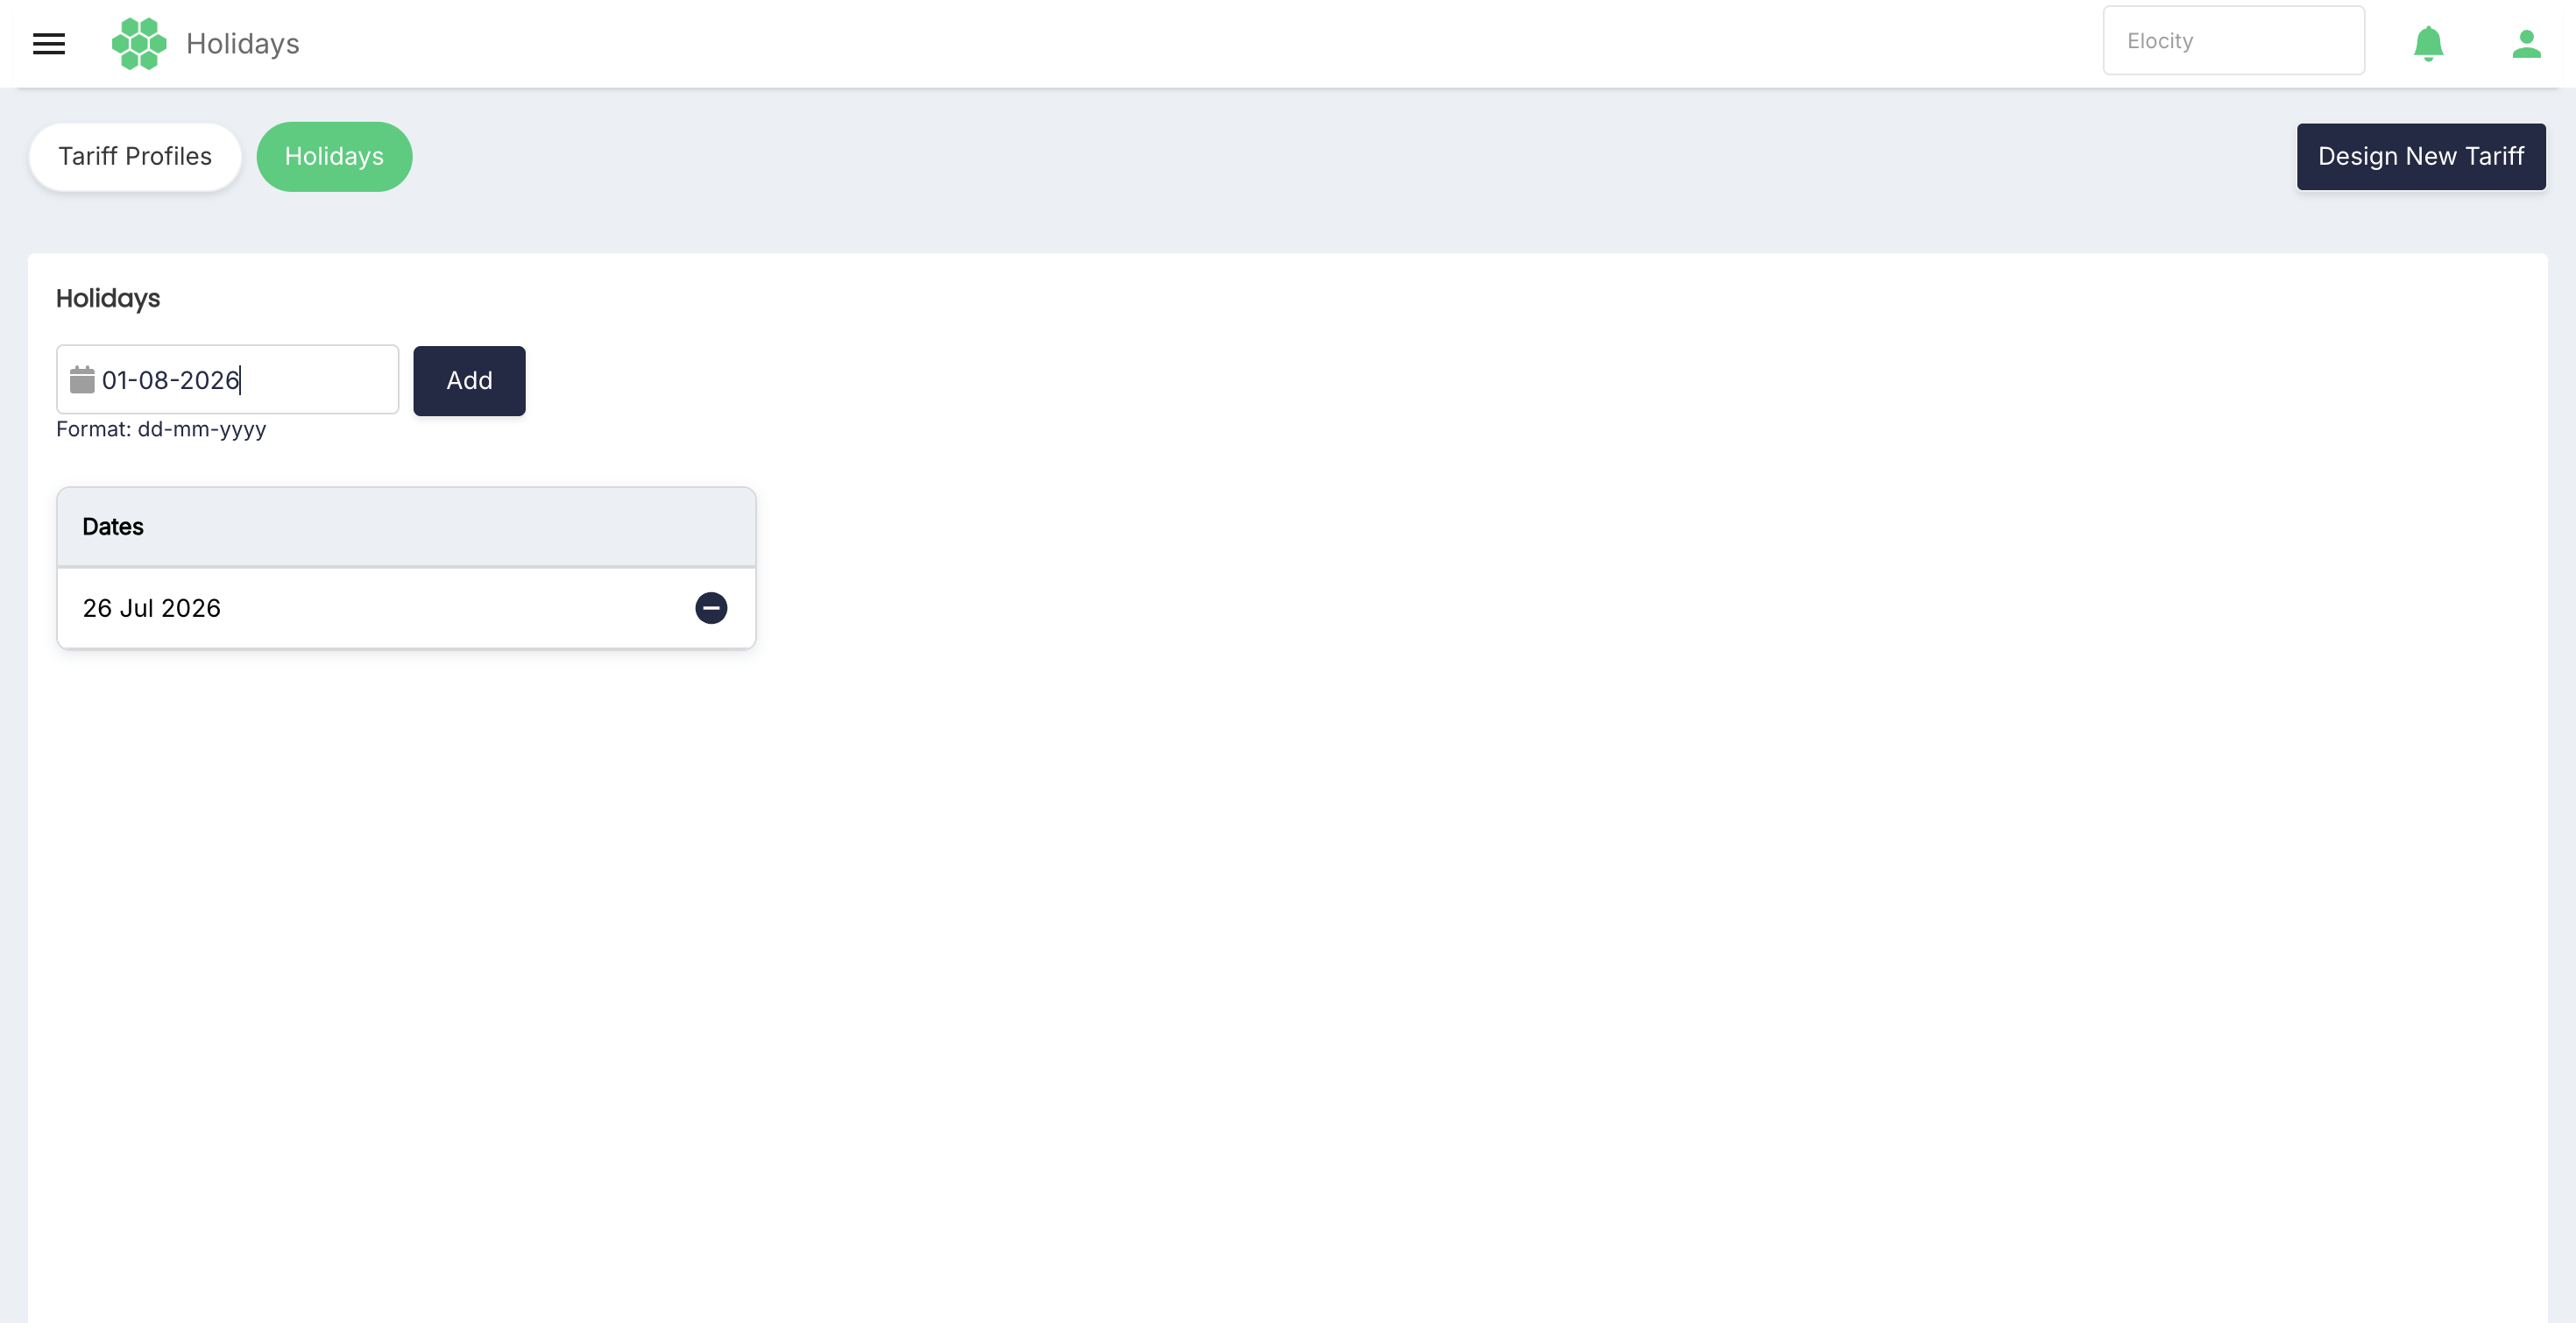
Open Tariff > Holidays to maintain the Tariff module's holiday-date list.
Add a holiday
- Select or enter the required date in Add holiday.
- Use the displayed
dd-mm-yyyyformat. - Select Add.
- Confirm that the date appears in the holiday table.
Delete a holiday
-
Locate the required date in the holiday table.
-
Select its delete icon.

-
Select Delete in the confirmation dialog, or Cancel to retain the date.
The current live page shows a single Dates column. These dates support holiday pricing within a Time-of-Day profile. When holiday pricing is selected, the platform uses the maintained holiday calendar to identify the dates on which the configured holiday price applies.
Recommended operating workflow
- Confirm the selected business.
- Define and approve the required pricing model outside the portal, including amounts, units, taxes, increments, schedules, and scope.
- Select the smallest profile structure that can represent the approved model: Flat, Simple Variable, or Advanced Variable.
- Enter the profile under Design New Tariff.
- Review every enabled component and verify that unintended components remain cleared.
- Confirm the unit and step size for each selected component.
- For an Advanced profile, review every Time-of-Day range and limit entry. Confirm that all 24 hours and all seven days are covered; the platform prevents gaps and overlapping ranges.
- Save the profile and reopen it through View/Edit for an independent review.
- Select Launch, then verify the launch name, location hierarchy, power types, connector types, dates, period, and description.
- After launch, open Launched Tariff Details and inspect the connector count for each location.
- Open Connectors Information to verify the Charger Name, Chargepoint ID, and Connector Sequence included in the assignment.
- Monitor the launched status and deactivate the assignment when it should end.
Product rules confirmed for this guide
- Partial billing steps are rounded upward to the next complete step.
- Parking Charges begin after charging has stopped, the vehicle remains connected, and the configured grace period has elapsed.
- Charging Time runs from the successful charging-session start until the stop-charging event.
- EV Charging Service is an energy-based operator service charge.
- Load Charges use the displayed currency-per-kW-per-hour metric and the average delivered load.
- Taxes are added to the base charge, and multiple taxes are calculated independently on that base charge.
- Time-of-Day schedules use the charger's local timezone and must cover every hour of the entire week without gaps or overlaps.
- Limit-based tariffs use progressive pricing.
- Holiday dates determine when configured Time-of-Day holiday pricing applies.
- Launch scope is resolved automatically to all connectors matching the selected location, power type, and connector type; individual connector IDs are not selected during launch.
- The platform prevents overlapping tariff launches on the same connector.
- Tariff calculations stop when the tariff is no longer active; the remaining portion of an in-progress session is not charged under that tariff.
- Changes to a designed profile affect future launches only.
- Currency is inherited from the deployment configuration.
- Each tariff operation requires its corresponding permission.